


ELECTRONIC ORGANIZER
OPERATION MANUAL
CONTENTS |
|
Part Names and Tablet Key Assignments |
.......................................... 1 |
Using the Organizer for the First Time ............................................... |
2 |
Display Symbols .................................................................................. |
4 |
Entering Characters ............................................................................ |
5 |
Built-in Calendar and Clock ................................................................ |
6 |
Clock Mode .......................................................................................... |
6 |
Alarm ................................................................................................... |
8 |
Timer .................................................................................................... |
8 |
Telephone Mode .................................................................................. |
9 |
Calendar Mode .................................................................................. |
10 |
Schedule Mode ................................................................................. |
12 |
Anniversary Mode ............................................................................. |
13 |
To Do Mode ....................................................................................... |
15 |
Memo Mode ....................................................................................... |
16 |
MODEL
ZQ-590
Expense Mode ................................................................................... |
17 |
Editing Entries ................................................................................... |
20 |
Deleting Entries ................................................................................. |
20 |
Word Translator Mode ....................................................................... |
21 |
Calculator Mode ................................................................................ |
22 |
Conversion Mode .............................................................................. |
23 |
Secret Function ................................................................................. |
25 |
Game Mode ....................................................................................... |
26 |
Managing the Organizer's Memory ................................................... |
27 |
Using the Included PC Software ....................................................... |
27 |
Battery Replacement ......................................................................... |
30 |
Specifications .................................................................................... |
31 |
Appendix ............................................................................................ |
33 |
39

NOTICE
•SHARP strongly recommends that separate permanent written records be kept of all important data. Data may be lost or altered in virtually any electronic memory product under certain circumstances. Therefore, SHARP assumes no responsibility for data lost or otherwise rendered unusable whether as a result of improper use, repairs, defects, battery replacement, use after the specified battery life has expired, or any other cause.
•SHARP assumes no responsibility, directly or indirectly, for financial losses or claims from third persons resulting from the use of this product and any of its functions, such as stolen credit card numbers, the loss of or alteration of stored data, etc.
•Screen layouts illustrated in this manual may differ from those on the actual product. The information described in this manual is subject to change without notice.
CAUTIONS
•Do not carry the Organizer in the back pocket of slacks or trousers.
•Do not drop the Organizer or apply excessive force to it.
•Do not subject the Organizer to extreme temperatures.
•Since this product is not waterproof, do not use it or store it where fluids can splash onto it. Raindrops, water spray, juice, coffee, steam, perspiration, etc. will also cause malfunction.
•Clean only with a soft, dry cloth.
•Use only a SHARP approved service facility.
NOTES
• All company and/or product names are trademarks and/or registered trademarks of their respective manufacturers.
40

Part Names |
Tablet Key Assignments |
|
Stylus |
( |
): MAIN key |
|
||
|
( |
): Synchronization mode key for PC Software |
|
( |
): Telephone mode key |
Touch Display |
( |
): Schedule/Calendar mode key |
|
||
RESET switch |
( |
): Memo/Anniversary mode key |
(on the back of the unit) |
||
Mode keys |
( |
): To Do mode key |
ENTER key |
( |
): Expense mode key |
|
||
Backlight key |
|
|
Cursor keys |
( |
): Clock mode key |
Search keys |
( |
): Calculation/Conversion mode key |
|
||
|
Power ON/OFF key |
|
|
Option port |
): ENTER key |
|
( |
|
|
• In this manual, these mode keys are represented by icons in parentheses. |
|
1
Using the Organizer for the First Time
Be sure to perform the following operations before using the Organizer for the first time.
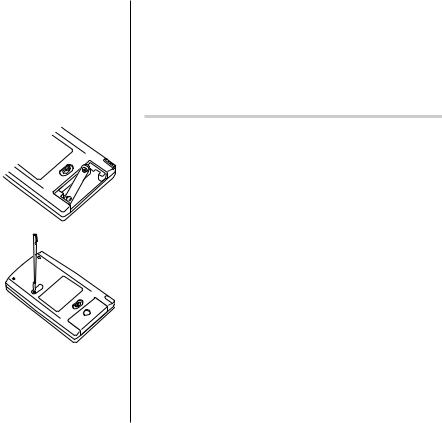
1.First, a battery will need to be installed. On the back of the Organizer, slide the Battery Replacement switch to the “REPLACE BATTERY” position.
2.Slide out to remove the battery compartment cover.
3.Insert a new battery, making sure to correctly orient the plus (+) and minus
(-) terminals, as illustrated. |
RESET |
|
Note:
Inserting a battery with reversed polarity may damage the Organizer.
4.Slide the battery compartment cover closed until it snaps into place.
5.Slide the Battery Replacement switch back to the “NORMAL OPERATION” position, then press the RESET switch.
The RESET switch is located on the back of the Organizer. Use the stylus (attached to the side) to carefully press down the switch.
Note:
• Do not use an object with a breakable or sharp tip.
BATTERY |
REPLACE |
|
|
• |
OPERATION |
NORMAL |
|
6.A dialog “System Reset Clear All Data? Yes No” appears on the screen. Use the stylus to tap “Yes” on the screen to proceed.
7.Next, a dialog “WARNING! All Data will be LOST Are you sure? Yes No” appears.
Again, tap “Yes” to proceed.
8.“Memory Reset Please wait...” appears. After a moment, Home Clock will appear on the screen (See page 6 “Clock Mode”).
If a malfunction occurs under abnormal conditions
If the Organizer is subjected to strong extraneous electrical noise or shock during use, on rare occasions, all the functions will not work properly and data may be displayed incorrectly. In such cases, follow the procedures shown below.
1.Press the RESET switch.
2.A dialog "System Reset Clear All Data? Yes No" will be displayed. Tap “No”.
If the above procedure doesn't work, follow the next procedure to initialize the Organizer's memory. All stored data in the Organizer will be deleted.
1.Press the RESET switch.
2.When a dialog "System Reset Clear All Data? Yes No" is displayed, tap “Yes”.
3.When a dialog “WARNING! All Data will be LOST Are you sure? Yes No” appears, tap “Yes”.
2

Auto Power Off Function
When none of the keys have been pressed or tapped for a specified time (default: 3 minutes), the Organizer will automatically turn off to save the battery.
To adjust the Auto Power Off time, do the following:
1.Tap the ø once or twice to display the second page of the Main menu, then tap : .
2.In the list of Setup items, scroll down the list by tapping m, then tap to select “8. Auto Power Off”.
3.Tap to select a desired interval (1, 3, 5, 7, 10 or 15 minutes).
Backlight
The Backlight allows you to view the display and use the Organizer even in low-light conditions. Pressing z once illuminates the display for as long as you continue to use the Organizer; if no key activities are detected within the specified interval, it will automatically be turned off.
To turn the Backlight off, press z again.
Note:
•Excessive use of the Backlight will significantly reduce the life of your battery.
•The Backlight may be turned off in less than the set interval.
•The Backlight may not light when the battery power is low.
•The Backlight will be disabled while transferring data with the PC.
Setting up the Backlight
The Backlight can be set to turn off after a specified interval.
1.Tap ø once or twice to display the second page of the Main menu, then tap : .
2.In the list of Setup items, tap to select “3. Backlight Time”.
3.Select a desired interval (10, 20, or 30 seconds) by using k or m, then press x .
Adjusting the LCD Contrast
1.Tap ø once or twice to display the second page of the Main menu, then tap : .
2.In the list of Setup items, tap to select “5. LCD Contrast”.
3.Use k or m to increase/decrease the screen brightness.
Turning the Key Sound On and Off
1.Tap ø once or twice to display the second page of the Main menu, then tap : .
2.In the list of Setup items, tap to select “6. Key Tone”.
3.The default is ON. Tap “OFF” to turn off the key sound.
Checking Available Memory
1.Tap ø once or twice to display the second page of the Main menu, then tap : .
2.In the list of Setup items, tap to select “7. Check Memory”.
The memory check display will appear indicating the remaining memory space.
The following will be displayed: Memory Free: available memory space
Reusable: amount of reusable memory space after running Memory Management (see page 27).
3
Entering User Information
1.Tap ø once or twice, then tap to select :.
2.In the list of Setup items, tap to select "2. User Information".
3.On the menubar, tap “, then enter your name, address, e-mail, and mobile phone information with the touch keyboard. Refer to page 5 "Entering Characters" for more information.
4.At the completion of each field entry, tap x. To save entries, tap x at the Mobile entry field, or tap æ on the menubar.
To edit the information, tap “, then select "Edit Entry". To delete the whole entry, select "Delete Entry" in the menu.
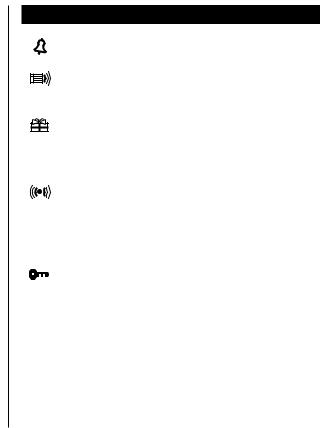
Display Symbols
Alarm icon: The Alarm is ON and will go off at the specified time.
Schedule icon: Appears when the Home clock time reaches the Reminder time or Start time of a schedule entry. Disappears when the time reaches the End time of the entry.
Anniversary sign: Appears prior to a special day programmed in the Anniversary Reminder.
C Capitalized (uppercase) letters will be entered.
b Beep sound: Key touch sound (beep) is ON.
Daily Alarm: The Daily Alarm is ON and is set to go off at the specified time every day.
BLow Battery sign: Indicates that the battery level is extremely low. (Replace the operating battery with a new one immediately.)
Secret sign: Secret function is in effect.
(The password will be required to view/edit entries.)
•The display examples in this manual show only the symbols required for each explanation.
4
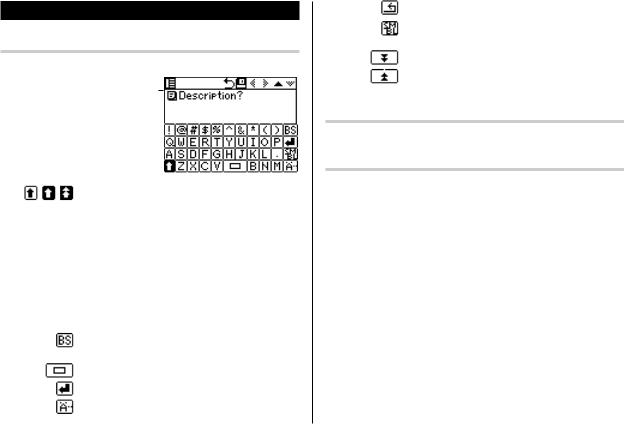
Entering Characters
Entering Characters
Entering letters and numbers Menubar
When the cursor enters a text entry  field, a touch keyboard will pop up on the screen.
To enter characters, use the attached stylus to tap on the keys.
A list of frequently used keys is shown below:
Shift keys: when tapped, it will rotate through lowercase, caps, and caps-lock mode, to enable uppercase and lowercase character entries. When the `key appears on the keyboard, tap the key once; its appearance will change to ¡ ,
indicating an uppercase character entry is enabled. Tap ¡again to set “Caps Lock” (⁄), to enter a series of uppercase characters.
Tap ⁄ once again to return to the lowercase keyboard mode.
Backspace key: deletes a character to the left of the cursor.
Space key: enters a space at the cursor.
Return key: enters a carriage return at the cursor.
Extended character key: activates a set of extended character keys.
Go-back key: brings back the regular keyboard set.
Symbol key: activates a set of characters to enter symbols.
Displays the second page of the symbol keyboard.
Displays the first page of the symbol keyboard.
Moving the Cursor
Move the cursor by pressing/tapping j , l , k , or m .
Making Corrections
1.Inserting characters
Place the cursor at the desired insertion point, then enter characters.
2.Deleting characters
c is used for deletion of data in Calculator mode and the Rate figure in Conversion mode.
b is used for deletion of characters.
5
Built-in Calendar and Clock
Precautions
•Calendar, Schedule, Expense, ToDo, Anniversary and Clock modes allow you to enter any desired date and time between Jan. 1, 1950 and Dec. 31, 2150.
•If an attempt is made to store an invalid time or date, you will not be able to move the cursor to date entering, or store the time and date by pressing x. Enter the correct time/date and press x again.
•The Organizer has 98 names of cities (see Appendix).
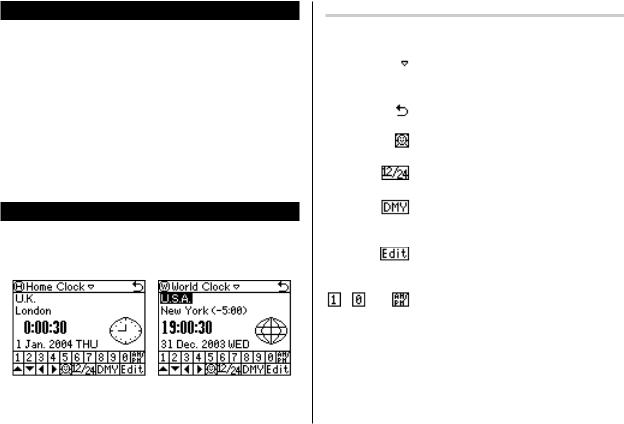
Clock Mode
To enter the Home Clock or World Clock mode, tap the h or ; icon on the Main menu.
Home Clock Mode |
World Clock Mode |
Navigating the Clock mode
Some icons and keys in the Clock modes can be tapped to activate functions:
Tap on this icon to display menu items. Home Clock, World Clock, Timer, and three Alarm modes can be accessed through here.
Tap on this menubar item to go back to the Main menu.
|
|
Tap to toggle Daylight Saving Time adjustment. |
|
|
Refer to page 7 for details. |
|
|
Tap this icon (Z, hereafter) to switch |
|
|
between 12-hour/24-hour display modes. |
|
|
Each time this key is tapped, the date format |
|
|
settings will be rotated. Refer to page 7 |
|
|
“Selecting the date format” for details. |
|
|
Tap this key (e, hereafter) to edit the time |
|
|
and date settings of the Home Clock (disabled |
|
|
in the World Clock mode). |
~ |
, and |
Use these keys to set the Home Clock to the |
|
|
desired time and day. |
6

Setting the Home Clock
1. Enter the Home Clock mode; tap the h icon in the Main menu.
Note:
•During the period of Daylight Saving Time (summer time), set the DST ON beforehand as described in "Setting Daylight Saving Time ON/OFF" later on this page.
2.Tap e to enter the clock setting mode. The “hour” field will be selected.
3.While the cursor is in the field, enter the appropriate number by using the soft number key.
4.The cursor moves to the “minute” field; set the appropriate minutes. When done, set AM/PM (if 12-hour time system is selected; tap l
to move the cursor to the Month field), as well as month, day and year, in the same manner. Then, tap j several times to select the home country field.
5.While the cursor is at the “country” field, use k and/or m key to browse through the list of country names. When done, move on to the “city” field by tapping the l key once.
6.If there is more than one city name to choose from (see Appendix), browse the list likewise and select the appropriate home city.
7.When done, tap ' to activate the settings.
Selecting the date format (Default: Day-Month-Year)
1.Tap ø, then tap to select h or ;.
2.The date format key (default: “DMY”) should be found near the bottom of the screen.
Each time the date format key is tapped, the three date formats will be rotated as follows:
Mode |
Day-Month-Year |
Year-Month-Day |
Month-Day-Year |
||
|
(“DMY”) |
|
(“YMD”) |
(“MDY”) |
|
|
|
|
|
||
Jan 24, 2004 |
24 Jan. 2004 |
2004 Jan. 24 |
Jan. 24,2004 |
||
Note:
•The selected date format affects all modes in the Organizer. Entering dates in other modes will have to comply with the date format settings here; entering “24” for the month, for instance, will be rejected.
Selecting the 12or 24-hour time system (Default: 24 hour)
In the Home Clock or World Clock mode, tap Z the appropriate number of times to select the 12-hour or 24-hour system.
Setting Daylight Saving Time (DST: Summer time) ON/OFF
Tap ç to toggle the DST setting.
When DST is ON, a DST icon “ ç” appears on the screen. The adjusted time will be displayed.
7
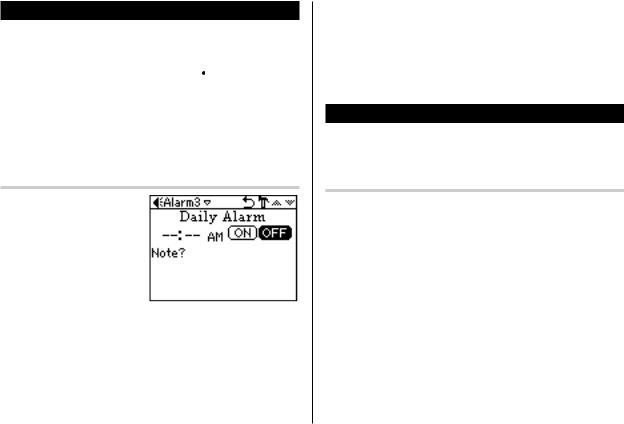
Alarm
The Organizer has 2 types of alarm:
1. Daily Alarm.......... Sounds every day at the specified time (for approx. 1 minute), when "
 " is displayed. Up to 3 alarms can be set separately (Alarm1, Alarm2, and Alarm3).
2. Schedule Alarm... Sounds at the specified times set in the Schedule entries (see page 12).
Press any key or tap the screen to stop the Alarm sounding.
Setting the Alarm time
1.Tap h, then tap the Home Clock menu on the menubar.
2.In the list of menu, tap to select (or use k or m to select, then press x) a desired Alarm: Alarm 1, Alarm 2, or Alarm 3.
3.Tap the “ icon to edit the selected Alarm setup.
4.Enter the Alarm time to go off. Each field value can be increased or decreased by using the k or mkeys.
5.When done, tap the “Note” field. Enter a reminder here, if desired.
6.Tap æ , or press x to activate the Alarm settings.
While the Alarm is activated, the “ 
 ” icon will appear on the screen.
When the set time arrives, the Alarm will sound, and the reminder message will be displayed.
Note:
•Each Alarm can be set independently from other Alarms.
•Once set, the Alarm can be activated or deactivated by tapping o or ).
Timer
The Timer mode literally functions as a timer. When the specified time passes, the Organizer will remind you with the alarm sound.
Setting the Timer
1.Tap ø once or twice, then find and tap the Q icon to enter the Timer mode.
2.In the Timer mode, set the Timer activation time. Enter "000130", for example, to set the Timer to go off at a minute and a half later. When done entering, tap x.
The Timer is now activated, and the clock starts ticking.
3.The Timer alarm should sound after one minute and thirty seconds later.
Tap the screen, or press any key to stop the alarm sounding.
Note:
•Only one Timer can be set at a time.
•The largest Timer interval to be set is 23:59:59.
•The alarm will automatically stop sounding after 1 minute.
8
Telephone Mode
Four telephone entry categories are available: Business, Personal, Unfiled, and All. Selecting the Business category, for example, will display the entries categorized
as “Business”, so that data can be browsed easily. Selecting “All”, on the other hand, will list all entries.
To select a desired category, use the menu on the Telephone mode menubar.
In each category, 11 entry fields are available as follows:
|
|
Maximum number of |
|
Field Name |
alphanumeric characters |
|
|
|
1 |
Last name: |
48 |
2 |
First name: |
48 |
3 |
Company: |
48 |
4 |
Home No.: |
48 |
5 |
Work No.: |
48 |
6 |
Fax No.: |
48 |
7 |
Mobile No.: |
48 |
8 |
Pager No.: |
48 |
9 |
Address: |
255 |
10 |
E-mail: |
96 |
11 |
Note: |
255 |
Entry
<Example>
Enter the contact info. for a business partner, John Smith.
1.Tap vin the Main menu to enter the Telephone mode, then tap the menu on the left side of the menubar to set the category for this new entry (“Business”, for example).
2.Tap “, then select “New Entry” in the menu.
3.Enter data in the Last Name field: enter “Smith”.
Note:
•Data must be entered in the Last Name, First Name or Company field to make the new entry valid.
4.Tap m , then enter the First Name: enter “John”.
Entry area can be selected by using m or k , or simply by tapping the desired entry field.
5.Set the cursor at the Company field, then enter “ABC International Co.”.
6.Tap m to move the cursor to the Home Number field, then enter “585-4280”.
Note:
•Data must be entered in at least one of the four phone number fields (Home, Work, Mobile, and Fax) to make the new entry valid.
9
7.Press mand enter “619-542-7320” as the Work Number.
8.Enter the rest of the fields, then tap æto store the entry.
The overview of the new entry will be displayed. To verify entries, scroll down the display area by tapping m.
Direct Search
1.Tap v, then select the category in the menubar.
2.Tap “, then select “Search Entry” in the menu.
3.Select desired field by tapping the field name (“Last Name”, for example), then enter a string to be searched (“Smi”, in this example).
Up to 10 characters can be entered in the Search entry field.
4.Tap  on the menubar, or press x.
If there is no matching data, “Not Found!” will appear, then the screen will return to the Search display.
See also |
|
Entering Characters |
................................................... 5 |
Editing Entries .......................................................... |
20 |
Deleting Entries ........................................................ |
20 |
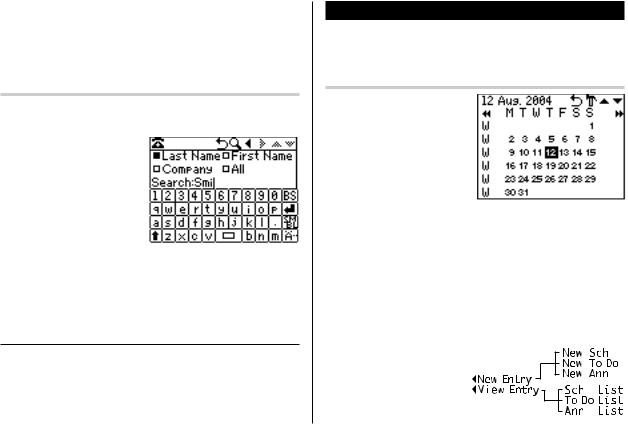
Calendar Mode
Use the Calendar mode to quickly view/add Schedule, To Do, and Anniversary entries.
Navigating the monthly calendar display
1.In the Main menu, tap a to enter the Calendar mode.
The monthly calendar of the current month will be displayed, with the current day highlighted.
To navigate the calendar, use the following keys:
∆: Displays the previous month.
¬: Displays the next month.
k: Displays the next year in the monthly view. In the weekly view, it will scroll through the entry items of the day.
m: Displays the previous year in the monthly view. In the weekly view, it will scroll through the entry items of the day.
jl: In the weekly view mode, rotate through previously entered To Do, Anniversary, and Schedule items.
 : Displays the weekly view.
“: Displays a set of menus. Refer to Schedule, To Do, and Anniversary mode sections of this manual for details.
10
 Loading...