


e00_zq800(introduction)60.book Page 1 Wednesday, April 24, 2002 8:45 PM
MODEL
ZQ-800
ELECTRONIC ORGANIZER
OPERATION MANUAL
• Getting Started .................................. |
9 |
• Basic Operation............................... |
17 |
• E-Mail................................................ |
33 |
• Attachment Viewer .......................... |
49 |
• Schedule & Calendar ...................... |
55 |
• Address Book .................................. |
71 |
• To Do List......................................... |
79 |
• Memo ................................................ |
87 |
• NotePad............................................ |
91 |
• Other Applications .......................... |
97 |
• Exchanging Information with |
|
Your PC (PC-Link).......................... |
113 |
• Appendix ........................................ |
115 |

e00_zq800(cover)60.fm Page 2 Wednesday, May 1, 2002 4:53 PM

e00_zq800(introduction)60.book Page 1 Wednesday, April 24, 2002 8:45 PM
Introduction 1
Introduction
Congratulations and thank you for choosing the ZQ-800!
Please read this operation manual thoroughly to familiarize yourself with all the features of the unit and to ensure years of reliable operation. You may also find it useful to keep this operation manual on hand for reference.
Some accessories described in this manual may not be available at the time of purchasing this unit.
Check with your local SHARP dealer concerning availability.
NOTICE
•SHARP strongly recommends that you keep separate permanent written records of all important data. Data may be lost or altered in virtually any electronic memory product under certain circumstances. Therefore, SHARP assumes no responsibility for data lost or otherwise rendered unusable, whether as a result of improper use, repairs, defects, battery replacement, use after the specified battery life has expired, or any other cause.
•SHARP assumes no responsibility, directly or indirectly, for financial losses or claims from third parties resulting from the use of this product and any of its functions, such as stolen credit card numbers, the loss or alteration of stored data, etc.
•The information provided in this manual is subject to change without notice.
•Screen layouts illustrated in this manual may differ from the actual one.
The information described in this manual is subject to change without notice.
•Microsoft, Powerpoint, Outlook, and Windows are either registered trademarks or trademarks of Microsoft Corporation in the United States and/or other countries.
•All company and/or product names are trademarks and/or registered trademarks of their respective holders.

e00_zq800(introduction)60.book Page 2 Wednesday, April 24, 2002 8:45 PM
2 Introduction
About this manual
Operation procedure
This product can be operated by the following three ways.
•Press keys to operate.
•Tap keys on tablet keyboard with the attached stylus.
•Tap buttons, icons and entries on screens with stylus.
This manual explains the basic operation for using keys.
Buttons and keys

 : Alphabetic Q key
 : SHIFT key


 : Escape key
 : Scroll keys


 : Scroll up key
 : Scroll down key

 : Scroll left key


 : Scroll right key


 : Enter key


 : Power (ON/OFF) key


 : Menu key


 : Backlight key
Operation buttons on the screen
•These buttons, such as “OK button” for executing operation, are indicated as “OK” etc.
•The application icons, such as [Address], are indicated as “Address” etc.

e00_zq800(introduction)60.book Page 3 Wednesday, April 24, 2002 8:45 PM
3
Table of Contents |
|
Introduction............................................................ |
1 |
About this manual.............................................................. |
2 |
Caring for the unit.................................................. |
7 |
Getting Started....................................................... |
9 |
Part names and Functions................................................. |
9 |
Using the stylus ............................................................... |
10 |
Attaching the hand strap.................................................. |
11 |
Installing the batteries and Initializing.............................. |
11 |
Setting up the unit............................................................ |
13 |
Basic Operation ................................................... |
17 |
Common operations ........................................................ |
17 |
Entering data ................................................................... |
26 |
Operations using the menu ............................................. |
26 |
Main menu screen ........................................................... |
31 |
E-Mail .................................................................... |
33 |
An overview of the E-Mail application.............................. |
33 |
Inbox folder...................................................................... |
35 |
Outbox folder ................................................................... |
38 |
Mybox folder .................................................................... |
40 |
Creating an e-mail message............................................ |
42 |
Browsing an e-mail attachment ....................................... |
44 |
Easy reply function .......................................................... |
44 |
Creating PIM data from e-mail messages ....................... |
45 |
Operations using the menu ............................................. |
45 |
Attachment Viewer .............................................. |
49 |
An overview of the Attachment Viewer application.......... |
49 |
Viewing Index screen ...................................................... |
51 |
Viewing Details screen .................................................... |
52 |
Operations using the menu ............................................. |
54 |
Schedule & Calendar........................................... |
55 |

e00_zq800(introduction)60.book Page 4 Wednesday, April 24, 2002 8:45 PM
4
An overview of the Schedule & Calendar application...... |
55 |
Creating a new Schedule & Calendar entry .................... |
57 |
Viewing a Daily schedule................................................. |
60 |
Viewing a Weekly schedule............................................. |
62 |
Viewing a Monthly schedule ............................................ |
63 |
Viewing the details of a Schedule & Calendar entry........ |
65 |
Modifying a Schedule & Calendar entry .......................... |
66 |
Operations using the menu ............................................. |
68 |
Address Book ...................................................... |
71 |
An overview of the Address Book application ................. |
71 |
Creating a new Address Book entry ................................ |
72 |
Viewing a list of Address Book entries ............................ |
73 |
Viewing the details of an Address Book entry ................. |
74 |
Modifying an Address Book entry.................................... |
75 |
Changing the sorting order .............................................. |
75 |
Creating an e-mail message from an Address Book entry .. |
|
77 |
|
Operations using the menu ............................................. |
78 |
To Do List ............................................................. |
79 |
An overview of the To Do List application ....................... |
79 |
Creating a new To Do List entry ...................................... |
81 |
Viewing a list of To Do List entries .................................. |
82 |
Viewing the details of a To Do List entry ......................... |
83 |
Modifying a To Do List entry............................................ |
83 |
Changing the sorting order .............................................. |
84 |
Operations using the menu ............................................. |
84 |
Memo .................................................................... |
87 |
|||
An overview of the Memo application |
..............................87 |
|||
Creating a new Memo entry ............................................ |
88 |
|||
Viewing a list of Memo entries......................................... |
88 |
|||
Viewing the details of a Memo entry................................ |
89 |
|||
Modifying a Memo entry .................................................. |
89 |
|||
Changing the sorting order .............................................. |
89 |
|||
Operations using the menu ............................................. |
90 |
|||
|
|
|
|
|
|
|
|
|
|
|
|
|
|
|

e00_zq800(introduction)60.book Page 5 Wednesday, April 24, 2002 8:45 PM
5
NotePad ................................................................ |
91 |
An overview of the NotePad application.......................... |
91 |
Creating a new NotePad entry ........................................ |
92 |
Viewing a list of NotePad entries..................................... |
93 |
Viewing the details of a NotePad entry............................ |
94 |
Modifying a NotePad entry .............................................. |
94 |
Changing the sorting order .............................................. |
94 |
Operations using the menu ............................................. |
95 |
Other Applications............................................... |
97 |
Calculator ........................................................................ |
97 |
Clock................................................................................ |
99 |
Customizing the unit (Settings)...................................... |
103 |
Checking memory information (Memory) ...................... |
107 |
Setting a password (Secret) .......................................... |
107 |
Entering owner information............................................ |
111 |
About Add-on software .................................................. |
112 |
Exchanging Information with |
|
Your PC (PC-Link).............................................. |
113 |
PC software set up ........................................................ |
113 |
Appendix ............................................................ |
115 |
Resetting the unit........................................................... |
115 |
Battery replacement ...................................................... |
116 |
Specifications ................................................................ |
118 |
Index ................................................................... |
121 |
Troubleshooting ................................................ |
123 |

e00_zq800(introduction)60.book Page 6 Wednesday, April 24, 2002 8:45 PM
6

e00_zq800(introduction)60.book Page 7 Wednesday, April 24, 2002 8:45 PM
Caring for the unit |
7 |
|
|
Caring for the unit
The unit contains sophisticated circuitry and a glass display panel, which can be damaged if not handled with care. A few precautions should be taken regarding the unit’s care to ensure it gives you many years of reliable use.
•Keep the unit away from extreme heat. Do not leave it on the dashboard of a car or near any heat source. Do not leave it in any place that is extremely damp or dusty.
•Do not drop the unit or subject it to severe impact or extreme force.
•Do not use force when pressing on the touch panel. Do not use any sharp or pointed objects, or even your fingernails, to press on it.
•Sharp or hard objects can scratch or damage the unit. Make sure it is adequately protected when carried with other objects. Do not carry it loose in a bag or briefcase. Put it in a pocket or secure compartment within your bag.
•Clean the unit only with a soft, dry cloth. Do not use solvents.
•Do not carry the unit in your back pocket, as it may break when you sit down. The display is made of glass and is very delicate.
•This product is not waterproof. Do not use it or store it near liquids or where it can be subject to extreme moisture. Rain, juice, coffee, steam and perspiration can also cause malfunctions.
•Replace the battery as soon as it becomes weak. Failing to replace a weak battery may result in loss of data or damage from battery leakage.
•Do not throw or swing the unit around by its hand strap, as this may cause injury or result in malfunction or damage to the unit.

e00_zq800(introduction)60.book Page 8 Wednesday, April 24, 2002 8:45 PM
8 Caring for the unit
e00_zq800(introduction)60.book Page 9 Wednesday, April 24, 2002 8:45 PM
Getting Started |
9 |
|
|
Getting Started
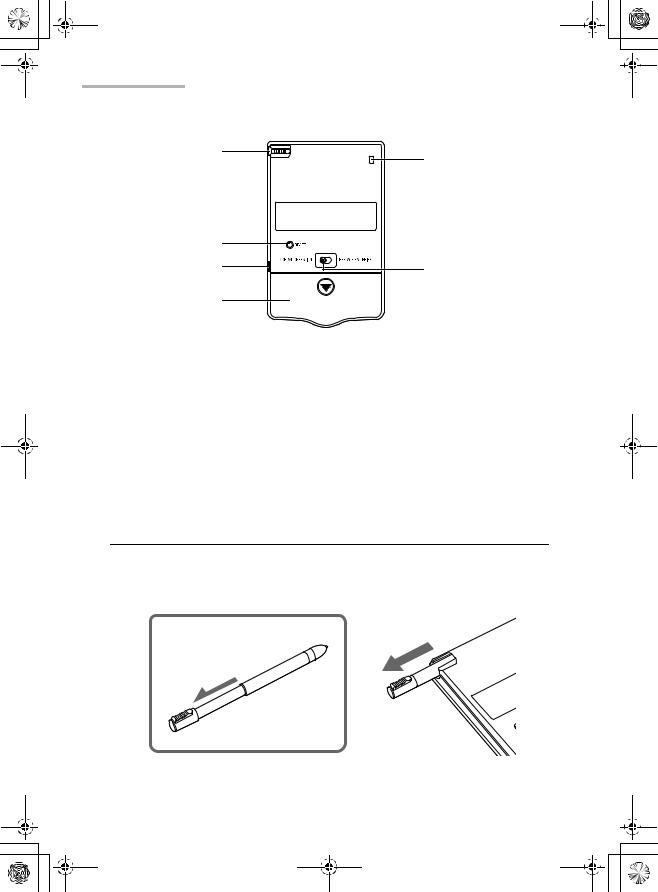
Part names and Functions
8
7
6
1.Display:
2.Tablet keyboard:
3.Menu key:
4.Backlight key:
5.Scroll keys:
6.Enter key:
1
2
3
4
5
Displays information, selects operations, data entry, etc.
Used to input characters and execute quick search.
Opens the application menu window.
Turns the backlight on and off.
Scrolls up, down, left and right through items (icons). Scrolls index, detailed text view, etc.
Selects item. Goes to next screen. (Starts application or displays the Details screen from the Index screen etc.)
7. |
Power (ON/OFF) key: |
Turns the unit on and off. |
8. |
Esc key: |
Returns to the previous screen. Closes a |
|
|
current menu window. Jumps to the Main |
menu screen when pressed and held for 1 second.
e00_zq800(introduction)60.book Page 10 Wednesday, April 24, 2002 8:45 PM
10 Getting Started
14
9
|
13 |
|
|
12 |
10 |
|
11 |
|
9. |
Eyelet for the hand strap: |
Attach the hand strap here. |
10. |
Battery replacement switch: |
Locks the battery compartment to prevent |
|
|
access to the batteries. |
11. |
Battery compartment lid: |
Open it when installing/removing the batteries. |
12. |
PC-Link port: |
Connects PC-Link cable. |
13. |
RESET button: |
Resets the unit. |
14. |
Stylus: |
Use to tap buttons and input data. |
Using the stylus
This unit comes equipped with a telescopic stylus. Remove and extend the stylus as illustrated below. To replace it, insert it until the pointed end locks into place.
.
e00_zq800(introduction)60.book Page 11 Wednesday, April 24, 2002 8:45 PM
Getting Started 11
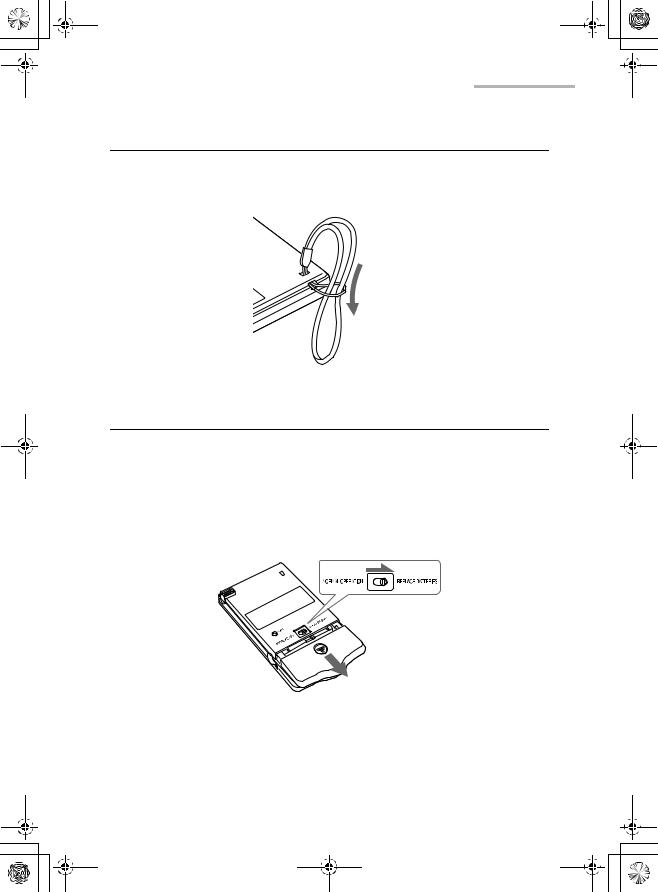
Attaching the hand strap
Pass the small loop of the hand strap through the eyelet and pass the other end through the loop as illustrated below.
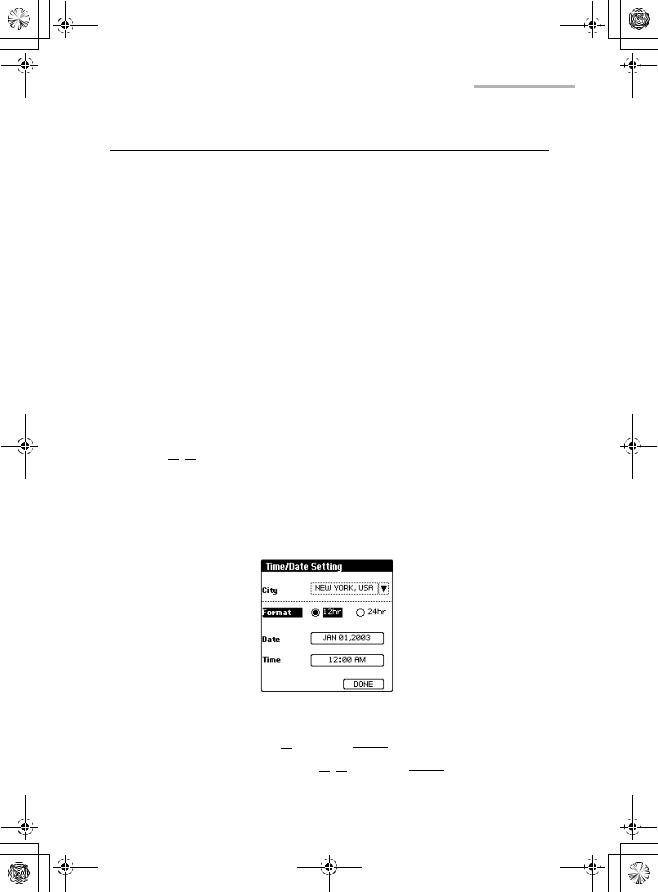
Installing the batteries and Initializing
Installing the batteries
1.Slide the battery replacement switch on the back of the unit to the “REPLACE BATTERIES” position.
2.Open the battery compartment lid, then gently remove it.

e00_zq800(introduction)60.book Page 12 Wednesday, April 24, 2002 8:45 PM
12Getting Started
3.Insert two AAA batteries, making sure to position them correctly according to the plus (+) and minus (-) terminals, as illustrated below.
4.Replace the battery compartment lid.
5.Slide the battery replacement switch to the “NORMAL OPERATION” position. Follow the setup procedures described in “Setting up the unit” on page 13.
Initializing
1.While pressing and holding  , press and release the RESET button on the back of the unit using the stylus or similar object.
A message appears.
2.Release  .
.
3.Highlight “OK” by pressing 
 and press
  (or tap “OK”).
Note: The following data will be lost when the batteries are replaced or extremely low. It is recommended to copy important data to the Mybox folder. (See page 34, 50)
• E-Mail messages in the Inbox folder (E-Mail application).
• Attachments in the Inbox folder (Attachment Viewer application).
e00_zq800(introduction)60.book Page 13 Wednesday, April 24, 2002 8:45 PM
Getting Started 13
Setting up the unit
After battery installation, the unit takes you through various steps needed to setup the unit before use. It is recommended to complete the entire setup procedures described below.
Adjusting the touch panel
The Calibration screen appears.
1.Tap the center of the target with the stylus. The target moves to another position.
2.Repeat step 1 until you tap the target at the bottom right of the screen.
3.Tap “Q” followed by “P” on the tablet keyboard according to the instructions displayed on the screen.
Adjusting the LCD contrast
After adjusting the touch panel, the Contrast screen appears.
1.Press 
 or tap icons on the screen to adjust the LCD contrast.
2.Tap “NEXT”.
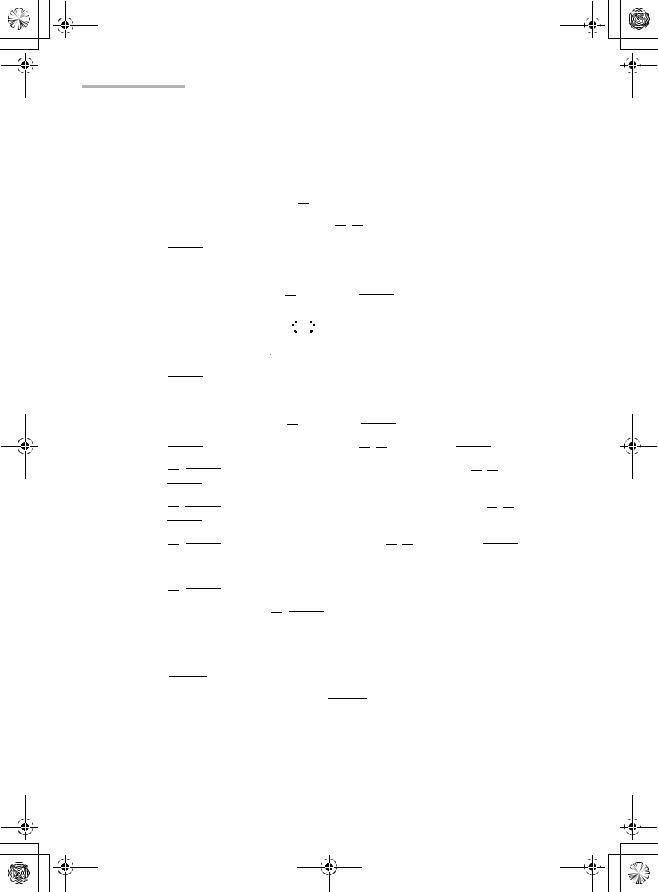
Setting the CLOCK
After setting the LCD contrast, the Time/Date Setting screen appears.
City:
1.Highlight “City” by pressing  and press


 .
.
2.Select the desired city by pressing 


 and press


 .
.
e00_zq800(introduction)60.book Page 14 Wednesday, April 24, 2002 8:45 PM
14 Getting Started
Note: If you type the first letter of the desired city on the tablet keyboard, a list of cities that begin with that letter appears.
Format:
1.Highlight “Format” by pressing  .
.
2.Select the desired format by pressing 
 .
.
3.Press 


 .
.
Date:
1.Highlight “Date” by pressing  and press
  to display the pop-up calendar.
2.Select the month by tapping “
 ” “
” “ ”.
”.
3.Select the date by using 
 .
.
4.Press  .
.
Time:
1.Highlight “Time” by pressing  and press
  .
.
2.Press  , adjust the hour by pressing
 , then press
  .
.
3.Press 
 , adjust the first digit of the minute by pressing
 , then press
  .
.
4.Press 
 , adjust the second digit of the minute by pressing
 , then press
  .
.
5.Press 
 , select AM or PM by pressing
 , then press
  . (The AM/PM menu does not appear if you have selected “24hr” for format.)
6.Press 
 .
.
After setting the above, press 
 .
.
Turning the unit on and off
1.Press  to turn the unit on.
2.If you want to turn the unit off, press  .
.
Note:
•If you cannot turn the unit on, check that the battery replacement switch is set to the “NORMAL OPERATION” position.

e00_zq800(introduction)60.book Page 15 Wednesday, April 24, 2002 8:45 PM
Getting Started 15
•If a message appears saying there is a problem, see page 123 “Troubleshooting” or page 116 “Battery replacement”.
•If you do not tap the screen or operate the buttons and keys for more than the set number of minutes, the unit will automatically turn off to save the battery. For details on setting the Auto-off function, see page 104 “Adjusting the Autooff function:”.
•Restarting the unit will restore the most recently used screen to the display when the resume function is turned on.
•Restarting the unit while an entry is edited will restore that entry to the display when the resume function is turned on.

e00_zq800(introduction)60.book Page 16 Wednesday, April 24, 2002 8:45 PM
16 Getting Started

e00_zq800(introduction)60.book Page 17 Wednesday, April 24, 2002 8:45 PM
Basic Operation 17
Basic Operation
Common operations
This section explains how to select applications, entries and items, how to enter characters, and how to scroll through screens.
•Highlight the selected application, entry or item.
•Using the scroll keys moves the highlighted position.
•Pressing  executes the selected operation.
•Pressing  returns to the previous screen or closes a current menu window.
The Address Book application is used in the following examples. These techniques can be applied to all of the applications.
Pressing keys and tapping buttons/icons and tablet keys
You can operate the unit by pressing keys on the unit and selecting commands from menus.
The unit can be operated by pressing the keys or tapping on-screen with the stylus.
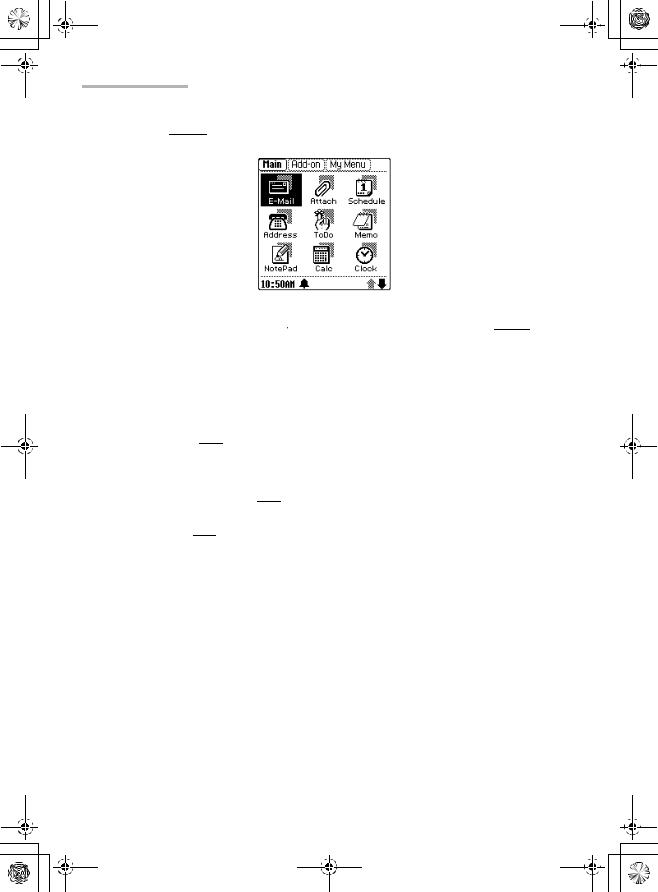
To open an application on the Main menu screen
The Main menu screen displays all major applications.
This outlines, how to display the Main menu screen, and how to select applications are explained here.
Note: You can customize the Main menu screen. See page 31 “Main menu screen” for further details.
e00_zq800(introduction)60.book Page 18 Wednesday, April 24, 2002 8:45 PM
18Basic Operation
1. Press 


 to display the Main menu screen.
2.Move the highlight by using  to select the desired icon, and press
  . Or
. Or
Tap the desired application icon. The selected application opens.
If you press  , the screen returns to the Main menu screen.
Note:
•If you press and hold  for 1 second in any screen, the screen returns to the Main menu screen.
•Pressing  on the Main menu screen switches the screen in the following order: Add-on menu screen → My Menu screen → Main menu screen
Entering characters
This section explains general data entry techniques used to edit an existing entry or create a new one in each application.
The unit has two types of keyboards: tablet keyboard and on-screen keyboard.
The Tablet keyboard
You can input alphabet letters, commas and periods by tapping the tablet keyboard. The keyboard corresponds to a QWERTY keyboard.
The On-screen keyboard
When you tap “New” or “Edit” in an application, the on-screen keyboard appears at the bottom of the screen, allowing you to input certain types of characters and symbols.
e00_zq800(introduction)60.book Page 19 Wednesday, April 24, 2002 8:45 PM
Basic Operation 19
1 |
2 |
3 |
4 |
On-screen |
|
|
|
keyboard |
|
|
|
Tablet |
|
|
5 |
|
|
6 |
|
keyboard |
|
|
|
|
|
|
7 |
1.SMBL: Enters symbols or foreign language characters.
2.Words & Phrases: Activates the Words & Phrases function.
3.

 : Enters uppercase (capital) letters on the tablet keyboard. To cancel the function, tap “
  ” again.
4. SHIFT: Shifts to enter uppercase or lowercase letters when Caps lock is turned on.
5. (Back space): Deletes the character to the left of the cursor.
6. (Carriage return): Starts a new line.
7. : Inserts a space.
Symbols
Tap “SMBL” to display the symbol keyboard. Select the symbol display containing the desired symbol by tapping “  ” or “
 ”, then tap on it.
The unit automatically displays the 18 characters most recently selected.
Close box |
|
|
|
|
Scroll buttons |
(Tap here |
|
|
|||
|
|
||||
to return |
|
|
(Tap to scroll |
||
|
|||||
the |
|
|
the symbol |
||
keyboard |
|
|
display.) |
||
to the |
|
|
|
||
previous |
|
|
|
||
mode.) |
|
|
|
||

e00_zq800(introduction)60.book Page 20 Wednesday, April 24, 2002 8:45 PM
20 Basic Operation
Word completion feature
The word completion feature helps you enter characters by giving you four word suggestions that begin with the letters you have entered on the keyboard. In addition to easy character input, you can also store frequently used words and phrases in the user dictionary. See page 103 “Customizing the unit (Settings)” for further details.
Words and phrase function
You can enter a word or phrase by selecting from the preset text.
1.Tap “Words & Phrases”.
The Words and Phrases screen appears.
2.Select the desired word or phrase by pressing 
 and press
  .
.
Note: You can quickly find a word or phrase by typing it in the “Find” field.
Adding a new word or phrase:
1.Tap “Words & Phrases”.
The Words and Phrases screen appears.
2.Tap “New”.
The Enter Word/Phrase screen appears.
3.Enter the word or phrase you want to store.
4.Tap “SAVE”.
The field
Most applications divide the display into field boxes. The number and types of fields varies in each application. The field types include text, date, time, and pop-up menus.
You can enter any character in a text field.
The cursor
The cursor indicates the position where text will be entered or deleted.
e00_zq800(introduction)60.book Page 21 Wednesday, April 24, 2002 8:45 PM
Basic Operation 21
Text input
Text input is simple. Tapping a key enters the corresponding standard letter.
To enter a lowercase letter “h”, tap . |
|
To enter an uppercase letter “H”, tap |
SHIFT to turn the keyboard to shift mode, |
then tap . |
|
Note: While Caps lock is active,  functions in reverse.
Deleting text
If you make a mistake while entering text, you can erase as follows:
1.Move the cursor to the right of the character to be deleted.
2.Press  to delete a character to the left of the cursor.
Working with blocks of text
Working with a block of text is sometimes easier than working with individual characters.
Selecting text:
1.Drag the stylus over the entire text you want to work with in the Edit screen of an application. The selected text is highlighted.
2.You can now perform the following operations on the highlighted text.
Note: While the text is selected:
•Pressing  deletes the text.
•Entering a character deletes the text and inserts the character.
•Moving the cursor de-selects the text.
Screens and elements in applications
You can switch screens in any application.
For example, you can see the following screens in the Address Book application.
e00_zq800(introduction)60.book Page 22 Wednesday, April 24, 2002 8:45 PM
22 Basic Operation
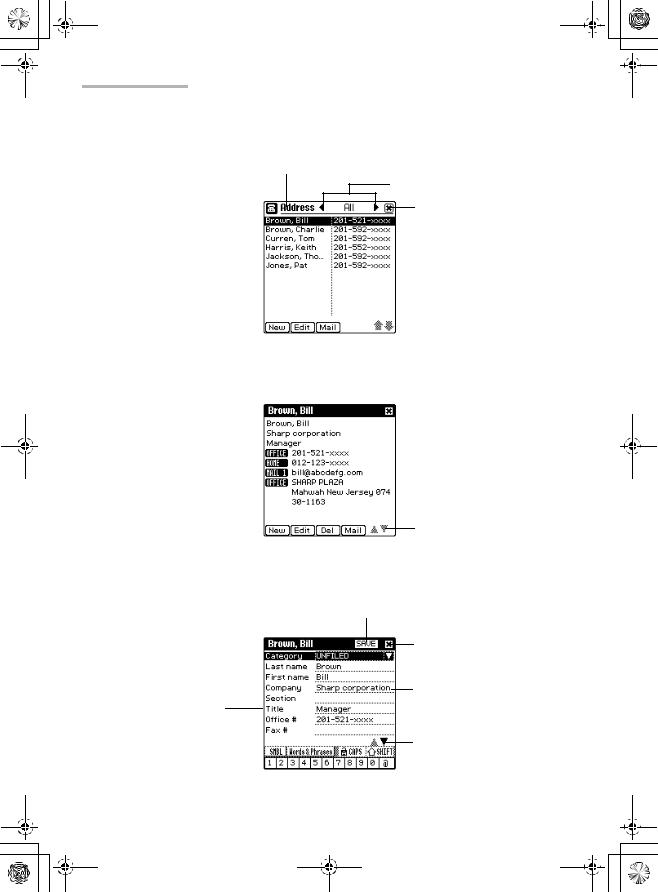
•The Index screen shows a list of entries within the application. This screen allows you to easily find a desired entry.
Name of the application
Category menu (See page 23)
Close
Operation buttons |
|
|
|
Scroll up/down |
|
|
|
||
|
• The Details screen allows you to see the details of the entry.
Scroll buttons
• The Edit screen allows you to modify an existing entry.
Save
(Saves the modified data.)
Close
(Tap this box to cancel the modification.)
Data
Field name
Scroll buttons
e00_zq800(introduction)60.book Page 23 Wednesday, April 24, 2002 8:45 PM
Basic Operation 23
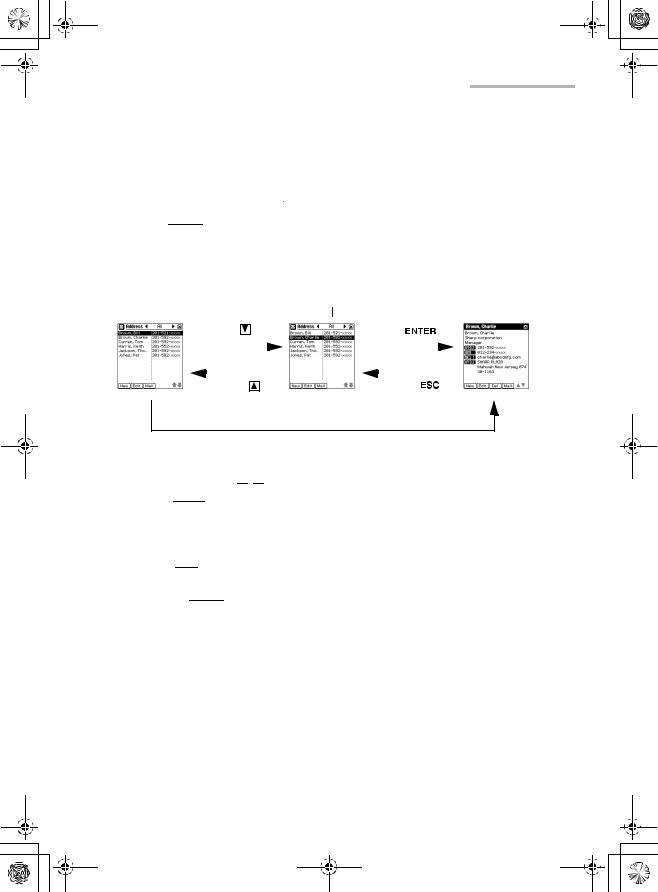
Operations in the Index screen
When you select the Address Book application from the Main menu screen, the Address Book Index screen appears.
1.Highlight an entry by using 
 .
.
2.Press 


 to open the Details screen of the highlighted entry. Or
Tapping an entry also opens the Details screen.
Category menu
Address Book (See below)
Index screen
|
Press |
. |
|
|
|
|
|
|
Press |
|
|
|
. |
||
|
|
|
|
|
|
|
|
|
|
||||||
|
|
|
|||||||||||||
|
|
|
|
|
|
|
|
|
|
|
|
|
|
|
|
|
|
|
|
|
|
|
|
|
|
|
|
|
|
|
|
|
Press . |
|
|
|
Press |
|
|
. |
|||||||
|
|
|
|
||||||||||||
Tapping an entry directly opens the Details screen.
•Each time you press 
 , the highlight moves one line at a time up or down.
•Pressing  displays the commands of menus available in the present screen. (See page 26)
•Tapping the operation button (ex. “New” ) executes the command (ex. creating a new entry).
•Pressing  returns to the Main menu screen.
•Refer to the description of the respective application regarding the screen opened by pressing  .
.
Selecting a Category
In the “All” category, all entries are displayed. You can limit the entries displayed by selecting other categories.
e00_zq800(introduction)60.book Page 24 Wednesday, April 24, 2002 8:45 PM
24Basic Operation
1.Select categories one by one by pressing 
 . Or
. Or
Tap the category menu and then tap a category name. The entries in the selected category appears.
Note:
•In the default setting, you can select the categories “All”, “UNFILED”, “PERSONAL”, or “BUSINESS”.
•If you are using the E-Mail or Attachment Viewer application, you can select a
category only with Mybox folder. To set a category, press  and select “Categorize...”.
•You can create or edit a category. (See page 30)
•If you do not set a category, the category becomes “UNFILED” by default.
•You can also set a category by pressing  and selecting “Categorize...”.
•You cannot categorize an entry into more than one category.
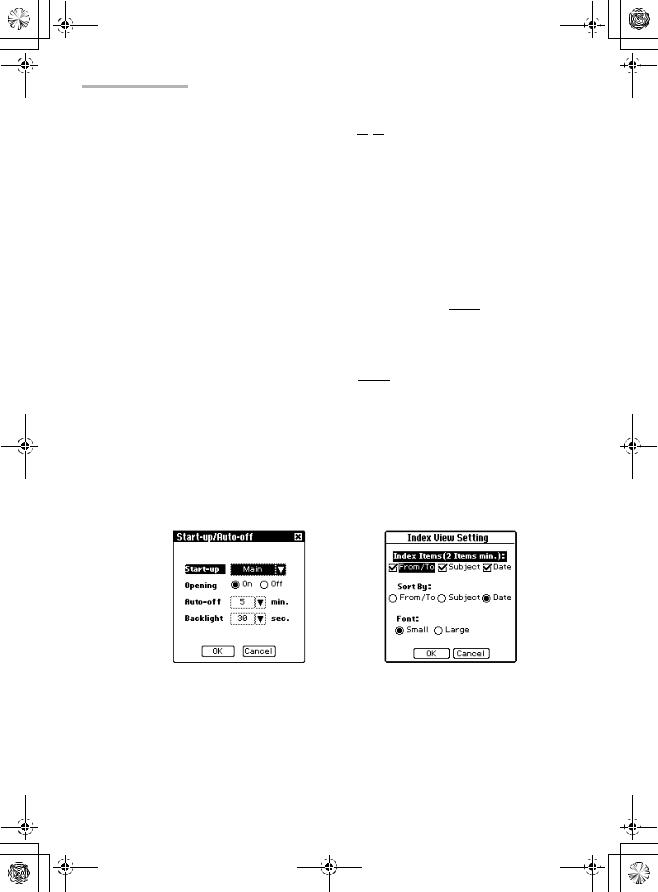
Operations for pop-up menu, radio buttons, and check boxes
When you carry out a certain operation, screens that contain pop-up menu, radio buttons and check boxes may appear for selecting settings. For example, the operations in Settings screen are as follows.
|
|
|
|
|
|
|
|
|
|
|
|
|
|
|
|
E-Mail Index View Setting screen |
|
Start-up/Auto-off screen |
|
||||
|
(example of check box and radio |
||||
(example of pop-up menu) |
|
||||
|
button) |
||||
|
|
|
|
||

e00_zq800(introduction)60.book Page 25 Wednesday, April 24, 2002 8:45 PM
Basic Operation 25
Pop-up menu
The operations for pop-up menu in the example on the previous page are as follows.
1.Highlight a pop-up menu by using 
 .
.
2.Press 


 . Or
. Or
Tap the pop-up menu.
3.Select the desired item by pressing 
 and press
  . The new setting will be activated.
Or
Press  (or tap “Cancel”) to cancel the selected setting.
Radio buttons and Check boxes
The operations for radio buttons and check boxes in the example on the previous page are as follows.
1.Highlight a check box  or a radio button
  by using
 . Press
  .
.
Or
Tap the box or the button.
The selected item is turned on  or
or  .
.
2.Highlight “OK” by using 
 and press
  (or tap “OK”) to store the selected setting.
The new setting will be activated. Or
Press 


 (or tap “Cancel”) to cancel the selected setting.
The former setting will continue to be active.
•In selecting a radio button, you can select only one item out of many. When you select an item  , other items become unselectable
  .
.
•In selecting a check box, each time you press  it switches between on
  and off
  .
.

e00_zq800(introduction)60.book Page 26 Wednesday, April 24, 2002 8:45 PM
26 Basic Operation
Entering data
Creating a new entry
1.On the Index or Details screen, tap “New”. The New Entry screen appears.
The following steps vary depending on the applications. E-Mail application: page 42
Schedule & Calendar application: page 57 Address Book application: page 72
To Do List application: page 81 Memo application: page 88 NotePad application: page 92
Modifying an entry
1.On the Index screen, highlight the entry you want to modify by using 
 . Or
. Or
Open the Details screen of the entry you want to modify.
2.Tap “Edit”.
The Edit screen of the highlighted entry appears.
3.Modify the entry.
4.Press  (or tap “SAVE”) to store the modification.
If you press  (or tap the close box), a confirmation message appears asking you if you really want to throw away all of the changes. To cancel the modification, highlight “OK” by pressing
 and press
  (or tap “OK”).
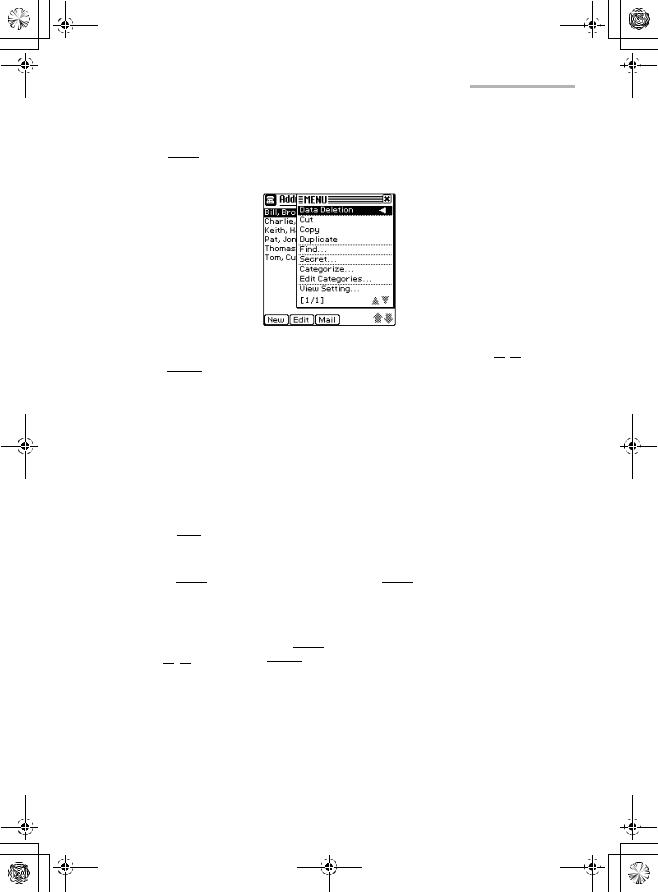
Operations using the menu
Operations using the menu
The menu system is a quick way to issue commands and perform operations. Pressing  displays the specific menu. Each menu contains various commands.
The menus and commands differ by application or mode currently in use.
e00_zq800(introduction)60.book Page 27 Wednesday, April 24, 2002 8:45 PM
Basic Operation 27
1.Press 


 on the Address Book Index screen as an example. The menu window appears.
2.Select a menu command (ex. “Data Deletion” command) by pressing 
 and press
  .
.
Or
Tap a menu command.
If a menu command line has “  ” mark, the sub menu will be displayed.
If a menu command name has an ellipsis “...”, the related screen will be displayed.
Note:
•Press  (or tap the close box or outside of the menu window) to return to the previous screen.
•If the menu window consists of two pages, the 1/2 page is displayed when you press  . To display the 2/2 page, press
  again.
Copying and moving text
Select the text at first. Then press 


 and select the following commands by pressing


 . Then press
  .
.
•Cut: Cuts the selected text.
•Copy: Copies the selected text.
•Paste: Pastes the text that you have copied or cut at a selected point in a field.
Duplicating an entry
You can duplicate an existing entry.

e00_zq800(introduction)60.book Page 28 Wednesday, April 24, 2002 8:45 PM
28Basic Operation
This function is convenient to create a new entry using an existing entry.
1.On the Index screen, highlight the entry you want to duplicate by pressing

 .
.
Or
Display the Details screen of the entry you want to duplicate.
2.Press 


 .
.
3.Select “Duplicate” by pressing 
 and press


 . The selected entry will be duplicated.
Deleting entries
You can delete unnecessary entries. For example, you can perform the following deletion in the Address Book application for deleting a single entry.
1.On the Index screen, highlight the entry you want to delete by pressing 
 .
.
2.Press  .
.
3.Select “Data Deletion” by pressing 
 and press
  .
.
4.Select “Selected Entry” by pressing 
 and press
  . The confirmation message appears before the entry is deleted.
5.Highlight ”OK” by pressing  and press
  (or tap “OK”). The selected entry will be deleted.
If you press  (or tap “Cancel”), the deletion is canceled.
Note: The sub menus of “Data Deletion” differ by application.
Finding entries
If you know a particular entry is in the unit, but cannot remember where, you can use the Find function.
1.Press  on the Address Book Index screen as an example.
2.Select “Find...” by pressing 
 and press
  .
.
 Loading...