


21E-FG1F
|
|
C O L O U R T E L E V I S I O N |
ENGLISH |
|||||||
|
|
|
||||||||
|
|
TÉLÉVISEUR COULEUR |
|
|||||||
|
CVETNOJ TELEVIZOR |
|
||||||||
|
||||||||||
|
|
|
|
|
|
|
|
|
|
|
|
|
|
|
21E-FG1F |
FRANÇAIS |
|||||
|
|
|
|
|
||||||
|
|
|
|
OPERATION MANUAL |
|
|
|
|
|
|
|
|
|
|
|
|
|||||
|
||||||||||
|
|
|
|
M O D E D ’ E M P L O I |
|
|
|
|
|
|
РУССКИЙ |
||||||||||
|
|
|
|
|
||||||
|
|
|
|
|
||||||
|
|
|
|
INSTRUKCIQ PO ?KSPLUATACII |
|
|
|
|||
|
|
|
|
|
|
|
||||
|
|
|
|
|
|
|||||
|
|
|
|
|
|
|
|
|
|
|
Please read this operation manual carefully before using the colour television.
Veuillez lire attentivement ce mode d’emploi avant d’utiliser ce téléviseur couleur.
TINS-B850WJZZ |
TINS-B850WJZZ |
03P09-MSM |
03P09-MSM |
|
|

Contents
Preparation |
|
Accessories ...................................................................................... |
2 |
Easy setup ........................................................................................ |
3 |
Safety precautions ............................................................................ |
4 |
Part names ....................................................................................... |
6 |
Installing batteries in the remote control unit .................................... |
6 |
Watching TV |
|
Watching a TV programme ............................................................... |
8 |
Operating the TV buttons .................................................................. |
9 |
Useful features |
|
Channel/Timer display .................................................................... |
10 |
Mute ............................................................................................... |
10 |
Channel recall ................................................................................ |
11 |
TV/Video selection ......................................................................... |
11 |
Selecting menu items |
|
Selecting a menu item .................................................................... |
12 |
Settings and adjustments |
|
On-screen display language selection ............................................ |
13 |
Auto channel tuning ........................................................................ |
14 |
Manual channel tuning ................................................................... |
15 |
Channel setting .............................................................................. |
16 |
Picture adjustment .......................................................................... |
17 |
Sound adjustment .......................................................................... |
18 |
Surround sound .............................................................................. |
19 |
Blue screen .................................................................................... |
20 |
Off timer .......................................................................................... |
21 |
On timer .......................................................................................... |
22 |
Reminder on-screen timer .............................................................. |
23 |
Connections |
|
Connecting to a DVD player ........................................................... |
24 |
Watching DVD Playback ................................................................. |
24 |
Connecting to an antenna .............................................................. |
25 |
Connecting to an antenna via a VCR ............................................. |
25 |
Connecting to video equipment ...................................................... |
26 |
Troubleshooting |
|
Troubleshooting .............................................................................. |
27 |
Specifications |
|
Specifications ................................................................................. |
28 |
E 1
ENGLISH
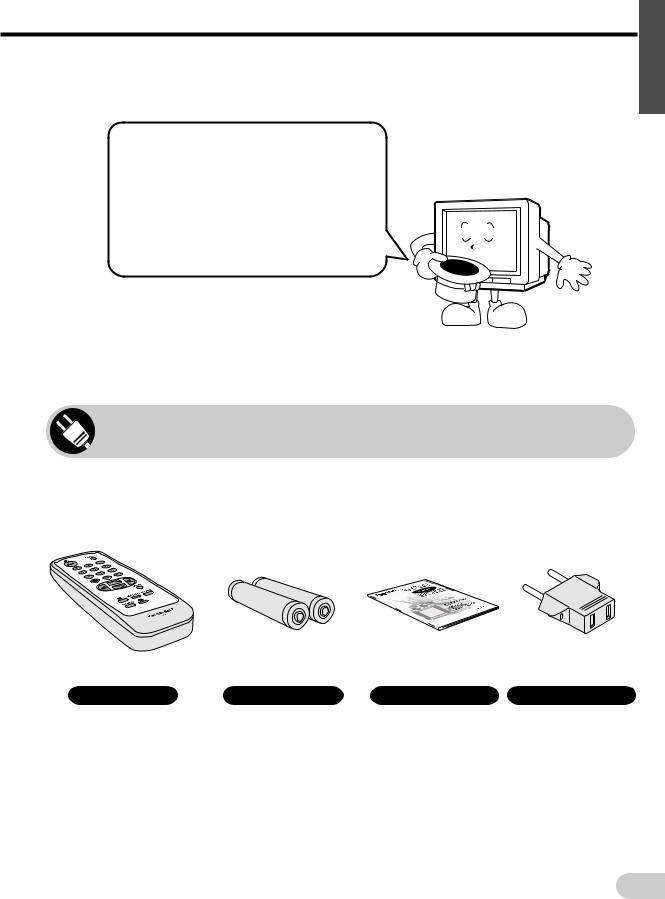
Dear SHARP Customer
Thank you for buying SHARP's Colour Television. We hope you will have many years of enjoyment from this television set. To ensure proper operation, please read this manual carefully, and keep it in a safe place for future reference.
Accessories
The following accessories are included with this television.
Remote control |
Size-AA batteries |
Operation manual |
AC plug adaptor |
E 2

 Easy setup
To use your TV set, perform the easy setup procedure below.
The  mark indicates the page numbers with more detailed information.
Connect the antenna.
• See 25 to connect the antenna.
Connect any video equipment.
• See 25 , 26 to connect video equipment.
• See the operation manual of your video equipment when connecting to the TV set.
Insert the batteries into the remote control.
• Use the two batteries included with the TV.
• See 6 .
Insert the AC plug to the power outlet.
• If you will not use the TV set for a considerable length of time, as a safety precaution, unplug the cord from the outlet.
Tune the channels.
• Use the buttons on the TV.
• See 14 , 15 .
E 3
 Safety precautions
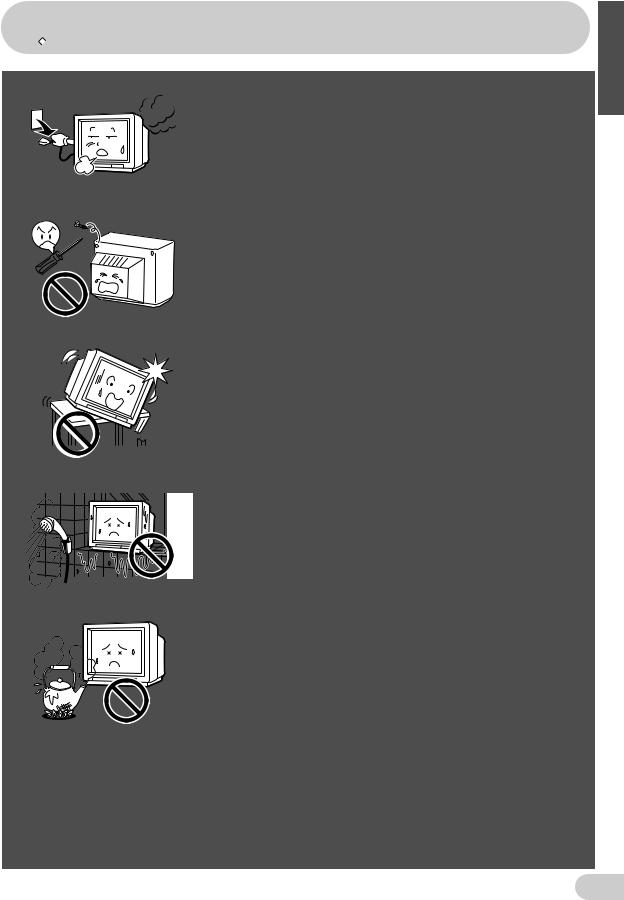
Damage
Turn off the power and unplug the power cord from the wall outlet immediately if the TV set begins to make any unusual noises or gives off smoke or an unusual smell. Then call your dealer for service.
Servicing
To reduce the risk of electric shock, do not remove the back of the cabinet. This TV set contains dangerous voltage.
Unstable surface and shocks
Do not place this TV set on an unstable cart, stand, shelf, or table. The TV set may fall, causing serious injury to a child or adult, and serious damage to the set.
Sharp recommends securing the TV set to a stable surface or wall to prevent the set from falling due to sudden shocks or impact.
Water
To prevent fire or electrical shock, do not place the TV set near a bathroom, swimming pool or other area where it may become wet.
Moisture
To prevent electrical shock, do not use the TV set in an excessively damp place.
Power-cord protection
To prevent electrical shock, do not subject the AC power cord to damage by bending or twisting it, or by placing heavy items on top of it and do not place the AC power cord under the TV set. If the AC power cord becomes damaged, unplug it from the wall outlet immediately and call your dealer for service.
ENGLISH
E 4
Safety precautions
Liquid entry
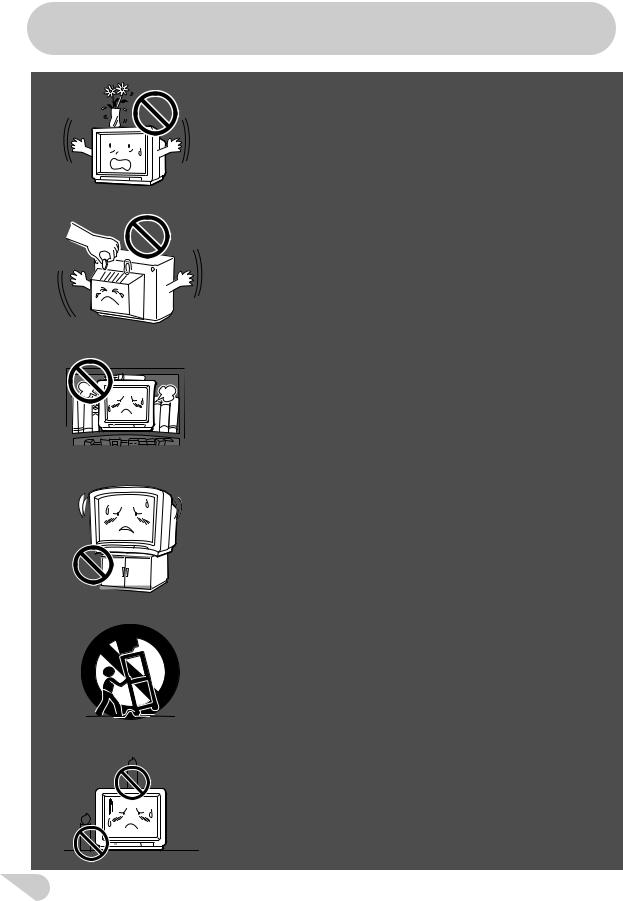
Do not place a flower vase or anything else containing liquid on the TV set, as liquid spilt on the TV set can cause electrical shock or failure.
Object entry
Never insert or drop any metallic or inflammable objects into the ventilation openings of the TV set, as this can cause fire, electrical shock, or electrical failure.
Ventilation
Do not place this TV set in a confined area, such as on a bookshelf or in a built-in case. Leave adequate space behind the TV for proper ventilation.
TV Set position
Do place the TV set onto an even stand, table or track which size is bigger than the TV set.
If the TV set is put onto a smaller size or uneven stand, table or track may cause the TV cabinet distort.
Do not put or insert anything between TV set and the stand, table or track.
Uneven surface and excessive force
Television equipment and cart combination should be moved with care. Quick stops, excessive force, and uneven surfaces may cause the equipment and cart combination to overturn.
Fire prevention
To prevent fire, never place any type of candle or naked flames on the top or near the TV set.
E 5
Part names
The  mark indicates the page numbers with more detailed information.
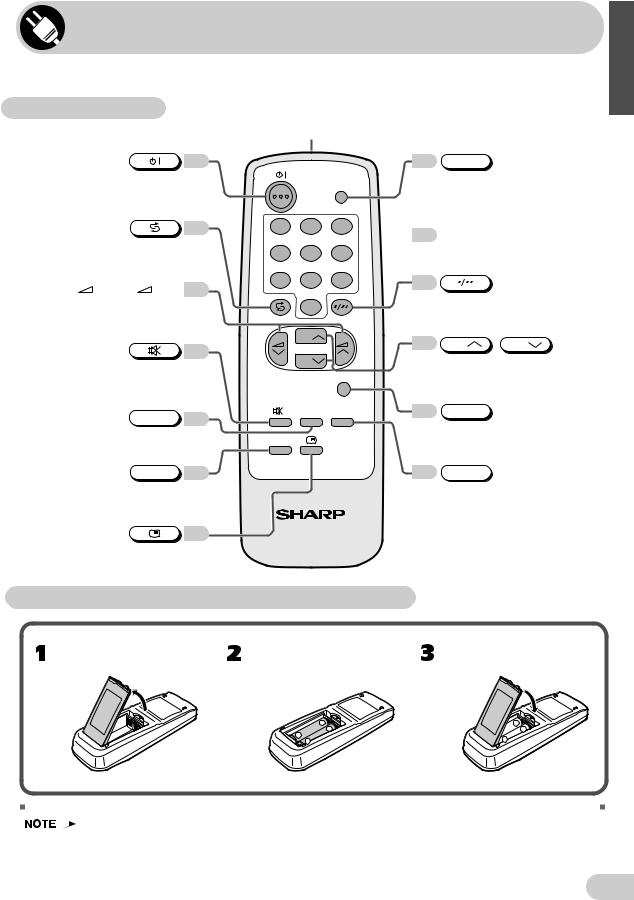
 Remote control
8
Turns the TV on or to
Standby mode.
11
Returns to previously viewed channel.
 /
/ 8
8
Adjusts the volume.
Used for MENU setup.
10
Mutes the sound and restores sound to previous level.
SURROUND 19
Produces a more spacious sound.
LANGUAGE 13
Changes the on-screen display language.
10
Infrared transmitter window
Aim this window at the infrared sensor window on your TV set.
11 TV/VIDEO
Switches between TV broadcasts
TV/VIDEO |
and A/V input programmes. |
|
1 2 3
 8 Number buttons
4 5 6
7 |
8 |
9 |
8 |
|
|
|
0 |
|
|
Switches between oneor two-digit |
|
|
|
|
mode channel selection. |
||
|
|
|
|
||
|
CH |
|
8 |
CH |
/ CH |
|
|
|
|||
|
CH |
|
|
Selects the channel. |
|
|
|
MENU |
|
Used for MENU setup. |
|
|
|
|
|
|
|
|
SURROUND NORMAL |
12 |
MENU |
|
|
|
|
|
|
Calls the MENU screen. |
|
LANGUAGE |
|
|
|
|
|
|
|
|
17 |
NORMAL |
|
|
|
|
|
Resets all settings. |
|
TV
Displays the channel and timer settings on the screen.
ENGLISH
 Installing batteries in the remote control unit
|
|
|
|
|
|
With your thumbnail, pull |
|
|
|
|
|
Insert two batteries |
|
|
|
|
|
Replace the battery cover. |
|||||||||||||||||||||||||||||||||||||||||||||||||||||||||||||||||||||||||||||||||||||
|
|
|
|
|
|
up at the slit to open the |
|
|
|
|
|
(size AA). |
|
|
|
|
|
|
|
|
|
|
|
|
|
|
|
|
|
|
|
|
|
|
|
|
|
|
|
|
|
|
|
||||||||||||||||||||||||||||||||||||||||||||||||||||||||||||
|
|
|
|
|
|
battery cover. |
|
|
|
|
|
|
|
|
|
|
|
|
|
|
|
|
|
|
|
|
|
|
|
|
|
|
|
|
|
|
|
|
|
|
|
|
|
|
|
|
|
|
|
|
|
|
|
|
|
|
|
|
|
|
|
|
|
|
|
|
|
|
|
|
|
|
|
|
|||||||||||||||||||||||||||||
|
|
|
|
|
|
|
|
|
|
|
|
|
|
|
|
|
|
|
|
|
|
|
|
|
|
|
|
|
|
|
|
|
|
|
|
|
|
|
|
|
|
|
|
|
|
|
|
|
|
|
|
|
|
|
|
|
|
|
|
|
|
|
|
|
|
|
|
|
|
|
|
|
|
|
|
|
|
|
|
|
|
|
|
|
|
|
|
|
|
|
|
|
|
|
|
|
|
|
|
|
|
|
|
|
|
|
|
|
|
|
|
|
|
|
|
|
|
|
|
|
|
|
|
|
|
|
|
|
|
|
|
|
|
|
|
|
|
|
|
|
|
|
|
|
|
|
|
|
|
|
|
|
|
|
|
|
|
|
|
|
|
|
|
|
|
|
|
|
|
|
|
|
|
|
|
|
|
|
|
|
|
|
|
|
|
|
|
|
|
|
|
|
|
|
|
|
|
|
|
|
|
|
|
|
|
|
|
|
|
|
|
|
|
|
|
|
|
|
|
|
|
|
|
|
|
|
|
|
|
|
|
|
|
|
|
|
|
|
|
|
|
|
|
|
|
|
|
|
|
|
|
|
|
|
|
|
|
|
|
|
|
|
|
|
|
|
|
|
|
|
|
|
|
|
|
|
|
|
|
|
|
|
|
|
|
|
|
|
|
|
|
|
|
|
|
|
|
|
|
|
|
|
|
|
|
|
|
|
|
|
|
|
|
|
|
|
|
|
|
|
|
|
|
|
|
|
|
|
|
|
|
|
|
|
|
|
|
|
|
|
|
|
|
|
|
|
|
|
|
|
|
|
|
|
|
|
|
|
|
|
|
|
|
|
|
|
|
|
|
|
|
|
|
|
|
|
|
|
|
|
|
|
|
|
|
|
|
|
|
|
|
|
|
|
|
|
|
|
|
|
|
|
|
|
|
|
|
|
|
|
|
|
|
|
|
|
|
|
|
|
|
|
|
|
|
|
|
|
|
|
|
|
|
|
|
|
|
|
|
|
|
|
|
|
|
|
|
|
|
|
|
|
|
|
|
|
|
|
|
|
|
|
|
|
|
|
|
|
|
|
|
|
|
|
|
|
|
|
|
|
|
|
|
|
|
|
|
|
|
|
|
|
|
|
|
|
|
|
|
|
|
|
|
|
|
|
|
|
|
|
|
|
|
|
|
|
|
|
|
|
|
|
|
|
|
|
|
|
|
|
|
|
|
|
|
|
|
|
|
|
|
|
|
|
|
|
|
|
|
|
|
|
|
|
|
|
|
|
|
|
|
|
|
|
|
|
|
|
|
|
|
|
|
|
|
|
|
|
|
|
|
|
|
|
|
|
|
|
|
|
|
|
|
|
|
|
|
|
|
|
|
|
|
|
|
|
|
|
|
|
|
|
|
|
|
|
|
|
|
|
|
|
|
|
|
|
|
|
|
|
|
|
|
|
|
|
|
|
|
|
|
|
|
|
|
|
|
|
|
|
|
|
|
|
|
|
|
|
|
|
|
|
|
|
|
|
|
|
|
|
|
|
|
|
|
|
|
|
|
|
|
|
|
|
|
|
|
|
|
|
|
|
|
|
|
|
|
|
|
|
|
|
|
|
|
|
|
|
|
|
|
|
|
|
|
|
|
|
|
|
|
|
|
|
|
|
|
• Be sure to match the battery j/k terminals with the j/k marks inside the compartment.
•Remove the batteries if weak or if the unit is not in use for long periods.
•Do not mix old and new batteries.
•Incorrect installation of the batteries may damage the remote control.
E 6
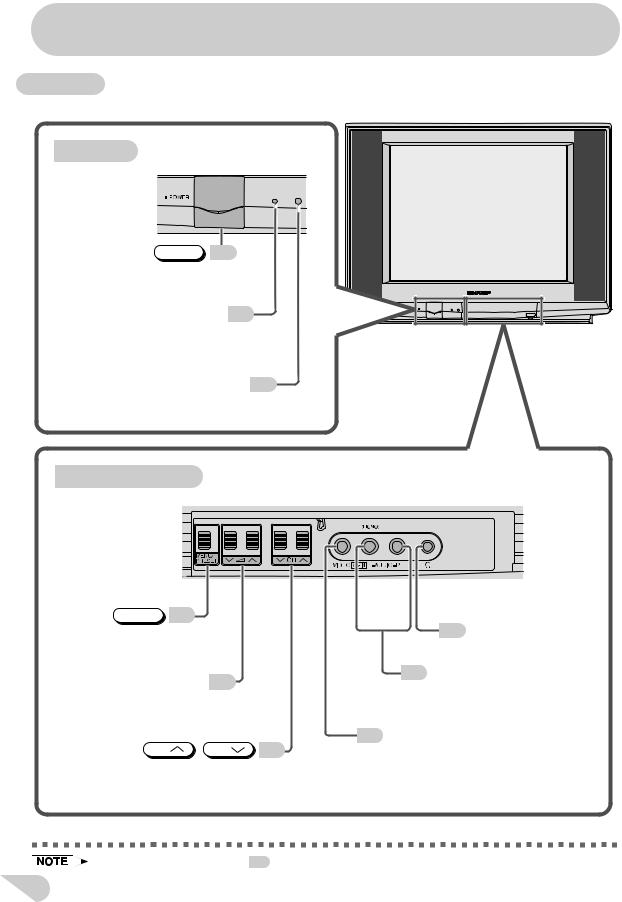
Part names
 TV set
TV front
 POWER 8
 POWER switch
Turns on and off the main power.
Power indicator 8
Power can be turned on by the remote control when the indicator is dimly.
Infrared sensor window 6
Receives the infrared wave from the remote control.
Behind the door
PULL-OPEN |
MENU/PRESET 12
MENU/PRESET button
Tunes the channels.
Used for MENU setup.
 /
/ 8
8
Volume up/down buttons
Adjusts the volume.
Makes adjustments in PRESET.
CH |
/ CH |
8 |
Channel up/down buttons
Selects the channels.
Tunes or sets the channels.
9Headphone jack
Use to listen to the audio with headphone.
26Audio input terminals (AV-2)
Connects to a camcorder, video game, etc.
26Video input terminal (AV-2)
Connects to a camcorder, video game, etc.
• When using headphone, see 9 .
E 7
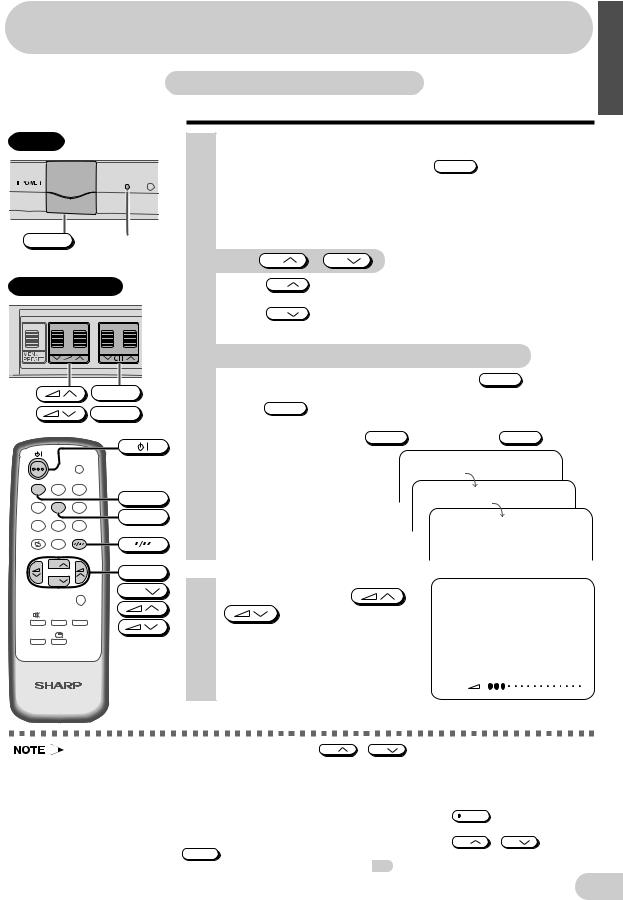
 Watching TV
 Watching a TV programme
TV Set
 POWER Power indicator
Behind the door
CH
CH
TV/VIDEO
1 2 3
1
4 5 6
5
7 8 9
0
CH
CH
CH
MENU |
CH |
SURROUND NORMAL
LANGUAGE
TV
Simple operations for watching a TV programme
1 Turn on power.
•When the power indicator is off, press  POWER .
•When the power indicator lights up dimly, press  on the remote control. The power indicator changes to bright and a picture appears.
|
|
|
|
|
|
2 Select channel. |
|||||
|
|
With |
CH |
/ CH |
|
|
|
• Press |
CH |
and channels change as shown below. |
|
|
|
|
1 / 2 / ... / 98 / 99 / AV1 (or COMPONENT) / AV2 / 0 / 1 / 2 ... |
||
|
|
• Press |
CH |
and channels change as shown below. |
|
|
|
|
1 / 0 / AV2 / AV1 (or COMPONENT) / 99 / 98 / ... / 2 / 1 / 0 ... |
||
 With the number buttons (on remote control)
• To select a one-digit channel, such as 5, press |
5 |
. |
If “5-” is indicated, press  to select one-digit input, and then press 5 again.
• To select a two-digit channel, such as 15, press  to select
the two-digit input. Press |
1 |
, and then press |
5 |
. |
--
1-
15
PAL B/G
3 Adjust volume using |
/ |
. |
|
•The number of oval blocks “ ” indicates the volume level. The volume bar disappears
approximately three seconds after
the volume has been adjusted. |
VOLUME |
10 |
|
|
ENGLISH
• When the power indicator lights up dimly, either CH |
/ CH |
on the TV can be pressed to turn on |
the power.
•The channel number is displayed in green for channels tuned by auto tuning and displayed in yellow for channels tuned using fine tuning.
•When the power indicator lights up dimly, the TV is in Standby mode and power is still supplied to the
TV. If you will not watch TV for a while, turn off the main power by pressing |
POWER |
on the TV set. Also, |
|
if you will not be at home for a considerable length of time, unplug the cord from the outlet. |
|
||
• The AV1 (or COMPONENT), AV2 input channels cannot be selected using |
CH |
/ CH |
on the |
remote control. Use TV/VIDEO to select these channel. |
|
• Channels that have been skipped cannot be selected. See 16 . |
|
• The on-screen displays in this manual may differ from their actual appearance. |
E 8 |
|
 Loading...