


Samsung UE46D6510WQ, UE46D6540UQ, UE32D6540UQ, UE40D6500VQ, UE37D6540UQ Manual
...Contact SAMSUNG WORLDWIDE
If you have any questions or comments relating to Samsung products, please contact the SAMSUNG customer care centre.
Country |
Customer Care Centre |
Web Site |
|
|
|
ALBANIA |
42 27 5755 |
- |
AUSTRIA |
0810 - SAMSUNG (7267864, € 0.07/min) |
www.samsung.com |
BELGIUM |
02-201-24-18 |
www.samsung.com/be (Dutch) |
|
|
www.samsung.com/be_fr (French) |
BOSNIA |
05 133 1999 |
- |
BULGARIA |
07001 33 11 |
www.samsung.com |
CROATIA |
062 SAMSUNG (062 726 7864) |
www.samsung.com |
CZECH |
800 - SAMSUNG (800-726786) |
www.samsung.com |
|
Samsung Zrt., česká organizační složka, Oasis Florenc, Sokolovská394/17, 180 00, Praha 8 |
|
DENMARK |
70 70 19 70 |
www.samsung.com |
FINLAND |
030 - 6227 515 |
www.samsung.com |
FRANCE |
01 48 63 00 00 |
www.samsung.com |
GERMANY |
01805 - SAMSUNG (726-7864 € 0,14/Min) |
www.samsung.com |
GREECE |
2106293100 |
www.samsung.com |
HUNGARY |
06-80-SAMSUNG (726-7864) |
www.samsung.com |
ITALIA |
800-SAMSUNG (726-7864) |
www.samsung.com |
KOSOVO |
+381 0113216899 |
- |
LUXEMBURG |
261 03 710 |
www.samsung.com |
MACEDONIA |
023 207 777 |
- |
MONTENEGRO |
020 405 888 |
- |
NETHERLANDS |
0900-SAMSUNG (0900-7267864) (€ 0,10/Min) |
www.samsung.com |
NORWAY |
815-56 480 |
www.samsung.com |
POLAND |
0 801 1SAMSUNG (172678) |
www.samsung.com |
|
022-607-93-33 |
|
PORTUGAL |
80820-SAMSUNG (726-7864) |
www.samsung.com |
RUMANIA |
08010 SAMSUNG (08010 7267864) – doar din reţeaua |
www.samsung.com |
|
Romtelecom, tarif local; |
|
|
021.206.01.10 – din orice reţea, tarif normal |
|
SERBIA |
0700 Samsung (0700 726 7864) |
www.samsung.com |
SLOVAKIA |
0800 - SAMSUNG (0800-726 786) |
www.samsung.com/sk |
SPAIN |
902 - 1 - SAMSUNG (902 172 678) |
www.samsung.com |
SWEDEN |
0771 726 7864 (SAMSUNG) |
www.samsung.com |
Switzerland |
0848 - SAMSUNG(7267864, CHF 0.08/min) |
www.samsung.com/ch |
|
|
www.samsung.com/ch_fr/(French) |
U.K |
0330 SAMSUNG (7267864) |
www.samsung.com |
EIRE |
0818 717100 |
www.samsung.com |
LITHUANIA |
8-800-77777 |
www.samsung.com |
LATVIA |
8000-7267 |
www.samsung.com |
ESTONIA |
800-7267 |
www.samsung.com |
Turkey |
444 77 11 |
www.samsung.com |
© 2011 Samsung Electronics Co., Ltd. All rights reserved. |
BN68-03776C-00 |
|
LED TV
user manual
imagine the possibilities
Thank you for purchasing this Samsung product. To receive more complete service, please register your product at
www.samsung.com/register
Model _____________ Serial No. _____________
For more information on how to use the e-Manual (p. 14)
Figures and illustrations in this User Manual are provided for reference only and may differ from actual product appearance. Product design and specifications may be changed without notice.
Digital TV notice
1.Functionalities related to Digital TV (DVB) are only available in countries/areas where DVB-T (MPEG2 and MPEG4 AVC) digital terrestrial signals are broadcasted or where you are able to access to a compatible DVB-C (MPEG2 and MPEG4 AAC) cable-TV service. Please check with your local dealer the possibility to receive DVB-T or DVB-C signal.
2.DVB-T is the DVB European consortium standard for the broadcast transmission of digital terrestrial television and DVB-C is that for the broadcast transmission of digital TV over cable. However, some differentiated features like EPG (Electric Programme Guide), VOD (Video On Demand) and so on, are not included in this specification. So, they cannot be workable at this moment.
3.Although this TV set meets the latest DVB-T and DVB-C standards, as of [August, 2008], the compatibility with future DVB-T digital terrestrial and DVB-C digital cable broadcasts cannot be guaranteed.
4.Depending on the countries/areas where this TV set is used some cable-TV providers may charge an additional fee for such a service and you may be required to agree to terms and conditions of their business.
5.Some Digital TV functions might be unavailable in some countries or regions and DVB-C might not work correctly with some cable service providers.
6.For more information, please contact your local Samsung customer care centre.
The reception quality of TV may be affected due to differences in broadcasting method between the countries. Please check the TV performance in the local SAMSUNG Authorized Dealer, or the Samsung Call Centre whether it can be improved by reconfiguring TV setting or not.
Still image warning
Avoid displaying still images (like jpeg picture files) or still image element (like TV programme logo, panorama or 4:3 image format, stock or news bar at screen bottom etc.) on the screen. Constant displaying of still picture can cause ghosting of LED screen, which will affect image quality. To reduce risk of this effect, please follow below recommendations:
•Avoid displaying the same TV channel for long periods.
•Always try do display any image on full screen, use TV set picture format menu for best possible match.
•Reduce brightness and contrast values to minimum required to achieve desired picture quality, exceeded values may speed up the burnout process.
•Frequently use all TV features designed to reduce image retention and screen burnout, refer to e-Manual for details.
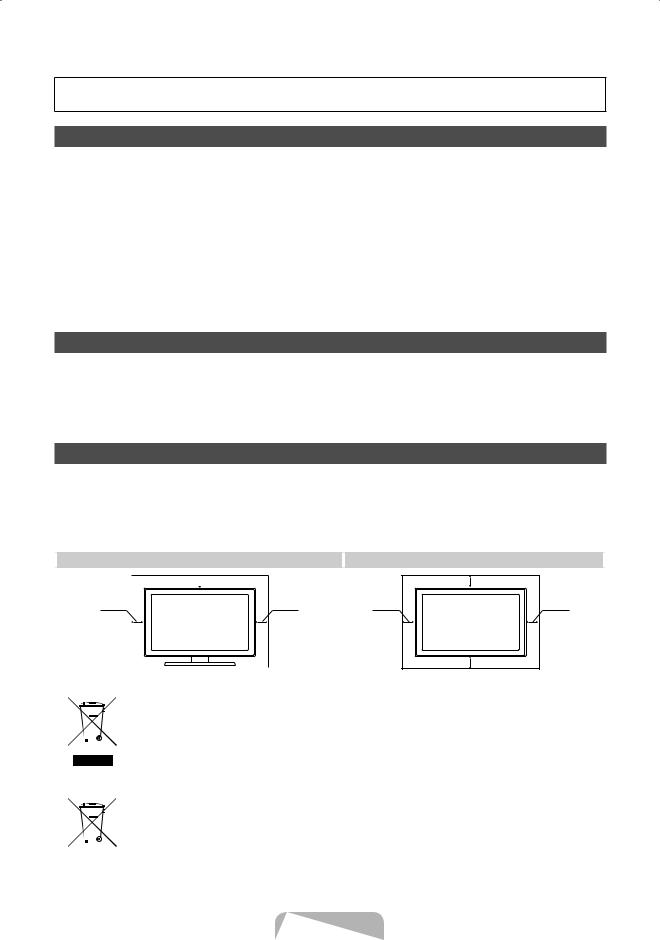
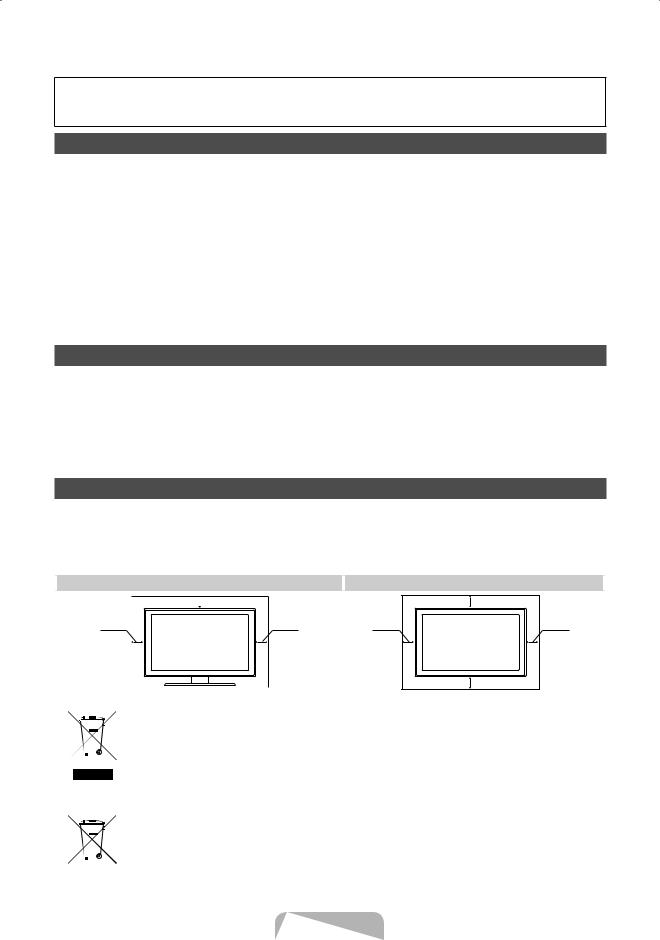
Securing the Installation Space
Keep the required distances between the product and other objects (e.g. walls) to ensure proper ventilation.
Failing to do so may result in fire or a problem with the product due to an increase in the internal temperature of the product.
When using a stand or wall-mount, use parts provided by Samsung Electronics only.
• If you use parts provided by another manufacturer, it may result in a problem with the product or an injury due to the product falling.
|
|
The appearance may differ depending on the product. |
|
• Be careful when you contact the TV because some parts can be somewhat hot. |
|
Installation with a stand. |
Installation with a wall-mount. |
 10 cm
10 cm
10 cm |
10 cm |
|
10 cm |
10 cm |
10 cm |
|
10 cm |
Correct Disposal of This Product (Waste Electrical & Electronic Equipment)
(Applicable in the European Union and other European countries with separate collection systems)
This marking on the product, accessories or literature indicates that the product and its electronic accessories (e.g. charger, headset, USB cable) should not be disposed of with other household waste at the end of their working life. To prevent possible harm to the environment or human health from uncontrolled waste disposal, please separate these items from other types of waste and recycle them responsibly to promote the sustainable reuse of material resources. Household users should contact either the retailer where they purchased this product, or their local government office, for details of where and how they can take these items for environmentally safe recycling. Business users should contact their supplier and check the terms and conditions of the purchase contract. This product and its electronic accessories should not be mixed with other commercial wastes for disposal.
Correct disposal of batteries in this product
(Applicable in the European Union and other European countries with separate battery return systems)
This marking on the battery, manual or packaging indicates that the batteries in this product should not be disposed of with other household waste at the end of their working life. Where marked, the chemical symbols Hg, Cd or Pb indicate that the battery contains mercury, cadmium or lead above the reference levels in EC Directive 2006/66. If batteries are not properly disposed of, these substances can cause harm to human health or the environment. To protect natural resources and to promote material reuse, please separate batteries from other types of waste and recycle them through your local, free battery return system.
English - 2
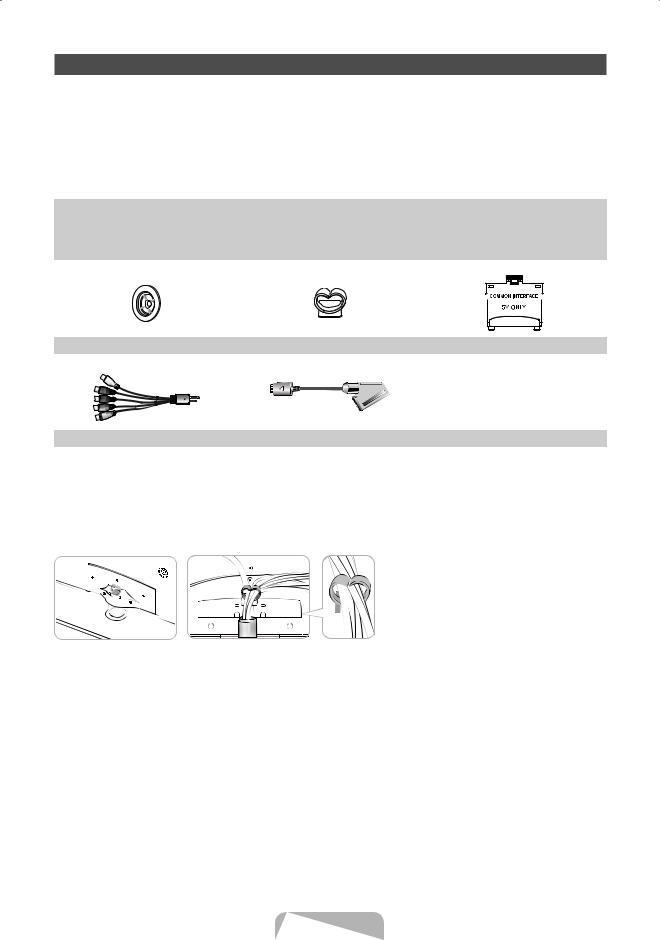
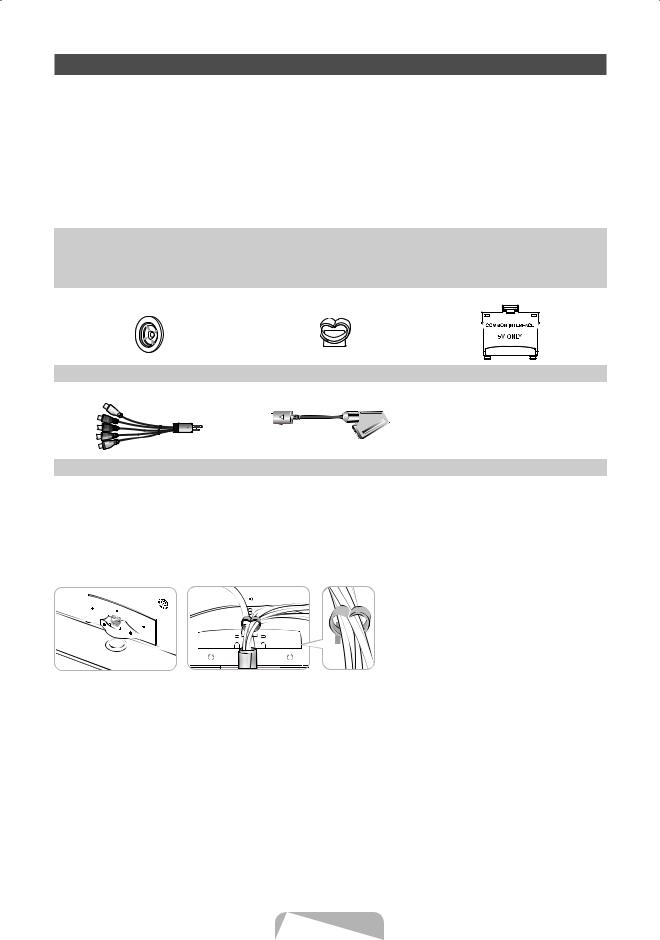
Accessories
Please make sure the following items are included with your TV. If any items are missing, contact your dealer.
The items’ colours and shapes may vary depending on the models.Cables not included in the package contents can be purchased separately.
Check that there is no accessory hidden behind packing materials when you open the box. |
||||
[[ |
|
|
|
|
|
CAUTION: INSERT SECURELY LEST SHOULD BE DETACHED IN SET |
|||
•• |
Remote Control & Batteries (AAA x 2) |
•• Cleaning-Cloth |
||
•• |
Owner’s Instructions |
•• Power cord |
||
•• |
Warranty Card (Not available in some locations) / Safety Guide |
|||
|
|
|
|
|
|
|
|
|
|
|
|
|
|
|
|
|
|
|
|
|
|
|
|
|
|
|
|
|
|
|
|
|
|
|
|
|
|
|
|
|
|
|
|
|
|
|
|
|
|
|
|
|
|
|
|
|
|
|
|
|
|
|
|
|
|
|
|
|
|
|
|
|
|
|
|
|
|
|
|
|
|
|
|
|
|
|
|
Holder Ring (4 EA) |
Holder-Wire Stand |
CI Card Adapter |
||||||||||
|
|
|
|
|
|
|
|
|
|
|
|
|
|
|
|
|
|
|
|
|
|
|
|
|
|
AV / Component Adapter |
Scart Adapter |
An administration fee may be charged if either |
|
––(a) an engineer is called out at your request and there is no defect in the product (i.e. where you have failed to read this user manual)
––(b) you bring the unit to a repair centre and there is no defect in the product (i.e. where you have failed to read this user manual).
•The amount of such administration charge will be advised to you before any work or home visit is carried out.
Assembling the Holder-Wire stand
English - 3

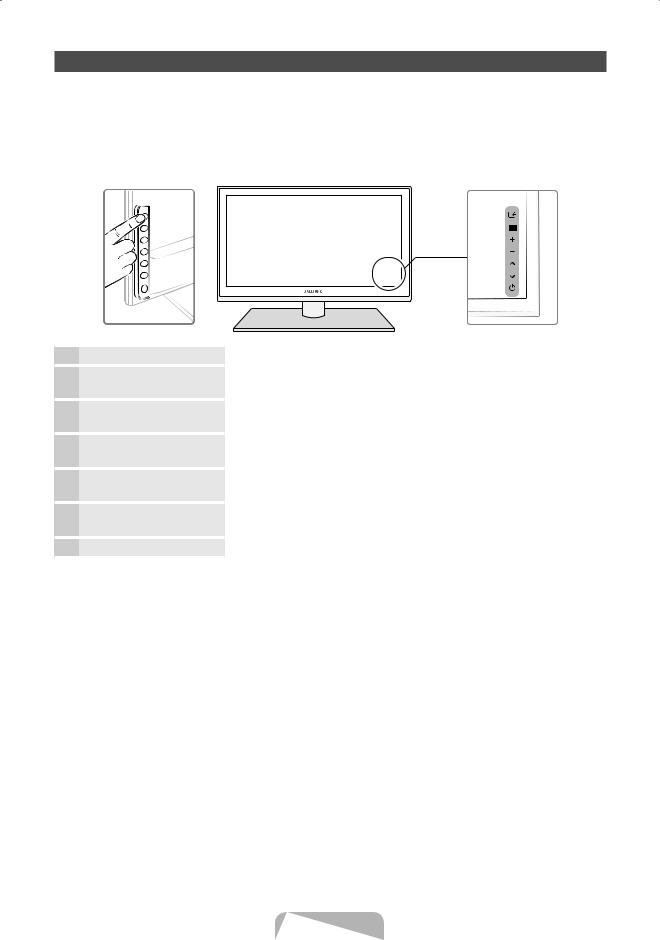
Viewing the Control Panel
The product colour and shape may vary depending on the model.
There are control buttons in rear of TV. When you touch the button, control icons appears.
Any object (an electric wire, etc.) near the control panel may cause unintended activation of the OSD.Press the POWER button a little longer when you turn off the TV.
TV Rear
Remote control sensor |
Aim the remote control towards this spot on the TV. |
Power Indicator |
Blinks and turns off when the power is on and lights up in standby mode. |
E (Source) |
Toggles between all the available input sources. In the on-screen menu, use |
|
this button as you would use the ENTERE button on the remote control. |
m (Menu) |
Displays an on-screen menu, the OSD (on screen display) of your TV’s |
|
features. |
o (Volume) |
Adjusts the volume. In the OSD, use the wv buttons as you would use the |
|
◄ and ► buttons on the remote control. |
k (Channel) |
Changes the channels. In the OSD, use the <> buttons as you would |
|
use the ▲ and ▼ buttons on the remote control. |
P (Power) |
Turns the TV on or off. |
Standby mode
Do not leave your TV in standby mode for long periods of time (when you are away on a holiday, for example). A small amount of electric power is still consumed even when the power button is turned off. It is best to unplug the power cord.
English - 4

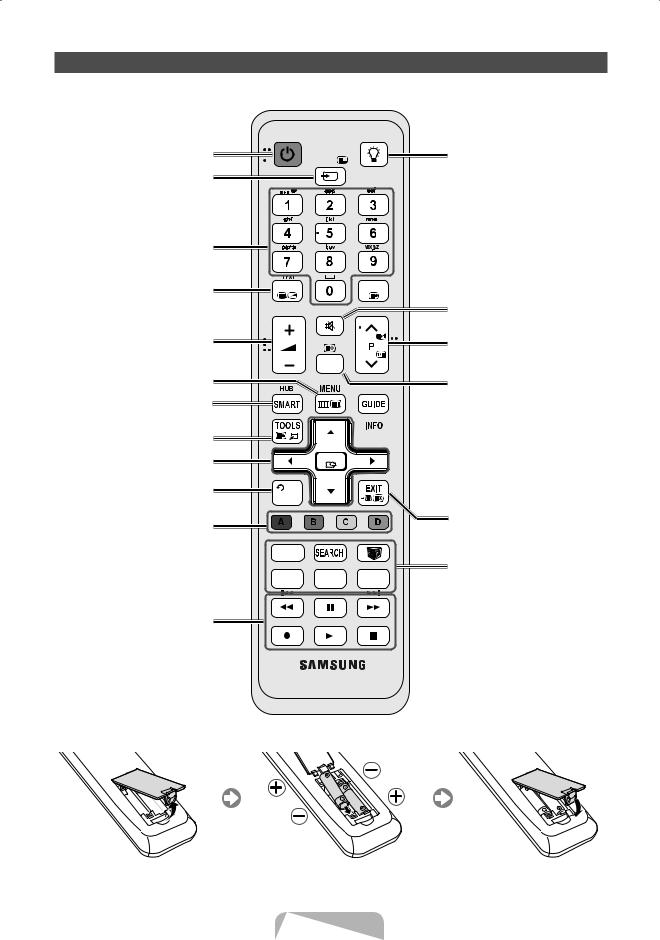
Viewing the Remote Control
This is a special remote control for the visually impaired persons and has Braille points on the Power, Channel and Volume buttons.
Turns the TV on and off.
Displays and selects the available video sources.
Have direct access to channels.
Alternately select Teletext ON, Double, Mix or OFF.
Adjusts the volume.
Opens the OSD.
Link to various application services.
Quickly select frequently used functions.
Selects the on-screen menu items and changes the values seen on the menu.
Returns to the previous menu.
These buttons are for the Channel Manager, SMART HUB menu, etc.
Use these buttons in a specific feature. For details, refer to e-Manual.
POWER
SOURCE
TTX/MIX
MUTE
CH LIST
OK
RETURN
 BACK
BACK
TV
SOCIAL
E-MANUAL D
ON/OFF
 Turns the remote control light on or off. When on, the buttons become illuminated for a moment when pressed. (Using the remote control with this button set to On will reduce the battery usage time.)
PRE-CH  Returns to the previous channel.
Cuts off the sound temporarily.
Changes channels.
Displays channel lists on the screen.
Displays the EPG (Electronic Programme
Guide).
Displays information on the TV screen.
u/d/l/r : Move the cursor on-screen menu item.
ENTERE: Selects the menu and changes the corresponding item value.
Exits the on-screen menu.
 SOCIAL TV: Displays the Social TV
AD/SUBT. screen.
SEARCH: Support to recommendation search word and search function.
W: Sets the video, which provided with 3D signal.
E-MANUAL: Displays the e-Manual.
D: Use this button when using data broadcast service.
AD/SUBT.: Turns the audio description on and off. This is not available in some locations. / Displays digital subtitles.
Installing batteries (Battery size: AAA)
English - 5
Changing the Input Source
Source
Use to select TV or an external input |
SOURCE |
sources such as a DVD / Blu-ray player / |
|
cable box / STB satellite receiver. |
|
■■ TV / Ext. / PC / AV / Component / HDMI1/DVI / HDMI2 / HDMI3 / HDMI4 / USB / AllShare
In the Source, connected inputs will be highlighted.
Ext. and PC always stay activated.
If the connected external devices are not highlighted, press the red button. The TV will search for connected devices.
Edit Name
In the Source, press the TOOLS button, and then you can set an external input sources name you want.
■■ VCR / DVD / Cable STB / Satellite STB / PVR STB / AV Receiver / Game / Camcorder / PC
/DVI PC / DVI Devices / TV / IPTV / Blu-ray
/HD DVD / DMA: Name the device connected to the input jacks to make your input source selection easier.
When connecting a PC to the HDMI IN 1(DVI) port with HDMI cable, you should set the TV to PC mode under Edit Name.
When connecting a PC to the HDMI IN 1(DVI) port with HDMI to DVI cable, you should set the TV to DVI PC mode under Edit Name.
When connecting an AV devices to the HDMI IN 1(DVI) port with HDMI to DVI cable, you should set the TV to DVI Devices mode under Edit Name.
Edit Favourites
In the Source, press the TOOLS button to select Edit Favourites. You can set an external input source to Favorites.
Information
You can see detailed information about the selected external device.
Refresh
In the Source, If the external devices are not displayed, press the TOOLS button to select Refresh. Search for connected devices.
For best cable connection to this product, be sure to use cables with a maximum thickness as below:
•• Maximum thickness - 0.55 inches (14mm)
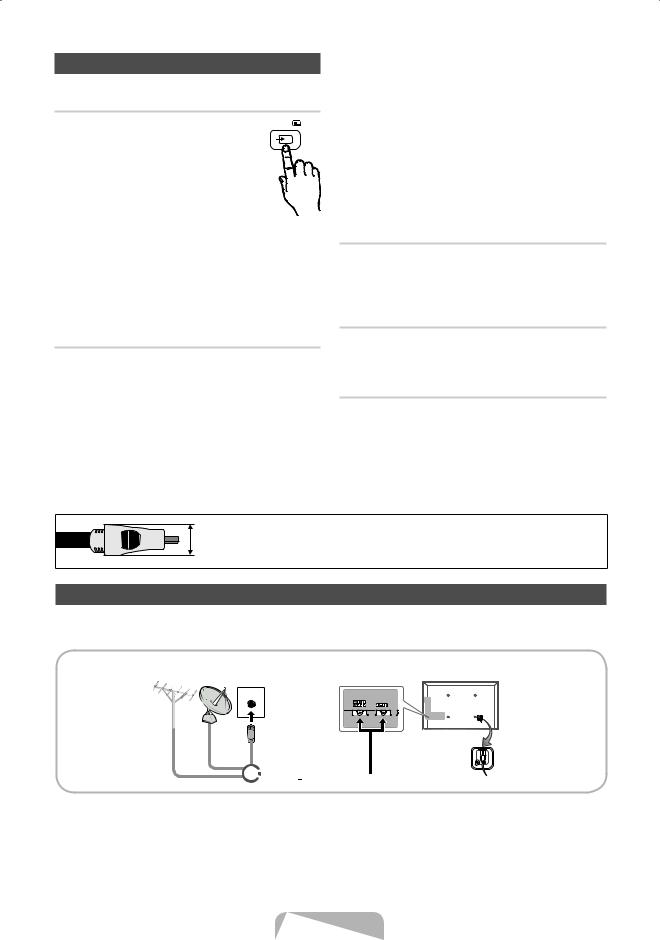
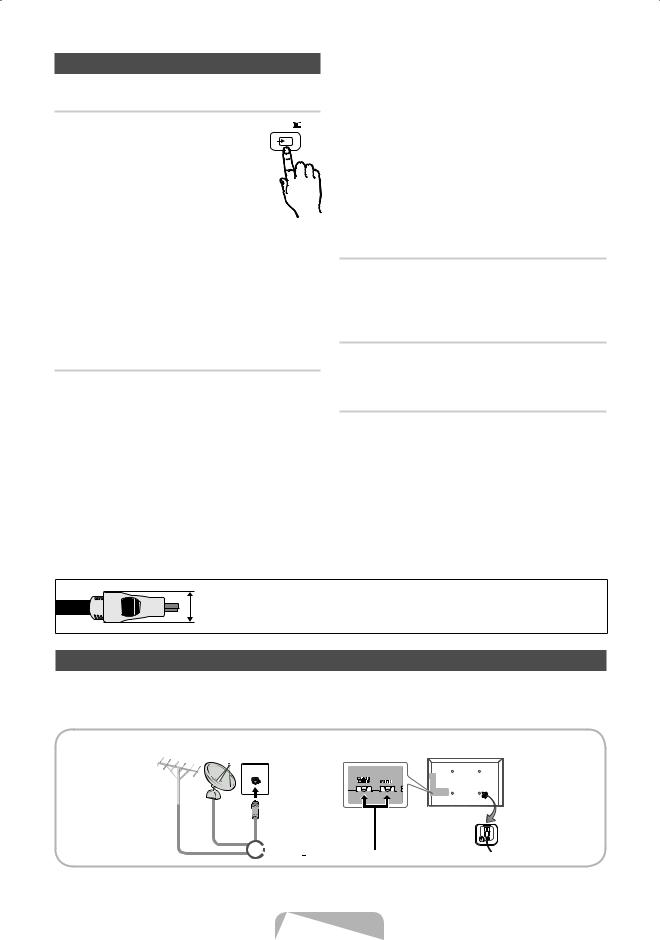
Connecting to an Antenna
When the TV is initially powered on, basic settings proceed automatically.Preset: Connecting the mains and antenna.
VHF/UHFAntenna Satellite Cable
or


English - 6

Plug & Play (Initial Setup)
When the TV is initially powered on, a sequence of on-screen prompts will assist in configuring basic settings. Press the POWERP button. Plug & Play is available only when the Input source is set to TV.
Before turning on the TV, make sure the antenna cable is connected (p. 6).The option may differ depending on country.
1 Selecting the OSD Language
2 Setting up the Network
3 Software upgrade
4 Selectingmode the usage
5 Selecting a country
(Depending on the country)
6 SettingMode the Clock
7 Selecting search options for auto tuning
8 Enjoy your TV.
Press the ▲ or ▼ button, then press the ENTERE button. Select the desired OSD (On Screen Display) language.
Set up your network connection. Press the ENTERE button to start. If you do not know your network set up information or want to set to it later, select Skip. We suggest you skip network connection setup now and refer to “Network menu” in the e-Manual for set up requirements and instructions, and the Network Connection section of this manual (Page 13).
You can set up the network connection later using the Network menu.
When network connection settings are complete, Software Upgrade is available. Select Next to upgrade TV software. Your TV will automatically upgrade, if your TV need a software upgrade. If you want to upgrade later, select the Skip. For more information, refer to "Software Upgrade" (Preference → Support) in the e-Manual.
This may take some time, depending on network status.
Press the ▲ or ▼ button to select Home Use, and then press the ENTERE button twice.
Select the Home Use mode. Store Demo mode is for retail environments. Press the ▲ or ▼ button, then press the ENTERE button.
Select the appropriate country.
After selecting the country in the Country menu, some models may proceed with an additional option to setup the pin number.
When you input the PIN number, “0-0-0-0” is not available.
The option may differ depending on country. Set the Clock Mode automatically or manually.
Press the ▲ or ▼ button, then press the ENTERE button. Select the channel source to memorise. When setting the antenna source to Cable, a step appears allowing you to assign numerical values (channel frequencies) to the channels.
For more information, refer to Channel - Memorising Channels - Auto Tuning.
When Aerial or Cable is selected first: After all Aerial or Cable channels are stored, the step for storing Satellite channels is displayed.
When Satellite is selected first: After all Satellite channels are stored, the step for storing Aerial or Cable channels is displayed.
Press the ENTERE button at any time to interrupt the memorisation process.
If you want to watch a broadcast program, select Close. If you want to enjoy the Smart Hub, select the Smart Hub. The Smart Hub will start. For more detailed information, refer to “Smart Hub” in the e-Manual.
If You Want to Reset This Feature...
Select System - Plug & Play (Initial Setup). Enter your 4 digit PIN number. The default PIN number is “0-0-0-0.” If you want to change the PIN number, use the Change PIN function.
You should do Plug & Play (MENU → System) again at home although you did in shop.
If you forget the PIN code, press the remote control buttons in the following sequence in Standby mode, which resets the PIN to “0-0-0-0”: MUTE → 8 → 2 → 4 → POWER (on).
English - 7
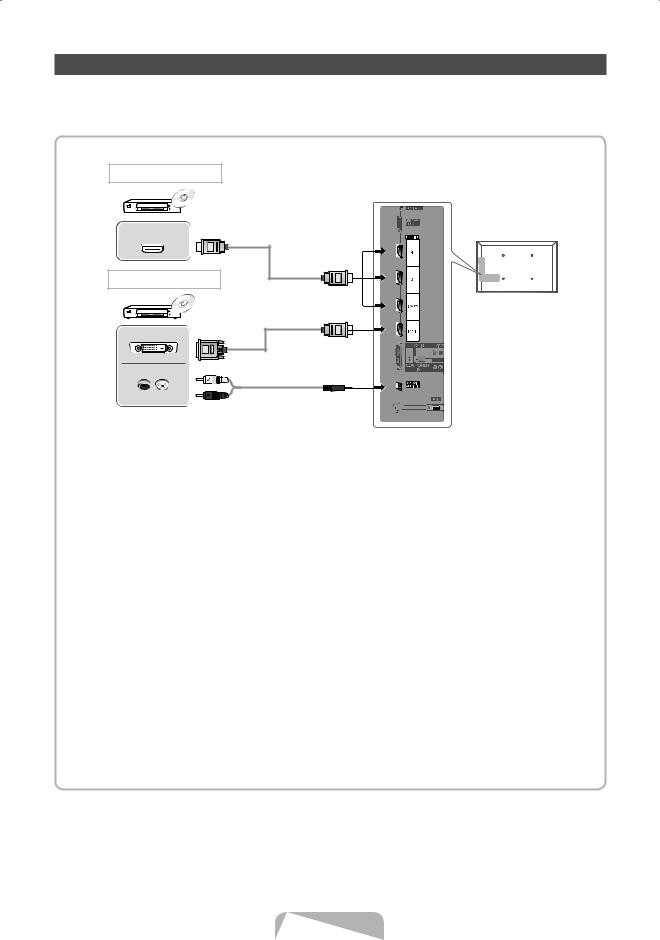
Connecting to an AV devices
¦¦Available devices: DVD, Blu-ray player, HD cable box, HD STB (Set-Top-Box) satellite receiver, VCR
HDMI connection
HDMI OUT
HDMI to DVI connection
DVI OUT
AUDIO OUT
R-AUDIO-L
Using an HDMI or an HDMI to DVI cable (up to 1080p)
HDMI IN 1(DVI), 2(ARC), 3, 4 / PC/DVI AUDIO IN
xx For better picture and audio quality, connect to a digital device using an HDMI cable.
xx An HDMI cable supports digital video and audio signals, and does not require an audio cable.
––To connect the TV to a digital device that does not support HDMI output, use an HDMI/DVI and audio cables.
xx The picture may not display normally (if at all) or the audio may not work if an external device that uses an older version of HDMI mode is connected to the TV. If such a problem occurs, ask the manufacturer of the external device about the HDMI version and, if out of date, request an upgrade.
xx Be sure to use an HDMI cable with a thickness of 14 mm or less.
xx Be sure to purchase a certified HDMI cable. Otherwise, the picture may not display or a connection error may occur.
xx A basic high-speed HDMI cable or one with ethernet is recommended. This product does not support the ethernet function via HDMI.
xx This product supports the 3D and ARC (Audio Return Channel) functions via an HDMI cable. Note that the ARC function is supported by the HDMI IN 2(ARC) port only.
xx The ARC function allows digital audio to output via the HDMI IN 2(ARC) port. It can be enabled only when the TV is connected with an audio receiver that supports the ARC function.
English - 8
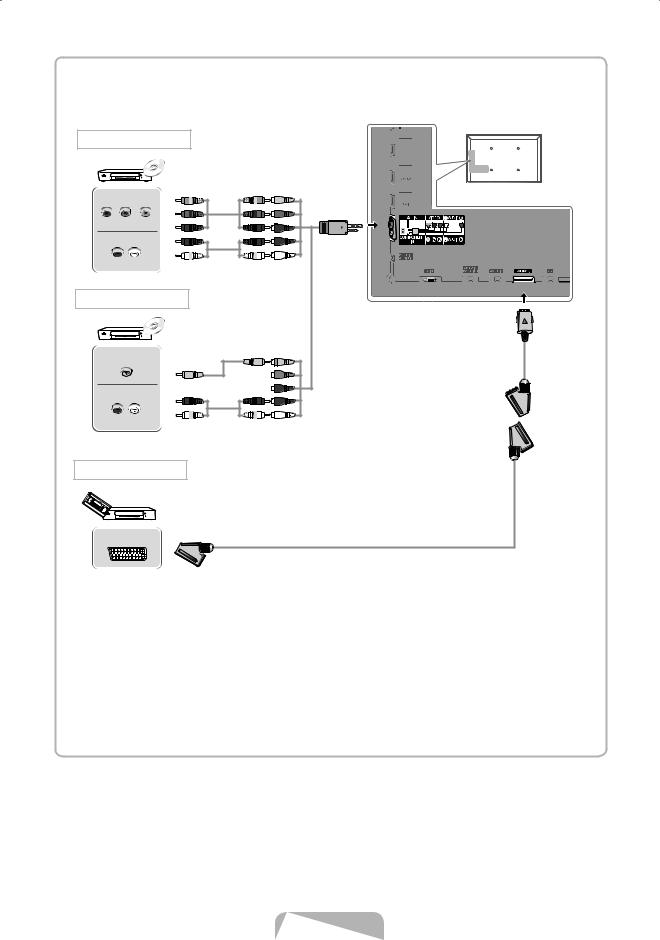
Component connection
COMPONENT OUT
PR PB Y
AUDIO OUT
R-AUDIO-L
G |
G |
B |
B |
R |
R |
R |
R |
W |
W |
AV connection
VIDEO OUT
AUDIO OUT
R-AUDIO-L
Y |
Y |
R |
R |
W |
W |
SCART connection
EXT
Using a Component (up to 1080p) or an Audio/Video (480i only) and a Scart Cable
In Ext. mode, DTV Out supports MPEG SD Video and Audio only.
When connecting to AV IN, the colour of the AV IN [VIDEO] jack (green) will not match the video cable (yellow).
To obtain the best picture quality, the Component connection is recommended over the A/V connection.
English - 9
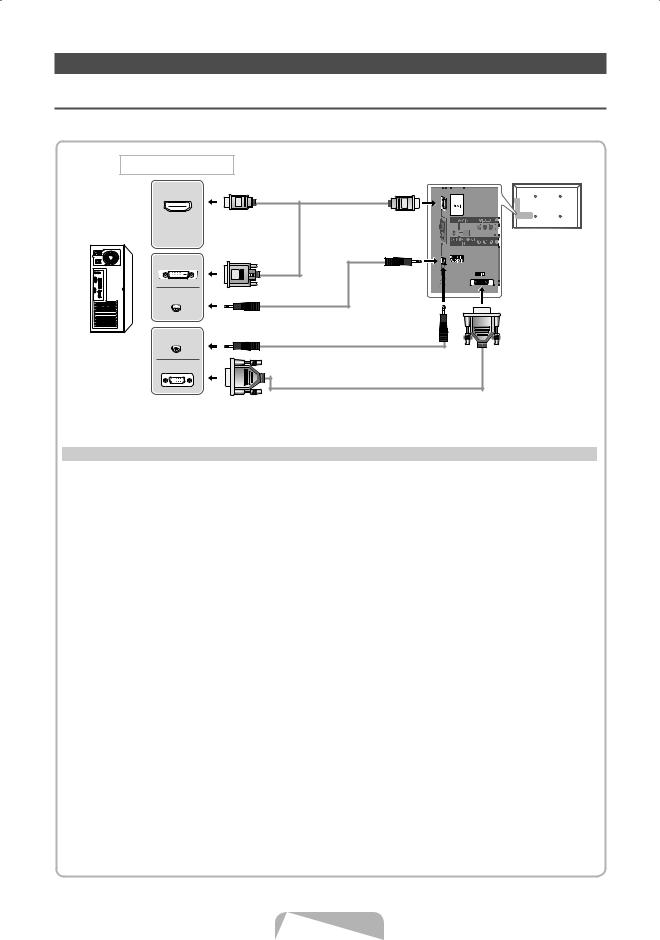
Connecting to a PC and Audio device
¦¦ Using an HDMI cable or an HDMI to DVI cable or a D-sub cable
Connecting through the HDMI cable may not be supported depending on the PC.
PC connection
HDMI OUT
DVI OUT
AUDIO OUT
AUDIO OUT
PC OUT
Display Modes (D-Sub and an HDMI to DVI Input)
Optimal resolution is 1920 X 1080 @ 60 Hz.
Mode |
Resolution |
Horizontal Frequency (KHz) |
Vertical Frequency (Hz) |
Pixel Clock Frequency (MHz) |
Sync Polarity (H / V) |
|
|
|
|
|
|
|
|
IBM |
640 x 350 |
31.469 |
70.086 |
25.175 |
+/- |
|
720 x 400 |
31.469 |
70.087 |
28.322 |
-/+ |
||
|
||||||
|
640 x 480 |
35.000 |
66.667 |
30.240 |
-/- |
|
MAC |
832 x 624 |
49.726 |
74.551 |
57.284 |
-/- |
|
|
1152 x 870 |
68.681 |
75.062 |
100.000 |
-/- |
|
|
|
|
|
|
|
|
|
640 x 480 |
31.469 |
59.940 |
25.175 |
-/- |
|
|
640 x 480 |
37.861 |
72.809 |
31.500 |
-/- |
|
|
640 x 480 |
37.500 |
75.000 |
31.500 |
-/- |
|
|
800 x 600 |
37.879 |
60.317 |
40.000 |
+/+ |
|
|
800 x 600 |
48.077 |
72.188 |
50.000 |
+/+ |
|
|
800 x 600 |
46.875 |
75.000 |
49.500 |
+/+ |
|
|
1024 x 768 |
48.363 |
60.004 |
65.000 |
-/- |
|
|
1024 x 768 |
56.476 |
70.069 |
75.000 |
-/- |
|
|
1024 x 768 |
60.023 |
75.029 |
78.750 |
+/+ |
|
VESA DMT |
1152 x 864 |
67.500 |
75.000 |
108.000 |
+/+ |
|
|
1280 x 1024 |
63.981 |
60.020 |
108.000 |
+/+ |
|
|
1280 x 1024 |
79.976 |
75.025 |
135.000 |
+/+ |
|
|
1280 x 800 |
49.702 |
59.810 |
83.500 |
-/+ |
|
|
1280 x 800 |
62.795 |
74.934 |
106.500 |
-/+ |
|
|
1280 x 960 |
60.000 |
60.000 |
108.000 |
+/+ |
|
|
1360 x 768 |
47.712 |
60.015 |
85.500 |
+/+ |
|
|
1440 x 900 |
55.935 |
59.887 |
106.500 |
-/+ |
|
|
1440 x 900 |
70.635 |
74.984 |
136.750 |
-/+ |
|
|
1680 x 1050 |
65.290 |
59.954 |
146.250 |
-/+ |
|
|
|
|
|
|
|
|
VESA DMT / |
1920 x 1080p |
67.500 |
60.000 |
148.500 |
+/+ |
|
DTV CEA |
||||||
|
|
|
|
|
NOTE
xx For HDMI/DVI cable connection, you must use the HDMI IN 1(DVI) jack. xx The interlace mode is not supported.
xx The set might operate abnormally if a non-standard video format is selected.
xx Separate and Composite modes are supported. SOG(Sync On Green) is not supported.
English - 10
¦¦ Available devices: digital audio system, amplifier, home theatre
Audio connection
OPTICAL
Headphones connection
Using an Optical (Digital) or a Headphone Connection
DIGITAL AUDIO OUT (OPTICAL)
xx When a digital audio system is connected to the DIGITAL AUDIO OUT (OPTICAL) jack, decrease the volume of both the TV and the system.
xx 5.1 CH (channel) audio is available when the TV is connected to an external device supporting 5.1 CH.
xx When the receiver (home theatre) is set to on, you can hear sound output from the TV’s optical jack. When the TV is receiving a DTV signal, the TV will send 5.1 CH sound to the home theatre receiver. When the source is a digital component such as a DVD / Blu-ray player / cable box / STB (Set-Top- Box) satellite receiver and is connected to the TV via HDMI, only 2 CH audio will be heard from the home theatre receiver. If you want to hear 5.1 CH audio, connect the digital audio out jack from your DVD / Blu-ray player / cable box / STB satellite receiver directly to an amplifier or home theatre.
Headphones H: You can connect your headphones to the headphones output on your set. While the headphones are connected, the sound from the built-in speakers will be disabled.
xx Sound function may be restricted when connecting headphones to the TV. xx Headphone volume and TV volume are adjusted separately.
English - 11
Connecting to a COMMON INTERFACE slot
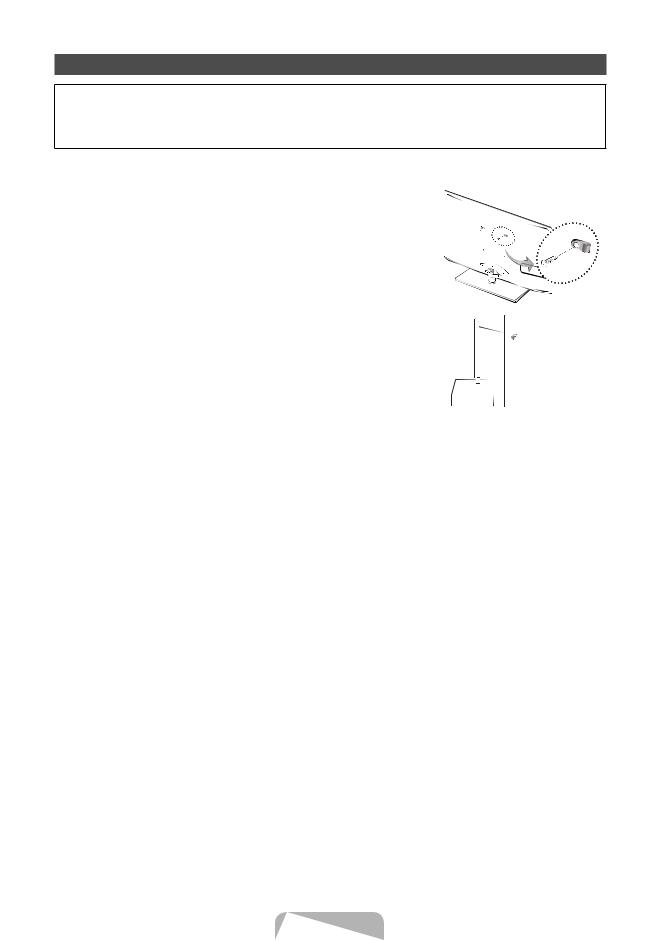
Attaching the CI Card Adapter
Attach the adapter as shown below.
To connect the CI CARD Adapter, follow these steps.
We recommend attaching the adapter before installing the wall mount, or inserting the “CI or CI+ CARD.”
1. Insert the CI CARD Adapter into the two holes on the |
TV Rear |
|
|
product 1. |
|
Please find a two holes on the rear of the TV. A two holes is beside the COMMON INTERFACE port.
2.Connect the CI CARD Adapter into the COMMON INTERFACE port on the product 2.
3.Insert the “CI or CI+ CARD”.
We recommand that you insert the CI card before you mount the TV on a wall.
It may be difficult to insert after the mounting.
Insert the card after attaching the CI CARD Adapter, on TV.
It is difficult to attach the module if you insert the card before attaching.
Using the “CI or CI+ CARD”
To watch paid channels, the “CI or CI+ CARD” must be inserted.
•• If you don’t insert the “CI or CI+ CARD,” some channels will display the message “Scrambled Signal”.
•• The pairing information containing a telephone number, the “CI or CI+ CARD” ID the Host ID and other information will be displayed in about 2~3 minutes. If an error message is displayed, please contact your service provider.
•• When the configuration of channel information has finished, the message “Updating Completed” is displayed, indicating the channel list is updated.
NOTE
xx You must obtain a “CI or CI+ CARD” from a local cable service provider.
xx When removing the “CI or CI+ CARD”, carefully pull it out with your hands since dropping the “CI or CI+ CARD” may cause damage to it.
xx Insert the “CI or CI+ CARD” in the direction marked on the card.
xx The location of the COMMON INTERFACE slot may be different depending on the model.
xx “CI or CI+ CARD” is not supported in some countries and regions; check with your authorized dealer. xx If you have any problems, please contact a service provider.
xx Insert the “CI or CI+ CARD” that supports the current antenna settings. The screen will be distorted or will not be seen.
English - 12
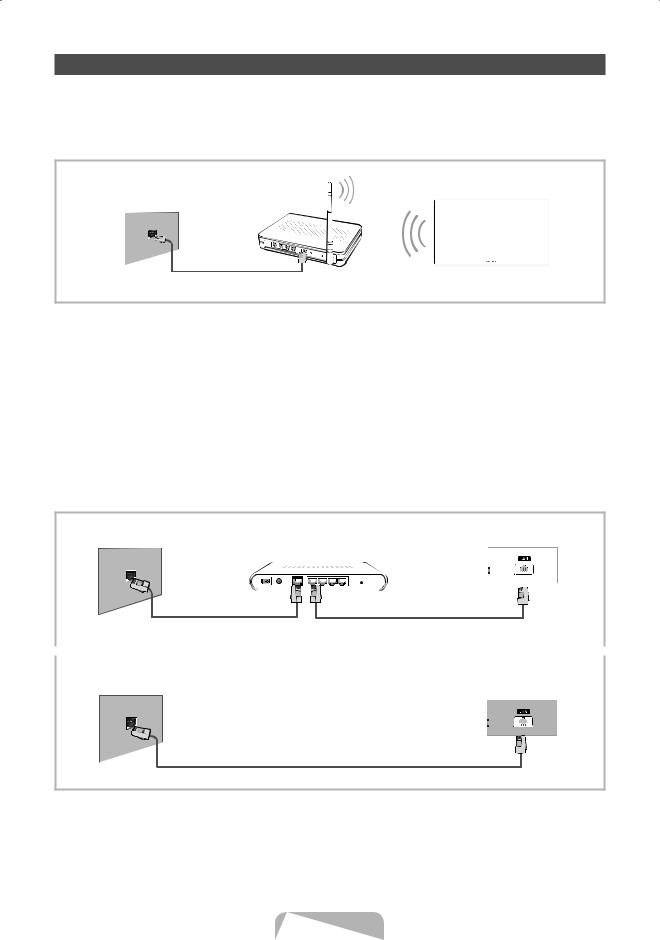
Network Connection
You can connect your TV to your LAN through a standard wireless router or modem. You can use a wireless network to use the Samsung Wireless LAN Adapter where is built-in the TV.
Network Connection - Wireless
You can connect your TV to your LAN through a standard wireless router or modem.
The LAN Port on |
Wireless IP sharer |
TV |
|
(router having DHCP server) |
|||
the Wall |
|
||
|
|
LAN Cable
Samsung’s Wireless LAN adapter supports the IEEE 802.11a/b/g and n communication protocols. Samsung recommends using IEEE 802.11n. When you play the video over a IEEE 802.11b/g connection, the video may not play smoothly.
Most wireless network systems incorporate a security system that requires devices that access the network through an access point or wireless router (typically a wireless IP Sharer) to transmit an encrypted security code called an access key.
If Pure High-throughput (Greenfield) 802.11n mode is selected and the Encryption type is set to WEP, TKIP or TKIP AES (WPS2Mixed) for your wireless router, Samsung TVs will not support a connection in compliance with new Wi-Fi certification specifications.
Network Connection - Wired
There are two main ways to connect your TV to your network using cable, depending on your network setup. They are illustrated below:
The Modem Port on the Wall |
|
|
External Modem |
TV Rear Panel |
|||
|
(ADSL / VDSL / Cable TV) |
|
|||||
|
|
||||||
|
|
|
|
|
|
|
|
|
|
|
|
|
|
|
|
Modem Cable |
LAN Cable |
|
|
|
|
The LAN Port on the Wall |
TV Rear Panel |
|
LAN Cable
It is not supported when the network speed is under 10 Mbps.
English - 13

How to view the e-Manual
E-MANUAL |
You can read the introduction and instructions about the TV features stored |
|
in your TV. |
||
|
O MENUm → Support → e-Manual → ENTERE
If you want to return to e-Manual, press E-MANUAL button on remote.
You can’t use the Try Now function, if the menu is not activated.
Screen Display
TV Screen: Displays the current input  source screen.
Changing the Preset Picture Mode
Adjusting Picture Settings
Changing the Picture Size
Changing the Picture Options
Setting up the TV with Your PC
Help: Displays the e-Manual Guide  or Product guide. Press ENTERE
button.
 Change the category. Press l or r button to select category you want.
 Displays the sub-menu list. Press ENTERE button to select submenu you want.
Index: Displays index screen.
X: Exit the e-Manual.
Using the Help
Display the e-Manual Guide & the Product Guide by pressing Help.
Changing the Preset Picture Mode
You can read the introduction and instructions about |
|
the TV features stored in your TV. |
Basic Features |
O MENUm → Support → e-Manual → ENTERE |
Adjusting Picture Settings |
|
Changing the Preset Picture Mode |
|
Changing the Picture Size |
|
Changing the Picture Options |
|
Setting up the TV with Your PC |
Help |
Index |
Return
Sync media from multiple devices with AllShare
AllShare™ syncs your digital devices so you can enjoy music, movies and photos from your PC, camera and mobile devices, on your larger TV screen. Connects you to multiple PCs, as well.
Return
<e-Manual Guide>
The e-Manual guide appears as above.
<Product Guide>
The product guide appears as above.
How to toggle between the e-Manual and the corresponding menu(s).
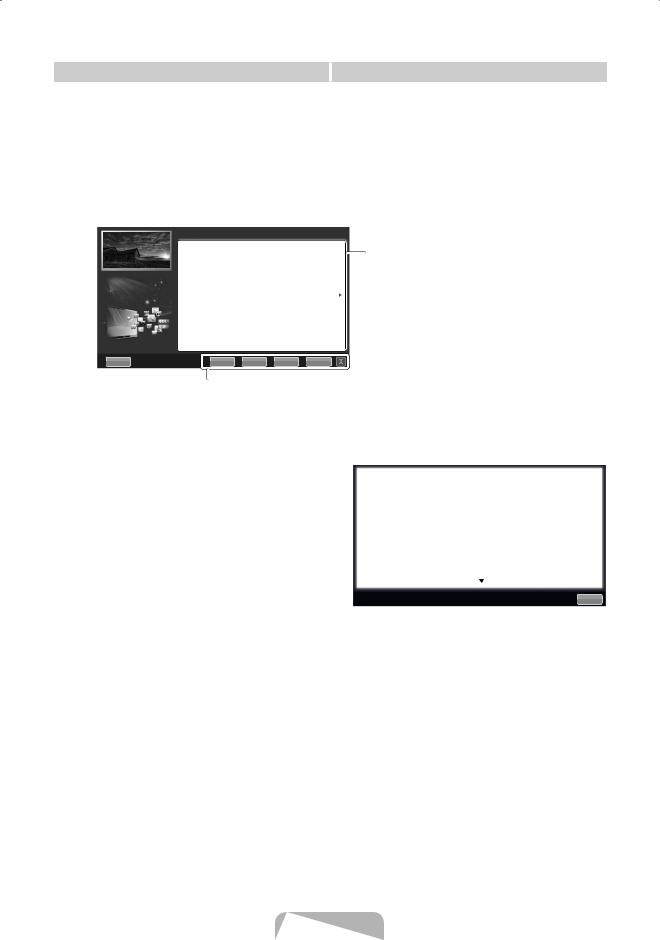
Basic Features > Changing the Preset Picture Mode (5/10)
Changing the Preset Picture Mode
O MENUm → Picture → Picture Mode → ENTERE
■Picture Mode t
Select your preferred picture type.
•Dynamic: Suitable for a bright room.
•Standard: Suitable for a normal environment.
•Natural: Suitable for reducing eye strain.
•Movie: Suitable for watching movies in a dark room.
•Entertain: Suitable for watching movies and games. N It is only available when connecting a PC.
Help |
Try Now |
Home |
Zoom |
Index |
Try Now
E-MANUAL
Picture |
|
|
Picture Mode |
|
Standard |
Backlight |
|
14 |
Contrast |
|
100 |
Brightness |
|
45 |
Sharpness |
|
50 |
Colour |
|
50 |
Tint (G/R) |
G 50 |
R 50 |
This function is not enabled in some menus.
English - 14
Method 1
1.During watching the e-Manual, move the cursor to select Try Now, when you want to execute the corresponding menu(s).
2.To return to the e-Manual screen, press the
E-MANUAL button.
Viewing the Contents
Basic Features > Changing the Preset Picture Mode (5/10)
Changing the Preset Picture Mode
OO MENUm → Picture → Picture Mode → ENTERE
■■ Picture Mode t
Select your preferred picture type.
• Dynamic: Suitable for a bright room.
• Standard: Suitable for a normal environment.
• Natural: Suitable for reducing eye strain.
• Movie: Suitable for watching movies in a dark room.
• Entertain: Suitable for watching movies and games. NN It is only available when connecting a PC.
Help |
Try Now |
Home |
Zoom |
Index |
Method 2
1.Press the ENTERE button when selecting Contents Area. The “Are you sure?” is displayed. Select Yes and then press the ENTERE button. The OSD window will be displayed.
2.To return to the e-Manual screen, press the
E-MANUAL button.
Contents Area: You can view the corresponding contents, if you selected a sub-menu. To move previous or next page, press the l or r button.
Try Now: Displays the corresponding menu(s). Home: Moves to the e-Manual home screen. Zoom: Magnifies a screen.
Index: Displays index screen.
Using the Zoom mode
When you view the e-Manual instruction, select the Zoom to magnify the screen. You can scroll through the magnified screen by using the u or d buttons.
To return to the previous screen, press the RETURN button.
Changing the Preset Picture Mode
OO MENUm → Picture → Picture Mode → ENTERE
■■Picture Mode t
Select your preferred picture type.
•Dynamic: Suitable for a bright room.
•Standard: Suitable for a normal environment.
•Natural: Suitable for reducing eye strain.
•Movie: Suitable for watching movies in a dark room.
•Entertain: Suitable for watching movies and games. NN It is only available when connecting a PC.
Return
How to search a keyword by using index page
This function may not supported depending on the language.
1.If you want to search a keyword, select Index.
2.Press the l or r button to select a character order you want, and then press the ENTERE button.
3.Press the u or d button to select a keyword you want to see, and then press the ENTERE button.
4.You can view the corresponding e-Manual instruction screen.To close the Index screen, press the RETURN button.
English - 15
Installing the Wall Mount
Installing the Wall Mount Kit
The wall mount kit (sold separately) allows you to mount the TV on the wall.
For detailed information on installing the wall mount, see the instructions provided with the wall mount. Contact a technician for assistance when installing the wall mount bracket.
Samsung Electronics is not responsible for any damage to the product or injury to yourself or others if you elect to install the TV on your own.
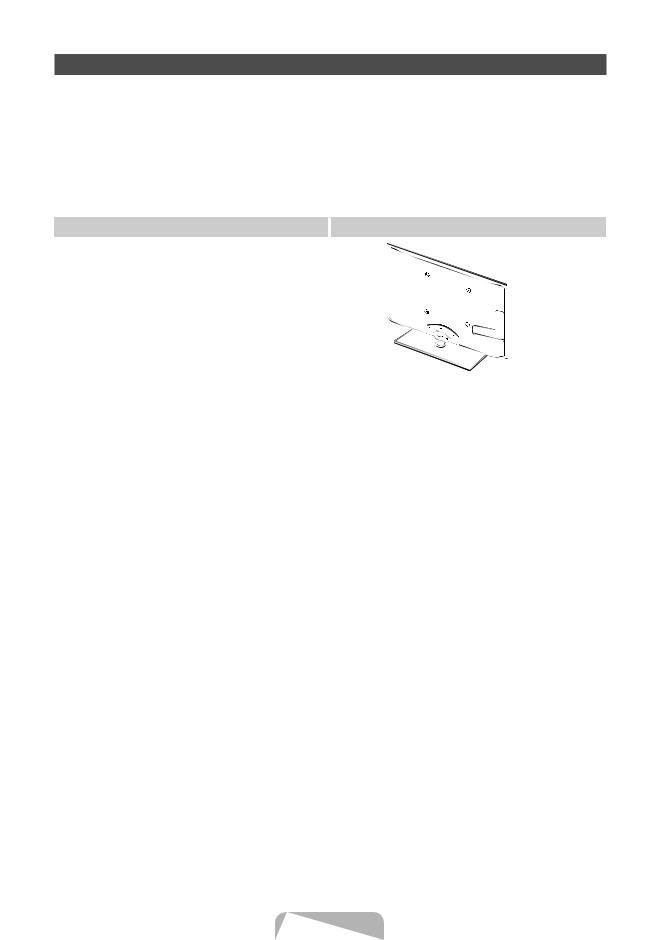
Preparing before installing Wall-Mount
Case A. Installing the SAMSUNG Wall-Mount |
Case B. Installing another company’s Wall-Mount |
To install a wall-mount, use the Holder-Ring 1.
English - 16
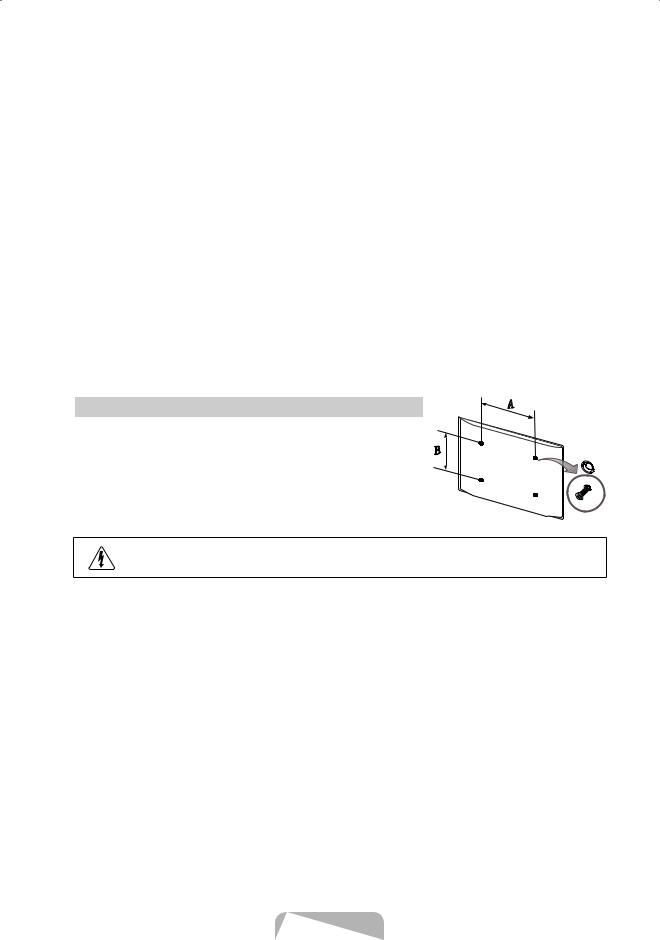
Wall Mount Kit Specifications (VESA)
Install your wall mount on a solid wall perpendicular to the floor. When attaching to other building materials, please contact your nearest dealer. If installed on a ceiling or slanted wall, it may fall and result in severe personal injury.
NOTE
xx Standard dimensions for wall mount kits are shown in the table below.
xx When purchasing our wall mount kit, a detailed installation manual and all parts necessary for assembly are provided.
xx Do not use screws that do not comply with the VESA standard screw specifications.
xx Do not use screws that are longer than the standard dimension or do not comply with the VESA standard screw specifications. Screws that are too long may cause damage to the inside of the TV set.
xx For wall mounts that do not comply with the VESA standard screw specifications, the length of the screws may differ depending on the wall mount specifications.
xx Do not fasten the screws that are too strongly; this may damage the product or cause the product to fall, leading to personal injury. Samsung is not liable for these kinds of accidents.
xx Samsung is not liable for product damage or personal injury when a non-VESA or non-specified wall mount is used or the consumer fails to follow the product installation instructions.
xx Our 55” model do not comply with VESA Specifications. Therefore, you should use our dedicated wall mount kit for this model.
xx Do not mount the TV at more than a 15 degree tilt.
Product Family |
inches |
VESA Spec. (A * B) |
Standard Screw |
Quantity |
|
|
|
|
|
|
19~22 |
75 X 75 |
M4 |
|
|
|
|
|
|
|
23~27 |
200 X 100 |
|
|
|
|
|
||
LED-TV |
|
|
|
4 |
32~40 |
200 X 200 |
|
||
|
|
|
|
|
|
46~60 |
400 X 400 |
M8 |
|
|
|
|
|
|
|
65~75 |
600 X 400 |
|
|
|
|
|
|
|
Do not install your Wall Mount Kit while your TV is turned on. It may result in personal injury due to electric shock.
English - 17

Troubleshooting
If you have any questions about the TV, first refer to this list. If none of these troubleshooting tips apply, please visit “www.samsung.com”, then click on Support, or contact the call centre listed on the back-cover of this manual.
Issues |
Solutions and Explanations |
The TV won’t turn on. |
• Make sure the AC power cord is securely plugged in to the wall outlet and the TV. |
|
• Make sure the wall outlet is working. |
|
• Try pressing the POWER button on the TV to make sure the problem is not the remote. If the TV turns |
|
on, refer to “Remote control does not work” below. |
|
|
There is no picture/video. |
• Check cable connections (remove and reconnect all cables connected to the TV and external |
|
devices). |
|
• Set your external device’s (Cable/Sat Box, DVD, Blu-ray etc) video outputs to match the connections |
|
to the TV input. For example, if an external device’s output is HDMI, it should be connected to an |
|
HDMI input on the TV. |
|
• Make sure your connected devices are powered on. |
|
• Be sure to select the TV’s correct source by pressing the SOURCE button on the remote control. |
|
• Reboot the connected device by reconnecting the device’s power cable. |
|
|
The remote control does not work. |
• Replace the remote control batteries with the poles (+/–) in the right direction. |
|
• Clean the sensor’s transmission window on the remote. |
|
• Try pointing the remote directly at the TV from 5~6 feet away. |
|
|
The cable/set top box remote control |
• Programme the Cable/Set remote control to operate the TV. Refer to the Cable/Set user manual for |
doesn’t turn the TV on or off, or adjust the |
the SAMSUNG TV code. |
volume. |
|
|
|
This TFT LED panel uses a panel consisting of sub pixels which require sophisticated technology to produce. However, there may be a few bright or dark pixels on the screen. These pixels will have no impact on the performance of the product.
You can keep your TV as optimum condition to upgrade the latest firmware on web site (samsung.com → Support → Downloads) by USB.
Licence
English - 18
List of Features
Excellent Digital Interface & Networking: With a built-in HD digital tuner, nonsubscription HD broadcasts can be viewed without a cable box / STB (Set-Top-Box) satellite receiver.
3D
This exciting new feature enables you to view 3D content.
SMART HUB
The Gateway to all content integrated in one place
•• It’s all integrated to guide you to easier and diverse entertainment choices.
•• Control your entertainment life with easy and simple user friendly UI.
•• Access to diverse Apps that are adding up every day.
•• Customize your TV, by App grouping & sorting to your taste.
AllShare™
AllShare™ connects your TV and compatible Samsung mobile phones/devices through a network.
Anynet+(HDMI-CEC)
Allows you to control all connected Samsung devices that support anynet+ with your Samsung TV’s remote.
Storage and Maintenance
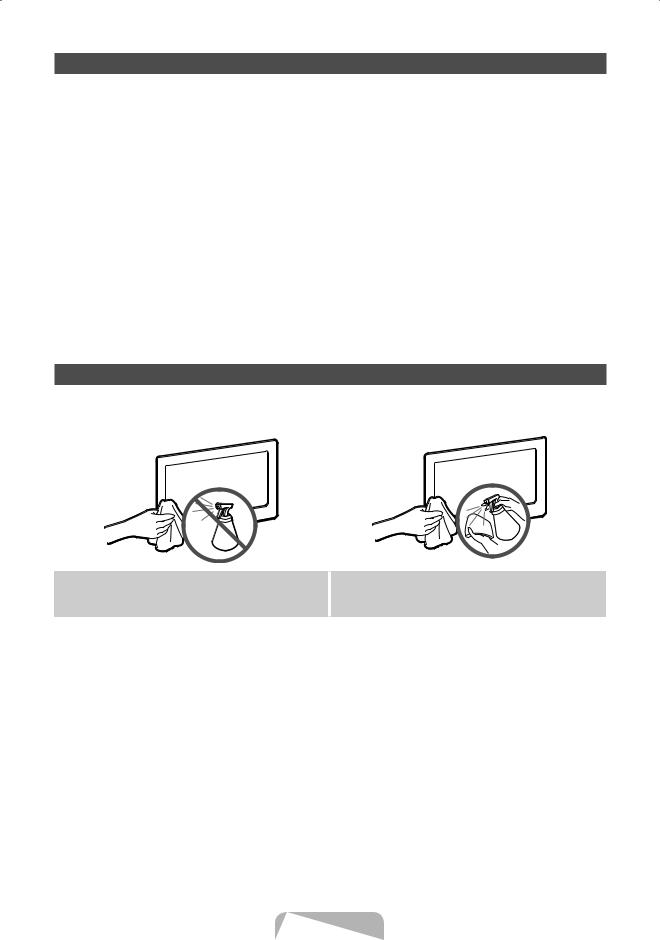
If you attached some stickers on the TV screen, it remains some debris after removing the sticker. Please clean it to watch TV.
Do not spray water or a cleaning agent directly onto the product. Any liquid that goes into the product may cause a failure, fire, or electric shock.
Clean the product with a soft cloth dapped in a small amount of water.
English - 19
Securing the TV to the wall
Caution: Pulling, pushing, or climbing onto the TV may cause the TV to fall. In particular, ensure that your children do not hang over or destabilize the TV; doing so may cause the TV to tip over, resulting in serious injuries or death. Follow all safety precautions provided in the included Safety Flyer. For added stability and safety, install the anti-fall device as follows.
To Avoid the TV from Falling
1.Put the screws into the clamps and firmly fasten them onto the wall. Confirm that the screws have been firmly installed onto the wall.
You may need additional material such as an anchor depending on the type of wall.
Since the necessary clamps, screws, and string are not supplied, please purchase these additionally.
2. Remove the screws from the back centre of the TV, put the screws into the clamps, and then fasten the screws onto the TV again.
Screws may not be supplied with the product. In this case, please purchase the screws of the following specifications.
Screw Specifications
xx For a 19 ~ 27 inch: M4 |
Wall |
|
|
xx For a 32 ~ 75 inch: M8 |
|
3.Connect the clamps fixed onto the TV and the clamps fixed onto the wall with a strong cable and then tie the string tightly.
NOTE
xx Install the TV near to the wall so that it does not fall backwards.
xx It is safe to connect the string so that the clamps fixed on the wall are equal to or lower than the clamps fixed on the TV.
xx Untie the string before moving the TV.
4.Verify all connections are properly secured. Periodically check connections for any sign of fatigue for failure. If you have any doubt about the security of your connections, contact a professional installer.
English - 20
|
Specifications |
|
|||
|
|
|
|
|
|
Display Resolution |
|
|
1920 x 1080 |
|
|
|
|
|
|
|
|
Environmental Considerations |
|
|
|
|
|
Operating Temperature |
|
|
10°C to 40°C (50°F to 104°F) |
|
|
Operating Humidity |
|
|
10% to 80%, non-condensing |
|
|
Storage Temperature |
|
|
-20°C to 45°C (-4°F to 113°F) |
|
|
Storage Humidity |
|
|
5% to 95%, non-condensing |
|
|
|
|
|
|
||
TV System |
Analogue: B/G, D/K, L, I (Depending on your country selection) |
||||
|
|
|
Digital: DVB-T/DVB-C/DVB-S2 |
|
|
Colour/Video System |
Analogue: PAL, SECAM, NTSC-4.43, NTSC-3.58, PAL60 |
||||
|
Digital: MPEG-2 MP@ML, MPEG-4, H.264/AVC MP@L3, MP@L4.0, HP@L4.0 |
||||
|
|
|
|
|
|
Sound System |
|
BG, DK, L, NICAM, MPEG1, DD, DD+, HEAAC. |
|
||
|
|
|
|
|
|
HDMI IN |
|
Video: 1080 24p, 1080p, 1080i, 720p, 576p, 480p |
|
||
|
Audio: 2Ch Linear PCM 32/44.1/48kHz, 16/20/24bits. |
||||
Stand Swivel (Left / Right) |
|
|
-20˚ ~ 20˚ |
|
|
|
|
|
|
|
|
Model Name |
UE32D6500 / UE32D6510 |
|
UE37D6500 / UE37D6510 |
|
UE40D6500 / UE40D6510 / |
|
/ UE32D6530 / UE32D6540 / |
|
/ UE37D6530 / UE37D6540 / |
|
UE40D6530 / UE40D6540 / |
|
UE32D6570 |
|
UE37D6570 |
|
UE40D6570 |
Screen Size |
32 inches |
|
37 inches |
|
40 inches |
|
|
|
|
|
|
Sound |
|
|
|
|
|
(Output) |
|
|
10 W X 2 |
|
|
|
|
|
|
|
|
Dimensions (WxDxH) |
|
|
|
|
|
Body |
745.8 X 29.9 X 443.4 mm |
|
867.7 X 29.9 X 512.3 mm |
|
933.0 X 29.9 X 548.8 mm |
With stand |
745.8 X 240.0 X 503.8 mm |
|
867.7 X 255.0 X 571.6 mm |
|
933.0 X 255.0 X 608.2 mm |
|
|
|
|
|
|
Weight |
|
|
|
|
|
Without Stand |
7.1 kg |
|
9.1 kg |
|
10.7 kg |
With Stand |
9.8 kg |
|
12.4 kg |
|
14.0 kg |
Model Name |
UE46D6500 / UE46D6510 |
|
UE55D6500 / UE55D6510 |
|
UE60D6500 |
|
/ UE46D6530 / UE46D6540 / |
|
/ UE55D6530 / UE55D6540 / |
|
|
|
UE46D6570 |
|
UE55D6570 |
|
|
|
|
|
|
|
|
Screen Size |
46 inches |
|
55 inches |
|
60 inches |
|
|
|
|
|
|
Sound |
|
|
|
|
|
(Output) |
10 W X 2 |
|
15 W X 2 |
|
|
Dimensions (WxDxH) |
|
|
|
|
|
Body |
1068.4 X 29.9 X 625.2 mm |
|
1258.8 X 29.9 X 731.7 mm |
|
1379.0 x 30.4 x 799.4 mm |
With stand |
1068.4 X 275.0 X 683.6 mm |
|
1258.8 X 305.0 X 791.4 mm |
|
1379.0 x 335.0 x 860.3 mm |
Weight |
|
|
|
|
|
Without Stand |
13.2 kg |
|
17.3 kg |
|
23.5 kg |
With Stand |
17.2 kg |
|
21.5 kg |
|
29.1 kg |
|
|
|
|
|
|
Design and specifications are subject to change without prior notice.
For information about power supply, and more about power consumption, refer to the label attached to the product.
¦¦ Recommendation - EU Only
••
••
••
•• This equipment may be operated in all EU countries.
English - 21
Ulteriori informazioni sull'uso del Manuale elettronico (p. 14)
Le figure e le illustrazioni presenti in questo Manuale dell'utente sono fornite unicamente a titolo di riferimento e possono differire da quelle del prodotto attuale. Le specifiche e il design del prodotto possono variare senza preavviso.
Avviso relativo alla trasmissione TV digitale
1.Le funzioni relative alla trasmissione televisiva digitale (DVB) sono disponibili solo nei paesi o nelle aree in cui vengono trasmessi segnali digitali terrestri DVB-T (MPEG2 E MPEG4 AVC) o laddove l'utente abbia la possibilità di accedere a un servizio TV via cavo DVB-C (MPEG2 e MPEG4 AAC) compatibile. Verificare con il rivenditore locale la possibilità di ricevere segnali DVB-T o DVB-C.
2.DVB-T è lo standard del consorzio europeo DVB per la trasmissione della televisione digitale terrestre mentre DVB-C è lo standard per la trasmissione della televisione digitale via cavo. Tuttavia, alcune funzioni quali EPG (Electronic Program Guide), VOD (Video on Demand) e altre non sono incluse in queste specifiche. Per questo motivo, al momento non sono disponibili.
3.Sebbene questo apparecchio TV soddisfi i più recenti standard DVB-T e DVB-C, [Agosto 2008], la compatibilità con future trasmissioni digitali via cavo DVB-C e terrestri DVB-T non può essere garantita.
4.In base alla nazione o all'area in cui viene utilizzato questo televisore, alcuni fornitori di trasmissioni TV via cavo potrebbero applicare una tariffa aggiuntiva per tali servizi e richiedere all'utente di accettare i termini e le condizioni della loro offerta.
5.Alcune funzioni della TV digitale potrebbero non essere disponibili in alcuni paesi o regioni e DVB-C potrebbe non funzionare correttamente con alcuni fornitori di servizi via cavo.
6.Per ulteriori informazioni, contattare il centro di assistenza clienti Samsung locale.
La qualità di ricezione del televisore può essere influenzata dai diversi metodi di trasmissione esistenti nei vari paesi. Verificare le prestazioni del televisore presso un Rivenditore autorizzato SAMSUNG o presso un Call Centre Samsung per sapere se la qualità di ricezione può essere migliorata o meno riconfigurando le impostazioni dell'apparecchio.
Avvertenza per la visualizzazione di immagini fisse
Evitare la visualizzazione di immagini fisse (per es. file jpeg) o di elementi grafici fissi (come ad esempio il logo di un programma TV, il formato panorama o 4:3, la barra dei titoli di borsa o delle notizie nella parte inferiore dello schermo). La visualizzazione continua di una immagine fissa può causare immagini residue sullo schermo LED e influenzare la qualità della riproduzione. Per ridurre questo rischio, seguire questi consigli:
•Evitare di visualizzare lo stesso canale televisivo per un lungo periodo di tempo.
•Visualizzare sempre le immagini a schermo pieno, usando il menu del formato immagini per impostarlo al valore più appropriato.
•Ridurre la luminosità e il contrasto al valore minimo necessario per ottenere la qualità visiva desiderata; valori troppo elevati possono accelerare il processo di bruciatura dello schermo.
•Usare frequentemente tutte le funzioni TV progettate per ridurre la ritenzione delle immagini e la bruciatura dello schermo. Per maggiori informazioni, consultare la relativa sezione del manuale elettronico.
Messa in sicurezza della posizione di installazione
Mantenere le distanze indicate tra il prodotto e gli altri elementi presenti (per esempio le pareti) per garantire un'adeguata ventilazione.
Il mancato rispetto di questa precauzione può comportare un incendio o un malfunzionamento provocato dall'aumento della temperatura interna del prodotto.Se si usa un piedistallo o un sistema di montaggio a parete, utilizzare solo componenti forniti da Samsung Electronics.
•L'uso di componenti di altri produttori può causare problemi di funzionamento del prodotto o lesioni provocate dalla caduta del prodotto.L'aspetto del prodotto può differire in base al modello.
•Prestare attenzione quando si tocca il televisore poiché alcune parti potrebbero essere calde.
Installazione con piedistallo. |
Installazione con supporto a parete. |
 10 cm
10 cm
10 cm |
10 cm |
|
10 cm |
10 cm |
10 cm |
|
10 cm |
Corretto smaltimento di questo prodotto (WEEE/RAEE, Rifiuti da apparecchiature elettriche ed elettroniche) (applicabile nei paesi dell'Unione Europea e in quelli con sistema di raccolta differenziata)
Questo simbolo riportato sul prodotto, sugli accessori e sulla documentazione indica che il prodotto e i suoi accessori elettronici (per es. caricatore, cuffie, cavo USB) non devono essere smaltiti unitamente ai rifiuti domestici al termine del loro ciclo vitale. Per prevenire eventuali danni all'ambiente o alla salute delle persone derivanti da uno smaltimento non appropriato, separarli da altri tipi di rifiuti e riciclarli in modo responsabile per promuovere il riutilizzo sostenibile delle risorse materiali. Gli utenti residenziali sono invitati a contattare il rivenditore presso il quale hanno acquistato il prodotto, o l'ufficio locale preposto, per richiedere le informazioni relative alla raccolta differenziata e al riciclaggio di questo tipo di prodotto. Gli utenti aziendali sono invitati a contattare il proprio fornitore e verificare i termini e le condizioni del contratto d'acquisto. Questo prodotto e i suoi accessori elettronici non devono essere smaltiti insieme agli altri rifiuti commerciali.
Corretto smaltimento delle batterie utilizzate in questo prodotto
(applicabile nei paesi dell'Unione Europea e in quelli con sistemi di raccolta differenziata delle batterie)
Questo contrassegno posto sulla batteria, sul manuale o sull'imballaggio, indica che le batterie contenute in questo prodotto non devono essere smaltite insieme ai rifiuti domestici una volta esauste. Laddove presenti, i simboli chimici Hg, Cd o Pb indicano che le batterie contengono mercurio, cadmio o piombo sopra i limiti stabiliti nell'ambito della Direttiva CE 2006/66. Se le batterie non vengono smaltite in modo corretto, tali sostanze possono causare danni alla salute o all'ambiente. Per proteggere le risorse naturali e promuovere il riutilizzo dei materiali, separare le batterie dagli altri rifiuti e riciclarle utilizzando il sistema locale gratuito di ritiro delle batterie esauste.
Italiano - 2
Accessori
Controllare che nell'imballaggio siano contenuti i seguenti componenti. Se eventuali componenti risultassero mancanti, contattare il rivenditore.
La forma e il colore dei componenti possono variare in base al modello.Eventuali cavi non forniti in dotazione possono essere acquistati separatamente.
Una volta aperta la confezione, verificare che non vi siano accessori nascosti dietro i materiali di imballaggio.
[[ |
|
|
|
|
|
|
|
|
|
|
|
ATTENZIONE: INSERIRE SALDAMENTE PER EVITARE UNO SCOLLEGAMENTO ACCIDENTALE |
|||||||||
|
DALL'APPARECCHIO |
|
|
|
|
|
|
|
|
|
•• |
Telecomando e batterie (2 tipo AAA) |
•• |
Panno per la pulizia |
|||||||
•• |
Istruzioni per l'utente |
•• |
Cavo di alimentazione |
|||||||
•• |
Scheda di garanzia (non disponibile in tutti i paesi) / Guida alla sicurezza |
|||||||||
|
|
|
|
|
|
|
|
|
|
|
|
|
|
|
|
|
|
|
|
|
|
|
|
|
|
|
|
|
|
|
|
|
|
|
|
|
|
|
|
|
|
|
|
Anello di ritenuta (4 EA) |
Ferma cavo piedistallo |
Adattatore scheda CI |
|||
|
|
|
|
|
|
|
|
|
|
|
|
AV / Adattatore component |
Adattatore Scart |
Può essere richiesto un rimborso se |
|
––(a) l'uscita del tecnico in seguito a una chiamata non rileva difetti nel prodotto (per es. nel caso l'utente abbia omesso di leggere il presente manuale)
––(b) l'utente ha portato l'unità presso un centro di riparazione che non rileva difetti nel prodotto (per es. nel caso l'utente abbia omesso di leggere il presente manuale).
•L'importo di tale rimborso verrà comunicato all'utente prima di eseguire una visita a domicilio o un eventuale intervento di manutenzione.
Montaggio del Piedistallo con fermacavo
Italiano - 3
Vista del Pannello di controllo
La forma e il colore del prodotto possono variare in base al modello.
Sul pannello posteriore del televisore sono presenti alcuni tasti di regolazione. Toccando il tasto, vengono visualizzate le icone di regolazione.
Qualsiasi oggetto (elettrico, ecc...) posizionato nei pressi del pannello di controllo può causare inavvertitamente l'attivazione dei menu OSD.
Pannello posteriore del televisore
Sensore del telecomando |
Puntare il telecomando in direzione di questo punto sul televisore. |
Indicatore di alimentazione |
Lampeggia e si spegne quando l'alimentazione è attiva, si accende in |
|
modalità standby. |
E (Sorgente) |
Alterna tutte le sorgenti d'ingresso disponibili. Nel menu a video, utilizzare |
|
questo tasto come si usa il tasto ENTERE del telecomando. |
m (Menu) |
Visualizza attraverso un menu OSD (on screen display) le funzioni del |
|
televisore. |
o (Volume) |
Regola il volume. Nel menu OSD, utilizzare i tasti wv così come si usano i |
|
tasti ◄ e ► del telecomando. |
k (Canale) |
Cambia i canali. Nel menu OSD, utilizzare i tasti <> così come si |
|
userebbero i tasti ▲ e ▼ del telecomando. |
P (Alimentazione) |
Spegne e accende il televisore. |
Modalità standby
Non lasciare il televisore in modalità standby per un lungo periodo di tempo (quando si parte per le vacanze, ad esempio). Anche quando il tasto di accensione è disattivo, l'apparecchio consuma una piccola quantità di energia elettrica. Si consiglia quindi di scollegare il cavo di alimentazione.
Italiano - 4
Vista del telecomando
Questo speciale telecomando, progettato per aiutare chi ha problemi di vista, presenta punti in braille sui tasti Power, Channel e Volume.
Spegne e accende il televisore.
Visualizza e seleziona le sorgenti video disponibili.
Accesso diretto ai canali.
Seleziona alternativamente le modalità Teletext ON, Doppia, Mista o OFF.
Regola il volume.
Apre il menu OSD.
Link a vari servizi e applicazioni.
Scelta rapida delle funzioni usate più di frequente.
Seleziona le voci del menu OSD e cambia i valori visualizzati sul menu.
Ritorna al menu precedente.
POWER |
|
ON/OFF |
|
SOURCE |
Accende/Spegne la luce del telecomando. |
|
Questa funzione attiva l’illuminazione |
|
|
|
|
|
|
momentanea dei tasti quando questi |
|
|
vengono premuti. (L’uso del telecomando |
|
|
con questo tasto impostato su On riduce |
|
|
l’uso della batteria.) |
TTX/MIX
MUTE
CH LIST
OK
RETURN
 BACK
BACK
PRE-CH  Ritorna al canale precedente.
Esclude temporaneamente l'audio.
Cambia i canali.
Visualizza l'elenco canali sullo schermo.
 Visualizza la EPG (Electronic Programme Guide).
 Visualizza le informazioni sullo schermo TV.
 u/d/l/r: Per spostare il cursore sulla voce del menu OSD.
ENTERE: Seleziona il menu e le modifiche alle correspondenti voci.
Usare questi tasti per i menu Gestione canali, SMART HUB, ecc.
Utilizzare quesi tasti per funzioni specifiche.
Per maggiori informazioni, vedere il manuale elettronico.
|
|
|
Esce dal menu OSD. |
TV |
|
|
|
SOCIAL |
|
|
SOCIAL TV: Visualizza la schermata |
|
|
|
|
E-MANUAL |
D |
AD/SUBT. |
Social TV. |
|
|
|
SEARCH: Supporto alla funzione di |
|
|
|
ricerca e alle parole di ricerca consigliate. |
|
|
|
W: Imposta il video con segnale 3D. |
|
|
|
E-MANUAL: Visualizza e-Manual. |
|
|
|
D: Utilizzare questo tasto quando si usa il |
|
|
|
servizio di trasmissione dati. |
|
|
|
AD/SUBT.: Attiva/Disattiva la descrizione |
|
|
|
audio. Non disponibile in alcune nazioni. / |
|
|
|
Visualizza i sottotitoli digitali. |
Inserimento delle batterie (tipo: AAA)
Italiano - 5
Modifica della sorgente di ingresso
Sorgente
Questa funzione viene usata per |
SOURCE |
selezionare il televisore o un'altra sorgente |
|
di ingresso esterna come un lettore DVD |
|
/ Blu-Ray / ricevitore via cavo / ricevitore |
|
satellitare STB collegato al televisore. |
|
■■ TV / Est. / PC / AV / Comp. / HDMI1/DVI / HDMI2 / HDMI3 / HDMI4 / USB / AllShare
In Sorgente, gli ingressi collegati vengono evidenziati.
Est. e PC rimangono sempre attive.
Se i dispositivi esterni collegati non sono evidenziati, premere il tasto rosso. Il televisore
cercherà i dispositivi collegati.
Modifica Nome
In Sorgente, premere TOOLS , quindi impostare il nome della sorgente di ingresso esterna desiderata.
■■ VCR / DVD / STB cavo / STB satellite / STB PVR / Ricevitore AV / Giochi / Videocamera / PC / DVI PC / Dispositivi DVI / TV / IPTV / Blu-ray / HD DVD / DMA: Assegnare un nome al dispositivo collegato alle porte di ingresso per semplificare la selezione della sorgente di ingresso.
Quando si collega un PC alla porta HDMI IN 1(DVI) tramite cavo HDMI, impostare il
televisore in modalità PC in Modifica Nome.
Quando si collega un PC alla porta HDMI IN 1(DVI) tramite cavo HDMI-DVI, impostare il televisore in modalità DVI PC in Modifica Nome.
Quando si collega un dispositivo AV alla porta HDMI IN 1(DVI) tramite cavo HDMI-DVI, impostare il televisore in modalità Dispositivi DVI in Modifica Nome.
Modifica pref.
In Sorgente, premere TOOLS per selezionare Modifica pref. E' possibile impostare tra i Preferiti una sorgente di ingresso esterna.
Informazioni
E' possibile visualizzare informazioni dettagliate sul dispositivo esterno selezionato.
Aggiorna
In Sorgente, se i dispositivi esterni non vengono visualizzati, premere TOOLS per selezionare Aggiorna. Ricerca dispositivi connessi.
Per la migliore connessione via cavo a questo prodotto, utilizzare cavi del diametro massimo indicato di seguito:
•• Diametro massimo - 0,55 pollici (14 mm)
Collegamento all'antenna
Quando il televisore viene acceso per la prima volta, le impostazioni di base vengono visualizzate automaticamente.
Preset: Collegare l'alimentazione e l'antenna.
VHF/UHFAntenna Satellite Cavo
o 


Italiano - 6
 Loading...