


 Checking Computer Connections
 Check whether the PC icon is displayed at the top left of the screen.
 If the PC icon[
 ] is displayed, move to the Main screen. If not, move to [Settings]-[Default Computer].
 In the [Default Computer] window, select the PC you want to connect your Digital Photo Frame to. If a required PC is not displayed, click on [Refresh List] to update the list and select it.
 If connected, you will be returned to the [Settings] screen. You will find that the PC icon is displayed at the top left of that screen.
 Checking Computer Connections
 In the Main screen, select [Photos].
 In the [Photos] screen, check whether the ['Account Name's Photos' on 'Computer Name'] is correct. If incorrect, press the [Menu] button and select the PC you want to connect to.

 You can view the shared photos on the connected computer via Playlists, Tags, Dates, Folders, and Ratings.
 Viewing the Photos from Windows Live Space
 Checking Windows Live Space and Uploading Photos
 If you have no MSN account (MSN Hotmail, MSN Messenger, Passport account), please create one. Go to and login to Windows Live Space (http://spaces.live.com/) with your MSN account.
 If you do not have a space, create a space and enter it.
 In your space, change to edit mode. Add albums and photos by clicking on Add under the Photos category.
 Setting up the Web Configuration
 In your Digital Photo Frame, go to [Settings]- [Management Web Address]. Make a note of the web address (URL) displayed in the Management Web Address window. Connect to that address using Internet Explorer on your PC.
Alternatively, if you click the Frame Manager icon (  ) in the tray menu at the bottom right of the PC screen, a linked frame list will be displayed. If you select a frame name, the Samsung Photo Frame Web Configuration screen for the corresponding
frame appears.
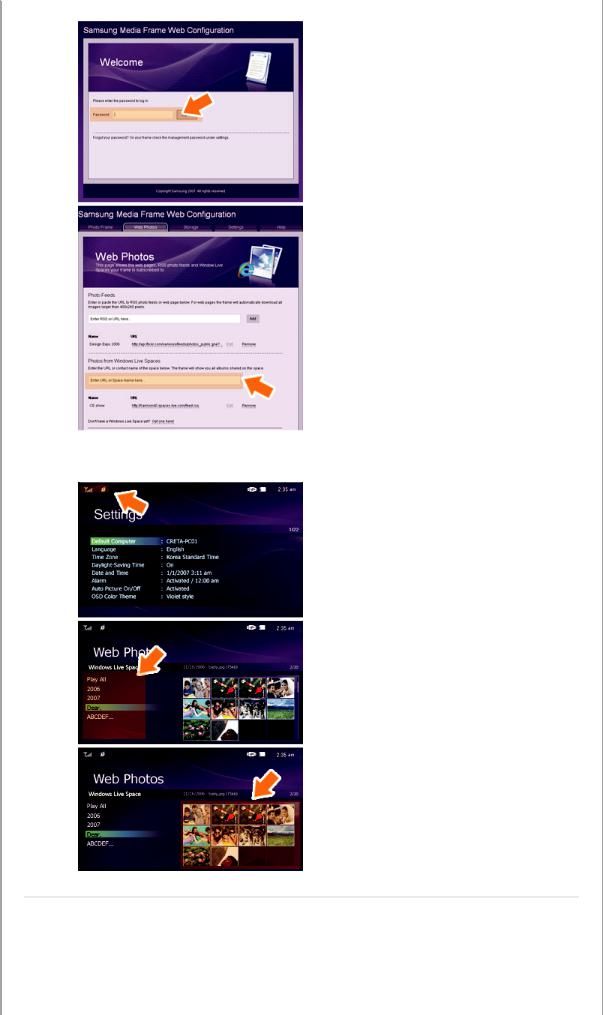
 When connected, the Welcome page will be displayed. On the Welcome page, enter the password displayed in the [Settings]-[Management Password] screen of your Digital Photo Frame in the [Password] box and click [Sign in].
 You can change the password (default: Admin) in the Settings of the Samsung Photo Frame Web Configuration.
 On the Samsung Photo Frame Web Configuration page, click the [Web Photos] tab and add the space address (for example, if it is 'http://test.space.live.com', you have only to type 'test'.) to the URL input box for the Photos From Windows Live Spaces list and click [Add].
 Checking your Space Photos on your Digital Photo Frame
 First check the network connections. (Refer to Viewing the Photos Shared from Vista Windows on your Digital Photo Frame - What You Should Do on Your Digital Photo Frame - Checking Network Connections.)
 In the Main screen of your Digital Photo Frame, go to [Web Photo]-[Windows Live Space]. A list of the spaces you have added to the Web Configuration will be displayed.
 Select a space. A list of albums in the selected space will be displayed. Select an album, and thumbnails for the photos in the selected album will be displayed on the right.
 Viewing the Photos via RSS
 Web Configuration
 Go to the Web Photos page by following the description in the Settings Web Configuration

section for Windows Live Space. Click [Web Photo]-[Photo Feeds] for the RSS Input window. In the RSS Input window, enter the RSS address and click [Add].
What is an RSS Address?
It is the address that appears in the address box of the web page (XML) displayed when clicking the FEED icon on a RSS service site where photos are uploaded.
 Checking the Photos from RSS on Your Digital Photo Frame
 In the Main screen of your Digital Photo Frame, go to [Web Photo]-[RSS and Web Feeds]. A list of feeds you have added to the Web Configuration will be displayed.
 Select a feed from the list. Thumbnails for the photos in the selected feed will be displayed to the right.
 Setting up Rating and Tags (VISTA:Tags, XP:Labels) on a PC
 Windows VISTA
 Click Start - All Programs - Windows Photo Gallery to launch the Windows Photo Gallery.
 If you select Info at the top of the Windows Photo Gallery screen, the photo information pane appears on the right.
 Select a photo and change the Rating or Tags in the right information pane.
 Windows XP
 Click Start - All Programs - Microsoft Digital Image
Starter Edition 2006 - Microsoft Digital Image Starter Edition 2006 Library.
 The Microsoft Digital Image Starter Edition 2006 Library window appears.
 Select a photo and configure the Rating and Labels for the selected photo at the bottom of the screen.
 I want to update firmware.
Preparations |
Digital Photo Frame |
 Firmware update file.
 USB memory card or external memory devices(CF/SD/MMC/MS/XD)

 Connect USB memory card to PC
 Connect USB Memory Card to Digital Photo Frame
Please visit www.samsung.com for the latest firmware update.
 If you are ready, connect the USB memory card to your PC.
 Copy the firmware update file you downloaded to the USB memory card. (Make sure to copy the firmware update file to the root directory.)
 Remove the USB memory card from your PC, and connect it to your Digital Photo Frame. If your Digital Photo Frame is off, turn it on.
 Select Update
 Updating
 Select Firmware Update of Settings.
 The update progression is displayed on the screen.
 After boot-up, turn your Digital Photo Frame off, remove the USB memory card, and turn your Digital Photo Frame on again, for maximum safety.
Do not remove the USB memory card during the update operation. Do not press any key during the update operation.
Do not insert any other card during the update operation.
Do not turn your Digital Photo Frame off during the update operation.
You can identify whether the update operation has finished successfully or not by checking the firmware version of your Digital Photo Frame is changed to the version of the firmware update.
|
|
| Specifications |
| Supported Files | |
Specifications |
|
|
|
|
Items |
Specifications |
|
|
Type |
7" (17 cm) TFT |
|
|
Resolution |
800 x 480 |
|
Panel |
Brightness |
200cd/ |
|
|
Contrast Ratio |
300 : 1 |
|
|
Interface |
Digital 6 bit |
|
|
|
JPEG. MPEG4. WMV9 |
|
Supported Formats |
|
* JPEG max Image Resolution 3200x2400(8Mb) |
|
|
|
(Progressive JPEG is not supported.) |
|
Built-in Memory |
|
64Mb |
|
Network |
|
Wi-Fi 802.11b/g 2.4GHz 54Mbps |
|
Audio |
|
1 W x 1 built-in speaker |
|
|
|
USB 2.0 |
|
USB |
|
(One up stream (host) and one down stream (slave). |
|
|
|
External Memory Reader is not supported) |
|
Media (Memory Card) |
|
4 in 1(SD≤4Gb / MMC≤4Gb / XD≤2Gb / MS≤32Gb) |
|
|
SDHC (High-Capacity) cards are not supported. |
||
|
|
||
|
Rating |
External Power Adapter (12V. 2A. 24W) |
|
Power |
|
Max mode : 12W, |
|
|
Consumption |
Normal mode: 10W, |
|
|
|
Off mode(Power Switch Off) : under 1W |
|
|
Photo File |
Slide Show/Interval/Effect Image Rotate(auto.manual)/ |
|
|
Thumbnail View/Windows Vista WMC support |
||
|
|
||
Content Files |
|
|
|
|
Music File |
MP3 |
|
 Loading...