

Saeco Talea Ring Plus Installation Manual

Operation and maintenance manual
Before using the machine, please read the attached operating instructions.
Carefully read the safety rules.
FOR HOUSEHOLD USE ONLY

IMPORTANT SAFEGUARDS
When using electrical appliances, basic safety precautions should always be
followed, including the following:
1. Read all instructions.
2. Do not touch hot surfaces. Use handles or knobs.
3. To protect against fire, electric shock and injury to persons do not immerse
cord, plugs, or appliance in water or other liquid.
4. Close supervision is necessary when the appliance is used by or near
children.
5. Unplug from outlet when not in use and before cleaning. Allow to cool
before putting on or taking off parts, and before cleaning the appliance.
6. Do not operate any appliance with a damaged cord or plug or after the
appliance malfunctions, or has been damaged in any manner. Return
appliance to the nearest authorized service facility for examination, repair
or adjustment.
7. The use of accessory attachments not recommended by the appliance
manufacturer may result in fire, electric shock or injury to persons.
8. Do not use outdoors.
9. Do not let cord hang over edge of table or counter, or touch hot
surfaces.
10. Do not place on or near a hot gas or electric burner, or in a heated
oven.
11. Always attach plug to appliance first, then plug cord into wall outlet. To
disconnect, turn any control to “off”, then remove plug from wall outlet.
12. Do not use appliance for other than intended use.
13. Save these instructions.
SAVE THESE INSTRUCTIONS

CAUTION
This appliance is for household use only. Any servicing, other than cleaning
and user maintenance, should be performed by an authorized service center.
Do not immerse machine in water. To reduce the risk of fire or electric shock, do
not disassemble the machine. There are no parts inside the machine serviceable
by the user. Repair should be done by authorized service personnel only.
1 Check voltage to be sure that the voltage indicated on the nameplate
corresponds with your voltage.
2 Never use warm or hot water to fill the water tank. Use cold water only.
3 Keep your hands and the cord away from hot parts of the appliance during
operation.
4 Never clean with scrubbing powders or harsh cleaners. Simply use a soft
cloth dampened with water.
5 For optimal taste of your coffee, use purified or bottled water. Periodic
descaling is still recommended every 2-3 months.
6 Do not use flavored or caramelized coffee.
INSTRUCTIONS FOR THE POWER
SUPPLY CORD
A. A short power-supply cord (or detachable power-supply cord) is to be
provided to reduce risks resulting from becoming entangled in or tripping
over a longer cord.
B. Longer detachable power-supply cords or extension cords are available
and may used if care is exercised in their use.
C. If a long detachable power-supply cord or extension cord is used,
1. The marker electrical rating of the detachable power-supply cord or
extension cord should be at least as great as the electrical rating of the
appliance
2. If the appliance is of the grounded type, the extension cord should be a
grounding-type 3-wire cord, and
3. The longer cord should be arranged so that it will not drape over the counter
top or table top where it can be pulled on by children or tripped over.

2
CONTENTS
GENERAL INFORMATION ................................................................................................................... 3
TECHNICAL DATA ............................................................................................................................... 3
APPLIANCE ......................................................................................................................................... 4
ACCESSORIES ......................................................................................................................................................4
INSTALLATION .................................................................................................................................... 5
STARTING THE MACHINE .........................................................................................................................................5
SETTING THE LANGUAGE......................................................................................................................................... 6
SETTING THE WATER HARDNESS ...............................................................................................................................6
INTENZA WATER FILTER ..........................................................................................................................................7
CONTROL PANEL ................................................................................................................................ 8
ADJUSTMENTS ................................................................................................................................... 9
AROMA OPTI-DOSE (ADJUSTS THE COFFEE DOSE PER CUP) ............................................................................................ 9
COFFEE STRENGTH ............................................................................................................................................... 9
DRIP TRAY HEIGHT ADJUSTMENT ............................................................................................................................. 10
SAECO ADAPTING SYSTEM..................................................................................................................................... 10
COFFEE GRINDER ADJUSTMENT .............................................................................................................................. 11
BEVERAGE DISPENSING ................................................................................................................. 12
BREWING WITH WHOLE BEANS ...............................................................................................................................12
BREWING WITH PRE-GROUND COFFEE ...................................................................................................................... 13
HOT WATER DISPENSING .......................................................................................................................................14
DISPENSING STEAM ............................................................................................................................................. 15
MAKING CAPPUCCINO ........................................................................................................................................... 16
MILK ISLAND (OPTIONAL) ...................................................................................................................................... 17
BEVERAGE SETTINGS ..................................................................................................................... 18
QUICK PROGRAMMING .......................................................................................................................................... 18
PROGRAMMING FROM THE “BEVERAGE SETTINGS” MENU .............................................................................................. 18
PROGRAMMING THE MACHINE ....................................................................................................... 20
MACHINE SETTINGS ............................................................................................................................................. 21
LANGUAGE MENU
WATER
HARDNESS MENU
ALARM MENU
ACOUSTIC
FILTER
ALARM MENU
RINSE
MENU
WARMER MENU
CUP
CLOCK
SETTING MENU
MAINTENANCE
ENERGY
SPECIAL
.................................................................................................................................................... 22
WATER FILTER MENU
DESCALING
MENU
BREW
GROUP WASHING
SAVING (STAND-BY) .................................................................................................................................23
TURN OFF DELAY
TIMER
SETTING
FUNCTIONS ............................................................................................................................................ 23
MAINTENANCE ................................................................................................................................. 24
DESCALING CYCLE .............................................................................................................................................. 24
BREW GROUP WASHING ........................................................................................................................................ 26
CLEANING AND MAINTENANCE ...................................................................................................... 27
MAINTENANCE DURING OPERATION .......................................................................................................................... 27
GENERAL MACHINE CLEANING ................................................................................................................................ 27
CLEANING THE BREW GROUP. ................................................................................................................................ 28
ERROR CODES ................................................................................................................................. 29
TROUBLESHOOTING ........................................................................................................................ 30
SAFETY RULES ................................................................................................................................. 31
TECHNICAL DATA
3
GENERAL INFORMATION
This coffee machine is made for brewing espresso coffee using coffee beans, and it is equipped with a device
to dispense steam and hot water.
The machine is designed for domestic use only, and is not suitable for heavy or professional use.
Warning: no liability is assumed for any damage caused by:
• incorrect use not in accordance with the intended uses;
• repairs not carried out by authorized customer service centers;
• tampering with the power cord;
• tampering with any part of the machine;
• the use of non-original spare parts and accessories;
• failure to descale the machine or use at temperatures below 0°C (32°F)
IN THESE CASES, THE WARRANTY IS NOT VALID.
THE WARNING TRIANGLE INDICATES ALL IMPORTANT INSTRUCTIONS
FOR THE USER’S SAFETY. PLEASE FOLLOW THESE INSTRUCTIONS
CAREFULLY TO PREVENT SERIOUS INJURIES!
HOW TO USE THESE OPERATING INSTRUCTIONS.
Keep these operating instructions in a safe place and make them available to anyone else who may use the coffee
machine. For further information or in case of problems, please refer to an authorized service center.
For Saeco customer service, call 1-800-933-7876 in the U.S., or 1-514-385-5551 in Canada.
TECHNICAL DATA
Nominal voltage
Power rating
Power supply
Shell material
Size (w x h x d)
Weight
Cord length
Control panel
Water tank
Coffee bean hopper capacity
Pump pressure
Boiler
Coffee grinder
Quantity of ground coffee
Dregdrawer capacity
Safety devices
Subject to engineering and manufacturing changes due to technological developments.
See label on the appliance
See label on the appliance
See label on the appliance
ABS - Thermoplastic
313 x 372 x 426 mm - 12.60 x 14.57 x 15.75 in
9 Kg - 19.8 lbs
1200 mm - 47.24 in
Front
1.7 liters - 57.5 oz (removable)
250 grams - 8.9 oz of coffee beans
15 bar
Stainless steel
Ceramic
7 - 10.5 grams / 0.25 - 0.37 oz.
14 portions
Boiler pressure safety valve – Double safety thermostat.
4
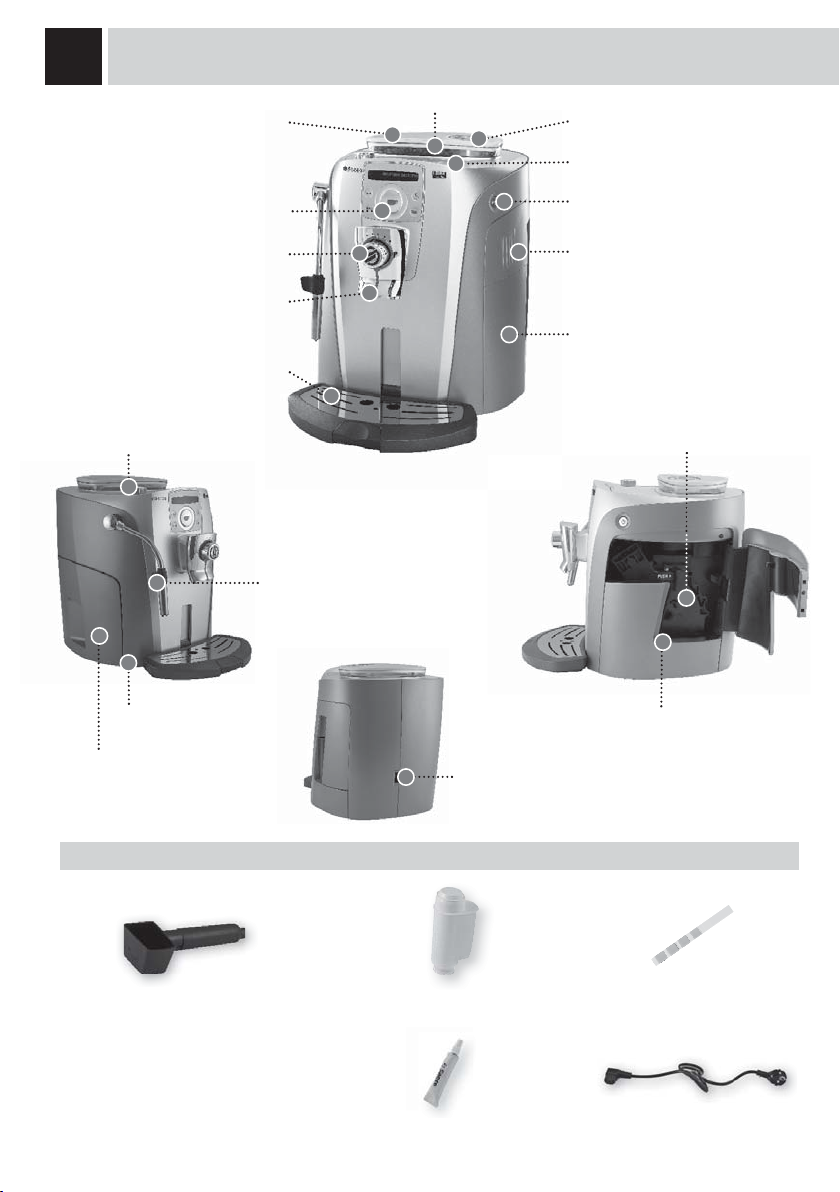
APPLIANCE
Coffee bean hopper lid
Dispensing head
Drip tray + grill
Hot water / steam knob
Control panel
SBS dial
Hot water / steam wand
Coffee bean hopper
Pre-ground bypass doser
Cup warming surface
Power button
Service door
Dregdrawer
Brew group
Milk Island connection
Water tank
ACCESSORIES
Pre-ground coffee
measuring scoop and
grinder adjustment key
Socket for power cord
Intenza water fi lter
Lubricant for the
brew group
Drip tray
Water hardness test strip
Power cord
INSTALLATION
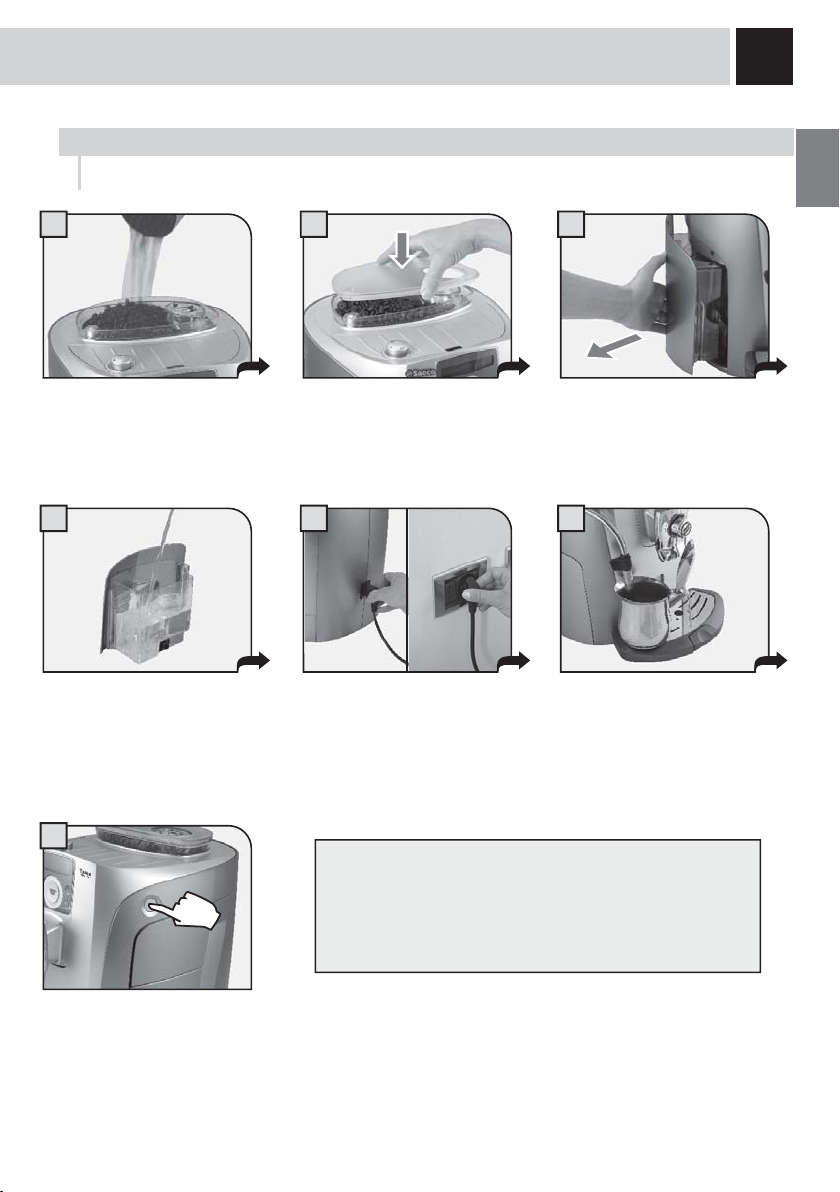
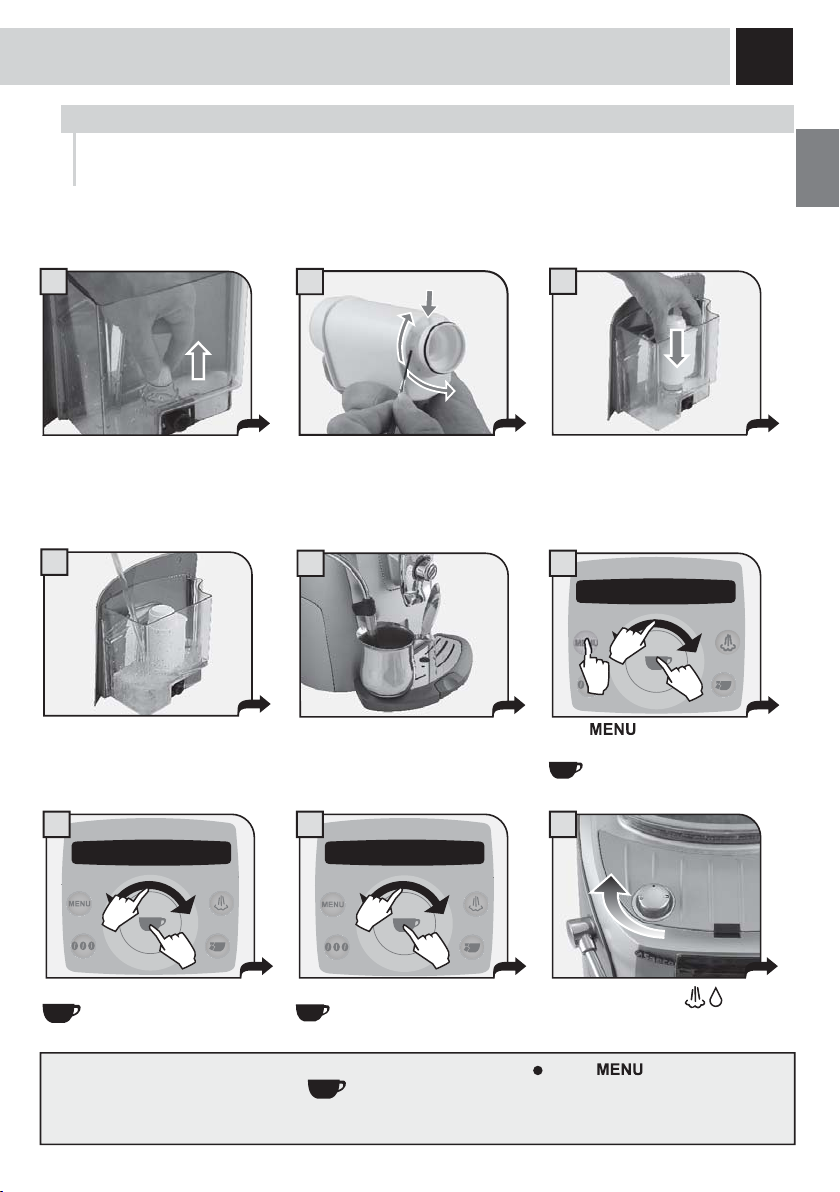
STARTING THE MACHINE
Make sure the power button is not pressed and the machine is turned off. Check the machine
features on the label on the bottom of the appliance.
1 2 3
5
Remove the coffee bean hopper
lid.
Fill the hopper with coffee beans.
4
Fill the tank with fresh drinking
water. Do not exceed the “max”
level indicated on the water tank.
Once fi lled, place the tank back
into the machine.
7
Close the lid pushing it down
completely.
Insert the plug into the socket
located on the back of the machine
and insert the other end into a
power outlet with suitable current.
The machine will automatically prime the water circuit.
The machine is now ready for use.
Water may not dispense into the container when the machine is
self-priming. This should be considered normal.
Remove the water tank.
Install the water fi lter as
recommended on page 7.
65
Place a container beneath the hot
water/steam wand.
Press the main power button to the
“ON” position.
6
INSTALLATION
SETTING THE LANGUAGE
When the machine is switched on for the fi rst time, it requires the selection of the desired language.
This allows you to adjust the parameters of the beverages to the typical parameters of the country
where the machine is used. This is why some languages are differentiated also by country.
1 2 3
2.1 language
English
2.1 language
English
self-diagnosis
Select the desired language by
navigating the click wheel with
When the desired language is
displayed, press
your fi nger.
4
warming up
- +
Wait until the machine completes
the warming phase.
Once the warming phase is
completed, a small quantity of water
rinse cycle
please wait
is dispensed. Wait for this rinsing to
be completed automatically. Refer
to page 21 to enable/disable the
rinsing function.
SETTING THE WATER HARDNESS
The test strip can only be used for one measurement.
1
.
all the messages in the selected
language.
65
The machine starts and displays
medium aroma
espresso coffee 08:33
The machine is now ready to
brew.
2
Intenza Aroma System
A
B
C
Immerse the water hardness test strip
in water for 1 second.
1234
Machine water hardness setting
Check the water hardness value and set:
- the machine water hardness level (page 21);
- the Intenza Aroma System (page 7).
INTENZA WATER FILTER
To improve the quality of the water you use, and to extend the life of your machine at the same time, it is
recommended that you install the water fi lter. After installation, select the water fi lter function under the
maintenance menu (see page 20). By setting the water fi lter status to ON, the machine informs the user when
the fi lter must be replaced.
Remove the water fi lter from its packaging, immerse it vertically (with the opening facing upwards) in
cold water and gently press its sides so as to let the air bubbles out.
1
2
3
7
Remove the small white fi lter from
the tank and store it in a dry place
sheltered from dust.
Set the Intenza Aroma System:
A = Soft water
B = Medium water (standard)
C = Hard water
4
Fill the tank with fresh drinking
water and re-insert it into the
5 6
Place a container beneath the hot
water/steam wand.
machine.
7 8 9
3.1 water filter 3.1.3 activate filter
execute now
1.1.
2.2.
Select “water fi lter” and press
again.
Select “activate fi lter” and press the
button.
Insert the fi lter in the empty tank.
The reference mark and the
groove must match. Push fi rmly
until it is completely inserted.
3 maintenance
2.
1.
3.
Press .
Select “maintenance” and press the
button.
Turn the knob to the position.
Water dispensing begins..
When the machine has fi nished, turn the knob until it is in the rest position ( ). Press a few times until the
“exit” message is displayed. Then press
. The machine is now ready for use.
NOTE: if the Intenza water fi lter is not used, insert the small white fi lter previously removed (see step 1)
into the tank.
8
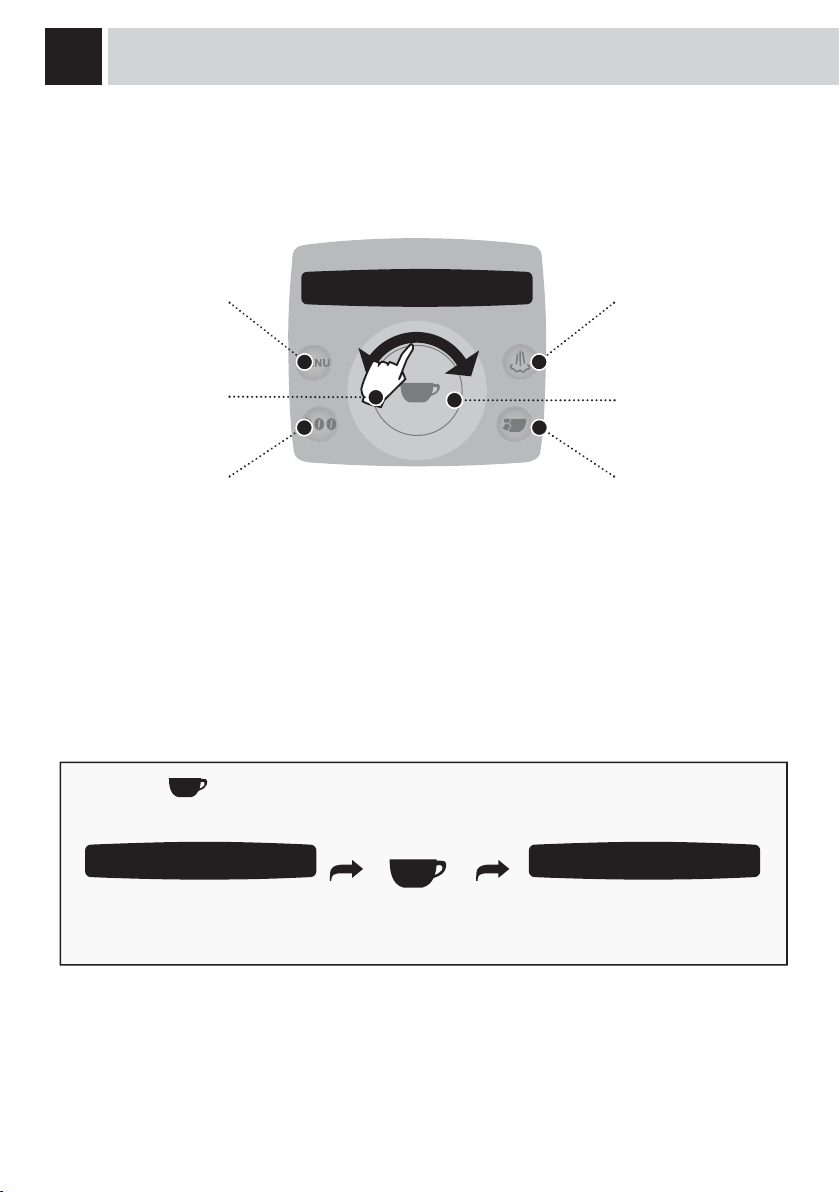
CONTROL PANEL
Access the
programming menu
Click wheel
Selects the aroma
(amount of coffee ground
per cup) or selects
pre-ground coffee
• Press the button twice to make 2 cups.
This operation can be performed up until the grinding of the fi rst cup is complete.
selected
espresso coffee
strong aroma
espresso coffee 08:33
Press twice
Steam button
Brew button
Hot water button
selected
double espresso
• To brew 2 cups, the machine dispenses the fi rst coffee and briefl y interrupts dispensing in order to grind
the second serving of coffee.
Coffee dispensing is then restarted and completed.
ADJUSTMENTS
AROMA OPTI-DOSE (ADJUSTS THE COFFEE DOSE PER CUP)
It is possible to choose three aroma options
(strong, medium and mild) by pressing the
button. These indicate the quantity of coffee the
machine grinds for each beverage. This button is
also used to select the pre-ground coffee function.
strong aroma
espresso coffee 08:33
medium aroma
espresso coffee 08:33
9
espresso coffee 08:33
espresso coffee 08:33
mild aroma
pre-ground
SELECT THE AMOUNT OF COFFEE TO
BE GROUND BEFORE DISPENSING
THE BEVERAGE.
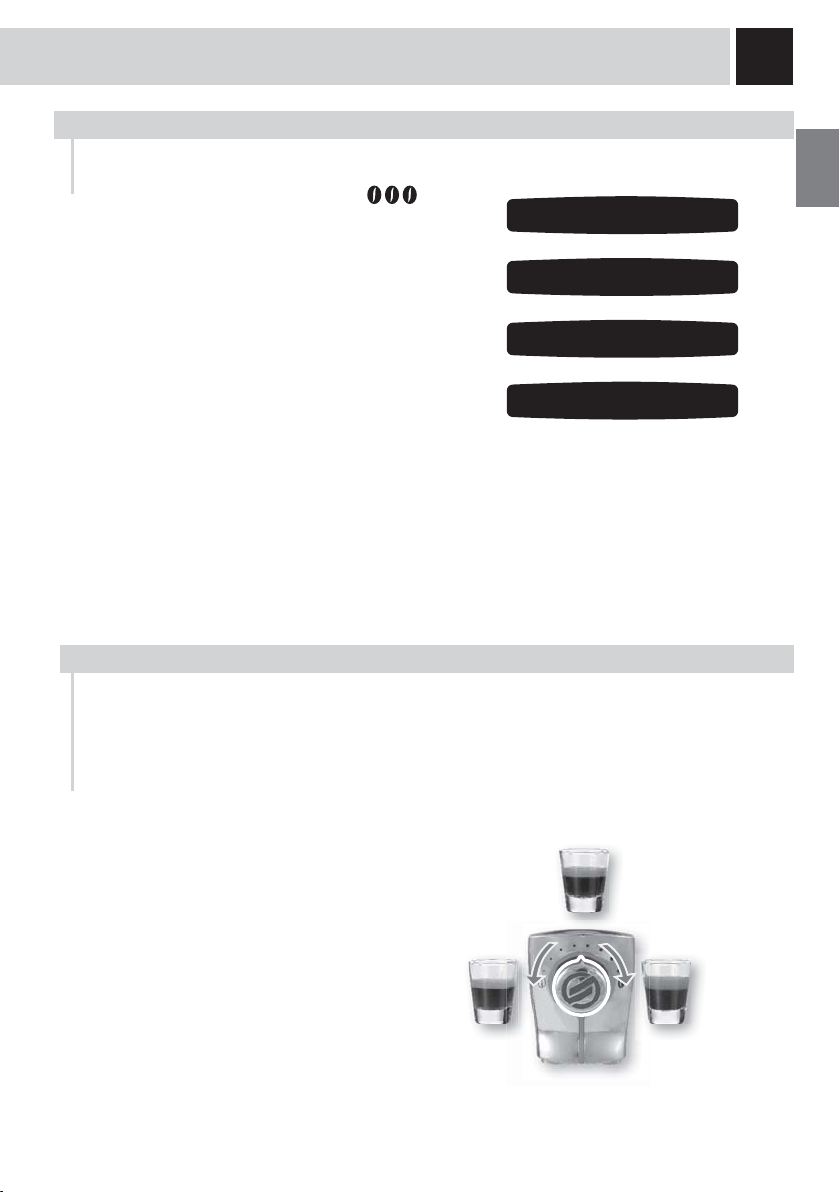
COFFEE STRENGTH
The SBS dial has been carefully designed to give your coffee the fullness and intensity you desire. Simply
turn the dial, and you will notice that the coffee brewed will adjust to the setting selected.
SBS – SAECO BREWING SYSTEM
MEDIUM
SBS adjusts the fullness of the brewed coffee.
The coffee may even be adjusted while
brewing. This adjustment has an immediate
effect on the selected type of brewing.
MILD
COFFEE
COFFEE
STRONG
COFFEE
 Loading...