

Page 1
ALLEN–BRADLEY
Bulletin 2705
RediPANEL Plug & Go Push Button
Modules
(Bulletin 800A 16 and 32 Points)
User Manual
Page 2

Important User Information
Solid state equipment has operational characteristics differing from those of
electromechanical equipment. “Safety Guidelines for the Application,
Installation and Maintenance of Solid State Controls” (Publication SGI-1.1)
describes some important differences between solid state equipment and
hard-wired electromechanical devices. Because of this difference, and also
because of the wide variety of uses for solid state equipment, all persons
responsible for applying this equipment must satisfy themselves that each
intended application of this equipment is acceptable.
In no event will the Allen-Bradley Company be responsible or liable for
indirect or consequential damages resulting from the use or application of
this equipment.
The examples and diagrams in this manual are included solely for illustrative
purposes. Because of the many variables and requirements associated with
any particular installation, the Allen-Bradley Company cannot assume
responsibility or liability for actual use based on the examples and diagrams.
No patent liability is assumed by Allen-Bradley Company with respect to use
of information, circuits, equipment, or software described in this manual.
Reproduction of the contents of this manual, in whole or in part, without
written permission of the Allen-Bradley Company is prohibited.
Throughout this manual we use notes to make you aware of safety
considerations.
ATTENTION: Identifies information about practices or
circumstances that can lead to personal injury or death, property
!
damage, or economic loss.
Attentions help you:
• identify a hazard
• avoid the hazard
• recognize the consequences
PLC, PLC–2, PLC–3, and PLC–5 are registered trademarks of Allen-Bradley Company, Inc.
SLC, SLC 500, PanelView, RediPANEL, and Dataliner are trademarks of Allen-Bradley Company, Inc.
IBM is a registered trademark of International Business Machines, Incorporated.
Page 3
Page 4

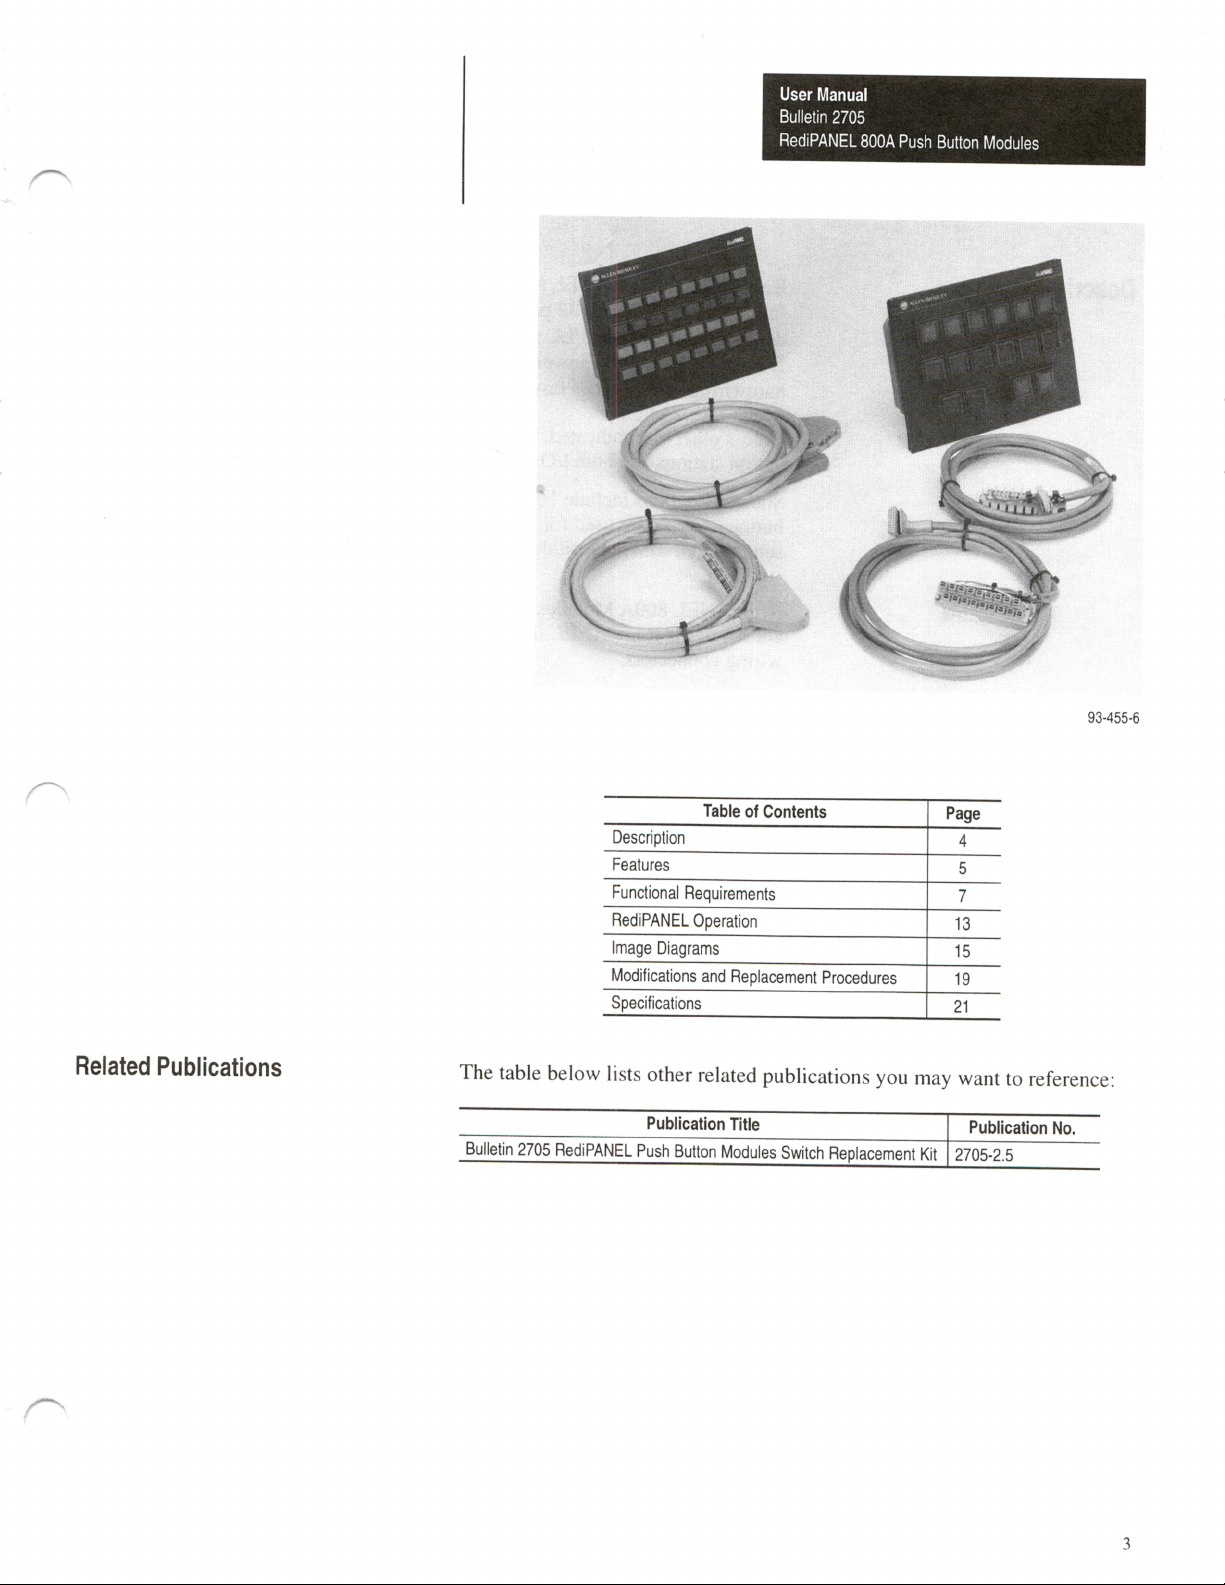
User Manual
Bulletin 2705
RediPANEL 800A Push Button Modules
Description
Bulletin 2705 RediPANEL Modules with Bulletin 800A Push Buttons are
fully assembled 16 and 32 point push button stations that operate with high
density Allen-Bradley PLC and SLC I/O modules. The only wiring required
is a pair of cables and power supply connections, which eliminates costly
hardwiring and provides fast installation and start-up.
Unless otherwise indicated, the descriptions that follow apply to both push
button stations and both I/O modules.
Standard stations include 16 or 32 normally open (N.O.) illuminated push
buttons. LED’s are used for illumination. The industrial 800A version is
suitable for NEMA 13 oil/dust tight industrial enviornments.
RediPANEL 800A Modules can also be ordered as custom models which
consist of the RediPANEL front plate and all the necessary push button
wiring connectors.
These custom Push Button stations can include any of the following
Allen-Bradley Bulletin 800A devices:
D Momentary illuminated or non-illuminated push buttons
D Flush or extended head operators
D Two position non-illuminated selector switches
4
Page 5

User Manual
Bulletin 2705
RediPANEL 800A Push Button Modules
Features
Easy Installation
Each RediPANEL is supplied complete with preassembled push buttons and
front plate. Separately ordered Bulletin 1492 wiring system cables plug
directly between the I/O Modules and the RediPANEL adapter boards,
eliminating hardwiring of individual devices. To install RediPANEL modules
follow these easy steps:
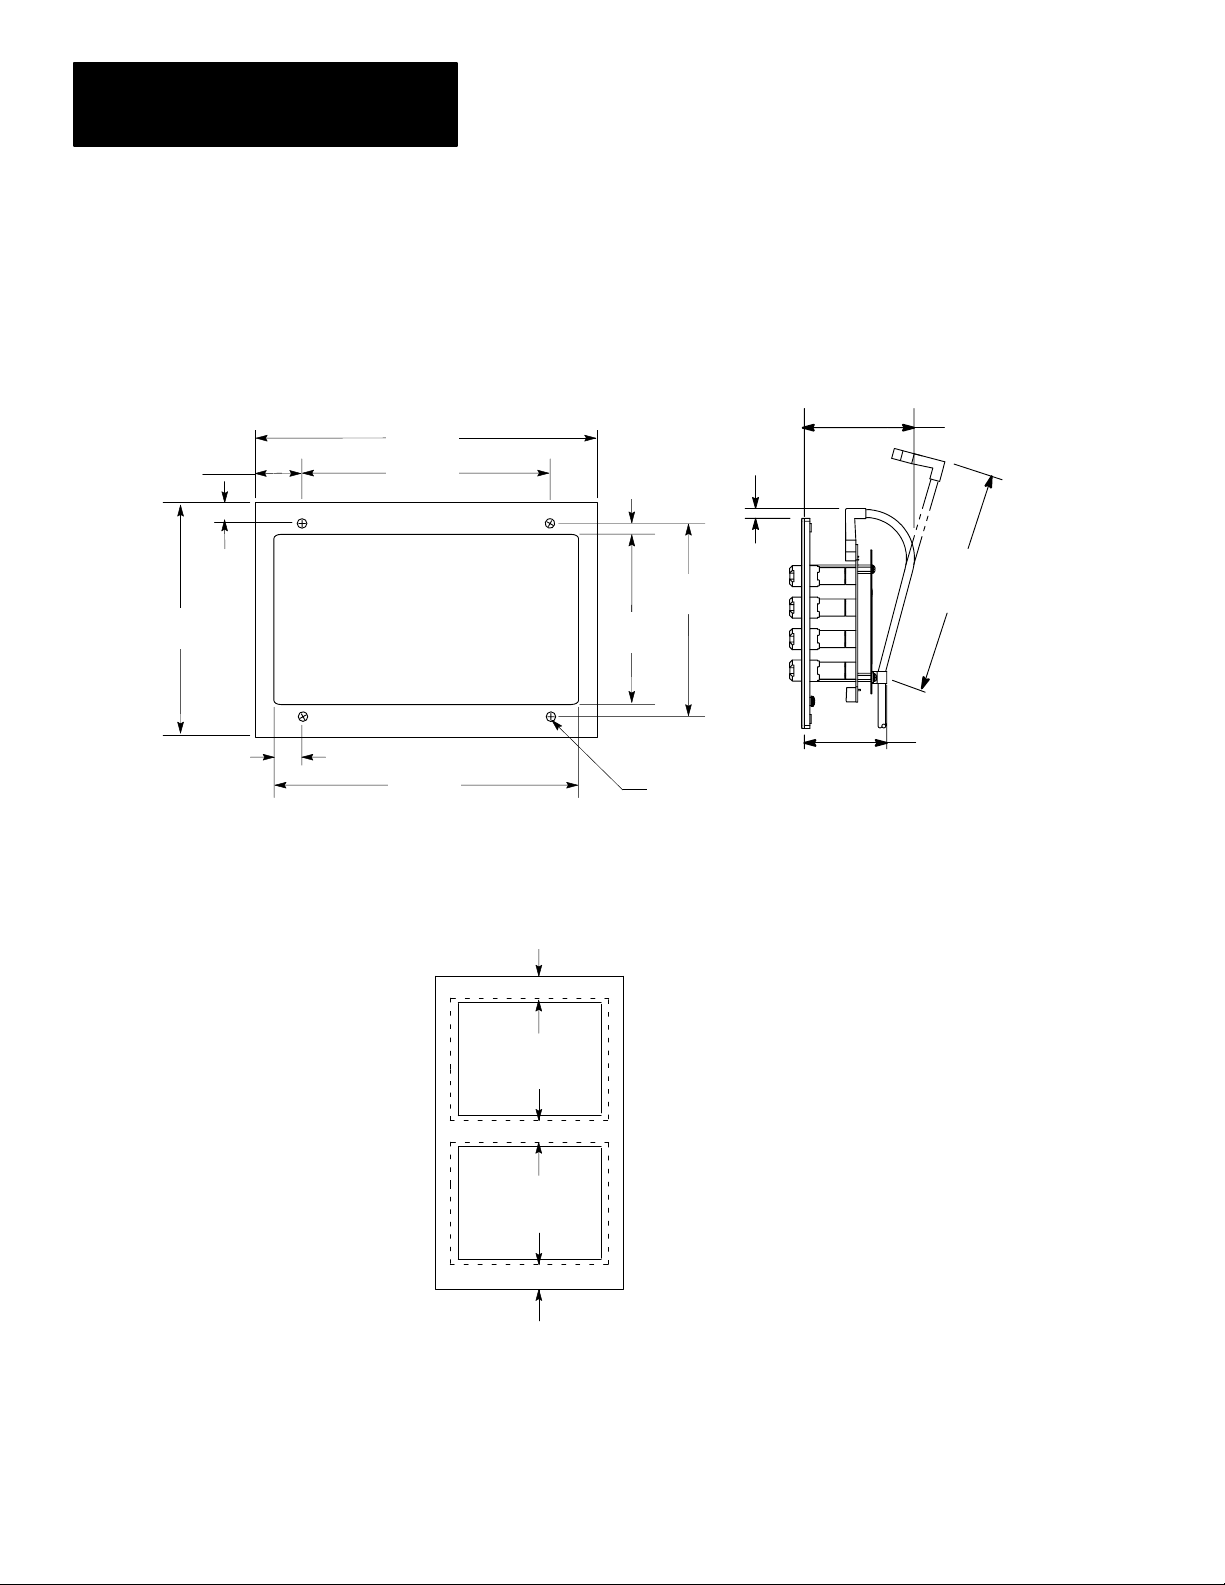
1. Cut an opening in the panel approximately 5.9 in. (149 mm) high x 8.6 in.
(218 mm) wide. See Figure 1.
2. Drill four 0.296” (7.52mm) dia. holes for the top and bottom mounting
brackets. A template is provided with the module to assist in this
operation.
3. Slide the module through the opening.
4. Apply the mounting brackets and tighten all the captive knurled
thumbscrews, being certain gasket is in place. Figure 1 shows screw
locations.
5. Connect the appropriate cables between the RediPANEL modules and the
PLC or SLC I/O modules. See page 10.
6. Connect external 24VDC power supply to pull-apart screw terminals on
the RediPANEL.
7. Connect green ground screw on the RediPANEL to the earth ground.
See pages 9 and 10 for detailed instructions on connecting power and
I/O cables.
Clearance Considerations
RediPANEL 800A Modules mounted inside an enclosure must have adequate
space for wire clearances. See Figure 2 for minimum recommended spacing.
5
Page 6
User Manual
Bulletin 2705
RediPANEL 800A Push Button Modules
1.06
(26.92)
Figure 1
Mounting Dimensions of the Module in Inches (mm)
FRONT VIEW SIDE VIEW
9.50
(241.30)
7.375
(187.33)
0.26
(6.60)
1.50 (38.1)
Max..
4.0 (101.6) 16 PB
4.5 (114.3) 32 PB
7.25
(184.15)
.44
(11.18)
0.62
(15.75)
Panel Cutout
5.86 x 8.61
(148.84 x 218.69)
8.61
(218.69)
Figure 2
Enclosure spacing in Inches (mm)
2.5 (63.5)
2.5 (63.5)
5.86
(148.84)
6.375
(161.93)
4-.296 (7.52)
Dia. Holes
8.0
(203.2)
2.6 (66.0) 16 PB
2.7 (68.6) 32 PB
Note: T o ensure proper strain relief, be certain that
the distance from the end of the cable to the
tie wrap is 8 inches.
2.5 (63.5)
6
Page 7

User Manual
Bulletin 2705
RediPANEL 800A Push Button Modules
Low System Cost
The RediPANEL reduces overall system cost by reducing wiring,
engineering, installation, and maintenance. Connection to high density
Allen-Bradley I/O modules is simple, easy, and cost effective.
Functional Requirements
Electrical Requirements and Power Supply
An external 24 VDC 10% power supply is used for this module. The
power supply must be able to provide the current requirements for the
Bulletin 800A assembly and the selected PLC or SLC input sinking and
output sourcing modules.
The Bulletin 800A LED’s use the power supply to draw the source current
from the output module and the contacts complete the circuit for the sink
current to the input modules. See Table 1 below for current requirements.
Table 1
RediP ANEL Current Requirements
No. of
Pushbuttons
16
32
32
PC type
SLC
SLC
PLC
PLC
SLC
PLC
PLC
Item
Bulletin 800A LED’s from 1746-OB16 Output module .35 Amps
Bulletin 800A contacts to 1746-IB16 Input module .12 Amps
Total maximum current required .47 Amps
Bulletin 800A LED’s from 1771-OBD Output module .35 Amps
Bulletin 800A contacts to 1771-IBD Input module .20 Amps
Total maximum current required .55 Amps
Bulletin 800A LED’s from 1746-OB32 Output module .71 Amps
Bulletin 800A contacts to 1746-IB32 Input modules
Total maximum current required .95 Amps
Bulletin 800A LED’s from 1771-OBN Output module .71 Amps
Bulletin 800A contacts to 1771-IBN Input module .52 Amps
Total maximum current required 1.23 Amps
Current
Required
.24 Amps
7
Page 8

User Manual
Bulletin 2705
RediPANEL 800A Push Button Modules
Push button Board
The push button assembly used is Bulletin 800A with 24 VDC six chip LED
cluster lamps which have longer life than incandescent lamps. The LED
cluster is polarity sensitive and will be positioned with the plus (+) indicator
facing left when viewing the front of the module. It is NOT acceptable to
interchange LED and incandescent lamps in the Bulletin 800A assembly.
Interchanging lamps could result in intermittent connections, since the lamp
bases have slightly different dimensions and mating contacts will set over
time. The contacts will be operating at 24 VDC.
I/O Modules
A sinking input module is used to interface with the Bulletin 800A contacts.
Each contact will typically draw 8 mA when energized. Connection from the
input module to the pushbutton contacts is through one of the cables
described in Table 2 on the next page.
A sourcing output module is used to interface to the 800A push button
assembly lamps (LED’s). Each LED will typically require 18 mA when
illuminated. Connection from the output module to the LED’s is through one
of the cables described in Table 2 on the next page.
Interconnecting Cables
Two preassembled cables connect the push button assembly and I/O
modules: one cable will connect to the input module and one to the output
module. All connections to Bulletin 800A contacts and LED’s are sent
through these cables. See Table 2 on the next page.
For SLC systems, each end of the cable for the 32 point RediPANEL has a
40 pin connector which mates with a 40 pin receptacle on the RediPANEL.
The other end of the cable has a 40 pin connector which mates with a 40 pin
receptacle on the Bulletin 1746 module. One end of the cable on the 16 point
version has a 20 pin connector which mates with a 20 pin receptacle on the
Bulletin 800A panel assembly and the other end has an 18 position prewired
swing arm which mates with a Bulletin 1746 module.
For PLC systems each end of the cable for the 32 point RediPANEL has a 40
pin connector which mates with a 40 pin receptacle on the RediPANEL. The
other end of the cable has a 40 point prewired swing arm which mates with
the Bulletin 1771 module. One end of the cable on the 16 point version has a
20 pin connector which mates with a 20 pin receptacle on the RediPANEL
and the other end has a 21 point prewired swing arm which mates with a
Bulletin 1771 module.
8
Page 9

User Manual
Bulletin 2705
RediPANEL 800A Push Button Modules
The input and output cable connectors are identified on the printed circuit
board. It is important that the input and output module connectors are
connected correctly, since the output modules do not have reverse polarity
protection. Connecting the wrong cable and module could result in a short to
the power supply output terminals or a blown module fuse. Some of these
fuses are not field replaceable.
Table 2
Module and Cable Catalog Numbers
No. of PC type Module Type Module Cable Catalog No. based on cable length
Push buttons Catalog No.
Input 1746-IB16 1492-CABLE10B 1492-CABLE25B 1492-CABLE50B
Output 1746-OB16 1492-CABLE10E 1492-CABLE25E 1492-CABLE50E
Input 1771-IBD
Output 1771-OBD
Input 1746-IB32
Output
Input 1771-IBN 1492-CABLE10J 1492-CABLE25J 1492-CABLE50J
Output
1746-OB32
1771-OBN 1492-CABLE10L 1492-CABLE25L 1492-CABLE50L
16
16
32
SLC
PLC
SLC
PLC
1.0 Meter 2.5 Meters 5.0 Meters
1492-CABLE10F 1492-CABLE25F 1492-CABLE50F
1492-CABLE10H 1492-CABLE25H 1492-CABLE50H
9
Page 10

User Manual
Bulletin 2705
RediPANEL 800A Push Button Modules
Faceplate Configurations
Figures 3 and 4 show the push button locations and bit addresses for 16 and
32 point SLC’s and PLC’s.
Figure 3
Faceplate configurations for 16 point SLC’s and PLC’s
PLC Bit Addresses (Octal)
123456
00 01 02 03 04 05
789101112
06 07 10 11 12 13
13 14 15 16
14 15 16 17
Figure 4
Faceplate configurations for 32 point SLC’s and PLC’s
PLC Bit Addresses (Octal)
12345678
00 01 02 03 04 05 06 07
Button #
Address Bit #
Button #
Address Bit #
SLC Bit Addresses (Decimal)
123456
00 01 02 03 04 05
789101112
06 07 08 09 10 11
13 14 15 16
12 13 14 15
SLC Bit Addresses (Decimal)
12345678
00 01 02 03 04 05 06 07
10
9 10111213141516
10 11 12 13 14 15 16 17
17 18 19 20 21 22 23 24
00 01 02 03 04 05 06 07
25 26 27 28 29 30 31 32
10 11 12 13 14 15 16 17
9 10111213141516
08 09 10 11 12 13 14 15
17 18 19 20 21 22 23 24
16 17 18 19 20 21 22 23
25 26 27 28 29 30 31 32
24 25 26 27 28 29 30 31
Page 11

Page 12

User Manual
Bulletin 2705
RediPANEL 800A Push Button Modules
To connect wires to the power connection from the power source, follow
these easy steps (see Figures 5 and 6):
1. Remove the power connector from the receptacle.
2. Loosen left and right screws on the power connector and insert the wires
into the openings on the bottom of the power connector, being certain that
the correct polarity is observed between the power connection and the
power source.
3. Tighten the screws on the power connector and insert the power connector
into the receptacle.
To connect the preassembled cables between the RediPANEL and I/O
modules, follow these easy steps:
1. Remove the tie wrap from the back of the RediPANEL and place it over
the cable at a distance of 8” from the end.
2. Insert the proper cable (see Table 2 ) into the appropriate connection
terminal (input or output) and secure with locking tabs.
3. Be certain that the distance from the end of the cable to the tie wrap is
8”, then reinstall the tie wrap to the back of the RediPANEL. See Figure 7
below.
Figure 7
Side view of Push button Module
Dimensions in inches (millimeters)
4.0 (101.6) 16 PB
4.5 (114.3) 32 PB
1.50 (38.1)
Max.
8.0
(203.2)
12
2.6 (66.0) 16 PB
2.7 (68.6) 32 PB
Page 13

User Manual
Bulletin 2705
RediPANEL 800A Push Button Modules
RediPANEL Operation
Connections
RediPANEL modules connect to Allen-Bradley 1746 or 1771 I/O modules
with two preassembled cables. This replaces large wire bundles used in
hardwired implementation. See Figure 8.
Figure 8
Typical RediPANEL I/O Module connection
2705 RediPANEL
I/O Modules
•
•
•
•
•
•
•
•
•
•
•
•
Output Cable
Push Button Panel
Input Cable
Bulletin 800A devices in the RediPANEL module “appear” to the
programmable controller as though they were hardwired to I/O modules in an
I/O rack. No special instructions are required since the push button, lamp,
and switch selection are programmed as discrete I/O devices using the input
and output image tables of the programmable controller.
13
Page 14

User Manual
Bulletin 2705
RediPANEL 800A Push Button Modules
24 VDC
Power Supply
2705 RediPANEL
Push Button Module
=
Selector Switch
Modules
RediPANEL modules combine the functions of standard push button devices
with the capabilities of a remote I/O rack – all in one package. See Figure 9.
Figure 9
Typical RediPANEL Functionality
+
Push Buttons
Pilot Lights
Key Switch
PC Board
Cables
•
•
•
•
•
•
•
•
•
•
•
•
•
•
•
•
I/O Modules
RediPANEL modules communicate directly with the programmable
controller via cables to I/O modules. Programming the devices in the
modules is identical to programming devices hardwired to I/O racks. This
means that the RediPANEL modules are mapped directly into the I/O image
tables of the programmable controller through the I/O modules.
14
Page 15

User Manual
Bulletin 2705
RediPANEL 800A Push Button Modules
Image Diagrams
Output Image Table
1/4 Rack
Image Table Configurations
Figures 10-13 show a typical I/O image table configuration when using a 16
or 32 button RediPANEL module with a 1746 SLC or a 1771 PLC I/O
module.
Figure 10
Typical Image Table Configuration for 16 Button RediPANEL with 1746 SLC I/O Modules
Lamp Control Bits
SLC Bit Addresses (Decimal)
123456
00 01 02 03 04 05
7 8 9 10 11 12
06 07 08 09 10 11
13 14 15 16
12 13 14 15
Input Image Table
1/4 Rack
0123456789101112131415
WORD 0
WORD 1
Input
Switch Status Bits
Word
Output
I:2
01
Bits
0123456789101112131415
O:3
08
Push Button #2
Push Button #9 Lamp
I:2
01
NOTE: This example has push button #2 (at input module word 2 bit 01) turning on lamp #9 (at output module word 3 bit 08).
O:3
08
15
Page 16

User Manual
Bulletin 2705
RediPANEL 800A Push Button Modules
Figure 11
Typical Image Table Configuration for 16 Button RediPANEL with 1771 PLC I/O Modules
Output Image Table
1/4 Rack
1617 101112131415
Lamp Control Bits
PLC Bit Addresses (Octal)
123456
00 01 02 03 04 05
789101112
06 07 10 11 12 13
13 14 15 16
14 15 16 17
Push Button #2
I:020
Input Image Table
1/4 Rack
01234567 012345671011121314151617
WORD 0
WORD 1
Input
01
Switch Status Bits
Module Group 1
Rack #2
Output
Module Group (Word)
Bits
Push Button #9 Lamp
O:021
(Word)
O:021I:020
10
01
NOTE: This example has push button #2 (at rack 2, word 0, bit 01) turning on lamp #9 (at rack 2, word 1, bit 10).
This example assumes one slot addressing for I/O chassis.
16
10
Page 17

User Manual
Bulletin 2705
RediPANEL 800A Push Button Modules
Figure 12
Typical Image Table Configuration for 32 Button RediPANEL with 1746 SLC I/O Modules
Output Image Table
1/4 Rack
Lamp Control Bits
Lamp Control Bits
SLC Bit Addresses (Decimal)
12345678
00 01 02 03 04 05 06 07
9 10111213141516
08 09 10 11 12 13 14 15
17 18 19 20 21 22 23 24
16 17 18 19 20 21 22 23
25 26 27 28 29 30 31 32
24 25 26 27 28 29 30 31
Input Image Table
1/4 Rack
0123456789101112131415 0123456789101112131415
WORD 0
WORD 1
Input
I:2
16
Switch Status Bits
Switch Status Bits
Word
Bits
Output
O:3
31
Push Button #17
Push Button #32 Lamp
I:2
16
NOTE: This example has push button #17 (at input module word 2, bit 16) turning on lamp #32 (at output module word 3 bit 31).
O:3
31
17
Page 18

User Manual
Bulletin 2705
RediPANEL 800A Push Button Modules
Figure 13
Typical Image Table Configuration for 32 Button RediPANEL with 1771 PLC I/O Modules
Output Image Table
1/4 Rack
Lamp Control Bits
Lamp Control Bits
PLC Bit Addresses (Octal)
12345678
00 01 02 03 04 05 06 07
9 10111213141516
10 11 12 13 14 15 16 17
17 18 19 20 21 22 23 24
00 01 02 03 04 05 06 07
25 26 27 28 29 30 31 32
10 11 12 13 14 15 16 17
Input Image Table
1/4 Rack
012345671011121314151617 012345671011121314151617
WORD 0
WORD 1
Input
00
Switch Status Bits
Switch Status Bits
Module Group 3
Rack #2
Output
Module Group (Word)
Bits
(Word)
O:023I:023
17
Push Button #17
I:023
00
NOTE: This example has push button #17 (at rack 2, word 3, bit 00) turning on lamp #32 (at rack 2, word 3, bit 17).
This example assumes one slot addressing for I/O chassis.
18
Push Button #32 Lamp
O:023
17
Page 19

User Manual
ËËË
Bulletin 2705
RediPANEL 800A Push Button Modules
Modification and Replacement Procedures
Custom 800A RediPANEL Modules
If the standard configuration modules with momentary push buttons do not
meet your requirements, 800A custom modules are available. Custom
modules can contain any combination of the following Bulletin 800A
devices:
Momentary Illuminated Push Buttons
Maintained Illuminated Push Buttons
Two Position Selector Switches
Flush Head or Extended Head Operators
Two Position Key Switches
Installing or Replacing Push Button Legends
ATTENTION: To avoid electrical shock or unintended operation
of the equipment, disconnect power before servicing.
!
1. Remove the lens carrier from the push button on the module by gently
prying it out on either side of the carrier with a screwdriver.
ATTENTION: DO NOT use the slot on either side of the lens
carrier for prying as it may break the assembly.
!
2. Remove the color lens by placing a small screwdriver into the slot on the
back of the lens carrier and gently prying the two pieces apart.
ATTENTION: DO NOT use too much pressure in prying the
assembly apart as it can damage the colored lens.
!
STEP 1 STEP 2
19
Page 20

User Manual
Bulletin 2705
RediPANEL 800A Push Button Modules
Installing or Replacing Push Button Legends (cont’d)
3. Insert the new legend and “snap” the two pieces back together.
4. Replace the keyed lens carrier into the push button.
5. Check for proper operation of the push button.
STEP 3
Lamp Replacement
ATTENTION: To avoid electrical shock or unintended operation
of the equipment, disconnect power before servicing.
STEP 5
!
1. Remove the lens carrier from the push button on the module by gently
prying it out on either side of the carrier with a screwdriver.
ATTENTION: DO NOT use the slot on either side of the lens
carrier for prying as it may break the assembly.
!
2. Remove existing lamp from socket.
20
ATTENTION: DO NOT use the screwdriver or any other metal
object to remove the bulb. Use ONLY the 800M-N5 lamp
!
replacement tool.
Page 21

User Manual
Bulletin 2705
RediPANEL 800A Push Button Modules
Lamp Replacement (cont’d)
800M-N5
STEP 1 STEP 2
3. Carefully insert the new lamp into the socket.
Specifications
ATTENTION: Before replacing the lens carrier into the push
button, be sure the lamp is seated properly or a short may result.
!
The LED must be installed with plus (+) indicator facing to the
left.
4. Replace the keyed lens carrier into the push button.
5. Check for proper operation of the push button.
Electrical
External Power Supply 24 Volts DC "10 %
21.6-26.4 VDC
Input Current and
Power Ratings
(All On)
LEDs
32 Buttons 16 Buttons
SLC .95 Amps .47 Amps
PLC 1.23 Amps .55 Amps
24 VDC six chip cluster lamps
Catalog No. 800T-N62R (red)
-N62G (green)
-N62A (amber)
Power Connector
UL File/Guide Non-Hazardous Locations: E56639/NMTR
CSA Non-Hazardous Locations: LR62923
Two position header (part of printed circuit board
assembly) and two position removable connector
(provided). End user responsible for wiring between
connector and external power supply.
21
Page 22

User Manual
Bulletin 2705
RediPANEL 800A Push Button Modules
Mechanical
Enclosure NEMA Type 13
32 Push Button Module
Configurations
Standard: 8 Red, 16 Green, 8 Amber
16 Push Button Module
Standard: 8 Red, 8 Green
Replacement Illuminated
Push Button
Approximate Dimensions
Approximate Weight of
Module (w/o Cables)
16 PB Units – 800A-C2DG24 (Green)
32 PB Units – 800A-C2CA24 (Amber)
Length: 9.5” (241.3mm)
Height: 7.25
Depth: 4.0
2.9 lbs. (1.3 kg) 16 Button Panel
3.25 lbs. (1.5 kg.) 32 Button Panel
800A-C2DR24 (Red)
800A-C2CG24 (Green)
800A-C2CR24 (Red)
” (184.15mm)
” (101.6 mm - 16 Button Panel)
” (114.3 mm - 32 Button Panel)
4.5
Enviornmental
Temperature
Humidity 5% – 95% non-condensing
Operating: -20_C to +45_C (-4_F to 113_F)
(Operating temperature at 0_C (32_F) is based on the
absence of freezing moisture or liquid.)
Storage: -30_C to +85_C (-22_F to 185_F)
22
Page 23

Allen-Bradley has been helping its customers improve productivity and quality for 90 years.
A-B designs, manufactures and supports a broad range of control and automation products
worldwide. They include logic processors, power and motion control devices, man-machine
interfaces and sensors. Allen-Bradley is a subsidiary of Rockwell International, one of the
world’s leading technology companies.
With major offices worldwide.
Algeria • Argentina • Australia • Austria • Bahrain • Belgium • Brazil • Bulgaria • Canada • Chile • China, PRC • Colombia • Costa Rica • Croatia • Cyprus • Czech
Republic • Denmark • Ecuador • Egypt • El Salvador • Finland • France • Germany • Greece • Guatemala • Honduras • Hong Kong • Hungary • Iceland • India •
Indonesia • Israel • Italy • Jamaica • Japan • Jordan • Korea • Kuwait • Lebanon • Malaysia • Mexico • New Zealand • Norway • Oman • Pakistan • Peru • Philippines
• Poland • Portugal • Puerto Rico • Qatar • Romania • Russia–CIS • Saudi Arabia • Singapore • Slovakia • Slovenia • South Africa, Republic • Spain • Switzerland •
Taiwan • Thailand • The Netherlands • Turkey • United Arab Emirates • United Kingdom • United States • Uruguay • Venezuela • Yugoslavia
World Headquarters, Allen-Bradley, 1201 South Second Street, Milwaukee, WI 53204 USA, Tel: (1) 414 382-2000 Fax: (1) 414 382-4444
Publication 2705-803 — March 1994 40061-223-01(A)
Copyright 1994 Allen-Bradley Company, Inc. Printed in USA
 Loading...