

Page 1

ProcessLogix
R510.0 Installation
and Upgrade Guide
1757-SWKIT5100
Installation Instructions
Page 2
Important User Information
Solid state equipment has operational characteristics differing from those of
electromechanical equipment. Safety Guidelines for the Application,
Installation and Maintenance of Solid State Controls (Publication SGI-1.1
available from your local Rockwell Automation sales office or online at
http://www.ab.com/manuals/gi) describes some important differences
between solid state equipment and hard-wired electromechanical devices.
Because of this difference, and also because of the wide variety of uses for
solid state equipment, all persons responsible for applying this equipment
must satisfy themselves that each intended application of this equipment is
acceptable.
In no event will Rockwell Automation, Inc. be responsible or liable for
indirect or consequential damages resulting from the use or application of
this equipment.
The examples and diagrams in this manual are included solely for illustrative
purposes. Because of the many variables and requirements associated with
any particular installation, Rockwell Automation, Inc. cannot assume
responsibility or liability for actual use based on the examples and diagrams.
No patent liability is assumed by Rockwell Automation, Inc. with respect to
use of information, circuits, equipment, or software described in this manual.
Reproduction of the contents of this manual, in whole or in part, without
written permission of Rockwell Automation, Inc. is prohibited.
Throughout this manual we use notes to make you aware of safety
considerations.
WARNING
!
ATTENTION
!
IMPORTANT
Identifies information about practices or circumstances
that can cause an explosion in a hazardous environment,
which may lead to personal injury or death, property
damage, or economic loss.
Identifies information about practices or circumstances
that can lead to personal injury or death, property
damage, or economic loss.
Attentions help you:
• identify a hazard
• avoid a hazard
• recognize the consequence
Identifies information that is critical for successful
application and understanding of the product.
Page 3

Table of Contents
Preface
ProcessLogix R510.0 Installation
Introduction
Our Assumptions About Users . . . . . . . . . . . . . . . . . . Preface-1
Starting Conditions and Assumptions . . . . . . . . . . Preface-1
Minimum Hardware Requirements. . . . . . . . . . . . . . . Preface-2
Contents of Release. . . . . . . . . . . . . . . . . . . . . . . . . . Preface-2
ProcessLogix Online Help/Knowledge Builder . . . Preface-3
ProcessLogix R510.0 Installation and
Upgrade Guide . . . . . . . . . . . . . . . . . . . . . . . . . . Preface-3
Removing the Default Startup Screens . . . . . . . . . . . . Preface-4
Rockwell Automation Support . . . . . . . . . . . . . . . . . . Preface-4
New Product Satisfaction Return. . . . . . . . . . . . . . Preface-4
Your Questions or Comments about This Manual . Preface-4
Conventions . . . . . . . . . . . . . . . . . . . . . . . . . . . . . . . Preface-5
Terms and Type Representations . . . . . . . . . . . . . Preface-5
Checklists . . . . . . . . . . . . . . . . . . . . . . . . . . . . . . Preface-5
Acronyms and Abbreviations . . . . . . . . . . . . . . . . . . . Preface-6
Chapter 1
Operating System Support . . . . . . . . . . . . . . . . . . . . . . . . . 1-1
Operating System Options. . . . . . . . . . . . . . . . . . . . . . . . . 1-1
ProcessLogix Server Supported Installations . . . . . . . . . . . . 1-2
ProcessLogix Client Supported Installations . . . . . . . . . . . . 1-4
Operating System Installation
Procedures
Chapter 2
Clean System Windows 2000 Server Installation . . . . . . . . . 2-2
Installing Windows 2000 Server on a New System . . . . . 2-2
Starting the Windows 2000 Server Installation
from the Boot Floppies . . . . . . . . . . . . . . . . . . . . . . . . 2-4
Starting the Windows 2000 Server Installation
from the CD-ROM . . . . . . . . . . . . . . . . . . . . . . . . . . . . 2-5
Completing the Windows 2000 Server Installation . . . . . 2-5
PC Naming Rules . . . . . . . . . . . . . . . . . . . . . . . . . . . . . 2-7
Clean System Windows 2000 Professional Installation . . . . . 2-11
Installing Windows 2000 Professional on a New System 2-11
Creating Windows 2000 Professional Boot Floppies. . . . 2-12
Starting the Windows 2000 Professional Installation
from the Boot Floppies . . . . . . . . . . . . . . . . . . . . . . . . 2-13
Starting the Windows 2000 Professional Installation
from the CD-ROM . . . . . . . . . . . . . . . . . . . . . . . . . . . . 2-13
Completing the Windows 2000 Professional Installation. 2-14
Clean System Windows XP Professional Installation . . . . . . 2-18
Installing Windows XP Professional on a New System . . 2-18
Starting the Windows XP Installation from the CD-ROM 2-19
Completing the Windows XP Professional Installation . . 2-20
Upgrading Windows 2000 Professional to XP Professional . 2-24
Creating the ProcessLogix User Accounts . . . . . . . . . . . . . . 2-26
Creating the ps_user and erserver accounts. . . . . . . . . . 2-26
i Publication 1757-IN510A-EN-P - October 2003
Page 4

Table of Contents ii
Modifying Windows XP. . . . . . . . . . . . . . . . . . . . . . . . . . . 2-28
Windows 2000 Service Pack 4 Installation . . . . . . . . . . . . . 2-29
Checking for Windows 2000 Service Pack 4 . . . . . . . . . 2-29
Installing Windows 2000 Service Pack 4 . . . . . . . . . . . . 2-30
Windows Security Hotfix Installation . . . . . . . . . . . . . . . . . 2-31
Installing Windows 2000 Security Hotfix . . . . . . . . . . . . 2-31
Installing Windows XP Security Hotfix . . . . . . . . . . . . . 2-32
Internet Explorer 6.0 SP1 Installation . . . . . . . . . . . . . . . . . 2-33
Checking the Internet Explorer Version. . . . . . . . . . . . . 2-33
Installing Internet Explorer 6.0 SP1 . . . . . . . . . . . . . . . . 2-35
Updating Windows Installer. . . . . . . . . . . . . . . . . . . . . . . . 2-36
Updating ISScript . . . . . . . . . . . . . . . . . . . . . . . . . . . . . . . 2-37
Additional Operating System Customization Procedures . . . 2-38
Adjusting the Video Settings . . . . . . . . . . . . . . . . . . . . 2-38
Setting Up Additional Drivers . . . . . . . . . . . . . . . . . . . . 2-39
Other Required System Settings . . . . . . . . . . . . . . . . . . 2-39
Creating Emergency Repair Disks . . . . . . . . . . . . . . . . . . . 2-40
Windows 2000. . . . . . . . . . . . . . . . . . . . . . . . . . . . . . . 2-40
Windows XP . . . . . . . . . . . . . . . . . . . . . . . . . . . . . . . . 2-40
ProcessLogix Server Installation
Procedures
Chapter 3
ProcessLogix Software Installation on a Clean PC . . . . . . . . 3-1
Installing ProcessLogix R510.0 Software . . . . . . . . . . . . . . . 3-2
Installing ProcessLogix Product. . . . . . . . . . . . . . . . . . . 3-4
Installing SQL Server . . . . . . . . . . . . . . . . . . . . . . . . . . 3-4
Installing Knowledge Builder . . . . . . . . . . . . . . . . . . . . 3-6
Installing RSLinx . . . . . . . . . . . . . . . . . . . . . . . . . . . . . 3-7
Installing Engineering Tools . . . . . . . . . . . . . . . . . . . . . 3-8
Installing Active X Components . . . . . . . . . . . . . . . . . . 3-8
Installing the ProcessLogix Server . . . . . . . . . . . . . . . . . 3-9
Installing ProcessLogix Update . . . . . . . . . . . . . . . . . . . 3-12
Moving the RSLinx Activation File . . . . . . . . . . . . . . . . . . . 3-14
About the Activation File . . . . . . . . . . . . . . . . . . . . . . . 3-14
Determining the Current RSLinx Version . . . . . . . . . . . . 3-14
Installing the Activation File . . . . . . . . . . . . . . . . . . . . . 3-15
Configuring RSLinx Drivers for ControlNet
Supervisory Network. . . . . . . . . . . . . . . . . . . . . . . . . . . . . 3-16
Updating the 1784-PCIC Firmware . . . . . . . . . . . . . . . . 3-17
Configuring RSLinx Drivers for Ethernet
Supervisory Network. . . . . . . . . . . . . . . . . . . . . . . . . . . . . 3-19
Completing the ProcessLogix R510.0 Install on a
Non-Redundant Server . . . . . . . . . . . . . . . . . . . . . . . . . . . 3-20
Upgrading Hardware Component Firmware . . . . . . . . . 3-20
Checking Control Builder Operation and Logging On . . 3-20
Backing Up a ProcessLogix Server Hard Drive to Tape . 3-21
Creating an Emergency Repair Disk . . . . . . . . . . . . . . . 3-21
Publication 1757-IN510A-EN-P - October 2003
Page 5

ProcessLogix Server Upgrade
Procedures
Table of Contents iii
Chapter 4
ProcessLogix Server Upgrade Scenarios . . . . . . . . . . . . . . . 4-1
Upgrade R500.1 Server to R510.0 . . . . . . . . . . . . . . . . . 4-1
Upgrade R400.0 SP2 Server to R510.0 . . . . . . . . . . . . . . 4-3
Upgrade R320.0 Server to R510.0 . . . . . . . . . . . . . . . . . 4-5
Preparing for a ProcessLogix R400.0 SP2 or R500.1 to R510.0
Server Upgrade . . . . . . . . . . . . . . . . . . . . . . . . . . . . . . . . . 4-6
Exporting the R400.0 SP2 or R500.1 Engineering
Repository Database . . . . . . . . . . . . . . . . . . . . . . . . . . 4-6
Saving Fieldbus Device Definition Files. . . . . . . . . . . . . 4-8
Saving Important R400.0 SP2 or R500.1 Server Data. . . . 4-9
Exporting the R400.0 SP2 or R500.1 ProcessLogix
Server Database . . . . . . . . . . . . . . . . . . . . . . . . . . . . . . 4-11
Removing the RSLinx Software Activation File . . . . . . . . 4-12
Saving R400.0 SP2 or R500.1 Data to a Remote PC . . . . . . . 4-13
Networking an R400.0 SP2 or R500.1 Server to a
Remote PC . . . . . . . . . . . . . . . . . . . . . . . . . . . . . . . . . 4-13
Transferring Data . . . . . . . . . . . . . . . . . . . . . . . . . . . . . 4-14
Disconnect Redundant Servers . . . . . . . . . . . . . . . . . . . 4-15
Removing ProcessLogix R500.1 Software . . . . . . . . . . . . . . 4-15
Removing Selected ProcessLogix R500.1 Components . . 4-15
Remove ProcessLogix Server Components . . . . . . . . . . 4-17
Verifying and Finalizing Component Removal . . . . . . . . 4-18
Removing ProcessLogix R400.0 SP2 Software . . . . . . . . . . . 4-19
Removing Selected ProcessLogix R400.0 SP2
Components . . . . . . . . . . . . . . . . . . . . . . . . . . . . . . . . 4-19
Removing ProcessLogix Server Components . . . . . . . . . 4-21
Verifying and Finalizing Component Removal . . . . . . . . 4-21
Preparing for a ProcessLogix R320.0 to R510.0
Server Upgrade . . . . . . . . . . . . . . . . . . . . . . . . . . . . . . . . . 4-23
Backing Up a ProcessLogix R320.0 Server to Tape. . . . . 4-23
Exporting the R320.0 Engineering Repository Database . 4-24
Saving Important R320.0 Server Data . . . . . . . . . . . . . . 4-26
Exporting the ProcessLogix Server Database . . . . . . . . . 4-28
Removing the RSLinx Software Activation File . . . . . . . . 4-28
Copying R320.0 Data to the R510.0 Server . . . . . . . . . . . . . 4-29
Networking the R320.0 and R510.0 Servers . . . . . . . . . . 4-29
Transferring R320.0 Data to the R510.0 Server . . . . . . . . 4-30
Transferring the 1784-PCIC Card to the R510.0 System . . . . 4-32
Copying R400.0 SP2 or R500.1 Data to the R510.0 Server . . 4-33
Reconnect Redundant Servers. . . . . . . . . . . . . . . . . . . . 4-33
Transferring R400.0 SP2 or R500.1 Data to the
R510.0 Server. . . . . . . . . . . . . . . . . . . . . . . . . . . . . . . . 4-34
Restoring ProcessLogix Data . . . . . . . . . . . . . . . . . . . . . . . 4-35
Restoring Server Redundancy . . . . . . . . . . . . . . . . . . . . 4-36
Importing the Engineering Database . . . . . . . . . . . . . . . 4-36
Publication 1757-IN510A-EN-P - October 2003
Page 6

Table of Contents iv
ProcessLogix Client Installation
and Upgrade Procedures
Restoring the ProcessLogix Server Points Database . . . . 4-39
Upgrading Hardware Component Firmware . . . . . . . . . 4-40
Reloading Controllers. . . . . . . . . . . . . . . . . . . . . . . . . . 4-41
Backing Up a ProcessLogix Server Hard Drive to Tape . 4-41
Chapter 5
Introduction . . . . . . . . . . . . . . . . . . . . . . . . . . . . . . . . . . . 5-1
Operating System Support . . . . . . . . . . . . . . . . . . . . . . . . . 5-2
Windows 2000 Professional . . . . . . . . . . . . . . . . . . . . . 5-2
Windows XP Professional. . . . . . . . . . . . . . . . . . . . . . . 5-3
Windows 2000 Server. . . . . . . . . . . . . . . . . . . . . . . . . . 5-3
Windows 2000 Professional Client Installation Scenarios . . . 5-3
Clean Install: Windows 2000 Professional . . . . . . . . . . . 5-3
Upgrade R500.1 Windows 2000 Professional Client
to R510.0 Windows 2000 Professional Client . . . . . . . . . 5-4
Upgrade R400.0 SP2 Windows 2000 Professional Client
to R510.0 Windows 2000 Professional Client . . . . . . . . . 5-5
Upgrade R400.0 SP2 Windows NT 4.0 Client to R510.0
Windows 2000 Professional Client (Clean Install) . . . . . 5-6
Upgrade R320.0 Windows NT 4.0 Client to R510.0
Windows 2000 Professional Client (Clean Install) . . . . . 5-7
Windows XP Professional Client Installation Scenarios . . . . 5-8
Clean Install: Windows XP Professional . . . . . . . . . . . . 5-8
Upgrade R500.1 Windows XP Professional Client to
R510.0 Windows XP Professional Client . . . . . . . . . . . . 5-8
Upgrade R500.1 Windows 2000 Professional Client to
R510.0 Windows XP Professional Client . . . . . . . . . . . . 5-9
Upgrade R400.0 SP2 Windows 2000 Professional Client to
R510.0 Windows XP Professional Client . . . . . . . . . . . . 5-9
Upgrade R400.0 SP2 Windows NT 4.0 Client to R510.0
Windows XP Professional Client (Clean Install) . . . . . . . 5-11
Upgrade R320.0 Windows NT 4.0 Client to R510.0
Windows XP Professional Client (Clean Install) . . . . . . . 5-12
Saving Important Data. . . . . . . . . . . . . . . . . . . . . . . . . . . . 5-13
Networking an Existing Client to a Remote PC . . . . . . . . . . 5-14
Removing Selected R500.1 Components . . . . . . . . . . . . . . . 5-15
Removing Selected R400.0 SP2 Components. . . . . . . . . . . . 5-16
Installing ProcessLogix R510.0 Client Software . . . . . . . . . . 5-18
Installing Knowledge Builder . . . . . . . . . . . . . . . . . . . . 5-19
Installing Engineering Tools . . . . . . . . . . . . . . . . . . . . . 5-20
Installing the ProcessLogix Client Software . . . . . . . . . . 5-21
Installing ProcessLogix Update . . . . . . . . . . . . . . . . . . . 5-23
Transferring ProcessLogix Data . . . . . . . . . . . . . . . . . . . . . 5-25
Transferring Data to the R510.0 Client. . . . . . . . . . . . . . 5-25
Restoring ProcessLogix Data. . . . . . . . . . . . . . . . . . . . . 5-26
Finalizing ProcessLogix Client Installation . . . . . . . . . . . . . 5-26
Publication 1757-IN510A-EN-P - October 2003
Page 7

Additional Redundant Server
Procedures
Table of Contents v
Changing Hosts File Entries . . . . . . . . . . . . . . . . . . . . . 5-26
Station Setup . . . . . . . . . . . . . . . . . . . . . . . . . . . . . . . . 5-29
Creating Emergency Repair Disks . . . . . . . . . . . . . . . . . 5-34
Checking Control Builder Operation and Logging On . . 5-34
Chapter 6
Adding Redundancy to R510.0 Non-Redundant
Server Systems . . . . . . . . . . . . . . . . . . . . . . . . . . . . . . . . . 6-2
Changing the Computer Name on a ProcessLogix Server 6-2
Completing the ProcessLogix R510.0 Setup on a Redundant
Server Pair . . . . . . . . . . . . . . . . . . . . . . . . . . . . . . . . . . . . 6-2
Changing Hosts File Entries . . . . . . . . . . . . . . . . . . . . . 6-3
Changing TCP/IP address on a Secondary
Server (SERVERB) . . . . . . . . . . . . . . . . . . . . . . . . . . . . 6-5
Changing the ProcessLogix License. . . . . . . . . . . . . . . . 6-5
Setting up Primary Server (SERVERA). . . . . . . . . . . . . . . . . 6-6
Making Redundant Hardware File Entries . . . . . . . . . . . 6-7
Configuring the Time Service . . . . . . . . . . . . . . . . . . . . 6-9
Restarting ProcessLogix Services . . . . . . . . . . . . . . . . . . 6-9
Setting Up Secondary Server (SERVERB) . . . . . . . . . . . . . . 6-9
Making Redundant Hardware File Entries . . . . . . . . . . . 6-9
Configuring the Time Service . . . . . . . . . . . . . . . . . . . . 6-10
Restarting ProcessLogix Services . . . . . . . . . . . . . . . . . . 6-10
Confirming Data Link is Available. . . . . . . . . . . . . . . . . 6-10
Configuring Stations in Quick Builder (on SERVERA) . . . . . 6-11
Setting Up Station on SERVERA . . . . . . . . . . . . . . . . . . . . . 6-12
Setting Up Station on SERVERB . . . . . . . . . . . . . . . . . . . . . 6-15
Setting up the Redundant ERDB . . . . . . . . . . . . . . . . . . . . 6-18
Restarting Redundant Servers. . . . . . . . . . . . . . . . . . . . . . . 6-19
Synchronizing Server Databases on Redundant Server . . . . 6-20
Confirming Databases are Synchronized . . . . . . . . . . . . 6-20
Synchronizing Other Files . . . . . . . . . . . . . . . . . . . . . . 6-22
Upgrading Hardware Component Firmware . . . . . . . . . . . . 6-22
Checking Control Builder Operation and Logging On . . 6-22
Backing Up a ProcessLogix Server Hard Drive to Tape . 6-23
Creating an Emergency Repair Disk . . . . . . . . . . . . . . . 6-23
Firmware Maintenance
Procedures
Chapter 7
1784-PCIC Driver Installation . . . . . . . . . . . . . . . . . . . . . . . 7-1
Install Hardware Device Drivers . . . . . . . . . . . . . . . . . . 7-1
Verify the 1784-PCIC Driver Version . . . . . . . . . . . . . . . 7-2
1784-PCIC Firmware Installation . . . . . . . . . . . . . . . . . . . . 7-3
Upgrading Hardware Component Firmware . . . . . . . . . . . . 7-4
About Firmware Upgrades . . . . . . . . . . . . . . . . . . . . . . 7-4
Firmware Revision Level Reference . . . . . . . . . . . . . . . . . . 7-5
Publication 1757-IN510A-EN-P - October 2003
Page 8

Table of Contents vi
Supplementary Procedures
Important Usage Considerations . . . . . . . . . . . . . . . . . . 7-8
Loading 1757-PLX52, TC-MUX021, or 1757-FIM Boot and
Personality Images . . . . . . . . . . . . . . . . . . . . . . . . . . . . 7-9
Updating Firmware in CNB, ENET, IOM, SRM, PIM
or ControlNet Adapter . . . . . . . . . . . . . . . . . . . . . . . . . 7-13
Redundant Chassis Firmware Upgrade Precautions . . . . 7-13
Setting CNB Module NUT Timing . . . . . . . . . . . . . . . . . 7-15
Updating Firmware in the 1757-ABRIO Module . . . . . . . 7-17
Chapter 8
Stopping ProcessLogix Applications and Services . . . . . . . . 8-1
Installing Knowledge Builder on a Non-ProcessLogix System 8-2
Installing Knowledge Builder on Windows 2000 . . . . . . 8-2
Installing Knowledge Builder on Windows XP . . . . . . . 8-3
Removing Knowledge Builder . . . . . . . . . . . . . . . . . . . 8-3
Installing Knowledge Builder . . . . . . . . . . . . . . . . . . . . 8-4
Launching ProcessLogix Knowledge Builder. . . . . . . . . . . . 8-6
SQL Server . . . . . . . . . . . . . . . . . . . . . . . . . . . . . . . . . . . . 8-7
SQL Status . . . . . . . . . . . . . . . . . . . . . . . . . . . . . . . . . . 8-7
Cancelling a Software Component Installation . . . . . . . . . . 8-7
Manual System Backup/Restore Procedures . . . . . . . . . . . . 8-8
Backing Up a ProcessLogix R510.0 Server to Tape. . . . . 8-8
Restoring a ProcessLogix Server System from a
Backup Tape . . . . . . . . . . . . . . . . . . . . . . . . . . . . . . . . 8-8
Using Network Tools . . . . . . . . . . . . . . . . . . . . . . . . . . . . 8-8
About Network Tools. . . . . . . . . . . . . . . . . . . . . . . . . . 8-8
Usage guidelines . . . . . . . . . . . . . . . . . . . . . . . . . . . . . 8-9
Online help . . . . . . . . . . . . . . . . . . . . . . . . . . . . . . . . . 8-9
Making First Time Network Tools Settings. . . . . . . . . . . 8-10
Installing and Running NetShield with ProcessLogix . . . . . . 8-14
Background. . . . . . . . . . . . . . . . . . . . . . . . . . . . . . . . . 8-14
Removing Existing NetShield Installation. . . . . . . . . . . . 8-14
Installing NetShield and Configuring Directories for Scan
Exclusion. . . . . . . . . . . . . . . . . . . . . . . . . . . . . . . . . . . 8-15
Changing the Computer Name on a ProcessLogix Server . . 8-16
Exporting the Engineering Repository Database . . . . . . 8-17
Removing Selected ProcessLogix R510.0 Components . . 8-18
Removing ProcessLogix R510.0 Server Components. . . . 8-19
Verifying and Finalizing Component Removal . . . . . . . . 8-20
Changing the PC Name . . . . . . . . . . . . . . . . . . . . . . . . 8-21
PC Naming Rules . . . . . . . . . . . . . . . . . . . . . . . . . . . . . 8-21
Reinstalling ProcessLogix R510.0 Components. . . . . . . . 8-22
Restoring the Data . . . . . . . . . . . . . . . . . . . . . . . . . . . . 8-22
Changing the Computer Name on a ProcessLogix Client . . . 8-23
Changing the Computer Name on a Windows
2000 Client . . . . . . . . . . . . . . . . . . . . . . . . . . . . . . . . . 8-23
Publication 1757-IN510A-EN-P - October 2003
Page 9

New Functions and Features
Table of Contents vii
Changing the Computer Name on a Windows XP Client 8-24
Configuring a ProcessLogix Client. . . . . . . . . . . . . . . . . 8-24
Adding 1757-PLX52 Controller Redundancy to R510.0
Non-Redundant 1757-PLX52 Controller Configurations . . . . 8-25
Deleting a Non-Redundant 1757-PLX52 and Unassigning
its Contents . . . . . . . . . . . . . . . . . . . . . . . . . . . . . . . . . 8-25
Installing and connecting Redundant Chassis Pair (RCP)
Hardware . . . . . . . . . . . . . . . . . . . . . . . . . . . . . . . . . . 8-27
Updating Firmware Revision Levels . . . . . . . . . . . . . . . 8-27
Creating a Redundant 1757-PLX52 . . . . . . . . . . . . . . . . 8-28
Chapter 9
Overview . . . . . . . . . . . . . . . . . . . . . . . . . . . . . . . . . . . . . 9-1
ProcessLogix DeviceNet Wizard. . . . . . . . . . . . . . . . . . . . . 9-1
1757-ABRIO Update . . . . . . . . . . . . . . . . . . . . . . . . . . . . . 9-2
New PLX Function Blocks . . . . . . . . . . . . . . . . . . . . . . . . . 9-2
RSView Connectivity . . . . . . . . . . . . . . . . . . . . . . . . . . . . . 9-3
Additional Module Support . . . . . . . . . . . . . . . . . . . . . . . . 9-3
Major ProcessLogix Software
Components
Performance and Capacity
Specifications
Chapter 10
Major ProcessLogix Engineering Tools Software
Revisions. . . . . . . . . . . . . . . . . . . . . . . . . . . . . . . . . . . 10-1
Major ProcessLogix Server Software Revisions . . . . . . . . 10-2
Embedded Software Components . . . . . . . . . . . . . . . . . 10-3
External, Third Party Qualified Software Components . . 10-4
Miscellaneous SCADA Component Revisions. . . . . . . . . 10-6
Chapter 11
Server/Client Performance and Capacity. . . . . . . . . . . . . . . 11-1
PC Platform Requirements . . . . . . . . . . . . . . . . . . . . . . 11-1
Server Requirements . . . . . . . . . . . . . . . . . . . . . . . . . . 11-2
Platform System Configuration Definitions . . . . . . . . . . 11-2
Client Platform Requirements . . . . . . . . . . . . . . . . . . . . 11-3
Application Usage . . . . . . . . . . . . . . . . . . . . . . . . . . . . 11-4
User Interface Capacity and Performance . . . . . . . . . . . 11-7
Control Builder Considerations . . . . . . . . . . . . . . . . . . . 11-8
Server Redundancy . . . . . . . . . . . . . . . . . . . . . . . . . . . 11-9
Client/Server Communication Capacity . . . . . . . . . . . . . 11-9
Server Notifications . . . . . . . . . . . . . . . . . . . . . . . . . . 11-10
Server Data Access. . . . . . . . . . . . . . . . . . . . . . . . . . . 11-10
Controller and Communications Capacity and
Performance . . . . . . . . . . . . . . . . . . . . . . . . . . . . . . . . . . 11-11
Control Network Capacity . . . . . . . . . . . . . . . . . . . . . 11-11
System Communications Load Philosophy and
Guidelines. . . . . . . . . . . . . . . . . . . . . . . . . . . . . . . . . 11-12
Publication 1757-IN510A-EN-P - October 2003
Page 10

Table of Contents viii
System Communications Limits. . . . . . . . . . . . . . . . . . 11-13
Controller Communications . . . . . . . . . . . . . . . . . . . . 11-15
Controller Notifications . . . . . . . . . . . . . . . . . . . . . . . 11-17
Controller Redundancy. . . . . . . . . . . . . . . . . . . . . . . . 11-17
1757-PLX52 Resources . . . . . . . . . . . . . . . . . . . . . . . . 11-18
I/O Performance and Capacity Specifications . . . . . . . . . . 11-20
PROFIBUS DP Capacity and Topology Specifications. . 11-22
FIM Performance Limits . . . . . . . . . . . . . . . . . . . . . . . 11-23
FIM Display-related Performance Limits . . . . . . . . . . . 11-24
I/O Module Publication Periods . . . . . . . . . . . . . . . . . 11-25
Special Considerations. . . . . . . . . . . . . . . . . . . . . . . . . . . 11-25
Device Control May Generate Nuisance Alarms. . . . . . 11-25
Migration Consideration . . . . . . . . . . . . . . . . . . . . . . . 11-26
ERDB is Master for Configuration Data in R510.0. . . . . 11-26
Possible Loss of Communication with CPM . . . . . . . . . 11-26
Publication 1757-IN510A-EN-P - October 2003
Page 11

Preface
Our Assumptions About Users
Before configuring a ProcessLogix system you must:
• Be familiar with navigating and running applications in a
Microsoft Windows 2000 environment.
• Have some experience in loading software applications on a
personal computer (PC).
• Be familiar with ProcessLogix hardware components.
• Be familiar with ControlNet or ENET configuration.
• Be trained on ProcessLogix, including Control Builder and
Server components.
• If applicable to your system, you must also have appropriate
training on other Rockwell Automation products applicable to
ControlLogix, RSNetworx, and DeviceNet.
IMPORTANT
If you have not received ProcessLogix R510.0
training, we recommend that you find someone who
does have experience to assist you in loading the
ProcessLogix software and making hardware and
firmware changes in associated ProcessLogix
hardware components.
Contact your local sales office for more information
about training schedules and available trained
personnel.
Starting Conditions and Assumptions
You have the following ProcessLogix R510.0 Software Kit, including:
• ProcessLogix R510.0 Base Software CD containing software
such as SQL.
• ProcessLogix R510.0 Application Software CD containing
ProcessLogix applications software.
• ProcessLogix R510.0 Supplemental Software CD containing
Windows Service Packs and additional software
• ProcessLogix R510.0 Knowledge Builder CD containing the
latest version of the online documentation.
• Microsoft Windows Operating System(s) CD(s).
• RSLinx OEM Master (Activation) Disk.
1 Publication 1757-IN510A-EN-P - October 2003
Page 12

Preface 2
You must be certain that your PC meets the hardware requirements
for a ProcessLogix Server or ProcessLogix Client.
• ProcessLogix Servers require a Windows 2000 Server operating
system. See
Minimum Hardware Requirements, below, for
information about ProcessLogix Server hardware.
• ProcessLogix Client Stations require a Windows 2000
Professional, XP Professional or 2000 Server operating system.
See Table 11.B: Client Platform Requirements based on System
Configurations on page 11-3 to review the ProcessLogix Client
platform requirements.
Minimum Hardware Requirements
Contents of Release
ProcessLogix R510.0 Server Software must be installed on a PC that is
specifically qualified. Use of any other PC variations will render the
standard warranty and support agreement null and void.
There are two methods of obtaining the qualified ProcessLogix Server:
1. Purchase the Server from Rockwell Automation.
2. Contact Rockwell Automation Technical Support for further
information on ordering specifically qualified hardware.
The following software and documentation components are included
in the ProcessLogix R510.0 Software/Documentation Kit
(1757-SWKIT5000).
Table P.1 ProcessLogix R510.0 Release Components
Release Components Pub/Part Number
ProcessLogix R510.0 Base Software CD
• SQL Server 2000
ProcessLogix R510.0 Application Software CD
• ProcessLogix Engineering Tools
• ProcessLogix Server Software
• RSLinx 2.41
ProcessLogix R510.0 Supplemental Software CD 957824-83
ProcessLogix Knowledge Builder CD 957824-84
957859-46
957824-82
Publication 1757-IN510A-EN-P - October 2003
ProcessLogix R510.0 Installation and Upgrade Guide 957824-79
Page 13

Preface 3
ProcessLogix Online Help/Knowledge Builder
ProcessLogix online help documentation is included with your
ProcessLogix system in browser format through Knowledge Builder.
Many of the documents may also be ordered individually through
Rockwell Automation in print format, visit us at:
www.theautomationbookstore.com
Knowledge Builder provides task-based documentation within the
Server and Client stations and may be accessed while using any of
ProcessLogix’s software programs. Knowledge Builder’s internal links
and search functions allow you to access process relevant information
and references.
References to Knowledge Builder throughout this document are
illustrated as:
Navigate in Knowledge Builder to Ethernet Implementation
Guide
⇒
Configuration⇒ Setting Up Drivers and IP Addresses for
more information.
ProcessLogix R510.0 Installation and Upgrade Guide
The ProcessLogix R510.0 Installation and Upgrade Guide is shipped
with a ProcessLogix system and provides:
• procedures for upgrading an R320.0, R400.0 SP2, or R500.1
system to R510.0
• procedures for updating the firmware to R510.0 levels
• procedures for installing the software on a clean PC
• procedures for tasks associated with migrating to redundant
Server and/or redundant Controller architecture.
ProcessLogix R510.0 Software Change Notice is incorporated into this
Installation and Upgrade Guide in the following chapters:
Table P.2 Installation and Upgrade Guide SCN Chapter Descriptions
Chapter Description
9 New Functions and Features
10 Major ProcessLogix Software Components
11 Performance and Capacity Specifications
Publication 1757-IN510A-EN-P - October 2003
Page 14

Preface 4
Removing the Default Startup Screens
Rockwell Automation Support
Throughout this document there are times when you need to remove
the default startup screens. Use the following Tip to complete the
task
.
TIP
If this is the first startup since the operating system
install, you must remove the default startup screens.
Professional Systems
1. On the Getting Started with Windows 2000 window, uncheck the
Show this screen at startup checkbox.
2. Click Exit.
Server Systems
1. On the Windows 2000 Configure your Server window, select the I
will configure this Server later option and click Next.
2. Uncheck the Show this screen at startup checkbox and close
the window.
Rockwell Automation provides technical information on the web to assist you
in using our products. At http://support.rockwellautomation.com, you can
find technical manuals, a knowledge base of FAQs, technical and application
notes, sample code and links to software service packs, and a MySupport
feature that you can customize to make the best use of these tools.
For an additional level of technical phone support for installation,
configuration and troubleshooting, we offer TechConnect Support programs.
For more information, contact your local distributor or Rockwell Automation
representative, or visit http://support.rockwellautomation.com.
New Product Satisfaction Return
Rockwell tests all of our products to ensure that they are fully operational
when shipped from the manufacturing facility. However, if your product is
not functioning and needs to be returned:
United States Contact your distributor. You must provide a Customer Support case
number to your distributor in order to complete the return process.
Outside United
States
Please contact your local Rockwell Automation representative for
return procedure.
Your Questions or Comments about This Manual
If you find a problem or have a comment about this manual, please
notify us of it on the enclosed How Are We Doing Form, at the back
of this manual. This form is also available in Knowledge Builder.
Publication 1757-IN510A-EN-P - October 2003
Page 15

Preface 5
Conventions
Terms and Type Representations
The following table summarizes the terms and type representation
conventions used in this Guide.
Table P.3 : Terms and Type Representations
Term /Typ e
Representation
click Click left mouse button once. (Assumes cursor is positioned
double-click Click left mouse button twice in quick succession. (Assumes
right-click Click right mouse button once. (Assumes cursor is positioned
drag Press and hold left mouse button while dragging cursor to
select Click to highlight a menu item or list choice. Select Configure Allen-Bradley drivers from the
check/uncheck Click to activate/deactivate a checkbox. Check the Do not show this dialog again
Meaning Example
Click Browse.
on object or selection.)
Double-click the Station icon.
cursor is positioned on object or selection.)
Right-click the AND function block.
on object or selection.)
Drag the PID function block onto the Control
new screen location and then release the button. (Assumes
cursor is positioned on object or selection to be moved.)
Drawing.
list box.
checkbox.
File ⇒ New
expand Click the + to the left of a given item /folder to show its
<F1> Keys to be pressed are shown in angle brackets. Press <F1> to view the online Help.
<Ctrl>+<C> Keys to be pressed together are shown with a plus sign. Press <Ctrl>+<C> to close the window.
>D:\setup.exe< Data to be typed at prompt or in an entry field. Enter this path location >D:\setup.exe<.
Shows nested menu selections as menu name followed by
menu selection.
contents.
Click File ⇒ New to start new drawing.
Expand Local Users and Groups.
Checklists
To use checklists, continue in each section until you are instructed to
return to the checklist that led you to the given task. Be sure to review
the entire procedure before executing the steps.
Publication 1757-IN510A-EN-P - October 2003
Page 16

Preface 6
Acronyms and Abbreviations
Table P.4 Acronyms and Abbreviations
AI — Analog Input LAN — Local Area Network
AO — Analog Output LED — Light Emitting Diode
CB — Control Builder MAC — Media Access Control
CD — Compact Disc MB — Megabytes
CDA — Control Data Access Mb — Megabits
CD-ROM — Compact Disc Read Only Memory NUT — Network Update Time
CEE — Control Execution Environment ODBC — Open Database Communications
CM — Control Module OEM — Original Equipment Manufacturer
1756-CNB or CNB — ControlNet Bridge module PC — Personal Computer
CPM — Control Processor Module PCI — Personal Computer Interconnect
CPU — Central Processing Unit 1784-PCIC or PCIC — PCI ControlNet Interface Module
DI — Digital Input 1757-PLX52 — ProcessLogix Hybrid Controller with
Optional Redundancy
DO — Digital Output 1757-PIM or PIM— Pulse Input Module
DOS — Disk Operating System PLC — Programmable Logic Controller
ER — Engineering Repository PLX — ProcessLogix
ERDB — Engineering Repository Database RAM — Random Access Memory
FB — Function Block RCP — Redundant Chassis Pair
FF — FoundationTM Fieldbus
FTA — Field Termination Assembly SCM — Sequential Control Module
HTML — HyperText Markup Language SP — Service Pack
I/O — Input/Output 1757-SRM or SRM — System Redundancy Module
IOM — Input/Output Module TC-MUX01 — Serial Interface Module
IRQ — Interrupt Request TCP/IP — Transmission Control Protocol/Internet Protocol
SCADA — Supervisory Control and Data Access
Publication 1757-IN510A-EN-P - October 2003
Page 17

Chapter
1
ProcessLogix R510.0 Installation Introduction
Operating System Support
Operating System Options
The following table shows the supported operating systems for
ProcessLogix.
Table 1.A ProcessLogix Component Configuration Table
ProcessLogix R510.0 Windows 2000 Windows XP
Professional
Server Professional
Server
Client
(1)
Windows 2000 Server is not recommended as a Client for ProcessLogix R510.0 due to the
default standard hardware and operating system requirements.
Windows NT 4.0 Server and Workstation are not supported.
The hardware platform and all devices contained within it designated
for running the ProcessLogix R510.0 Software should be evaluated for
compatibility with the Windows 2000 operating system.
Systems designated to run ProcessLogix R510.0 Server software should
be Server Class and certified to run the Windows 2000 Server
Operating System.
page Preface-2.
✔
(1)
✔
Refer to Minimum Hardware Requirements on
✔ ✔
Systems designated to run ProcessLogix R510.0 Client Software should
be Workstation/Desktop Class and certified to run the Windows 2000
Professional Operating System.
To check to see which certifications your computer and hardware
components have, consult the Microsoft Hardware Compatibility List
at:
http://www.microsoft.com/windows2000/server/howtobuy/upgrading/
compat/default.asp
Review the scenarios below for your current operating system
installation and upgrade options.
1 Publication 1757-IN510A-EN-P - October 2003
Page 18

1-2 ProcessLogix R510.0 Installation Introduction
ProcessLogix Server Supported Installations
IMPORTANT
IMPORTANT
If you purchased a new ProcessLogix R510.0 Server
from Rockwell Automation, the operating system and
ProcessLogix software have already been installed.
Do not r einstall the softw are. Refer to the
ProcessLogix R510.0 Server Installation Instructions,
publication 1757-IN950 shipped with your hardware.
It is strongly recommended that you name your
Server properly prior to installing ProcessLogix
R510.0 software.
To change the Server name prior to installing
ProcessLogix R510.0, follow the procedures in
Changing the Computer Name on a ProcessLogix
Client on page 8-23.
Once the ProcessLogix R500.0 software is installed,
changing the computer name requires a full uninstall
and reinstall of all the ProcessLogix R510.0 software.
Refer to Changing the Computer Name on a
ProcessLogix Server on page 8-16.
A 1784-PCIC or Ethernet card must already be
installed in the ProcessLogix Server(s).
Publication 1757-IN510A-EN-P - October 2003
Page 19

ProcessLogix R510.0 Installation Introduction 1-3
ProcessLogix R510.0 Servers require the Windows 2000 Server
operating system. The following table lists the ProcessLogix Server
Install Options. This table also applies if you have a redundant Server
pair. During the installations, the procedures refer you to the
appropriate redundant Server sections.
Table 1.B ProcessLogix R510.0 Server Install Options
Type of Install: Refer to:
Clean Install
The Clean Install is a clean machine installed with
ProcessLogix R510.0 Server software. That is, the
installation begins with formatting the hard disk and
installing Windows 2000 Server.
Upgrade from R500.1, Option 1
1. Backup your data.
2. Complete a clean install.
Upgrade from R500.1, Option 2
1. Backup your data.
2. Uninstall your current ProcessLogix software.
3. Install ProcessLogix R510.0.
Upgrade from R400.0 SP2, Option 1
1. Backup your data.
2. Complete a clean install.
Upgrade from R400.0 SP2, Option 2
1. Backup your data.
2. Uninstall your current ProcessLogix software.
3. Install ProcessLogix R510.0.
Upgrade from R320.0
ProcessLogix R510.0 requires that you replace your
R320.0 current installation with new hardware and
operating software for the Server.
ProcessLogix Software Installation
on a Clean PC on page 3-1.
Option 1: Upgrading R500.1 Server
to R510.0 - Clean Install on page
4-1.
Option 2: Upgrading R500.1 Server
to R510.0 on page 4-2.
Option 1: Upgrading R400.0 SP2
Server to R510.0 - Clean Install on
page 4-3.
Option 2: Upgrading R400.0 SP2
Server to R510.0 on page 4-4.
Upgrade R320.0 Server to R510.0
on page 4-5.
Publication 1757-IN510A-EN-P - October 2003
Page 20

1-4 ProcessLogix R510.0 Installation Introduction
ProcessLogix Client
The ProcessLogix R510.0 Client requires Windows 2000 Professional
or XP Professional operating systems. The following table lists the
Supported Installations
ProcessLogix Client Install options. First, select the operating system
you plan to use and then select an install type.
Table 1.C Selecting a ProcessLogix R510.0 Client Install Options
Step 1: Select an
R510.0 Operating
System
Step 2: Select a type
of install:
Clean Install ProcessLogix Client Installation and
Upgrade from R500.1
Windows XP
Professional Client
Upgrade from R500.1
Windows 2000
Professional Client
Windows 2000 Professional Windows XP Professional Windows 2000 Server
Refer to: Refer to: Refer to:
Upgrade Procedures on page 5-1.
N/A Upgrade R500.1 Windows XP
Upgrade R500.1 Windows 2000
Professional Client to R510.0
Windows 2000 Professional Client
on page 5-4.
Clean Install: Windows XP
Professional on page 5-8.
Professional Client to R510.0
Windows XP Professional Client on
page 5-8.
Upgrade R500.1 Windows 2000
Professional Client to R510.0
Windows XP Professional Client on
page 5-9.
Windows 2000 Server on
page 5-3.
Windows 2000 Server is not
a recommended operating
system for Clients.
N/A
N/A
Upgrade from R400.0
SP2 Windows 2000
Professional Client
Upgrade from R400.0
SP2 Windows NT 4.0
Client
Upgrade from R320.0
Windows NT 4.0 Client
Upgrade R400.0 SP2 Windows 2000
Professional Client to R510.0
Windows 2000 Professional Client
on page 5-5.
Upgrade R400.0 SP2 Windows NT
4.0 Client to R510.0 Windows 2000
Professional Client (Clean Install) on
page 5-6.
Upgrade R320.0 Windows NT 4.0
Client to R510.0 Windows 2000
Professional Client (Clean Install) on
page 5-7.
Upgrade R400.0 SP2 Windows 2000
Professional Client to R510.0
Windows XP Professional Client on
page 5-9.
Upgrade R400.0 SP2 Windows NT
4.0 Client to R510.0 Windows XP
Professional Client (Clean Install) on
page 5-11.
Upgrade R320.0 Windows NT 4.0
Client to R510.0 Windows XP
Professional Client (Clean Install) on
page 5-12.
N/A
N/A
N/A
Publication 1757-IN510A-EN-P - October 2003
Page 21

Chapter
2
Operating System Installation Procedures
IMPORTANT
(1)
Windows 2000 Server is not recommended as a Client for ProcessLogix R510.0 due to the standard hardware
and operating system requirements.
Table 2.A Installing Windows on a Clean PC
For... See Page...
Clean System Windows 2000 Server Installation 2-2
Clean System Windows 2000 Professional Installation 2-11
Clean System Windows XP Professional Installation 2-18
These installation scenarios use a “clean” PC
installation method in which all data on the system is
erased. This is an irrecoverable action. All data must
be first backed up or transferred to another system
before proceeding.
• ProcessLogix R510.0 Servers require the Windows
2000 Server operating system.
• ProcessLogix R510.0 Client Stations may use
Windows 2000 Professional, Windows XP
Professional or Windows 2000 Server.
• Windows NT 4.0 Server and Workstation are not
supported.
(1)
1 Publication 1757-IN510A-EN-P - October 2003
Page 22

2-2 Operating System Installation Procedures
Clean System Windows 2000 Server Installation
These instructions cover installation of Windows 2000 Server from
either CD-ROM or floppy disks.
IMPORTANT
Several additional installation methods are available. Consult the
Microsoft Documentation set included with the Operating System for
the following installation methods:
• Unattended Installation
• Remote Installation Services
• Over the Network Installation
• SysPrep
• Systems Management Server
If you purchased a new ProcessLogix R510.0 Server
from Rockwell Automation, the operating system and
ProcessLogix software have already been installed.
Do not r einstall the softw are. Refer to the
ProcessLogix R510.0 Server Installation Instructions,
publication 1757-IN950, shipped with your
hardware.
Installing Windows 2000 Server on a New System
You must install Windows 2000 Server on your Server before you can
install or run the ProcessLogix R510.0 software. The current required
Operating System components are:
• Windows 2000 Server with Windows 2000 Service Pack 4
• Internet Explorer 6.0 SP1
The Windows 2000 Server software, Service Packs, and Internet
Explorer are licensed products of Microsoft Corporation. Copies of the
Service Packs and Internet Explorer are included on the ProcessLogix
CDs for your convenience.
Publication 1757-IN510A-EN-P - October 2003
Page 23

Operating System Installation Procedures 2-3
This procedure assumes you have:
• All network cards installed in the PC and set to the correct IRQs.
• All supporting ProcessLogix System hardware installed and
connected to the PC.
• A PC that meets specified hardware and software requirements
for R510.0.
Refer to Minimum Hardware Requirements in the Preface for
more information.
• All manufacturers’ related driver diskettes available to complete
the installation.
TIP
Consult the PC Manufacturer for any specialized
instructions/procedures related to the installation of
the Microsoft Windows 2000 Server operating system.
This procedure lists only the generic installation
procedure. It does not contain any special
instructions for any manufacturer specific driver
installation requirements.
Creating Windows 2000 Server Boot Floppies
If your system does not support booting from a CD-ROM, follow these
instructions to create the required Boot Floppies. Otherwise,
to Starting the Windows 2000 Server Installation from the CD-ROM on
page 2-5.
IMPORTANT
If your installation requires additional Drivers to be
installed for access to the Hard Disk Controller, Disk
Device, or CD-ROM, it may be necessary to start the
installation via the Boot Floppies (even if your
system supports booting off of a CD-ROM).
skip
You nee d:
• 4 blank 3.5” 1.44 Mb (High Density) Floppy Disks
• 1.44 MB Floppy Drive
• CD-ROM Drive
• DOS or Windows based Operating System with access to
CD-ROM and floppy devices.
Publication 1757-IN510A-EN-P - October 2003
Page 24

2-4 Operating System Installation Procedures
1. Insert the Windows 2000 Server CD into the CD-ROM drive.
2. Click Star t ⇒ Run .
3. Enter >cmd< and click OK to open the DOS window.
4. At the DOS prompt, enter the CD-ROM drive letter (e.g., >D:<)
and press <Enter>.
5. Enter >cd bootdisk< and press <Enter>.
6. Enter >makeboot< and press <Enter>.
7. Enter floppy disk drive letter (e.g., >A<).
8. Follow the on-screen prompts for inserting, labeling, and
creating the four floppy disks.
IMPORTANT
9. Label your floppy disks.
10. When all the boot floppies have been made, shut down the PC.
Server Boot floppies and Professional Boot floppies
are different.
Starting the Windows 2000 Server Installation from the Boot Floppies
1. With the PC’s power off, insert the diskette titled Windows 2000
Setup Boot Disk into the floppy disk drive.
2. Turn on the PC.
3. Insert the Microsoft Windows 2000 Server CD into the CD-ROM
drive.
4. Follow the on-screen prompts to remove and insert the
Windows 2000 Server Setup Disks 2, 3, and 4 when instructed to
do so.
Publication 1757-IN510A-EN-P - October 2003
5. Press <Enter> at the Welcome to Setup window.
IMPORTANT
If your installation requires additional
Manufacturer’s Drivers, press <F6> during the boot
process and follow the on-screen instructions for
adding the necessary drivers.
Page 25

Operating System Installation Procedures 2-5
6. Continue with Completing the Windows 2000 Server Installation
on page 2-5.
Starting the Windows 2000 Server Installation from the CD-ROM
1. Turn on the PC.
2. Insert the Microsoft Windows 2000 Server CD into the CD-ROM
drive.
3. When prompted, enter into the computer’s BIOS setup program.
4. Verify that the Boot Priority has the CD-ROM device listed first.
(Before the floppy or hard disk devices.)
5. Exit the BIOS and save the setting.
6. If prompted, press any key to boot from the CD-ROM.
IMPORTANT
7. Press <Enter> at the Welcome to Setup window.
If your installation requires additional
Manufacturer’s Drivers, press <F6> during the boot
process and follow the on-screen instructions for
adding the necessary drivers.
Completing the Windows 2000 Server Installation
1. If requested, insert the Windows 2000 Server CD into the
CD-ROM drive and press <Enter>.
2. Press <F8> to agree to the Windows 2000 Licensing Agreement.
Publication 1757-IN510A-EN-P - October 2003
Page 26

2-6 Operating System Installation Procedures
3. If necessary, press <ESC> to continue installing a fresh copy of
Windows 2000.
IMPORTANT
If existing partitions are found, you must delete all
of them first before proceeding.
To delete a partition:
1. Select the partition.
2. Press <D>.
3. Press <Enter>.
4. Press <L>.
5. Repeat for all partitions.
TIP
Certain PCs limit the size of the partition that you
can create. Windows 2000 supports a boot partition
size up to 32 Gigabytes on a NTFS formatted drive.
Use the entire hard disk if possible. If your system
has a limitation, create the largest partition you can,
and leave the leftover space as unpartitioned. (You
can create and format the unpartitioned space
later.) The minimum partition size required for this
installation is 4 Gigabytes.
6. Press <Enter> to set up Windows 2000 on the Unpartitioned
space.
7. Press <Enter> to format the partition using the NTFS file system.
• Setup formats the partition. This takes a few minutes to
complete.
• The computer automatically restarts. Be sure there is not a
disk in the floppy disk drive.
8. At the Welcome to Setup window, click Ne x t .
IMPORTANT
If there is a delay clicking Ne x t , setup continues the
installation automatically.
9. Verify the information on the Regional Settings window and
click Ne x t .
10. Enter the appropriate Name and Organization and click Ne x t .
11. Enter your Windows 2000 Server Product Key and click Ne x t .
12. Select your Server’s Licensing Mode and click Ne x t .
Publication 1757-IN510A-EN-P - October 2003
Page 27

Operating System Installation Procedures 2-7
Rockwell Automation recommends selecting the “Per Seat”
licensing option.
IMPORTANT
Microsoft requires that you attain the appropriate
number of Client Access Licenses required for your
system. For ProcessLogix Systems, the total number
of clients includes other ProcessLogix Servers
(Redundant Servers), and ProcessLogix Clients.
When you purchase a ProcessLogix Client License,
a Client Access License for Windows 2000 Server is
included.
13. At the Computer Name and Administrator Password window:
a. Enter the Computer Name.
IMPORTANT
It is strongly recommended that you name your
Server properly prior to installing ProcessLogix
R510.0 software.
Once the ProcessLogix R510.0 software is installed,
changing the computer name requires a full uninstall
and reinstall of all the ProcessLogix R510.0 software.
Refer to Changing the Computer Name on a
ProcessLogix Server on page 8-16.
IMPORTANT
PC Naming Rules
The base name cannot contain more than 13
alphanumeric characters and must contain no spaces.
The full computer name cannot contain more than
14 alphanumeric characters. The following naming
conventions are required for given ProcessLogix
system architectures.
For non-redundant Server, be sure the name does
not end in the letter “A” or “B”. The default name is
PLX1.
For redundant Servers, append a letter to the base
name to identify the PC’s function in the system
architecture beginning with the letters A and B for
the primary and secondary Servers, respectively. For
example, use the name PLX1A for the primary Server
(SERVERA) and PLX1B for the secondary Server
(SERVERB). (14 Character total: Up to 13 Base plus
A or B)
For a ProcessLogix Client, be sure the name does not
end in the letter “A” or “B”. The suggested name is
STNxx, where xx is the Station Number (01-20).
Publication 1757-IN510A-EN-P - October 2003
Page 28

2-8 Operating System Installation Procedures
b. Enter the Administrator password.
c. Confirm the password.
IMPORTANT
d. Click Ne x t .
TIP
14. At the Windows 2000 Components window:
a. Uncheck the box for the Internet Information Services (IIS).
Only the Accessories and Utilities, Indexing Service, and
Script Debugger remain checked.
b. Click Ne x t .
15. At the Date and Time Settings window:
a. If necessary, adjust the Date and Time settings.
b. Set the appropriate Time Zone for your location.
c. Uncheck the Automatically adjust clock for daylight saving
changes option.
d. Click Ne x t .
Be sure to document the Administrator Password. (It
is required later in the procedure.) The Administrator
Account and password gives a user full access to the
system. Care should be taken to who has access to
this information.
In the next section, you have the ability to add
many services and options during the Server
installation. These components are not required for
the base operation of the ProcessLogix R510.0
Software. If any of these components are needed
for a custom installation, they can be added later
after the installation.
Publication 1757-IN510A-EN-P - October 2003
ATTENTION
!
If setup has not found a suitable Network Device, you are
prompted for installing one. Follow the instructions for adding a
manufacturer supplied driver or add the Microsoft Loop Back
adapter.
16. Select the Custom Settin gs option and click Ne x t .
Failure to uncheck the Automatic adjustment for
Daylight Savings Time causes Redundant Systems to
loose “Sync” when the time is automatically
adjusted. Choosing not to automatically adjust the
time allows you to decide when to make the
adjustment (at a time that is not critical to your
process).
Page 29
Operating System Installation Procedures 2-9
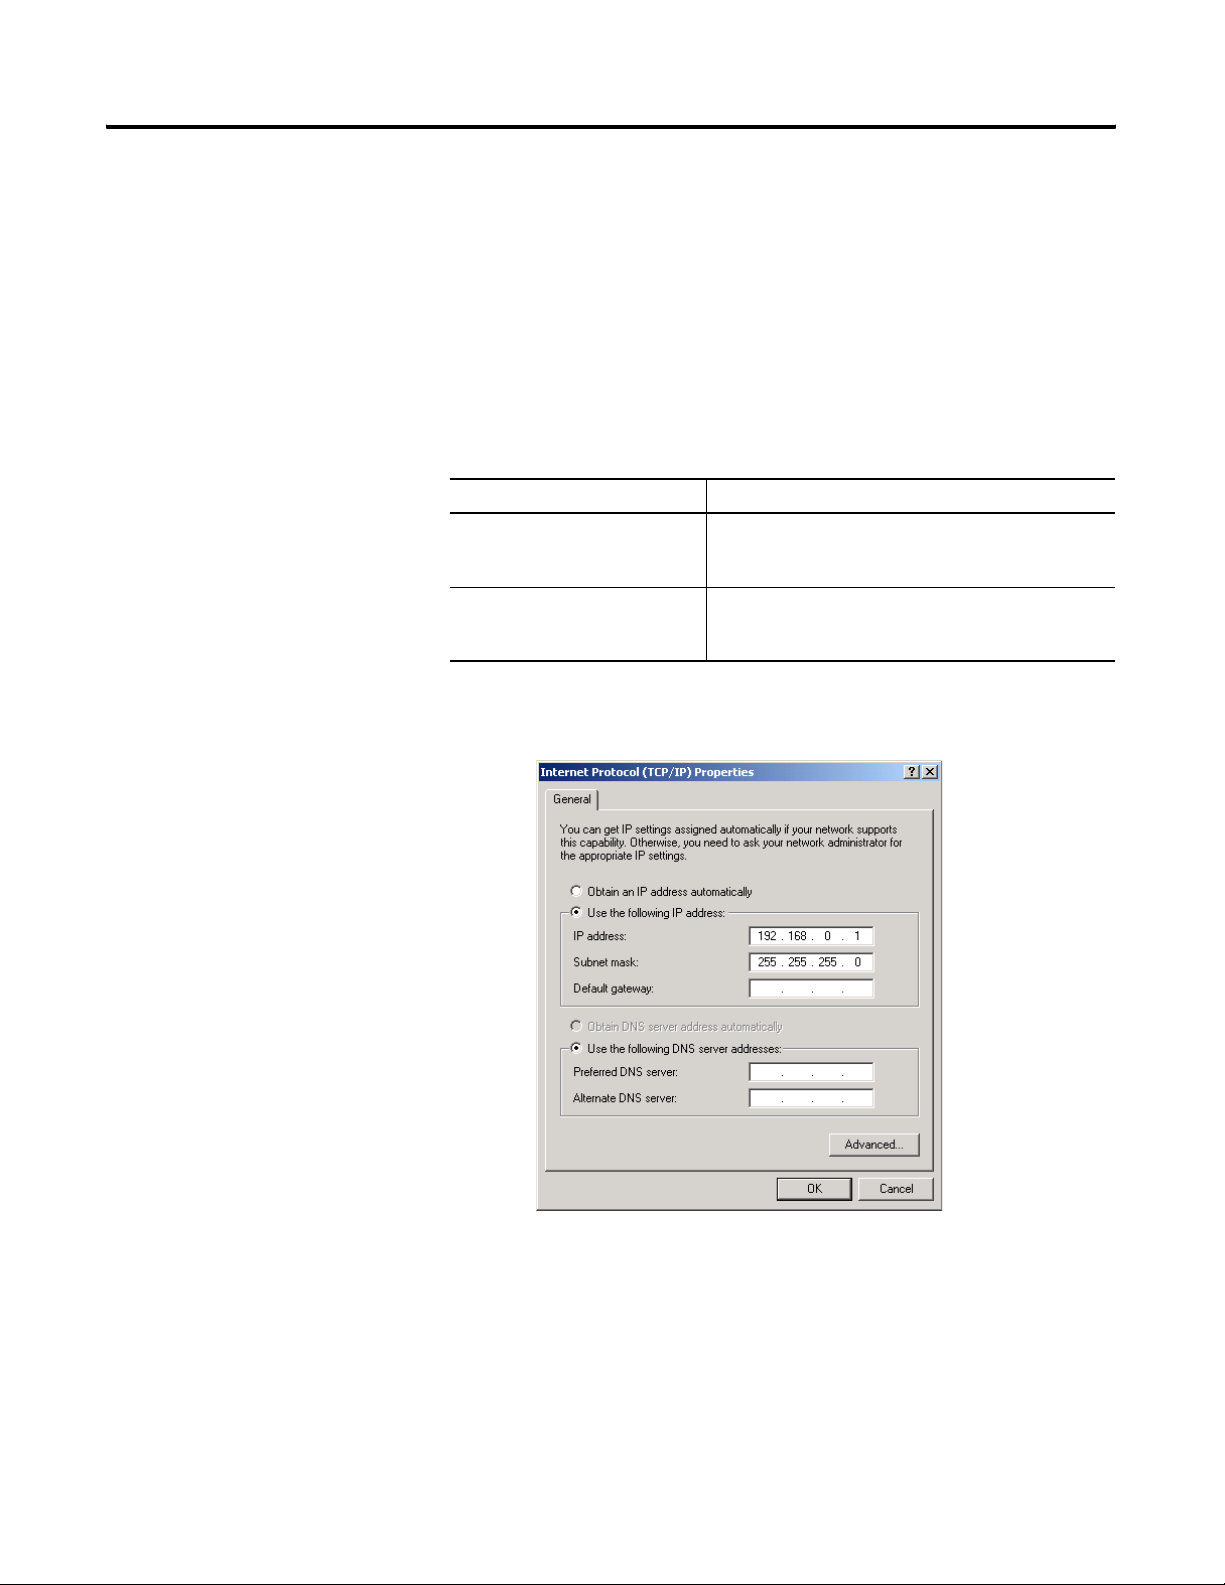
17. At the Networking Components window, select Inte r n et
Protocol (TCP/IP) and click Pr op er ties.
18. In the Networking Components Window,
a. Select the Use the following IP address option.
b. Enter the appropriate IP address information.
The following Private Networking IP Address scheme can be
utilized for the system to operate:
Table 2.B Private Networking IP Address scheme
Server Type Suggested Private Networking IP Address
Non-Redundant Server or Primary
Redundant Server
Backup Redundant Server NIC 1: 192.168.0.2
NIC 1: 192.168.0.1
NIC 2: 192.168.1.1
NIC 3: 192.168.2.1
NIC 2: 192.168.1.2
NIC 3: 192.168.2.2
c. Enter the Subnet Mask >255.255.255.0<.
d. Enter a default gateway if necessary.
Publication 1757-IN510A-EN-P - October 2003
Page 30

2-10 Operating System Installation Procedures
e. Click OK to return to the Networking Components window.
IMPORTANT
IP Addresses are critical to the communication of
the system. Rockwell Automation suggests, when
possible, to utilize a Private Network for the control
system, not connected to any other networks. This
isolates the control system from interference from
any business communication.
In some organizations it is important for these
addresses to be controlled by the IT organization.
Consult your company’s practices and IT
organization for the appropriate IP address
information. It is necessary to use valid IP
information to integrate the ProcessLogix Control
system with the Business Network.
19. Click Ne x t .
20. Repeat steps 17-19 for additional network cards.
21. At the Workgroup or Computer Domain window:
a. Select the No , t h i s c o m p u t e r ... option.
b. Enter an appropriate WorkGroup Name.
c. Click Ne x t .
TIP
All systems which are configured for this Process
Control System should utilize the same Workgroup
Name for easier operations.
At this point in the installation, setup finishes installing Windows
2000. The amount of time this takes depends on your hardware
configuration.
22. At the Completing the Setup Wizard window, remove the
Windows 2000 Server CD and click Fin is h .
The PC restarts.
Clean System Windows 2000 Server Installation is complete.
Return to the checklist that led you to this task.
Publication 1757-IN510A-EN-P - October 2003
Page 31

Operating System Installation Procedures 2-11
Clean System Windows 2000 Professional Installation
Windows 2000 Professional is the preferred Client operating system
for ProcessLogix R510.0. The current required operating system
components are:
• Windows 2000 Professional with Windows 2000 Service Pack 4
• Internet Explorer 6.0 SP1
The Windows 2000 Professional software, Service Packs, and Internet
Explorer are licensed products of Microsoft Corporation. Copies of the
Service Packs and Internet Explorer are included on the ProcessLogix
CDs for your convenience.
Installing Windows 2000 Professional on a New System
This procedure assumes you have:
• All network cards installed in the PC and set to the correct IRQs.
• All supporting ProcessLogix System hardware installed and
connected to the PC.
• A PC that meets specified hardware and software requirements.
See Table 11.B: Client Platform Requirements based on System
Configurations on page 11-3 to review the ProcessLogix Client
platform requirements.
• All manufacturers’ related driver diskettes available to complete
the installation.
TIP
Consult the PC Manufacturer for any specialized
instructions/procedures related to the installation of
the Microsoft Windows 2000 Professional operating
system.
This procedure lists only the generic installation
procedure. It does not contain any special
instructions for any manufacturer specific driver
installation requirements.
Publication 1757-IN510A-EN-P - October 2003
Page 32

2-12 Operating System Installation Procedures
Creating Windows 2000 Professional Boot Floppies
If your system does not support booting from a CD-ROM, follow these
instructions to create the required Boot Floppies. Otherwise,
to Starting the Windows 2000 Professional Installation from the
CD-ROM on page 2-13.
skip
IMPORTANT
If your installation requires additional Drivers to be
installed for access to the Hard Disk Controller, Disk
Device, or CD-ROM, it may be necessary to start the
installation via the Boot Floppies (even if you system
supports booting off of a CD-ROM).
You nee d:
• 4 blank 3.5” 1.44 Mb (High Density) Floppy Disks
• 1.44 MB Floppy Drive
• CD-ROM Drive
• DOS or Windows based Operating System with access to
CD-ROM and floppy devices.
1. Insert the Windows 2000 Professional CD into the CD-ROM
drive.
2. Click Star t ⇒ Run .
3. Enter >cmd< and click OK to open the DOS window.
Publication 1757-IN510A-EN-P - October 2003
4. At the DOS prompt, enter the CD-ROM drive letter (e.g., >D:<)
and press <Enter>.
5. Enter >cd bootdisk< and press <Enter>.
6. Enter >makeboot< and press <Enter>.
7. Enter the letter of your floppy disk drive (e.g., >A<).
8. Follow the on-screen prompts for inserting, labeling, and
creating the four floppy disks.
IMPORTANT
Server Boot floppies and Professional Boot floppies
are different.
9. Label your floppy disks.
Page 33

Operating System Installation Procedures 2-13
10. When all the boot floppies have been made, shut down the PC.
Starting the Windows 2000 Professional Installation from the Boot Floppies
1. With the PC’s power off, insert the diskette titled Windows 2000
Setup Boot Disk into the floppy disk drive.
2. Turn on the PC.
3. Insert the Microsoft Windows 2000 Professional CD into the
CD-ROM drive.
4. Follow the on-screen prompts to remove and insert the
Windows 2000 Professional Setup Disks 2, 3, and 4 when
instructed to do so.
5. Continue with Completing the Windows 2000 Professional
Installation on page 2-14.
Starting the Windows 2000 Professional Installation from the CD-ROM
1. Turn on the PC.
2. Insert the Microsoft Windows 2000 Professional CD into the
CD-ROM drive.
3. When prompted, enter into the computer’s BIOS setup program.
4. Verify that the Boot Priority has the CD-ROM device listed first.
(Before the floppy or hard disk devices.)
5. Exit the BIOS and save the setting.
6. Press any key to boot from the CD-ROM.
IMPORTANT
If your installation requires additional
Manufacturer’s Drivers, press <F6> during the boot
process and follow the on-screen instructions for
adding the necessary drivers.
Publication 1757-IN510A-EN-P - October 2003
Page 34

2-14 Operating System Installation Procedures
Completing the Windows 2000 Professional Installation
1. At the Welcome to Setup window, press <Enter>.
2. If requested, insert the Windows 2000 Professional CD into the
CD-ROM drive and press <Enter>.
IMPORTANT
If Windows 2000 Setup did not find a suitable
installation device, it stops and prompts you for
additional Manufacturer’s Drivers. Follow the
on-screen instructions for adding the necessary
drivers.
3. Press <F8> to agree to the Windows 2000 Licensing Agreement.
4. If necessary, press <ESC> to continue installing a fresh copy of
Windows 2000.
IMPORTANT
If existing partitions are found, delete all of them
first before proceeding. Use the on-screen
instructions to complete this task.
TIP
Certain PCs limit the size of the partition that you
can create. Windows 2000 supports a boot partition
size up to 32 Gigabytes on a NTFS formatted drive.
Use the entire hard disk if possible. If your system
has a limitation, create the largest partition you can,
and leave the leftover space as unpartitioned (you
can format the unpartitioned space later). The
minimum partition size required for this installation
is 4 Gigabytes.
Publication 1757-IN510A-EN-P - October 2003
5. Press <Enter> to set up Windows 2000 on the Unpartitioned
space.
6. Format the partition using the NTFS file system.
Setup formats the partition. This takes a few minutes to
complete.
The computer automatically restarts. Be sure there is not a disk
in the floppy disk drive.
7. At the Welcome to Setup window, click Ne x t .
If there is a delay clicking Ne x t , setup continues the installation
automatically.
Page 35

Operating System Installation Procedures 2-15
8. Verify the information on the Regional Settings window and
click Ne x t .
9. Enter the appropriate Name and Organization name and click
Ne x t .
10. Enter your Windows 2000 Professional Product Key and click
Ne x t .
11. At the Computer Name and Administrator Password window:
a. Enter the Computer Name.
IMPORTANT
b. Enter the Administrator password.
c. Confirm the password.
IMPORTANT
d. Click Ne x t .
12. At the Date and Time Settings window:
a. If necessary, adjust the Date and Time settings.
b. Set the appropriate Time Zone for your location.
c. Uncheck the Automatically adjust clock for daylight saving
changes option.
d. Click Ne x t .
The computer name cannot contain more than 14
alphanumeric characters and must contain no spaces.
For a ProcessLogix Client, be sure the name does not
end in the letter “A” or “B”. The suggested name is
STNxx, where xx is the Station Number (01-20).
Be sure to document the Administrator password, it
is required later in the procedure. The Administrator
account and password gives a user full access to the
system. Care should be taken to who has access to
this information.
ATTENTION
!
13. If setup has not found a suitable Network Device, you are
prompted to install one. Follow the instructions for adding a
manufacturer supplied driver or add the Microsoft Loop Back
adapter.
Failure to uncheck the Automatic adjustment for
Daylight Savings Time causes Redundant Systems to
lose “Sync” when the time is automatically adjusted.
Choosing not to automatically adjust the time
allows you to decide when to make the adjustment
(at a time that is not critical to your process).
Publication 1757-IN510A-EN-P - October 2003
Page 36

2-16 Operating System Installation Procedures
14. Select the Custom settings option and click Ne x t .
15. At the Networking Components window, select Inte r n et
Protocol (TCP/IP) and click Pr operties.
16. In the Networking Components Window:
a. Select the Use the following IP address option.
b. Enter the appropriate IP address information.
The following Private Networking IP Address scheme can be
utilized for the system to operate:
Table 2.C Private Networking IP Address scheme
PC Type Suggested Private Networking IP Address
Client NIC 1: 192.168.0.x
NIC 2: 192.168.1.x
where x is the Station number +2 (for Station number 2, x=4)
c. Enter the Subnet Mask of >255.255.255.0<.
d. Enter a default gateway, if necessary.
Publication 1757-IN510A-EN-P - October 2003
Page 37

Operating System Installation Procedures 2-17
e. Click OK to return to the Networking Components window.
IMPORTANT
IP Addresses are critical to the communication of
the system. Rockwell Automation suggests, when
possible, to utilize a Private Network for the control
system, not connected to any other networks. This
isolates the control system from interference from
any business communication.
In some organizations it is important for these
addresses to be controlled by the IT organization.
Consult your company’s practices and IT
organization for the appropriate IP address
information. It is necessary to use valid IP
information to integrate the ProcessLogix Control
system with the business network.
17. Click Ne x t .
18. Repeat steps 15-16 for additional network cards.
19. At the Workgroup or Computer Domain window:
a. Select the No , t h is co m p u te r … option.
b. Enter an appropriate Workgroup name.
c. Click Ne x t .
TIP
All systems which are configured for this Process
Control System should utilize the same Workgroup
name for easier operations.
At this point in the installation, Setup finishes installing Windows
2000. This takes some time depending on your hardware
configuration.
20. At the Completing the Setup Wizard window, remove the
Windows 2000 Professional CD and click Fin is h .
The PC restarts.
21. If a Network Identification wizard opens, click Can ce l.
Clean System Windows 2000 Professional Installation is complete.
Return to the checklist that led you to this task.
Publication 1757-IN510A-EN-P - October 2003
Page 38

2-18 Operating System Installation Procedures
Clean System Windows XP Professional Installation
Windows XP Professional is available as a Client operating system for
ProcessLogix R510.0. The Windows XP Professional software and
Internet Explorer are licensed products of Microsoft Corporation. A
copy of Internet Explorer is included on the ProcessLogix Knowledge
Builder CD for your convenience.
Installing Windows XP Professional on a New System
This procedure assumes you have:
• All network cards installed in the PC and set to the correct IRQs.
• All supporting ProcessLogix System hardware installed and
connected to the PC.
• A PC that meets specified hardware and software requirements.
See Table 11.B: Client Platform Requirements based on System
Configurations on page 11-3 to review the ProcessLogix Client
platform requirements.
• All manufacturers’ related driver diskettes available to complete
the installation.
IMPORTANT
TIP
For ProcessLogix Client software to operate correctly,
Windows XP MUST be installed to C:\winnt.
If you received your PC from the manufacturer with
Windows XP Professional pre-installed, you must
confirm that the install was to C:\winnt. If Windows
XP was installed to C:\winnt,
Explorer 6.0 SP1 Installation on page 2-33. If
Windows XP was not installed to C:\winnt, you must
complete a clean Windows XP install.
with Starting the Windows XP Installation from the
CD-ROM on page 2-19.
Consult the PC Manufacturer for any specialized
instructions/procedures related to the installation of
the Microsoft Windows XP Professional operating
system.
This procedure lists only the generic installation
procedure. It does not contain any special
instructions for any manufacturer specific driver
installation requirements.
skip to Internet
Continue
Publication 1757-IN510A-EN-P - October 2003
Page 39

Operating System Installation Procedures 2-19
Starting the Windows XP Installation from the CD-ROM
TIP
If you are performing a clean XP installation, steps
1–4 must be completed on a different PC.
1. Insert the ProcessLogix R510.0 Supplemental Software CD into
the CD-ROM drive.
2. Insert a blank disk into the PC’s floppy drive.
3. Using Windows Explorer, copy the WinXP Install\winnt.sif file
from the ProcessLogix R510.0 Supplemental CD to the blank
floppy.
4. Remove the floppy disk.
5. Insert the floppy disk into the PC where XP is to be installed.
6. Turn on the PC.
7. Insert the Microsoft Windows XP Professional CD into the
CD-ROM drive.
8. When prompted, enter into the computer’s BIOS setup program.
9. Verify that the Boot Priority has the CD-ROM device listed first.
(Before the floppy or hard disk devices.)
10. Exit the BIOS and save the setting.
11. Press any key to boot from the CD-ROM.
IMPORTANT
If your installation requires additional
Manufacturer’s Drivers, press <F6> during the boot
process and follow the on-screen instructions for
adding the necessary drivers.
Publication 1757-IN510A-EN-P - October 2003
Page 40

2-20 Operating System Installation Procedures
Completing the Windows XP Professional Installation
1. Press <Enter> at the Welcome to Setup Window.
IMPORTANT
If Windows XP Setup did not find a suitable
installation device, it stops and prompts you for
additional Manufacturer’s Drivers. Follow the
on-screen instructions for adding the necessary
drivers.
2. Press <F8> to agree to the Windows XP Licensing Agreement.
3. If necessary, press <ESC> to continue installing a fresh copy of
Windows XP.
IMPORTANT
If existing partitions are found, you must delete all
of them first before proceeding.
To delete a partition:
1. Select the partition.
2. Press <D>.
3. Press <Enter>.
4. Press <L>.
5. Repeat for all partitions.
TIP
Certain PCs limit the size of the partition that you
can create. Windows XP supports a boot partition
size up to 32 Gigabytes on a NTFS formatted drive.
Use the entire hard disk if possible. If your system
has a limitation, create the largest partition you can,
and leave the leftover space as unpartitioned. (You
can create and format the unpartitioned space
later.) The minimum partition size required for this
installation is 4 Gigabytes.
6. Press <Enter> to set up Windows XP on the Unpartitioned
space.
7. Press <Enter> to format the partition using the NTFS file system.
Setup formats the partition. This takes a few minutes to
complete.
The computer automatically restarts. Be sure there is not a disk
in the floppy disk drive.
Publication 1757-IN510A-EN-P - October 2003
Page 41

Operating System Installation Procedures 2-21
8. If necessary, select the I accept this agreement option and
click Ne x t .
9. Verify the information on the Regional and Language Options
window and click Ne x t .
10. Enter the appropriate Name and Organization and click Ne x t .
11. Enter your Windows XP Professional Product Key and click
Ne x t .
12. At the Computer Name and Administrator Password window:
a. Enter the Computer Name.
IMPORTANT
b. Enter the Administrator password.
c. Confirm the password.
IMPORTANT
d. Click Ne x t .
13. At the Date and Time Settings window:
a. If necessary, adjust the Date and Time settings.
b. Set the appropriate Time Zone for your location.
c. Uncheck the Automatically adjust clock for daylight saving
changes checkbox.
d. Click Ne x t .
The computer name cannot contain more than 14
alphanumeric characters and must contain no spaces.
For a ProcessLogix Client, be sure the name does not
end in the letter “A” or “B”. The suggested name is
STNxx, where xx is the Station Number (01-20).
Be sure to document the Administrator Password. (It
is required later in the procedure.) The Administrator
Account and password gives a user full access to the
system. Care should be taken to who has access to
this information.
ATTENTION
!
Failure to uncheck the Automatic adjustment for
Daylight Savings Time causes Redundant Systems to
loose “Sync” when the time is automatically
adjusted. Choosing not to automatically adjust the
time allows you to decide when to make the
adjustment (at a time that is not critical to your
process).
Publication 1757-IN510A-EN-P - October 2003
Page 42

2-22 Operating System Installation Procedures
TIP
If setup has not found a suitable Network Device,
you are prompted for installing one. Follow the
instructions for adding a manufacturer supplied
driver or add the Microsoft Loop Back adapter.
14. Select the Custom settings option and click Ne x t .
15. At the Networking Components window, select Inte r n et
Protocol (TCP/IP) and click Pr operties.
16. In the Internet Protocol (TCP/IP) Properties window:
a. Select the Use the following IP address option.
b. Enter the appropriate IP address information.
The following Private Networking IP Address scheme can be
utilized for the system to operate:
Table 2.D Private Networking IP Address scheme
PC Type Suggested Private Networking IP Address
Client NIC 1: 192.168.0.x
NIC 2: 192.168.1.x
where x is the Station number +2 (for Station number 2, x=4)
c. Enter the Subnet Mask >255.255.255.0<.
d. Enter a default gateway if necessary.
e. Click OK to return to the Networking Components window.
Publication 1757-IN510A-EN-P - October 2003
Page 43

Operating System Installation Procedures 2-23
IMPORTANT
IP Addresses are critical to the communication of
the system. Rockwell Automation suggests, when
possible, to utilize a Private Network for the control
system. (Not connected to any other networks.)
This isolates the control system from interference
from any business communication.
In some organizations it is important for these
addresses to be controlled by the IT organization.
Consult your company’s practices and IT
organization for the appropriate IP address
information. It is necessary to use valid IP
information to integrate the ProcessLogix Control
system with the Business Network.
17. Click Ne x t .
18. Repeat steps 15-17 for additional network cards.
19. At the Workgroup or Computer Domain window:
a. Select the No , t h is co m p u te r … option.
b. Enter an appropriate workgroup Name.
c. Click Ne x t .
TIP
All systems which are configured for this Process
Control System should use the same Workgroup
Name for easier operations.
Setup finishes installing Windows XP. This takes some time
depending on your hardware configuration. The PC
automatically restarts.
20. If a Display Settings prompt appears, click OK , then click OK at
the Monitor Settings prompt.
21. At the Welcome to Microsoft Windows window, click Ne x t .
22. At the How will this computer connect to the internet window,
click Skip.
IMPORTANT
Microsoft Windows XP Professional must be
registered with the Microsoft Corporation, but
registration is not required at this time. We
recommend that you skip this step by answering
No to the activation and registration wizard.
Consult your company’s practices and IT
organization to determine proper license
acquisition.
Publication 1757-IN510A-EN-P - October 2003
Page 44

2-24 Operating System Installation Procedures
23. To skip the Windows Registration, select the No, not at this
time option and click Ne x t .
24. At the Who will use this computer? window, enter >xptemp<
into the Your name field and click Ne x t .
25. At the Thank You! window, remove the Windows XP
Professional CD and click Fin is h to start Windows XP.
26. Click Star t, right-click the My Computer icon and select
Man age .
27. Expand Local Users and Groups.
28. Click the Us er s folder.
29. Right-click >xptemp< and select Delete.
30. Click Ye s to confirm.
Upgrading Windows 2000 Professional to XP Professional
31. Close the Computer Management window.
Windows XP Professional installation is complete.
Return to the checklist that led you to this task.
1. Insert the Windows XP Professional CD into the CD-ROM drive.
The Auto-Run capability should start the application
automatically. If it does not, do the following:
a. Click Star t ⇒ Run .
b. Enter this path or Br ow se to:
>D:(or your CD-ROM drive letter)\setup.exe<
c. Click OK.
2. At the Welcome to Microsoft Windows XP window, click Ins tal l
Window s XP.
3. At the Welcome to Windows Setup window, select Up gr ad e
(Recommended) from the drop-down list and click Ne x t .
Publication 1757-IN510A-EN-P - October 2003
4. Select the I accept this agreement option and click Ne x t .
5. Enter your Windows XP Professional Product Key and click
Ne x t .
Page 45

Operating System Installation Procedures 2-25
6. Select the No, skip this step and continue installing
Window s option and click Ne x t .
After automatically restarting, the installation cycles through the
following:
• Preparing Installation
• Installing Windows
• Finalizing Installation
This may take 30-60 minutes to complete. When completed, the
system automatically restarts.
7. At the Welcome to Microsoft Windows window, click Ne x t .
IMPORTANT
Microsoft Windows XP Professional must be
registered with the Microsoft Corporation, but
registration is not required at this time. We
recommend that you skip this step by answering
No to the activation and registration wizards.
Consult your company’s practices and IT
organization to determine proper license
acquisition.
8. To skip the Windows Registration Wizard, select the No , n o t a t
this time option and click Ne x t .
9. Click Fi n ish to start Windows XP.
Upgrading Windows 2000 Professional to XP Professional is complete.
Return to the checklist that led you to this task.
Publication 1757-IN510A-EN-P - October 2003
Page 46

2-26 Operating System Installation Procedures
Creating the ProcessLogix User Accounts
Table 2.E User Account Details
Username Full name
ps_user Process User ProcessLogix
(1)
erserver
(1)
The erserver account is only necessary on ProcessLogix Servers.
(2)
This field may be left blank.
(3)
For security reasons, it is recommended that you create a more complex ps_user password after the ProcessLogix installation is complete.
(4)
The confirm password must be lowercase.
erserver Engineering
You must create a Process User account to be used to complete the
ProcessLogix R510.0 Software installation. Follow the steps below to
create the ps_user and erserver accounts.
If you have a redundant Server pair, you must complete this
procedure on both SERVERA and SERVERB.
IMPORTANT
All R510.0 Systems are required to use the ps_user
account. This is a change from R320.0, where most
systems used the plx_user account.
Unless otherwise noted, all subsequent software
installs should be performed with the ps_user
account logged on to the system.
TIP
If this is the first time starting up since the Windows
2000 operating system install, it is necessary to
remove the default startup screens.
Refer
to Removing the Default Startup Screens on
page P-4.
Description
System
Administrator
Repository Server
(2)
Password Confirm Password Member of
password
erserver
(3)
(4)
password
erserver
(3)
(4)
Administrators
Users
Administrators
Users
Publication 1757-IN510A-EN-P - October 2003
Creating the ps_user and erserver accounts
1. If using Windows XP, click Star t.
1. Right-click the My Computer icon and select Man age.
2. Expand Local Users and Groups.
3. Click the Users folder.
4. Click Action ⇒ Ne w Us e r .
5. Enter the appropriate information for ps_user from table
Table 2.E on page 2-26.
Page 47

Operating System Installation Procedures 2-27
6. Uncheck the User must change password at nex t logon
checkbox.
7. Check ONLY the Passwor d never ex pires checkbox.
8. Click Cr eate.
9. On ProcessLogix Servers, repeat steps 5 through 8 for the
erserver account.
10. Click Clo se.
11. Double-click the ps_user account.
12. On the Member of tab, click Add.
13. In Windows 2000, under Name, click on Administrators and
click Add. In Windows XP, type Administrators in the object
name field.
14. Click OK.
15. Click Apply.
16. Close the user properties window.
17. On ProcessLogix Servers, repeat steps 11 through 16 for the
erserver account.
18. Close the Computer Management window.
Creating the ProcessLogix User Accounts is complete.
Return to the checklist that led you to this task.
Publication 1757-IN510A-EN-P - October 2003
Page 48

2-28 Operating System Installation Procedures
Modifying Windows XP
If upgrading from an R500.1 Windows XP Client, skip to step 12.
If you have a redundant Server pair, you must complete this
procedure on both SERVERA and SERVERB.
1. Logon to Windows XP Professional as ps_user or Process User.
2. Click Star t ⇒ Con tr ol Pa nel.
3. Click Us er Acc ou n ts .
4. Click Change the way users Log on or off.
5. Uncheck the Use the Welcome screen checkbox and click
Apply Option s.
6. Close all windows, restart the PC and logon as ps_user.
7. Right-click in the taskbar and select Properties.
8. On the Start Menu tab, select Classic Start Menu and click OK .
9. Click Star t ⇒ Settin gs ⇒ Control Panel.
10. Click Switch to Classic View.
11. Close the Control Panel window.
12. Open Windows Explorer.
13. Right-click the CD-ROM drive and select Pr oper ties.
14. On the AutoPlay tab, in the drop-down list, select Pictur es.
15. Select Select an action to per for m and select Ta k e n o a ct i o n .
16. In the drop-down list, select Mix e d c o n te n t.
17. Select Select an action to per for m and select Ta k e n o a ct i o n .
18. Click OK and close Windows Explorer.
19. Click Start ⇒ Shut Dow n.
20. In the drop-down list, select Lo g o f f p s _u s e r and click OK.
Modifying Windows XP is complete.
Return to the checklist that led you to this task.
Publication 1757-IN510A-EN-P - October 2003
Page 49

Operating System Installation Procedures 2-29
Windows 2000 Service Pack 4 Installation
Checking for Windows 2000 Service Pack 4
Complete the following steps to determine whether the source CDs
included SP4. If you have a redundant Server pair, you must complete
this procedure on both SERVERA and SERVERB.
1. Logon to the system.
TIP
2. Click Star t ⇒ Run .
3. Enter >winver< and press <Enter>.
4. In the About Windows window, look to see if the following line
appears: Version 5.0 (Build 2195: Service Pack 4).
• If the line appears as shown, click OK and return to the
checklist that led you to this task.
If this is the first time starting up since the Windows
2000 operating system install, it is necessary to
remove the default startup screens.
to Removing the Default Startup Screens on
page P-4.
Refer
• If the line does not say Service Pack 4, click OK and continue
Installing Windows 2000 Service Pack 4 on page 2-30.
with
Publication 1757-IN510A-EN-P - October 2003
Page 50

2-30 Operating System Installation Procedures
Installing Windows 2000 Service Pack 4
If you have a redundant Server pair, you must complete this
procedure on both SERVERA and SERVERB.
1. If necessary, logon to the system.
TIP
If this is the first time starting up since the Windows
2000 operating system install, it is necessary to
remove the default startup screens.
Refer
to Removing the Default Startup Screens on
page P-4.
2. Insert the ProcessLogix R510.0 Supplemental Software CD into
the CD-ROM drive.
3. Click Star t ⇒ Run .
4. Enter this path or Br ow se to:
>D:(or your CD-ROM drive letter)\Win2k_SP4\W2KSP4_EN.EXE<
5. Click OK to launch the Service Pack 4 setup application.
6. At the Welcome window, click Ne x t .
7. Select the I Agr ee option and click Ne x t .
8. Select the Ar chive Files option and click Ne x t .
Publication 1757-IN510A-EN-P - October 2003
9. At the Completing the Windows 2000 Service Pack 4 window,
click Fin is h.
The system automatically restarts.
10. Logon to the system.
11. Click Star t ⇒ Settings ⇒ Control Panel.
12. Double-click Automatic Updates.
13. Uncheck the Keep my computer up to date checkbox and
click OK.
14. Close the Control Panel window.
The Windows 2000 Service Pack 4 installation is complete.
Return to the checklist that led you to this task.
Page 51

Operating System Installation Procedures 2-31
Windows Security Hotfix Installation
All systems are required to install the Windows Security Hotfix.
Installing Windows 2000 Security Hotfix
If your system has Windows XP, skip to Installing Windows XP
Security Hotfix on page 2-32.
If you have a redundant Server pair, you must complete this
procedure on both SERVERA and SERVERB.
1. If necessary, logon to the system.
TIP
2. If necessary, insert the ProcessLogix R510.0 Supplemental
Software CD into the CD-ROM drive.
If this is the first time starting up since the Windows
2000 operating system install, it is necessary to
remove the default startup screens.
to Removing the Default Startup Screens on
page P-4.
Refer
3. Click Star t ⇒ Run .
4. Enter this path or Br ow se to:
>D:(or your CD-ROM drive letter)\Win2k_Security_Hotfix_824146\
Windows2000-KB824146-x86-ENU.exe<
5. Click OK to launch the setup application.
6. At the Welcome window, click Ne x t .
7. Select the I Agr ee option and click Ne x t .
8. At the Completing the Windows 2000 KB824146 Setup Wizard
window, click Fin is h .
The system automatically restarts.
The Windows 2000 Security Hotfix installation is complete.
Return to the checklist that led you to this task.
Publication 1757-IN510A-EN-P - October 2003
Page 52

2-32 Operating System Installation Procedures
Installing Windows XP Security Hotfix
1. If necessary, logon to the system.
2. Insert the ProcessLogix R510.0 Supplemental Software CD into
the CD-ROM drive.
3. Click Star t ⇒ Run .
4. Enter this path or Br ow se to:
>D:(or your CD-ROM drive letter)\WinXP_Security_Hotfix_824146\
WindowsXP-KB824146-x86-ENU.exe<
5. Click OK to launch the setup application.
6. At the Welcome window, click Ne x t .
7. Select the I Agr ee option and click Ne x t .
8. At the Completing the Windows XP KB824146 Setup Wizard
window, click Fin is h .
The system should automatically restart. If it does not, restart the
PC manually.
The Windows XP Security Hotfix installation is complete.
Return to the checklist that led you to this task.
Publication 1757-IN510A-EN-P - October 2003
Page 53

Operating System Installation Procedures 2-33
Internet Explorer 6.0 SP1 Installation
Checking the Internet Explorer Version
All systems are required to use Internet Explorer 6.0 SP1. Complete
the following steps to determine the version of Internet Explorer that
is installed. If you have a redundant Server pair, you must complete
this procedure on both SERVERA and SERVERB.
1. If necessary, logon to the system.
TIP
2. Start Internet Explorer.
IMPORTANT
If this is the first time starting up since the Windows
2000 operating system install, it is necessary to
remove the default startup screens.
Refer
to Removing the Default Startup Screens on
page P-4.
If this is the first time running Internet Explorer on
Windows 2000, the Internet Connection Wizard
opens.
An internet connection is not required for this
function or ProcessLogix software use. However,
components in the software are required.
Fill in the appropriate information if known,
otherwise follow the steps listed here:
a. Select the I want to setup my Internet connection
manually option and click Next.
b. Select the I connect through a local area network
(LAN) option and click Next.
c. Click Next at the local area network internet
configuration window.
d. Select the No option for setting up an Internet Mail
Account and click Next.
e. Click Finish.
f. If you do not have an Internet connection, you receive an
error attempting to download the page. Click Work
Offline.
Publication 1757-IN510A-EN-P - October 2003
Page 54

2-34 Operating System Installation Procedures
IMPORTANT
If this is the first time running Internet Explorer on
Windows XP, you are prompted with the New
Connection Wizard.
An internet connection is not required for this
function or ProcessLogix software use. However,
components in the software are required.
Fill in the appropriate information if known,
otherwise follow the steps listed here:
a. Click Cancel on the Location Information Window.
b. Click Yes to confirm.
c. Click Cancel at the New Connection Wizard window.
d. Start Internet Explorer.
3. Click He l p ⇒ About Inter n et Explor er.
4. Check to see the Version information:
• If the version is 6.0 and the service pack is SP1, click OK , close
Internet Explorer and return to the checklist that led you to this
task.
• If the version is less than 6.0 or the service pack is not SP1, click
OK, close Internet Explorer and continue with
Installing Internet
Explorer 6.0 SP1 on page 2-35.
Publication 1757-IN510A-EN-P - October 2003
Page 55

Operating System Installation Procedures 2-35
Installing Internet Explorer 6.0 SP1
All systems are required to use Internet Explorer 6.0 SP1. Complete
the following steps to install Internet Explorer 6.0 SP1. If you have a
redundant Server pair, you must complete this procedure on both
SERVERA and SERVERB.
1. If necessary, logon to the system.
TIP
If this is the first time starting up since the Windows
2000 operating system install, it is necessary to
remove the default startup screens.
Refer
to Removing the Default Startup Screens on
page P-4.
2. Insert the ProcessLogix R510.0 Knowledge Builder CD into the
CD-ROM drive.
3. Click Star t ⇒ Run .
4. Enter this path or Br ow se to:
>D:(or your CD-ROM drive letter)\IE6_SP1\IE6Setup.exe<
5. Click OK to launch the Internet Explorer setup application.
6. Select the I accept the agreement option and click Ne x t .
7. At the Windows Update: Internet Explorer window, click Ne x t .
8. Click Fi ni sh .
The system automatically restarts.
TIP
On subsequent logons to the computer, a task runs
to apply the update. You will see this one time for all
users of the computer.
Internet Explorer 6.0 SP1 Installation is complete.
Return to the checklist that led you to this task.
Publication 1757-IN510A-EN-P - October 2003
Page 56

2-36 Operating System Installation Procedures
Updating Windows Installer
All Windows 2000 systems are required to install the Windows
Installer update. Complete the following steps to install the Windows
Installer update. If you have a redundant Server pair, you must
complete this procedure on both SERVERA and SERVERB.
IMPORTANT
1. If necessary, logon to the system.
TIP
2. Insert the ProcessLogix R510.0 Base CD in the CD-ROM drive.
3. Click Star t ⇒ Run .
4. Enter this path or Br ow se to:
>D:(or your CD-ROM drive letter)\Process Product\instmsiw.exe<
If using Windows XP Professional, do not complete
this update as Windows XP Professional has the most
recent update for the Windows Installer.
If this is the first time starting up since the Windows
2000 operating system install, it is necessary to
remove the default startup screens.
to Removing the Default Startup Screens on
page P-4.
Refer
5. Click OK .
6. If a Specified service already exists error appears, Windows
Installer is already up to date, click OK and return to the
checklist that led you to this task. Otherwise, click OK at the
Windows Installer Setup completed successfully dialog box.
7. Click No (Do not restart the system at this time.).
8. Wait for installation operations to complete.
9. Close all applications.
10. Restart the PC.
Updating Windows Installer is complete.
Return to the checklist that led you to this task.
Publication 1757-IN510A-EN-P - October 2003
Page 57

Operating System Installation Procedures 2-37
Updating ISScript
All systems are required to install the ISScript update. Complete the
following steps to install the ISScript update. If you have a redundant
Server pair, you must complete this procedure on both SERVERA and
SERVERB.
1. If necessary, logon to the system.
2. If necessary, insert the ProcessLogix R510.0 Base CD in the
CD-ROM drive.
3. Click Star t ⇒ Run .
TIP
4. Enter this path or Br ow se to:
>D:(or your CD-ROM drive letter)\Process Product\ISScript8.msi<
5. Click OK .
6. At the ISScript InstallShield Wizard window, click Ne x t .
In the next step, if browsing, select All Files in the
Files of type drop-down list.
7. Select the I accept th e terms option and click Ne x t .
8. At the Ready to Install window, click In st a ll.
9. At the InstallShield Wizard Completed window, click Fin ish .
10. Restart the PC.
Updating ISScript is complete.
Return to the checklist that led you to this task.
Publication 1757-IN510A-EN-P - October 2003
Page 58

2-38 Operating System Installation Procedures
Additional Operating System Customization Procedures
All procedures in this section assume that you are logged onto the
system with Administrator access. If you have a redundant Server pair,
you must complete this procedure on both SERVERA and SERVERB.
Adjusting the Video Settings
The system applications and displays have been optimized to be
displayed at a resolution of 1024 by 768 or 1280 by 1024, with 65K
color (High Color, 16 bit). Utilizing any other setting produces
anomalies in some displays. Complete the following steps to set the
Video Settings:
1. Right-click the desktop and select Pr ope rties.
2. On the Settings tab, click Advanced in the lower-right side of
the window.
3. If you are using Windows 2000, confirm that on the General
Tab, the Display Font size is set to Small Fonts. If you are using
Windows XP, confirm the DPI setting is Normal size (96 DPI).
4. Click the Adap ter tab.
5. Click Li s t A l l Mo d e s .
6. Select one of the settings entitled 1024 by 768, or 1280 by 1024,
High Color (16 bit).
You should select a refresh rate (listed in Hertz) at the maximum
the monitor can handle. For Example, 1024 by 768, High Color
(16 bit), 75 Hertz. Click OK after your selection.
7. Click Apply.
At this point the setting is applied.
8. Click OK .
9. Click Ye s to keep your setting.
If nothing appears or you are unable to see the screen, the
previous mode is reset after 15 seconds. Repeat steps
reset the mode to a lower Hertz setting.
5–9 to
Publication 1757-IN510A-EN-P - October 2003
10. Click OK to close the Advanced adapter properties Window.
11. Click OK to close the Display Properties window.
Page 59

Operating System Installation Procedures 2-39
Setting Up Additional Drivers
The Microsoft Windows 2000 or XP Operating System CDs used to
complete an installation contain a finite set of drivers for the most
common hardware items at the time of release. Rockwell Automation
considers this set to be the “base” set of drivers. Manufacturers update
their drivers to fix anomalies or provide additional features.
Third Party Platforms
Rockwell Automation recommends that you check your PC Supplier
for driver/software updates pertaining to running the Windows 2000
or XP Operating System on the platform. It may be necessary to
upgrade or install additional drivers to utilize the hardware in your
system.
IMPORTANT
Hardware drivers affect the stability of the system
and should be evaluated for their impact before
implementing.
Other Required System Settings
The following table summarizes the various system settings required
for optimum ProcessLogix R510.0 software operation.
IMPORTANT
Table 2.F Required System Settings for ProcessLogix R510.0 Software
Function Required Setting Value
Dynamic Host Configuration
Protocol (DHCP) IP Addressing
View Options
Windows Explorer
ProcessLogix System requires that all specified IP address are fixed and known. We recommend that
you do not use DHCP, but if your organization requires it, use only reserved addressing.
1. Open Windows Explorer
2. Click Too ls ⇒ Folder Options.
3. On the View tab, select the Choose the Show hidden files and folders option.
4. Uncheck the Hide extensions for known file types checkbox.
5. Repeat for each user.
If you change any system settings, it may be
necessary to restart the PC for the system to apply
them.
Virtual Memory The default Virtual Memory settings are typically appropriate for ProcessLogix installation. After the
ProcessLogix installation is complete, navigate in Knowledge Builder to Server and Client Installation
⇒
Guide
Preparing to Install
⇒
Configuring Virtual Memory for more information.
Publication 1757-IN510A-EN-P - October 2003
Page 60

2-40 Operating System Installation Procedures
Creating Emergency Repair
After all installations are completed and all drivers are installed, you
need to create your Emergency Repair Disks.
Disks
Windows 2000
Complete the following Steps to create emergency repair disks for
your Windows 2000 installation. If you have a redundant Server pair,
you must complete this procedure on both SERVERA and SERVERB.
1. Insert a blank diskette into the PC's floppy drive.
2. Click Star t ⇒ Pro gr am s ⇒ Accessor ies ⇒ System Tools ⇒
Backu p.
3. Click Em e r g e n c y Re p ai r Di s k .
An Emergency Repair Diskette window opens.
4. Check the Also back up th e r egistry to the repair directory
checkbox and click OK.
5. When finished, click OK .
6. Repeat Steps 1–5 with another blank formatted diskette.
7. Click Job ⇒ Ex i t .
8. Store the two diskettes in different places to protect against
damage to the diskettes.
Windows XP
Complete the following steps to create recovery disks for your
Windows XP installation.
1. Insert a blank diskette into the PC's floppy drive.
2. Click Star t ⇒ Pr ogr am s ⇒ Accessor ies ⇒ System Tools ⇒
Backu p.
3. If the Backup or Restore Wizard opens, click Adv an ced Mode.
Publication 1757-IN510A-EN-P - October 2003
4. Click Automated System Recover y Wizar d.
5. Click Ne x t .
Page 61

Operating System Installation Procedures 2-41
6. Enter a backup media or file name and click Ne x t .
7. Click Fi ni sh .
8. Repeat Steps 1–7 with another blank formatted diskette.
9. Click Job ⇒ Ex i t .
10. Store the two diskettes in different places to protect against
damage to the diskettes.
Creating Emergency Repair Disks is complete.
Return to the checklist that led you to this task.
Publication 1757-IN510A-EN-P - October 2003
Page 62

2-42 Operating System Installation Procedures
Publication 1757-IN510A-EN-P - October 2003
Page 63

Chapter
3
ProcessLogix Server Installation Procedures
ProcessLogix Software Installation on a Clean PC
Rockwell Automation delivers the ProcessLogix Server with all the
required software pre-installed. The following instructions can be
used if the system has to be reinstalled or for new installations on a
PC that was not purchased from Rockwell Automation.
IMPORTANT
The following table lists the items that you MUST complete to install
the ProcessLogix software. If you are installing ProcessLogix software
on a redundant Server pair you must complete the items on SERVERA
then repeat the same items on SERVERB.
Table 3.A ProcessLogix Software Installation on a Clean PC
Step Item Page
✔
1.
2.
If you purchased a new ProcessLogix R510.0 Server
from Rockwell Automation, the operating system and
ProcessLogix software have already been installed.
Do not reinstall the software. Refer to the
ProcessLogix R510.0 Server Installation Instructions,
publication 1757-IN951 shipped with your hardware.
Clean System Windows 2000 Server Installation 2-2
Creating the ProcessLogix User Accounts 2-26
Windows 2000 Service Pack 4 Installation 2-29
3.
Windows Security Hotfix Installation 2-31
4.
Internet Explorer 6.0 SP1 Installation 2-33
5.
Updating Windows Installer 2-36
6.
Updating ISScript 2-37
7.
Additional Operating System Customization Procedures 2-38
8.
Creating Emergency Repair Disks 2-40
9.
10.
11.
12.
1 Publication 1757-IN510A-EN-P - October 2003
1784-PCIC Driver Installation 7-1
Installing ProcessLogix R510.0 Software 3-2
Moving the RSLinx Activation File 3-14
Page 64

3-2 ProcessLogix Server Installation Procedures
Table 3.A ProcessLogix Software Installation on a Clean PC
Step Item Page
✔
13.
14.
IMPORTANT
Configuring RSLinx Drivers for ControlNet Supervisory
Network
or
Configuring RSLinx Drivers for Ethernet Supervisory
Network
Completing the ProcessLogix R510.0 Setup on a
Redundant Server Pair
or
Completing the ProcessLogix R510.0 Install on a
Non-Redundant Server
3-19
PC Naming Requirements
Before installing ProcessLogix R510.0, you must
verify that your computer name follows the PC
naming requirements.
Refer to PC Naming Rules on
page 2-7.
It is strongly recommended that you name your
Server properly prior to installing ProcessLogix
R510.0 software.
To change the Server name prior to installing
ProcessLogix R510.0, follow the procedures in
Changing the Computer Name on a ProcessLogix
Client on page 8-23.
3-16
6-2
3-20
Installing ProcessLogix R510.0 Software
Once the ProcessLogix R510.0 software is installed,
changing the computer name requires a full uninstall
and reinstall of all the ProcessLogix R510.0 software.
Refer to Changing the Computer Name on a
ProcessLogix Server on page 8-16.
Complete the following steps to install these ProcessLogix software
components in succession.
• SQL Server
• Knowledge Builder
• RSLinx OEM 2.31 (Build 10)
• Engineering Tools
• Client/Server (Display Builder, Station, Server, etc.)
Publication 1757-IN510A-EN-P - October 2003
Page 65

ProcessLogix Server Installation Procedures 3-3
Special Considerations
Table 3.B Special Considerations when Installing ProcessLogix R510.0 Software
Special Consideration Description
Redundant Servers Directory
Structures
R500.1 References If at any time, during installation of R510.0, you see a reference to R500.1, this is expected because
Using Microsoft Excel Data
Exchange
McAfee NetShield If your system has McAfee NetShield software you must disable virus scanning before installing
If you have a redundant Server pair, you must install software on SERVERA first. Then complete the
software installation process again on SERVERB.
You must install the ProcessLogix Server on the same partition on both the Primary and Secondary
Servers and ensure that their directory structures match.
For example, if you install the ProcessLogix Server to C:\honeywell\server on the Primary Server then it
should be installed to the same location on the Secondary Server.
Synchronization problems have been encountered by customers installing the ProcessLogix Server to
C:\honeywell\server on the Primary Server and to D:\honeywell\server on the Secondary Server.
R510.0 is a point release of R500.1.
If you plan to use Microsoft Excel Data Exchange, Microsoft Excel must be installed before installing
ProcessLogix.
Prior to the ProcessLogix installation, it is mandatory that the Excel macro security level is set to
Medium. To change the security level for macro virus protection in Excel:
1. On the Tools menu, click Macro, then click Security.
2. On the Security Level tab, select Medium and click OK.
3. Close Excel.
ProcessLogix components. After the ProcessLogix installation is complete, refer to Installing and
Running NetShield with ProcessLogix on page 8-13. Pay attention to instructions regarding the
configuring of virus-scan exclusion directories. You can re-enable NetShield after the ProcessLogix
installation is complete.
If the message “Dr. Watson has been installed as default application debugger,” appears during
software installation, click OK.
1. Restart the PC.
ATTENTION
It is required that you restart the PC before the
ProcessLogix installation can begin. Do n ot
continue with the ProcessLogix installation
until you have restarted your system.
!
2. Logon as ps_user.
IMPORTANT
3. Close any running applications.
The system must be logged on as ps_user to
complete the procedures listed below.
Refer to Creating the ProcessLogix User Accounts on
page 2-26 if you need to create the ps_user account.
Publication 1757-IN510A-EN-P - October 2003
Page 66

3-4 ProcessLogix Server Installation Procedures
Installing ProcessLogix Product
1. Insert the ProcessLogix R510.0 Base Software CD into the
CD-ROM drive.
2. Click Star t ⇒ Run .
3. Enter this path or Br ow se to:
>D:(or your CD-ROM drive letter)\SETUP.EXE<
4. Click OK to launch the software setup application.
5. Select the ProcessLogix Server option and click Ne x t .
IMPORTANT
6. At the Before installing window, click Yes.
7. At the Product Selection Completed window, click Con tin ue.
You must have either a PCIC or Ethernet card
installed in your ProcessLogix Server to install
R510.0.
Installing SQL Server
IMPORTANT
If SQL Server version 7.0 is present on the machine,
the following appears:
“If for any reason you do not want your SQL version
updated, click Abort.”
Click OK to continue. Clicking Abort terminates the
entire ProcessLogix installation.
If at any time during the SQL install you see a
Windows File Protection window, click Can ce l then
click Yes to keep the file versions.
Publication 1757-IN510A-EN-P - October 2003
1. The SQL Setup Installation Application automatically starts.
Status messages indicate progress, but no user interaction is
required. This takes 4–7 minutes to complete.
Page 67

ProcessLogix Server Installation Procedures 3-5
2. When the following dialog opens, click OK to restart the PC.
A System Shutdown warning opens and closes. After the restart,
installation automatically continues.
Normally, no actions are necessary on your part. Do not press
any keys, buttons, etc. during shutdown and restart. However, if
the system displays the logon window for more than about ten
(10) seconds, logon as ps_user.
TIP
Upon restarting the system, you may receive:
• a message that a service failed to start. If you
receive this message, click OK.
• an notcli.exe – Unable to Locate DLL prompt.
This is normal at this stage and can be ignored.
Click OK to close the prompt.
ProcessLogix installation resumes automatically. It is
possible for ProcessLogix installation to be delayed
for several minutes before resuming.
3. SQL Service Pack 2 installation automatically starts.
Status messages indicate progress, but no user interaction is
required. This takes 2 to 6 minutes to complete.
TIP
If a Q323875 window opens, click Yes to all to
overwrite old files.
When the SQL install is complete, the ProcessLogix R510.0 Base
Software CD ejects.
Publication 1757-IN510A-EN-P - October 2003
Page 68

3-6 ProcessLogix Server Installation Procedures
Installing Knowledge Builder
ATTENTION
Do not click No in the next step.
Clicking No aborts the entire ProcessLogix
installation.
!
1. Insert the ProcessLogix R510.0 Knowledge Builder CD into the
CD-ROM drive and click Yes.
Installing Adobe Acrobat
Adobe Acrobat Reader 4.05 is required to view *.pdf files contained in
Knowledge Builder. Follow these steps to install Acrobat Reader 4.05.
If Adobe Acrobat is already installed, the install will automatically
continue with
Installing Knowledge Builder Components, below.
2. At the Acrobat Reader 4.05 Setup window, click Ne x t .
3. At the Choose Destination Location window, click Ne x t .
4. Click OK .
Installing Knowledge Builder Components
5. At the Knowledge Builder Welcome window, click Ne x t .
6. Click Ye s to accept the license agreement.
7. Select the KB Full option and click Ne x t .
For additional information on KB install types, refer to Installing
Knowledge Builder Components on page 8-5.
8. Click Select All and click Ne x t .
9. At the Server selection window, click Ne x t to accept the default
directory for Knowledge Builder.
Publication 1757-IN510A-EN-P - October 2003
Page 69

ProcessLogix Server Installation Procedures 3-7
10. At the Start Copy window, click Ne x t .
11. At the Installation completed window, click Fi n ish .
The KB_update executes. No user interaction is required.
When the Knowledge Builder install is complete, the
ProcessLogix R510.0 Knowledge Builder CD ejects.
Installing RSLinx
ATTENTION
Do not click No in the next step.
Clicking No aborts the entire ProcessLogix
installation.
!
1. Insert the ProcessLogix R510.0 Application Software CD into the
CD-ROM drive and click Yes.
2. At the RSLinx Welcome window, click Ne x t .
3. Select the I accept th e terms option and click Ne x t .
4. Enter the User Name and Organization to whom the RSLinx
package is registered, and click Ne x t .
5. At the Standard Setup window, click Ne x t .
6. At the Ready to Install window, click In st a ll.
7. At the If you have a previous Backup message window, click
OK.
8. At the InstallShield Wizard Completed window, click Fin ish .
9. After reviewing, close the Release Notes window.
10. At the ProcessLogix Installation window, click OK to restart the
PC.
A System Shutdown warning opens and closes. After restart,
installation automatically continues.
Normally, no actions are necessary on your part. Do not press
any keys, buttons, etc. during shutdown and restart. However, if
the system displays the logon window for more than about ten
(10) seconds, logon as ps_user.
Publication 1757-IN510A-EN-P - October 2003
Page 70

3-8 ProcessLogix Server Installation Procedures
Installing Engineering Tools
1. At the Ready to Install window, click In stall .
TIP
2. At the Installation Complete window, click Fin is h .
Command windows open during Engineering Tools
installation. These windows close automatically.
Installing Active X Components
1. Click OK to acknowledge the change directory warning.
2. At the PsAxCtl Document EXE Setup Welcome window, click
OK.
3. Verify that the Directory is:
C:\Honeywell\TPS50\System\bin.
Publication 1757-IN510A-EN-P - October 2003
4. Click the PC icon install button.
5. At the Setup complete window, click OK.
Page 71

ProcessLogix Server Installation Procedures 3-9
Installing the ProcessLogix Server
1. At the Welcome to ProcessLogix Server Setup window, click
Ne x t .
2. At the Choose Setup Type window, click Pr ocessLogix Ser ver
setup (desktop PC icon).
3. At the Enter License window, enter the System number and
Authorization number which appear on your software license
certificate in their respective fields and click Ne x t .
TIP
You must install Microsoft Excel prior to installing
Microsoft Excel Data Exchange.
4. At the Choose ProcessLogix Server Options window, select
Microsoft Excel Data Exchange and/or Network API and click
Ne x t .
TIP
In steps 5–12 below, you MUST NOT change the
directory names from their defaults. If you do change
directory names, the ProcessLogix system may not
operate properly.
If you see a Directory Already Exists window, click
Yes.
5. Click Ne x t to accept the default directory for the Server
Software.
6. Click Ne x t to accept the default directory for the Client
Software.
7. Click Ne x t to accept the default directory for the Display Search
Path.
8. Click Ne x t to accept the default directory for the ProcessLogix
Software.
9. If the Specify Microsoft Excel Directory window opens, click
Ne x t . Otherwise, skip to step
IMPORTANT
Rockwell Automation recommends answering No to
the question:
11.
Do you want Microsoft Excel Data Exchange to be
allowed to write to a ProcessLogix Server database?
Answering Yes enables the write option and it is
possible for anyone with access to the machine to
write to the Server database.
Publication 1757-IN510A-EN-P - October 2003
Page 72

3-10 ProcessLogix Server Installation Procedures
10. To disable the Microsoft Excel Data Exchange write option, click
No in response to the question:
Do you want Microsoft Excel Data Exchange to be allowed to
write to a ProcessLogix Server database?
11. Click Ne x t to accept the default directories for the History
Archive.
12. Click Ne x t to accept the default directory for the Event Archive.
13. At the Enter Account Passwords window, complete all entries:
(passwords are case sensitive)
a. Enter >mngr123< as the manager account password and press
<Tab>.
b. Enter >mngr123< again to confirm password and press
<Tab>.
c. Enter >engr123< as the engineering account password and
press <Tab>.
d. Enter >engr123< again to confirm password and press <Tab>.
e. Enter >oper123< as the operator account password and press
<Tab>.
f. Enter >oper123< again to confirm password.
14. Click Ne x t to complete the password entry.
15. At the Choose Report Paper Format, select the desired paper
format and click Ne x t . Letter paper is the standard format.
16. If the Choose ProcessLogix Server Folder window opens, click
Ne x t . Otherwise, continue with the next step.
17. If the Choose ProcessLogix Server Diagnostic Tools Folder
window opens, click Ne x t . Otherwise, continue with the next
step.
18. At the Choose Point Mode Acronyms window, select the
Default acr on ym s option and click Ne x t .
19. At the Choose Fast History Rate window, select a Fast History
collection rate and click Ne x t . 5 seconds is the default rate.
TIP
To change the Fast History Collection Rate after
installation is complete, click Star t
ProcessLogix Server
⇒ Setup.
⇒ Pr ogr am s ⇒
20. Review the software installation details summarized in the
Confirmation window.
Publication 1757-IN510A-EN-P - October 2003
Page 73

ProcessLogix Server Installation Procedures 3-11
• If you need to make changes, click Back to access any
previous entries.
• If the details are okay, click Ne x t to begin the Server setup.
This may take 10 to 15 minutes to complete.
• If a Sentinel Pro Driver Setup Error window appears, click
OK.
21. If necessary, click OK at the Failed to uninstall Quick Builder
setup error.
22. If the system includes Excel Data Exchange, click En a b l e
Mac r o s when prompted. Otherwise, continue to the next step.
TIP
TIP
ATTENTION
If a Read Only File Detected window opens, select
Don’t display this w indow again and click Ye s to
overwrite old files.
If a Microsoft Excel window opens, check the Do
not show this dialog again checkbox and click
OK.
The CD must remain in the CD-ROM drive. You must
select No in
Step 23.
!
23. At the Setup Complete window, select the No , I w i l l r e s t a r t m y
computer later option and click Fi n ish .
Wait until the command windows have closed and file copying
is complete. This may take a few minutes to complete.
24. At the ProcessLogix Setup Complete window, select the No , I
will restart my computer later option and click Fin is h.
Publication 1757-IN510A-EN-P - October 2003
Page 74

3-12 ProcessLogix Server Installation Procedures
Installing ProcessLogix Update
1. Restart the PC.
2. Logon as ps_user.
3. Click Star t ⇒ Pr ogr ams ⇒ ProcessLogix Server ⇒ Star t-Stop
ProcessLogix Server to call up the ProcessLogix Server dialog
box.
TIP
4. With the Full Mode version of the dialog box active, select the
Database Un lo aded option.
5. Click Yes to confirm the action and wait for the Server to change
its state.
6. Close the ProcessLogix Server dialog box.
7. Insert the ProcessLogix R510.0 Supplemental Software CD into
the CD-ROM drive.
8. Click Star t ⇒ Run .
9. Enter this path or Br ow se to:
>D:(or your CD-ROM drive letter)\SP1\Server-Client\setup.exe<
To display the Full Mode version of the ProcessLogix
Server dialog box, click the icon on the left of the
title bar and click Advan ced
A checkmark appears in front of the Full Mode
selection to show that it is active.
⇒ Ful l Mo d e.
Publication 1757-IN510A-EN-P - October 2003
10. Click OK to launch the software setup application.
11. At the Welcome window, click Ne x t .
12. At the Destination Folder window, click Ne x t .
13. At the Ready to Install window, click Ins tal l.
Status messages indicate progress, but no user interaction is
required. This takes 10-15 minutes to complete.
14. At the InstallShield Wizard Completed window, click Fin is h .
15. Click Yes to restart the system.
Page 75

ProcessLogix Server Installation Procedures 3-13
16. Logon as ps_user.
17. Click Start ⇒ Run .
18. Enter this path or Br ow se to:
>D:(or your CD-ROM drive letter)\Update\setup.exe<
19. Click OK to launch the software setup application.
20. Click Ne x t to install the ProcessLogix Update.
21. At the ProcessLogix Update Complete window, click Fi n is h.
22. If prompted to reboot, click No .
ATTENTION
!
ATTENTION
!
Non-redundant Server
If you are installing ProcessLogix software on a
non-redundant Server:
1. Restart the Server.
2. Logon as ps_user.
Return to the checklist that led you to this task.
Redundant Server Pair
If you are installing ProcessLogix software on a
redundant Server pair:
1. Do not restart SERVERA.
2. Return to the beginning of ProcessLogix Software
Installation on a Clean PC on page 3-1 and repeat
for SERVERB.
3. Once you have completed these procedures for
both SERVERA and SERVERB, restart SERVERB.
4. Logon to SERVERB as ps_user.
5. When SERVERB is running, restart SERVERA and
logon as ps_user.
Return to the checklist that led you to this task.
Publication 1757-IN510A-EN-P - October 2003
Page 76

3-14 ProcessLogix Server Installation Procedures
Moving the RSLinx Activation File
About the Activation File
IMPORTANT
Complete the following steps to move the activation file (evrsi.sys)
from the RSLinx software Master Disk to the hard drive where RSLinx
is to be operated. The PC cannot execute the full OEM version of the
RSLinx application if the activation file is not present on its hard drive.
ATTENTION
Be sure to move the activation file on both
SERVERA and SERVERB.
If you need to reformat the hard drive, you must first
move the activation file back to the RSLinx Master
Disk using the same general procedure as follows.
Otherwise, the file will be corrupted and you will not
be able to run RSLinx in the OEM mode.
!
Before you attempt to move the activation file, you
MUST exit all ProcessLogix applications and stop all
ProcessLogix services.
Applications and Services on page 8-1.
Do not manually copy or move the evrsi.sys file.
Moving/copying the evrsi.sys file will disable the OEM
version of RSLinx.
Refer to Stopping ProcessLogix
Always use the EVMOVE.EXE program (refer to page
4-28) to move the evrsi.sys file. If the evrsi.sys file is
corrupted or manually moved, resulting in RSLinx
changing to Lite version, you can visit the Rockwell
web site
to recover the RSLinx activation.
(http://suppport.automation.rockwell.com/resetcodes/)
Determining the Current RSLinx Version
1. Click Start ⇒ Pr o gr am s ⇒ Rockwell Software ⇒ RSLin x ⇒
RSLin x to start the RSLinx application.
2. If necessary, click the RSLinx Icon ( ) in the Taskbar to open
the RSLinx window.
Publication 1757-IN510A-EN-P - October 2003
Page 77

ProcessLogix Server Installation Procedures 3-15
3. Verify the application title in the title bar.
• If the title is RS Li n x Lit e , close RSLinx and continue with
Installing the Activation File, below.
• If the title is RSLin x OEM you already have the OEM version
installed and you do not have to install the activation file.
Close RSLinx, and return to the checklist that led you to this
task.
Installing the Activation File
1. Locate the RSLinx Master Disk and insert it into the floppy drive.
2. Click Star t ⇒ Run .
3. Enter this path or Br ow se to:
>A:(or your floppy drive letter)\EVMOVE.EXE<
4. Click OK to launch the move executive.
5. Verify that you are Moving Activations From Drive A:(or your
floppy drive letter)
To Drive C:(or your hard drive letter).
6. Click OK to initiate the move.
7. Click Mo v e to move the file to the hard drive.
8. Wait for a dialog box to indicate a successful move, and click
OK.
Publication 1757-IN510A-EN-P - October 2003
Page 78

3-16 ProcessLogix Server Installation Procedures
9. Remove the Master Disk and store it in a safe place.
10. Restart the PC.
11. If you are installing ProcessLogix software on a redundant
Server pair, return to the beginning of
Activation File on page 3-14 and repeat for SERVERB. Otherwise,
return to the checklist that led you to this task.
Moving the RSLinx
Configuring RSLinx Drivers for ControlNet Supervisory Network
TIP
Complete the following steps to configure the ControlNet PCIC drivers
for RSLinx.
IMPORTANT
1. Click Start ⇒ Pr ogr am s ⇒ Rockwell Software ⇒ RSLin x ⇒
RSLin x to call up the Rockwell Software RSLinx window.
2. Click Communications ⇒ Configure Drivers to call up the
Configure Drivers dialog box.
3. Select 1 78 4-PCIC(S) f o r Con tr olNet d ev ices in the Available
Drivers drop-down list and click Add New to call up the Add
New RSLinx Driver dialog box.
If you need to move the activation file back to the
Master Disk,
Activation File on page 4-28.
If you are using Ethernet for your Supervisory
Network,
Ethernet Supervisory Network on page 3-19.
refer to Removing the RSLinx Software
skip to Configuring RSLinx Drivers for
Publication 1757-IN510A-EN-P - October 2003
Page 79

ProcessLogix Server Installation Procedures 3-17
4. Click OK to accept the default name AB_PCIC-1 for the driver.
IMPORTANT The driver name MUST be AB_PCIC-1.
5. In the Configure 1784-PCIC window, enter the following:
a. Serial Number(hex): This value is read from the PCIC card
and does not change.
b. Network Address(dec): Change the default of 99 to:
• Non-redundant Server 24
• Redundant Server A 24
• Redundant Server B 23
6. Click OK start the PCIC driver.
7. In the Configure Drivers dialog box, you should see AB_PCIC-1
listed in the Configured Drivers list with the status Running. If
the AB_PCIC-1 driver status is not Running, call Rockwell
Automation Technical Support.
Support in the Preface.
Refer to Rockwell Automation
8. Click Clo se to close the Configure Drivers dialog box.
9. Close RSLinx.
10. Restart the PC.
IMPORTANT
Whenever the 1784-PCIC driver has been updated or
the Network Address is changed, the 1784-PCIC
driver must be stopped and restarted to complete the
change. You must power down the PC.
Updating the 1784-PCIC Firmware
Starting Network Tools Application
If this is the first time you have used Network Tools on this PC, refer
to Making First Time Network Tools Settings on page 8-10 and then
continue with the following steps.
1. Click Star t ⇒ Run .
2. Enter >ntools -c -u<.
3. Click OK to launch the Network Tools application.
Publication 1757-IN510A-EN-P - October 2003
Page 80

3-18 ProcessLogix Server Installation Procedures
4. Click OK to acknowledge the warning about monitoring
through Control Builder.
5. Click the resume button to initiate network scan.
Updating the 1784-PCIC Firmware
1. Click the desired PCIC icon under the Desktop tree and wait for
the card details to appear in the Detail pane.
2. Verify the firmware revision shown in the Name field.
• If the firmware is 3.7.39, return to the checklist that led you
to this task.
• If the firmware is not 3.7.39, go to Step 3.
3. Click the firmware button to initiate the firmware update.
4. Click Ye s to acknowledge the Warning prompt.
5. Navigate to the directory:
C:\Honeywell\TPS50\System\Firmware\1784-PCIC\3_7_39
6. Select the 99417807.nvs file.
7. Click Op en to start the firmware load and click Yes to confirm.
8. Wait for the load to complete. The Status field in the lower
portion of the Network Tools window tracks the load progress.
9. Click OK to acknowledge the load completes with no errors.
10. Close NTools.
11. Restart the PC.
12. If you are installing ProcessLogix software on a redundant
Server pair, return to the beginning of
Configuring RSLinx
Drivers for ControlNet Supervisory Network on page 3-16 and
repeat for SERVERB. Once all Servers have been updated,
return to the checklist that led you to this task.
Publication 1757-IN510A-EN-P - October 2003
Page 81

ProcessLogix Server Installation Procedures 3-19
Configuring RSLinx Drivers for Ethernet Supervisory Network
IMPORTANT
1. Verify the settings of the Ethernet Network Interface card to be
used to communicate with the controller.
Navigate in Knowledge Builder to:
Ethernet Implementation Guide
Drivers and IP Addresses for more information.
2. Configure the IP Address for each controller.
Navigate in Knowledge Builder to:
Ethernet Implementation Guide
Drivers and IP Addresses
for Ethernet module section for more information.
3. Configure RSLinx drivers.
A driver must be configured for each controller.
If you are using ControlNet for your Supervisory
Network, skip this section.
Refer to Configuring RSLinx Drivers for ControlNet
Supervisory Network on page 3-16.
⇒
Configuration
⇒
Configuration
⇒
Configuring and setting IP address
⇒
Setting Up
⇒
Setting Up
Navigate in Knowledge Builder to:
Ethernet Implementation Guide
Drivers and IP Addresses
drivers for more information.
4. If you are installing ProcessLogix software on a redundant
Server pair, return to the beginning of
Drivers for Ethernet Supervisory Network on page 3-19 and
repeat for SERVERB. Once all Servers have been updated,
return to the checklist that led you to this task.
⇒
⇒
Configuration⇒ Setting up
Configuring additional RSLinx
Configuring RSLinx
Publication 1757-IN510A-EN-P - October 2003
Page 82

3-20 ProcessLogix Server Installation Procedures
Completing the
Upgrading Hardware Component Firmware
ProcessLogix R510.0 Install
on a Non-Redundant Server
Checking Control Builder Operation and Logging On
1. Refer to Loading 1757-PLX52, TC-MUX021, or 1757-FIM Boot
and Personality Images on page 7-9 to upgrade the 1757-PLX52
boot and personality images to the current release level.
2. After upgrading the 1757-PLX52, refer to Upgrading Hardware
Component Firmware on page 7-4 to check if other hardware
components require upgrades.
IMPORTANT
Stop! It is essential that you check the firmware
revision levels for ALL ProcessLogix hardware
components after a ProcessLogix software
installation.
Do not proceed until you have upgraded the
firmware.
Complete the following general steps to log on and check Control
Builder operation on a ProcessLogix Server.
Changing the default Operator's password
In previous releases of ProcessLogix it was not necessary to change
the default mngr operator's password to use it. As a security
precaution it is now necessary to change the password before you can
log in as the mngr operator. To change the password, do the
following:
1. Click Star t ⇒ Pro gr am s ⇒ ProcessLogix Server ⇒ Station.
2. Click the Op er field in the lower right corner of the display.
3. Enter >mngr< in the Station logon prompt and click OK.
4. Click Co nfigur e ⇒ Op er ato rs ⇒ Op e r ato rs.
5. Click the mngr Operator ID.
6. Click Ch an ge Passw or d.
Publication 1757-IN510A-EN-P - October 2003
7. Enter the New Password, Confirm the New Password, and click
OK.
Page 83

ProcessLogix Server Installation Procedures 3-21
The message Passwor d accepted should appear in the message
zone. If it does not repeat steps
Only systems using operator-based security and Control Builder
are affected by this change. The mngr operator account is
different than the Windows mngr user account. Navigate in
Knowledge Builder to Administration and Startup Guide for
more information before changing the password of the
Windows mngr user account.
8. Close Station.
9. Click Start ⇒ Pr ogr am s ⇒ ProcessLogix Engineering Tools
⇒ Con tr o l Builder .
10. In the Login dialog box, make these entries:
a. Enter >mngr< as the User Name.
b. Enter the appropriate Password.
c. Enter the appropriate Server name in the Server Name field.
d. Select Classic Ser ver Secur ity in the Domain Name
drop-down list.
6 and 7.
11. Click OK.
Backing Up a ProcessLogix Server Hard Drive to Tape
Performing backups is an essential part of maintaining your system.
You should back up all the files under the data directory, as well as
any user files you create.
Server to Tape on page 8-8.
Refer to Backing Up a ProcessLogix R510.0
Creating an Emergency Repair Disk
After all installations and drivers are installed, you should create an
Emergency Repair Disk.
Complete the following steps to create an emergency repair disk for
your Windows 2000 Server installation.
1. Insert a blank diskette into the PC's floppy drive.
2. Click Star t ⇒ Pro gr am s ⇒ Accessor ies ⇒ System Tools ⇒
Back up .
Publication 1757-IN510A-EN-P - October 2003
Page 84

3-22 ProcessLogix Server Installation Procedures
3. Click Em e r g e n c y Re p ai r Di s k .
An Emergency Repair Diskette window opens.
4. Insert a blank diskette into the PC's floppy drive.
5. Check the Also back up th e r egistry to the repair directory
checkbox and click OK.
6. When finished, click OK .
7. Repeat Steps 1 through 5 with another blank formatted diskette.
8. Click Job ⇒ Ex i t .
9. Store the two diskettes in different places to protect against
damage to the diskettes.
Publication 1757-IN510A-EN-P - October 2003
Page 85

Chapter
4
ProcessLogix Server Upgrade Procedures
The supported ProcessLogix server upgrade scenarios are:
• Upgrade from R500.1 - clean install
• Upgrade from R500.1
• Upgrade from R400.0 SP2 - clean install
• Upgrade from R400.0 SP2
• Upgrade from R320.0 - requires clean install on new hardware
ProcessLogix Server Upgrade Scenarios
Upgrade R500.1 Server to R510.0
This section describes the steps necessary to upgrade the
ProcessLogix R500.1 Server software to R510.0. There are two upgrade
options.
IMPORTANT
Option 1: Upgrading R500.1 Server to R510.0 - Clean Install
a. Backup your data.
b. Install a clean Windows 2000 Server operating system.
c. Install ProcessLogix R510.0.
d. Restore your data.
The following table lists the items in Option 1 that you MUST
complete to upgrade an R500.1 Server to an R510.0 Server.
Table 4.A Option 1: Upgrading R500.1 Server to R510.0 Checklist
Step Item Page
✔
1.
Due to the nature of this upgrade, it is strongly
recommended that you follow Option 1 when
upgrading from R500.1 Server to R510.0.
Preparing for a ProcessLogix R400.0 SP2 or R500.1 to R510.0
Server Upgrade
4-6
Saving R400.0 SP2 or R500.1 Data to a Remote PC 4-13
2.
Clean System Windows 2000 Server Installation 2-2
3.
Windows 2000 Service Pack 4 Installation 2-29
4.
Windows Security Hotfix Installation 2-31
5.
Internet Explorer 6.0 SP1 Installation 2-33
6.
Updating Windows Installer 2-36
7.
1 Publication 1757-IN510A-EN-P - October 2003
Page 86

4-2 ProcessLogix Server Upgrade Procedures
Table 4.A Option 1: Upgrading R500.1 Server to R510.0 Checklist
Step Item Page
✔
Updating ISScript 2-37
8.
Additional Operating System Customization Procedures 2-38
9.
Creating Emergency Repair Disks 2-40
10.
Copying R400.0 SP2 or R500.1 Data to the R510.0 Server 4-33
11.
Restoring ProcessLogix Data 4-35
12.
Option 2: Upgrading R500.1 Server to R510.0
a. Backup your data.
b. Uninstall your current ProcessLogix software.
c. Install ProcessLogix R510.0.
d. Restore your data.
The following table lists the items in Option 2 that you MUST
complete to upgrade an R500.1 Server to an R510.0 Server.
Table 4.B Option 2: Upgrading R500.1 Server to R510.0 Checklist
Step Item Page
✔
Preparing for a ProcessLogix R400.0 SP2 or R500.1 to R510.0
1.
Server Upgrade
Saving R400.0 SP2 or R500.1 Data to a Remote PC 4-13
2.
Removing ProcessLogix R500.1 Software 4-15
3.
Windows 2000 Service Pack 4 Installation 2-29
4.
Windows Security Hotfix Installation 2-31
5.
Internet Explorer 6.0 SP1 Installation 2-33
6.
Updating Windows Installer 2-36
7.
Updating ISScript 2-37
8.
Installing ProcessLogix R510.0 Software 3-2
9.
Moving the RSLinx Activation File 3-14
10.
Configuring RSLinx Drivers for ControlNet Supervisory Network
11.
or
Configuring RSLinx Drivers for Ethernet Supervisory Network
Completing the ProcessLogix R510.0 Install on a
12.
Non-Redundant Server
or
Completing the ProcessLogix R510.0 Install on a
Non-Redundant Server
Copying R400.0 SP2 or R500.1 Data to the R510.0 Server 4-33
13.
4-6
3-16
3-19
6-2
3-20
Publication 1757-IN510A-EN-P - October 2003
Restoring ProcessLogix Data 4-35
14.
Page 87

ProcessLogix Server Upgrade Procedures 4-3
Upgrade R400.0 SP2 Server to R510.0
This section describes the steps necessary to upgrade the
ProcessLogix R400.0 SP2 Server software to R510.0. There are two
upgrade options.
IMPORTANT
Due to the nature of this upgrade, it is strongly
recommended that you follow Option 1 when
upgrading from R400.0 SP2 to R510.0.
Option 1: Upgrading R400.0 SP2 Server to R510.0 - Clean Install
a. Backup your data.
b. Complete a clean install.
c. Restore your data.
The following table lists the items in Option 1 that you MUST
complete to upgrade an R400.0 SP2 Server to an R510.0 Server.
TIP
Table 4.C Option 1: Upgrading R400.0 SP2 Server to R510.0 Checklist
Step Item Page
✔
1.
2.
Upon restarting the system, you may receive a
message that a service failed to start. If you receive
this message, click OK.
Preparing for a ProcessLogix R400.0 SP2 or R500.1 to R510.0
Server Upgrade
Saving R400.0 SP2 or R500.1 Data to a Remote PC 4-13
4-6
Clean System Windows 2000 Server Installation 2-2
3.
Windows 2000 Service Pack 4 Installation 2-29
4.
Windows Security Hotfix Installation 2-31
5.
Internet Explorer 6.0 SP1 Installation 2-33
6.
Updating Windows Installer 2-36
7.
Updating ISScript 2-37
8.
Additional Operating System Customization Procedures 2-38
9.
Creating Emergency Repair Disks 2-40
10.
Copying R400.0 SP2 or R500.1 Data to the R510.0 Server 4-33
11.
Restoring ProcessLogix Data 4-35
12.
Publication 1757-IN510A-EN-P - October 2003
Page 88

4-4 ProcessLogix Server Upgrade Procedures
Option 2: Upgrading R400.0 SP2 Server to R510.0
a. Backup your data.
b. Uninstall your current ProcessLogix software.
c. Install ProcessLogix R510.0.
d. Restore your data.
The following table lists the items in Option 2 that you MUST
complete to upgrade an R400.0 SP2 Server to an R510.0 Server.
Table 4.D Option 2: Upgrading R400.0 SP2 Server to R510.0 Checklist
Step Item Page
✔
Preparing for a ProcessLogix R400.0 SP2 or R500.1 to R510.0
1.
Server Upgrade
Saving R400.0 SP2 or R500.1 Data to a Remote PC 4-13
2.
Removing ProcessLogix R400.0 SP2 Software 4-19
3.
Windows 2000 Service Pack 4 Installation 2-29
4.
Windows Security Hotfix Installation 2-31
5.
Internet Explorer 6.0 SP1 Installation 2-33
6.
Updating Windows Installer 2-36
7.
Updating ISScript 2-37
8.
Installing ProcessLogix R510.0 Software 3-2
9.
Moving the RSLinx Activation File 3-14
10.
Configuring RSLinx Drivers for ControlNet Supervisory Network
11.
or
Configuring RSLinx Drivers for Ethernet Supervisory Network
Copying R400.0 SP2 or R500.1 Data to the R510.0 Server 4-33
12.
Restoring ProcessLogix Data 4-35
13.
4-6
3-16
3-19
Publication 1757-IN510A-EN-P - October 2003
Page 89

ProcessLogix Server Upgrade Procedures 4-5
Upgrade R320.0 Server to R510.0
ProcessLogix R320.0 Server is certified to run only on Windows NT
4.0. Due to significant changes in the ProcessLogix platform, operating
system, and performance requirements, upgrading from a
ProcessLogix R320.0 Server to a ProcessLogix R510.0 Server requires
that you purchase a new PC and complete a clean R510.0 Server
installation on Windows 2000 Server.
The procedures in this section assume that:
• the old ProcessLogix R320.0 Server(s) and new ProcessLogix
R510.0 Server(s) are different PC hardware.
• the new R510.0 Server(s) is fully up and configured at this stage.
If you need to install ProcessLogix R510.0 on your Server(s),
refer to ProcessLogix Software Installation on a Clean PC on
page 3-1.
• the R320.0 and R510.0 Servers are configured on the same
network and accessible to each other. This requires that each
server has a different computer name and a unique TCP/IP
address for each network card.
Before continuing, it is recommended that you verify your R320.0 and
R510.0 Servers are properly connected using a utility like ping.
Table 4.E Upgrading R320.0 Server to R510.0 Checklist
Step Item Page
✔
Preparing for a ProcessLogix R320.0 to R510.0 Server
1.
Upgrade
Copying R320.0 Data to the R510.0 Server 4-29
2.
Transferring the 1784-PCIC Card to the R510.0 System 4-32
3.
Restoring ProcessLogix Data 4-35
4.
4-23
Publication 1757-IN510A-EN-P - October 2003
Page 90

4-6 ProcessLogix Server Upgrade Procedures
Preparing for a ProcessLogix R400.0 SP2 or R500.1 to R510.0 Server Upgrade
Exporting the R400.0 SP2 or R500.1 Engineering Repository Database
ATTENTION
!
IMPORTANT
All procedures listed in this section should be
performed with the system(s) Off-Process. Be certain
that your process is off control before you begin any
upgrade procedure. This means the 1757-PLX52
should be in the Idle state.
To save Fieldbus device values and CM block
parameter values, it is recommended to do the
following:
1 . Upload w ith Contents of your Control Modules.
2. Update to Project, which saves the Monitor
image to the Project image.
This procedure captures the latest configuration
changes. Otherwise, after re-loading the CMs
following the ProcessLogix upgrade, changed values
would be lost.
Use the following procedure to export the Engineering Repository
Database.
Disabling ERDB Replication
This procedure is only required for a redundant Server pair. Complete
these steps on SERVERB only. If you have a non-redundant server,
skip to
Exporting the Database Using Control Builder on page 4-7.
1. Logon to SERVERB as ps_user.
2. Click Start ⇒ Pr ogr am s ⇒ ProcessLogix Engineering Tools
⇒ DB Adm in .
3. Expand DbAdm in .
4. In the Login dialog box make these entries:
a. Enter >mngr< as the default User Name.
b. Enter the appropriate Password.
c. Enter >localhost< in the Server Name field.
Publication 1757-IN510A-EN-P - October 2003
Page 91

ProcessLogix Server Upgrade Procedures 4-7
d. If necessary, select Classic Ser ver Secur ity in the Domain
Name drop-down list.
5. Expand ProcessLogix Node.
6. Click Adm in Tasks.
7. Click Disab le Rep lication .
8. Click OK at the Disabled Database Replication prompt.
9. Close DbAd min .
Exporting the Database Using Control Builder
Complete these steps on a non-redundant Server or SERVERB.
1. If necessary, logon to the system as ps_user.
2. Using Windows Explorer, create the folder C:\Data\ExportDB.
3. Click Start ⇒ Pr ogr am s ⇒ ProcessLogix Engineering Tools
⇒ Con tr o l Builder .
4. In the Login dialog box, make these entries:
a. Enter >mngr< as the User Name.
b. Enter the appropriate Password.
c. Enter >localhost< in the Server Name field.
d. Select Classic Ser ver Secur ity in the Domain Name
drop-down list.
5. Click OK .
6. Click Fi le ⇒ Ex p o r t .
7. Click Br o w se to set the Directory to C:\Data\ExportDB.
8. Click Select All.
a. Depending on the size of your database, this step may take
several minutes. It is recommended that you do not export
the examples. New examples are provided with R510.0.
b. To deselect an item, hold Ctrl and click each item.
Publication 1757-IN510A-EN-P - October 2003
Page 92

4-8 ProcessLogix Server Upgrade Procedures
c. Deselect the following Point Names:
example_cascade
example_motor
example_pid
example_scm
pidloop
8. Click Ex p o r t .
Depending on the size of your database, this step may take
several minutes to several hours.
9. When completed, close the Export Window (if it did not
automatically close).
10. Close Control Builder.
Saving Fieldbus Device Definition Files
This procedure is required if migrating a system containing Fieldbus
devices. Complete these steps on a non-redundant Server or
SERVERB. If you do not have Fieldbus devices connected to your
ProcessLogix system,
skip to Saving Important R400.0 SP2 or R500.1
Server Data on page 4-9.
1. If necessary, logon to the system as ps_user.
2. Using Windows Explorer, create the folder C:\Data\FFdevices.
3. Click Star t ⇒ Run .
4. Enter >cmd< and click OK to open the DOS window.
5. At the C:\ prompt, enter >xcopy C:\Honeywell\TPS50\
System\ER\FFdevices\*.* C:\Data\FFdevices /E<
and press <Enter>.
Publication 1757-IN510A-EN-P - October 2003
6. If prompted, enter >A< to specify all files and folders.
Page 93

ProcessLogix Server Upgrade Procedures 4-9
7. Enter >xcopy C:\Honeywell\TPS50\System\ER\Release\*.*
C:\Data\FFdevices /E<
and press <Enter>.
8. If prompted, enter >A< to specify all files and folders.
9. Close the DOS window.
Saving Important R400.0 SP2 or R500.1 Server Data
Each of the following items should be completed on an R400.0 SP2 or
R500.1 Server before proceeding.
IMPORTANT
ATTENTION
!
Redundant ProcessLogix Systems
All steps need to be performed on both the Primary
(SERVERA) and Backup (SERVERB) ProcessLogix
Servers.
If you have a redundant Server pair, you must
complete this procedure on SERVERB first. Then
complete the entire procedure again on SERVERA.
Before saving ProcessLogix data, you MUST exit all
ProcessLogix applications and stop all ProcessLogix
services. You must complete the procedure in
Stopping ProcessLogix Applications and Services on
page 8-1 before continuing.
If you have a redundant Server pair, you must
complete this procedure on SERVERB first. Then
complete the entire procedure again on SERVERA.
Publication 1757-IN510A-EN-P - October 2003
Page 94

4-10 ProcessLogix Server Upgrade Procedures
Table 4.F Saving Important R400.0 SP2 or R500.1 Server Data
Item Pre-upgrade Requirement Post-upgrade
Folders and Files The following folders and their sub-folders may contain files
you will require after upgrading. (For example. History
Archives in the archive folder, Event Archives in the evtarch
folder, etc.)
1. Using Windows Explorer, create the folder C:\Data\Server.
2. Copy these folders and files from C:\Honeywell\Server to
C:\Data\Server.
Copy backed up folders and files from the backup
directory to C:\Honeywell\Server after the system
is upgraded.
• \archive
• \cl
• \evtarch
• \help
Custom Displays Save any custom displays that were created. Typically these
displays are located in C:\Honeywell\Client\abstract.
1. Using Windows Explorer, create the folder C:\Data\abstract.
2. Copy all custom displays to C:\Data\abstract.
System Displays Document any changes that were made to existing system
displays. This applies in particular to the System Startup
display, which is often customized.
Station Menus Document any changes that were made to existing menus. You must reapply the changes to the new menus
System Acronyms Document any changes that were made to existing set. You must reapply the changes to the new set after
Scan Periods Document any specialized scan periods that were used. You must reapply the periods after the upgrade.
Localization Localization settings are lost during the upgrade. You must reapply the settings after the upgrade.
Station
configuration file
C:\Winnt\station.ini
Document any changes that were made to the station.ini file.
Navigate in Knowledge Builder to Server and Client
Configuration Guide
Station.ini.
• \i18n
• \report
• \user
⇒
Configuring Stations and Printers
Copy backed up displays from the backup directory
to C:\Honeywell\Client\abstract.
Custom displays may require modification for use
in an R510.0 system.
You must reapply the changes to the new display
after the upgrade.
after the upgrade.
the upgrade.
You must reapply the changes to the new
station.ini file after the upgrade.
⇒
Station setup file C:\Honeywell\client\station\default.stn
Document any changes that were made to the default Station
setup file, default.stn.
History archive
search path
Publication 1757-IN510A-EN-P - October 2003
Document the history archive search path.
1. Click Start ⇒ Programs ⇒ ProcessLogix Server ⇒
ProcessLogix Server Control Panel.
2. In the Registry Key drop-down list, select ArchiveDirectory.
3. Document the String field.
The new default setup file, default.stn, is
configured as “Static Station 1”. If this is not
correct, you must make the appropriate changes to
the Connection Properties.
Navigate in Knowledge Builder to Server and
Client Configuration Guide
Stations and Printers
more information.
After upgrading, you must specify the history
archive search path using the ProcessLogix Server
Control Panel.
Navigate in Knowledge Builder to Server and
Client Configuration Guide
Configuring Points
Archiving
information.
⇒
History Archiving for more
⇒
Configuring
⇒
Setting Up Station for
⇒
Understanding and
⇒
History Collection and
Page 95

ProcessLogix Server Upgrade Procedures 4-11
Table 4.F Saving Important R400.0 SP2 or R500.1 Server Data
Item Pre-upgrade Requirement Post-upgrade
Custom applications Backup any custom applications built for your existing system. Custom applications must be re-compiled and
re-linked using an appropriate development
environment.
Navigate in Knowledge Builder to Application
⇒
Development Guide
Environment
for more information.
Quick Builder
projects
File dumps Do not use any file dumps of the pre-upgrade
Hardware definition
files
Alarms and
messages
Handover notes Handover notes are lost during the upgrade. Handover notes
Backup any Quick Builder projects. When opening an old project file with the new
version of Quick Builder, you are prompted to
migrate the project file to the new format.
database to restore the upgraded database.
If you want to use existing hardware definition (hdwbld) files
to build printers, you must change any instance of the
CYRILLIC keyword to LANGUAGE=CYRILLIC.
Resolve any alarms before starting the upgrade. Alarms and
messages currently in the system cannot be copied across for
the upgrade.
in the system cannot be copied for the upgrade.
⇒
About the Development
Compiling, Linking, and Editing
Exporting the R400.0 SP2 or R500.1 ProcessLogix Server Database
ATTENTION
Before exporting the ProcessLogix Server Database,
you MUST exit all ProcessLogix applications and
stop all ProcessLogix services. You must complete
the procedure in
and Services on page 8-1 before continuing.
Stopping ProcessLogix Applications
!
If you have a redundant server pair, you must
complete this procedure on SERVERB first. Then
complete the entire procedure again on SERVERA.
If you have a redundant Server pair, complete these steps on
SERVERA only.
1. If necessary, logon to the system as ps_user.
2. Click Star t ⇒ Run .
3. Enter >cmd< and click OK to open the DOS window.
Publication 1757-IN510A-EN-P - October 2003
Page 96

4-12 ProcessLogix Server Upgrade Procedures
4. Enter >xcopy C:\Honeywell\server\data\*.* C:\
Data\server\backup /E<
and press <Enter>.
5. If necessary, enter >D< to specify that backup is a directory.
6. Wait until the C:\ prompt appears and close the DOS window.
Removing the RSLinx Software Activation File
It is possible to transfer your RSLinx Activation codes from the old
system to the new system. Complete these steps on each Server in
your system.
To move the activation file from your Server:
1. Insert the RSLinx Master Disk into the floppy drive.
2. Click Star t ⇒ Run .
3. Enter this path or Br ow se to:
>A:(or your floppy drive letter)\EVMOVE.EXE<
4. Click OK to launch the move executive.
5. Verify that you are Moving Activations From Drive C:(or your hard
drive letter)
to Drive A:(or your floppy drive letter).
Publication 1757-IN510A-EN-P - October 2003
6. Click OK to initiate the move.
7. Click Mo v e to move the file to the floppy.
8. Wait for a dialog box to indicate a successful move, and click
OK.
Page 97

ProcessLogix Server Upgrade Procedures 4-13
9. Close EvMove.
10. Remove the Master Disk and store it in a safe place.
Preparation for a ProcessLogix R400.0 SP2 or R500.1 to R510.0 Server
Upgrade is complete.
Return to the checklist that led you to this task.
Saving R400.0 SP2 or R500.1 Data to a Remote PC
Networking an R400.0 SP2 or R500.1 Server to a Remote PC
Use the following procedure to map a drive to a remote PC. If you
have a redundant server pair, you must complete this procedure on
SERVERB first. Then complete the entire procedure again on
SERVERA.
1. If necessary, logon to the R400.0 SP2 or R500.1 Server as
ps_user.
2. Click Star t ⇒ Run .
3. Enter >cmd< and click OK to open the DOS window.
4. Enter >NET USE T: \\STN01\C$ /user:ps_user<
(where STN01 is the remote PC name and ps_user is the user
currently logged on to STN01) and press <Enter>.
5. If prompted, enter the appropriate password.
6. Open Windows Explorer and verify that the T: drive exists.
Publication 1757-IN510A-EN-P - October 2003
Page 98

4-14 ProcessLogix Server Upgrade Procedures
Transferring Data
1. If you have a non-redundant server:
a. At the DOS prompt, enter >xcopy C:\Data\*.* T:\
UpgradeData /E< and press <Enter>.
b. If necessary, enter >D< to specify that UpgradeData is a
directory.
2. If you have a redundant Server pair:
a. At the DOS prompt, on SERVERA, enter >xcopy C:\Data\
*.* T:\UpgradePrimaryData /E< and press <Enter>.
b. If necessary, enter >D< to specify that UpgradePrimaryData is
a directory.
c. On SERVERB, enter >xcopy C:\Data\*.* T:\
UpgradeBackupData /E< and press <Enter>.
d. If necessary, enter >D< to specify that UpgradeBackupData is
a directory.
Publication 1757-IN510A-EN-P - October 2003
Page 99

ProcessLogix Server Upgrade Procedures 4-15
Disconnect Redundant Servers
If you have a redundant Server pair, complete these steps on both
SERVERA and SERVERB. If you have a non-redundant Server, return
to the checklist that led you to this task.
1. Disconnect the Ethernet network cable(s).
2. Use the PING command to confirm that the Servers can no
longer communicate with each other by name or IP address.
The network cables should be reconnected only after both
Servers have been upgraded.
3. Close the DOS window.
Saving Data to a Remote PC is complete.
Return to the checklist that led you to this task.
Removing ProcessLogix R500.1 Software
This procedure completely removes ProcessLogix R500.1 SP2 software
from your system, including:
• SQL
• Knowledge Builder
• RSLinx
• Engineering Tools
• Server and/or Station
ATTENTION
!
Before installing or uninstalling any software
component, you MUST exit all ProcessLogix
applications and stop all ProcessLogix services. You
must complete the procedure in
ProcessLogix Applications and Services on page 8-1
before continuing.
If you have a redundant server pair, you must
complete this procedure on SERVERB first. Then
complete the entire procedure again on SERVERA.
Stopping
Removing Selected ProcessLogix R500.1 Components
1. If necessary, logon to the system as ps_user.
2. Click Star t ⇒ Settin gs ⇒ Control Panel.
Publication 1757-IN510A-EN-P - October 2003
Page 100

4-16 ProcessLogix Server Upgrade Procedures
3. Double-click Add/Remove Programs.
4. To remove a program:
a. Click on the appropriate program in the list of installed
programs.
b. Click Add/Rem ov e, Ch an ge/Rem ov e or Rem ov e.
c. Click Yes to confirm removal.
d. Repeat the steps for each installed component in the
following order
.
IMPORTANT
Be sure to remove the components, if installed, in
the order they are listed below.
If at any time during software uninstall, a Remove
shared file prompt appears, click Yes to all or
Rem ov e a ll .
If necessary, click OK or Yes to confirm.
If you see an Uninstall successfully completed
message, or a message stating some elements were
not removed, click OK.
If a delay occurs during uninstall, verify that there
are no hidden Remove Programs windows in the
taskbar.
When you remove a program, its name may not be
automatically removed from the Add/Remove
Programs window. Do not remove the program
again, continue with the next program on the list.
Table 4.G Removal of Selected ProcessLogix R500.1 Components
Order Component
✔
Publication 1757-IN510A-EN-P - October 2003
ProcessLogix Update
1.
Process Detail Displays (If you receive a Windows Installer prompt, click
2.
Cancel, then click OK. Continue with the next section.)
Control Component Library
3.
PsAxCtl Document EXE (If you see Application Removal windows, click
4.
OK.)
Psc Engineering Tools
5.
RSLinx
6.
KB Server - Knowledge Builder Tools 4
7.
KB Server - ProcessLogix R500
8.
KB Client
9.
 Loading...