

Page 1

ProcessLogix
R320.0 Installation
and Upgrade Guide
1757-SWKIT3200
Installation Instructions
Page 2
Important User Information
Because of the variety of uses for the products described in this
publication, those responsible for the application and use of this control
equipment must satisfy themselves that all necessary steps have been
taken to assure that each application and use meets al l performance and
safety requirements, including any applicable laws, regulations, codes and
standards.
The illustrations, charts, sample programs and layout examples shown in
this guide are intended solely for purposes of example. Since there are
many variables and requirements associated with any particular
installation, Allen-Bradley does not assume responsibility or liabilit y (to
include intellectual property liability) for actual use based upon the
examples shown in this publication.
Allen-Bradley publication SGI-1.1, Safety Guidelines for the Application,
Installation and Maintenance of Solid-State Control (available from your
local Allen-Bradley office), describes some important differences between
solid-state equipment and electromechanical devices that should be taken
into consideration when applying products such as those described in this
publication.
Reproduction of the contents of this copyrighted publication, in whole
or part, without written permission of Rockwell Automation, is
prohibited.
Throughout this manual we use notes to make you aware of safety
considerations:
ATTENTION
Identifies information about practices or circumstances
that can lead to personal injury or death, property
damage or economic loss
!
Attention statements help you to:
• identify a hazard
• avoid a hazard
• recognize the consequences
IMPORTANT
Allen-Bradley is a trademark of Rockwell Automation.
Identifies information that is critical for successful
application and understanding of the product.
Page 3

European Communities (EC) Directive Compliance
If this product has the CE mark it is approved for installation within the
European Union and EEA regions. It has been designed and tested to
meet the following directives.
EMC Directive
This product is tested to meet the Council Directive 89/336/EC
Electromagnetic Compatibility (EMC) by applying the following
standards, in whole or in part, documented in a technical construction
file:
• EN 50081-2 EMC — Generic Emission Standard, Part 2 —
Industrial Environment
• EN 50082-2 EMC — Generic Immunity Standard, Part 2 —
Industrial Environment
This product is intended for use in an industrial environment.
Low Voltage Directive
This product is tested to meet Council Directive 73/23/EEC Low
Voltage, by applying the safety requirements of EN 61131-2
Programmable Controllers, Part 2 - Equipment Requirements and Tests.
For specific information required by EN 61131-2, see the appropriate
sections in this publication, as well as the Allen-Bradley publication
Industrial Automation Wiring and Grounding Guidelines, publication
1770-4.1.
This equipment is classified as open equipment and must be mounted in
an enclosure during operation to provide safety protection.
Page 4

Page 5

Table of Contents
Important User Information. . . . . . . . . . . . . . . . . . . . . . . . . . ii
European Communities (EC) Directive Compliance . . . . . . . iii
EMC Directive . . . . . . . . . . . . . . . . . . . . . . . . . . . . . . . . iii
Low Voltage Directive . . . . . . . . . . . . . . . . . . . . . . . . . . iii
Preface
Our Assumptions About Readers . . . . . . . . . . . . . . . . . . . . P-1
Starting Conditions and Assumptions . . . . . . . . . . . . . . P-1
Minimum Hardware Requirements. . . . . . . . . . . . . . . . . . . P-2
Rockwell Automation Technical Support . . . . . . . . . . . . . . P-3
Local Product Support . . . . . . . . . . . . . . . . . . . . . . . . . P-3
Technical Product Assistance . . . . . . . . . . . . . . . . . . . . P-3
Your Questions or Comments about This Manual . . . . . P-3
Conventions . . . . . . . . . . . . . . . . . . . . . . . . . . . . . . . . . . . P-4
Terms and Type Representations . . . . . . . . . . . . . . . . . P-4
Related Documents. . . . . . . . . . . . . . . . . . . . . . . . . . . . . . P-5
ProcessLogix R320.0 Installation and Upgrade Guide. . . P-5
ProcessLogix Online User Documentation/Knowledge
Builder . . . . . . . . . . . . . . . . . . . . . . . . . . . . . . . . . . . . P-6
Contents of Release . . . . . . . . . . . . . . . . . . . . . . . . . . . . . P-6
Acronyms and Abbreviations. . . . . . . . . . . . . . . . . . . . . . . P-7
Chapter 1
Preparing for a ProcessLogix Software Upgrade . . . . . . . . . 1-1
Things to consider before upgrading . . . . . . . . . . . . . . 1-1
Saving Current Controller Data (optional) . . . . . . . . . . . 1-3
Determining Your Hard Drive Free Space Requirements 1-4
Backing Up a ProcessLogix Server to Tape . . . . . . . . . . 1-6
Stopping ProcessLogix Applications and Services . . . . . . . . 1-8
Installing Service Pack 6a for Windows NT 4.0. . . . . . . . . . 1-11
Installing Internet Explorer 5.01. . . . . . . . . . . . . . . . . . . . . 1-12
Upgrading Data Access Components . . . . . . . . . . . . . . . . . 1-13
Uninstalling ProcessLogix Knowledge Builder Software . . . 1-14
Recording the NT System Path Value . . . . . . . . . . . . . . 1-14
Uninstall Knowledge Builder . . . . . . . . . . . . . . . . . . . . 1-14
Verifying the NT System Path Value . . . . . . . . . . . . . . . 1-15
Uninstalling Adobe Acrobat Reader 3.01 . . . . . . . . . . . . 1-15
Installing ProcessLogix Knowledge Builder Software . . . . . 1-16
Removing the 9904/1784-KTCX15 Card
and Installing the 1784-PCIC Card . . . . . . . . . . . . . . . . . 1-18
Upgrading ProcessLogix Software
on a Non-redundant Server Only. . . . . . . . . . . . . . . . . . . 1-19
About Upgrading Software on the Server . . . . . . . . . . . 1-19
Installing Server Software. . . . . . . . . . . . . . . . . . . . . . . 1-20
Installing RSLinx . . . . . . . . . . . . . . . . . . . . . . . . . . . . . 1-21
Installing Engineering Tools . . . . . . . . . . . . . . . . . . . . . 1-22
i Publication 1757-IN032B-EN-P - April 2001
Page 6

Table of Contents ii
Migrating the ERDB. . . . . . . . . . . . . . . . . . . . . . . . . . . 1-23
Installing the ProcessLogix Server . . . . . . . . . . . . . . . . 1-23
Setting Up User Accounts . . . . . . . . . . . . . . . . . . . . . . 1-25
Moving the RSLinx Activation File. . . . . . . . . . . . . . . . . . . 1-26
About the Activation File. . . . . . . . . . . . . . . . . . . . . . . 1-26
Determining the Current RSLinx Version . . . . . . . . . . . 1-26
Installing the Activation File. . . . . . . . . . . . . . . . . . . . . 1-27
Configuring RSLinx Drivers for ControlNet
Supervisory Network. . . . . . . . . . . . . . . . . . . . . . . . . . . 1-29
Installing the 1784-PCIC Driver . . . . . . . . . . . . . . . . . . 1-29
Updating the 1784-PCIC Card Firmware . . . . . . . . . . . . 1-30
Re-installing the 1784-PCIC Driver . . . . . . . . . . . . . . . . 1-34
Updating the 1784-PCIC Network Address . . . . . . . . . . 1-36
Configuring RSLinx Drivers for Ethernet
Supervisory Network. . . . . . . . . . . . . . . . . . . . . . . . . . . 1-38
Upgrading Hardware Component Firmware . . . . . . . . . . . 1-39
Making Post ProcessLogix Software Installation
Checks for a Non-redundant Server . . . . . . . . . . . . . . . . 1-39
Things to check after the upgrade . . . . . . . . . . . . . . . . 1-39
Reconfiguring Other RSLinx Clients . . . . . . . . . . . . . . . 1-40
Reloading the 1757-PLX52 Database. . . . . . . . . . . . . . . 1-40
Initiating Redundant Controller Switchover. . . . . . . . . . 1-41
Enabling the ProcessLogix OPC Server. . . . . . . . . . . . . 1-42
Backing up a ProcessLogix Server to Tape . . . . . . . . . . 1-43
Creating an Emergency Repair Disk . . . . . . . . . . . . . . . 1-43
Upgrading ProcessLogix Software
on a Redundant Server Pair. . . . . . . . . . . . . . . . . . . . . . 1-45
About Upgrading Software on the Server . . . . . . . . . . . 1-45
Installing Server Software . . . . . . . . . . . . . . . . . . . . . . 1-47
Installing RSLinx . . . . . . . . . . . . . . . . . . . . . . . . . . . . . 1-49
Installing Engineering Tools . . . . . . . . . . . . . . . . . . . . 1-50
Migrating the ERDB (on SERVERB only). . . . . . . . . . . . 1-50
Installing the ProcessLogix Server . . . . . . . . . . . . . . . . 1-51
Setting Up User Accounts . . . . . . . . . . . . . . . . . . . . . . 1-52
Configuring RSLinx Drivers for ControlNet
Supervisory Network . . . . . . . . . . . . . . . . . . . . . . . . . . . 1-54
Installing the 1784-PCIC Driver . . . . . . . . . . . . . . . . . . 1-54
Updating the 1784-PCIC Card Firmware . . . . . . . . . . . . 1-55
Re-installing the 1784-PCIC Driver . . . . . . . . . . . . . . . . 1-55
Configuring the ControlNet Supervisory Network. . . . . . . . 1-57
Updating the 1784-PCIC Network Address . . . . . . . . . . 1-58
Configuring RSLinx Drivers for Ethernet
Supervisory Network. . . . . . . . . . . . . . . . . . . . . . . . . . . 1-60
Upgrading Hardware Component Firmware . . . . . . . . . . . 1-61
Making Post ProcessLogix Software Installation
Checks for a Redundant Server Pair. . . . . . . . . . . . . . . . 1-62
Publication 1757-I N0 32B-EN-P - April 2001
Page 7

Table of Contents iii
Things to Check after the Upgrade. . . . . . . . . . . . . . . . 1-62
Creating the Secondary ERDB . . . . . . . . . . . . . . . . . . . 1-62
Synchronizing ERDB on Redundant Servers . . . . . . . . . 1-63
Setting Up Station on SERVERB . . . . . . . . . . . . . . . . . . 1-64
Setting Up Station on SERVERA . . . . . . . . . . . . . . . . . . 1-67
Synchronizing Server Databases on Redundant Servers . 1-71
Synchronizing Other Files . . . . . . . . . . . . . . . . . . . . . . 1-72
Reconfiguring Other RSLinx Clients . . . . . . . . . . . . . . . 1-72
Reloading the 1757-PLX52 Database. . . . . . . . . . . . . . . 1-72
Initiating Redundant Controller Switchover. . . . . . . . . . 1-72
Enabling the ProcessLogix OPC Server . . . . . . . . . . . . . 1-72
Backing up a ProcessLogix Server to Tape . . . . . . . . . . 1-72
Creating an Emergency Repair Disk . . . . . . . . . . . . . . . 1-72
Installing ProcessLogix Client Software . . . . . . . . . . . . . . . 1-73
Configuring an Operator Workstation . . . . . . . . . . . . . . . . 1-73
Installing Service Pack 6a for Windows NT 4.0 . . . . . . . 1-74
Installing Internet Explorer 5.01 . . . . . . . . . . . . . . . . . . 1-74
Upgrading Data Access Components . . . . . . . . . . . . . . 1-74
Uninstalling ProcessLogix Knowledge Builder Software. 1-74
Installing ProcessLogix Knowledge Builder Software. . . 1-74
Installing ProcessLogix Operator Workstation Software . 1-74
Configuring an Engineering Workstation . . . . . . . . . . . . . . 1-78
Installing Service Pack 6a for Windows NT 4.0 . . . . . . . 1-78
Installing Internet Explorer 5.01 . . . . . . . . . . . . . . . . . . 1-78
Upgrading Data Access Components . . . . . . . . . . . . . . 1-78
Uninstalling ProcessLogix Knowledge Builder Software. 1-78
Installing ProcessLogix Knowledge Builder Software. . . 1-78
Installing ProcessLogix Engineering
Workstation Software . . . . . . . . . . . . . . . . . . . . . . . . 1-79
Verifying ProcessLogix Client Installation. . . . . . . . . . . . . . 1-83
Things To Consider After The Installation. . . . . . . . . . . 1-83
Setting Up a ProcessLogix Client
With a Non-redundant Server . . . . . . . . . . . . . . . . . . 1-84
Setting Up a ProcessLogix Client
With Redundant Servers . . . . . . . . . . . . . . . . . . . . . . 1-86
Checking Control Builder Operation and Logging On . . 1-89
Creating an Emergency Repair Disk . . . . . . . . . . . . . . . 1-89
Publication 1757-IN032B-EN-P - April 2001
Page 8

Table of Contents iv
Chapter 2
Upgrading Hardware Component Firmware . . . . . . . . . . . . 2-1
About firmware upgrades . . . . . . . . . . . . . . . . . . . . . . . 2-1
Firmware revision level reference . . . . . . . . . . . . . . . . . 2-2
Important Usage Considerations . . . . . . . . . . . . . . . . . . 2-4
Updating the 1784-PCIC Card Firmware . . . . . . . . . . . . . 2-5
Loading 1757-PLX52 and TC-MUX021
Boot and Personality Images . . . . . . . . . . . . . . . . . . . 2-10
Updating Firmware in CNB, ENET, IOM, SRM, PIM
or ControlNet Adapter. . . . . . . . . . . . . . . . . . . . . . . . 2-15
Setting CNB Module NUT Timing. . . . . . . . . . . . . . . . . 2-16
Chapter 3
Installing Windows NT . . . . . . . . . . . . . . . . . . . . . . . . . . . . 3-1
Overview . . . . . . . . . . . . . . . . . . . . . . . . . . . . . . . . . . . 3-1
Starting the Windows NT Installation . . . . . . . . . . . . . . . 3-2
Setting Up Windows NT . . . . . . . . . . . . . . . . . . . . . . . . 3-4
Installing TCP/IP Networking Software. . . . . . . . . . . . . . 3-5
Setting the Date and Time . . . . . . . . . . . . . . . . . . . . . . . 3-8
Setting Up the Display Driver . . . . . . . . . . . . . . . . . . . . 3-9
Completing Installation . . . . . . . . . . . . . . . . . . . . . . . . . 3-9
Installing Service Pack 6a for Windows NT 4.0. . . . . . . . 3-9
Setting Up Additional Drivers after
the Service Pack Installation . . . . . . . . . . . . . . . . . . . 3-10
Configuring System Properties . . . . . . . . . . . . . . . . . . . 3-11
Converting to NTFS after Installing Windows NT . . . . . 3-12
Creating the plx_user Account. . . . . . . . . . . . . . . . . . . 3-12
Installing Internet Explorer 5.01. . . . . . . . . . . . . . . . . . 3-12
Upgrading Data Access Components . . . . . . . . . . . . . . 3-12
Checking Required System Settings. . . . . . . . . . . . . . . . . . 3-13
Creating an Emergency Repair Disk . . . . . . . . . . . . . . . . . 3-14
Installing ProcessLogix Knowledge Builder Software . . . . . 3-15
Installing the 1784-PCIC Card . . . . . . . . . . . . . . . . . . . . . . 3-15
Installing ProcessLogix Software on a Clean PC . . . . . . . . . 3-16
Installing Server Software . . . . . . . . . . . . . . . . . . . . . . 3-17
Installing RSLinx . . . . . . . . . . . . . . . . . . . . . . . . . . . . . 3-18
Installing Engineering Tools . . . . . . . . . . . . . . . . . . . . 3-19
Installing the ProcessLogix Server . . . . . . . . . . . . . . . . 3-19
Setting up User Accounts. . . . . . . . . . . . . . . . . . . . . . . 3-23
Completing ProcessLogix Install
on a Non-Redundant Server . . . . . . . . . . . . . . . . . . . . 3-23
Configuring RSLinx Drivers for ControlNet
Supervisory Network. . . . . . . . . . . . . . . . . . . . . . . . . . . 3-24
Installing the 1784-PCIC Driver . . . . . . . . . . . . . . . . . . 3-25
Updating the 1784-PCIC Card Firmware . . . . . . . . . . . 3-26
Re-installing the 1784-PCIC Driver . . . . . . . . . . . . . . . . 3-30
Publication 1757-I N0 32B-EN-P - April 2001
Page 9

Table of Contents v
Configuring the ControlNet Supervisory Network . . . . . 3-31
Updating the 1784-PCIC Network Address . . . . . . . . . . 3-32
Configuring RSLinx Drivers for Ethernet
Supervisory Network. . . . . . . . . . . . . . . . . . . . . . . . . . . 3-33
Upgrading Hardware Component Firmware. . . . . . . . . . . . 3-34
Making Post ProcessLogix Software Installation
Checks for a Non-redundant Server . . . . . . . . . . . . . . . . 3-34
Checking Control Builder Operation and Logging On . . 3-34
Enabling the ProcessLogix OPC Server . . . . . . . . . . . . . 3-34
Backing Up a ProcessLogix Server Hard Drive to Tape . 3-34
Creating the Emergency Repair Disk . . . . . . . . . . . . . . 3-35
Installing ProcessLogix Client Software on a Clean PC . . . . 3-35
Checking Required System Settings . . . . . . . . . . . . . . . 3-35
Installing ProcessLogix Client software . . . . . . . . . . . . . 3-35
Verifying ProcessLogix Client Installation. . . . . . . . . . . . . . 3-36
Setting Up a ProcessLogix Client
with a Non-redundant Server . . . . . . . . . . . . . . . . . . 3-36
Setting up a ProcessLogix Client
with Redundant Servers . . . . . . . . . . . . . . . . . . . . . . 3-36
Checking Control Builder Operation and Logging On . . 3-36
Creating an Emergency Repair Disk . . . . . . . . . . . . . . . 3-36
Chapter 4
Completing ProcessLogix Install on a Redundant Server Pair
and Adding Redundancy to R320.0
Non-Redundant Server Systems . . . . . . . . . . . . . . . . . . . . 4-1
Changing Hosts File Entries . . . . . . . . . . . . . . . . . . . . . . 4-1
Changing TCP/IP address on a Secondary
Server (SERVERB) Node . . . . . . . . . . . . . . . . . . . . . . . 4-4
Changing the Computer Name. . . . . . . . . . . . . . . . . . . . 4-5
Updating the Registry . . . . . . . . . . . . . . . . . . . . . . . . . . 4-5
Changing the ProcessLogix License . . . . . . . . . . . . . . . . 4-6
Re-installing ProcessLogix Engineering Tools . . . . . . . . . 4-6
Configuring RSLinx Drivers for ControlNet
Supervisory Network. . . . . . . . . . . . . . . . . . . . . . . . . . . . 4-9
Installing the 1784-PCIC Driver . . . . . . . . . . . . . . . . . . . 4-9
Updating the 1784-PCIC Card Firmware . . . . . . . . . . . . 4-10
Configuring the ControlNet Supervisory Network . . . . . 4-10
Updating the 1784-PCIC Network Address . . . . . . . . . . 4-11
Configuring RSLinx Drivers for Ethernet
Supervisory Network. . . . . . . . . . . . . . . . . . . . . . . . . . . 4-12
Restarting Redundant Servers . . . . . . . . . . . . . . . . . . . . . . 4-13
Setting up Secondary Server (SERVERB) node . . . . . . . . . . 4-13
Setting Up Primary Server (SERVERA) Node. . . . . . . . . . . . 4-19
Upgrading Hardware Component Firmware. . . . . . . . . . . . 4-20
Publication 1757-IN032B-EN-P - April 2001
Page 10

Table of Contents vi
Making Post ProcessLogix Software Installation
Checks for a Redundant Server Pair. . . . . . . . . . . . . . . . 4-20
Synchronizing ERDB on Redundant Servers . . . . . . . . . 4-20
Synchronizing Server Databases on Redundant Servers. 4-20
Synchronizing Other Files . . . . . . . . . . . . . . . . . . . . . . 4-21
Checking Control Builder Operation and Logging On. . 4-21
Enabling the ProcessLogix OPC Server. . . . . . . . . . . . . 4-21
Backing Up a ProcessLogix Server to Tape. . . . . . . . . . 4-21
Creating an Emergency Repair Disk . . . . . . . . . . . . . . . 4-21
Chapter 5
Launching ProcessLogix Knowledge Builder . . . . . . . . . . . . 5-1
Cancelling a Software Component Installation . . . . . . . . . . . 5-1
Removing ProcessLogix Software Components . . . . . . . . . . 5-1
Uninstalling ProcessLogix Knowledge Builder Software . 5-2
Removing the ProcessLogix Server. . . . . . . . . . . . . . . . . 5-2
Removing ProcessLogix Client Software . . . . . . . . . . . . . 5-3
Removing Engineering Tools. . . . . . . . . . . . . . . . . . . . . 5-3
Removing RSLinx . . . . . . . . . . . . . . . . . . . . . . . . . . . . . 5-6
Upgrading an Engineering Database to R320.0. . . . . . . . . . . 5-7
Recovering from Failure of an Automatic
ER Database Migration . . . . . . . . . . . . . . . . . . . . . . . . . . 5-8
Manual System Backup/Restore Procedures. . . . . . . . . . . . 5-10
Backing Up a ProcessLogix Server to Tape. . . . . . . . . . 5-10
Restoring a ProcessLogix Server System
From a Backup Tape . . . . . . . . . . . . . . . . . . . . . . . . 5-10
Using Network Tools . . . . . . . . . . . . . . . . . . . . . . . . . . . . 5-14
About Network Tools . . . . . . . . . . . . . . . . . . . . . . . . . 5-14
Usage guidelines. . . . . . . . . . . . . . . . . . . . . . . . . . . . . 5-15
Online help . . . . . . . . . . . . . . . . . . . . . . . . . . . . . . . . 5-15
Making First Time Network Tools Settings . . . . . . . . . . 5-15
Installing and Running VirusScan with ProcessLogix . . . . . 5-20
About VirusScan . . . . . . . . . . . . . . . . . . . . . . . . . . . . . 5-20
Removing Existing VirusScan NT Program . . . . . . . . . . 5-20
Installing VirusScan NT and Configuring Directories
for Scan Exclusion . . . . . . . . . . . . . . . . . . . . . . . . . . 5-21
Changing the Computer Name . . . . . . . . . . . . . . . . . . . . . 5-22
Procedure for Configuring a Non-redundant Server . . . 5-22
Procedure for Configuring a ProcessLogix Client . . . . . 5-23
Adding 1757-PLX52 Controller Redundancy to R320.0
Non-Redundant 1757-PLX52 Controller Configurations . . 5-23
Deleting a Non-Redundant 1757-PLX52
and Unassigning its Contents . . . . . . . . . . . . . . . . . . 5-23
Installing and connecting Redundant Chassis
Pair (RCP) hardware . . . . . . . . . . . . . . . . . . . . . . . . 5-25
Checking firmware revision levels . . . . . . . . . . . . . . . . 5-26
Publication 1757-I N0 32B-EN-P - April 2001
Page 11

Table of Contents vii
Creating a Redundant 1757-PLX52 . . . . . . . . . . . . . . . . 5-26
Setting Up User Accounts . . . . . . . . . . . . . . . . . . . . . . . . . 5-27
Creating the plx_user Account . . . . . . . . . . . . . . . . . . . 5-27
Setting up erserver and/or mngr user accounts. . . . . . . 5-28
Setting Up User Accounts to Logon as a Service . . . . . . 5-28
Setting up mngr Account on a ProcessLogix Server
to Logon as a Batch Job . . . . . . . . . . . . . . . . . . . . . . 5-29
Chapter 6
ProcessLogix System. . . . . . . . . . . . . . . . . . . . . . . . . . . . . . 6-1
Ethernet Supervisory Network . . . . . . . . . . . . . . . . . . . . 6-1
CCL Installation. . . . . . . . . . . . . . . . . . . . . . . . . . . . . . . 6-1
Controller & I/O. . . . . . . . . . . . . . . . . . . . . . . . . . . . . . . . . 6-2
Expanded ControlNet Interoperability . . . . . . . . . . . . . . 6-2
1794 FLEX I/O . . . . . . . . . . . . . . . . . . . . . . . . . . . . . . . 6-2
Common SCM’s. . . . . . . . . . . . . . . . . . . . . . . . . . . . . . . 6-3
10 1757-PLX52s per Server. . . . . . . . . . . . . . . . . . . . . . . 6-3
1784-PCIC Card. . . . . . . . . . . . . . . . . . . . . . . . . . . . . . . 6-3
Control Builder. . . . . . . . . . . . . . . . . . . . . . . . . . . . . . . . . . 6-5
Chart Visualization. . . . . . . . . . . . . . . . . . . . . . . . . . . . . 6-5
Printing Enhancements . . . . . . . . . . . . . . . . . . . . . . . . . 6-5
Data Base Import/Export. . . . . . . . . . . . . . . . . . . . . . . . 6-5
CB Change Journaling . . . . . . . . . . . . . . . . . . . . . . . . . . 6-5
Engineering Tools. . . . . . . . . . . . . . . . . . . . . . . . . . . . . . . . 6-6
Network Diagnostic Manager. . . . . . . . . . . . . . . . . . . . . 6-6
Interrupt Usage Note. . . . . . . . . . . . . . . . . . . . . . . . . . . 6-7
Server . . . . . . . . . . . . . . . . . . . . . . . . . . . . . . . . . . . . . . . . 6-8
20 Stations per Server (NT Server) . . . . . . . . . . . . . . . . . 6-8
FSC (Fail Safe Controller) Ethernet . . . . . . . . . . . . . . . . . 6-9
Support for Windows NT v4.0 Service Pack 6a . . . . . . . . 6-9
Support for Internet Explorer v5.01 . . . . . . . . . . . . . . . . 6-9
New Station and Display Builder . . . . . . . . . . . . . . . . . . 6-9
New Quick Builder . . . . . . . . . . . . . . . . . . . . . . . . . . 6-10
Bristol Babcock OpenBSI Interface. . . . . . . . . . . . . . . . 6-11
Additional Modicon Data Formats . . . . . . . . . . . . . . . . 6-11
Modbus Plus SA85 Adapter Selectable for a Channel. . . 6-12
Support for Siemens S5 TF Driver v5.2 . . . . . . . . . . . . . 6-14
Support for the 1784-PCIC card
on Allen-Bradley SCADA channels . . . . . . . . . . . . . . 6-14
Support for Redundant PLC-5 Controllers on ControlNet 6-15
Improved Industrial Shape Files. . . . . . . . . . . . . . . . . . 6-18
Alarm Pager support for UCP Protocols . . . . . . . . . . . . 6-19
Optional Failover of Redundant Servers On Process
Controller Communications Subsystem Failure. . . . . . 6-19
Station Object Model Extensions . . . . . . . . . . . . . . . . . 6-20
RSLinx 2.2 Service Pack 1 . . . . . . . . . . . . . . . . . . . . . . 6-20
New Features . . . . . . . . . . . . . . . . . . . . . . . . . . . . . . . 6-21
Publication 1757-IN032B-EN-P - April 2001
Page 12

Table of Contents viii
Chapter 7
PC/NT Platform Requirements . . . . . . . . . . . . . . . . . . . . . . 7-1
Server Requirements . . . . . . . . . . . . . . . . . . . . . . . . . . . 7-1
Platform System Configuration Definitions . . . . . . . . . . . 7-2
User Interface Capacity and Performance . . . . . . . . . . . . . . 7-9
Control Network . . . . . . . . . . . . . . . . . . . . . . . . . . . . . . . 7-10
Server Redundancy. . . . . . . . . . . . . . . . . . . . . . . . . . . . . . 7-10
Server Notifications . . . . . . . . . . . . . . . . . . . . . . . . . . . . . 7-10
Communications Capacity and Performance . . . . . . . . . . . 7-11
Controller Communications . . . . . . . . . . . . . . . . . . . . . 7-11
Client/Server Communication Capacity. . . . . . . . . . . . . 7-12
Controller Notifications. . . . . . . . . . . . . . . . . . . . . . . . . . . 7-13
Controller Redundancy. . . . . . . . . . . . . . . . . . . . . . . . . . . 7-13
I/O Specifications. . . . . . . . . . . . . . . . . . . . . . . . . . . . . . . 7-14
. . . . . . . . . . . . . . . . . . . . . . . . . . . . . . . . . . . . . . . . . 7-15
Input Module Sample Periods . . . . . . . . . . . . . . . . . . . 7-15
Output Module Sample Periods . . . . . . . . . . . . . . . . . . 7-15
I/O Network Configuration Rules . . . . . . . . . . . . . . . . 7-16
1757-PLX52 Resources . . . . . . . . . . . . . . . . . . . . . . . . . . . 7-17
Engineering Tools Resources. . . . . . . . . . . . . . . . . . . . 7-20
Chapter 8
Major ProcessLogix FTW Software Revisions . . . . . . . . . 8-1
Major ProcessLogix Server Software Revisions . . . . . . . . 8-2
Embedded Software Components . . . . . . . . . . . . . . . . . 8-3
External, Third Party Qualified Software Components. . . 8-5
Miscellaneous SCADA Component Revisions . . . . . . . . . 8-7
Controller/Communication/I/O Firmware. . . . . . . . . . . . 8-7
Publication 1757-I N0 32B-EN-P - April 2001
Page 13

Preface
Our Assumptions About Readers
We assume that you are familiar with navigating and running
applications in a Microsoft Windows NT environment. Y ou have some
experience in loading software applications on a personal computer
and are somewhat familiar with ProcessLogix hardware components
as well as the Control Builder application. If you have no software
loading experience and are not familiar with ProcessLogix hardware
components and Control Builder, we recommend that you find
someone who does have experience to assist you in loading the
ProcessLogix software and making hardware and firmware changes in
associated ProcessLogix hardware components.
Starting Conditions and Assumptions
You have the following items on hand:
• ProcessLogix R320.0 Software Ch ange Not e is now incorporated
into the Installation and Upgrade Guide. Refer to Chapters 5, 6,
and 7 in this publication.
• ProcessLogix R320.0 compact disc (CD) containing all
ProcessLogix software components
• ProcessLogix R320.0 Kno wledge Builder CD containing the lat est
version of the online documentation
• Windows NT 4.0 Workstation CD (Microsoft CD, including boot
diskettes)
• RSLinx OEM Master (Activation) Disk
• Your PC meets the minimum hardware requirements for a
ProcessLogix Server or ProcessLogix Client.
1 Publication 1757-IN032B-EN-P - April 2001
Page 14

Preface 2
Minimum Hardware Requirements
ProcessLogix Server Software must be installed on a PC that is
specifically qualified. Use of any other PC variations will render the
standard warranty and support agreement null and void .
IMPORTANT
End users purchasing ProcessLogix 1757-PLXSYS KIT
are not eligible for the standard 90 day technical
support, unless the software is installed by personnel
trained specifically for ProcessLogix installation.
Please refer to the table below to review the hardware requirements
for a new R320.0 ProcessLogix server or client system. ProcessLogix
Clients require a Windows NT operating system to support the
multiple-user configuration nodes architecture that is possible with
R320.0 ProcessLogix systems See Table 7.C on page 7-4 for minimum
hardware requirements for upgrading an existing system to R320.0.
Component Description
Base Dell OptiPlex GX200
Processor 800Mhz,Pentium III, 133Mhz Front Side Bus
Integrated Functions 4X AGP Video w/8MB of Memory
Audio, 512KB Cache 10/100 NIC
Mouse Microsoft Intellimouse
Keyboard Quietkey Spacesaver 104-Key, US
System RAM 256MB, ECC PC700, 1 RIMM
CD-ROM 40X SCSI
Floppy Drive 1.44MB, 3.5"
SCSI Controller Adaptec 29160N Controller
Hard Drive 9.1GB Minimum U2W, 10,000 RPM, SCSI
GX1/M, w/T erm inated Cabl e
Tape Drive 10/20 G, SCSI, TR-5, Tape Backup Unit
Network Integrated 3COM
3C90SC with 1 RJ45 connector
I/O Expansion 5 PCI, 2 ISA/PCI shared slots
Software Microsoft Windows NT4.0 (Service Pack 6a), NTFS
All hardware component drivers
Publication 1757-IN032B-EN-P - April 2001
Page 15

Preface 3
Rockwell Automation Technical Support
Rockwell Automation offers support services worldwide, with over 75
sales/support offices, 512 authorized distributors, and 260 authorized
systems integrators located throughout the United States alone, plus
Rockwell Automation representatives in every major country in the
world.
Local Product Support
Contact your local Rockwell Automation representative for:
• sales and order support
• product technical training
• warranty support
• support service agreements
Technical Product Assistance
If you need to contact Rockwell Automation for technical assistance,
first call your local Rockwell Auto mation representative, then:
• Network Pre-sales Hotline, 440.646.3638 (3NET)
• Post-sales Technical Support, 440.646.5800
• Web Links
http://www.ab.com — as a registered member, open to
http://www.ab.com/mem/technotes/techmain.html
Your Questions or Comments about This Manual
If you find a problem or have a comment about this manual, please
notify us of it on the enclosed Publication Problem Report (at the back
of this manual).
If you have any suggestions about how we can make this manual
more useful to you, please contact us at the following address:
Rockwell Automation, Allen-Bradley Company, Inc.
Control and Information Group
Technical Communication
1 Allen-Bradley Drive
Mayfield Heights, OH 44124-6118
Publication 1757-IN032B-EN-P - April 2001
Page 16

Preface 4
Conventions
Term s and Type Representations
The following table summarizes the terms and type representation
conventions used in this Guide.
Term/Type
Representation
click, click on, click
[button name]
double-click Click left mouse button twice in
drag Press and hold left mouse button
right-click Click right mouse button once.
select click to highlight a menu item or
<F1> Keys to be pressed are shown in
Meaning Example
Click left mouse button once.
(Assumes cursor is positioned on
object or selection.)
quick succession. (Assumes cursor
is positioned on object or
selection.)
while dragging cursor to new
screen location and then release
the button. (Assumes cursor is
positioned on object or selection to
be moved.)
(Assumes cursor is positioned on
object or selection.)
list choice, or click on a button.
angle brackets.
Click Browse.
Double-click the Station icon.
Drag the PID function block
onto the Control Drawing.
Right-click the AND function
block.
Select Configure
Allen-Bradley drivers from the
list box.
Press <F1> to view the online
Help.
<Ctrl>+<C> Keys to be pressed together are
shown with a plus sign.
⇒New
File
>D:\setup.exe< Data to be keyed in at prompt or in
Shows menu selection as menu
name followed by menu selection.
an entry field.
Press <Ctrl>+<C> to close the
window.
Click File⇒New to start new
drawing.
Key in this path location
>D:\setup.exe<.
Publication 1757-IN032B-EN-P - April 2001
Page 17

Preface 5
Related Documents
The following is a list of the printed documents that ship with a
ProcessLogix system. These documents complement the Knowledge
Builder online user documentation and are listed in the suggested reading
order.
ProcessLogix R320.0 Installation and Upgrade Guide
The ProcessLogix R320.0 Installation and Upgrade Guide provides:
• procedures for upgrading a system to R320.0
• procedures for updating the firmware to R320.0 levels
• procedures for installing the software on a clean personal
computer
• procedures for tasks associated with migrating to redundant
Server and/or redundant Controller architecture.
The following items used to be included in the SCN Software Change
Notice in previous releases:
• descriptions of new features and functions
• descriptions of performance and capacity specifications
• listings of major ProcessLogix software components
Publication 1757-IN032B-EN-P - April 2001
Page 18

Preface 6
ProcessLogix Online User Documentation/Knowledge Builder
ProcessLogix online user documen tati on is included with yo ur
ProcessLogix system in browser format through the Knowledge
Builder. The same documents may also be ordered individually
through Rockwell Automation in print format.
Knowledge Builder provides the user with task-based documentation
within the Server and Client stations and may be accessed while using
any of ProcessLogix’s software programs. Knowledge Builder’s internal
links and search functions allow the user to quickly access process
relevant information and references.
References to Knowledge Builder throughout this document are
illustrated as:
Navigate in Knowledge Builder to Ethernet Implementation
⇒Configuration⇒Setting Up Drivers and IP Addresses for more
Guide
information.
Contents of Release
The following software and documentation components are included
in the ProcessLogix R320.0 Software/documentation kit
(1757-SWKIT3200).
Release Component s Catalog and part numbers
ProcessLogix CD
ProcessLogix Engineering Tools
ProcessLogix Server Software
RSLinx 2.2
ProcessLogix Knowledge Builder CD 1757-SWKIT3200
ProcessLogix R320.0 Installation and
Upgrade Guide
1757-SWKIT3200
957445-88
957536-40
1757-IN032B-EN-P
957536-31
Publication 1757-IN032B-EN-P - April 2001
Page 19

Acronyms and Abbreviations
AI —
AO
— Analog Output
CB
— Control Builder
CCL — Control Component Library
CD
— Compact Disc
CDA
CD-ROM
CEE
CM
— Control Module
1756-CNB or CNB
CPM
CPU
DI
— Digital Input
Analog Input
— Control Data Access
— Compact Disc Read Only Memory
— Control Execution Environment
— ControlNet Bridge module
— Control Processor Module
— Central Processing Unit
LAN
— Local Area Network
LED
— Light Emitting Diode
MAC
— Media Access Control
MB
— Megabytes
NTFS
— Windows NT File System
NUT
— Network Update Time
NTFS
— Windows NT File System
NUT
— Network Update Time
ODBC
— Open Database Communications
OEM
— Original Equipment Manufacturer
PC
— Personal Computer
1784-PCIC or PCIC
1757-PIM
— Pulse Input Module
— PCI ControlNet Interface Module
Preface 7
DNS
— Domain Name System
DO
— Digital Output
DOS
— Disk Operating System
ER
— Engineering Repository
ERDB
— Engineering Repository Database
FB
— Function Block
FSC
— Fail Safe Controller
HTML
— HyperText Markup Language
I/O
— Input/Output
IOM
— Input/Output Module
IRQ
— Interrupt Request
ISA
— Industry-Standard Architecture
PLC
— Programmable Logic Controller
RAM
— Random Access Memory
RCP
— Redundant Chassis Pair
RTU
— Remote Terminal Unit
SCADA
— Supervisory Control and Data Access
SCM
— Sequential Control Module
SCSI
— Small Computer System Interface
1757-SRM or SRM
TC-MUX01
TCP/IP
— Transmission Control Protocol/Internet Protocol
VGA
— Video Graphics Array
WINS
— Windows Internet Name Service
— System Redundancy Module
— Serial Interface Module
Publication 1757-IN032B-EN-P - April 2001
Page 20

Preface 8
Publication 1757-IN032B-EN-P - April 2001
Page 21
Preparing for a ProcessLogix Software Upgrade
Chapter
System Software Upgrade Procedures
ATTENTION
This section assumes that you are currently running
ProcessLogix software version R300.1 or 310.0 and
Service Pack 5 for Windows NT 4.0. The tasks
associated with upgrading from an earlier release are
beyond the scope of this docu ment.
!
If you are migrating a system from R300.0 or earlier,
you must upgrade to R300.1 or R310.0 before
proceeding with the R320.0 upgrade.
Refer to the documentation supplied with R300 .1 or
R310.0 ProcessLogix software for instructions on
upgrading from an earlier release to R300.1 or R310.0.
1
• Refer to Installing ProcessLogix Client Software on page 1-73 to
upgrade the Client software on a networked ProcessLogix
Client system.
• Refer to Full PC Software Installation Procedures on page 3-1 to
install ProcessLogix software on a clean PC.
Things to consider before upgrading
ATTENTION
Be certain that your process is off control before you
begin any upgrade procedure. This means the
1757-PLX52 should be in the Idle state.
!
ATTENTION
Before upgrading to this release, be certain that the
ProcessLogix user accounts exist and are set up
correctly. Refer to Setting Up User Accounts on
page 5-27.
!
1 Publication 1757-I N0 32B-EN-P - April 2001
Page 22

1-2 System Software Upgrade Procedures
The following table summarizes some upgrade related functions that you
should consider before upgrading the existing system to R320.0.
Consider this: Because:
New license with
R320.0 ProcessLogix
software
Localization • The localization of an existing system is lost during an
Save Controller Data • This updates the database with current Controller data.
Back Up R300.0 Server
Data
• Your existing R300.1 or 310.0 license will not work with
R320.0.
• Be certain that you have the R320.0 license numbers on
hand before starting the software installation.
upgrade.
• Before starting an upgrade, be certain that you have the
localization toolkit in your language for R320.0.
• Remove the current localization update using the Control
Panel Add/Remove Programs function.
• Select R200 Language Update to change the language for
the Control Builder application back to the default of US
English.
• This is recommended if you plan to make a backup of your
current database.
• Refer to Saving Current Controller Data (optional) on
page 1-3.
• This provides a path for recovering your current system as a
standard precaution.
• Refer to Installing Service Pack 6a for Windows NT 4.0 on
page 1-11.
Have at least 400MB
of Free Disk Space
• This allows sufficient disk space to automatically backup
selected system data during the installation process.
• Refer to Determining Your Hard Drive Free Space
Requirements on page 1-4.
Publication 1757-IN032B-EN-P - April 2001
Page 23

System Software Upgrade Pr ocedures 1-3
Saving Current Controller Data (optional)
IMPORTANT
While not required, we suggest that you use this procedure to update the
ERDB with the most current Controller data before the upgrade. This
procedure assumes that the Control Builder (CB) application is running
and communicating with 1757-P LX52 Controllers in your ProcessLogix
system.
1. If Control Builder isn’t running, start it.
2. Close any open Control Module and/or Sequential Control
Module.
3. For a system with redundant ProcessLogix Servers, be certain that
the databases are synchronized. Refer to Synchronizing ERDB
on Redundant Servers on page 1-63.
4. In Monitoring tab, click the plus s ign in the t ree root path t o the
CPM icon for the controller to display the CEE fo lder icon.
5. Click the CEE folder icon. Click Tools
and then click Continue to upload the existing controller database.
This may take considerable time to complete, depending on the
amount of CM/SCMs (and their number of FBs and/or number of
Steps/Transitions) currently assigned to this CEE.
If you have redundant Servers, you only need to
perform this procedure on the SERVERB node.
⇒Upload with Contents
6. Click the CEE folder icon. Click Tools
Project) and then click Continue to save the existing controller
database.
This may take considerable time to complete, depending on the
amount of CM/SCMs (and their number of FBs and/or number of
Steps/Transitions) currently assigned to this CEE.
7. Repeat Step 4 to Step 6 for each controller (CPM icon) in your
system.
8. In preparation for the software upgrade, inactivate the CMs, SCMs,
and IOMs, and put the CEE in its Idle mode.
9. Close Control Builder.
⇒Update with Contents (to
Publication 1757-IN032B-EN-P - April 2001
Page 24
1-4 System Software Upgrade Procedures
TIP
W e recommend that you make a backup copy of your
erdb_a.mdb database after you save th e curr en t
controller data. The default direct ory location for the
erdb_a.mdb database is:
C:\Honeywell\TPS50\System\ER.
W e recommend that you create a new folder in the C:
directory for this purpose and then rename the database
after it is copied to the folder.
For example, you could name the folder erbackup and
rename the file erdb_a_bu.mdb to readily identify this
as the backup database copy.
Determining Your Hard Drive Free Space Requirements
A base requirement for ProcessLogix software releases is that they fit on
older PCs having 4 GB hard drives. This means that the R320.0 rele ase
needs to fit within a 4 GB partition, regardless of the overall size of the
hard drive. For example, if your PC has an 8 GB hard drive partitioned
into two 4 GB partitions, then all ProcessLogix applications and the
entire operating system (the swap file, Service Pack 6a, etc.) will reside on
the C: partition, while the other partition will be empty.
This means you must provide sufficient space on the C: partition before
you begin an upgrade, or the upgrade will fail at several points due to
insufficient disk space. The software installation routine requires
additional disk space to automatically back up selected system data during
the installation process.
ATTENTION
We recommend that you have free space equal to at
least 1.5 times the size of your C:\Honeywel l directory
and its subdirectories (minimum of 400 MB) before you
begin an upg rade.
!
Use the following steps to compute the minimum free space requirements
for your PC.
1. Open Windows NT Explorer.
2. Right-click the C:\Honeywell folder in the left pane and click
Properties. W ait until the Size number stops updating.
Publication 1757-IN032B-EN-P - April 2001
Page 25
System Software Upgrade Pr ocedures 1-5
3. Take this number and multiply it by 1.5 to find your free space
requirements. If the result is le ss than 400 MB, make the result 400
MB. Click Cance l to clos e th e H one y we l l Properties dialog box .
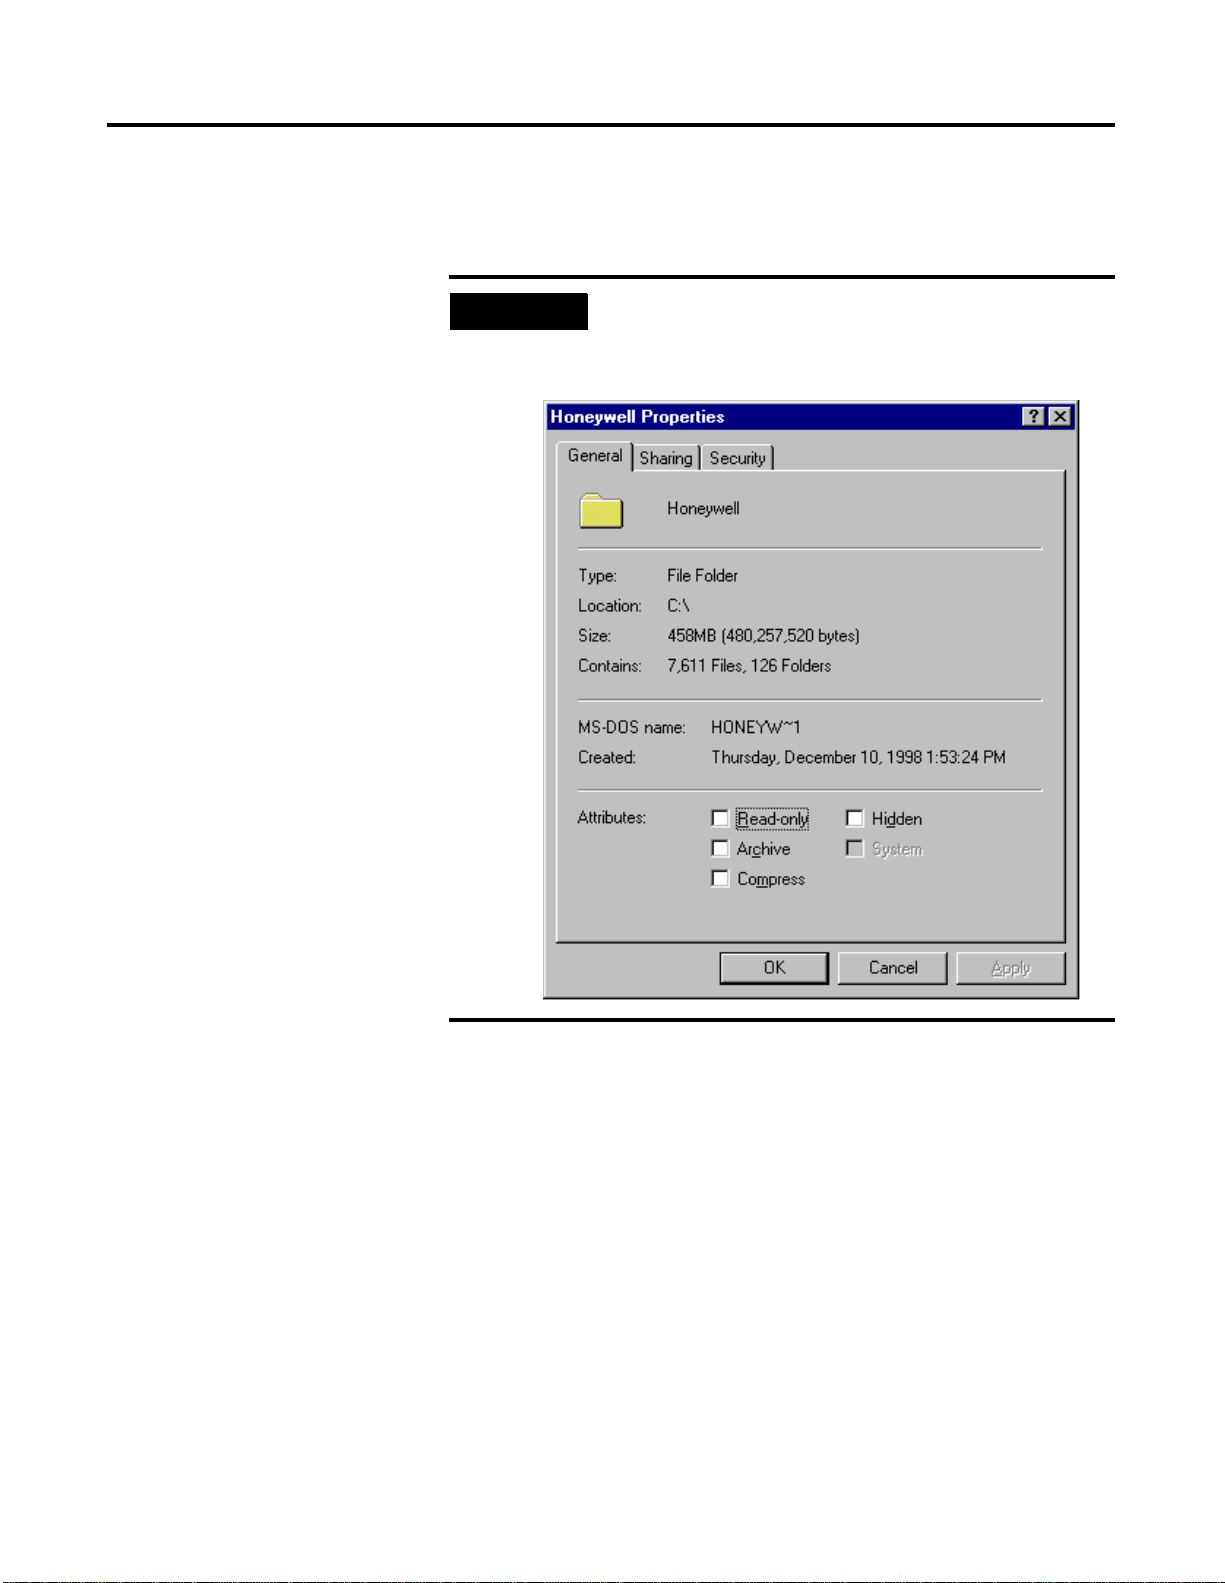
EXAMPLE
In the following example, the C:\Honeywell tree size is
458 MB. Multiplying 458 MB by 1.5 results in 687 MB.
This means you would need at least 687 MB of free disk
space before beginning your upgrade.
4. In Windows NT Explorer, right-click the (C:) drive icon in the left
pane and click properties. Check the free space size listed for the C
drive in the open dialog box. Click Cancel to close the dialog box.
If there is not enough free disk space, refer to the following
paragraph for suggestions on how to increase it.
Publication 1757-IN032B-EN-P - April 2001
Page 26

1-6 System Software Upgrade Procedures
What should you do if you do not meet the recommended
memory requirements:
If you do not me et the minimum free disk space requirement, you
can try one or more of the follow ing actions to increase your free
disk space:
• Compact the ERD B ( Use the Db Adm i n uti lit y :
⇒Programs⇒ProcessLogix Engineering Tools⇒
Start
DBADMIN
• Remove old error logs in directory C:\ErrorHandling,
• Remove old backups you have of the ERDB.
• Remove the Service Pack Uninstall directory C:\WINNT\
$NtServicePackUninstall$.
• Move any of your application files not residing in the
C:\Honeywell tree to the oth er partition, if you have another
partition.
⇒Tools⇒Compact Database.)
Backing Up a P r ocessLogix Server to Tape
Use the following procedure to back up your current ProcessLogix
Server data to tape.
1. If the Server to be backed up is a member of a redundant Server
pair, synchronize the ER and Server databases.
a. Refer to Synchronizing ERDB on Redundant Servers on
page 1-63.
b. Refer to Synchronizing Server Databases on Redundant
Servers on page 1-71.
ATTENTION
!
2. Insert a tape into the PC’s tape drive.
Before continuing, you MUST exit all ProcessLogix
applications and stop all ProcessLogix services.
Refer to Stopping ProcessLogix Applications and
Services on page 1-8.
Publication 1757-IN032B-EN-P - April 2001
Wait for the tape to mount (stop making noise).
3. Click Start
⇒Run.
Page 27

System Software Upgrade Pr ocedures 1-7
4. Key in this command in the Open entry field:
>cmd<
and click OK to open the DOS window.
5. At the DOS prompt, key in this command:
>fullbkup<
and press >Enter<
This initiates some file copying and then the backup dialog box
appears. No further interaction is needed until the backup
completes. This process may take considerable ti me to complete,
depending on the Server.
TIP
For more information on backup procedures, refer
to the Windows documentation and/or online help
that accompanied your system.
TIP
You may see errors such as: “file xxx skipped”.
These errors are normal and will not affect the
validity of your backup tape.
6. When the backup completes, remove the backup tape from the tape
drive.
7. Exit the DOS window.
Publication 1757-IN032B-EN-P - April 2001
Page 28
1-8 System Software Upgrade Procedures
Stopping ProcessLogix Applications and Services
ATTENTION
Before installing or uninstalling any software
component, you MUST exit all ProcessLogix
applications and stop all ProcessLogix services.
!
IMPORTANT
Use the following procedure to exit all ProcessLogix applications and
stop all ProcessLogix services.
1. Exit all running ProcessLogix applications, such as Control Builder,
Station, and Network Tools (NTOOLS).
2. Stop the following ProcessLogix services through the Services icon
in Control Panel. When finished, close the Services dialog box.
TIP
• ProcessLogix ER Replicator (redundant SERVERB node only)
• ProcessLogix ER Server
• ProcessLogix System Repository
• ProcessLogix Control Data Access Server
If you have redundant servers, you must complete this
procedure on the SERVERB node first. Then complete
the entire procedure again for the SERVERA node.
Some software services may interact. For example,
stopping the ProcessLogix System Repository
automatically stops the ProcessLogix Control Data
Access Server, if it is running.
Observe the on-screen prompts for details.
Publication 1757-IN032B-EN-P - April 2001
Page 29
System Software Upgrade Pr ocedures 1-9
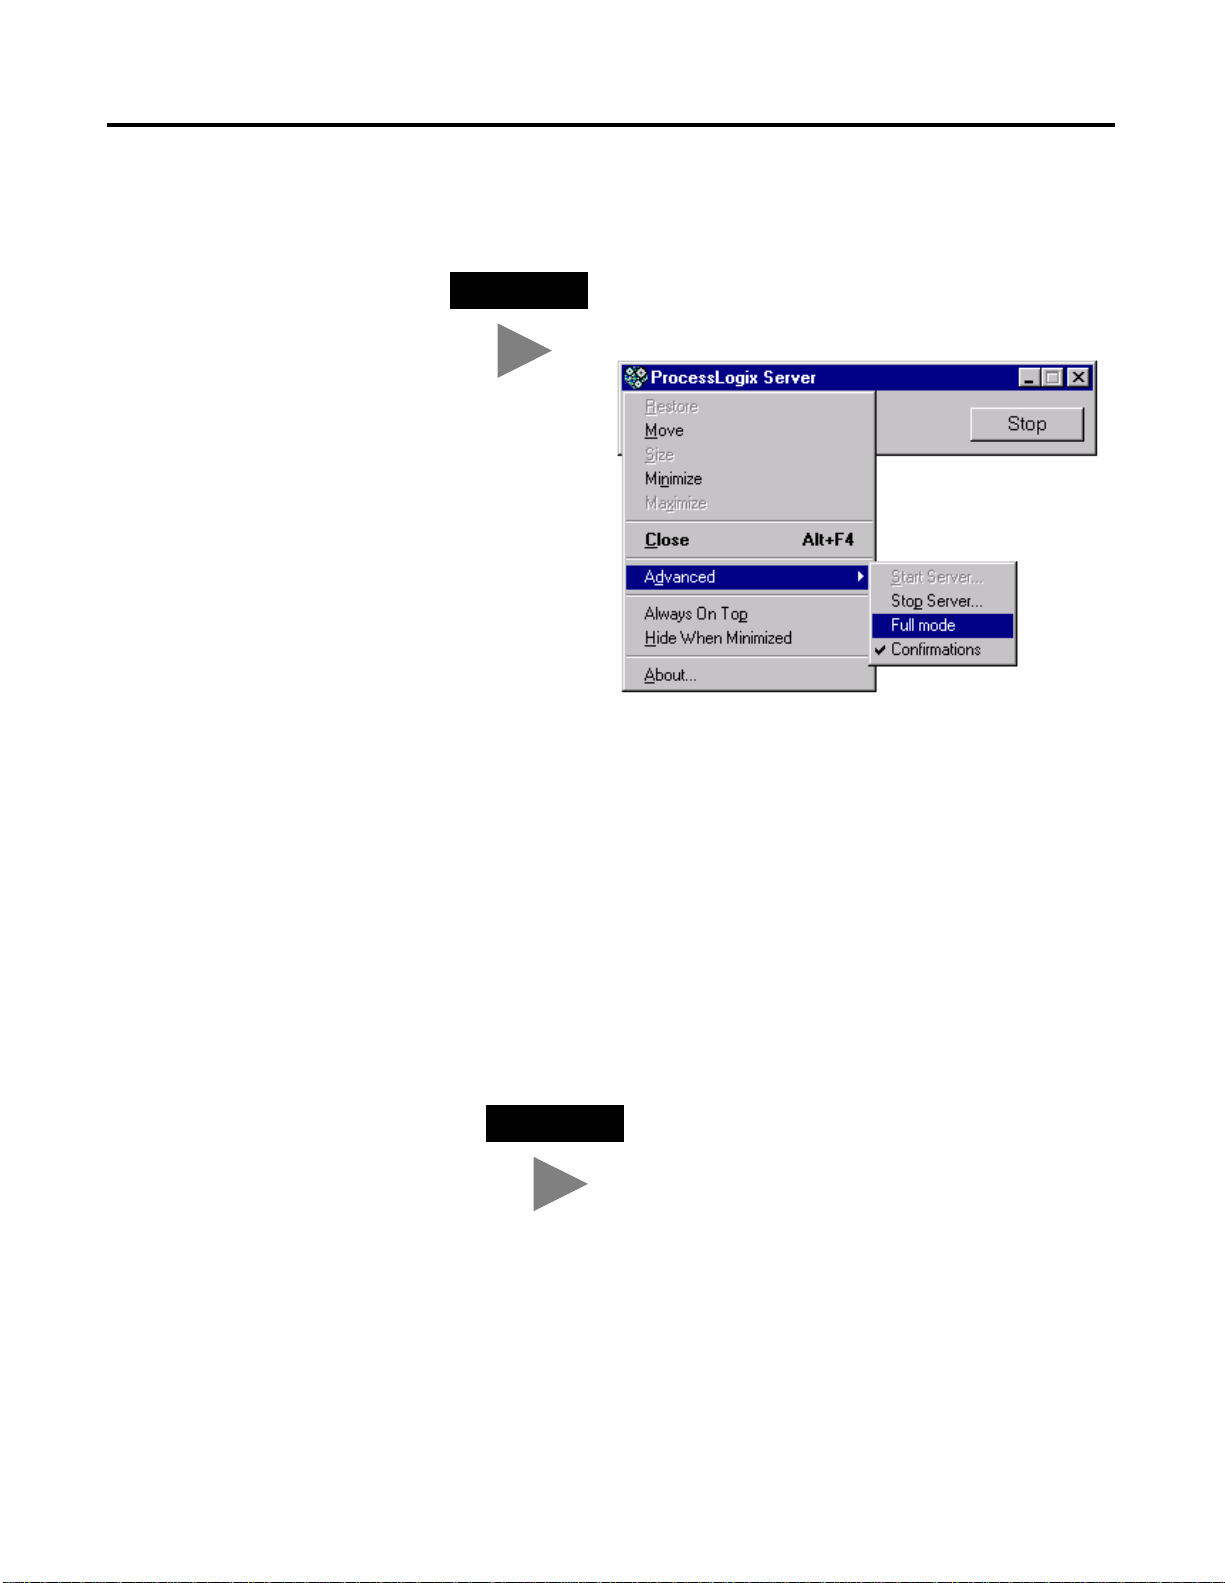
3. Click Start⇒Programs⇒ProcessLogix Server⇒Start-Stop
ProcessLogix Server to call up the ProcessLogix Server dialog box.
TIP
To display the “Full Mode” version of the ProcessLogix
Server dialog box, click the icon on the left of the title
bar and click Advanced
⇒Full Mode.
A checkmark will now appear in front of the Full
Mode selection to show that it is active.
a. With the Full Mode version of the dial og box act ive, cl ick the
Database Unloaded option.
b. Click Yes to confirm the action and wait for the Server to
change its state.
c. Close the ProcessLogix Server dialog box.
4. Click Start
⇒Programs⇒Rockw e ll Software⇒RSLinx⇒RSLinx
Service Control Panel to call up the RSLinx Service Control dialog
box.
a. Click Stop.
TIP
The ProcessLogix Control Data Acces s Server
service must be stopped before you can stop
RSLinx through its control panel.
Publication 1757-IN032B-EN-P - April 2001
Page 30

1-10 System Software Upgrade Procedures
b. Wait for the message RSLinx Service is not running to appear.
Close the dialog box.
5. Skip to Step 9 if NI-FBUS is not running. Otherwise, close the
NI-FBUS configurator.
6. Wait until the FCS shutdown window disappears before
proceeding.
7. Right-click the NI-FBUS 2.3 icon in the taskbar and select Open.
8. Close the NI-FBUS window and click Yes to confirm.
9. Right-click an open space in the taskbar and click Task Manager to
open the Windows NT Task Manager window.
10. Click the Processes tab, scroll through the list box and select any
process with the Image Name of EXCEL.EXE.
11. Click End Process.
12. Close Task Manager.
Stopping the 1784-PCIC(S) devices
After you have installed the 1784-PCIC card and installed the
ProcessLogix R320.0 sof tware, use the foll owing procedure to st op the
PCIC(S) devices.
13. Click Start
14. Double-click the Devices icon.
⇒Settings⇒Control Panel.
Publication 1757-IN032B-EN-P - April 2001
15. Select the A-B Virtual Backplane device driver.
16. Click Stop.
17. Click OK to also stop the A-B 1784-PCIC(S) device driver.
18. Close the Devices dialog box.
Page 31

Installing Service Pack 6a for Windows NT 4.0
System Software Upgrade Procedur es 1-11
IMPORTANT
For your convenience, we have included Service Pack 6a for Windows
NT 4.0 on the ProcessLogix R320.0 software CD. This is also avail able as
a free download from the Microsoft we b site
(www.microsoft.com/downloads/search.asp?)
Use the following procedure to install Service Pack 6a.
Y our system should be running Service Pack 6a. If it is
not running Service Pack 6a, follow this procedure to
install it.
.
ATTENTION
!
1. Insert the ProcessLogix R320.0 software CD into the CD-ROM
drive.
2. Click Start
3. Key in this path location in the Op en entry field or use Bro wse to
navigate to the sp 6i 3 86. e x e fil e on the CD .
>D: (or your CD-ROM drive letter)\nt_sp6a\sp6i386.exe<
4. Click OK to launch the Service Pack 6a setup application.
5. If a third-party system utilities message appears, click OK.
6. At the Setup window, check the boxes:
• Accept the License Agreement
• Backup files necessary to uninstall the Service Pack at a later
time.
Before installing or uninstalling any software
component, you MUST exit all ProcessLogix
applications and stop all ProcessLogix services.
Refer to Stopping ProcessLogix Applications and
Services on page 1-8.
⇒Run.
7. Click Install to initiate the Service Pack 6a update.
8. If a window appears requesting you to replace a vendor installed
file, click Yes to replace the file with the one provided by the
Service Pack Setup.
9. At the Setup complete window, remove the CD and then click
Restart. The PC automatically restarts.
Publication 1757-IN032B-EN-P - April 2001
Page 32

1-12 System Software Upgrade Procedures
Installing Internet Explorer 5.01
ATTENTION
!
For your convenience, we have included Internet Explor er 5.01 on the
ProcessLogix R320.0 software CD. Use the following procedure to install
Internet Explorer 5.01 on a PC with Windows NT.
If installing on a PC with Windows 95 or 98, complete Steps 1 through
4 and then follow on-screen prompts. If you need help, call Rockwell
Automation Technical Support. Refer to Rockwell Automation
Technical Support in the Preface.
Before installing or uninstalling any software
component, you MUST exit all ProcessLogix
applications and stop all ProcessLogix services.
Refer to Stopping ProcessLogix Applications and
Services on page 1-8.
1. Insert the ProcessLogix R320.0 software CD into the CD-ROM
drive.
2. Click Start
3. Key in this path location in the Op en entry field or use Bro wse to
navigate to the ie5setup.exe file on the CD.
>D: (or your CD-ROM drive letter)\IEXP_5_0_1\ie5setup.exe<
4. Click OK to launch Internet Explorer setup.
5. Accept the license agreement and click Next.
6. Select the Install Now-Typical option and click Next.
7. When installation completes, click Finish.
The PC automatically restarts.
8. Remo v e th e CD.
⇒Run.
Publication 1757-IN032B-EN-P - April 2001
Page 33

Upgrading Data Access Components
System Software Upgrade Procedur es 1-13
ATTENTION
!
For your convenience, we have included MDAC 2.1 on the
ProcessLogix R320.0 software CD. Use the following procedure to
install MDAC 2.1 on the PC.
1. Insert the ProcessLogix R320.0 software CD into the CD-ROM
drive.
Before installing or uninstalling any software
component, you MUST exit all ProcessLogix
applications and stop all ProcessLogix services.
Refer to Stopping ProcessLogix Applications and
Services on page 1-8.
2. Click Start
3. Key in this path location in the Open entry field or use Browse
to navigate to the mdac_typ.exe file on the CD.
>D: (or your CD-ROM drive letter)\Mdac21\Mdac_typ.exe<
4. Click OK to launch the MDAC 2.1 setup.
5. Click Yes to accept the license agreement.
6. Click Continue.
7. At the MDAC 2.1 Setup window, click to start the
installation.
8. At the Restart Windows dialog box, remove the CD and click
Restart Windows for the changes to take effect.
If you don’t get a Restart Windows dialog box, click OK, remove
the CD and manually restart the PC for changes to take effect.
⇒Run.
Publication 1757-IN032B-EN-P - April 2001
Page 34

1-14 System Software Upgrade Procedures
Uninstalling ProcessLogix Knowledge Builder Software
If you have a previous version of Knowledge Bu ilder on your PC , you
must first record the system path and uninstall the installed version
before attempting to install the lat est version. Follow the steps below to
record the system path and uninstall the Knowledge Builder software.
Recording the NT System Path Value
If you are running Windows NT, you must record the NT System Path
before uninstalling Knowledge Builder.
1. Click Start
2. Double-click the System icon.
3. Click the Environment tab.
4. Select the Path from the System Variables list.
5. Record the Path Value.
⇒Settings⇒Control Panel.
TIP
Use Notepad to create a file c:\path. txt. Copy the path
value into this file and save.
Uninstall Knowledge Buil der
ATTENTION
!
1. Click Start⇒Settings⇒Contro l Panel.
2. Double-click the Add/Remove Programs icon.
Before installing or uninstalling any software
component, you MUST exit all ProcessLogix
applications and stop all ProcessLogix services.
Refer to Stopping ProcessLogix Applications and
Services on page 1-8.
Publication 1757-IN032B-EN-P - April 2001
3. Select Knowledge Builder.
4. Click Add/Remove.
Page 35

System Software Upgrade Procedur es 1-15
5. Click Yes to confirm file deletion.
6. When prompted to remove shared files, click Yes to All and click
Yes to continue.
7. When the uninstall completes, click OK.
You can ignore details for any items that were not removed.
8. Close the Add/Remove window.
9. Close the Control Panel.
Verifying the NT System Path Value
1. Click Start⇒Settings⇒Control Panel.
2. Double-click the Syst em icon.
3. Click the Environment tab.
4. Select the Path from the System Variables list.
5. If the Path Value does not match the recorded path value from
before the uninstall, change the path value t o the recorded value.
6. Click Set and then click OK.
7. Close the Control Panel.
Uninstalling Adobe Acrobat Reader 3.01
1. Click Start⇒Programs⇒Adobe Acrobat⇒Uninstall Acrobat
Reader 3.01.
2. Click Yes to confirm file deletion.
3. When the uninstall completes, click OK.
4. Resta rt the PC.
Publication 1757-IN032B-EN-P - April 2001
Page 36

1-16 System Software Upgrade Procedures
Installing ProcessLogix Knowledge Builder Software
Knowledge Builder is the software application used to display
ProcessLogix online documentation. Knowledge Builder (KB) requires
several other software applications and Microsoft components to
function properly. These components include:
Knowledge Builder requires
this component:
Service Pack 6a for Windows NT • refer to Installing Service Pack 6a
Internet Explorer 5.01 • refer to Installing Internet Explorer
Microsoft MDAC 2.1 • refer to Upgrading Data Access
Adobe Acrobat 4.05 • refer to Uninstalling Adobe
DCOM95 or 98 • automatically installed during the
VB Runtime files • automatically installed during the
You MUST:
for Windows NT 4.0 on page 1-11
5.01 on page 1-12
Components on page 1-13
Acrobat Reader 3.01 on page1-15
• Adobe Acrobat 4.05 will be
installed during the Knowledge
Builder install
Knowledge Builder install
Knowledge Builder install
Since Knowledge Builder is provided on a separate CD, use the following
procedure to install the soft ware and update the online doc umentation
database.
ATTENTION
!
1. Insert the ProcessLogix R320.0 Knowledge Builder CD into the
CD-ROM drive.
2. Click Start
3. Key in this path location in the Op en entry field or use Bro wse to
navigate to the Setup.exe file on the CD.
>D: (or your CD-ROM drive letter)\Knowledge_Builder\Setup.exe<
4. Click OK.
Before installing or uninstalling any software
component, you MUST exit all ProcessLogix
applications and stop all ProcessLogix services.
Refer to Stopping ProcessLogix Applications and
Services on page 1-8.
⇒Run.
Publication 1757-IN032B-EN-P - April 2001
5. Follow the on-screen prompts to load the software.
Page 37

System Software Upgrade Procedur es 1-17
Accept the defaults for the program and the directory path location
selections. The defaults are:
• Next at the Welcome window
• Yes to accept license agreement
• Full Install and Next
6. At the Acrobat Reader 4.05 Setup window, click Next.
7. Accept the default directory location for Acrobat and click Next.
8. Click OK at the Thank you for choosing Acrobat Reader window.
9. Select No, I will restart my computer later and click OK.
10. Rem ove the CD.
11. Res t a r t th e PC .
Publication 1757-IN032B-EN-P - April 2001
Page 38

1-18 System Software Upgrade Procedures
Removing the 9904/1784-KTCX15 Card and Installing the 1784-PCIC Card
Use the following procedure as a general guide to remove the
9904/1784-KTCX15 drivers for RSLinx from an R300.1 or R310.0
ProcessLogix Server. If you already have a 1784-PCIC card installed, skip
this section.
ATTENTION
!
IMPORTANT
1. Click Start⇒Programs⇒Rockwell Software⇒RSLinx⇒RSLinx
2. Click Communications
Before continuing, you MUST exit all ProcessLogix
applications and stop all ProcessLogix services.
Refer to Stopping ProcessLogix Applications and
Services on page 1-8.
If you have redundant servers, you must complete this
procedure on the SERVERB node first. Then complete
the entire procedure again for the SERVERA node.
to call up the Rockwell Software RSLinx window.
⇒Configure Drivers to call up the
Configure Drivers dialog box.
3. Select the AB_KTC-1 in the Configure d Drivers list bo x and click
Configure.
4. Record the AB_KTC-1 Network Address.
5. Click Delete.
6. Close RSLinx and power down the PC.
7. Remove ControlNet cables from the KTCX15 card and remove the
KTCX15 card from the PC.
8. Install the 1784-PCIC card and attach the ControlNet cables.
Refer to the installation instructions, Publication
1784-IN003A-EN-P for details.
ATTENTION
!
In order to perform correctly, the 1784-PCIC card
MUST have the PAL part number 99640604. If the
1784-PCIC card does not have this PAL, you must
return your card for the update.
Contact Rockwell Automation Technical Support for
more information. Refer to Rockwell Automation
Technical Support in th e Preface.
Publication 1757-IN032B-EN-P - April 2001
Page 39

Upgrading ProcessLogix Software on a Non-redundant Server Only
System Software Upgrade Procedur es 1-19
IMPORTANT
ATTENTION
If you are upgrading a redundant Server pair, refer
to Upgrading ProcessLogix Software on a Redundant
Server Pair on page 1-45.
Be certain that your process is off control before you
begin any upgrade procedure. This means the
1757-PLX52 should be in the Idle state.
!
About Upgrading Soft wa r e on the Ser ve r
ProcessLogix now automates most of the migration tasks from a previous
version of the system to the current version. The migration
enhancements support error handling and recovery from migration
problems.
While the ProcessLogix R320.0 soft ware CD supports several platforms,
this procedure covers upgrading the ProcessLogix Software from R300.1
or R310.0 to R320.0 on the Server . In this case, the following components
are installed in succession once you start the installation setup.
• RSLinx OEM 2.2
• Engineering Tools
• Server/Client (Display Builder, Station, and Server)
• ProcessLogix Server Upgrade
All files included with the migration wizard will be included as part of the
installation package for the Engineering Tools media included in the
Engineering Tools directory of the ProcessLogix CD. The files that
comprise this utility will be installed into the default location
C:\Honeywell\TPS50\System\ER\Migrate.
Publication 1757-IN032B-EN-P - April 2001
Page 40

1-20 System Software Upgrade Procedures
The following table lists the items that you MUST complete before
attempting to upgrade the ProcessLogix software on a non-redundant
Server pair
Step Item: Refer to page:
1 Preparing for a ProcessLogix Software Upgrade 1-1
2 Stopping ProcessLogix Applications and Services 1-8
3 Installing Service Pack 6a for Windows NT 4.0 1-11
4 Installing Internet Explorer 5.01 1-12
5 Upgrading Data Access Components 1-13
6 Uninstalling ProcessLogix Knowledge Builder
Software
1-14
7 Installing ProcessLogix Knowledge Builder
Software
8 Removing the 9904/1784-KTCX15 Card and
Installing the 1784-PCIC Card
9 Setting Up User Accounts 5-27
ATTENTION
Be certain that your current NT logon is through an
administrator account, such as plx_user, and not an
engr or mngr account.
!
IMPORTANT
Although not recommended, if you do not want to
install a software component, just click Cancel on the
Welcome display to abort the installation.
1-16
1-18
Publication 1757-IN032B-EN-P - April 2001
Installing Server Software
ATTENTION
!
Before installing or uninstalling any software
component, you MUST exit all ProcessLogix
applications and stop all ProcessLogix services.
Refer to Stopping ProcessLogix Applications and
Services on page 1-8.
Page 41

System Software Upgrade Procedur es 1-21
1. If the following pre-upgrade directories exist from a previous Server
migration, delete them:
• C:\Honeywell\ips.preupgrade
• C:\Honeywell\server.preupgrade
2. Insert the ProcessLogix R320.0 software CD into the CD-ROM
drive.
3. Click Start
4. Key in this path location in the Op en entry field or use Bro wse to
navigate to the setup.exe file on the CD.
>D: (or your CD-ROM drive letter)\SETUP.EXE<
5. Click OK to launch the software setup application.
6. Click the ProcessLogix Server option and click Next.
7. At the ProcessLogix R320.0 Welcome window, click Next.
8. Click Yes to accept the license agreement.
IMPORTANT
9. At the Before installing window, click Yes.
⇒Run.
You must have either a 1784-PCIC or Ethernet card
installed in your ProcessLogix Server to install R320.0.
Installing RSLinx
1. At the RSLinx Welcome window, click Next.
2. Click Yes to accept the license agreement.
3. At the Verify System Files window, click Next.
TIP
If a Read only File Detected message appears during
software installation, check the Don’t display again
checkbox and click Yes to acknowledge the message.
Publication 1757-IN032B-EN-P - April 2001
Page 42

1-22 System Software Upgrade Procedures
4. Enter the name, company to whom the RSLinx package is
registered, and the RSLinx OEM serial number (located on the
RSLinx box and/or Master Disk).
5. Click Next.
6. At the Select Components window, be certain that all the
components are checked, including any sublevel listings. Expand
the items to display the sublevels and be certain that all the
components are selected.
7. Click Next.
8. Click the Upgrade the existing version option and click Next.
9. At the Choose Destination Location window, click Next.
TIP
You must not change the directory name or the
ProcessLogix system will not operate properly.
10. At the RSLinx Configuration Security Setting window, click the
Disable option and click Next.
11. At the Setup Complete window, uncheck these checkboxes:
• Activate RSLinx
• View the ReadMe file now
12. Click Finish.
Installing Engineering Tools
1. Engineering Tools is automatically installed. This takes a few
minutes to complete.
Installing PsAxCtl Document EXE
Publication 1757-IN032B-EN-P - April 2001
a. Click OK to acknowledge the change directory warning.
b. At the PsAxCtl Document EXE Set up Welcome window,
click OK.
c. Verify that the destination directory is
C:\Honeywell\TPS50\System\Bin.
Page 43

System Software Upgrade Procedur es 1-23
d. Click the large install button (PC icon).
e. At the Setup complete window, click OK.
Installing CCL Deployment
a. At the Welcome window, click Next.
b. At the CCL Deployment Installation Complete window,
click Finish.
2. At the Engineering Tools Setup Complete window, click Finish.
Migrating the ERDB
1. Wait wh ile the automatic ERDB migrat ion from R300.1 or R310.0
to R320.0 is executed.
The migration activity appears in a DOS window. This may take
some time to complete, depending on the size of your database.
2. When the ERDB Migration is complete, click OK.
If ERDB Migration fails, refer to ref er to Recovering from Failure
of an Automatic ER Database Migration on page 5-8.
Installing the ProcessLogix Server
1. At the Welcome to ProcessLogix Server Setup window, click Next.
2. Click Y es in the Question box t o upgrade the ProcessLogix S erver
to R320.0.
3. Click Y es to replace the detected versions of Display Builder,
Quick Builder, and Station.
Publication 1757-IN032B-EN-P - April 2001
Page 44

1-24 System Software Upgrade Procedures
4. Skip to Step 6 if the Specify Microsoft Excel Directory window
does not appear. Otherwise, click Nex t to accept the default
directory for Microsoft Excel.
ATTENTION
!
5. Click No in response to the question:
Do you want Microsoft Excel Data Exchange to be allowed to
write to a ProcessLogix Server database?
to disable the Microsoft Excel Data Exchange write option.
6. At the Choose point mode acronyms window, click the Default
acronyms option and click Next.
7. Review the software installation details summarized in the
Confirmation window.
• If you need to make changes, click Back to access any previous
entries.
• If the details are okay, click Next to begin the Server setup. This
may take 10 to 15 minutes to complete.
We recommend that you answer No to the question:
Do you want Microsoft Exc el Data Exchange to be
allowed to write to a ProcessLogix Server database?
If you answer Y es, the write option is enabled and it is
possible for anyone with access to the machine to write
to the Server database.
Publication 1757-IN032B-EN-P - April 2001
8. Skip this step if the system does not include Excel Da ta Exchange.
Otherwise, click Enable Macros when requested.
TIP
If a Microsoft Excel dialog box appears, check the Do
not show this dialog again checkbox and click OK.
TIP
If a Read only File Detected message appears during
software installation, check the Don’t display again
checkbox and click Yes to acknowledge the message.
Page 45

System Software Upgrade Procedur es 1-25
9. At the Setup Complete window, click the No, I will restart my
computer later option and click Finish.
IMPORTANT
If the message “Dr. Watson has been installed as default
application debugger,” appears during software
installation, click OK.
10. The ProcessLogix Server Update is automatically installed. At the
ProcessLogix Setup Complete window, click Finish.
11. Rem ove the CD.
IMPORTANT
Do not restart the Server!
Before restarting the PC, you must have all user
accounts configured correctly.
Setting Up User Accounts
1. Configure the plx_user, mngr, and erserver accounts.
Refer to Setting Up User Accounts on page 5-27.
2. Resta rt the PC.
IMPORTANT
TIP
You must restart the PC after all user accounts have
been changed.
If you see any “end task” and “failure to start at least
one service; see Event Viewer” prompts during reboot,
click OK to continue. Logon as plx_user and verify that
all user accounts have been properly configured .
Publication 1757-IN032B-EN-P - April 2001
Page 46

1-26 System Software Upgrade Procedures
Moving the RSLinx Activation File
About the Activation File
Use the following proced ure to move the activation file (evrsi .sys) from
the RSLinx software Master Disk to the hard drive where RSLinx is to be
operated. The PC cannot execute the full OEM version of the RSLinx
application if the activation file is not present on its hard drive.
IMPORTANT
ATTENTION
Complete Step 1 and Step 2 in the following
procedure to determine your current RSLinx version.
If you need to reformat the hard d rive, you must first
move the activation file back to the RSLinx Master
Disk using the same general procedure as follows.
Otherwise, the file wil l be corrupted and you will no t
be able to run RSLinx in the OEM mode.
!
Before you attempt to move the activation file, you
MUST exit all ProcessLogix applications and stop all
ProcessLogix services. Refer to Stopping
ProcessLogix Applications and Services on page 1-8.
Do not manually copy or move the evrsi.sys file.
Moving/coping the evrsi.sys file will disable the OEM
version of RSLinx.
Always use the EVMOVE.EXE program to move the
evrsi.sys file. If the evrsi.sys file is corrupted or
manually moved, resulting in RSLinx changing to Lite
version, you can visit the Rockwell web site
(http://suppport.automation.rockwell.com/resetcodes
/) to recover the RSLinx activation.
Determining the Current RSLinx Version
1. Click Start⇒Programs⇒Rockwell Software⇒RSLinx⇒RSLinx
to open the RSLinx application.
Publication 1757-IN032B-EN-P - April 2001
Page 47

System Software Upgrade Procedur es 1-27
2. Check the application title in the title bar.
• If the title is RSLinx Lite, go to Step 3.
• If the title is RSLinx OEM you already ha ve the O EM versi on
installed and you do not have to install the activation file.
– For ControlNet Supervisory Networks, skip to Configuring
RSLinx Drivers for ControlNet Supervisory Network on
page 1-29.
– For Ethernet Supervisory Networks, skip to Configuring
RSLinx Drivers for Ethernet Supervisory Network on
page 1-38.
3. Close RSLinx.
Installing the Activation File
1. Locate the RSLinx Master Disk and insert it into the floppy drive.
2. Click Start
3. Key in this path location in the Op en entry field or use Bro wse to
navigate to the evm o ve . e xe fil e on the di sk et t e.
>A: (or your floppy drive letter)\EVMOVE.EXE<.
4. Click OK to launch the move executive.
⇒Run.
Publication 1757-IN032B-EN-P - April 2001
Page 48

1-28 System Software Upgrade Procedures
5. Confirm that the floppy drive letter A:, for example, appears in the
From Drive field and the hard drive letter C:, for example, appears
in the To Drive field in the dialog box.
6. Click OK to initiate the move.
7. Click Move to move the file to the hard drive. W ait for a dialog box
to give a successful move indication, and click OK to exit.
8. Remove the Master Disk from your floppy drive and store it in a
safe place
TIP
If you need to reformat the hard d rive, you must first
move the evrsi.sys file back to this Master Disk using
this same general procedure; otherwise, the file will be
corrupted.
Publication 1757-IN032B-EN-P - April 2001
Page 49

System Software Upgrade Procedur es 1-29
Configuring RSLinx Drivers for ControlNet Supervisory Network
Use the following procedure t o co nfigure the ControlNet 1784-PCIC
drivers for RSLinx.
IMPORTANT
If you are using Ethernet for your Supervisory
Network, skip to Configuring RSLinx Drivers for
Ethernet Supervisory Network on page 1-38.
Installing the 1784-PCIC Driver
1. Click Start⇒Programs⇒Rock w ell Software⇒RSLinx⇒RSLinx
to call up the Rockwell Software RSLinx window.
2. Click Communications
Configure Drivers dialog box.
3. Click the 1784-PCIC(S) for ControlNet devices selection in the
Available Drivers list box and click Add New to call up the Add
New RSLinx Driver dialog box.
⇒Configure Drivers to call up the
4. Click OK to accept the default name AB_PCIC-1 for the driver.
5. In the Configure 1784-PCIC window, enter the following:
• Serial Number(hex): This value is read from the PCIC card and
does not change.
• Network Address(dec): Change the default of 99 to 20.
6. Click OK to close the dialog box and start the 1784-PCIC driver.
Publication 1757-IN032B-EN-P - April 2001
Page 50

1-30 System Software Upgrade Procedures
7. In the Configure Drivers dialog box, you should see AB_PCIC-1
listed in the Configured Drivers lis t with the status Running. If the
AB_PCIC-1 driver status is not Running, call Rockwell
Automation Technical Support. Refer to Rockwell Automation
Technical Support in the Preface.
8. Click Close to close the Configure Drivers dialog box.
9. Close RSLinx.
IMPORTANT
10. Res t a r t th e PC .
Whenever the 1784-PCIC Network Address is changed,
the 1784-PCIC driv er must be stopped and restarted to
complete the change.
Updating the 1784-PCIC Card Firmware
ATTENTION
!
IMPORTANT
In order to perform correctly, the 1784-PCIC card
MUST have the PAL part number 99640604. If the
1784-PCIC card does not have this PAL, you must
return your card for the update.
Contact Rockwell Automation Technical Support for
more information. Refer to Rockwell Automation
Technical Support in th e Preface.
The 1784-PCIC card’s driver mus t be listed as available
in RSLinx before running the ControlFLASH update.
Publication 1757-IN032B-EN-P - April 2001
If you have not installed the 1784-PCIC driver, refer
to Installing the 1784-PCIC Driver on page 1-29.
Determining the 1784-PCIC Firmware Revision
If your 1784-PCIC card is not at 3.3 Q28 firmware revision, you will need
to flash update the card.
If you have ControlNet devices attached to the 1784-P CIC card, do th e
followi ng:
1. Click Start
to call up the Rockwell Software RSLinx window.
2. Click Communications
⇒Programs⇒Rockwell Software⇒RSLinx⇒RSLinx
⇒RSWho.
Page 51

System Software Upgrade Procedur es 1-31
3. Click the + (plus) sign next to AB_PCIC-1 to expand the
ControlNet tree.
4. Confirm that the 1784-PCIC Workstation icon is listed with 3.3
Q28 firmware.
If the revision is at 3.3 Q28, skip to Configuring the ControlNet
Supervisory Network on page 1-35, if not go to Stop All
ProcessLogix Applications and Services on page 1-31.
If you do not ha ve ControlNet devices con nected to the 1784-PCIC, you
can verify the firmware revision using the virtual backplane. Do the
following:
1. Click Start
to call up the Rockwell Software RSLinx window.
2. Click Communications
3. Click the Virtual Backplane (SoftLogix 58XX) selection in the
Available Drivers list box and click Add New to call up the Add
New RSLinx Driver dialog box.
4. Click OK to accept the default name AB_VBP-1 for the dr iver.
5. Click Close to close the Configure Drivers dialog box.
6. Click the + (pl us ) si gn nex t to AB_ VB P-1 to e xpa nd the Virtual
Backplane tree.
7. Confirm that the 1784-PCIC icon is listed with 3.3 Q28 firmware.
If the revision is at 3.3 Q28, skip to Configuring the ControlNet
Supervisory Network on page 1-35, if not continue with the n ext
section Stop All ProcessLogix Applications and Services on page
1-31.
⇒Programs⇒Rockw e ll Software⇒RSLinx⇒RSLinx
⇒Configure Drivers
Stop All ProcessLogix Applications and Services
1. Exit all running ProcessLogix applications, such as Control Builder,
Station, and Network Tools (NTOOLS).
2. Click Start
3. Double-click the Services icon.
4. Change ALL the ProcessLogix Services Startup Type to Manual.
To change a Service Startup Type to Manual:
⇒Settings⇒Control Panel.
Publication 1757-IN032B-EN-P - April 2001
Page 52

1-32 System Software Upgrade Procedures
a. Select the Service and click Startup.
b. In the Startup Type field, click the Manual option and click OK.
The following Services should be changed to Manual Startup:
• ProcessLogix ER Replicator (redundant SERVERB node only)
• ProcessLogix ER Server
• ProcessLogix System Repository
• ProcessLogix Control Data Access Server
• ProcessLogix Server Daemon
• ProcessLogix Server Database
• ProcessLogix Server System
5. Click Start
⇒Shut Down and select the shutdown the computer
option.
6. Power down the PC.
Continue with the updating of the 1784-PCIC card firmware.
1. Turn on the PC and logon as plx_user.
2. Click Start
3. Key in this command in the Open entry field:
>C:\Honeywell\TPS50\System\Firmware\1784-PCIC\3_3\Setup.exe.<
4. Click OK.
5. At the Welcome to ControlFLASH Setup window, click Next.
6. Click Next to accept the default location.
7. Uncheck the Yes, I want to view the ControlFLASH readme file.
⇒Run.
Publication 1757-IN032B-EN-P - April 2001
8. Check Yes, I want to launch ControlFLASH and click Finish.
9. At the Welcome to ControlFLASH window, click Next.
10. Click 1784-PCIC and click Next.
11. Do uble-click on AB _PCI C1.
12. Confirm that the update revision is 3.3 and click Next.
13. At the Summary window, click Finish.
Page 53

System Software Upgrade Procedur es 1-33
14. Click Yes to confirm flash.
The card will now execute the 3.3 firmware.
15. Click OK.
When the update is completed, ControlFLASH will report that the
1784-PCIC card failed to report the new revision number. Since the
3.3 firmware requires a different driver than the 1.4 card,
ControlFLASH does not reset the card when the update is
completed. This allows the card to continue functioning as a 1.4
card.
16. Click OK, and then click Cancel at the Welcome to
ControlFLASH Setup window.
17. Click Yes to end the configuration session.
18. Click Start
⇒Programs⇒Rockw e ll Software⇒RSLinx⇒RSLinx
to call up the Rockwell Software RSLinx window.
19. Click Communicat ions
⇒Configure Drivers to call up the
Configure Drivers dialog box.
20. Click AB_PCIC-1 selection in the Configured Drivers list and click
Delete.
21. Click Close to close the Configure Drivers dialog box.
22. Close RSLinx.
23. Click Start
⇒Settings⇒Control Panel.
24. Double-click the Services icon.
25. Change ALL the ProcessLogix Services Startup Type to Automatic.
To change a Service Startup Type to Automatic:
a. Select the Service and click Startup.
b. In the Startup Type field, click the Automatic option and click
OK.
Publication 1757-IN032B-EN-P - April 2001
Page 54

1-34 System Software Upgrade Procedures
The following Services should be changed to Automatic Startup:
• ProcessLogix ER Replicator (redundant SERVERB node only)
• ProcessLogix ER Server
• ProcessLogix System Repository
• ProcessLogix Control Data Access Server
• ProcessLogix Server Daemon
• ProcessLogix Server Database
• ProcessLogix Server System
26. Click Start
option.
27. Pow er dow n the PC.
IMPORTANT
⇒Shut Down and select the shutdown the computer
If you are configuring a redundant server pair,
configure both SERVERA and SERVERB.
Do not restart the Servers. Return to Re-installing the
1784-PCIC Driver on page 1-55.
Re-installing the 1784-PCIC Driver
1. Turn on the PC and logon as plx_user.
2. Click Start
to call up the Rockwell Software RSLinx window.
3. Click Communications
Configure Drivers dialog box.
⇒Programs⇒Rockwell Software⇒RSLinx⇒RSLinx
⇒Configure Drivers to call up the
Publication 1757-IN032B-EN-P - April 2001
Page 55

System Software Upgrade Procedur es 1-35
4. Click the 1784-PCIC(S) for ControlNet devices selection in the
Available Drivers list box and click Add New to call up the Add
New RSLinx Driver dialog box.
5. Click OK to accept the default name AB_PCIC-1 for the driver.
6. In the Configure 1784-PCIC window, enter 20 for the Network
Address and click OK.
7. In the Configure Drivers dialog box, you should see AB_PCIC-1
listed in the Configured Drivers li st with the stat us Running. If t he
AB_PCIC-1 driver status is not Running, call Rockwell
Automation Technical Support. Refer to Rockwell Automation
Technical Support in the Preface.
8. Click Close to close the Configure Drivers dialog box.
9. Close RSLinx.
IMPORTANT
10. Res t a r t th e PC .
Whenever the 1784-PCIC Network Address is changed,
the 1784-PCIC dri ver must be stopped and restarted to
complete the change.
Configuring the ControlNet Supervisory Network
If this is th e first time you have used Network Tools on this PC, refer
to Making First Time Network Tools Settings on page 5-15 and then
continue with this procedure beginning at Step 5.
1. Click Start
⇒Run.
Publication 1757-IN032B-EN-P - April 2001
Page 56

1-36 System Software Upgrade Procedures
2. Key in this command in the Open entry field:
>ntools -25 -c -nl -pit -pg -u<
and click OK to launch Network Tools.
3. Click OK to acknowledge the warning about monitoring through
Control Builder.
4. Click Resume to initiate network scan.
5. When network nodes appear under the Desktop tree icon, click the
01 CNB icon.
6. In the graphic pane, select the Supervisory Uplink CNB and click
Change ControlNet Parameters .
7. Change UMax to 24 and click OK.
8. Click Yes to confirm the action.
9. Click OK.
10. Close NTOOLS.
Updating the 1784-PCIC Network Address
ATTENTION
Before continuing, you MUST exit all ProcessLogix
applications and stop all ProcessLogix services.
Publication 1757-IN032B-EN-P - April 2001
Refer to Stopping ProcessLogix Applications and
!
1. Click Start⇒Programs⇒Rockwell Software⇒RSLinx⇒RSLinx
to call up the Rockwell Software RSLinx window.
Services on page 1-8.
Page 57

System Software Upgrade Procedur es 1-37
2. Click Communications⇒Configure Drivers to call up the
Configure Drivers dialog box.
3. Select AB_PCIC-1 in the Configured Drivers list box and click
Configure.
4. In the Configure 1784-PCIC window, enter 24 for the new
Network Address for the 1784-PCIC and click OK.
5. Resta rt the PC.
Publication 1757-IN032B-EN-P - April 2001
Page 58

1-38 System Software Upgrade Procedures
Configuring RSLinx Drivers for Ethernet Supervisory Network
IMPORTANT
1. Verify the settings of the Ethernet Network Interface card to be
used to communicate with the controller.
Navigate in Knowledge Builder to:
Ethernet Implementation Guide
Drivers and IP Addresses for more information.
2. Configure the IP Address for each controller.
Navigate in Knowledge Builder to:
Ethernet Implementation Guide
Drivers and IP Addresses
Ethernet module section for more information.
If you are using ControlNet for your Supervisory
Network, skip this section.
Refer to Configuring RSLinx Drivers for ControlNet
Supervisory Network on page 1-29.
⇒Configuration⇒Setting Up
⇒Configuration⇒Setting Up
⇒Configuring an d setting IP address for
3. Configure RSLinx drivers.
TIP
A driver must be configured for each controller.
Navigate in Knowledge Builder to:
Ethernet Implementation Guide
additional RSLinx drivers for more information.
⇒Configuration⇒Configuring
Publication 1757-IN032B-EN-P - April 2001
Page 59

System Software Upgrade Procedur es 1-39
Upgrading Hardware Component Firmware
Making Post ProcessLogix Software Installation Checks for a Non-redundant Server
1. Refer to Loading 1757-PLX52 and TC-MUX021 Boot and
Personality Images on page 2-10 to upgrade the 1757-PLX52 bo ot
and personality images to the current release level.
2. After upgrading the 1757-PLX52, refer to Upgrading Hardware
Component Firmware on page 2-1 to check if other hardware
components require upgrades.
IMPORTANT
Stop! It is mandatory that you check the firmware
revision levels for ALL ProcessLogix hardware
components after a ProcessLogix software installation
and/or a component addition or replacement.
Do not proceed until you have upgraded the firmware.
Then go to the next section, Making Post
ProcessLogix Software Installation Checks for a
Non-redundant Server.
Things to check after the upgrade
The following table summarizes some items that should be checked
before you begin operating your upgraded ProcessLogix system.
Check this: Because:
Station
Configuration File
Station Menu A new Station menu (menu.txt) is installed. This means any
The original station.ini file is renamed old_station.ini and is
replaced by a new station.ini in the
changes made to the original file (old_station.ini) need to be made
to the new file (station.ini).
The old default.stn file in the C:\Honeywell\client\station directory
will be overwritten. Any changes made to the original file will need
to be made to the new file.
configurations made to the original Station menu will be lost and
will need to be reconfigured for the new Station menu through
Station.
C:\WINNT
directory. Any
Publication 1757-IN032B-EN-P - April 2001
Page 60

1-40 System Software Upgrade Procedures
Reconfiguring Other RSLinx Clients
Other applications which utilized th e deleted 9904-KTCX15 driver must
be reconfigured for the 1784-PCIC driver.
If using: You must:
NI-FBUS
• reconfigure the NI-FBUS communications software to use
the new 1784-PCIC card
navigate in Knowledge Builder to Linking
•
Device Implementation Guide
⇒Installation
⇒Configur e the NI-FBUS Interface for more
information
• use AB_PCIC-1 for the Driver name
SCADA points
• reconfigure the Channel for the 1784-PCIC
• navigate in Knowledge Builder to
Allen-Bradley Controller Reference
Allen-Bradley Channel
• use AB_PCIC-1 for the Driver name
for more information.
Controller References⇒
⇒
Defining a
Reloading the 1757-PLX52 Database
Use the following procedure to log on and check Control Builder
operation after the R320.0 software is installed.
1. Click Start
Tools
⇒Programs⇒ProcessLogix Engineering
⇒Control Builder.
Publication 1757-IN032B-EN-P - April 2001
2. In the Login dialog box, make these entries:
a. Key in >mngr< as the default User Name.
b. Key in >mngr1< as the default Password.
c. Key in >localhost< in the Server Name field.
3. Click OK.
4. In the Project tab, confirm that the components of your configured
control strategy are listed in the Root direct ory.
ATTENTION
!
If you also upgraded from a non-redundant
1757-PLX52 to a redundant 1757-PLX52, you must
delete the existing CPM and its associated CEE from
the Project tab, reconfigur e a new 1757-PLX52 and its
associated CEE, and reassign the components before
you download the CPM to the Controller.
Page 61

System Software Upgrade Procedur es 1-41
5. Download each CPM and SRM to its given Controller.
6. Download the database (contents of each CPM’s CEE) to the
Controller.
7. In the Monitoring tab, activate the CEE and all of its components
in a given Controller.
Initiating Redundant Controller Switchover
For ProcessLogix system with redundant Controllers, use the following
procedure to initiate a Backup (Secondary) Controller switchover to
Primary Controller in a Redundant Chassis Pair (RCP).
ATTENTION
This procedure assumes that you have at least loaded
the CPM/CEE and SRM Control Builder
configurations to the 1757-PLX52s and 1757-SRMs in
the RCP and that the RCP is powered.
!
1. Click Start
Tools
2. In the Login dialog box, make these entries:
a. Key in >mngr< as the default User Name.
b. Key in >mngr1< as the default Password.
c. Key in >localhost< in the Server Name field.
3. Click OK.
4. Click the Monitoring tab. Click the Root director y to ope n it.
5. Double-click the Primary SRM icon to call up the SRM block
form.
⇒Programs⇒ProcessLogix Engineering
⇒Control Builder.
6. Click the Summary tab, if it is not already on display.
7. Confirm that the displayed Secondary Readiness status is
SYNCHRONIZED.
• If the status is Synch r oniz e d, go to Step 8.
• If the status is something other than Synchronized, contact
Rockwell Automation Technical Support for help in
determining why the status is not Synchronized.
Publication 1757-IN032B-EN-P - April 2001
Page 62

1-42 System Software Upgrade Procedures
The chassis information listed in the Primary and Secondary data
boxes.
8. Click Initiate Switchover to initiate a Primary to Secondary
Controller switchover. Click Yes to acknowledge the action.
9. V erify th at th e chassis information in the Primary and Se condary
data boxes have switched positions. The names do not change .
10. Click Synchronize Secondary and click Yes to acknowledge the
action.
11. Wait a minute or two for the Secondary Readiness status to change
from DISQUALIFIED to SYNCHRONIZED.
If the status does not change, contact Rockwell Automation
Technical Support for help in determining why the Secondary will
not Synchronize.
12. Click OK to close the block form.
13. Close Control Builder.
Enabling the ProcessLogix OPC Server
To use the ProcessLogix OPC Server, you must manually enable the
OPC Server after you install ProcessLogix R320.0 software.
1. Insert the ProcessLogix R320.0 software CD into the CD-ROM
drive.
2. Click Start
3. Key in this path location in the Op en entry field or use Bro wse to
navigate to the setup.exe file on the CD.
>D: (or your CD-ROM drive letter)\server-client\hci\hci_cdrive.bat
4. Click OK.
5. Click Start
⇒Run.
⇒Run.
Publication 1757-IN032B-EN-P - April 2001
6. Key in this command in the Open entry field:
>cmd<
and click OK to open the DOS window.
Page 63

System Software Upgrade Procedur es 1-43
7. At DOS prompt, key in:
>cd\Honeywell\server\run<
and press <Enter>.
8. Key in this command:
>hscopcserv.exe /r /s<
and press <Enter>.
9. Key in this command:
>copy d:\server-client\hci\gopc.dll “c:\Program Files\Honeywell\TPS\hci”<
and press <Enter>.
10. At DOS prompt, key in:
>cd\Program Files\Honeywell\TPS\hci<
and press <Enter>.
11. Key in this command:
>regsvr32 gopc.dll<
and press <Enter>.
12. A gopc.dll registration succeeded message appears. Click OK.
13. Close the DOS window.
Backing up a ProcessLogix Server to Tape
If your PC has a tape drive, refer to Backing Up a ProcessLogix Server
to Tape on page 1-6 to back up your Server to tape.
Creating an Emergency Repair Disk
After all installations and drivers are installed, create your Emergency
Repair Disk. Use the following procedure to create an emergency repair
disk for your Windows NT installation.
1. Insert a blank diskette into the floppy drive.
2. Click Start
⇒Run.
Publication 1757-IN032B-EN-P - April 2001
Page 64

1-44 System Software Upgrade Procedures
3. Key in this command in the open entry field:
>rdisk /s<
and click OK.
4. Click Yes to create the Repair Disk.
5. Click OK to confirm the diskette is in the floppy drive.
IMPORTANT All data on the floppy disk will be erased.
6. Click OK to exit.
7. Label the Emergency Repair Disk and place the diskette in a secure
area.
Publication 1757-IN032B-EN-P - April 2001
Page 65

Upgrading
ProcessLogix Software on
System Software Upgrade Procedur es 1-45
a Redundant Server Pair
ATTENTION
!
IMPORTANT
Due to the changes in the communications protocol
between redundant servers in th is release it is not
possible to synchronize a server loaded with this
version of ProcessLogix with a server loaded with an
earlier version of ProcessLogix (including R300.0,
R300.1 and R310.0). This means that redundant servers
should be upgraded to this release at the same time.
Y ou must install the ProcessLogix S erver on the same
partition on both the primary and backup servers and
that their directory structures match.
For example, if you install the ProcessLogix Server to
c:\honeywell\server on the primary server then it
should be installed to the same location on the backup
server.
Synchronization problems have been encountered by
customers installing the ProcessLogix Server to
c:\honeywell\server on the primary server and to
d:\honeywell\server on th e backu p serve r.
ATTENTION
Be certain that your process is off control before you
begin any upgrade procedure. This means the
1757-PLX52 should be in the Idle state.
!
About Upgrading Soft wa r e on the Ser ve r
ProcessLogix now automates most of the migration tasks from a previous
version of the system to the current version. The migration
enhancements support error handling and recovery from migration
problems.
While the ProcessLogix R320.0 soft ware CD supports several platforms,
this procedure covers upgrading the ProcessLogix Software from R300.1
or R310.0 to R320.0 on the Server . In this case, the following components
are installed in succession once you start the installation setup.
• RSLinx OEM 2.2
• Engineering Tools
Publication 1757-IN032B-EN-P - April 2001
Page 66

1-46 System Software Upgrade Procedures
• Server/Client (Display Builder, Station, and Server)
• ProcessLogix Server Upgrade
All files included with the migration wizard will be included as part of the
installation package for the Engineering Tools media included in the
Engineering Tools directory of the ProcessLogix CD. The files that
comprise this utility will be installed into the default location
C:\Honeywell\TPS50\System\ER\Migrate.
The following table lists the items that you MUST complete on both
SERVERA and SERVERB before attempting to upgrade the
ProcessLogix software on a redundant Server pair.
Step Item: Refer to page:
1 Preparing for a ProcessLogix Software Upgrade 1-1
2 Stopping ProcessLogix Applications and Services 1-8
3 Installing Service Pack 6a for Windows NT 4.0 1-11
4 Installing Internet Explorer 5.01 1-12
5 Upgrading Data Access Components 1-13
6 Uninstalling ProcessLogix Knowledge Builder Software 1-14
7 Installing ProcessLogix Knowledge Builder Software 1-16
8 Removing the 9904/1784-KTCX15 Card and Installing
the 1784-PCIC Card
9 Setting Up User Accounts 5-27
ATTENTION
Be certain that your current NT logon is through an
administrator account, such as plx_user, and not an
engr or mngr account.
!
IMPORTANT
Although not recommended, if you do not want to
install a software component, just click Cancel on the
Welcome display to abort the installation.
1-18
Publication 1757-IN032B-EN-P - April 2001
Page 67

System Software Upgrade Procedur es 1-47
IMPORTANT
If you have redundant Servers, you must install
software on the SERVERA node first. Then complete
the software installation process again for the
SERVERB node.
The Secondary or SERVERB node has the Primary or
erdb_a database file. The Primary or SERVERA node
has the Secondary or erdb_b database file.
This procedure assumes that the ERDB and Servers
have been synchronized.
Installing Server Software
ATTENTION
!
Before installing or uninstalling any software
component, you MUST exit all ProcessLogix
applications and stop all ProcessLogix services.
Be certain to shutdown the services on SERVERB first
and then on SERVERA.
Refer to Stopping ProcessLogix Applications and
Services on page 1-8.
1. If the following pre-upgrade directories exist from a previous Server
migration, delete them:
• C:\Honeywell\ips.preupgrade
• C:\Honeywell\server.preupgrade
2. Insert the ProcessLogix R320.0 software CD into the CD-ROM
drive.
3. Click Start
4. Key in this path location in the Op en entry field or use Bro wse to
navigate to the setup.exe file on the CD.
>D: (or your CD-ROM drive letter)\SETUP.EXE<
5. Click OK to launch the software setup application.
6. Click the ProcessLogix Server option and click Next.
7. At the ProcessLogix R320.0 Welcome window, click Next.
⇒Run.
Publication 1757-IN032B-EN-P - April 2001
Page 68

1-48 System Software Upgrade Procedures
8. Click Yes to accept the license agreement.
IMPORTANT
You must have either a 1784-PCIC or Ethernet card
installed in your ProcessLogix Server to install R320.0.
9. At the Before installing window, click Yes.
Publication 1757-IN032B-EN-P - April 2001
Page 69

System Software Upgrade Procedur es 1-49
Installing RSLinx
1. At the RSLinx Welcome window, click Next.
2. Click Yes to accept the license agreement.
3. At the Verify System Files window, click Next.
TIP
If a Read only File Detected message appears during
software installation, check the Don’t display again
checkbox and click Yes to acknowledge the message.
4. Enter the name, company to whom the RSLinx package is
registered, and the RSLinx OEM serial number (located on the
RSLinx box and/or Master Disk).
5. Click Next.
6. At the Select Components window, be certain that all the
components are checked, including any sublevel listings. Expand
the items to display the sublevels and be certain that all the
components are selected.
7. Click Next.
8. Click the Upgrade the existing version option and click Next.
9. At the Choose Destination Location window, click Next.
TIP
You must not change the directory name or the
ProcessLogix system will not operate properly.
10. At the RSLinx Configuration Security Setting window, click the
Disable option and click Next.
11. At the Setup Complete window, uncheck these checkboxes:
• Activate RSLinx
• View the ReadMe file now
12. Click Finish.
Publication 1757-IN032B-EN-P - April 2001
Page 70

1-50 System Software Upgrade Procedures
Installing Engineering Tools
1. Engineering Tools is automatically installed. This takes a few
minutes to complete.
Installing PsAxCtl Document EXE
a. Click OK to acknowledge the change directory warning.
b. At the PsAxCtl Document EXE Set up Welcome window,
click OK.
c. Verify that the destination directory is
C:\Honeywell\TPS50\System\Bin.
d. Click the large install button (PC icon).
e. At the Setup complete window, click OK.
Installing CCL Deployment
a. At the Welcome window, click Next.
b. At the CCL Deployment Installation Complete window,
click Finish.
2. At the Engineering Tools Setup Complete window, click Finish.
Migrating the ERDB (on SERVERB only)
ERDB migration only occurs on SERVERB. If you are upgrading
SERVERA, skip to Installing the ProcessLogix Server on page 1-51.
1. Wait while the a utomatic ERDB migrati on fro m R300.1 o r R310.0
to R320.0 is executed.
The migration activity appears in a DOS window. This may take
some time to complete, depending on the size of your database.
2. When the ERDB Migration is complete, click OK.
If ERDB Migration fails, refer to Recovering from Failure of an
Automatic ER Database Migration on page 5-8.
Publication 1757-IN032B-EN-P - April 2001
Page 71

System Software Upgrade Procedur es 1-51
Installing the ProcessLogix Server
1. At the Welcome to ProcessLogix Server Setup window, click Next.
2. Click Y es in the Question box t o upgrade the ProcessLogix S erver
to R320.0.
3. Click Y es to replace the detected versions of Display Builder,
Quick Builder, and Station.
4. Skip to Step 6 if the Specify Microsoft Excel Directory window
does not appear. Otherwise, click Next to accept the default
directory for Microsoft Excel.
ATTENTION
!
5. Click No in response to the question:
Do you want Microsoft Excel Data Exchange to be allowed to
write to a ProcessLogix Server database?
to disable the Microsoft Excel Data Exchange write option.
6. At the Choose point mode acronyms window, click the Default
acronyms option and click Next.
7. Review the software installation details summarized in the
Confirmation window.
• If you need to make changes, click Back to access any previous
entries.
• If the details are okay, click Next to begin the Server setup. This
may take 10 to 15 minutes to complete.
We recommend that you answer No to the question:
Do you want Microsoft Exc el Data Exchange to b e
allowed to write to a ProcessLogix Server database?
If you answer Yes, the write option is enabled and it is
possible for anyone with access to the machine to write
to the Server database.
Publication 1757-IN032B-EN-P - April 2001
Page 72

1-52 System Software Upgrade Procedures
8. Skip this step if the system does not include Excel Da ta Exchange.
Otherwise, click Enable Macros when requested.
TIP
If a Microsoft Excel dialog box appears, check the Do
not show this dialog again checkbox and click OK.
TIP
If a Read only File Detected message appears during
software installation, check the Don’t display again
checkbox and click Yes to acknowledge the message.
9. At the Setup Complete window, click the No, I will restart my
computer later option and click Finish.
IMPORTANT
If the message “Dr. Watson has been installed as default
application debugger,” appears during software
installation, click OK.
10. The ProcessLogix Server Update is automatically installed. At the
ProcessLogix Setup Complete window, click Finish.
11. Remove the CD.
IMPORTANT
Do not restart the Server!
Before restarting the PC, you must have all user
accounts configured correctly.
Setting Up User Accounts
Configure the plx_user, mngr, and erserver accounts.
Refer to Setting Up User Accounts on page 5-27.
Publication 1757-IN032B-EN-P - April 2001
IMPORTANT
Do not restart the Server at this time. Continue with
the next section.
Page 73

Moving the RSLinx Activation File
System Software Upgrade Procedur es 1-53
IMPORTANT
ATTENTION
!
Complete Step 1 and Step 2 in the following
procedure to determine your current RSLinx version.
If you need to reformat the ha rd drive, you must first
move the activation file back to the RSLinx Master
Disk using the same general procedure as follows.
Otherwise, the file will be corrupted and you will not
be able to run RSLinx in the OEM mode.
Before you attempt to move the activation file, you
MUST exit all ProcessLogix applications and stop all
ProcessLogix services. Refer to Stopping
ProcessLogix Applications and Services on page 1-8.
Do not manually copy or move the evrsi.sys file.
Moving/coping the evrsi.sys file will disable the OEM
version of RSLinx.
Always use the EVMOVE.EX E pro gram to move the
evrsi.sys file. If the evrsi.sys file is corrupted or
manually moved, resulting in RSLinx changing to Lite
version, you can visit the Rockwell web site
(http://suppport.
/) to recover the RSLinx activation.
automation.rockwell.com/resetcodes
1. Click Start⇒Programs⇒Rock w ell Software⇒RSLinx⇒RSLinx
to open the RSLinx application.
2. Check the application title in the title bar:
• If the title is RSLinx Lite, refer to Installing the Activation File
on page 1-27.
• If the title is RSLinx OEM you already ha ve the O EM versi on
installed and you do not have to install the activation file.
– For ControlNet Supervisory Networks, skip to Configuring
RSLinx Drivers for ControlNet Supervisory Network on
page 1-54.
– For Ethernet Supervisory Networks, skip to Configuring
RSLinx Drivers for Ethernet Supervisory Network on
page 1-60.
Publication 1757-IN032B-EN-P - April 2001
Page 74

1-54 System Software Upgrade Procedures
Configuring RSLinx Drivers for ControlNet Supervisory Network
Use the following procedure t o co nfigure the ControlNet 1784-PCIC
drivers for RSLinx.
IMPORTANT
If you are using Ethernet for your Supervisory
Network, do not restart SERVERA. Return to the
beginning of Upgrading ProcessLogix Software on a
Redundant Server Pair on page 1-45 and repeat for
SERVERB.
Once you have completed these procedures for both
SERVERA and SERVERB, you can skip
to Configuring RSLinx Drivers for Ethernet
Supervisory Network on page 1-60.
Installing the 1784-PCIC Driver
1. Click Start⇒Programs⇒Rockwell Software⇒RSLinx⇒RSLinx
to call up the Rockwell Software RSLinx window.
2. Click Communications
Configure Drivers dialog box.
⇒Configure Drivers to call up the
3. Click the 1784-PCIC(S) for ControlNet devices selection in the
Available Drivers lis t box and click Add New to call up the Add
New RSLinx Driver dialog box.
4. Click OK to accept the default name AB_PCIC-1 for the driver.
5. In the Configure 1784-PCIC(S) window, enter the following:
• Serial Number(hex): This value is read from the 1784-PCIC card
and does not change.
• Network Address(dec):
Publication 1757-IN032B-EN-P - April 2001
Page 75

System Software Upgrade Procedur es 1-55
– For SERVERA change the default of 99 to 20
– For SERVERB change the default of 99 to 19
6. Click OK to close the dialog box and start the 1784-PCIC driver.
7. In the Configure Drivers dialog box, you should see AB_PCIC-1
listed in the Configured Drivers lis t with the status running. If t he
AB_PCIC-1 driver status is not running, call Rockwell Automation
Technical Support. Refer to Rockwell Automation Technical
Support in th e Pre f a c e.
8. Click Close to close the Configure Drivers dialog box.
9. Close RSLinx.
IMPORTANT
Do not restart SERVERA. Return to the beginning
of Upgrading ProcessLogix Software on a Redundant
Server Pair on page 1-45 and repeat for SERVERB.
Once you have completed these procedures for both
SERVERA and SERVERB, you can continue with
Updating the 1784-PCIC Card Firm war e on page
1-55.
Updating the 1784-PCIC Card Firmware
Refer to Updating the 1784-PCIC Card Firmware on page 1-30.
IMPORTANT
Be certain to update the 1784-PCIC firmware for both
SERVERA and SERVERB.
Re-installing the 1784-PCIC Driver
1. Turn on the PC and logon as plx_user.
2. Click Start
to call up the Rockwell Software RSLinx window.
3. Click Communications
Configure Drivers dialog box.
⇒Programs⇒Rockw e ll Software⇒RSLinx⇒RSLinx
⇒Configure Drivers to call up the
Publication 1757-IN032B-EN-P - April 2001
Page 76

1-56 System Software Upgrade Procedures
4. Click the 1784-PCIC(S) for ControlNet devices selection in the
Available Drivers lis t box and click Add New to call up the Add
New RSLinx Driver dialog box.
5. Click OK to accept the default name AB_PCIC-1 for the driver.
6. In the Configure 1784-PCIC(S) window, enter the following:
• Serial Number(hex): This value is read from the 1784-PCIC card
and does not change.
• Network Address(dec):
– For SERVERA change the default of 99 to 20
– For SERVERB change the default of 99 to 19
7. Click OK to close the dialog box and start the 1784-PCIC driver.
8. In the Configure Drivers dialog box, you should see AB_PCIC-1
listed in the Configu red Drivers list with the stat us running. If the
AB_PCIC-1 driver status is not running, call Rockwell Automation
Technical Support. Refer to Rockwell Automation Technical
Support in the Preface.
9. Click Close to close the Configure Drivers dialog box.
10. Close RSLinx.
IMPORTANT
Whenever the 1784-PCIC Network Address is changed,
the 1784-PCIC driv er must be stopped and restarted to
complete the change.
Publication 1757-IN032B-EN-P - April 2001
Page 77

11. Res t a r t th e PC .
System Software Upgrade Procedur es 1-57
Configuring the ControlNet Supervisory Network
IMPORTANT
If this is th e first time you have used Network Tools on this PC, refer
to Making First Time Network Tools Settings on page 5-15 and then
continue with this procedure beginning at Step 6.
1. Restart SERVERB.
2. On SERVERB, click Start
3. Key in this command in the Open entry field:
>ntools -25 -c -nl -pit -pg -u<
Be certain to update the 1784-PCIC firmware for both
SERVERA and SERVERB.
Once you have completed these procedures for both
SERVERA and SERVERB, you can continue with the
next section, Configuring the ControlNet Supervisory
Network.
⇒Run.
and click OK to launch Network Tools.
4. Click OK to acknowledge the warning about monitoring through
Control Builder.
5. Click Resume to initiate network scan.
6. When network nodes appear under the Desktop tree icon, click the
01 CNB icon.
7. In the graphic pane, select the Supervisory Uplink CNB and click
Change ControlNet Parameters .
8. Change UMax to 24 and click OK.
Publication 1757-IN032B-EN-P - April 2001
Page 78

1-58 System Software Upgrade Procedures
9. Click Yes to confirm the action.
10. Click OK.
11. Close NTOOLS.
Updating the 1784-PCIC Network Address
ATTENTION
!
1. On SERVERB, click Start⇒Programs⇒Rockwell
Software
RSLinx window.
2. Click Communications
Configure Drivers dialog box.
3. Select AB_PCIC-1 in the Configured Drivers list box and click
Configure.
4. In the Configure 1784-PCIC window, enter 23 for the new
Network Address for the 1784-PCIC and click OK.
5. Restart SERVERB.
Before continuing, you MUST exit all ProcessLogix
applications and stop all ProcessLogix services on t he
SERVERB node.
Refer to Stopping ProcessLogix Applications and
Services on page 1-8.
⇒RSLinx⇒RSLinx to call up the Rockwell Software
⇒Configure Drivers to call up the
Publication 1757-IN032B-EN-P - April 2001
ATTENTION
!
6. On SERVERA, click Start
Software
RSLinx window.
7. Click Communications
Configure Drivers dialog box.
Before continuing, you MUST exit all ProcessLogix
applications and stop all ProcessLogix services on t he
SERVERA node.
Refer to Stopping ProcessLogix Applications and
Services on page 1-8.
⇒RSLinx⇒RSLinx to call up the Rockwell Software
⇒Programs⇒Rockwell
⇒Configure Drivers to call up the
Page 79

System Software Upgrade Procedur es 1-59
8. Select AB_PCIC-1 in the Configured Drivers list box and click
Configure.
9. In the Configure 1784-PCIC window, enter 24 for the new
Network Address for the 1784-PCIC and click OK.
10. Restart SERVERA.
Publication 1757-IN032B-EN-P - April 2001
Page 80

1-60 System Software Upgrade Procedures
Configuring RSLinx Drivers for Ethernet Supervisory Network
IMPORTANT
Do not restart SERVERA. Return to the beginning
of Upgrading ProcessLogix Software on a Redundant
Server Pair on page 1-45 and repeat for SERVERB.
Once you have completed these procedures for both
SERVERA and SERVERB, you can continue with this
section.
IMPORTANT
1. Verify the settings of the Ethernet Network Interface card to be
used to communicate with the controller.
Navigate in Knowledge Builder to:
Ethernet Implementation Guide
Drivers and IP Addresses for more information.
2. Configure the IP Address for each controller.
Navigate in Knowledge Builder to:
Ethernet Implementation Guide
Drivers and IP Addresses
Ethernet module section for more information.
3. Configure RSLinx drivers.
TIP
If you are using ControlNet for your Supervisory
Network, skip this section.
Refer to Configuring RSLinx Drivers for ControlNet
Supervisory Network on page 1-54.
⇒Configuration⇒Setting Up
⇒Configuration⇒Setting Up
⇒Configuring an d setting IP address for
Publication 1757-IN032B-EN-P - April 2001
A driver must be configured for each controller.
Navigate in Knowledge Builder to:
Ethernet Implementation Guide
additional RSLinx drivers for more information.
⇒Configuration⇒Configuring
Page 81

System Software Upgrade Procedur es 1-61
Upgrading Hardware Component Firmware
1. Refer to Loading 1757-PLX52 and TC-MUX021 Boot and
Personality Images on page 2-10 to upgrade the 1757-PLX52 bo ot
and personality images to the current release level.
2. After upgrading the 1757-PLX52, refer to Upgrading Hardware
Component Firmware on page 2-1 to check if other hardware
components require upgrades.
IMPORTANT
Stop! It is mandatory that you check the firmware
revision levels for ALL ProcessLogix hardware
components after a ProcessLogix software installation
and/or a component addition or replacement.
Do not proceed until you have upgraded the firmware.
Then go to the next section, Making Post
ProcessLogix Software Installation Checks for a
Redundant Server Pair.
Publication 1757-IN032B-EN-P - April 2001
Page 82

1-62 System Software Upgrade Procedures
Making Post ProcessLogix Software Installation Checks for a Redundant Server Pair
Things to Check after the Upgrade
The following table summarizes some items that should be checked
before you begin operating your upgraded ProcessLogix system.
Check this. Because.
Station
Configuration File
Station Menu A new Station menu (menu.txt) is installed. This means any
The original station.ini file is renamed old_station.ini and is
replaced by a new station.ini in the
changes made to the original file (old_station.ini) need to be made
to the new file (station.ini).
The old default.stn file in the C:\Honeywell\client\station directory
will be overwritten. Any changes made to the original file will need
to be made to the new file.
configurations made to the original Station menu will be lost and
will need to be reconfigured for the new Station menu through
Station.
C:\WINNT
directory. Any
Creating the Secondary ERDB
After updating the 1784-PCIC or Ethernet card (on SERVERA and
SERVERB), complete the following procedure on SERVERB only:
1. Click Start
DBADMIN.
2. Click Tools
a. Click OK to Make Replica of ERDB at the Primary Server.
b. If prompted to stop the ER Replicator service, click Yes.
c. If prompted to overwrite any existing files, click Yes.
4. Click OK at Stopping ER Replication Service.
The replicate window appears:
Created Secondary ERDB Successfully at:
\\severname\Hybrid\System\ER\erdb_b.mdb
TIP
⇒Programs⇒ProcessLogix Engineering Tools⇒
⇒Create a New Replica.
If the File Already Exists window appears, click OK to
replace it with a new replica file.
Publication 1757-IN032B-EN-P - April 2001
Page 83

System Software Upgrade Procedur es 1-63
5. When the replica creation has completed, click Y es to start the ER
Replicator service.
6. Close DbAdmin.
Synchroniz ing ERDB on Redundant Servers
Use the following procedure t o synchronize the ERDB after the
redundant Servers are restarted as noted in the previous section.
1. On the SERVERB node, click Start
Engineering Tools
2. In the Login dialog box, make these entries:
a. Key in >mngr< as the default User Name.
b. Key in >mngr1< as the default Password.
c. Key in the name of the SERVERB node in the Server Name
field.
3. Click OK.
4. Does the synchronization status field on the right side of the status
bar at the bottom of the display read “SYNC”.
• If answer is Yes, go to Step 9.
• If answer is No, go to Step 5.
5. Click Tools to open the pulldown menu.
• Confirm that a checkmark appears before Enable Engineering
Database Synchronization selection.
• If a checkmark does not appear, click Enable Engineering
Database Synchronization to enable it and display the
checkmark.
⇒Control Builder.
⇒Programs⇒ProcessLogix
6. Click OK to acknowledge the warning prompt.
7. Verify that the synchronization status field on the right side of the
status bar at the bottom of the display now reads “SYNC”.
8. Click Tools and confirm that a checkmark appears by the Enable
Engineering Database Synchronization selection.
9. Click Tools
10. Read the warning prompt message and click OK to start ERDB
synchronization.
⇒Synchronize Engineering Database Now.
Publication 1757-IN032B-EN-P - April 2001
Page 84

1-64 System Software Upgrade Procedures
11. Check that the synchronization status field indication changes to
“SYNCING”. It may take a few seconds before the status field
changes.
12. If the status field indication changes to “SYNCERR” with a red
background, and/or an error message is displayed, please call
Rockwell Automation Technical Support for help in determining
the cause of the synchronization proble m .
13. Wait for the st atus field indication to return to “SYNC”, which
means the database synchronization is complete.
14. Close Control Builder.
Setting Up Station on SERVERB
Use the following procedure to connect a ProcessLogix Client Station to
the Secondary Server (SERVERB).
1. On the SERVERB node, click Start
⇒Station.
Server
2. Click Cancel at the Unable to connect prompt, if applicable.
3. Click Station
4. Click the down arrow button in the Server Connection field and
select Network (TCP/IP).
5. Click Setup in the Server Connection field to call up the
TCP/IP Setup dialog box. Make these entries:
a. Key in the name or IP address o f the SERVERB (PLX1B) node
specified in the Hosts file in the Server Name field.
This sets up the correct file reference for SERVERB on the
SERVERB node.
b. Select the Static option.
c. Key in >2< as the Station number.
⇒Setup to call up the Station Setup dialog box.
⇒Programs⇒ProcessLogix
Publication 1757-IN032B-EN-P - April 2001
Page 85

System Software Upgrade Procedur es 1-65
d. Key in >default.stn< in the Auxiliary Setup File field.
6. Click OK to close the TCP/IP dialog box.
7. Click Save to open the Save Setup dialog box.
8. Key in >defaultb.stn< in the File name field and click Save.
9. Click Yes to replace the existing file, if applicable.
10. Click Cancel at the Unable to connect prompt, if applicable.
11. Click Station
⇒Setup to call up the Station Setup dialog box.
12. Click the down arrow button in the Server Connection field and
select Network (TCP/IP).
13. Click Setup in the Server Connection field to call up the
TCP/IP Setup dialog box. Make these entries:
a. Key in the name or IP address of the SERVERA (PLX1A) node
specified in the Hosts file in the Server Name field.
This function sets up the correct file reference for SERVERA on
the SERVERB node.
b. Select the Static option.
c. Key in >2< as the Station number.
Publication 1757-IN032B-EN-P - April 2001
Page 86

1-66 System Software Upgrade Procedures
d. Key in >defaultb.stn< in the Auxiliary Setup File field.
14. Click OK to close the TCP/IP dialog box.
15. Click Save to open the Save Setup dialog box.
16. Key in >default.stn< the File name field and click Save.
17. Click Yes to replace the exis ting file.
18. Click Cancel at the Unable to connect prompt, if applicable.
Publication 1757-IN032B-EN-P - April 2001
Page 87

System Software Upgrade Procedur es 1-67
19. If yo u have red und ant LANs , you must repe at Step 3 throug h
Step 18 to set up files for the second LAN using the name or IP
address of the SERVERA and SERVERB nodes specified in the
Hosts file for the second LAN.
EXAMPLE
20. Click Station
21. Click OK to exit Station.
For example, the Secondary Server (SER VERB) name
would be PLX1B1 based on a Server name of PLX1B
in Step 5 and the Primary (SERVERA) name would
be PLX1A1 based on a Server name of PLX1A in
Step 13.
Refer to the Server/Client Configuration Guide in
Knowledge Builder for more information.
The Server names used are for example purposes only
and must not be used in place of your actual Server
names.
⇒Exit.
Setting Up Station on SERVERA
Use the following procedure to connect a ProcessLogix Client Station to
the Primary Server (SERVERA).
1. On the SERVERA node, click Start
⇒Station.
Server
2. Click Cancel at the Unable to connect prompt, if applicable.
3. Click Station
4. Click the down arrow in the Server Connection field and select
Network (TCP/IP).
5. Click Setup in the Server Connection field to call up the
TCP/IP Setup dialog box. Make these entries:
a. Key in the name or IP address of the SERVERB (PLX1B) node
specified in the Hosts file in the Server Name field.
This function sets up the correct file reference for SER VERB on
the SERVERA node.
b. Select the Static option.
c. Key in >1< as the Station number.
⇒Setup to call up the Station Setup dialog box.
⇒Programs⇒ProcessLogix
Publication 1757-IN032B-EN-P - April 2001
Page 88

1-68 System Software Upgrade Procedures
d. Key in >default.stn< in the Auxiliary Setup File field.
6. Click OK to close the TCP/IP dialog box.
7. Click Save to open the Save Setup dialog box.
8. Key in >defaultb.stn< in the File name field and click Save.
9. Click Yes to replace the existing file, if applicable.
10. Click Cancel at the Unable to connect prompt, if applicable.
11. Click Station
⇒Setup to call up the Station Setup dialog box.
12. Click the down arrow button in the Server Connection field and
select Network (TCP/IP).
13. Click Setup in the Server Connection field to call up the
TCP/IP Setup dialog box. Make these entries.
a. Key in the name or IP address of the SERVERA (PLX1A) node
specified in the Hosts file in the Server Name field.
This sets up the correct file reference for SERVERA on the
SERVERA node.
Publication 1757-IN032B-EN-P - April 2001
b. Select the Static option.
Page 89

System Software Upgrade Procedur es 1-69
c. Key in >1< as the Station number.
d. Key in >defaultb.stn< in the Auxiliary Setup File field.
14. Click OK to close the TCP/IP dialog box.
15. Click Save to open the Save Setup dialog box.
16. Key in >default.stn< the File name field and click Save.
17. Click Yes to replace the existing file.
18. Click Cancel at the Unable to connect prompt, if applicable.
Publication 1757-IN032B-EN-P - April 2001
Page 90

1-70 System Software Upgrade Procedures
19. If yo u have re dund ant LANs , you must repe at Step 3 thr ough
Step 18 to set up files for the second LAN using the name or IP
address of the SERVERA and SERVERB nodes specified in the
Hosts file for the second LAN.
EXAMPLE
20. Click Station
21. Click OK to exit Station.
22. Click Start
23. Click View
Server redundancy display.
24. Verify that the n ame of the P rimary Server (SERVERA) specified
in the HOSTS file is listed in the lower right half of the st atus bar at
the bottom of the Station display as the Server to which this Station
is pointing.
• If the Primary Server is listed, go to Step 33.
• If the Primary Server is not listed, go to Step 25.
For example, the Secondary Server (SER VERB) name
would be PLX1B1 based on a Server name of PLX1B
in Step 5 and the Primary (SERVERA) name would
be PLX1A1 based on a Server name of PLX1A in
Step 13.
Refer to the Server/Client Configuration Guide in
Knowledge Builder for more information.
The Server names used are for example purposes only
and must not be used in place of your actual Server
names.
⇒Exit.
⇒Programs⇒ProcessLogix Server⇒Station.
⇒System Status⇒Server Redundancy to call up the
Publication 1757-IN032B-EN-P - April 2001
25. Click the Oper field in the lower right corner of the display.
26. Key in >mngr< in the open Enter password field above the
display and press <Enter>.
27. Click the Manual Failover button. When the Failover to backup
(Y/N) prompt appears, key in >Y< in the entry field above the
display and press <Enter>.
28. Wait for failover to occur and verify that this Station now points to
the Primary Server as noted in Step 24.
29. Click Station
30. Click OK to exit Station.
⇒Exit.
Page 91

System Software Upgrade Procedur es 1-71
Synchronizing Server Databases on Redundant Servers
31. Click Start⇒Programs⇒ProcessLogix Server⇒Station.
32. Click View
Server redundancy display.
33. Click the Oper field in the lower right corner of the display.
34. Key in >mngr< in the open Enter password field above the
display and press <Enter>.
35. Click Synchronize. When the Synchronize Databases (Y/N)
prompt appears, key in >Y< in the entry field ab ov e the displ ay
and press <Enter>.
36. Wait for the synchronization to complete (“Synchronization
Complete” prompt appears) and verify that the display shows
simulated Green LED indications for the following states:
Primary Server
• Running
Backup Server
• Synchronized
• Running
⇒System Status⇒Server Redundancy to call up the
Link Status
• Link 0 (LNK00) - In use for control & data information
37. Click Station
38. Click OK to exit Station.
⇒Exit.
Publication 1757-IN032B-EN-P - April 2001
Page 92

1-72 System Software Upgrade Procedures
Synchronizing Other Files
The Primary SERVERA node automatically transfers ProcessLogix
database information to the Secondary SERVERB node. This transfer
includes any changes in configuration data, such as points and displa ys.
Navigate in Knowledge Builder to Server/Client Configuration Guide
Configuring and Monitoring a Redundant Server System
Other Files for more information.
If you previously configured the flbkup.def file for an earlier release, you
must re-configure it for R320.0.
⇒Synchronizing
⇒
Reconfiguring Other RSLinx Clients
Refer to Reconfiguring Other RSLinx Clients on page 1-40.
Reloading the 1757-PLX52 Database
Refer to Reloading the 1757-PLX52 Database on page 1-40 to check
Control Builder operation and to download the database to the
1757-PLX52.
Initiating Redundant Controller Switchover
Publication 1757-IN032B-EN-P - April 2001
For ProcessLogix systems with redundant controllers, refer to Initiating
Redundant Controller Switchover on page 1-41.
Enabling the ProcessLogix OPC Server
Refer to Enabling the ProcessLogix OPC Server on page 1-42. Be sure
to enable the OPC Server on both SERVERA and SERVERB.
Backing up a ProcessLogix Server to Tape
If your PC has a tape drive, refer to Backing Up a ProcessLogix Server
to Tape on page 1-6 to back up your server to tape.
Creating an Emergency Repair Disk
Refer to Creating an Emergency Repair Disk on page 1-43.
Page 93

Installing ProcessLogix Client Software
System Software Upgrade Procedur es 1-73
IMPORTANT
Two levels of the ProcessLogix Client software installation are available:
• Operator Workstation
• Engineering Workstation
Operator Workstation allows remote connections to the ProcessLogix
Server.
Engineering Workstation has all the functionality of the Operator
W orkstation but also includes the ProcessLogix Engineering Tools. From
the Engineering Workstation, an engineer using Control Builder can
remotely access and modify the 1757-PLX52 ERDB database.
The ProcessLogix Server(s) must be upgraded before
the ProcessLogix Client upgrade is performed.
Configuring an Operator Workstation
ATTENTION
!
ATTENTION
!
This procedure assumes that you are installing software
on an Operator Workstation that can be used in an
R320.0 ProcessLogix system. This means that the
Operator Workstation must be running on a system
with Windows 95,98, or NT 4.0 with Service Pack 6a
installed.
Navigate in Knowledge Buil der to Server and Client
Installation Guide
for details on installing a Windows 95 or 98 operating
system on an Operator Workstation.
Refer to Configuring an Engineering Workstation on
page 1-78 to install the Engineering version of
ProcessLogix Client software.
If you are installing on Windows 95 or 98 and you
encounter errors, call Rockwell Automation Technical
Support. Refer to Rockwell Automation Technical
Support in the Preface.
⇒ Setting up ProcessLogix Client PCs
Publication 1757-IN032B-EN-P - April 2001
Page 94

1-74 System Software Upgrade Procedures
Installing Service Pack 6a for Windows NT 4.0
If you are installing Operator Workstation Software on a system with
Windows NT, re fer to Installing Service Pack 6a for Windows NT 4.0
on page 1-11.
Installing Internet Explorer 5.01
Refer to Installing Internet Explorer 5.01 on page 1-12.
Upgrading Data Access Components
Refer to Upgrading Data Access Components on page 1-13.
Uninstalling ProcessLogix Knowledge Builder Software
If you have a previous version of Knowledge Bu ilder on your PC , you
must uninstall Knowledge Builder before attempting to install the latest
version. Refer to Uninstalling ProcessLogix Knowledge Builder
Software on page 1-14.
If you do not have Knowledge Builder on your PC, go to Installing
ProcessLogix Knowledge Builder Software on page 1-16.
Installing ProcessLogix Knowledge Builder Software
Refer to Installing ProcessLogix Knowledge Builder Software on
page 1-16.
Installing ProcessLogix Operator Workstation Software
Publication 1757-IN032B-EN-P - April 2001
Page 95

System Software Upgrade Procedur es 1-75
1. Be certain that the current logon account is plx_user.
TIP
If you are installing Operator W orkstation Software on
a system with Windows NT and you do not have a
plx_user account, refer to Creating the plx_user
Account on page 3-12.
2. Confir m that the PC ’s dat e and time settings are corr ec t.
3. Insert the ProcessLogix R320.0 software CD into the CD-ROM
drive.
4. Click Start
⇒Run.
5. Key in this path location in the Op en entry field or use Bro wse to
navigate to the setup.exe file on the CD.
>D: (or your CD-ROM drive letter)\SETUP.EXE<
6. Click OK.
7. Click the ProcessLogix Operator Workstation option and click
Next.
8. At the ProcessLogix R320.0 Welcome window, click Next.
9. Click Yes to accept the license agreement.
10. At the W elcome to ProcessLogix Server Setup window, click Next.
11. At the Choose Setup Type window, click the ProcessLogix Server
Client setup button (laptop computer icon).
TIP
You must install Microsoft Excel prior to installing
Microsoft Excel Data Exchange.
12. At the Choose ProcessLogix Client Software window, confirm that
the checkboxes for the following Client s oftware components are
checked, as appropriate for your application. Click the box to
check or uncheck it, or click Select All.
• Display Builder
• Quick Builder
Publication 1757-IN032B-EN-P - April 2001
Page 96

1-76 System Software Upgrade Procedures
• Station
• System Shapes
• Microsoft Excel Data Exchange
Uncheck this selection if Microsoft Excel is not currently
installed on this PC.
• Network API for Windows
• ODBC Client
• Standard Displays
• HCI Runtime toolkit (Windows NT only)
• OPC Server Connect (Windows NT only)
13. Click Next to confirm the settings.
14. Click Next to accept the default direct ory for t he Clie nt So ft ware.
15. If you see a Directory Already Exists window, click Yes.
16. Skip to Step 18 if the Specify Microsoft Excel Directory window
doesn’t appear. Otherwise, click Next to accept the default
directory for Microsoft Excel.
ATTENTION
We recommend that you answer No to the question:
Do you want Microsoft Exc el Data Exchange to be
allowed to write to a ProcessLogix Server database?
!
Click No in response to the question:
Do you want Microsoft Excel Data Exchange to be allowed to
write to a ProcessLogix Server database?
to disable the Microsoft Excel Data Exchange write option.
17. Skip this step if the Choose ProcessLogix Client Software folder
window doesn’t appear. Otherwise, click Next to accept PlantScape
Client Software as the default Program Folder for the Client
Software.
18. Review the software installation details summarized in the
Confirmation window.
• If you need to make changes, use the Back but ton to access any
previous entries.
If you answer Y es, the write option is enabled and it is
possible for anyone with access to the machine to write
to the Server database.
Publication 1757-IN032B-EN-P - April 2001
Page 97

System Software Upgrade Procedur es 1-77
• If the details are okay, click Next to begin Client setup. This
takes a few minutes to complete.
TIP
If a Read only File Detected message appears during
software installation, check the Don’t display again
checkbox and click Yes to acknowledge the message.
19. Skip this step if the system does not includ e Excel Data Exchange.
Otherwise, click Enable Macros when requested.
TIP
If a Microsoft Excel dialog box appears, check the Do
not show this dialog again checkbox and click OK.
20. At the Setup Complete window, click the No, I will restart my
computer later option and click Finish.
21. The ProcessLogix Operator Workstation Update is automatically
installed.
TIP
In Windows 95/98, if blank DOS windows appear
periodically, simply close the windows to continue.
22. At the ProcessLogix Setup Complete window, click the No, I will
restart my computer later option and click Finish.
23. Rem ove the CD.
24. Res t a r t th e PC .
25. Go to Verifying ProcessLogix Client Installation on page 1-83.
Publication 1757-IN032B-EN-P - April 2001
Page 98

1-78 System Software Upgrade Procedures
Configuring an Engineering Workstation
ATTENTION
!
This procedure assumes that you are installing software
on an Engineering Workstation that can be used as a
configuration node in an R320.0 ProcessLogix system.
This means that the Engineering Workstation must be
running on a system with Windows NT 4.0 with
Service Pack 6a installed.
Refer to Configuring an Operator Workstation on
page 1-73 to install the Operator version of
ProcessLogix Client software.
Installing Service Pack 6a for Windows NT 4.0
Refer to Installing Service Pack 6a for Windows NT 4.0 on page 1-11.
Installing Internet Explorer 5.01
Refer to Installing Internet Explorer 5.01 on page 1-12.
Upgrading Data Access Components
Refer to Upgrading Data Access Components on page 1-13.
Uninstalling ProcessLogix Knowledge Builder Software
If you have a previous version of Knowledge Bu ilder on your PC , you
must uninstall Knowledge Builder before attempting to install the
latest version. Refer to Uninstalling ProcessLogix Knowledge Builder
Software on page 1-14.
If you do not have Knowledge Builder on your PC, go to Installing
ProcessLogix Knowledge Builder Software on page 1-16.
Publication 1757-IN032B-EN-P - April 2001
Installing ProcessLogix Knowledge Builder Software
Page 99

System Software Upgrade Procedur es 1-79
Refer to Installing ProcessLogix Knowledge Builder Software on
page 1-16.
Installing ProcessLogix Engineering Workstation Software
1. Be certain that the current logon account is plx_user.
TIP
If you do not have a plx_user account, refer
to Creating the plx_user Account on page 3-12.
2. Confir m that th e PC ’s date and time sett ings are correct.
3. Insert the ProcessLogix R320.0 software CD into the CD-ROM
drive.
4. Click Start
5. Key in this path location in the Op en entry field or use Bro wse to
navigate to the setup.exe file on the CD.
>D: (or your CD-ROM drive letter)\SETUP.EXE<
6. Click OK.
7. Click the ProcessLogix Engineering Works tation option and click
Next.
8. At the ProcessLogix R320.0 Welcome window, click Next.
9. Click Yes to accept the license agreement.
TIP
⇒Run.
If you see a DOS window that asks if you are sure you
want to unload the database, type y and press Enter.
Installing Engineering Tools
10. Engineering Tools is automatically installed. This takes a few
minutes to complete.
Publication 1757-IN032B-EN-P - April 2001
Page 100

1-80 System Software Upgrade Procedures
Installing PsAxCtl Document EXE
a. Click OK to acknowledge the change directory warning.
b. At the PsAxCtl Document EXE Setup Welcome window, click
OK.
c. Verify that the destination directory is:
C:\Honeywell\TPS50\System\Bin.
d. Click the large install button (PC icon).
e. At the Setup Complete window, click OK.
Installing CCL Deployment
a. At the Welcome window, click Next.
b. At the CCL Deployment Installation Complete window, click
Finish.
11. At the Engineering Tools Setup Complete window, click the No, I
will restart my computer later option and click Finish.
TIP
You do not install ERDB on the client. Cancel out of
migrate and continue.
12. At the Choose ERDB File Location window, click Cancel.
13. At the Exit Setup window, click Exit Setup.
Installing ProcessLogix Client Software
14. At the W elcome to ProcessLogix Server Setup window, click Next.
15. At the Choose Setup Type window, click the ProcessLogix Server
Client setup button (laptop computer icon).
TIP
You must install Microsoft Excel prior to installing
Microsoft Excel Data Exchange.
Publication 1757-IN032B-EN-P - April 2001
 Loading...