

Page 1

Barrel Temperature
Control Module
1746-BTM
User Manual
Page 2

ii
Important User Information
Because of the variety of uses for the products described in this
publication, those responsible for the application and use of this
control equipment must satisfy themselves that all necessary steps
have been taken to assure that each application and use meets all
performance and safety requirements, including any applicable laws,
regulations, codes and standards.
The illustrations, charts, sample programs and layout examples shown
in this guide are intended solely f or purpo ses of ex ample. Since t here
are many variables and requirements associated with any particular
installation, Allen-Bradley does not assume responsibility or liability
(to include intellectual property liability) for actual use based upon
the examples shown in this publication.
Allen-Bradley publication SGI-1.1, Safety Guidelines for the
Application, Installation and Maintenance of Solid-State Control
(available from your local Allen-Bradley office), describes some
important differences between solid-state equipment and
electromechanical devices that should be taken into consideration
when applying products such as those described in this publication.
Reproduction of the contents of this copyrighted publication, in whole
or part, without written permission of Rockwell Automation, is
prohibited.
Throughout this manual we use notes to make you aware of safety
considerations:
ATTENTION
Identifies information about practices or
circumstances that can lead to personal injury or
death, property damage or economic loss
!
Attention statements help you to:
• identify a haza r d
• avoid a hazard
• recognize the consequences
IMPORTANT
Allen-Bradley is a trademark of Rockwell Automation
Identifies information that is critical for successful
application and understanding of the product.
Publication 1746-UM010B-EN-P - April 2001
Page 3

iii
European Communities (EC) Directive Compliance
If this product has the CE mark it is approved for installation within
the European Union and EEA regions. It has been designed and tested
to meet the following directives.
EMC Directive
This product is tested to meet the Council Directive 89/336/EC
Electromagnetic Compatibility (EMC) by applying the following
standards, in whole or in part, documented in a technical construction
file:
• EN 50081-2 EMC — Generic Emission Standard, Part 2 —
Industrial Environment
• EN 50082-2 EMC — Generic Immunity Standard, Part 2 —
Industrial Environment
This product is intended for use in an industrial environment.
Low Voltage Directive
This product is tested to meet Council Directive 73/23/EEC Low
Voltage, by applying the safety requirements of EN 61131-2
Programmable Controllers, Part 2 - Equipment Requirements and
Tests. For specific information required by EN 61131-2, see the
appropriate sections in this publication, as well as the Allen-Bradley
publication Industrial Automation Wiring and Grounding Guidelines,
publication 1770-4.1.
This equipment is classified as open equipment and must be mounted
in an enclosure during operation to provide safety protection.
Publication 1746-UM010 B- EN-P - April 2001
Page 4

iv
Publication 1746-UM010B-EN-P - April 2001
Page 5

Summary of Changes
Major changes in this revision include:
• Ladder code addresses have been changed.
• The sample ladder code in Chapter 9 has been enhanced.
• Examples outlining the mathematical relationships involved in
Startup Aggressiveness Factor and Ramp Rates have been
included in Chapter 3.
• Appendixes A and B have been omitted.
• Module specifications can be found in the 1746-BTM Installation
Instructions, Publication 1746-IN014B-EN-P.
1 Publication 1746-UM010 B- EN-P - April 2001
Page 6

2 Summary of Changes
Publication 1746-UM010B-EN-P - April 2001
Page 7

Preface
Using This Manual
This manual shows you how to use the Barrel Temperature Control
Module (cat. no. 1746-BTM) in an A llen- Bradley SLC sys tem fo r barrel
temperature control and other injection molding or extrusion related
temperature control applications. The manual explains how to install,
program, calibrate, and troubleshoot the BTM module.
ATTENTION
Use the 1746-BTM module in a local I/O chassis only
for barrel temperature control of injection molding
applications or extruders. Any other applications are
not supported.
!
Audience
You must be able to program and operate an Allen-Bradley SLC
programmable controller to make efficient use of this module. In
particular, you must know how to configure M0 and M1 files. For
more information, see the appropriate SLC programming manual
before you generate a program for this module.
System Compatibility
System compatibility involves data table use as well as compatibility
with a local I/O chassis and SLC processor.
Data Table
Communication between the module and processor is bi-directional.
The processor transfers output data through the output image table to
the BTM module and transfers input data from the BTM module
through the input image table. The BTM module also requires M files
for configuration and calibration values.
I/O Chassis
You can use this module with 1746-A4, -A7, -A10, -or -A13 chassis,
provided there is an SLC controller in the chassis (local system). You
can place the BTM module in any I/O slot except for the first slot
which is reserved for the processor.
1 Publication 1746-UM010 B- EN-P - April 2001
Page 8

P-2 Preface
SLC Processor
The 1746-BTM module is compatible with any SLC processor that
supports M0/M1 files, such as the SLC 5/05, SLC 5/04, SLC 5/03, and
SLC 5/02 controllers.
Vocabulary
In this manual, we refer to:
• the barrel temperature control module as the “1746-BTM
module,” the “BTM module,” or as “the module”
• the programmable controller as the “SLC processor”, or “the
processor”
• a thermocouple as a “TC”
• a time-proportioned output as “TPO”
• the tuning-assisted processes as “TAP”
• proportional-integral-derivative as “PID”
• cold-junction compensation as “CJC”
Publication 1746-UM010B-EN-P - April 2001
Page 9

Table of Contents
Important User Information. . . . . . . . . . . . . . . . . . . . . . . . . . ii
European Communities (EC) Directive Compliance . . . . . . . iii
EMC Directive . . . . . . . . . . . . . . . . . . . . . . . . . . . . . . . . iii
Low Voltage Directive . . . . . . . . . . . . . . . . . . . . . . . . . . iii
Using This Manual . . . . . . . . . . . . . . . . . . . . . . . . . . . . . . P-1
Audience. . . . . . . . . . . . . . . . . . . . . . . . . . . . . . . . . . . P-1
System Compatibility . . . . . . . . . . . . . . . . . . . . . . . . . . P-1
Vocabulary . . . . . . . . . . . . . . . . . . . . . . . . . . . . . . . . . . . . P-2
Chapter 1
Temperature Control Using a BTM Module in an SLC System 1-1
Features of the Temperature Control Module . . . . . . . . . . . 1-2
Module Outputs . . . . . . . . . . . . . . . . . . . . . . . . . . . . . . . . 1-2
Current CV . . . . . . . . . . . . . . . . . . . . . . . . . . . . . . . . . 1-2
TPO . . . . . . . . . . . . . . . . . . . . . . . . . . . . . . . . . . . . . . 1-2
Module Addressing . . . . . . . . . . . . . . . . . . . . . . . . . . . . . . 1-4
Response to Slot Disabling . . . . . . . . . . . . . . . . . . . . . . . . 1-4
Input response. . . . . . . . . . . . . . . . . . . . . . . . . . . . . . . 1-4
Output response . . . . . . . . . . . . . . . . . . . . . . . . . . . . . 1-4
Chapter 2
Avoiding Electrostatic Damage. . . . . . . . . . . . . . . . . . . . . . 2-1
European Communities (EC) Directive Compliance . . . . . . 2-2
EMC Directive . . . . . . . . . . . . . . . . . . . . . . . . . . . . . . . 2-2
Low Voltage Directive . . . . . . . . . . . . . . . . . . . . . . . . . 2-2
Determining Power Requirements . . . . . . . . . . . . . . . . . . . 2-3
Choosing a Module Slot in a Local I/O Chassis. . . . . . . . . . 2-3
Installation considerations . . . . . . . . . . . . . . . . . . . . . . 2-3
Installing the Module. . . . . . . . . . . . . . . . . . . . . . . . . . . . . 2-4
Removing the terminal block . . . . . . . . . . . . . . . . . . . . 2-5
Wiring the Module . . . . . . . . . . . . . . . . . . . . . . . . . . . . . . 2-6
Cold Junction Compensation (CJC). . . . . . . . . . . . . . . . 2-6
Wiring considerations. . . . . . . . . . . . . . . . . . . . . . . . . . 2-7
Preparing and Wiring the Cables . . . . . . . . . . . . . . . . . 2-8
Specifications. . . . . . . . . . . . . . . . . . . . . . . . . . . . . . . . 2-10
Chapter 3
Loop Operation Mode. . . . . . . . . . . . . . . . . . . . . . . . . . . . 3-1
Word 1, Bits 0 and 1 for Channel 1. . . . . . . . . . . . . . . . 3-1
Type of Loop Input. . . . . . . . . . . . . . . . . . . . . . . . . . . . . . 3-1
Word 1, Bits 2-5 for Channel 1 . . . . . . . . . . . . . . . . . . . 3-1
Enable Loop Alarms . . . . . . . . . . . . . . . . . . . . . . . . . . . . . 3-2
Word 1, Bit 6 for Channel 1 . . . . . . . . . . . . . . . . . . . . . 3-2
TC Break Response. . . . . . . . . . . . . . . . . . . . . . . . . . . . . . 3-2
Word 1, Bits 7 and 8 for Channel 1. . . . . . . . . . . . . . . . 3-2
Loop Autotune Gains Level . . . . . . . . . . . . . . . . . . . . . . . . 3-2
Word 1, Bits 10 and 11 for Channel 1 . . . . . . . . . . . . . . 3-2
1 Publication 1746-UM010 B- EN-P - April 2001
Page 10

TOC-2 Table of Contents
Barrel/Non-barrel Control . . . . . . . . . . . . . . . . . . . . . . . . . 3-3
Word 1, Bit 12 for Channel 1 . . . . . . . . . . . . . . . . . . . . 3-3
Barrel Control . . . . . . . . . . . . . . . . . . . . . . . . . . . . . . . 3-3
Non–barrel control. . . . . . . . . . . . . . . . . . . . . . . . . . . . 3-3
Switching the barrel control . . . . . . . . . . . . . . . . . . . . . 3-3
Inner/Outer Zone Selection. . . . . . . . . . . . . . . . . . . . . . . . 3-4
Word 1, Bit 13 for Channel 1 . . . . . . . . . . . . . . . . . . . . 3-4
High/Low CV Limits . . . . . . . . . . . . . . . . . . . . . . . . . . . . . 3-5
Words 2 and 3 for Channel 1 . . . . . . . . . . . . . . . . . . . . 3-5
TC Break Control . . . . . . . . . . . . . . . . . . . . . . . . . . . . . . . 3-5
Word 4 or O:e.8 for Channel1 . . . . . . . . . . . . . . . . . . . 3-5
Standby Setpoint. . . . . . . . . . . . . . . . . . . . . . . . . . . . . . . . 3-5
Word 5 for Channel 1 . . . . . . . . . . . . . . . . . . . . . . . . . 3-5
Heat/Cool Minimum On-times. . . . . . . . . . . . . . . . . . . . . . 3-6
Words 6 and 8 for channel 1 . . . . . . . . . . . . . . . . . . . . 3-6
Heat/Cool TPO Period . . . . . . . . . . . . . . . . . . . . . . . . . . . 3-6
Words 7 and 9 for Channel 1 . . . . . . . . . . . . . . . . . . . . 3-6
PV Rate and Associated Alarm. . . . . . . . . . . . . . . . . . . . . . 3-6
Word 10 and Alarm Bit I:e.4/05 for Channel 1. . . . . . . . 3-6
High/Low Temperature and Deviation Alarms . . . . . . . . . . 3-6
Words 11-14 for Channel 1. . . . . . . . . . . . . . . . . . . . . . 3-6
Alarm Dead Band . . . . . . . . . . . . . . . . . . . . . . . . . . . . . . . 3-8
Word 15 for Channel 1. . . . . . . . . . . . . . . . . . . . . . . . . 3-8
Thermal Integrity Loss Detection . . . . . . . . . . . . . . . . . . . . 3-9
Words 16 and 17 for Channel 1 . . . . . . . . . . . . . . . . . . 3-9
Ramp Rates. . . . . . . . . . . . . . . . . . . . . . . . . . . . . . . . . . . . 3-9
Words 18 for Channel 1 . . . . . . . . . . . . . . . . . . . . . . . . 3-9
Non-barrel Autotune Disturbance Size . . . . . . . . . . . . . . . . 3-9
Word 20 for Channel 1. . . . . . . . . . . . . . . . . . . . . . . . . 3-9
Implied Decimal Point . . . . . . . . . . . . . . . . . . . . . . . . . 3-10
Configuration Block, M1 File, Loops 1-4 N10:0-100. . . . . . . 3-11
Startup Aggressiveness factor. . . . . . . . . . . . . . . . . . . . . . . 3-11
Ramp Rates. . . . . . . . . . . . . . . . . . . . . . . . . . . . . . . . . . . . 3-12
Publication 1746-UM010B-EN-P - April 2001
Chapter 4
Sequence of Setting PID Gains . . . . . . . . . . . . . . . . . . . . . 4-1
Autotuning the Loops . . . . . . . . . . . . . . . . . . . . . . . . . . . . 4-2
Fine-Tuning the Loops . . . . . . . . . . . . . . . . . . . . . . . . . . . 4-3
Using the PID Equation. . . . . . . . . . . . . . . . . . . . . . . . . . . 4-4
Entering Autotune/Gains Values with Implied Decimal Point 4-5
PID Gains/Autotune Block, M0 File for Loops 1–4 . . . . 4-6
Page 11

Table of Contents TOC-3
Chapter 5
Controlling a Loop . . . . . . . . . . . . . . . . . . . . . . . . . . . . . . 5-1
M1 Configuration File. . . . . . . . . . . . . . . . . . . . . . . . . . 5-1
Output Image Table. . . . . . . . . . . . . . . . . . . . . . . . . . . 5-1
Autotune a Loop. . . . . . . . . . . . . . . . . . . . . . . . . . . . . . . . 5-2
Requirements for Autotune. . . . . . . . . . . . . . . . . . . . . . 5-2
Items to check before autotune . . . . . . . . . . . . . . . . . . 5-4
Autotune barrel control applications. . . . . . . . . . . . . . . 5-4
Example: Autotune non–barrel control applications. . . . 5-7
Troubleshooting Autotune . . . . . . . . . . . . . . . . . . . . . . 5-7
Using the Output Image Table. . . . . . . . . . . . . . . . . . . . . . 5-8
Global Commands to All Loops . . . . . . . . . . . . . . . . . . 5-9
BTM Auto Tune . . . . . . . . . . . . . . . . . . . . . . . . . . . . . . . . 5-10
Chapter 6
Input Image Table. . . . . . . . . . . . . . . . . . . . . . . . . . . . . . . 6-1
Implied Decimal Point . . . . . . . . . . . . . . . . . . . . . . . . . 6-1
Chapter 7
About the Procedure. . . . . . . . . . . . . . . . . . . . . . . . . . . . . 7-1
Calibration Codes and Status . . . . . . . . . . . . . . . . . . . . 7-1
Calibration Procedure. . . . . . . . . . . . . . . . . . . . . . . . . . 7-2
Chapter 8
Troubleshooting with LED Indicators. . . . . . . . . . . . . . . . . 8-1
Locating Error Code Information . . . . . . . . . . . . . . . . . . . . 8-2
Chapter 9
Obtaining the Sample Program from the Internet . . . . . . . . 9-1
To Access the Internet:. . . . . . . . . . . . . . . . . . . . . . . . . 9-1
RSLogix500 Version. . . . . . . . . . . . . . . . . . . . . . . . . . . . . . 9-1
BTM Firmware Revision . . . . . . . . . . . . . . . . . . . . . . . . . . 9-1
Support for 5/03, 5/04, 5/04P, 5/05, and
5/05P Processors Using BTM201.rss . . . . . . . . . . . . . . . . . . 9-1
BTM201.rss Data Table Layout . . . . . . . . . . . . . . . . . . . 9-2
Download and Upload Settings . . . . . . . . . . . . . . . . . . 9-3
BTM201.rss Programming Notes . . . . . . . . . . . . . . . . . . 9-5
Support for 5/02 Processors Using BTM50220.RSS . . . . . . . 9-7
BTM50220.RSS Data table layout. . . . . . . . . . . . . . . . . . 9-7
Download and Upload Settings . . . . . . . . . . . . . . . . . . 9-7
General Notes for Programming the 1746-BTM. . . . . . . . . . 9-9
Publication 1746-UM010 B- EN-P - April 2001
Page 12

TOC-4 Table of Contents
Publication 1746-UM010B-EN-P - April 2001
Page 13
Getting Started
This chapter gives you information on:
• the function of the temperature control module
• features of the temperature control module
• time–proportioned output (TPO)
• module addressing
• response to slot disa bli ng
Chapter
1
Temperature Control Using a BTM Module in an SLC System
ATTENTION
Use the 1746–BTM module only for barrel
temperature control for injection mold ing
applications or extruders in a local I/O chassis. Any
other applications are not supported.
!
The temperature control module is an intelligent I/O module that can
provide a maximum of 4 PID loops for temperature control. The
module has 4 analog thermocouple (TC) inputs. Each analog input
functions as the process variable (PV) for a PID loop. The PID
algorithm and tuning–assisted–process (TAP) algorithm are performed
on the module for each of the loops. The control–variable (CV)
output of each loop, either analog output or time–proportioned
output (TPO), is sent from the module to the SLC data table. Your
application ladder logic must access the CV value in the data table and
send the analog or TPO data to an output module to close the loop.
Figure 1.1
A 1746–BTM module with 4 PID logic channels, showing one complete PID loop
SLC data table
CV
1 Publication 1746-UM010 B- EN-P - April 2001
CV
CV
CV
CV
CV
output module
analog or TPO
loop logic
loop logic
loop logic
loop logic
PV
PV
PV
PV
CV
heater
process to be
controlled
TC
Page 14

1-2 Getting Started
Features of the T emperature Control Module
The 1746–BTM module provides:
• 4 independent temperature control loops
• autotune PID loops (one loop or any combination of loops can
be autotuned while other loops are running)
• a unique start–up algorithm to minimize overshoot
• an isolated thermocouple (J and K) input for each PID loop
• 16–bit analog–to–digital converter resolution (0.1° resolution)
• a heat CV signal (for each PID loop) as a numeric % value
• a cool CV signal (for each PID loop) as a numeric % value
• a heat CV signal (for each PID loop) as a TPO bit
• a cool CV signal (for each PID loop) as a TPO bit
• temperature values in C ° or F °
• self–calibration (external reference required)
• user–selectable high and low alarms with dead band for
hysteresis
• input open–circuit detection
Module Outputs
The BTM module sends the control variable (CV) for heating an d/or
cooling each loop to the SLC processor’s input image table as both of:
• numeric value (current CV)
• time–proportioned output (TPO)
Current CV
Y our ladder logic should read the numeric value (current CV), scale it,
and send it to an analog output module to generate the control signal
to an analog temperature control actuator. If using the sample
program look for current CVs in N10:208–211 for loops 1–4. Refer
to Sample Program on page 9-1.
TPO
The module returns the heat TPO (bit 6) and cool TPO (bit 7) in input
image table words 8–11 for loops 1–4. The sample program sends
TPO signals to a digital output module to generate the control signal
to a digital temperature control actuator. Refer to Sample Program on
page 9-1.
Publication 1746-UM010B-EN-P - April 2001
Page 15

Figure 1.2 TPO timing diagram
Getting Started 1-3
TPO bit
BTM
Module
On
Off
Y
X
SLC 5/0x
I/O Image Table
Output Image
Slot e
See Figure 1.3 on
page 1-4
Input Image
Slot e
See Figure 1.3 on
page 1-4
CV% = (40%)
X = on time (2.0 sec)
Y = TPO period (5.00 sec)
data in parenthesis refers to
sample program values.
The TPO duty cycle (Y) must be considerable shorter in time than
the system dead time. For additional information, Refer to Autotune
a Loop on page 5-2.
The following memory map shows you how the SLC processor’s
output and input image tables are defined for the module. See Table
9.A: BTM201.r s s N7 Da t a Table on pag e 9-2.
Bit 15 Bit 0 Address
Loop 1 configuration data word 0 O:e.0
Slot e portion of
SLC image table
for BTM module
output
image
16 words
input
image
16 words
Loop 2 configuration data word 1 O:e.1
Loop 3 configuration data word 2 O:e.2
Loop 4 configuration data word 3 O:e.3
Loop 1 run setpoint value word 4 O:e.4
Loop 2 run setpoint value word 5 O:e.5
Loop 3 run setpoint value word 6 O:e.6
Loop 4 run setpoint value word 7 O:e.7
Loop 1 manual output value word 8 O:e.8
Loop 2 manual output value word 9 O:e.9
Loop 3 manual output value word 10 O:e.10
Loop 4 manual output value word 11 O:e.11
miscellaneous control bits word 12 O:e.12
not used word 13 O:e.13
not used word 14 O:e.14
not used word 15 O:e.15
Loop 1 temper ature word 0 I:e.0
Loop 2 temper ature word 1 I:e.1
Loop 3 temper ature word 2 I:e.2
Loop 4 temper ature word 3 I:e.3
Loop 1 configuration status word 4 I:e.4
Loop 2 configuration status word 5 I:e.5
Loop 3 configuration status word 6 I:e.6
Loop 4 configuration status word 7 I:e.7
Loop 1 control status and TPO word 8 I:e.8
Loop 2 control status and TPO word 9 I:e.9
Loop 3 control status and TPO word 10 I:e.10
Loop 4 control status and TPO word 11 I:e.11
If using the sample program,
variables in words 12-15, including
current CVs, are multiplexed and
scanned into N10:200-243
word 12 I:e.12
word 13 I:e.13
word 14 I:e.14
word 15 I:e.15
Publication 1746-UM010 B- EN-P - April 2001
Page 16
1-4 Getting Started
Module Addressing
Input Image Table Address Output Image Table Address
slot slot
file type file type
When you enter the module ID in processor configuration (off-line),
the processor automatically reserves the required number of I/O
image table words. In the figure below, that section of the I/O image
table is designated by “slot e”. Its location in the I/O image table is
determined by the module’s slot location “e” in the I/O chassis. Slot
location “e” is a required addressing unit when referring to the
module in ladder logic. For the sample program’s data table layout,
See Table 9.A: BTM201.rss N7 Data Table on page 9-2. See Figure 1.3
for an explanation of the image table addresses
Figure 1.3 .
word
I : e . 6 O : e . 6
element
delimiter
word
delimiter
element
delimiter
word
word
delimiter
Response to Slot Disabling
By writing to the status file in your modular SLC processor you can
disable any chassis slot. See your SLC programming manual for the
slot disable/enable procedure.
ATTENTION
Always understand the implications of disabling the
module before using the slot disable feature.
!
Input response
When the slot for this module is disabled, the module continues to
update its inputs. However, the SLC processor does not read from a
module whose slot is disabled. Therefore, inputs appearing in the
processor image table remain in their last state, and the module’s
updated inputs are not read. When the processor re–enabl es the
module slot, the current state of module inputs are read by the
controller during the subsequent scan.
Output response
Publication 1746-UM010B-EN-P - April 2001
When the slot for this module is disabled, configuration words in the
SLC processor’s output image table are held in their last state and not
transferred to the module. When the slot is re–enabled, output image
table words are transferred to the module during the subsequent scan.
Page 17

Installing and Wiring
This document gives you information about:
• avoiding electrostatic damage
• compliance with European Union directive
• determining the module’s chassis power requirement
• planning for sufficient enclosure depth
• choosing a module slot in a local I/O chassis
• installing the module
• wiring the module
Chapter
2
Avoiding Electrostatic Damage
Electrostatic discharge can damage semiconductor devices inside this
module if you touch backplane connector pins. Guard against
electrostatic damage by observing the following precautions:
ATTENTION
Electrostatic discharge can degrade performance or
cause permanent damage. Handle the module as
stated below.
!
• Touch a grounded object to rid yourself of charge before
handling.
• Wear an approved wrist strap when handling the module.
• Handle the module from the front, away from the backplane
connector.
• Do not touch backplane connector pins.
1 Publication 1746-UM010 B- EN-P - April 2001
Page 18

2-2 Installing and Wiring
European Communities (EC) Directive Compliance
If this product has the CE mark it is approved for installation within
the European Union and EEA regions. It has been designed and tested
to meet the following directives.
EMC Directive
This product is tested to meet the Council Directive 89/336/EC
Electromagnetic Compatibility (EMC) by applying the following
standards, in whole or in part, documented in a technical construction
file:
• EN 50081-2 EMC — Generic Emissi on Standard, Part 2 —
Industrial Environment
• EN 5001082-2 EMC — Generic Immunity Standard, Part 2 —
Industrial Environment
This product is intended for use in an industrial environment.
Low Voltage Directive
This product is tested to meet Council Directive 73/23/EC Low
Voltage, by applying the safety requirements of EN 61131-2
Programmable Controllers, Part 2 - Equipment Requirements and
Tests. For specific information required by EN 61131-2, see the
appropriate sections in this publication, as well as the Allen-Bradley
publication Industrial Automation Wiring and Grounding Guidelines,
publication 1770-4.1.
This equipment is classified as open equipment and must be mounted
in an enclosure during operation to provide safety protection.
Publication 1746-UM010B-EN-P - April 2001
Page 19

Installing and Wiring 2-3
Determining Power Requirements
Choosing a Module Slot in a Local I/O Chassis
When computing power supply requirements, add the values shown
in Table 2.A to the requirements of all other modules in the SLC
chassis to prevent overloading the chassis power supply.
Table 2.A Power Supply Requirements
5V dc amps 24V dc amps
0.110 0.085
Place your module in any slot of an SLC500 module, or modular
expansion chassis, except for the left–most slot (slot 0), reserved for
the SLC processor or adapter modules.
IMPORTANT
For proper operation, use this module with a local
processor. The module is not designed to operate in
a remote chassis.
Installation conside rations
Most thermocouple–type applications require an industrial enclosure
to reduce the effects of electrical interference. Thermocouple inputs
are highly susceptible to electrical noises due to the small signal
amplitudes (microvolt/C °). Isolate them from other input wiring and
modules that radiate electrical interference.
Group your modules within the I/O chassis to minimize adverse
effects from radiated electrical noise and heat. Consider the following
conditions when selecting a slot location. Position the module away
from modules that:
• connect to sources of electrical noise such as relays and ac
motor drives
• generate significant heat, such as 32–point I/O modules
Publication 1746-UM010 B- EN-P - April 2001
Page 20
2-4 Installing and Wiring
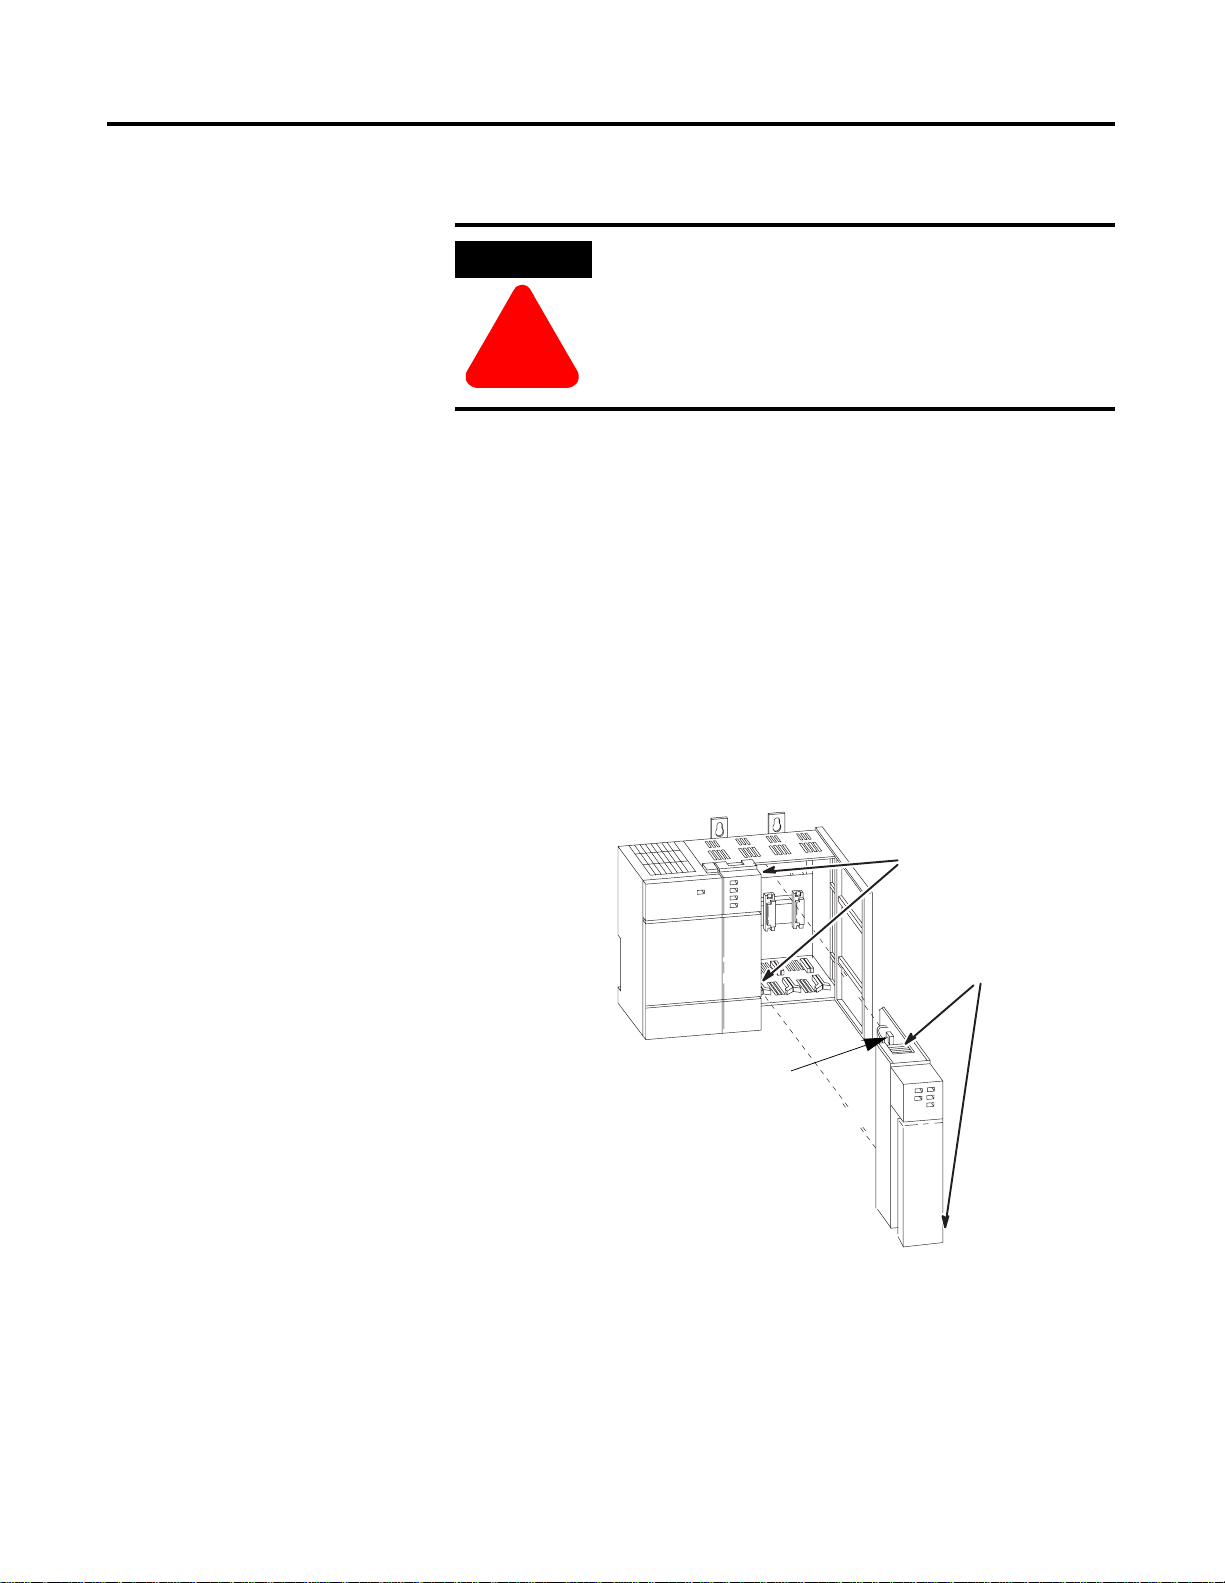
Installing the Module
Follow this procedure:
ATTENTION
Never install, remove, or wire modules with power
applied to the chassis or devices wired to the
module.
!
1. Align the circuit board of the thermocouple module with the
card guides located at the top and bottom of the chassis.
2. Slide the module into the chassis until both top and bottom
retaining clips are secured. Apply firm even pressure on the
module to attach it to its backplane connector. Never force the
module into the slot.
3. Cover unused slots with the card slot filler, catalog number
1746–N2.
4. To remove, press the releases at the top and bottom of the
module, and slide the module out of the chassis slot.
retaining clips
card guides
top and bottom
releases
Publication 1746-UM010B-EN-P - April 2001
Page 21
Installing and Wiring 2-5
Removing th e terminal block
When installing the module, it is not necessary to remove the terminal
block. But if you need to remove it, follow this procedure:
1. Alternately loosen the two retaining screw s to avoid cracking the
terminal block.
2. Grasp the terminal block at the top and bottom and pull
outward and down. When removing or installing the terminal
block be careful not to damage the CJC sensors.
Tip: The R eplacement Part Number
for the Terminal Block with the CJCs
is 1746-RT32.
You cannot purchase a CJC by itself.
CJC sensors
retaining screws
3. Use the write–on label to identify the module and its location.
SLOT
MODULE
RACK
Publication 1746-UM010 B- EN-P - April 2001
Page 22
2-6 Installing and Wiring
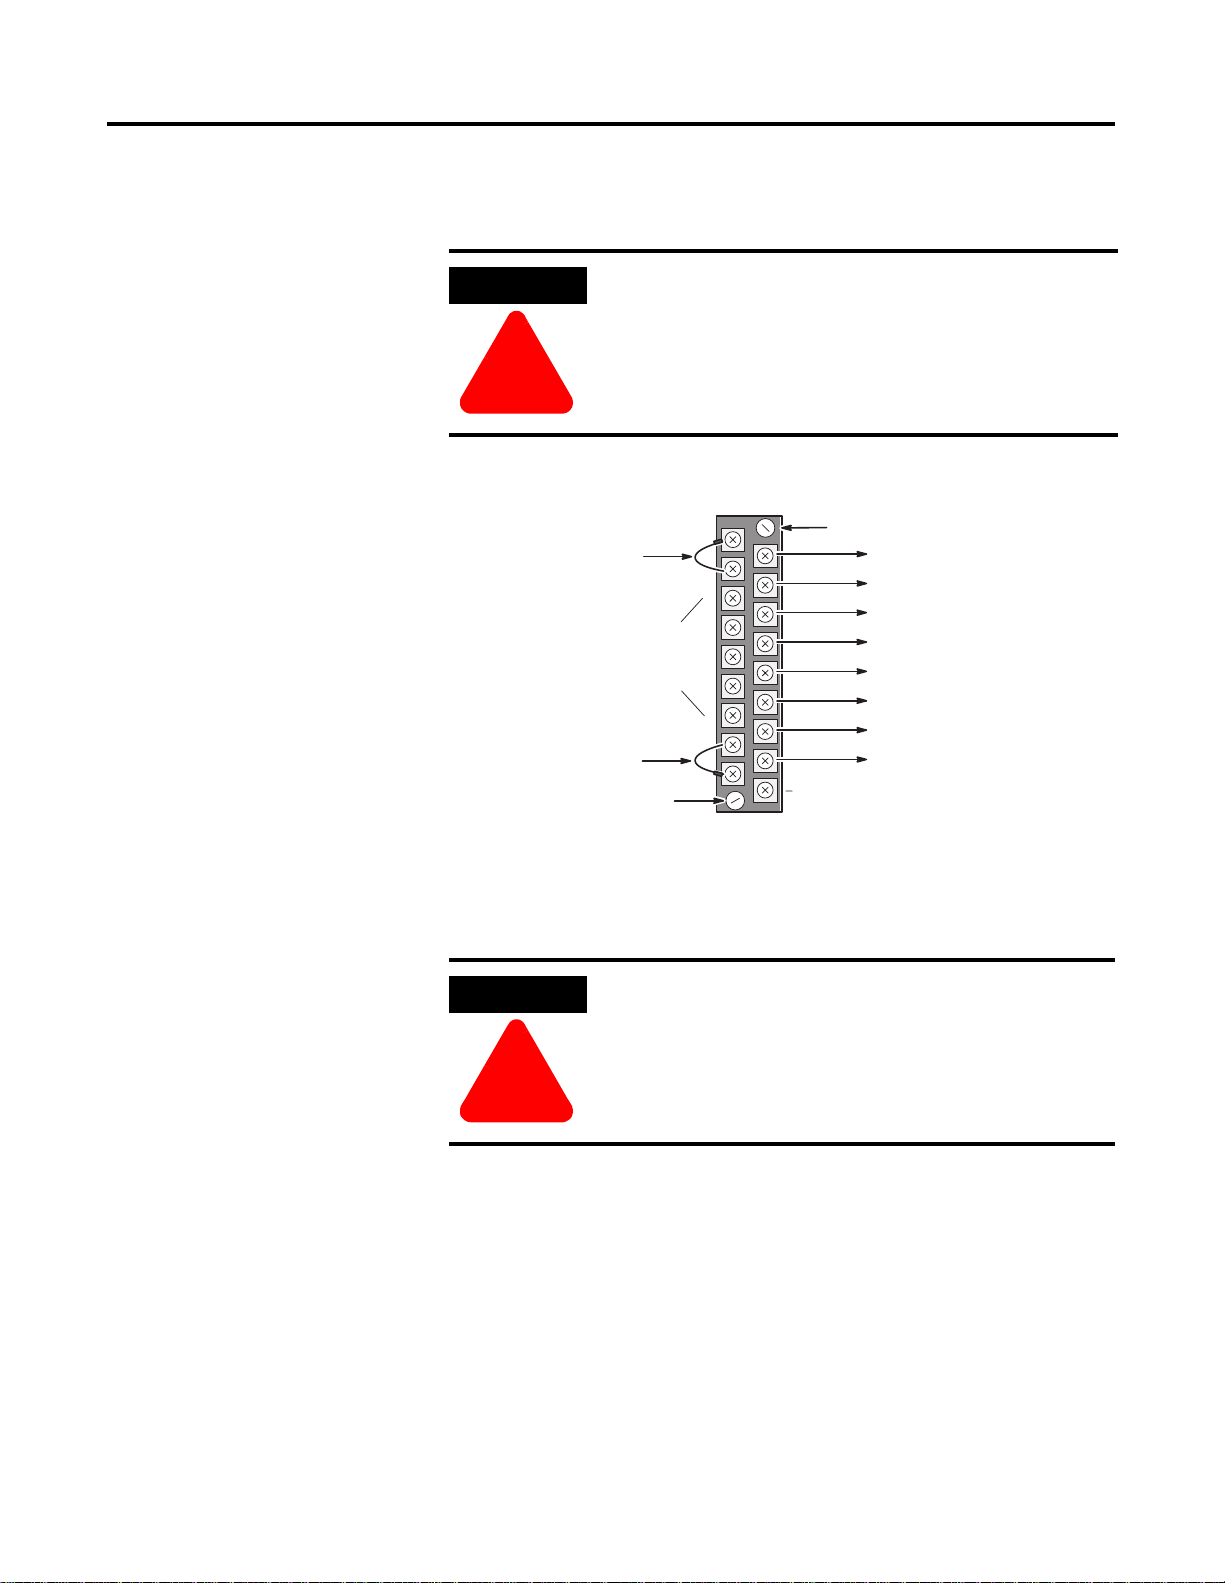
Wiring the Module
The module has an 18–position, removable terminal block. The
terminal block pin–out is shown below.
ATTENTION
Disconnect power to the SLC before attempting to
install, remove, or wire the removable terminal
wiring block.
!
Figure 2.1 Terminal block pin out.
Retaining Screw
Channel 0+
Channel 0Channel 1+
Channel 1-
Channel 2+
Channel 2-
Channel 3+
Channel 3-
spare part catalog number:
n/c
1746-RT32
CJC Assembly
Do NOT use these
connections
CJC Assembly
Retaining Screw
CJC A+
CJC A-
CJC B+
CJC B-
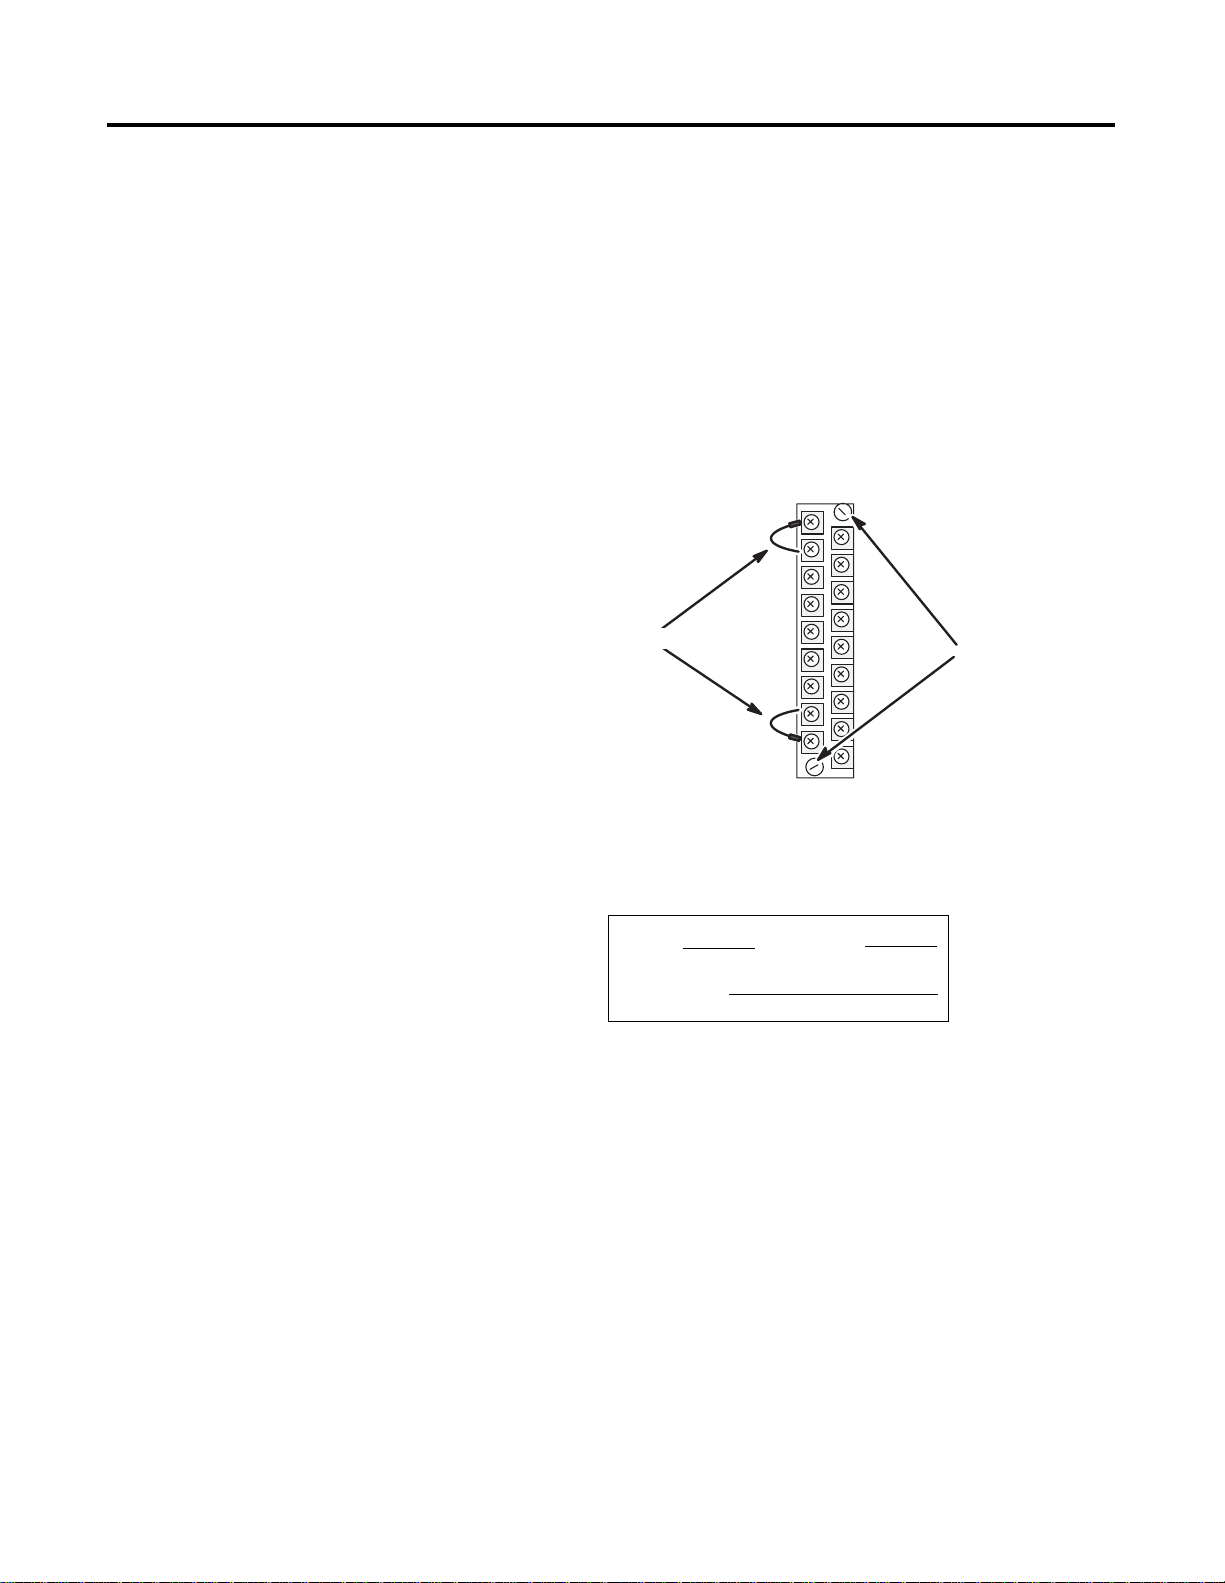
Cold Junction Compensation (CJC)
ATTENTION
!
In case of accidental removal of one or both thermistors, replace them
by connecting them across the CJC terminals located at the top and/or
bottom left side of the terminal block. Always connect the red lug to
the (+) terminal (to CJC A+ or CJC B+).
Do not remove or loosen the cold junction
compensating thermistors located on the terminal
block. Both thermistors are critical to ensure
accurate thermocouple input readings at each
channel. The module will not operate in the
thermocouple mode if a thermistor is removed
Publication 1746-UM010B-EN-P - April 2001
Page 23

Installing and Wiring 2-7
Figure 2.2 Thermistor place me nt on t he bot t om of the terminal block
Always attach red
lug to the CJC+
terminal
Wiring consi derations
Follow the guidelines below when planning your system wiring.
• To limit th e pickup of electrical noise, keep thermocouple and
millivolt signal wires away from power and load lines.
• For high immunity to electrical noise, use Alpha 5121 (shielded,
twisted pair) or equivalent wire for millivolt sensors; or use
shielded, twisted pair thermocouple extension lead wire
specified by the thermocouple manufacturer. Using the incorrect
type of thermocouple extension wire or not following the
correct polarity may cause invalid readings. See IEEE Std. 518,
Section 6.4.2.7 or contact your sensor manufacturer for
additional details.
• When trimming cable leads, minimize the length of unshielded
wires.
• Ground the shield drain wire at only one end of the cable. The
preferred location is at the I/O chassis ground (See Figure 2.4).
• For maximum noise reduction, use 3/8 inch braid wire to
connect cable shields to the nearest I/O chassis mounting bolt.
Then connect the I/O chassis to earth ground (See Figure 2.4).
These connections are a requirement regardless of cable type.
• Tighten terminal scre ws . Ex ce ss i ve ti gh te ni n g c an stri p th e
screw.
• The open–circuit detector generates approximately 20 nano–
amperes into the thermocouple cable. A total lead resistance of
25 ohms (12.5 one–way) will produce 0.5 mV of error.
• Follow system grounding and wiring guidelines found in your
SLC 500 Modular Hardware Installation and Operation Manual,
publication 1747–6.2.
Publication 1746-UM010 B- EN-P - April 2001
Page 24

2-8 Installing and Wiring
Preparing and Wiring the Cables
To prepare and connect cable leads and drain wires, follow these
steps:
Figure 2.3 Cable lead and drain wire preparation
Remove the foil shield
and drain wire from
sensor-end of the cable
Signal Wires
Extract th e d r ain wire but
remove the foil shield, at
the module-end of the
cable.
Drain Wire
Signal Wires
1. At each end of the cable, s trip s ome casi ng to expo se in divid ual
wires.
2. Trim signal wires to 5–inch lengths beyond the cable casing.
Strip about 3/16 inch (4.76 mm) of insulation to expose the ends
of the wires.
3. At the module–end of the cables:
- extract the drain wire and signal wires
- remove the foil shield
- bundle the input cables with a cable strap
4. Connect drain wires together and solder them to a 3/8” wire
braid, 12” long. Keep drain wires as short as possible.
5. Connect the 3/8” wire braid to the nearest chassis mounting
bolt.
Publication 1746-UM010B-EN-P - April 2001
6. Connect the signal wires of each channel to the terminal block.
Page 25
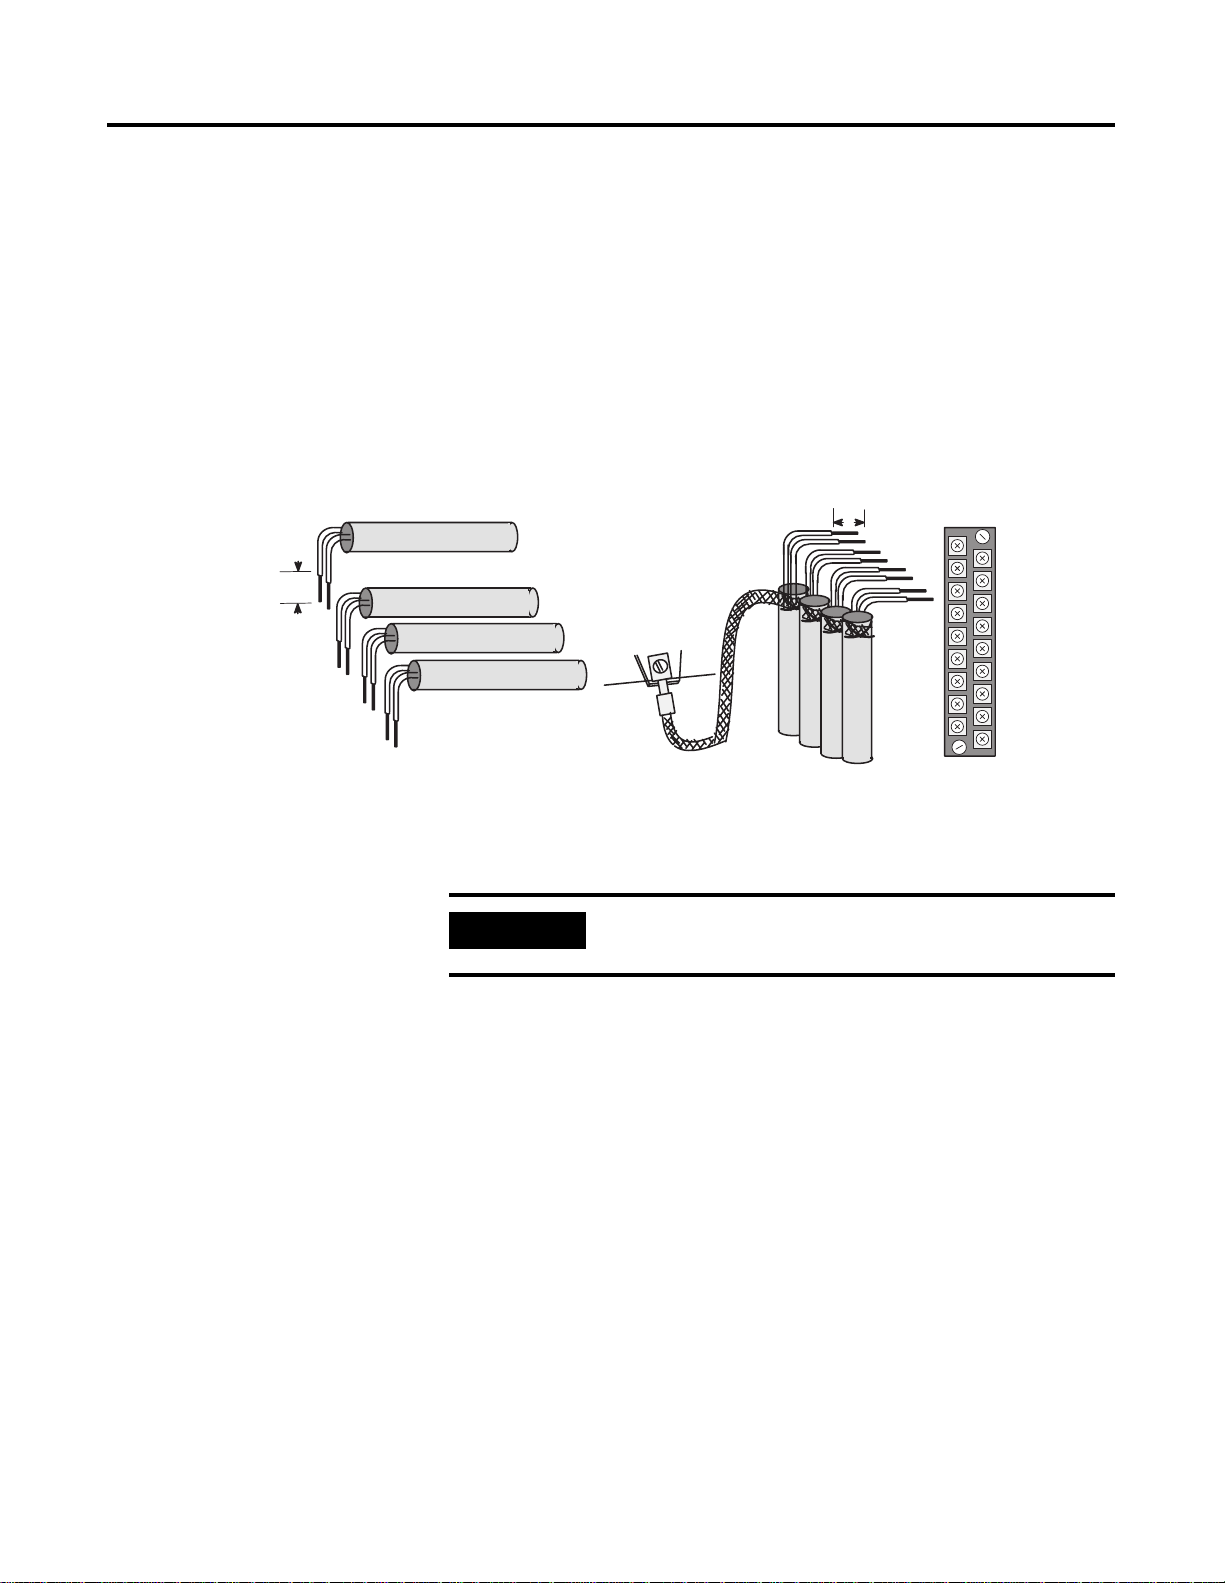
Installing and Wiring 2-9
7. At the source-end of cables from mV devices (See Figure 2.3
and Figure 2.4):
• remove the drain wire and foil shield
• apply shrink wrap as an option
• connect to mV devices keeping the leads short
Figure 2.4 Cable Preparation to Minimize Electrical Noise Interference
Wires
3/8”
Make
unshielded
wires as
short as
possible.
Limit braid length to 12” or
less. Solder braid to lug on
bottom row of I/O chassis
bolts.
IMPORTANT
Make unshielded wires
as short as possible.
Solder drain wires to
braid at casing.
Connect I/O
chassis bolt to
earth ground
3/8”
Signal
Wires
Cables
Terminal
Block
Chnl 0
Chnl 1
Chnl 2
Chnl 3
n/c
If noise persists, try grounding the opposite end of
the cable. Ground one end only.
Publication 1746-UM010 B- EN-P - April 2001
Page 26

2-10 Installing and Wiring
Specifications
Backplane Current
consumption
110 mA at 5V dc
85 mA at 24V dc
Backplane power consumption 0.6W maximum (0.55W @ 5V dc, 2W @ 24V dc)
Number of channels 4 (backplane and channel-to-channel isolated)
I/O chassis location any I/O module slot except 0
A/D conversion method sigma-delta modulation
Input filtering analog filter with low pass digital filter
Normal mode rejection
between [+]input and [-]input
Common mode rejection
between inputs and chassis
greater than 50 dB at 50 Hz
greater than 60 dB at 60 Hz
greater than 120 dB at 50/60 Hz with 1K ohm
imbalance
ground
Channel bandwidth (-3db) 8 Hz
Calibration once every six months
Isolation 1000V transient or 150 VAC continuous
channel-to-channel or channel-to-backplane
Agency
Certifications
When product or
packaging is
marked:
Listed Industrial Control Equipment
Certified Process Control Equipment
Certified for use in Class I, Division 2, Groups A, B, C, D or
nonhazardous locations
Marked for all applicable directives
Marked for all applicable acts
N223
Publication 1746-UM010B-EN-P - April 2001
Page 27

Chapter
3
Configuring the Module
You configure the module by setting words and bits for each loop in
Configuration Block, N10:0–100, which your ladder logic uses to load
the module’s M1 file. We cover bit selections and word descriptions.
Refer to Table 3.B on page 3-13 for selections, units, and defaults.
Loop Operation Mode
Type of Loop Input
Word 1, Bits 0 and 1 for Channel 1
Use these bits to select how you want the loop to perform:
Mode of Loop Operation 01 00
monitor the loop to indicate temperature and alarms 0 0
perform PID loop control with temperature indication and
alarms
disable the loop 1 0
invalid sett ing 1 1
01
Word 1, Bits 2-5 for Channel 1
Use the following bits to sel ect type J or K thermocouple; any other
bit setting is invalid:
TC 05 04 03 02
type J 0 0 0 0
type K 0 0 0 1
1 Publication 1746-UM010 B- EN-P - April 2001
Page 28

3-2 Configuring the Module
Enable Loop Alarms
TC Break Response
Word 1, Bit 6 for Channel 1
Set this bit to enable alarms for the designated loop.
Word 1, Bits 7 and 8 for Channel 1
If the module detects a TC open wire for a loop in automatic mode,
you can select how the module responds in one of the following
ways:
TC Break Response 08 07
disables the loop 0 0
forces CV to TC Break Control value (word 4, below) 0 1
forces CV to manual % output (O:e.8 for loop 1) 1 0
invalid setting 1 1
For additional information, Refer to TC Break Control on page 3-5.
Loop Autotune Gains Level
Word 1, Bits 10 and 11 for Channel 1
You can change and download autotune gains level selection for any
or all zones at any time. When changed, you must redownload the M1
file (configuration) followed by the M0 file (autotune/gains) so the
module can recalculate PID values based on new loop autotune gains.
You do not need to re–autotune.
Autotune Gain Level 11 10
low 0 0
medium 0 1
high 1 0
very high 1 1
Publication 1746-UM010B-EN-P - April 2001
Page 29

Configuring the Module 3-3
Barrel/Non-barrel Control
Word 1, Bit 12 for Channel 1
You select between barrel and non–barrel control.
Select: for these applications: 12
barrel control heat–only or heat/cool 0
non–barrel control heat–only, cool–only, or heat/cool 1
Barrel Control
Select barrel control for multiple–zone applications in which there is
thermal conduction between the zones. Injection molding and
extrusion are good example applications because they use multiple
heater bands (zones) mounted on one thermal conductor (the metal
barrel). The barrel conducts heat between different zones. If you
select barrel control, also select between inner and outer zones (word
1, bit 13 for channel 1). A barrel loop is autotuned as the temperature
rises from a cold start to a temperature setpoint during startup.
Non–barrel con tr ol
Select non–barrel control for applications with independent loops and
no thermal conduction between zones. If you select non–barrel
control, the inner/outer zone selection doesn’t apply.
Switching the barrel control
For some applications, even though the loop s are independent with
no thermal conduction between zones, barrel control might provide
better performance than non–barrel control. If a loop has any of these
characteristics, you might want to use barrel control if the:
• time constant is greater than 10 - 30 seconds
• loop has a problem of overshooting the setpoint
• loop output is saturating (CV is at 100%) for a significant
duration
Publication 1746-UM010 B- EN-P - April 2001
Page 30

3-4 Configuring the Module
)
Inner/Outer Zone Selection
ATTENTION
If you switch a loop between non–barrel and barrel
control, you must re–autotune the loop before
operating it. If you don’t re–autotune, the autotune
values will be wrong for the application and the
!
gains will be greatly distorted.
Word 1, Bit 13 for Channel 1
If you make a selection for barrel control, you also must select
whether the loop is an inner zone or outer zone.
Select: for a zone: 13
inner not at either end of the
barrel
outer at either end of the barrel 1
The PID gain calculation algorithm for an inner zone is slightly
different than that for an outer zone to account for an inner zone
being more affected by adjacent zones. The inner zones are treated as
more of an integrating process than the outer zones.
0
Typical plastic injection barrel
with multiple temperature zones
Publication 1746-UM010B-EN-P - April 2001
Outer
Zone
Nozzle
Ts
T = temperature measurement point (thermocouple)
H = heater band (element
Inner
Zone
Zone 1 Zone 2 Zone 3
Hn
Tn
H1 H2 H3
T1 T2 T3
Inner
Zone
Outer
Zone
Ram
(Screw)
Tf
If you change the inner/outer zone selection after autotune, you must
re–autotune.
Page 31

Configuring the Module 3-5
High/Low CV Limits
TC Break Control
Words 2 and 3 for Channel 1
Use CV High and Low Limits to set up the loop mode:
For this loop
mode:
heat, only 0% 100%
cool, only -100% 0
heat/cool -100% +100%
CV
Low:
CV
High:
Word 4 or O:e.8 for Channel1
If a loop input circuit becomes open (open wire) the loop can not
measure temperature. In automatic mode, the lack of temperature
feedback makes it impossible to control the temperature. To guard
against this condition, the BTM module provides TC break detection.
When a break is detected, the module responds in one of these ways:
Standby Setpoint
• disables the loop
• forces CV to this (TC Break Control) value (word 4 for loop 1)
• forces the CV to the manual %–output value (O:e.8 for loop 1)
Once the thermocouple break has been repaired you must d isable the
loop and then re-enable it (through the input image table O:e.0/0
loop 1).
For additional information, Refer to TC Break Response on page 3-2.
Word 5 for Channel 1
When not using the runti me setpoi nt (O:e.4 f or loop 1) , use this value
to hold a lower temperature for faster warm up and/or optimum
standby conditions.
Publication 1746-UM010 B- EN-P - April 2001
Page 32

3-6 Configuring the Module
Heat/Cool Minimum On-times
Heat/Cool TPO Period
PV Rate and Associated
Words 6 and 8 for channel 1
These values determine the minimum cycle time after which loop
TPO bits will turn ON. They are used to allow contactors time to close
or pull in. If the contactor is energized for less than this value, the
contactor will not close, but the attempt will count as a cycle.
For example, suppose you set the TPO period for 10 seconds and the
minimum ON time to 1 second. Then if the module calculates a CV%
of 10% or less, the TPO bit for that zone will not tur n ON .
Words 7 and 9 for Channel 1
When CV loop output is time–proportioned (TPO), use this value to
set the interval between successive turn–ONs. For less than a 100%
output level, the output goes OFF for the balance of the interval.
Word 10 and Alarm Bit I:e.4/05 for Channel 1
Alarm
High/Low Temperature and Deviation Alarms
The PV Rate is a setpoint with an associated alarm that indicate s when
the temperature is rising too rapidly. If the zone’s PV has risen more
than this setpoint in one second (in auto mode), the module sets the
PV rate alarm bit (I:e.4/05, loop 1). The module only reports this
alarm - no action is taken.
Words 11-14 for Channel 1
In the configurat ion block (M1 file) yo u select val ues for the follow ing
temperature–level alarms:
• low temperature alarm (word 11 for channel 1)
• high temperature alarm (word 12 for channel 1)
• low deviation alarm from the set point(word 13 for channel 1)
• high deviation alarm from the set point(word 14 for channel 1)
Publication 1746-UM010B-EN-P - April 2001
Page 33

Configuring the Module 3-7
Set
Point
Temp
0°
High Temperature Alarm Value (absolute)
High Deviation Alarm Value (track setpoint )
Low Deviation Alarm Value (track setpoint)
Low Temperature Alarm Value (absolute)
Time
Publication 1746-UM010 B- EN-P - April 2001
Page 34

3-8 Configuring the Module
Alarm Dead Band
Word 15 for Channel 1
Once the temperature alarm bits are on, they remain on until the
temperature drops below the high alarm by the alarm dead–band
value or rises above the low alarm by this value.
The alarm dead band applies to the CV value at the high and low
temperature alarms and deviation alarm values and provides a
hysteresis effect. Low and high alarms are defined as:
• Low Alarm With Dead Band — When the temperature falls
below the user–defined low alarm value, the low alarm bit is
turned on. When the temperature rises above the level of the
low alarm value but still below the level of the dead–band
value, the low alarm bit remains on. Only when the temperature
rises above the dead–band level will the alarm bit be turned off.
• High Alarm With Dead Band — When the temperature rises
above the user–defined high alarm value, the high alarm bit is
turned on. When the temperature falls below the level of the
high alarm value but still above the level of the dead–band
value, the high alarm bit remains on. Only when the
temperature falls below the dead–band level will the alarm bit
be turned off.
high (CV)
alarm level
low (CV)
alarm level
Deadband
Deadband
Temperature
Time
alarm off
alarm on
Publication 1746-UM010B-EN-P - April 2001
Page 35

Configuring the Module 3-9
Thermal Integrity Loss Detection
Ramp Rates
Words 16 and 17 for Channel 1
The loss of thermal integrity is detected when the loop, in automatic
mode, is not responding to a CV at 100% Detecti ng the loss of thermal
integrity requires an assumption of a minimum rate of change in the
temperature (PV) when the o utput (CV) is at 100%. Exa mples of a loss
of thermal integrity could be the failure of a heating–band contactor to
close, or a sensor not in proper position to measure true temperature.
The values you enter in words 16 and 17 for loop 1 establish a
minimum rate of change (°/min.) in the temperature input (PV) that
you allow when the output (CV) is at 100% in automatic mode. The
temperature change value you enter in word 16 divided by the period
value you enter in word 17 is the thermal integrity rate.
IMPORTANT
Once loss of thermal integrity is detected, you must
clear this condition by disabling the affected loop
and then re–enabling it. To disable this feature, enter
zero in for both setpoints.
Words 18 for Chann el 1
Non-barrel Autotune Disturbance Size
This value ramp s th e se t poi nt in st ep s to the new setpoint.
Word 20 for Channel 1
This is a pure %–output step function for performing a non-barrel
autotune. It is added to the current output (%). It should be applied
under steady–state conditions. The loop operating mode must be
non–barrel.
EXAMPLE
Consider this:
• CV is 10%
• non-barrel Autotune Disturbance Size is 10%
If an autotune is invoked the CV’s output would go
to 20% for the duration of the Autotune.
Publication 1746-UM010 B- EN-P - April 2001
Page 36

3-10 Configuring the Module
Table 3.A Implied Decimal Po i nt Examples
Parameter Given Range
IMPORTANT
Because loop values are stored and reported in
integer files, you must understand the meaning of
implied decimal point (IDP). Otherwise, the
magnitude of your intended value may be in error by
as much as 1000, depending on the position of the
IDP.
Implied Decimal Point
When entering or reading integer values, the range, given in Table
3.A, provides the implied decimal point. It is the number of digits to
the right of the decimal point (for an example (IDP) range of 0.0 thru
3276.7, the implied decimal point is 1).
Status values are similarly read. You must know the range of the value
to read it correctly. For example, if reading a heat integral (0.0000 thru
3.2767), a display of 5000 would have a value of 0.5.
(1)
IDP
Example
Thermal Integrity
Standby Setpoint
TPO Period 0.00 thru 100.00
Cool Proportional 0.000 thru 32.767 3 If you want to store a value of 18, enter 18000.
Heat Integral 0.0000 thru 3.2767 4 If you want to store a value of 0.5, enter 05000.
(1)
IDP indicates the number of digits from the right that locates the implied decimal point.
0 thru 100
0.0 thru 32767.7
sec.
o
o
0
If you want to store a value of 66
1
If you want to store a value of 660.0
2 If you want to store a value of 6 seconds, enter
00600.
o
, enter 00066.
o
, enter 06600.
Publication 1746-UM010B-EN-P - April 2001
Page 37

Configuring the Module 3-11
Configuration Block, M1 File, Loops 1-4 N10:0-100
Startup Aggressiveness factor
Configuration block (M1 file) contains 101 words as listed below. Data
table location for Loops 1-4 are located in N10. For each additional
1746-BTM, add 1 to N10 (N11:0-100).
The startup aggressiveness factor (SAF) modifies the pre-set point
value. The pre-set point value is the temperature at which you switch
from the cold startup algorithms to PID control. The pre-set point
value is calculated from the auto tune data. The value is returned
through the rotator bits. In the example code it would be found in
Nxx:236 thru 239, a value for each channel.
The startup aggressiveness factor increases the pre-set point value by
percentage. For example:
EXAMPLE
Consider:
• setpoint is 400.0°
• preset point for channel 1 (nxx:236) is 75°
• startup aggressiveness factor is 0%
The point at which you would switch from the cold
startup algorithm to PID control would be:
IMPORTANT
SAF
---------- 100
0()
presetpoint×
75.0×
75.0×
325°=–
343.8°=–
setpoint 1
400.00 1
If the startup SAF factor is set to 25%, the poi nt at
which you would switch from the cold startup
algorithms to PID control would be:
400.00 1
The higher the startup aggressiveness factor is, the
closer to setpoint you will go before you switch from
the cold startup algorithms to PID control. If your
pre-set point is too close to the actual setpoint you
can expect overshoot to occur.
If you change the startup aggressiveness factor you
will need to redownload the M1 configuration and
the M0 autotune block for the change to take effect.
–
–
-------- -
–
100
25()
----------
–
100
Publication 1746-UM010 B- EN-P - April 2001
Page 38

3-12 Configuring the Module
Ramp Rates
The ramp rate value modifies the setpoint in steps until it reaches the
new setpoint. This value works in conjunction with the ramp enable
and ramp hold bits in the output image table for each channel.
EXAMPLE
The following outlines the relationship between
ramp rate, TPO:
• ramp rate 10 °/min.
• TPO of 10 sec.
• set point of 300°
• current tempe r at ure of 100°
• your goal is to ramp to the setp oint, but hold at
200° for 10 minutes; then continue to ramp to set
point.
To set the ramp enable bit, do the following:
1. Go to the output image table to set the ramp
enable bit.
2. A snap shot of the current temperature occurs,
which becomes the current setpoint.
3. A calculation is performed to determine the
amount the setpoint needs to be raised every
TPO period, so every TPO period the setpoint
increases 1.67° until the setpoint is reached.
1min
------------ 60
TPO×
10 1.67°=sec× TPO⁄
period
1min
------------ 60
×
ramprate
10°
4. Temperature ramps. Ladder logic determines
when you reach 200°. When 200° is reached,
ladder logic would set the ramp hold bit in the
output image table, and ladder logic would start a
10 minute time.
5. When the 10 minute time runs out, the ladder
logic would reset the ramp hold bit in the output
image table.
6. Ramping of the setpoint would continue until
300° is reached. At that point, ladder logic would
determine 300° was met, and it would reset the
ramp enable bit.
Publication 1746-UM010B-EN-P - April 2001
Page 39

Table 3.B Block Header (word 0 / N10:0) = 8801 (-30719 decimal)
Configuring the Module 3-13
Loops 1-4
Word #
1 2 3 4 bit to Configure Bit Select or Range 15 14 13 12 11 10 9876543210
1265176
0-1 operati on mo de
2-5 input type
6 alarm enable Disable = 0; Enable = 1 X
7-8 TC break configuration
9reserved
10-11 Autotune gains
12 Barrel control Barrel=0;Non-barrel=1 X
13 Zone I nner=0; Outer=1 X
14-15 reserved
2 27 52 77 0-15 High CV limit % -100.00 thru +100.00% default = +100.00%
3 28 53 78 0-15 Low CV limit % -100.00 thru +100.00% default = 0.00%
4 29 54 79 0-15 CV for TC break -100.00 thru +100.00% default = 0.0
5 30 55 80 0-15 Standby setpoint 0.0 thru 3276.7° default = 0.0
6 31 56 81 0-15 Heat on time (min.) 0.00 thru 100.00 sec. default = 0.00
7 32 57 82 0-15 Heat TPO period 0.00 thru 100.00 sec. default = 5.00
8 33 58 83 0-15 Cool on time (min.) 0.00 thru 100.00 sec. default = 0.00
9 34 59 84 0-15 Cool TPO period 0.00 thru 100.00 sec. default = 5.00
10 35 60 85 0-15 PV alarm rate -3276.8 thru 3276.7°/s default = 0.0
11 36 61 86 0-15 Low temp alarm -3276.8 thru 3276.7°/s default = +999.9
12 37 62 87 0-15 High temp alarm -3276.8 thru 3276.7°/s default = +999.9
13 38 63 88 0-15 Low deviation -3276.8 thru 3276.7°/s default = +999.9
14 39 64 89 0-15 High deviati on -3276.8 thru 3276.7°/s default = +999.9
15 40 65 90 0-15 Alarm dead band 0.0 thru 10.0° default = 0.0
16 41 66 91 0-15 T hermal Inte grity Loss 0 thru 100° de fault = 5
17 42 67 92 0-15 Integrity Rate 0 thru 100 minu tes default = 20
18 43 68 93 0-15 r amping 0 thru 100°/min. default = 0
19 44 69 94 reserved
20 45 70 95 0-15 N on-barrel a utotune
21 46 71 96 0-15 Startup
<=25 <=50 <=75 <=99 reserved
disturb size
aggressiveness factor
Monitor, No PID Control
Control loop with PID
Disable loop
Type J
Type K 0001
disable PID loop (CV=0)
Use thermal runaway
CV
Use manual mode CV 10
low gains
medium gains 01
high gains 10
very high gains 11
0.00-100.00% default = 10.00
0 thru 100 default = 0 fo r heat or cool, only; 25 for heat/cool
Set a bit or enter a value
00
01
10
0000
00
01
00
Publication 1746-UM010 B- EN-P - April 2001
Page 40

3-14 Configuring the Module
Publication 1746-UM010B-EN-P - April 2001
Page 41

Chapter
4
Setting Autotune and Gains Values
This chapter shows you how to independently set the gains for each
PID loop of the BTM module. This includes:
• setting PID gains
• autotuning the loops
• fine tuning the loops
• using the PID equation
• configuring the autotuning and gains block
Sequence of Setting PID Gains
Any time you successfully au totu ne the lo op, writ e an aut otun e blo ck
to the module, or write a gains block to the module, a new set of PID
gains is established on the module. The following list summarizes the
process:
• Autotuning causes the module to measure the process dynamics
and calculates PID gains.
• Reading the PID gains block from the module copies the PID
gains generated by autotuning into the SLC files.
• Writing the PID gains block to the module overwrites any PID
gains that had been in the module.
• Autotuning or writing the autotune block to the module causes
the module to calculate PID gains and overwrite any PID gains
that had been in the module.
At initial start–up, you must write the autotune block to the BTM
module or perform autotuning. If you select autotuning, for any loop
that is successfully tuned, the gains are calculated by the module.
Gains you sent to the module for a loop in any gains block previous
to successful autotuning of the loop are superseded by the gains
derived from autotuning. If you then read the gains block, it contains
the gains derived from autotuning.
If autotuning is not successful for any loops (as i ndicated in the status
block) the gains you sent for those loops before autotuning is used by
the module.
1 Publication 1746-UM010 B- EN-P - April 2001
Page 42

4-2 Setting Autotune and Gains Values
Once autotuning is complete, you mus t read th e gain s blo ck from th e
module to store it in SLC processor memory.
You can write the autotune and gains block either of these ways:
• Send autotune block to the module in words 1-24
(NXX:110-134). This causes the module to calculate the PID
gains. In this case, set the block header in word 0 (NXX:110) to
880A hexadecimal.
or
• Send PID gains only in words 25-48 (NXX:145-168). This
overwrites the current PID values in the mod ule. In this case, set
the block header in word 0 (NXX:120) to 880B hexadecimal.
Autotuning the Loops
IMPORTANT
The module’s memory is volatile. Whenever power to the module is
interrupted, you must establish the gains again. If you don’t send an
autotune block, PID block, or both blocks to the module, the module
will not work in automode. Sending the autotune block establishes
the start–up algorithm and the values the module uses to calculate the
PID gains, causing the module to recalculate th e PID gains. H owever,
you can override the autotune gains by sending the gains block after
the autotune block.
IMPORTANT
You select autotuning from the output image table block (Refer
to Using the Output Image Table on page 5-8). For each loo p, you
must turn on the specific bit to enable autotuning for the
corresponding loop. To trigger the start of autotuning, you must also
cause a 0–to–1 transition of word 12, bit 1 of the output image table.
When you download either an autotune or gains
block, the BTM module’s PID algorithm requires
time to adjust, proportional to the thermal mass of
the system. This could cause a slow or unexpected
system response .
You must initially download M0 and M1 files for the
module to operate.
Publication 1746-UM010B-EN-P - April 2001
During autotuning, the module measures system parameters. At the
end of autotuning, the module calculates PID gains based on these
parameters and your selection of low, medium, or high PID gain level
in the configuration block. When autotuning is complete, the PID
gains calculated from autotuning are available in the gains block that
you can read from the module.
Page 43

Configuration Block
Your selection of PID gains level:
• low
• medium
• high
Autotune Block
System parameters
Setting Autotune and Gains Values 4-3
Whenever you write autotune values to the module, it recalculates
PID gains based on measured system parameters stored in the
autotune block and your selection of low, medium, or high PID gain
level stored in the latest conf igu rati on b lock. If yo u chan ged th e level
of PID gains selection in the configuration block in the mean time, the
PID gains calculated would be different from those calculated
originally.
Autotuning
Calculations
Gains Block
PID gains
Fine-Tuning the Loops
After autotuning, you may want to fine–tune the loops by manually
setting the gains. As you fine–tune a loop, first try adjusting the
proportional gain; this will have the greatest impact. Your second
choice for adjustment should be the integral gain. The derivative gain
should be the last choice for fine–tuning a loop.
If the loop over–shoots the set point either at start–up or at a change
of set point, (See Figure 4.1) you may be able to dampen the loop
response by doing one or more of the following (in order of
effectiveness):
1. decrease the proportional gain
2. decrease the integral gain
3. increase the derivative gain
Figure 4.1 Loop Over-shoot
Set Point
Publication 1746-UM010 B- EN-P - April 2001
Page 44

4-4 Setting Autotune and Gains Values
If the loop is slow in reaching the set point either at start–up or at a
change of set point, (See Figure 4.2) you may be able to improve the
loop response by doing one or more of the following (in order of
effectiveness):
1. increase the proportional gain
2. increase the integral gain
3. decrease the derivative gain
Figure 4.2 Loop Slow to Set Point
Set Point
Using the PID Equation
The module provides dependant PID control action. Dependent
control action can be represented by the equation
CV KpEKiEDtK
=
The module is capable of performing PID control by calculating the
solution to an approximation of the PID equation. The approximation
is represented by the equation:
t
Ed
------
+
∫
0
+⋅
z
td
CV KpEKiE ∆tK
=
+
Where:
t
Where:
CV = Control variable
Kp = Proportional gain (no units)
E = Error (SP-PV or PV-SP)
Ki = Integral gain (repeats /seconds)
Kz = Derivative gain (seconds)
t = Time
t
∆E
-------
+⋅
∑
0
z
∆t
Publication 1746-UM010B-EN-P - April 2001
∑
0
E
∆t⋅ E1∆tE2∆tE3∆tetc+⋅+⋅+⋅=
.....
Page 45

Setting Autotune and Gains Values 4-5
Entering Autotune/Gains
The autotune/gains block (M0 file) contains 49 words as listed in
Table 4.A below. For each gain value, you enter a 16–bit integer
Values with Implied
value.
Decimal Point
IMPORTANT
When entering or reading integer values, the range, given in the
associated table, tells you the implied decimal point. It is the number
of digits to the right of the decimal point (for an example range of 0.0
thru 3276.7, the implied decimal point is 1).
Table 4.A Autotune/Gains Values with Implied Decimal Point
Parameter Given Range
Cool Time Constant 0.0 thru 32767.7 sec. 1 If you want to store a value of 660.0, enter 06600.
Heat Gain
0.00 thru 327.67
o
/sec.
Because loop values are stored and reported in
integer files, you must understand the meaning of
IDP. Otherwise, the magnitude of your intended
value may be in error by as much as 1000,
depending on the position of the IDP.
(1)
IDP
Example
2 If you want to store a value of 100.00, enter 10000.
Cool Proportional 0.000 thru 32.767 3 If you want to store a value of 18, enter 18000.
Heat Integral 0.0000 thru 3.2767 4 If you want to store a value of 0.5, enter 05000.
(1)
IDP indicates the number of digits from the right that locates the implied decimal point.
Publication 1746-UM010 B- EN-P - April 2001
Page 46

4-6 Setting Autotune and Gains Values
PID Gains/Autotune Block, M0 File for Loops 1–4
IMPORTANT
Word numbers for loops 1–4 are in left–most
columns. For corresponding NX:xx address, add 110
to word the number.
Table 4.B PID Gains/Autotune
(N10:110-158): Block Header (word 0 / N10:110) = 880B (-30709 decimal)
Loops 1-4 Autotune Values (N10:111-134)
1234To Configure Range
1 7 13 19 Heat gain 0.00 thru 327.67°/sec.
2 8 14 20 Heat time constant 0.0 thru 3276.7 sec.
3 9 15 21 Heat dead time 0.0 thru 3276.7 sec.
4 10 16 22 Cool gain 0.00 thru 327.67°/sec.
5 11 17 23 Cool time constant 0.0 thru 3276.7sec
6 12 18 24 Cool dead time 0.0 thru 3276.7 sec.
Loops 1-4 PID Gains Values (N10:135-158)
1234To Configure Range
25 31 37 43 Heat proportional 0.000 thru 32.767
26 32 38 44 Heat integral 0.0000 thru 3.2767 rpts/
sec.
27 33 39 45 Heat derivative 0.0 thru 3276.7 sec.
28 34 40 46 Cool proportional 0.000 thru 32.767
29 35 41 47 Cool integral 0.0000 thru 3.2767 rpts/
sec.
30 36 42 48 Cool derivative 0.0 thru 3276.7 sec.
Note: Refer to Download and Upload Settings on page 9-3 for
download command bits.
Publication 1746-UM010B-EN-P - April 2001
Page 47

Control and Autotune a Loop
This chapter explains how to:
• control loop operation
• autotune a loop
Chapter
5
Controlling a Loop
At initial start–up, you must write the M1 configuration block to
establish the module’s mode of control. Then, you must update the
output image table any time you want to change the operating mode.
M1 Configuration File
You select the loop control mode in the configuration file:
Words Bit 01 Bit 00 Lets you select
1, 26, 51, 76
for loops 1-4
0 0 monitor the loop
0 1 control the loop with PID
1 0 disable the loop
Output Image Table
If you select “control–the–loop” mode, you control loop operation
with these words and bits in the output image table (abbreviated list):
Words Bit Lets you
0-3
loops 1-4
4-7 n/a enter run temperature setpoints
8-11 n/a enter manual CV% output values
12
global for
all loops
1 Publication 1746-UM010 B- EN-P - April 2001
00 enable or disable the loop
03 enable or disable autotune
01 invoke autotune
02 abort autotune
03 reset error codes
Page 48

5-2 Control and Autotune a Loop
Figure 5.1 Control Mode Selections and Loop Operation
through the M1 configuration bl ock
Control Mode Selectio ns
Disable the Loop
Monitor the Loop
Control the Loop
Autotune a Loop
through the output image table
Loop Operation
Hold CV=0, and no temperature or al ar ms
Hold CV=0, but monitor temperatur e and provide
Disable Loop Control
Enable Loop Control
Manual Mode
Automatic Mode
temperature and alarms in the status block
The manual output value in the configur at ion block
is used as the CV value
The PID algorithm generates the CV value
The BTM module uses the output image table to control loop
operation. See Table 5.C on page 5-8 for the listing of words and
bits. Operating Commands to Loops 1-4
Use the following as a guide:
Requirements for Autotune
• Start autotune from a steady–state temperature. For best results,
do a cold start. If the temperature fluctuates, autotune may not
provide accurate results.
o
• The runtime setpoint for autotune must be at least 50
F (28.7o
C) above current temperature or autotune will not start.
Publication 1746-UM010B-EN-P - April 2001
Page 49

Control and Autotune a Loop 5-3
• Set the TPO period smal ler than the syst em dead time. Autotu ne
algorithm may calculate excessive gains if system dead time is
less than the TPO period. This may cause the PV to overshoot
Figure 5.2 Set TPO Period
output (CV)
changed
Temperature
Output (CV)
system dead time
System dead time should be larger than one
TPO period for autotune to work properly
1 TPO period
t
0
Time
• The autotune algorithm does not take the temperature to
setpoint. When autotune is complete, the zones will return to
the mode (auto or manual) that was selected before autotune.
Figure 5.3 Autotune setpoint zones
Temperature
system dead
time
maximum slope
Time
Return to the control mode
that was selected before
autotune
autotune
complete
Publication 1746-UM010 B- EN-P - April 2001
Page 50

5-4 Control and Autotune a Loop
Items to check before autotune
Each loop must:
• be configured with a valid M1 file and no errors (N10:212-215)
• be set for barrel mode
• be set in manual mode and that run setpoints are selected,
starting from a cold start. If not starting from a cold start, at a
steady state temperature.
• have the TPO period set considerably smaller than the system
dead time.
A good place to start is 5 or 10 seconds.
• not have any existing alarm conditions that could cause
problems (such as a TC break)
Autotune barrel control applications
Autotune enables the mod ule to compute PID values for optimum
temperature control. You must load the program and use the
following procedure to autotune the module.
For barrel control, better results are achieved when you autotune all
loops associated with the barrel at the same time. After autotune,
each zone will return to the mode (auto or manual) that was selected
beforehand.
IMPORTANT
For best results, start from room temperature (cold
start).
Publication 1746-UM010B-EN-P - April 2001
Page 51

Control and Autotune a Loop 5-5
1. Assume using data table N10 in the following example. Set initial
conditions:
Table 5.A Configuration File N10 Data Table Example
N10:1 bits 00 01 set for PID control
N10:26 bits 00 01 set for PID control
N10:51 bits 00 01 set for PID control
N10:76 bits 00 01 set for PID control
remaining bits/words set for your application
Table 5.B Data Table Example:
Output image buffer table words 180–183
bits 00–03 for loops 1–4.
bit 00 1 enables PID control
bit 01 0 puts loop into manual mode
bit 02 1 uses runtime setpoint
bit 03 1 enables autotune
• Set to zero Output image buffer table words 188–191 for
loops 1–4.
• In the sample code, it zeros manual outputs to remove
control signals from loops.
2. Download the M1 Configuration File by setting N7:12/00 = 1.
3. Download the M0 Autotune File by setting N7:12/01 = 1.
4. Verify that the M1 Configuration File downloaded:
a. Check input image buffer words 164–167 bits 03, 04 for loops
1–4 to verify:
• bit 03 = 1 module received a valid M1 file for the loop
•bit 04 = 0 no parameter errors for the loop.
If bit 04 (parameter error) is set for any loop, look for the
error code in N10:212–215.
Refer to Locating Error Code Information on page 8-2.
b. Check input image buffer words 168–171 bits 00–02 for l oops
1–4 to verify that the module:
• bit 00 = 1 enabled PID control
• bit 01 = 0 put loop into manual mode
• bit 02 = 1 used runtime setpoint
Publication 1746-UM010 B- EN-P - April 2001
Page 52

5-6 Control and Autotune a Loop
5. Enter runtime temperature setpoints (at least 50oF (28.7oC)
above current temperature) into output image buffer words 184–
187 for loops 1–4.
IMPORTANT
For implied decimal point, enter 2000 for 200
o
6. Invoke autotune. (Starts autotu ne for loops enabled in step 1.)
Set output image buffer table word 192, bit 1 = 1.
The module needs a 0–1 transition of this bit.
7. Verify autotune is in progress.
Monitor input image buffer word 168, bit 11 for a 0–1 transition.
8. Reset the autotune invoke bit.
Reset output image buffer table word 192, bit 1 = 0.
9. Enable each loop for automatic mode.
This lets each loop control to run setpoint when autotune
completes.
a. Output image buffer words 160–163 bit 01 for loops 1–4 bit
01 = 1 puts loop into automatic mode
10. Verify that autotune is complete and successful.
Input image buffer words 168–171 bits 03 and 04 for loops 1–4
bit 03 = 1 autotune complete
bit 04 = 1 autotune successful
If bit 04 = 0 (not successful) for any loop, look for the error code
in N10:212–215. Refer to Locating Error Code Information on
page 8-2.
Publication 1746-UM010B-EN-P - April 2001
11. Upload the autotune/PID gains block to the processor for
storage. Set word N7:12 = 24. Following a power loss or module
replacement, you can download the autotune/PID gains block
to avoid repeating this procedure.
12. We suggest that you modify our ladder code Refer to Obtaining
the Sample Program from the Internet on page 9-1 to set N7:12 =
3 at power up. This will automatically download M0 autotune
data and M1 configuration data files to the module to start
module operation.
Page 53

Control and Autotune a Loop 5-7
Example: Autotune non–barrel control applications
1. Enter a safe non–barrel autotune disturbance size in the M1 file.
• Disturbance size is the step output that the module uses to
autotune. For example, if disturbance size is 15% and current
CV is:
0% when autotune is invo ked, the CV changes to 15%
10% when autotune is invoked, the CV changes to 25%
• Optimum disturbance lets temperature rise, then level off. If
too large, temperature will not level off and autotune will be
unsuccessful.
2. Make sure all zones have valid M1 fi les and n o parameter e rrors.
3. Start Autotune from a cold start or start from a steady–state
temperature.
• If doing a cold start, invoke autotune after putting loop into
manual mode and setting manual CV output to zero.
• If starting from a steady–state temperature, invoke autotune.
Temperature
4. When autotune completes, upload the autotune and gains block.
5. Return the zone to auto mode.
Temperature for safe autotune disturbance size
Autotune completes when
temperature reaches steady
state
dead time
Time
Tr o ub l es ho otin g Autotune
The module reports successful completion of autotune in status word
N10: 168-171, bits 03, and 04 in the input image buffer table. If
autotune was not successful, look for autotune error codes in
N10:212-215. Refer to Locating Error Code Information on page 8-2.
Publication 1746-UM010 B- EN-P - April 2001
Page 54

5-8 Control and Autotune a Loop
Using the Output Image
The output image table contains 16 words as shown in Table
5.Cbelow. You must enter a 16–bit signed integer value for the run
Table
temperature setpoint and manual output. If you are using the example
code from the manual you will not manipulate the output image table
directly. You will manipulate the output image buffer N10:180-195.
• For a run temperature setpoint, the implied decimal point is 1
place from the right (causing the resolution to be 0.1). For
example, if you want a value of 499.9, enter 04999.
• For the manual output, the implied decimal point is 2 places
from the right (causing the resolution to be 0.01). For example,
if you want a value of 49.99%, enter 04999.
T able 5.C Operating Commands to Loops 1-4
Loops 1-4
Word #
12 3 4 bit to Configure Bit Select or Range1514131211109876543210
0 1 2 3 0 loop control Disable=0; Enable=1
1 Auto/manual Manual =0; Auto =1
(2)
2 Setpoint select
3 Autotune enable Disable=0; Enable=1 X
4
PID integral reset
5 Ramp enable Disable = 0;Enable =1 X
6 Ramp hold Hold =0; Don’t hold =1 X
7-15 Reserved
4 5 6 7 0-15 Run temp setpoint -3276.7 thru 3276.7
8 9 10 11 0-15 Manual Output -100.00 thru +100.00%
(1)
Requires a 0-to-1 transition for each reset.
(2)
For loops 1-4 standby setpoint is stored in N10:5, 30, 55, 80 respectively.
(3)
Entered bel ow
(1)
Standby=0
Accume = 0;Reset =1 X
; Run=1
(3)
Set a bit or enter a value
X
X
X
Publication 1746-UM010B-EN-P - April 2001
Note: Refer to Download and Upload Settings on page 9-3 for
download command bits.
Page 55

Control and Autotune a Loop 5-9
Global Commands to All Loops
Word Bit To Control Selected By 1514131211109876543210
12 0 Temperature units F =0;C =1
1 Autotune invoke invoke =1;None = 0
2 Autotune abort Abort = 1;None =0
3 Reset error codes None =0; Re set =1
3-7 Reserved
Selection of Reported value
if bit 11 is not set in the
output image buffer
N10:192/11
8-10
Selection of Reported value
if bit 11 is set in the output
image buffer
N10:192/11
11 Advanced Rotator Values Disable = 0;Enable =1
12 MO download request None =0; Download =1
13 M1 download reques t None =0; Down load =1
14 M0 upload request None =0; Upload =1
15 M1 upload request None =0; Upload =1
13 0-15 Reserved
14 0-15 Calibra tion word
15 0-15 Reserved
Current Setpoint
Current Erro r Value 010
Current CV (lo op output) 011
Current Erro r Code 100
Cold Junction Temperature 101
Firmware Revision Number 110
P Contributi on
I Contribution 010
D Contribution 011
Pre-set Point 100
Wait Period 101
Reserved 110
001
001
IMPORTANT
The sample program returns all six variables. For
their data table locations, Refer to BTM201.rss Data
Table Layout on page 9-2 and BTM50220.RSS Data
table layout on page 9-7.
Remember that the module returns the control variable (CV) of each
loop to the input image table as both a numeric value (current CV)
and a time–proportioned output (TPO). For additional information,
Refer to BTM201.rss M1, M0, Input Image, Output Image, and Rotator
Code Data Table on page 9-4 and BTM50220.RSS M1, M0, Input
Image, Output Image, and Rotator Code Data Table on page 9-8.
Publication 1746-UM010 B- EN-P - April 2001
Page 56

5-10 Control and Autotune a Loop
BTM Auto Tune
The 1746-BTM Auto Tune procedure was designed to be performed
as a one-time event from which all characteristics of the system being
controlled could be identified and incorporated into the control
scheme.
The identification procedure has two critical points:
Before exercising the system with the identification procedure the
system in question must be as stable as possible. Essential to a good
system identification routine is the assumption that there is a high
correlation between excitat ion and system response. The identification
procedure tries to identify the system by assuming that an y excitation
used to disturb the sys tem is solely responsible for the observed
reaction of that same system. If heat or any other form of input is
exciting the system other than what th e identi fication rout ine is aware
and in control of, the routine will draw erroneous conclusions about
its observations and misidentify the system in question. Thus at the
onset of auto tune it is desired to let all of the influences other than
direct auto-tune excitation dissipate before excitation is applied.
In the BTM there is a wait period at the beginning of the auto tune
procedure. Once it is initiated for all of the aforementioned effects to
dissipate. Then and only then will the routine qualify the system as
stable and begin excitation. This, however, does not mean that the
system must have zero output. It does mean that the system must
remain at a consistent temperature with very little fluctuation. There
are two ways in which this condition can be achieved. The first and
most typical, is that of a cold-start condition. In this case there is no
energy being inputted to the system and the system is stable with
respect to ambient conditions. With regards to the BTM this is
achieved easiest by setting all active zones to Manual Mode with 0%
(zero percent) output. The second most common way to achieve
stability is with a non-zero output being applied to the system, either
in Manual or Automatic Modes. It is perfectly acceptable to have a
non-zero output applied to the system as long as it is stable: in
Automatic Mode this is stability at a setpoint, in Manual Mode this is a
single manual output value and a settled response (no temperature
variation). A common mistake is to have heat applied to the system
prior to auto-tune and turn it off just prior to auto-tune initiation. In a
high lag situation where it takes some finite amount of time for that
energy to manifest itself as temperature, the result is as follows. The
auto-tune routine waits for stability and qualifies it, it then attempts to
exercise the system by giving a step output, the heat that was
previously introduced into the system finally produces a temperature
change, the auto-tune routine marks the rise in temperature as being a
direct result of its excitation of the system and records the amount of
time from the beginning of its step output to the start of the
temperature rise as the deadtime. In this case the system is now
misidentified with an artificially short deadtime.
Publication 1746-UM010B-EN-P - April 2001
Page 57

Control and Autotune a Loo p 5-11
The second critical procedure is that of finding the maximum rate of
change of the system for the given excitation. A number of the BTM’s
auto-tune failures are associated with this proce dure: ‘temperature will
exceed deadtime’, ‘too much noise in the system’, etc. For any given
step change of ex citation for a given system there will ultimately be a
maximum rate of change (max slope) attributable to that excitation.
This information is used to identify system ‘gain’ and ‘time constant’
information.
When trying to find a max imum slope, th e system must be ab le to rise
in temperature sufficiently to guarantee that a maximum slope has
been attained. Thus a minimum temperature differential has been
identified and documented as being necessary and sufficient to a
successful auto-tune. If there is not enough temperature differential
between the sta rt in g te mp e ra t ure and the setpoint to achi e v e
maximum slope an error is generated and auto-tune is aborted.
Another cause of error here is in having sufficient temperature
differential to attain maximum rate of change but not enough
differential for the system to recover from the test successfully. The
system will overshoot setpoint as a result of the test. The module
‘knows’ when this is going to happen as a result of the gain and time
constant information previously learned and flags it as an error if
conditions are appropriate.
After these two tests are completed, an identical procedure is applied
to exercise the cooling control on the system if it is so configured, in
which case the autotune procedure would continue by first stabilizing
at setpoint. This is a module-wide event, meaning that all zones
enabled on the module must be stable before the procedure will
continue.
When all tests have been completed, the module will default to the
mode it was set at prior to the auto tune, auto or manual, and behave
accordingly.
Publication 1746-UM010 B- EN-P - April 2001
Page 58

5-12 Control and Autotune a Loop
A synopsis of the complete tuning procedure would be as follows:
1. W ait f or all zones to be stable. A module wide event inclusive of
all zones enabled for control and autotune at the time of auto
tune invoke.
2. When stability has been qualified, all enabled zones will be
subject to maximum configured output. At this time the system
is observed for a departure from stability to quantify the
deadtime of the system.
3. The output continues at the same value until a maximum rate of
change for each active zone in the auto tune has been identified
and recorded.
4. For heat or cool o nly zones , t he t est is no w compl ete, auto tune
finishes, and the individual zon es revert to their current
configuration and mode.
5. For zones designated as heat/cool, they will continue to setpoint
under ‘slow’ closed loop control and stabilize. Again, this
stabilization is a module wide event and is inclusive of all heat/
cool zones engage d in the current au to tune .
6. When stability has been qualified, all enabled zones will be
subject to maximum (cool) configured output. At this time the
system is observed for a departure from stability to quantify the
deadtime of the system.
7. The output continues at the same value until a maximum rate of
change for each zone still active in the auto tune has been
identified a nd r e co rded.
8. The test is now complete, auto tune finishes, and the individual
zones revert to their current configuration and mode.
If for any reason the auto tune does no t successful ly complete fo r any
individual zone, that zones auto tune and gain parameters will not be
updated, and error codes will be displayed. Refer to Locating Error
Code Information on page 8-2
Publication 1746-UM010B-EN-P - April 2001
Page 59

Chapter
6
Monitoring Status Data
This chapter describes statu s d ata reported by the B TM module i n the
input image table (16 words), applicable to the sample program.
Input Image Table
Implied Decimal Point
You must interpret th e val ue of d isp layed 1 6–bit in teger n umbers. For
temperature values reported in words 0-3, the implied decimal point is
1 place from the right (for a resolution to be 0.1). For example, if
4999 is displayed, you must interpret it as 499.9.
Table 6.A Status Values from Each Loop
12 3 4 Bit Define M1 Indicated By 1514131211109876543210
0123 Current temperature (-3276.8° thru +3276.°7)
4 5 6 7 0 Open circuit 0 = None; 1 =Error
1 Under range 0 = None; 1 =Error
2 Over range 0 = None; 1 =Error
3 Configuration 0 = None; 1 =Valid
4 Parameter value 0 = None; 1 = Error
5 PV rate a larm 10 0 = None; 1 = Ala rm
6 Thermal Integrity 16 0 = None ; 1 = Alarm
7 High CV limit 2 0 = None; 1 = Alarm
8 Low CV limit 3 0 = None; 1 = Alarm
9 Low temperature 11 0 = None; 1 = Alarm
10 High temperature 12 0 = None; 1 = Alarm
11 Low d eviation 13 0 = None; 1 = Alarm
12 Hig h deviation 14 0 = None; 1 = Al arm
>15 Reserved
8 9 10 11 0 Loop control 0 = No; 1 = Enabled
1 Loop mode 0 = Manual; 1 = Auto
2 Setpoint 5 0 = Standby; 1 = Run
3 Autotune
complete
4 Autotune success 0 = No; 1 = Yes
5 Setpoint ramping 0 = No; 1 = Enabled
6 Heat TPO 0 = Off; 1 = On
7 Cool TPO 0 = Off; 1 = On
8-15 SeeTable 6.C on page6-2
12 13 14 15 Function and value of this word set by N10:192, b its 8-10. See Table 6.B
0 = No; 1 = Yes
0 = None; 1 = Alarm
1 Publication 1746-UM010 B- EN-P - April 2001
Page 60

6-2 Monitoring Status Data
Values reported in words 12-15 for loops 1–4 vary, depending on the
bit code set in global commands N10:192/bits 08-10 and reported in
input image word N10:168/bits 08-10. You must interpret the reported
value according to the implied decimal point:
Table 6.B Interpret Implied Decimal Points
If N10:168/10-09-08 Reports: Implied decimal point is: Interpret:As:
001
010
101
0 1 1 current CV (analog
100
110
current setpoint,
current er ror, or
cold–junction
temperatur e
output)
error code, or
firmware re vision number
1 decimal place
(from the right)
2 decimal places 4999 49.99
none 4999 4999
4999 499.9
Table 6.C Global Status from All Loops
Word Bit Define Indicated By 1514131211109876543210
8
upper
byte
9
upper
byte
Current setpoint
Selection of Reported
values
8-10
See Important Below
11 Autotune progress 0 = None; 1 = In progress
12 Cold junction low 0 = None; 1 = Alarm
13 Cold junction hi gh 0 = None; 1 = Alarm
14 Rese rved
15 Advanced rotator
values
8-11 Reserved
12 M0 download 0 = None; 1 = Download
13 M1 download 0 = None; 1 = Download
14 M0 upload 0 = No; 1 = Upload
15 M1 upload 0 = No; 1 = Upload
Current Error value 0 1 0
Current CV (loop output) 0 1 1
Current error code 1 0 0
Cold junction temperature 1 0 1
Firmware revision number 1 1 0
0 = Normal Values
1 = Advanced Diagnostic Values
0 0 1
Publication 1746-UM010B-EN-P - April 2001
IMPORTANT
The sample program returns all six variables. For
their data table locations, Refer to BTM201.rss Data
Table Layout on page 9-2 and BTM50220.RSS Data
table layout on page 9-7.
Remember that the module returns the control variable (CV) of each
loop to the input image table as both a numeric value (current CV)
and a time–proportioned output (TPO). For additional information,
Refer to BTM201.rss Data Table Layout on page 9-2 and
BTM50220.RSS Data table layout on page 9-7.
Page 61

Calibrating the Module
Chapter
7
About the Procedure
Use Word 14 (Out put Image) for entering calibration codes
15 12 11 08 07 04 03 00
Code Word 5
Calibrate the module after the first 6 months of operation. Then check
the calibration and re-calibrate only if necessary once a year.
Use this procedure to store calibration values for each channel in
EEPROM. Calibration sets channel accuracy at 0.05% of full range
regardless of channel circuit tolerances. You can calibrate the input
channels individually or in groups. The thermocouple/mV operation
of all channels is suspended during calibration.
Calibration Codes and Status
Use the following format for entering calibration code words and
reading calibration status bits. Enter calibration values in hexadeci mal.
You read channel status bits at different steps in the calibration
procedure, one bit for each channel you are calibrating.
1001
Use Words 4 and 5 (Input Ima g e) for rea d ing calibration status
Status Word 4
Status Word 5
Channel status words 6 and 7 display “CAL4” during calibration
1 Publication 1746-UM010 B- EN-P - April 2001
15 12 11 08 07 04 03 00
OK status bits (1=OK) for channels 3,2,1,0
(high-end calibration) @
OK status bits (1=OK) for channels 3, 2,1,0
(low-end calibration) @
15 12 11 08 07 04 03 00
OK status bits (1=OK) for channels 3, 2,1,0
(low-end calibration) @
@ Reads F Hex if all four channels are OK
Calibration codes in Hex
Channel status during
calibration
Channel status at
completion of calibration
Page 62

7-2 Calibrating the Module
Calibration Procedure
To calibrate the module, you need a precision dc voltmeter and
precision power supply that can display and maintain a calibration
voltage to 1/1000 of a millivolt: at 0.000 mV and 90.000 mV.
For convenience, calibrate all four channels at the same time.
To prepare for the calibration:
• Remove the thermocouple leads from the input terminals of the
channels that you want to calibrate.
• Switch the SLC processor to run mode so it can execute the
calibration ladder logic.
To calibrate the module, follow this procedure:
1. With your programming terminal, enter calibration code 1001
Hex into output word 14.
2. Observe input words 0–3, 6 and 7.
– The module clears words 0-3. The module returns “CA14”
Hex in words 6 and 7.
3. Short circuit the pairs of input terminals for the channels you
want to calibrate. Make the jumper as short as possible.
4. With your programming terminal, enter calibration code 1002
Hex into output word 14.
5. Observe bits 0–3 in input word 4.
– If all the channels you are calibrating see zero voltage, the
module returns status–OK bits set, one bit for each channel (F
Hex for all four channels). Otherwise, the module returns
channel status bits set to zero.
6. Apply 90.000 mV to the pairs of input terminals, all in parallel,
for the channels you are calibrating. Use short leads.
7. With your programming terminal, enter calibration code 1004
Hex into output word 14.
Publication 1746-UM010B-EN-P - April 2001
8. Observe bits 4–7 in status word 4.
– If all channels being calibrating see 90.000 mV, the module
returns a status–OK bit set for each channel (F Hex for all
four channels). Otherwise, the module returns channel status
bits set to zero.
Page 63

Calibrating the Module 7-3
9. Remove the 90.000 mV calibration voltage.
10. With your programming terminal, enter calibration code 1008
Hex into output word 14.
11. Observe bits 0–3 in status word 5.
– After the module burns the calibration values into its
EEPROM, it returns status–OK bits set, one bit for each
channel (F Hex for all four channels). If the module could not
complete the calibration of one or more channels, it returns a
zeroed status bit for that channel (non–F Hex returned)
12. To end the calibration procedure, enter calibration code 0000
Hex into output word 14. During thermocouple/mV operation,
word 14 must be zero (which is normal operation).
Publication 1746-UM010 B- EN-P - April 2001
Page 64

7-4 Calibrating the Module
Publication 1746-UM010B-EN-P - April 2001
Page 65

Troubleshooting the Module
This chapter provides troubleshooting guidelines.
Chapter
8
Troubleshooting with LED Indicators
Indication Probable Cause Recommended Action:
all indicators
are OFF
The front panel of the module contains five green LED indicators for
channel status and one green LED indicator for module status.
INPUT
ISOLATED
CHANNEL
STATUS
MODULE STATUS
02
13
LED: When: Indicates
Channel
Status
Module
Status
On channel is correctly configured
when you enable the channel
Flashing channel fault condition
On self-check completed OK
Flashing communication occurring between
SLC processor and BTM module
W e present a table of indications, probable causes, and recommended
action. See Table 8.A on page 8-3 and Table 8.B on page 8-4 for a
listing of error codes.
no power to module check power to I/O chassis
recycle power as necessary
module performing self–check wait until self check is complete
module performing calibration wait until calibration is complete
possible short on the module
LED failure
channel status
indicator is ON
channel status
indicator is flashing
1 Publication 1746-UM010 B- EN-P - April 2001
channel is correctly configured
when you enable the channel
during calibration, the channel is
properly configured for the high –end of
millivolt range
fault condition, such as open circuit or
an under/over range condition
during calibration, the channel is
properly configured for the low–end of
millivolt range
replace module
normal operation
normal calibration
correct fault condition
normal calibration
Page 66

8-2 Troubleshooting the Module
Indication Probable Cause Recommended Action:
module status
indicator is ON
module status
indicator is flashing
Locating Error Code Information
Display of error code in
N10:212-215 if using example
program
self–check is completed satisfactorily
module is OK
communication occurring between
SLC processor and the BTM module
You configure the 1746-BTM module to report error codes by setting
bits 10–8 to 100 in word 192 of the output image buffer table Refer
to Using the Output Image Table on page 5-8. The modul e reports
error codes in input image table words 172-175.If using the sample
program, error codes are reported in N10:212-215. Location of the 2–
digit code in the error word determines its source:
xx
Autotune error code
Autotune error codes only reset
when an autotune is invoked.
normal power–up
module waiting for channels to be
enabled
normal operation
yy
Configuration
error code
A configuration error code is
only reset when th e reset error
code bit is transitioned.
Publication 1746-UM010B-EN-P - April 2001
EXAMPLE
If 002 is displayed, the error code is from the
configuration block.
If 6700 is displayed, the error code is from the
autotune.
Page 67

Table 8.A Configur ation Error Codes
Code Description
0
1
2
10
11
12
13
14
15
20
21
22
23
24
25
30
31
32
33
34
35
36
37
38
39
40
41
42
43
44
45
46
47
48
49
50
51
No error
Run setpoint is invalid
Manual control value is < -100% or > +100%
Heat system gain is less than 0
Heat time constant is less than 0
Heat dead time is less than 0
Cool system gain is less than 0
Cool time constant is less than 0
Cool dead time is less than 0
Heat proportional gain is less than 0
Heat integral gain is less than 0
Heat derivative gain is less than 0
Cool proportional gain is less than 0
Cool integral gain is less than 0
Cool derivative gain is less than 0
Loop operational mode is invalid
Thermocouple type is invalid
Maximum CV allowable is < -100%, > +100%, or max CV < min. CV
Minimum CV allowable is < -100% or > +100%
Control value when TC break detected is< -100 or > +100%
Standby setpoint is invalid
Heat minimum TPO cycle time is < 0 or > 100
Heat maximum TPO cycle time is < 0, > 100, or min. TPO > max TPO
Cool minimum TPO cycle time is < 0 or > 100
Cool maximum TPO cycle time is < 0, > 100, or min. TPO > max TPO
PV rate alarm degrees per second is invalid
Low temperature alarm is invalid
High temperature alarm is invalid
Low deviation alarm is invalid
High deviation alarm is invalid
Temperature alarm deadband is < 0 or > 10
Thermal Integrity Loss value is < 0- or > 100
Integrity Rate in minutes < 0 or > 100
Setpoint ramp rate is < 0
reserved
Nonbarrel autotune disturbance size is < 0% or greater than 100%
Startup aggressiveness factor is <0 or > 100
Troubleshooting the Module 8-3
Publication 1746-UM010 B- EN-P - April 2001
Page 68

8-4 Troubleshooting the Module
Table 8.B Autotune Error Co des
Code Description
66
67
68
69
70
71
72
Autotune terminated because of TC break
Start conditions prevent heat autotune
Start conditions prevent cool autotune
Setpoint will be reached before autotuning is complete
Too much noise causing time constant to be 0
Very small gain
PV now higher than maximum PV; do not trust PID values
Publication 1746-UM010B-EN-P - April 2001
Page 69

Chapter
9
Sample Program
This chapter describes:
• Obtaining the sample program from the internet
• Configuring Your SLC processor, Off–line
• Using the Sample Program
• General Programming Notes
You can obtain the sample program from the Allen–Bradley website
on the Internet and download it to your PC as an executable file.
Obtaining the Sample Program from the Internet
RSLogix500 Version
BTM Firmware Revision
To Access the Internet:
1. Access the Sample Program and manuals at the Allen–Bradley
website: http://www.ab.com/appsys/
2. Download the sample program to your PC.
3. Move the sample program into the subdirectory on your hard
drive where your programming software looks for files.
For example, with
– C:\program files\rockwell software\rslogix 500
english\projects
The examples in this chapter were built using RSLogix500 version
4.50.00. For other types of programming software, the procedure and/
or prompts may vary.
The examples in this chapter were written for B TM fi rmware Revision
2.00 or greater.
RSLogix500:
Support for 5/03, 5/04, 5/04P,
5/05, and 5/05P Processors
Using the code in file BTM201.rss you will be able to have multiple
BTMs in a SLC system without having to duplicate code for each BTM.
The only code that will need to be added will be in the M1/M0
Using BTM201.rss
1 Publication 1746-UM010 B- EN-P - April 2001
Page 70

9-2 Sample Program
communications program file 4 and in the main program file 2. Later
there will be an example for the code that will need to be added.
BTM201.rss Data Table Layout
The data table layout for this version of code has change considerably
from the current BTM application code. The biggest change is that the
input and output images are now buffered. This means that you will
now manipulate all input and output data thru the buffer area, not in
the actual input and output images. If you manipulate data in the
actual input and output image the buffers will over write them. The
following is a layout of the new data tables. Th e M-file and the rot ator
information have been move d into a different data table. In the
previous version the information was located in N7.
Table 9.A BTM201.rss N7 Data Table
Location Description
N7:0 User request pending
N7:1 User request being serviced
N7:2 Request mask
N7:3 Bit 0 request complete cleanup needed
N7:4 Indirect address for pointer in rotator
N7:5 Rotator bits
N7:6 Bit 0, all requests and acknowledges cleared
N7:7 Data table pointer for M1/M0 communications
N7:8 Slot pointer for M1/M0 communications
N7:9 What BTM are we currently working on for M1/M0
communications
N7:10 Data table pointer for rotator code
N7:11 What BTM are we working on for rotator code
N7:12 Master Command requests for M1M0 communications
N7:13 Rotator code input bits = output bits memory
N7:14 Rotator initialization data table to use
N7:15 Rotator initialization what BTM are we doing
N7:16 Data table for first BTM
Publication 1746-UM010B-EN-P - April 2001
N7:17 Slot number for first BTM
N7:18 Number of BTMs in system
N7:19 Misc control Bits
N7:20 Rotator Level 1 or 2 check
Page 71

Sample Program 9-3
IMPORTANT
In this version of code you do not command M1/M0
file transfers thru N7:0, you will now use N7:12
(master command request).
Download and Upload Settings
Table 9.B Download and Upload Settings
Location Description
N7:12/0 set will download the M1 configuration
N7:12/1 set will download the M0 auto tune information
N7:12/2 set will download the M0 PID information
N7:12/3 set will upload the M0 auto tune information
N7:12/4 set will upload the M0 PID information
Publication 1746-UM010 B- EN-P - April 2001
Page 72

9-4 Sample Program
The information for the M1, M0, input image, output image, and the
rotator code is pu t in to one da ta ta b le. Th e l ayout of the file is as
follows:
Table 9.C BTM201.rss M1, M0, Input Image, Output Image, and Rotator Code Data Table
Location Description See Page
(1)
:0
NXX
NXX:1 thru NXX:100 M1 configuration information 3-13
NXX:101 thru NXX:109 Reserved do not use NA
NXX:110 Block header for the M0 file 4-6
NXX:111 thru NXX:159 M0 file information 3-11, 4-6
NXX:160 thru NXX:175 Input image buffer 6-2
NXX:176 thru NXX:179 Reserved do not use NA
NXX:180 thru NXX:195 Output image table 5-8
NXX:196 thru NXX:199 Reserved do not use NA
NXX:200 thru NXX:203 Current set points NA
Block header for the M1 configuration file 3-11
NXX:204 thru NXX:207 Current error PV-SP NA
NXX:208 thru NXX:211 Current CVs NA
NXX:212 thru NXX:215 Error codes 8-2
NXX:216 thru NXX:219 CJC temperatures 2-6
NXX:220 thru NXX:223 Firmware revision 9-1
NXX:224 thru NXX:227 P contribution 4-4
NXX:228 thru NXX:231 I contribution 4-4
NXX:232 thru NXX:235 D contribution 4-4
NXX:236 thru NXX:239 Pre-set point NA
NXX:240 thru NXX:243 Wait period NA
NXX:244 thru NXX:247 Reserved for future use NA
NXX:248 thru NXX:255 Reserved do not use NA
(1)
The XX in all data table address above will depend on the data table location of the first BTM and which BTM is being
manipulated by the code.
Publication 1746-UM010B-EN-P - April 2001
Page 73

Sample Program 9-5
BTM201.rss Programming Notes
When programming the BTM with the BTM201.rss code there are
several things to note:
1. You must in the N7 data table define words 16 thru 18. These
tell the program what the starting data table the BTMs use, the
slot location of the first BTM, and how many BTMs are in the
system. This information is move into the data table by the
initialization code in file 3.
Figure 9.1
2. The data tables that are used to hold the M1, M0, input image,
output image, and rotator information must be consecutive for
the ladder code to work.
3. The BTMs must be in consecutive slots for the ladder code to
work.
4. In program file two you will have to add copies for the input
and output images.
5. The example code has five BTMs in it. The BTMs are in slots 2
thru 6. The starting data table file that is used is N10. So the
information that needs to be code into N7:16 = 10, N7:17 = 2,
and N7:18 = 5
Publication 1746-UM010 B- EN-P - April 2001
Page 74

9-6 Sample Program
6. In program file 4 you will have to add the following rungs for
each BTM added to the system. See 6. and Figure 9.3. You will
need to change the slot reference in the “M” address. You will
also need to change Source B of th e equal to match th e “M” slot
reference.
Figure 9.2
Figure 9.3
Publication 1746-UM010B-EN-P - April 2001
Page 75

Sample Program 9-7
Support for 5/02 Processors Using BTM50220.RSS
Using the code in file BTM50220.RSS you will be able to have
multiple BTMs in a SLC system, but you will have to duplicate the
ladder logic and create new data table locations for each BTM.
BTM50220.RSS Data table layout
The data table layout for this version of code has change considerably
from the current BTM application code. The M-file and the rotator
information have been move d into a different data table. In the
previous version the information was located in N7.
Table 9.D BTM50220.RSS N7 Data Table
Location Description
(1)
:0
N7
N7:1 User request being serviced
N7:2 Request mask
N7:3 Bit 0, request complete cleanup needed
N7:4 Indirect address for pointer in rotator
N7:5 Rotator bits
User request pending
N7:6 Bit 0, all requests and acknowledges cleared
N7:7 thru N7:18 reserved. Do not use
N7:19 Misc control Bits
N7:20 Rotator Level 1 or 2 check
(1)
In this version of code you command M1/M0 file transfers thru N7:0.
Download and Upload Settings
Table 9.E Download and Upl oad Settings
Bit
N7:0/0 set will download the M1 configuration
N7:0/1 set will download the M0 auto tune information
N7:0/2 set will download the M0 PID information
N7:0/3 set will upload the M0 auto tune information
N7:0/4 set will upload the M0 PID information
The information for the M1, M0, and the rotator code is put into one
data table the layout of the file is as follows:
Publication 1746-UM010 B- EN-P - April 2001
Page 76

9-8 Sample Program
Table 9.F BTM50220.RSS M1, M0, Input Image, Output Image, and Rotator Code Data Table
Description See Page
NXX:0 Block header for the M1 configuration file 3-11
NXX:1 thru NXX:100 M1 configuration information 3-13
NXX:101 thru NXX:109 Reserved do not use NA
NXX:110 Block header for the M0 file 4-6
NXX:111 thru NXX:159 M0 file information 3-11, 4-6
NXX:160 thru NXX:199 Reserved. Do not use 6-2
NXX:200 thru NXX:203 Current set points NA
NXX:204 thru NXX:207 Current error PV-SP 5-8
NXX:208 thru NXX:211 Current CVs NA
NXX:212 thru NXX:215 Error codes NA
NXX:216 thru NXX:219 CJC temperatures NA
NXX:220 thru NXX:223 Firmware revision NA
NXX:224 thru NXX:227 P contribution 8-2
NXX:228 thru NXX:231 I contribution 2-6
NXX:232 thru NXX:235 D contribution 9-1
NXX:236 thru NXX:239 Pre-set point 4-4
NXX:240 thru NXX:243 Wait period 4-4
NXX:244 thru NXX:247 Reserved for future use 4-4
NXX:248 thru NXX:255 Reserved do not use NA
IMPORTANT
The XX in the data table address above will depend
on the data table location of the 1746-BTM. In the
example code it is N10.
Publication 1746-UM010B-EN-P - April 2001
Page 77

Sample Program 9-9
General Notes for Programming the 1746-BTM
This section outlines general programming information concerning the
1746-BTM module.
Figure 9.4 Correct way to shut down loop
An autotune invoke is an edge triggered event. That is the module
only looks to see a 0 to 1 transit ion of b it O:1.12/ 1. Once the auto tune
in progress bit I:1.8/11 is on yo u can turn off the autotune invoke bit
O:1.12/1.
Figure 9.5 Correct way to turn off Autotune invoke bit
Publication 1746-UM010 B- EN-P - April 2001
Page 78

9-10 Sample Program
The autotune abort bit O:1.12/2 must be turned off after an autotune
is aborted, if not the next time you try to enable an autotune it will
immediately be aborted. When you set bit O:1.12/2 high you must
also check that the au totu ne in progres s bit I :1. 8/11 is lo w. Wh en t hat
happens reset the autotune abort bit O:1.12/2.
Figure 9.6 Correct way to abort an Autotune
TIP
• Do not set the Autotuning enabled bits in the
output image table in the same scan that you set
the invoke autotune bit.
• Do not perform M1 or M0 file transfers without
using the up/download request bits (output word
12 bits 12 thru 15) and the up/downl oad request
ready bits (input word 9 bits 12 thru 15). These
bits must be used to insure block integrity.
• When you need to disable a loop of control do
not just put a contact in front of the output TPO
bit. This will cause the PID loop to windup,
because the loop is still active and wants to
control. When you re-enable the loop, it will
oscillate about the setpoint then come into
control. The correct way to shut down a loop is
to put the loop into manual mode with 0% CV
output.
Publication 1746-UM010B-EN-P - April 2001
Page 79

Index
A
alarm
dead band
hysteresis 3-8
autotune block
layout
overview 4-1
PID equation 4-4
autotuning
finetuning
loops 4-2
3-8
4-5
4-3
C
calibrating
codes and status
procedure 7-2
codes
calibration
configuration block
3-11
layout
overview 3-1
configuring
3-1
module
7-1
7-1
D
dead band 3-8
disabling
1-4
slots
F
finetuning
4-3
loops
G
gains block
4-5
layout
overview 4-1
PID equation 4-4
sequence of setti ng PID gains 4-1
H
hysteresis 3-8
I
installing
procedure
2-4
M
M0/M1 files
configuration block
module
calibrating
troubleshooting 8-1
monitoring
status data
7-1
6-1
3-11
O
operating
5-1
module
overview 1-1
P
PID
equation
gains 4-1
loop 1-1
procedure
calibrating
programming example 9-1
4-4
7-2
R
response
disabling slots
1-4
S
sequence
setting PID gains
setting
autotune values
gains values 4-1
PID gains 4-1
status words
monitoring
switching
barrel control
4-1
4-1
6-1
3-3
T
TPO timing diagram 1-2, 3-6
Publication 1746-UM010 B- EN - P - April 2001
Page 80

2 Index
Publication 1746-UM010B-EN-P - April 2001
Page 81

Allen-Bradley
Publication Problem Report
If you find a problem with our documentation, please complete and return this form.
Pub. Title/Type Barrel Temperature Control Module User Manual
Cat. No.
Check Problem(s) Type: Describe Problem(s)
Technical Accuracy text illustration
Completeness procedure/step illustration definition info in manual
What information is missing?
Clarity
What is unclear?
1746-BTM Pub. No. 1746-UM010B-EN-P Pub. Date April 2001 Part No. 957555-22
Internal Use Only
example guideline feature (accessibility)
explanation other info not in manual
Sequence
What is not in the right order?
Other Comments
Use back for more comments.
Your Name Location/Phone
Return to: Marketing Communications, Allen-Bradley., 1 Allen-Bradley Drive, Mayfield Hts., OH 44124-6118Phone:(440) 646-3176
FAX:(440) 646-4320
Publication ICCG-5.21- August 1995 PN 955107-82
Page 82

Other Comments
PLEASE FASTEN HERE (DO NOT STAPLE)
PLEASE FOLD HERE
BUSINESS REPLY MAIL
FIRST-CLASS MAIL PERMIT NO. 18235 CLEVELAND OH
POSTAGE WILL BE PAID BY THE ADDRESSEE
NO POSTAGE
NECESSARY
IF MAILED
IN THE
UNITED STATES
PLEASE REMOVE
1 ALLEN-BRADLEY DR
MAYFIELD HEIGHTS OH 44124-9705
Page 83

Back Cov
Page 84

er
Publication 1746-UM010B-EN-P - April 2001 2 PN 957555-22
Supersedes Publication 1746-6.10 - September 1999 © 2001 Rockwell International Corporation. Printed in the U.S.A.
 Loading...