Radio Shack 15-1634 User Manual

#ORNKHKGF"1OPKFKTGEVKQPCN"8*(17*("68"#PVGPPC
15-1634 |
OWNER’S MANUAL — Please read before using this equipment. |
|
|
%106'065
Important Safety Precautions .......................... |
1 |
Important Antenna Notes ................................. |
1 |
Pre-Installation Test ...................................... |
2 |
Mounting The Antenna .................................... |
2 |
Inside Mounting ............................................ |
2 |
Outside Mounting ......................................... |
2 |
Lightning Protection .................................. |
3 |
Connecting The Antenna To Your TV .............. |
3 |
Coaxial Cable Installation Precautions ......... |
4 |
Specifications .................................................. |
4 |
#"+/2146#06"#
If an icon appears at the end of a paragraph, go to the box on that page with the corresponding icon for pertinent information.
Rý— Warning |
# — Important |
. — Caution |
° — Hint |
± — Note |
|
ýR"9#40+0)ýR"
Use extreme caution when installing an outdoor antenna close to overhead wires. If the antenna starts to fall, let it go! If any part of the antenna makes contact with overhead power lines, touching the antenna, mast, cable or guy wires can cause electrocution and death. Call the power company to remove the antenna. Do not attempt to remove it yourself!
Your Radio Shack Amplified Omnidirectional VHF/UHFTV Antenna provides excellent reception of VHF/UHF TV channels in most viewing locations. The UV-protected housing is made of impact-resistant filled co-polymer, making the exterior resistant to weathering and color change. The antenna’s unique omnidirectional characteristics provide excellent reception in areas where broadcasts are received from different directions.
The built-in fixed FM trap helps prevent strong FM stations from interfering with TV Channels 2–13.
+/2146#06"5#('6;"24'%#76+105
Many do-it-yourself and professional antenna installers are injured or killed each year by electric shock, because they fail to recognize overhead wires as being potentially lethal. Touching any part of the antenna mast or guy wire to these overhead wires is the same as touching the wires with your bare hand.
A very serious shock is almost sure to result when contacting an electrical wire. In the case of primary wires on the top of poles, the shock is like being struck by a bolt of lightning. Many power wires are within 20 to 25 feet of the ground and could easily be touched by an assembled antenna and mast.Rý
Please read and follow these important safety precautions:
•Be sure to select an antenna site well away from all overhead wires.
•Do not try to guess which overhead wires carry high voltage. Check with the power company.
•If you notice anything making contact with the overhead wires, call the power company to have it removed safely.
•Do not run the downlead cable over power wires.
•Get help from a qualified professional when removing the old antenna if there is any doubt of clearing overhead wires.
•Never install an antenna when it is windy.
•Be sure to do all assembly work on the ground, then raise the antenna.
•Make sure the antenna mast downlead cable is connected to suitable lightning arrestors.
•Use 8 (or larger) AWG ground wire between the mast and ground.
•Make sure the installation is secure. Use plenty of guy wires and new hardware.
+/2146#06"#06'00#"016'5
This antenna system is designed to work properly when the power injector is connected to the antenna through a 75-ohm coax cable.
The power injector’s indicator lights to show that:
• DC power is supplied to the antenna
•there are no shorts in the connection between the power injector and antenna
The coax cable between the power injector and the antenna carries:
•DC power from the power injector to the amplifier board in the antenna
© 2002 RadioShack Corporation.
All Rights Reserved.
RadioShack and RadioShack.com are trademarks used by RadioShack Corporation.

±"016'"±"
If installing a new lead-in cable, use the actual cable to be used in the installation.
±"016'"±"
If installing the antenna in a motor home, we recommend you use a 12V DC cord (not supplied, available at your local RadioShack store and online at RadioShack.com).
•the amplified TV signal from the antenna, through the power injector, to the video equipment
If any devices (such as amplifiers, splitters, combiners, matching transformers, 300-ohm cable) are used in your home cabling system, they must be connected between the power injector and your video equipment. Any devices connected between the power injector and the antenna might cause a short in the amplifier power source. If this happens, the injector’s indicator does not light and the signals to your video equipment (multiple TVs or VCRs) might be significantly degraded.
24'/+056#..#6+10"6'56
Before installing your antenna, perform this test to make sure it works properly.
1.Connect a temporary 75-ohm cable between the power injector’s ANT 75-
ohm jack and the antenna’s F- connector.±
2.Connect the power injector’s TV cable to your TV’s VHF/UHF 75-ohm F- connector.
3.Insert the supplied AC adapter’s small
plug into the DC 12V jack on the power injector.±
4.Plug the supplied AC adapter into a standard AC outlet. If the power injector’s indicator lights, the antenna is properly connected.
/1706+0)"6*'"#06'00#
+05+&'"/1706+0)
You can mount the antenna in an attic, closet or other out-of-the way indoor location. The antenna can be mounted on a horizontal mast, closet rod, or on a short piece of mast suspended from a roof support by a 4-inch wall-mount bracket (not supplied, available at RadioShack).
Or, you can simply place the antenna on a shelf in a closet. Be sure the antenna is not in a position where it could easily fall or be damaged.
1765+&'"/1706+0)
For the best results, mount the antenna away from trees or other obstructions. Higher frequencies are noticeably affected by these obstructions.
The antenna is easy to install on any antenna mast or optional light-duty mount using simple hand tools and the following additional items (not supplied, available at RadioShack).
•coax downlead (we recommend RG-6 cable for best performance)
•connection sealant tape or weather boots
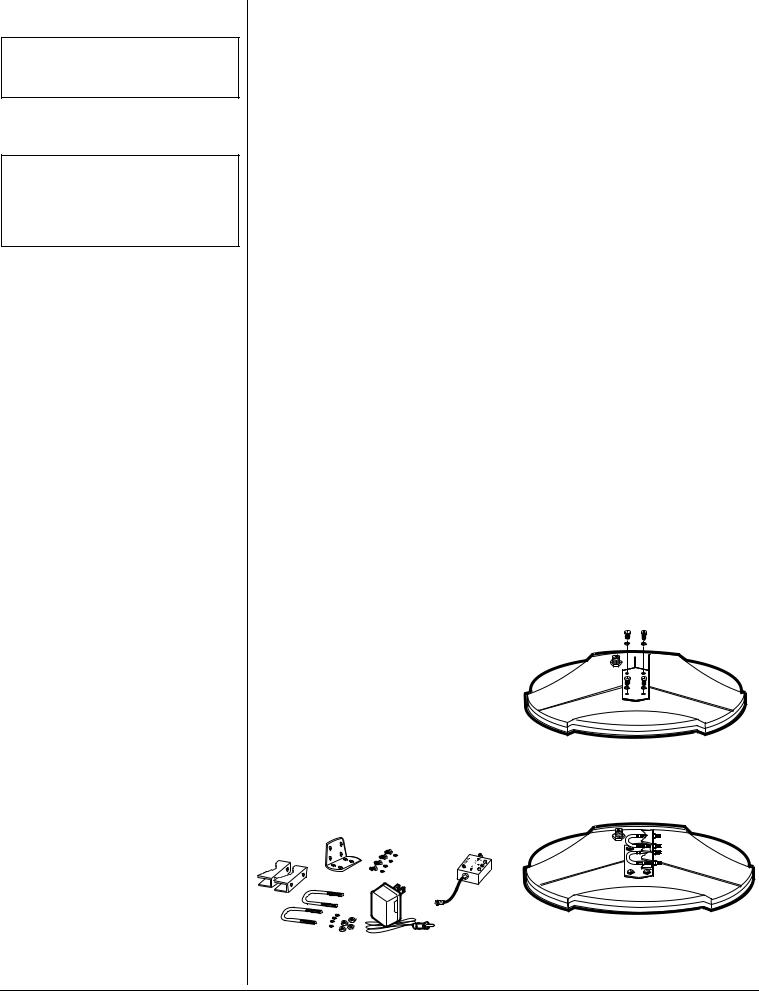
The antenna package includes these parts:
&GUETKRVKQP |
3WCPVKV[ |
|
|
|
|
Antenna |
1 |
|
|
|
|
Antenna Mounting Bracket |
1 |
|
Mast Clamps |
2 |
|
|
|
|
1/4-Inch U-Bolts |
2 |
|
1/4-Inch Split Lockwashers |
4 |
|
1/4-20 Hex Nuts |
4 |
|
#12 1/2-Inch Long Self-Tapping |
4 |
|
Screws |
||
|
||
|
|
|
#12 Split Lockwashers |
4 |
|
Power Injector |
1 |
|
|
|
|
AC Adapter |
1 |
|
|
|
1.Attach the antenna mounting bracket to the bottom of the antenna using the four #12 (1/2-inch long) self-tapping screws and four #12 split lockwashers.
2.Attach both mast clamps, U-bolts, four 1/4-inch split lockwashers, and four 1/4-20 hex nuts to the mounting bracket. Do not tighten the hex nuts.
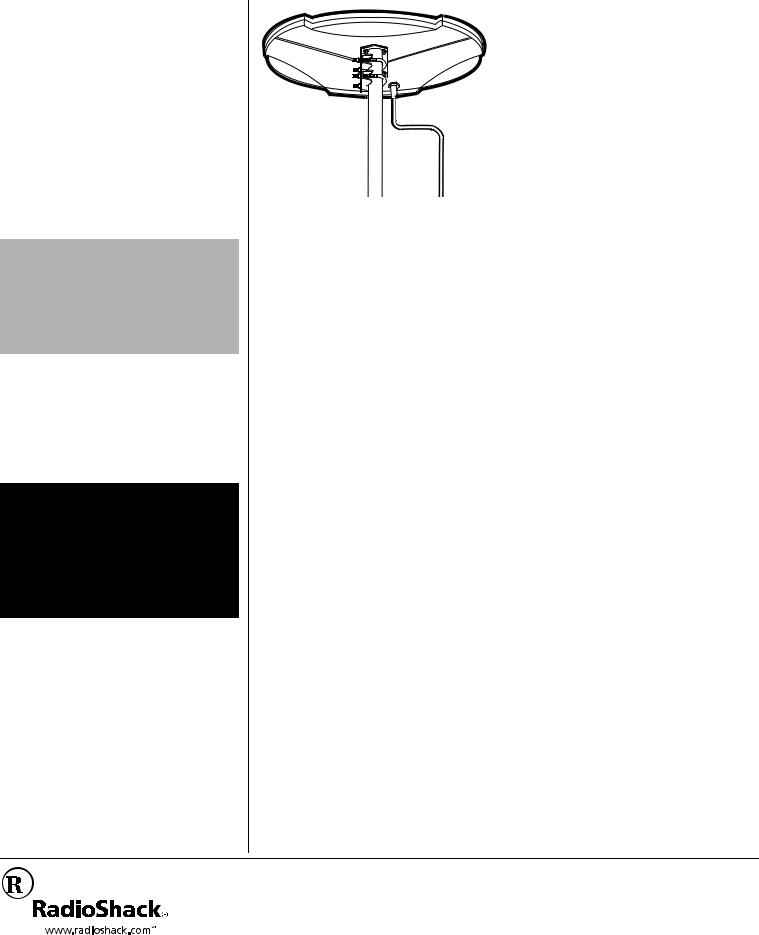
3.Plug one end of the 75-ohm coaxial downlead cable to the antenna’s jack
2
 Loading...