


Cat. No. 12-249
OWNER’S MANUAL
Please read before using this equipment.
7-Channel Weatheradioâ
with NWR-SAME Severe-Weather Alert
WARNING: To reduce the risk of fire or shock hazard, do not expose this product to rain or moisture.
|
CAUTION |
! |
|
|
|
|
RISK OF ELECTRIC SHOCK. |
|
|
DO NOT OPEN. |
|
|
|
|
CAUTION: TO REDUCE THE RISK OF
ELECTRIC SHOCK, DO NOT REMOVE
COVER OR BACK. NO USER-SERVICE-
ABLE PARTS INSIDE. REFER SERVIC-
ING TO QUALIFIED PERSONNEL.
This symbol is intended to alert you to the presence of uninsulated dangerous voltage within the product’s enclosure that might be of sufficient magnitude to constitute a risk of electric shock. Do not open the product’s case.
This symbol is intended to inform you that important op-
!erating and maintenance instructions are included in the literature accompanying this product.
The graphical symbols with supplemental markings are on the bottom of the unit.
© 1997, 1998 Tandy Corporation.
All Rights Reserved.
RadioShack and Weatheradio are registered trademarks used by Tandy Corporation.
X-10 is a registered trademark of X-10 (USA) Inc.
2

FEATURES
In 1994, the National Oceanic and Aerospace Administration (NOAA) began broadcasting coded emergency weather signals that identify the specific geographic area (such as a county) affected by an emergency. Until that time, such specific emergency weather information was sent in other ways (over land wire, for example) to other communication outlets (such as radio stations), then broadcast to the public on AM or FM radio frequencies or on TV.
NOAA transmits the coded weather emergency signals using a technique called Specific Area Message Encoding, or SAME. Your RadioShack 7-Channel Weatheradioâ with NWR-SAME (National Weather Radio-SAME) Severe-Weather Alert is specially designed to receive these SAME transmissions.
The Weatheradio’s SAME technology circuitry lets you program it with up to 15 predefined state/county codes and receive emergency weather alert broadcasts that notify you of weather warnings, watches, statements — about 30 different types — for only those areas. You can set the Weatheradio to sound an alert when it receives a SAME emergency signal, and you can adjust the alert volume.
The Weatheradio also comes preprogrammed with the seven NOAA broadcast frequencies, so you can select the channel that is broadcast in your area and listen to general weather information 24 hours a day.
3

The Weatheradio’s features include:
Alert Function — lets you set the Weatheradio to sound an alert when it receives a weather emergency broadcast from NOAA.
SAME Operation — lets you program up to 15 different FIPS (Federal Information Processing System) codes into the Weatheradio’s memory. Each FIPS code identifies a specific geographic area (defined by the NWS), so your Weatheradio sounds an alert when a weather emergency is declared in only those locations. This helps you track the weather conditions in and around your area.
8-Character Liquid Crystal Display — clearly displays as digital characters items such as channel numbers and alert status descriptions (TORNADO WARNING, FLOOD WATCH, and so on).
Alert Status Indicators — different-colored indicators let you determine at a glance the type of alert received (red is for a warning, yellow is for a watch, and green is for a statement).
7 Channels — let you select the frequency for your local NOAA weather broadcasts.
4

Adjustable Display Backlight — makes the display easy to read in low light situations. You can set the light to turn on for about 10 seconds when you press a key, or remain on until you turn it off.
Alert Volume Control — lets you adjust the volume of the alert so you will be sure to hear it.
External Alert Terminals — let you connect an external controller system (such as a Plug ’n Power or X-10â system) to the Weatheradio and set that system to indicate an alert based on signals received by the Weatheradio. This is useful for ensuring you can hear or see the alert in a location (such as the garage) that might be some distance from where you installed the Weatheradio.
External Antenna Connector — lets you connect an optional external antenna to the Weatheradio to improve reception (in remote areas, for example).
We recommend you record your Weatheradio’s serial number here. The number is on the bottom of the radio.
Serial Number:
5

CONTENTS |
|
Preparation ...................................................................... |
7 |
Connecting Power ..................................................... |
7 |
Connecting AC Power ....................................... |
8 |
Installing a Back-Up Battery .............................. |
9 |
Using the Antenna ................................................... |
11 |
Connecting an External Antenna .................... |
11 |
Getting Started .............................................................. |
12 |
Understanding the FIPS Code ................................ |
12 |
Obtaining Your Area’s FIPS Code(s) ............... |
13 |
Programming the Weatheradio ............................... |
14 |
Using the Weatheradio’s “All |
|
Signals” Code ................................................. |
19 |
Choosing a Location and Mounting |
|
the Weatheradio .............................................. |
20 |
Operation ....................................................................... |
22 |
Listening to the Weather Broadcast ........................ |
23 |
Using the Alert Function .......................................... |
24 |
Setting the Alert Volume .................................. |
25 |
Checking/Changing the Alert Pattern .............. |
25 |
When a Weather Alert Occurs ........................ |
27 |
NWS Weather Alert Descriptions .................... |
28 |
Reviewing Overlapping Alerts ......................... |
32 |
When a Test or Demo Alert Occurs ................. |
33 |
Locking Out Undefined (New or Commercial) |
|
Weather Descriptions ...................................... |
34 |
Special Features ............................................................ |
37 |
Using Continuous Backlight .................................... |
37 |
Connecting the Weatheradio to an |
|
External System ...................................................... |
38 |
Troubleshooting ............................................................ |
40 |
Care ................................................................................ |
44 |
The FCC Wants You to Know .................................. |
46 |
Specifications ................................................................ |
47 |
6

PREPARATION
CONNECTING POWER
Your Weatheradio uses standard AC power for normal operation. For back-up power (when AC power fails or is temporarily disconnected), your Weatheradio requires a 9V battery (not supplied). For the best performance and longest life, we recommend an alkaline battery, such as RadioShack Cat. No. 23-553.
Notes:
•A fresh back-up battery will power the Weatheradio for up to 1 hour with the weather broadcast turned on (see “Listening to the Weather Broadcast” on Page 23) or up to 8 hours in alert standby mode (see “Using the Alert Function” on Page 24). For normal use, however, we recommend you always connect the Weatheradio to AC power.
•If you disconnect the Weatheradio from AC power and you will not be using the Weatheradio for several days, remove the back-up battery. A battery can leak chemicals that damage your Weatheradio’s electronic parts.
7
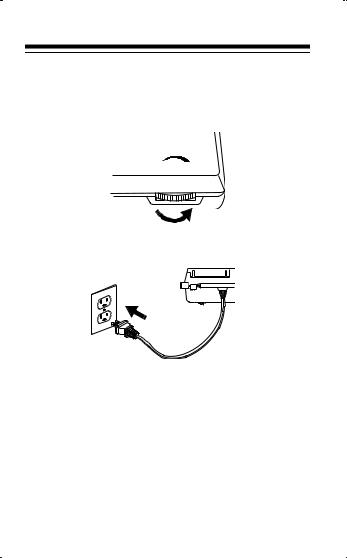
Connecting AC Power
1.If the Weatheradio is on, turn VOLUME to the right until it clicks to turn the Weatheradio off.
VOLUME
OFF |
MAX |
2.Plug the Weatheradio’s power cord into a standard AC outlet.
Caution: Your Weatheradio’s power cord has a polarized plug (one blade is wider than the other). If you have difficulty inserting the plug into the outlet, do not force it! Turn the plug over and try again.
8
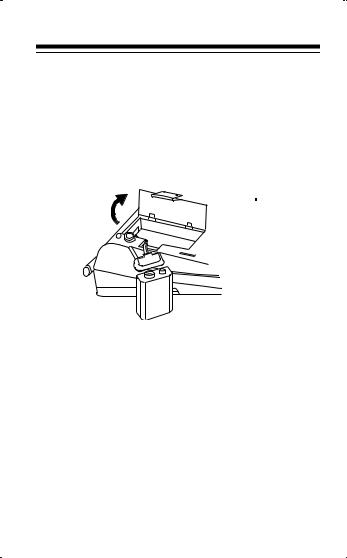
Installing a Back-Up Battery
Cautions:
•Use only a fresh battery of the required size and recommended type.
•We recommend you not use a rechargeable battery.
 Tab
Tab
1.If the Weatheradio is on, turn VOLUME to the right until it clicks to turn the Weatheradio off.
2.Press in the tab on the battery compartment cover and lift the cover up to remove it.
3.Snap a battery onto the battery terminals inside the compartment, then put the battery in the compartment.
4.Replace the cover.
9

When REPLACE (then) BATTERY appears, replace the battery.
STATEMENT |
WATCH |
WARNING |
STATEMENT |
WATCH |
WARNING |
|
ALERT LEVEL |
|
|
ALERT LEVEL |
|
Note: REPLACE BATTERY also appears if no battery is installed and the Weatheradio is turned on and connected to AC power.
Caution: Never leave a dead or weak battery in the Weatheradio. Dispose of an old battery promptly and properly; do not bury or burn it.
10
USING THE ANTENNA
For the best reception at all times, lift up the Weatheradio’s built-in telescoping antenna so it is vertical, then fully extend it.
+ –
Connecting an External Antenna
To improve reception (in remote areas, for example), you can connect an external antenna using an adapter cable (RadioShack Unlimited Cat. No. 11806437, not supplied) with a phono plug to the Weatheradio’s EXT ANT jack. Your local RadioShack store sells a wide variety of antennas.
To connect an external antenna to the Weatheradio, connect one end of the adapter cable to EXT ANT on the Weatheradio and connect the other end to the phono plug on the antenna. Then lower the Weatheradio’s telescoping antenna.
PROGRAM OPERATE + –
EXT ANT
MODE |
ALARM OUT |
11
GETTING STARTED
UNDERSTANDING THE FIPS CODE
The NWS divides the United States by state and county (or parish, where applicable), then assigns a 6-digit “FIPS” (Federal Information Processing System) code to identify each county/parish for the purpose of broadcasting weather conditions. For example, the code for Tarrant County, Texas, is 048439.
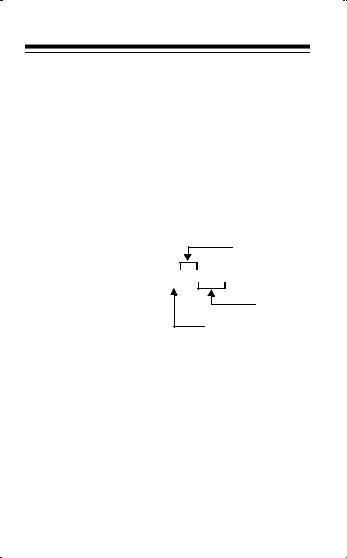
The first digit in a FIPS code identifies the county subdivision, the next two digits identify the state, and the last three digits identify the county itself. For example:
State
048439
County
County Subdivision
Note: Most FIPS codes begin with 0, which means that FIPS code represents an entire county. The NWS, however, eventually plans to subdivide some large counties. When that happens, each subdivision will be assigned a digit from 1–9, resulting in codes such as 148439, 248439, and so on.
Your Weatheradio is preset to receive all SAME alert signals broadcast within about a 50-mile radius of where you installed it. To receive SAME alerts and broadcasts about weather occurring only in particular counties within that area, you can program up to 15 12

FIPS codes into the Weatheradio’s memory. That way, for example, you can avoid an alert that applies to an area within that 50-mile radius but not in your county.
Obtaining Your Area’s FIPS Code(s)
To obtain the FIPS code for the location where you installed the Weatheradio, contact your local RadioShack store or call the NWS toll free at:
1-888-NWR-SAME
(1-888-697-7263)
If you call the NWS, follow the instructions you hear.
Note: If you are close to a county/parish line(s), you might want to obtain the codes for any other counties/ parishes you are close to.
Hint: Since you can program up to 15 FIPS codes into the Weatheradio’s memory, you might want to obtain the codes for other local areas that you travel through to work (as long as those areas are within a 50 mile radius of your location and within an area covered by your local NWS broadcast station). That way, you can program those codes into the Weatheradio and receive broadcasts covering those locations, too.
13

PROGRAMMING THE
WEATHERADIO
Note: Some of the Weatheradio’s keys (such as 0–9) are located under the cover on top of the Weatheradio. Lift the cover to access the keys.
The first time you use your Weatheradio, it is automatically set to:
•Use the NOAA weather broadcast frequency 162.400 MHz (Channel 1)
•Receive all SAME alert signals broadcast within a 50-mile radius of where you installed it
Your Weatheradio is preprogrammed with the seven national NOAA broadcast frequencies (Channels 1– 7). Depending on your location, you might need to select a different channel.
To select a different broadcast frequency (if necessary) and store or change FIPS codes in the Weatheradio’s memory (to narrow the area in which you receive SAME alerts), follow these steps.
14

1.To turn on the Weatheradio, turn VOLUME to the left until it clicks. Then set SINGLE/MULTIPLE (on the bottom of the radio) to SINGLE if you are entering only one FIPS code or to MULTIPLE if you are entering more than one.
2.Set PROGRAM/OPERATE to PROGRAM. The Weatheradio displays the last selected weather broadcast channel and frequency number.
PROGRAM OPERATE + –
EXT ANT
MODE |
ALARM OUT |
3.Press WEATHER to turn on the weather broadcast (if necessary), then turn VOLUME to adjust the volume so you can hear the broadcast as you make your selection.
OFF |
WEATHER |
ALERT |
|
|
VOLUME |
|
OFF |
MAX |
15
 Loading...