


Speaker System Enceintes acoustiques Lautsprechersystem Sistema di diffusori Luidsprekersysteem Sistema de altavoces
PDP-S11
Operating Instructions Mode d'emploi Bedienungsanleitung Istruzioni per l'uso Gebruiksaanwijzing Manual de instrucciones

English
Thank you for buying this Pioneer product.
Please read through these operating instructions before using your speaker system so you will know how to make the most of its performance. After you have finished reading the instructions, put them away in a safe place for future reference.
WARNING: Handling the cord on this product or cords associated with accessories sold with the product will expose you to lead, a chemical known to the State of California and other governmental entities to cause cancer and birth defects or other reproductive harm. Wash hands after handling.
CAUTION
This product is designed exclusively for use with the PDP-4330HD,PDP-433HDE,PDP-433HDG Pioneer plasma display.
CAUTION
AFTER THE SPEAKER HAS BEEN INSTALLED, DO NOT HOLD IT OR USE IT FOR SUPPORT WHEN MOVING THE DISPLAY. REMOVE THE SPEAKER BEFORE MOVING.
BEFORE USE
The nominal impedance of this speaker system is 8 ohms.
÷In order to prevent damage to the speaker system resulting from input overload, please observe the following precautions:
÷Do not supply power to the speaker system in excess of the maximum permissable input. This can result in damage or a possible fire hazard.
÷When connecting or disconnecting pin-plugs, be sure that amplifier power is OFF.
÷When using a graphic equalizer to emphasize loud sounds of a high frequency range, do not use excessive amplifier volume.
÷Do not force a low-powered amplifier to produce a loud volume of sound (the amplifier’s harmonic distortion will be increased, and you may damage the speaker).
÷Please handle the speakers with sufficient care, as the grille net and the cabinet can become damaged or broken when they are subjected to strong external impacts.
Placing a CRT computer screen or CRT monitor near to the speakers may result in interference or color distortion. If this happens, distance the monitor from the speakers.
Notes on Installation Work:
This product is marketed assuming that it is installed by qualified personnel with enough skill and competence. Always have an installation specialist or your dealer install and set up the product.
PIONEER cannot assume liabilities for damage caused by mistake in installation or mounting, misuse, modification or a natural disaster.
CHECKING THE ACCESSORIES
7 Speaker cable x 2
7 Wire clamp x 2
7 Speaker mounting fittings x 2
7 Speaker mounting bolts
• Flat countersunk head screw x 2
• Hexagon socket head screw x 2
7 Mounting tool (Hex wrench)
7 Operating instructions
NOTE:
•Always use the accessory mounting fittings for installation.
•When screws other than those enclosed as accessories are used to install the speakers, the speakers may drop off or accidents may be caused. Always use the screws enclosed as accessories.
2

English
INSTALLATION ON THE PLASMA DISPLAY
Perform installation according to the following steps 1 to 7.
NOTE:
Before attaching the speaker, please attach the PDKTS03 table top stand (or another Pioneer plasma display stand) to the plasma display unit.
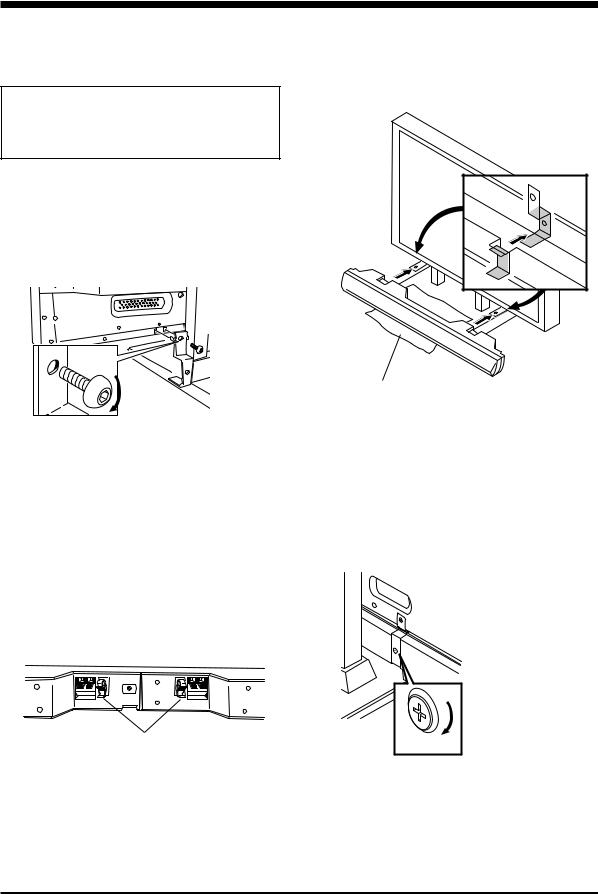
5 Mount the speakers onto the speaker
mounting fittings.
To avoid damaging the stand, cover it with the
protective wrapping that covered the speaker.
This illustration shows the PDK-TS03 table top stand.
1 Attach the speaker mounting fittings to
the rear of the plasma display.
Using the supplied hexagon socket head screws, fix the speaker mounting fittings to the left and right sides of the plasma display. (Use the supplied hex wrench to tighten the screws.
This illustration shows the PDKTS03 table top stand.
•Turn clockwise to tighten.
•Align the lugs on the speaker mounting fittings with the holes in the plasma display unit.
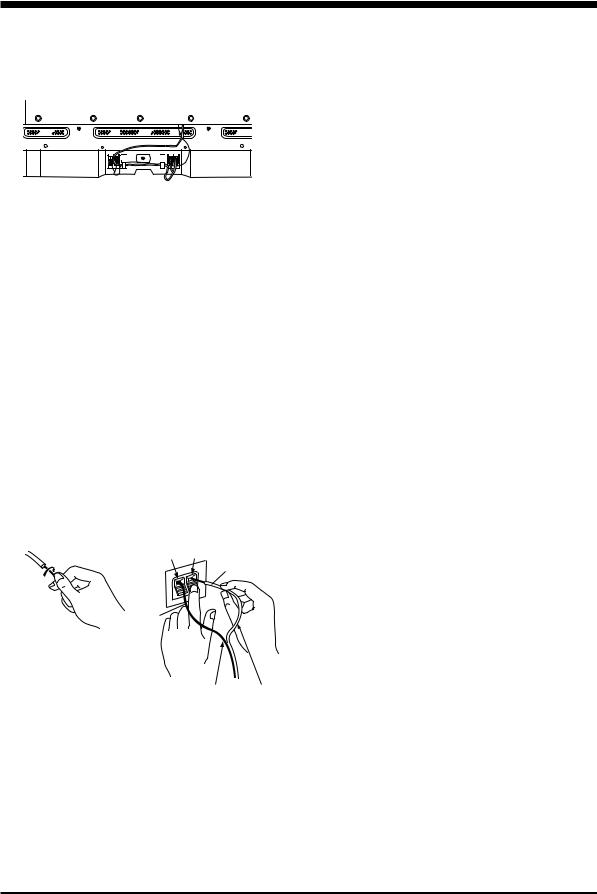
2 Connect the supplied speaker cords to
the back of the plasma display.
(Please also see the installation instructions of the
plasma display.)
3Attach the two supplied wire clamps to the rear of the speakers, as shown.
• The clamp opening should be pointing downward.
4 Connect the other end of the speaker
cords (see step 2) to the speakers.
See the following page for more detailed information
on connecting speaker cords.
Protective wrapping (the PDK-TS03 table top stand
only)
Carefully, mount the speaker onto the mounting
fittings.
6 Fix the speaker to the mounting fittings.
Use the supplied flat countersunk-head screws to fix both right and left sides of the speaker to the mounting fittings as shown below.
This illustration shows the PDK-TS03 table top stand.
• Turn clockwise to tighten.
NOTE:
Do not use the screw hole located on the underside of the mounting fittings to fix the speaker.
English
3
English
7 Route the speaker cords out of sight
from the front of the unit.
Route as shown in the diagram, using the wire clamps (step 3) to secure the cords.
NOTE:
If you want to move the plasma display unit, make sure that you remove the speaker first. In addition, do not move the display holding on to the mounting fittings. This can result in injury or damage to the unit.
CONNECTION TO A PLASMA DISPLAY
1Switch off the power of the plasma display.
2Use the supplied speaker cords to connect the speaker outputs of the plasma display to the speaker inputs on the speaker system.
1. Remove the insulation |
2. Push the lever, insert the |
||
and twist the core ends |
cable into the hole, and |
||
together. |
release the lever. |
||
· terminal |
ª terminal (red) |
||
|
(black) |
|
Red |
Black
To the·terminal To the ª terminal
(Speaker output terminals of the plasma display)
The polarity of the input terminals is plus ª for the red terminal (the terminal on the right side in the following figure) and minus · for the black terminal (the terminal on the left side in the following figure).
•After connection to the terminals, pull lightly on the cable to confirm that the tips of the cable are properly connected to the terminals. An imperfect connection can cause sound interruptions and noise.
•When cable cores stick out and ª and · lines are short-circuited, an excessive load will be applied to the plasma display and the operation will stop or trouble will be caused.
•Match the colors on the speaker cable with the speaker terminals to ensure correct polarity. This will result in correct stereo sound. Incorrect polarity will result in poor, unfocused sound.
CABINET MAINTENANCE
•Use a polishing cloth or dry cloth to wipe off dust and dirt.
•When the cabinet is very dirty, wipe with a soft cloth moistened with water-diluted cleanser; then wipe again with a dry cloth. Do not use furniture wax or cleaners. They may damage the surface of the cabinet.
•Never use thinner, benzine, insecticide sprays and other chemicals on or near the cabinets, since these will corrode the surfaces.
•When a chemical cloth is used, read the cautions for the chemical cloth carefully.
SPECIFICATIONS |
|||
Cabinet : |
Enclosed type |
|
|
Used speakers (two-way system) : |
|||
Woofer (for low tones) .............................. |
|
Oval cone type |
|
Tweeter (for high tones) ...................... |
|
2.5 cm dome type |
|
Nominal impedance ..................................................... |
|
8 Ω |
|
Frequency Range ..................................... |
|
60 to 20,000 Hz |
|
Sensitivity |
................................ |
|
82 dB/W (at 1 m distance) |
Permissible input : |
|
|
|
Max. input |
................................................................. |
|
12 W |
Rated input ............................................................. |
|
2.5 W |
|
Crossover frequency ................................................ |
|
3 kHz |
|
External Dimensions ..... |
1070 (W) x 74 (H) x 102 (D) mm |
||
Weight ..................................................................... |
|
|
2.7 kg |
Accessory parts |
|
|
|
Speaker cable .................................................................. |
|
2 |
|
Wire clamp ...................................................................... |
|
2 |
|
Flat countersunk head screw |
.......................................... 2 |
||
Hexagon socket head screw ........................................... |
2 |
||
Mounting tool (Hex wrench) ........................................... |
1 |
||
Speaker mounting fittings ............................................... |
2 |
||
Operating |
Instructions .................................................... |
|
1 |
NOTE:
Specifications and design subject to possible modification
without notice, due to improvements.
Published by Pioneer Corporation.
Copyright © 2002 Pioneer Corporation.
All rights reserved.
4

Françias
Merci pour votre achat de cet appareil Pioneer. |
V’ERIFICATIONDESACCESSOIRES |
|
Veuillez lire attentivement toutes ces instructions de |
||
|
||
fonctionnement avant d’utiliser votre enceinte acoustique |
|
|
de façon à pouvoir en tirer le meilleur profit. Après lecture |
7 Câbles de haut-parleur x 2 |
|
complète du livret d’instructions de fonctionnement, le |
|
|
ranger dans un endroit sûr afin de pouvoir vous y reporter |
|
|
facilement en cas de besoin lors de l’utilisation de l’enceinte |
|
|
acoustique. |
|
English
ATTENTION
Ce produit est conçu exclusivement pour l’utilisation avec un écran d’affichage au plasma Pioneer PDP-4330HD ou PDP-433HDE.
ATTENTION
APRÈS L’INSTALLATION DE L’ENCEINTE ACOUSTIQUE NE LE TENEZ PAS EN DÉPLAÇANT L’ÉCRAN D’AFFICHAGE. RETIREZ ENCEINTE ACOUSTIQUE AVANT DE DÉPLACER L’ÉCRAN D’AFFICHAGE.
AVANT USAGE
÷L’impédance nominale de cette enceinte acoustique est de 8 Ω.
÷Afin d’éviter d’endommager l’enceinte acoustique, suite à une surcharge à l’entrée, veuillez observer les précautions suivantes:
÷Ne pas fournir aux haut-parleurs une alimentation supérieure à la valeur maximale admise, sinon l’appareil risque d’être endommagé ou un incendie pourrait éclater.
÷En connectant ou en déconnectant les fiches à plots, s’assurer que l’alimentation de l’amplificateur est coupée sans faute.
÷En utilisant un égalisateur graphique pour accentuer les sons forts dans la plage des hautes fréquences, ne pas régler l’amplificateur à un volume excessif.
÷Ne pas contraindre un amplificateur de faible puissance à fonctionner à un volume sonore poussé (la distorsion harmonique de l’amplificateur sera accrue, ce qui risquerait d’endommager le haut-parleur).
÷Manipuler les haut-parleurs avec suffisamment de soin, car autrement, l’enjoliveur frontal et le coffret risqueraient d’être endommagés ou hors d’usage en les soumettant à des chocs externes exagérés.
÷Si un écran d’ordinateur à écran cathodique (CRT) ou un moniteur à écran cathodique (CRT) est placé à proximité des haut-parleurs, il risque de présenter des interférences ou une dénaturation des couleurs. Dans ce cas, éloigner le moniteur des haut-parleurs.
Remarques sur l’installation:
Ce produit est vendu en assumant qu’il sera installé par un personnel suffisamment expérimenté et qualifié. Faites toujours réaliser le montage et l’installation par un spécialiste ou par votre revendeur.
PIONEER ne peut être tenu responsable pour tout dommage causé par une erreur d’installation ou de montage, une mauvaise utilisation ou un désastre naturel.
7 Serre-fil x 2 |
Françias |
|
7 Accessoires de montage de haut parleur x 2
7 Boulons de montage de haut parleur
Vis à tête fraisée plate x 2
Vis à tête hexagonale noyée x 2
7 Outil de montage (Clé hexagonale)
7 Mode d’emploi
REMARQUE:
÷Utilisez toujours les accessoires de montage pour l’installation.
÷Si des vis autres que ceux ci-joints sont utilisés pour installer les haut-parleurs, ceux-ci peuvent se détacher et tomber, ou des accidents risquent de se produire. Utilisez toujours les vis ci-joints comme accessoires.
5
Françias
INSTALLATION SUR ÉCRAN DE VISUALISATION AU PLASMA
Effectuez l’installation selon les étapes 1 á 7 suivantes.
REMARQUE
Avant de fixer le haut-parleur, veuillez fixer le support de dessus de table PDK-TS03 (ou un autre support d’écran Pioneer) á l’unité d’écran plasma.
5 Montez les enceintes sur les accessoires
de montage de haut-parleur.
Afin d’éviter d’endommager le support, couvrez-le de l’emballage protecteur qui a servi á couvrir les haut-
parleurs.
Cette illustration présente le support de dessus de table PDK-TS03.
1Fixez les accessoires de montage de haut-parleur á l’arrière de l’écran plasma.
Á l’aide des vis á tête hexagonale noyée fournies, fixez les accessoires de montage de haut-parleur aux côtés gauche et droite de l’écran plasma. (Servezvous de la clé hexagonale fournie pour serrer les vis.)
Cette illustration présente le support de dessus de table PDK-TS03.
•Faites tourner dans le sens des aiguilles d’une montre pour serrer.
•Alignez les tenons se trouvant sur les accessoires de montage de haut-parleur sur les trous de l’unité
écran plasma.
2 Branchez les cordons de haut-parleurs
fournis á l’arrière de l’écran plasma.
(Veuillez également lire les instructions d’installation
de l’écran plasma.)
3Fixez les deux serre-fils fournis á l’arrière des haut-parleurs, comme indiqué ci-dessous.
•L’ouverture des serre-fils devra être orientée vers le bas.
4Branchez l’autre extrémité des cordons de haut-parleurs (voir étape 2) aux haut-
parleurs.
Voir la page suivante pour des informations plus détaillées sur la manière de brancher les cordons de haut-parleurs.
Emballage protecteur (dessus de table PDK-TS03 seulement).
Montez prudemment l’enceinte sur les accessoires de montage.
6 Fixez l’enceinte aux accessoires de
montage.
Aidez-vous des vis á tête fraisée plate fournies pour attacher les deux côtés du haut-parleur aux accessoires de montage, comme indiqué ci-dessous.
Cette illustration présente le support de dessus de table PDK-TS03.
•Faites tourner dans le sens des aiguilles d’une montre pour serrer.
REMARQUE:
N’utilisez pas le trou de vis situé sur le dessous des accessoires de montage pour attacher le haut-parleur.
6
 Loading...