


> Before Start > Part Names > Install > Initial Setup > Playback
Advanced Setup | Firmware Update | Others
NETWORK SURROUND SOUND BAR
FS-EB70
Instruction Manual
Mode d’emploi
Manual de instrucciones

> Before Start > Part Names > Install > Initial Setup > Playback
Advanced Setup | Firmware Update | Others
Contents
Before Start |
|
What's in the box ............................................................................................... |
3 |
Part Names |
|
Main Unit (Front Panel) ..................................................................................... |
5 |
Main Unit (Rear Panel) ..................................................................................... |
6 |
Remote Controller ............................................................................................. |
7 |
Main Unit (Display) ............................................................................................ |
8 |
Sound Bar ......................................................................................................... |
9 |
Subwoofer ....................................................................................................... |
10 |
Install |
|
1. Connect the Speakers ................................................................................. |
11 |
2. Connect the TV ........................................................................................... |
13 |
3. Connect the HDMI AV Components ............................................................ |
14 |
4. Connect the Audio Components ................................................................. |
15 |
5. Connect Other Cables ................................................................................ |
16 |
Initial Setup |
|
Initial Setup with Auto Start-up Wizard ............................................................ |
17 |
Playback |
|
AV Component Playback ................................................................................ |
19 |
Internet Radio ................................................................................................. |
20 |
Spotify ............................................................................................................. |
22 |
Music Server ................................................................................................... |
23 |
USB Storage Device ....................................................................................... |
25 |
AirPlay® ........................................................................................................... |
27 |
BLUETOOTH® Playback ................................................................................ |
28 |
Listening to the FM Radio ............................................................................... |
29 |
Listening Modes .............................................................................................. |
30 |
AV Adjust ........................................................................................................ |
37 |
2
Advanced Setup |
|
System Setup................................................................................................... |
39 |
MCACC............................................................................................................ |
48 |
Network/Bluetooth............................................................................................ |
49 |
Firmware Update |
|
Firmware Update ............................................................................................. |
52 |
Others |
|
Troubleshooting ............................................................................................... |
55 |
General Specifications .................................................................................... |
60 |
About HDMI ..................................................................................................... |
62 |
License and Trademark Information ................................................................ |
63 |
E N
> Before Start > Part Names > Install > Initial Setup > Playback
Advanced Setup | Firmware Update | Others
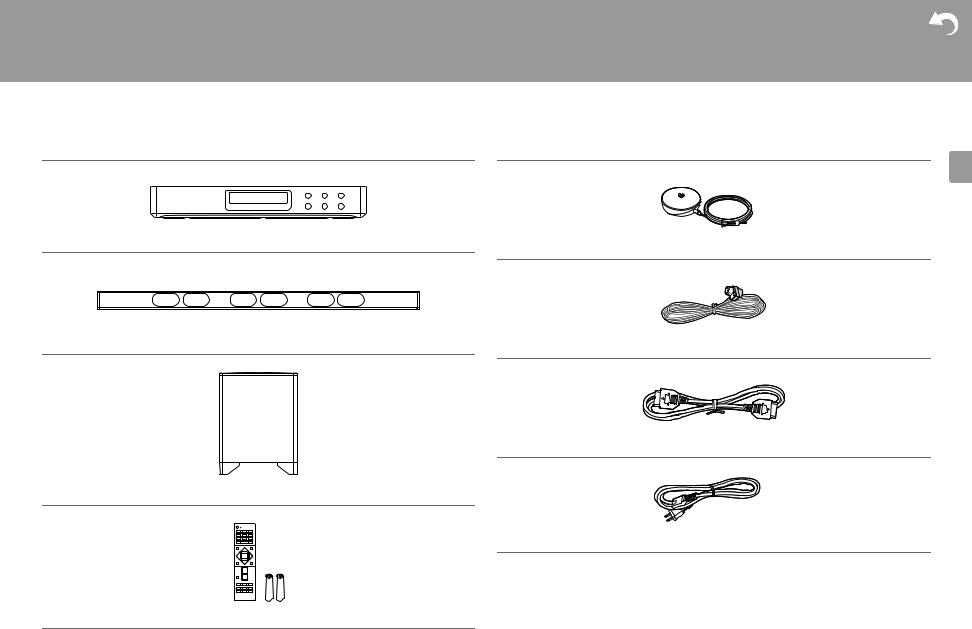
What's in the box
Sound System Controller (Main unit/AC-700) (1)
Sound bar (S-EB1) (1)
Subwoofer (S-EB1SW) (1)
E
N
Speaker setup microphone (1)
Indoor FM antenna (1)
Sound bar connection cable (1)
Power cord (for subwoofer) (1)
0 Quick Start Guide (1)
This document is an online instruction manual. It is not included as an accessory.
Remote controller (RC-940S) (1), batteries (AAA/R03) (2)
3

> Before Start > Part Names > Install > Initial Setup > Playback
Advanced Setup | Firmware Update | Others
E
N
0The power cord must be connected only after all other cable connections are completed.
0We will not accept responsibility for damage arising from the connection of equipment manufactured by other companies.
0Functionality may be introduced by firmware updates and service providers may cease services, meaning that some network services and content may become unavailable in the future. Furthermore, available services may vary depending on your area of residence.
0Specifications and appearance are subject to change without prior notice.
4
> Before Start > Part Names > Install > Initial Setup > Playback
Advanced Setup | Firmware Update | Others
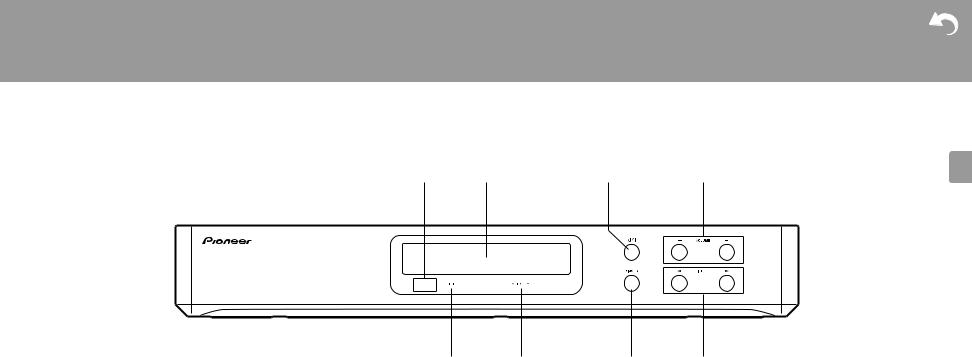
Main Unit (Front Panel)
|
|
|
|
E |
N |
|
|
|
|
1.Remote control sensor
2.Display ( P8)
3.Í/I button: Turns the unit on or into standby mode.
4.VOLUME button: Allows you to adjust the volume.
5.ON indicator: This lights blue when the power is on and goes out when the unit switches
to standby. It lights red if the unit enters standby mode when the features are enabled that continue to work when this unit is in standby, such as HDMI Standby Through ( P45) and Network Standby ( P46).
6.NETWORK indicator: This lights blue when network features are being used. It will flash if the connection to the network is not correct.
7.DIMMER button: You can switch the display off or adjust the brightness of the display in three steps.
8.INPUT button: Switches the input to be played. (BD/DVD / CBL/SAT / GAME / STRM BOX / CD / TV / FM / NET / USB / BT AUDIO)
5
> Before Start > Part Names > Install > Initial Setup > Playback
Advanced Setup | Firmware Update | Others
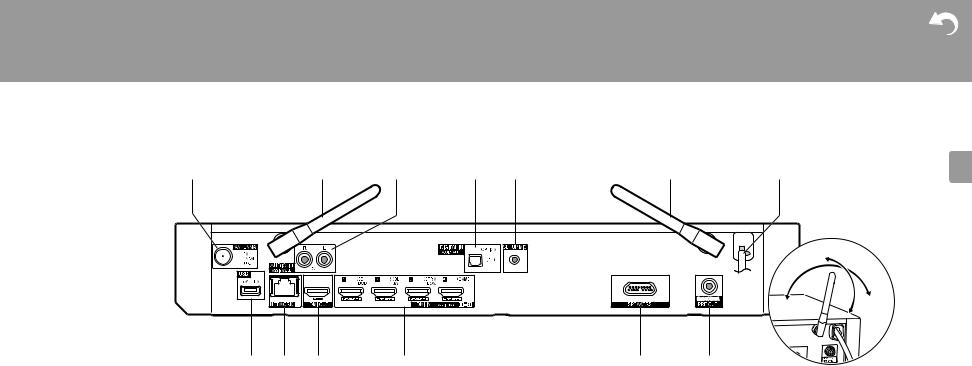
Main Unit (Rear Panel)
|
|
|
|
|
|
|
E |
N |
90°
180°
|
|
|
|
1.ANTENNA FM UNBAL 75Ω jack: Connect the supplied antenna.
2.Wireless antenna: Raise for Wi-Fi connection or when using a BLUETOOTH enabled device. The diagram shows the movable range for the wireless antenna. Do not try to force it beyond this range otherwise you may break it.
3.AUDIO IN jacks: Input AV component audio signals with an analog audio cable.
4.DIGITAL IN OPTICAL jack: Input digital audio signals from a TV, for example, with a digital optical cable.
5.SETUP MIC jack: The supplied speaker setup microphone is connected.
6.Power cord
7.USB port: A USB storage device is connected so that music files stored in it can be played. You can also supply power (maximum 5 V/1 A) to USB devices with a USB cable.
8.NETWORK port: Connect to the network with an Ethernet cable.
9.HDMI OUT jack: Connect a HDMI cable to transfer video signals and audio signals to a TV.
10.HDMI IN jacks: Input video signals and audio signals with a HDMI cable connected to an AV component.
11.SPEAKERS terminal: Connect the included sound bar using the included sound bar connection cable.
12.SUBWOOFER PRE OUT jack: Connect a powered subwoofer with a subwoofer cable.
6
> Before Start > Part Names > Install > Initial Setup > Playback
Advanced Setup | Firmware Update | Others
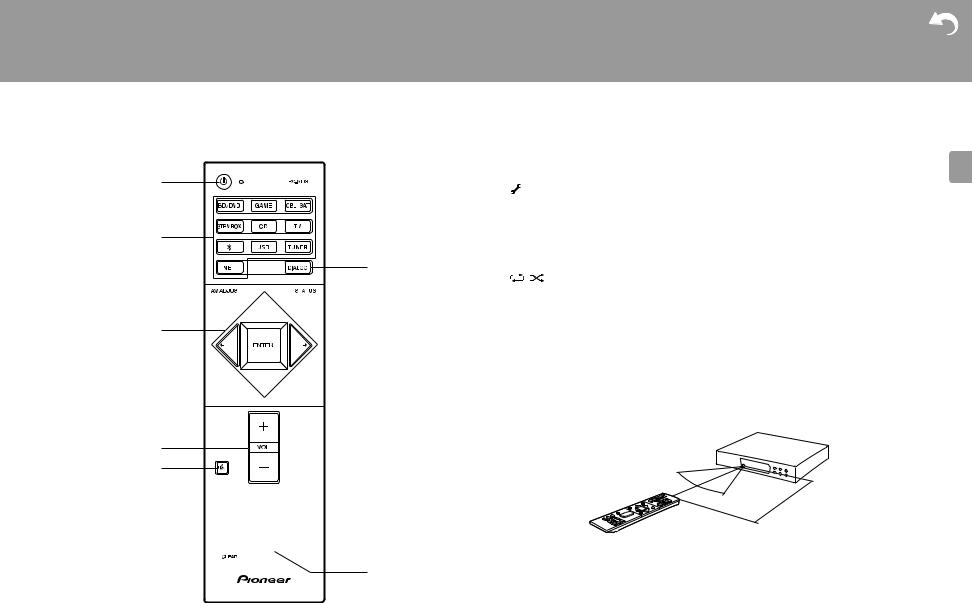
Remote Controller


1. |
Í button: Turns the unit on or into standby mode. |
E |
2. |
Input selector buttons: Switches the input to be played. |
N |
3. |
(AV ADJUST) button: You can perform common settings on the TV screen. ( |
P37) |
4.Cursors, ENTER button: Select the item with the cursors and press ENTER to confirm.
5. button: Displays the Home.
6.Volume buttons: Allows you to adjust the volume. This button also cancels the muting.
7. button: Temporarily mutes audio. Press again to cancel muting.
8. |
Listening mode buttons: Allows you to select the listening mode. ( P30) |
9. |
Play buttons: You can start play of the Music Server or USB. |
10. |
button: You can start repeat or random play of the Music Server or USB. |
|
CLEAR button: Deletes all characters you have entered when entering text on the TV |
|
screen. |
11.DIALOG button: Switches the Dialog Enhancement setting. ( P38)
12. (STATUS) button: Switches the information on the display.
13. button: Returns the display to the previous state during setting.
14.DIMMER button: Switch the display off or adjust the brightness of the display in three
steps.
15.MODE button: Switches tuning to an FM station between automatic tuning and manual tuning.
16.+Fav button: Used to register FM radio stations.
30°
30°
Approx.5 m (16 ft.)
7
> Before Start > Part Names > Install > Initial Setup > Playback
Advanced Setup | Firmware Update | Others
Main Unit (Display)
|
|
|
|
|
|
E |
||||||
N |
||||||||||||
|
|
|
|
|
|
|
|
|
|
|
|
|
|
|
|
|
|
|
|
|
|
|
|
|
|
|
|
|
|
|
|
|
|
|
|
|
|
|
|
|
|
|
|
|
|
|
|
|
|
|
|
|
|
|
|
|
|
|
|
|
|
|
|
|
|
|
|
|
|
|
|
|
|
|
|
|
|
|
|
|
|
|
|
|
|
|
|
|
|
|
|
|
|
|
|
|
|
|
|
|
|
|
|
|
|
|
|
|
|
|
|
|
|
|
|
|
|
|
|
|
|
|
|
|
|
|
|
|
|
|
|
|
|
|
|
|
|
|
|
|
|
|
|
|
|
|
|
|
|
|
|
|
|
|
|
|
|
|
|
|
|
|
|
|
|
|
|
|
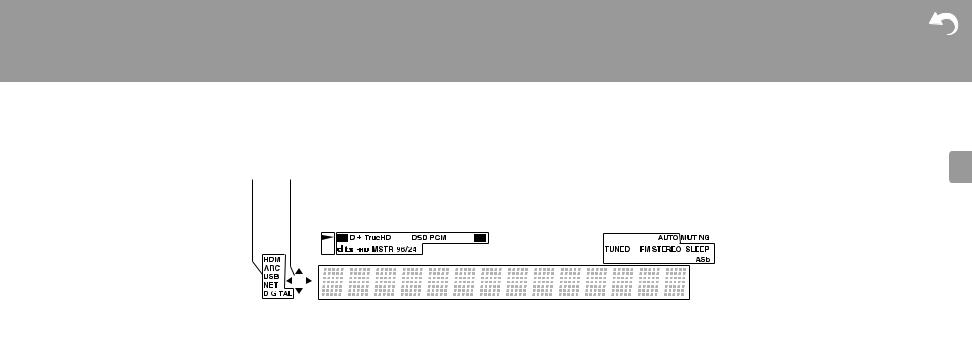
1.Lights in the following conditions.
HDMI: HDMI signals are input and selected.
ARC: Audio signals from the ARC compatible TV are input and selected.
USB: When "USB" is selected with the input selector and the unit is connected by USB and the USB device is selected. Flashes if the USB is not properly connected.
NET: When "NET" is selected with the input selector and the unit is connected to the network. It will flash if the connection to the network is not correct.
DIGITAL: Digital signals are input and the digital input selector is selected.
2.Lights when operating the "NET" or "USB" input selector indicating remote controller cursor operations are possible in screens showing list of tracks, for example.
3.Lights when operating the "NET" or "USB" input selector when tracks are played or paused.
4.Lights according to the type of input digital audio signals and the listening mode.
5.Lights in the following conditions. AUTO: When tuning mode is auto. TUNED: Receiving FM radio.
FM STEREO: Receiving FM stereo. SLEEP: Sleep timer has been set.
ASb: When Auto Standby function is enabled. ( P46) 6. Flashes when muting is on.
7.Displays various information of the input signals. Characters that cannot be displayed on this unit are replaced with asterisks ( ).
8
> Before Start > Part Names > Install > Initial Setup > Playback
Advanced Setup | Firmware Update | Others
Sound Bar
|
|
E |
||
N |
||||
|
|
|
|
|
|
|
|
|
|
|
|
|
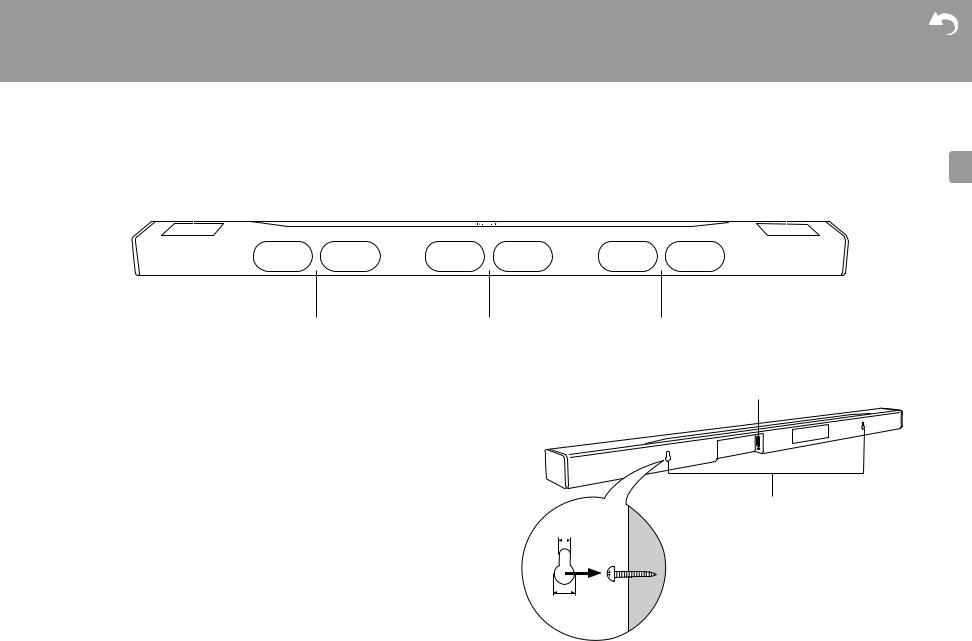
1.Height left speaker
2.Height right speaker
3.Front left speaker
4.Center speaker
5.Front right speaker
6.Speaker jacks: Connect to the main unit using the included sound bar connection cable.
7. Holes for attaching to the wall: The sound bar can be attached to the wall by putting these |
|
|
|
|
holes on wood screws, etc., that are fixed to the wall. The holes for attaching to the wall |
|
|
|
|
are on the rear of the sound bar, in two places 580 mm (22-7/8") apart. |
|
|
|
|
0 |
The wood screws, etc., to fit the brackets to the wall are not included. Consult with a |
|
|
|
|
professional to make sure you select the type, material, length, etc., that will provide |
|
|
|
|
sufficient support. Add a reinforcing plate or anchor if reinforcement is necessary. |
5 mm (3/16") |
||
0 |
We accept no responsibility for damage or injury that arises due to incorrect fitting, |
|||
|
incomplete fitting, incorrect use, or acts of nature. |
|
|
|
10 mm (3/8")
9
> Before Start > Part Names > Install > Initial Setup > Playback
Advanced Setup | Firmware Update | Others
Subwoofer
E
N


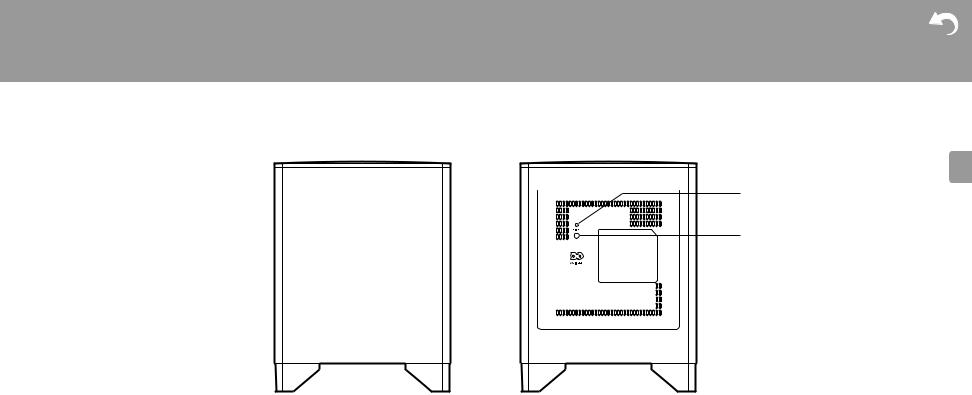
1.LINK LED: Lights when paired with the main unit.
2.LINK button: Used to pair the subwoofer and the main unit.
3.AC INLET: The supplied power cord is connected.
The wireless connection setting between the subwoofer and the main unit was completed at the time of shipping. You need only connect the power cord to start using the unit.
0 If LINK LED is flashing and you do not hear sound from the subwoofer, go to "Troubleshooting" and check "The subwoofer produces no sound" ( P56).
10
> Before Start > Part Names > Install > Initial Setup > Playback
1. Connect the Speakers
1 |
2 |
3
Advanced Setup | Firmware Update | Others
Setting up the sound bar |
E |
|
N |
The sound bar outputs the audio for the front speakers and center speaker from the front, and the audio for the height speakers from the top. Set up in front of the TV so the logo faces up.
Setting up the Subwoofer
The connection between the main unit and the subwoofer is
wireless. Put the subwoofer within 32 ft. (10 m) of the main unit. Also, place so there are no obstacles such as walls
between the main unit and the subwoofer.


The directionality of subwoofers, where hearing discerns the direction of sound, is weak, so you will get the same effect from the subwoofer wherever you decide to put it in the room.
11
> Before Start > Part Names > Install > Initial Setup > Playback
Advanced Setup | Firmware Update | Others
1 |
E |
|
N |
||
|
a

2
a
a
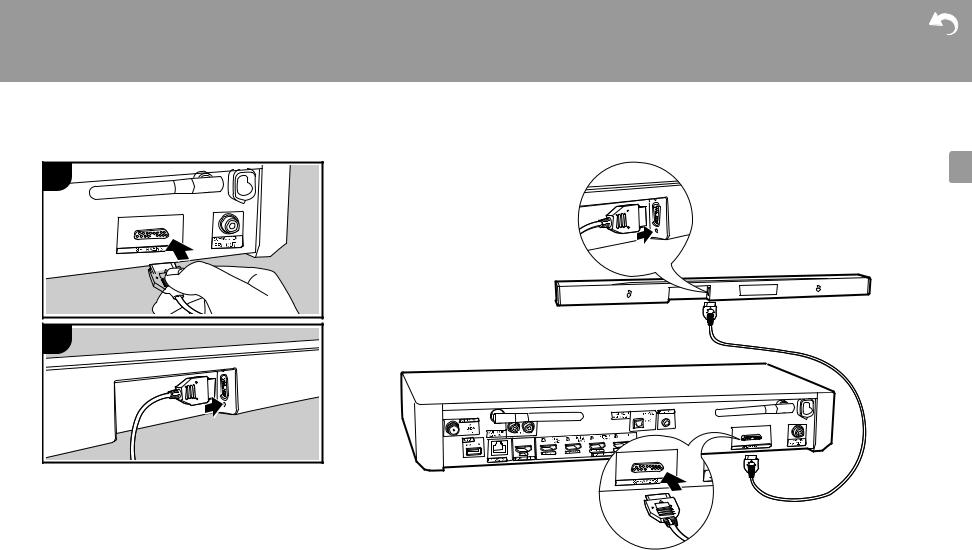
Connecting the sound bar
Refer to the illustration to connect the sound bar. Match the facing of the cable connector to the port, and make sure that it is pushed in all the way.
a Sound bar connection cable
12

> Before Start > Part Names > Install > Initial Setup > Playback
Advanced Setup | Firmware Update | Others
2. Connect the TV
1
DIGITAL
OPTICAL OUT
To ARC TV |
E |
|
N |
For a TV that supports the ARC (Audio Return Channel)
( P62) feature, use an HDMI cable and connect according to illustration "a". Choose an HDMI IN jack on the TV that supports ARC when connecting.
To Non-ARC TV
For a TV that does not support the ARC (Audio Return Channel) feature, connect both the HDMI cable in illustration "a" and the digital optical cable in "b".
b
Setup
0 Settings are required to use the ARC function. Select
"Yes" in "4. Audio Return Channel" ( P18) in the Initial
Setup.
0 Please refer to the TV’s operation manual for directions on connections and setup for the TV.
a HDMI cable, b Digital optical cable
13
> Before Start > Part Names > Install > Initial Setup > Playback
Advanced Setup | Firmware Update | Others
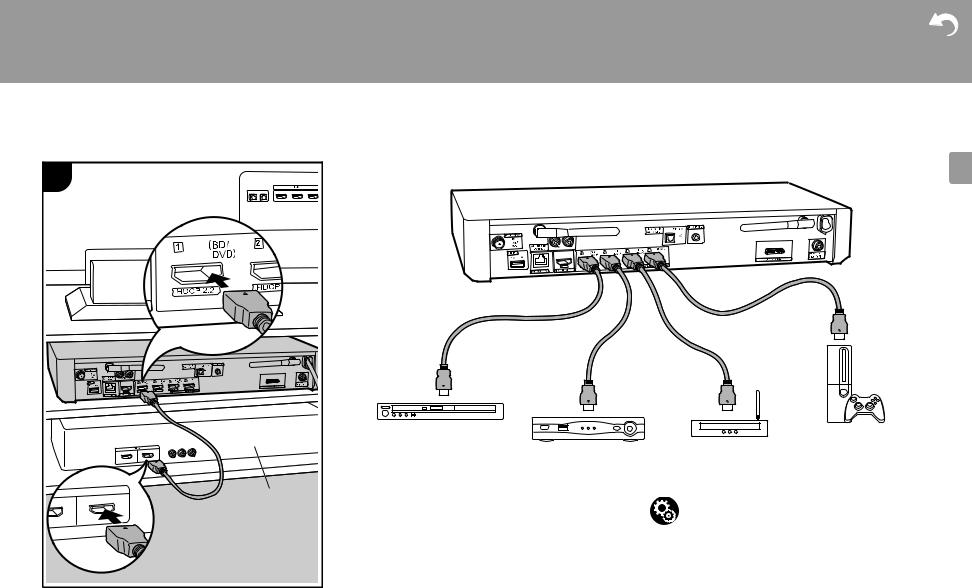
3. Connect the HDMI AV Components
1 |
|
|
a |
HDMI OUT |
e.g. BD |
|
a HDMI cable
a
BD/DVD
Cable/Satellite set-top box
This is an example of connection with an AV component that has an HDMI jack. With connection to an AV component that conforms with the CEC (Consumer Electronics Control) standard, you can use features such as the HDMI CEC feature that links with the input selector, and the HDMI Standby Through feature which allows you to play video and audio from AV components on the TV even when this unit is in standby mode. ( P62)
0To play 4K or 1080p video, use the high speed HDMI cable.
E
N
GAME
Streaming media player
Setup
0 Settings are required to use the HDMI CEC and HDMI Standby Through features. ( P44, 45) Make settings after all connections are complete.
0 To enjoy digital surround sound including Dolby Digital, audio output should be set to "Bitstream output" on the connected Blu-ray Disc player or other device.
14
> Before Start > Part Names > Install > Initial Setup > Playback
Advanced Setup | Firmware Update | Others
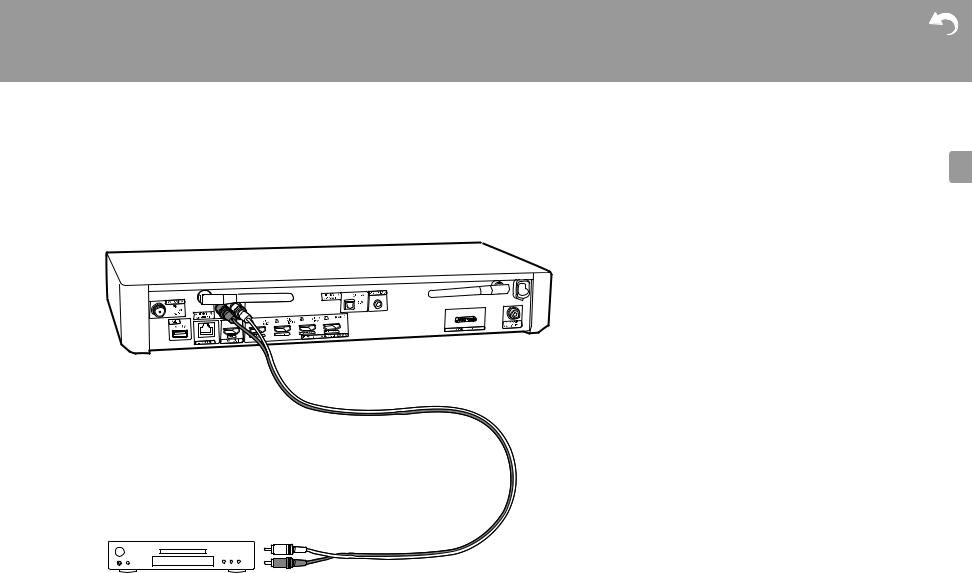
4. Connect the Audio Components
Connecting a CD player |
E |
|
N |
Use an analog audio cable to connect a CD player to the
AUDIO IN jack.
a
CD
a Analog audio cable
15

> Before Start > Part Names > Install > Initial Setup
5. Connect Other Cables
1 2
2
a
b
3 |
4 |
d
c |
c |
d |
a FM indoor antenna, b Ethernet cable, c Power cord (Main unit), d Power cord (for subwoofer)
> Playback
Advanced Setup | Firmware Update | Others
Antenna Hookup |
E |
|
N |
Connect the supplied FM indoor antenna to the ANTENNA
FM UNBAL 75Ω terminal. Move the FM indoor antenna around while playing the radio to find the position with the
best reception.
Network Hookup
Connect this unit to the network using wired LAN or Wi-Fi (wireless LAN). You can enjoy network features such as internet radio by connecting the unit to the network. If you connect by wired LAN, connect with an Ethernet cable to the NETWORK port as shown in the illustration. To connect by Wi-Fi, then after selecting "Wireless" in "3. Network Connection" ( P18) in Initial Setup, select the desired setting method and follow the onscreen instructions to configure the connection.
Power Cord Hookup
Connect the power cords of the main unit and subwoofer after all other connections are completed.
16
> Before Start > Part Names > Install > Initial Setup > Playback
Advanced Setup | Firmware Update | Others
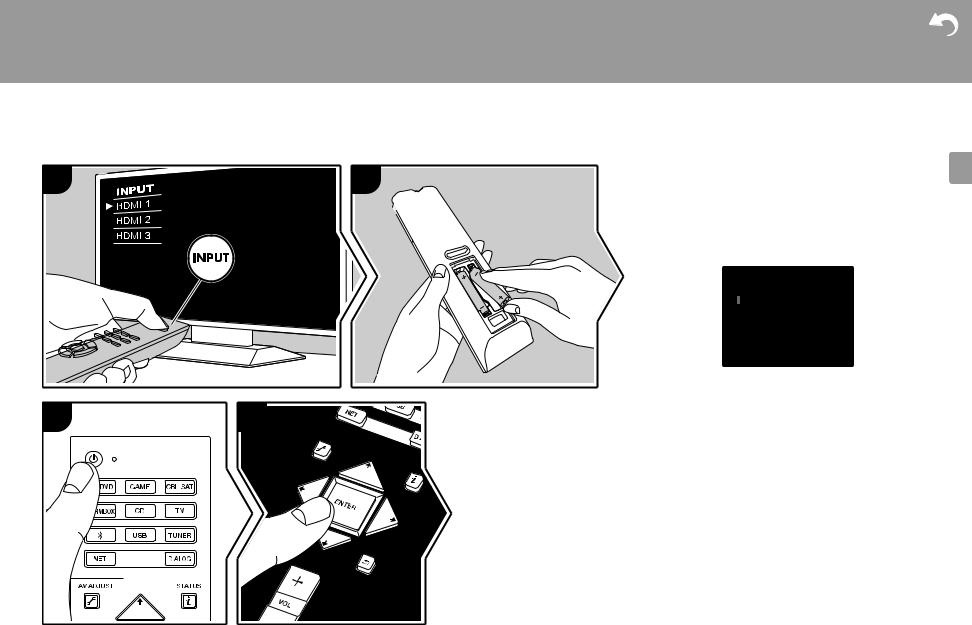
Initial Setup with Auto Start-up Wizard
1 |
2 |
Initial Setup starts automatically |
E |
1. Switch the input on the TV to that assigned to the unit. |
N |
||
|
|||
|
|
2. Put batteries into the remote controller of this unit. |
|
|
|
3. Press Í on the remote controller. When power is turn on |
|
|
|
for the first time, an Initial Setup screen is automatically |
|
|
|
displayed on the TV to allow you to make settings |
|
|
|
required for start up. |
|
|
|
Initial Setup |
|
|
|
Language Select |
|
|
|
English |
|
|
|
Deutsch |
|
|
|
Français |
|
|
|
Español |
|
|
|
Italiano |
|
|
|
Nederlands |
|
|
|
Svenska |
|
|
TV's remote controller |
3 |
4 |
4.Follow the on-screen instructions to select the item with the cursors of the remote controller and press ENTER to confirm your selection.
0 To return to the previous screen, press  .
.
To redo Initial Setup: If you terminate the procedure on the way or want to change a setting made during Initial Setup, press  on the remote controller, select "Miscellaneous" - "Initial Setup" in the System Setup menu from Home and press ENTER. To select the language displayed again, change "OSD Language". ( P39)
17

> Before Start > Part Names > Install > Initial Setup > Playback
Advanced Setup | Firmware Update | Others
1. Full Auto MCACC
Place the supplied speaker setup microphone in the listening position, measure the test tones emitted by the speakers, then the unit automatically sets the optimum volume level for each speaker and the distance from the listening position. This also automatically adjusts the equalizers for the speakers and enables correction of distortion caused by the acoustic environment of the room.
0Calibration takes between 3 to 12 minutes to be completed. The speakers emit the test tone at high volume during measurement, so be careful of your surroundings. Keep the room as quiet as possible during measurement.
1.Place the supplied speaker setup microphone in the listening position, and connect to the SETUP MIC jack on the main unit. A confirmation screen is displayed, so follow the on screen instructions.
SETUP MIC
When putting the speaker setup microphone on a tripod, refer to the illustration when putting it in place.
0 To cancel Full Auto MCACC partway through, disconnect the speaker setup microphone.
2.Test tones are emitted by the speakers, and firstly the unit detects the speakers connected and the noise in the
environment.
3.After the results of the above measurements are displayed, select "Next", press ENTER on the remote controller, and the test tones are emitted again, and the unit automatically makes settings such as the optimum volume level and the distance from the listening position.
4.Disconnect the speaker setup microphone.You cannot use any other menu options while it is connected.
2. Source Connection
Check that each input source is connected correctly. Follow the guidance, select the input you want to confirm, start play of the selected player, and confirm that the images appear on the TV and that sound is played.
3. Network Connection
Set up Wi-Fi connection with an access point such as a wireless LAN router. There are the following two methods of connecting by Wi-Fi:
"Scan Networks": Search for an access point from this unit. Find out the SSID of the access point beforehand.
"Use iOS Device (iOS7 or later)": Share the iOS device's Wi-Fi settings with this unit.
If you select "Scan Networks", there are a further two choices of connection method. Check the following.
0"Enter Password": Enter the password (or key) of the access point to connect.
0"Push Button": If the access point has an automatic connection button, you can connect without entering a password.
0If the SSID of the access point is not displayed, then in the screen listing the SSIDs, select "Other..." with the button on the remote controller and press ENTER, then follow the on-screen instructions.
E
N
Wi-Fi Setup
Рбуучптд
a b c d e |
f |
g |
h |
i j k l |
m |
|
|
|
|
|
|||
n o p q r s t |
u v w x y |
z |
||||
1 2 3 4 5 |
6 7 8 |
9 0 - ^ |
\ |
|||
, . / ; : |
@ |
[ |
] |
|
|
|
|
A/a |
|
|
|
OK |
|
When finished, select the "OK" key.
 All Erase
  Hide/Show
  A/a
A/a
Keyboard input: To switch between upper and lower case, select "A/a" on the screen and press ENTER. To select whether to mask the password with " " or display it in plain text, press +Fav on the remote controller. Pressing CLEAR will delete all the input characters.
Privacy policy: A confirmation screen asking you to agree to the privacy policy is displayed during network setting. Select "Yes" and press ENTER to indicate agreement.
4. Audio Return Channel
If you have connected a TV that supports ARC, select "Yes". This unit's ARC setting turns on and you can listen to the TV's audio through this unit.
0If you select "Yes", the HDMI CEC function is enabled and power consumption increases during standby.
18
> Before Start > Part Names > Install > Initial Setup > Playback
Advanced Setup | Firmware Update | Others
AV Component Playback
|
Basic operations |
E |
|
|
Play an AV component or TV connected to this unit with an |
N |
|
|
|
||
|
HDMI cable or other cable. |
|
|
a |
1. |
Switch the input on the TV to that assigned to the unit. |
|
2. |
Press the input selector (a) on the remote controller with |
|
|
|
|
the same name as the jack to which you connected the |
|
|
|
player to switch the input. |
|
|
|
For example, press BD/DVD to play the player connected |
|
|
|
to the BD/DVD jack. Press TV to listen the TV's sound. |
|
|
|
0 Note that when the CEC link function works, the input |
|
|
|
switches automatically when you have connected a |
|
|
|
CEC compliant TV and player to this unit using HDMI |
|
|
|
connection. |
|
|
3. |
Start play on the player. |
|
|
4. |
Use VOL+/– (b) to adjust the volume. |
|
b
19
> Before Start > Part Names > Install > Initial Setup > Playback
Advanced Setup | Firmware Update | Others
Internet Radio
1
a
b
 c
c
20
Basic operations
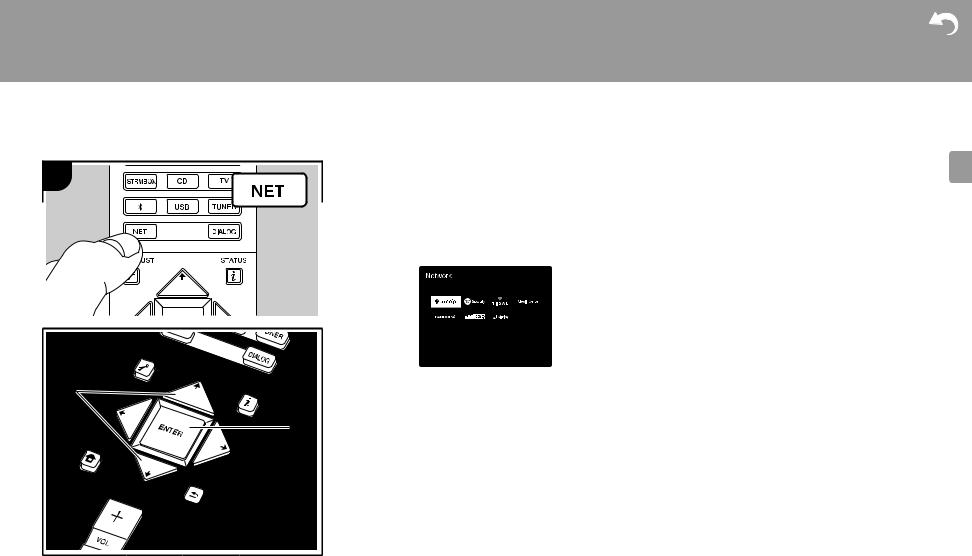
When this unit is connected to a network, you can listen to TuneIn or other preregistered Internet radio services. Depending on the internet radio service, the user may need to register from their computer first.
1.Switch the input on the TV to that assigned to the unit.
2.Press NET on the remote controller.
3.Follow the on-screen instructions, using the cursors to select radio stations and programs, then press ENTER
(b) to play. Play starts when 100% is displayed for buffering.
0 To return to the previous screen, press  (c).
(c).
0If you cannot select a network service, it will become selectable when the network function is started.
Regarding the TuneIn Radio
To display the TuneIn Radio menu during play, press ENTER (b) on the remote controller.
Add to My Presets: Registers radio stations being broadcast and programs in "My Presets". Once registered, "My Presets" is displayed in the level under TuneIn Radio. To play, select the program you like from "My Presets".
Remove from My Presets: Removes a radio station or program from "My Presets" in TuneIn Radio.
Pandora® |
E |
|
N |
Pandora is a free, personalized Internet radio service that plays the music you know and helps you discover music you’ll love. After selecting "Pandora", do the following.
1. Use / (a) on the remote controller to select "I have a Pandora Account" or "I’m new to Pandora" and then press ENTER (b).
If you are new to Pandora, select "I’m new to Pandora". You will see an activation code on your TV screen. Please write down this code. Go to an Internet connected computer and point your browser to www.pandora.com/ pioneer. Enter your activation code and then follow the instructions to create your Pandora account and your personalized Pandora stations. You can create your stations by entering your favorite tracks and artists when prompted. After you have created your account and stations you can return to your receiver and press ENTER (b) to begin listening to your personalized Pandora.
If you have an existing Pandora account, you can add your Pandora account to your receiver by selecting "I have a Pandora Account" and logging in with your email and password.
2. To play a station, use / (a) on the remote controller to select the station from your station list, and then press ENTER (b). Playback starts and the playback screen appears.
Create new station: Enter the name of a track, artist, or genre and Pandora will create a unique radio station for you based on the musical qualities of that track, artist, or genre.
Regarding the Pandora Menu: Icons are displayed on the screen while playing a station. You can do the following by selecting the icon with / (a) on the remote controller and pressing ENTER (b).
 (I like this track) :
> Before Start > Part Names > Install > Initial Setup > Playback
Advanced Setup | Firmware Update | Others
Give a track "thumbs-up" and Pandora will play more music |
E |
like it. |
N |
(I don't like this track) : |
|
Give a track "thumbs-down" and Pandora will ban that track |
|
from the current station. |
|
: |
|
Automatically find stations matching your preferences |
|
based on genre, specific artists, and songs, and delete |
|
those stations you don't need. |
|
21

> Before Start > Part Names > Install > Initial Setup > Playback
Advanced Setup | Firmware Update | Others
Spotify
1 |
|
|
Basic operations |
E |
|
|
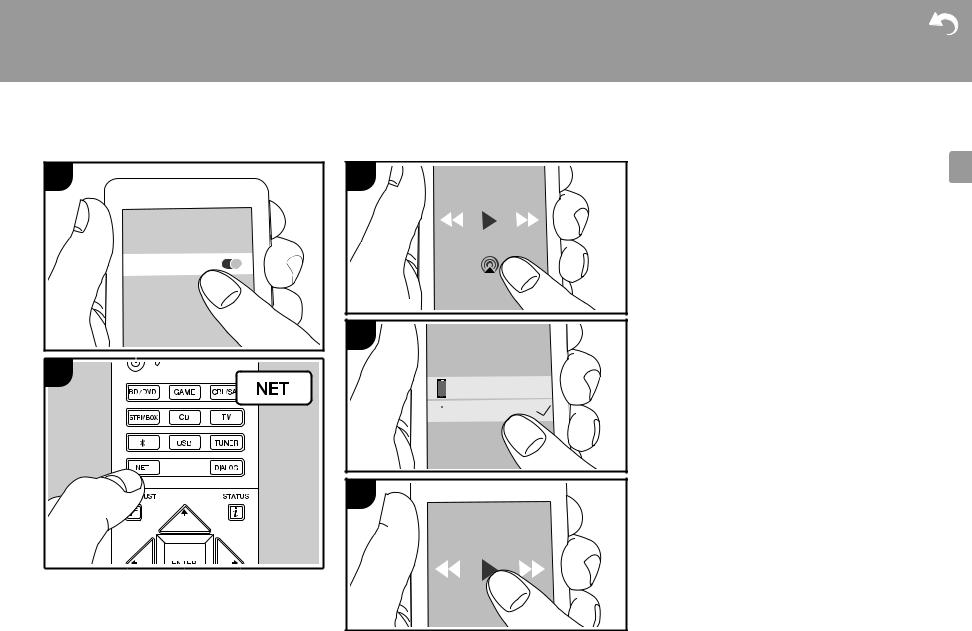
Spotify Connect play is possible by connecting this unit to |
N |
|
|
|
|
||
|
Wi-Fi |
|
the same network as a smartphone or tablet. To enable |
|
|
|
Spotify Connect, install the Spotify application on your |
|
|
|
|
smartphone or tablet and create a Spotify premium account. |
|
|
|
|
|
1. Connect the smartphone to the network that this unit is |
|
|
|
|
connected to. |
|
|
|
|
2. Click the Connect icon in the track play screen of the |
|
|
|
|
Spotify app. |
|
2 |
|
a |
3. Select this unit. |
|
|
4. This unit turns on automatically and the input selector |
|
||
|
|
|
changes to NET and streaming of Spotify starts. |
|
|
|
|
0 If "System Setup" - "Hardware" - "Power Management" - |
|
|
|
|
"Network Standby" is set to "Off" in the Home, manually |
|
|
|
|
turn the unit on and then press NET on the remote |
|
|
|
|
controller. |
|
|
b |
|
0 Refer to the following for Spotify settings: |
|
|
|
|
www.spotify.com/connect/ |
|
3 |
|
|
0 The Spotify software is subject to third party licenses |
|
c |
|
found here: |
|
|
|
www.spotify.com/connect/third-party-licenses |
|
|
d |
The following remote controller operations are also |
|
possible. |
|
|
|
|
|
|
(a)Pressed during play, this button changes the displayed |
|
|
track information. |
|
|
(b)This button plays the previous track. |
e |
|
(c) This button lets you start repeat or random playback. |
4 |
|
Pressing this button repeatedly cycles through the |
|
repeat modes. |
|
|
(d)Pressed during play this button pauses playback. |
|
PioneerAC-700 |
|
Pressed while paused, and it restarts play. |
|
(e)This button plays the next track. |
|
|
|
22
> Before Start > Part Names > Install > Initial Setup > Playback
Advanced Setup | Firmware Update | Others
Music Server
1 |
|
|
It is possible to stream music files stored on PCs or NAS |
|
|
|
devices connected to the same network as this unit. The |
||
|
|
network servers this unit is compatible with are those PCs |
||
|
|
|
with players installed that have the server functionality of |
|
|
|
|
Windows Media® Player 11 or 12, or NAS that are |
|
|
|
|
compatible with home network functionality. You may need |
|
|
|
|
to make some settings in advance to use Windows Media® |
|
|
|
|
Player 11 or 12. Note that only music files registered in the |
|
|
|
|
library of Windows Media® Player can be played. |
|
a |
|
|
Configuring Windows Media® Player |
|
|
|
■ Windows Media® Player 11 |
||
|
|
|
1. |
Turn on your PC and start Windows Media® Player 11. |
|
|
|
2. |
In the "Library" menu, select "Media Sharing" to display a |
|
|
|
|
dialog box. |
b |
|
|
3. Select the "Share my media" check box, and then click |
|
|
|
|
|
"OK" to display the compatible devices. |
|
|
|
4. |
Select this unit, click "Allow" and put a check mark next to |
|
|
c |
5. |
the icon for this unit. |
|
|
|
Click "OK" to close the dialog. |
|
|
|
|
0 Depending of the version of Windows Media® Player, |
|
|
|
|
|
there may be differences in the names of items you can |
|
d |
|
|
select. |
e |
|
|
■ Windows Media® Player 12 |
|
|
|
1. Turn on your PC and start Windows Media® Player 12. |
||
|
|
|
2. |
In the "Stream" menu, select "Turn on media streaming" |
|
|
|
|
to display a dialog box. |
f |
|
|
0 If media streaming is already turned on, select "More |
|
|
|
|
streaming options..." in the "Stream" menu to list players |
|
|
|
|
|
|
|
|
g |
|
in the network, and then go to step 4. |
|
|
3. |
Click "Turn on media streaming" to list players in the |
|
|
|
|
||
|
|
|
|
network. |
|
|
|
4. |
Select this unit in "Media streaming options" and check |
|
h |
|
5. |
that it is set to "Allow". |
|
|
|
Click "OK" to close the dialog. |
|
|
|
|
0 Depending of the version of Windows Media® Player, |
|
there may be differences in the names of items you can |
E |
select. |
N |
Playing
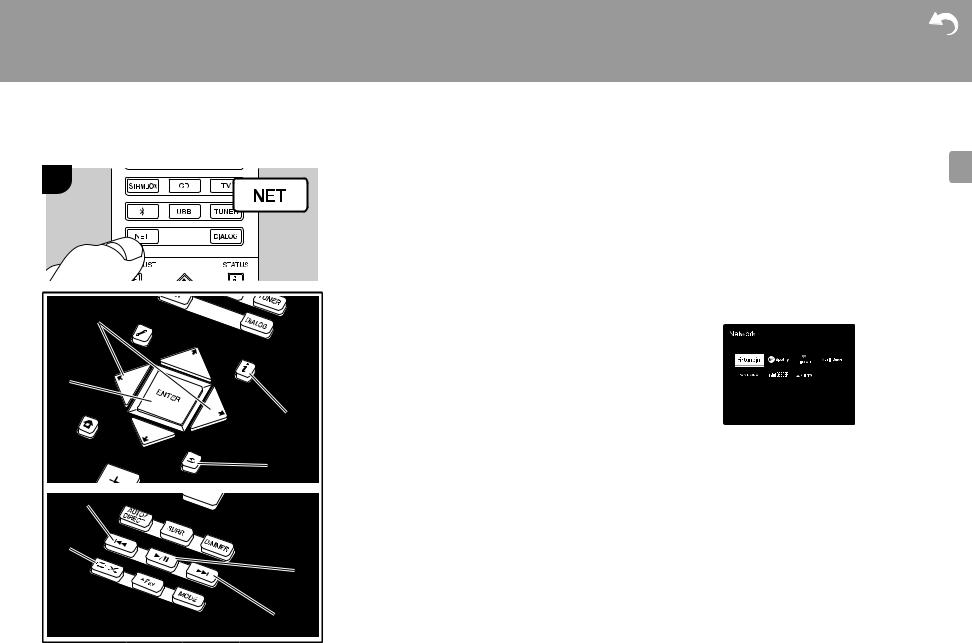
1.Start the server (Windows Media® Player 11, Windows Media® Player 12, or NAS device) containing the music files to play.
2.Make sure that the PCs and/or NASs are properly connected to the same network as this unit.
3.Switch the input on the TV to that assigned to the unit.
4.Press NET on the remote controller.
5.With the cursors on the remote controller, select "Music Server", and then press ENTER (b).
6.Select the target server with the cursors on the remote controller and press ENTER (b) to display the items list screen.
7.With the cursors on the remote controller, select the music file to play, and then press ENTER (b) to start playback. To return to the previous screen, press  (d).
(d).
0If "No Item." is displayed, check whether the network is properly connected.
0Depending on the server and share settings, the unit may not recognize it, or may not be able to play its music files. Furthermore, the unit cannot access pictures and videos stored on servers.
0For music files on a server, there can be up to 20,000 tracks per folder, and folders may be nested up to 16 levels deep.
23

> Before Start > Part Names > Install > Initial Setup > Playback
Advanced Setup | Firmware Update | Others
The following remote controller operations are also possible.
(a)When the folder or file lists are not shown on one screen, you can change the screen.
(c)Pressed during play, this button changes the displayed track information. Pressed while a folder or file list is displayed, this button returns you to the play screen.
(e)This button plays the previous track.
(f) This button lets you start repeat or random playback. Pressing this button repeatedly cycles through the repeat modes.
(g)Pressed during play this button pauses playback. Pressed while paused, and it restarts play.
(h)This button plays the next track.
Controlling Remote Playback from a PC
You can use this unit to play music files stored on your PC by operating the PC inside your home network. The unit supports remote playback with Windows Media® Player 12.
1.Turn on your PC and start Windows Media® Player 12.
2.Open the "Stream" menu and check that "Allow remote control of my Player..." is checked. Click "Turn on media streaming" to list players in the network.
3.Switch the input on the TV to that assigned to the unit.
4.Select and right-click the music file to play with Windows Media® Player 12. To remotely play a music file on another server, open the target server from "Other Libraries" and select the music file to play.
5.Select this unit in "Play to" to open the "Play to" window of Windows Media® Player 12 and start playback on the unit. If your PC is running on Windows® 8.1, click "Play
to", and then select this unit.
If your PC is running on Windows® 10, click "Cast to Device", and select this unit. Operations during remote playback are possible from the "Play to" window on the PC. The playback screen is displayed on the TV connected to the HDMI output of the unit.
6. Adjust the volume using the volume bar on the "Play to" |
0 |
Quantization bit: 8 bit, 16 bit, 24 bit |
E |
|
|
window. |
AAC (.aac/.m4a/.mp4/.3gp/.3g2/.AAC/.M4A/.MP4/.3GP/ |
N |
|
0 |
Sometimes, the volume displayed on the remote |
|
||
|
playback window may differ from that appeared on the |
.3G2): |
|
|
|
display of the unit. Also, when the volume is adjusted |
0 |
Supported formats: MPEG-2/MPEG-4 Audio |
|
|
from this unit, this is not reflected in the "Play to" window. |
0 |
Supported sampling rates: 44.1 kHz, 48 kHz, 64 kHz, |
|
0 |
Remote playback is not possible when using a network |
|
88.2 kHz, 96 kHz |
|
|
service or playing music files on a USB storage device. |
0 |
Supported bitrates: Between 8 kbps and 320 kbps and |
|
0 |
Depending of the version of Windows®, there may be |
|
VBR. |
|
|
differences in the names of items you can select. |
FLAC (.flac/.FLAC): |
|
|
|
|
|
||
Supported Audio Formats |
0 |
Supported sampling rates: 44.1 kHz, 48 kHz, 64 kHz, |
|
|
|
88.2 kHz, 96 kHz, 176.4 kHz, 192 kHz |
|
||
This unit supports the following music file formats. Remote |
0 |
Quantization bit: 8 bit, 16 bit, 24 bit |
|
|
LPCM (Linear PCM): |
|
|||
play of FLAC, DSD, and Dolby TrueHD is not supported. |
|
|||
MP3 (.mp3/.MP3): |
0 |
Supported sampling rates: 44.1 kHz, 48 kHz |
|
|
0 |
Quantization bit: 16 bit |
|
||
0 |
Supported formats: MPEG-1/MPEG-2 Audio Layer-3 |
Apple Lossless (.m4a/.mp4/.M4A/.MP4): |
|
|
0 |
Supported sampling rates: 44.1 kHz, 48 kHz |
|
||
0 |
Supported bitrates: Between 8 kbps and 320 kbps and |
0 |
Supported sampling rates: 44.1 kHz, 48 kHz, 64 kHz, |
|
|
VBR. |
|
88.2 kHz, 96 kHz, 176.4 kHz, 192 kHz |
|
WMA (.wma/.WMA): |
0 |
Quantization bit: 16 bit, 24 bit |
|
|
DSD (.dsf/.dff/.DSF/.DFF): |
|
|||
0 |
Supported sampling rates: 44.1 kHz, 48 kHz |
|
||
0 |
Supported bitrates: Between 5 kbps and 320 kbps and |
0 |
Supported formats: DSF/DSDIFF |
|
|
VBR. |
0 |
Supported sampling rates: 2.8 MHz, 5.6 MHz |
|
0 |
WMA Pro/Voice/WMA Lossless formats are not |
0 |
Variable bit-rate (VBR) files are supported. However, |
|
|
supported. |
|
playback times may not be displayed correctly. |
|
WAV (.wav/.WAV): |
0 |
Remote playback does not support the gapless playback. |
|
|
|
|
|
||
WAV files include uncompressed PCM digital audio. |
|
|
|
|
0 |
Supported sampling rates: 44.1 kHz, 48 kHz, 64 kHz, |
|
|
|
|
88.2 kHz, 96 kHz, 176.4 kHz, 192 kHz |
|
|
|
0 |
Quantization bit: 8 bit, 16 bit, 24 bit |
|
|
|
AIFF (.aiff/.aif/.aifc/.afc/.AIFF/.AIF/.AIFC/.AFC): |
|
|
|
|
AIFF files include uncompressed PCM digital audio. |
|
|
|
|
0 |
Supported sampling rates: 44.1 kHz, 48 kHz, 64 kHz, |
|
|
|
|
88.2 kHz, 96 kHz, 176.4 kHz, 192 kHz |
|
|
|
24
> Before Start > Part Names > Install > Initial Setup > Playback
USB Storage Device
1 |
2 |
Advanced Setup | Firmware Update | Others
|
Basic play |
E |
|
|
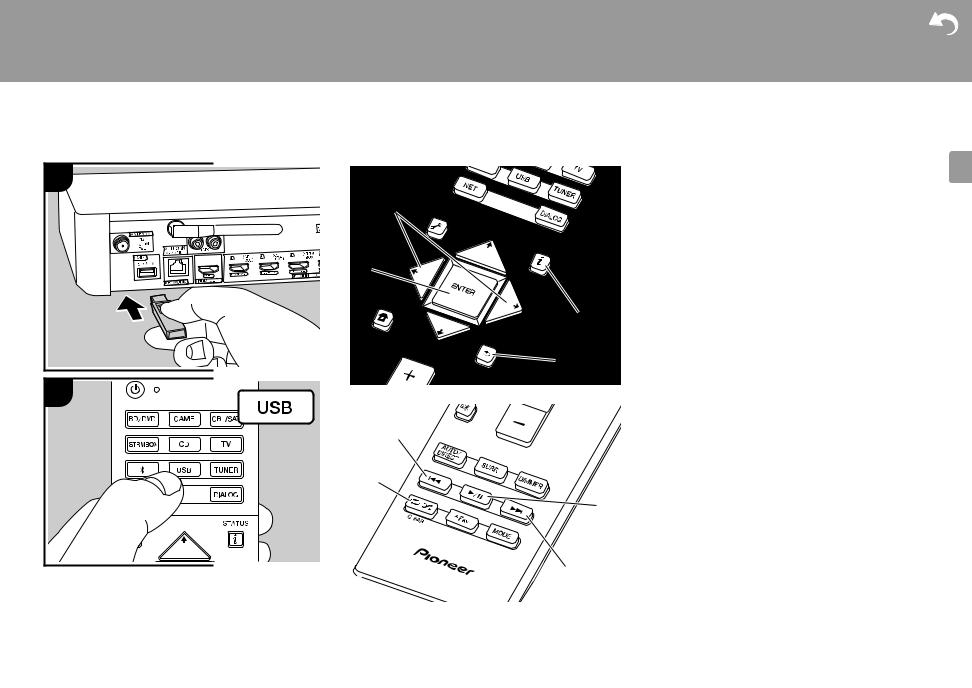
Play music files on a USB storage device. |
N |
|
|
|
||
a |
1. Switch the input on the TV to that assigned to the unit. |
|
|
2. Plug your USB storage device with the music files into |
|
||
|
|
||
|
|
the USB port on the rear of the main unit. |
|
|
3. Press "USB" on the remote controller. |
|
|
|
0 If the "USB" indicator flashes on the display, check |
|
|
b |
|
whether the USB storage device is plugged in properly. |
|
|
0 |
Do not unplug the USB storage device connected to this |
|
|
|
unit while "Connecting…" is on the display. This may |
|
|
|
cause data corruption or malfunction. |
|
c4. Press ENTER (b) on the remote controller in the next screen. The list of folders and music files on the USB
storage device are displayed. Select the folder with the cursors and press ENTER (b) to confirm your selection.
d0 To return to the previous screen, press  (d).
(d).
|
5. With the cursors on the remote controller, select the |
|
music file, and then press ENTER (b) to start playback. |
|
0 The USB port of this unit conforms with the USB 2.0 |
|
standard. The transfer speed may be insufficient for |
e |
some content you play, which may cause some |
|
interruption in sound. |
|
The following remote controller operations are also |
f |
possible. |
|
(a)When the folder or file lists are not shown on one screen, |
g |
you can change the screen. |
|
(c) Pressed during play, this button changes the displayed |
|
track information. Pressed while a folder or file list is |
|
displayed, this button returns you to the play screen. |
|
(e)This button plays the previous track. |
h |
(f) This button lets you start repeat or random playback. |
Pressing this button repeatedly cycles through the |
|
|
repeat modes. |
|
(g)Pressed during play this button pauses playback. |
|
Pressed while paused, and it restarts play. |
|
(h)This button plays the next track. |
25

> Before Start > Part Names > Install > Initial Setup > Playback
USB Storage Device Requirements
0Note that operation is not guaranteed with all USB storage devices.
0This unit can use USB storage devices that comply with the USB mass storage device class standard. The unit is also compatible with USB storage devices using the FAT16 or FAT32 file system formats.
0If the USB storage device has been partitioned, each section will be treated as an independent device.
0Up to 20,000 tracks per folder can be displayed, and folders may be nested up to 16 levels deep.
0USB hubs and USB storage devices with hub functions are not supported. Do not connect these devices to the unit.
0USB storage devices with security function are not supported on this unit.
0If you connect a USB hard disk drive to the USB port of the unit, we recommend that you use its AC adapter to power it.
0Media inserted to the USB card reader may not be available in this function. Furthermore, depending on the USB storage device, proper reading of the contents may not be possible.
0We accept no responsibility whatsoever for the loss or damage to data stored on a USB storage device when that device is used with this unit. We recommend that you back up your important music files beforehand.
Supported Audio Formats
For server playback and playback from a USB storage device, this unit supports the following music file formats. Note that sound files that are protected by copyright cannot be played on this unit.
MP3 (.mp3/.MP3):
0 Supported formats: MPEG-1/MPEG-2 Audio Layer 3
Advanced Setup | Firmware Update | Others
0 |
Supported sampling rates: 44.1 kHz, 48 kHz |
DSD (.dsf/.dff/.DSF/.DFF): |
E |
|
0 |
Supported bitrates: Between 8 kbps and 320 kbps and |
0 |
Supported formats: DSF/DSDIFF |
N |
|
VBR. |
0 |
Supported sampling rates: 2.8 MHz, 5.6 MHz |
|
WMA (.wma/.WMA): |
Dolby TrueHD (.vr/.mlp/.VR/.MLP): |
|
||
0 |
Supported sampling rates: 44.1 kHz, 48 kHz |
0 |
Supported sampling rates: 44.1 kHz, 48 kHz, 64 kHz, |
|
0 |
Supported bitrates: Between 5 kbps and 320 kbps and |
|
88.2 kHz, 96 kHz, 176.4 kHz, 192 kHz |
|
|
VBR. |
0 |
Variable bit-rate (VBR) files are supported. However, |
|
0 |
WMA Pro/Voice/WMA Lossless formats are not |
|
playback times may not be displayed correctly. |
|
|
supported. |
0 |
This unit supports the gapless playback of the USB |
|
WAV (.wav/.WAV): |
|
storage device in the following conditions. |
|
|
|
When playing WAV, FLAC and Apple Lossless, and the |
|
||
WAV files include uncompressed PCM digital audio. |
|
same format, sampling frequency, channels and |
|
|
0 |
Supported sampling rates: 44.1 kHz, 48 kHz, 64 kHz, |
|
quantization bit rate are played continuously. |
|
|
88.2 kHz, 96 kHz, 176.4 kHz, 192 kHz |
|
|
|
0 |
Quantization bit: 8 bit, 16 bit, 24 bit |
|
|
|
AIFF (.aiff/.aif/.aifc/.afc/.AIFF/.AIF/.AIFC/.AFC):
AIFF files include uncompressed PCM digital audio.
0 Supported sampling rates: 44.1 kHz, 48 kHz, 64 kHz, 88.2 kHz, 96 kHz, 176.4 kHz, 192 kHz
0 Quantization bit: 8 bit, 16 bit, 24 bit
AAC (.aac/.m4a/.mp4/.3gp/.3g2/.AAC/.M4A/.MP4/.3GP/
.3G2):
0 Supported formats: MPEG-2/MPEG-4 Audio
0 Supported sampling rates: 44.1 kHz, 48 kHz, 64 kHz, 88.2 kHz, 96 kHz
0Supported bitrates: Between 8 kbps and 320 kbps and VBR.
FLAC (.flac/.FLAC):
0 Supported sampling rates: 44.1 kHz, 48 kHz, 64 kHz, 88.2 kHz, 96 kHz, 176.4 kHz, 192 kHz
0 Quantization bit: 8 bit, 16 bit, 24 bit
Apple Lossless (.m4a/.mp4/.M4A/.MP4):
0 Supported sampling rates: 44.1 kHz, 48 kHz, 64 kHz, 88.2 kHz, 96 kHz, 176.4 kHz, 192 kHz
0 Quantization bit: 16 bit, 24 bit
26
> Before Start > Part Names > Install > Initial Setup > Playback
Advanced Setup | Firmware Update | Others
AirPlay®
1 |
3 |
Wi-Fi
4 
2
iPhone
 Pioneer AC-700
5 
e.g., iOS 10
Basic play |
E |
|
N |
You can wirelessly enjoy the music files on an iPhone®, iPod touch®, or iPad® connected to the same access point as this unit.
0Update the OS version on your iOS device to the latest version.
0There may be some differences in the operations screens and how operations are performed on the iOS device depending on the iOS version. For details, see the
operating instructions for the iOS device.
1.Connect the iOS device to the access point.
2.Press NET.
3.Tap the AirPlay icon  in the play screen of the music app on the iOS device and select this unit from the list of devices displayed.
4.Play the music files on the iOS device.
0The default status is for the Network Standby feature to be on, so when you do steps 3 and 4 above, this unit automatically comes on and input switches to "NET". To reduce the amount of power consumed in standby mode,
press the button on the remote controller, then in the Home displayed set "System Setup" – "Hardware" – "Power Management" – "Network Standby" to "Off".
0Due to the characteristics of AirPlay wireless technology, the sound produced on this unit may slightly be behind the sound played on the AirPlay-enabled device.
You can also play back music files on the computer with iTunes (Ver. 10.2 or later). Before operation, make sure this unit and the PC are connected to the same network, then press NET on this unit. Next, click the AirPlay icon  in iTunes, select this unit from the list of devices displayed, and start play of a music file.
27
> Before Start > Part Names > Install > Initial Setup > Playback
Advanced Setup | Firmware Update | Others
BLUETOOTH® Playback
Pairing |
1 |
2 |
PioneerAC-700
Playing Back
1
PioneerAC-700
2
Pairing |
E |
|
N |
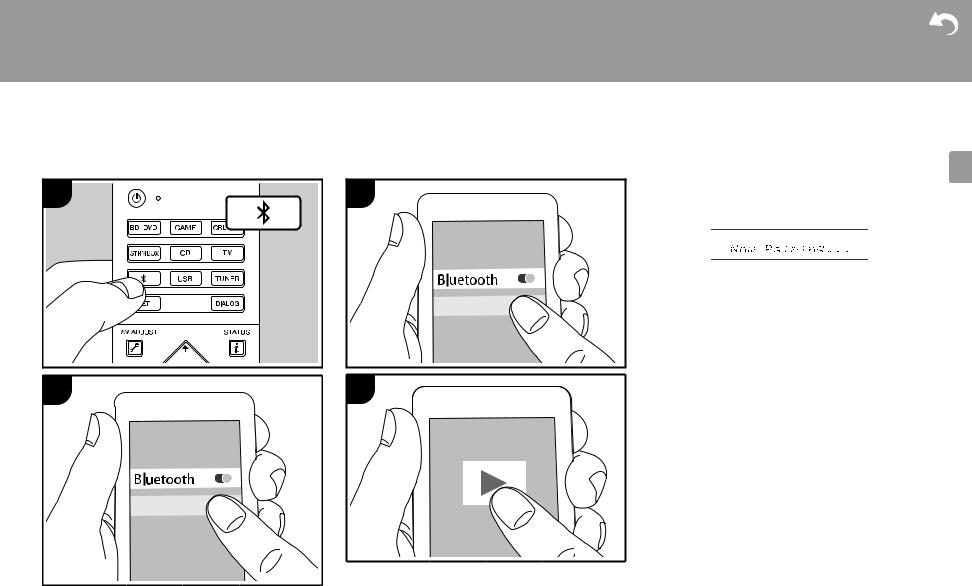
1.When you press the  button on the remote controller, "Now Pairing..." is displayed on this unit's display, and the pairing mode is enabled.
2.Enable (turn on) the BLUETOOTH function of the BLUETOOTH enabled device, then select this unit from amongst the devices displayed. If a password is
requested, enter "0000".
0To connect another BLUETOOTH enabled device, press
and hold the  button until "Now Pairing..." is displayed, then perform step 2 above. This unit can store the data of up to eight paired devices.
0The coverage area is 15 meters (48 feet). Note that connection is not always guaranteed with all BLUETOOTH enabled devices.
Playing Back
1.When the unit is on, perform the connection procedure on the BLUETOOTH enabled device.
2.The input selector on this unit automatically switches to "BT AUDIO".
3.Play the music files. Increase the volume of the BLUETOOTH enabled device to an appropriate level.
0Due to the characteristics of BLUETOOTH wireless technology, the sound produced on this unit may slightly be behind the sound played on the BLUETOOTH enabled device.
28
> Before Start > Part Names > Install > Initial Setup > Playback
Advanced Setup | Firmware Update | Others
Listening to the FM Radio
1
a
b 

 c
c 


d
Tuning Automatically
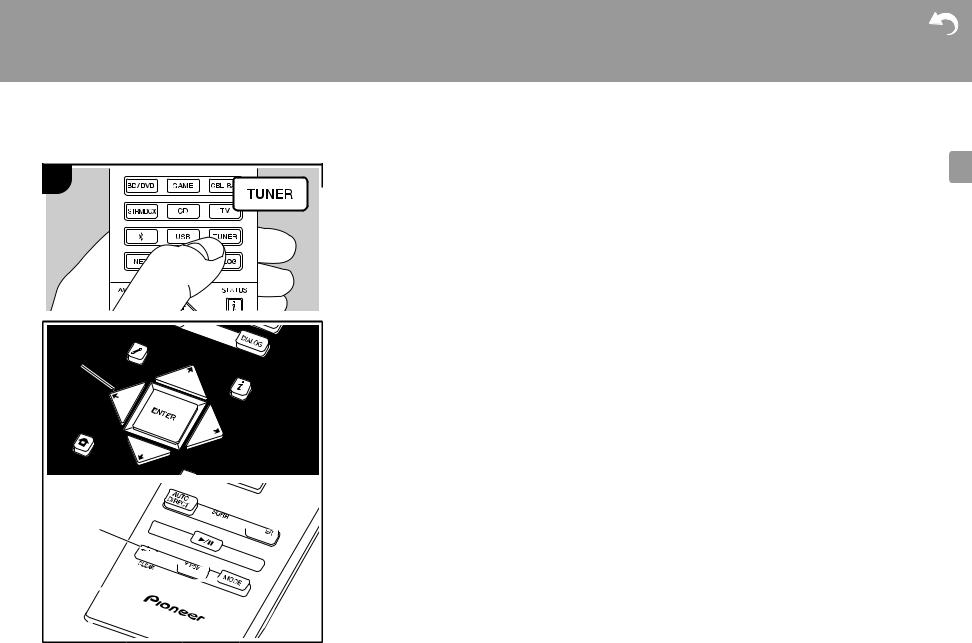
1.Press TUNER on the remote controller.
2.Press MODE (d) on the remote controller so that "AUTO" appears on the display.
3. When you press the cursor / buttons (a) on the remote controller, automatic tuning starts, and searching stops when a station is found. When tuned into a radio station, the "TUNED" indicator on the display lights. When tuned into a stereo FM station, the "FM STEREO" indicator lights.
0 No sound is output while the "TUNED" indicator is off.
When FM broadcasts reception is poor
Radio waves may be weak depending on the building structure and environmental conditions. In that case, perform the procedure as explained below in "Tuning Manually" to manually select the desired station.
Tuning Manually
1.Press TUNER on the remote controller.
2.Press MODE (d) on the remote controller to turn off "AUTO" on the display.
3. While pressing the cursor / buttons (a) on the remote controller, select the desired radio station.
0 The frequency changes by 1 step each time you press the button. The frequency changes continuously if the button is held down and stops when the button is released. Tune by looking at the display.
To return to the auto tuning mode
Press MODE (d) on the remote controller again so that "AUTO" appears on the display. The unit tunes automatically into a radio station.
Frequency step setting
Press the button on the remote controller to select "System Setup" – "Miscellaneous" – "Tuner" – "FM
Frequency Step" and select the frequency step for your |
E |
area. Note that when this setting is changed, all radio |
N |
presets are deleted. |
|
Presetting a Radio Station
It allows you to register up to 40 of your favorite radio stations. Registering radio stations in advance allows you to tune into your radio station of choice directly.
1.Tune into the radio station you want to register.
2.Press +Fav (c) on the remote controller so that the preset number on the display flashes.
3.While the preset number is flashing (about 8 seconds),
repeatedly press the cursor / buttons (a) on the remote controller to select a number between 1 and 40.
4.Press +Fav (c) on the remote controller again to register the station. When registered, the preset number stops flashing.
Selecting a Preset Radio Station
1.Press TUNER on the remote controller.
2.Press the cursor / buttons (a) on the remote controller to select a preset number.
Deleting a Preset Radio Station
1.Press TUNER on the remote controller.
2.Press the cursor / buttons (a) on the remote controller to select the preset number to delete.
3.After pressing +Fav (c) on the remote controller, press CLEAR (b) while the preset number is flashing to delete the preset number.
0 When deleted, the number on the display goes off.
29
> Before Start > Part Names > Install > Initial Setup > Playback
Advanced Setup | Firmware Update | Others
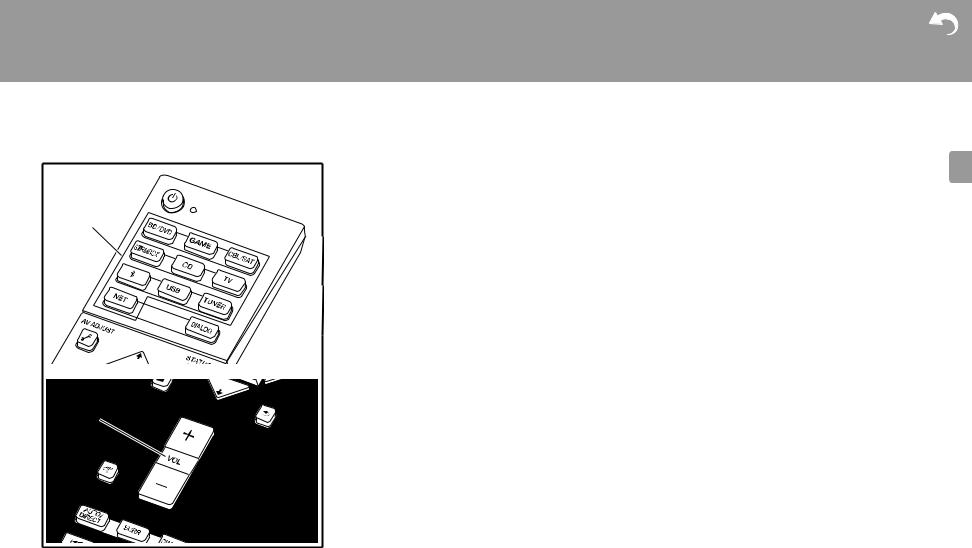
Listening Modes
a |
b |
c |
Selecting Listening Modes
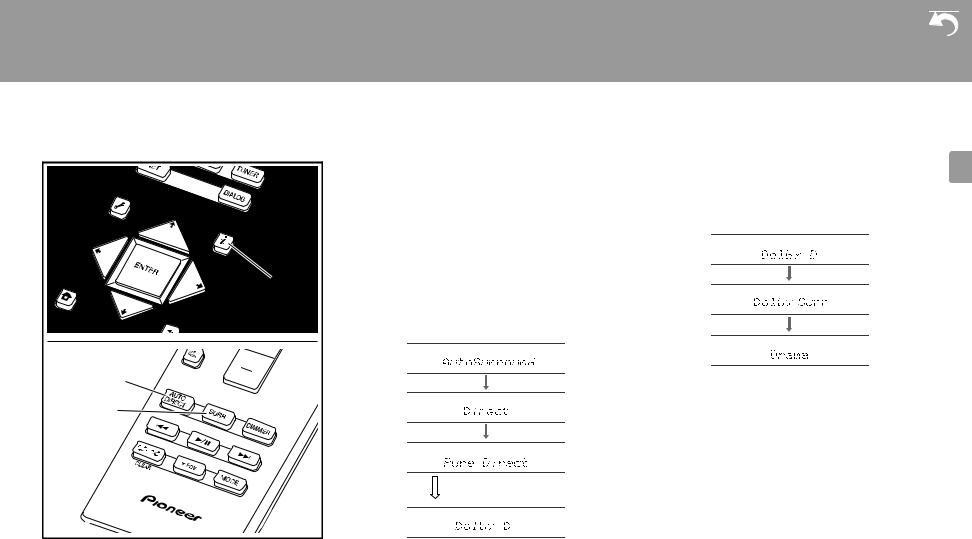
You can change the listening mode during play by pressing repeatedly "AUTO/DIRECT" or "SURR".
AUTO/DIRECT button (b)
Press repeatedly and the listening modes suited to the input signal are switched between "Auto Surround", "Direct" and "Pure Direct". After selecting one of them, "Auto Surround" (or "Direct", "Pure Direct") is displayed on the display, then the most suitable listening mode for the audio format is selected automatically (Dolby Digital for multi-channel input signals, Stereo for 2 channel input signals, etc.) and an indicator such as "Dolby D" is displayed on the display.
The display changes automatically.
The Direct mode shuts down some processing that can affect sound quality, such as the tone control features, so you can enjoy even better sound quality. The Pure Direct mode shuts down even more processes that affects sound quality, so you get a more faithful reproduction of the original sound. In this case, the speaker calibration made with MCACC is disabled.
SURR button (c)
By pressing repeatedly you can select the audio format of the signals being input and switch between a variety of listening modes. Select the mode that suits your preference. The selected listening mode is displayed on the display.
For details on the effects of each of the listening modes see "Listening Mode Effects" ( P31). For listening modes selectable for each of the audio formats in the input signals, refer to "Selectable listening modes" ( P33).
The listening mode last selected for the source is remembered for each of the AUTO/DIRECT and SURR buttons. If content you play is not supported by the listening mode you selected last, the listening mode that is standard for that content is selected automatically.
Press  (a) repeatedly to switch the display of the main unit in order of:
E N
30
 Loading...