


F3 F-F3MK2-K
FM/AM Tuner
Tuner AM/FM
UKW/MW-Tuner
FM/AM-tuner
Sintonizzatore FM/AM
Sintonizador FM/AM
BZ02
Discover the benefits of registering your product online at
http://www.pioneer.co.uk (or http://www.pioneer.eu).
Découvrez les nombreux avantages offerts en enregistrant votre produit en ligne
maintenant sur http://www.pioneer.fr (ou http://www.pioneer.eu).
Bitte nutzen Sie die Möglichkeit zur Registrierung Ihres Produktes
unter http://www.pioneer.de (oder http://www.pioneer.eu)
Ontdek nu de voordelen van online registratie! Registreer uw Pioneer product via
http://www.pioneer.nl - http://www.pioneer.be (of http://www.pioneer.eu).
Registra il tuo prodotto su http://www.pioneer.it (o http://www.pioneer.eu) e scopri subito quali vantaggi puoi ottenere!
Registre su producto en http://www.pioneer.es
(o en http://www.pioneer.eu) Descubra los beneficios de registrarse on-line:
Operating Instructions | Mode d’emploi | Bedienungsanleitung | Handleiding | Istruzioni per I’uso | Manual de instrucciones
IMPORTANT
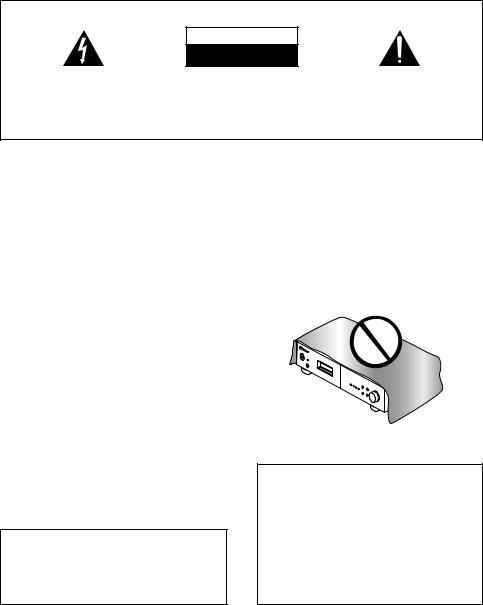
CAUTION
RISK OF ELECTRIC SHOCK
DO NOT OPEN
The lightning flash with arrowhead symbol, within an equilateral triangle, is intended to alert the user to the presence of uninsulated “dangerous voltage” within the product’s enclosure that may be of sufficient magnitude to constitute a risk of electric shock to persons.
CAUTION:
TO PREVENT THE RISK OF ELECTRIC SHOCK, DO NOT REMOVE COVER (OR BACK). NO USER-SERVICEABLE PARTS INSIDE. REFER SERVICING TO QUALIFIED SERVICE PERSONNEL.
The exclamation point within an equilateral triangle is intended to alert the user to the presence of important operating and maintenance (servicing) instructions in the literature accompanying the appliance.
D3-4-2-1-1_A1_En
& $( # !' & !"' * ' %#%"" " #% ) !' % "% & " - % " !"' # !, "!' ! % * ' $( ! % ' & $( # !' &( & ) & "%"* % #"' "% +#"& ' '" % ## ! & ! % ! "% " &'(%
" #% ) !' % + % " !"' # !* !&"(% & &( & ' ! "! '$( # !'
Operating Environment
Operating environment temperature and humidity: +5 °C to +35 °C (+41 °F to +95 °F); less than 85 %RH (cooling vents not blocked)
Do not install this unit in a poorly ventilated area, or in locations exposed to high humidity or direct sunlight (or strong artificial light)
+$!)$) + ! ! %$, ' (*%%!- '($' # )$ $*#)'- $' ' $# (*' ) ) ) %$, ' (*%%!-+$!)$) ' , ' ) ( *# ) , !! *( " )( ) ' &* ' +$!) $' ,' )) #$# ) ' ' % # !
VENTILATION CAUTION
When installing this unit, make sure to leave space around the unit for ventilation to improve heat radiation (at least 10 cm at top, 10 cm at rear, and 10 cm at each side).
WARNING
Slots and openings in the cabinet are provided for ventilation to ensure reliable operation of the product, and to protect it from overheating. To prevent fire hazard, the openings should never be blocked or covered with items (such as newspapers, table-cloths, curtains) or by operating the equipment on thick carpet or a bed.
POWER |
|
OFF |
ON |
F3
If the AC plug of this unit does not match the AC outlet you want to use, the plug must be removed and appropriate one fitted. Replacement and mounting of an AC plug on the power supply cord of this unit should be performed only by qualified service personnel. If connected to an AC outlet, the cut-off plug can cause severe electrical shock. Make sure it is properly disposed of after removal.
The equipment should be disconnected by removing the mains plug from the wall socket when left unused for a long period of time (for example, when on vacation).
CAUTION
The POWER switch on this unit will not completely shut off all power from the AC outlet. Since the power cord serves as the main disconnect device for the unit, you will need to unplug it from the AC outlet to shut down all power. Therefore, make sure the unit has been installed so that the power cord can be easily unplugged from the AC outlet in case of an accident. To avoid fire hazard, the power cord should also be unplugged from the AC outlet when left unused for a long period of time (for example, when on vacation).
POWER-CORD CAUTION
Handle the power cord by the plug. Do not pull out the plug by tugging the cord and never touch the power cord when your hands are wet as this could cause a short circuit or electric shock. Do not place the unit, a piece of furniture, etc., on the power cord, or pinch the cord. Never make a knot in the cord or tie it with other cords. The power cords should be routed such that they are not likely to be stepped on. A damaged power cord can cause a fire or give you an electrical shock. Check the power cord once in a while. When you find it damaged, ask your nearest PIONEER authorized service center or your dealer for a replacement.
Information for users on collection and disposal of old equipment and used batteries
Symbol for |
These symbols on the products, packaging, and/or accompanying documents mean |
||||||||
equipment |
that used electrical and electronic products and batteries should not be mixed with |
||||||||
|
|
|
|
|
|
|
|
|
general household waste. |
|
|
|
|
|
|
|
|
|
For proper treatment, recovery and recycling of old products and used batteries, |
|
|
|
|
|
|
|
|
|
|
|
|
|
|
|
|
|
|
|
please take them to applicable collection points in accordance with your national |
|
|
|
|
|
|
|
|
|
legislation. |
|
|
|
|
|
|
|
|
|
By disposing of these products and batteries correctly, you will help to save valuable |
|
|
|
|
|
|
|
|
|
|
Symbol examples |
resources and prevent any potential negative effects on human health and the |
||||||||
for batteries |
environment which could otherwise arise from inappropriate waste handling. |
||||||||
|
|
|
|
|
|
|
|
|
For more information about collection and recycling of old products and batteries, |
|
|
|
|
|
|
|
|
|
|
|
|
|
|
|
|
|
|
|
please contact your local municipality, your waste disposal service or the point of sale |
|
|
|
|
|
|
|
|
|
where you purchased the items. |
|
|
|
|
|
|
|
|
|
These symbols are only valid in the European Union. |
|
|
|
|
|
|
|
|
|
For countries outside the European Union: |
|
|
|
|
|
|
|
|
|
|
|
|
|
|
|
|
|
|
|
If you wish to discard these items, please contact your local authorities or dealer and |
|
|
|
|
|
|
|
|
|
ask for the correct method of disposal. |
Pb
K058a_A1_En
Replacement and mounting of an AC plug on the power supply cord of this unit should be performed only by qualified service personnel.
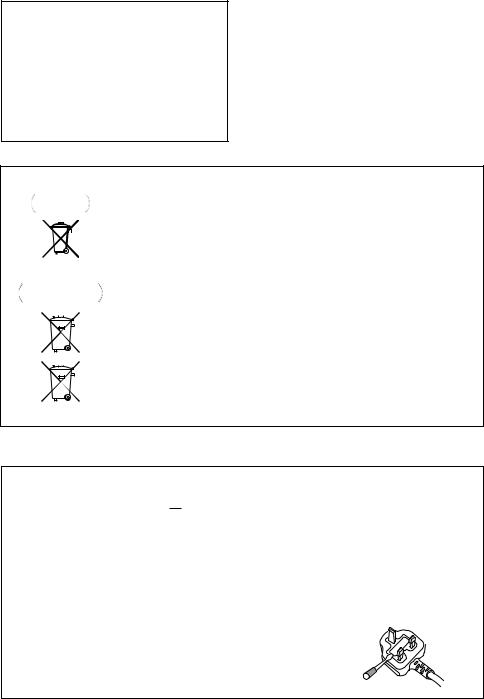
IMPORTANT: THE MOULDED PLUG
This appliance is supplied with a moulded three pin mains plug for your safety and convenience. A 10 amp fuse is fitted in this plug. Should the fuse need to be replaced, please ensure that the replacement fuse has a rating of 10 amps and that it is approved by ASTA or BSI to BS1362.
Check for the ASTA mark  or the BSI mark
  on the body of the fuse.
If the plug contains a removable fuse cover, you must ensure that it is refitted when the fuse is replaced. If you lose the fuse cover the plug must not be used until a replacement cover is obtained. A replacement fuse cover can be obtained from your local dealer.
If the fitted moulded plug is unsuitable for your socket outlet, then the fuse shall be removed and the plug cut off and disposed of safely. There is a danger of severe electrical shock if the cut off plug is inserted into any 13 amp socket.
If a new plug is to be fitted, please observe the wiring code as shown below. If in any doubt, please consult a qualified electrician.
IMPORTANT: The wires in this mains lead are coloured in accordance with the following code: Blue : Neutral Brown : Live
As the colours of the wires in the mains lead of this appliance may not correspond with the coloured markings identifying the terminals in your plug, proceed as follows ;
The wire which is coloured BLUE must be connected to the terminal which is marked with the letter N or coloured BLACK.
The wire which is coloured BROWN must be connected to the terminal which is marked with the letter L or coloured RED.
How to replace the fuse: Open the fuse compartment with a screwdriver and replace the fuse.
D3-4-2-1-2-2_B_En

Thank you for buying this Pioneer product.
Please read through these operating instructions so that you will know how to operate your model properly. After you have finished reading the instructions, put them in a safe place for future reference.
Contents
01 Before you start
Features . . . . . . . . . . . . . . . . . . . . . . . . . . . . . 5 What’s in the box . . . . . . . . . . . . . . . . . . . . . . 5 Inserting the battery . . . . . . . . . . . . . . . . . . . . 6 Installing the tuner . . . . . . . . . . . . . . . . . . . . . 6
02 Connections
Making cable connections . . . . . . . . . . . . . . . 7 Connecting analog audio sources . . . . . . . . . 9
Plugging in . . . . . . . . . . . . . . . . . . . . . . . . . . . 9
03 Controls and displays
Front panel . . . . . . . . . . . . . . . . . . . . . . . . . . 10 Remote control unit . . . . . . . . . . . . . . . . . . . 11
04 Listening to FM/AM
Auto preset memory . . . . . . . . . . . . . . . . . . . 13 Search Mode. . . . . . . . . . . . . . . . . . . . . . . . . 14 Preset stations . . . . . . . . . . . . . . . . . . . . . . . 16
An introduction to RDS . . . . . . . . . . . . . . . . . 17 RDS Search/PTY Search/TP Search. . . . . . . . 17 Naming station presets . . . . . . . . . . . . . . . . . 18
Last function memory . . . . . . . . . . . . . . . . . . 19
Initialization of the microprocessor . . . . . . . . 19
05 Other connections
Connecting external antennas. . . . . . . . . . . . 20 Operating this tuner with the remote
sensor of your Pioneer amplifier . . . . . . . . . . 20
06 Additional information
Troubleshooting . . . . . . . . . . . . . . . . . . . . . . 21 Specifications . . . . . . . . . . . . . . . . . . . . . . . . 23
4
En

Before you start
Chapter 1:
Before you start
Features |
What’s in the box |
High Quality Audio Parts
•Schottky Barrier Diode
•Gold Plated Terminal
100 Stations, Groupe Presets (FM/AM 100)
RDS (Radio Data System) with Radio Text MPX mode
Please confirm that the following accessories are in the box when you open it.
•Remote control unit
•AAA/IEC R03 dry cell batteries x2
•Power cord
•RCA/phono stereo audio cable
•SR control cable
•AM loop antenna
•FM antenna
•Warranty card
•Operating instructions (This document)
01
Español Nederlands Italiano Français Deutsch English
5
En

01 Before you start
Inserting the battery
 Caution
Incorrect use of batteries may result in such hazards as leakage and bursting. Observe the following precautions:
•Never use new and old batteries together.
•Insert the plus and minus sides of the batteries properly according to the marks in the battery case.
•Batteries with the same shape may have different voltages. Do not use different batteries together.
•When disposing of used batteries, please comply with governmental regulations or environmental public institution’s rules that apply in your country or area.
•WARNING
Do not use or store batteries in direct sunlight or other excessively hot place, such as inside a car or near a heater. This can cause batteries to leak, overheat, explode or catch fire. It can also reduce the life or performance of batteries.
6
Installing the tuner
•When installing this unit, make sure to put it on a level and stable surface.
Don’t install it on the following places:
–on a color TV (the screen may distort)
–near a cassette deck (or close to a device that gives off a magnetic field). This may interfere with the sound.
–in direct sunlight
–in damp or wet areas
–in extremely hot or cold areas
–in places where there is vibration or other movement
–in places that are very dusty
–in places that have hot fumes or oils (such as a kitchen)
En

Connections
Chapter 2:
Connections
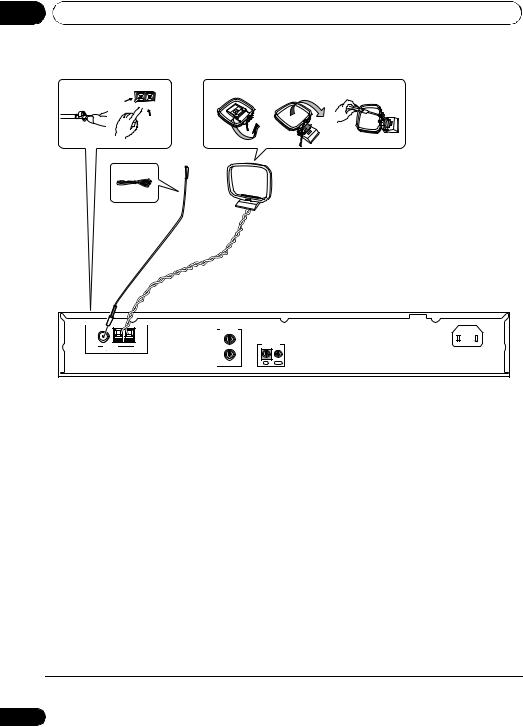
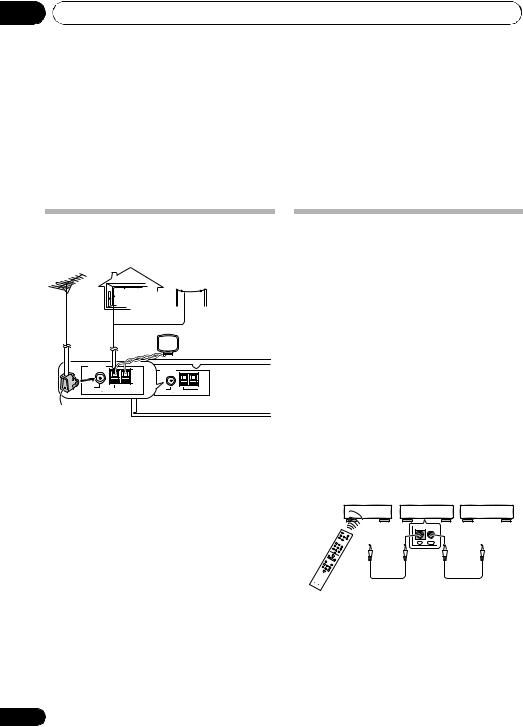
Making cable connections
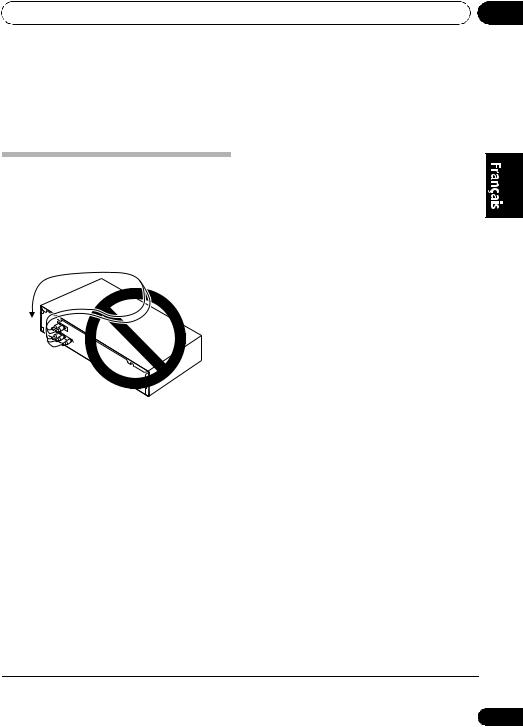
Make sure not to bend the cables over the top of this unit (as shown in the illustration), since the magnetic field produced by the unit’s transformers may cause a humming noise in the speakers.
 Important
•Before making or changing any connections, switch off the power and disconnect the power cord from the AC outlet.
02
|
English |
|
Connecting antennas |
|
|
|
||
Deutsch |
||
Connect the AM loop antenna and FM antenna |
||
as shown in the illustration (page 8). To |
||
improve reception and sound quality, connect |
||
external antennas1 (See Connecting external |
||
antennas on page 20). |
|
|
|
Français |
|
|
Italiano |
|
|
Nederlands |
|
|
||
|
Español |
|
|
|
 Note
Note
1 Do not disconnect the AM loop antenna even if an external AM antenna is used.
7
En
02 Connections
fig. A |
fig. B |
fig. C |
1 2
2


3
5
4
 AM loop antenna
FM antenna
ANTENNA |
|
LINEOUT |
AC IN |
|
|
|
|
|
|
L |
|
FM |
AM |
CONTROL |
|
UNBAL 75 |
LOOP |
R |
|
|
|
|
|
|
|
IN |
OUT |
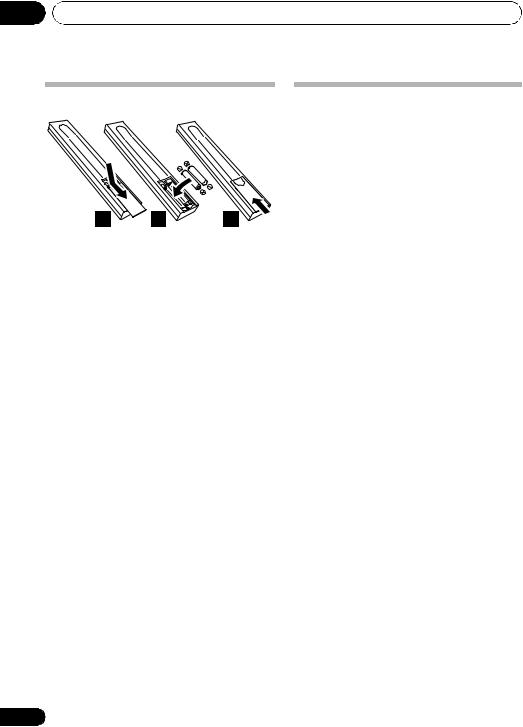
1Pull off the protective shields of both AM antenna wires.
2Push open the tabs, then insert one wire fully into each terminal, then release the tabs to secure the AM antenna wires.
3Fix the AM loop antenna to the attached stand.
To fix the stand to the antenna, bend in the direction indicated by the arrow (fig. A) then clip the loop onto the stand (fig. B).
•If you plan to mount the AM antenna to a wall or other surface, secure the stand with screws (fig. C) before clipping the loop to the stand. Make sure the reception is clear.
4Place the AM loop antenna on a flat surface, pointing in the direction that produces best reception.
Don’t let it come into contact with metal objects and avoid placing near computers, television sets or other electrical appliances.
5Connect the FM antenna1 in the same way as the AM loop antenna.
For best results, extend the FM antenna fully and fix to a wall or door frame. Don’t drape loosely or leave coiled up.
 Note
Note
1 Do not connect two FM antennas simultaneously.
8
En
Connections
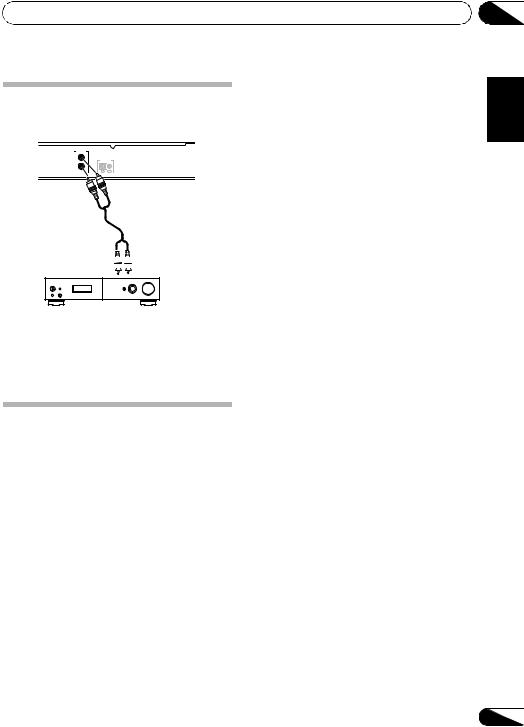
Connecting analog audio sources
LINEOUT |
|
L |
|
CONTROL |
|
R |
|
IN |
OUT |
To analog input 

Amplifier
•Use the RCA/phono jack audio cable to connect this unit’s LINE OUT connectors to the analog input connectors of an amplifier.
Plugging in
Make sure to complete all connections before connecting to an AC outlet.
• Connect the power cord to the AC inlet (AC IN) on the rear panel of the tuner, then plug into a AC outlet.
02
Español Nederlands Italiano Français Deutsch English
9
En
03 Controls and displays
Chapter 3:
Controls and displays
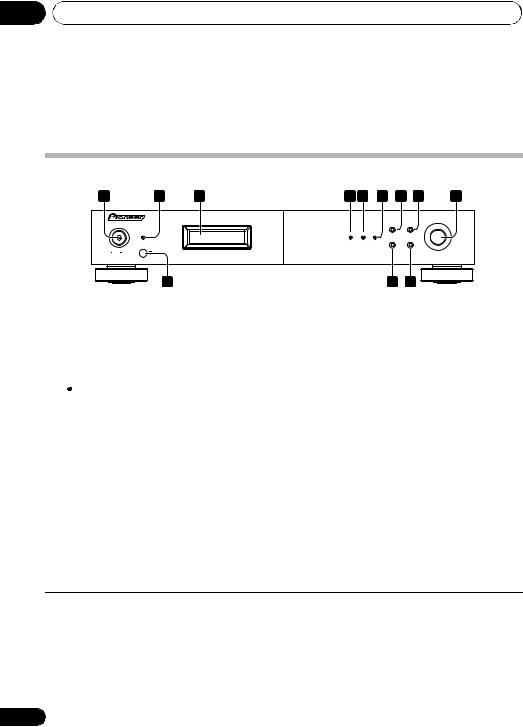
Front panel
1 |
2 |
3 |
4 |
5 |
6 |
7 |
8 |
9 |
|
|
|
|
|
|
|
|
F3 |
|
|
|
|
|
|
|
|
TUNING/PRESET |
POWER |
|
|
|
BAND |
|
MENU |
|
|
|
STANDBY |
|
|
|
|
|
|
|
|
|
|
RDS |
TUNED STEREO |
|
|
|
|
|
|
|
|
|
DISPLAY |
AUTO PRESET |
|
|
OFF |
ON |
|
|
|
|
|
|
|
|
10 |
|
|
|
11 |
|
12 |
|
1POWER OFF ON1
2STANDBY indicator
3Display
 Tip
Tip
•Liquid Crystal Display
The LCD used in this unit has a tendency to change color in response to the surrounding temperature. The display’s color tone may turn gray or its ability to switch between displayed information may slow down when the room is not at optimum temperature, or when the unit has been operating for a long period of time. However, these are only temporary symptoms and regular functionality will be restored once the unit returns to optimum temperature.
4 RDS indicator
Lights when an RDS broadcast is received, and flashes during RDS search.
5 TUNED indicator
Lights when a station is properly tuned in.
6 STEREO indicator
Lights red when a stereo broadcast is received. Goes off when a monaural broadcast is received. Lights blue when the MPX mono mode is selected.
 Note
Note
1• Remember that even when the unit is in the standby mode, it remains connected to the AC line voltage. Be sure to unplug the power cord whenever leaving your home for vacations or when otherwise not using the unit for extended periods of time.
•When the unit is in the standby mode, if the power is turned off by pressing the main unit’s POWER button, the power will not turn on if the button is prersed again.
To turn on the power in this c`se, press either the remote control unit’s TUNER button or a different button (other than the POWER button) on the main unit.
•When the unit is in the standby mode, if the power is turned off by unplugging the power cord, the power will not turn merely by reconnecting the power cord.
To turn on the power in this case, reconnect the power cord and then press either the remote control unit’s TUNER button or a different button (other than the POWER button) on the main unit.
10
En
Controls and displays
7 BAND
Selects FM or AM.1
8 MENU
Use to enter/exit menu mode.
The unit times out if no operation is performed for about five seconds after the menu mode is set.
9 TUNING/PRESET dial
Press this dial to select an option or execute a command.
Turn this dial to select menu options, radio presets or stations.
In the tuning mode, the reception frequency can be tuned in an increasing or decreasing direction. Turn the dial clockwise to change the reception toward higher frequencies. Turn the dial counterclockwise to tune the reception toward lower frequencies.
In the preset mode, turning this dial moves the selected preset channel2 up or down. The auto tuning operation cannot be used when in this mode.
When inputting station names, use this dial to select desired characters (page 18).
10Remote sensor
11DISPLAY
Use to select the display mode (page 18).
12 AUTO PRESET
When pressed during FM or AM mode, receivable stations are automatically stored in the preset memory in order starting from preset channel A1.
Remote control unit
Using the remote control
Keep in mind the following when using the remote control:
•Make sure that there are no obstacles between the remote and the remote sensor on the unit.
•The remote has a range of about 7 m at an angle of about 30º from the remote sensor.
•Remote operation may become unreliable if strong sunlight or fluorescent light is shining on the unit’s remote sensor.
•Remote controllers for different devices can interfere with each other. Avoid using remotes for other components located close to this unit.
•Replace the battery when you notice a decrease in the operating range of the remote.
03
Español Nederlands Italiano Français Deutsch English

 Note
Note
1Noise may be generated when receiving AM or FM if a near-by television set is turned on. The tuner should be used as far away from a television as possible.
2Effective period of memory back-up is about a month under normal temperature.
11
En
03 Controls and displays
|
TUNER |
|
DIMMER |
1 |
|
|
7 |
|
A/B/C |
D/E/F |
MPX |
2 |
|
|
8 |
G/H |
I / J |
|
|
|
1 |
2 |
3 |
3 |
4 |
5 |
6 |
|
|
|
|
|
7 |
8 |
9 |
|
|
10 |
|
|
|
VOLUME |
|
4 |
AMP |
|
MUTE |
|
|
|
A.PRESET |
5 |
MENU |
|
A.TUNE |
|
|
9 |
|
6 |
BAND |
TUNE |
MEMORY |
|
|
10 |
|
|
PRESET |
ENTER |
PRESET |
|
|
|
11 |
TUNE
TUNER
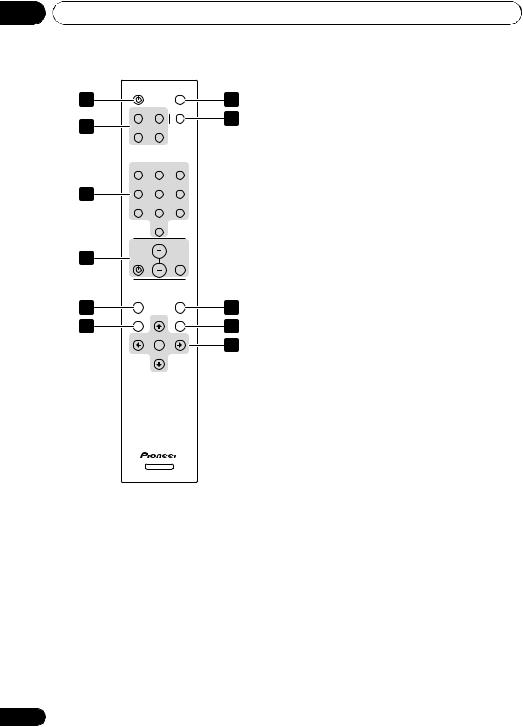
1 TUNER
Switches the unit between standby and on.
2Preset channel range buttons (A/B/C, D/E/F, G/H, I/J)
Use to tune in preset broadcast stations.
3Station call buttons (1 to 10)
Use these buttons to preset stations, and to recall previously preset stations.
4 AMP controls
Use to control Pioneer amplifier.
AMP
VOLUME MUTE
12
5 MENU
Use to enter/exit menu mode.
6BAND
Selects FM or AM.
7DIMMER
Dims or brightens the display (or switches the backlight off).
8 MPX
Use to switch between stereo and mono reception during FM broadcasts. If the signal is weak, switching to mono may improve the sound quality (page 15).
9 A.PRESET/A.TUNE
When pressed during FM or AM mode, receivable stations are automatically stored in the preset memory in order starting from preset channel A1.
10 MEMORY
Use to preset stations. This button is also used for manual station-name character selection for FM and AM broadcasts, and for Program Type search.
11 Tuning buttons
ENTER
Selects an option or executes a command.
TUNE
Use to change reception frequency.
PRESET
Selects station preset when listening to the radio.
En
Listening to FM/AM
Chapter 4:
Listening to FM/AM
Auto preset memory
TUNER DIMMER
A/B/C D/E/F MPX
G/H |
I / J |
A.PRESET
MENU A.TUNE
•If a station cannot be preset automatically due to poor reception, use the “Manual tuning” operation to tune in the station, then preset it using the manual “Preset stations” operation.
•To interrupt this function, press the TUNER button.
•Perform this operation from the remote control unit.
BAND TUNE MEMORY
PRESET ENTER PRESET
TUNE
1Make sure that the unit is in standby mode, and then press the TUNER button to turn on the power.
2Watching the display, press the BAND button to select the desired band (AM or FM).
3Press the A.PRESET/A.TUNE button.
4Press the ENTER button.
The unit automatically begins searching for the broadcast stations.
•When the first broadcast station is found, that station is stored in the preset memory at channel A1.
Subsequent stations are automatically stored in order at preset channels A1 to A10, B1 to B10, C1 to C10, D1 to D10,
E1 to E10, F1 to F10, G1 to G10, H1 to H10, I1 to I10 and J1 to J10 for a maximum of 100 stations.
•Channel A1 is tuned in after the auto preset memory operation is completed.
DEFAULT VALUE
Auto tuner presets
A1 to A10 87.5 MHz/88.0 MHz/90.0 MHz/
92.0 MHz/94.0 MHz/96.0 MHz/
98.0 MHz/100.0 MHz/102.0 MHz/
104.0 MHz
B1 to B10 106.0 MHz/108.0 MHz/98.0 MHz/
98.0 MHz/98.0 MHz/98.0 MHz/
98.0 MHz/98.0 MHz/98.0 MHz/
98.0 MHz
C1 to C10 98.0 MHz
D1 to D10 98.0 MHz
E1 to E10 98.0 MHz
F1 to F10 531 kHz/531 kHz/603 kHz/801 kHz/
999 kHz/1197 kHz/1395 kHz/
1602 kHz/1602 kHz/999 kHz
G1 to G10 999 kHz
H1 to H10 999 kHz
I1 to I10 |
999 kHz |
J1 to J10 |
999 kHz |
04
Español Nederlands Italiano Français Deutsch English

13
En
04 Listening to FM/AM
Search Mode |
|
|
Manual tuning |
|
|
|
|
|
|
|
|
|
|
TUNING/PRESET F3 |
|
|
|
|
POWER |
|
BAND |
MENU |
|
|
|
|
|
STANDBY |
|
|
|
|
|
|
|
|
|
RDS TUNED STEREO |
|
Auto tuning |
|
|
|
|
|
DISPLAY |
AUTO PRESET |
|
|
OFF |
ON |
|
|
|
|
|
|
|
F3 |
|
|
|
|
|
|
|
TUNING/PRESET |
|
|
|
|
POWER |
|
BAND |
MENU |
|
|
|
|
STANDBY |
|
|
|
|
|
|
|
|
|
RDS TUNED STEREO |
|
TUNER |
|
DIMMER |
|
|
|
DISPLAY |
AUTO PRESET |
|
|
||
OFF ON |
|
|
|
|
|
|
|
|
|
|
|
A/B/C |
D/E/F |
MPX |
|
|
|
|
|
|
I / J |
|
|
TUNER |
|
DIMMER |
|
|
|
A.PRESET |
|
|
|
|
|
|
|
|
|
|
|
|
|
MENU |
|
A.TUNE |
|
A/B/C |
D/E/F |
MPX |
|
|
|
|
|
|
|
|
|
BAND |
TUNE |
MEMORY |
|
|
I / J |
|
|
|
|
|
|
|
|
|
|
PRESET |
ENTER |
PRESET |
|
|
|
A.PRESET |
|
|
|
|
|
MENU |
|
A.TUNE |
|
|
|
|
|
|
|
|
|
|
TUNE |
|
|
BAND |
TUNE |
MEMORY |
|
|
|
|
|
PRESET |
ENTER |
PRESET |
|
|
|
|
|
TUNE
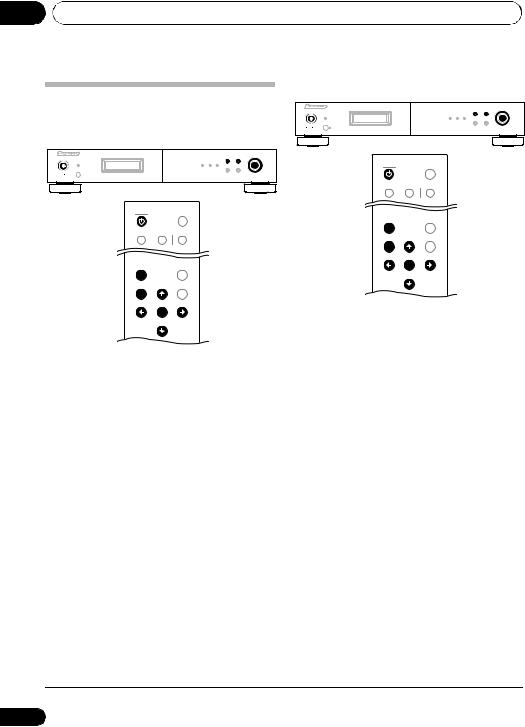
1Press the POWER or TUNER button to turn on the power.
2Watching the display, press the BAND button to select the desired band (AM or FM).
1Press the POWER or TUNER button to turn on the power.
2Watching the display, press the BAND button to select the desired band (AM or FM).
3Press the MENU button to select menu.
4Either turn the TUNING/PRESET dial or press the / button to select the search
3Press the MENU button to select menu.
4Either turn the TUNING/PRESET dial or press the / button to select the search mode.
5Press the TUNING/PRESET dial or ENTER button to set the auto tuning mode.
6Either turn the TUNING/PRESET dial or press the / button.
Automatic searching will begin, and then stop when a station is received.
•When the unit is in the MPX stereo mode and FM band auto tuning is selected, the front-panel STEREO indicator will light red when a stereo broadcast is received. At open frequencies (no station is received), the sound will be muted and the TUNED and STEREO indicators will turn off.
mode.1
5Press the TUNING/PRESET dial or ENTER button to set the manual tuning mode.
6Either turn the TUNING/PRESET dial or press the / button to tune in the desired station.
The frequency changes continuously when the / button on the remote control unit is held in.
•When the MPX mono mode has been selected, FM stereo broadcasts will be received in monaural, and the STEREO indicator will light blue.
 Note
Note
1 Hold the / button depressed for 0.5 seconds or more to perform rapid tuning.
14
En
Listening to FM/AM |
04 |
Improving FM stereo sound
If the TUNED or STEREO indicator fails to light when tuning into an FM station due to a weak reception signal, press the MPX button to
switch the tuner into mono reception mode.1 This should improve the sound quality and allow you to enjoy the broadcast.
Recalling preset stations
F3
TUNING/PRESET
POWER |
BAND |
MENU |
STANDBY |
|
|
RDS |
TUNED STEREO |
|
|
DISPLAY |
AUTO PRESET |
OFF ON
TUNER DIMMER
A/B/C D/E/F MPX
G/H |
I / J |
1 2 3
4 5 6
7 8 9
|
10 |
|
VOLUME |
AMP |
MUTE |
|
A.PRESET |
MENU |
A.TUNE |
BAND TUNE MEMORY
PRESET ENTER PRESET
TUNE
For instructions on presetting stations, see the section “Preset stations” (page 16).
1Connect the antenna and confirm that reception is possible.
2Press the POWER or TUNER button to turn on the power.
3Press the MENU button to select menu.
4Either turn the TUNING/PRESET dial or press the / button to select the search mode.
5Either turn the TUNING/PRESET dial or press the / button to select “Preset”.
6Press the TUNING/PRESET dial or ENTER button to set the preset mode.
7Watching the display, either turn the TUNING/PRESET dial, or press the / button to select the desired preset channel.
7-1 Press one of the preset channel range (A to J) buttons to select the desired memory block (A to J).
7-2 Press one of the station call (1 to 10) buttons to select the desired preset channel (1 to 10).
•Steps 1 to 5 can be skipped when using the /, preset channel range (A to J) and station call (1 to 10) buttons.
The preset mode is set when any of these buttons is pressed, regardless of the menu setting at that time.
 Note
Note
1 The STEREO indicator will light blue when the MPX button is pressed.
Español Nederlands Italiano Français Deutsch English

15
En
04 Listening to FM/AM
1 Use the “Auto tuning” or “Manual
Preset stations tuning” operation to tune in the station to be preset in the memory.
RDS TUNED STEREO |
|
|
F3 |
|
TUNING/PRESET |
2 Press the MENU button to select menu. |
|
POWER |
BAND MENU |
|
|
STANDBY |
|
|
|
|
DISPLAY AUTO PRESET |
|
|
OFF ON |
|
|
3 Either turn the TUNING/PRESET dial or |
|
|
|
|
|
|
|
press the / button to select “Memory”. |
TUNER DIMMER
A/B/C D/E/F MPX
G/H |
I / J |
4 Press the TUNING/PRESET dial or ENTER button to set the preset mode and make the preset channel number flash.
•Steps 1 to 4 can be skipped when using the MEMORY button.
1 |
2 |
3 |
4 |
5 |
6 |
7 |
8 |
9 |
|
10 |
|
|
VOLUME |
|
AMP |
|
MUTE |
|
|
A.PRESET |
MENU |
|
A.TUNE |
BAND |
TUNE |
MEMORY |
PRESET |
ENTER |
PRESET |
|
TUNE |
|
When this button is pressed, the preset memory standby mode is set, regardless of the menu setting at that time.
5While the preset channel number is flashing, press one of the preset channel range (A to J) buttons to select the desired memory block (A to J).
6While the preset channel number is
flashing, either turn the TUNING/PRESET dial, press the / or Station call (1 to 10) button to select the desired preset channel (1
to 10).1
7 While the preset channel number is flashing, either press the TUNING/PRESET dial or the MEMORY button to store the station in the preset memory.
•To preset other channels, repeat steps 2 to 6.
•A total of 100 broadcast stations can be preset — 10 stations (channels 1 to 10) in each of blocks A to J.2
 Note
Note
1When the preset channel is A1, pressing the button or rotating the TUNING/PRESET dial to the left will cause the preset channel to move to J10.
2When a broadcast station is stored in memory, the MPX setting is simultaneously stored.
16
En

Listening to FM/AM
An introduction to RDS
Radio Data System (RDS) is a system used by most FM radio stations to provide listeners with various kinds of information, such as the name of the station and the kind of show being broadcast.
One feature of RDS is that you can search by type of program. For example, you can search for a station that’s broadcasting a show with the program type, JAZZ.
You can search the following program types:1
NEWS – News
AFFAIRS – Current Affairs INFO – General Information SPORT – Sport
EDUCATE – Educational DRAMA – Radio plays, etc. CULTURE – National or regional culture, theater, etc.
SCIENCE – Science and technology
VARIED – Usually talkbased material, such as quiz shows or interviews. POP M – Pop music ROCK M – Rock music EASY M – Easy listening LIGHT M – ‘Light’ classical music
CLASSICS – ‘Serious’ classical music OTHER M – Music not fitting above categories WEATHER – Weather reports
FINANCE – Stock market reports, commerce, trading, etc.
CHILDREN – Programs for children
SOCIAL – Social affairs RELIGION – Programs concerning religion
PHONE IN – Public expressing their views by phone
TRAVEL – Holiday-type travel information as opposed to traffic announcements. LEISURE – Leisure interests and hobbies
JAZZ – Jazz
COUNTRY – Country music NATION M – Popular music in a language other than English
OLDIES – Popular music from the ’50s and ’60s FOLK M – Folk music DOCUMENT – Documentary
RDS Search/PTY Search/TP Search
Searching for RDS programs
One of the most useful features of RDS is the ability to search for a particular kind of radio program. You can search for any of the program types listed above.
1Press the BAND button to select the FM band.2
2Press the MENU button to select menu.
3Select “RDS” by either rotating the TUNING/PRESET dial or pressing the / button, then press either the TUNING/ PRESET dial or ENTER button.
4Either turn the TUNING/PRESET dial or press / button to select the desired search mode (RDS search, PTY search or TP search).
5Press the TUNING/PRESET dial or ENTER button to search for the RDS program you want to hear.
The system starts searching through the station presets for a match. When it finds one, the search stops and the station plays for five seconds.
6If you want to continue listening to the station, press the TUNING/PRESET dial or ENTER button within five seconds.
If you don’t press the TUNING/PRESET knob or ENTER button, searching resumes.
If the program type cannot be found, the unit will automatically begin the frequency search
mode.3
 Note
Note
1In addition, ALARM may be displayed. ALARM is used for emergency broadcast announcements. You cannot search for this type of announcement, but the tuner will switch automatically to this RDS signal in the event of a broadcast.
2RDS is only possible in the FM band.
3PTY searches station presets only. If no stations have been preset, or if the PTY search could not be found among the station presets NO PTY DATA is displayed.
04
Español Nederlands Italiano Français Deutsch English
17
En

04 Listening to FM/AM
Displaying RDS information
Use the DISPLAY button to display the different types of RDS information available.1
• Press the DISPLAY button for RDS information.
Each press changes the display as follows:
•Radio Text (RT) – Messages sent by the radio station. For example, a talk radio station may provide a phone number as RT.
•Program Service Name (PS) – The name of the radio station.
•Program Type (PTY) – This indicates the kind of program currently being broadcast.
•Clock Time (CT)
Naming station presets
For easier identification, you can name your station presets.
1Choose the station preset you want to name.
For how to do this, see “Recalling preset stations” (page 15).
2Press the MENU button to select menu.
3Select Station Name by either rotating the TUNING/PRESET dial or pressing the /button, then press either the TUNING/
PRESET dial or ENTER button.
4 Input the name you want.
Choose from the following characters for a name up to eight characters long.
ABCDEFGHIJKLMNOPQRSTUVWXYZ
abcdefghijklmnopqrstuvwxyz
0123456789
!"#$%&'()*+,-./[ \ ]^_:;<=>? [space]
•Use the TUNING/PRESET dial or / buttons to select characters.
•Press the TUNING/PRESET dial or ENTER button to confirm a character. If no character is input, a space is input.
•The name is stored when the TUNING/ PRESET dial or MEMORY button is pressed after choosing the fourth character.
5 Either turn the TUNING/PRESET dial, press the preset channel range (A to J) or station call (1 to 10) button.
The display shows Station Name, then a blinking cursor at the first character position.
 Tip
Tip
•To delete a station name, repeat steps 4 and 5, and input all blank spaces in place of the name.
 Note
Note
1• If any noise is picked up while displaying the RT scroll, some characters may be displayed incorrectly.
• NO ** DATA will appear when the required data cannot be found.
18
En

Listening to FM/AM
Last function memory
•This unit is equipped with a last function memory which stores the input and output setting conditions as they were immediately before the power is switched off.
This function eliminates the need to perform complicated resettings when the power is switch on.
•The unit is also equipped with a back-up memory.
This function provides approximately two week of memory storage when the main unit’s POWER button is off and with the power cord disconnected.
Initialization of the microprocessor
•When the indication of the display is not normal or when the operation of the unit does not shows the reasonable result, the initializaton of the microprocessor is required by the following procedure.
1Press the unit’s POWER button to turn the power off.
2Press the unit’s POWER button to turn the power on while holding down the MENU button.
3“Memory Clear?” will be displayed in the display. Using the unit’s TUNING/PRESET dial, select either “Yes” or “No” and press the TUNING/PRESET dial.
4If “Yes” is selected, the memory will be cleared and the unit will then be set to standby mode. If “No” is selected, the unit
will be set to standby mode.1
 Note
Note
1• If step 4 does not work, start over from step 1.
•If the microprocessor has been reset, all the button settings are reset to the default values (the values set upon shipment from the factory).
04
Español Nederlands Italiano Français Deutsch English
19
En
05 Other connections
Chapter 5:
Other connections
 Caution
• Make sure the power is switched off before making or changing the connections.
Connecting external antennas
external
FM antenna external AM antenna
Operating this tuner with the remote sensor of your Pioneer amplifier
|
|
Outdoor antenna |
Many Pioneer components have SR CONTROL |
|
|
Indoor antenna |
|
jacks which can be used to link components |
|
|
(vinyl-coated Wire) |
|
together so that you can use just the remote |
|
|
|
|
|
|
|
(5 m to 6 m) |
|
sensor of one component. When you use a |
|
|
|
|
|
remote control, the control signal is passed |
|
|
|
Loop antenna |
along the chain to the appropriate component. |
ANTENNA |
|
ANTENNA |
|
Note that if you use this feature, make sure that |
|
|
|
you also have at least one set of analog audio |
|
|
|
|
|
|
FM |
AM |
UNBAL 75 |
LOOP |
jacks connected to another component for |
UNBAL 75 |
LOOP |
FM |
AM |
|
|
|
|
||
PAL connector |
|
|
|
grounding purposes. |
|
|
|
|
|
•For an external AM antenna, use 5 m to 6 m of vinyl-insulated wire and set up either indoors or outdoors. Leave the loop antenna connected. Only use the included AM loop antenna.
•For an external FM antenna, use a PAL connector to hook up an external FM antenna.
1 Connect the CONTROL IN jack of this tuner to the CONTROL OUT jack of your Pioneer amplifier.
Use a cable with a mono mini-plug on each end for the connection.
|
Amplifier |
This tuner |
CD player, etc. |
Pioneer |
|
|
|
component |
To control |
CONTROL |
To control |
remote |
|
||
control |
output |
IN OUT |
input |
2 This process can be used to form a daisychain linkage with other Pioneer components as well.
20
En
Additional information
Chapter 6:
Additional information
Troubleshooting
Incorrect operations are often mistaken for trouble and malfunctions. If you think that there is something wrong with this component, check the points below. Sometimes the trouble may lie in another component. Investigate the other components and electrical appliances being used. If the trouble cannot be rectified even after performing the checks listed below, ask your nearest Pioneer authorized service center or your dealer to carry out repair work.
•If the unit does not operate normally due to external effects such as static electricity, disconnect the power plug from the outlet and insert again to return to normal operating conditions.
Problem |
Remedy |
The power does not turn on. |
• Disconnect the power plug from the outlet, and insert again. |
|
• If you’re trying to switch on using the remote control, make sure the |
|
front panel POWER button is switched on first. |
|
• If the power shuts off automatically, take the unit to your nearest |
|
Pioneer authorized service center or your dealer for servicing. |
|
|
No sound is output. |
• Turn the amplifier’s power on. |
|
• Make sure the amplifier is connected correctly (refer to Connections on |
|
page 7). |
|
• Press the MUTE button on your Pioneer amplifier to turn the muting off. |
|
|
Can’t operate the remote |
• Replace the battery (page 6). |
control. |
• Operate within 7 m, 30° of the remote sensor on the front panel |
|
(page 11). |
|
• Remove the obstacle or operate from another position. |
|
• Avoid exposing the remote sensor on the front panel to direct light. |
|
|
The display is dark or off. |
• Press DIMMER on the remote repeatedly to return to the default. |
|
|
Hissing or buzzing sounds are |
• Turn off the TV. |
heard during AM broadcasts. |
• Change the position of the loop antenna. |
(Noise from a TV or interference |
• Install an outdoor antenna (page 20). |
in the signals sent from the |
|
broadcast station.) |
|
|
|
Booming sounds (humming) are |
• Insert the plug in the opposite direction. |
heard during AM broadcasts. |
• Install an outdoor antenna (page 20). |
(Signals transmitted over the |
|
power supply cord are |
|
modulated by the power source |
|
frequency.) |
|
|
|
06
Español Nederlands Italiano Français Deutsch English

21
En

06 Additional information
Problem |
Remedy |
Considerable noise in radio |
• Connect the AM antenna and adjust the direction and position for best |
broadcasts. |
reception. You may also connect an external indoor or outdoor AM |
|
antenna (page 20). |
|
• Fully extend the FM wire antenna, position for best reception, and |
|
secure to a wall. You may also connect an outdoor FM antenna (page 20). |
|
• Turn off other equipment that may be causing the noise or move it |
|
further away. |
Auto tuning does not pick up some stations.
• The radio signal is weak. Auto tuning will only detect radio stations with a good signal. For more sensitive tuning, connect an outdoor antenna (page 20).
22
En
Additional information |
06 |
Specifications
FM tuner section
Frequency range . . . . . . . . .87.5 MHz to 108 MHz Usable sensitivity . . . . . . . . . . Mono: 15.2 dBf, IHF (1.6 µV/75 Ω)
50 dB quieting sensitivity . . . Mono: 21.3 dBf, IHF (3.2 µV/75 Ω)
Signal-to-noise ratio . . . .Mono: 76 dB (at 85 dBf) Stereo: 71 dB (at 85 dBf)
Distortion . . . . . . . . . . . . . . . Stereo: 0.6 % (1 kHz) Alternate channel selectivity
. . . . . . . . . . . . . . . . . . . . . . . . . . .70 dB (±400 kHz) Stereo separation . . . . . . . . . . . . . . 45 dB (1 kHz) Frequency response . . . ±1 dB (30 Hz to 15 kHz) Image response ratio. . . . . . . . . . . . . . . . . . . 90 dB IF response ratio . . . . . . . . . . . . . . . . . . . . . . 95 dB Antenna Input . . . . . . . . . . . . . . 75 Ω unbalanced
AM tuner section
Frequency range . . . . . . . . . .531 kHz to 1602 kHz Sensitivity (IHF, loop antenna) . . . . . . . .350 µV/m Selectivity . . . . . . . . . . . . . . . . . . . .33 dB (±9 kHz) Signal-to-noise ratio . . . . . . . . . . . . . . . . . . . 55 dB Image response ratio. . . . . . . . . . . . . . . . . . . 35 dB IF response ratio . . . . . . . . . . . . . . . . . . . . . . 65 dB Antenna . . . . . . . . . . . . . . . . . . . . . .Loop Antenna
Audio section
Output (Level/Impedance)
FM (100 % MOD) . . . . . . . . . . 890 mVrms/2 kΩ AM (30 % MOD). . . . . . . . . . . 224 mVrms/2 kΩ
Miscellaneous
Power requirements
. . . . . . . . . . . . . . . .AC 220 V to 240 V, 50 Hz/60 Hz Power consumption . . . . . . . . . . . . . . . . . . . . 8 W Power consumption in standby mode. . . . . 0.5 W Dimensions
. . . . . . . . 420 mm (W) x 78 mm (H) x 350 mm (D) Weight (without package). . . . . . . . . . . . . . .4.3 kg
Accessories |
1 |
English |
|
Power cord . . . . . . . . . . . . . . . . . . . . . . . . . . . . . . |
|||
Remote control unit . . . . . . . . . . . . . . . . . . . . . . . |
1 |
|
|
AAA/IEC R03 dry cell batteries. . . . . . . . . . . . . |
2 |
|
|
RCA/phono stereo audio cable . . . . . . . . . . . . . . |
1 |
|
|
. . . . . . . . . . . . . . . . . . . . . . . . . .SR control cable |
1 |
|
|
|
|||
. . . . . . . . . . . . . . . . . . . . . . . . .AM loop antenna |
1 |
Deutsch |
|
FM antenna |
1 |
||
|
|||
Warranty card . . . . . . . . . . . . . . . . . . . . . . . . . . . . |
1 |
|
|
Operating instructions (This document) |
|
|
|
Note |
|
Français |
|
to improvements. |
|
||
• Specifications and design are subject to |
|
|
|
possible modifications without notice, due |
|
||
Cleaning the unit |
|
Italiano |
|
• Use a polishing cloth or dry cloth to wipe |
|
||
|
|
||
off dust and dirt. |
|
|
|
• When the surface is dirty, wipe with a soft |
|
||
cloth dipped in some neutral cleanser |
|
|
|
diluted five or six times with water, and |
|
Nederlands |
|
|
|||
• Never use thinners, benzine, insecticide |
|
||
wrung out well, and then wipe again with a |
|
||
dry cloth. Do not use furniture wax or |
|
|
|
cleansers. |
|
|
|
sprays or other chemicals on or near this |
|
|
|
|
|
||
unit, since these will corrode the surface. |
Español |
||
|
|
||
|
|
|
|
Published by Pioneer Corporation.
Copyright © 2009 Pioneer Corporation.
All rights reserved.
23
En

IMPORTANT
Ce symbole de l’éclair, placé dans un triangle équilatéral, a pour but d’attirer l’attention de l’utilisateur sur la présence, à l’intérieur du coffret de l’appareil, de “tensions dangereuses” non isolées d’une grandeur suffisante pour représenter un risque d’électrocution pour les êtres humains.
ATTENTION
DANGER D´ELECTROCUTION
NE PAS OUVRIR
ATTENTION :
POUR ÉVITER TOUT RISQUE D’ÉLECTROCUTION, NE PAS ENLEVER LE COUVERCLE (NI LE PANNEAU ARRIÈRE). AUCUNE PIÈCE RÉPARABLE PAR L’UTILISATEUR NE SE TROUVE À L’INTÉRIEUR. CONFIER TOUT ENTRETIEN À UN PERSONNEL QUALIFIÉ UNIQUEMENT.
Ce point d’exclamation, placé dans un triangle équilatéral, a pour but d’attirer l’attention de l’utilisateur sur la présence, dans les documents qui accompagnent l’appareil, d’explications importantes du point de vue de l’exploitation ou de l’entretien.
D3-4-2-1-1_A1_Fr
) %% ' ! # () % ( .) #$*' .+ ) ' ! ( ' (&* ( # # ) . ' .! )' &* # %!-%'0( !* *# '. % #) ' "%! * ) !
&* *# + ($* *# %$) ! *'( ) # ! ,%$(-% ( 2 ($*)) ( * ( . !$*((*' ( ! %!* $* ! *" ).
AVERTISSEMENT
Pour éviter les risques d’incendie, ne placez aucune flamme nue (telle qu’une bougie allumée) sur l’appareil.
Milieu de fonctionnement
Température et humidité du milieu de fonctionnement : De +5 °C à +35 °C (de +41 °F à +95 °F) ; Humidité relative inférieure à 85 % (orifices de ventilation non obstrués)
N’installez pas l’appareil dans un endroit mal ventilé ou un lieu soumis à une forte humidité ou en plein soleil (ou à une forte lumière artificielle).
D3-4-2-1-7c*_A1_Fr
AVERTISSEMENT
Avant de brancher l’appareil pour la première, lisez attentivement la section suivante.
La tension de l’alimentation électrique disponible varie selon le pays ou la région. Assurez-vous que la tension du secteur de la région où l’appareil sera utilisé correspond à la tension requise (par ex. 230
V ou 120 V), indiquée sur le panneau arrière.
D3-4-2-1-4_A_Fr
Si la fiche d’alimentation secteur de cet appareil ne convient pas à la prise secteur à utiliser, la fiche doit être remplacée par une appropriée. Ce remplacement et la fixation d’une fiche secteur sur le cordon d’alimentation de cet appareil doivent être effectués par un personnel de service qualifié. En cas de branchement sur une prise secteur, la fiche de coupure peut provoquer une sérieuse décharge électrique. Assurez-vous qu’elle est éliminée correctement après sa dépose.
L’appareil doit être déconnecté en débranchant sa fiche secteur au niveau de la prise murale si vous prévoyez une période prolongée de non utilisation (par exemple avant un départ en vacances).
D3-4-2-2-1a_A1_Fr

PRÉCAUTION DE VENTILATION
Lors de l’installation de l’appareil, veillez à laisser un espace suffisant autour de ses parois de manière à améliorer la dissipation de chaleur (au moins 10 cm sur le dessus, 10 cm à l’arrière et 10 cm de chaque côté).
AVERTISSEMENT
Les fentes et ouvertures du coffret sont prévues pour la ventilation, pour assurer un fonctionnement stable de l’appareil et pour éviter sa surchauffe. Pour éviter les risques d’incendie, ne bouchez jamais les ouvertures et ne les recouvrez pas d’objets, tels que journaux, nappes ou rideaux, et n’utilisez pas l’appareil posé sur un tapis épais ou un lit.
"
|
|
|
|
ATTENTION
! ! ! & ! ! ( # ! ! " * ( ( ! " ! ! ! ! & ( ! " % , & !
! * ( ( |
|
||
! ! (" ! |
|
||
! |
|
||
( ( ! " ! ! " ! |
|
||
("$% ! ( ( ! |
|
||
# " ! ( " |
|
||
|
|
D3-4-2-2-2a_A_Fr |
|
NOTE IMPORTANTE SUR LE CABLE D’ALIMENTATION
Tenir le câble d’alimentation par la fiche. Ne pas débrancher la prise en tirant sur le câble et ne pas toucher le câble avec les mains mouillées. Cela risque de provoquer un court-circuit ou un choc électrique. Ne pas poser l’appareil ou un meuble sur le câble. Ne pas pincer le câble. Ne pas faire de noeud avec le câble ou l’attacher à d’autres câbles. Les câbles d’alimentation doivent être posés de façon à ne pas être écrasés. Un câble abîmé peut provoquer un risque d’incendie ou un choc électrique. Vérifier le câble d’alimentation de temps en temps. Contacter le service après-vente PIONEER le plus proche ou le revendeur pour un remplacement.
Information à destination des utilisateurs sur la collecte et l’élimination des équipements et batteries usagés
Marquage pour les équipements
Exemples de marquage pour les batteries
Pb
Ces symboles qui figurent sur les produits, les emballages et/ou les documents d’accompagnement signifient que les équipements électriques et électroniques et batteries usagés ne doivent pas être jetés avec les déchets ménagers et font l’objet d’une collecte sélective.
Pour assurer l’enlèvement et le traitement appropriés des produits et batteries usagés, merci de les retourner dans les points de collecte sélective habilités conformément à la législation locale en vigueur.
En respectant les circuits de collecte sélective mis en place pour ces produits, vous contribuerez à économiser des ressources précieuses et à prévenir les impacts négatifs éventuels sur la santé humaine et l’environnement qui pourraient résulter d’une mauvaise gestion des déchets.
Pour plus d’information sur la collecte et le traitement des produits et batteries usagés, veuillez contacter votre municipalité, votre service de gestion des déchets ou le point de vente chez qui vous avez acheté ces produits.
Ces symboles ne sont valables que dans les pays de l’Union Européenne.
Pour les pays n’appartenant pas à l’Union Européenne :
Si vous souhaitez jeter ces articles, veuillez contacter les autorités ou revendeurs locaux pour connaître les méthodes d’élimination appropriées.

Nous vous remercions d’avoir acheté ce produit Pioneer.
Veuillez lire attentivement ces instructions d’utilisation afin d’apprendre à manipuler votre modèle correctement. Lorsque vous avez terminé, rangez ces instructions en lieu sûr afin de pouvoir vous y référer à l’avenir.
Sommaire
01 Avant la mise en service
Caractéristiques . . . . . . . . . . . . . . . . . . . . . . . 5
Contenu de l’emballage . . . . . . . . . . . . . . . . . 5
Insertion de la pile . . . . . . . . . . . . . . . . . . . . . 6
Installation du syntoniseur . . . . . . . . . . . . . . . 6
02 Connexions
Raccorder les câbles . . . . . . . . . . . . . . . . . . . 7
Connexion de sources audio analogiques. . . . 9
Branchement . . . . . . . . . . . . . . . . . . . . . . . . . 9
04 Écouter la radio FM/AM
Mémoire de préréglage automatique . . . . . . 13
Mode recherche . . . . . . . . . . . . . . . . . . . . . . 14
Préréglage des stations. . . . . . . . . . . . . . . . . 16 Présentation du système RDS. . . . . . . . . . . . 17 Recherche RDS/Recherche
PTY/Recherche TP. . . . . . . . . . . . . . . . . . . . . 17
Nommer les stations préréglées . . . . . . . . . . 18 Fonction Last Function Memory . . . . . . . . . . 19 Initialisation du microprocesseur . . . . . . . . . 19
03 Commandes et écrans
Panneau avant . . . . . . . . . . . . . . . . . . . . . . . 10 Télécommande . . . . . . . . . . . . . . . . . . . . . . . 11
05 Autres connexions
Connexion d’antennes externes . . . . . . . . . . 20 Faire fonctionner le syntoniseur avec le capteur de votre amplificateur Pioneer. . . . . . . . . . . . 20
06 Informations complémentaires
Guide de dépannage . . . . . . . . . . . . . . . . . . . 21
Caractéristiques techniques . . . . . . . . . . . . . 23
4
Fr

Avant la mise en service |
01 |
Chapitre 1 :
Avant la mise en service
Caractéristiques
Équipement audio haute qualité
•Diode Schottky
•Terminal plaqué or
100 stations, préréglages de groupes (FM/AM 100)
Système RDS (système de radiocommunication de données) avec radiotexte
Mode MPX
Contenu de l’emballage
Veuillez vérifier que les accessoires suivants se trouvent bien dans la boîte lorsque vous l’ouvrez.
•Télécommande
•piles sèches AAA/IEC R03 x 2
•Câble d’alimentation
•Câble audio RCA (fiches rouge/blanc)
•Câble de contrôle SR
•Antenne cadre AM
•Antenne FM
•Carte de garantie
•Mode d’emploi (ce document)
5
Fr
01 Avant la mise en service
Insertion de la pile
 Attention
Toute utilisation incorrecte des piles peut entraîner des accidents, par exemple une fuite ou une explosion. Respectez les précautions suivantes :
•N’utilisez jamais des piles neuves et des piles usagées ensemble.
•Insérez correctement les pôles positifs et négatifs des piles en suivant les marques du boîtier.
•Des piles de forme identique peuvent présenter des tensions différentes. Utilisez uniquement des piles du même type.
•Lorsque vous vous débarrassez de piles usées, veuillez vous conformer aux réglementations gouvernementales ou environnementales des institutions publiques en vigueur dans votre pays ou votre région.
•AVERTISSEMENT
N’utilisez ni ne conservez les piles sous la lumière directe du soleil ou dans un endroit excessivement chaud, comme une voiture ou à proximité d’un appareil de chauffage. Les piles risqueraient de fuir, de surchauffer, d’exploser ou de s’enflammer. Leur durée de vie ou leur performance pourrait également être réduite.
Installation du syntoniseur
•Lorsque vous installez cet appareil, assurez-vous de le poser sur une surface plane et stable.
Ne pas l’installer aux endroits suivants :
–sur un téléviseur couleur (il pourrait y avoir des interférences sur l’écran)
–près d’un lecteur de cassettes (ou d’un appareil émettant un champ magnétique). Cela pourrait causer des interférences avec le son.
–en plein soleil
–dans des zones humides ou moites
–dans des zones extrêmement chaudes ou froides
–dans des lieux soumis à vibrations ou autres mouvements
–dans des lieux très poussiéreux
–dans des lieux présentant des fumées ou des huiles chaudes (par exemple une cuisine)
6
Fr
Connexions
Chapitre 2 :
Connexions
Raccorder les câbles
Assurez-vous de ne pas plier les câbles audessus de cet appareil (comme indiqué sur l’illustration), car le champ magnétique produit par les transformateurs de l’appareil peuvent créer un grésillement dans les enceintes.
 Important
•Avant d’effectuer ou de modifier toute connexion, éteignez l’appareil et débranchez le cordon d’alimentation de la prise de courant.
02
Connecter les antennes
Connectez l’antenne en boucle AM et l’antenne FM de la manière indiquée sur le schéma (page 8). Pour améliorer la réception et la qualité du son, raccordez des antennes externes1 (Voir Connexion d’antennes externes page 20).
 Remarque
1 Ne pas débrancher l’antenne cadre AM même si vous utilisez une antenne externe AM.
7
Fr

02 Connexions
fig. A |
fig. B |
fig. C |
1 |
2 |
|
3
5
4
Antenne cadre AM
Antenne FM
ANTENNA |
|
LINEOUT |
AC IN |
|
|
|
|
|
|
L |
|
FM |
AM |
CONTROL |
|
UNBAL 75 |
LOOP |
R |
|
|
|
|
|
|
|
IN |
OUT |
1Retirez les gaines protectrices de chacun des fils de l’antenne AM.
2Ouvrez les languettes en poussant, puis insérez entièrement un fil dans chaque borne. Relâchez ensuite les languettes pour fixer les fils de l’antenne AM.
3Fixez l’antenne cadre AM au support intégré.
Pour fixer le support à l’antenne, pliez le cadre dans la direction indiquée par la flèche (fig. A) puis clipsez-le sur le support (fig. B).
•Si vous désirez fixer l’antenne AM à un mur ou sur une autre surface, fixez le support avec des vis (fig. C) avant de clipser le cadre sur le support. Assurez-vous que la réception est bonne.
4Placez l’antenne cadre AM sur une surface plane, tournée dans la direction de la meilleure réception.
Évitez de la mettre en contact avec des objets métalliques et de la placer près d’ordinateurs, de téléviseurs ou d’autres appareils électriques.
5Branchez l’antenne FM1 de la même manière que l’antenne cadre AM.
Pour obtenir les meilleurs résultats, déployez l’antenne FM au maximum et fixez-la à un mur ou à un montant de porte. Ne la laissez pas pendre ou enroulée.
 Remarque
1 Ne pas branchez deux antennes FM en même temps.
8
Fr
 Loading...