

Page 1

Owner’s Manual
HIDE-AWAY NAVIGATION SYSTEM
FOR TRUCKS/CAMPER VANS
AVIC-F160
HIDE-AWAY NAVIGATION SYSTEM
AVIC-F260
For details on software updates,
visit www.naviextras.com.
English
Page 2
2
Engb
Page 3
Contents
Thank you for buying this Pioneer product.
Please read through these instructions so you will know how to operate your model
properly. After you have finished reading the instructions, keep this document in a
safe place for future reference.
Important
! The screens shown in the examples may
differ from actual screens, which may be
changed without notice for performance
and function improvements.
! The screen examples shown in this manual
are the ones for AVIC-F160. If you use a different model, the screens that appear may
differ from the examples in the manual.
Precaution
Introduction
Licence agreement 7
– PIONEER AVIC-F160, AVIC-F260 7
– END USER LICENSE AGREEMENT 9
About the data for the map database 11
Important safety information 11
– Fuel cost management 13
– Traffic information 13
– Speed limit indication 13
– Lorry navigation 13
Additional safety information 13
– To avoid battery exhaustion 13
– Handling the SD card slot 13
Notes before using the system 14
– In case of trouble 14
– Visit our website 14
– About this product 14
Checking part names and functions 14
Inserting an SD memory card 14
Resetting the microprocessor 15
Before you start
On first-time startup 16
Regular startup 17
How to use the navigation menu screens
Screen switching overview 18
What you can do on each menu 19
Operating list screens (e.g. route settings
screen) 19
Operating the on-screen keyboard 19
Monitoring the GPS reception quality 20
How to use the map
How to read the map screen 21
Frequently shown route events 22
Seeing the current position on the map 22
– Checking the detailed information
about the current position 23
Browsing the data field 24
Display during motorway driving 24
Operating the map screen 25
– Changing the scale of the map 25
– Smart Zoom 25
– Switching the map orientation 25
– Changing the view angle of the
map 26
– Switching the map between 2D and
3D 26
– Scrolling the map to the position you
want to see 27
– Viewing information about a specified
location 27
Searching for and selecting a location
Searching for a location by address 28
Searching for a location by entering the
midpoint of a street 29
Searching for a location by entering the city/
town centre 29
Finding the location by specifying the
postcode 29
Searching for Points of Interest (POI) 30
– Searching for POIs using “Quick
Search” 30
Engb
3
Page 4

Contents
– Searching for POIs using preset
categories 31
Searching for POIs by categories 31
Searching for a POI directly from the name of
the facilities 33
Searching for a nearby POI 34
Selecting a location by using “Find on
Map” 34
Selecting destination from stored
locations 35
Selecting a location you searched for
recently 36
– Smart History 36
– History 36
Searching for a location by coordinates 36
Searching for a location by scrolling the
map 37
After the location is decided
Setting a route to your destination 38
– Setting a route using a searched
location 38
– Checking route alternatives when
planning the route 38
– Setting a route using the “My Route”
menu 39
Checking and modifying the current
route
Displaying the route overview 41
Checking route parameters and accessing
route related functions 41
Modifying the route calculation
conditions 41
– Changing the vehicle used 41
– Setting the vehicle parameters 42
– Setting the route calculation 44
– Changing road types used 44
Setting the waiting time at waypoints 45
Setting driving time alerts 46
Modifying the route 46
– Selecting a new destination when a
route is already set 47
– Setting a new starting position for the
route 47
Editing the list of destinations 48
Cancelling the current route guidance 48
Checking route alternatives for the current
route 49
Watching the simulation of the route 49
Navigating in off-road mode 50
Registering and editing locations
Storing a location in “Favourites” 51
Saving a location as an alert point 51
Editing an alert point 52
Using traffic information
Checking historical traffic information 53
Receiving real-time traffic information
(TMC) 53
– Checking the traffic incidents on the
map 54
Customising preferences
Displaying the settings screen 55
Setting the volume and the guidance voice
for navigation system 55
Customising the quick menu 56
Setting the traffic information 57
Setting the user profiles 58
Customising the map screen settings 58
Setting the visual guidance 59
Customising the display settings 60
Customising the regional settings 61
Setting the Trip Monitor 61
Starting the configuration wizard 61
Resetting to the default settings 62
4
Engb
Page 5

Contents
Other operations
More menu 63
Installation
Important safeguards 64
Precautions before connecting the
system 64
Before installing this product 65
To prevent damage 65
Precautions before installation 66
Connecting the system 67
Installing with the hook and loop
fastener 68
Appendix
Positioning technology 69
– Positioning by GPS 69
Handling large errors 69
– When positioning by GPS is
impossible 69
– Conditions likely to cause noticeable
positioning errors 69
Route setting information 71
– Route search specifications 71
SD and SDHC logo 72
Display information 73
Glossary 74
Specifications 75
Engb
5
Page 6
Chapter
01
Precaution
Certain country and government laws may prohibit or restrict the placement and use of this
system in your vehicle. Please comply with all
applicable laws and regulations regarding the
use, installation and operation of your navigation system.
If you want to dispose this product, do not mix
it with general household waste. There is a separate collection system for used electronic
products in accordance with legislation that requires proper treatment, recovery and recycling.
Private households in the member states of
the EU, in Switzerland and Norway may return
their used electronic products free of charge
to designated collection facilities or to a retailer (if you purchase a similar new one). For
countries not mentioned above, please contact your local authorities for the correct method of disposal. By doing so you will ensure
that your disposed product undergoes the necessary treatment, recovery and recycling and
thus prevent potential negative effects on the
environment and human health.
6
Engb
Page 7

Introduction
Chapter
02
Licence agreement
PIONEER AVIC-F160, AVIC-F260
THIS IS A LEGAL AGREEMENT BETWEEN
YOU, AS THE END USER, AND PIONEER
CORP. (JAPAN) (“PIONEER”). PLEASE READ
THE TERMS AND CONDITIONS OF THIS
AGREEMENT CAREFULLY BEFORE USING
THE SOFTWARE INSTALLED ON THE
PIONEER PRODUCTS. BY USING THE SOFTWARE INSTALLED ON THE PIONEER PRODUCTS, YOU AGREE TO BE BOUND BY THE
TERMS OF THIS AGREEMENT. THE SOFTWARE INCLUDES A DATABASE LICENCED BY
THIRD PARTY SUPPLIER(S) (“SUPPLIERS”),
AND YOUR USE OF THE DATABASE IS COVERED BY THE SUPPLIERS’ SEPARATE
TERMS, WHICH ARE ATTACHED TO THIS
AGREEMENT (refer to page 9). IF YOU DO NOT
AGREE WITH ALL OF THESE TERMS, PLEASE
RETURN THE PIONEER PRODUCTS (INCLUDING THE SOFTWARE, AND ANY WRITTEN MATERIALS) WITHIN FIVE (5) DAYS OF RECEIPT
OF THE PRODUCTS, TO THE AUTHORISED
PIONEER DEALER FROM WHICH YOU PURCHASED THEM.
1 GRANT OF LICENCE
Pioneer grants to you a non-transferable, nonexclusive licence to use the software installed
on the Pioneer products (the “Software”) and
the related documentation solely for your own
personal use or for internal use by your business, only on such Pioneer products.
You shall not copy, reverse engineer, translate,
port, modify or make derivative works of the
Software. You shall not loan, rent, disclose,
publish, sell, assign, lease, sublicence, market
or otherwise transfer the Software or use it in
any manner not expressly authorised by this
agreement. You shall not derive or attempt to
derive the source code or structure of all or
any portion of the Software by reverse engineering, disassembly, decompilation, or any
other means. You shall not use the Software to
operate a service bureau or for any other use
involving the processing of data for other persons or entities.
Pioneer and its licensor(s) shall retain all copyright, trade secret, patent and other proprietary ownership rights in the Software. The
Software is copyrighted and may not be copied, even if modified or merged with other products. You shall not alter or remove any
copyright notice or proprietary legend contained in or on the Software.
You may transfer all of your licence rights in
the Software, the related documentation and a
copy of this Licence Agreement to another
party, provided that the party reads and agrees
to accept the terms and conditions of this Licence Agreement.
2 DISCLAIMER OF WARRANTY
The Software and related documentation are
provided to you “AS IS”. PIONEER AND ITS LICENSOR(S) (for the purpose of provisions 2
and 3, Pioneer and its licensor(s) shall be collectively referred to as “Pioneer”) MAKES AND
YOU RECEIVE NO WARRANTY, WHETHER EXPRESS OR IMPLIED, AND ALL WARRANTIES
OF MERCHANTABILITY AND FITNESS FOR
ANY PARTICULAR PURPOSE ARE EXPRESSLY EXCLUDED. SOME COUNTRIES DO
NOT ALLOW EXCLUSION OF IMPLIED WARRANTIES, SO THE ABOVE EXCLUSION MAY
NOT APPLY TO YOU. The Software is complex
and may contain some nonconformities, defects or errors. Pioneer does not warrant that
the Software will meet your needs or expectations, that operation of the Software will be
error free or uninterrupted, or that all nonconformities can or will be corrected. Furthermore, Pioneer does not make any
representations or warranties regarding the
use or results of the use of the Software in
terms of its accuracy, reliability or otherwise.
Introduction
Engb
7
Page 8

Chapter
02
Introduction
3 LIMITATION OF LIABILITY
IN NO EVENT SHALL PIONEER BE LIABLE
FOR ANY DAMAGES, CLAIM OR LOSS INCURRED BY YOU (INCLUDING, WITHOUT LIMITATION, COMPENSATORY, INCIDENTAL,
INDIRECT, SPECIAL, CONSEQUENTIAL, OR
EXEMPLARY DAMAGES, LOST PROFITS, LOST
SALES OR BUSINESS, EXPENDITURES, INVESTMENTS, OR COMMITMENTS IN CONNECTION WITH ANY BUSINESS, LOSS OF
ANY GOODWILL, OR DAMAGES) RESULTING
FROM THE USE OF OR INABILITY TO USE
THE SOFTWARE, EVEN IF PIONEER HAS
BEEN INFORMED OF, KNEW OF, OR SHOULD
HAVE KNOWN OF THE LIKELIHOOD OF
SUCH DAMAGES. THIS LIMITATION APPLIES
TO ALL CAUSES OF ACTION IN THE AGGREGATE, INCLUDING WITHOUT LIMITATION
BREACH OF CONTRACT, BREACH OF WARRANTY, NEGLIGENCE, STRICT LIABILITY, MISREPRESENTATION, AND OTHER TORTS. IF
PIONEER’S WARRANTY DISCLAIMER OR
LIMITATION OF LIABILITY SET FORTH IN THIS
AGREEMENT SHALL OR FOR ANY REASON
WHATSOEVER BE HELD UNENFORCEABLE
OR INAPPLICABLE, YOU AGREE THAT
PIONEER’S LIABILITY SHALL NOT EXCEED
FIFTY PERCENT (50 %) OF THE PRICE PAID BY
YOU FOR THE ENCLOSED PIONEER PRODUCT.
Some countries do not allow the exclusion or
limitation of incidental or consequential damages, so the above limitation or exclusion
may not apply to you. This warranty disclaimer
and limitation of liability shall not be applicable to the extent that any provision of this
warranty is prohibited by any country or local
law which cannot be pre-empted.
laws and regulations of the Government. If the
Software has been rightfully obtained by you
outside of the Country, you agree that you will
not re-export the Software nor any other technical data received from Pioneer, nor the direct product thereof, except as permitted by
the laws and regulations of the Government
and the laws and regulations of the jurisdiction in which you obtained the Software.
5 TERMINATION
This Agreement is effective until terminated.
You may terminate it at any time by destroying
the Software. The Agreement also will terminate if you do not comply with any terms or
conditions of this Agreement. Upon such termination, you agree to destroy the Software.
6 MISCELLANEOUS
This is the entire Agreement between Pioneer
and you regarding its subject matter. No
change in this Agreement shall be effective
unless agreed to in writing by Pioneer. If any
provision of this Agreement is declared invalid
or unenforceable, the remaining provisions of
this Agreement shall remain in full force and
effect.
4 EXPORT LAW ASSURANCES
You agree and certify that neither the Software
nor any other technical data received from
Pioneer, nor the direct product thereof, will be
exported outside the country or district (the
“Country”) governed by the government having
jurisdiction over you (the “Government”) except as authorised and as permitted by the
8
Engb
Page 9

T
Y
T
T
Introduction
END USER LICENSE AGREEMENT
PLEASE READ THIS END USER LICENSE
AGREEMENT CAREFUL BEFORE USING THE
HERE DATABASE
NOTICE TO THE USER
HIS IS A LICENSE AGREEMENT - AND NOT AN
AGREEMENT FOR SALE - BETWEEN YOU AND HERE
B.V. FOR YOUR COPY OF THE HERE NAVIGABLE MAP
DATABASE, INCLUDING ASSOCIATED COMPUTER
SOFTWARE, MEDIA AND EXPLANATORY PRINTED
DOCUMENTATION PUBLISHED BY HERE (JOINTLY “THE
DATABASE”). BY USING THE DATABASE, YOU ACCEPT
AND AGREE TO ALL TERMS AND CONDITIONS OF THIS
END USER LICENSE AGREEMENT (“AGREEMENT”).
IF YOU DO NOT AGREE TO THE TERMS OF THIS
AGREEMENT, PROMPTLY RETURN THE DATABASE,
ALONG WITH ALL OTHER ACCOMPANYING ITEMS, TO
OUR SUPPLIER FOR A REFUND.
OWNERSHIP
he Database and the copyrights and intellectual
property or neighboring rights therein are owned by
HERE or its licensors. Ownership of the media on
which the Database is contained is retained by HERE
and/or your supplier until after you have paid in full any
amounts due to HERE and/or your supplier pursuant
to this Agreement or similar agreement(s) under which
goods are provided to you.
LICENSE GRANT
HERE grants you a non-exclusive license to use the
Database for your personal use or, if applicable, for use
in your business’ internal operations. This license does
not include the right to grant sub-licenses.
LIMITATIONS ON USE
he Database is restricted for use in the specific
system for which it was created. Except to the extent
explicitly permitted by mandatory laws (e.g. national
laws based on the European Software Directive
(91/250) and the Database Directive (96/9)), you may
not extract or reutilize substantial parts of the contents
of the Database nor reproduce, copy, modify, adapt,
translate, disassemble, decompile, reverse engineer
any portion of the Database. If you wish to obtain
interoperability information as meant in (the national
laws based on) the European Software Directive, you
shall grant HERE reasonable opportunity to provide
said information on reasonable terms, including costs,
to be determined by HERE.
TRANSFER OF LICENSE
You may not transfer the Database to third parties,
except when installed in the system for which it was
created or when you do not retain any copy of the
Database, and provided that the transferee agrees
to all terms and conditions of this Agreement and
confirms this in writing to HERE. Multi-disc sets
may only be transferred or sold as a complete set as
provided by HERE and not as subset thereof.
LIMITED WARRANTY
HERE warrants that, subject to the warnings set out
below, for a period of 12 months after acquisition of
your copy of the Database, it will perform substantially
in accordance with HERE’s Criteria for Accuracy and
Completeness existing on the date you acquired the
Database; these criteria are available from HERE
at your request. If the Database does not perform
in accordance with this limited warranty, HERE
will use reasonable efforts to repair or replace your
non-conforming copy of the Database. If these
efforts do not lead to performance of the Database in
accordance with the warranties set out herein, you will
have the option to either receive a reasonable refund
of the price you paid for the Database or to rescind this
Agreement. This shall be HERE’s entire liability and
your sole remedy against HERE. Except as expressly
provided in this section, HERE does not warrant nor
make any representations regarding the use of results
of the use of the Database in terms of its correctness,
accuracy, reliability, or otherwise. HERE does not
warrant that the Database is or will be error free.
No oral or written information or advice provided by
HERE, your supplier or any other person shall create
a warranty or in any way increase the scope of the
limited warranty described above. The limited warranty
set forth in this Agreement does not affect or prejudice
any statutory legal rights that you may have under the
legal warranty against hidden defects.
If you did not acquire the Database from HERE
directly, you may have statutory rights against the
person from whom you have acquired the Database
in addition to the rights granted by HERE hereunder
according to the law of your jurisdiction. The above
warranty of HERE shall not affect such statutory rights
and you may assert such rights in addition to the
warranty rights granted herein.
Chapter
02
Introduction
Engb
9
Page 10
Chapter
02
Introduction
10
Engb
Page 11

Introduction
Chapter
02
About the data for the map
database
! Modifications related to roads, streets/high-
ways, terrain, construction and other things
before/during the development period may
not be reflected in this database. Inevitably,
those modifications after that period are
not reflected in this database.
! Regardless of existing and newly-built
things, the data may be different from the
actual condition.
! For details about the map coverage of this
navigation system, refer to the information
on our website.
! It is strictly prohibited to reproduce and use
any part or the whole of this map in any
form without permission from the copyright
owner.
! If the local traffic regulations or conditions
deviate from this data, follow the local traf-
fic regulations (such as signs, indications,
etc.) and conditions (such as construction,
weather, etc.).
! The traffic regulation data used in the map
database applies only to standard sized
passenger vehicles. Note that regulations
for larger vehicles, motorbikes, and other
non-standard vehicles are not included in
the database.
! © 1987-2013 HERE. All rights reserved.
Important safety information
WARNING
! Do not attempt to install or service this pro-
duct by yourself. Installation or servicing of
this product by persons without training and
experience in electronic equipment and automotive accessories may be dangerous and
could expose you to the risk of electric shock,
injury or other hazards.
! If liquid or foreign matter should get inside
this navigation system, park your vehicle to
safe place and turn the ignition switch off
(ACC OFF) immediately and consult your dealer or the nearest authorised Pioneer Service
Station. Do not use the navigation system in
this condition because doing so may result in
a fire, electric shock, or other failure.
! If you notice smoke, a strange noise or odour
from the navigation system, or any other abnormal signs on the LCD screen, turn off the
power immediately and consult your dealer or
the nearest authorised Pioneer Service Station. Using this navigation system in this condition may result in permanent damage to the
system.
! Do not disassemble or modify this navigation
system, as there are high-voltage components
inside which may cause an electric shock. Be
sure to consult your dealer or the nearest
authorised Pioneer Service Station for internal
inspection, adjustments or repairs.
! Do not allow this product to come into contact
with liquids. Electrical shock could result.
Also, damage to the product, smoke, and overheating could result from contact with liquids.
Introduction
! For copyright of contents, please check the
About window in the software.
= For details, refer to More menu on page
63.
Engb
11
Page 12

Chapter
02
Introduction
CAUTION
When a route is calculated, the route and voice
guidance for the route are automatically set.
Also, for day or time traffic regulations, only information about traffic regulations applicable at the
time when the route was calculated is considered. One-way streets and street closures may
not be taken into consideration. For example, if a
street is open during the morning only, but you
arrive later, it would be against the traffic regulations so you cannot drive along the set route.
When driving, please follow the actual traffic
signs. Also, the system may not know some traffic regulations.
Before using your navigation system, be sure
to read and fully understand the following
safety information:
! Read the entire manual before operating
this navigation system.
! This navigation system may in certain cir-
cumstances display inaccurate position of
your vehicle, the distance of objects shown
on the screen, and compass directions. In
addition, the system has certain limitations, including the inability to identify oneway streets, temporary traffic restrictions
and potentially unsafe driving areas. Please
exercise your own judgement in the light of
actual driving conditions.
! The navigation features of your navigation
system (and rear view camera option if purchased) are intended solely as an aid to
you in the operation of your vehicle. It is
not a substitute for your attentiveness, judgement, and care when driving.
! Certain country and government laws may
prohibit or restrict the placement and use
of this system in your vehicle. Please comply with all applicable laws and regulations
regarding the use, installation and operation of your navigation system.
! Do not operate this navigation system (or
the rear view camera option if purchased) if
doing so will divert your attention in any
way from the safe operation of your vehicle.
Always observe safe driving rules and fol-
low all existing traffic regulations. If you experience difficulty in operating the system
or reading the display, park your vehicle in
a safe location and apply the handbrake before making the necessary adjustments.
! Never allow others to use the system un-
less they have read and understood the operating instructions.
! Never use this navigation system to route
to hospitals, police stations or similar facilities in an emergency. Stop using any functions relating to the hands-free phoning
and please call the appropriate emergency
number.
! Route and guidance information displayed
by this equipment is for reference purposes
only. It may not accurately reflect the latest
permissible routes, road conditions, one
way streets, road closures, or traffic restrictions.
! Traffic restrictions and advisories currently
in force should always take precedence
over guidance given by the navigation system. Always obey current traffic restrictions, even if the navigation system
provides contrary advice.
! Failure to set correct information about the
local time may result in the navigation system providing improper routing and guidance instructions.
! Never set the volume of your navigation
system so high that you cannot hear outside traffic and emergency vehicles.
! The data encoded in the built-in memory is
the intellectual property of the provider, and
the provider is responsible for such content.
! Keep this manual handy as a reference for
operating procedures and safety information.
! Pay close attention to all warnings in this
manual and follow the instructions carefully.
! Please remember to wear your seat belt at
all times while operating your vehicle. If
you are in an accident, your injuries can be
considerably more severe if your seat belt
is not properly fastened.
12
Engb
Page 13
Introduction
Chapter
02
! Never use headphones while driving.
Fuel cost management
These calculations are based only on the information that you provide and not on any data
from the vehicle. The fuel mileage displayed is
only a reference value, and does not guarantee
the fuel mileage displayed can be obtained.
Traffic information
! Pioneer does not bear responsibility for the
accuracy of the information transmitted.
! Pioneer does not bear responsibility for
changes to information services provided
by broadcasting stations or by related com-
panies, such as cancellation of services or
changing to pay-services. Also, we do not
accept return of the product for this rea-
son.
Speed limit indication
The speed limit is based on the map database.
The speed limit in the database may not
match the actual speed limit of the current
road. This is not a definite value. Be sure to
drive according to the actual speed limit.
Lorry navigation
p This function is only available on AVIC-
F160.
! Based on the dimensions and other en-
tered parameters of your vehicle, this sys-
tem warns you when you are approaching
a restricted road segment or such roads
must be used in your route.
! Warnings are both visual and audible.
There are different kinds of warnings:
! When approaching a restricted road
segment without a route, you are
warned that there is a restricted area
ahead.
! Restricted road segments are excluded
from your routes but in some cases
some restricted roads need to be used
to reach the given destination. In this
case you receive a warning and you
must accept that you have restricted
roads in your route or you can stop the
navigation and continue without an active route.
p Please note that lorry navigation is only as
accurate and comprehensive as the restrictions received with the map. Restrictions
may not cover lower priority roads and in
most cases the coverage changes as you
move around your map region. You are obliged to always obey the restrictions displayed on the road.
Additional safety information
To avoid battery exhaustion
Be sure to run the vehicle engine while using
this product. Using this product without running the engine can drain the battery.
WARNING
Do not install this product in a vehicle that does
not have an ACC wire or circuitry available.
Handling the SD card slot
The SD memory card and SDHC memory card
are collectively referred to as the “SD memory
card”.
CAUTION
! Keep the SD memory card out of the reach of
small children to prevent them from accidentally swallowing it.
! Ejecting an SD memory card during data
transfer can damage the SD memory card. Be
sure to eject the SD memory card by the procedure described in this manual.
! To prevent data loss and damage to the sto-
rage device, never remove it from this navigation system while data is being transferred.
Introduction
Engb
13
Page 14
Chapter
02
Introduction
! If data loss or corruption occurs on the sto-
rage device for any reason, it is usually not
possible to recover the data. Pioneer accepts
no liability for damages, costs or expenses
arising from data loss or corruption.
! Never insert or eject an SD memory card
while driving.
! Do not insert anything other than SD memory
cards into the SD card slot.
Notes before using the system
In case of trouble
Should the navigation system fail to operate
properly, contact your dealer or nearest
authorised Pioneer Service Station.
Visit our website
Visit us at the following site:
http://www.pioneer.eu
! Register your product. We will keep the de-
tails of your purchase on file to help you
refer to this information in the event of an
insurance claim such as loss or theft.
! We offer the latest information about
PIONEER CORPORATION on our website.
About this product
This navigation system does not work correctly
in areas other than Europe. The RDS (Radio
Data System) function operates only in areas
with FM stations broadcasting RDS signals.
The RDS-TMC service can also be used in the
area where there is a station that broadcasts
the RDS-TMC signal.
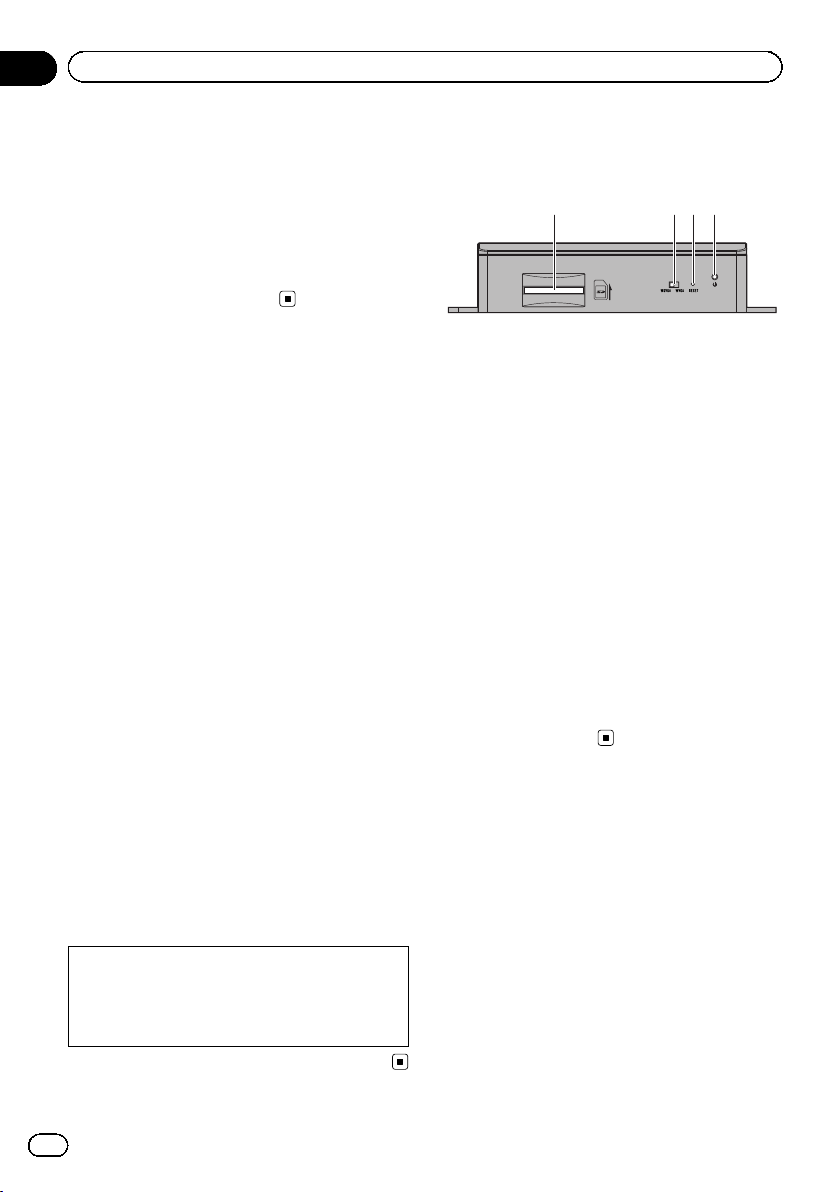
Checking part names and
functions
3 421
1 SD card slot
p An SD memory card containing map
data is inserted at the factory.
p Do not erase the map data stored on the
SD memory card (inserted at the factory).
Without the data, the navigation function
is disabled.
2 Video output selector switch
The switch is used to change the resolution
of video output to the AV receiver.
! When the switch is set to the left,
WQVGA video is output.
! When the switch is set to the right,
WVGA video is output.
3 Reset button
= For details, refer to Resetting the micro-
processor on page 15.
4 Power indicator
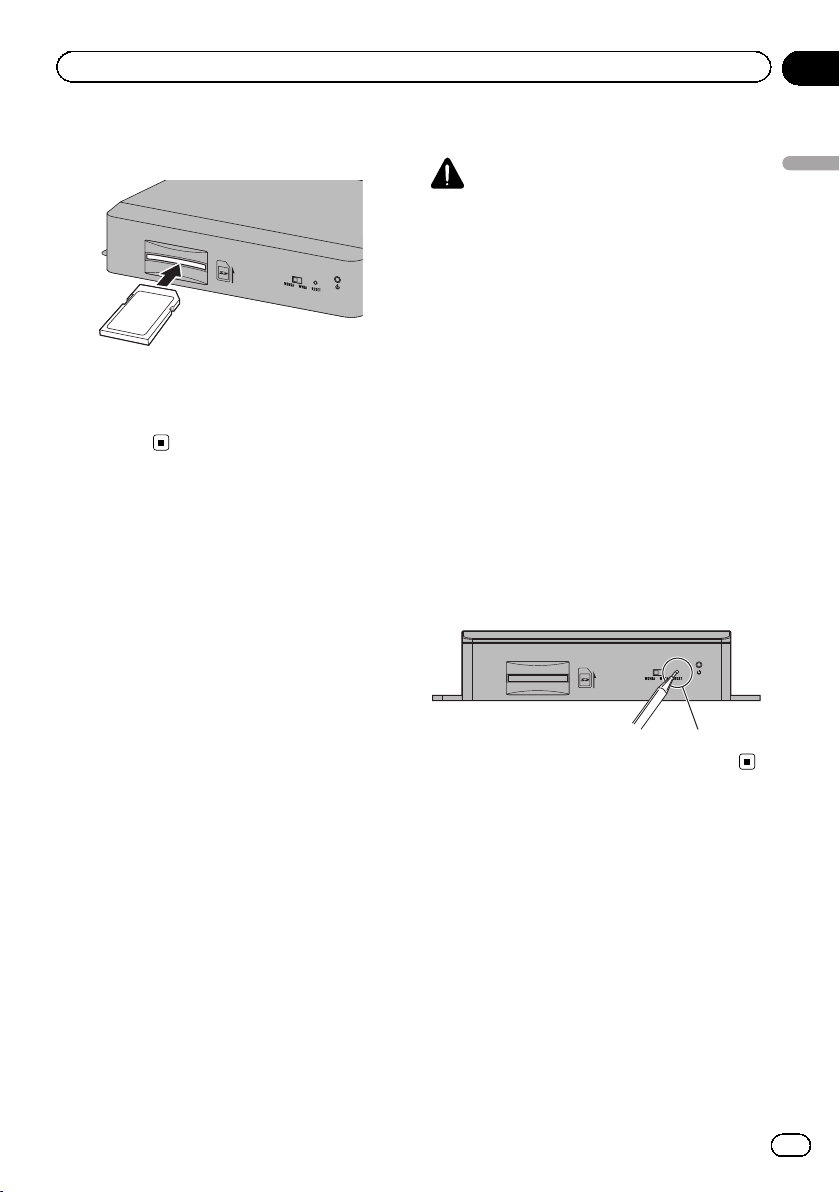
Inserting an SD memory card
p The included SD memory card must be in-
serted into the SD card slot for prior to
using the AVIC-F160 or AVIC-F260 for the
first time.
The names of private corporations, products and other entities described in this
product are the registered trademarks or
trademarks of their respective firms.
14
Engb
Page 15
Introduction
Chapter
02
1 Insert an SD memory card into the SD
card slot.
2 Gently press the card in against the
spring latch until it stops, then release.
The card will lock firmly into place inside the
SD card slot.
Resetting the microprocessor
CAUTION
Please refer to the related section before clearing.
The microprocessor should be reset under the
following conditions:
! Prior to using this product for the first time
after installation.
! If this product fails to operate properly.
! If there appears to be problems with the op-
eration of the system.
! When changing the combination of equip-
ment.
! When adding/removing additional pro-
ducts that connect to the navigation system.
! If your vehicle position is shown on the
map with a significant positioning error.
% Press the reset button on this product
with a pointed object such as the tip of a
pen.
Introduction
Reset button
Engb
15
Page 16
Chapter
03
Before you start
On first-time startup
When you use the navigation system for the
first time, an initial setup process starts automatically. Follow the steps below.
1 Start the engine to boot up the system.
2 Wait approximately 10 seconds, and
then press the MODE button of the AV receiver.
After a short pause, the navigation splash
screen appears.
3 Set the video output selector switch according to your AV receiver.
p If the screen remains black after pressing
the MODE button of the AV receiver, set the
switch to the other side.
= For details, refer to Checking part names
and functions on page 14.
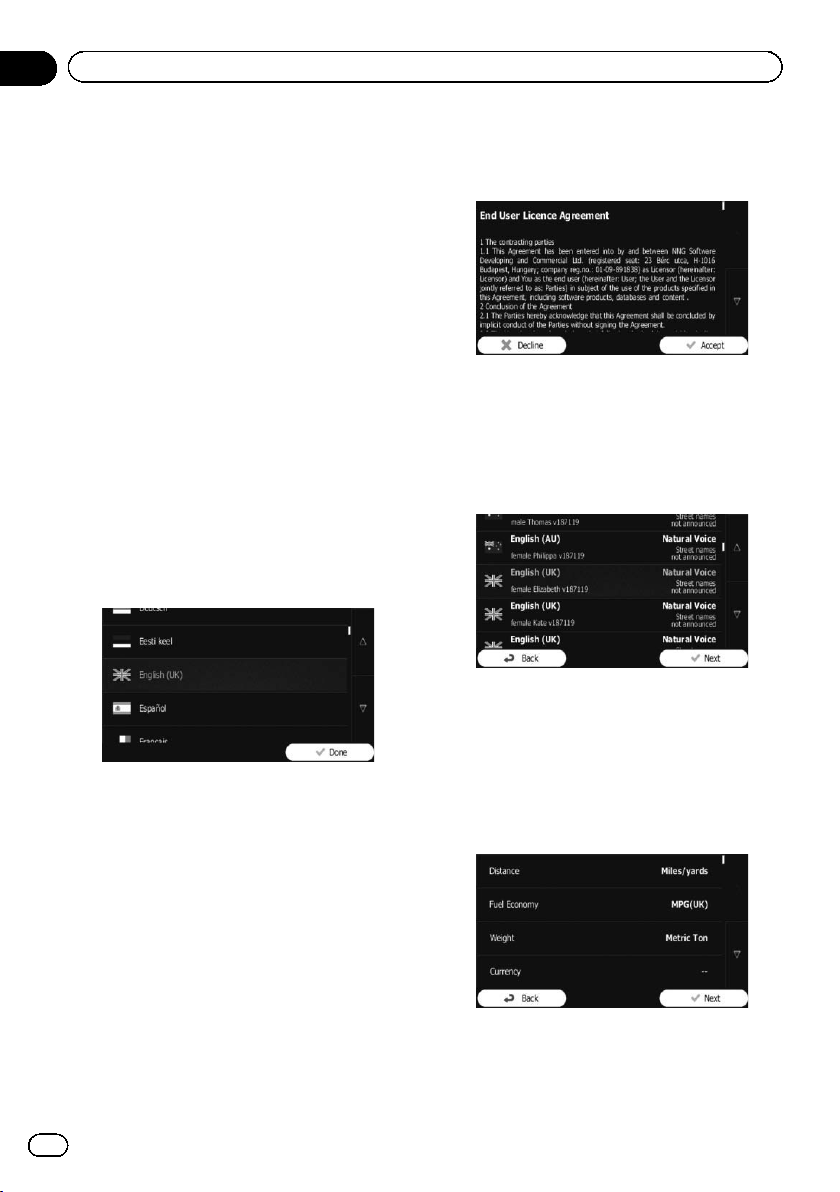
4 Select the language that you want to
use on the screen, then touch [Done].
p Later you can change it in “Regional” set-
tings.
= For details, refer to Customising the regional
settings on page 61.
The navigation system will restart and the
“End User Licence Agreement” screen is displayed.
5 Read the terms carefully, checking its
details, and then touch [Accept] if you
agree to the conditions.
The configuration wizard starts.
6 Touch [Next] to continue.
7 Select the language that you want to
use for voice guidance messages, then
touch [Next].
p Later you can change it in “Sound and
Warnings” settings.
= For details, refer to Setting the volume and
the guidance voice for navigation system on
page 55.
8 If needed, modify the time format and
unit settings, then touch [Next].
16
p Later you can change it in “Regional” set-
tings.
= For details, refer to Customising the regional
settings on page 61.
Engb
Page 17
Before you start
Chapter
03
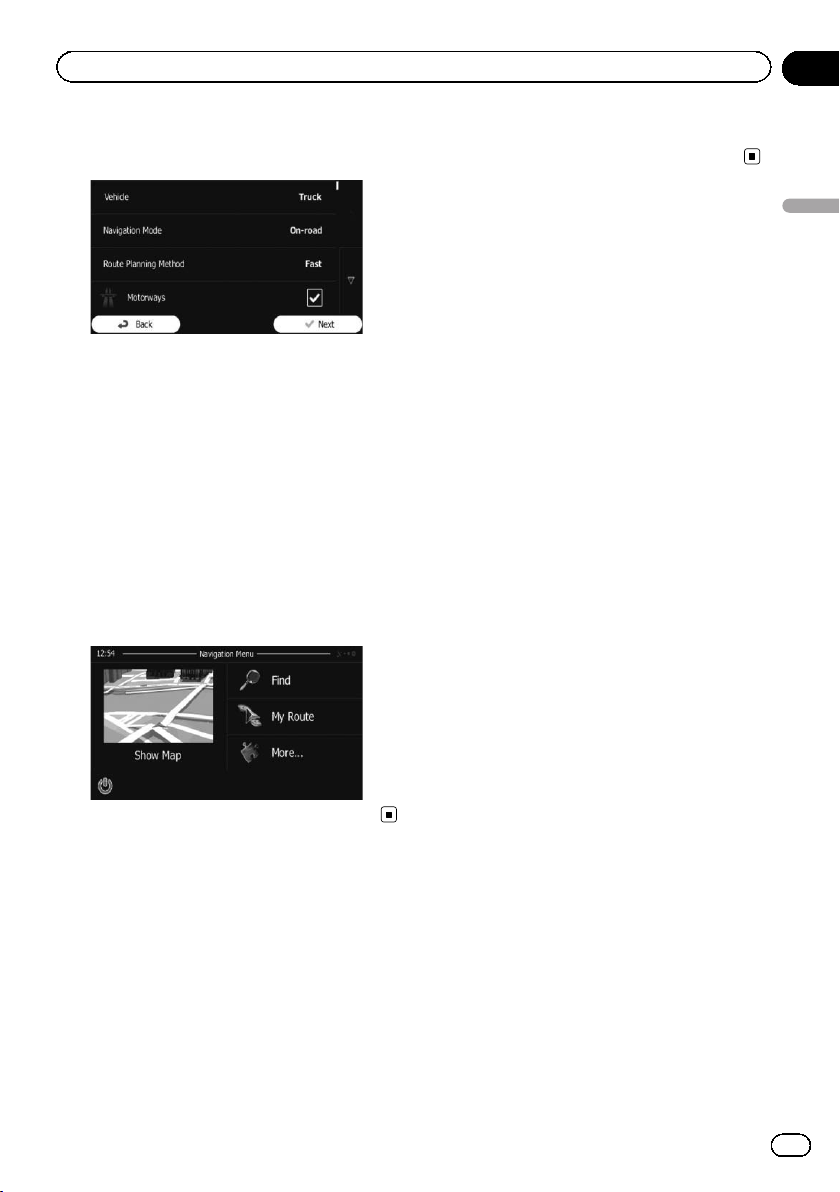
9 If needed, modify the default route
planning options, then touch [Next].
p Later you can change them in “Route Set-
tings”.
= For details, refer to Modifying the route cal-
culation conditions on page 41.
p You can restart the configuration wizard
later from the “Settings” menu.
= For details, refer to Starting the configuration
wizard on page 61.
10 Touch [Finish].
The initial setup is now complete.
After touching [Finish], the “Navigation
Menu” screen appears and you can start
using the navigation system.
wait (approximately 10 seconds) after restart before pressing the MODE button.
Before you start
Regular startup
1 Start the engine to boot up the system.
2 Press the MODE button of the AV receiver.
After a short pause, the navigation screen appears.
p The display will turn off if you press the
MODE button of the AV receiver immediately after the navigation system restarts, so
Engb
17
Page 18
Chapter
04
How to use the navigation menu screens
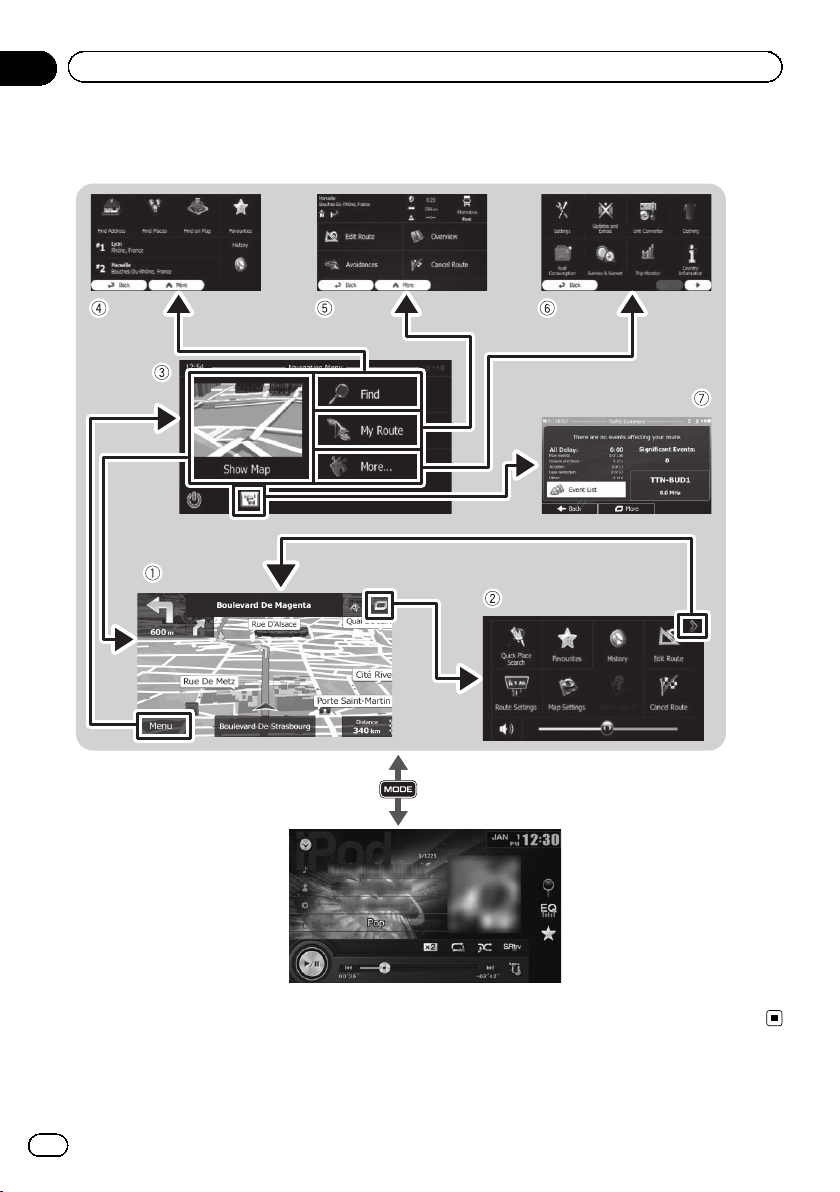
Screen switching overview
Navigation screen
18
Press the MODE button of the AV receiver.
AV receiver screen (e.g. AVH-X2600BT)
Engb
Page 19
How to use the navigation menu screens
Chapter
04
What you can do on each
menu
1 Map screen
Touch [Show Map] on the “Navigation
Menu” screen.
2 Quick menu
Registering your favourite menu items in
shortcuts allows you to quickly jump to the re-
gistered menu screen by a simple touch on
the quick menu screen. The master volume
slider at the bottom of the screen adjusts the
sound volume of the device. All sounds of this
system are affected.
p You can customise the menu options.
= For details, refer to Customising the
quick menu on page 56.
3 “Navigation Menu” screen
Touch [Menu] on the map screen to display
the “Navigation Menu” screen.
This is the starting menu to access the desired
screens and operate the various functions.
4 “Find” menu
You can search for your destination on this
menu.
Other features include useful functions to
support your navigation.
5 “My Route” menu
You can display your route information on the
map. You can also perform route-related ac-
tions such as editing or cancelling your route
on this menu.
6 “More...” menu
You can customise the way the navigation sys-
tem works, to simulate demo routes or to run
some additional applications.
7 Traffic summary screen
You can check the summary of traffic events
on the set route.
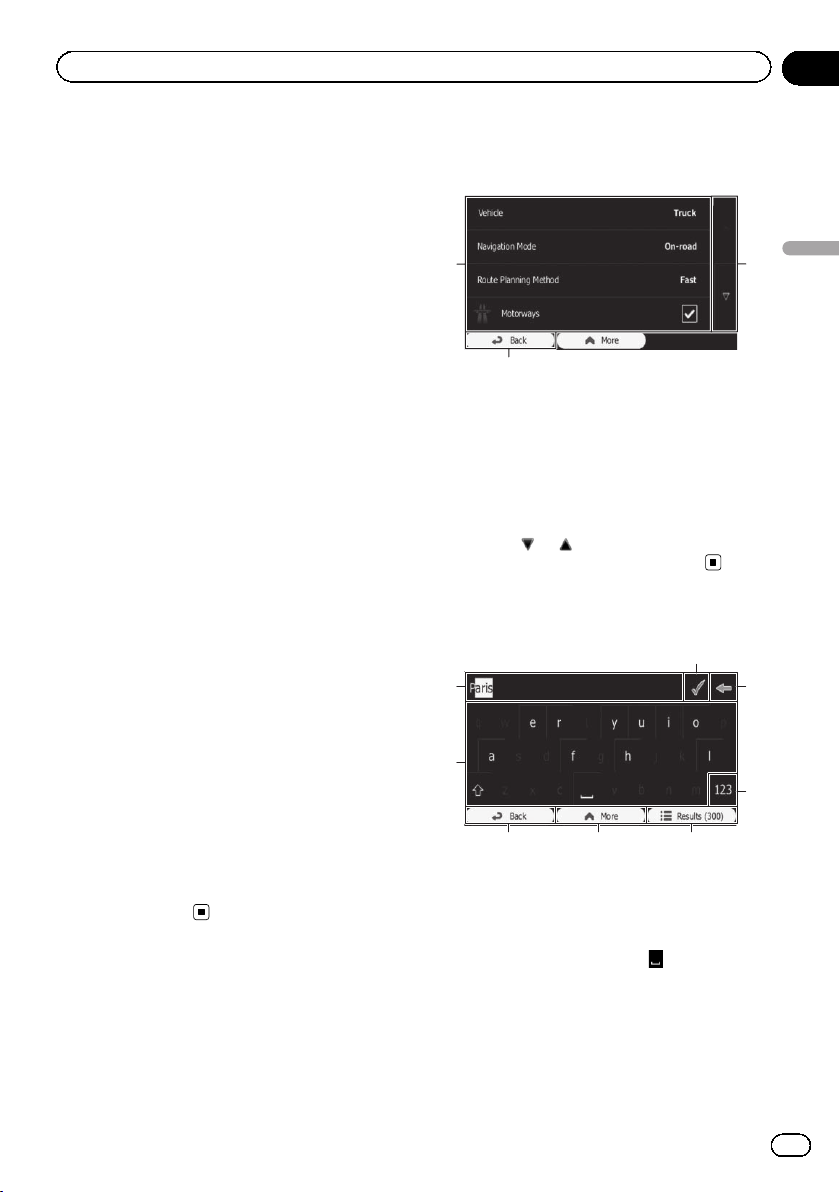
Operating list screens (e.g.
route settings screen)
1
2
1 Listed items
Touching an item on the list allows you to narrow down the options and proceed to the next
operation.
2 Back
The previous screen returns. Touching and
holding [Back] returns to the map screen.
3 Touching
you to see the next or previous page.
or on the right of screen allows
Operating the on-screen
keyboard
8
1
2
345
1 Text box
Displays the characters that are entered.
2 Keyboard
Touch the keys to enter the characters.
p To enter a space, touch at the bottom
centre of the screen.
How to use the navigation menu screens
3
7
6
Engb
19
Page 20

Chapter
04
How to use the navigation menu screens
p When entering text, the first character
appears in upper case while the rest of
the text is in lower case. Touch
enter an upper case letter or touch
twice to turn on Caps Lock. Touch again
and lower case letters return.
3 Back
The previous screen returns. Touching and
holding [Back] returns to the map screen.
4 More
Touching [More] switches to another keyboard layout, for example from an English keyboard to a Greek keyboard.
5 Results
Touch to finalise the keyboard entry (open the
list of search results).
If the desired name does not show up, the
names that match the string appear in a list
after entering a couple of characters (to open
the list of results before it appears automatically, touch [Results]).
6
Touch to switch to a keyboard offering numeric and symbol characters.
7
Touch to correct your entry on the keyboard.
Touching and holding
acters or the entire input string.
8
Touch to finalise the keyboard entry (accept
the suggested search result).
deletes several char-
to
Monitoring the GPS
reception quality
In the top right corner, the GPS reception quality icon shows the current accuracy of the position information.
Indicator Meaning
: GPS navigation possible
: Insufficient GPS navigation
: GPS navigation not possible
: No connection to GPS receiver
20
Engb
Page 21
How to use the map
Most of the information provided by your navigation system can be seen on the map. You need to become familiar with how information appears on the map.
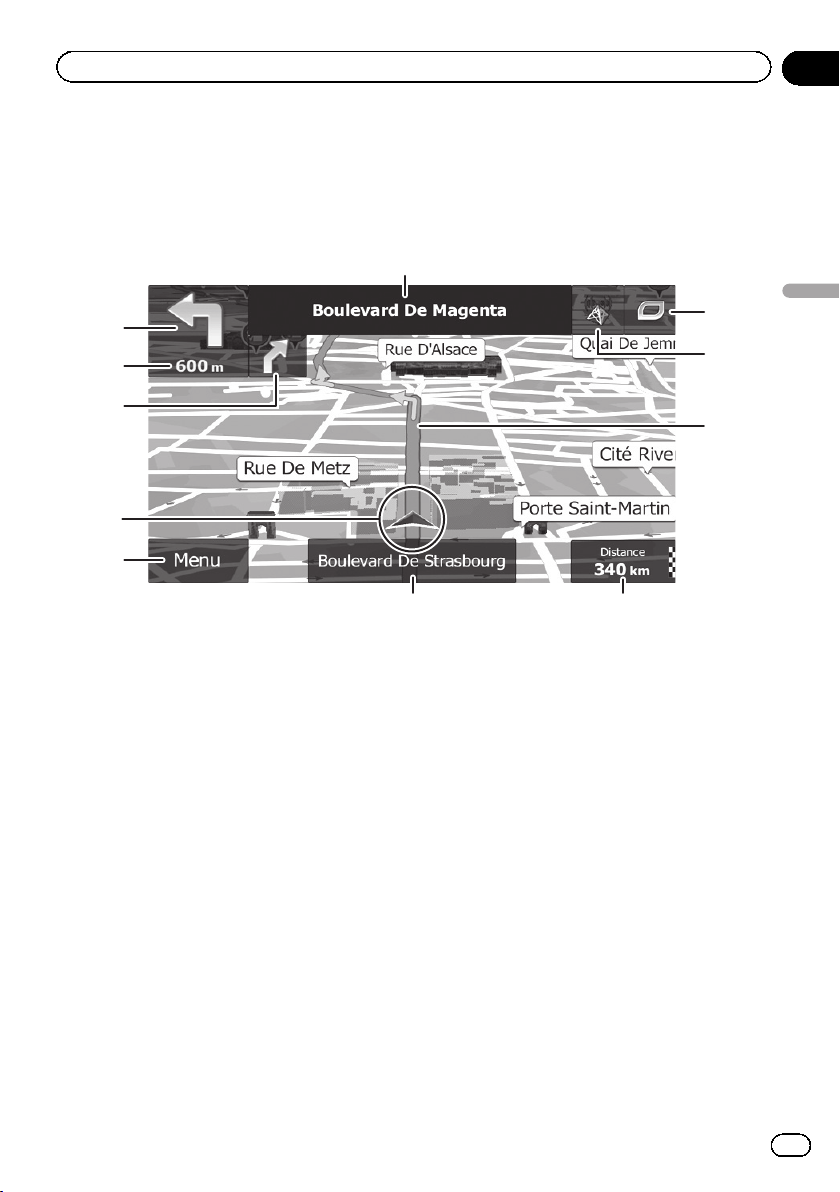
How to read the map screen
1
Chapter
05
2
3
4
5
6
p Information with an asterisk (*) appears
only when the route is set.
p Depending on the conditions and settings,
some items may not be displayed.
1 Name of the street to be used (or next gui-
dance point)*
Shows information about the next guidance
point (manoeuvre) and the next street or the
next city/town.
2 Next guidance point (manoeuvre)*
When you approach the next manoeuvre, this
appears in orange. Both the type of the event
(turn, roundabout, exiting motorway, etc.) and
its distance from the current position are dis-
played. A smaller icon shows the type of the
second next manoeuvre if it is near the first
one.
= For details, refer to Frequently shown
route events on page 22.
3 Distance to the next guidance point (man-
oeuvre)*
Shows the distance to the next manoeuvre.
4 Second manoeuvre arrow*
7
Shows the turning direction after the next guidance point and the distance to it.
5 Current position
Indicates the current location of your vehicle.
The apex of the triangular mark indicates your
orientation and the display moves automatically as you drive.
8
p The exact location of the arrow mark de-
pends on the vehicle type used for route
calculation and the navigation mode.
= For details, refer to Changing the vehicle
used on page 41.
6 Menu key
Touch [Menu] to return to the “Navigation
Menu” screen.
= For details, refer to What you can do on
each menu on page 19.
7 Street name (or city name) that your vehi-
cle is travelling along
8 Data field
b
a
9
How to use the map
Engb
21
Page 22
Chapter
05
How to use the map
Touching this field displays route information
during navigation. By default, only one data
field is displayed. Touch this field to see all
data fields.
= For details, refer to Browsing the data
field on page 24.
9 Current route*
The route currently set is highlighted in colour
on the map.
= For details of the POI icons, refer to Cus-
tomising the map screen settings on
page 58.
a Traffic information
The recommended route is not always the
same between two points. Whenever suitable
data exists, traffic information can be taken
into account in the route calculation.
b Quick menu
Touching this key causes the quick menu to
appear.
= For details, refer to Quick menu on
page 19.
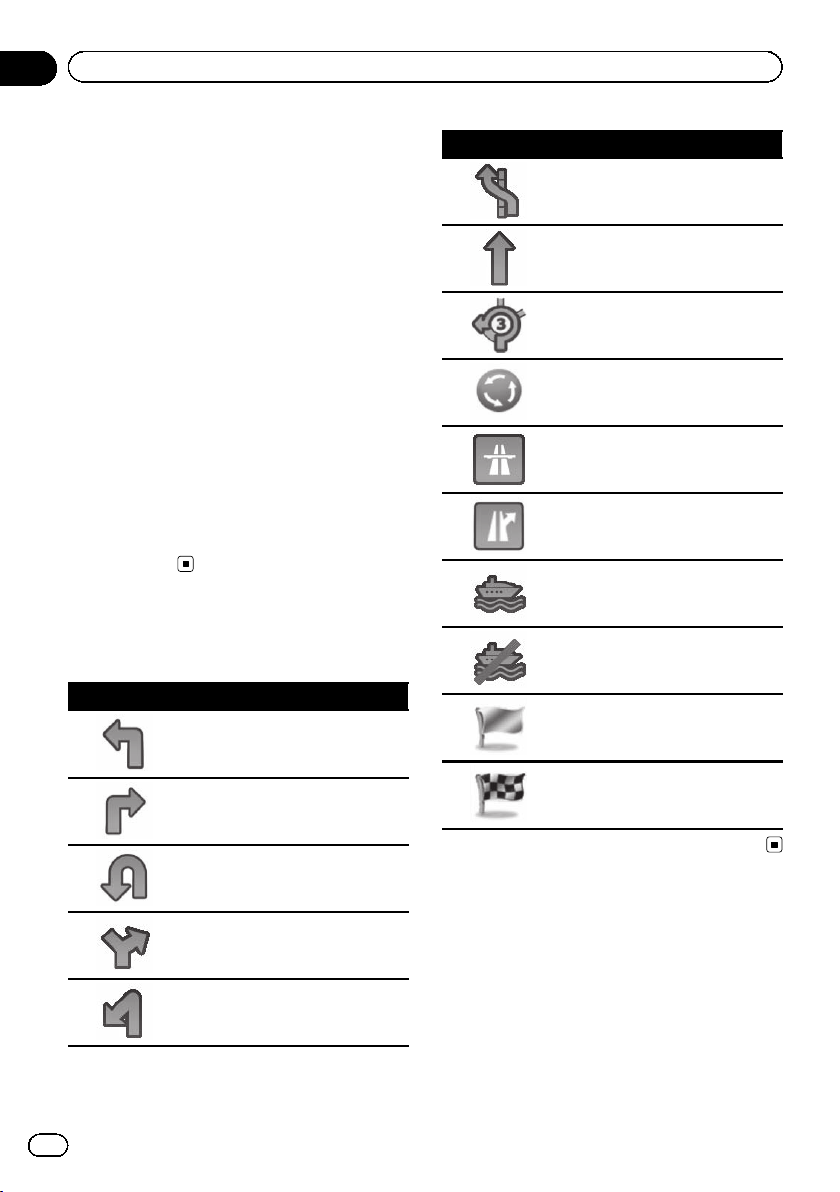
Frequently shown route
events
Icon Description
Turn left.
Icon Description
Keep left.
Continue straight in the intersection.
Go left on the roundabout, 3rd exit
(next manoeuvre).
Enter roundabout (second next
manoeuvre).
Enter motorway.
Exit motorway.
Board ferry.
Leave ferry.
Approaching a waypoint.
22
Engb
Turn right.
Turn back.
Bear right.
Turn sharp left.
Approaching the destination.
Seeing the current position
on the map
1 Display the “Navigation Menu” screen.
= For details of the operations, refer to Screen
switching overview on page 18.
Page 23
How to use the map
Chapter
05
2 Touch [Show Map] on the “Navigation
Menu” screen.
The map screen appears showing the current
position (a blue arrow by default), recommended route (an orange line) and surrounding map area.
p The arrow mark appears in blue by default.
You can change this icon.
= For details of the POI icons, refer to Custo-
mising the map screen settings on page 58.
When there is no GPS position, the arrow
mark is transparent. It shows your last known
position. The more green dots you see in a satellite symbol in the top left corner, the closer
you are to get the valid GPS position.
When GPS position is available, the arrow
mark is displayed in full colour, now showing
your current position.
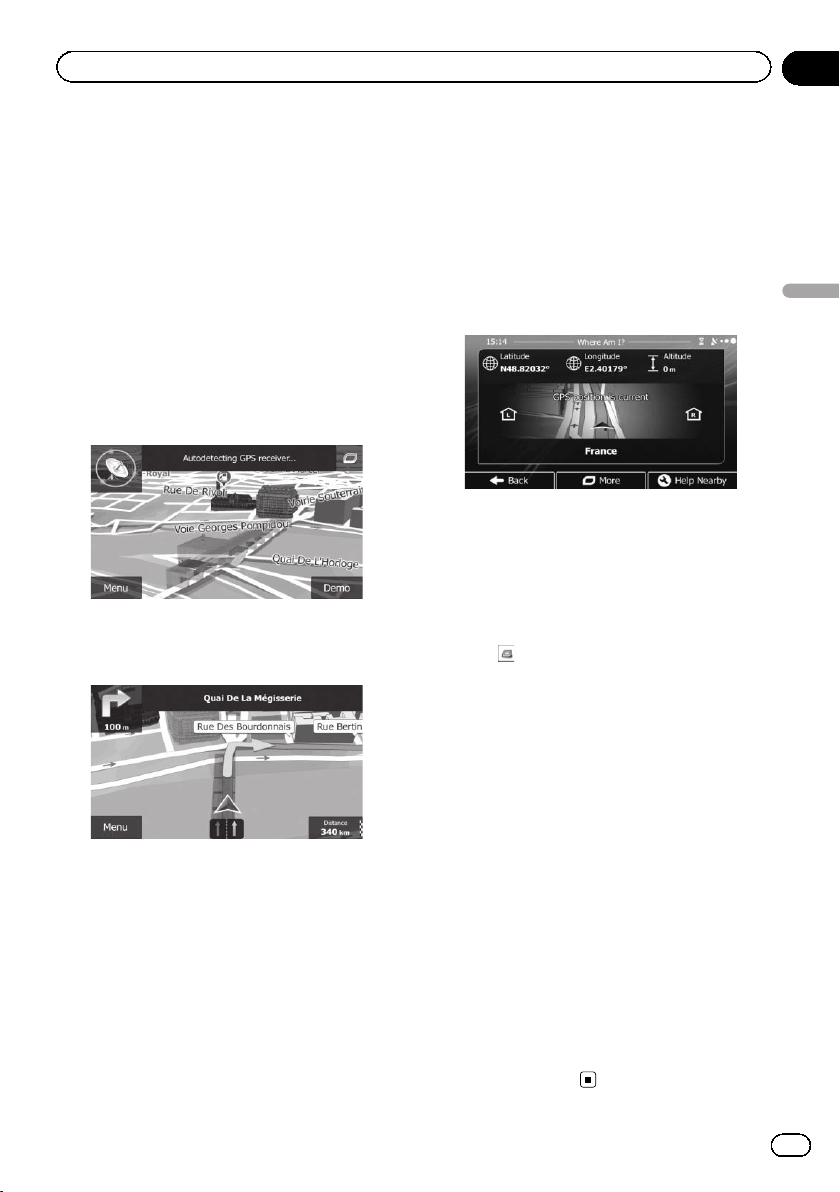
Checking the detailed information
about the current position
You can get the detailed information about the
current position (or about the last known position if GPS reception is not available) from the
“Where Am I?” screen. You can also search
for useful Points Of Interest (POI) nearby on
the screen. Follow the steps below to open the
“Where Am I?” screen.
1 Display the map screen.
= For details of the operations, refer to Screen
switching overview on page 18.
2 If the current street is displayed below
the arrow mark (current position), touch it
to open the “Where Am I?” screen.
# Touch in the top right corner of the screen
to open the quick menu screen, then touch
[Where Am I?].
The screen provides the following information:
! Latitude and longitude (coordinate of the
current position in WGS84 format)
! Altitude (elevation information coming from
the GPS receiver – often inaccurate)
! House number on the left
! House number on the right
! Position information (current or last
known)/time left since it was last updated
! Address details of the current position
(when available)
p To save the current position as a “Fa-
vourites” destination, touch [More].
= For details, refer to Storing a location in
“Favourites” on page 51.
p You can also search for assistance near
your current position.
= For details, refer to Searching for a nearby
POI on page 34.
How to use the map
Engb
23
Page 24

Chapter
05
How to use the map
Browsing the data field
The data fields are different when you are navigating the current route and when you have
no specified destination (the orange line is not
displayed). The data field provides the following information.
! When the route is set:
Distance to final destination, time needed
to reach the final destination and estimated
arrival time
! When the route is not set:
Current speed, speed limit of the current
road and current time
Display during motorway
driving
In certain locations of the motorway, lane information is available, indicating the recommended lane to be in to easily manoeuvre the
next guidance.
Lane information
While driving on the motorway, motorway exit
numbers and motorway signs may be displayed in the vicinity of interchanges and
exits.
If you are approaching a complex intersection
and the needed information exists, the map is
replaced with a 3D view of the junction.
Signposts
p The estimated time of arrival is an ideal
value calculated based on the value set for
“Max. Speed” and the actual driving
speed. The estimated time of arrival is only
a reference value, and does not guarantee
arrival at that time.
= For details, refer to Setting the vehicle
parameters on page 42.
p You can change the value by touching and
holding any of the fields.
24
Engb
Junction view
p If the data for these items is not contained
in the map data, the information is not
available even if there are signs on the actual road.
Page 25

How to use the map
Chapter
05
An icon showing a petrol station or a restaurant will appear on the map during you are
driving on motorways. Touch the icon to open
the details of the next few exits or service stations.
Motorway exit services
p You can add any of them as a waypoint to
your route.
= For details, refer to Setting a route using the
“My Route” menu on page 39.
p If you want to display other types of POIs
for the exits, you can change the icons in
“Visual Guidance Settings”.
= For details, refer to Setting the visual gui-
dance on page 59.
Operating the map screen
Changing the scale of the map
You can change how much of the map is displayed on the screen with street names and
other text displayed in the same font size.
1 Display the map screen.
= For details of the operations, refer to Screen
switching overview on page 18.
2 Touch anywhere on the map during navigation.
The map stops following the current position
and control keys appear.
3 Touch
p Map scaling has a limit in 3D map view
= For details, refer to Switching the map be-
4 Touch [Back] to move the map back to
follow the current GPS position.
or to change the map scale.
mode. If you zoom out further, the map
switches to 2D view mode.
tween 2D and 3D on page 26.
Smart Zoom
Your navigation system features “Smart Zoom”
that works in two ways:
! When the route is set:
When approaching a turn, it will zoom in
and raise the view angle to let you easily recognise your manoeuvre at the next junction. It the next turn is at a distance, it will
zoom out and lower the view angle to be
flat so you can see the road in front of you.
! When the route is not set:
“Smart Zoom” will zoom in if you drive
slowly and zoom out when you drive at
high speed.
Switching the map orientation
You can switch how the map shows your vehicle’s direction between “Heading up” and
“North up”.
! Heading up:
The map display always shows the vehicle’s
direction as proceeding toward the top of
the screen.
! North up:
The map display always has north at the
top of the screen.
How to use the map
Engb
25
Page 26

Chapter
05
How to use the map
p The map orientation is fixed at “Heading
up” when the 3D map screen is displayed.
1 Display the map screen.
= For details of the operations, refer to Screen
switching overview on page 18.
2 Touch anywhere on the map during navigation.
The map stops following the current position
and control keys appear.
3 Touch
Each time you touch the key the setting
changes.
4 Touch [Back] to move the map back to
follow the current GPS position.
to switch the map orientation.
Changing the view angle of the
map
You can change the view angle of the map horizontally or vertically.
p You can change the vertical view angle of
the map in 3D mode only.
= For details, refer to Switching the map be-
tween 2D and 3D on page 26.
1 Display the map screen.
= For details of the operations, refer to Screen
switching overview on page 18.
2 Touch anywhere on the map during navigation.
The map stops following the current position
and control keys appear.
3 Touch
rotate left/right.
p Touching the key once modifies the view in
4 Touch [Back] to move the map back to
follow the current GPS position.
/ to tilt up/down or / to
large steps and touching and holding the
key modifies it continuously and smoothly.
Switching the map between 2D
and 3D
1 Display the map screen.
= For details of the operations, refer to Screen
switching overview on page 18.
2 Touch anywhere on the map during navigation.
The map stops following the current position
and control keys appear.
3 Touch
and 3D view modes.
Each time you touch the key the setting
changes.
p When the 2D map screen is selected, is
p When the 3D map screen is selected,
4 Touch [Back] to move the map back to
follow the current GPS position.
or to switch between 2D
displayed.
is
displayed.
26
Engb
Page 27

How to use the map
Scrolling the map to the
position you want to see
1 Display the map screen.
= For details of the operations, refer to Screen
switching overview on page 18.
2 Touch and drag the map in the desired
direction to scroll.
p Positioning the cursor to the desired loca-
tion results in a brief information overview
about the location being displayed at the
top of the screen, with street name and
other information for this location being
shown.
p The scrolling increment depends on your
dragging length.
3 Touch [Back] to move the map back to
follow the current GPS position.
Viewing information about a
specified location
An icon appears at registered places such as
“Favourites” entries and places where there is
a POI icon or traffic information icon. Place
the cursor over the icon to view detailed information.
Chapter
05
How to use the map
1 Scroll the map and move the scroll cursor to the icon you want to view.
2 Touch
lected location.
3 Touch the item that you want to check
the detailed information.
# Touch [Back] to return to the map.
= For details of the POI icons, refer to Custo-
mising the map screen settings on page 58.
= For details of the traffic information icons,
refer to Setting the traffic information on
page 57.
to see the details of the se-
Engb
27
Page 28

Chapter
06
Searching for and selecting a location
p Some information regarding traffic regula-
tions depends on the time when the route
calculation is performed. Thus, the information may not correspond with a certain
traffic regulation when your vehicle actually
passes through the location in question.
Also, the information on the traffic regulations provided applies for a passenger vehicle, and not for a truck or other delivery
vehicles. Always follow the actual traffic
regulations when driving.
Searching for a location by
address
The most frequently used function is “Find
Address”, in which the address is specified
and the location is searched.
p Depending on the search results, some
steps may be skipped.
1 Touch [Menu] on the map screen.
The “Navigation Menu” screen appears.
= For details of the operations, refer to Screen
switching overview on page 18.
2 Touch [Find], then [Find Address].
4 Touch [Town] and enter the name of
the city/town on the keyboard.
5 Touch [Street] and enter the street
name on the keyboard.
6 Touch [House Number] and enter the
house number on the keyboard.
p To enter letters, touch .
7 When the entry is complete, touch
[Done].
3 Touch [Country], enter the first few letters of the country on the keyboard and
then select one country from the list of results.
By default, your navigation system proposes
the country and city/town where you are. If no
changes are required, skip steps 3 and 4.
28
Engb
p If the entered house number cannot be
found, the midpoint of the street is selected
as the destination.
The searched location appears on the map
screen.
= For subsequent operations, refer to Setting
a route to your destination on page 38.
Page 29

Searching for and selecting a location
Chapter
06
Searching for a location by
entering the midpoint of a
street
You can also navigate to the midpoint of a
street if the house number is not available.
1 Touch [Menu] on the map screen.
The “Navigation Menu” screen appears.
= For details of the operations, refer to Screen
switching overview on page 18.
2 Touch [Find], then [Find Address].
3 If necessary, modify the country.
= For details of the operations, refer to Search-
ing for a location by address on page 28.
4 Touch [Street] and enter the street
name on the keyboard.
5 Touch [Select Street].
The map screen appears with the selected
point in the middle. The midpoint of the street
is selected as the destination.
= For subsequent operations, refer to Setting
a route to your destination on page 38.
Searching for a location by
entering the city/town centre
You can search for a location by entering the
city/town centre.
1 Touch [Menu] on the map screen.
The “Navigation Menu” screen appears.
= For details of the operations, refer to Screen
switching overview on page 18.
2 Touch [Find], then [Find Address].
3 If necessary, modify the country.
= For details of the operations, refer to Search-
ing for a location by address on page 28.
4 Touch [Town] and enter the name of
the city/town on the keyboard.
Searching for and selecting a location
5 Touch [Select Town].
The map screen appears with the selected
point in the middle. The centre of the displayed city/town becomes the destination of
the route.
= For subsequent operations, refer to Setting
a route to your destination on page 38.
Finding the location by
specifying the postcode
If you know the postcode of the location that
you want to find, you can use it to find the location.
p Depending on the search results, some
steps may be skipped.
1 Touch [Menu] on the map screen.
The “Navigation Menu” screen appears.
= For details of the operations, refer to Screen
switching overview on page 18.
2 Touch [Find], then [Find Address].
3 If necessary, modify the country.
= For details of the operations, refer to Search-
ing for a location by address on page 28.
Engb
29
Page 30

Chapter
06
Searching for and selecting a location
4 Touch [Town] and enter the name of
the city/town using its postcode.
p To open the numeric keypad, touch .
5 Touch [Street] and enter the street
name on the keyboard.
6 Touch [House Number] and enter the
house number on the keyboard.
p To enter letters, touch .
7 When the entry is complete, touch
[Done].
p If the entered house number cannot be
found, the midpoint of the street is selected
as the destination.
Searching for Points of
Interest (POI)
Information of various facilities (Points Of Interest – POI), such as petrol stations, car parks
or restaurants, is available. You can search for
a POI by using the “Quick Search” feature, or
by selecting the category (or entering the POI
name).
Searching for POIs using “Quick
Search”
You can quickly find a favourite place by its
name. The search is always carried out along
the recommended route if it exists or around
your current position if no destination is set.
1 Touch [Menu] on the map screen.
The “Navigation Menu” screen appears.
= For details of the operations, refer to Screen
switching overview on page 18.
2 Touch [Find], then [Find Places].
3 Touch [Quick Search Along Route].
The searched location appears on the map
screen.
= For subsequent operations, refer to Setting
a route to your destination on page 38.
30
Engb
A keyboard screen appears. Start entering the
name of the place.
4 After entering a few letters, touch [Results].
Page 31

Searching for and selecting a location
Chapter
06
The list of places opens with names containing the entered character sequence.
5 Scroll the list and touch the place you
want.
A full screen map appears with the selected
point in the middle. The name and address of
the place is displayed at the top of the screen.
= For subsequent operations, refer to Setting
a route to your destination on page 38.
p To see the details of the selected place,
touch
Touching [Back] returns to the map screen.
p The places in the list are ordered by their
distance from the current or last known position, from the destination or by the length
of the necessary detour. To change the
order, follow the steps below:
Touch [More], then touch one of the list
items.
.
Searching for POIs using preset
categories
The preset search allows you to quickly find
the most frequently selected types of POIs.
1 Touch [Menu] on the map screen.
The “Navigation Menu” screen appears.
= For details of the operations, refer to Screen
switching overview on page 18.
2 Touch [Find], then [Find Places].
The preset search categories are as follows.
! Petrol Station Along Route:
! Parking At My Destination:
! Restaurant Along Route:
! Accommodation At My Destination:
p When the route is set, accommodation is
searched around the destination of the
route.
p When the route is not set, they are searched
around the current position.
p When the current position is not available
either (no GPS signal), they are searched
around the last known position.
3 Touch the POI you want.
Searching for and selecting a location
The searched location appears on the map
screen.
= For subsequent operations, refer to Setting
a route to your destination on page 38.
Searching for POIs by
categories
You can search for POIs by their categories
and subcategories.
1 Touch [Menu] on the map screen.
The “Navigation Menu” screen appears.
= For details of the operations, refer to Screen
switching overview on page 18.
Engb
31
Page 32

Chapter
06
Searching for and selecting a location
2 Touch [Find], then [Find Places].
3 Touch [Custom Search].
4 Select the area around which the POIs
should be searched for.
! In a Town:
Searches for a place within a selected city/
town. (The result list will be ordered by the
distance from the centre of the selected
city/town.)
! Around Last Known Position:
Searches around the current position or if it
is not available, around the last known position. (The result list will be ordered by the
distance from this position.)
! Around Destination:
Searches for a place around the destination
of the current route. (The result list will be
ordered by the distance from the destination.)
! Along Route:
Searches along the current route, and not
around a given point. This is useful when
you search for a later stopover that results
in a minimal detour only, such as searching
for upcoming petrol stations or restaurants.
(The result list will be ordered by the length
of the necessary detour.)
p If you have selected [In a Town], select the
city/town to search in.
5 Select one of the main place categories
(e.g. Accommodation) or touch [List All
Places].
The screen appears showing all places around
the selected location or along the route.
6 Select one of the sub place categories
(e.g. Hotel or Motel) or touch [List All
Places in Accommodation].
The screen appears showing all places in the
selected main category around the selected location or along the route.
Sometimes the list of brands in the selected
place subcategory appears.
7 Select one brand or touch [List All
Places in Accommodation >> Hotel or
Motel].
32
The screen appears showing all places in the
selected subcategory around the selected location or along the route.
Finally, the results appear in a list.
Engb
Page 33

Searching for and selecting a location
tion. (The result list will be ordered by the
distance from this position.)
! Around Destination:
Searches for a place around the destination
of the current route. (The result list will be
ordered by the distance from the destination.)
! Along Route:
8 Touch the POI you want.
The searched location appears on the map
screen.
= For subsequent operations, refer to Setting
a route to your destination on page 38.
Searching for a POI directly
Searches along the current route, and not
around a given point. This is useful when
you search for a later stopover that results
in a minimal detour only, such as searching
for upcoming petrol stations or restaurants.
(The result list will be ordered by the length
of the necessary detour.)
p If you have selected [In a Town], select the
city/town to search in.
from the name of the facilities
You can search for POIs by their names.
1 Touch [Menu] on the map screen.
The “Navigation Menu” screen appears.
= For details of the operations, refer to Screen
switching overview on page 18.
2 Touch [Find], then [Find Places].
3 Touch [Custom Search].
4 Select the area around which the POIs
should be searched for.
5 Select one of the main place categories
(e.g. Accommodation) to search in, or
touch [Find by Name] to search among all
places.
6 Select one of the place subcategories
(e.g. Hotel or Motel) to search in, or touch
[Find by Name] to search in the selected
place category.
7 Touch [Find by Name] if you have not
done it before.
Chapter
06
Searching for and selecting a location
! In a Town:
Searches for a place within a selected city/
town. (The result list will be ordered by the
distance from the centre of the selected
city/town.)
! Around Last Known Position:
Searches around the current position or if it
is not available, around the last known posi-
Engb
33
Page 34

Chapter
06
Searching for and selecting a location
8 Using the keyboard, start entering the
name of the place.
9 After entering a few letters, touch [Results].
The screen appears showing the list of places
with names containing the entered character
sequence.
10 Touch the POI you want.
The searched location appears on the map
screen.
= For subsequent operations, refer to Setting
a route to your destination on page 38.
Searching for a nearby POI
You can search for POIs in your surroundings.
1 Display the map screen.
= For details of the operations, refer to Screen
switching overview on page 18.
2 Touch on the map screen.
= For details, refer to Customising the quick
menu on page 56.
3 Touch [Where Am I?], then [Help Nearby].
(or around the last known position if the current position is not available).
! Car Repair Around Here:
Car repair and roadside assistance services
! Health Around Here:
Medical and emergency services
! Police Around Here:
Police stations
! Petrol Station Around Here:
Petrol stations
4 Touch the desired quick search key.
5 Touch the POI you want.
The searched location appears on the map
screen.
= For subsequent operations, refer to Setting
a route to your destination on page 38.
Selecting a location by
using “Find on Map”
1 Touch [Menu] on the map screen.
The “Navigation Menu” screen appears.
= For details of the operations, refer to Screen
switching overview on page 18.
2 Touch [Find] on the “Navigation Menu”
screen.
3 Touch [Find on Map].
The following preset search categories appear,
all for searching around the current position
34
Engb
Page 35

Searching for and selecting a location
Chapter
06
4 Move and scale the map to locate your
destination.
5 Touch [Select].
The selected location appears on the map
screen.
= For details, refer to Setting a route to your
destination on page 38.
p You can also select a map location as the
destination by scrolling the map.
= For details, refer to Searching for a location
by scrolling the map on page 37.
= For details, refer to Modifying the route cal-
culation conditions on page 41.
Selecting destination from
stored locations
Storing locations you visit frequently saves
time and effort.
Selecting an item from the list provides an
easy way to specify the position.
p This function is not available if no locations
have been registered in “Favourites”.
= For details, refer to Storing a location in “Fa -
vourites” on page 51.
1 Touch [Menu] on the map screen.
The “Navigation Menu” screen appears.
= For details of the operations, refer to Screen
switching overview on page 18.
2 Touch [Find] on the “Navigation Menu”
screen.
3 Touch [Favourites].
The list of “Favourites” destinations appears.
4 Touch the entry you want.
The searched location appears on the map
screen.
= For subsequent operations, refer to Setting
a route to your destination on page 38.
p To see more of the list, browse down or
touch [Filter] to enter a few letters from the
name of the “Favourites” destination.
Searching for and selecting a location
Engb
35
Page 36

Chapter
06
Searching for and selecting a location
Selecting a location you
searched for recently
The places that you set as destinations or waypoints previously are automatically stored in
“History”.
Smart History
Two of the most recently set destinations are
shown in the “History” field for easier access.
1 Touch [Menu] on the map screen.
The “Navigation Menu” screen appears.
= For details of the operations, refer to Screen
switching overview on page 18.
2 Touch [Find] on the “Navigation Menu”
screen.
3 Touch
The searched location appears on the map
screen.
= For subsequent operations, refer to Setting
a route to your destination on page 38.
or in the “History” field.
History
Three most likely destinations are displayed on
the first page of the list while the rest of the
destinations are ordered by time they were last
selected.
1 Touch [Menu] on the map screen.
The “Navigation Menu” screen appears.
= For details of the operations, refer to Screen
switching overview on page 18.
4 Touch the entry you want.
The searched location appears on the map
screen.
= For subsequent operations, refer to Setting
a route to your destination on page 38.
Searching for a location by
coordinates
Entering a latitude and longitude pinpoints
the location.
1 Touch [Menu] on the map screen.
The “Navigation Menu” screen appears.
= For details of the operations, refer to Screen
switching overview on page 18.
2 Touch [Find] on the “Navigation Menu”
screen.
3 Touch [More], then touch [Coordinate].
4 Enter the latitude and longitude values.
2 Touch [Find] on the “Navigation Menu”
screen.
3 Touch [History].
The list of recent destinations appears.
36
Engb
p You can enter the latitude and longitude va-
lues in any of the following formats: Decimal degrees; degrees and decimal minutes;
or degrees, minutes and decimal seconds.
p When entering the coordinate in UTM for-
mat, touch [More], then [UTM].
Page 37

Searching for and selecting a location
5 When finished, touch [Done].
The searched location appears on the map
screen.
= For subsequent operations, refer to Setting
a route to your destination on page 38.
Searching for a location by
scrolling the map
Specifying a location after scrolling the map
enables you to set the position as destination,
waypoint.
1 Display the map screen.
= For details of the operations, refer to Screen
switching overview on page 18.
Chapter
06
Searching for and selecting a location
2 Touch and drag the screen to scroll the
map to the position you want.
3 Touch the location that you want to select as your destination.
The cursor appears.
4 Touch [Select].
The selected location appears on the map
screen.
= For subsequent operations, refer to Setting
a route to your destination on page 38.
p You can also select a map location as the
destination using the “Find on Map” feature.
= For details, refer to Selecting a location by
using “Find on Map” on page 34.
Engb
37
Page 38

Chapter
07
After the location is decided
Setting a route to your
destination
You can set a route to your destination by
using either a searched location or the “My
Route” menu.
Setting a route using a
searched location
1 Search for a location.
= For details, refer to Searching for and select-
ing a location on page 28.
The map screen appears with the selected
point in the middle.
2 Touch [Go] to confirm the destination.
After a short summary of the route parameters, the map appears showing the entire
route. The route is automatically calculated.
p If you have already set the route to the desti-
nation, [Next] will appears. Touch [Next]
and select the way to modify the current
route.
= For details, refer to Selecting a new destina-
tion when a route is already set on page 47.
3 Touch [Go!].
Your navigation system starts the route guidance.
# Touch [More] to modify route parameters.
Checking route alternatives
when planning the route
You can select from different route alternatives
or change the route planning method after
you have selected a new destination.
1 Search for a location.
= For details, refer to Searching for and select-
ing a location on page 28.
The map screen appears with the selected
point in the middle.
2 Touch [Go] to confirm the destination.
After a short summary of the route parameters, the map appears showing the entire
route. The route is automatically calculated.
p If you have already set the route to the desti-
nation, [Next] will appears. Touch [Next]
and select the way to modify the current
route.
3 Touch [More].
38
4 Touch [Route Alternatives].
Engb
Page 39

After the location is decided
Chapter
07
5 Touch any of the alternatives to see it
on the map.
If you cannot find a good alternative, touch
[More Results] and scroll down for routes
with different routing methods.
6 Select one of the alternatives and
touch [Back].
The previous screen returns. The navigation
system calculates the route. The orange line
now shows the new recommended route.
Setting a route using the “My
Route” menu
1 Touch [Menu] on the map screen.
The “Navigation Menu” screen appears.
= For details of the operations, refer to Screen
switching overview on page 18.
3 Touch [Create Route].
p The start point of the route, normally it is
the current GPS position, is displayed.
4 Touch .
p When the “Create Route” option is not dis-
played, touch [More] to open a list with
more options.
5 Select the destination you want to set.
You can select the destination of the route the
same way as described in the previous sections.
= For details, refer to Selecting a location you
searched for recently on page 36.
When the new destination is selected, the list
returns.
After the location is decided
2 Touch [My Route] on the “Navigation
Menu” screen.
p To add more destinations, touch where
you want to insert the new point in the list,
and repeat the above steps.
Engb
39
Page 40

Chapter
07
After the location is decided
6 Touch [Go] to confirm the destination.
After a short summary of the route parameters, the map appears showing the entire
route. The route is automatically calculated.
p If you have already set the route to the desti-
nation, [Next] will appears. Touch [Next]
and select the way to modify the current
route.
= For details, refer to Selecting a new destina-
tion when a route is already set on page 47.
7 Touch [Go!].
Your navigation system starts the route
guidance.
40
Engb
Page 41

Checking and modifying the current route
Chapter
08
Displaying the route overview
1 Touch [Menu] on the map screen.
The “Navigation Menu” screen appears.
= For details of the operations, refer to Screen
switching overview on page 18.
2 Touch [My Route] on the “Navigation
Menu” screen.
3 Touch [Overview].
The current route is displayed in its full length
on the map together with additional information and controls.
Checking route parameters
and accessing route related
functions
You can check different parameters of the
route recommended by the navigation system.
1 Touch [Menu] on the map screen.
The “Navigation Menu” screen appears.
= For details of the operations, refer to Screen
switching overview on page 18.
2 Touch [My Route] on the “Navigation
Menu” screen.
The following information is displayed on this
screen:
5
4
3
1
2
6
7
5 The symbol of the vehicle type used in route
calculation
6 Route planning method (e.g. Fast)
7 Estimated delay calculated from traffic
events on your route
p The following options are available.
= For details, refer to Registering and editing
locations on page 51.
! Edit Route:
Touch this key to add or remove destinations or change their sequence. You can
also set a route start point other than your
current location. This can be useful to plan
and save a future map.
! Overview:
Touch this key to display the entire route on
the map.
! Avoidances:
Touch this key to bypass a part of the route.
! Cancel Route:
Touch this key to delete the current route.
! More:
Touch this key to open a list with more options like selecting from route alternatives,
changing route parameters, simulating the
route, saving the current route or loading a
previously saved route.
! Back:
Touch this key to return to the “Navigation
Menu” screen.
Modifying the route
calculation conditions
You can modify the conditions for route calculation and recalculate the current route.
Checking and modifying the current route
1 Name and/or address of the destination
2 Warning icons (if any). They provide extra
information about your route (e.g. unpaved
roads or toll roads to be taken).
3 Total time of the route
4 Total length of the route
Changing the vehicle used
You can set the type of vehicle you will use to
navigate the route. Based upon this setting,
some of the road types can be excluded from
the route, or some of the restrictions may not
be taken into account in route calculation.
Engb
41
Page 42

Chapter
08
Checking and modifying the current route
1 Touch [Menu] on the map screen.
The “Navigation Menu” screen appears.
= For details of the operations, refer to Screen
switching overview on page 18.
2 Touch [More...], then [Settings].
3 Touch [Route Settings].
4 Touch [Vehicle], then touch the vehicle
type you use.
You can select from the following vehicle
types:
p Items marked with asterisk (*) appear only
on AVIC-F160.
! Default Car:
! Manoeuvre restrictions and directional
constraints are taken into account when
planning a route.
! Roads are used only if access for cars is
allowed.
! Private roads and resident-only roads
are used only if they are inevitable to
reach the destination.
! Walkways are excluded from routes.
! Default Bus:
! Manoeuvre restrictions and directional
constraints are taken into account when
planning a route.
! Roads are used only if access for buses
is allowed.
! Private roads, resident-only roads and
walkways are excluded from routes.
! Default Taxi:
! Manoeuvre restrictions and directional
constraints are taken into account when
planning a route.
! Roads are used only if access for taxis is
allowed.
! Private roads, resident-only roads and
walkways are excluded from routes.
! Default Lorry*:
! Manoeuvre restrictions and directional
constraints are taken into account when
planning a route.
! Roads are used only if access for lorries
is allowed.
! Private roads, resident-only roads and
walkways are excluded from routes.
! U-turns are excluded from routes (turn-
ing back on a divided road is not considered as a U-turn).
= For details, refer to Lorry navigation on
page 13.
This system calculates the route optimised for
the new vehicle type. The orange line now
shows the new recommended route.
Setting the vehicle parameters
You can edit the parameters of the vehicle profile.
1 Touch [Menu] on the map screen.
The “Navigation Menu” screen appears.
= For details of the operations, refer to Screen
switching overview on page 18.
2 Touch [More...], then [Settings].
3 Touch [Route Settings].
4 Touch [Vehicle].
42
Engb
Page 43

Checking and modifying the current route
Chapter
08
5 Touch next to the vehicle profile that
you want to modify.
6 Scroll the list and touch any of the lines
to change the parameters.
p Items marked with an asterisk (*) do not ap-
pear when the vehicle type is set to “ De-
fault Lorry”.
! Name:
Touch this key to rename the profile.
! Fuel Consumption Urban*:
Enter the average consumption of your vehicle when used in built-up areas. The unit
for consumption can be set in “Regional”
settings.
! Fuel Consumption Rural*:
Enter the average consumption of your vehicle when used on motorways. The unit for
consumption can be set in “Regional” settings.
! Engine Type*:
Select the engine and fuel type of your vehicle. This helps in estimating the CO
sion.
! Fuel Price*:
Enter the average fuel price for travel cost
calculation. The currency can be set in “Re-
gional” settings.
! Max. Speed:
emis-
2
Set the maximum speed you travel with the
vehicle.
! Use Extended Settings:
Check this box to enable more settings for
the following parameters.
! Length:
Set the total length of the vehicle.
! Width:
Set the width of the vehicle.
! Height:
Set the height of the vehicle.
! Trailer:
Set if there is a trailer attached to the vehicle.
! Maximum Allowed Weight:
Set the maximum allowed weight of the
vehicle.
! Actual Weight:
Set the actual weight of the vehicle.
! Freight:
Select one or more hazard types if the
vehicle carries dangerous material.
You can also set the following option:
! Confirm Parameters for Each Route Plan-
ning:
When enabled, the list of vehicle parameters always appears before route calculation. This helps you quickly adjust the
parameters when some of them (actual
weight, for instance) often change.
7 When finished modifying an existing
vehicle profile, touch [Back].
The settings are completed.
p While this profile is selected, the para-
meters of your vehicle are taken into account when planning routes.
For AVIC-F160 users
p Note that this navigation system leads to a
safe route for your lorry only if map data
contains the weight, height and etc. restrictions of the road network in your area.
p Speed limits for lorries may not be available
for all roads. It is advised to enter the maximum allowed speed in your area for your
vehicle instead of the maximum speed your
lorry is capable of.
Checking and modifying the current route
Engb
43
Page 44

Chapter
08
Checking and modifying the current route
Setting the route calculation
These settings determine how routes will be
calculated. Select the type of vehicle you are
driving, the road types used in route planning,
and the route planning method.
1 Touch [Menu] on the map screen.
The “Navigation Menu” screen appears.
= For details of the operations, refer to Screen
switching overview on page 18.
2 Touch [More...], then [Settings].
3 Touch [Route Settings].
4 Touch the setting item.
! Navigation Mode:
On-road navigation creates a turn by turn
itinerary using the road network on the
map. Switch to off-road navigation to navigate between destinations in a straight line.
! Route Planning Method:
The route calculation can be optimised for
different situations and vehicle types by
changing the planning method.
! Fast:
Calculates a route with the shortest travel time to your destination as a priority.
Usually the best selection for fast and
normal cars.
! Green:
Calculates a quick but fuel efficient
route based on the fuel consumption
data given in Route settings. Travel cost
and CO
mations only. They cannot take elevations, curves and traffic conditions into
account.
p This item does not appear when the
! Short:
Calculates a route with the shortest distance to your destination as a priority.
Usually practical for pedestrians, cyclists or slow vehicles. Searching for a
short route regardless of the speed, this
emission calculations are esti-
2
vehicle profile is set to “Default
Lorry”.
route type is rarely practical for normal
vehicles.
! Economical:
For vehicle types where “Green” routing
is not available, this method combines
the benefits of “Fast” and “Short”. This
system calculates as if it were calculating the “Fast” route, but it takes other
roads as well to save fuel.
p This item is available for AVIC-F160
only.
! Easy:
Results in a route with fewer turns and
no difficult manoeuvres. With this option, you can make this system to take,
for example, the motorway instead of a
series of smaller roads or streets.
Changing road types used
To recalculate the current route with different
road type preferences, follow the steps below.
p To let the route fit your needs, you can also
set which road types are to be considered
for or to be excluded from the route if possible. Excluding a road type is a preference. It
does not necessarily mean total prohibition.
p If your destination can only be accessed
using some of the excluded road types,
they will be used but only as much as necessary. In this case a warning icon will be
shown on the route parameter, and the part
of the route not matching your preference
will be displayed in a different colour on
the map.
= For details, refer to Checking route para-
meters and accessing route related functions on page 41.
1 Touch [Menu] on the map screen.
The “Navigation Menu” screen appears.
= For details of the operations, refer to Screen
switching overview on page 18.
2 Touch [More...], then [Settings].
3 Touch [Route Settings].
44
Engb
Page 45

Checking and modifying the current route
Chapter
08
4 Touch any of the listed road types.
If needed, scroll the list for all road types. The
following options can be set for route calculation:
p Items marked with an asterisk (*) do not ap-
pear when the vehicle type is set to “ De-
fault Lorry”.
! Motorways:
Set whether to avoid motorways when you
are driving a slow car or you are towing another vehicle.
! Period Charge:
Set whether to include toll roads with restricted time access where you can purchase a pass or vignette to use the road for
a longer period of time. This option can be
enabled or disabled separately from toll
roads.
! Per-use Toll:
Set whether to include toll roads where
there is a per-use charge. The navigation
system includes toll roads by default.
! Ferries:
Set whether to include ferries. The navigation system includes ferries by default.
! Carpool/HOV*:
Sets whether to include the carpool or HOV
lanes. The navigation system excludes carpool or HOV by default.
p Carpool or HOV lanes can be used if a
given number of passengers are travelling in the vehicle.
! Unpaved Roads:
Set whether to include unpaved roads. The
navigation system excludes unpaved roads
by default.
! Calculate Green Alternative*:
If the selected routing method is not
“Green”, you can have your route compared
to the best green alternative on the screen
when confirming the route. If this alternative is much better than the selected method, you can quickly switch to “Green”
mode.
5 Touch [Back] to confirm the changes.
The navigation system recalculates the route.
The orange line now shows the new recommended route.
Setting the waiting time at
waypoints
p This function is only available on AVIC-
F160.
You can specify a waiting time for each stop
on your route which allows the navigation system to estimate a more precise arrival time,
and use time restrictions and statistical traffic
information en route to your destination.
p If you enable this feature, your navigation
system will ask you to enter the time you
will spend at a stopover every time you
enter a new destination.
1 Touch [Menu] on the map screen.
The “Navigation Menu” screen appears.
= For details of the operations, refer to Screen
switching overview on page 18.
2 Touch [More...], then [Settings].
3 Touch [Driving Time Management].
4 Touch [Ask for Waiting Time] to enable
or disable this option.
Checking and modifying the current route
Engb
45
Page 46

Chapter
08
Checking and modifying the current route
5 When finished, touch and hold [Back].
The map screen returns.
Setting driving time alerts
p This function is only available on AVIC-
F160.
You can set countdown timers to alert you
when you need a break or a sleep. This feature
can be set for one driver or two alternative drivers.
1 Touch [Menu] on the map screen.
The “Navigation Menu” screen appears.
= For details of the operations, refer to Screen
switching overview on page 18.
2 Touch [More...], then [Settings].
3 Touch [Driving Time Management].
4 Touch [Configure Driving Timers].
5 Set the driving timer defaults for the
driver.
When a break is initiated, the continuous driving timer stops and it is reset to its default
value, the daily driving timer also stops, and
the break time starts counting down (the
break starts from the moment when the vehicle stopped). When the vehicle is in motion
again, the break timer is reset, and both driving timers start counting down again.
Modifying the route
When navigation is already started, there are
several ways to modify the current route. The
following sections describe some of those options.
p You can select [2 Drivers] to use the vehicle
with two drivers. The timer defaults are the
same but the timers will count down for
each driver individually.
6 When finished, touch and hold [Back].
The map screen returns.
Whenever the vehicle stops, the current driver
receives a message a few minutes later
whether this stop means a break.
46
Engb
Page 47

Checking and modifying the current route
Chapter
08
Selecting a new destination
when a route is already set
If you already have a recommended route and
you select a new destination, the navigation
system will ask you whether to start a new
route, add a new waypoint to the route or append the newly selected destination at the end
of the current route.
! New Route:
Touch this key to plan a new route to the
newly selected location. The previous destination and waypoint(s) are deleted.
! Waypoint:
Touch this key to add the newly selected location as a waypoint to your route. The
other destinations of the route remain intact.
p The new waypoint is placed among des-
tinations to keep the route optimal. To
decide where a waypoint to appear, use
the “Edit Route” menu.
! Final Destination:
Touch this key to append the newly selected destination at the end of the route.
The other destinations of the route remain
intact. The previous final destination is now
the last waypoint.
the route to a different location than the current GPS position.
1 Touch [Menu] on the map screen.
The “Navigation Menu” screen appears.
= For details of the operations, refer to Screen
switching overview on page 18.
2 Touch [My Route] on the “Navigation
Menu” screen.
3 Touch [Edit Route] when you already
have a route.
Checking and modifying the current route
4 Touch on the first line (normally the
current GPS position) and confirm your action on the warning message screen.
5 Touch [Set Start Point].
Setting a new starting position
for the route
For normal navigation, all routes are planned
from the current position. In order to check future routes, simulate them or see their length
in time and distance, you can turn off the GPS
receiver. Then you can set the starting point of
Engb
47
Page 48

Chapter
08
Checking and modifying the current route
6 Select the start point of the route the
same way as you select a destination.
7 Touch [Set Start].
8 Select [Go] when the new start point is
set.
The map screen returns with a transparent
arrow mark (showing that there is no GPS reception). If the current route already existed, it
is now recalculated starting from the selected
location.
# Touch [Turn on GPS].
Normal navigation returns.
= For details, refer to Seeing the current posi-
tion on the map on page 22.
Editing the list of destinations
You can edit the route by modifying the list of
destinations. You can add or remove destinations, modify the start position or reorder the
list.
1 Touch [Menu] on the map screen.
The “Navigation Menu” screen appears.
= For details of the operations, refer to Screen
switching overview on page 18.
2 Touch [My Route] on the “Navigation
Menu” screen.
3 Touch [Edit Route] when you already
have a route.
! :
Touch this key to add a new destination.
!
:
Touch this key to delete a destination.
!
:
Touch this key to modify the start point of
the route.
! More:
Touch this key to reorder the list. You can do
it manually or you can let this system optimise the route for you.
Cancelling the current
route guidance
If you no longer need to travel to your destination, follow the steps below to cancel the route
guidance. You can cancel it from either the
“Navigation Menu” screen or the map
screen.
1 Touch [Menu] on the map screen.
The “Navigation Menu” screen appears.
= For details of the operations, refer to Screen
switching overview on page 18.
2 Touch [My Route] on the “Navigation
Menu” screen.
3 Touch [Cancel Route].
The current route is deleted with all its
waypoints.
48
Engb
Page 49

Checking and modifying the current route
Chapter
08
Checking route alternatives
for the current route
To recalculate the current route with a different route planning method, you can modify
the settings for the route calculation (refer to
Checking and modifying the current route on
page 41). There is another way to do this and
to compare different route alternatives with
the same route planning method.
1 Touch [Menu] on the map screen.
The “Navigation Menu” screen appears.
= For details of the operations, refer to Screen
switching overview on page 18.
2 Touch [My Route] on the “Navigation
Menu” screen.
3 Touch [More].
4 Touch [Route Alternatives].
6 Select one of the alternatives and
touch [Back].
The map screen returns. The navigation system recalculates the route. The orange line
now shows the new recommended route.
Checking and modifying the current route
Watching the simulation of
the route
You can run a simulated navigation that demonstrates the current route. Follow the steps
below.
1 Touch [Menu] on the map screen.
The “Navigation Menu” screen appears.
= For details of the operations, refer to Screen
switching overview on page 18.
2 Touch [My Route] on the “Navigation
Menu” screen.
5 Touch any of the alternatives to see it
on the map.
If you cannot find a good alternative, touch
[More Results] and scroll down for routes
with different routing methods.
3 Touch [More].
Engb
49
Page 50

Chapter
08
Checking and modifying the current route
4 Scroll down the list and touch [Simulate
Navigation].
The simulation starts from the starting point of
the route, and using a realistic speed, it leads
you through the whole recommended route.
p During simulation, you can use the follow-
ing control keys (they disappear after a few
seconds but you can open them again by
touching the map).
!
:
Jumps to the previous guidance point
(manoeuvre).
!
:
Pauses the simulation.
!
:
Jumps to the next guidance point (manoeuvre).
!
:
Increases the speed of the simulation to
four, eight or 16 times faster. Touching the
key again returns to the normal speed.
# Touch [Back].
The simulation stops.
destinations in a straight line regardless of the
road network and traffic regulations.
1 Touch [More...], then [Settings].
2 Touch [Route Settings].
3 Touch [Navigation Mode], then select
[Off-road].
Navigating in off-road mode
You can switch your navigation to off-road
mode. The off-road mode navigates between
50
Engb
Page 51

Registering and editing locations
Chapter
09
Storing a location in
“Favourites”
Storing your favourite locations as “Favour-
ites” provides you with the opportunity to save
the time and effort of re-entering this information. “Favourites” can include your home location, favourite places, destinations you have
already registered and any location on the
map.
1 Select a destination.
= For details, refer to Searching for and select-
ing a location on page 28.
2 When the map screen appears with the
selected location in the middle, touch
[More].
3 Touch [Add to Favourites].
To change the name, use the keyboard. Touch
to enter numbers or symbols.
4 Touch [Done].
Saving a location as an
alert point
Alert points are preloaded in your navigation
system. You can also download more from our
website, or save any map location as an alert
point (a speed camera or a railway crossing,
for example).
p This feature can warn you when you ap-
proach one of these points. The following
alert types are available:
! Audio and Visual: A sound beeps or
announces the type of the alert.
! Visual: The type of the alert point, its
distance and the related speed limit appear on the map.
= For details, refer to Setting the volume and
the guidance voice for navigation system on
page 55.
1 Touch [Menu] on the map screen.
The “Navigation Menu” screen appears.
= For details of the operations, refer to Screen
switching overview on page 18.
2 Touch [More...], then [Settings].
3 Touch [Sound and Warnings].
4 Touch [Alert Point Settings].
5 Touch [Alert Point Warnings], then
[Turn On].
Registering and editing locations
The location is saved as a new “Favourites”
destination.
6 Scroll the map and select a location.
The cursor appears at the selected point.
7 Touch [More].
8 Scroll down the list and touch [Add
Alert Point].
Engb
51
Page 52

Chapter
09
Registering and editing locations
9 Set the necessary parameters.
! Type of Alert:
Set the type of alert point.
! Direction of Alert:
Set the direction from which you expect the
alert.
! Speed Limit:
Set the speed limit for this alert point (if applicable).
10 Touch [Save].
The location is saved as a new alert point.
p The warning for road safety cameras (like
speed cameras) is disabled when you are in
certain countries where road safety camera
warning is prohibited. However, you are
fully responsible for ensuring that this feature is legal in the country where you intend
to use it.
3 Scroll down the list and touch [Edit
Alert Point].
4 Modify the necessary parameters.
! Type of Alert:
Modify the type of alert point.
! Direction of Alert:
Modify the direction from which you expect
the alert.
! Speed Limit:
Modify the speed limit for this alert point (if
applicable).
Editing an alert point
You can edit a previously saved alert point (a
speed camera or a railway crossing, for example).
1 Scroll the map and select the alert point
to edit.
The cursor appears around the alert point.
2 Touch [More].
52
Engb
5 Touch [Save].
The changes are saved to the alert point.
p The warning for road safety cameras (like
speed cameras) is disabled when you are in
certain countries where road safety camera
warning is prohibited. However, you are
fully responsible for ensuring that this feature is legal in the country where you intend
to use it.
Page 53

Using traffic information
Chapter
10
! If you want to use the Traffic information
function in Russia, access
www.naviextras.com
beforehand and activate the service.
! The service activation is subject to fees.
Checking historical traffic
information
When this feature is enabled on the “Traffic”
settings menu, the navigation system can take
the traffic information into account when planning a route. For settings, follow the steps
below.
1 Touch [Menu] on the map screen.
The “Navigation Menu” screen appears.
= For details of the operations, refer to Screen
switching overview on page 18.
2 Touch [More...].
3 Touch [Settings], then [Traffic].
4 Touch [Historical Traffic] and enable the
historical traffic data.
Receiving real-time traffic
information (TMC)
Traffic Message Channel (TMC) can provide
you with the real-time status of the traffic. Your
device contains the TMC receiver that is
needed to receive traffic incidents (the receiver
is enabled by default). If you need to enable
the TMC receiver, follow the steps below.
1 Touch [Menu] on the map screen.
The “Navigation Menu” screen appears.
= For details of the operations, refer to Screen
switching overview on page 18.
2 Touch [More...].
3 Touch [Settings], then [Traffic].
4 Touch [Traffic Receiver] and enable the
receiver.
Using traffic information
p When the traffic data is available, a 2D map
is displayed with road segments coloured
by the density of the traffic in the given period.
p You can modify the day of week and the
time of day to see the desired period.
p You can disable this feature on public holi-
days, for example, in order not to take into
account normal weekday traffic jams.
p When traffic information that may affect
your route is received, this system will warn
you that it is recalculating the route, and
navigation will continue with a new route
that is optimal considering the most up-todate traffic conditions.
To fine-tune this calculation, you can set the
minimum delay that can trigger a route recalculation, or you can instruct the software to
have you confirm the new recommended
route before it takes effect. You can set these
in “Traffic” settings.
= For details of the traffic information icons,
refer to Setting the traffic information on
page 57.
Engb
53
Page 54

Chapter
10
Using traffic information
p When the traffic data is available, a 2D map
is displayed with road segments coloured
by the severity of traffic incidents. Touch the
event type icon at the road segment and
then touch
traffic incident.
p TMC is not a global service. It may not be
available in your country or region. Ask your
local dealer for coverage details.
to get information about the
Checking the traffic incidents
on the map
You can check the details of traffic incidents
on the map.
p Road segments affected by traffic incidents
are displayed with an alternate colour on
the map, and small symbols above the road
show the nature of the incident.
p A special icon
whether traffic incidents are received. The
icon shows the status of the traffic receiver
when there are no traffic incidents on your
route, otherwise it shows the type of the
next traffic incident on your route.
appears to show you
1 Touch
2 Touch [Event List].
The list of traffic incidents appears.
3 Touch any of the list items to see its details, and to display the affected road segment on the map.
If there are traffic incidents on the recommended route that this system has not bypassed, the
significant traffic incidents to let you quickly
check them.
54
Engb
.
icon will open the list of
Page 55

Customising preferences
Chapter
11
Displaying the settings screen
1 Touch [Menu] on the map screen.
The “Navigation Menu” screen appears.
= For details of the operations, refer to Screen
switching overview on page 18.
2 Touch [More...].
3 Touch [Settings].
4 Touch the setting item.
Setting the volume and the
guidance voice for
navigation system
You can adjust the sound volume, mute your
device or change the voice guidance language.
1 Display the settings screen.
= For details of the operations, refer to Dis-
playing the settings screen on page 55.
2 Touch [Sound and Warnings].
3 Touch the setting item.
! Volume:
You can adjust the volume of the following
sounds in this system. If you touch this key,
a new screen appears where you can set
the following sound types and their controls.
! Voice: These controls affect the volume
of the guidance sounds (verbal instructions).
! Ding: Turn off the attention tone preced-
ing verbal instructions or adjust its volume.
! Alert Beeps: These controls affect the
volume of the non verbal alert sounds
(beeps).
! Key: Key sounds provide audible confir-
mation of either pressing hardware keys
or touching the touch panel screen.
These controls affect key sounds.
! Voice Language:
Displays the current voice guidance profile.
If you touch this key, you can select a new
profile from the list of available languages
and speakers. Touch any of these to hear a
sample voice prompt. Just touch [Back]
when you have selected the new spoken
language.
Different voice profiles are capable of different levels of service:
! Natural Voice: These prerecorded
sounds can only tell you basic information about turns and distances.
! TTS Voice: These computed voices can
tell you complex instructions. They can
tell you the street names or read out the
messages for you.
! Advanced Settings:
You can set this system to read the street
names in a foreign country, use road numbers in your language or announces the
manoeuvre only.
You can also decide whether you want an
announcement for distance manoeuvres or
it is enough to receive the information
when the turn is near.
! Verbosity Level:
You can set the verbosity of the voice instructions: how much information is given
and how often the prompts occur.
! Speed Warning Settings:
This system is able to warn you if you exceed the current limit. This information may
not be available for your region (ask your
local dealer), or may not be fully correct for
all roads in the map.
Customising preferences
Engb
55
Page 56

Chapter
11
Customising preferences
The maximum speed set in the vehicle profile is also used for this warning. This system alerts you if you exceed the preset
value even if the legal speed limit is higher.
This setting lets you decide whether you
wish to receive visible and/or audible warnings.
Adjust the slider to set the relative speed
above which the application initiates the
warning.
The following alert types are available:
! Audio and Visual: you receive a verbal
warning when you exceed the speed
limit with the given percentage.
! Visual: the current speed limit is shown
on the map when you exceed it.
If you prefer to see the speed limit sign on
the map all the time (normally it is shown
only if your speed exceeds it), you can set it
here.
! Alert Point Settings:
This feature allows you to receive a warning
when approaching a Road Safety Camera
or other alert points like school zones or
railroad crossings. You must ensure on
your own liability that using this feature is
legal in the country where you intend to use
it.
You can set the alert for the different alert
point categories individually. The following
alert types are available:
! Audio and Visual: beeps can be played
(natural voice) or the type of the alert
can be announced (TTS) while you are
approaching one of these points, and an
extra alert can warn you if you exceed
the given speed limit while approaching.
! Visual: the type of the alert point, its dis-
tance and the related speed limit appear
on the map screen while you are ap-
proaching one of these cameras.
For some of the alert points, the enforced or
expected speed limit is available. For these
points, the audio alert can be different if
you are below or above the given speed
limit.
! When approaching: The audio alert is
always played when approaching one of
these alert points. In order to draw your
attention, the alert is different when you
exceed the speed limit.
! Only when speeding: The audio alert is
only played when you exceed the given
speed limit.
! Warning Sign Alerts:
Maps may contain driver alert information.
Touch this key to turn on or off these warnings and to set the distance from the hazard to receive the warning at. These can be
set individually for the different warning
types.
Customising the quick menu
You can customise the items of the quick
menu.
1 Display the settings screen.
= For details of the operations, refer to Dis-
playing the settings screen on page 55.
2 Touch [Customise Quick Menu].
3 Touch the key from the list that you
want to set.
! Favourites:
Displays the list of your favourite destinations.
! Overview:
Displays a 2D map scaled and positioned to
show the entire route.
! Quick Place Search:
This function lets you search for a place
along your route or around your current location if there is no route calculated.
! Map Settings:
Displays the map related settings.
! Visual Guidance Settings:
Displays the settings related to route information on the map screen.
! Traffic:
Displays the traffic information.
! Avoid:
56
Engb
Page 57

Customising preferences
Chapter
11
Touching this key lets you bypass parts of
the recommended route.
! Cancel Route:
Cancels the route and stops navigation. The
key is replaced with the next one if waypoints are given.
! Remove Next Waypoint:
Skips the next waypoint from the route.
! Trip Monitor:
Displays the “Trip Monitor” where you can
manage your trip logs and track logs that
you previously saved.
! Where Am I?:
Displays a special screen with information
about the current position and a key to
search for nearby emergency or roadside
assistance services.
! Create Route/Edit Route:
Displays the screen for creating a route to
the destination or editing the current route.
! Itinerary:
Displays the list of manoeuvres (the itinerary).
! Vehicle Profile:
Displays the parameters of the selected vehicle profile.
! Save Route:
With this function you can save the active
route for later use.
! Load Route:
With this function you can replace the active route with a previously saved route.
! History:
Displays the destinations history list. You
can select one of your previous destinations.
! Route Settings:
Displays the route related settings.
! Find Places:
With this function you can search for Points
of Interest in various different ways.
! Simulate Navigation:
Displays the map screen and starts simulating the active route.
! GPS Info:
Displays the GPS information screen with
satellite position and signal strength information.
! Configure Driving Timers:
Displays the screen for setting the driving
timers.
p This item is available for AVIC-F160
only.
Setting the traffic information
The recommended route is not always the
same between two points. Whenever suitable
data exists, traffic information can be taken
into account in the route calculation.
1 Display the settings screen.
= For details of the operations, refer to Dis-
playing the settings screen on page 55.
2 Touch [Traffic].
3 Touch the setting item.
! Historical Traffic:
You can switch to enable or disable historical traffic data and traffic patterns by touching this key. This locally stored information
can be very useful in normal circumstances
but for example on public holidays it may
be better to turn off in order not to take into
account normal weekday traffic jams.
! Traffic Receiver:
You can set to enable or disable the TMC receiver that can receive real-time traffic information. The following items (Detour, and
Event types) are all related to the TMC function and are available only if the receiver is
enabled.
! Detour:
This setting determines how this system
uses the received real-time traffic information in route calculation. When calculating
a new route, or when recalculation becomes necessary based on the received
traffic events, this system avoids traffic
events if it makes sense.
Customising preferences
Engb
57
Page 58

Chapter
11
Customising preferences
You can also set the minimum delay that
triggers route recalculation, and you can instruct the application if you want to confirm
every recalculation.
! Event Types:
Touch this key to open the list of traffic
event types, and select which events to take
into account in route calculation.
Setting the user profiles
If more drivers use this navigation system,
their settings can be remembered by using
one of the user profiles.
1 Display the settings screen.
= For details of the operations, refer to Dis-
playing the settings screen on page 55.
2 Touch [User Profiles].
3 Touch the key on the right of new profile that you want to set.
p Rename the profiles so that all users know
which profile to use and switch between
profiles by touching its name.
p If you select a new profile, this system re-
starts so that the new settings can take
effect.
Customising the map
screen settings
You can fine-tune the appearance of the map
screen.
Adjust the map view to your needs, choose
suitable colour themes from the list for both
daytime and night use, change the blue arrow
to a 3D car model, show or hide 3D buildings,
turn track logging on or off, and manage your
place visibility settings (which places to show
on the map).
1 Display the settings screen.
= For details of the operations, refer to Dis-
playing the settings screen on page 55.
2 Touch [Map Settings].
The “Map Settings” screen appears.
3 Touch the setting item.
You can see the effect when you change a setting.
! View Mode:
Switch the map view between a 3D perspective view and a 2D topdown view.
! Viewpoint:
Adjust the basic zoom and tilt levels to your
needs. Three levels are available.
! Automatic Overview:
When selected, the map zooms out to show
an overview of the surrounding area if the
next route event (manoeuvre) is far. When
you get close to the event, the normal map
view returns.
! Colours:
Switch between daytime and night colour
modes or let the software switch between
the two modes automatically a few minutes
before sunrise and a few minutes after sunset.
! Day Map Colour:
Select the colour scheme used in daytime
mode.
! Night Map Colour:
Select the colour scheme used in night
mode.
! 3D Vehicle Gallery:
Replace the default position marker to one
of the 3D vehicle models.
You can select separate icons for different
vehicle types selected for route planning.
Separate icons can be used for car, pedestrian and the other vehicles.
! Landmarks:
Show or suppress 3D landmarks, 3D artistic
or block representations of prominent or
well-known objects.
! Buildings:
Show or suppress 3D city models, 3D artistic or block representation of full city building data containing actual building size
and position on the map.
! 3D Terrain:
58
Engb
Page 59

Customising preferences
Chapter
11
Show or suppress the 3D elevation of the
surrounding terrain.
! Track Logs:
Turn on or off track log saving, that is, saving the sequence of the locations your journeys go through.
! Place Markers:
Select which places to show on the map
while navigating. Too many places make
the map crowded so it is a good idea to
keep as few of them on the map as possible. For this, you have the possibility to save
different place visibility settings. You have
the following possibilities:
! Touch the checkbox to show or hide the
place category.
! Touch the name of the place category to
open the list of its subcategories.
! Touch [More] to save the current place
visibility set or to load a previously saved
one. Here you can also revert to the default visibility settings.
Setting the visual guidance
Adjust how this system helps you navigate
with different kinds of route related information on the map screen.
1 Display the settings screen.
= For details of the operations, refer to Dis-
playing the settings screen on page 55.
2 Touch [Visual Guidance Settings].
3 Touch the setting item.
! Data Fields:
The data fields in the corner of the map
screen can be customised. Touch this key
and select the values you want to see. The
values can be different when you navigate a
route from when you are just cruising without a given destination. You can select general trip data like your current speed or the
altitude, or route data related to your final
destination or the next waypoint on your
route.
! Offer Motorway Services:
You may need a petrol station or a restaurant during your journey. This feature displays a new key on the map when you are
driving on motorways. Touch this key to
open a panel with the details of the next few
exits or service stations. Touch any of them
to display it on the map and add it as a waypoint to your route if needed.
! Facility Types:
Select the service types displayed for the
motorway exists. Choose from the POI categories.
! Signposts:
Whenever adequate information is available, lane information similar to the real
ones on road signs above the road is displayed at the top of the map. You can turn
this feature on or off.
! Junction View:
Customising preferences
Engb
59
Page 60

Chapter
11
Customising preferences
If you are approaching a motorway exit or a
complex intersection and the needed information exists, the map is replaced with a
3D view of the junction. You can turn this
feature on or let the map be displayed for
the whole route.
! Tunnel View:
When entering tunnels, the surface roads
and buildings can be distracting. This feature shows a generic picture of a tunnel instead of the map. A top-down overview of
the tunnel and remaining distance are also
displayed.
! Route Progress Bar:
Turn on the route progress bar to see your
route as a straight line on the left side of
the map. The blue arrow represents your
current position and moves up as you travel. Waypoints and traffic events are also
displayed on the line.
! Offer Congestion Detour on Highways:
When you slow down while driving on a motorway, there is a chance that you are in a
traffic jam so this system offers you a detour using the next exit. The message
shows you distance of the exit and the difference in distance and estimated time
compared to the original route. You can
choose from one of the following options:
! Touch [Dismiss] or just ignore the mes-
sage if you want to keep the original
route.
! Touch [Preview] to see the overview of
the original route and the detour to
make the decision. You can accept the
detour as offered or increase the by-
passed motorway segment before ac-
cepting.
! Turn to the suggested new direction and
the route will be automatically recalcu-
lated.
! Offer Real-time Route Alternatives:
Alternative routes can be suggested when
driving on normal roads. This system will
select a different turn in the upcoming intersection and offers you a different route
for the next section of the route. But you
cannot modify the offered detour.
! Offer Parking Around Destination:
Parking at the destination may not be easy
in city areas. As you approach the destination, this system can offer parking category
places near your destination. Touch this key
to open a top-down map with the destination and the offered parking places. Select
one and modify the route accordingly.
! Offer Hints Upon Detour:
If you leave the recommended route and
suddenly exit the motorway, this system offers different alternatives near the exit like
petrol stations or restaurants. Also, if there
are avoidable parts of the original route
ahead (like a tunnel, a toll road or a ferry),
you will find them in the list in case you
want to bypass them with the help of this
system.
Customising the display
settings
Display related settings include menu animations and the brightness of the display.
1 Display the settings screen.
= For details of the operations, refer to Dis-
playing the settings screen on page 55.
2 Touch [Display].
3 Touch the setting item.
! Menu Animations:
When animation is turned on, keys on
menus and keyboard screens appear in an
animated way. Screen transitions are also
animated.
60
Engb
Page 61

Customising preferences
Chapter
11
Customising the regional
settings
These settings allow you to customise this system for your local language, measurement
units, time and date settings and formats, as
well as to choose the time zone.
1 Display the settings screen.
= For details of the operations, refer to Dis-
playing the settings screen on page 55.
2 Touch [Regional].
3 Touch the setting item.
! Program Language:
This key displays the current written language of the user interface. By touching
the key, you can select a new language
from the list of available languages. This
system will restart if you change this setting.
! Units and Formats:
You can set the distance units to be used by
this system. This system may not support
all the listed units in some voice guidance
languages.
Select between 12 and 24 hours time display and the various international date display formats.
You can also set other country specific
units used to display different values in this
system.
! Time Zone:
By default, time zone is taken from the map
information and adjusted by your current location. Here you can set time zone and
summer time manually.
Setting the Trip Monitor
Trip logs contain useful information about
your trips. Trip logs can be saved manually
when you reach your destination or you can
turn on the automatic saving here. You can access these logs in the “Trip Monitor”. “Trip
Monitor” is available from the “More...”
menu.
1 Display the settings screen.
= For details of the operations, refer to Dis-
playing the settings screen on page 55.
2 Touch [Trip Monitor].
3 Touch [More], then touch [Trip Monitor
Settings].
4 Touch the setting item.
! Enable Auto-Saving:
Trip monitor can record statistical data of
your trips. If you need these logs later, you
can let this system save them automatically
for you.
! Trip Database Size:
You cannot select this. This line shows the
current size of the trip database, the sum of
all trip and track logs saved.
! Save Track Log:
Track logs, the sequence of the positions
given by the GPS receiver, can be saved together with trip logs. They can later be displayed on the map. You can let this system
save the track log whenever it saves a
trip.
Starting the configuration
wizard
Modify the basic software parameters set during the initial setup process.
= For details, refer to On first-time startup on
page 16.
1 Display the settings screen.
= For details of the operations, refer to Dis-
playing the settings screen on page 55.
2 Touch [Start Configuration Wizard].
Customising preferences
Engb
61
Page 62

Chapter
11
Customising preferences
3 Select the language that you want to
use for voice guidance messages, then
touch [Next].
p Later you can change it in “Sound and
Warnings” settings.
= For details, refer to Setting the volume and
the guidance voice for navigation system on
page 55.
4 If needed, modify the time format and
unit settings, then touch [Next].
p Later you can change it in “Regional” set-
tings.
= For details, refer to Customising the regional
settings on page 61.
5 If needed, modify the default route
planning options, then touch [Next].
p Later you can change them in “Route Set-
tings”.
= For details, refer to Setting the route calcula-
tion on page 44.
Resetting to the default
settings
Delete all saved data and reset all settings to
their factory defaults.
1 Display the settings screen.
= For details of the operations, refer to Dis-
playing the settings screen on page 55.
2 Touch [Reset to Defaults].
62
Engb
Page 63

Other operations
Chapter
12
More menu
The “More...” menu provides you with various
options and additional applications.
1 Touch [Menu] on the map screen.
The “Navigation Menu” screen appears.
= For details of the operations, refer to Screen
switching overview on page 18.
2 Touch [More...].
3 Touch the desired menu item.
! Settings:
You can configure the program settings,
and modify the behaviour of the software,
fine-tune route planning options, change
the look of the map screen, turn on or off
warnings, or restart the configuration wizard, etc.
! Updates and Extras:
Visit www.naviextras.com to get additional
content, such as new maps or 3D landmarks and useful applications.
! Unit Converter:
Access travel applications: the unit converter helps you convert between various different international units for temperature,
speed, area or pressure, etc.
! Clothing:
Access travel applications: the clothing size
converter helps you convert between various different international size units for
men’s or women’s cloth types and shoes.
! Fuel Consumption:
The Fuel consumption monitor helps you
keep track of the consumption of your car
even if you do not use navigation for all
your journeys. Set the initial odometer value
and then record the distance taken and fuel
filled in whenever you fill your car. You can
also set reminders for regular car maintenance.
! Sunrise & Sunset:
Touch this key to see the sunlit and dark
areas of the world. Your current location
and route points are marked on the map.
Touch [Details] to see the exact sunrise and
sunset times for all your route points (your
current location, all waypoints and the final
destination).
! Trip Monitor:
If you save your trip logs when you arrive at
some of your destinations or let this system
automatically save the trip logs for you,
those logs are all listed here. Touch one of
the trips to see the trip statistics, speed and
altitude profile. If track log has also been
saved, you can display it on the map with
the selected colour. Track logs can be exported to GPX files for later use.
! Country Information:
Select a country from the list and see useful
driving information about the selected
country. Information may include speed
limits on different road types, the maximum
blood alcohol level and any compulsory
equipment you need to show when stopped
by the police.
! Calculator:
The scientific calculator helps you in all
your calculation needs. Touch [MODE] for
additional functions and use the memory to
save your results.
! Help:
Run the Demo to watch sample route simulations to see how navigation works. The
“About” section provides you with product
information. Read the software and database end user licence agreement, or check
the map and other contents of the application. You can also access program usage
statistics.
Other operations
Engb
63
Page 64

Chapter
13
Installation
Important safeguards
WARNING
Pioneer does not recommend that you install
your navigation system yourself. This product is designed for professional installation
only. We recommend that only authorised
Pioneer service personnel, who have special
training and experience in mobile electronics, set up and install this product. NEVER
SERVICE THIS PRODUCT YOURSELF. Installing or servicing this product and its connecting cables may expose you to the risk of
electric shock or other hazards, and can
cause damage to the navigation system that
is not covered by warranty.
! Read this manual fully and carefully before
installing your navigation system.
! As with any accessory in your vehicle’s in-
terior, the navigation system should not divert your attention from the safe operation
of your vehicle as it may result in serious
injury or death. If you experience difficulty
in operating the system or reading the display, please make adjustments while safely
parked.
Precautions before
connecting the system
CAUTION
! If you decide to perform the installation
yourself, and have special training and experience in the mobile electronics installations, please carefully follow all of the
steps in the installation manual.
! Secure all wiring with cable clamps or
electrical tape. Do not allow any bare wiring to remain exposed.
! Do not directly connect the yellow lead of
this product to the vehicle battery. If the
lead is directly connected to the battery,
engine vibration may eventually cause
the insulation to fail at the point where
the wire passes from the passenger compartment into the engine compartment. If
the yellow lead’s insulation tears as a result of contact with metal parts, short-circuiting can occur, resulting in
considerable danger.
! It is extremely dangerous to allow cables
to become wound around the steering column or gearstick. Be sure to install this
product, its cables, and wiring away in
such so that they will not obstruct or hinder driving.
! Make sure that the cables and wires will
not interfere with or become caught in
any of the vehicle’s moving parts, especially the steering wheel, gearstick, handbrake, sliding seat tracks, doors, or any of
the vehicle’s controls.
! Do not route wires where they will be ex-
posed to high temperatures. If the insulation heats up, wires may become
damaged, resulting in a short circuit or
malfunction and permanent damage to
the product.
! Do not cut the GPS aerial cable to shorten
it or use an extension to make it longer.
Altering the aerial cable could result in a
short circuit or malfunction.
! Do not shorten any leads. If you do, the
protection circuit (fuse holder, fuse resistor or filter, etc.) may fail to work properly.
! Never feed power to other electronic pro-
ducts by cutting the insulation of the
power supply lead of the navigation system and tapping into the lead. The current
capacity of the lead will be exceeded,
causing overheating.
64
Engb
Page 65

Installation
Chapter
13
Before installing this product
! Use this unit with a 12-volt battery and ne-
gative earthing only. Failure to do so may
result in a fire or malfunction.
! To avoid shorts in the electrical system, be
sure to disconnect the (–) battery cable before installation.
To prevent damage
WARNING
! The black lead is earth. Please earth this
lead separately from the earth of high-current products such as power amps. Do not
earth more than one product together
with the earth from another product. For
example, you must separately earth any
amp unit away from the earth of this navigation system. Connecting earths together can cause a fire and/or damage the
products if their earths became detached.
! When replacing the fuse, be sure to only
use a fuse of the rating prescribed on this
product.
! When disconnecting a connector, pull the
connector itself. Do not pull the lead, as
you may pull it out of the connector.
! This product cannot be installed in a vehi-
cle without ACC (accessory) position on
the ignition switch.
C
C
A
O
F
N
F
O
S
T
A
R
T
O
F
N
F
O
S
T
A
R
T
Installation
ACC position No ACC position
! To avoid short-circuiting, cover the discon-
nected lead with insulating tape. It is especially important to insulate all unused
speaker leads, which if left uncovered may
cause a short circuit.
! Attach the connectors of the same colour
to the corresponding coloured port, i.e.,
blue connector to the blue port, black to
black, etc.
Engb
65
Page 66

Chapter
13
Installation
Precautions before
installation
CAUTION
! Never install this product in places where,
or in a manner that:
! Could injure the driver or passengers if
the vehicle stops suddenly.
! May interfere with the driver’s opera-
tion of the vehicle, such as on the floor
in front of the driver’s seat, or close to
the steering wheel or gearstick.
! Make sure there is nothing behind the
dashboard or panelling when drilling
holes in them. Be careful not to damage
fuel lines, brake lines, electronic components, communication wires or power
cables.
! When using screws, do not allow them to
come into contact with any electrical lead.
Vibration may damage wires or insulation,
leading to a short circuit or other damage
to the vehicle.
! To ensure proper installation, be sure to
use the supplied parts in the manner specified. If any parts are not supplied with
this product, use compatible parts in the
manner specified after you have the parts’
compatibility checked by your dealer. If
parts other than supplied or compatible
ones are used, they may damage internal
parts of this product or they may work
loose and the product may become detached.
! It is extremely dangerous to allow cables
to become wound around the steering column or gearstick. Be sure to install this
product, its cables, and wiring away in
such so that they will not obstruct or hinder driving.
! Make sure that leads cannot get caught in
a door or the sliding mechanism of a seat,
resulting in a short circuit.
! Please confirm the proper function of
your vehicle’s other equipment after installation of the navigation system.
! Install the navigation system between the
driver’s seat and front passenger seat so
that it will not be hit by the driver or passenger if the vehicle stops quickly.
! Never install the navigation system in
front of or next to the place in the dashboard, door, or pillar from which one of
your vehicle’s airbags would deploy.
Please refer to your vehicle’s owner’s
manual for reference to the deployment
area of the frontal airbags.
66
Engb
Page 67

Installation
Chapter
13
Connecting the system
AV receiver
RGB cable (supplied)
TMC aerial (supplied)
Attach the GPS aerial to
the “GPS ANTENNA” jack
on the side of this product.
3 m
2.65 m
TMC aerial IF
Installation
Insert one end of the RGB cable into the “DATA BUS”
slot on the side of this product and secure it with an
11 mm (.4 in) screw (supplied). Connect the other
end of the cable to RGB IN input on the back of your
Pioneer AV receiver.
2 m
Secure the RGB cable with
the 11 mm (.4 in) screw
Where applicable, secure the cable to
the AV receiver using an 11 mm (.4 in)
screw (supplied).
GPS aerial (supplied)
Affix the double-sided tape (supplied)
on the surface as level as possible
where the GPS aerial faces the
window. Place the GPS aerial on the
double-sided tape.
Fuse (3 A, 250 V)
The navigation unit
Power cord (supplied)
Black (GND)
To vehicle (metal) body.
FUSE
Yellow (B+)
To the terminal that the power is always supplied
regardless of the ignition switch position.
Engb
67
Page 68

Chapter
13
Installation
Installing with the hook
and loop fastener
1 Thoroughly wipe off both surfaces before affixing the hook and loop fastener.
2 Peel off the protective sheet and attach
the hook and loop fastener.
Navigation unit
Protective sheet
3 Decide on the installation position.
4 Peel off the other protective sheet and
install the navigation unit on the surface of
the glove box or similar location.
Navigation unit Protective sheet
68
Surface of the glove box or similar location
Engb
Page 69

Appendix
Appendix
Positioning technology
Positioning by GPS
The Global Positioning System (GPS) uses a
network of satellites orbiting the Earth. Each
of the satellites, which orbit at a height of
21 000 km, continually broadcasts radio signals giving time and position information. This
ensures that signals from at least three can be
picked up from any open area on the earth’s
surface.
The accuracy of the GPS information depends
on how good the reception is. When the signals are strong and reception is good, GPS
can determine latitude, longitude and altitude
for accurate positioning in three dimensions.
But if signal quality is poor, only two dimensions, latitude and longitude, can be obtained
and positioning errors are somewhat greater.
Handling large errors
Positioning errors are kept to a minimum by
combining GPS, dead reckoning and map
matching. However, in some situations, these
functions may not work properly, and the error
may become bigger.
When positioning by GPS is
impossible
! GPS positioning is disabled if signals can-
not be received from more than two GPS
satellites.
! In some driving conditions, signals from
GPS satellites may not reach your vehicle.
In this case, it is impossible for the system
to use GPS positioning.
In tunnels or enclosed parking
garages
When driving
among high buildings
! If a car phone or mobile phone is used near
the GPS aerial, GPS reception may be lost
temporarily.
! Do not cover the GPS aerial with spray
paint or car wax, because this may block
the reception of GPS signals. Snow buildup
can also degrade the signals, so keep the
aerial clear.
p If a GPS signal has not been received for a
long time, your vehicle’s actual position
and the current position mark on the map
may diverge considerably or may not be updated. In such case, once GPS reception is
restored, accuracy will be recovered.
Under elevated
roads or similar
structures
When driving through
a dense forest or tall
trees
Conditions likely to cause
noticeable positioning errors
For various reasons, such as the state of the
road you are travelling on and the reception
status of the GPS signal, the actual position of
your vehicle may differ from the position displayed on the map screen.
Appendix
Engb
69
Page 70

Appendix
Appendix
! If you make a slight turn.
! If there is a parallel road.
! If there is another road very nearby, such
as in the case of an elevated motorway.
! If you take a recently opened road that is
not on the map.
! If the road has a series of hairpin bends.
! If there is a loop or similar road configura-
tion.
! If you take a ferry.
! If you are driving on a long, straight road or
a gently curving road.
! If you drive in zigzags.
70
Engb
! If you are on a steep mountain road with
many height changes.
Page 71

Appendix
Appendix
! If you enter or exit a multi-storey car park or
similar structure using a spiral ramp.
! If your vehicle is turned on a turntable or si-
milar structure.
! If trees or other obstacles block the GPS
signals for a considerable period.
! If you drive very slowly, or in a start-and-
stop manner, as in a traffic jam.
! When you drive around a roundabout.
Appendix
! When starting driving immediately after
starting the engine.
Route setting information
Route search specifications
Your navigation system sets a route to your
destination by applying certain built-in rules to
the map data. This section provides some useful information about how a route is set.
CAUTION
When a route is calculated, the route and voice
guidance for the route are automatically set.
Also, for day or time traffic regulations, only information about traffic regulations applicable at the
time when the route was calculated is considered. One-way streets and street closures may
not be taken into consideration. For example, if a
street is open during the morning only, but you
arrive later, it would be against the traffic regulations so you cannot drive along the set route.
When driving, please follow the actual traffic
signs. Also, the system may not know some traffic regulations.
! If you join the road after driving around a
large car park.
! The calculated route is one example of the
route to your destination decided by the navigation system while taking the type of
streets or traffic regulations into account. It
is not necessarily an optimum route. (In
some cases, you may not be able to set the
streets you want to take. If you need to take
a certain street, set a waypoint on that
street.)
Engb
71
Page 72

Appendix
Appendix
! If the destination is too far, there may be in-
stances where the route cannot be set. (If
you want to set a long-distance route going
across several areas, set waypoints along
the way.)
! During voice guidance, turns and intersec-
tions from the motorway are announced.
However, if you pass intersections, turns,
and other guidance points in rapid succession, some may delay or not be announced.
! It is possible that guidance may direct you
off a motorway and then back on again.
! In some cases, the route may require you
to travel in the opposite direction to your
current heading. In such cases, you are instructed to turn around, so please turn
around safely by following the actual traffic
rules.
! In some cases, a route may begin on the
opposite side of a railway or river from your
actual current location. If this happens,
drive towards your destination for a while,
and try route calculation again.
! When there is a traffic jam ahead, a detour
route may not be suggested if driving
through the traffic jam would still be better
than taking the detour.
! There may be instances when the starting
point, the waypoint and the destination
point are not on the highlighted route.
! The number of roundabout exits displayed
on the screen may differ from the actual
number of roads.
Auto reroute function
! If you deviate from the set route, the system
will re-calculate the route from that point
so that you remain on track to the destination.
! This function may not work under certain
conditions.
SD and SDHC logo
SD Logo is a trademark of SD-3C, LLC.
SDHC Logo is a trademark of SD-3C, LLC.
Route highlighting
! Once set, the route is highlighted in bright
colour on the map.
! The immediate vicinity of your starting
point and destination may not be highlighted, and neither will areas with particularly complex road layouts. Consequently,
the route may appear to be cut off on the
display, but voice guidance will continue.
72
Engb
Page 73

Appendix
Display information
Find
Find Address 28
Find Places 30, 31
Find on Map 34
Favourites 35
History 36
Coordinate 36
My Route
Create Route 39
Edit Route 47, 48
Overview 41
Avoidances 41
Cancel Route 48
More...
Settings
Sound and Warnings 55
Customise Quick Menu 56
Driving Time Management 45, 46
Traffic 53, 57
Route Settings 42, 44
User Profiles 58
Map Settings 58
Visual Guidance Settings 59
Display 60
Regional 61
Trip Monitor 61
Start Configuration Wizard 61
Reset to Defaults 62
Page
More...
Updates and Extras
Unit Converter
Clothing
Calculator
Fuel Consumption
Sunrise & Sunset
Trip Monitor
Country Information
Help
Page
63
Appendix
Appendix
Engb
73
Page 74

Appendix
Appendix
Glossary
Current location
The present location of your vehicle; your current location is shown on the map by a blue
triangle mark (default).
Destination
A location you choose as the end point of your
journey.
Favourites
A frequently visited location (such as your
workplace or a relative’s home) that you can
register to allow easy routing.
GPS
Global Positioning System. A network of satellites that provides navigation signals for a variety of purposes.
Guidance mode
The mode in which guidance is given as you
drive to your destination; the system automatically switches to this mode as soon as a route
has been set.
Guidance point
These are important landmarks along your
route, generally intersections. The next guidance point along your route is indicated on
the map by the flag icon.
matically by the system when you specify a
destination.
Set route
The route marked out by the system to your
destination. It is highlighted in bright colour
on the map.
Track log
Your navigation system logs routes that you already passed through if the track logger is activated. This recorded route is called a “track
log”. It is handy when you want to check a
route travelled or if returning along a complex
route.
Voice guidance
The giving of directions by navigation voice
while in guidance.
Waypoint
A location that you choose to visit before your
destination; a journey can be built up from
multiple waypoints and the destination.
Point Of Interest (POI)
Any of a range of locations stored in the data,
such as railway stations, shops, restaurants,
and amusement parks.
RDS-TMC
A communication system for informing drivers
of the latest traffic information using FM multiplex broadcast. Information such as traffic
jams or accidents can be checked on the display.
Route setting
The process of determining the ideal route to a
specific location; route setting is done auto-
74
Engb
Page 75

Appendix
Specifications
General
Rated power source ............... 14.4 V DC
(allowable voltage range:
12.0 V to 14.4 V DC)
Earthing system ....................... Negative type
Maximum current consumption
..................................................... 0.21A
Dimensions (W × H × D):
............................................... 134mm × 29 mm × 84 mm
Weight .......................................... 140 g
Tolerable temperature range:
Power on ............................ –10 °C to +60 °C
GPS receiver
System .......................................... L1, C/Acode GPS
Reception system .................... 32 tracking/32 acquisition-
channel system
Reception frequency .............. 1 575.42 MHz
Sensitivity .................................... –157.5 dBm (typ)
Position update frequency
..................................................... Approx. once per second
GPS aerial
Aerial ............................................. Micro strip flat aerial/right-
handed helical polarisation
Aerial cable ................................ 3.0 m
Dimensions (W × H × D) ... 50.6 mm × 15.5 mm ×
50.6 mm
Weight .......................................... 85 g
Appendix
Appendix
SD
Compatible physical format
..................................................... Version 2.00
Max memory capacity ........... 32GB
File system .................................. FAT16, FAT32
Note
Specifications and design are subject to possible
modifications without notice due to improvements.
Engb
75
Page 76

PIONEER CORPORATION
1-1, Shin-ogura, Saiwai-ku, Kawasaki-shi,
Kanagawa 212-0031, JAPAN
PIONEER EUROPE NV
Haven 1087, Keetberglaan 1, B-9120 Melsele, Belgium/Belgique
TEL: (0) 3/570.05.11
PIONEER ELECTRONICS (USA) INC.
P.O. Box 1540, Long Beach, California 90801-1540, U.S.A.
TEL: (800) 421-1404
© 2014 PIONEER CORPORATION.
All rights reserved.
<KTSZ13L>
<127075005641> EU,EW
 Loading...