

Page 1
Upgrade Instructions and Operation Manual Addendum
Instructions de mise à jour et Addenda au manuel de
fonctionnement
2012 NAVIGATION UPGRADE microSDHC-CARD
Carte microSDHC de mise à jour 2012
microSDHC di aggiornamento mappa 2012
TARJETA microSDHC DE ACTUALIZACIÓN DE NAVEGACIÓN DE 2012
2012 microSDHC-KARTE FÜR NAVIGATIONS-UPGRADE
2012 NAVIGATIE UPGRADE microSDHC-KAART
T1000-19325
This software upgrade will result in changes to certain features and availability of
information. While the changes are intended to improve the overall user experience
for most users, Pioneer and its licensors disclaim any warranty or liability for
damages in connection with such changes.
Cette mise à jour logicielle modifiera l’accès à certaines fonctions et à certaines
informations. Si ces changements sont destinés à améliorer le confort d’utilisation
de la plupart des consommateurs, Pioneer et ses partenaires déclinent toute
responsabilité pour tout préjudice lié à ces modifications.
Questo software d’aggiornamento modifica certe funzioni e le modalità
d’esposizione o di reperimento di certe informazioni. Nell’assicurare che tali
modifiche sono intese a migliorare il piacere d’uso per la maggior parte degli utenti,
Pioneer ed i suoi licenziatari declinano qualsiasi responsabilità per eventuali danni
connessi a tali cambiamenti.
Esta actualización de software dará lugar a cambios en ciertas características y la
disponibilidad de la información. Mientras que los cambios están destinados a
mejorar la experiencia general del usuario para la mayoría de los usuarios, Pioneer
y sus otorgantes de licencias, declinamos toda responsabilidad por daños y
perjuicios en relación con dichos cambios.
Dieses Software-Upgrade führt zu Änderungen in der Funktionalität und der
Verfügbarkeit von Informationen. Diese Änderungen werden für die meisten Nutzer
eine Verbesserung darstellen. Pioneer und seine Lizenzgeber lehnen jegliche
Gewährleistung oder Haftung für Schäden im Zusammenhang mit diesen
Änderungen ab.
Deze software upgrade bevat niet enkel een update voor de kaart maar ook nieuwe
functionaliteit die bepaalde informatie op een andere manier weergeeft. Daar deze
aanpassingen bedoeld zijn om het gebruik te verbeteren voor de meeste gebruikers,
wijzen Pioneer en haar licentieverstrekkers elke garantie of aansprakelijkheid voor
schade in verband met deze wijzigingen af.
English NederlandsDeutschEspañolItalianoFrançais
Page 2
2
Engb
Page 3
English
Engb
3
Page 4
4
Engb
Page 5
English
Engb
5
Page 6
6
Engb
Page 7
English
Engb
7
Page 8

8
Engb
Page 9
Contents
Thank you for buying this Pioneer product.
Please read through these operating instructions so you will know how to operate
your model properly.
English
Important
! The screens shown in the examples may
differ from actual screens.
! Actual screens may be changed without
notice for performance and function improvements.
Licence agreement
PIONEER PRODUCT 10
About the database
About the data for the map database 12
Precaution
Models to be upgraded 13
Manual overview 13
Conventions used in this manual 13
“microSD card” 14
In case of trouble 14
Visit our website 14
Copyright 14
Changing to the NAVTEQ map database 14
Functions enabled or disabled by
upgrade
Setting items to be deleted and initialised by
upgrade 18
Unchanged functions on the upgraded
programme 18
– Checking whether the upgrade was
done properly 21
– Updating the Bluetooth wireless
technology software (for AVICF10BT) 21
– Updating the Bluetooth wireless
technology software 23
Playing a DVD-VR disc
Starting procedure 25
Reading the screen 25
Using the touch panel keys 26
– Playing by selecting from the title
list 27
– Searching for a specific scene and
starting playback from a specified
time 27
– Switching the playback mode 28
– Using the short-time skip function 28
– Frame-by-frame playback 28
– Slow motion playback 28
Using advanced functions 29
Troubleshooting
Problems in the procedures for updating 30
Messages in the procedures for
updating 30
Instructions for upgrading
The navigation system upgrade process 19
Preparation for upgrade 19
– Checking the device number 19
– Getting the password for
authentication 19
Upgrade procedures 20
– Upgrading the software programme
and the map database 20
Engb
9
Page 10

Chapter
01
Licence agreement
PIONEER PRODUCT
THIS IS A LEGAL AGREEMENT BETWEEN
YOU, AS THE END USER, AND PIONEER
CORP. (JAPAN) (“PIONEER”). PLEASE READ
THE TERMS AND CONDITIONS OF THIS
AGREEMENT CAREFULLY BEFORE USING
THE SOFTWARE INSTALLED ON THE
PIONEER PRODUCTS. BY USING THE SOFTWARE INSTALLED ON THE PIONEER PRODUCTS, YOU AGREE TO BE BOUND BY THE
TERMS OF THIS AGREEMENT. THE SOFTWARE INCLUDES A DATABASE LICENCED BY
THIRD PARTY SUPPLIER(S) (“SUPPLIERS”),
AND YOUR USE OF THE DATABASE IS COVERED BY THE SUPPLIERS’ SEPARATE TERMS
IN A DOCUMENT INCLUDED IN THIS PRODUCT. IF YOU DO NOT AGREE WITH ALL OF
THESE TERMS, PLEASE RETURN THE
PIONEER PRODUCTS (INCLUDING THE SOFTWARE, AND ANY WRITTEN MATERIALS)
WITHIN FIVE (5) DAYS OF RECEIPT OF THE
PRODUCTS, TO THE AUTHORISED PIONEER
DEALER FROM WHICH YOU PURCHASED
THEM.
1 GRANT OF LICENCE
Pioneer grants to you a non-transferable, nonexclusive licence to use the software installed
on the Pioneer products (the “Software”) and
the related documentation solely for your own
personal use or for internal use by your business, only on such Pioneer products.
You shall not copy, reverse engineer, translate,
port, modify or make derivative works of the
Software. You shall not loan, rent, disclose,
publish, sell, assign, lease, sublicence, market
or otherwise transfer the Software or use it in
any manner not expressly authorised by this
agreement. You shall not derive or attempt to
derive the source code or structure of all or
any portion of the Software by reverse engineering, disassembly, decompilation, or any
other means. You shall not use the Software to
operate a service bureau or for any other use
involving the processing of data for other persons or entities.
Pioneer and its licensor(s) shall retain all copyright, trade secret, patent and other proprietary ownership rights in the Software. The
Software is copyrighted and may not be copied, even if modified or merged with other products. You shall not alter or remove any
copyright notice or proprietary legend contained in or on the Software.
You may transfer all of your licence rights in
the Software, the related documentation and a
copy of this Licence Agreement to another
party, provided that the party reads and agrees
to accept the terms and conditions of this Licence Agreement.
2 DISCLAIMER OF WARRANTY
The Software and related documentation are
provided to you “AS IS”. PIONEER AND ITS LICENSOR(S) (for the purpose of provisions 2
and 3, Pioneer and its licensor(s) shall be collectively referred to as “Pioneer”) MAKES AND
YOU RECEIVE NO WARRANTY, WHETHER EXPRESS OR IMPLIED, AND ALL WARRANTIES
OF MERCHANTABILITY AND FITNESS FOR
ANY PARTICULAR PURPOSE ARE EXPRESSLY EXCLUDED. SOME COUNTRIES DO
NOT ALLOW EXCLUSION OF IMPLIED WARRANTIES, SO THE ABOVE EXCLUSION MAY
NOT APPLY TO YOU. The Software is complex
and may contain some nonconformities, defects or errors. Pioneer does not warrant that
the Software will meet your needs or expectations, that operation of the Software will be
error free or uninterrupted, or that all nonconformities can or will be corrected. Furthermore, Pioneer does not make any
representations or warranties regarding the
use or results of the use of the Software in
terms of its accuracy, reliability or otherwise.
10
Engb
Page 11

Licence agreement
Chapter
01
3 LIMITATION OF LIABILITY
IN NO EVENT SHALL PIONEER BE LIABLE
FOR ANY DAMAGES, CLAIM OR LOSS INCURRED BY YOU (INCLUDING, WITHOUT LIMITATION, COMPENSATORY, INCIDENTAL,
INDIRECT, SPECIAL, CONSEQUENTIAL, OR
EXEMPLARY DAMAGES, LOST PROFITS, LOST
SALES OR BUSINESS, EXPENDITURES, INVESTMENTS, OR COMMITMENTS IN CONNECTION WITH ANY BUSINESS, LOSS OF
ANY GOODWILL, OR DAMAGES) RESULTING
FROM THE USE OF OR INABILITY TO USE
THE SOFTWARE, EVEN IF PIONEER HAS
BEEN INFORMED OF, KNEW OF, OR SHOULD
HAVE KNOWN OF THE LIKELIHOOD OF
SUCH DAMAGES. THIS LIMITATION APPLIES
TO ALL CAUSES OF ACTION IN THE AGGREGATE, INCLUDING WITHOUT LIMITATION
BREACH OF CONTRACT, BREACH OF WARRANTY, NEGLIGENCE, STRICT LIABILITY, MISREPRESENTATION, AND OTHER TORTS. IF
PIONEER’S WARRANTY DISCLAIMER OR
LIMITATION OF LIABILITY SET FORTH IN THIS
AGREEMENT SHALL OR FOR ANY REASON
WHATSOEVER BE HELD UNENFORCEABLE
OR INAPPLICABLE, YOU AGREE THAT
PIONEER’S LIABILITY SHALL NOT EXCEED
FIFTY PERCENT (50 %) OF THE PRICE PAID BY
YOU FOR THE ENCLOSED PIONEER PRODUCT.
Some countries do not allow the exclusion or
limitation of incidental or consequential damages, so the above limitation or exclusion
may not apply to you. This warranty disclaimer
and limitation of liability shall not be applicable to the extent that any provision of this
warranty is prohibited by any country or local
law which cannot be pre-empted.
laws and regulations of the Government. If the
English
Software has been rightfully obtained by you
outside of the Country, you agree that you will
not re-export the Software nor any other technical data received from Pioneer, nor the direct product thereof, except as permitted by
the laws and regulations of the Government
and the laws and regulations of the jurisdiction in which you obtained the Software.
5 TERMINATION
This Agreement is effective until terminated.
You may terminate it at any time by destroying
the Software. The Agreement also will terminate if you do not comply with any terms or
conditions of this Agreement. Upon such termination, you agree to destroy the Software.
6 MISCELLANEOUS
This is the entire Agreement between Pioneer
and you regarding its subject matter. No
change in this Agreement shall be effective
unless agreed to in writing by Pioneer. If any
provision of this Agreement is declared invalid
or unenforceable, the remaining provisions of
this Agreement shall remain in full force and
effect.
4 EXPORT LAW ASSURANCES
You agree and certify that neither the Software
nor any other technical data received from
Pioneer, nor the direct product thereof, will be
exported outside the country or district (the
“Country”) governed by the government having
jurisdiction over you (the “Government”) except as authorised and as permitted by the
Engb
11
Page 12
Chapter
02
About the database
About the data for the map
database
! Modifications related to roads, streets/high-
ways, terrain, construction and other things
before/during the development period may
not be reflected in this database. Inevitably,
those modifications after that period are
not reflected in this database.
! Regardless of existing and newly-built
things, the data may be different from the
actual condition.
! For details about the map coverage of this
navigation system, refer to the information
on our website.
! It is strictly prohibited to reproduce and use
any part or the whole of this map in any
form without permission from the copyright
owner.
! If the local traffic regulations or conditions
deviate from this data, follow the local traffic regulations (such as signs, indications,
etc.) and conditions (such as construction,
weather, etc.).
! The traffic regulation data used in the map
database applies only to standard sized
passenger vehicles. Note that regulations
for larger vehicles, motorbikes, and other
non-standard vehicles are not included in
the database.
! © 1993-2011 NAVTEQ. All rights reserved.
meenschap and the Ministèrie de l’Equipement et des Transports.
! source: © IGN 2009 – BD TOPO
! Die Grundlagendaten wurden mit Geneh-
migung der zuständigen Behörden entnommen
! Contains Royal Mail data © Royal Mail
copyright and database right 2010
! Copyright Geomatics Ltd.
! Copyright © 2003; Top-Map Ltd.
! La Banca Dati Italiana è stata prodotta
usando quale riferimento anche cartografia
numerica ed al tratto prodotta e fornita
dalla Regione Toscana.
! Copyright © 2000; Norwegian Mapping
Authority
! Source: IgeoE – Portugal
! Información geográfica propiedad del
CNIG
! Based upon electronic data © National
Land Survey Sweden.
! Topografische Grundlage: ©Bundesamt für
Landestopographie
! © 2012 INCREMENT P CORP. ALL RIGHTS
RESERVED.
®
! NAVTEQ Maps is a trademark of NAVTEQ.
! © Bundesamt für Eich- und Vermessungs-
wesen
! © EuroGeographics
! Traffic Codes for Belgium are provided by
the Ministerie van de Vlaamse Ge-
12
Engb
Page 13

Precaution
! Read the entire manual before upgrading
the programme of your navigation system.
! This package is unique, and cannot be in-
stalled on more than one unit.
! Web-connected computer is required for
online issuance of password.
Models to be upgraded
This product can upgrade the software programme and database of the following models:
! AVIC-F10BT
! AVIC-F20BT
! AVIC-F920BT
! AVIC-F9210BT
! AVIC-F9220BT
! CNSD-110FM
! CNSD-210FM
p In this manual, CNSD-110FM indicates the
navigation system that is upgraded using
the software upgrade CNSD-110FM.
p In this manual, CNSD-210FM indicates the
navigation system that is upgraded using
the software upgrade CNSD-210FM.
Manual overview
This manual describes how to get the password and activate the upgrade. It also provides
an overview of how functions change after the
upgrade.
p The screen examples shown in this manual
are based on the upgraded version of AVICF10BT using this product. The screens may
vary according to the models.
Chapter
03
English
! By upgrading AVIC-F10BT or AVIC-F20BT
with this product, functions and operations
will be nearly equivalent to AVIC-F40BT.
Therefore, obtain the Operation Manual for
AVIC-F40BT and use it as your primary reference.
! By upgrading AVIC-F920BT, AVIC-F9210BT
or AVIC-F9220BT with this product, functions and operations will be nearly equivalent to AVIC-F940BT. Therefore, obtain
Operation Manual for AVIC-F940BT and use
it as your primary reference.
http://www.pioneer.eu
Conventions used in this
manual
Before moving on, take a few minutes to read
the following information about the conventions used in this manual. Familiarity with
these conventions will help you greatly as you
learn how to use your new equipment.
! Buttons on your navigation system are de-
scribed in ALL CAPITAL, BOLD lettering:
e.g.)
Press the MODE button or the HOME button.
! Menu items, screen titles, and functional
components are described in bold with
double quotation marks “”:
e.g.)
The “System Settings” screen appears.
! Touch panel keys that are available on the
screen are described in bold in brackets [ ]:
e.g.)
Touch [Settings].
! Extra information, alternatives and other
notes are presented in the following format:
e.g.)
p If the home location has not been stored
yet, set the location first.
! Functions of other keys on the same screen
are indicated with # at the beginning of the
description:
e.g.)
Engb
13
Page 14
Chapter
03
Precaution
# If you touch [OK], the entry is deleted.
! References are indicated like this:
e.g.)
= For details of the operation, refer to
Checking the device number on page
19.
“microSD card”
The microSD card and microSDHC card are
collectively referred to as the “microSD card”.
p Keep the microSD card out of the reach of
small children to prevent them from accidentally swallowing it.
p Do not store the microSD card in high tem-
peratures or direct sunlight.
p Do not subject the microSD card to shock
or impact.
p Do not allow the microSD card to come
into contact with liquids. Damage to the
microSD card and your products could result from contact with liquids.
p Be careful not to touch terminals on the
microSD card. Doing so may cause connection failures. If any terminals are dirty,
wipe them with a clean dry cloth.
In case of trouble
! Should the navigation system fail to oper-
ate properly, contact your dealer or nearest
authorised Pioneer Service Station.
! Do not lose the supplied Media Number
Card (MEDIA NUMBER CARD). If the
Media Number Card is lost, reissue of the
Media Number (MEDIA NUMBER) is not
possible. Also you must submit the Media
Number Card when repairs are needed.
The card is necessary as proof of authenticity if service is required (including recovery).
Visit our website
Visit us at the following site:
http://www.pioneer.eu
! Register your product. We will keep the de-
tails of your purchase on file to help you
refer to this information in the event of an
insurance claim such as loss or theft.
! We offer the latest information about
PIONEER CORPORATION on our
website.
Copyright
p microSD Logo is a trademark of SD-3C,
LLC.
p microSDHC Logo is a trademark of SD-
3C, LLC.
14
Engb
The names of private corporations, products and other entities described herein
are the registered trademarks or trademarks of their respective firms.
= For more information, refer to the Operation
Manual of your navigation system.
Changing to the NAVTEQ
map database
! The map design will be changed by upgrad-
ing.
! The display of roads, street names, the
background texture of the map, and POI
categories will change depending on locations or the map scale after upgrading.
Page 15

Functions enabled or disabled by upgrade
Chapter
04
If you upgrade your navigation system using this product, the system will have the following changes.
Group 1: AVIC-F10BT
Group 2: CNSD-110FM, AVIC -F20BT, AVIC-F920BT, AVIC-F9210BT or AVIC-F9220BT
Group 3: CNSD-210FM
1: Functions and operations changed by upgrade
Navigation functions
Map function
Destination
System Settings
Navi Settings
Summary of changes Group 1 Group 2 Group 3
The Voice icon displayed on the map screen will no longer appear.
If you move the cursor on the POI icon or a traffic icon
on the map screen and touch
screen of the icon will be displayed.
Tick marks will appear on the “Overlay POI (Main Cate-
gory)” screen.
The function of searching by entering multiple keywords
will be unavailable.
When you enter characters, the system will automatically search the database for all possible options. Only
the characters you enter are active.
The number of possible choices will appear on the upper
right on the list of the search result screen.
You can search the cities from the history that you have
searched by entering the name with the keyboard and
selected by “Address”, “POI” or “Favourites”.
If you touch [OK] without entering the house number, a
representative location on the road in the selected city
appears.
You can sort search results of POI names by degree of
consistency with the entered text.
Facility’s address will appear on the “POI List” screen. 111
“Power Voltage” on the “Status” screen will no longer
appear.
You will be able to make settings to turn on and off the
beep sound that plays when voice recognition starts.
p This setting is available on the “Volume Settings”
screen.
The function “Memory 3” in the illumination colour setting will be changed to “Eco”.
Upgrading enables the Eco-driving function, which supports environmentally-friendly driving.
! Displaying Eco-Meter on the map
! Checking the eco-friendly driving status
! Displaying Eco Drive Level guidance
! Sudden start alert
, details information
1 ——
11—
1 ——
11—
11—
11—
111
111
111
1 ——
1 ——
1 ——
1 ——
English
Engb
15
Page 16

Chapter
04
Functions enabled or disabled by upgrade
Navigation functions
Map Settings
Bluetooth Settings
Other functions
(*1) If the desired language is not available in your navigation system, install TTS files from the CD-ROM provided with
this product. For details of the operation, refer to the activation manual in the supplied CD-ROM.
AV functions Summary of changes Group 1 Group 2 Group 3
AV source
iPod
Aha Radio
Summary of changes Group 1 Group 2 Group 3
“Position Fix” function will be added to the “Quick Access” menu.
The Eco-Meter display setting will be available on the
“Displayed Information” screen.
You can switch the order of names (first/last name) in
the phone book.
The Bluetooth firmware version will be updated. 111
After you start using this navigation system, a message
related to map data may be displayed.
If you do not operate this navigation system for two minutes, demonstration images are displayed.
“Find the nearest <POI category>” and “Find an address” on the voice operation screen will no longer ap-
pear.
The languages of TTS files stored in your navigation system will be changed (*1).
The AV source screen design and operation procedure
will be changed.
= For details of the operation, refer to Playing a DVD-VR
disc on page 25.
The display status for the TRFC indicator and NEWS indicator will be changed.
Your navigation system can switch to the Advanced
App Mode, allowing you to display and operate iPod applications on the screen.
In Advanced App Mode, you can operate applications
with finger gestures such as tapping, dragging, scrolling
or flicking on the screen of the navigation system.
[Change Control Mode] on the iPod function menu
screen will no longer appear.
The keyboard language preference for iPhone application screens can be set on the iPod function menu
screen.
By connecting a smartphone that has installed Aha
Radio, you can control, view and hear Aha Radio from
your navigation system.
p Before connecting an Android
Bluetooth firmware version to 3.24.
™
device, update the
11—
1 ——
111
111
111
111
111
1 ——
1 ——
111
11—
111
111
16
Engb
Page 17

Functions enabled or disabled by upgrade
AV functions Summary of changes Group 1 Group 2 Group 3
AV Settings
Other functions
p The following functions are only available for AVIC-F40BT and AVIC-F940BT. Even if you upgrade your navigation
system, these functions will not be available.
! Displaying your DivX VOD deregistration code
! Using sonic centre control
! Adjusting the equaliser curve automatically (Auto EQ)
! Displaying the operation status of vehicle equipment
[App Connection] used for Aha Radio connection setting will be added.
[AV Source] on the “Top Menu” screen will be changed
to [AV Source & Contents].
111
111
Chapter
04
English
Engb
17
Page 18
Chapter
04
Functions enabled or disabled by upgrade
Setting items to be deleted
and initialised by upgrade
The following data and settings will be cleared
and reset to default values. Other items will be
retained. However, some items are not listed
because the setting can be easily recovered by
users, such as the last cursor position on the
map screen.
Bold indicates functions or command names.
Setting Items
Top Menu Shortcut Menu
Current route
Route setting
Destination “Favourites” list sort order
Traffic Settings Displayed Traffic Info
Map Settings
Navi Settings
System Settings
Bluetooth Settings
Others Keyboard layout
Guidance state of the current route
Route Options
Learning route data
Displayed Info
Quick Access Selection
Overlay POI
Day/Night Display
AV Guide Mode
Road Colour
Drive Log Settings
Demo Mode
Eco Settings
Regional Settings
Volume
Auto Answer Preference
Refuse All Calls
Unchanged functions on
the upgraded programme
Even if you upgrade your navigation system,
the following functions will not be changed.
! Using the equaliser
! Setting the simulated sound stage
! Switching the auto aerial setting (*2)
! Changing the voice output of the naviga-
tion guidance (*2)
(*2) These functions are only available for
AVIC-F10BT, CNSD-110FM, and CNSD-210FM
that has been upgraded from AVIC-F10BT.
The user data stored in the internal memory of
the unit may be erased if an unexpected error
occurs during software installation. Pioneer is
not responsible for any data loss or unavailability of user data.
18
Engb
Page 19

Instructions for upgrading
The navigation system
upgrade process
1 Check the device number of your naviga-
tion system.
= For details of the operation, refer to
Checking the device number on this
page.
j
2 Get the password for authentication.
= For details, refer to Getting the password
for authentication on this page.
j
3 Upgrade the software programme of your
navigation system.
= For details of the operation, refer to Up-
grading the software programme and the
map database on the next page.
j
4 Check whether the upgrade was done prop-
erly.
= For details of the operation, refer to
Checking whether the upgrade was done
properly on page 21.
Chapter
05
English
Preparation for upgrade
Checking the device number
First, check your device number
(DEVICE NUMBER, displayed such as
Device # or Device Number) of your navigation system for later procedures. To display the
device number, do the following.
1 Press the HOME button to display the
“Top Menu” screen.
2 Touch [Settings].
The “Settings Menu” screen appears.
3 Touch [System Settings].
The “System Settings” screen appears.
4 Touch [Service Information].
The “Service Information Screen” screen appears.
5 Write down your device number
(Device Number) onto the supplied Media
Number Card (MEDIA NUMBER CARD) to
avoid mistakes.
p Also write down “Version” information
which would be used to confirm completion
of the update.
j
5 Update the Bluetooth firmware.
= For details of the operation, refer to Up-
dating the Bluetooth wireless technology
software (for AVIC-F10BT) on page 21.
= For details of the operation, refer to Up-
dating the Bluetooth wireless technology
software on page 23.
Getting the password for
authentication
For upgrade, a unique password issued online
is necessary. Access the website with your PC
and get your password.
The following information is required.
! Media Number (MEDIA NUMBER) printed
on supplied Media Number Card
(MEDIA NUMBER CARD)
! Device Number (DEVICE NUMBER) of your
navigation system
1 Access on the following website to
issue your password.
http://www.pioneer.eu/UnlockNavgate
For issuing the password, follow the instruction on the website.
Engb
19
Page 20
Chapter
05
Instructions for upgrading
2 Record the password that you received.
You need to input this password accurately.
Write down your password to avoid mistakes.
Upgrade procedures
! NEVER stop the engine of your vehicle or
turn off the power supply to the navigation
system until the installation is completed.
Turning the power off during upgrade process causes a malfunction or failure of the
navigation system.
! No functions are available during upgrade
process.
Upgrading the software
programme and the map database
This section describes the upgrade procedures for your navigation system.
p The upgrade takes approximately 30 min-
utes in total.
1 Park your vehicle in a safe place and
apply the handbrake.
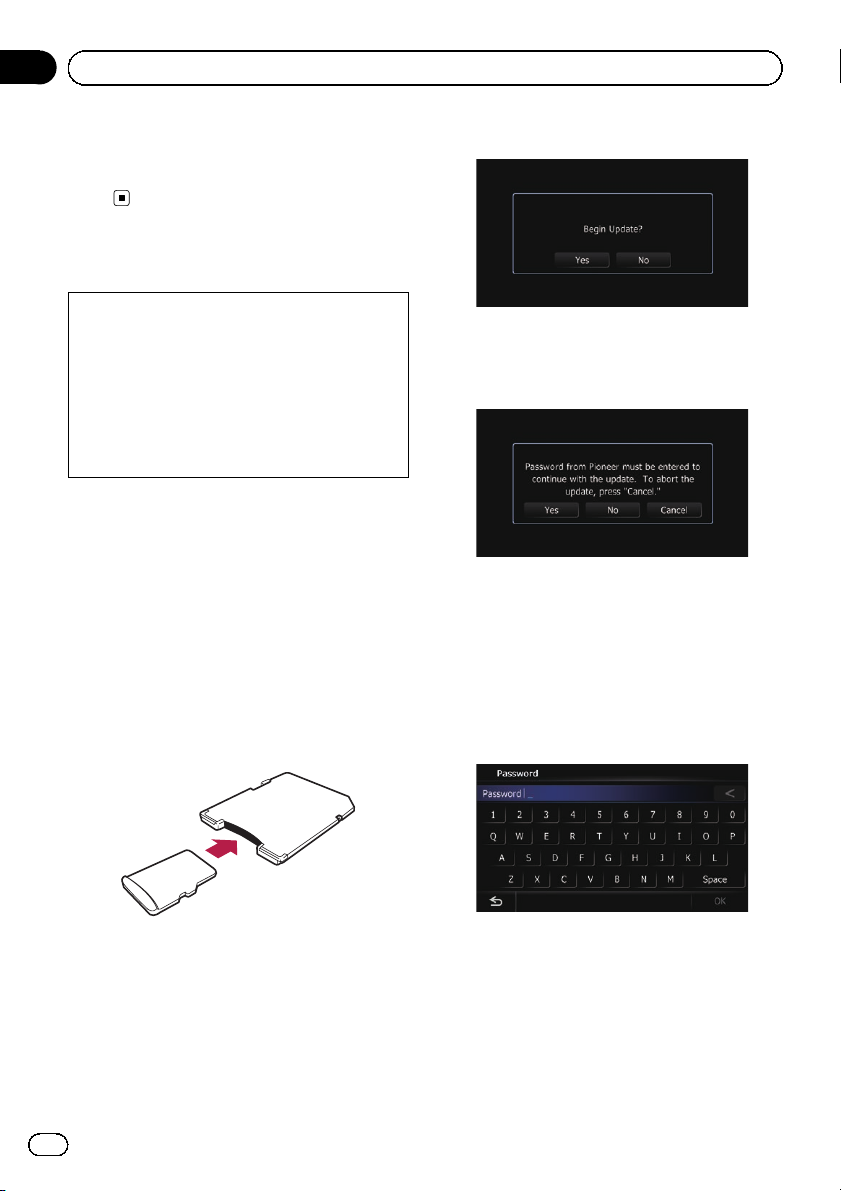
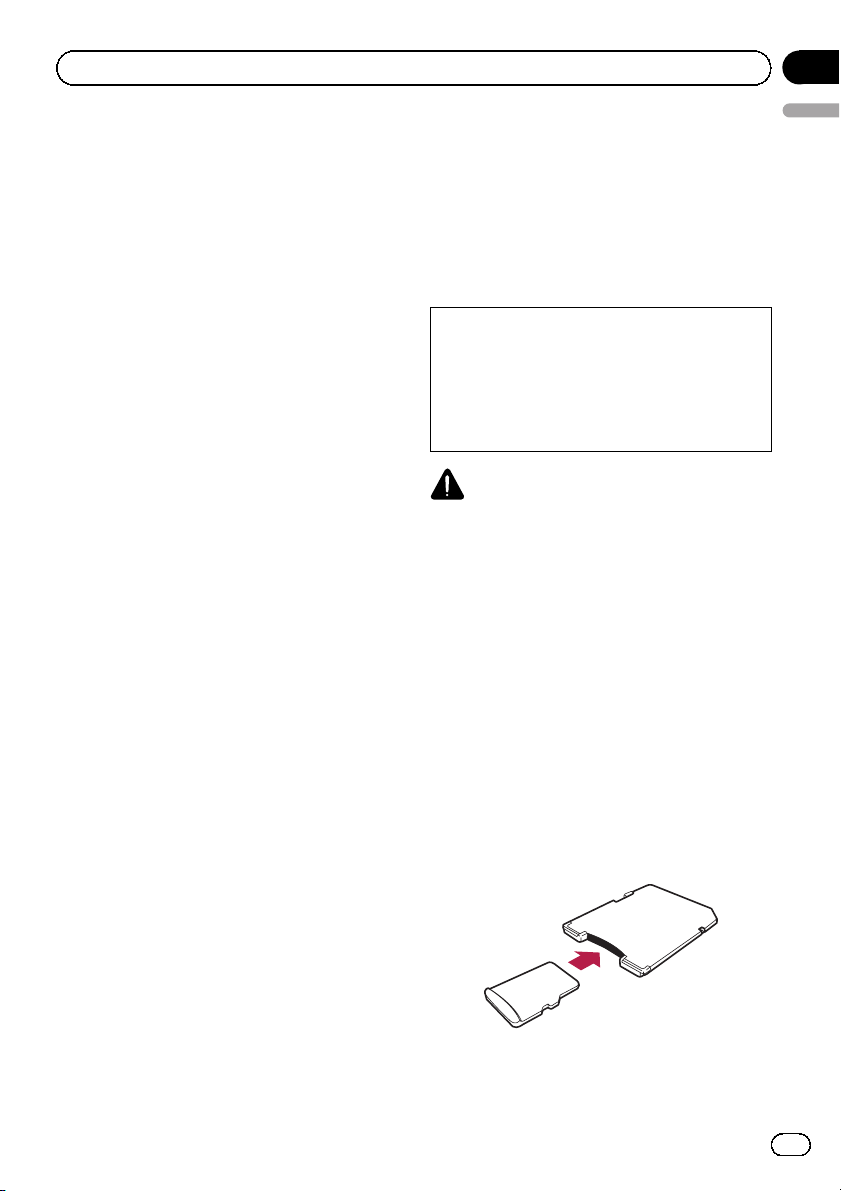
2 Insert the upgrade microSD card #1
(8 GB) into the SD card adapter.
4 Touch [Yes].
The message confirming whether or not to
enter the password will appear.
5 Touch [Yes].
After a short pause, the keyboard for entering
the password will appear.
# If you touch [No], the device number
(Device #) of your navigation system will appear.
# If you touch [Cancel], the update will be can-
celled.
6 Enter the password for authentication
that you obtained, then touch [OK].
p Step 2 is not necessary for AVIC-F920BT,
AVIC-F9210BT and AVIC-F9220BT.
3 Insert the upgrade microSD card #1
(8 GB) into the SD card slot.
The message confirming whether or not to
start the update will appear.
20
Engb
A message confirming whether to restart the
navigation system appears.
7 Touch [OK].
The navigation system restarts and then the installation begins.
Page 21

Instructions for upgrading
Chapter
05
8 Wait until the upgrade process is complete.
After the installation is complete, the navigation system restarts.
Checking whether the upgrade
was done properly
Display “Service Information Screen” screen
to compare the current version number with
the previous one.
1 Press the HOME button to display the
“Top Menu” screen.
2 Touch [Settings].
The “Settings Menu” screen appears.
3 Touch [System Settings].
The “System Settings” screen appears.
4 Touch [Service Information].
The “Service Information Screen” screen appears.
5 Check the version information.
6 Eject the upgrade microSD card #1
(8 GB).
English
Updating the Bluetooth
wireless technology software
(for AVIC-F10BT)
p This description is for customers updating
the Bluetooth firmware of AVIC-F10BT for
the first time.
Access the Pioneer website to check your
phone’s compatibility. If your phone is on the
list and you wish to update, manually update
the Bluetooth firmware after the automatic upgrade is finished.
http://www.pioneer.eu
CAUTION
! Be sure to upgrade your navigation system
first.
! Be careful to follow the update procedure cor-
rectly. If you make a mistake, Bluetooth wireless technology functions will become
unavailable.
p Consult your authorised dealer if you are
unable to use Bluetooth wireless technology functions.
! Be sure to complete the Bluetooth firmware
update procedure without interruption.
p Registered phones that are listed on the
“Connection List” screen are cleared by
the software update.
1 Insert the upgrade microSD card #1
(8 GB) into the SD card adapter.
2 Insert the upgrade microSD card #1
(8 GB) into the SD card slot.
3 Press the HOME button to display the
“Top Menu” screen.
4 Touch [Settings].
The “Settings Menu” screen appears.
5 Touch [Bluetooth Settings].
The “Bluetooth Settings” screen appears.
Engb
21
Page 22
Chapter
05
Instructions for upgrading
6 Touch [Firmware update].
The current version is displayed.
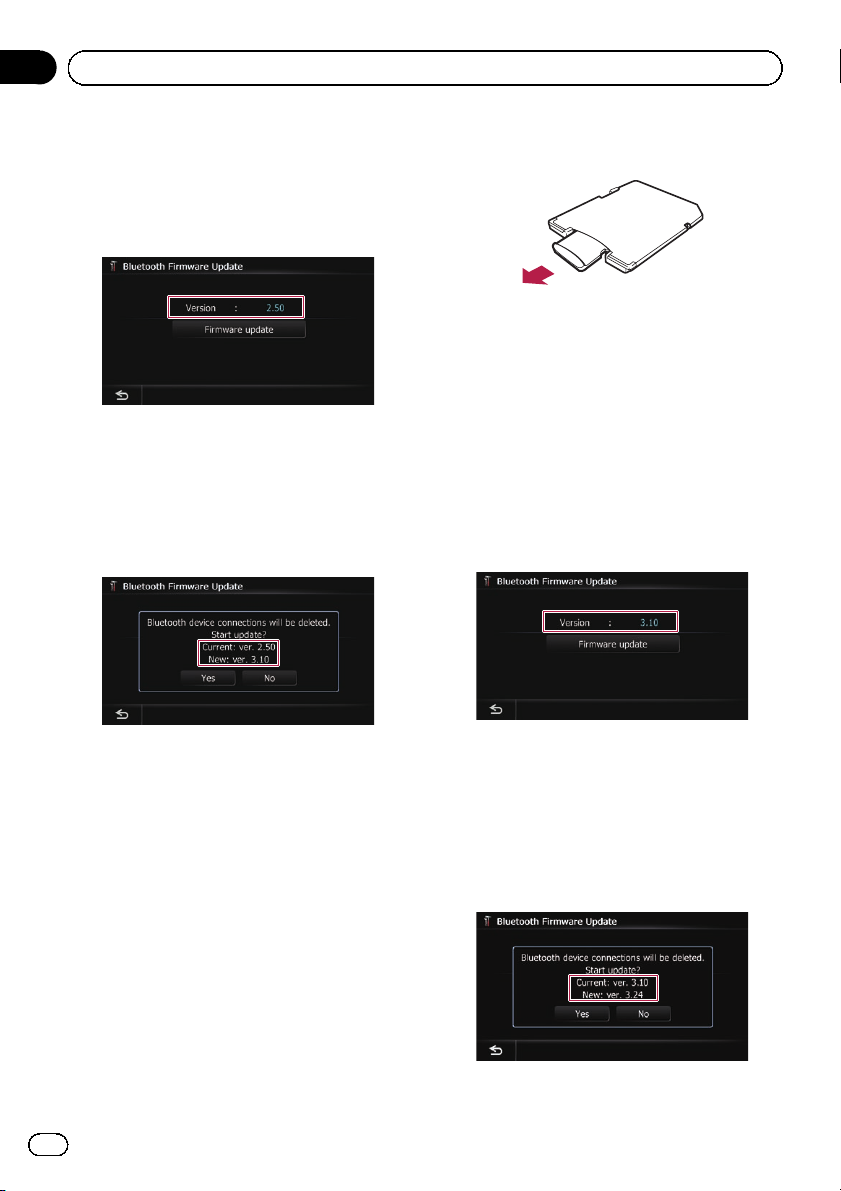
7 Confirm the Bluetooth firmware version.
Make sure that the current version is 2.50.
8 Touch [Firmware update].
The message confirming whether or not to
start the update will appear.
9 Make sure that the current Bluetooth
firmware version is 2.50 and the new
Bluetooth firmware version is 3.10.
14 Eject the upgrade microSD card #1
(8 GB) from the SD card adapter.
15 Insert the upgrade microSD card #2
(2 GB) into the SD card adapter.
16 Insert the upgrade microSD card #2
(2 GB) into the SD card slot.
17 Repeat steps 3 through 6.
18 Confirm the Bluetooth firmware version.
Make sure that the current version is 3.10.
p If the current version is 2.50, return to
step 1.
10 Touch [Yes].
Update starts.
11 Wait until the upgrade process is complete.
A message will appear after the update is
complete.
12 Touch [OK].
The message disappears, and the map screen
returns.
13 Eject the upgrade microSD card #1
(8 GB).
22
Engb
19 If the current version is 3.10, touch
[Firmware update].
The message confirming whether or not to
start the update will appear.
20 Make sure that the current Bluetooth
firmware version is 3.10 and the new
Bluetooth firmware version is 3.24.
Page 23
Instructions for upgrading
Chapter
05
21 Touch [Yes].
Update starts.
22 Wait until the upgrade process is complete.
A message will appear after the update is
complete.
23 Touch [OK].
The message disappears, and the map screen
returns.
24 Eject the upgrade microSD card #2
(2 GB).
Update is completed.
English
Updating the Bluetooth
wireless technology software
p Customers updating the Bluetooth firm-
ware of AVIC-F10BT for the first time should
refer to Updating the Bluetooth wireless
technology software (for AVIC-F10BT) on
page 21.
Access the Pioneer website to check your
phone’s compatibility. If your phone is on the
list and you wish to update, manually update
the Bluetooth firmware after the automatic upgrade is finished.
http://www.pioneer.eu
CAUTION
! Be sure to upgrade your navigation system
first.
! Be careful to follow the update procedure cor-
rectly. If you make a mistake, Bluetooth wireless technology functions will become
unavailable.
p Consult your authorised dealer if you are
unable to use Bluetooth wireless technology functions.
! Be sure to complete the Bluetooth firmware
update procedure without interruption.
p Registered phones that are listed on the
“Connection List” screen are cleared by
the software update.
1 Insert the upgrade microSD card #2
(2 GB) into the SD card adapter.
p Step 1 is not necessary for AVIC-F920BT,
AVIC-F9210BT and AVIC-F9220BT.
Engb
23
Page 24
Chapter
05
Instructions for upgrading
2 Insert the upgrade microSD card #2
(2 GB) into the SD card slot.
3 Press the HOME button to display the
“Top Menu” screen.
4 Touch [Settings].
The “Settings Menu” screen appears.
5 Touch [Bluetooth Settings].
The “Bluetooth Settings” screen appears.
6 Touch [Firmware update].
The current version is displayed.
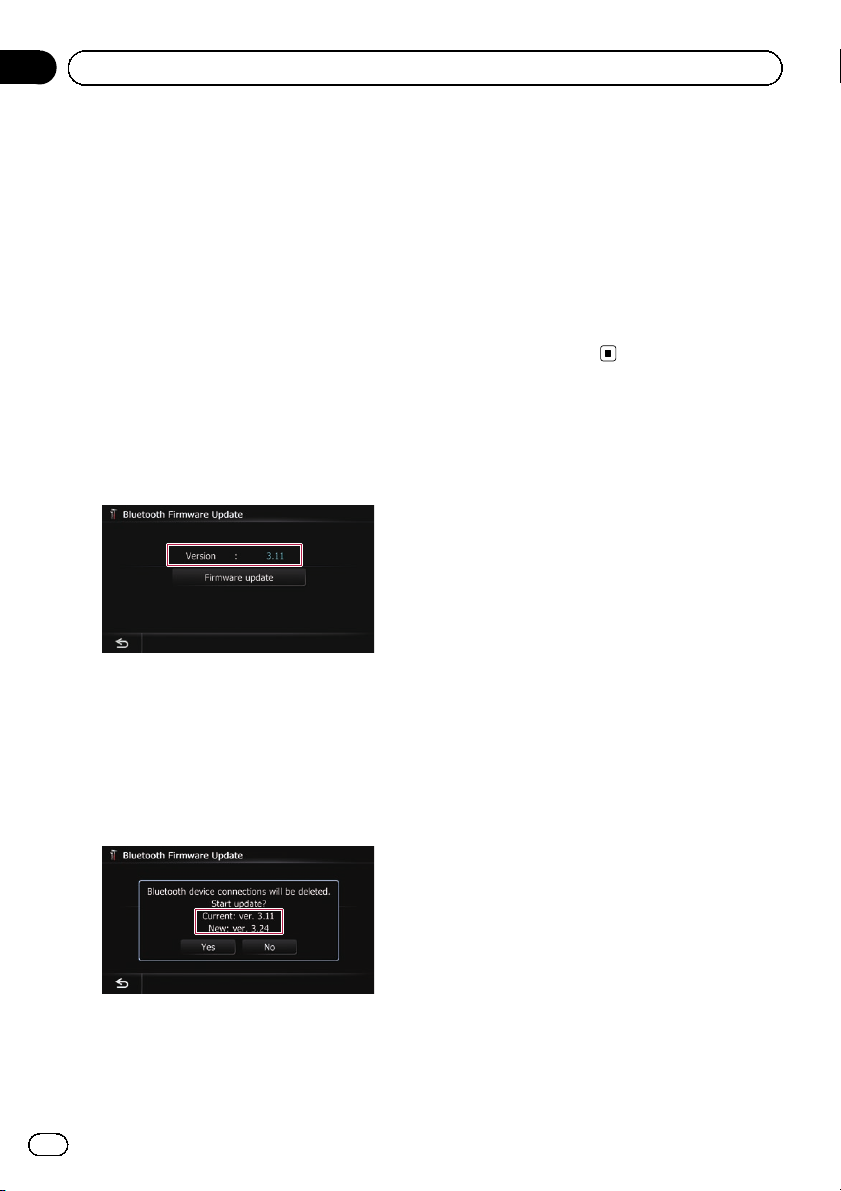
7 Confirm the Bluetooth firmware version.
Make sure that the current version is 3.11 or
later.
8 If the current version is 3.11 or later,
touch [Firmware update].
The message confirming whether or not to
start the update will appear.
11 Wait until the upgrade process is complete.
A message will appear after the update is
complete.
12 Touch [OK].
The message disappears, and the map screen
returns.
13 Eject the upgrade microSD card #2
(2 GB).
Update is completed.
9 Make sure that the current Bluetooth
firmware version is 3.11 or later and the
new Bluetooth firmware version is 3.24.
10 Touch [Yes].
Update starts.
24
Engb
Page 25
Playing a DVD-VR disc
Chapter
06
p This function is only available for AVIC-
F10BT that is upgraded using CNSD-
110FM, CNSD-210FM or this product.
You can play a DVD-VR (DVD Video Recording
Format) disc using the built-in drive of the navigation system. This section describes operations for DVD-VR discs.
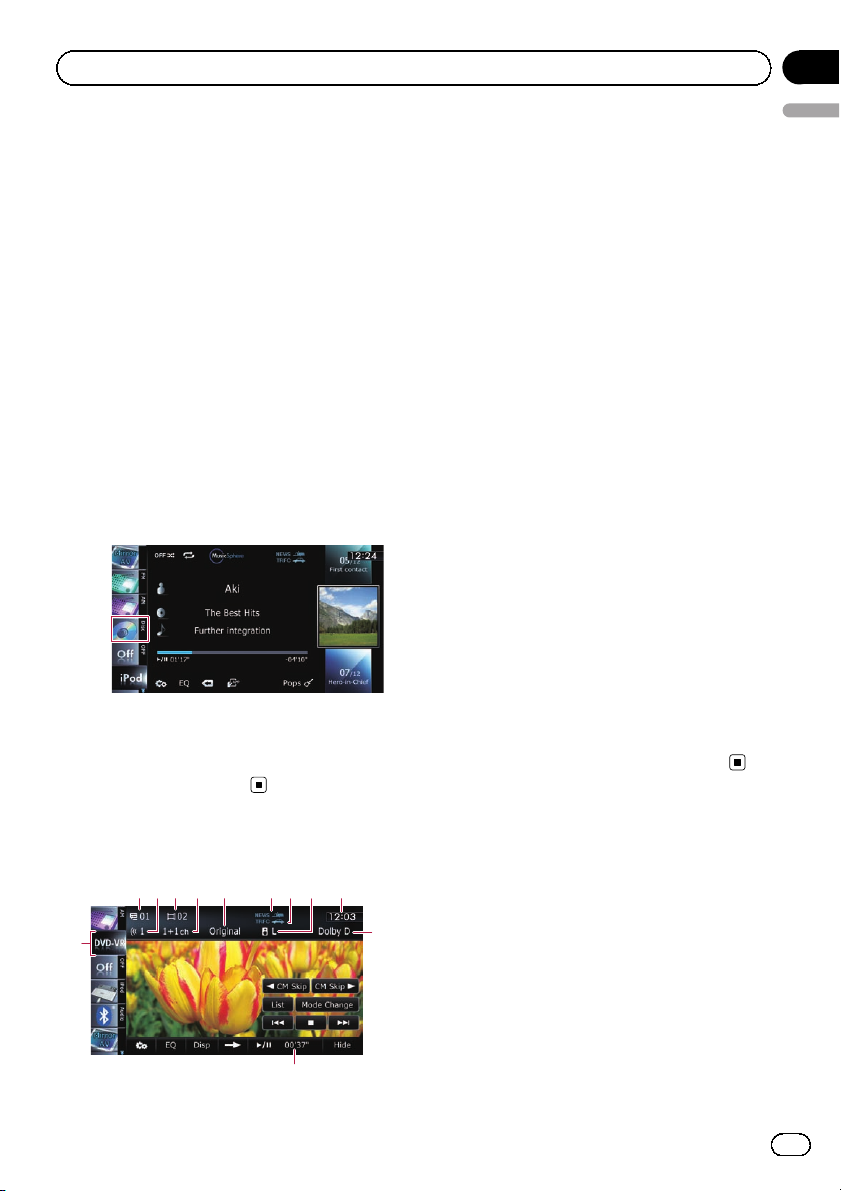
Starting procedure
1 Press the MODE button to display the
AV operation screen.
2 Insert the disc you want to play into
disc-loading slot.
The source changes and then playback will
start.
p If the disc is already set, tap [Disc] on the
left edge of the screen.
3 Use the touch panel keys on the screen
to control the disc.
= For details, refer to Using the touch panel
keys on the next page.
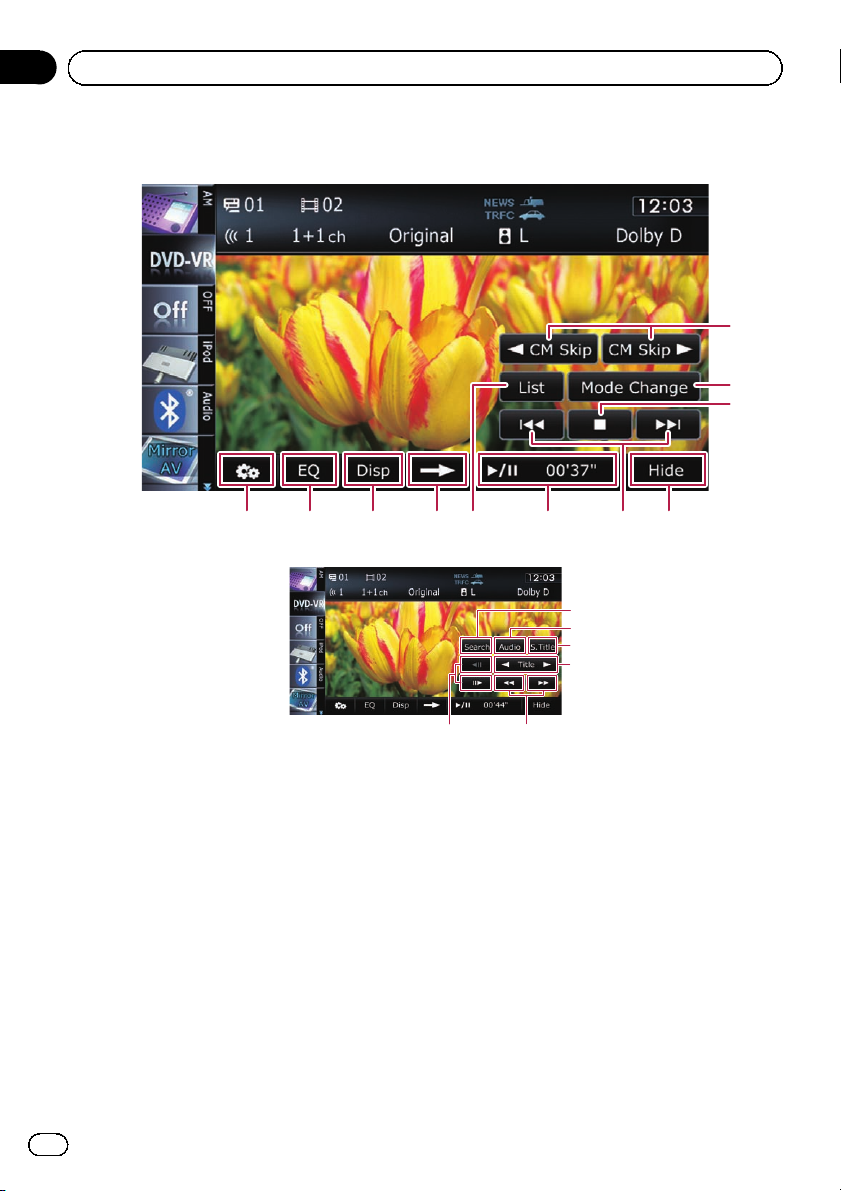
1 Title number indicator
English
Shows the title number currently playing.
2 Audio track indicator
Shows the audio track number currently selected.
3 Chapter number indicator
Shows the chapter number currently playing.
4 Audio channel indicator
Shows the current audio channel type, such
as “Mch” (Multi-channel).
5 Play mode indicator
Shows the current play mode.
= For details, refer to Switching the play-
back mode on page 28.
6 NEWS indicator
Shows the status of news programmes.
7 TRFC indicator
Shows the status of traffic announcements.
8 Mixing condition indicator
Shows the current mixing condition.
= For details, refer to Selects audio out-
put on page 29.
9 Current time
a Digital sound format indicator
Shows which digital sound format (surround
sound format) has been selected.
b Play time indicator
Shows the elapsed playing time within the
current title.
c Source icon
Shows which source has been selected.
Reading the screen
6152 3 4
c
8
7 9
b
a
Engb
25
Page 26
Chapter
06
Playing a DVD-VR disc
Using the touch panel keys
Playback screen (page 1)
Playback screen (page 2)
1
2
3
4
56789ab
c
d
e
f
p With some discs, the icon 9 may be dis-
played, meaning that the operation is invalid.
1 c CM Skip/CM Skip d
= For details, refer to Using the short-time
skip function on page 28.
2 Switches the playback mode
= For details, refer to Switching the play-
back mode on page 28.
3 Stops playback
4 Hides the touch panel keys and informa-
tion of the current video
Touching [Hide] shows only the current video.
5 Skips forward or backward
Touching [p] skips to the start of the next
chapter. Touching [o] once skips to the
26
Engb
gh
start of the current chapter. Touching it twice
quickly will skip to the previous chapter.
p You can also perform these operations
by using the TRK (c/d) button.
6 Playback and Pause
Touching [f] switches between playback
and pause.
7 Displays the title list
Displays the title list recorded on the disc.
p A dash (–) is displayed if there is no cor-
responding information.
= For details, refer to Playing by selecting
from the title list on the next page.
8 Switches to the next page of touch panel
keys
9 Switches the display
Page 27
Playing a DVD-VR disc
Chapter
06
Touching [Disp] changes the information as
follows:
Disc information display — Repeat range dis-
play and on-off state of the subtitle
a Recalls equaliser curves
b Displays the “Function” menu
= For details, refer to Using advanced func-
tions on page 29.
c Searches for a desired scene and starts
playback from a specified time
= For details, refer to Searching for a speci-
fic scene and starting playback from a
specified time on this page.
d Changes audio tracks (Multi-audio)
Each touch of [Audio] switches between
audio tracks.
p Display indications such as MPEG-A
and Mch describe the audio track recorded on the DVD. This indication may
not be the same as the actual sound
currently output from the navigation system.
e Changes the subtitle (Multi-subtitle)
Each touch of [S.Title] switches between the
subtitle languages recorded on the disc.
f Skips the title forward or backward
Touching [d] skips to the start of the next title.
Touching [c] skips to the start of the previous
title.
g Fast reverse or forward
Touch and hold [m]or[n] to perform fast
reverse or forward.
If you keep touching [m]or[n] for five
seconds, fast reverse/fast forward continues
even if you release either of these keys. To re-
sume playback at a desired point, touch
[f] or opposite key of [m]or[n] which
you touched.
h Frame-by-frame playback (or slow-motion
playback)
= For details, refer to Frame-by-frame play-
back on the next page.
= For details, refer to Slow motion playback
on the next page.
English
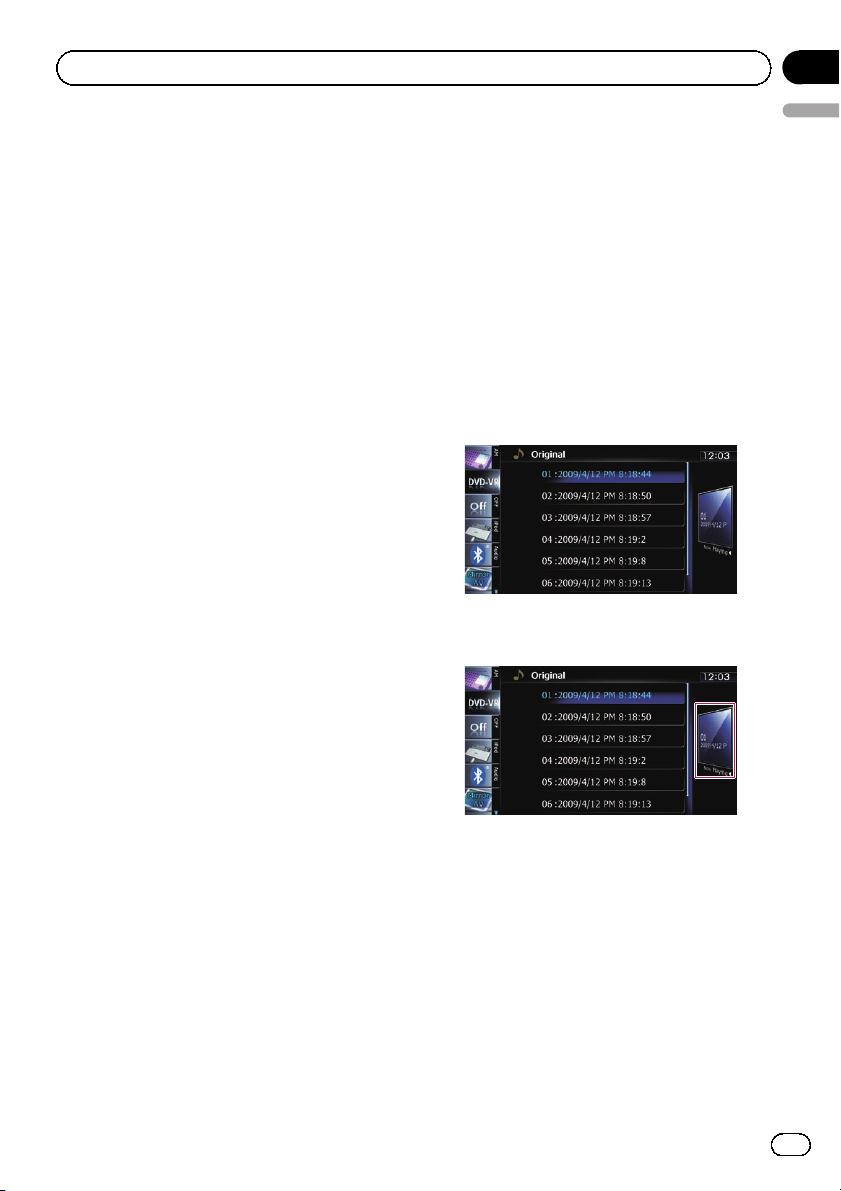
Playing by selecting from the
title list
You can select and play the title you want from
the list.
1 Touch [List] on the playback screen.
2 Scroll the list by dragging items up or
down to display the item you want to select.
p Flicking a list item enables you to quickly
scroll through the list.
p To stop scrolling, gently touch the list.
3 Touch the title to play from the list.
4 Touch the key on the right edge of the
screen.
The previous screen returns.
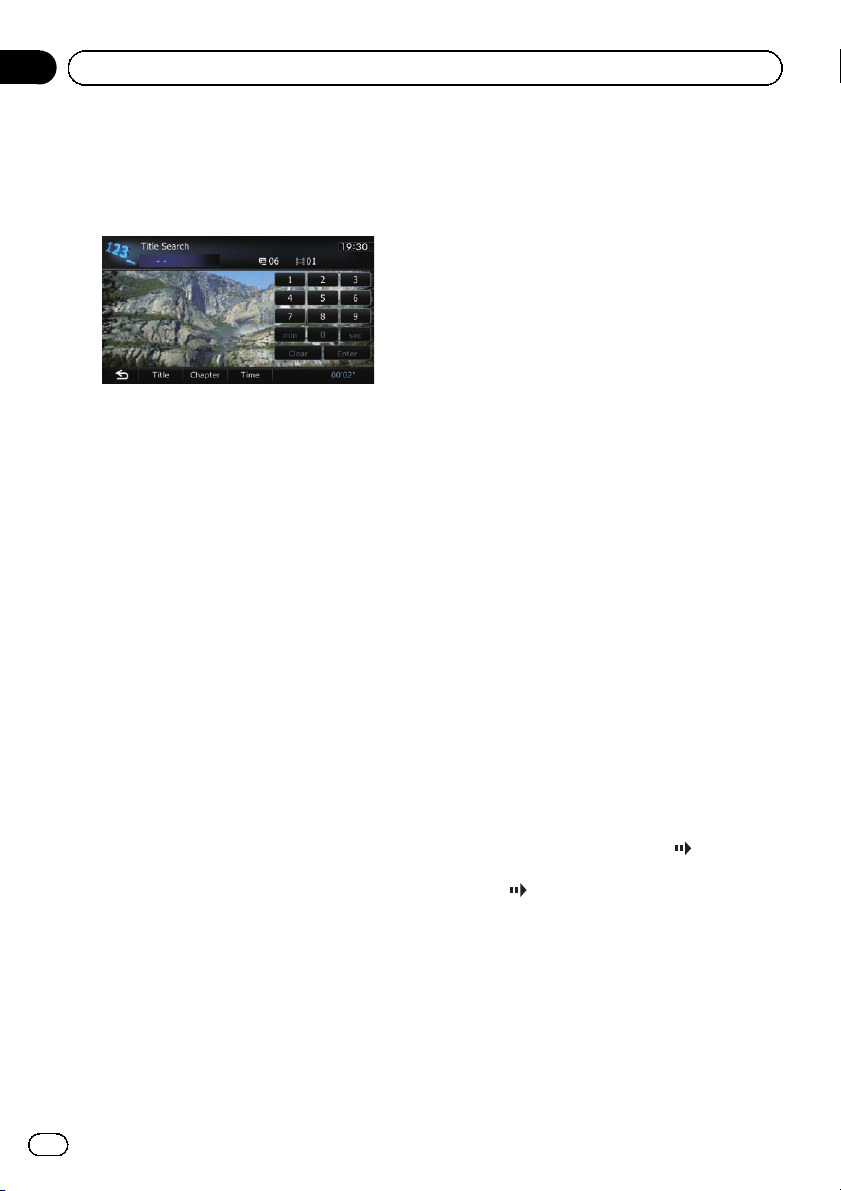
Searching for a specific scene
and starting playback from a
specified time
You can search for the scene you want by specifying a title or a chapter, and the time.
p Chapter search and time search are not
available when disc playback has been
stopped.
Engb
27
Page 28
Chapter
06
Playing a DVD-VR disc
1 Touch [Search] and then touch [Title]
(title), [Chapter] (chapter), [Time] (time).
2 Touch the keys to input the target number or time and then touch [Enter].
For titles, chapters
! To select 3, touch [3] and [Enter] in order.
! To select 10, touch [1] and [0] and [Enter]in
order.
For time (time search)
! To select 5 minutes 3 seconds, touch [5],
[min], [3], [sec] and [Enter] in order.
! To select 71 minutes 00 seconds, touch [7],
[1], [min] and [Enter] in order.
! To select 100 minutes 05 seconds, touch
[1], [0], [0], [5], [sec] and [Enter] in order.
p To cancel an input number, touch [Clear].
To cancel the input numbers, touch and
hold [Clear].
Switching the playback mode
You have two methods for playing DVD-VR
discs; Original (original) and Playlist (playlist).
p Titles created with DVD recorders are
called original. Those based on original, rearranged titles are called playlist. Playlists
are created on DVD-R/-RW discs.
% Touch [Mode Change] to switch the
play mode.
If the play mode is changed, playback starts
from the beginning of the selected play mode.
Using the short-time skip function
This function enables you to skip over your
specified interval on the video playback. This
is useful to skip commercials on your recorded
DVD-VR disc.
% To skip progressively backward or forward, touch [c CM Skip] or [CM Skip d].
p If no operations are performed after the
step changes, skip starts.
Each touch of [c CM Skip]or[CM Skip d]
within two seconds changes the steps in the
following order:
c CM Skip
5 sec. — 15 sec. — 30sec. — 1 min. — 2 min.
— 3 min. — 0 sec.
CM Skip d
30 sec. — 1 min. — 1.5 min. — 2 min. — 3 min.
— 5 min. — 10 min. — 0 sec.
# To cancel skipping, touch another key during
skip action.
Frame-by-frame playback
This lets you move ahead one frame at a time
during playback.
% Touch [r] during playback.
Each time you touch [r], you move ahead
one frame.
To return to normal playback, touch [f].
p With some discs, images may be unclear
during frame-by-frame playback.
Slow motion playback
This lets you slow down playback speed.
1 Touch and hold [r] until
played during playback.
The icon
motion playback begins.
p To return to normal playback, touch [f].
2 Touch [q]or[r] to adjust playback
speed during slow motion playback.
Each time you touch [q]or[r] it changes
the speed in four steps in the following order:
1/16 f 1/8 f 1/4 f 1/2
p There is no sound during slow motion play-
is displayed, and forward slow
back.
is dis-
28
Engb
Page 29
Playing a DVD-VR disc
Chapter
06
p With some discs, images may be unclear
during slow motion playback.
p Reversed slow motion playback is not possi-
ble.
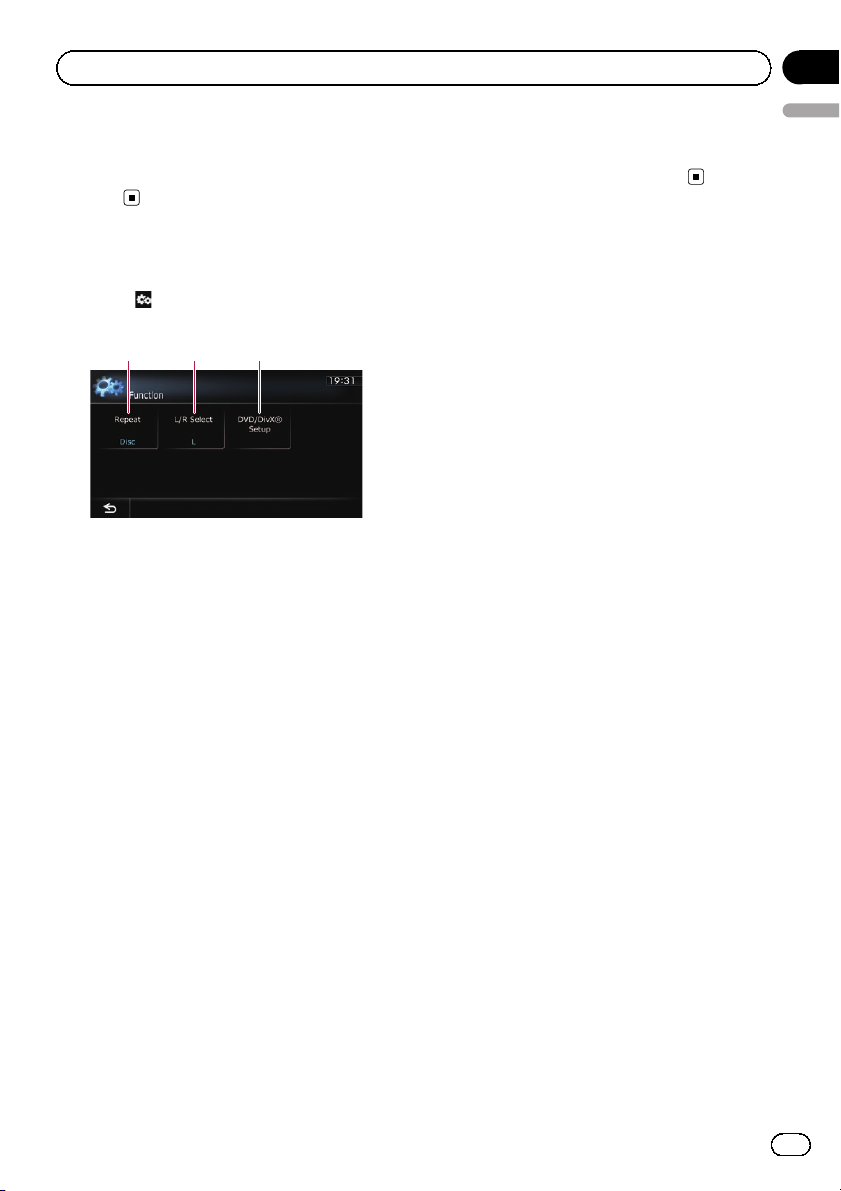
Using advanced functions
% Touch on the “DVD-VR” screen.
The “Function” menu appears.
21 3
1 Changes the repeat range
Each touch of [Repeat] changes the setting
as follows:
! Disc: Plays throughout the current disc.
! Chapter: Repeats just the current chap-
ter.
! Title: Repeats just the current title.
p If you perform chapter (title) search, fast
forward, fast reverse or slow motion
playback, the repeat play range changes
to “Disc”.
p This function is not available when disc
playback has been stopped.
2 Selects audio output
When playing DVDs that both channels are
recorded in monaural, you can switch the
audio output. Touch [L/R Select] repeatedly
until the desired audio output appears in
the display.
Each touch of [L/R Select] changes the settings as follows:
! L: Left
! R: Right
! Mix: Mixing left and right
! L+R: Left and right
p This function is not available when disc
playback has been stopped.
3 DVD setup adjustments
English
= For detailed operations, refer to Opera-
tion Manual for AVIC-F40BT.
Engb
29
Page 30
Appendix
Troubleshooting
Problems in the procedures for updating
Symptom Cause Action
The upgrade process doesn’t
start and the navigation system
boots up as usual.
The navigation system does not
work properly after upgrade.
An incorrect microSD card has
been inserted.
Upgrade has been already done. Check whether the upgrade was done prop-
The screen that cannot begin the
upgrade process is displayed.
The engine of your vehicle was
stopped or the power supply to the
navigation system was turned off
during upgrade process.
Upgrade microSD card was pulled
out during upgrade process.
Eject the inserted microSD card and insert
the correct upgrade microSD card.
erly. If the upgrade has not been done yet,
consult the nearest authorised service station.
Eject the upgrade microSD card #1 (8 GB),
and display the map of your current position,
and then reinsert the upgrade microSD card
#1 (8GB).
Consult the nearest authorised service station.
Consult the nearest authorised service station.
Messages in the procedures for updating
The following messages may be displayed by your navigation system. Refer to the table below to
identify the problem, then take the suggested corrective action.
There are occasions when you may see error messages other than those shown here. In such a
case, follow the instructions given on the display.
Message When What to do
An error occurred and the update failed.
30
Engb
Unexpected error occurred in the
update process.
Consult your local Pioneer dealer if this message persist.
Page 31

Français
31
Fr
Page 32

32
Fr
Page 33

Français
33
Fr
Page 34

34
Fr
Page 35

Français
35
Fr
Page 36

36
Fr
Page 37

Sommaire
Merci d’avoir acheté ce produit Pioneer.
Veuillez lire attentivement ces instructions de fonctionnement de façon à savoir
comment utiliser votre modèle correctement.
Français
Important
! Les écrans donnés en exemple peuvent être
différents des écrans réels.
! Les écrans réels peuvent être modifiés sans
préavis suite à des améliorations de performances et de fonctions.
Accord de licence
PRODUIT PIONEER 38
À propos de la base de données
À propos des données de la base de données
de carte 40
Précautions
Modèles à mettre à jour 41
Vue d’ensemble du manuel 41
Conventions utilisées dans ce manuel 41
“Carte microSD” 42
En cas d’anomalie 42
Notre site web 42
Droits d’auteur 43
Passage à la base de données de la carte
NAVTEQ 43
Fonctions activées ou désactivées par la
mise à niveau
Définition des éléments à supprimer et
initialiser par mise à jour 47
Fonctions inchangées sur le programme mis
à niveau 47
Instructions pour la mise à jour
Processus de mise à niveau du système de
navigation 48
Préparation pour la mise à jour 48
– Vérification du numéro d’appareil 48
– Obtention du mot de passe pour
authentification 48
Procédures de mise à jour 49
– Mise à niveau du programme logiciel et
de la base de données de la carte 49
– Comment contrôler si la mise à jour a
été faite correctement 50
– Mise à jour du logiciel de technologie
sans fil Bluetooth (pour AVICF10BT) 51
– Mise à jour du logiciel de technologie
sans fil Bluetooth 53
Lecture d’un disque DVD-VR
Procédure de départ 55
Lecture de l’écran 55
Utilisation des touches de l’écran tactile 56
– Lecture à partir de la sélection d’une
liste de titres 57
– Recherche d’une scène particulière et
reprise de la lecture à un moment
précis 58
– Changement du mode de lecture 58
– Utilisation de la fonction saut
court 58
– Lecture image par image 58
– Lecture en ralenti 59
Utilisation des fonctions avancées 59
Dépannage
Problèmes dans les procédures de mise à
jour 60
Messages dans les procédures de mise à
jour 60
37
Fr
Page 38

Chapitre
01
Accord de licence
PRODUIT PIONEER
CE DOCUMENT EST UN ACCORD LÉGAL
ENTRE VOUS, L’UTILISATEUR FINAL ET
PIONEER CORP. (JAPON) (appelé
“PIONEER”). VEUILLEZ LIRE ATTENTIVEMENT
LES CONDITIONS GÉNÉRALES DE CET ACCORD AVANT D’UTILISER LE LOGICIEL INSTALLÉ SUR LES PRODUITS PIONEER. EN
UTILISANT LE LOGICIEL INSTALLÉ SUR LES
PRODUITS PIONEER, VOUS ACCEPTEZ
D’ÊTRE TENU PAR LES CONDITIONS DU PRÉSENT ACCORD. LE LOGICIEL INCLUT UNE
BASE DE DONNÉES SOUS LICENCE DE
FOURNISSEUR(S) TIERS (“FOURNISSEURS”)
ET LES CONDITIONS DES FOURNISSEURS
SÉPARÉES DANS UN DOCUMENT INCLUS
DANS CE PRODUIT S’APPLIQUENT À VOTRE
UTILISATION DE LA BASE DE DONNÉES. SI
VOUS N’ACCEPTEZ PAS TOUTES CES CONDITIONS, VEUILLEZ RETOURNER LES PRODUITS PIONEER (Y COMPRIS LE LOGICIEL ET
LES DOCUMENTS ÉCRITS) DANS LES CINQ
(5) JOURS SUIVANT RÉCEPTION DES PRODUITS, AU REVENDEUR PIONEER AGRÉÉ À
L’ADRESSE OU VOUS LES AVEZ ACHETÉS.
1 OCTROI DE LICENCE
Pioneer vous accorde un droit non transférable et non exclusif d’utilisation du logiciel installé sur les produits Pioneer (appelé le
“Logiciel”) et de la documentation concernée
uniquement pour votre usage personnel ou
pour une utilisation interne au sein de votre
entreprise, uniquement sur les produits
Pioneer.
Vous ne pouvez pas effectuer de copie, rétroingénierie, traduction, port, modification ou
travaux dérivés du Logiciel. Vous ne pouvez
pas prêter, louer, divulguer, vendre, attribuer,
donner à bail, accorder une sous-licence, mettre sur le marché ou transférer le Logiciel ou
l’utiliser d’une manière quelconque non expressément autorisée par cet accord. Vous ne
pouvez pas extraire ou essayer d’extraire le
code source ou la structure de la totalité ou
d’une partie du Logiciel par rétro-ingénierie,
démontage, décompilation ou tout autre
moyen. Vous ne pouvez pas utiliser le Logiciel
pour faire fonctionner un bureau de service ou
pour toute autre finalité, liée au traitement de
données pour d’autres personnes ou entités.
Pioneer et les personnes autorisées conserveront tous les droits d’auteur, secrets commerciaux, brevets et autres droits de propriété sur
le Logiciel. Le Logiciel est protégé par des
droits d’auteur et il ne peut être copié, même
modifié ou fusionné avec d’autres produits.
Vous ne pouvez pas altérer ou modifier les
mentions de copyrights ou des droits exclusifs
du propriétaire présents dans le Logiciel.
Vous pouvez transférer tous vos droits de licence sur le Logiciel, la documentation qui s’y
rapporte et une copie de l’Accord de Licence à
un tiers, à condition que celui-ci lise et accepte les conditions générales de ce document.
2 CLAUSE DE NON-RESPONSABILITÉ
Le Logiciel et sa documentation vous sont
fournis sur une base “EN L’ÉTAT”. PIONEER ET
LES PERSONNES AUTORISÉES (dans les articles 2 et 3, Pioneer et les personnes autorisées
seront appelées collectivement “Pioneer”)
N’ACCORDENT ET VOUS NE RECEVEZ AUCUNE GARANTIE, EXPRESSE OU IMPLICITE,
ET TOUTES LES GARANTIES DE CARACTÈRE
MARCHAND ET DE QUALITÉ POUR
QUELQUE BUT PARTICULIER QUE CE SOIT
SONT EXPRESSÉMENT EXCLUES. CERTAINS
PAYS NE PERMETTENT PAS L’EXCLUSION
DES GARANTIES IMPLICITES, DE SORTE QUE
L’EXCLUSION CI-DESSUS PEUT NE PAS S’AP-
PLIQUER À VOUS. Le Logiciel est complexe et
il peut renfermer certains défauts, erreurs ou
imprécisions. Pioneer ne garantit pas que le
Logiciel satisfera vos besoins ou votre attente,
que son fonctionnement sera exempt d’erreur
ou ininterrompu et que toutes les imprécisions peuvent être corrigées et le seront. En
outre, Pioneer n’accorde aucune garantie en
ce qui concerne l’emploi ou les résultats de
l’emploi du Logiciel en termes de précision, de
fiabilité, etc.
38
Fr
Page 39

Accord de licence
Chapitre
01
3 LIMITE DE RESPONSABILITÉ
EN AUCUN CAS PIONEER NE SERA TENU
RESPONSABLE DE DOMMAGES, RÉCLAMATION OU PERTE QUE VOUS AVEZ ENCOURUS (Y COMPRIS ET SANS LIMITATION LES
DOMMAGES COMPENSATEURS, ACCESSOIRES, INDIRECTS, SPÉCIAUX, CONSÉQUENTS
OU EXEMPLAIRES, PERTES DE PROFITS,
VENTES OU AFFAIRES PERDUES, FRAIS, INVESTISSEMENTS OU ENGAGEMENTS EN
LIAISON AVEC UNE AFFAIRE, PERTE DE
BONNE VOLONTÉ, OU DÉGÂTS) RÉSULTANT
DE L’UTILISATION OU DE L’IMPOSSIBILITÉ
D’UTILISER LE LOGICIEL, MÊME SI PIONEER
A ÉTÉ INFORMÉ, SAVAIT OU POUVAIT AVOIR
CONNAISSANCE DE L’ÉVENTUALITÉ DE TELS
DOMMAGES. CETTE LIMITATION S’APPLIQUE
À TOUTES LES CAUSES D’ACTION EN JUSTICE, Y COMPRIS ET SANS LIMITATION, RUPTURE DE CONTRAT, RUPTURE DE GARANTIE,
NÉGLIGENCE, RESPONSABILITÉ STRICTE,
REPRÉSENTATION ERRONÉE ET AUTRES
TORTS. SI LA RENONCIATION DE GARANTIE
DE PIONEER OU LA LIMITATION DE GARANTIE, ÉNONCÉE DANS CET ACCORD, DEVIENT
POUR UNE RAISON QUELCONQUE NON
EXÉCUTOIRE OU INAPPLICABLE, VOUS ACCEPTEZ QUE LA RESPONSABILITÉ DE
PIONEER NE DÉPASSERA PAS CINQUANTE
POUR CENT (50 %) DU PRIX PAYÉ PAR VOUS
POUR LE PRODUIT PIONEER CI-INCLUS.
Certains pays n’autorisent pas certaines exclusions de responsabilité ou limitations de dommages, et dans cette mesure, la limitation
d’exclusion ci-dessus peut ne pas s’appliquer
à vous. Cette clause de renonciation de garantie et de limitation de responsabilité peut ne
pas s’appliquer dans la mesure où toute disposition de la présente garantie est interdite
par les lois nationales ou locales qui ne peuvent être préemptées.
“Pays”) régi par le gouvernement détenant le
pouvoir de juridiction (“Gouvernement”), sauf
si cela est autorisé et permis par les lois et réglementations du Gouvernement. Si vous avez
acquis le Logiciel de façon légale hors du
Pays, vous convenez de ne pas réexporter le
Logiciel ni d’autres données techniques reçues de Pioneer, non plus que le produit direct
desdites, sauf si les lois et réglementations du
Gouvernement et les lois et réglementations
de la juridiction dans laquelle vous avez obtenu le Logiciel le permettent.
5 RÉSILIATION
Cet Accord reste en vigueur jusqu’àcequ’il
soit résilié. Vous pouvez le résilier à tout moment en détruisant le Logiciel. L’Accord sera
résilié également si vous n’en respectez pas
les clauses ou les conditions. Lors de cette résiliation, vous acceptez de détruire le logiciel.
6 DIVERS
Le présent document constitue l’Accord
complet entre Pioneer et vous en ce qui
concerne son objet. Aucun amendement de
cet Accord n’entrera en vigueur sans le
consentement écrit de Pioneer. Si une clause
quelconque de cet Accord est déclarée invalide ou inapplicable, les stipulations restantes
resteront pleinement en vigueur et
effectives.
Français
4 ASSURANCES DE LOI D’EXPORTATION
Vous convenez et certifiez que ni le Logiciel ni
d’autres données techniques reçues de
Pioneer, ni le produit direct desdites, seront
exportés hors du pays ou du département (le
39
Fr
Page 40

Chapitre
02
À propos de la base de données
À propos des données de la
base de données de carte
! Les modifications relatives aux routes,
rues/autoroutes, terrains, constructions et
autres éléments avant/pendant la période
de développement peuvent ne pas êtres prises en compte dans cette base de données.
Et bien sûr, les modifications survenant
après cette période ne sont pas prises en
compte dans la base de données.
! Indépendamment l’existence de nouveaux
bâtiments, les données peuvent être différentes de la condition réelle.
! Pour en savoir plus sur la couverture de la
carte de ce système de navigation, consultez les informations sur notre site Web.
! Il est strictement interdit de reproduire et
d’utiliser quelque partie de la carte, partiellement ou dans sa totalité, sous quelque
forme que ce soit, sans l’autorisation du
propriétaire des droits d’auteur.
! Si les réglementations de la circulation rou-
tière ou les conditions locales diffèrent de
ces données, suivez les réglementations de
la circulation routière (tels que les panneaux, indications, etc.) et conditions locales (notamment des travaux et les
conditions météorologiques).
! Les données de réglementations de la cir-
culation utilisées dans la base de données
de la carte s’appliquent uniquement aux
véhicules de tourisme de taille standard.
Notez que les réglementations concernant
les plus grands véhicules, les deux roues et
autres véhicules hors standard, ne sont
pas incluses dans la base de données.
! © 1993-2011 NAVTEQ. Tous droits réservés.
! NAVTEQ Maps est une marque commer-
ciale de NAVTEQ.
! © Bundesamt für Eich- und Vermessungs-
wesen
! © EuroGeographics
! Traffic Codes for Belgium are provided by
the Ministerie van de Vlaamse Gemeenschap and the Ministèrie de l’Equipement et des Transports.
! source: © IGN 2009 – BD TOPO
! Die Grundlagendaten wurden mit Geneh-
migung der zuständigen Behörden entnommen
! Contains Royal Mail data © Royal Mail
copyright and database right 2010
! Copyright Geomatics Ltd.
! Copyright © 2003; Top-Map Ltd.
! La Banca Dati Italiana è stata prodotta
usando quale riferimento anche cartografia
numerica ed al tratto prodotta e fornita
dalla Regione Toscana.
! Copyright © 2000; Norwegian Mapping
Authority
! Source: IgeoE – Portugal
! Información geográfica propiedad del
CNIG
! Based upon electronic data © National
Land Survey Sweden.
! Topografische Grundlage: ©Bundesamt für
Landestopographie
! © 2012 INCREMENT P CORP. TOUS
DROITS RÉSERVÉS.
®
40
Fr
Page 41

Précautions
Chapitre
03
! Lisez la totalité du manuel avant de mettre
à jour le programme de votre système de
navigation.
! Ce progiciel est unique, et ne peut pas être
installé sur plus d’un appareil.
! Un ordinateur connecté au web est néces-
saire pour l’émission en ligne d’un mot de
passe.
Modèles à mettre à jour
Ce produit peut mettre à jour le programme logiciel et la base de données des modèles suivants :
! AVIC-F10BT
! AVIC-F20BT
! AVIC-F920BT
! AVIC-F9210BT
! AVIC-F9220BT
! CNSD-110FM
! CNSD-210FM
p Dans ce manuel, CNSD-110FM indique le
système de navigation qui a été mis à niveau à l’aide du logiciel de mise à niveau
CNSD-110FM.
p Dans ce manuel, CNSD-210FM indique le
système de navigation qui a été mis à niveau à l’aide du logiciel de mise à niveau
CNSD-210FM.
Vue d’ensemble du manuel
Ce manuel décrit la méthode pour obtenir le
mot de passe et activer la mise à niveau. Il
fournit également un aperçu sur le changement des fonctions après la mise à niveau.
p Les captures d’écran présentées dans ce
manuel reposent sur la version mise à niveau du AVIC-F10BT au moyen de ce produit. Les écrans peuvent varier selon les
modèles.
! En mettant à niveau AVIC-F10BT ou AVIC-
F20BT avec ce produit, les fonctions et opérations deviennent presque identiques à
celles de AVIC-F40BT. Par conséquent, obtenez le Manuel de fonctionnement de
AVIC-F40BT et utilisez-le comme référence
principale.
! En mettant à niveau AVIC-F920BT, AVIC-
F9210BTou AVIC-F9220BT avec ce produit,
les fonctions et opérations deviennent presque identiques à celles de AVIC-F940BT.
Par conséquent, obtenez le Manuel de fonctionnement de AVIC-F940BT et utilisez-le
comme référence principale.
http://www.pioneer.eu
Conventions utilisées dans
ce manuel
Avant de continuer, prenez quelques minutes
pour lire les informations suivantes à propos
des conventions utilisées dans ce manuel.
Vous familiariser avec ces conventions vous
aidera beaucoup à apprendre comment utiliser votre nouvel appareil.
! Les boutons de votre système de navigation
sont indiqués en MAJUSCULE et en
GRAS :
par ex.)
Appuyez sur le bouton MODE ou le bouton
HOME.
! Les éléments de menu, les titres des écrans
et les composants fonctionnels sont écrits
en caractères gras et se trouvent entre
guillemets “”:
par ex.)
L’écran “Paramètres système” apparaît.
! Les touches de l’écran tactile qui sont dis-
ponibles sur l’écran sont décrites en caractères gras entre crochets [] :
par ex.)
Touchez [Config.].
Français
41
Fr
Page 42

Chapitre
03
Précautions
! Les informations supplémentaires, les al-
ternatives et les autres remarques sont présentées dans le format suivant :
par ex.)
p Si le domicile n’a pas encore été mémo-
risé, réglez d’abord son emplacement.
! Les fonctions des autres touches sur le
même écran sont indiquées par la marque
# au début de la description :
par ex.)
# Si vous touchez [OK], l’entrée est suppri-
mée.
! Les références sont indiquées comme suit :
par ex.)
= Pour en savoir plus sur les opérations,
reportez-vous à la page 48, Vérification
du numéro d’appareil.
p Le logo microSD est une marque
commerciale de SD-3C, LLC.
p Le logo microSDHC est une marque
commerciale de SD-3C, LLC.
“Carte microSD”
La carte microSD et la carte microSDHC sont
communément appelées “carte microSD”.
p Conservez la carte microSD hors de la por-
tée des jeunes enfants pour éviter qu’elle
soit avalée accidentellement.
p Ne rangez pas la carte microSD dans un
endroit très chaud ou à la lumière directe
du soleil.
p Ne soumettez pas la carte microSD à des
chocs ou à des impacts.
p Ne laissez pas la carte microSD entrer en
contact avec des liquides. Un endommagement de la carte microSD et de vos appareils peut résulter d’un contact avec des
liquides.
p Veillez à ne pas toucher les bornes de la
carte microSD. Cela pourrait provoquer des
défaillances dans la connexion. Si les bornes sont sales, essuyez-les avec un chiffon
sec et propre.
En cas d’anomalie
! Si le système de navigation ne fonctionne
pas correctement, veuillez vous adresser à
votre concessionnaire ou au centre de service Pioneer agréé le plus proche.
! Ne perdez pas la carte de numéro de sup-
port fournie (MEDIA NUMBER CARD). Si la
carte de numéro de support est perdue, un
renouvellement du numéro de support
(MEDIA NUMBER) n’est pas possible. De
plus, vous devez présenter la carte de numéro de support quand des réparations
sont nécessaires. La carte est nécessaire
comme preuve d’authenticité si un service
est requis (y compris la récupération).
Notre site web
Visitez notre site :
http://www.pioneer.eu
! Enregistrez votre produit. Nous conservons
les détails de votre achat sur fichier pour
vous permettre de consulter ces informations en cas de déclaration de dommage
comme la perte ou le vol.
42
Fr
Page 43

Précautions
! Notre site Web fournit les informations les
plus récentes sur la PIONEER
CORPORATION.
Chapitre
03
Droits d’auteur
Les noms des sociétés privées, des produits ou de toute autre entité décrite ici
sont des marques déposées ou des marques commerciales de leur propriétaire
respectif.
= Pour de plus amples informations, reportez-
vous au Manuel de fonctionnement de
votre système de navigation.
Passage à la base de données
de la carte NAVTEQ
! La conception de la carte sera modifiée par
la mise à niveau.
! L’affichage des routes, les noms de rue, la
texture d’arrière-plan de la carte et les catégories de POI changeront selon les emplacements ou l’échelle de carte après la mise
à niveau.
Français
43
Fr
Page 44

Chapitre
04
Fonctions activées ou désactivées par la mise à niveau
Si vous mettez à niveau le système de navigation en utilisant ce produit, celui-ci présentera les modifications suivantes.
Groupe 1: AVIC-F10BT
Groupe 2: CNSD-110FM, AVIC-F20BT, AVIC-F920BT, AVIC-F9210BT ou AVIC-F9220BT
Groupe 3: CNSD-210FM
1 : Fonctions et opérations modifiées par la mise à niveau
Fonctions de navigation
Fonction de la carte
Destination
Paramètres système
Résumé des modifications
L’icône Voice affichée sur l’écran de la carte cesse d’ap-
paraître.
Si vous déplacez le curseur sur l’icône d’adresse utile ou
sur une icône de circulation sur l’écran de la carte et
touchez
s’affiche.
Des coches apparaissent sur l’écran “Superposition
PDI (Catégorie principale)”.
La fonction de recherche en saisissant plusieurs motsclés ne sera pas disponible.
Quand vous entrez des caractères, le système recherche
automatiquement toutes les options possibles dans la
base de données. Seuls les caractères que vous entrez
sont actifs.
Le nombre de choix possibles apparaît sur le coin supérieur droit de la liste de l’écran des résultats de la recherche.
Vous pouvez rechercher les villes dans l’historique recherchées en saisissant leur nom avec le clavier et sélectionnées par “Adresse”, “POI” ou “Favoris”.
Si vous touchez [OK] sans saisir le numéro de la maison, un emplacement représentatif de la route dans la
ville sélectionnée apparaît.
Vous pouvez trier les résultats de la recherche des noms
des adresses utiles par degré de cohérence avec le texte
saisi.
L’adresse du point de repère apparaît sur l’écran “Liste
PDI”.
“Tension d’alimentation” sur l’écran “Statut GPS” ces-
sera d’apparaître.
Vous serez en mesure d’activer ou désactiver le bip sonore émis lorsque la reconnaissance vocale démarre.
p Le réglage est disponible sur l’écran “Paramètres de
La fonction “Mémoire 3” dans le réglage de la couleur
d’éclairage devient “Eco”.
,l’écran d’information détaillée de l’icône
volume”.
Groupe1Groupe2Groupe
3
1 ——
11—
1 ——
11—
11—
11—
111
111
111
111
1 ——
1 ——
1 ——
44
Fr
Page 45

Fonctions activées ou désactivées par la mise à niveau
Chapitre
04
Fonctions de navigation
Paramètres Navigation
Paramètres carte
Paramètres
Bluetooth
Autres fonctions
(*1) Si la langue souhaitée n’est pas disponible dans votre système de navigation, installez les fichiers TTS depuis le
CD-ROM accompagnant ce produit. Pour en savoir plus sur les opérations, reportez-vous au manue l d’activation sur le
CD-ROM fourni.
Résumé des modifications
La mise à niveau active la fonction de conduite écologique, qui soutient une conduite respectueuse de l’environnement.
! Affichage du compteur éco sur la carte
! Vérification de l’état de conduite écologique
! Affichage du guidage du degré de conduite écolo-
gique
! Alerte de démarrage intempestif
La fonction “Relevé de position” est ajoutée au menu
“Accès rapide”.
Le réglage de l’affichage du compteur éco est disponible
sur l’écran “Informations affichées”.
Vous pouvez changer l’ordre des noms (prénom/nom)
dans l’annuaire.
La version du microprogramme Bluetooth est mise à
jour.
Lorsque vous commencez à utiliser ce système de navigation, un message relatif aux données cartographiques
peut s’afficher.
Si vous n’utilisez pas ce système de navigation dans les
deux minutes, les images de démonstration apparaissent.
“Afficher le <catégorie de POI> le plus près” et “Chercher une adresse” sur l’écran de fonctionnement vocal
cesseront d’apparaître.
La langue des fichiers TTS stockés dans votre système
de navigation est modifiée (*1).
Groupe1Groupe2Groupe
3
1 ——
11—
1 ——
111
111
111
111
111
111
Français
45
Fr
Page 46

Chapitre
04
Fonctions activées ou désactivées par la mise à niveau
Fonctions AV Résumé des modifications
Le design de l’écran de la source AVet la marche à suivre des opérations seront modifiés.
Source AV
iPod
Aha Radio
Paramètres AV
Autres fonctions
= Pour en savoir plus sur les opérations, reportez-vous
à la page 55, Lecture d’un disque DVD-VR.
Le statut d’ affichage pour l’indicateur TRFC et l’indicateur NEWS sera modifié.
Votre système de navigation peut passer en Advanced
App Mode, ce qui vous permet d’afficher et d’utiliser
des applications iPod sur l’écran.
En Advanced App Mode, vous pouvez utiliser les applications avec le doigt, à savoir par tapotement, glissement, défilement ou balayage sur l’écran du système de
navigation.
[Changer mode contr] sur l’écran de menu des fonctions iPod cessera d’apparaître.
La préférence de langue du clavier pour les écrans des
applications iPhone peut être réglée sur l’écran de
menu des fonctions iPod.
En connectant un smartphone sur lequel est installé
Aha Radio, vous pouvez commander, voir et écouter Aha
Radio depuis votre système de navigation.
p Avant de connecter un appareil Android
jour la version du microprogramme Bluetooth vers
3.24.
[Connexion de l’App] utilisé pour le réglage de la
connexion Aha Radio sera ajouté.
[Source AV] sur l’écran “Menu supérieur” bascule sur
[Multimedia].
™
, mettez à
Groupe1Groupe2Groupe
3
1 ——
1 ——
111
11—
111
111
111
111
p Les fonctions suivantes ne sont disponibles que pour AVIC-F40BT et AVIC-F940BT. Même si vous mettez à niveau
votre système de navigation, ces fonctions ne seront pas disponibles.
! Affichage du code de désenregistrement de VOD DivX
! Utilisation de la commande sonique centrale
! Réglage automatique de la courbe d’égalisation (Auto EQ)
! Affichage de l’état de fonctionnement de l’équipement du véhicule
46
Fr
Page 47

Fonctions activées ou désactivées par la mise à niveau
Chapitre
04
Définition des éléments à
supprimer et initialiser par
mise à jour
Les données et les réglages suivants seront effacés et ramenés aux valeurs par défaut. Les
autres éléments seront conservés. Toutefois,
certains éléments ne figurent pas dans la
liste, car la valeur de réglage peut être facilement récupérée par les utilisateurs, par exemple, la dernière position du curseur sur l’écran
de la carte.
Les caractères gras indiquent les noms de
fonctions ou de commandes.
Rubriques de configuration
Menu supérieur
Définition de l’ itinéraire
Destination Ordre de tri de la liste “Favoris”
Paramètres de
trafic
Paramètres
carte
Paramètres
Navigation
Paramètres
système
Menu des raccourcis
Itinéraire actuel
État du guidage de l’itinéraire actuel
Options D’Itinéraire
Données d’apprentissage de la
route
Infos circulation affichées
Infos affichées
Sélection accès rapide
Superposition PDI
Affichage jour/nuit
Guidage A/V
Couleur route
Param. journal conduite
Mode Démo
Réglages Eco
Paramètres régionaux
Volume
Rubriques de configuration
Paramètres
Bluetooth
Autres Disposition du clavier
Préférence réponse auto
Refuser ts appels
Les données personnelles se trouvant dans la
mémoire interne de l’appareil peuvent être effacées si une erreur imprévue se produit pendant l’installation logicielle. Pioneer n’est pas
responsable pour toute perte de données ou
indisponibilité de données personnelles.
Fonctions inchangées sur le
programme mis à niveau
Même si vous mettez à niveau votre système
de navigation, les fonctions suivantes ne seront pas modifiées.
! Utilisation de l’égaliseur
! Réglage de l’étage sonore simulé
! Changement du réglage de l’antenne auto-
matique (*2)
! Changement de la voix émise par le gui-
dage de navigation (*2)
(*2) Ces fonctions ne sont disponibles que
pour AVIC-F10BT, CNSD-110FM et CNSD210FM mis à niveau depuis AVIC-F10BT.
Français
47
Fr
Page 48

Chapitre
05
Instructions pour la mise à jour
Processus de mise à niveau
du système de navigation
1 Vérifiez le numéro d’appareil de votre sys-
tème de navigation.
= Pour en savoir plus sur les opérations,
reportez-vous à cette page, Vérification
du numéro d’appareil.
j
2 Obtenez le mot de passe pour authentifica-
tion.
= Pour les détails, reportez-vous à cette
page, Obtention du mot de passe pour
authentification.
j
3 Mettez à niveau le programme logiciel de
votre système de navigation.
= Pour en savoir plus sur les opérations,
reportez-vous à la page suivante, Mise à
niveau du programme logiciel et de la
base de données de la carte.
j
4 Contrôlez si la mise à niveau a été faite cor-
rectement.
= Pour en savoir plus sur les opérations,
reportez-vous à la page 50, Comment
contrôler si la mise à jour a été faite correctement.
Préparation pour la mise à
jour
Vérification du numéro d’appareil
D’abord, vérifiez le numéro d’appareil
(DEVICE NUMBER, affiché sous la forme
Périph. N° ou Numéro appareil) de votre système de navigation pour les procédures postérieures. Pour afficher le numéro d’appareil,
procédez de la façon suivante.
1 Appuyez sur le bouton HOME pour afficher l’écran “Menu supérieur”.
2 Touchez [Configurations].
L’écran “Menu Paramètres” apparaît.
3 Touchez [Paramètres système].
L’écran “Paramètres système” apparaît.
4 Touchez [Infos sur services].
L’écran “Ecran d’informations sur les servi-
ces” apparaît.
5 Notez par écrit le numéro de votre appareil (Numéro appareil) sur la carte de numéro de support fournie
(MEDIA NUMBER CARD) pour éviter les erreurs.
p Notez également les informations de “Ver-
sion” qui pourraient être nécessaire pour
confirmer la réussite de la mise à jour.
j
5 Mettez à jour le microprogramme
Bluetooth.
= Pour en savoir plus sur les opérations,
reportez-vous à la page 51, Mise à jour
du logiciel de technologie sans fil
Bluetooth (pour AVIC-F10BT).
= Pour en savoir plus sur les opérations,
reportez-vous à la page 53, Mise à jour
du logiciel de technologie sans fil
Bluetooth.
48
Fr
Obtention du mot de passe
pour authentification
Pour la mise à jour, un mot de passe unique
émis en ligne est nécessaire. Accédez au site
web avec votre PC et obtenez votre mot de
passe.
L’information suivante est requise.
! Numéro de support (MEDIA NUMBER) im-
primé sur la carte de numéro de support
fournie (MEDIA NUMBER CARD)
! Numéro d’appareil (DEVICE NUMBER) de
votre système de navigation
Page 49

Instructions pour la mise à jour
Chapitre
05
1 Accédez au site web suivant pour émettre votre numéro de passe.
http://www.pioneer.eu/UnlockNavgate
Pour l’émission du mot de passe, suivez les
instructions du site web.
2 Enregistrez le numéro de passe que
vous avez reçu.
Vous devez entrer ce mot de passe avec exactitude. Notez votre mot de passe pour éviter les
erreurs.
Procédures de mise à jour
! Ne coupez JAMAIS le moteur de votre véhi-
cule, ni n’éteignez le système de navigation
tant que l’installation n’est pas terminée. La
mise hors tension durant le processus de
mise à niveau entraînera un dysfonctionnement ou une défaillance du système de navigation.
! Aucune fonction n’est disponible pendant
le processus de mise à niveau.
Mise à niveau du programme
logiciel et de la base de
données de la carte
Cette partie décrit les procédures de mise à
jour pour votre système de navigation.
p La mise à jour prend environ 30 minutes en
tout.
2 Insérez la carte microSD #1 (8 Go) de
mise à niveau dans l’adaptateur pour carte
SD.
Français
p L’étape 2 n’est pas nécessaire pour AVIC-
F920BT, AVIC-F9210BTet AVIC-F9220BT.
3 Insérez la carte microSD #1 (8 Go) de
mise à niveau dans la fente pour carte SD.
Le message confirmant le lancement ou non
de la mise à jour apparaît.
4 Touchez [Oui].
Le message confirmant la saisie ou non du
mot de passe apparaît.
5 Touchez [Oui].
1 Stationnez votre véhicule en lieu sûr et
serrez le frein à main.
Après une courte pause, le clavier servant à
entrer le mot de passe apparaîtra.
# Si vous touchez [Non], le numéro d’appareil
(Périph. N°) de votre système de navigation apparaît.
# Si vous touchez [Annuler], la mise à jour est
annulée.
Fr
49
Page 50

Chapitre
05
Instructions pour la mise à jour
6 Entrez le mot de passe que vous avez
obtenu pour authentification puis touchez
[OK].
Un message confirmant le redémarrage du
système de navigation s’affiche.
7 Touchez [OK].
Le système de navigation redémarre puis l’installation commence.
8 Patientez jusqu’à ce que le processus
de mise à niveau se termine.
1 Appuyez sur le bouton HOME pour afficher l’écran “Menu supérieur”.
2 Touchez [Config.].
L’écran “Menu Paramètres” apparaît.
3 Touchez [Paramètres système].
L’écran “Paramètres système” apparaît.
4 Touchez [Infos sur services].
L’écran “Ecran d’informations sur les servi-
ces” apparaît.
5 Vérifiez les informations sur la version.
6 Éjectez la carte microSD #1 (8 Go) de
mise à niveau.
Une fois que l’installation est terminée, le système de navigation redémarre.
Comment contrôler si la mise à
jour a été faite correctement
Affichez l’écran “Ecran d’informations sur
les services” pour comparer le numéro de ver-
sion actuel avec le précédent.
50
Fr
Page 51

Instructions pour la mise à jour
Chapitre
05
Mise à jour du logiciel de
technologie sans fil Bluetooth
(pour AVIC-F10BT)
p Cette description est pour les utilisateurs
mettant à jour le microprogramme
Bluetooth de AVIC-F10BT pour la première
fois.
Accédez au site Web de Pioneer pour vérifier la
compatibilité de votre téléphone. Si votre téléphone figure sur la liste et que vous souhaitez
effectuer la mise à jour, procédez à la mise à
jour manuelle du microprogramme Bluetooth
une fois la mise à niveau automatique terminée.
http://www.pioneer.eu
ATTENTION
! Il est important de commencer par mettre à
niveau votre système de navigation.
! Prenez soin de suivre correctement la procé-
dure de mise à niveau. Si vous commettez
une erreur, les fonctions de la technologie
sans fil Bluetooth ne seront plus disponibles.
p Contactez votre revendeur agréé si vous ne
parvenez pas à utiliser les fonctions de la
technologie sans fil Bluetooth.
! Il est important de réaliser la procédure de
mise à jour du microprogramme Bluetooth
sans interruption.
4 Touchez [Config.].
L’écran “Menu Paramètres” apparaît.
5 Touchez [Paramètres Bluetooth].
L’écran “Paramètres Bluetooth ” apparaît.
6 Touchez [Mise à jour].
La version actuelle est affichée.
7 Confirmez la version du microprogramme Bluetooth.
Assurez-vous que la version actuelle est 2.50.
8 Touchez [Mise à jour].
Le message confirmant le lancement ou non
de la mise à jour apparaît.
9 Assurez-vous que la version actuelle du
microprogramme Bluetooth est 2.50 et que
la nouvelle version du microprogramme
Bluetooth est 3.10.
Français
p Les téléphones enregistrés figurant dans la
liste sur l’écran “Liste des connexions”
sont effacés par la mise à jour du logiciel.
1 Insérez la carte microSD #1 (8 Go) de
mise à niveau dans l’adaptateur pour carte
SD.
2 Insérez la carte microSD #1 (8 Go) de
mise à niveau dans la fente pour carte SD.
3 Appuyez sur le bouton HOME pour afficher l’écran “Menu supérieur”.
10 Touchez [Oui].
La mise à jour démarre.
11 Patientez jusqu’à ce que le processus
de mise à niveau se termine.
Un message apparaîtra une fois la mise à jour
terminée.
12 Touchez [OK].
Le message disparaît et l’écran de la carte est
rétabli.
Fr
51
Page 52

Chapitre
05
Instructions pour la mise à jour
13 Éjectez la carte microSD #1 (8 Go) de
mise à niveau.
14 Éjectez la carte microSD #1 (8 Go) de
mise à niveau de l’adaptateur pour carte
SD.
15 Insérez la carte microSD #2 (2 Go) de
mise à niveau dans l’adaptateur pour carte
SD.
16 Insérez la carte microSD #2 (2 Go) de
mise à niveau dans la fente pour carte SD.
17 Répétez les étapes 3 à 6.
18 Confirmez la version du microprogramme Bluetooth.
Assurez-vous que la version actuelle est 3.10.
p Si la version actuelle est 2.50, retour à l’é-
tape 1.
20 Assurez-vous que la version actuelle du
microprogramme Bluetooth est 3.10 et que
la nouvelle version du microprogramme
Bluetooth est 3.24.
21 Touchez [Oui].
La mise à jour démarre.
22 Patientez jusqu’à ce que le processus
de mise à niveau se termine.
Un message apparaîtra une fois la mise à jour
terminée.
23 Touchez [OK].
Le message disparaît et l’écran de la carte est
rétabli.
24 Éjectez la carte microSD #2 (2 Go) de
mise à niveau.
La mise à jour est terminée.
19 Si la version actuelle est 3.10, touchez
[Mise à jour].
Le message confirmant le lancement ou non
de la mise à jour apparaît.
52
Fr
Page 53

Instructions pour la mise à jour
Chapitre
05
Mise à jour du logiciel de
technologie sans fil Bluetooth
p Les utilisateurs mettant à jour le micropro-
gramme Bluetooth de AVIC-F10BT pour la
première fois doivent se reporter à la page
51, Mise à jour du logiciel de technologie
sans fil Bluetooth (pour AVIC-F10BT).
Accédez au site Web de Pioneer pour vérifier la
compatibilité de votre téléphone. Si votre téléphone figure sur la liste et que vous souhaitez
effectuer la mise à jour, procédez à la mise à
jour manuelle du microprogramme Bluetooth
une fois la mise à niveau automatique terminée.
http://www.pioneer.eu
ATTENTION
! Il est important de commencer par mettre à
niveau votre système de navigation.
! Prenez soin de suivre correctement la procé-
dure de mise à niveau. Si vous commettez
une erreur, les fonctions de la technologie
sans fil Bluetooth ne seront plus disponibles.
p Contactez votre revendeur agréé si vous ne
parvenez pas à utiliser les fonctions de la
technologie sans fil Bluetooth.
! Il est important de réaliser la procédure de
mise à jour du microprogramme Bluetooth
sans interruption.
p Les téléphones enregistrés figurant dans la
liste sur l’écran “Liste des connexions”
sont effacés par la mise à jour du logiciel.
1 Insérez la carte microSD #2 (2 Go) de
mise à niveau dans l’adaptateur pour carte
SD.
p L’étape 1 n’est pas nécessaire pour AVIC-
F920BT, AVIC-F9210BTet AVIC-F9220BT.
2 Insérez la carte microSD #2 (2 Go) de
mise à niveau dans la fente pour carte SD.
3 Appuyez sur le bouton HOME pour afficher l’écran “Menu supérieur”.
4 Touchez [Config.].
L’écran “Menu Paramètres” apparaît.
5 Touchez [Paramètres Bluetooth].
L’écran “Paramètres Bluetooth ” apparaît.
6 Touchez [Mise à jour].
La version actuelle est affichée.
7 Confirmez la version du microprogramme Bluetooth.
Assurez-vous que la version actuelle est 3.11
ou ultérieure.
8 Si la version actuelle est 3.11 ou ultérieure, touchez [Mise à jour].
Le message confirmant le lancement ou non
de la mise à jour apparaît.
9 Assurez-vous que la version actuelle du
microprogramme Bluetooth est 3.11 ou ultérieure, et que la nouvelle version du microprogramme Bluetooth est 3.24.
Français
10 Touchez [Oui].
La mise à jour démarre.
53
Fr
Page 54

Chapitre
05
Instructions pour la mise à jour
11 Patientez jusqu’à ce que le processus
de mise à niveau se termine.
Un message apparaîtra une fois la mise à jour
terminée.
12 Touchez [OK].
Le message disparaît et l’écran de la carte est
rétabli.
13 Éjectez la carte microSD #2 (2 Go) de
mise à niveau.
La mise à jour est terminée.
54
Fr
Page 55

Lecture d’un disque DVD-VR
Chapitre
06
p Cette fonction n’est disponible que pour
AVIC-F10BT mis à niveau au moyen de
CNSD-110FM, CNSD-210FM ou ce produit.
Vous pouvez lire un disque DVD-VR (format
d’enregistrement vidéo DVD) à l’aide du lecteur intégré du système de navigation. Cette
section décrit le fonctionnement des disques
DVD-VR.
Procédure de départ
1 Appuyez sur le bouton MODE pour afficher l’écran de fonction AV.
2 Insérez le disque que vous voulez lire
dans le logement de chargement de
disque.
La source change et la lecture démarre.
p Si le disque est déjà inséré, tapotez [Disc]
sur le coin gauche de l’écran.
3 Utilisez les touches de l’écran tactile
pour commander le disque.
= Pour en savoir plus, reportez-vous à la page
suivante, Utilisation des touches de l’écran
tactile.
1 Indicateur du numéro du titre
Indique le numéro du titre en cours de lecture.
2 Indicateur de piste audio
Indique le numéro de la piste audio actuellement sélectionnée.
3 Indicateur du numéro de chapitre
Indique le numéro du chapitre en cours de
lecture.
4 Indicateur du canal audio
Indique le type de canal audio utilisé, comme
“Mch” (multicanaux).
5 Indicateur du mode de lecture
Indique le mode de lecture actuel.
= Pour en savoir plus, reportez-vous à la
page 58, Changement du mode de lec-
ture.
6 Indicateur NEWS
Indique le statut des infos.
7 Indicateur TRFC
Indique le statut des bulletins d’informations
routières.
8 Indicateur d’état mixte
Indique l’état mixte en cours.
= Pour en savoir plus, reportez-vous à la
page 59, Sélectionne la sortie audio.
9 Heure locale
a Indicateur du format audionumérique
Indique le format audionumérique (format
surround) sélectionné.
b Indicateur de temps de lecture
Indique le temps de lecture écoulé dans le
titre en cours de lecture.
c Icône source
Indique quelle source a été sélectionnée.
Français
Lecture de l’écran
c
6152 3 4
7 9
b
8
a
55
Fr
Page 56

Chapitre
06
Lecture d’un disque DVD-VR
Utilisation des touches de l’écran tactile
Écran de lecture (page 1)
Écran de lecture (page 2)
1
2
3
4
56789ab
c
d
e
f
p Pour certains disques, l’icône 9 peut s’affi-
cher, indiquant que l’opération est invalide.
1 c Saut/Saut d
= Pour en savoir plus, reportez-vous à la
page 58, Utilisation de la fonction saut
court.
2 Change le mode de lecture
= Pour en savoir plus, reportez-vous à la
page 58, Changement du mode de lec-
ture.
3 Arrête la lecture
4 Masque les touches de l’écran tactile et
les informations sur la vidéo sélectionnée
Toucher [Masquer] montre uniquement la
vidéo sélectionnée.
5 Saute en avant ou en arrière
56
Fr
gh
Touchez [p] pour sauter au début du chapitre suivant. Touchez une fois [o] pour sauter au début du chapitre en cours de lecture.
Touchez deux fois de suite rapidement pour
sauter au chapitre précédent.
p Vous pouvez réaliser ces commandes
avec le bouton TRK (c/d).
6 Lecture et pause
La touche [f] permute entre la lecture et la
pause.
7 La liste des titres est affichée
Affiche la liste de titres enregistrés sur le
disque.
p Un tiret (–) est affiché en l’absence d’in-
formations correspondantes.
Page 57

Lecture d’un disque DVD-VR
Chapitre
06
= Pour en savoir plus, reportez-vous à
cette page, Lecture à partir de la sélection
d’une liste de titr es.
8 Passe à la page suivante des touches de
l’écran tactile
9 Change l’affichage
Si vous touchez [Aff.], les informations chan-
gent comme suit :
Informations sur le disque — Plage de lecture
répétée et statut activé/désactivé des sous-ti-
tres
a Rappelle les courbes d’égalisation
b Affiche le menu “Fonction”
= Pour en savoir plus, reportez-vous à la
page 59, Utilisation des fonctions avan-
cées.
c Recherche une scène particulière et re-
prend la lecture à un moment précis
= Pour en savoir plus, reportez-vous à la
page suivante, Recherche d’une scène
particulière et reprise de la lecture à un
moment précis.
d Change de pistes audio (multi-audio)
Chaque fois que vous touchez [Audio], les
pistes audio changent.
p Les indications d’affichage telles que
MPEG-A et Mch décrivent la piste audio
enregistrée sur le DVD. Cette indication
peut être différente du son réellement
émis par le système de navigation.
e Change de sous-titres (Multi-sous-titres)
Chaque fois que vous touchez [Ss-titre], la
langue des sous-titres enregistrés sur le
disque change.
f Saute le titre en avant ou en arrière
Si vous touchez [d] vous passez au début du
titre suivant. Si vous touchez [c] vous passez
au début du titre précédent.
g Retour ou avance rapide
Touchez de manière prolongée [m]ou[n]
pour effectuer une avance ou un retour ra-
pide.
Si vous continuez de toucher [m]ou[n]
pendant cinq secondes, le retour rapide/l’a-
vance rapide continue même si vous relâchez
l’une de ces touches. Pour reprendre la lec-
ture à un point désiré, touchez [f], ou la
touche opposée à [m]ou[n], la touche
que vous avez touchée.
h Lecture image par image (ou lecture en ra-
lenti)
= Pour en savoir plus, reportez-vous à la
page suivante, Lecture image par image.
= Pour en savoir plus, reportez-vous à la
page 59, Lecture en ralenti.
Français
Lecture à partir de la sélection
d’une liste de titres
Vous pouvez sélectionner et lire le titre de
votre choix dans la liste.
1 Touchez [Liste] dans l’écran de lecture.
2 Faites défiler la liste en faisant glisser
les éléments en haut ou en bas pour afficher l’élément que vous souhaitez sélectionner.
p Le balayage d’un élément de la liste permet
de faire défiler rapidement la liste.
p Pour arrêter le défilement, touchez délicate-
ment la liste.
3 Touchez le titre à lire dans la liste.
4 Touchez la touche sur le coin droit de
l’écran.
L’écran précédent est rétabli.
57
Fr
Page 58

Chapitre
06
Lecture d’un disque DVD-VR
Recherche d’une scène
particulière et reprise de la
lecture à un moment précis
Vous pouvez rechercher la scène de votre
choix en indiquant un titre ou un chapitre,
ainsi que le temps.
p La recherche de chapitre et la recherche
temporelle ne sont pas disponibles quand
la lecture du disque est arrêtée.
1 Touchez [Rech] puis [Titre] (titre),
[Chapitre] (chapitre), [Heure] (temps).
2 Touchez les touches pour saisir le numéro ou le temps visé, puis touchez
[Entrer].
Pour les titres et les chapitres
! Pour sélectionner 3, touchez [3]et[Entrer]
dans l’ordre.
! Pour sélectionner 10, touchez [1]et[0] puis
[Entrer] dans l’ordre.
Pour le temps (recherche temporelle)
! Pour sélectionner 5 minutes 3 secondes,
touchez [5], [min], [3],[sec]et[Entrer]
dans l’ordre.
! Pour sélectionner 71 minutes 00 seconde,
touchez [7], [1], [min]et[Entrer] dans l’or-
dre.
! Pour sélectionner 100 minutes 05 secon-
des, touchez [1], [0], [0], [5], [sec]et [Entrer]
dans l’ordre.
p Pour annuler un numéro saisi, touchez
[Effacer].
Pour annuler les numéros saisis, touchez
de manière prolongée [Effacer].
Changement du mode de lecture
Deux méthodes s’offrent à vous pour lire des
disques DVD-VR: Original (original) et Liste
(liste de lecture).
p Les titres créés avec des enregistreurs DVD
sont appelés originaux. Les titres qui se basent sur les originaux, les titres réorganisés
sont appelés liste de lecture. Les listes de
lecture sont créées sur des disques DVDR/-RW.
% Touchez [Chang. mode] pour passer en
mode de lecture.
Si le mode de lecture est modifié, la lecture démarre au début du mode de lecture sélectionné.
Utilisation de la fonction saut
court
Cette fonction vous permet de passer l’intervalle de temps de votre choix pendant la lecture de la vidéo. Elle est utile pour passer les
publicités sur votre disque DVD-VR enregistré.
% Pour avancer ou revenir en arrière progressivement, touchez [c Saut] ou [Saut
d].
p Si aucune opération n’est effectuée après le
changement d’étapes, l’omission est activée.
Chaque pression de [c Saut]ou[Saut d ]
dans les deux secondes modifie les étapes
dans l’ordre suivant :
c Saut
5 sec. — 15 sec. — 30sec. — 1 min. — 2 min.
— 3 min. — 0 sec.
Saut d
30 sec. — 1 min. — 1,5 min. — 2 min. — 3 min.
— 5 min. — 10 min. — 0 sec.
# Pour annuler l’omission, touchez une autre
touche pendant l’action d’omission.
Lecture image par image
Cette fonction vous permet d’avancer image
par image pendant la lecture.
58
Fr
Page 59

Lecture d’un disque DVD-VR
Chapitre
06
% Touchez [r] pendant la lecture.
Chaque fois que vous touchez [r], vous
avancez d’une image.
Pour retourner à la lecture normale, touchez
[f].
p Avec certains disques, il est possible que
les images ne soient pas nettes en lecture
image par image.
Lecture en ralenti
Cette fonction vous permet de ralentir la vitesse de lecture.
1 Touchez de manière prolongée [r] jusqu’à ce que
soit affiché pendant la lec-
ture.
L’icône
s’affiche et la lecture en ralenti
avant commence.
p Pour retourner à la lecture normale, tou-
chez [f].
2 Touchez [q]ou[r] pour régler la vi-
tesse de lecture en mode ralenti.
Chaque fois que vous touchez [q]ou[r], la
vitesse change de quatre plages, dans l’ordre
suivant :
1/16 f 1/8 f 1/4 f 1/2
p Il n’y a pas de son pendant la lecture en ra-
lenti.
p Avec certains disques, il est possible que
les images ne soient pas nettes en lecture
en ralenti.
p La lecture en ralenti arrière n’est pas
possible.
Utilisation des fonctions
avancées
% Touchez sur l’écran “DVD-VR”.
Le menu “Fonction” apparaît.
21 3
Français
1 La plage de répétition est modifiée
Chaque fois que vous touchez [Répéter], le
réglage change comme suit :
! Disc :L’ensemble du disque sélectionné
est lu.
! Chapitre: Le chapitre en cours de lec-
ture seulement est répété.
! Titre : Le titre en cours de lecture seule-
ment est répété.
p Si vous procédez à la recherche par cha-
pitre (titre), à l’avance rapide, au retour
rapide ou à la lecture en ralenti, la plage
de lecture répétée passe sur “Disc”.
p Cette fonction n’est pas disponible
quand la lecture du disque est arrêtée.
2 Sélectionne la sortie audio
Lors de la lecture d’un DVD sur lequel les
deux canaux sont enregistrés en monophonique, vous pouvez changer la sortie audio.
Touchez répétitivement [Sélection G/D] jusqu’à ce que la sortie audio souhaitée apparaisse.
Chaque fois que vous touchez [Sélection
G/D], les réglages changent comme suit :
! L : gauche
! R : droite
! Mix : mixage gauche et droite
! L+R : gauche et droite
p Cette fonction n’est pas disponible
quand la lecture du disque est arrêtée.
3 Réglages de configuration du DVD
= Pour le détail des opérations, reportez-
vous au Manuel de fonctionnement de
AVIC-F40BT.
59
Fr
Page 60

Annexe
Dépannage
Problèmes dans les procédures de mise à jour
Symptôme Causes possibles Action
Le processus de mise à jour ne
démarre pas et le système de
navigation s’initialise comme
d’habitude.
Le système de navigation ne
fonctionne pas correctement depuis la mise à niveau.
Une carte microSD incorrecte a été
insérée.
La mise à niveau a déjà été effectuée.
Un écran qui ne peut pas commencer le processus de mise à jour est
affiché.
Le moteur de votre véhicule était
coupé ou le système de navigation
était hors tension pendant le processus de mise à niveau.
La carte microSD de mise à niveau
a été retirée pendant le processus
de mise à niveau.
Éjectez la carte microSD et insérez la bonne
carte microSD de mise à niveau.
Vérifiez si la mise à niveau a été correctement
effectuée. Si elle n’a pas encore été effectuée,
communiquez avec le centre de service agréé
le plus proche.
Éjectez la carte microSD #1 (8 Go) de mise à
niveau et affichez la carte de votre position
actuelle, puis réinsérez la carte microSD #1
(8 Go) de mise à niveau.
Communiquez avec le centre de service
agréé le plus proche.
Communiquez avec le centre de service
agréé le plus proche.
Messages dans les procédures de mise à jour
Les messages suivants peuvent être affichés par votre système de navigation. Reportez-vous au tableau ci-dessous pour identifier le problème, puis effectuez l’action corrective suggérée.
Dans certains cas, des messages différents de ceux indiqués ci-dessous apparaissent. Suivez
alors les instructions données à l’écran.
Message Quand Que faire
Un problème est survenu et la
mise à jour a échoué.
60
Fr
Une erreur imprévue a eu lieu au
cours du processus de mise à jour.
Adressez-vous à votre revendeur local Pioneer
si le message persiste.
Page 61

Sommario
Grazie per aver acquistato questo prodotto Pioneer.
Leggere queste istruzioni per usare correttamente il proprio modello.
Procedure di aggiornamento 74
Importante
! Le schermate mostrate negli esempi po-
trebbero differire da quelle effettive.
! Le schermate effettive potrebbero essere
soggette a modifiche senza preavviso a
scopo di migliorarne le prestazioni e le funzionalità.
Accordo di licenza
PRODOTTO PIONEER 62
Informazioni sul database
Informazioni sui dati del database delle
mappe 65
Precauzione
Modelli da aggiornare 66
Presentazione del manuale 66
Convenzioni utilizzate nel presente
manuale 66
“Schede microSD” 67
In caso di problemi 67
Sito internet 67
Copyright 68
Passaggio al database delle mappe
NAVTEQ 68
Funzioni abilitate o disabilitate
dall’aggiornamento
Impostazione di voci da eliminare e
inizializzare mediante
l’aggiornamento 72
Funzioni invariate nel programma
aggiornato 72
Istruzioni per l’aggiornamento
Procedura di aggiornamento del sistema di
navigazione 73
Preparativi per l’aggiornamento 73
– Verifica del numero del dispositivo 73
– Ottenimento della password per
l’autenticazione 73
– Aggiornamento del programma
software e del database delle
mappe 74
– Verifica del corretto
aggiornamento 75
– Aggiornamento del software per
tecnologia senza fili Bluetooth (per
AVIC-F10BT) 76
– Aggiornamento del software per
tecnologia senza fili Bluetooth 78
Riproduzione di un disco DVD-VR
Procedura di avvio 80
Lettura della schermata 80
Uso dei tasti del pannello tattile 81
– Riproduzione mediante selezione
dall’elenco dei titoli 82
– Ricerca di una scena specifica e avvio
della riproduzione a un orario
specificato 83
– Cambio della modalità di
riproduzione 83
– Uso della funzione di salto per breve
tempo 83
– Riproduzione fotogramma per
fotogramma 83
– Riproduzione rallentata 84
Utilizzo delle funzioni avanzate 84
Risoluzione dei problemi
Problemi con le procedure di
aggiornamento 85
Messaggi durante le procedure di
aggiornamento 85
Italiano
61
It
Page 62

Capitolo
01
Accordo di licenza
PRODOTTO PIONEER
IL PRESENTE DOCUMENTO COSTITUISCE
CONTRATTO LEGALE TRA L’UTENTE FINALE E
PIONEER CORPORATION (GIAPPONE)
(“PIONEER”). SI PREGA DI LEGGERE ATTENTAMENTE I TERMINI E LE CONDIZIONI DEL
PRESENTE CONTRATTO PRIMA DI UTILIZZARE IL SOFTWARE INSTALLATO SUI PRODOTTI
PIONEER. UTILIZZANDO IL SOFTWARE INSTALLATO SUI PRODOTTI PIONEER SI ACCETTANO I VINCOLI DERIVANTI DAI TERMINI DEL
PRESENTE CONTRATTO. IL SOFTWARE INCLUDE UN DATABASE CONCESSO IN LICENZA DAL/DAI FORNITORE/I TERZO/I
(“FORNITORI”)EL’IMPIEGO DEL DATABASE È
COPERTO DAI TERMINI DEI FORNITORI, RIPORTATI IN UN DOCUMENTO A PARTE ALLEGATO AL PRESENTE PRODOTTO. SE NON SI
ACCETTANO I PRESENTI TERMINI E CONDIZIONI CONTRATTUALI, RESTITUIRE I PRODOTTI PIONEER (INCLUSO IL SOFTWARE E
QUALSIASI MATERIALE SCRITTO) ENTRO
CINQUE (5) GIORNI DALLA RICEZIONE DEI
PRODOTTI AL RIVENDITORE PIONEER AUTORIZZATO PRESSO IL QUALE È STATO EFFETTUATO L’ACQUISTO.
1 CONCESSIONE DELLA LICENZA
Pioneer concede una licenza non trasferibile e
non esclusiva per l’impiego del software installato sui prodotti Pioneer (il “Software”)e
della relativa documentazione unicamente destinata ad uso personale o interno alle attività
commerciali e soltanto sui suddetti prodotti
Pioneer.
Non è permesso copiare, reingegnerizzare, tradurre, convertire per un altro sistema operativo, modificare o creare opere di natura
derivativa del Software. Non è permesso concedere in prestito, noleggiare, divulgare, pubblicare, vendere, cedere, affittare, concedere
in sublicenza, commercializzare o trasferire in
altro modo il Software o impiegarlo in qualsiasi altra maniera non espressamente autorizzata dal presente contratto. Non è permesso
ricavare o tentare di ricavare il codice sorgente
o la struttura di tutto il Software o di parti dello
stesso tramite reingegnerizzazione, decodifica,
disassemblaggio, decompilazione o qualsiasi
altro mezzo. Non è permesso utilizzare il Software per condurre attività di servizio al pubblico o per qualsiasi altro impiego che coinvolga
l’elaborazione di dati per altre persone o enti.
Pioneer e i suoi concessori di licenza manterranno tutti i diritti di copyright, segreto commerciale, brevetto e proprietà relativamente al
Software. Il Software è protetto da copyright e
non può essere copiato, anche se modificato
o combinato con altri prodotti. Non è permesso alterare o rimuovere qualsiasi nota relativa
al copyright o ai diritti di proprietà che si trovi
nel o sul Software.
È permesso trasferire a terzi tutti i diritti di licenza sul Software, la relativa documentazione e una copia del presente Contratto di
Licenza, a condizione che la parte interessata
legga ed accetti i termini e le condizioni del
presente Contratto di Licenza.
62
It
Page 63

Accordo di licenza
Capitolo
01
2 ESCLUSIONE DI GARANZIA
Il Software e la relativa documentazione sono
forniti all’utente “NELLO STATO IN CUI SI TROVANO”. PIONEER E I SUOI CONCESSORI DI
LICENZA (ai fini delle disposizioni 2 e 3,
Pioneer e i suoi concessori di licenza saranno
denominati collettivamente “Pioneer”) NON
FORNISCONO E L’UTENTE NON RICEVE NES-
SUNA GARANZIA, ESPRESSA O IMPLICITA, E
SI ESCLUDONO ESPRESSAMENTE TUTTE LE
GARANZIE DI COMMERCIABILITÀ ED IDONEITÀ PER QUALSIASI SCOPO PARTICOLARE. IN ALCUNI PAESI NON È PERMESSA
L’ESCLUSIONE DELLE GARANZIE IMPLICITE,
QUINDI L’ESCLUSIONE DI CUI SOPRA PO-
TREBBE NON TROVARE APPLICAZIONE NEL
PRESENTE CASO SPECIFICO. Il Software è
complesso e potrebbe contenere non conformità, difetti o errori. Pioneer non garantisce in
alcun modo che il Software soddisfi i requisiti
o le aspettative dell’Utente, che il suo uso sia
esente da errori o non subirà interruzioni, né
che le suddette non conformità possano essere o saranno corrette. Pioneer esclude qualsiasi dichiarazione o garanzia relativamente
all’uso o al risultato dell’uso del Software in
termini di precisione, affidabilità o altro.
3 LIMITAZIONE DI RESPONSABILITÀ
IN NESSUN CASO PIONEER POTRÀ ESSERE
RITENUTA RESPONSABILE PER DANNI, RIVENDICAZIONI O PERDITE SUBITE DALL’U-
TENTE (INCLUSI MA NON LIMITATAMENTE AI
DANNI RISARCIBILI, INCIDENTALI, INDIRETTI, SPECIALI, CONSEGUENZIALI O PENALI,
ALLE PERDITE DI PROFITTO, DI VENDITA O DI
INTERRUZIONE DI ATTIVITÀ, ALLE SPESE,
AGLI INVESTIMENTI O AGLI OBBLIGHI IN
CONNESSIONE A QUALSIVOGLIA ATTIVITÀ,
PERDITA DI AVVIAMENTO O DANNO) DERIVANTI DALL’USO O DALL’INCAPACITÀ D’USO
DEL SOFTWARE, ANCHE SE PIONEER È
STATA INFORMATA, ERA O AVREBBE DOVUTO ESSERE A CONOSCENZA DELLA POSSIBILITÀ DEL VERIFICARSI DI TALI DANNI. LA
SUDDETTA LIMITAZIONE SI APPLICA A TUTTE
LE CAUSE DI AZIONE NEL LORO COMPLES-
SO, COMPRESE, A TITOLO NON LIMITATIVO,
LE VIOLAZIONI DI CONTRATTO O DI GARANZIA, NEGLIGENZA, RESPONSABILITÀ OGGETTIVA, DICHIARAZIONI ERRONEE O ALTRI
ILLECITI ANCORA. QUALORA LE LIMITAZIONI
DI GARANZIA O L’ESCLUSIONE DI RESPONSABILITÀ DICHIARATE DA PIONEER NEL
PRESENTE CONTRATTO SIANO PER QUALSIVOGLIA RAGIONE INAPPLICABILI O NON TUTELABILI IN GIUDIZIO, L’UTENTE
ACCONSENTE CHE LA RESPONSABILITÀ DI
PIONEER NON ECCEDERÀ IL CINQUANTA
PER CENTO (50 %) DEL PREZZO PAGATO
DALL’UTENTE STESSO PER L’ACQUISTO DEL
PRODOTTO PIONEER CUI IL PRESENTE CONTRATTO SI RIFERISCE.
In alcuni Paesi non è permessa l’esclusione o
la limitazione dei danni incidentali o consequenziali e, pertanto, la suddetta esclusione o
limitazione potrebbe non risultare applicabile
all’Utente. Questa esclusione di garanzia e limitazione di responsabilità non si applicherà
nella misura in cui una qualsiasi delle disposizioni della presente garanzia sia vietata da
leggi nazionali o locali non prevenibili.
4 RISPETTO DELLA NORMATIVA SULL’E-
SPORTAZIONE
L’Utente accetta e certifica che né il Software
né alcun’altra informazione tecnica ottenuta
da Pioneer, né il prodotto ad essi direttamente
relativo, saranno esportati al di fuori della nazione o del distretto (di seguito denominato
“Paese”) governato dal Governo (di seguito denominato “Governo”) alla cui giurisdizione appartiene l’Utente stesso, ad eccezione di
quanto espressamente concesso e permesso
dalle leggi e dai regolamenti da esso emanati.
Se il Software è stato legittimamente acquisito
al di fuori del Paese, l’Utente s’impegna a non
riesportare il Software stesso né alcun’altra informazione tecnica ricevuta da Pioneer, né il
prodotto ad essi direttamente relativo, ad eccezione di quanto espressamente concesso
dalle leggi e dai regolamenti emanati dal Governo della giurisdizione in cui il Software è
stato acquisito.
Italiano
63
It
Page 64

Capitolo
01
Accordo di licenza
5 CESSAZIONE
Il presente Contratto rimane in vigore sino alla
sua rescissione. Esso può essere rescisso in
qualsiasi momento previa distruzione del Software. Il presente Contratto sarà altresì rescisso in caso di mancata osservanza di uno
qualsiasi dei termini e delle condizioni in esso
riportati. In seguito a tale rescissione l’Utente
s’impegna a distruggere il Software.
6 VARIE
Il presente documento costituisce l’intero Contratto tra Pioneer e l’Utente in relazione al suo
contenuto. Nessuna modifica apportata al presente Contratto potrà essere ritenuta valida
senza il consenso scritto di Pioneer. Qualora
una qualsiasi delle disposizioni contenute nel
presente Contratto sia dichiarata non valida o
non tutelabile in giudizio, le rimanenti disposizioni dello stesso continueranno a conservare
piena validità ed efficacia.
64
It
Page 65

Informazioni sul database
Capitolo
02
Informazioni sui dati del
database delle mappe
! Questo database potrebbe non essere ag-
giornato con eventuali variazioni di vie,
strade, autostrade, terreni, costruzioni e
altro occorse durante il periodo di sviluppo.
Variazioni di questo tipo successive a tale
periodo inevitabilmente non sono incluse
in questo database.
! Indipendentemente dalle costruzioni nuove
ed esistenti, i dati potrebbero differire dalle
condizioni effettive.
! Per ulteriori informazioni riguardo la coper-
tura delle mappe con questo sistema di navigazione, consultare le informazioni sul
nostro sito Web.
! È assolutamente vietato riprodurre e utiliz-
zare una parte qualsiasi o la totalità di questa mappa in qualsiasi forma senza la
previa autorizzazione del titolare del copyright.
! Qualora la regolamentazione stradale o le
condizioni del traffico locali non concordino con questi dati, si raccomanda di attenersi alla regolamentazione locale
(segnaletica, indicazioni, ecc.) e alle condizioni (costruzioni, fenomeni atmosferici,
ecc.) presenti.
! I dati sulla regolamentazione del traffico
usati nel database delle mappe si applicano esclusivamente ai veicoli passeggeri di
dimensioni standard. È da notare, infatti,
che tale database non contiene i regolamenti applicabili ai veicoli più grandi, alle
moto e agli altri veicoli non standard.
! © 1993-2011 NAVTEQ. Tutti i diritti riservati.
! NAVTEQ Maps è un marchio di NAVTEQ.
! © Bundesamt für Eich- und Vermessungs-
wesen
! © EuroGeographics
! Traffic Codes for Belgium are provided by
the Ministerie van de Vlaamse Gemeenschap and the Ministèrie de l’Equipement et des Transports.
! source: © IGN 2009 – BD TOPO
! Die Grundlagendaten wurden mit Geneh-
migung der zuständigen Behörden entnommen
! Contains Royal Mail data © Royal Mail
copyright and database right 2010
! Copyright Geomatics Ltd.
! Copyright © 2003; Top-Map Ltd.
! La Banca Dati Italiana è stata prodotta
usando quale riferimento anche cartografia
numerica ed al tratto prodotta e fornita
dalla Regione Toscana.
! Copyright © 2000; Norwegian Mapping
Authority
! Source: IgeoE – Portugal
! Información geográfica propiedad del
CNIG
! Based upon electronic data © National
Land Survey Sweden.
! Topografische Grundlage: ©Bundesamt für
Landestopographie
! © 2012 INCREMENT P CORP. TUTTI I DIRIT-
TI RISERVATI.
®
Italiano
65
It
Page 66

Capitolo
03
Precauzione
! Prima di aggiornare il programma del siste-
ma di navigazione, leggere l’intero manuale.
! Questo pacchetto è univoco ed è destinato
all’installazione su una sola unità.
! Per l’emissione online della password è ne-
cessario disporre di un computer connesso
a Internet.
Modelli da aggiornare
Questo prodotto contiene l’aggiornamento del
programma software e del database dei seguenti modelli:
! AVIC-F10BT
! AVIC-F20BT
! AVIC-F920BT
! AVIC-F9210BT
! AVIC-F9220BT
! CNSD-110FM
! CNSD-210FM
p In questo manuale, CNSD-110FM indica il
sistema di navigazione che viene aggiornato utilizzando il software d’aggiornamento
CNSD-110FM.
p In questo manuale, CNSD-210FM indica il
sistema di navigazione che viene aggiornato utilizzando il software d’aggiornamento
CNSD-210FM.
Presentazione del manuale
Questo manuale descrive le modalità per ottenere la password e attivare l’aggiornamento.
Fornisce inoltre una panoramica delle variazioni delle funzioni a seguito dell’aggiornamento.
p Gli esempi di schermate illustrati nel pre-
sente manuale fanno riferimento alla versione aggiornata di AVIC-F10BTcon questo
prodotto. Le schermate possono variare in
base ai modelli.
! Aggiornando AVIC-F10BT o AVIC-F20BT con
questo prodotto, le funzioni e le operazioni
saranno quasi equivalenti a AVIC-F40BT.
Pertanto, procurarsi il Manuale di funzionamento di AVIC-F40BT e utilizzarlo come riferimento principale.
! Aggiornando AVIC-F920BT, AVIC-F9210BT o
AVIC-F9220BT con questo prodotto, le funzioni e le operazioni saranno quasi equivalenti a AVIC-F940BT. Pertanto, procurarsi il
Manuale di funzionamento di AVIC-F940BT
e utilizzarlo come riferimento principale.
http://www.pioneer.eu
Convenzioni utilizzate nel
presente manuale
Prima di procedere alle sezioni successive, è
opportuno dedicare qualche minuto alla lettura delle seguenti informazioni sulle convenzioni adottate nel presente manuale. Una buona
conoscenza di queste convenzioni permetterà
un apprendimento molto più facile dell’impiego di questo nuovo apparecchio.
! I pulsanti del sistema di navigazione sono
identificati con LETTERE MAIUSCOLE in
GRASSETTO:
Esempio:
Premere il pulsante MODE o HOME.
! Le voci di menu, i titoli delle schermate e i
componenti funzionali sono descritti in
grassetto con virgolette doppie “”:
Esempio:
Viene visualizzata la schermata “Imposta-
zioni del sistema”.
! I tasti del pannello tattile sono indicati sullo
schermo in grassetto tra parentesi quadre
[]:
Esempio:
Toccare [Impostazioni].
! Informazioni extra, alternative e altre note
sono presentate nel seguente formato:
Esempio:
66
It
Page 67

Precauzione
p Se non è stato ancora memorizzato il
domicilio, farlo ora.
! Le funzioni di altri tasti sulla stessa scher-
mata vengono indicate con # all’inizio della
descrizione:
Esempio:
# Se si tocca [OK], il contatto viene elimi-
nato.
! I riferimenti sono indicati in questo modo:
Esempio:
= Per informazioni sull’operazione, vedere
Verifica del numero del dispositivo a pagi-
na 73.
“Schede microSD”
Si fa riferimento in modo collettivo alla scheda
microSD e alla scheda microSDHC come
“scheda microSD”.
p Tenere la scheda microSD fuori dalla porta-
ta dei bambini per impedire che venga ingerita accidentalmente.
p Non conservare la scheda microSD a tem-
perature elevate o alla luce diretta del sole.
p Evitare che la scheda microSD subisca urti
o colpi.
p Evitare che la scheda microSD entri in con-
tatto con i liquidi. Il contatto con i liquidi
può infatti provocare danni alla scheda
microSD e ai prodotti.
p Fare attenzione a non toccare i terminali
della scheda microSD. Ciò potrebbe causare errori di connessione. Se i terminali sono
sporchi, strofinarli con un panno asciutto e
pulito.
p Il logo microSD è un marchio di SD-3C,
LLC.
p Il logo microSDHC è un marchio di SD-
3C, LLC.
In caso di problemi
! Qualora il sistema di navigazione non do-
vesse funzionare correttamente, si raccomanda di rivolgersi al proprio rivenditore o
al più vicino centro di servizio Pioneer autorizzato.
! Non smarrire la scheda del numero sup-
porto fornita (MEDIA NUMBER CARD). In
caso di smarrimento, non è possibile emettere un nuovo numero supporto
(MEDIA NUMBER). La scheda del numero
supporto deve essere presentata anche in
caso sia necessaria effettuare una riparazione. La scheda è necessaria come prova
di autenticità in caso di richiesta di assistenza (incluso il ripristino).
Sito internet
Si prega di visitare il seguente sito:
http://www.pioneer.eu
! Si suggerisce di registrare il sistema appe-
na acquistato. Le informazioni dettagliate
sul suo acquisto saranno conservate in un
file affinché possano essere d’aiuto in caso
di denuncia assicurativa per perdita o furto.
! Nel nostro sito Web sono disponibili le in-
formazioni più recenti su PIONEER CORPORATION.
Capitolo
03
Italiano
67
It
Page 68

Capitolo
03
Precauzione
Copyright
I nomi di corporazioni private, prodotti e
altri enti qui descritti sono marchi o marchi
registrati delle rispettive aziende.
= Per ulteriori informazioni, vedere il manuale
di funzionamento del sistema di navigazione.
Passaggio al database delle
mappe NAVTEQ
! La struttura delle mappe verrà modificata
in seguito all’aggiornamento.
! La visualizzazione di strade, nomi di strade,
trama di sfondo della mappa e categorie di
PDI cambierà in base alla posizione corrente o alla scala della mappa dopo l’aggiornamento.
68
It
Page 69

Funzioni abilitate o disabilitate dall’aggiornamento
Aggiornando il sistema di navigazione con questo prodotto, il sistema subirà le seguenti modifiche.
Gruppo 1: AVIC-F10BT
Gruppo 2: CNSD-110FM, AVIC-F20BT, AVIC-F920BT, AVIC-F9210BTo AVIC-F9220BT
Gruppo 3: CNSD-210FM
1: funzioni e operazioni modificate dall’aggiornamento
Capitolo
04
Funzioni di navigazione
Funzione della
mappa
Destinazione
Impostazioni del sistema
Riepilogo delle modifiche
L’icona Voice sulla schermata della mappa non viene
più visualizzata.
Se si sposta il cursore sull’icona PDI o su un’icona del
traffico nella schermata della mappa e si tocca
visualizzata la schermata con informazioni dettagliate
sull’icona.
Nella schermata “Sovrapponi POI (Categoria principa-
le)” verranno visualizzati segni di spunta.
La funzione di ricerca mediante l’immissione di più parole chiave non è disponibile.
Quando si immettono i caratteri, il sistema cerca automaticamente nel database tutte le opzioni possibili.
Sono attivi solo i caratteri inseriti.
Il numero delle opzioni possibili verrà visualizzato in alto
a destra nella schermata con l’elenco dei risultati della
ricerca.
È possibile cercare le città dalla cronologia delle ricerche effettuate immettendo il nome dalla tastiera e selezionare “Indirizzo”, “POI” o “Preferiti”.
Se si tocca [OK] senza immettere il numero civico, viene
visualizzata una posizione rappresentativa della strada
nella città selezionata.
È possibile ordinare i risultati della ricerca per nomi di
PDI in base al grado di coerenza con il testo immesso.
L’indirizzo del servizio verrà visualizzato nella schermata
“Elenco POI”.
“Tensione alimentazione” sulla schermata “Stato GPS”
non viene più visualizzata.
Sarà possibile effettuare impostazioni per attivare e disattivare il segnale acustico riprodotto all’avvio del riconoscimento vocale.
p Questa impostazione è disponibile sulla schermata
“Impostazioni volume”.
La funzione “Memoria 3” nelle impostazioni del colore
di illuminazione verrà modificata in “Eco”.
, verrà
Gruppo1Gruppo2Gruppo
3
1 ——
11—
Italiano
1 ——
11—
11—
11—
111
111
111
111
1 ——
1 ——
1 ——
69
It
Page 70

Capitolo
04
Funzioni abilitate o disabilitate dall’aggiornamento
Funzioni di navigazione
Impostazioni Navi
Impostazioni
mappa
Impostazioni
Bluetooth
Altre funzioni
(*1) Se la lingua desiderata non è disponibile nel sistema di navigazione, installare i file TTS dal CD-ROM fornito con
questo prodotto. Per informazioni sull’operazione, vedere il manuale di attivazione nel CD-ROM fornito.
Riepilogo delle modifiche
L’aggiornamento abilita la funzione di guida ecologica
che supporta la guida ecocompatibile.
! Visualizzazione del misuratore eco sulla mappa
! Verifica dello stato di guida ecologica
! Visualizzazione del livello di guida ecologica
! Avviso di avvio improvviso
La funzione “Posizione Fissa” verrà aggiunta al menu
“Accesso rapido”.
L’impostazione di visualizzazione del misuratore eco
sarà disponibile nella schermata “Informazioni visua-
lizzate”.
È possibile modificare l’ordine dei nomi (nome/cognome) nella rubrica telefonica.
La versione del firmware Bluetooth verrà aggiornata. 111
Quando si inizia a utilizzare il sistema di navigazione, è
possibile che venga visualizzato un messaggio relativo ai
dati della mappa.
Se non si utilizza il sistema di navigazione per due minuti, verranno visualizzate immagin i dimostrative.
“Visualizzare il <P DI categoria> più vicino” e “Trova
un indirizzo” nella schermata della gestione vocale non
verranno più visualizzati.
La lingua dei file TTS memorizzati nel sistema di navigazione verrà modificata (*1).
Gruppo1Gruppo2Gruppo
3
1 ——
11—
1 ——
111
111
111
111
111
70
It
Page 71

Funzioni abilitate o disabilitate dall’aggiornamento
Capitolo
04
Funzioni audiovideo
Sorgente AV
iPod
Aha Radio
Impostazioni AV
Altre funzioni
Riepilogo delle modifiche
L’aspetto e il funzionamento della schermata della sor-
gente AV cambiano.
= Per informazioni sull’operazione, vedere Riproduzio-
ne di un disco DVD-VR a pagina 80.
Lo stato di visualizzazione dell’indicatore TRFC e dell’indicatore NEWS cambia.
Il sistema di navigazione consente di passare a
Advanced App Mode, che consente di visualizzare e
far funzionare le applicazioni per iPod sullo schermo.
In Advanced App Mode è possibile far funzionare le applicazioni mediante i movimenti delle dita, ad esempio
toccando, trascinando, scorrendo o spostandosi rapidamente sullo schermo del sistema di navigazione.
[Cambia Mod. controllo] nella schermata della funzione iPod non verrà più visualizzato.
La preferenza della lingua della tastiera per la schermata
dell’applicazione per iPhone può essere impostata nella
schermata del menu della funzione iPod.
Collegando uno smartphone in cui è installato Aha
Radio, è possibile controllare, visualizzare e ascoltare
Aha Radio dal sistema di navigazione.
p Prima di collegare un dispositivo Android
nare la versione del firmware Bluetooth a 3.24.
[Conness. app], utilizzato per l’impostazione della connessione Aha Radio, verrà aggiunto.
[Fonte AV] nella schermata “Menu top” verrà modificato in [Fonte e contenuti AV].
™
, aggior-
Gruppo1Gruppo2Gruppo
3
1 ——
1 ——
111
Italiano
11—
111
111
111
111
p Le seguenti funzioni sono disponibili solo per AVIC-F40BT e AVIC-F940BT. Anche se si aggiorna il sistema di naviga-
zione, queste funzioni non saranno disponibili.
! Visualizzazione del codice di cancellazione dei contenuti DivX VOD
! Utilizzo della funzione Controllo acustico centrale
! Regolazione automatica della curva di equalizzazione (Auto EQ)
! Visualizzazione dello stato di funzionamento delle apparecchiature del veicolo
It
71
Page 72

Capitolo
04
Funzioni abilitate o disabilitate dall’aggiornamento
Impostazione di voci da
eliminare e inizializzare
mediante l’aggiornamento
I dati e le impostazioni seguenti vengono cancellati e ripristinati ai valori predefiniti. Le altre
voci vengono mantenute. Tuttavia, alcune
delle voci non sono elencate se il valore di impostazione può essere facilmente recuperato
dall’utente, come l’ultima posizione del cursore sulla schermata della mappa.
Il grassetto indica funzioni o nomi di comandi.
Voci d’impostazione
Menu top Menu di scelta rapida
Itinerario attuale
Stato di guida dell’itinerario attua-
Impostazione
dell’itinerario
Destinazione
Impostazioni
traffico
Impostazioni
mappa
Impostazioni
Navi
Impostazioni
del sistema
Impostazioni
Bluetooth
Altre Layout della tastiera
le
Opzioni Itinerario
Apprendimento dei dati dell’itinerario
Ordinamento dell’elenco “ Preferi-
ti”
Infor. Traff. Vis.
Info visualizzate
Selezione accesso rapido
Sovrapponi POI
Visual. giorno/notte
Mod. contr. AV
Colore strada
Crea Imp. registro
Modalità demo
Impostazioni Eco
Impostazioni locali
Volume
Preferenze risp. Auto.
Rifiuta tutte le chiamate
Se durante l’installazione software si verifica
un errore inatteso, i dati utente archiviati nella
memoria interna dell’unità potrebbero essere
cancellati. Pioneer non è responsabile per
eventuali perdite di dati o indisponibilità dei
dati utente.
Funzioni invariate nel
programma aggiornato
Anche se si aggiorna il sistema di navigazione,
le seguenti funzioni non verranno modificate.
! Uso dell’equalizzatore
! Impostazione del palcoscenico sonoro si-
mulato
! Selezione dell’impostazione antenna auto-
matica (*2)
! Modifica dell’uscita vocale della guida di
navigazione (*2)
(*2) Queste funzioni sono disponibili solo per
AVIC-F10BT, CNSD-110FM e CNSD-210FM aggiornati da AVIC-F10BT.
72
It
Page 73

Istruzioni per l’aggiornamento
Capitolo
05
Procedura di aggiornamento
del sistema di navigazione
1 Verificare il numero del dispositivo del siste-
ma di navigazione.
= Per informazioni sull’operazione, vedere
Verifica del numero del dispositivo in questa pagina.
j
2 Ottenere la password per l’autenticazione.
= Per ulteriori dettagli, vedere Ottenimento
della password per l’autenticazione in
questa pagina.
j
3 Aggiornare il programma software del si-
stema di navigazione.
= Per informazioni sull’operazione, vedere
Aggiornamento del programma software
e del database delle mappe nella pagina
seguente.
j
4 Verificare il corretto aggiornamento.
= Per informazioni sull’operazione, vedere
Verifica del corretto aggiornamento a pagina 75.
j
5 Aggiornare il firmware Bluetooth.
= Per informazioni sull’operazione, vedere
Aggiornamento del software per tecnologia senza fili Bluetooth (per AVIC-F10BT) a
pagina 76.
= Per informazioni sull’operazione, vedere
Aggiornamento del software per tecnologia senza fili Bluetooth a pagina 78.
Preparativi per
l’aggiornamento
Verifica del numero del dispositivo
Verificare il numero del dispositivo
(DEVICE NUMBER, visualizzato come
Dispositivo n. o Numero dispositivo) del sistema di navigazione per le procedure successive. Per visualizzare il numero del dispositivo,
procedere come segue.
1 Premere il pulsante HOME per visualizzare la schermata “Menu top”.
Italiano
2 Toccare [Impostazioni].
Viene visualizzata la schermata “Menu impo-
stazioni”.
3 Toccare [Impostazioni del sistema].
Viene visualizzata la schermata “Impostazioni
del sistema”.
4 Toccare [Informazioni di servizio].
Viene visualizzata la schermata “Schermata
informazioni sull’assistenza”.
5 Annotare il numero del dispositivo
(Numero dispositivo) sulla scheda del numero supporto (MEDIA NUMBER CARD)
fornita onde evitare errori.
p Annotare anche le informazioni della “Ver-
sione” che saranno utilizzate per conferma-
re il completamento dell’aggiornamento.
Ottenimento della password
per l’autenticazione
Per l’aggiornamento è necessaria una pas-
sword univoca emessa online. Accedere al
sito web con il proprio PC per ottenere la password.
Sono necessarie le seguenti informazioni.
! Numero supporto (MEDIA NUMBER) stam-
pato sulla scheda del numero supporto
(MEDIA NUMBER CARD)
! Numero del dispositivo (DEVICE NUMBER)
del sistema di navigazione
73
It
Page 74

Capitolo
05
Istruzioni per l’aggiornamento
1 Accedere al seguente sito web per ottenere la password.
http://www.pioneer.eu/UnlockNavgate
Per ottenere la password, seguire le istruzioni
sul sito web.
2 Registrare la password ottenuta.
Questa password deve essere immessa correttamente. Annotare la password per evitare errori.
Procedure di aggiornamento
! NON arrestare il motore del veicolo né spe-
gnere l’alimentazione del sistema di navigazione fino al completamento
dell’installazione. Lo spegnimento dell’alimentazione durante la procedura di aggiornamento causa malfunzionamenti o guasti
del sistema di navigazione.
! Nessuna funzione è disponibile durante la
procedura di aggiornamento.
Aggiornamento del
programma software e del
database delle mappe
Questa sezione descrive le procedure di aggiornamento del sistema di navigazione.
p L’aggiornamento richiede circa 30 minuti in
totale.
2 Inserire la scheda microSD di aggiornamento n. 1 (8 GB) nell’apposito adattatore
per scheda SD.
p Il passaggio 2 non è necessario per AVIC-
F920BT, AVIC-F9210BTe AVIC-F9220BT.
3 Inserire la scheda microSD di aggiornamento n. 1 (8 GB) nell’apposito alloggiamento per scheda SD.
Viene visualizzato un messaggio in cui si chiede di confermare l’avvio dell’aggiornamento.
4 Toccare [Sì].
Viene visualizzato un messaggio che chiede
se immettere la password.
5 Toccare [Sì].
1 Parcheggiare il veicolo in un luogo sicuro e innestare il freno di stazionamento.
74
It
Dopo una breve pausa, appare la tastiera per
l’immissione della password.
# Se si tocca [No], verrà visualizzato il numero
di dispositivo (Dispositivo n.) del sistema di navigazione.
Page 75

Istruzioni per l’aggiornamento
Capitolo
05
# Se si tocca [Annulla], l’aggiornamento verrà
annullato.
6 Immettere la password di autenticazione ricevuta e toccare [OK].
Viene visualizzato un messaggio che chiede di
confermare il riavvio del sistema di navigazione.
7 Toccare [OK].
Il sistema di navigazione viene ravviato e ha
inizio l’installazione.
8 Attendere il completamento della procedura di aggiornamento.
Verifica del corretto
aggiornamento
Visualizzare la schermata “Schermata infor-
mazioni sull’assistenza” per confrontare il
numero della versione corrente con il precedente.
1 Premere il pulsante HOME per visualizzare la schermata “Menu top”.
2 Toccare [Impostazioni].
Viene visualizzata la schermata “Menu impo-
stazioni”.
3 Toccare [Impostazioni del sistema].
Viene visualizzata la schermata “Impostazioni
del sistema”.
4 Toccare [Informazioni di servizio].
Viene visualizzata la schermata “Schermata
informazioni sull’assistenza”.
5 Verificare le informazioni di versione.
6 Espellere la scheda microSD di aggiornamento n. 1 (8 GB).
Italiano
Al termine dell’installazione, il sistema di navigazione si riavvia.
75
It
Page 76

Capitolo
05
Istruzioni per l’aggiornamento
Aggiornamento del software
per tecnologia senza fili
Bluetooth (per AVIC-F10BT)
p Questa descrizione è destinato ai clienti
che intendono aggiornare il firmware
Bluetooth di AVIC-F10BT per la prima volta.
Accedere al sito web Pioneer per verificare la
compatibilità del proprio telefono. Se il telefono è presente nell’elenco e si desidera effettuare l’aggiornamento, eseguire l’aggiornamento
manuale del firmware Bluetooth al termine
dell’aggiornamento automatico.
http://www.pioneer.eu
ATTENZIONE
! Aggiornare prima il sistema di navigazione.
! Eseguire correttamente la procedura di ag-
giornamento. In caso di errori, le funzioni
della tecnologia senza fili Bluetooth non saranno disponibili.
p Se non si riesce a utilizzare le funzioni
della tecnologia senza fili Bluetooth, rivolgersi al proprio rivenditore autorizzato.
! Completare la procedura di aggiornamento
del firmware Bluetooth senza interruzioni.
5 Toccare [Impostazioni Bluetooth].
Viene visualizzata la schermata “Impostazioni
Bluetooth”.
6 Toccare [Aggiornamento firmware].
Viene visualizzata la versione corrente.
7 Verificare la versione del firmware
Bluetooth.
Assicurarsi che la versione corrente sia 2.50.
8 Toccare [Aggiornamento firmware].
Viene visualizzato un messaggio in cui si chiede di confermare l’avvio dell’aggiornamento.
9 Assicurarsi che la versione corrente del
firmware Bluetooth sia 2.50 e che la nuova
versione del firmware Bluetooth sia 3.10.
p I telefoni registrati elencati nella schermata
“Elenco collegamento” vengono eliminati
dall’aggiornamento software.
1 Inserire la scheda microSD di aggiornamento n. 1 (8 GB) nell’apposito adattatore
per scheda SD.
2 Inserire la scheda microSD di aggiornamento n. 1 (8 GB) nell’apposito alloggiamento per scheda SD.
3 Premere il pulsante HOME per visualizzare la schermata “Menu top”.
4 Toccare [Impostazioni].
Viene visualizzata la schermata “Menu impo-
stazioni”.
76
It
10 Toccare [Sì].
Inizia l’aggiornamento.
11 Attendere il completamento della procedura di aggiornamento.
Viene visualizzato un messaggio al termine
dell’aggiornamento.
12 Toccare [OK].
Il messaggio viene chiuso e si torna alla schermata della mappa.
13 Espellere la scheda microSD di aggiornamento n. 1 (8 GB).
Page 77

Istruzioni per l’aggiornamento
Capitolo
05
14 Espellere la scheda microSD di aggiornamento n. 1 (8 GB) dall’apposito adattatore per scheda SD.
15 Inserire la scheda microSD di aggiornamento n. 2 (2 GB) nell’apposito adattatore
per scheda SD.
16 Inserire la scheda microSD di aggiornamento n. 2 (2 GB) nell’apposito alloggiamento per scheda SD.
17 Ripetere i passaggi da 3 a 6.
18 Verificare la versione del firmware
Bluetooth.
Assicurarsi che la versione corrente sia 3.10.
p Se la versione corrente è 2.50, tornare al
punto 1.
20 Assicurarsi che la versione corrente del
firmware Bluetooth sia 3.10 e che la nuova
versione del firmware Bluetooth sia 3.24.
21 Toccare [Sì].
Inizia l’aggiornamento.
22 Attendere il completamento della procedura di aggiornamento.
Viene visualizzato un messaggio al termine
dell’aggiornamento.
23 Toccare [OK].
Il messaggio viene chiuso e si torna alla schermata della mappa.
24 Espellere la scheda microSD di aggiornamento n. 2 (2 GB).
L’aggiornamento viene completato.
Italiano
19 Se la versione corrente è 3.10, toccare
[Aggiornamento firmware].
Viene visualizzato un messaggio in cui si chiede di confermare l’avvio dell’aggiornamento.
77
It
Page 78

Capitolo
05
Istruzioni per l’aggiornamento
Aggiornamento del software per
tecnologia senza fili Bluetooth
p I clienti che intendono aggiornare il firmwa-
re Bluetooth di AVIC-F10BT per la prima
volta possono vedere Aggiornamento del
software per tecnologia senza fili Bluetooth
(per AVIC-F10BT) a pagina 76.
Accedere al sito web Pioneer per verificare la
compatibilità del proprio telefono. Se il telefono è presente nell’elenco e si desidera effettuare l’aggiornamento, eseguire l’aggiornamento
manuale del firmware Bluetooth al termine
dell’aggiornamento automatico.
http://www.pioneer.eu
ATTENZIONE
! Aggiornare prima il sistema di navigazione.
! Eseguire correttamente la procedura di ag-
giornamento. In caso di errori, le funzioni
della tecnologia senza fili Bluetooth non saranno disponibili.
p Se non si riesce a utilizzare le funzioni
della tecnologia senza fili Bluetooth, rivolgersi al proprio rivenditore autorizzato.
! Completare la procedura di aggiornamento
del firmware Bluetooth senza interruzioni.
p I telefoni registrati elencati nella schermata
“Elenco collegamento” vengono eliminati
dall’aggiornamento software.
1 Inserire la scheda microSD di aggiornamento n. 2 (2 GB) nell’apposito adattatore
per scheda SD.
2 Inserire la scheda microSD di aggiornamento n. 2 (2 GB) nell’apposito alloggiamento per scheda SD.
3 Premere il pulsante HOME per visualizzare la schermata “Menu top”.
4 Toccare [Impostazioni].
Viene visualizzata la schermata “Menu impo-
stazioni”.
5 Toccare [Impostazioni Bluetooth].
Viene visualizzata la schermata “Impostazioni
Bluetooth”.
6 Toccare [Aggiornamento firmware].
Viene visualizzata la versione corrente.
7 Verificare la versione del firmware
Bluetooth.
Assicurarsi che la versione corrente sia 3.11 o
successiva.
8 Se la versione corrente è 3.11 o successiva, toccare [Aggiornamento firmware].
Viene visualizzato un messaggio in cui si chiede di confermare l’avvio dell’aggiornamento.
9 Assicurarsi che la versione corrente del
firmware Bluetooth sia 3.11 o successiva e
che la nuova versione del firmware
Bluetooth sia 3.24.
p Il passaggio 1 non è necessario per AVIC-
F920BT, AVIC-F9210BTe AVIC-F9220BT.
78
It
Page 79

Istruzioni per l’aggiornamento
10 Toccare [Sì].
Inizia l’aggiornamento.
11 Attendere il completamento della procedura di aggiornamento.
Viene visualizzato un messaggio al termine
dell’aggiornamento.
12 Toccare [OK].
Il messaggio viene chiuso e si torna alla schermata della mappa.
13 Espellere la scheda microSD di aggiornamento n. 2 (2 GB).
L’aggiornamento viene completato.
Capitolo
05
Italiano
79
It
Page 80

Capitolo
06
Riproduzione di un disco DVD-VR
p Questa funzione è disponibile solo per
AVIC-F10BT aggiornato utilizzando CNSD-
110FM, CNSD-210FM o questo prodotto.
È possibile riprodurre un DVD-VR (formato
DVD Video Recording) mediante il lettore integrato nel sistema di navigazione. Questa sezione descrive le operazioni attinenti alla
riproduzione di dischi DVD-VR.
Procedura di avvio
1 Premere il pulsante MODE per visualizzare la schermata delle operazioni audiovideo.
2 Inserire il disco che si desidera riprodurre nella fessura del disco.
La sorgente cambia e quindi la riproduzione
viene avviata.
p Se il disco è già inserito, toccare [Disc] sul
margine sinistro dello schermo.
3 Utilizzare i tasti del pannello tattile per
controllare il disco.
= Per ulteriori informazioni vedere Uso dei
tasti del pannello tattile nella pagina se-
guente.
Lettura della schermata
8
6152 3 4
7 9
c
b
1 Indicatore del numero del titolo
Mostra il numero del titolo attualmente in riproduzione.
2 Indicatore della traccia audio
Mostra il numero della traccia audio attualmente selezionata.
3 Indicatore del numero del capitolo
Mostra il numero del capitolo attualmente in
riproduzione.
4 Indicatore del canale audio
Mostra il tipo di canale audio corrente, ad
esempio “Mch” (multicanale).
5 Indicatore della modalità di riproduzione
Mostra la modalità di riproduzione corrente.
= Per ulteriori dettagli, vedere Cambio
della modalità di riproduzione a pagina
83.
6 Indicatore NEWS
Mostra lo stato dei notiziari.
7 Indicatore TRFC
Mostra lo stato dei notiziari sul traffico.
8 Indicatore delle condizioni di miscelazio-
ne
Mostra le attuali condizioni di miscelazione.
= Per ulteriori dettagli, vedere Seleziona
l’uscita audio a pagina 84.
9 Ora corrente
a Indicatore del formato audio digitale
Mostra il formato audio digitale (audio surround) attualmente selezionato.
b Indicatore del tempo di riproduzione
Mostra il tempo di riproduzione trascorso per
il titolo corrente.
c Icona della sorgente
Mostra la sorgente selezionata.
a
80
It
Page 81

Riproduzione di un disco DVD-VR
Uso dei tasti del pannello tattile
Schermata di riproduzione (pagina 1)
Schermata di riproduzione (pagina 2)
Capitolo
06
1
2
3
4
56789ab
c
d
e
f
Italiano
p Per alcuni dischi può essere visualizzata l’i-
cona 9, per indicare che l’operazione non
è valida.
1 c No Pub/No Pub d
= Per ulteriori dettagli, vedere Uso della
funzione di salto per breve tempo a pagi-
na 83.
2 Cambia la modalità di riproduzione
= Per ulteriori dettagli, vedere Cambio
della modalità di riproduzione a pagina
83.
3 Interrompe la riproduzione
4 Nasconde i tasti del pannello tattile e le
informazioni del video corrente
Toccando [Nasc], si mostra solo il video corrente.
5 Salta in avanti o all’indietro
gh
Toccando [p] si salta all’inizio del capitolo
successivo. Toccando [o] una volta si salta
all’inizio del capitolo corrente, mentre toccandolo due volte si passa al capitolo precedente.
p È anche possibile eseguire queste ope-
razioni utilizzando il pulsante TRK (c/
d).
6 Riproduzione e pausa
Toccando [f] si commuta tra riproduzione
e pausa.
7 Visualizza l’elenco dei titoli
Mostra l’elenco di titoli registrati nel disco.
p Se non sono disponibili informazioni
corrispondenti, viene visualizzato un
trattino (–).
81
It
Page 82

Capitolo
06
Riproduzione di un disco DVD-VR
= Per ulteriori informazioni vedere Ripro-
duzione mediante selezione dall’elenco
dei titoli in questa pagina.
8 Passa alla pagina successiva dei tasti del
pannello tattile
9 Cambia la visualizzazione
Toccando [Info], le informazioni visualizzate
cambiano come segue:
Visualizzazione delle informazioni sul disco —
Visualizzazione dell’intervallo di ripetizione e
dello stato di attivazione/disattivazione dei sot-
totitoli
a Richiama le curve di equalizzazione
b Visualizza il menu “Funzione”
= Per ulteriori dettagli, vedere Utilizzo delle
funzioni avanzate a pagina 84.
c Ricerca una scena desiderata e avvia la ri-
produzione a un orario specificato
= Per ulteriori dettagli, vedere Ricerca di
una scena specifica e avvio della riproduzione a un orario specificato nella pagina
seguente.
d Cambia le tracce audio (audio multiplo)
Ogni volta che si tocca [Audio] si passa da
una traccia audio all’altra.
p Le indicazioni visualizzate quali MPEG-
A e Mch descrivono la traccia audio re-
gistrata nel DVD. Queste indicazioni
possono non corrispondere all’audio attualmente riprodotto dal sistema di navigazione.
e Cambia il sottotitolo (sottotitoli multipli)
Ogni volta che si tocca [Sottot.] si passa da
una lingua dei sottotitoli registrata all’altra nel
disco.
f Salta al titolo successivo o precedente
Toccando [d] si salta all’inizio del titolo suc-
cessivo. Toccando [c] si salta all’inizio del tito-
lo precedente.
g Riavvolgimento o avanzamento rapido
Toccare a lungo [m]o[n] per eseguire l’a-
vanzamento rapido o il riavvolgimento rapido.
Se si tiene premuto [m]o[n] per cinque
secondi, il riavvolgimento/avanzamento rapi-
do continua, anche se uno dei tasti viene rila-
sciato. Per riprendere la riproduzione dal
punto desiderato, toccare [f] o il tasto op-
posto di [m]o[n] che si è toccato.
h Riproduzione fotogramma per fotogram-
ma (o riproduzione rallentata)
= Per ulteriori dettagli, vedere Riproduzio-
ne fotogramma per fotogramma nella pa-
gina seguente.
= Per ulteriori dettagli, vedere Riproduzio-
ne rallentata a pagina 84.
Riproduzione mediante
selezione dall’elenco dei titoli
È possibile selezionare e riprodurre il titolo desiderato dall’elenco.
1 Toccare [Elenco] sulla schermata Riproduzione.
2 Scorrere l’elenco trascinando le voci
verso l’alto o verso il basso in modo da visualizzare la voce che si desidera selezionare.
p Spostando rapidamente una voce dell’elen-
co è possibile scorrere velocemente l’elenco.
p Per fermare lo scorrimento, toccare l’elenco
con delicatezza.
3 Toccare il titolo da riprodurre nell’elenco.
4 Toccare il tasto sul margine destro dello
schermo.
82
It
Page 83

Riproduzione di un disco DVD-VR
Capitolo
06
Viene visualizzata di nuovo la schermata precedente.
Ricerca di una scena specifica e
avvio della riproduzione a un
orario specificato
È possibile cercare la scena desiderata specificando un titolo o un capitolo e il tempo.
p La ricerca di capitoli e la ricerca temporale
non sono disponibili quando la riproduzione del disco è stata interrotta.
1 Toccare [Cerca], quindi [Titolo] (titolo),
[Capitolo] (capitolo) o [Tempo] (tempo).
2 Toccare i tasti per immettere il numero
o il tempo desiderato, quindi toccare [Ins.].
Per titoli e capitoli
! Per selezionare 3, toccare nell’ordine [3]e
[Ins.].
! Per selezionare 10, toccare nell’ordine [1],
[0]e[Ins.].
Per il tempo (ricerca temporale)
! Per selezionare 5 minuti e 3 secondi, tocca-
re nell’ordine [5], [min], [3], [sec]e[Ins.].
! Per selezionare 71 minuti e 00 secondi, toc-
care nell’ordine [7], [1], [min]e[Ins.].
! Per selezionare 100 minuti e 05 secondi,
toccare nell’ordine [1], [0], [0], [5], [sec]e
[Ins.].
p Per cancellare un numero immesso, tocca-
re [Cancella].
Per cancellare i numeri immessi, toccare a
lungo [Cancella].
Cambio della modalità di
riproduzione
Sono disponibili due metodi per riprodurre dischi DVD-VR: Originale (originale) e Playlist
(elenco di riproduzione).
p I titoli creati con registratori DVD sono defi-
niti originali, mentre quelli basati su titoli
originali riorganizzati sono definiti elenchi
di riproduzione e vengono creati su dischi
DVD-R/-RW.
% Toccare [Cambio mod.] per selezionare
la modalità di riproduzione.
Se la modalità di riproduzione viene modificata, la riproduzione inizia dal principio della modalità di riproduzione selezionata.
Uso della funzione di salto per
breve tempo
Questa funzione consente di saltare l’intervallo specificato nella riproduzione del video. Ciò
è utile per evitare le pubblicità sui dischi DVDVR registrati.
% Per saltare progressivamente intervalli
precedenti o successivi, toccare [c No Pub]
o [No Pub d].
p Se non vengono eseguite operazioni dopo il
cambiamento di passaggio, viene avviata
l’operazione di salto di intervalli.
A ogni tocco di [c No Pub]o[No Pub d]
entro due secondi, i passaggi cambiano nell’ordine seguente:
c No Pub
5 sec. — 15 sec. — 30sec. — 1 min. — 2 min.
— 3 min. — 0 sec.
No Pub d
30 sec. — 1 min. — 1,5 min. — 2 min. — 3 min.
— 5 min. — 10 min. — 0 sec.
# Per annullare l’operazione di salto di intervalli,
toccare un altro tasto durante l’azione.
Riproduzione fotogramma per
fotogramma
Questa funzione consente di avanzare di un
fotogramma alla volta durante la riproduzione.
Italiano
83
It
Page 84

Capitolo
06
Riproduzione di un disco DVD-VR
% Toccare [r] durante la riproduzione.
Ogni volta che si tocca [r], la visualizzazione
avanza di un fotogramma.
Per ritornare alla riproduzione normale, toccare [f].
p Con alcuni dischi, le immagini potrebbero
risultare non perfettamente chiare durante
la riproduzione fotogramma per fotogramma.
Riproduzione rallentata
Questa funzione consente di rallentare la velocità di riproduzione.
1 Toccare a lungo [r] finché non viene
visualizzato
Viene visualizzata l’icona
durante la riproduzione.
e ha inizio la ri-
produzione rallentata.
p Per ritornare alla riproduzione normale, toc-
care [f].
2 Toccare [q]o[r] per regolare la velo-
cità durante la riproduzione rallentata.
Ogni volta che si tocca [q]o[r], la velocità
viene modificata in quattro passaggi nell’ordine seguente:
1/16 f 1/8 f 1/4 f 1/2
p Durante la riproduzione rallentata, l’audio
non viene emesso.
p Con alcuni dischi, le immagini potrebbero
risultare non perfettamente chiare durante
la riproduzione rallentata.
p La riproduzione rallentata al contrario non è
disponibile.
Utilizzo delle funzioni
avanzate
% Toccare sulla schermata “DVD-VR”.
Viene visualizzato il menu “Funzione ”.
21 3
1 Cambia l’intervallo di ripetizione
Ogni volta che si tocca [Ripeti], le impostazioni cambiano come segue:
! Disco: riproduce completamente il disco
corrente.
! Capitolo: ripete solo il capitolo corrente.
! Titolo: ripete solo il titolo corrente.
p Se si esegue la ricerca per capitolo (tito-
lo), l’avanzamento rapido, il riavvolgimento rapido o la riproduzione
rallentata, l’intervallo della riproduzione
ripetuta diventa “Disco”.
p Questa funzione è disponibile solamen-
te durante la riproduzione del disco.
2 Seleziona l’uscita audio
Durante la riproduzione di dischi DVD con
entrambi i canali registrati con audio mono,
è possibile cambiare l’uscita audio. Toccare
ripetutamente [Selez. Sx/Dx] fino a quando
nel display non viene visualizzata l’uscita
audio desiderata.
A ogni tocco di [Selez. Sx/Dx], le impostazioni cambiano come segue:
! Sx: sinistra
! Dx: destra
! Mix: miscelazione di destra e sinistra
! S+D: destra e sinistra
p Questa funzione è disponibile solamen-
te durante la riproduzione del disco.
3 Regolazioni della configurazione del
DVD
= Per i dettagli sul funzionamento, vedere
il Manuale di funzionamento di AVICF40BT.
84
It
Page 85

Risoluzione dei problemi
Problemi con le procedure di aggiornamento
Sintomo Causa Azione
La procedura di aggiornamento
non si avvia e il sistema di navigazione si avvia normalmente.
Il sistema di navigazione non
funziona correttamente dopo
l’aggiornamento.
È stata inserita una scheda
microSD errata.
L’aggiornamento è già stato effet-
tuato.
Viene visualizzata una schermata in
cui non è possibile iniziare la procedura di aggiornamento.
Il motore del veicolo è stato spento
ol’alimentazione del sistema di na-
vigazione è stata spenta durante la
procedura di aggiornamento.
La scheda microSD di aggiornamento è sta ta estratta durante la
procedura di aggiornamento.
Espellere la scheda microSD e inserire la
scheda microSD di aggiornamento corretta.
Verificare se l’aggiornamento è stato effettuato correttamente. Se non è stato ancora effettuato, rivolgersi al più vicino centro di
assistenza autorizzato.
Espellere la scheda microSD di aggiornamento n. 1 (8 GB) e visualizzare la mappa della posizione corrente, quindi reinserire la scheda
microSD di aggiornamento n. 1 (8 GB).
Rivolgersi al più vicino centro di assistenza
autorizzato.
Rivolgersi al più vicino centro di assistenza
autorizzato.
Messaggi durante le procedure di aggiornamento
Il sistema di navigazione potrebbe visualizzare i seguenti messaggi. Vedere la tabella seguente per
identificare il problema, quindi eseguire l’azione correttiva consigliata.
In alcuni casi potrebbero anche apparire messaggi diversi da questi. Se dovesse accadere, seguire le istruzioni visualizzate sullo schermo.
Appendice
Italiano
Messaggio Quando Cosa fare
Errore nell’aggiornamento.
Riavviare l’unità.
Quando è verificato un errore imprevisto durante il processo di aggiornamento.
Se il messaggio persiste, rivolgersi al proprio
rivenditore Pioneer locale.
85
It
Page 86

Índice
Gracias por adquirir este producto de Pioneer.
Lea detenidamente estas instrucciones de operación para utilizar de forma correcta el modelo que ha adquirido.
– Actualización del programa de
Importante
! Las pantallas que aparecen en los ejemplos
podrían diferir de las pantallas reales.
! Las pantallas reales podrían cambiarse sin
previo aviso con el objetivo de realizar mejoras de rendimiento y funcionamiento.
Contrato de licencia
PRODUCTO PIONEER 87
Acerca de la base de datos
Acerca de los datos para la base de datos de
mapas 90
Precaución
Modelos que se actualizarán 91
Presentación del manual 91
Convenciones utilizadas en este manual 91
“Tarjeta microSD” 92
En caso de problemas 92
Visite nuestro sitio web 92
Copyright 93
Cambio a la base de datos de mapas
NAVTEQ 93
Funciones activadas o desactivadas a
través de la actualización
Elementos de configuración que va a
eliminar e inicializar el proceso de
actualización 97
Funciones no modificadas en el programa
actualizado 97
Instrucciones para la actualización
El proceso de actualización del sistema de
navegación 98
Preparación para la actualización 98
– Comprobación del número de
dispositivo 98
– Obtención de la contraseña para la
autenticación 98
Procedimientos de actualización 99
86
Es
software y la base de datos de
mapas 99
– Comprobación de si la actualización se
ha efectuado correctamente 100
– Actualización del software de la
tecnología inalámbrica Bluetooth (para
AVIC-F10BT) 101
– Actualización del software de la
tecnología inalámbrica Bluetooth 103
Reproducción de un disco DVD-VR
Procedimiento de inicio 105
Lectura de la pantalla 105
Utilización de las teclas del panel táctil 106
– Reproducción mediante la selección de
la lista de títulos 107
– Búsqueda de una escena específica e
inicio de la reproducción a partir del
tiempo especificado 108
– Cambio del modo de
reproducción 108
– Utilización de la función de salto
breve 108
– Reproducción fotograma a
fotograma 108
– Reproducción a cámara lenta 109
Utilización de las funciones avanzadas 109
Solución de problemas
Problemas en los procedimientos de
actualización 110
Mensajes de los procedimientos de
actualización 110
Page 87

Contrato de licencia
Capítulo
01
PRODUCTO PIONEER
ESTE ES UN CONTRATO LEGAL ENTRE
USTED, COMO EL USUARIO FINAL, Y
PIONEER CORP. (JAPÓN) (EN ADELANTE,
“PIONEER”). LEA ATENTAMENTE LOS TÉRMINOS Y CONDICIONES DE ESTE CONTRATO
ANTES DE UTILIZAR EL SOFTWARE INSTALADO EN LOS PRODUCTOS PIONEER. AL UTILIZAR EL SOFTWARE INSTALADO EN LOS
PRODUCTOS PIONEER, USTED ACEPTA
ESTAR SUJETO A LOS TÉRMINOS DE ESTE
CONTRATO. EL SOFTWARE INCLUYE UNA
BASE DE DATOS LICENCIADA POR OTROS
PROVEEDORES (EN ADELANTE, “PROVEEDORES”), Y EL EMPLEO DE LA BASE DE
DATOS ESTÁ SUJETO A LOS TÉRMINOS DISTINTOS DE TALES PROVEEDORES, QUE SE
ENCUENTRAN EN UN DOCUMENTO INCLUIDO EN ESTE PRODUCTO. SI USTED NO ESTÁ
DE ACUERDO CON ESTOS TÉRMINOS, DEVUELVA LOS PRODUCTOS PIONEER (INCLUYENDO EL SOFTWARE, Y TODOS LOS
MATERIALES IMPRESOS) DENTRO DE CINCO
(5) DÍAS DESDE SU RECEPCIÓN, AL DISTRIBUIDOR AUTORIZADO PIONEER DONDE
LOS COMPRÓ.
1 CONCESIÓN DE LICENCIA
Pioneer le otorga una licencia no transferible y
no exclusiva para utilizar el software instalado
en los productos Pioneer (en adelante, el
“Software”) y la documentación relacionada
únicamente para su uso personal o de manera
interna en su empresa y exclusivamente en
los productos Pioneer mencionados.
No tendrá el derecho a copiar, realizar cambios técnicos, modificar, traducir, ni hacer trabajos derivados del Software. Queda
totalmente prohibido prestar, alquilar, divulgar,
publicar, vender, ceder, arrendar con derecho
a compra, otorgar licencia, comercializar o
transferir de cualquier otro modo el Software
o utilizarlo de otra forma que no esté expresamente autorizada en el presente contrato.
Queda totalmente prohibido derivar o tratar de
derivar el código de fuente o la estructura par-
cial o total del Software mediante manipulación técnica, desmontaje, descompilación, ni
por ningún otro medio. No utilice el Software
para explotar una empresa de servicios informáticos ni para cualquier otra aplicación que
implique el proceso de datos para otras personas o entidades.
Pioneer y sus cedentes de licencias deberán
mantener todos los derechos, secretos comerciales, de patente y otros derechos de propiedad sobre este Software. El Software está
protegido por Copyright y no puede copiarse,
aunque esté modificado y mezclado con otros
productos. No altere ni extraiga ningún aviso
sobre el Copyright ni indicaciones sobre la
propiedad contenidos dentro o fuera del Software.
Podrá transferir todos los derechos de la licencia del Software, de los documentos relacionados, y una copia de este contrato a un tercero,
siempre y cuando éste acepte los términos y
condiciones estipulados.
Español
87
Es
Page 88

Capítulo
01
Contrato de licencia
2 EXENCIÓN DE GARANTÍA
El Software y la documentación relacionada
se suministran “TAL Y COMO SON”. PIONEER
Y SUS CEDENTES DE LICENCIAS (a efectos
de las disposiciones 2 y 3, Pioneer y sus concedentes de licencias se denominarán colectivamente “Pioneer”) NO CONCEDEN
NINGUNA GARANTÍA, DE MANERA EXPLÍCITA O IMPLÍCITA, Y TODAS LAS GARANTÍAS
DE COMERCIALIZACIÓN Y ADAPTACIÓN
PARA CUALQUIER PROPÓSITO CONCRETO
QUEDAN EXCLUIDAS EXPLÍCITAMENTE. ALGUNOS PAÍSES NO PERMITEN LA EXCLUSIÓN DE GARANTÍAS IMPLÍCITAS, POR LO
QUE PUEDE NO APLICARSE LA EXCLUSIÓN
ANTERIOR. El Software es complejo y puede
contener alguna falta, defectos o errores.
Pioneer no garantiza que el Software satisfaga
sus necesidades o expectativas, que el funcionamiento del Software esté exento de errores
o interrupciones, ni que todas las faltas de
conformidad puedan ser corregidas. Además,
Pioneer no es responsable de ninguna representación ni garantía con relación al empleo o
a los resultados del empleo del Software en
términos de precisión, fiabilidad y aspectos semejantes.
3 LIMITACIÓN DE RESPONSABILIDAD
PIONEER NO SE HACE RESPONSABLE EN
NINGÚN CASO DE DAÑOS, RECLAMACIONES NI PÉRDIDAS SUFRIDAS POR USTED
(INCLUYENDO Y SIN LIMITARSE A ELLO,
DAÑOS COMPENSATORIOS, ACCIDENTALES,
INDIRECTOS, ESPECIALES, CONSECUENTES
Y EJEMPLARES, PÉRDIDAS DE BENEFICIOS,
PÉRDIDA DE VENTAS O DE NEGOCIO, GASTOS, INVERSIONES, OBLIGACIONES EN RELACIÓN A CUALQUIER NEGOCIO, PÉRDIDA
DE PRESTIGIO, Y DAÑOS) DEBIDOS AL EMPLEO O A LA IMPOSIBILIDAD DE EMPLEO
DEL SOFTWARE, AUNQUE PIONEER HUBIERA SIDO INFORMADO SOBRE, SUPIERA, O
DEBIERA HABER CONOCIDO LA POSIBILIDAD DE TALES DAÑOS. ESTA LIMITACIÓN SE
APLICA A TODAS LAS CAUSAS DE ACCIÓN
LEGAL EN ESTE CONJUNTO, INCLUYENDO Y
SIN LIMITARSE A ELLO, LA RUPTURA DEL
CONTRATO, DE LA GARANTÍA, NEGLIGENCIA,
RESPONSABILIDAD OBJETIVA, FALSEDAD, Y
OTROS PERJUICIOS. SI L A EXENCIÓN DE LA
GARANTÍA O LA LIMITACIÓN DE RESPONSABILIDADES DE PIONEER ESTABLECIDAS EN
ESTE CONTRATO NO PUDIERAN, POR CUALQUIER RAZÓN, PONERSE EN PRÁCTICA O
NO PUDIERAN APLICARSE, USTED ESTÁ DE
ACUERDO CON QUE LA OBLIGACIÓN DE
PIONEER NO DEBERÁ EXCEDER EL CINCUENTA POR CIENTO (50 %) DEL PRECIO PAGADO POR USTED AL COMPRAR EL
PRODUCTO PIONEER ADJUNTO.
Algunos países no permiten la exclusión o limitación de los daños accidentales o consecuentes, por lo que puede no aplicarse la
exclusión o limitación anterior. Esta exención
de garantía y limitación de responsabilidad no
será aplicable en el supuesto de que alguna
provisión de esta garantía esté prohibida por
cualquier ley nacional o local que no pueda
ser anulada.
4 COMPROMISO CON LAS LEYES SOBRE
LA EXPORTACIÓN
Usted acuerda y certifica que ni el Software ni
ningún otro dato técnico recibido de Pioneer,
ni el mismo producto, serán exportados fuera
del país o distrito (en adelante, el “País”) que
se rija por las leyes del gobierno que tenga jurisdicción sobre usted (en adelante, el “Gobierno”) excepto si está autorizado por las leyes y
regulaciones de dicho Gobierno. Si usted ha
adquirido el Software legalmente fuera del
País, se compromete a no reexportar el Software ni ningún otro dato técnico recibido de
Pioneer, ni el mismo producto, con excepción
de lo que permitan las leyes y regulaciones del
Gobierno y las leyes y regulaciones de la jurisdicción en la que usted obtuvo el Software.
88
Es
Page 89

Contrato de licencia
5 EXTINCIÓN DEL CONTRATO
Este Contrato será efectivo hasta la fecha de
su extinción. Usted podrá terminarlo en cualquier momento destruyendo el Software. El
Contrato también se extinguirá si no cumple
alguno de los términos y condiciones de este
Contrato. En caso de tal extinción, usted está
de acuerdo en destruir el Software.
6 VARIOS
Este es el Contrato completo entre Pioneer y
usted con relación a este asunto. Ningún cambio de este Contrato entrará en vigor a menos
que lo acuerde por escrito Pioneer. Aunque alguna disposición de este Contrato se declare
inválida o inaplicable, las restantes permanecerán con pleno vigor y validez.
Capítulo
01
Español
89
Es
Page 90

Capítulo
02
Acerca de la base de datos
Acerca de los datos para la
base de datos de mapas
! Es posible que las modificaciones relacio-
nadas con carreteras, calles/autopistas, te-
rrenos, construcciones, etc. que se hayan
realizado antes y durante el período de de-
sarrollo podrían no quedar reflejadas en
esta base de datos. Inevitablemente, las
modificaciones que se hayan realizado de
forma posterior no quedarán plasmadas en
esta base datos.
! Independientemente de los lugares ya exis-
tentes o de nueva construcción, los datos
podrían diferir de la condición real.
! Para los detalles acerca de la cobertura de
mapas de este sistema de navegación, con-
sulte la información de nuestro sitio web.
! Queda terminantemente prohibido repro-
ducir o utilizar cualquier parte o la totalidad
del mapa de cualquier forma sin el permiso
del propietario del Copyright.
! Si las normativas de tráfico locales o las
condiciones difieren de estos datos, siga
las normativas locales (señales, indicacio-
nes, etc.) y las condiciones existentes
(construcciones, tiempo atmosférico, etc.).
! Los datos de regulación de tráfico usados
en esta base de datos de mapas sólo se
aplican a vehículos de pasajeros de tama-
ño estándar. Observe que en esta base de
datos no se incluyen las normas para ve-
hículos de mayor tamaño, motocicletas u
otros vehículos no estándares.
! © 1993-2011 NAVTEQ. Todos los derechos
reservados.
! NAVTEQ Maps es una marca comercial de
NAVTEQ.
! © Bundesamt für Eich- und Vermessungs-
wesen
! © EuroGeographics
! Traffic Codes for Belgium are provided by
the Ministerie van de Vlaamse Gemeenschap and the Ministèrie de l’Equipement et des Transports.
! source: © IGN 2009 – BD TOPO
! Die Grundlagendaten wurden mit Geneh-
migung der zuständigen Behörden entnommen
! Contains Royal Mail data © Royal Mail
copyright and database right 2010
! Copyright Geomatics Ltd.
! Copyright © 2003; Top-Map Ltd.
! La Banca Dati Italiana è stata prodotta
usando quale riferimento anche cartografia
numerica ed al tratto prodotta e fornita
dalla Regione Toscana.
! Copyright © 2000; Norwegian Mapping
Authority
! Source: IgeoE – Portugal
! Información geográfica propiedad del
CNIG
! Based upon electronic data © National
Land Survey Sweden.
! Topografische Grundlage: ©Bundesamt für
Landestopographie
! © 2012 INCREMENT P CORP. TODOS LOS
DERECHOS RESERVADOS.
®
90
Es
Page 91

Precaución
Capítulo
03
! Lea todo el manual antes de actualizar el
programa de su sistema de navegación.
! Este paquete es único, y no puede instalar-
se en más de una unidad.
! Es necesario contar con un ordenador con
conexión a Internet para obtener la contraseña a través de Internet.
Modelos que se actualizarán
Este producto puede actualizar el programa
de software y la base de datos de los siguientes modelos:
! AVIC-F10BT
! AVIC-F20BT
! AVIC-F920BT
! AVIC-F9210BT
! AVIC-F9220BT
! CNSD-110FM
! CNSD-210FM
p En este manual, CNSD-110FM indica el sis-
tema de navegación que se actualiza mediante la actualización del software CNSD110FM.
p En este manual, CNSD-210FM indica el sis-
tema de navegación que se actualiza mediante la actualización del software CNSD210FM.
Presentación del manual
Este manual describe cómo conseguir la contraseña y activar la actualización. También
ofrece una descripción general de cómo cambian las funciones después de la actualización.
p Las capturas de pantalla que aparecen en
este manual están basadas en la versión
actualizada del AVIC-F10BT utilizando este
producto. Las pantallas podrían variar en
función del modelo.
! Al actualizar AVIC-F10BT o AVIC-F20BTcon
este producto, las funciones y las operaciones serán casi equivalentes a las de AVICF40BT. Por lo tanto, obtenga el Manual de
operación de AVIC-F40BT y utilícelo como
referencia principal.
! Al actualizar AVIC-F920BT, AVIC-F9210BT o
AVIC-F9220BT con este producto, las funciones y las operaciones serán casi equivalentes a las de AVIC-F940BT. Por lo tanto,
obtenga el Manual de operación de AVICF940BT y utilícelo como referencia principal.
http://www.pioneer.eu
Convenciones utilizadas en
este manual
Antes de seguir, dedique algunos minutos a
leer la siguiente información sobre las convenciones utilizadas en este manual. Conocer
bien estas convenciones le facilitará el aprendizaje del uso de este nuevo equipo.
! Los botones del sistema de navegación
aparecen en MAYÚSCULAS y NEGRITA:
p. ej.)
Pulse el botón MODE o el botón HOME.
! Los elementos de menú, títulos de pantalla
y componentes de funciones aparecen en
negrita con comillas dobles “”:
p. ej.)
Aparecerá la pantalla “Config. sist.”.
! Las teclas del panel táctil disponibles en la
pantalla aparecen en negrita y entre corchetes [ ]:
p. ej.)
Pulse [Ajustes].
! La información adicional, alternativas y
otras notas se presentan con el siguiente
formato:
p. ej.)
p Si no se ha almacenado aún su domici-
lio, ajuste en primer lugar la ubicación.
Español
91
Es
Page 92

Capítulo
03
Precaución
! Las funciones del resto de teclas de la
misma pantalla se indican con el símbolo
# al principio de la descripción:
p. ej.)
# Si pulsa [OK], se eliminará la entrada.
! Las referencias se indican del modo si-
guiente:
p. ej.)
= Para los detalles sobre la operación,
consulte Comprobación del número de
dispositivo en la página 98.
“Tarjeta microSD”
La tarjeta microSD y la tarjeta microSDHC se
denominan de forma colectiva “tarjeta
microSD”.
p Mantenga la tarjeta microSD fuera del al-
cance de los niños pequeños para evitar
que la ingieran accidentalmente.
p No almacene la tarjeta microSD en lugares
con elevadas temperaturas ni sometida a
la luz del sol directa.
p No someta la tarjeta microSD a golpes ni
impactos.
p Evite que la tarjeta microSD entre en con-
tacto con cualquier tipo de líquido. Podrían
producirse daños en la tarjeta microSD y
en sus productos.
p Tenga cuidado de no tocar los terminales
de la tarjeta microSD. De lo contrario, po-
drían producirse fallos en la conexión. Si
algún terminal se encuentra sucio, frótelo
con un paño limpio seco.
p El logotipo de microSD es una marca
comercial de SD-3C, LLC.
p El logotipo de microSDHC es una
marca comercial de SD-3C, LLC.
En caso de problemas
! Si el sistema de navegación no funcionase
correctamente, póngase en contacto con
su concesionario o el servicio técnico autorizado Pioneer más próximo.
! No extravíe la tarjeta de número de soporte
suministrada (MEDIA NUMBER CARD). Si
pierde la tarjeta de número de soporte, no
podrá volver a obtener el número de soporte (MEDIA NUMBER). Además, deberá enviar la tarjeta de número de soporte
cuando haya que realizar alguna reparación. La tarjeta es necesaria como prueba
de autenticidad si es necesario algún tipo
de servicio técnico (incluida la
recuperación).
Visite nuestro sitio web
Visítenos en:
http://www.pioneer.eu
! Registre su producto. Conservaremos los
datos de su adquisición para que pueda
consultarlos en caso de una demanda de
seguro, como pérdida o robo.
! En nuestro sitio Web ofrecemos la informa-
ción más reciente acerca de PIONEER
CORPORATION.
92
Es
Page 93

Precaución
Copyright
Los nombres de las empresas privadas,
productos y otras entidades aquí descritas
son marcas comerciales registradas o marcas registradas de sus respectivos propietarios.
= Para obtener más información, consulte el
Manual de operación de su sistema de navegación.
Cambio a la base de datos
de mapas NAVTEQ
! El diseño del mapa cambiará al actualizar.
! La visualización de carreteras, nombres de
calles, la textura del fondo del mapa y las
categorías de PDI cambiarán en función de
las ubicaciones o de la escala del mapa
tras la actualización.
Capítulo
03
Español
93
Es
Page 94

Capítulo
04
Funciones activadas o desactivadas a través de la
actualización
Si actualiza su sistema de navegación utilizando este producto, el sistema presentará los siguientes cambios.
Grupo 1: AVIC-F10BT
Grupo 2: CNSD-110FM, AVIC -F20BT, AVIC-F920BT, AVIC-F9210BT o AVIC-F9220BT
Grupo 3: CNSD-210FM
1: funciones y operaciones cambiadas a través de la actualización
Funciones de navegación
Función de mapa
Destino
Config. sist.
Resumen de los cambios Grupo 1 Grupo 2 Grupo 3
El icono Voice que aparece en la pantalla del mapa ya
no aparecerá.
Si coloca el cursor en el icono de PDI o un icono de tráfico en la pantalla del mapa y pulsa
talla de información detallada del icono.
Aparecerán marcas de verificación en la pantalla “Su-
perpos. PDI (categ. princ.)”.
No estará disponible la función de búsqueda mediante
la introducción de varias palabras clave.
Al introducir caracteres, el sistema buscará automáticamente todas las opciones posibles en la base de datos.
Solo se activarán los caracteres que introduzca.
El número de opciones posibles aparecerá en la parte
superior derecha de la lista de la pantalla de resultados
de búsqueda.
Puede buscar ciudades en el historial introduciendo el
nombre con el teclado y seleccionando por “Dirección”,
“PDI” o “Favoritos”.
Si pulsa [OK] sin introducir el número de casa, aparecerá la ubicación más representativa de la carretera de la
ciudad seleccionada.
Puede ordenar los resultados de búsqueda de los nombres de PDI por grado de coincidencia con el texto introducido.
Aparecerán direcciones de instalaciones en la pantalla
“Lista PDI”.
Ya no aparecerá “Tensión alimentación” en la pantalla
“Estado GPS”.
Podrá realizar ajustes para activar o desactivar el sonido
que se reproduce al iniciarse el reconocimiento de voz.
p Este ajuste está disponible en la pantalla “Ajustes
de volumen”.
La función “Memoria 3” del ajuste del color de iluminación se cambiará a “Eco”.
, aparecerá la pan-
1 ——
11—
1 ——
11—
11—
11—
111
111
111
111
1 ——
1 ——
1 ——
94
Es
Page 95

Funciones activadas o desactivadas a través de la
actualización
Capítulo
04
Funciones de navegación
Configuración navegación
Parámetros mapa
Configuración de
Bluetooth
Otras funciones
(*1) Si el idioma deseado no está disponible en su sistema de navegación, instale los archivos TTS del CD-ROM suministrado con este producto. Para los detalles sobre la operación, consulte el manual de activación del CD-ROM suministrado.
Resumen de los cambios Grupo 1 Grupo 2 Grupo 3
La actualización activa la función de conducción Eco,
que promueve la conducción respetuosa con el medio
ambiente.
! Visualización en el mapa del Medidor Eco
! Compro bación del estado de conducción Eco
! Visualización de la guía del nivel de conducción Eco
! Alerta de arranque repentino
La función “Fijar posición” se añadirá al menú “Acceso
rápido”.
La configuración de visualización del Medidor Eco estará disponible en la pantalla “Información visualizada”.
Puede cambiar el orden de los nombres (nombre/apellidos) de la agenda telefónica.
La versión del firmware Bluetooth se actualizará. 111
Cuando empiece a utilizar este sistema de navegación,
es posible que aparezca un mensaje relacionado con los
datos de mapas.
Si no utiliza este sistema de navegación durante dos minutos, aparecerán imágenes de demostración.
Ya no aparecerán “Elige la <categoría de puntos de in-
terés> más cercana” ni “Busca una dirección” en la
pantalla de operaciones por voz.
Los idiomas de los archivos TTS almacenados en su sistema de navegación cambiarán (*1).
1 ——
11—
1 ——
111
111
111
111
111
Español
95
Es
Page 96

Capítulo
04
Funciones activadas o desactivadas a través de la
actualización
Funciones AV Resumen de los cambios Grupo 1 Grupo 2 Grupo 3
Cambiará tanto el diseño de la pantalla de fuente de AV
como el p roceso de funcionamiento.
Fuente de AV
iPod
Aha Radio
Configuración deAV[Conexión de ap], utilizado por la configuración de co-
Otras funciones
= Para los detalles sobre la operación, consulte Repro-
ducción de un disco DVD-VR en la página 105.
Cambiará el estado de visualización del indicador TRFC
y el indicador NEWS.
Su sistema de navegación puede cambiar a Advanced
App Mode, lo que le permitirá ver y utilizar las aplicaciones para iPod en la pantalla.
En Advanced App Mode, puede utilizar aplicaciones
pulsando, arrastrando, desplazando o deslizando el
dedo por la pantalla del sistema de navegación.
[Cambiar modo de control] ya no aparecerá en la pantalla del menú de funciones de iPod.
La preferencia del idioma del teclado para las pantallas
de las aplicaciones para iPhone puede establecerse en
la pantalla del menú de funciones de iPod.
Al conectar un smartphone con Aha Radio instalado,
puede controlar, ver y escuchar Aha Radio desde su sistema de navegación.
p Antes de conectar un dispositivo Android
ce la vers ión del firmware Bluetooth a 3.24.
nexión de Aha Radio, se añadirá.
[Fuente AV] en la pantalla “Menú superior ” cambiará a
[Fuente AV y contenido].
™
, actuali-
1 ——
1 ——
111
11—
111
111
111
111
p Las siguientes funciones solo están disponibles para AVIC-F40BT y AVIC-F940BT. Aunque actualice su sistema de
navegación, estas funciones no estarán disponibles.
! Visualización del código de cancelación de registro DivX VOD
! Utilización del control del centro de sonido
! Ajuste automático de la curva del ecualizador (Ecualizador automático)
! Visualización del estado de funcionamiento del equipo del vehículo
96
Es
Page 97

Funciones activadas o desactivadas a través de la
actualización
Capítulo
04
Elementos de configuración
que va a eliminar e inicializar
el proceso de actualización
Los siguientes datos y ajustes se eliminarán y
restaurarán a los valores predeterminados.
Otros elementos permanecerán en el dispositivo. Sin embargo, existen ciertos elementos
que no aparecen en la lista, ya que el usuario
puede recuperar el ajuste fácilmente, como
por ejemplo, la última posición del cursor en
la pantalla del mapa.
La negrita indica nombres de comandos o funciones.
Elementos de configuración
Menú superior Menú de accesos directos
Ruta actual
Establecimiento
de ruta
Destino
Conf. tráfico Info. tráfico visualizada
Parámetros
mapa
Configuración
navegación
Config. sist.
Configuración
de Bluetooth
Otros Distribución del teclado
Estado de guía de la ruta actual
Opciones de ruta
Aprendizaje de datos de rutas
Orden de clasificación de lista de
“Favoritos”
Info mostrada
Selec. acceso rápido
Superp. PDI
Visualización día/noche
Modo guía AV
Color carret.
Config. registro conducc.
Modo de demostración
Config. Eco
Ajustes regionales
Volumen
Preferencia contestador
Rechazar todas las llamadas
Los datos de usuario almacenados en la memoria interna de la unidad podrían borrarse si
se produce un error inesperado durante la instalación del software. Pioneer no se hace responsable de cualquier pérdida de datos o no
disponibilidad de datos de usuario.
Funciones no modificadas
en el programa actualizado
Aunque actualice su sistema de navegación,
las siguientes funciones no cambiarán.
! Utilización del ecualizador
! Configuración del escenario de sonido si-
mulado
! Cambio de la configuración de la antena
automática (*2)
! Cambio de la salida de voz de la guía de na-
vegación (*2)
(*2) Estas funciones solo están disponibles
para AVIC-F10BT, CNSD-110FM y CNSD210FM que se han actualizado mediante AVICF10BT.
Español
97
Es
Page 98

Capítulo
05
Instrucciones para la actualización
El proceso de actualización
del sistema de navegación
1 Compruebe el número de dispositivo de su
sistema de navegación.
= Para los detalles sobre la operación,
consulte Comprobación del número de
dispositivo en esta página.
j
2 Consiga la contraseña para la autentica-
ción.
= Para los detalles, consulte Obtención de
la contraseña para la autenticación en
esta página.
j
3 Actualice el programa de software de su
sistema de navegación.
= Para los detalles sobre la operación,
consulte Actualización del programa de
software y la base de datos de mapas en
la página siguiente.
j
4 Compruebe si la actualización se ha efec-
tuado correctamente.
= Para los detalles sobre la operación,
consulte Comprobación de si la actuali-
zación se ha efectuado correctamente en
la página 100.
j
5 Actualice el firmware Bluetooth.
= Para los detalles sobre la operación,
consulte Actualización del software de la
tecnología inalámbrica Bluetooth (para
AVIC-F10BT) en la página 101.
= Para los detalles sobre la operación,
consulte Actualización del software de la
tecnología inalámbrica Bluetooth en la
página 103.
Preparación para la
actualización
Comprobación del número de
dispositivo
En primer lugar, compruebe el número de su
dispositivo (DEVICE NUMBER, que aparece
como N.º disp. o Número de dispositivo) de su
sistema de navegación para procedimientos
posteriores. Para visualizar el número de dispositivo, realice los siguientes pasos.
1 Pulse el botón HOME para visualizar la
pantalla “Menú superior”.
2 Pulse [Ajustes].
Aparecerá la pantalla “Menú de configura-
ción”.
3 Pulse [Config. sist.].
Aparecerá la pantalla “Config. sist.”.
4 Pulse [Información de servicio].
Aparecerá la pantalla “Pantalla info. servi-
cio”.
5 Anote el número de su dispositivo
(Número de dispositivo) en la tarjeta de número de soporte suministrada
(MEDIA NUMBER CARD) para no cometer
errores.
p Anote también la información de “Versión”,
que se utilizarán para confirmar la finalización del proceso de actualización.
Obtención de la contraseña
para la autenticación
A la hora de realizar la actualización es necesario disponer de una contraseña única que
se proporciona en línea. Acceda al sitio web
con su ordenador y obtenga su contraseña.
Es necesaria la siguiente información.
! Número de soporte (MEDIA NUMBER) im-
preso en la tarjeta de número de soporte
suministrada (MEDIA NUMBER CARD)
98
Es
Page 99

Instrucciones para la actualización
Capítulo
05
! Número de dispositivo (DEVICE NUMBER)
de su sistema de navegación
1 Acceda al siguiente sitio web para obtener su contraseña.
http://www.pioneer.eu/UnlockNavgate
Para obtener la contraseña, siga las instrucciones que aparecen en el sitio web.
2 Guarde la contraseña que reciba.
Tendrá que introducir esta contraseña con
exactitud. Anote la contraseña para no cometer errores.
Procedimientos de
actualización
! NO detenga NUNCA el motor de su ve-
hículo ni desactive la fuente de alimentación del sistema de navegación hasta
que no finalice el proceso de instalación. Si
apaga el dispositivo durante el proceso de
actualización provocará un fallo de funcionamiento o errores en el sistema de navegación.
! No hay funciones disponibles durante el
proceso de actualización.
2 Introduzca la tarjeta microSD de actualización nº 1 (8 GB) en el adaptador para
tarjetas SD.
p El paso 2 no es necesario para AVIC-
F920BT, AVIC-F9210BTy AVIC-F9220BT.
3 Introduzca la tarjeta microSD de actualización nº 1 (8 GB) en la ranura para tarjetas SD.
Aparecerá un mensaje preguntándole si
desea iniciar o no el proceso de actualización.
4 Pulse [Sí].
Español
Actualización del programa de
software y la base de datos de
mapas
Esta sección describe los procedimientos de
actualización de su sistema de navegación.
p El proceso de actualización tarda unos 30
minutos en finalizar.
1 Estacione el vehículo en un lugar seguro y accione el freno de mano.
Aparecerá un mensaje preguntándole si
desea introducir o no la contraseña.
5 Pulse [Sí].
Después de una breve pausa, aparecerá el teclado para introducir la contraseña.
# Si pulsa [No], aparecerá el número de disposi-
tivo (N.º disp.) de su sistema de navegación.
# Si pulsa [Cancelar], se cancelará la actualiza-
ción.
Es
99
Page 100

Capítulo
05
Instrucciones para la actualización
6 Introduzca la contraseña de autenticación que obtuvo y, a continuación, pulse
[OK].
Aparecerá un mensaje de confirmación de reinicio del sistema de navegación.
7 Pulse [OK].
El sistema de navegación se reiniciará, y comenzará el proceso de instalación.
8 Espere hasta que finalice el proceso de
actualización.
Comprobación de si la
actualización se ha efectuado
correctamente
Visualice la pantalla “Pantalla info. servicio”
para comparar el número de versión actual
con el anterior.
1 Pulse el botón HOME para visualizar la
pantalla “Menú superior”.
2 Pulse [Ajustes].
Aparecerá la pantalla “Menú de configura-
ción”.
3 Pulse [Config. sist.].
Aparecerá la pantalla “Config. sist.”.
4 Pulse [Información de servicio].
Aparecerá la pantalla “Pantalla info. servi-
cio”.
5 Compruebe la información sobre la versión.
6 Expulse la tarjeta microSD de actualización nº 1 (8 GB).
Una vez finalizada la instalación, se reinicia el
sistema de navegación.
100
Es
 Loading...