


Operation Manual
AV Receiver / CD Player with 6.5 inch Wide Display
AVH-P6450CD
AV Receiver with 6.5 inch Wide Display
AVH-P6450
English
Español
(B) Português

Section
00 Contents
Pioneer product.
instructions so you will know how to oper- finished reading the instructions, put them
 Before You Start
IMPORTANT SAFEGUARDS 5
About this manual 5
To ensure safe driving 6
•When Using a Display connected to Rear Video Output 6
Precautions 6
CD playback (Only AVH-P6450CD) 6 To avoid battery exhaustion 7
To protect the LCD screen of the display 7 When viewing is difficult, use BRIGHT and
DIMMER to adjust 7 Remote control and care 7
• Battery 8
Protecting your unit from theft 8
•Removing the operation panel 8
•Attaching the operation panel 9 Resetting the Microprocessor 9 What’s what 11
Remote control 12
 Power ON/OFF
Turning the unit on 13
Closing the Display 13
Screen Angle Adjustment 13
Selecting a source 14
Turning the unit off 14
 Common Operations
Source display 15
Displays menus (e.g., Tuner) 15
 Display
Changing the wide mode 16
Video Adjust 17
DIMMER Settings 18
 Tuner
Tuner
Listening to the radio 19 Introduction of advanced tuner
operation 20
Storing broadcast frequencies 20 Tuning in strong signals 21 Storing the strongest broadcast
frequencies 21
 Built-in CD Player
Playing a CD (Only AVH-P6450CD) 22 Introduction of advanced built-in CD player
operation (Only AVH-P6450CD) 23 Repeating play 23
Playing tracks in a random order 23 Scanning tracks of a CD 24 Playing back from the track list 24 Pausing CD playback 24
Using disc title functions 24
•Entering disc titles 25
•Displaying titles on CD TEXT discs 25
 Multi-CD Player
Playing a CD 26
50-disc multi-CD player 26
Introduction of advanced multi-CD player operation 27
Repeating play 27
Playing tracks in a random order 28 Scanning CDs and tracks 28 Playing back from the track list 28 Pausing CD playback 29
Using compression and bass emphasis 29 Using ITS playlists 29
•Creating a playlist with ITS programming 29
•Erasing a track from your ITS playlist 30
•Playback from your ITS playlist 30
2 En

Contents
Stopping Playback 41
Section
00
|
English |
|
Still, Frame-by-Frame and Slow Motion |
|
|
Playback 41 |
|
|
• Still Playback 41 |
olñEspa |
|
• Frame-by-Frame Playback 41 |
||
• Slow Motion Playback 41 |
||
Operating using Information Display 1 42 |
||
• Specifying time 42 |
|
|
• Switching audio, subtitle and angle 43 |
|
|
Operating with Information Display 2 43 |
|
|
• Switching Repeat play range 43 |
Deutsch |
|
• Switching audio L/R 43 |
||
|
||
Audio Adjustments |
|
|
Introduction of audio adjustments 44 |
|
|
Setting the sound focus equalizer 45 |
|
|
Using balance adjustment 45 |
|
|
Using the equalizer 46 |
|
|
• Recalling equalizer curves 46 |
aisçFran |
|
• Adjusting equalizer curves 46 |
||
Adjusting bass 47 |
||
Adjusting treble 47 |
||
Adjusting loudness 48 |
|
|
Using subwoofer output 48 |
|
|
Using non fading output 48 |
|
|
Using the high pass filter 49 |
Italiano |
|
Initial Settings |
||
Adjusting source levels 49 |
|
|
Adjusting initial settings 50 |
|
|
Setting the FM tuning step 50 |
|
|
Setting the AM tuning step 50 |
|
|
Switching the warning tone 51 |
Nederlands |
|
Switching the auxiliary setting 51 |
||
|
||
Setting the rear output and |
|
|
subwoofer controller 51 |
|
|
Switching the Telephone |
|
|
Muting/Attenuation 52 |
|
En 3

Section
00 Contents
4 En

Before You Start
IMPORTANT SAFEGUARDS
Please read all of these instructions regarding your display and retain them for future reference
1Read this manual fully and carefully before operating your display.
2Keep this manual handy for future reference.
3Pay close attention to all warnings in this manual and follow the instructions carefully.
4Do not allow other persons to use this system until they have read and understood the operating instructions.
5Do not install the display where it may (i) obstruct the driver’s vision, (ii) impair the performance of any of the vehicle’s operating systems or safety features, including air bags, or (iii) impair the driver’s ability to safely operate the vehicle.
6As with any accessory in your vehicle’s interior, the display should not divert your attention from the safe operation of your vehicle. If you experience difficulty in operating the system or reading the display, please park safely before making adjustments.
7Do not attempt to install or service your display by yourself. Installation or servicing of the display by persons without training and experience in electronic equipment and automotive accessories may be dangerous and could expose you to the risk of electric shock or other hazards.
8Please remember to wear your seat belt at all times while operating your vehicle. If you are ever in an accident, your injuries can be considerably more severe if your seat belt is not properly buckled. 
Section
01
About this manual
This unit features a number of sophisticated |
English |
|
|
||
functions ensuring superior reception and oper- |
|
|
ation. All the functions have been designed for |
|
|
the easiest possible use, but many are not self- |
|
|
explanatory. This operation manual will help you |
|
|
benefit fully from this product’s potential and to |
|
|
maximize your listening enjoyment. |
olñEspa |
|
We recommend that you familiarize yourself |
||
|
||
with the functions and their operation by read- |
|
|
ing through the manual before you begin using |
|
|
this product. It is especially important that you |
|
|
read and observe precautions on this page and |
|
|
in other sections. |
|
|
This manual explains head unit operation. You |
Deutsch |
|
can perform the same operations with the |
||
|
||
remote control. |
|
|
|
aisçFran |
|
|
Italiano |
|
|
Nederlands |
En 5
Section
01 Before You Start
To ensure safe driving
WARNING
•To avoid the risk of accident and the potential violation of applicable laws, this product is not for use with a video screen that is visible to the driver.
•In some countries or states the viewing of images on a display inside a vehicle even by persons other than the driver may be illegal. Where such regulations apply, they must be obeyed.
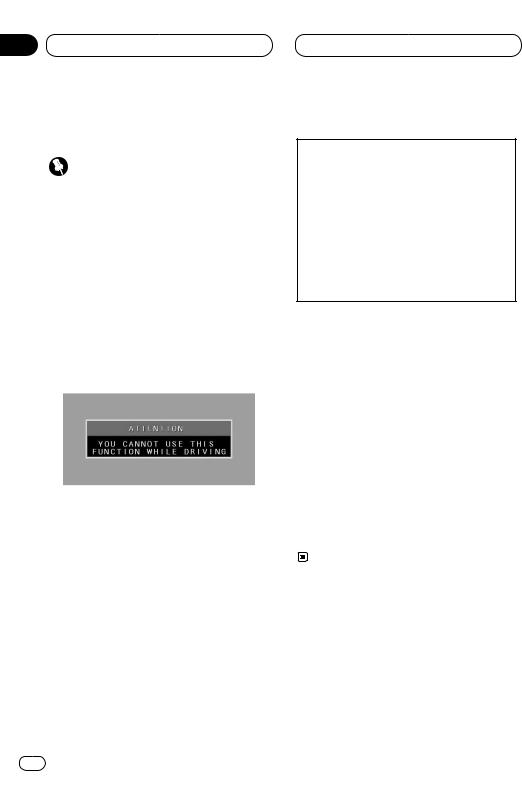
To ensure safe vehicle operation, do not operate this product during driving. If you try to view pictures from a TV-tuner and, DVD-Video disc or other sources etc. on the front display while the parking brake is not engaged, this warning will appear:
Precautions
CAUTION: USE OF CONTROL OR ADJUSTMENT OR PERFORMANCE OF PROCEDURES OTHER THAN THOSE SPECIFIED HEREIN MAY RESULT IN HAZARDOUS RADIATION EXPOSURE.
CAUTION: THE USE OF OPTICAL INSTRUMENTS WITH THIS PRODUCT WILL INCREASE EYE HAZARD.
•Keep this manual handy as a reference for operating procedures and precautions.
•Always keep the volume low enough so you can hear sounds outside of the car.
•Protect this product from moisture.
•If the battery is disconnected or discharged, the preset memory will be erased and must be reprogrammed.
•If this unit does not operate properly, contact your dealer or nearest authorized Pioneer Service Station. 
When you park your car in a safe place and apply the parking brake, the picture appears on the screen.
When Using a Display connected to Rear Video Output
This product’s Rear video output is for connection of a display to enable passengers in the Rear seats to watch the DVD, etc.
 WARNING
•NEVER install the rear display connected to this product’s rear video output in a location that enables the Driver to watch the TV-tuner and, DVD-Video disc or other sources etc. while Driving. 
CD playback (Only AVH-P6450CD)
Music CD/CD-R/CD-RW playback is possible.
6 En
Before You Start
To avoid battery exhaustion
Always run the the vehicle engine while using this unit. Using this unit without running the engine can result in battery drainage. 
To protect the LCD screen of the display
•Do not allow direct sunlight to fall on the Display when this unit is not being used. Extended exposure to direct sunlight can result in LCD screen malfunction due to the resulting high temperatures.
•When using a portable phone, keep the antenna of the portable phone away from the Display to prevent disruption of the video by the appearance of spots, colored stripes, etc.
When viewing is difficult, use BRIGHT and DIMMER to adjust
Due to its construction, the view angle of the LCD screen is limited. The viewing angle (vertical and horizontal) can be increased, however, by using BRIGHT to adjust the black density of the video. When using for the first time, adjust the black density in accordance with the viewing angle (vertical and horizontal) to adjust for clear viewing.
DIMMER can also be used to adjust the brightness of the LCD screen itself to suit your personal preference. 
Section
01
Remote control and care
This product is equipped with a remote control |
English |
|
|
||
for convenient operation. |
|
|
• Point the control in the direction of the signal |
|
|
reception on the color display to operate. |
|
|
Notes |
olñEspa |
|
• Do not store the remote control in high tem- |
||
|
||
peratures or direct sunlight. |
|
|
• The remote control may not function properly |
|
|
in direct sunlight. |
|
|
• Do not let the remote control fall onto the |
|
|
floor, where it may become jammed under the |
|
|
brake or accelerator pedal. |
|
|
|
Deutsch |
|
|
aisçFran |
|
|
Italiano |
Nederlands
En 7
Section
01 Before You Start
Battery
Slide the tray out on the back of the remote control and insert the battery with the (+) and (–) poles pointing in the proper direction.
 Important
•Keep the lithium battery out of reach of children. Should the battery be swallowed, immediately consult a doctor.
 Notes
Notes
•When using for the first time, pull out the film protruding from the tray.
•Do not recharge, disassemble, heat or dispose of battery in a fire.
•Use a CR2025 (3 V) lithium battery only. Never use other types of battery with this unit.
•Do not handle the battery with metallic tools.
•Do not store the lithium battery with metallic materials.
•When disposing of used batteries, please comply with governmental regulations or environmental public institution’s rules that apply in your country/area.
•Always check carefully that you are loading the battery with its (+) and (–) poles facing in the proper directions.
•Remove the battery if remote control is not to be used for a month or longer. 
Protecting your unit from theft
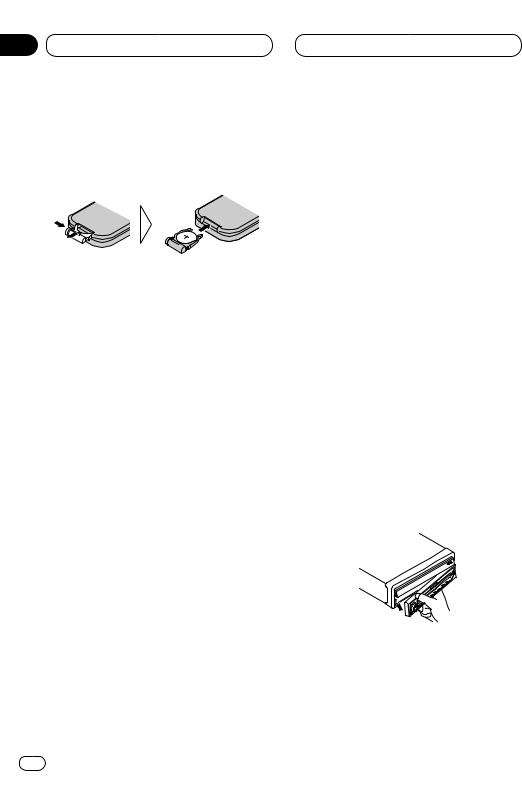
The operation panel can be detached from the head unit and stored in the protective case provided to discourage theft.
•If the operation panel is not detached from the head unit within five seconds of turning off the ignition, a warning tone will sound.
•You can turn off the warning tone. See
Switching the warning tone on page 51.
 Important
•Never use force or grip the display and the buttons tightly when removing or attaching.
•Avoid subjecting the operation panel to excessive shocks.
•Keep the operation panel out of direct sunlight and high temperatures.
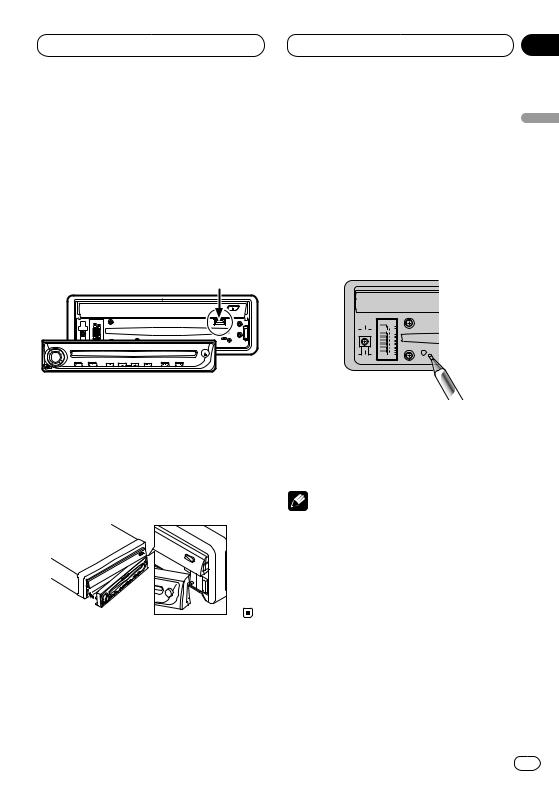
Removing the operation panel
1Press DETACH to remove the operation panel.
2Grip the left side of the operation panel and pull it gently outward.
Take care not to grip it tightly or drop it.
3 Put the operation panel into the protective case provided for safe keeping.
8 En
Before You Start
 Important
•Do not drive with the operation panel removed and the display up as the angle of the display may change resulting in scratching or damage.
•Be careful of the magnetic part of this product. Do not place magnetic products such as credit cards, cassette tapes and watches near it. Doing so may result in damage to those products or the loss of information recorded on them.
Attaching the operation panel
Replace the operation panel by holding it upright to this unit and clipping it securely into the mounting hooks.
Do not use this product when it is just hanging on hooks.
Section
01
Resetting the Microprocessor
When the ignition switch is turned OFF, press- |
English |
|||
|
||||
ing RESET lets you reset the microprocessor to |
|
|||
its initial settings without changing SET UP |
|
|||
MENU settings, Condition Memory and other |
|
|||
settings. |
|
|||
Press RESET in the following cases. |
|
|||
• When this unit fails to operate correctly. |
olñEspa |
|||
• When strange (incorrect) messages appear |
||||
|
||||
on the display. |
|
|||
|
|
|
|
|
|
|
|
|
|
|
|
|
|
|
Deutsch |
|
|
|
|
|
|
||
|
|
|
|
|
||
1 Turn the ignition switch OFF. |
||||||
aisçFran |
||||||
2 Press RESET. |
||||||
|
||||||
Use a pen tip or other pointed instrument. |
|
|||||
Notes |
|
|||||
• When using with a Pioneer Navigation |
|
|||||
System, if you press RESET, be sure the ACC |
Italiano |
|||||
OFF is selected. If ACC ON is selected, correct |
||||||
|
||||||
operation may not be possible even if you |
|
|||||
press RESET. |
|
|||||
• After completing connections or when you |
|
|||||
want to erase all memorized settings or return |
|
|||||
the unit to its initial (factory) settings, switch |
|
|||||
your engine ON or set the ignition switch to |
Nederlands |
|||||
ACC ON before pressing RESET. |
||||||
|
||||||
En 9

Section
01 Before You Start
AVH-P6450CD |
|
|
|
|
|
|
3 |
|
|
|
|
|
|
|
2 |
|
|
|
|
|
|
|
4 |
|
|
|
|
|
|
|
5 |
|
|
|
|
|
|
|
6 |
|
|
|
|
|
|
|
7 |
|
|
|
|
|
|
|
% |
1 |
|
|
|
|
|
|
|
|
|
|
PAUSE |
|
ATT |
|
|
$ |
# |
@ ! ~ = - 0 9 8 ^ |
|||||
AVH-P6450 |
|
|
|
|
|
|
3 |
|
|
|
|
|
|
|
2 |
|
|
|
|
|
|
|
4 |
|
|
|
|
|
|
|
5 |
|
|
|
|
|
|
|
6 |
|
|
|
|
|
|
|
7 |
1 |
|
|
|
|
|
|
|
|
|
|
PAUSE |
|
ATT |
|
|
$ |
# |
@ ! |
~ |
= |
- |
0 9 |
8 |
10 En
Before You Start
What’s what
1VOLUME
Rotate to increase or decrease the volume.
2OPEN/CLOSE button
Press to open or close the display panel.
3Ambient light sensor
Senses ambient light. This system automatically adjusts the brightness of the display to compensate for ambient light.
4DISPLAY button
Press to select different displays.
5ENTERTAIN button
Switches between still picture and video entertainment displays.
6WIDE/V.ADJ button
Change the method of enlarging 4:3 video to 16:9 video. Pressing this button for 2 seconds, and displayed the Video adjustment. Once the picture adjustment is displayed, its adjustment is switched each time the button is pressed.
Video adjustment cannot be done with the remote control.
7AUDIO controller/ENTER button
Use to operate AUDIO MENU, select stations etc.
8 Remote control signal receiver
9SFEQ button
Press to select a natural sound with presence.
0BAND/ESC button
Press to select among three FM or AM bands and cancel the control mode of functions.
Section
01
- ATT button |
|
|
Press to switch traffic announcements func- |
English |
|
tion on or off. |
||
|
||
= ANGLE buttons |
|
|
Adjust the screen to an easily viewable |
|
|
angle. |
|
|
~ PAUSE button |
olñEspa |
|
Press to switch PAUSE function on or off. |
||
|
||
! EQ button |
|
|
Press to select various equalizer curves. |
|
|
@ SOURCE button |
|
|
This unit is switched on by selecting a |
Deutsch |
|
source. Press to cycle through all of the |
||
|
||
available sources. |
|
|
# DETACH button |
|
|
Detaches the operation panel. |
|
|
$ RESET button |
aisçFran |
|
% CD loading slot |
||
Only AVH-P6450CD |
|
|
Insert a CD. |
|
|
^ CD EJECT button |
|
|
Press to eject a CD. |
Italiano |
|
Notes |
||
|
•Pressing WIDE on the head unit returns you to the previous display.
•Cancel the MENU display with BAND/ESC. 
Nederlands
En 11
Section
01 Before You Start
∞

|
4 |
|
& |
( |
|
|
||
£ |
* |
|
§ |
||
|
||
|
0 |
|
|
) |
|
¢ |
_ |
|
™ |
+ 6 |
|
|
¡ |
Remote control
&Volume control (–/+) buttons
Press to – or + the volume.
*Joystick
Use when using with a Pioneer DVD component. If you set the switch to DVD, you can perform some Pioneer DVD unit operations.
(Picture source switch
Press to cycle through all of the available sources. Performs the same operation as @ on the head unit.
)Power button
Use when using with a Pioneer DVD component.
_ATT button
Press to quickly lower the volume level, by about 90%. Press once more to return to the original volume level.
+STOP button
Use when using with a Pioneer DVD component.
¡NUMBER button
Use when using with a Pioneer component enabling DVD playback.
™BACK button
Returns you to the display before a MENU or PICTURE ADJUST display.
£MENU, TOP, AUDIO, RTN, S.TITLE, ANGLE buttons
Use when using with a Pioneer DVD component.
¢Audio control buttons and DVD control buttons
Use to operate AUDIO MENU, select stations etc. Performs the same operation as 7 on the head unit.
Switch § to the DVD position, and use when using with a Pioneer component that enables DVD playback.
∞Remote control selection switch
Switch to change the setting of the remote control. (Refer to page 50.)
§Remote control operation mode switch
Switch the operation mode between AUDIO mode (sources can be operated by remote control) or DVD mode (only DVD player can be operated by remote control). 
12 En
02 Power ON/OFF
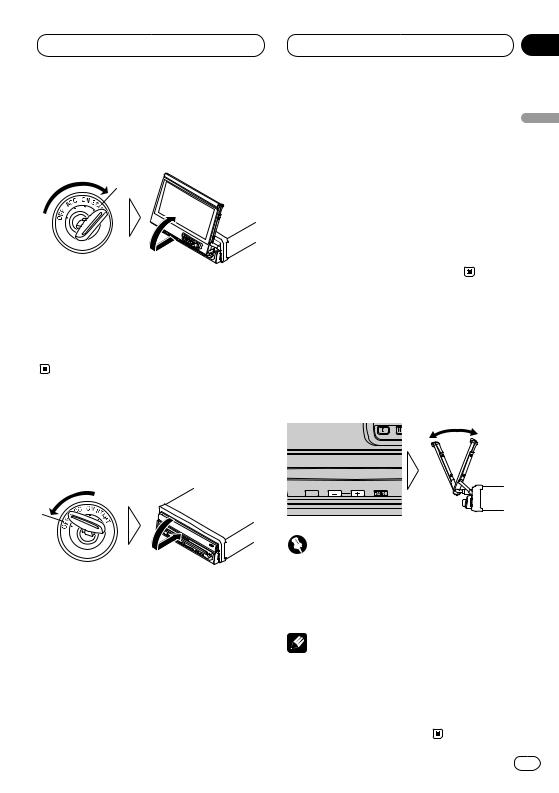
Turning the unit on
1 Turn your vehicle’s engine ON.
The display will be automatically deployed by the automatic close/open mode.
If the display is not automatically deployed, press OPEN/CLOSE.
2 Press SOURCE to select the tuner.
Press SOURCE until you see Tuner displayed.
Closing the Display
Turn the vehicle’s engine OFF.
The display will be automatically closed by the automatic close/open mode. If the display does not close automatically, turn the ignition switch ON again (or turning it to ACC) and press
OPEN/CLOSE.
 Notes
Notes
•The automatic close/open mode will operate the display as follows.
—When the ignition switch is turned OFF while the display is deployed, the display will be closed after approximately 6 seconds.
Section
02
— When the ignition switch is turned ON |
|
|
again (or turned to ACC), the display will be |
English |
|
deployed automatically. |
||
— Installing the operation panel will automat- |
||
ically deploy the display. (Refer to page 8.) |
||
|
||
• The automatic close/open mode can be |
|
|
switched ON/OFF. (Refer to page 55.) |
|
|
• When the ignition switch is turned OFF after |
|
|
the display has been closed, turning the igni- |
olñEspa |
|
tion switch ON again (or turning it to ACC) |
||
will not deploy the display. In this case, press |
||
OPEN/CLOSE to deploy the display. |
||
|
Screen Angle Adjustment
The angle of this product’s screen continues |
Deutsch |
|
|
changing as long as you keep pressing the |
|
ANGLE button. |
|
Adjust the screen to an easily viewable angle.
|
aisçFran |
TEXT |
|
your vehicle’s console or dashboard, press |
Italiano |
Important |
|
• If you can hear the display knocking against |
|
ANGLE on the (–) side to move the screen a |
|
little forward. |
|
Notes |
Nederlands |
• The adjusted angle of the display will be mem- |
|
• When adjusting the angle, be sure to press |
|
ANGLE. Forcible adjusting of the display by |
|
hand may damage it. |
|
orized and automatically returned to the next |
|
time the display is deployed. |
|
En |
13 |

Section
02 Power ON/OFF
Selecting a source
You can select a source you want to listen to. To switch to the built-in CD player, load a disc in this product (AVH-P6450CD only) (refer to page 22).
Press SOURCE to select a source.
Press SOURCE repeatedly to switch between the following sources:
Built-in CD player (AVH-P6450CD)—TV— VIDEO—Tuner—DVD (one disc only/multi-DVD player)—Multi-CD player—External unit 1— External unit 2 —AUX
 Notes
Notes
•In the following cases, the sound source will not change:
—When a product corresponding to each source is not connected to this product.
—When no disc is set in this product (AVHP6450CD only).
—When no magazine is set in the multi-CD player.
—When no magazine is set in the multi-DVD player.
—When the AUX (auxiliary input) is set to off (refer to page 51).
•External unit refers to a Pioneer product (such as one available in the future) that, although incompatible as a source, enables control of basic functions by this product. Two external units can be controlled by this product. When two external units are connected, the allocation of them to external unit 1 or external unit 2 is automatically set by this product.
•When this product’s blue/white lead is connected to the car’s auto-antenna relay control terminal, the car’s antenna extends when this product’s source is switched on. To retract the antenna, switch the source off. 
Turning the unit off
Press SOURCE and hold for at least one second to turn the unit off. 
14 En

Common Operations
Source display
12
3
Information of each source is displayed.
1SOURCE name
Name of the selected source.
2Source status
Status of the selected source.
3Equalizer display
Equalizer setting status. 
Section
03
Displays menus (e.g., Tuner)
1 |
2 |
English |
Displays menus of each source, and enables |
olñEspa |
||
|
|||
adjustments. |
|
||
1 |
SOURCE menu |
|
|
|
You can access MENUS to make various |
|
|
|
adjustments for each source. AUDIO and |
Deutsch |
|
|
SET UP settings are the same for each |
||
|
|
||
|
source. |
|
|
2 |
Indicates there is more for this item. |
|
|
|
Press ∞and the continuation of the item is |
|
|
|
displayed. Pressing 5takes you to the previ- |
|
|
|
ous item. |
aisçFran |
|
1 |
Press A.MENU in each source display. |
||
|
|||
The menu for the displayed source is displayed. |
|
||
e.g., TUNER MENU |
|
||
2 |
Press 5or ∞to select a menu item, and |
|
|
press A.MENU. |
Italiano |
||
Executes the selected item. |
|||
|
|||
|
Notes |
|
|
• Select BACK in the MENU display or press |
|
||
BACK to return to the previous display. |
|
||
Pressing WIDE on the head unit returns you to |
Nederlands |
||
|
|
||
the previous display.
• If you do not operate the audio function within about 30 seconds, the display is automatically returned to the source display. The MENU display is automatically canceled if no operations are performed for about 30 seconds. 
En 15
Section
04 Display
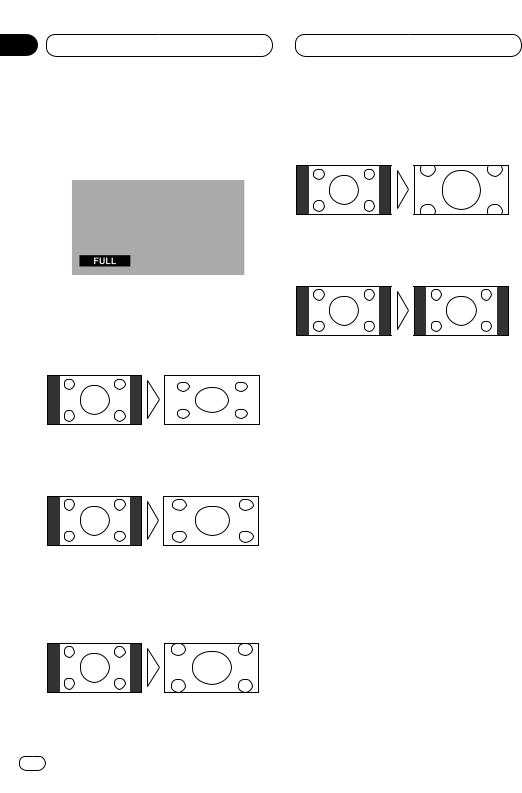
Changing the wide mode
You can select a desired mode for enlarging a 4:3 picture to a 16:9 one.
1 When viewing an image, press WIDE.
Wide mode in the following order:
Full (FULL) — Just (JUST) — Cinema (CINEMA)
— Zoom (ZOOM) — Normal (NORMAL)
Full (FULL)
A 4:3 picture is enlarged in the horizontal direction only, enabling you to enjoy a 4:3 TV picture (normal picture) without any omissions.
Just (JUST)
The picture is enlarged slightly at the center and the amount of enlargement increases horizontally to the ends, enabling you to enjoy a 4:3 picture without sensing any disparity even on a wide screen.
Cinema (CINEMA)
A picture is enlarged by the same proportion as FULL or ZOOM in the horizontal direction and by an intermediate proportion between FULL and ZOOM in the vertical direction; ideal for a cinema-
sized picture (wide-screen picture) where captions lie outside.
Zoom (ZOOM)
A 4:3 picture is enlarged in the same proportion both vertically and horizontally; ideal for a cinemasized picture (wide-screen picture).
Normal (NORMAL)
A 4:3 picture is displayed as it is, giving you no sense of disparity since its proportions are the same as that of the normal picture.
 Notes
Notes
•Different settings can be memorized for the AV and VIDEO. In addition, different settings can also be memorized for a component (AV) connected to the AV-BUS input.
•The Wide Mode used for menu setting is switched to Full (FULL). The Wide Mode will return when the menu setting is deleted.
•When video is viewed in a wide mode that dose not match its original aspect ratio, it may appear differently.
•Remember that using the wide mode feature of this system for commercial or public viewing purpose may constitute an infringement on the author’s rights protected by the Copyright Law.
•Video will appear roughened when viewed in CINEMA or ZOOM mode.
•The source without video is always FULL. 
16 En
Display
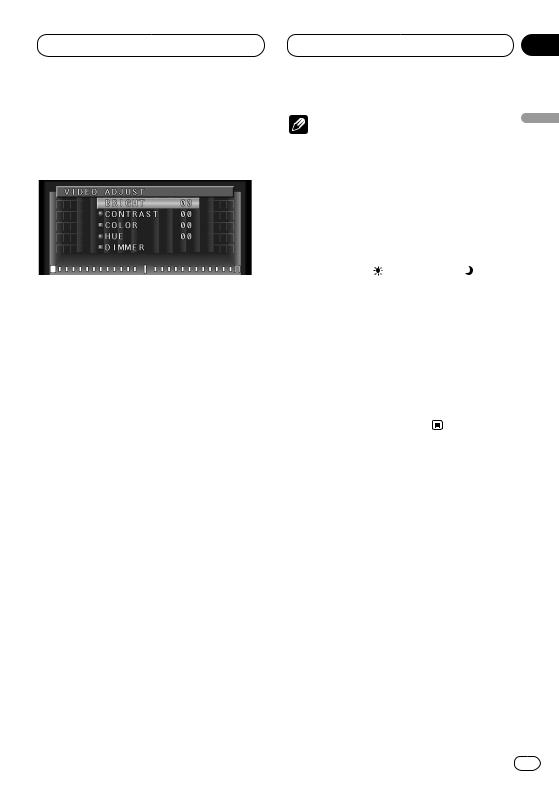
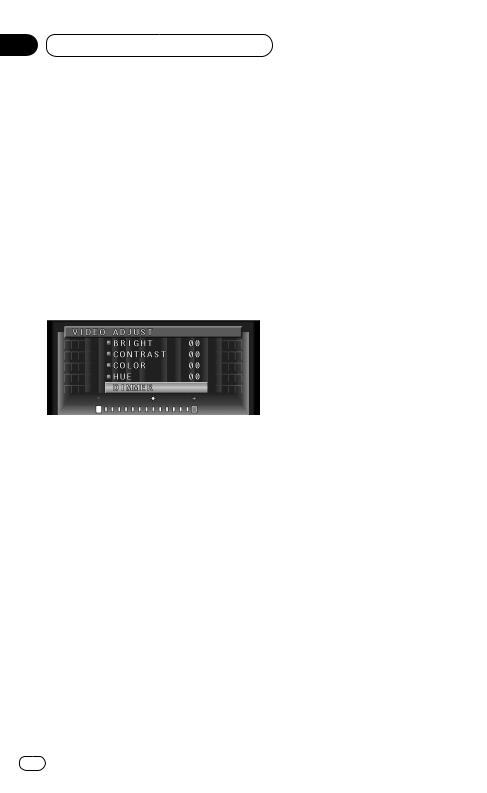
Video Adjust
BRIGHT, CONTRAST, COLOR, and HUE settings are stored for each source .
1Press WIDE on the head unit for 2 seconds or more, in the display of the source you want to adjust.
VIDEO ADJUST is displayed.
2Press 5or ∞and select an item:
Adjustable parameters:
• BRIGHT (black intensity)
• CONTRAST (contrast)
• COLOR (color intensity)
• HUE (hue)
• DIMMER (brightness)
3Adjust parameter settings with 2or 3.
4Press BAND/ESC to cancel the VIDEO ADJUST.
Section
04
Notes |
|
|
English |
|
• Pressing WIDE on the head unit returns you to |
||||
|
||||
the previous display. |
|
|
||
• To return to the frequency display, press |
|
|||
BAND/ESC. |
|
|
|
|
• BRIGHT, CONTRAST, COLOR and HUE can |
|
|||
be adjusted within a range of –24 to +24. |
|
|||
• The settings of BRIGHT and CONTRAST are |
olñEspa |
|||
stored separately for light ambient (daytime) |
||||
|
||||
and dark ambient (nighttime). |
|
|
||
• A yellow mark ( |
) or blue mark ( |
) is |
|
|
displayed to the right of BRIGHT and |
|
|
||
CONTRAST on the screen, respectively, as the |
|
|||
front-panel ambient light sensor determines |
|
|||
brightness or darkness. |
|
Deutsch |
||
• HUE cannot be adjusted for PAL video. |
|
|||
|
|
|||
• You cannot adjust picture COLOR and HUE for |
|
|||
the source without video. |
|
|
||
• Different settings can be memorized for the |
|
|||
AV and VTR. In addition, different settings can |
|
|||
also be memorized for a component (AV) con- |
|
|||
nected to the AV-BUS input. |
|
|
||
|
|
|
aisçFran |
|
|
|
|
Italiano |
|
Nederlands
En 17
Section
04 Display
DIMMER settings
Viewing can become difficult after extended video viewing if the screen is too bright at night or when ambient light darkens. You can select the brightness level from three settings; daytime, evening and nighttime viewing, after which this product will automatically adjusts the brightness to an optimum level within the setting range you selected and in relationship with the ambient light.
1 Select DIMMER from the PICTURE SELECT MENU. (Refer to Video adjust.)
External light level
Yellow: bright (daytime)
Red: intermediate brightness (evening)
Blue: dark (nighttime)
2 Adjust brightness. Adjust parameter settings with 2or 3.
Level indicates the brightness of the screen being adjusted. The farther yellow moves to the right, the brighter the screen.
 Notes
Notes
•The optimum light level used as the standard for adjusting DIMMER is indicated by the mark shown in step 3 and its position. The marks indicating the current ambient brightness used for adjusting BRIGHT and CONTRAST may differ slightly.
•The external light level can be adjusted to Dark, Intermediate or Bright and the each setting saved. 
18 En

Tuner
Listening to the radio
1 4 2
3
These are the basic steps necessary to operate the radio. More advanced tuner operation is explained starting on page 20.
1BAND indicator
Shows which band the radio is tuned to, AM or FM.
2FREQUENCY indicator
Shows to which frequency the tuner is tuned.
Section
05
4 To perform manual tuning, press 2or 3 |
|
|
with quick presses. |
English |
|
The frequencies move up or down step by step. |
||
|
||
5 To perform seek tuning, press and hold 2 |
|
|
or 3for about one second and release. |
|
|
The tuner will scan the frequencies until a |
|
|
broadcast strong enough for good reception is |
|
|
found. |
olñEspa |
|
• You can cancel seek tuning by pressing either |
||
|
||
2or 3with a quick press. |
|
|
• If you press and hold 2or 3you can skip |
|
|
broadcasting stations. Seek tuning starts as |
|
|
soon as you release the buttons. |
|
|
Note |
Deutsch |
|
• When the frequency selected is being broad- |
||
|
||
cast in stereo the STEREO (ST ) indicator will |
|
|
light. |
|
3STEREO (ST) indicator
Shows that the frequency selected is being broadcast in stereo.
4PRESET NUMBER indicator
Shows what preset has been selected.
1 Press SOURCE to select the tuner.
Press SOURCE until you see Tuner displayed.
2Use VOLUME to adjust the sound level.
Rotate to increase or decrease the volume.
3Press BAND/ESC to select a band.
Press BAND/ESC until the desired band is displayed, FM1, FM2, FM3 for FM or AM.
Italiano aisçFran
Nederlands
En 19
Section
05 Tuner
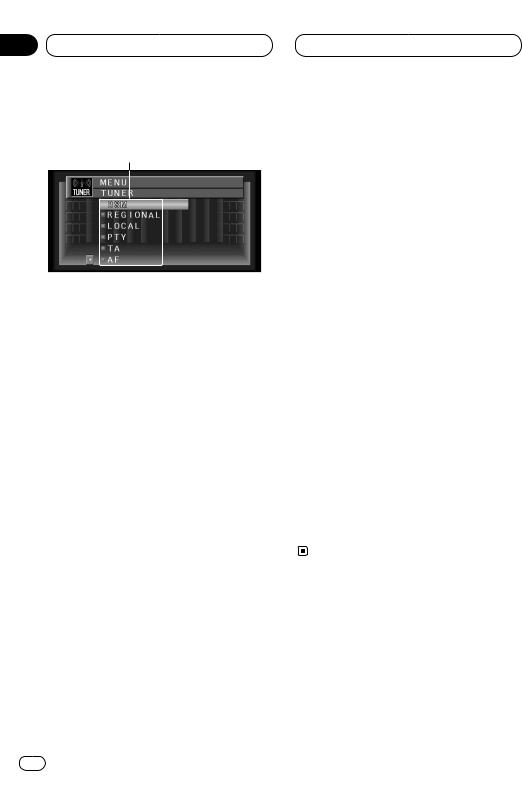
Introduction of advanced tuner operation
1
1FUNCTION display
Shows the function status.
1Press A.MENU when TUNER source indications are displayed.
MENU is displayed.
2Select TUNER and press A.MENU.
TUNER MENU indications are displayed as follows:
BSM (best stations memory) LOCAL (local seek tuning)
P.CH MEMORY (preset channel memory)
•Select BACK in the MENU display or press BACK to return to the previous display. Pressing WIDE on the head unit returns you to the previous display.
•To return to the frequency display, press both
BAND/ESC and DISP.
• If AM band is selected, you can only select
BSM, LOCAL and P. CH MEMORY.
 Note
Note
•If you do not operate the function within about 30 seconds, the display is automatically returned to the frequency display. 
Storing broadcast frequencies
You can easily store up to six broadcast frequencies for later recall with 5or ∞.
1Press 5or ∞to select P.CH MEMORY from the TUNER MENU, and press A.MENU.
P.CH MEMORY adjustment indications are displayed.
2Adjust frequency with 2or 3.
If you continue pressing 2or 3, a strong broadcast frequency is automatically searched for, and search ends when it is found.
3Select a preset channel number with 5or ∞and press A.MENU to preset that frequency.
4If you want to preset frequencies one after another, use 5or ∞to move to the next preset channel you want to use to store a frequency, and perform the same operation.
When you have finished, press BAND/ESC to return to the source display.
The number you have pressed will flash in the PRESET NUMBER indicator and then remain lit. The selected radio station frequency has been stored in memory.
You can use 5and ∞to recall radio station frequencies assigned to P1-6 (P.CH MEMORY).
20 En
Tuner
Tuning in strong signals
Local seek tuning lets you tune in only those radio stations with sufficiently strong signals for good reception.
1Press 5or ∞in the TUNER MENU to select LOCAL, and press A.MENU.
LOCAL adjustment indications are displayed.
2Press 2or 3to set the sensitivity.
There are four levels of sensitivity for FM and two levels for AM:
FM:OFF—1—2—3—4 AM:OFF—1—2
The 4 setting allows reception of only the strongest stations, while lower settings let you receive progressively weaker stations. 
Section
05
Storing the strongest broadcast |
|
|
frequencies |
English |
|
BSM (Best Station Memory) lets you automati- |
||
|
||
cally store the six strongest broadcast frequen- |
|
|
cies. The stored frequencies are displayed. |
|
|
1 Select BSM from the TUNER MENU, and |
|
|
press A.MENU. |
olñEspa |
|
2 Press 5to turn BSM on. |
||
BSM adjustment indications are displayed. |
|
|
BSM begins to flash. While BSM is flashing the |
|
|
six strongest broadcast frequencies will be |
|
|
stored in order of their signal strength. When |
|
|
finished, BSM stops flashing. |
Deutsch |
|
Notes |
||
• To cancel the storage process, press ∞. |
|
|
• Up to 18 FM stations, 6 for each of the three |
|
|
FM bands, and 6 AM stations can be stored in |
|
|
memory. |
|
|
• You can also use 5and ∞to recall radio sta- |
aisçFran |
|
tion frequencies assigned to PRESET TUNING |
||
buttons. |
||
• If there are fewer than six strong broadcast |
||
frequencies, previously stored frequencies |
|
|
may remain in memory. |
|
|
|
Italiano |
|
|
Nederlands |
En 21
Section
06 Built-in CD Player
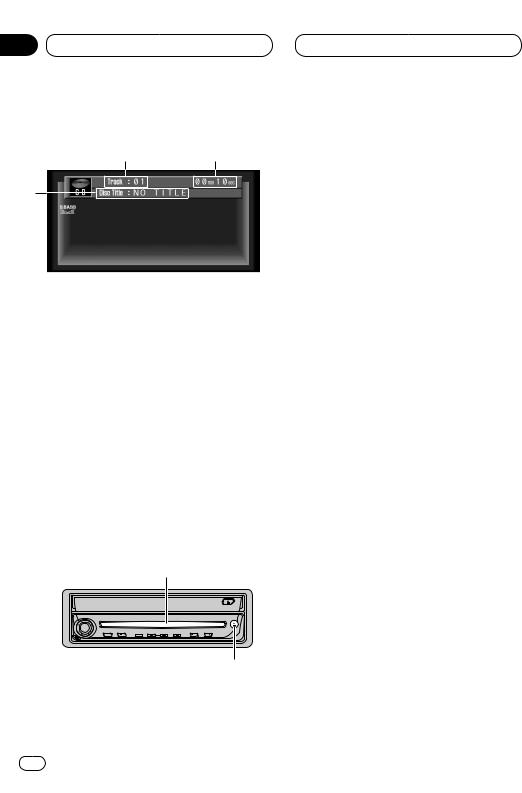
Playing a CD
(Only AVH-P6450CD)
12
3
These are the basic steps necessary to play a CD with your built-in CD player. More advanced CD operation is explained starting on page 23.
1TRACK NUMBER indicator
Shows the track currently playing.
2PLAY TIME indicator
Shows the elapsed playing time of the current track.
3DISC TITLE
When playing a CD TEXT disc, the DISC TITLE is displayed. With regular CDs that do not usually have the titles recorded on them, NO TITLE is displayed (refer to page 25).
1 Insert a CD into the CD loading slot.
Playback will automatically start.
• After inserting a CD, press SOURCE to select the built-in CD player.
CD loading slot
TEXT |
EJECT button
•You can eject a CD by pressing EJECT on the head unit.
•To avoid a malfunction, make sure that no metal object comes into contact with the operation panel when it is detached.
22 En
2Use VOLUME to adjust the sound level.
Rotate to increase or decrease the volume.
3To perform fast forward or reverse, press and hold 2or 3.
4To skip back or forward to another track, press 2or 3.
Pressing 3skips to the start of the next track. Pressing 2once skips to the start of the current track. Pressing again will skip to the previous track.
 Notes
Notes
•The built-in CD player plays one, standard, 12-cm or 8-cm (single) CD at a time. Do not use an adapter when playing 8-cm CDs.
•Do not insert anything other than a CD into the CD loading slot.
•If you cannot insert a disc completely or if after you insert a disc the disc does not play, check that the label side of the disc is up. Press EJECT on the head unit to eject the disc, and check the disc for damage before inserting the disc again.
•If the built-in CD player does not operate properly, an error message such as ERROR-11 may be displayed. Refer to Understanding built-in CD player error messages on page 57.
•Do not detach with a CD partially inserted in the CD slot as it may scratch or damage the disc. 
Built-in CD Player
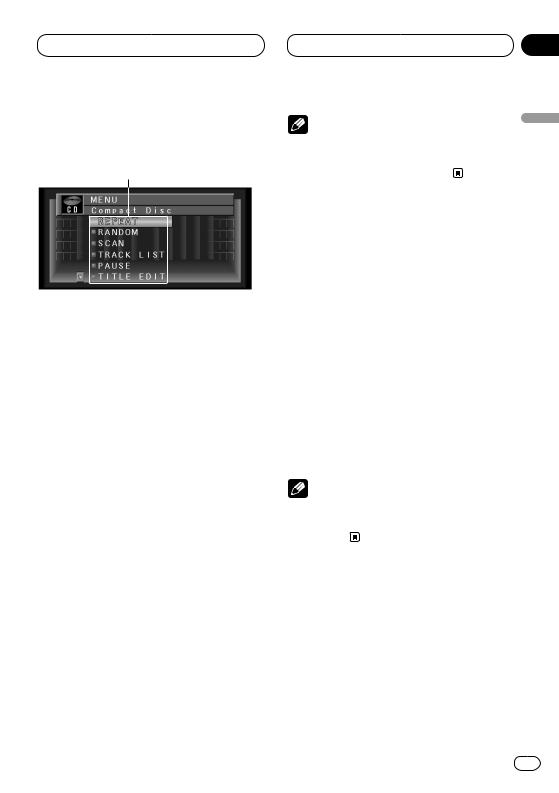
Introduction of advanced built-in CD player operation (Only AVHP6450CD)
1
1FUNCTION display
Shows the function status.
1Press A.MENU when CD source indications are displayed.
MENU is displayed.
2Select Compact Disc and press A.MENU.
The CD MENU is displayed as follows: REPEAT (repeat play)
RANDOM (random play) SCAN (scan play) TRACK LIST (track list) PAUSE (pause)
TITLE EDIT (title edit)
You can operate a desired function. For details, refer to the pages for each of the functions.
• When playing regular CDs that are not CD TEXT discs, you cannot select TRACK LIST.
• During playback of a CD Text disc, you cannot select TITLE EDIT.
• Select BACK in the MENU display or press BACK to return to the previous display. Pressing WIDE on the head unit returns you to the previous display.
• To return to the playback display, press
BAND/ESC.
Section
06
Note |
English |
|
• If you do not operate the function within about |
||
30 seconds, the display is automatically |
||
returned to the playback display. |
||
|
Repeating play |
olñEspa |
|
Repeat play lets you hear the same track over |
||
|
||
again. |
|
|
1 Press 5or ∞to select REPEAT from the CD |
|
|
MENU, and press A.MENU. |
|
|
REPEAT ON/OFF indications are displayed. |
Deutsch |
|
2 Press 5to turn repeat play on. |
||
|
||
REPEAT :ON appears in the display. The track |
|
|
presently playing will play and then repeat. |
|
|
3 Press ∞to turn repeat play off. |
|
|
REPEAT :OFF appears in the display. The track |
|
|
presently playing will continue to play and then |
aisçFran |
|
play the next track. |
||
|
||
Note |
|
|
• If you perform track search or fast |
|
|
forward/reverse, repeat play is automatically |
|
|
cancelled. |
Italiano |
|
Playing tracks in a random order |
||
|
||
Random play lets you play back tracks on the |
|
|
CD in a random order. |
Nederlands |
|
1 Press 5or ∞to select RANDOM from the |
||
|
||
CD MENU, and press A.MENU. |
|
|
RANDOM ON/OFF indications are displayed. |
|
|
2 Press 5to turn random play on. |
|
|
RANDOM :ON appears in the display. Tracks will |
|
|
play in a random order. |
|
En 23

Section
06 Built-in CD Player
3 Press ∞to turn random play off.
RANDOM :OFF appears in the display. Tracks will continue to play in order. 
Scanning tracks of a CD
Scan play lets you hear the first 10 seconds of each track on the CD.
1Press 5or ∞to select SCAN from the CD
MENU, and press A.MENU.
SCAN ON/OFF indications are displayed.
2Press 5to turn scan play on.
SCAN:ON appears in the display. The first 10 seconds of each track is played.
3 When you find the desired track press ∞to turn scan play off.
SCAN:OFF appears in the display. The track will continue to play.
• If the display has automatically returned to the playback display, select SCAN again by pressing A.MENU.
 Note
Note
•After scanning of a CD is finished, normal playback of the tracks will begin again. 
Playing back from the track list
When playing CD TEXT discs, you can select and playback tracks from the title’s displayed track list.
1Press 5or ∞to select TRACK LIST from the
CD MENU, and press A.MENU.
The TRACK LIST is displayed.
2Press 5or ∞to select the track you want to play in the LIST, and press A.MENU.
24 En
Playback of the selected track begins. After that, tracks play in order.
 Notes
Notes
•During playback of the track, list indications turn green.
•Up to six tracks in the list can be displayed at once. Press 2or 3to display previous or next list. When the first or sixth track is indicated in the displayed list, pressing 5or ∞takes you to the previous or next page.
•Titles of up to 10 characters can be displayed.
•Display of some characters may not be possible. 
Pausing CD playback
Pause lets you temporarily stop playback of the CD.
1Press 5or ∞to select PAUSE from the CD
MENU, and press A.MENU.
PAUSE ON/OFF indications are displayed.
2Press 5to turn pause on.
PAUSE :ON appears in the display. Play of the current track pauses.
3 Press ∞to turn pause off.
PAUSE :OFF appears in the display. Play will resume at the same point that you turned pause on. 
Using disc title functions
You can input CD titles and display the title. The next time you insert a CD for which you have entered a title, the title of that CD will be displayed.

Built-in CD Player
Entering disc titles
Disc title input lets you input CD titles up to 10 letters long and up to 48 disc titles into the builtin CD player.
1Play a CD that you want to enter the title.
2Press 5or ∞to select TITLE EDIT from the
CD MENU, and press A.MENU.
TITLE EDIT adjustment indications are displayed.
• When playing a CD TEXT disc, you cannot select to TITLE EDIT. The disc title will have already been recorded on a CD TEXT disc.
3Press A.MENU to select the desired character type.
Press A.MENU repeatedly to switch between the following character type:
Alphabet (upper case), Numbers and Symbols— Alphabet (lower case)
4Press 5or ∞to select a letter of the alphabet.
Each press of 5will display a letter of the alphabet in A B C ... X Y Z, numbers and symbols in 1 2
3... @ # < order. Each press of ∞will display a letter in the reverse order, such as Z Y X ... C B A order.
5 Press 3to move the cursor to the next character position.
When the letter you want is displayed, press 3 to move the cursor to the next position and then select the next letter. Press 2to move backwards in the display.
Section
06
6 Move the cursor to the last position by |
|
|
pressing 3after entering the title. |
English |
|
When you press 3one more time, the entered |
||
|
||
title is stored in memory. |
|
|
7 Press BAND/ESC to return to the playback |
|
|
display. |
|
|
Notes |
olñEspa |
|
• Titles remain in memory, even after the disc |
||
|
||
has been removed from built-in CD player, and |
|
|
are recalled when the disc is reinserted. |
|
|
• After data for 48 discs has been stored in |
|
|
memory, data for a new disc will overwrite the |
|
|
oldest one. |
Deutsch |
|
• If you connect a multi-CD player, you can |
||
|
||
input disc titles for up to 100 discs. |
|
Displaying titles on CD TEXT discs
Press DISP when playing a CD TEXT disc. |
|
|
Press DISP repeatedly to switch between the |
aisçFran |
|
following settings: |
||
|
||
Track Title (track title)—Disc-Artist Name (disc |
|
|
artist name)—Track Artist Name (track artist |
|
|
name) |
|
|
The lowest part of the source status display |
|
|
changes as above. |
|
|
• If specific information has not been recorded |
|
|
on a CD TEXT disc, NO TITLE will be displayed. |
Italiano |
|
|
Nederlands
En 25
Section
07 Multi-CD Player
Playing a CD
1 2 3
4
You can use this unit to control a multi-CD player, which is sold separately.
These are the basic steps necessary to play a CD with your multi-CD player. More advanced CD operation is explained starting on page 27.
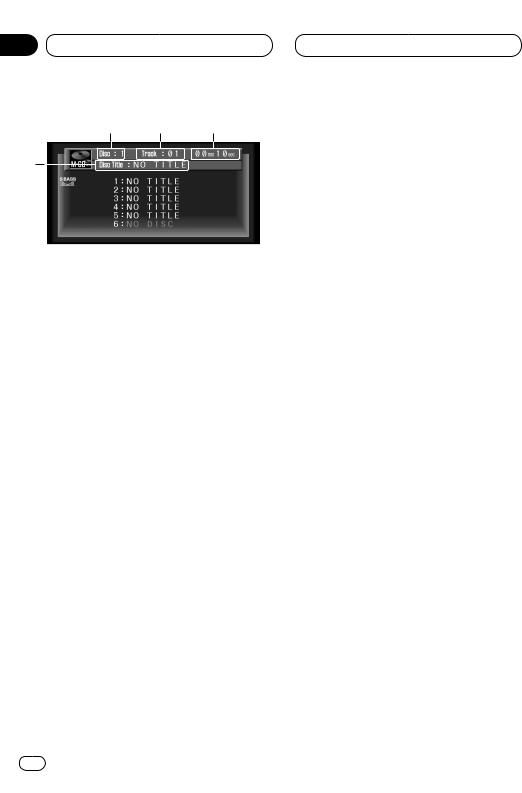
1DISC NUMBER indicator
Shows the disc currently playing.
2TRACK NUMBER indicator
Shows the track currently playing.
3PLAY TIME indicator
Shows the elapsed playing time of the current track.
4DISC TITLE
When playing a CD TEXT disc, the DISC TITLE is displayed. With regular CDs that do not usually have the titles recorded on them, NO TITLE is displayed (refer to page 32).
1Press SOURCE to select the multi-CD player.
Press SOURCE until you see Multi-CD displayed.
2Use VOLUME to adjust the sound level.
Rotate to increase or decrease the volume.
3Select a disc you want to listen to with the 5or ∞.
• Press 5to select 1, 2, 3..., press ∞to select 1, 6, 5...
4To perform fast forward or reverse, press and hold 2or 3.
5To skip back or forward to another track, press 2or 3.
Pressing 3skips to the start of the next track. Pressing 2once skips to the start of the current track. Pressing again will skip to the previous track.
 Notes
Notes
•When the multi-CD player performs the preparatory operations, Ready is displayed.
•If the multi-CD player does not operate properly, an error message such as ERROR-11 may be displayed. Refer to the multi-CD player owner’s manual.
•If there are no discs in the multi-CD player magazine, NO DISC is displayed. Depending on the multi-CD player you use with this product, the display may be blank. 
50-disc multi-CD player
Only those functions described in this manual are supported for 50-disc multi-CD players. 
26 En
Multi-CD Player
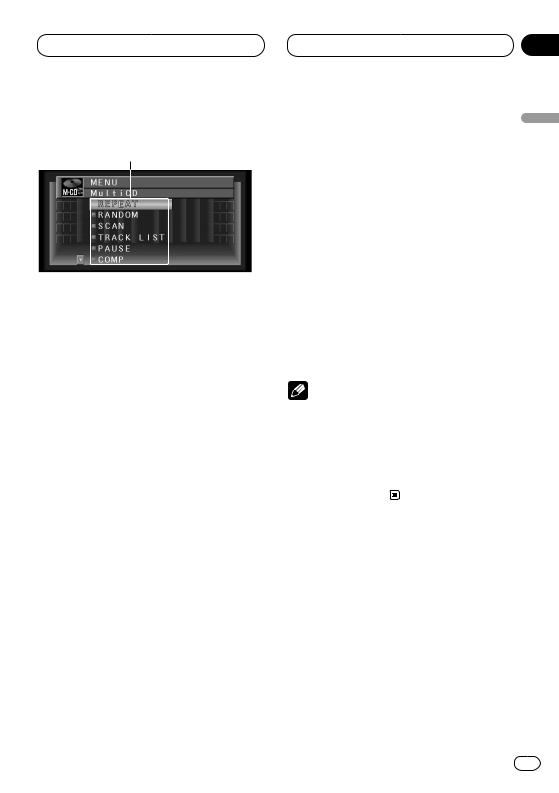
Introduction of advanced multiCD player operation
1
1FUNCTION display
Shows the function status.
1When M-CD indications are displayed, press A.MENU.
MENU is displayed.
2Select Multi CD, and press A.MENU.
The M-CD MENU is displayed as follows: REPEAT (repeat play)
RANDOM (random play) SCAN (scan play) TRACK.LIST (track title list) PAUSE (pause)
COMP (compression and DBE) ITS-PLAY (ITS play) ITS-MEMORY (ITS memory) TITLE EDIT (title edit)
You can operate a desired function. For details, refer to the pages for each of the functions.
• Select BACK in the MENU display or press BACK to return to the previous display. Pressing WIDE on the head unit returns you to the previous display.
• To return to the playback display, press
BAND/ESC.
 Note
Note
•If you do not operate the function within about 30 seconds, the display is automatically returned to the playback display. 
Section
07
Repeating play
There are three repeat play ranges for the multi- |
English |
|
|
||
CD player: M-CD (multi-CD player repeat), |
|
|
TRACK (one-track repeat), and DISC (disc |
|
|
repeat). |
|
|
1 Press 5or ∞to select REPEAT from the M- |
|
|
CD MENU, and press A.MENU. |
olñEspa |
|
REPEAT ON/OFF indications are displayed. |
||
|
||
2 Press 2or 3to select the repeat range. |
|
|
Press 2or 3until the desired repeat range |
|
|
appears in the display. |
|
|
• M-CD — Repeat all discs in the multi-CD |
|
|
player |
Deutsch |
|
• TRACK — Repeat just the current track |
||
|
||
• DISC — Repeat the current disc |
|
|
Notes |
|
|
• If you select other discs during repeat play, |
|
|
the repeat play range changes to M-CD (multi- |
|
|
CD player repeat). |
aisçFran |
|
• If you perform track search or fast |
||
forward/reverse during TRACK (one-track |
||
repeat), the repeat play range changes to |
||
DISC (disc repeat). |
|
|
|
Italiano |
|
|
Nederlands |
En 27

Section
07 Multi-CD Player
Playing tracks in a random order
Random play lets you play back tracks in a random order within the repeat range, M-CD (multiCD player repeat) and DISC (disc repeat).
1 Select the repeat range.
Refer to Repeating play on page 27.
2Press 5or ∞to select RANDOM from the
M-CD MENU, and press A.MENU.
RANDOM ON/OFF indications are displayed.
3Press 5to turn random play on.
Random :ON appears in the display. Tracks will play in a random order within the previously selected M-CD (multi-CD player repeat) or DISC (disc repeat) ranges.
4 Press ∞to turn random play off.
Random :OFF appears in the display. Tracks will continue to play in order. 
Scanning CDs and tracks
While you are using DISC (disc repeat), the beginning of each track on the selected disc plays for about 10 seconds. When you are using M-CD (multi-CD player repeat), the beginning of the first track of each disc is played for about 10 seconds.
1 Select the repeat range.
Refer to Repeating play on page 27.
2Press 5or ∞to select SCAN from the M-
CD MENU, and press A.MENU.
SCAN ON/OFF indications are displayed.
3Press 5to turn scan play on.
Scan :ON appears in the display. The first 10 seconds of each track of the present disc (or the first track of each disc) is played.
4 When you find the desired track (or disc) press ∞to turn scan play off.
Scan :OFF appears in the display. The track (or disc) will continue to play.
• If the display has automatically returned to the playback display, select SCAN again by pressing A.MENU.
 Note
Note
•After track or disc scanning is finished, normal playback of the tracks will begin again.
Playing back from the track list
When playing CD TEXT discs, you can select and playback tracks from the title’s displayed track list.
1Press 5or ∞to select TRACK LIST from the
M-CD MENU, and press A.MENU.
The TRACK LIST is displayed.
2Press 5or ∞to select the track you want to play in the LIST, and press A.MENU.
Playback of the selected track begins. After that, tracks play in order.
 Notes
Notes
•During playback of the track, list indications turn green.
•Up to six tracks in the list can be displayed at once. Press 2or 3to display previous or next list. When the first or sixth track is indicated in the displayed list, pressing 5or ∞takes you to the previous or next page.
•Titles of up to 10 characters can be displayed.
•Display of some characters may not be possible. 
28 En

Multi-CD Player
Pausing CD playback
Pause lets you temporarily stop playback of the CD.
1Press 5or ∞to select PAUSE from the M-
CD MENU, and press A.MENU.
PAUSE ON/OFF indications are displayed.
2Press 5to turn pause on.
Pause :ON appears in the display. Play of the current track pauses.
3 Press ∞to turn pause off.
Pause :OFF appears in the display. Play will resume at the same point that you turned pause on. 
Using compression and bass emphasis
You can use these functions only with a multi-CD player that supports them.
Using COMP (compression) and DBE (dynamic bass emphasis) functions let you adjust the sound playback quality of the multi-CD player. Each of the functions have a two-step adjustment. The COMP function balances the output of louder and softer sounds at higher volumes. DBE boosts bass levels to give playback a fuller sound. Listen to each of the effects as you select through them and use the one that best enhances the playback of the track or CD that you are listening to.
1 Press 5or ∞to select COMP from the M-
CD MENU, and press A.MENU.
COMP adjustment indications are displayed.
• If the multi-CD player does not support COMP/DBE, NO COMP is displayed when you attempt to select it.
Section
07
2 Press 5or ∞to select your favorite setting. |
|
|
Press 5or ∞repeatedly to switch between the |
English |
|
following settings: |
||
|
||
COMP OFF—COMP 1—COMP 2—COMP OFF— |
|
|
DBE 1—DBE 2 |
|
Using ITS playlists |
olñEspa |
|
ITS (instant track selection) lets you make a |
||
|
||
playlist of favorite tracks from those in the multi- |
|
|
CD player magazine. After you have added your |
|
|
favorite tracks to the playlist you can turn on ITS |
|
|
play and play just those selections. |
Deutsch |
|
Creating a playlist with ITS program- |
||
|
||
ming |
|
|
You can use ITS to enter and playback up to 99 |
|
|
tracks per disc, up to 100 discs (with the disc |
|
|
title). (With multi-CD players sold before the |
|
|
CDX-P1250 and CDX-P650, up to 24 tracks can |
aisçFran |
|
be stored in the playlist.) |
||
|
||
When using a multi-CD player that does not |
|
|
feature an ITS function, you cannot select ITS |
|
|
PLAY. |
|
|
1 Play a CD that you want to program. |
|
|
Press 5or ∞to select a CD. |
Italiano |
|
2 Press 5or ∞to select ITS MEMORY from |
||
|
||
the M-CD MENU, and press A.MENU. |
|
|
ITS MEMORY adjustment indications are dis- |
|
|
played. |
|
|
3 Select a desired track by pressing 2or 3. |
Nederlands |
|
4 Press 5to store the currently playing track |
||
|
||
in the ITS MEMORY. |
|
|
MEMORY is displayed briefly and the currently |
|
|
playing selection is added to your playlist. The |
|
|
display then shows ITS again. |
|
En 29

Section
07 Multi-CD Player
 Notes
Notes
•After data for 100 discs has been stored in memory, data for a new disc will overwrite the oldest one.
•If you do not operate the function within about 30 seconds, the display is automatically returned to the playback display.
Erasing a track from your ITS playlist
When you want to delete a track from your ITS playlist, you can if ITS play is on.
If ITS play is already on, skip to step 2. If ITS play is not already on, press A.MENU.
1Play a CD you want to delete a track from your ITS playlist, and turn ITS play on.
Refer to Playback from your ITS playlist on this page.
2Press 5or ∞to select ITS MEMORY from the M-CD MENU, and press A.MENU.
ITS MEMORY adjustment indications are displayed.
3Select a desired track by pressing 2or 3.
4Press ∞to erase a track from your ITS playlist.
The currently playing selection is erased from your ITS playlist and playback of the next track from your ITS playlist begins.
• If there are no tracks from your playlist in the current range, EMPTY is displayed and normal play resumes.
5Press BAND/ESC to return to the playback display.
 Note
Note
•If you do not operate the function within about 30 seconds, the display is automatically returned to the playback display.
Playback from your ITS playlist
ITS play lets you listen to the tracks that you have entered into your ITS playlist. When you turn on ITS play, tracks from your ITS playlist in the multi-CD player will begin to play.
1 Select the repeat range.
Refer to Repeating play on page 27.
2Press 5or ∞to select ITS PLAY from the
M-CD MENU, and press A.MENU.
ITS PLAY ON/OFF indications are displayed.
3Press 5to turn ITS play on.
ITS PLAY :ON appears in the display. Playback begins of those tracks from your playlist within the previously selected M-CD (multi-CD player repeat) or DISC (disc repeat) ranges.
• If no tracks in the current range are programmed for ITS play then EMPTY is displayed.
4 Press ∞to turn ITS play off.
ITS PLAY :OFF appears in the display. Playback will continue in normal order from the currently playing track and CD.
 Note
Note
•If you do not operate the function within about 30 seconds, the display is automatically returned to the playback display.
30 En
 Loading...