


Philips 40PFL6605-98, 46PFL8605-98, 52PFL8605-98, 40PFL6605S-98, 46PFL6605-98 User Manual
...Register your product and get support at
www.philips.com/welcome
52PFL8605S/98
46PFL8605S/98
42PFL8605S/98 52PFL8605 /98 46PFL8605 /98 42PFL8605 /98 46PFL6605S/98 40PFL6605S/98 46PFL6605 /98 40PFL6605 /98
EN User manual

Contents
1 |
Notice |
2 |
|
|
|
2 |
Important |
3 |
|
|
|
3 |
Your TV |
5 |
|
Side controls and indicators |
5 |
|
Remote control |
5 |
|
|
|
4 |
Use your TV |
7 |
|
Switch your TV on/off or to standby |
7 |
|
Switch channels |
7 |
|
Adjust TV volume |
8 |
|
Watch connected devices |
8 |
|
Use teletext |
9 |
|
Use Ambilight |
9 |
|
|
|
5 |
Use more of your TV |
10 |
|
Change menu language |
10 |
|
Access TV menus |
10 |
|
Change picture and sound settings |
11 |
|
Change Ambilight settings |
15 |
|
Use advanced teletext features |
16 |
|
Use timers |
17 |
|
Use child and rating locks |
17 |
|
Use subtitles |
18 |
|
Use the TV clock |
19 |
|
View photos, play music and watch video 19 |
|
|
Listen to digital radio channels |
21 |
|
Use universal access |
21 |
|
Use Scenea to display a picture as TV |
|
|
wallpaper |
22 |
|
Update the TV software |
23 |
|
Change TV preferences |
24 |
|
Start a TV demo |
25 |
|
Reset the TV to factory settings |
25 |
|
Re-install the TV |
25 |
6 |
Install channels |
26 |
|
Automatically install channels |
26 |
|
Manually install channels |
26 |
|
Reorder stored channels |
27 |
|
Rename channels |
27 |
|
Hide and unhide channels |
28 |
|
Set up your favorite channels |
28 |
|
|
|
7 |
Connect devices |
29 |
|
Connectors for PFL6605 |
29 |
|
Connectors for PFL8605 |
30 |
|
Connect a computer |
30 |
|
Connect to a computer network (For |
|
|
PFL8605) |
32 |
|
Use HDMI ARC |
36 |
|
Use Philips EasyLink |
36 |
|
Use a Kensington lock |
39 |
|
|
|
8 |
Product information |
40 |
|
Supported display resolutions |
40 |
|
Multimedia |
40 |
|
Tuner/Reception/Transmission |
41 |
|
Remote control |
41 |
|
Power |
41 |
|
Supported TV mounts |
41 |
|
Dimensions |
41 |
|
|
|
9 |
Troubleshooting |
42 |
|
General TV issues |
42 |
|
TV channel issues |
42 |
|
Picture issues |
43 |
|
Sound issues |
43 |
|
HDMI connection issues |
44 |
|
USB connection issues |
44 |
|
Computer connection issues |
44 |
|
Contact us |
44 |
|
|
|
10 |
Index |
45 |
English
EN 1

1 Notice
2010 © Koninklijke Philips Electronics N.V. All rights reserved.
Specifications are subject to change without notice.Trademarks are the property of Koninklijke Philips Electronics N.V. or their respective owners. Philips reserves the right to change products at any time without being obliged to adjust earlier supplies accordingly. The material in this manual is believed adequate for the intended use of the system. If the product, or its individual modules or procedures, are used for purposes other than those specified herein, confirmation of their validity and suitability must be obtained. Philips warrants that the material itself does not infringe any United States patents. No further warranty is expressed or implied.
Philips cannot be held responsible neither for any errors in the content of this document nor for any problems as a result of the content in this document. Errors reported to Philips will be adapted and published on the Philips support website as soon as possible.
Pixel characteristics
This LCD product has a high number of color pixels. Although it has effective pixels of
99.999% or more, black dots or bright points of light (red, green or blue) may appear constantly on the screen.This is a structural property of the display (within common industry standards) and is not a malfunction.
Open source software
This television contains open source software. Philips hereby offers to deliver or make available, upon request, for a charge no more than the cost of physically performing source distribution, a complete machine-readable copy of the corresponding source code on a medium customarily used for software interchange.This offer is valid for a period of 3 years after the date of purchase of this product.To obtain the source code, write to:
Development Manager Technology & Development Philips Consumer Lifestyle 620A Lorong 1,Toa Payoh TP1, Level 3
Singapore 319762
Warranty
No components are user serviceable. Do not open or remove covers to the inside of the product. Repairs may only be done by Philips
Service Centres and official repair shops. Failure to do so shall void any warranty, stated or implied.
Any operation expressly prohibited in this manual, any adjustments, or assembly
procedures not recommended or authorised in this manual shall void the warranty.
Copyright
All other registered and unregistered trademarks are the property of their respective owners.
® Kensington and Micro Saver are registered US trademarks of ACCO World corporation with issued registrations and pending applications in other countries throughout the world.
(For PFL8605 only)
Portions of this software are copyright © The FreeType Project (www.freetype.org). Windows Media is either a registered trademark or trademark of Microsoft Corporation in the United States and/or other countries.
DLNA®, the DLNA logo and DLNA 1.5
Certified are trademarks, service marks, or certification marks or the Digital Living
Network Alliance.
2 EN

2 Important
Read and understand all instructions before you use your TV. If damage is caused by failure to follow instructions, the warranty does not apply.
Safety
Risk of electric shock or fire!
•Never expose the TV to rain or water. Never place liquid containers, such as vases, near the TV. If liquids are spilt on or into the TV, disconnect the TV from the power outlet immediately. Contact Philips Consumer Care to have the TV checked before use.
•Never place the TV, remote control or batteries near naked flames or other heat sources, including direct sunlight.
To prevent the spread of fire, keep candles or other flames away from the
TV, remote control and batteries at all times.
•Never insert objects into the ventilation slots or other openings on the TV.
•When the TV is swiveled ensure that no strain is exerted on the power cord. Strain on the power cord can loosen connections and cause arcing.
Risk of short circuit or fire!
•Never expose the remote control or batteries to rain, water or excessive heat.
•Avoid force coming onto power plugs. Loose power plugs can cause arcing or fire.
Risk of injury or damage to the TV!
•Two people are required to lift and carry a TV that weighs more than 55 lbs.
•When stand mounting the TV, use only the supplied stand. Secure the stand to the TV tightly. Place the TV on a flat, level surface that can support the combined weight of the TV and the stand.
•When wall mounting the TV, use only a wall mount that can support the weight of the TV. Secure the wall mount to a wall that can support the combined weight of the TV and wall mount. Koninklijke Philips Electronics N.V. bears no responsibility for improper wall mounting that results in
accident, injury or damage.
Risk of injury to children!
Follow these precautions to prevent the TV from toppling over and causing injury to children:
•Never place the TV on a surface covered by a cloth or other material that can be pulled away.
•Ensure that no part of the TV hangs over the edge of the surface.
•Never place the TV on tall furniture (such as a bookcase) without anchoring both the furniture and TV to the wall or a suitable support.
•Educate children about the dangers of
climbing on furniture to reach the TV.
Risk of overheating!
•Never install the TV in a confined space.
Always leave a space of at least 4 inches or 10 cm around the TV for ventilation. Ensure curtains or other objects never cover the ventilation slots on the TV.
Risk of damage to the TV!
•Before you connect the TV to the power outlet, ensure that the power voltage matches the value printed on the back
of the TV. Never connect the TV to the power outlet if the voltage is different.
Risk of injury, fire or power cord damage!
•Never place the TV or any objects on the power cord.
•To easily disconnect the TV power cord from the power outlet, ensure that you have full access to the power cord at all times.
English
EN 3

•When you disconnect the power cord, always pull the plug, never the cable.
•Disconnect the TV from the power outlet and antenna before lightning storms. During lightning storms, never
touch any part of the TV, power cord or antenna cable.
Risk of hearing damage!
•Avoid using earphones or headphones at
high volumes or for prolonged periods of time.
Low temperatures
•If the TV is transported in temperatures below 5°C, unpack the TV and wait until the TV temperature matches room
temperature before connecting the TV to the power outlet.
Screen care
•Avoid stationary images as much as possible. Stationary images are images that remain on-screen for extended periods of time. Examples include: on-screen menus, black bars and time displays. If you must use stationary images, reduce screen contrast and brightness to avoid screen damage.
•Unplug the TV before cleaning.
•Clean the TV and frame with a soft, damp cloth. Never use substances such as alcohol, chemicals or household cleaners on the TV.
•Risk of damage to the TV screen! Never touch, push, rub or strike the screen with any object.
•To avoid deformations and color fading, wipe off water drops as soon as possible.
Disposal of your old product and batteries
Your product is designed and manufactured with high quality materials and components, which can be recycled and reused.
When this crossed-out wheeled bin symbol is attached to a product it means that the product is covered by the European Directive 2002/96/EC. Please inform yourself about the local separate collection system for electrical and electronic products.
Please act according to your local rules and do not dispose of your old products with your normal household waste.
Correct disposal of your old product helps to prevent potential negative consequences for the environment and human health.
Your product contains batteries covered by the European Directive 2006/66/EC, which cannot be disposed with normal household waste.
Please inform yourself about the local rules on separate collection of batteries because correct disposal helps to prevent negative consequences for the environmental and human health.
4 EN

3 Your TV
Congratulations on your purchase, and welcome to Philips!To fully benefit from the support that Philips offers, register your TV at www.philips.com/welcome.
This section gives you an overview of commonly used TV controls and functions.
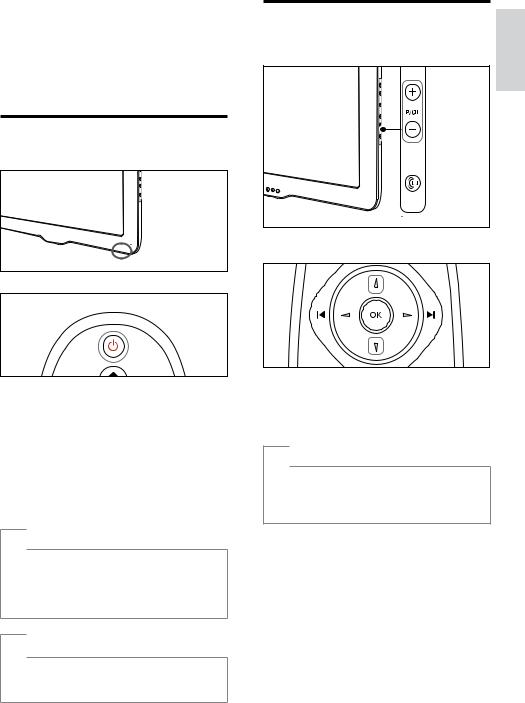
Side controls and indicators
1
2
3
4
6 |
5 |
A +/- : Increases or decreases volume.
B : Accesses the home menu.
CP/CH +/- : Switches to the next or
previous channel.
D : Switches Ambilight on or off.
EPower switch
FRemote control sensor/ Ambient sensor
Remote control
English
1
2
3
 4 5
4 5 


 5
5  6
6
13 |
7 |
|
8 |
12 |
9 |
|
|
|
10 |
|
11 |
A (Standby-On)
•Switches the TV to standby if it is on.
•Switches on the TV if it is in standby.
B (Home)
Accesses the home menu.
EN 5
C  (Browse)
Accesses the browse menu to select:
•channel list
•Teletext
D 

 (Navigation buttons)
Navigates menus.
E (Previous/Next)
•Skips to the previous or next channel.
•Skips to the previous or next page of the menu.
•Skips to the previous or next track, album or folder.
FOK
Confirms an entry or selection.
G 
 (Experience)
Accesses the experience bar menu.
H  (Options)
Accesses options for the current activity or selection.
I+/- (Volume)
Increases or decreases volume.
JColor buttons
Select tasks or options.
K0-9 (Numeric buttons)
Select a channel or setting.
L (Mute)
Mutes or restores volume.
M (Back)
•Returns to a previous menu screen.
•Press and hold to return to watching TV.
6 EN
4 Use your TV
This section helps you perform basicTV operations (see ‘Use more of yourTV’ on page 10).
Switch your TV on/off or to standby
To switch on
•Press the Power switch at the bottom of the TV.
To switch on/ off to standby
•Press  (Standby-On) on the remote control.
To switch off
•Press the Power switch at the bottom of the TV.
 Tip
Tip
•• Though your TV consumes very little power when in standby, energy continues to be consumed. When not in use for an extended period of time, disconnect the TV power cable from the power outlet.
 Note
Note
•• If you cannot locate your remote control and
want to switch on the TV from standby, press P/CH +/- on the side of the TV.
Switch channels
• Press P/CH +/- on the side of the TV. |
glish |
|
En |
• Press  on the remote control.
• Press  to skip to the previous or next channel.
•Enter a channel number using the
Numeric buttons.
 Tip
Tip
•• When you use a favorite list, you can only select those channels in the list.
•• At the channel list, press  to skip to the previous or next page of preset channels.
EN 7

Adjust TV volume
To increase or decrease volume
•Press+/- on the remote control.
•Press +/- on the side of the TV.
To mute or unmute sound
•Press  to mute the sound.
•Press  again to restore the sound.
 Note
Note
•• Use the [Sound] menu to adjust headphone volume (see ‘Manually adjust sound settings’ on page 15).
8 EN
Watch connected devices
 Note
Note
•• For easy access, add new devices to the home menu before selecting them.
Add a device to the home menu
Connect and switch on devices before adding them to the home menu.
1 Press  (Home).
»» The home menu appears.
Watch TV |
Browse USB |
Browse PC |
Scenea |
Add your devices
Setup
2 Press the Navigation buttons to select [Add your devices] and press OK.
»» A message appears with [Start] selected, prompting you to start the add new device guide.
3 Press OK.
»» Follow the on-screen instructions. When the guide is complete, a new device icon is added to the home menu.

 Tip
Tip
•• To avoid screen clutter, remove devices from the home menu when they are no longer connected (see ‘Remove devices from the home menu’ on page 11).
Select a device via the home menu
1 Press  (Home).
»» The home menu appears.
2 Press the Navigation buttons to select a device.
3 Press OK to confirm your choice.
»» The TV switches to the selected device.
Use Ambilight
1 Press 
 (Experience).
»» The experience bar appears.
2 Press the Navigation buttons to select [Ambilight], then press OK.
3 Press the Navigation buttons to select [On] or [Off].
4 Press OK to confirm your choice.
Tip
•• When watching TV, you can also press  on the side of the TV to switch Ambilight on or off.
•• To use Ambilight as a lounge light during TV standby, press  on the side of the TV.
English
Use teletext
1 |
Press |
(Browse). |
||
2 |
»» The browse menu appears. |
|||
Press the Navigation buttons to select |
||||
|
[Teletext], then press OK. |
|||
3 |
»» The teletext screen appears. |
|||
To select a page: |
||||
|
• Enter the page number with the |
|||
|
|
Numeric buttons. |
||
|
• |
Press |
or to view the next or |
|
|
|
previous page. |
||
|
• Press the Color buttons to select a |
|||
|
|
color coded item. |
||
|
• |
Press |
to return to the previously |
|
4 |
|
viewed page. |
||
Press |
(Browse) to exit teletext. |
|||
Set Ambilight active mode
You can set the speed at which Ambilight
responds to on-screen images.
1
2
3
4
5 Press  to exit.
Note
•• Before you can change the Ambilight active mode, set [Home] >[Ambilight] >[Colour] to [Dynamic]. More information and other
advanced Ambilight features are available (see ‘Change Ambilight settings’ on page 15).
EN 9
5Use more of your TV
Change menu language
 Note
Note
•• Skip this step if your language settings are correct.
1 When watching TV, press  (Home). »» The home menu appears.
2 Press the Navigation buttons to select
[Setup], then press OK.
»» The [Setup] menu appears.
3 Select [Advanced TV settings], then press OK.
4 Select [Preferences] > [Menu language] and press OK.
»» A list of languages appears.
5 Press the Navigation buttons to select a menu language.
6 Press OK to confirm your choice.
»» The selected language is applied to the menu.
More language settings
In addition to [Menu language], you can configure the following language settings via the [Languages] menu (Available in some
cities where digital channels is available only):
1
2
3
4
5 Select a setting then press OK to adjust the setting.
6 Press OK to confirm your choice.
The following language settings can be configured.
•[Primary audio]/ [Secondary audio]
Select primary and secondary audio languages for digital channels.
•[Primary subtitles]/ [Secondary subtitles]
Select primary and secondary subtitle languages for digital channels.
•[Primary teletext]/ [Secondary teletext]
Select primary and secondary teletext languages for digital channels.
•[Hearing impaired]
Select [On] to display subtitles with primary and secondary audio languages.
•[Preferred audio format]
Select [Advanced] to receive advanced audio formats (AAC, EAC-3, AC-3), available only if provided by the local broadcaster. Select [Standard] to receive standard audio format (MPEG).
•[Mono/Stereo]
Selects mono or stereo if stereo broadcast is available.
Access TV menus
Menus help you to install channels, change picture and sound settings and access other features.
Access the home menu
The home menu gives you easy access to connected devices, picture and sound settings,
and other useful features.
1
10 EN
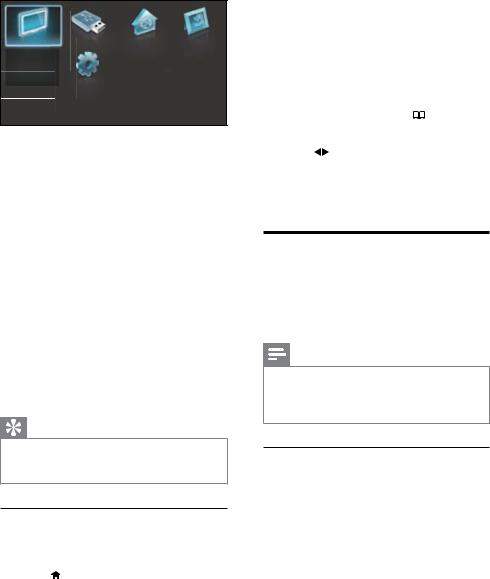
Watch TV |
Browse USB |
Browse PC |
Scenea |
Add your devices
Setup
2 Press the Navigation buttons to select a home menu item:
• [Watch TV]Switches back to the antenna source if another source is selected.
• [Browse USB]Accesses the content browser of the connected USB storage device.
• (For PFL8605 only)[Browse PC]Accesses the content browser of the connected PC network.
• [Scenea]Switches to the Scenea wallpaper.
• [Add your devices]Adds new devices to the home menu.
• [Setup]Accesses menus to change picture, sound and other settings.
3 Press OK to confirm your choice.
Tip
•• Press  (Home) to exit the home menu.
•• Press  (Back) to exit the [Setup] menu.
•• Press  (Options) to exit an options menu.
Remove devices from the home menu
If a device is no longer connected to the TV,
remove it from the home menu.
1
2 Press the Navigation buttons to select a device to remove.
3 Press  (Options).
»» A list appears, with [Remove this device] selected.
4 |
Press OK. |
|
|
|
|
|
|||
|
»» Follow the on-screen instructions to |
|
glish |
|
|
remove the device. Once complete, the |
|
||
|
device is removed from the home menu. |
|
En |
|
|
|
|
||
Access the browse menu |
|
|
||
1 |
When watching TV, press (Browse). |
|
|
|
2 |
»» The browse menu appears. |
|
|
|
Press |
to select: |
|
|
|
|
• [Channel list] Accesses TV channel list. |
|
|
|
3 |
• [Teletext] Accesses teletext. |
|
|
|
Press OK to confirm your choice. |
|
|
||
Change picture and sound settings
Change picture and sound settings to suit your preferences.You can apply pre-defined settings or change settings manually.
Note
•• The flexibility to change settings is limited if the
TV location is set to [Shop] mode. Set the TV location to [Home] mode to access all TV settings
(see ‘Change TV preferences’ on page 24).
Use settings assistant
Use the settings assistant to guide you through the picture and sound settings.
1 When watching TV, press  (Home). »» The home menu appears.
2
3
4 Select [Start] and press OK.
»» Follow the on-screen instructions.
EN 11

Use pre-defined picture settings
Use the[Smart picture] experience bar to access frequently used picture settings.
 Note
Note
•• All picture settings are available via the [Picture]menu (see ‘Manually adjust picture
settings’ on page 12).
1 When watching TV, press 
 (Experience).
»» The experience bar appears.
2 Press the Navigation buttons to select [Smart picture], then press OK.
3 Select a smart setting:
• [Personal]: Applies the settings you have selected in the [Personalise picture and sound] menu.
• [Vivid]: Applies rich and dynamic settings, ideal for daylight use.
• [Natural]: Applies a natural setting.
• [Cinema]: Applies settings for watching movies.
• [Game]: Applies settings for gaming.
• [Energy saving]: Applies the most energy conscious settings. Factory standard settings.
• [Standard]: Adjusts picture settings to suit most environments and types of video.
• [Photo]: Applies settings for viewing photos.
• [Custom]: Applies the stored adjustments you have made to a smart picture setting.
4 Press OK to confirm your choice.
»» The smart setting is applied. 5 Press  (Back) to exit.
Manually adjust picture settings
1 When watching TV, press  (Home). »» The home menu appears.
2 Press the Navigation buttons to select
[Setup], then press OK.
3 Select [Advanced TV settings], then press OK.
4 Select [Picture], then press OK.
5 Press  to select a setting.
6 Press OK to access and adjust the setting.
The following picture settings can be configured. Depending on the format of the picture source, some picture settings are not available.
•[Smart picture]: Accesses pre-defined smart picture settings.
•[Reset]: Resets to factory default settings.
•[Contrast]: Adjusts the intensity of bright areas, keeping dark areas unchanged.
•[Brightness]: Adjusts the intensity and details of dark areas.
•[Colour]: Adjusts color saturation.
•[Hue]: Compensates color variations in NTSC encoded transmissions.
•[Sharpness]: Adjusts sharpness in the image.
•[Noise reduction]: Filters and reduces noise in an image.
•[Tint]: Adjusts the color balance in an image.
 Note
Note
•• Before you adjust [Custom tint], select [Tint] > [Custom], then press OK to enable the
option.
•[Custom tint]: Customizes tint setting.
•[Pixel Plus HD]: Accesses advanced settings:
•[HD Natural Motion]: Reduces field and line flicker to display movement smoothly.
12 EN

•[100 Hz Clear LCD]: Sets the TV refresh rate to a maximum of
100Hz to provide superior motion sharpness, better black level, high contrast with a flicker free, quiet image and a larger viewing angle.
•[Super resolution]/[Advanced sharpness]: Enables superior sharpness, especially lines and contours in the picture.
•[Dynamic contrast]: Enhances contrast.
•[Dynamic backlight]: Adjusts brightness of the TV backlight to match lighting conditions.
•[MPEG artefact reduction]: Smooths out transitions on digital pictures. You can switch this feature on or off.
•[Colour enhancement]: Makes colors more vivid and improves the details in bright colors. You can switch this feature on or off.
•[Gamma]: Adjusts the midtones intensity in the picture. Black and white are not affected.
•[PC mode]: Enables picture settings adjustment when a PC is connected to the TV via HDMI. If enabled, you can select [Picture format] > [Unscaled] which provides maximum detail for display of PC content.
•[Light sensor]: Adjusts settings dynamically to match lighting conditions.
•[Picture format]: Changes the picture format.
•[Screen edges]: Changes the picture size.
•[Picture shift]: Adjusts the position of the picture.
Change picture format
1 Press 
 (Experience).
»» The experience bar appears.
2 Press the Navigation buttons to select [Picture format], then press OK.
3 Press the Navigation buttons to select a picture format.
»» The selected picture format is previewed.
4 Press OK to confirm your choice.
»» The selected picture format is applied.
 Tip
Tip
•• Picture formats are also accessible via the
[Setup]menu.
The following picture formats can be selected.
 Note
Note
•• Depending on the picture source, some picture formats are not available and will not
be seen on-screen.
•• Before you adjust [Unscaled], select [Picture] > [PC mode] > [On], then press OK to
enable the option.
English
EN 13

|
|
|
|
[Auto fill] |
Adjusts the |
|
|
|
|||
|
|
|
|
|
picture to fill the |
|
|
|
|
|
screen (subtitles |
|
|
|
|
|
|
|
|
|
|
|
remain visible). |
|
|
|
|
|
|
|
|
|
|
|
Recommended |
|
|
|
|
|
for minimal |
|
|
|
|
|
screen distortion |
|
|
|
|
|
(but not for HD |
|
|
|
|
|
or PC). |
|
|
|
|
[Auto |
Enlarges the |
|
|
|
|
||
|
|
|
|
zoom] |
picture to fill |
|
|
|
|
|
the screen. |
|
|
|
|
|
Recommended |
|
|
|
|
|
|
|
|
|
|
|
for minimal |
|
|
|
|
|
screen distortion |
|
|
|
|
|
(but not for HD |
|
|
|
|
|
or PC). |
|
|
|
|
[Movie |
Scales the classic |
|
|
|
|
||
|
|
|
|
||
|
|
|
|
expand |
4:3 format |
|
16:9] |
to 16:9. Not |
|||
|
|
|
|
|
recommended |
|
|
|
|
|
|
|
|
|
|
|
for HD or PC. |
|
|
|
|
[Super |
Removes the |
|
|
|
|
||
|
|
|
|
zoom] |
black bars on |
|
|
|
|
|
the sides of 4:3 |
|
|
|
|
|
broadcasts. Not |
|
|
|
|
|
|
|
|
|
|
|
recommended |
|
|
|
|
|
for HD or PC. |
[Unscaled] Provides maximum detail for PC. Only available
when[PC mode] is enabled in the
[Picture] menu.
[Wide Stretches the screen] classic 4:3 format
to 16:9.
14 EN
Shift picture position
1 Press 
 (Experience).
»» The experience bar appears.
2 Press the Navigation buttons to select [Picture shift], then press OK.
3 Press the Navigation buttons to adjust the position of the picture.
4 Press OK to confirm your choice.
Tip |
•• Picture shift is also accessible via the |
[Setup]menu. |
Use pre-defined sound settings
Use the [Smart sound] experience bar to access frequently used picture settings.
 Note
Note
•• All picture settings are available via the
[Sound]menu.
1 When watching TV, press 
 (Experience).
»» The experience bar appears.
2 Press the Navigation buttons to select [Smart sound], then press OK.
3 Select a smart setting:
•[Personal]: Applies personal preferences set in the [Sound] menus in [Setup].
•[Standard]: Adjusts sound settings to suit most environments and types of audio.
•[News]: Applies settings for spoken audio, such as news.
•[Movie]: Applies settings for movies.
•[Game]: Applies settings for gaming.
•[Drama]: Applies settings for drama.
•[Sports]: Applies settings for sports.
4 Press OK to confirm your choice.
»» The smart setting is applied. 5 Press  (Back) to exit.
 Loading...