


Philips 37HFL5560D-27, 32HFL5860D-27, 26HFL5830D-27, 42HFL7580A-27, 52HFL5580D-27 User Manual
...Philips Professional and Business Solutions
User Manual
The following models are supported by this User Manual: 26HFL5830D/27, 32HFL5860D/27, 37HFL5560D/27, 42HFL5860D/27, 42HFL7580A/27, 52HFL5580D/27
|
P |
TO |
|
S |
|
Thank you for choosing Philips.
Need help fast?
Read your Quick Use Guide and/or Owner’s Manual first for quick tips that make using your Philips product more enjoyable.
If you have read your instructions and still need assistance,
you may access our online help at www.philips.com/hospitality or call
1-866-497-4225 while with your product (and Model / Serial number)
For Customer Use
Enter below the Serial No. which is located on the rear of the cabinet. Retain this information for future reference.
Model No. ______________________________
Serial No. ___________________________

TABLE OF CONTENTS
1.Important safety instructions
. . . . . . . . . . . . . . . . . . . . . . . . . . . . . . . . 2
2. Safety information and useful
tips . . . . . . . . . . . . . . . . . . . . . . . . . . . 4
3. Before calling service . . . . . . 5
4. Basic TV connections . . . . . . 8
Antenna connection . . . . . . . . . 8 Mains connection . . . . . . . . . . . 8 Switching on the TV . . . . . . . . . 8
5. Overview of TV connectors
and controls . . . . . . . . . . . . . . . . . . . 9
6.Optional remote controls 11
RC2888/01 . . . . . . . . . . . . . . . 11 RC2573GR . . . . . . . . . . . . . . . 11
7. Description of guest remote
control . . . . . . . . . . . . . . . . . . . . . . 12
8.Overview of TV menus . . . 13
9.Accessing the setup menu 14
10. Installation . . . . . . . . . . . . . . . 15
Selecting the language . . . . . . . 15
Selecting the communication source . . . . . . . . . . . . . . . . . . . 15
Changing the settings of a channel . . . . . . . . . . . . . . . . . . 16
Tuning channels automatically. 19
Selecting cable or antenna mode
. . . . . . . . . . . . . . . . . . . . . . . . 19
Selecting a virtual or physical channel . . . . . . . . . . . . . . . . . . 20
Enabling your current ring . . . 20
Setting options for digital channels. . . . . . . . . . . . . . . . . . 20
Selecting and configuring settings and options . . . . . . . . . . . . . . 23
Change Ambilight settings. . . . 36
11. Appendix A . . . . . . . . . . . . . . . 38
12. Definitions, acronyms and
abbreviations . . . . . . . . . . . . . . . . . 39
13. USA limited warranty . . . . 42
14. Cleaning and care . . . . . . . . 46
15. Environmental care . . . . . . . 46
16. Index . . . . . . . . . . . . . . . . . . . . . 47
17. Dolby Digital . . . . . . . . . . . . . 50
18. Kensington Security Slot . . 50
1

1. Important safety instructions
Read Before Operating
Equipment
1.For the quickest and most trouble free installation, please consult the quick start guide that came packed in the television or download it from www.philips.com/ hospitality.
2.Keep these instructions.
3.Heed all warnings.
4.Follow all instructions.
5.Do not use this TV near water.
6.Clean only with a dry, soft, non-abrasive cloth.
7.Do not block any of the ventilation openings.
8.Install in accordance with the manufacturers instructions.
9.Do not install near any heat sources such as radiators, heat registers, stoves, or other apparatus (including amplifiers) that produce heat.
10.Do not defeat the safety purpose of the polarized or grounding-type plug.A polarized plug has two blades with one wider than the other.A grounding type plug has two blades and third grounding prong.The wide blade or third prong are provided for your safety.When
the provided plug does not fit into your outlet, consult an electrician for replacement of the obsolete outlet.
11.Protect the power cord from being walked on or pinched particularly at plugs, convenience receptacles and at the exit point.
12.Only use attachments/accessories specified by the manufacturer.
13.Use only with a cart, stand,
 tripod, bracket, or table
  specified by the manufacturer,
or sold with the TV.When a cart is used, use caution when moving the cart/TV combination to avoid injury from tipover.
14.Unplug this TV during lightning storms or when unused for long periods of time.
15.Refer all servicing to qualified service personnel. Servicing is required when the TV has been damaged in any way, such as power-supply cord or plug is damaged, liquid has been spilled or objects have fallen into apparatus, the TV has been exposed to rain or moisture, does not operate normally, or has been dropped.
16.This product may contain lead and mercury. Disposal of these materials may be regulated due to environmental considerations. For disposal or recycling information, please contact your local authorities or the Electronic Industries Alliance: www.eiae.org
17.Damage Requiring Service - The TV should be serviced by qualified service personnel when:
•The power supply cord or the plug has been damaged; or
•Objects have fallen, or liquid has been spilled into the TV; or
•The TV has been exposed to rain; or
•The TV does not appear to operate normally or exhibits a marked change in performance; or
•The TV has been dropped, or the enclosure damaged.
2
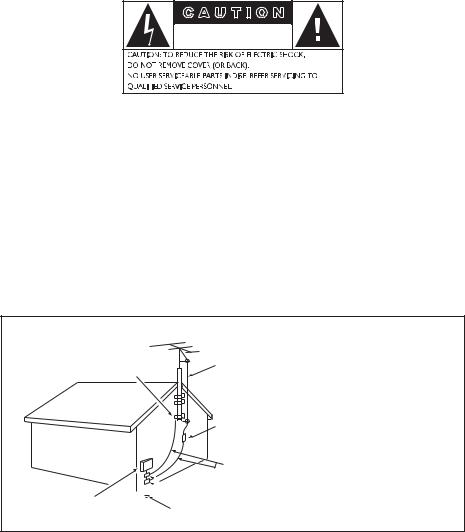
Know these safety symbols
C A U T I O N |
RISK OF ELECTRIC SHOCK |
DO NOT OPEN |
This “bolt of lightning” indicates material not insulated within your unit which may cause an electrical shock.
For the safety of everyone in your property, please do not remove product covering.
The “exclamation point” calls attention to features for which you should read the enclosed literature closely to prevent operating and maintenance problems.
BWARNING:To reduce the risk of fire or electric shock, this appliance should not be exposed to rain or moisture and objects filled with liquids, such as vases, should not be placed on this apparatus.
CCAUTION:To prevent electric shock, match wide blade of plug to wide slot, and fully insert.
Example of America Grounding as per NEC - National Electric Code
ANTENNA LEAD-IN WIRE
GROUND CLAMP
ANTENNA DISCHARGE UNIT (NEC SECTION 810-20)
GROUNDING CONDUCTORS (NEC SECTION 810-21)

 GROUND CLAMPS
ELECTRIC SERVICE EQUIPMENT
POWER SERVICE GROUNDING ELECTRODE
EQUIPMENT (NEC ART 250, PART H)
3

2. Safety information and useful tips
1.Two people are required to lift and carry a TV that weighs more than 55 lb (25 kg). Improper handling of the TV can cause serious injury.
2.If you place the TV set on a solid surface. Ensure the surface is level and that it can withstand the weight of the TV.
3.Installing the TV on the wall requires special skill that should only be performed by a qualified personnel.You should not attempt to do the work yourself. Philips bears no responsibility for improper mounting or mounting that results in accident or injury. Make sure that the wall mount is being fixed securely enough so that it meets safety standards.
4.This TV is compatible with the VESA wall mounting standard. Please contact your local electronics supplier for a VESA compliant bracket to wall mount this TV. Before you mount your TV on a wall, ensure the wall is suitable to carry the weight of the TV.
5.Do not insert the power plug in the wall socket before all connections are made.
6.Do not touch any part of the TV, power lead, or aerial lead during lightning storms.
7.Do not leave the TV in stand-by mode for an extended period of time. Instead, disconnect the TV from the mains.
8.The TV set is always connected to the mains. Disconnection of the TV set can be done by:
•unplugging the mains cord located at the back of TV set, or
•unplugging the mains plug from the mains socket outlet.
BPull the power lead by the plug - do not pull by the wire.
9.Ensure the power cord is fully inserted into the TV mains socket and the wall socket.
10.If the TV is mounted on a swivel base or swivel arm, ensure no strain is placed on the power cord when the TV is swivelled. Strain on the power cord can loosen connections and cause arcing or fire.
11.Verify that the mains supply voltage in your location corresponds to the voltage printed on the sticker at the rear of the TV.
4

3.Before calling service
Check this list of symptoms and suggested steps before you request service.
DNote: Familiarize yourself with the commercial features described in the TV installation setup.The effects of several of these features, if not thoroughly understood, might appear as faulty operation.
|
Symptoms |
Suggested steps |
Installation |
TV does not respond to |
Check the button on the left hand side of the remote control |
|
commands of the Setup |
must be in the SETUP location (see Accessing the setup |
|
Remote Control |
menu on page 14). |
|
|
|
|
TV does not respond |
Check if YES is selected in the REMOTE CONTROL |
|
to the Guest Remote |
LOCK feature (see Specifying the security options on page |
|
Control |
24). Select NO if YES is selected. |
|
|
|
|
Unable to enter Setup |
Use the Green Remote Control (RC2573GR) to access the |
|
menu via Guest Remote |
Setup menu and reset the SECURITY setting (see Specifying |
|
Control |
the security options on page 24). |
Picture |
No picture |
Check that the antenna / cable is connected properly at the |
|
|
back of the TV. |
|
|
Check picture adjustments (brightness, contrast, colour, tint). |
|
|
Check Tuning Mode setting (Air / Cable). |
|
|
Possible TV station problem.Try another channel. |
|
|
Ensure VIDEO is not selected in the MUTE feature of the |
|
|
CHANNEL INSTALL menu (see Selecting the Mute |
|
|
Source on page 18). |
|
Double image / “ghost” |
Check antenna, cable or set-top box. |
|
image |
|
|
|
|
|
Snowy / noisy picture |
Check antenna, cable and /or set-top box |
|
|
connections. Ensure that they are properly connected. |
|
|
|
Power |
No power |
Ensure that the TV's AC power cord is plugged into the main |
|
|
socket and to your TV. If there is still no power, disconnect the |
|
|
plug.Wait for 60 seconds and re-attach plug. Switch on the TV |
|
|
again. |
|
|
|
|
TV switches off by itself |
Check ESP (Energy Saving Programmability) setting in TV |
|
|
installation / setup (see Configuring the control options on |
|
|
page 27. |
|
TV cannot be switched |
Ensure FORCED ON is not selected in the POWER |
|
off |
ON feature of the SWITCH ON / OSD menu (see |
|
|
Specifying the configuration when switching on TV on page |
|
|
23). |
5
|
Symptoms |
Suggested steps |
Power |
TV cannot be switched |
The POWER . button of the remote control is used to |
|
on |
set the TV to stand-by mode or to switch on the TV. |
|
|
Check if YES is selected in the REMOTE CONTROL |
|
|
LOCK feature in SECURITY menu (see Specifying the |
|
|
security options on page 24). Select NO to deactivate the |
|
|
lock function. |
|
|
Check if ALL is selected in the KEYBOARD LOCK |
|
|
feature in SECURITY menu. Select NO to deactivate lock |
|
|
function (see Specifying the security options on page 24). |
|
|
D Note: If both REMOTE CONTROL LOCK and |
|
|
KEYBOARD LOCK features are on, use the Setup |
|
|
Remote Control to turn off the functions. |
Sound |
No sound |
Check if the volume of the TV is not at the minimum.Try |
|
|
pressing the Volume Up button of the remote control to |
|
|
increase volume. |
|
|
Check that the mute mode is off. If the mute mode is on, press |
|
|
the Mute button [ on the remote control to deactivate |
|
|
mute mode. |
|
|
Check AUDIO is not selected in the MUTE feature of the |
|
|
CHANNEL INSTALL menu (see Selecting the Mute |
|
|
Source on page 18). |
|
|
Check that the audio source in the DEFAULT HDMI |
|
|
AUDIO feature is selected correctly (see Configuring the |
|
|
features options and settings on page 29). |
|
|
If the TV is connected via HDMI to a DVD player, check |
|
|
whether the Digital Audio output of the DVD player is set to |
|
|
PCM mode. |
|
Volume level cannot be |
Check the limit setting for the Minimum and Maximum |
|
increased or decreased |
Volume and specify the setting in the MIN VOLUME / |
|
beyond a certain value |
MAX VOLUME features in the CONTROL menu (see |
|
|
Configuring the control options on page 27). |
|
|
|
6
|
Symptoms |
Suggested steps |
Remote |
TV does not respond to |
Change the batteries. |
Control |
Guest Remote Control |
Aim the remote control directly at remote control sensor lens |
|
|
|
|
|
on TV and press any button on the remote control. |
|
|
Check if YES is selected in the REMOTE CONTROL |
|
|
LOCK feature in SECURITY menu (see Specifying the |
|
|
security options on page 24). Select NO to deactivate lock |
|
|
function. |
|
|
|
7

4. Basic TV connections
4.1Antenna connection
Connect the antenna or RF cable signal to the 75 Ω RF ‘:’ connector socket located on the TV.
4.2Mains connection
Ensure that the mains voltage and frequency are correct. Refer to the product labelling and documentation.
DNote: The power button . on the TV does not disconnect the television from the AC mains. It toggles the TV between on and stand-by mode.To completely turn off the TV you must unplug the AC mains plugs from the wall socket.
4.3Switching on the TV
Press . on the TV or on one of the optional remote controls to switch the TV set on.
8
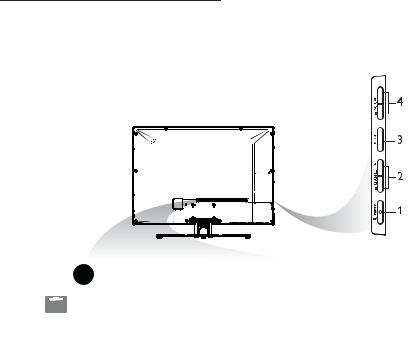
5. Overview of TV connectors and controls
USB 

 18
18

 19
19
20 |
|
21 |
CHANNEL |
5
|
|
|
|
|
|
|
|
|
|
|
|
|
|
|
|
PC |
HDMI 1 HDMI 2 |
|
SERVICE |
||||
|
|
|
|
|
|
|
|
|
|
|
|
|
|
|
|
|
|||||||
|
|
|
|
|
|
|
|
|
|
|
|
|
|
|
|
AUDIO IN |
|
||||||
DATA 1 |
|
|
|
AV 1 |
S-VIDEO |
|
|
AUDIO IN |
|
|
|
RS 232 |
|
||||||||||
|
|
|
|
|
|
|
|
|
|
|
|
|
|
|
|
||||||||
|
|
|
|
|
|
|
|
|
SPDIF |
|
|
|
|
|
|
|
|
|
|
|
|
|
|
|
|
|
|
|
|
|
|
|
|
|
|
|
|
|
|
|
|
|
|
|
|
8 |
|
|
|
|
|
|
|
|
|
|
|
|
|
|
|
|
|
|
|
|
|
|
|
|
|
|
|
|
|
|
|
AV |
|
|
CVI |
|
|
|
|
VGA |
|
|
|
|
|
|
|
|
|
|
|
|
|
|
|
|
|
|
|
|
|
|
|
|
|
|
|
|
|
|
|
||
|
|
|
|
|
|
|
|
|
|
|
|
|
|
|
|
|
|
||||||
6 |
7 |
|
8 |
9 |
10 |
11 12 13 |
|
14 |
15 |
|
16 |
17 |
|||||||||||
BWarning:
•Risk of electric shock.The rear jack panel must be removed by qualified personnel only.
•Do not connect any telephone cables or equipment to Data 1.
1. . POWER
To switch the TV on and off.To disconnect from the mains, remove the mains cord from the mains socket at the back of the TV or remove the mains plug from the wall socket.
2.- CHANNEL +
To select a channel.
3.MENU
To display or close menus.
4.- VOLUME +
To increase or decrease volume.
5.TV Aerial
To connect to the aerial plug.
6.DATA 1
For Pay Per View Terminal connection.
7.USB
To play media, clone and upgrade software.
8.AV 1
A replacement for the standard audio and video cables - red, white and yellow.To connect to video camera or camcorder.
9.S-Video
To play video from an external device. The audio is provided by the AV 1 jack.
DNote: Switching between AV 1 and S-Video does not occur automatically. Set the input to S-Video (see Select an input source on page 17).
10.Component Video Inputs/Audio Inputs
To connect to a DVD player or decoder which have the same connectors.
9
11.SPDIF
To connect to a HiFi / Home Theater system.
12.RS 232
To use serial communications to an external device.
DNote: Serial Xpress must be selected as the communication source (see Selecting the communication source on page 15).
13.VGA In
For input PC/Lap-top VGA.
14.PC Audio In
To play audio from a PC. Only compatible if also connected to an HDMI or VGA input.
15.HDMI 1/2
To connect to peripheral equipment, including high-definition equipment.
16.8 Ω [
To connect to a bathroom speaker.
17.Service
For diagnostic purposes. Should only be used by qualified Philips personnel.
DNote: The following connectors are available on certain sets only.
18.Side USB
See USB.
19.Headphones *
To listen to audio via headphones.
20.Side Audio / Video Inputs
To connect to a video camera or camcorder.
21.Side S-Video
To play video from an external device. The audio is provided by the Side Audio / Video Inputs.
DNote: Side Audio / Video Inputs and Side S-Video cannot be used at the same time. Do not connect both.
10
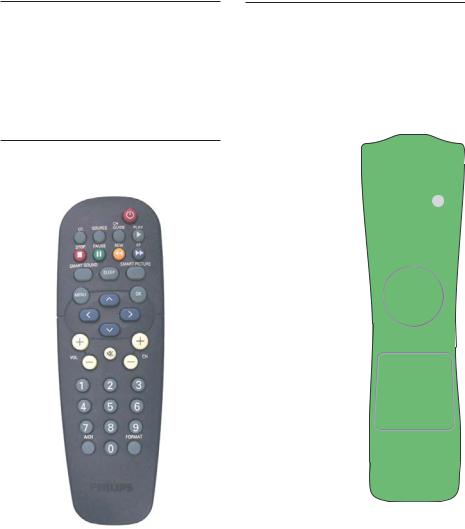
6. Optional remote controls
The following remote controls are applicable to TVs from Philips Commercial Solutions. These remote controls can be used for setup and configuration.
6.1RC2888/01
Guest Mode Remote Control (optional)
6.2RC2573GR
RC2573GR is an optional remote control. It is used for Philips Commercial Solutions features and SmartCard settings. It can be purchased separately.
|
|
|
|
POWER |
|
RECALL |
|
|
|
|
|
TEXT |
SMART |
SLEEP |
Slide this button |
CC |
|
|
|
GUEST |
|
|
|
|
up to enter into |
DCM 1 |
|
2 |
3 |
SETUP |
|
5 |
6 |
|
Guest mode. |
4 |
|
||
7 |
|
8 |
9 |
|
or |
|
|||
|
|
0 |
GUIDE |
|
|
|
|
||
|
RESET |
CH |
||
Slide this button |
M |
|
|
A/CH |
down to enter |
|
_ |
|
|
into Setup |
|
+ |
|
|
|
|
|
||
mode. |
+ |
|
+ |
|
|
|
|||
|
VOL |
_ |
_ CH |
|
|
A |
B |
C |
D |
|
E |
|
F |
G |
|
CLOCK |
A / V |
|
|
11
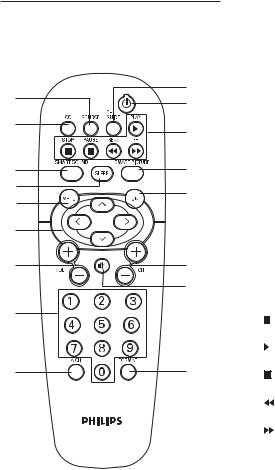
7. Description of guest remote control
6.Navigation cursors
To navigate through the menus/ submenus.
|
|
7. |
Volume + / – |
|
|
10 |
|
To adjust the TV volume. |
|
1 |
8. |
0 to 9 Digit keys |
||
11 |
||||
|
|
To select a TV channel. For a two digit |
||
2 |
|
|
||
12 |
|
number, enter the second digit before |
||
|
|
|||
|
|
|
the dash disappears. |
3 |
13 |
9. |
Alternate Channel |
|
4 |
14 |
|
To toggle between the alternate channels |
|
|
|
|||
5 |
10. |
Channel Guide |
||
|
||||
6 |
|
|
To activate the channel guide function. |
|
|
11. |
Standby |
||
|
|
|||
7 |
15 |
|
To switch the TV on from standby oir |
|
|
back to standby.. |
|||
|
|
|
||
|
16 |
12. |
DVD keys (if applicable) |
|
|
|
|||
8 |
|
|
To pause DVD play. |
|
|
|
|
||
|
|
|
To start DVD playback. |
|
9 |
17 |
|
To pause DVD playback. |
|
|
|
|
To rewind DVD playback |
|
|
|
|
To fast forward DVD playback. |
|
|
|
13. |
Smart Sound |
|
|
|
|
To select predefined sound settings. |
|
1. |
Source Select |
14. |
OK |
|
|
To confirm a selection. |
|||
|
To toggle between available video |
15. |
Channel + / – |
|
|
sources. |
|||
2. |
Closed Caption |
|
To select channels. |
|
16. |
Mute |
|||
|
To activate the Closed Caption function. |
|||
3. |
Smart Sound |
|
To mute or restore sound. |
|
17. |
Format |
|||
|
To select the predefined sound settings. |
|||
|
|
|
To select TV picture formats. |
4.Sleep
To activate the sleep timer. Press the button repeatedly to increase countdown time.
5.Menu
To call up or exit the menus.
12

8. |
|
Overview of TV menus |
|
|
|
|
|
|
|
|
||||||||||||||||||||||||||||||||||||||||||||||||
SETUP |
|
|
|
|
|
|
|
|
|
|
|
|
|
|
|
|
|
|
|
|
|
|
|
|
|
|
|
|
|
|
|
|
|
|
|
|
|
|
|
|
|
|
|
|
|
|
|
|
|
|
|
|
|
|
|
|
|
|
|
|
|
|
LANGUAGE |
|
|
|
|
|
|
|
|
|
|
|
|
|
|
|
|
|
|
|
|
|
|
|
|
|
|
|
|
|
|
|
|
|
|
|
|
|
|
|
|
|
|
|
ENGLISH, ESPANOL, FRANCAIS |
||||||||||
|
|
|
|
|
|
|
|
|
|
|
|
|
|
|
|
|
|
|
|
|
|
|
|
|
|
|
|
|
|
|
|
|
|
|
|
|
|
|
|
|
||||||||||||||||||
|
|
|
|
COMMUNICATION |
|
|
|
|
|
|
|
|
|
|
|
|
|
|
|
|
|
|
|
|
|
|
|
|
|
|
|
|
> |
|
||||||||||||||||||||||||
|
|
|
|
|
|
|
|
|
|
|
|
|
|
|
|
|
|
|
|
|
|
|
|
|
|
|
|
|
|
|
|
|
||||||||||||||||||||||||||
|
|
|
|
CHANNEL INSTALL |
|
|
|
|
|
|
TV NUMBER |
|||||||||||||||||||||||||||||||||||||||||||||||
|
|
|
|
|
|
|
|
|
|
|||||||||||||||||||||||||||||||||||||||||||||||||
|
|
|
|
|
|
|
|
|
|
|
|
|
CHANNEL |
|
|
|
|
|
|
|
|
|
|
|
|
|
|
|
|
|
|
|
|
|
|
|
|
|
|
|
|
|
|
|||||||||||||||
|
|
|
|
|
|
|
|
|
|
|
|
|
|
|
|
|
|
|
|
|
|
|
|
|
|
|
|
|
|
|
|
|
||||||||||||||||||||||||||
|
|
|
|
|
|
|
|
|
|
|
|
|
INPUT |
|
|
|
|
|
|
|
|
|
|
|
|
|
|
|
|
|
|
|
|
|
|
|
|
|
|
|
|
|
|
|
|
|
|
|
|
|
|
|
TUNER, AV, SVIDEO, CVI, *CARD CVBS |
|||||
|
|
|
|
|
|
|
|
|
|
|
|
|
|
|
|
|
|
|
|
|
|
|
|
|
|
|
|
|
|
|
|
|
|
|
|
|
|
|
|
|
||||||||||||||||||
|
|
|
|
|
|
|
|
|
|
|
|
|
|
|
|
|
|
|
|
|
|
|
|
|
|
|
|
|
|
|
|
|
|
|
|
|
|
|
|
|
|
|
|
|
|
|
|
|
|
|
|
|
|
|
|
|
*CARD-YC, *CARD CVI, *SIDE AV, |
|
|
|
|
|
|
|
|
|
|
|
|
|
|
|
|
|
|
|
|
|
|
|
|
|
|
|
|
|
|
|
|
|
|
|
|
|
|
|
|
|
|
|
|
|
|
|
|
|
|
|
|
|
|
|
|
|
|
*SIDE SVIDEO, VGA, HDMI1, HDMI 2 |
|
|
|
|
|
|
|
|
|
|
|
|
|
|
DIGITAL |
|
|
|
|
|
|
|
|
|
|
|
|
|
|
|
|
|
|
|
|
|
|
|
|
|
|
|
|
|
NO, YES |
|
||||||||||||||
|
|
|
|
|
|
|
|
|
|
|
|
|
|
|
|
|
|
|
|
|
|
|
|
|
|
|
|
|
||||||||||||||||||||||||||||||
|
|
|
|
|
|
|
|
|
|
|
|
|
RINGS |
|
|
|
|
|
|
|
|
|
|
|
|
|
|
|
|
|
|
|
|
|
|
|
(1) (2) (3) (4) |
|||||||||||||||||||||
|
|
|
|
|
|
|
|
|
|
|
|
|
|
|
|
|
|
|
|
|
|
|||||||||||||||||||||||||||||||||||||
|
|
|
|
|
|
|
|
|
|
|
|
|
LABEL |
|
|
|
|
|
|
|
|
|
|
|
|
|
|
|
|
|
|
|
|
|
|
|
|
|
|
|
|
|
( |
) > |
||||||||||||||
|
|
|
|
|
|
|
|
|
|
|
|
|
|
|
|
|
|
|
|
|
|
|
||||||||||||||||||||||||||||||||||||
|
|
|
|
|
|
|
|
|
|
|
|
|
MUTE |
|
|
|
|
|
|
|
|
|
|
|
|
|
|
|
|
|
|
|
|
|
|
|
|
|
|
|
|
|
|
|
|
|
|
|
NONE, AUDIO, VIDEO |
|||||||||
|
|
|
|
|
|
|
|
|
|
|
|
|
|
|
|
|
|
|
|
|
|
|
|
|
|
|
|
|
|
|
|
|
|
|
|
|
|
|
|
|
|
|
|
|||||||||||||||
|
|
|
|
AUTO INSTALL TV |
|
|
|
|
|
|
|
|
||||||||||||||||||||||||||||||||||||||||||||||
|
|
|
|
|
|
|
|
|
|
|
|
|||||||||||||||||||||||||||||||||||||||||||||||
|
|
|
|
|
|
|
|
|
|
|
|
|
START |
|
|
|
|
|
|
|
|
|
|
|
|
|
|
|
|
> |
|
|||||||||||||||||||||||||||
|
|
|
|
|
|
|
|
|
|
|
|
|
|
|
|
|
|
|
|
|
|
|||||||||||||||||||||||||||||||||||||
|
|
|
|
CABLE TUNING |
|
|
|
|
|
|
|
|
|
|
|
|
|
|
|
|
|
|
|
|
|
|
|
|
|
|
|
|
|
NO, YES |
|
|||||||||||||||||||||||
|
|
|
|
|
|
|
|
|
|
|
|
|
|
|
|
|
|
|
|
|
|
|
|
|
|
|
||||||||||||||||||||||||||||||||
|
|
|
|
USE CHANNEL TABLE |
|
|
|
|
|
|
|
|
|
|
|
|
|
|
|
|
|
|
|
|
|
|
NO, YES |
|
||||||||||||||||||||||||||||||
|
|
|
|
|
|
|
|
|
|
|
|
|
|
|
|
|
|
|
|
|||||||||||||||||||||||||||||||||||||||
|
|
|
|
CURRENT RING |
|
|
|
|
|
|
|
|
|
|
|
|
|
|
|
|
|
|
|
|
|
|
|
|
|
|
RING1, RING2, RING3, RING4 |
|||||||||||||||||||||||||||
|
|
|
|
|
|
|
|
|
|
|
|
|
|
|
|
|
|
|
|
|
|
|
|
|
|
|
||||||||||||||||||||||||||||||||
|
|
|
|
DIGITAL SETUP |
|
|
|
|
|
|
|
|
||||||||||||||||||||||||||||||||||||||||||||||
|
|
|
|
|
|
|
|
|
|
|
|
|||||||||||||||||||||||||||||||||||||||||||||||
|
|
|
|
|
|
|
|
|
|
|
|
|
CHANNEL SETUP |
|
|
|
|
|
|
|
|
|
|
|
> |
|
||||||||||||||||||||||||||||||||
|
|
|
|
|
|
|
|
|
|
|
|
|
|
|
|
|
|
|
|
|
|
|
|
|
|
|
|
|
|
|
|
|||||||||||||||||||||||||||
|
|
|
|
|
|
|
|
|
|
|
|
|
|
|
|
|
|
|
|
|
|
|
|
|
|
|
|
|
|
|||||||||||||||||||||||||||||
|
|
|
|
|
|
|
|
|
|
|
|
|
AUDIO |
|
|
|
|
|
|
|
|
|
|
|
|
|
|
|
> |
|
||||||||||||||||||||||||||||
|
|
|
|
|
|
|
|
|
|
|
|
|
|
|
|
|
|
|
|
|
|
|
|
|
|
|
|
|||||||||||||||||||||||||||||||
|
|
|
|
|
|
|
|
|
|
|
|
|
DIGITAL CC SETUP |
|
|
|
|
|
|
|
> |
|
||||||||||||||||||||||||||||||||||||
|
|
|
|
|
|
|
|
|
|
|
|
|
|
|
|
|
|
|||||||||||||||||||||||||||||||||||||||||
|
|
|
|
|
|
|
|
|
|
|
|
|
EMERGENCY ALERT |
|
|
|
|
> |
|
|||||||||||||||||||||||||||||||||||||||
|
|
|
|
|
|
|
|
|
|
|
|
|
|
|
|
|||||||||||||||||||||||||||||||||||||||||||
|
|
|
|
CONFIGURATION |
|
|
|
|
|
|
|
|
||||||||||||||||||||||||||||||||||||||||||||||
|
|
|
|
|
|
|
|
|
|
|
|
|||||||||||||||||||||||||||||||||||||||||||||||
|
|
|
|
|
|
|
|
|
|
|
|
|
SWITCH ON / OSD |
|
|
|
|
|
> |
|
||||||||||||||||||||||||||||||||||||||
|
|
|
|
|
|
|
|
|
|
|
|
|
|
|
|
|
|
|||||||||||||||||||||||||||||||||||||||||
|
|
|
|
|
|
|
|
|
|
|
|
|
PICTURE / SOUND |
|
|
|
> |
|
||||||||||||||||||||||||||||||||||||||||
|
|
|
|
|
|
|
|
|
|
|
|
|
|
|
||||||||||||||||||||||||||||||||||||||||||||
|
|
|
|
|
|
|
|
|
|
|
|
|
SECURITY |
|
|
|
|
|
|
> |
|
|||||||||||||||||||||||||||||||||||||
|
|
|
|
|
|
|
|
|
|
|
|
|
|
|
|
|
|
|||||||||||||||||||||||||||||||||||||||||
|
|
|
|
|
|
|
|
|
|
|
|
|
CONTROL |
|
|
|
|
> |
|
|||||||||||||||||||||||||||||||||||||||
|
|
|
|
|
|
|
|
|
|
|
|
|
|
|
|
|||||||||||||||||||||||||||||||||||||||||||
|
|
|
|
|
|
|
|
|
|
|
|
|
|
|
|
|
|
|
|
|
|
|
|
|
|
|
|
|
|
|
|
|
|
|
|
|
|
|
|
|
|
|
|
|
|
|
|
|
|
|
> |
|
||||||
|
|
|
|
|
|
|
|
|
|
|
|
|
FEATURES |
|
|
|
|
> |
|
|||||||||||||||||||||||||||||||||||||||
|
|
|
|
|
|
|
|
|
|
|
|
|
|
|
|
|
||||||||||||||||||||||||||||||||||||||||||
|
|
|
|
|
|
|
|
|
|
|
|
|
CC / V-CHIP |
|
|
> |
|
|||||||||||||||||||||||||||||||||||||||||
|
|
|
|
|
|
|
|
|
|
|
|
|
|
|
||||||||||||||||||||||||||||||||||||||||||||
|
|
|
|
|
|
|
|
|
|
|
|
|
AMBILIGHT |
|
|
> |
|
|||||||||||||||||||||||||||||||||||||||||
|
|
|
|
|
|
|
|
|
|
|
|
|
|
|
|
|||||||||||||||||||||||||||||||||||||||||||
* CARD CVBS, CARD-YC, CARD CVI, SIDE AV, SIDE SVIDEO are available on certain models only.
13
9. |
Accessing the setup |
|
|
menu |
SETUP |
|
|
|
|
LANGUAGE |
ENGLISH |
The following remote control commands |
COMMUNICATION |
> |
|
CHANNEL INSTALL |
> |
||
apply to Philips Commercial Solutions TV |
AUTO INSTALL TV |
> |
|
|
|
||
products.These can be used for setup and |
CABLE TUNING |
NO |
|
USE CHANNEL TABLE |
NO |
||
configuration purposes. |
CURRENT RING |
RING1 |
|
|
|
||
|
|
DIGITAL SETUP |
> |
|
|
CONFIGURATION |
> |
Accessing TV Setup Menu |
|
|
|
using the Remote Control |
|
|
|
(RC2573GR) |
To scroll through the menu: |
||
1. Slide the button to the Setup location. |
• |
Press Î or ï on the remote control |
||||
|
|
|
|
|
to a highlight a menu item. |
|
|
|
|
|
• Press Æ to modify the setting of the |
||
RECALL |
|
|
POWER |
|
highlighted menu item. |
|
|
TEXT |
SMART |
SLEEP |
• |
Press |
to exit the setup menu. |
CC |
|
|
|
|
|
|
GUEST |
|
|
|
|
|
|
DCM 1 |
|
2 |
3 |
|
|
|
SETUP |
|
5 |
6 |
|
|
|
4 |
|
|
|
|
||
7 |
|
8 |
9 |
|
|
|
|
|
0 |
GUIDE |
|
|
|
RESET |
CH |
|
|
|
||
M |
|
|
A/CH |
|
|
|
|
_ |
+ |
|
|
|
|
|
|
|
|
|
|
|
+ |
|
+ |
|
|
|
|
VOL |
_ |
_ CH |
|
|
|
|
A |
B |
C |
D |
|
|
|
E |
|
F |
G |
|
|
|
CLOCK |
A / V |
|
|
|
|
|
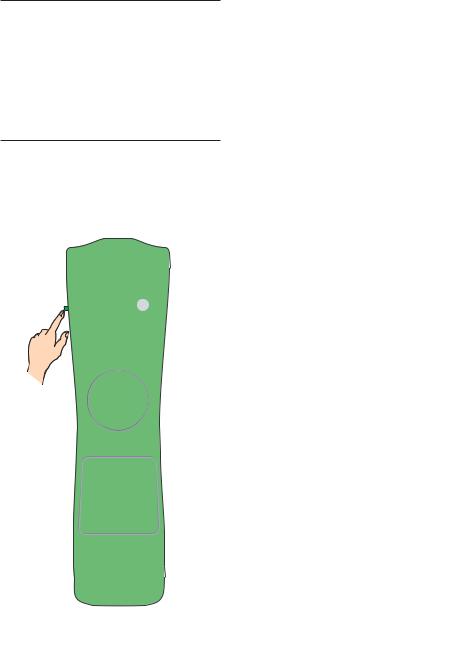
2.Press  on the remote control to access the Setup Menu.
14
10.Installation
10.1Selecting the language
You can select ENGLISH, ESPANOL or
FRANCAIS as your preferred language.
•Press Æ repeatedly to select your preferred language.
SETUP |
|
LANGUAGE |
ENGLISH |
COMMUNICATION |
> |
CHANNEL INSTALL |
> |
AUTO INSTALL TV |
> |
CABLE TUNING |
NO |
USE CHANNEL TABLE |
NO |
CURRENT RING |
RING1 |
DIGITAL SETUP |
> |
CONFIGURATION |
> |
10.2 Selecting the communication source
The following options are available in the
COMMUNICATION menu
•SP - SPI
•SP - I2C
•SERIAL XPRESS
•MULTI RC
•SMART RC
•OFF
The factory default (SP-SPI) is correct for most systems.
SETUP |
|
LANGUAGE |
ENGLISH |
COMMUNICATION |
> |
CHANNEL INSTALL |
> |
AUTO INSTALL TV |
> |
CABLE TUNING |
NO |
USE CHANNEL TABLE |
NO |
CURRENT RING |
RING1 |
DIGITAL SETUP |
> |
CONFIGURATION |
> |
COMMUNICATION |
|
COMMUNICATION |
SP - SPI |
STORE |
> |
DCM TYPE |
> |
•To identify a connection link between the TV display and the setup box, select
SP - SPI, SP - I2C or SERIAL XPRESS.
DFor SP - SPI and SP - I2C: if the settop box requires a source switch, select
GENERIC under DCM TYPE.
15
 Loading...