


 Loading...
I N S T A L L A T I O N / O P E R A T I O N
Esprit® SE Series
Positioning System
ES40/ES41
ES40P/ES41P
C1323M (5/12)

Contents
Important Safety Instructions . . . . . . . . . . . . . . . . . . . . . . . . . . . . . . . . . . . . . . . . . . . . . . . . . . . . . . . . . . . . . . . . . . . . . . . . . . . . . . . . . . . . . . . . . . . . 8
Important Notices . . . . . . . . . . . . . . . . . . . . . . . . . . . . . . . . . . . . . . . . . . . . . . . . . . . . . . . . . . . . . . . . . . . . . . . . . . . . . . . . . . . . . . . . . . . . . . . . . . . . . 9
Regulatory Notice . . . . . . . . . . . . . . . . . . . . . . . . . . . . . . . . . . . . . . . . . . . . . . . . . . . . . . . . . . . . . . . . . . . . . . . . . . . . . . . . . . . . . . . . . . . . . . . . . 9
Description. . . . . . . . . . . . . . . . . . . . . . . . . . . . . . . . . . . . . . . . . . . . . . . . . . . . . . . . . . . . . . . . . . . . . . . . . . . . . . . . . . . . . . . . . . . . . . . . . . . . . . . . . . 10 ES40/ES41 Esprit SE Series with IOP. . . . . . . . . . . . . . . . . . . . . . . . . . . . . . . . . . . . . . . . . . . . . . . . . . . . . . . . . . . . . . . . . . . . . . . . . . . . . . . . . 10 Models . . . . . . . . . . . . . . . . . . . . . . . . . . . . . . . . . . . . . . . . . . . . . . . . . . . . . . . . . . . . . . . . . . . . . . . . . . . . . . . . . . . . . . . . . . . . . . . . . . . . 10 ES40PC/ES41PC Esprit SE Series with Pressurized IOC. . . . . . . . . . . . . . . . . . . . . . . . . . . . . . . . . . . . . . . . . . . . . . . . . . . . . . . . . . . . . . . . . . . 10 Models . . . . . . . . . . . . . . . . . . . . . . . . . . . . . . . . . . . . . . . . . . . . . . . . . . . . . . . . . . . . . . . . . . . . . . . . . . . . . . . . . . . . . . . . . . . . . . . . . . . . 10
Installation . . . . . . . . . . . . . . . . . . . . . . . . . . . . . . . . . . . . . . . . . . . . . . . . . . . . . . . . . . . . . . . . . . . . . . . . . . . . . . . . . . . . . . . . . . . . . . . . . . . . . . . . . . 11
Optional TXB Series Translator Board Installation. . . . . . . . . . . . . . . . . . . . . . . . . . . . . . . . . . . . . . . . . . . . . . . . . . . . . . . . . . . . . . . . . . . . . . . 14
How to Remove the Pan/Tilt Cover. . . . . . . . . . . . . . . . . . . . . . . . . . . . . . . . . . . . . . . . . . . . . . . . . . . . . . . . . . . . . . . . . . . . . . . . . . . . . . 14
How to Reinstall the Pan/Tilt Cover . . . . . . . . . . . . . . . . . . . . . . . . . . . . . . . . . . . . . . . . . . . . . . . . . . . . . . . . . . . . . . . . . . . . . . . . . . . . . 15
Operation . . . . . . . . . . . . . . . . . . . . . . . . . . . . . . . . . . . . . . . . . . . . . . . . . . . . . . . . . . . . . . . . . . . . . . . . . . . . . . . . . . . . . . . . . . . . . . . . . . . . . . . . . . . 16
Power-Up Display . . . . . . . . . . . . . . . . . . . . . . . . . . . . . . . . . . . . . . . . . . . . . . . . . . . . . . . . . . . . . . . . . . . . . . . . . . . . . . . . . . . . . . . . . . . . . . . . 16
Quick Operation Guide . . . . . . . . . . . . . . . . . . . . . . . . . . . . . . . . . . . . . . . . . . . . . . . . . . . . . . . . . . . . . . . . . . . . . . . . . . . . . . . . . . . . . . . . . . . . 16
Quick Configuration Guide . . . . . . . . . . . . . . . . . . . . . . . . . . . . . . . . . . . . . . . . . . . . . . . . . . . . . . . . . . . . . . . . . . . . . . . . . . . . . . . . . . . . . . . . . 16
Pan/Tilt Functions . . . . . . . . . . . . . . . . . . . . . . . . . . . . . . . . . . . . . . . . . . . . . . . . . . . . . . . . . . . . . . . . . . . . . . . . . . . . . . . . . . . . . . . . . . . 17
Wiper . . . . . . . . . . . . . . . . . . . . . . . . . . . . . . . . . . . . . . . . . . . . . . . . . . . . . . . . . . . . . . . . . . . . . . . . . . . . . . . . . . . . . . . . . . . . . . . . . . . . . 17
Preset 95: Accessing Main Menu. . . . . . . . . . . . . . . . . . . . . . . . . . . . . . . . . . . . . . . . . . . . . . . . . . . . . . . . . . . . . . . . . . . . . . . . . . . . . . . . . . . . 17
CM6700/CM6800 . . . . . . . . . . . . . . . . . . . . . . . . . . . . . . . . . . . . . . . . . . . . . . . . . . . . . . . . . . . . . . . . . . . . . . . . . . . . . . . . . . . . . . . . . . . 17
KBD200A/KBD300A: Direct Mode Only . . . . . . . . . . . . . . . . . . . . . . . . . . . . . . . . . . . . . . . . . . . . . . . . . . . . . . . . . . . . . . . . . . . . . . . . . . 17
CM9500 . . . . . . . . . . . . . . . . . . . . . . . . . . . . . . . . . . . . . . . . . . . . . . . . . . . . . . . . . . . . . . . . . . . . . . . . . . . . . . . . . . . . . . . . . . . . . . . . . . . 18
CM9740/CM9760/CM9770/CM9780 . . . . . . . . . . . . . . . . . . . . . . . . . . . . . . . . . . . . . . . . . . . . . . . . . . . . . . . . . . . . . . . . . . . . . . . . . . . . 18
KBD4000/KBD4002 . . . . . . . . . . . . . . . . . . . . . . . . . . . . . . . . . . . . . . . . . . . . . . . . . . . . . . . . . . . . . . . . . . . . . . . . . . . . . . . . . . . . . . . . . . 18
MPT9500 . . . . . . . . . . . . . . . . . . . . . . . . . . . . . . . . . . . . . . . . . . . . . . . . . . . . . . . . . . . . . . . . . . . . . . . . . . . . . . . . . . . . . . . . . . . . . . . . . . 18
NET300/NET350/NET4001A . . . . . . . . . . . . . . . . . . . . . . . . . . . . . . . . . . . . . . . . . . . . . . . . . . . . . . . . . . . . . . . . . . . . . . . . . . . . . . . . . . . 18
Endura Workstation . . . . . . . . . . . . . . . . . . . . . . . . . . . . . . . . . . . . . . . . . . . . . . . . . . . . . . . . . . . . . . . . . . . . . . . . . . . . . . . . . . . . . . . . . . 18
VCD5000 . . . . . . . . . . . . . . . . . . . . . . . . . . . . . . . . . . . . . . . . . . . . . . . . . . . . . . . . . . . . . . . . . . . . . . . . . . . . . . . . . . . . . . . . . . . . . . . . . . 18
Digital Sentry® System Software. . . . . . . . . . . . . . . . . . . . . . . . . . . . . . . . . . . . . . . . . . . . . . . . . . . . . . . . . . . . . . . . . . . . . . . . . . . . . . . . 19
Digital Sentry DS ControlPoint . . . . . . . . . . . . . . . . . . . . . . . . . . . . . . . . . . . . . . . . . . . . . . . . . . . . . . . . . . . . . . . . . . . . . . . . . . . . . . . . . 19
DVR5100 . . . . . . . . . . . . . . . . . . . . . . . . . . . . . . . . . . . . . . . . . . . . . . . . . . . . . . . . . . . . . . . . . . . . . . . . . . . . . . . . . . . . . . . . . . . . . . . . . . 19
DX4100/DX4500/DX4600/DX8100 . . . . . . . . . . . . . . . . . . . . . . . . . . . . . . . . . . . . . . . . . . . . . . . . . . . . . . . . . . . . . . . . . . . . . . . . . . . . . . 19
Menu Tree . . . . . . . . . . . . . . . . . . . . . . . . . . . . . . . . . . . . . . . . . . . . . . . . . . . . . . . . . . . . . . . . . . . . . . . . . . . . . . . . . . . . . . . . . . . . . . . . . . . . . . . . . . 20
Language . . . . . . . . . . . . . . . . . . . . . . . . . . . . . . . . . . . . . . . . . . . . . . . . . . . . . . . . . . . . . . . . . . . . . . . . . . . . . . . . . . . . . . . . . . . . . . . . . . . . . . . . . . . 22
System Information . . . . . . . . . . . . . . . . . . . . . . . . . . . . . . . . . . . . . . . . . . . . . . . . . . . . . . . . . . . . . . . . . . . . . . . . . . . . . . . . . . . . . . . . . . . . . . . . . . . 23
DIP Switch Information. . . . . . . . . . . . . . . . . . . . . . . . . . . . . . . . . . . . . . . . . . . . . . . . . . . . . . . . . . . . . . . . . . . . . . . . . . . . . . . . . . . . . . . . . . . . 23
Display Setup. . . . . . . . . . . . . . . . . . . . . . . . . . . . . . . . . . . . . . . . . . . . . . . . . . . . . . . . . . . . . . . . . . . . . . . . . . . . . . . . . . . . . . . . . . . . . . . . . . . . . . . . 24
Label Positions . . . . . . . . . . . . . . . . . . . . . . . . . . . . . . . . . . . . . . . . . . . . . . . . . . . . . . . . . . . . . . . . . . . . . . . . . . . . . . . . . . . . . . . . . . . . . . . . . . 25
Settings . . . . . . . . . . . . . . . . . . . . . . . . . . . . . . . . . . . . . . . . . . . . . . . . . . . . . . . . . . . . . . . . . . . . . . . . . . . . . . . . . . . . . . . . . . . . . . . . . . . . . . . . . . . . 26
Camera . . . . . . . . . . . . . . . . . . . . . . . . . . . . . . . . . . . . . . . . . . . . . . . . . . . . . . . . . . . . . . . . . . . . . . . . . . . . . . . . . . . . . . . . . . . . . . . . . . . . . . . . 26
Type of Lighting . . . . . . . . . . . . . . . . . . . . . . . . . . . . . . . . . . . . . . . . . . . . . . . . . . . . . . . . . . . . . . . . . . . . . . . . . . . . . . . . . . . . . . . . . . . . . 26
Auto Focus . . . . . . . . . . . . . . . . . . . . . . . . . . . . . . . . . . . . . . . . . . . . . . . . . . . . . . . . . . . . . . . . . . . . . . . . . . . . . . . . . . . . . . . . . . . . . . . . . 26
PT Focus Lock. . . . . . . . . . . . . . . . . . . . . . . . . . . . . . . . . . . . . . . . . . . . . . . . . . . . . . . . . . . . . . . . . . . . . . . . . . . . . . . . . . . . . . . . . . . . . . . 27
Zoom Limit . . . . . . . . . . . . . . . . . . . . . . . . . . . . . . . . . . . . . . . . . . . . . . . . . . . . . . . . . . . . . . . . . . . . . . . . . . . . . . . . . . . . . . . . . . . . . . . . . 27
Zoom Speed . . . . . . . . . . . . . . . . . . . . . . . . . . . . . . . . . . . . . . . . . . . . . . . . . . . . . . . . . . . . . . . . . . . . . . . . . . . . . . . . . . . . . . . . . . . . . . . . 27
Low Light Limit. . . . . . . . . . . . . . . . . . . . . . . . . . . . . . . . . . . . . . . . . . . . . . . . . . . . . . . . . . . . . . . . . . . . . . . . . . . . . . . . . . . . . . . . . . . . . . 27
IR Cut Filter . . . . . . . . . . . . . . . . . . . . . . . . . . . . . . . . . . . . . . . . . . . . . . . . . . . . . . . . . . . . . . . . . . . . . . . . . . . . . . . . . . . . . . . . . . . . . . . . 28
Advanced Camera Settings . . . . . . . . . . . . . . . . . . . . . . . . . . . . . . . . . . . . . . . . . . . . . . . . . . . . . . . . . . . . . . . . . . . . . . . . . . . . . . . . . . . . . . . . 29
Shutter Speed . . . . . . . . . . . . . . . . . . . . . . . . . . . . . . . . . . . . . . . . . . . . . . . . . . . . . . . . . . . . . . . . . . . . . . . . . . . . . . . . . . . . . . . . . . . . . . 29
C1323M (5/12) |
3 |
AGC Limit . . . . . . . . . . . . . . . . . . . . . . . . . . . . . . . . . . . . . . . . . . . . . . . . . . . . . . . . . . . . . . . . . . . . . . . . . . . . . . . . . . . . . . . . . . . . . . . . . . 29
Auto Iris . . . . . . . . . . . . . . . . . . . . . . . . . . . . . . . . . . . . . . . . . . . . . . . . . . . . . . . . . . . . . . . . . . . . . . . . . . . . . . . . . . . . . . . . . . . . . . . . . . . 29
Auto Sharpness . . . . . . . . . . . . . . . . . . . . . . . . . . . . . . . . . . . . . . . . . . . . . . . . . . . . . . . . . . . . . . . . . . . . . . . . . . . . . . . . . . . . . . . . . . . . . 30
Auto White Balance. . . . . . . . . . . . . . . . . . . . . . . . . . . . . . . . . . . . . . . . . . . . . . . . . . . . . . . . . . . . . . . . . . . . . . . . . . . . . . . . . . . . . . . . . . 30
Backlight Compensation . . . . . . . . . . . . . . . . . . . . . . . . . . . . . . . . . . . . . . . . . . . . . . . . . . . . . . . . . . . . . . . . . . . . . . . . . . . . . . . . . . . . . . 30
Electronic Image Stabilization . . . . . . . . . . . . . . . . . . . . . . . . . . . . . . . . . . . . . . . . . . . . . . . . . . . . . . . . . . . . . . . . . . . . . . . . . . . . . . . . . . 30
Wide Dynamic Range . . . . . . . . . . . . . . . . . . . . . . . . . . . . . . . . . . . . . . . . . . . . . . . . . . . . . . . . . . . . . . . . . . . . . . . . . . . . . . . . . . . . . . . . 30
Low Lux Noise Reduction . . . . . . . . . . . . . . . . . . . . . . . . . . . . . . . . . . . . . . . . . . . . . . . . . . . . . . . . . . . . . . . . . . . . . . . . . . . . . . . . . . . . . 31
Video Level. . . . . . . . . . . . . . . . . . . . . . . . . . . . . . . . . . . . . . . . . . . . . . . . . . . . . . . . . . . . . . . . . . . . . . . . . . . . . . . . . . . . . . . . . . . . . . . . . 31
Field Align . . . . . . . . . . . . . . . . . . . . . . . . . . . . . . . . . . . . . . . . . . . . . . . . . . . . . . . . . . . . . . . . . . . . . . . . . . . . . . . . . . . . . . . . . . . . . . . . . 31
Low Light Sharpness . . . . . . . . . . . . . . . . . . . . . . . . . . . . . . . . . . . . . . . . . . . . . . . . . . . . . . . . . . . . . . . . . . . . . . . . . . . . . . . . . . . . . . . . . 31
Minimum Focus Distance . . . . . . . . . . . . . . . . . . . . . . . . . . . . . . . . . . . . . . . . . . . . . . . . . . . . . . . . . . . . . . . . . . . . . . . . . . . . . . . . . . . . . 32
Zoom Focus Trace . . . . . . . . . . . . . . . . . . . . . . . . . . . . . . . . . . . . . . . . . . . . . . . . . . . . . . . . . . . . . . . . . . . . . . . . . . . . . . . . . . . . . . . . . . . 32
Motion Settings . . . . . . . . . . . . . . . . . . . . . . . . . . . . . . . . . . . . . . . . . . . . . . . . . . . . . . . . . . . . . . . . . . . . . . . . . . . . . . . . . . . . . . . . . . . . . . . . . 32
Proportional Pan. . . . . . . . . . . . . . . . . . . . . . . . . . . . . . . . . . . . . . . . . . . . . . . . . . . . . . . . . . . . . . . . . . . . . . . . . . . . . . . . . . . . . . . . . . . . . 32
Park Time . . . . . . . . . . . . . . . . . . . . . . . . . . . . . . . . . . . . . . . . . . . . . . . . . . . . . . . . . . . . . . . . . . . . . . . . . . . . . . . . . . . . . . . . . . . . . . . . . . 32
Scan Speed . . . . . . . . . . . . . . . . . . . . . . . . . . . . . . . . . . . . . . . . . . . . . . . . . . . . . . . . . . . . . . . . . . . . . . . . . . . . . . . . . . . . . . . . . . . . . . . . 33
Preset Freeze Frame. . . . . . . . . . . . . . . . . . . . . . . . . . . . . . . . . . . . . . . . . . . . . . . . . . . . . . . . . . . . . . . . . . . . . . . . . . . . . . . . . . . . . . . . . . 33
Limit Stops . . . . . . . . . . . . . . . . . . . . . . . . . . . . . . . . . . . . . . . . . . . . . . . . . . . . . . . . . . . . . . . . . . . . . . . . . . . . . . . . . . . . . . . . . . . . . . . . . 33
Azimuth Zero . . . . . . . . . . . . . . . . . . . . . . . . . . . . . . . . . . . . . . . . . . . . . . . . . . . . . . . . . . . . . . . . . . . . . . . . . . . . . . . . . . . . . . . . . . . . . . . 34
Auto Tracking . . . . . . . . . . . . . . . . . . . . . . . . . . . . . . . . . . . . . . . . . . . . . . . . . . . . . . . . . . . . . . . . . . . . . . . . . . . . . . . . . . . . . . . . . . . . . . . . . . . 34
Auto Tracking. . . . . . . . . . . . . . . . . . . . . . . . . . . . . . . . . . . . . . . . . . . . . . . . . . . . . . . . . . . . . . . . . . . . . . . . . . . . . . . . . . . . . . . . . . . . . . . 34
Display Setup. . . . . . . . . . . . . . . . . . . . . . . . . . . . . . . . . . . . . . . . . . . . . . . . . . . . . . . . . . . . . . . . . . . . . . . . . . . . . . . . . . . . . . . . . . . . . . . 34
Sensitivity . . . . . . . . . . . . . . . . . . . . . . . . . . . . . . . . . . . . . . . . . . . . . . . . . . . . . . . . . . . . . . . . . . . . . . . . . . . . . . . . . . . . . . . . . . . . . . . . . 35
Start Time . . . . . . . . . . . . . . . . . . . . . . . . . . . . . . . . . . . . . . . . . . . . . . . . . . . . . . . . . . . . . . . . . . . . . . . . . . . . . . . . . . . . . . . . . . . . . . . . . 35
Zoom . . . . . . . . . . . . . . . . . . . . . . . . . . . . . . . . . . . . . . . . . . . . . . . . . . . . . . . . . . . . . . . . . . . . . . . . . . . . . . . . . . . . . . . . . . . . . . . . . . . . . 35
Lost Action . . . . . . . . . . . . . . . . . . . . . . . . . . . . . . . . . . . . . . . . . . . . . . . . . . . . . . . . . . . . . . . . . . . . . . . . . . . . . . . . . . . . . . . . . . . . . . . . . 35
Return. . . . . . . . . . . . . . . . . . . . . . . . . . . . . . . . . . . . . . . . . . . . . . . . . . . . . . . . . . . . . . . . . . . . . . . . . . . . . . . . . . . . . . . . . . . . . . . . . . . . . 35
Power Up. . . . . . . . . . . . . . . . . . . . . . . . . . . . . . . . . . . . . . . . . . . . . . . . . . . . . . . . . . . . . . . . . . . . . . . . . . . . . . . . . . . . . . . . . . . . . . . . . . . . . . . 35
Power Up Action . . . . . . . . . . . . . . . . . . . . . . . . . . . . . . . . . . . . . . . . . . . . . . . . . . . . . . . . . . . . . . . . . . . . . . . . . . . . . . . . . . . . . . . . . . . . 35
Line Sync. . . . . . . . . . . . . . . . . . . . . . . . . . . . . . . . . . . . . . . . . . . . . . . . . . . . . . . . . . . . . . . . . . . . . . . . . . . . . . . . . . . . . . . . . . . . . . . . . . . . . . . 36
Presets . . . . . . . . . . . . . . . . . . . . . . . . . . . . . . . . . . . . . . . . . . . . . . . . . . . . . . . . . . . . . . . . . . . . . . . . . . . . . . . . . . . . . . . . . . . . . . . . . . . . . . . . 37
Predefined Presets. . . . . . . . . . . . . . . . . . . . . . . . . . . . . . . . . . . . . . . . . . . . . . . . . . . . . . . . . . . . . . . . . . . . . . . . . . . . . . . . . . . . . . . . . . . 37
Configuring a Preset . . . . . . . . . . . . . . . . . . . . . . . . . . . . . . . . . . . . . . . . . . . . . . . . . . . . . . . . . . . . . . . . . . . . . . . . . . . . . . . . . . . . . . . . . 38
Creating an Action Preset . . . . . . . . . . . . . . . . . . . . . . . . . . . . . . . . . . . . . . . . . . . . . . . . . . . . . . . . . . . . . . . . . . . . . . . . . . . . . . . . . . . . . 39
Motion Detection. . . . . . . . . . . . . . . . . . . . . . . . . . . . . . . . . . . . . . . . . . . . . . . . . . . . . . . . . . . . . . . . . . . . . . . . . . . . . . . . . . . . . . . . . . . . 40
Edit Schedule . . . . . . . . . . . . . . . . . . . . . . . . . . . . . . . . . . . . . . . . . . . . . . . . . . . . . . . . . . . . . . . . . . . . . . . . . . . . . . . . . . . . . . . . . . . . . . . 41
Patterns. . . . . . . . . . . . . . . . . . . . . . . . . . . . . . . . . . . . . . . . . . . . . . . . . . . . . . . . . . . . . . . . . . . . . . . . . . . . . . . . . . . . . . . . . . . . . . . . . . . . . . . . 42
Zones. . . . . . . . . . . . . . . . . . . . . . . . . . . . . . . . . . . . . . . . . . . . . . . . . . . . . . . . . . . . . . . . . . . . . . . . . . . . . . . . . . . . . . . . . . . . . . . . . . . . . . . . . . 43
Window Blanking . . . . . . . . . . . . . . . . . . . . . . . . . . . . . . . . . . . . . . . . . . . . . . . . . . . . . . . . . . . . . . . . . . . . . . . . . . . . . . . . . . . . . . . . . . . . . . . . 44
Edit Schedule . . . . . . . . . . . . . . . . . . . . . . . . . . . . . . . . . . . . . . . . . . . . . . . . . . . . . . . . . . . . . . . . . . . . . . . . . . . . . . . . . . . . . . . . . . . . . . . 45
Reverse . . . . . . . . . . . . . . . . . . . . . . . . . . . . . . . . . . . . . . . . . . . . . . . . . . . . . . . . . . . . . . . . . . . . . . . . . . . . . . . . . . . . . . . . . . . . . . . . . . . 45
Clear Window . . . . . . . . . . . . . . . . . . . . . . . . . . . . . . . . . . . . . . . . . . . . . . . . . . . . . . . . . . . . . . . . . . . . . . . . . . . . . . . . . . . . . . . . . . . . . . 45
Blank All Above/Blank All Below . . . . . . . . . . . . . . . . . . . . . . . . . . . . . . . . . . . . . . . . . . . . . . . . . . . . . . . . . . . . . . . . . . . . . . . . . . . . . . . 46
Aux . . . . . . . . . . . . . . . . . . . . . . . . . . . . . . . . . . . . . . . . . . . . . . . . . . . . . . . . . . . . . . . . . . . . . . . . . . . . . . . . . . . . . . . . . . . . . . . . . . . . . . . . . . . 47
Wiper . . . . . . . . . . . . . . . . . . . . . . . . . . . . . . . . . . . . . . . . . . . . . . . . . . . . . . . . . . . . . . . . . . . . . . . . . . . . . . . . . . . . . . . . . . . . . . . . . . . . . 47
Edit Schedule . . . . . . . . . . . . . . . . . . . . . . . . . . . . . . . . . . . . . . . . . . . . . . . . . . . . . . . . . . . . . . . . . . . . . . . . . . . . . . . . . . . . . . . . . . . . . . . 48
Title Text . . . . . . . . . . . . . . . . . . . . . . . . . . . . . . . . . . . . . . . . . . . . . . . . . . . . . . . . . . . . . . . . . . . . . . . . . . . . . . . . . . . . . . . . . . . . . . . . . . . . . . . 48
Alert . . . . . . . . . . . . . . . . . . . . . . . . . . . . . . . . . . . . . . . . . . . . . . . . . . . . . . . . . . . . . . . . . . . . . . . . . . . . . . . . . . . . . . . . . . . . . . . . . . . . . . . . . . 49
Repeat . . . . . . . . . . . . . . . . . . . . . . . . . . . . . . . . . . . . . . . . . . . . . . . . . . . . . . . . . . . . . . . . . . . . . . . . . . . . . . . . . . . . . . . . . . . . . . . . . . . . 49
Ack Action . . . . . . . . . . . . . . . . . . . . . . . . . . . . . . . . . . . . . . . . . . . . . . . . . . . . . . . . . . . . . . . . . . . . . . . . . . . . . . . . . . . . . . . . . . . . . . . . . 49
Activate Aux. . . . . . . . . . . . . . . . . . . . . . . . . . . . . . . . . . . . . . . . . . . . . . . . . . . . . . . . . . . . . . . . . . . . . . . . . . . . . . . . . . . . . . . . . . . . . . . . 50
Current Reading . . . . . . . . . . . . . . . . . . . . . . . . . . . . . . . . . . . . . . . . . . . . . . . . . . . . . . . . . . . . . . . . . . . . . . . . . . . . . . . . . . . . . . . . . . . . . 50
Reset Alert . . . . . . . . . . . . . . . . . . . . . . . . . . . . . . . . . . . . . . . . . . . . . . . . . . . . . . . . . . . . . . . . . . . . . . . . . . . . . . . . . . . . . . . . . . . . . . . . . 50
Clear . . . . . . . . . . . . . . . . . . . . . . . . . . . . . . . . . . . . . . . . . . . . . . . . . . . . . . . . . . . . . . . . . . . . . . . . . . . . . . . . . . . . . . . . . . . . . . . . . . . . . . . . . . 51
Password. . . . . . . . . . . . . . . . . . . . . . . . . . . . . . . . . . . . . . . . . . . . . . . . . . . . . . . . . . . . . . . . . . . . . . . . . . . . . . . . . . . . . . . . . . . . . . . . . . . . . . . 51
Clock . . . . . . . . . . . . . . . . . . . . . . . . . . . . . . . . . . . . . . . . . . . . . . . . . . . . . . . . . . . . . . . . . . . . . . . . . . . . . . . . . . . . . . . . . . . . . . . . . . . . . . . . . . 52
Event . . . . . . . . . . . . . . . . . . . . . . . . . . . . . . . . . . . . . . . . . . . . . . . . . . . . . . . . . . . . . . . . . . . . . . . . . . . . . . . . . . . . . . . . . . . . . . . . . . . . . . . . . . 54
Event Type . . . . . . . . . . . . . . . . . . . . . . . . . . . . . . . . . . . . . . . . . . . . . . . . . . . . . . . . . . . . . . . . . . . . . . . . . . . . . . . . . . . . . . . . . . . . . . . . . 54
4 |
C1323M (5/12) |
Event Label. . . . . . . . . . . . . . . . . . . . . . . . . . . . . . . . . . . . . . . . . . . . . . . . . . . . . . . . . . . . . . . . . . . . . . . . . . . . . . . . . . . . . . . . . . . . . . . . . 55
Edit Event Label . . . . . . . . . . . . . . . . . . . . . . . . . . . . . . . . . . . . . . . . . . . . . . . . . . . . . . . . . . . . . . . . . . . . . . . . . . . . . . . . . . . . . . . . . . . . . 55
Edit Event . . . . . . . . . . . . . . . . . . . . . . . . . . . . . . . . . . . . . . . . . . . . . . . . . . . . . . . . . . . . . . . . . . . . . . . . . . . . . . . . . . . . . . . . . . . . . . . . . . 55
Clear Event. . . . . . . . . . . . . . . . . . . . . . . . . . . . . . . . . . . . . . . . . . . . . . . . . . . . . . . . . . . . . . . . . . . . . . . . . . . . . . . . . . . . . . . . . . . . . . . . . 56
List Event . . . . . . . . . . . . . . . . . . . . . . . . . . . . . . . . . . . . . . . . . . . . . . . . . . . . . . . . . . . . . . . . . . . . . . . . . . . . . . . . . . . . . . . . . . . . . . . . . . 56
Holiday . . . . . . . . . . . . . . . . . . . . . . . . . . . . . . . . . . . . . . . . . . . . . . . . . . . . . . . . . . . . . . . . . . . . . . . . . . . . . . . . . . . . . . . . . . . . . . . . . . . . 56
Edit Holiday . . . . . . . . . . . . . . . . . . . . . . . . . . . . . . . . . . . . . . . . . . . . . . . . . . . . . . . . . . . . . . . . . . . . . . . . . . . . . . . . . . . . . . . . . . . . . . . . 56
Clear Holiday . . . . . . . . . . . . . . . . . . . . . . . . . . . . . . . . . . . . . . . . . . . . . . . . . . . . . . . . . . . . . . . . . . . . . . . . . . . . . . . . . . . . . . . . . . . . . . . 57
List Holidays. . . . . . . . . . . . . . . . . . . . . . . . . . . . . . . . . . . . . . . . . . . . . . . . . . . . . . . . . . . . . . . . . . . . . . . . . . . . . . . . . . . . . . . . . . . . . . . . 57
Scheduled Events. . . . . . . . . . . . . . . . . . . . . . . . . . . . . . . . . . . . . . . . . . . . . . . . . . . . . . . . . . . . . . . . . . . . . . . . . . . . . . . . . . . . . . . . . . . . 58
Reset, Cycle Power, Reboot. . . . . . . . . . . . . . . . . . . . . . . . . . . . . . . . . . . . . . . . . . . . . . . . . . . . . . . . . . . . . . . . . . . . . . . . . . . . . . . . . . . . . . . . . . . . . 59
Reset Camera . . . . . . . . . . . . . . . . . . . . . . . . . . . . . . . . . . . . . . . . . . . . . . . . . . . . . . . . . . . . . . . . . . . . . . . . . . . . . . . . . . . . . . . . . . . . . . . . . . . 59
Cycle Camera Power. . . . . . . . . . . . . . . . . . . . . . . . . . . . . . . . . . . . . . . . . . . . . . . . . . . . . . . . . . . . . . . . . . . . . . . . . . . . . . . . . . . . . . . . . . . . . . 59
Reboot Device. . . . . . . . . . . . . . . . . . . . . . . . . . . . . . . . . . . . . . . . . . . . . . . . . . . . . . . . . . . . . . . . . . . . . . . . . . . . . . . . . . . . . . . . . . . . . . . . . . . 59
Software/Language File Upload . . . . . . . . . . . . . . . . . . . . . . . . . . . . . . . . . . . . . . . . . . . . . . . . . . . . . . . . . . . . . . . . . . . . . . . . . . . . . . . . . . . . . . . . . 60
Troubleshooting . . . . . . . . . . . . . . . . . . . . . . . . . . . . . . . . . . . . . . . . . . . . . . . . . . . . . . . . . . . . . . . . . . . . . . . . . . . . . . . . . . . . . . . . . . . . . . . . . . . . . . 61
Maintenance. . . . . . . . . . . . . . . . . . . . . . . . . . . . . . . . . . . . . . . . . . . . . . . . . . . . . . . . . . . . . . . . . . . . . . . . . . . . . . . . . . . . . . . . . . . . . . . . . . . . 62
Specifications . . . . . . . . . . . . . . . . . . . . . . . . . . . . . . . . . . . . . . . . . . . . . . . . . . . . . . . . . . . . . . . . . . . . . . . . . . . . . . . . . . . . . . . . . . . . . . . . . . . . . . . 63
Appendix A. . . . . . . . . . . . . . . . . . . . . . . . . . . . . . . . . . . . . . . . . . . . . . . . . . . . . . . . . . . . . . . . . . . . . . . . . . . . . . . . . . . . . . . . . . . . . . . . . . . . . . . . . . 65 Switch Settings. . . . . . . . . . . . . . . . . . . . . . . . . . . . . . . . . . . . . . . . . . . . . . . . . . . . . . . . . . . . . . . . . . . . . . . . . . . . . . . . . . . . . . . . . . . . . . . . . . 65 SW1: Receiver Address . . . . . . . . . . . . . . . . . . . . . . . . . . . . . . . . . . . . . . . . . . . . . . . . . . . . . . . . . . . . . . . . . . . . . . . . . . . . . . . . . . . . . . . 65 SW2 Switch 1: AD-32 Preset System . . . . . . . . . . . . . . . . . . . . . . . . . . . . . . . . . . . . . . . . . . . . . . . . . . . . . . . . . . . . . . . . . . . . . . . . . . . . 65 SW2 Switch 2: CM9502 Setting . . . . . . . . . . . . . . . . . . . . . . . . . . . . . . . . . . . . . . . . . . . . . . . . . . . . . . . . . . . . . . . . . . . . . . . . . . . . . . . . 65 SW2 Switch 3: Control System Compatibility. . . . . . . . . . . . . . . . . . . . . . . . . . . . . . . . . . . . . . . . . . . . . . . . . . . . . . . . . . . . . . . . . . . . . . 65 SW2 Switches 4 and 5: Serial Port Settings. . . . . . . . . . . . . . . . . . . . . . . . . . . . . . . . . . . . . . . . . . . . . . . . . . . . . . . . . . . . . . . . . . . . . . . 66 SW2 Switches 6 to 8: Baud Settings . . . . . . . . . . . . . . . . . . . . . . . . . . . . . . . . . . . . . . . . . . . . . . . . . . . . . . . . . . . . . . . . . . . . . . . . . . . . 66
Appendix B. . . . . . . . . . . . . . . . . . . . . . . . . . . . . . . . . . . . . . . . . . . . . . . . . . . . . . . . . . . . . . . . . . . . . . . . . . . . . . . . . . . . . . . . . . . . . . . . . . . . . . . . . . 67
C1323M (5/12) |
5 |

List of Illustrations
1 Removing the Transformer Module . . . . . . . . . . . . . . . . . . . . . . . . . . . . . . . . . . . . . . . . . . . . . . . . . . . . . . . . . . . . . . . . . . . . . . . . . . . . . . . . . . 11 2 Attaching the Base to a Mount . . . . . . . . . . . . . . . . . . . . . . . . . . . . . . . . . . . . . . . . . . . . . . . . . . . . . . . . . . . . . . . . . . . . . . . . . . . . . . . . . . . . . 12 3 Reinstalling the Transformer Module. . . . . . . . . . . . . . . . . . . . . . . . . . . . . . . . . . . . . . . . . . . . . . . . . . . . . . . . . . . . . . . . . . . . . . . . . . . . . . . . . 12 4 Wiring AUX 2 . . . . . . . . . . . . . . . . . . . . . . . . . . . . . . . . . . . . . . . . . . . . . . . . . . . . . . . . . . . . . . . . . . . . . . . . . . . . . . . . . . . . . . . . . . . . . . . . . . . 13 5 Attaching the Pan/Tilt to the Base . . . . . . . . . . . . . . . . . . . . . . . . . . . . . . . . . . . . . . . . . . . . . . . . . . . . . . . . . . . . . . . . . . . . . . . . . . . . . . . . . . . 13 6 DIP Switches. . . . . . . . . . . . . . . . . . . . . . . . . . . . . . . . . . . . . . . . . . . . . . . . . . . . . . . . . . . . . . . . . . . . . . . . . . . . . . . . . . . . . . . . . . . . . . . . . . . . 14 7 Removing the Pan/Tilt Cover . . . . . . . . . . . . . . . . . . . . . . . . . . . . . . . . . . . . . . . . . . . . . . . . . . . . . . . . . . . . . . . . . . . . . . . . . . . . . . . . . . . . . . . 14 8 Properly Seating the Pan/Tilt Covers . . . . . . . . . . . . . . . . . . . . . . . . . . . . . . . . . . . . . . . . . . . . . . . . . . . . . . . . . . . . . . . . . . . . . . . . . . . . . . . . . 15 9 Reinstalling the Pan/Tilt Cover . . . . . . . . . . . . . . . . . . . . . . . . . . . . . . . . . . . . . . . . . . . . . . . . . . . . . . . . . . . . . . . . . . . . . . . . . . . . . . . . . . . . . . 15 10 Wide Dynamic Range Settings. . . . . . . . . . . . . . . . . . . . . . . . . . . . . . . . . . . . . . . . . . . . . . . . . . . . . . . . . . . . . . . . . . . . . . . . . . . . . . . . . . . . . . 31 11 Motion Detection Areas . . . . . . . . . . . . . . . . . . . . . . . . . . . . . . . . . . . . . . . . . . . . . . . . . . . . . . . . . . . . . . . . . . . . . . . . . . . . . . . . . . . . . . . . . . . 41 12 Window Selection Tool. . . . . . . . . . . . . . . . . . . . . . . . . . . . . . . . . . . . . . . . . . . . . . . . . . . . . . . . . . . . . . . . . . . . . . . . . . . . . . . . . . . . . . . . . . . . 44 13 Window Blanking . . . . . . . . . . . . . . . . . . . . . . . . . . . . . . . . . . . . . . . . . . . . . . . . . . . . . . . . . . . . . . . . . . . . . . . . . . . . . . . . . . . . . . . . . . . . . . . . 45 14 Window Blank Tilt Angles . . . . . . . . . . . . . . . . . . . . . . . . . . . . . . . . . . . . . . . . . . . . . . . . . . . . . . . . . . . . . . . . . . . . . . . . . . . . . . . . . . . . . . . . . 46 15 Default Switch Settings . . . . . . . . . . . . . . . . . . . . . . . . . . . . . . . . . . . . . . . . . . . . . . . . . . . . . . . . . . . . . . . . . . . . . . . . . . . . . . . . . . . . . . . . . . . 65
6 |
C1323M (5/12) |

List of Tables
A Low Light Limit Settings . . . . . . . . . . . . . . . . . . . . . . . . . . . . . . . . . . . . . . . . . . . . . . . . . . . . . . . . . . . . . . . . . . . . . . . . . . . . . . . . . . . . . . . . . . . 27 B Presets for American Dynamics Controllers. . . . . . . . . . . . . . . . . . . . . . . . . . . . . . . . . . . . . . . . . . . . . . . . . . . . . . . . . . . . . . . . . . . . . . . . . . . . 38 C Window Blank Settings . . . . . . . . . . . . . . . . . . . . . . . . . . . . . . . . . . . . . . . . . . . . . . . . . . . . . . . . . . . . . . . . . . . . . . . . . . . . . . . . . . . . . . . . . . . 46 D Baud Settings . . . . . . . . . . . . . . . . . . . . . . . . . . . . . . . . . . . . . . . . . . . . . . . . . . . . . . . . . . . . . . . . . . . . . . . . . . . . . . . . . . . . . . . . . . . . . . . . . . . 66 E Switch Settings for SW1 Pelco P-Type Control . . . . . . . . . . . . . . . . . . . . . . . . . . . . . . . . . . . . . . . . . . . . . . . . . . . . . . . . . . . . . . . . . . . . . . . . . 67 F Switch Settings for SW1 Pelco D-Type Control . . . . . . . . . . . . . . . . . . . . . . . . . . . . . . . . . . . . . . . . . . . . . . . . . . . . . . . . . . . . . . . . . . . . . . . . . 68
C1323M (5/12) |
7 |

Important Safety Instructions
1.Read these instructions.
2.Keep these instructions.
3.Heed all warnings.
4.Follow all instructions.
5.Do not block any ventilation openings. Install in accordance with the manufacturer’s instructions.
6.Do not install near any heat sources such as radiators, heat registers, stoves, or other apparatus (including amplifiers) that produce heat.
7.Only use attachments/accessories specified by the manufacturer.
8.Use only with the cart, stand, tripod, bracket, or table specified by the manufacturer, or sold with the apparatus. When a cart is used, use caution when moving the cart/apparatus combination to avoid injury from tip-over.
9.Refer all servicing to qualified service personnel. Servicing is required when the apparatus has been damaged in any way, such as powersupply cord or plug is damaged, liquid has been spilled or objects have fallen into the apparatus, the apparatus has been exposed to rain or moisture, does not operate normally, or has been dropped.
10.Installation should be done only by qualified personnel and conform to all local codes.
11.Unless the unit is specifically marked as a NEMA Type 3, 3R, 3S, 4, 4X, 6, or 6P enclosure, it is designed for indoor use only and it must not be installed where exposed to rain and moisture.
12.Use only installation methods and materials capable of supporting four times the maximum specified load.
13.Use stainless steel hardware to fasten the mount to outdoor surfaces.
14.To prevent damage from water leakage when installing a mount outdoors on a roof or wall, apply sealant around the bolt holes between the mount and mounting surface.
15.AN ALL-POLE MAINS SWITCH with a contact separation of at least 3 mm in each pole shall be incorporated in the electrical installation of the building.
16.A readily accessible disconnect device shall be incorporated in the building installation wiring.
CAUTION: These servicing instructions are for use by qualified service personnel only. To reduce the risk of electric shock do not perform any servicing other that contained in the operating instructions unless you are qualified to do so.
Only use replacement parts recommended by Pelco.
After replacement/repair of this unit’s electrical components, conduct a resistance measurement between the line and exposed parts to verify the exposed parts have not been connected to the line circuitry.
The product and/or manual may bear the following marks:
This symbol indicates that dangerous voltage constituting a risk of electric shock is present within this unit.
This symbol indicates that there are important operating and maintenance instructions in the literature accompanying this unit.
WARNING: HAZARDOUS MOVING PARTS. KEEP FINGERS AND OTHER BODY PARTS AWAY.
CAUTION:
RISK OF ELECTRIC SHOCK.
DO NOT OPEN.
8 |
C1323M (5/12) |

Important Notices
REGULATORY NOTICE
This device complies with Part 15 of the FCC Rules. Operation is subject to the following two conditions: (1) this device may not cause harmful interference, and (2) this device must accept any interference received, including interference that may cause undesired operation.
RADIO AND TELEVISION INTERFERENCE
This equipment has been tested and found to comply with the limits of a Class B digital device, pursuant to Part 15 of the FCC Rules. These limits are designed to provide reasonable protection against harmful interference in a residential installation. This equipment generates, uses, and can radiate radio frequency energy and, if not installed and used in accordance with the instructions, may cause harmful interference to radio communications. However there is no guarantee that the interference will not occur in a particular installation. If this equipment does cause harmful interference to radio or television reception, which can be determined by turning the equipment off and on, the user is encouraged to try to correct the interference by one or more of the following measures:
•Reorient or relocate the receiving antenna.
•Increase the separation between the equipment and the receiver.
•Connect the equipment into an outlet on a circuit different from that to which the receiver is connected.
•Consult the dealer or an experienced radio/TV technician for help.
You may also find helpful the following booklet, prepared by the FCC: “How to Identify and Resolve Radio-TV Interference Problems.” This booklet is available from the U.S. Government Printing Office, Washington D.C. 20402.
Changes and modifications not expressly approved by the manufacturer or registrant of this equipment can void your authority to operate this equipment under Federal Communications Commission’s rules.
This Class B digital apparatus complies with Canadian ICES-003.
Cet appareil numérique de la classe B est conforme à la norme NMB-003 du Canada.
C1323M (5/12) |
9 |

Description
ES40/ES41 ESPRIT SE SERIES WITH IOP
The ES40/ES41 Esprit® SE Series combines a receiver, pan/tilt, enclosure, and integrated optics package (IOP) in a single, easy-to-install system. The integrated optics package contains an auto-focus camera and lens module with configurable features.
The devices are available with an input voltage of 24 VAC or with a selectable power source of 120/230 VAC. The Esprit SE Series devices are constructed of lightweight aluminum and have a heater, window defroster, sun shroud, and insulation blanket.
MODELS
ES4036 |
High resolution, color/black-white camera with infrared cut filter, electronic image stabilization, and 432X zoom |
|
(36X optical zoom and 12X digital zoom) |
ES4136 |
Same as ES4036, except supplied with window wiper |
Model Numbers
Model |
Format |
Pedestal Mount |
Wall Mount |
||||
|
|
|
|
||||
24 VAC |
120/230 VAC |
24 VAC |
120/230 VAC |
||||
|
|
|
|||||
|
|
|
|
|
|
|
|
|
Standard |
NTSC |
ES4036-2N |
ES4036-5N |
ES4036-2W |
ES4036-5W |
|
|
PAL |
ES4036-2N-X |
ES4036-5N-X |
ES4036-2W-X |
ES4036-5W-X |
||
36X Color/B-W |
|
||||||
|
|
|
|
|
|
||
With Wiper |
NTSC |
ES4136-2N |
ES4136-5N |
ES4136-2W |
ES4136-5W |
||
|
|||||||
|
PAL |
ES4136-2N-X |
ES4136-5N-X |
ES4136-2W-X |
ES4136-5W-X |
||
|
|
||||||
|
|
|
|
|
|
|
|
ES40PC/ES41PC ESPRIT SE SERIES WITH PRESSURIZED IOC
The ES40PC/ES41PC Esprit SE Series is designed to protect camera optics and electronics from moisture and airborne contaminants. The devices feature a receiver, pan/tilt, enclosure, and a pressurized integrated optics cartridge (IOC). The integrated optics cartridge packages an auto focus camera, lens, heater, and sensors in a small, self-contained unit pressurized to 10 pound-force per square inch gauge (psig) with dry nitrogen.
MODELS
ES40P36 |
High resolution, color/black-white camera with infrared cut filter, electronic image stabilization, and 432X zoom |
|
(36X optical zoom and 12X digital zoom) |
ES41P36 |
Same as ES40P36, except supplied with window wiper |
Model Numbers
Model |
Format |
Pedestal Mount |
Wall Mount |
||||
|
|
|
|
||||
24 VAC |
120/230 VAC |
24 VAC |
120/230 VAC |
||||
|
|
|
|||||
|
|
|
|
|
|
|
|
|
Standard |
NTSC |
ES40P36-2N |
ES40P36-5N |
ES40P36-2W |
ES40P36-5W |
|
|
PAL |
ES40P36-2N-X |
ES40P36-5N-X |
ES40P36-2W-X |
ES40P36-5W-X |
||
36X Color/B-W |
|
||||||
|
|
|
|
|
|
||
With Wiper |
NTSC |
ES41P36-2N |
ES41P36-5N |
ES41P36-2W |
ES41P36-5W |
||
|
|||||||
|
PAL |
ES41P36-2N-X |
ES41P36-5N-X |
ES41P36-2W-X |
ES41P36-5W-X |
||
|
|
||||||
|
|
|
|
|
|
|
|
10 |
C1323M (5/12) |
Installation
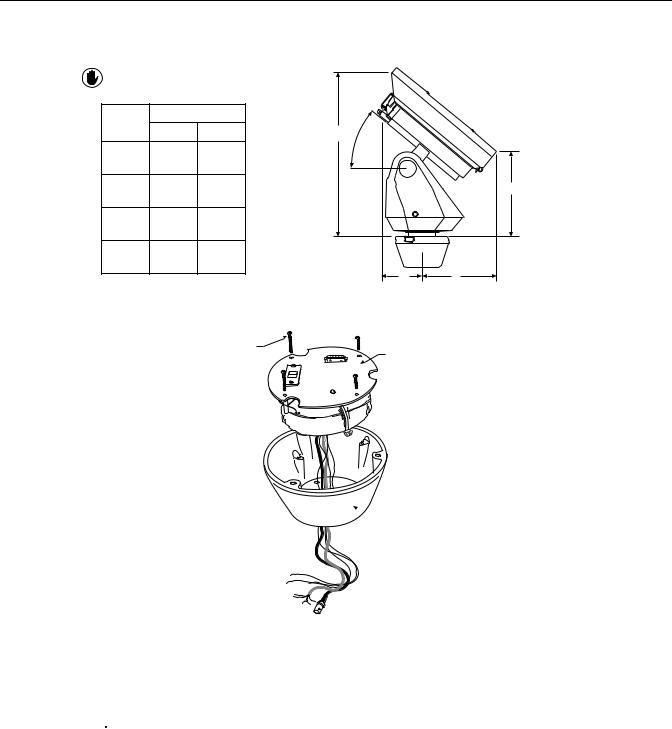
1.When installing the ES40/ES41 or ES40P/ES41P Esprit SE device, allow for sufficient clearance between the top of the unit and overhead obstructions. This will prevent interference when the enclosure is driven to its maximum elevation of 36 degrees.
VALUES IN PARENTHESES ARE INCHES;
ALL OTHERS ARE CENTIMETERS.
Position |
Model |
|
|
|
ES40 |
ES41 |
A |
|
|
|
|
|||
|
42.5 |
42.9 |
36.0 |
|
A |
|
|
||
(16.6) |
(16.9) |
|
|
|
|
|
|
||
B |
23.9 |
24.6 |
|
B |
(9.4) |
(9.7) |
|
||
|
|
|
||
C |
18.1 |
19.2 |
|
|
(7.1) |
(7.6) |
|
|
|
|
|
|
||
D |
10.7 |
11.7 |
|
|
(4.2) |
(4.6) |
|
|
|
|
D |
C |
||
|
|
|
||
2. Remove the transformer module from the base of the device by loosening the four Phillips screws and lifting the module.
LOOSEN |
TRANSFORMER |
|
PHILLIPS |
||
MODULE |
||
SCREWS |
||
|
 BASE
BASE
Figure 1. Removing the Transformer Module
3.Attach the base of the device to an Esprit mount (EWM or EPP):
a.Apply a drop of Loctite® thread compound (supplied) to each of the three mounting holes and 10-32 x 1/2-inch flathead screws (supplied).
 WARNING: Applying the Loctite thread compound is an important step in the installation process. Failure to apply Loctite to the mounting holes may increase the risk of damage to the unit
C1323M (5/12) |
11 |
b.Attach the base of the device to the mount using the three screws and washers.
120/230 VOLTAGE SELECTOR SWITCH
Figure 2. Attaching the Base to a Mount
4.Route the wires and cables through the center of the Esprit mount. Reinstall the transformer module into the base. The transformer module can be positioned in the mount base in only one orientation.
MOUNTING
SCREWS
 MOUNT
MOUNT
MOUNTING HOLES
BASE
Figure 3. Reinstalling the Transformer Module
5.Models with 120/230 VAC only: Set the 120/230 voltage selector switch on the transformer to the appropriate voltage.
6.Connect wires and cables.
a. Connect to power. Use the two supplied clamp connectors to connect the AC line and neutral.
120/230 VAC
Black wire |
Input (AC Line) |
|
|
White wire |
AC Neutral |
|
|
Green wire |
Ground |
|
|
|
24 VAC |
|
|
|
|
White wire |
|
Input (AC Line) |
|
|
|
White wire |
|
AC Neutral |
|
|
|
Green wire |
|
Ground |
|
|
|
b.Connect the video coaxial cable to the BNC connector.
c.Connect the wiring for a two-wire or four-wire control system. This step does not apply to Coaxitron® control systems.
Green wire |
RX– |
|
|
Red wire |
RX+ |
|
|
Black wire |
TX– |
|
|
White wire |
TX+ |
|
|
12 |
C1323M (5/12) |

d.Connect AUX 2 (optional).
Orange wire |
AUX 2 |
|
|
|
|
Blue wire |
AUX 2 COMMON |
|
|
|
USER |
|
ESPRIT |
|
|
ACCESSORY |
|
|
|
K1
OMRON G5V-1-DC12
D1
1N4005
|
|
|
|
|
|
AUX 2 |
|
AUX 2 |
|
|
|
|
|
|
ORANGE WIRE |
|
|
|
|
|
|
|
|
AUX 2 COM |
AUX 2 COM |
|
|
|
|
|
|
|
|||
|
|
|
|
|
|
BLUE WIRE |
|
|
|
|
|
|
|
|
|
|
|
|
|
|
|
|
|
|
|
|
NOTE: CURRENT MUST NOT EXCEED 40 mA.
V1
32 VDC
Figure 4. Wiring AUX 2
7.Install mount; refer to the installation manual supplied with the mount for instructions.
8.Turn on the power. If the red LED lights, turn off the power and proceed to the next step. If the red LED does not light, refer to
Troubleshooting on page 61.
9.Plug the male Esprit system connector, located on the bottom of the pan/tilt, into the female Esprit system connector located on the transformer module. Align the pan/tilt part number with the alignment label of the base, and then attach the pan/tilt to the base with three 1/4-20 nuts and washers (supplied).
PART
NUMBER
MALE SYSTEM 
CONNECTOR
|
FEMALE |
|
SYSTEM |
ALIGNMENT |
CONNECTOR |
LABEL |
|
Figure 5. Attaching the Pan/Tilt to the Base
C1323M (5/12) |
13 |

10.Set the receiver address and system baud rate by configuring DIP switches SW1 and SW2.
NOTE: Switch settings have no effect on Coaxitron control signals. The device will sense and automatically select input from Coaxitron control signals in either standard or extended mode.
To set the DIP switches:
a.Remove the plug from the left cover of the pan/tilt. It is not necessary to remove the pan/tilt cover.
b.Set the baud rate (SW1) and receiver address (SW2). For switch settings refer to the labels located on the inside lid of the housing or Table D on page 66 and Table E in the Appendix A on page 65.
c.Replace the plug.
O N |
|
|
|
|
|
|
|
|
|
SW2 |
|
|
|
|
|
|
|
|
|
1 |
2 |
3 |
4 |
5 |
6 |
7 |
8 |
9 |
10 |
O N |
|
|
|
|
|
|
|
|
|
SW1 |
|
|
|
|
|
|
|
|
|
1 |
2 |
3 |
4 |
5 |
6 |
7 |
8 |
|
|
Figure 6. DIP Switches
11. Refer to Operation on page 16 and Menu Tree on page 20 for instructions on how to use your device.
OPTIONAL TXB SERIES TRANSLATOR BOARD INSTALLATION
Pelco’s TXB Series translator boards allow controllers from other companies to communicate with the device.
To install a TXB Series board, remove the left cover of the pan/tilt. Once the cover is removed, refer to the manual supplied with the translator board to complete the installation.
HOW TO REMOVE THE PAN/TILT COVER
1.Unscrew the Phillips screw located on the left cover of the pan/tilt.
2.Remove and set aside the cover.

 PHILLIPS
SCREW
Figure 7. Removing the Pan/Tilt Cover
14 |
C1323M (5/12) |
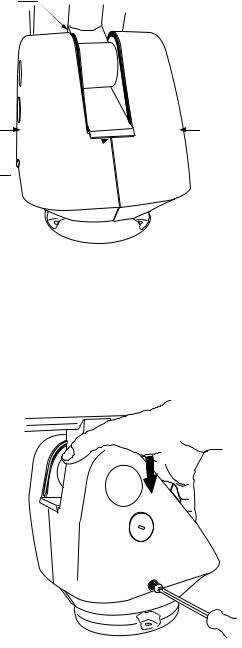
HOW TO REINSTALL THE PAN/TILT COVER
The pan/tilt covers must be properly seated and have a tight seal (all the way around) when installed.
NOT SEALED
THIS SIDE IS |
THIS SIDE IS |
IMPROPERLY |
PROPERLY |
INSTALLED |
INSTALLED |
GAP |
|
Figure 8. Properly Seating the Pan/Tilt Covers
To reinstall the pan/tilt cover, do the following:
1.Properly position the cover and slide it into place. The sides of the cover must fit under the front and back rain guards of the pan/tilt, and the top of the cover must seat against the lip of the top gasket.
2.Apply pressure and push down the top of the cover to align the fastener holes.
3.Insert the Phillips screw and tighten. Tighten until the screw will not turn.
TOP GASKET 
FRONT 
RAIN
GUARD
Figure 9. Reinstalling the Pan/Tilt Cover
C1323M (5/12) |
15 |

Operation
POWER-UP DISPLAY
When the device is powered up, the selected protocol, revision number, and other information is displayed on the monitor. For example, the screen might show the following information:
PELCO ESPRIT SE
VERSION 2.50
D ADDRESS 1
P ADDRESS 2
COMM 9600,N,8,1
CONFIGURE DONE
=============
12345678 |
1234567890 |
|
SW1[-------- |
] SW2[---------- |
] |
The information remains on the monitor until the device receives a command.
QUICK OPERATION GUIDE
Pan and Tilt |
Move the joystick or press the direction keys left/right and up/down. |
||
Zoom Far |
To zoom far: |
|
|
|
1. |
Press the Zoom Tele button or turn the joystick clockwise until zoom stops at the optical zoom limit. |
|
|
2. |
Release the button or joystick for one second. |
|
|
3. |
To continue zooming (digitally), press the button or turn the joystick clockwise again until you have the picture you want |
|
|
|
or reach the digital zoom* limit. |
|
Zoom Wide |
Press the Zoom Wide button or turn the joystick counterclockwise. |
||
Scanning |
Stop Scan |
Preset 96 |
|
|
Random Scan |
Preset 97 |
|
|
Frame Scan |
Preset 98 |
|
|
Auto Scan |
Preset 99 |
|
Presets |
Refer to the documentation supplied with the control system. |
||
Patterns† |
Refer to the documentation supplied with the control system. |
||
Zones |
Refer to Zones on page 43 and to the documentation supplied with the control system. |
||
QUICK CONFIGURATION GUIDE
1.Configure preset 95 to access the main menu (refer to Preset 95: Accessing Main Menu on page 17).
2.Use the joystick to position the cursor beside the menu selection.
NOTE: If your controller does not have a joystick, use the up or down key.
3.Press Iris Open, the submenu/cursor moves to the right.
4.Move the joystick up or down to view the selections.
5.Press Iris Open to enter the selection.
6.Press Iris Close to cancel the selection.
*Digital zoom magnifies the image electronically and the picture may appear pixilated. The larger the digital zoom limit the greater the reduction in resolution.
† The device cannot perform electronic zoom in a pattern. Optical zoom will operate in a pattern.
16 |
C1323M (5/12) |
PAN/TILT FUNCTIONS
Controller |
Pan |
Tilt |
Type |
(Capability: 360° Continuous Pan Rotation)† |
(Viewing Range: +36° to –85°) |
Fixed speed |
Speed determined by controller |
Speed determined by controller |
|
|
|
Variable speed* |
0.1 to 40° per second, depending on joystick and zoom |
0.1 to 30° per second, depending on joystick and zoom |
|
positions |
positions |
Turbo Mode* |
100° per second |
Does not affect the tilt speed |
Preset Mode* |
100° per second |
30° per second |
|
|
|
*80 kph (50 mph) wind-speed profile.
†If manual limit stops are set, “Pan Limit” appears on your monitor when a limit stop is reached (except when you are configuring or running a pattern). This does not apply to scan limit stops.
If the proportional pan mode is enabled (refer to Proportional Pan on page 32), the pan/tilt speeds will depend on the amount of zoom. At telephoto zoom settings, the pan/tilt speeds will be slower for a given amount of joystick deflection than at wide zoom settings. This keeps the image from moving too fast on the monitor when there is a large amount of zoom. This slowing does not happen when going to a preset but does occur in Turbo mode when high zoom is selected. The minimum pan/tilt speeds are 0.1 degree per second at full zoom.
WIPER
The ES41C Series features a window wiper to clear moisture from the enclosure glass. There are two modes of operation for the wiper: momentary and continuous. The wiper mode is easily set up through on-screen configuration (refer to Wiper on page 47).
To operate the wiper do the following:
Momentary mode: To operate the wiper one full cycle, press the AUX 1 button on your controller. Each press of the button operates the wiper one full cycle, even if the AUX 1 button is latching. If AUX 1 is latching, the first press will activate the wiper (open the latch). Pressing AUX 1 a second time closes the latch, but will not cycle the wiper. Press the AUX 1 key again to cycle the wiper.
Continuous mode: To operate the wiper press the AUX 1 button on your controller. The wiper will continue to operate until the AUX 1 button is pressed again or until the configured cycle is completed.
NOTE: (CM9740 and CM9760 matrix systems only) For the wiper to operate in continuous mode, the AUX 1 function in the camera file must be set to latching. If the AUX 1 camera file is not latching, the wiper will only operate in momentary mode, even if the Esprit wiper is configured for continuous operation. Refer to the operation manual supplied with the CM9740 or CM9760 matrix system for instructions.
PRESET 95: ACCESSING MAIN MENU
You can call up the main menu on your monitor by configuring (setting or creating) preset 95 (preset 28 in AD-32 preset mode).
Configuring preset 95 for Pelco’s controllers varies according to the type of controller you are using. Instructions for configuring preset 95 are given below for various Pelco controllers.
CM6700/CM6800
1.Enter the number of the Esprit SE device and press the CAM key.
2.Enter 95 and hold the PRESET key for two seconds.
3.In the Edit Preset menu, go to SET and press the ACK key. The main menu appears.
KBD200A/KBD300A: Direct Mode Only
1.Enter 95.
2.Hold the PRESET key (approximately five seconds) until the main menu appears on the screen.
C1323M (5/12) |
17 |
CM9500
1.Enter the number of the Esprit SE device and press the CAM key. The main menu appears.
2.Highlight SETUP in the main menu and press the SELECT key.
3.Highlight CAM in the Setup menu and press the SELECT key.
4.Highlight PRESET in the Camera menu and press the SELECT key.
5.Enter 95 and press the F1 key. The main menu appears.
CM9740/CM9760/CM9770/CM9780
1.Press the ESCAPE key to open the main menu. Select DEF. The Define submenu appears.
2.Enter your four-digit PIN if this is your first time entering this mode.
3.Enter 95 and select PRST. The main menu appears.
4.Select the Quit icon to return to the default menu.
KBD4000/KBD4002
1.Press the SPOT MONITOR key.
2.Enter 95, then hold the PRESET key (approximately five seconds) until the main menu appears on the screen.
MPT9500
Standard Coaxitron Mode
1.Enter 95 and press the PRESET SET key.
2.Position the asterisk in the YES row and press the F1 key. The main menu appears.
Extended Coaxitron or RS-485 Mode
1.Enter 95 and press the PRESET SET key.
2.Press the F2 key. The main menu appears.
NET300/NET350/NET4001A
1.Check the Set box.
2.Click the preset 95 button. The main menu appears.
ENDURA WORKSTATION
1.Right-click in the video pane of the Esprit SE device.
2.Click Preset and then click Select Preset.
3.Enter 95 and then click OK.
VCD5000
1.Enter 95 for the preset action. The shortcuts menu appears.
2.Press the Preset button on the KBD5000.
18 |
C1323M (5/12) |
DIGITAL SENTRY® SYSTEM SOFTWARE
1.Click the PTZ tab.
2.Click the right or left arrows below the Go to Preset button until Go to Preset 95 appears on the button.
3.Click the Go to Preset 95 button. The main menu appears.
DIGITAL SENTRY DS CONTROLPOINT
1.Click the PTZ Controls icon. The PTZ Control tab appears below the PTZ video frame.
2.Click the up and down arrows to display 95 in the Preset Name text box.
3.Click the Call button. The main menu appears.
DVR5100
1.While in live view mode, select a video pane that is displaying video from a Esprit SE device.
2.From the Main menu, click Actions. The Actions menu appears.
3.From the Actions menu, click PTZ Operations. The PTZ Operations dialog box appears.
4.In the PTZ Operations dialog box, type 95 in the text box, and then click Presets. The main menu appears.
DX4100/DX4500/DX4600/DX8100
1.Click the PTZ button on the toolbar. The PTZ control appears.
2.Click the Program button on the PTZ control. The main menu appears.
C1323M (5/12) |
19 |

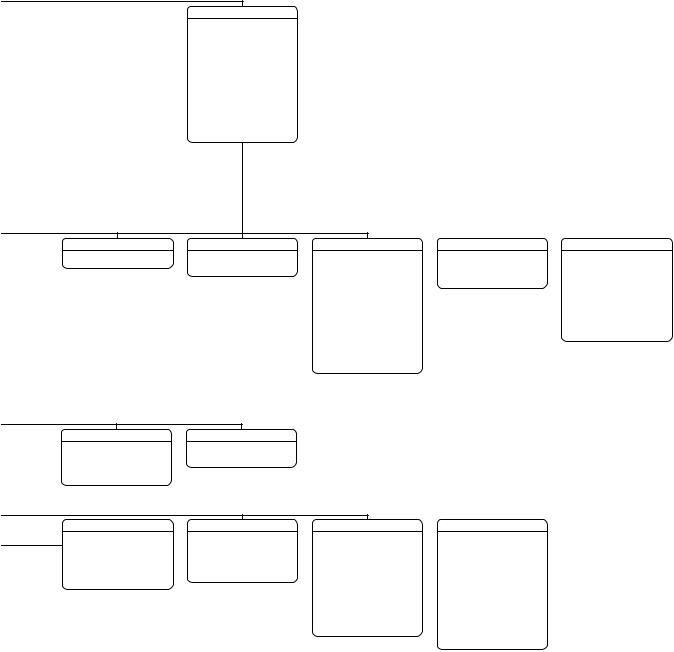
Menu Tree
PELCO ESPRIT SE
LANGUAGE |
ENGLISH |
<SYSTEM INFORMATION> |
|
<DISPLAY SETUP> |
|
<SETTINGS> |
|
ACK ALERT* |
|
RESET CAMERA |
|
CYCLE CAMERA POWER |
|
REBOOT SYSTEM |
|
SYSTEM INFORMATION DISPLAY SETUP
SERIAL # |
XXXXXXXXXXXXXX |
|
MODEL |
|
XX-XXXX |
SOFTWARE VERSION |
XX.X |
|
BUILD |
|
XX.X |
FONT VERSION |
|
|
COMM |
|
XXXXXXXXXX |
D ADDRESS |
|
1 |
P ADDRESS |
|
2 |
CM95OO MODE |
|
OFF |
32 PRESETS |
|
OFF |
PROTOCOL |
|
C |
PRESSURIZED* |
|
X.XX |
<ADDITIONAL> |
|
|
ADDITIONAL
FREE MEMORY |
|
XXXXXX |
LAST RESET |
|
POWER ON |
AZIMUTH ZERO OFFSET |
0° |
|
MOTOR ACTIVE |
|
YES |
CAMERA ACTIVE |
|
YES |
VIDEO LEVEL |
|
NORMAL |
CAMERA MODEL |
|
XXXX-XXXX |
LANGUAGE 1 |
ENGLISH X.XX |
|
. . . |
|
|
LANGUAGE 10 |
ITALIANO X.XX |
|
<DIP SWITCH INFORMATION>
DIP SWITCH INFORMATION
12345678 |
1234567890 |
|
SW1[-------- |
] SW2[---------- |
] |
SW1 1-8:
D ADDRESS 1
P ADDRESS 2
SW2 1 : 32 PRESETS, OFF SW2 2 : CM9500 MODE, OFF SW2 3 : COAX SPCL COMM SW2 4-5 : RS422 <->
SW2 6-8 : COMM. 2400.N.8.1 SW2 9 : UTC SOURCE, COAX SW2 10 : TX/RX TERM, OFF
PRESS IRIS OPEN TO CONTINUE
PRESET LABEL |
2 (SECS) |
ZONE LABEL |
2 (SECS) |
ZOOM |
2 (SECS) |
AZIMUTH/ELEVATION |
2 (SECS) |
DIRECTION |
OFF |
DATE/TIME |
ON |
EVENT LABEL |
2 (SECS) |
<LABEL POSITIONS> RESTORE FACTORY DEFAULTS
LABEL POSITION
[ZONE LABEL-------] [PRESET LABEL-------] [ALERT MESSAGE---]* [TITLE TEXT]
SAVE AND EXIT CANCEL
HELP
NE XXX°/-XX°
MM/DD/YYYY XXX.X* 

12:00:00 AM
CAMERA |
|
|
ADVANCED SETTINGS |
|
TYPE OF LIGHTING |
T1 |
|
SHUTTER SPEED |
AUTO |
PICTURE MODE |
NORMAL |
|
AGC LIMIT |
28 |
AUTO FOCUS |
ON |
|
AUTO IRIS |
AUTO |
SURE FOCUS |
OFF |
|
AUTO IRIS LEVEL |
66 |
PT FOCUS LOCK |
OFF |
|
AUTO IRIS PEAK |
8 |
ZOOM LIMIT |
XXXX |
|
AUTO SHARPNESS |
ON |
ZOOM SPEED |
XXXX |
|
SHARPNESS LEVEL |
26 |
LOW LIGHT LIMIT |
XXXXXX |
|
AUTO WHITE BALANCE |
ON |
IR CUT FILTER |
XXXX |
|
R GAIN |
255 |
AUTO IR LEVEL |
DUSK |
|
B GAIN |
255 |
LOW LIGHT FOCUS |
OFF |
|
BACKLIGHT COMP |
OFF |
|
|
|
E. IMAGE STABILIZER |
OFF |
<ADVANCED SETTINGS> |
|
|
WIDE DYNAMIC RANGE |
OFF |
|
|
|
NEXT |
|
|
|
|
BACK |
|
|
|
|
EXIT |
|
|
|
|
VIDEO LEVEL |
HIGH |
|
|
|
FIELD ALIGN |
OFF |
|
|
|
LOW LUX NOISE REDUCTION |
ON |
|
|
|
LOW LIGHT SHARPNESS DEFAULT |
|
|
|
|
MINIMUM FOCUS DISTANCE |
30 CM |
|
|
|
ZOOM FOCUS TRACE |
NIGHT |
MOTION
PROPORTIONAL PAN |
ON |
PARK TIME (MINUTES) |
0 |
PARK ACTION |
NONE |
SCAN SPEED (DEG/S) |
25 |
PRESET FREEZE FRAME |
AUTO |
LIMIT STOPS |
ON |
<SET MANUAL STOPS> |
|
<CLEAR MANUAL STOPS> |
|
<SET SCAN STOPS> |
|
<CLEAR SCAN STOPS> |
|
<SET AZIMUTH ZERO> |
|
<CLEAR AZIMUTH ZERO> |
|
REFERENCE INFORMATION |
|
MANUAL LIMITS SET |
|
SCAN LIMITS SET |
|
AUTO TRACKING
AUTO TRACKING |
OFF |
DISPLAY SETUP |
ON |
SENSITIVITY |
HIGH |
START TIME |
60 |
ZOOM |
ON |
LOST ACTION |
STOP |
RETURN |
OFF |
PATTERNS |
|
ZONES |
|
WINDOW BLANKING |
|
|
SET WINDOWS |
|
PATTERN NUMBER |
1 |
ZONE NUMBER |
1 |
STYLE |
GRAY |
|
WINDOW NUMBER |
1 |
<PROGRAM PATTERN> |
|
***ZONE NOT DEFINED*** |
|
BLANK ALL ABOVE |
OFF |
|
<EDIT WINDOW LOCATION> |
|
<CLEAR PATTERN> |
|
<EDIT ZONE LABEL> |
|
BLANK ALL BELOW |
OFF |
|
<EDIT WINDOW ZOOM> |
|
<EDIT SCHEDULE> |
|
<EDIT ZONE> |
ON |
<SET WINDOWS> |
|
|
<EDIT SCHEDULE> |
NO |
|
|
ZONE ENABLED |
|
|
|
ENABLE WINDOW |
||
REFERENCE INFORMATION |
|
ZONE BLANKING |
OFF |
|
|
|
REVERSE |
|
PATTERN USAGE |
0% |
<CLEAR ZONE> |
|
|
|
|
CLEAR WINDOW |
|
REMAINING |
100% |
|
|
|
|
|
|
|
ALERT* |
|
|
CURRENT READING |
CLEAR |
PASSWORD |
|
REPEAT |
CONSTANT |
|
TEMPERATURE |
CLEAR ALL ZONES |
ENABLE PASSWORD |
OFF |
ACK ACTION |
ALWAYS ON |
|
DEWPOINT |
CLEAR ALL PRESETS |
<EDIT PASSWORD> |
|
ACTIVATE AUX |
NO |
|
PRESSURE |
CLEAR ALL PATTERNS |
|
|
<CURRENT READING> |
|
|
REFRESH |
CLEAR ALL WINDOW BLANKING |
|
|
RESET ALERT |
|
|
|
CLEAR ALL EVENTS |
|
|
|
|
|
|
RESTORE FACTORY DEFAULTS |
|
|
*This setting applies to pressurized devices only. Devices that are not pressurized will not display this menu item.
NOTE: The BACK and EXIT options do not appear in these menus due to space limitations. See the individual menus in this document for complete configurations.
20 |
C1323M (5/12) |
SETTINGS
<CAMERA> <MOTION>
<AUTO TRACKING> <POWER UP> <LINE SYNC> <PRESETS> <PATTERNS> <ZONES>
<WINDOW BLANKING> <AUX>
<TITLE TEXT> <ALERT>* <CLEAR> <PASSWORD> <CLOCK> <EVENT>
POWER UP |
|
LINE SYNC |
|
PRESETS |
|
MOTION DETECTION |
|
EDIT DETECTION AREAS |
|
POWER UP ACTION |
AUTO |
LINE SYNC |
ON |
PRESET NUMBER |
|
MOTION DETECTION ENABLED |
|
DETECTION AREA 1 |
|
|
|
LINE SYNC PHASE |
0 |
***PRESET NOT DEFINED*** |
|
<EDIT DETECTION AREAS> |
|
LOCATION |
0 |
|
|
|
|
<CREATE ACTION PRESET> |
|
ACTIVATE AUX |
|
SENSITIVITY |
MEDIUM |
|
|
|
|
<EDIT PRESET LABEL> |
|
AUX TIME (SECS) |
|
DETECTION AREA 2 |
|
|
|
|
|
<EDIT PRESET SCENE> |
|
|
|
LOCATION |
0 |
|
|
|
|
<EDIT CAMERA SETTINGS> |
|
|
|
SENSITIVITY |
MEDIUM |
|
|
|
|
<MOTION DETECTION> |
|
|
|
DETECTION AREA 3 |
|
|
|
|
|
<EDIT SCHEDULE> |
|
|
|
LOCATION |
0 |
|
|
|
|
<CLEAR PRESET> |
|
|
|
SENSITIVITY |
MEDIUM |
|
|
|
|
<CLEAR CAMERA SETTINGS> |
|
|
|
DETECTION AREA 4 |
|
|
|
|
|
|
|
|
|
LOCATION |
0 |
|
|
|
|
REFERENCE INFORMATION |
|
|
|
SENSITIVITY |
MEDIUM |
|
|
|
|
|
|
|
|
|
|
|
|
|
|
AZIMUTH |
|
|
|
|
|
|
|
|
|
ELEVATION |
|
|
|
|
|
|
|
|
|
ZOOM |
|
|
|
|
|
|
|
|
|
CUSTOM CAMERA SETTINGS |
|
|
|
|
|
AUX |
|
TITLE TEXT |
WIPER MODE |
MOMENTARY |
ENABLE TITLE TEXT |
AUX 2 MODE |
TOGGLE |
<EDIT TITLE TEXT> |
DWELL TIME (SECS) |
1 |
|
<EDIT SCHEDULE> |
|
|
EDIT THE PASSWORD |
|
CLOCK |
|
EVENT |
|
EDIT EVENT |
||
1234567890 |
OK |
TIME BASE |
INTERNAL CLOCK |
EVENT TYPE |
|
EVENT LABEL |
EVENT 1 |
|
ABCDEFGHIJ |
CANCEL |
TIME FORMAT |
|
12 HOUR |
EVENT LABEL |
|
EVENT ACTIVE |
ON |
KLMNOPQRST |
|
SET TIME |
|
12:00 AM |
|
|
||
UVWXYZ.,-/ |
BACKSPACE |
DATE FORMAT |
|
MM/DD/YYYY |
<EDIT EVENT LABEL> |
|
EVENT TIME |
12:00 AM |
abcdefghij |
SPACE |
SET DATE |
|
00/00/0000 |
<EDIT EVENT> |
|
EVENT OCCURS |
|
klmnopqrst |
|
DAYLIGHT SAVINGS |
OFF |
<CLEAR EVENT> |
|
SUNDAY |
ON |
|
uvwxyz#&:* |
|
|
|
|
<LIST EVENT> |
|
MONDAY |
ON |
|
|
|
|
|
|
|
TUESDAY |
ON |
|
|
|
|
|
HOLIDAY |
|
WEDNESDAY |
ON |
|
|
|
|
|
<EDIT HOLIDAY> |
|
THURSDAY |
ON |
|
|
|
|
|
<CLEAR HOLIDAY> |
|
FRIDAY |
ON |
|
|
|
|
|
<LIST HOLIDAYS> |
|
SATURDAY |
ON |
|
|
|
|
|
REFERENCE INFORMATION |
|
HOLIDAY |
SKIP HOLIDAYS |
|
|
|
|
|
|
EVENT TYPE |
PRESET |
|
|
|
|
|
|
|
|
||
|
|
|
|
|
|
|
NUMBER |
1 |
C1323M (5/12) |
21 |
Language
PELCO ESPRIT SE
LANGUAGE
<SYSTEM INFORMATION> <DISPLAY SETUP> <SETTINGS>
ACK ALERT*
RESET CAMERA
CYCLE CAMERA POWER
REBOOT SYSTEM
EXIT
The language for the on-screen menus is selectable. Available languages include English, Spanish, French, German, Italian, Portuguese, Russian, Polish, Turkish, and Czech. The factory default language is English.
To change the display language:
1.Use the joystick to position the cursor beside LANGUAGE.
2.Press Iris Open. The cursor moves to the right, beside the current, selected language.
3.Move the joystick up or down to view the selections. Press Iris Open to enter the selection. All on-screen menus are changed to the selected language.
*This setting applies to pressurized devices only.
22 |
C1323M (5/12) |

System Information
PELCO ESPRIT SE
LANGUAGE
<SYSTEM INFORMATION> <DISPLAY SETUP> <SETTINGS>
ACK ALERT*
RESET CAMERA
CYCLE CAMERA POWER REBOOT SYSTEM
EXIT
SYSTEM INFORMATION
SERIAL #
MODEL
SOFTWARE VERSION
BUILD
FONT VERSION
COMM
D ADDRESS P ADDRESS
CM9500 MODE 32 PRESETS PROTOCOL PRESSURIZED* <ADDITIONAL>
BACK
EXIT
ADDITIONAL
FREE MEMORY LAST RESET
AZIMUTH ZERO OFFSET MOTOR ACTIVE CAMERA ACTIVE VIDEO LEVEL
CAMERA MODEL LANGUAGE 1 LANGUAGE 2 LANGUAGE 3 LANGUAGE 4 LANGUAGE 5 LANGUAGE 6 LANGUAGE 7 LANGUAGE 8 LANGUAGE 9 LANGUAGE 10
<DIP SWITCH INFORMATION>
BACK
EXIT
The System Information menu displays the model, software version, available memory, DIP switch information, and other diagnostic information.
System settings cannot be changed using this menu; this information is for reference only.
Use the following steps to display the System Information menu:
1.Use the joystick to position the cursor beside SYSTEM INFORMATION.
2.Press Iris Open. The SYSTEM INFORMATION menu opens.
DIP SWITCH INFORMATION
The DIP Switch Information menu displays the current DIP switch settings. This provides a way to remotely view the DIP switch settings without removing accessing the device.
DIP SWITCH INFORMATION
12345678 |
1234567890 |
|
SW1[-------- |
] SW2[---------- |
] |
SW1 1-8:
D ADDRESS 1
P ADDRESS 2
SW2 1 : 32 PRESETS, OFF
SW2 2 : CM9500 MODE, OFF
SW2 3 : COAX SPCL COMM
SW2 4-5 : RS422 <->
SW2 6-8 : COMM. 2400.N.8.1
SW2 9 : UTC SOURCE, COAX
SW2 10 : TX/RX TERM, OFF
PRESS IRIS OPEN TO CONTINUE
*This setting applies to pressurized devices only.
C1323M (5/12) |
23 |

Display Setup
PELCO ESPRIT SE
LANGUAGE
<SYSTEM INFORMATION> <DISPLAY SETUP> <SETTINGS>
ACK ALERT*
RESET CAMERA
CYCLE CAMERA POWER REBOOT SYSTEM
EXIT
DISPLAY SETUP
PRESET LABEL ZONE LABEL ZOOM
AZIMUTH/ELEVATION DIRECTION DATE/TIME
EVENT LABEL <LABEL POSITIONS>
RESTORE FACTORY DEFAULTS
BACK
EXIT
Display setup allows you to configure how labels are displayed on the monitor. The following labels are available:
PRESET LABEL: Identifies preset.
ZONE LABEL: Identifies zone.
ZOOM: Identifies the amount of magnification.
AZIMUTH†/ELEVATION‡: Amount of pan from zero degrees vertical and the amount of tilt from zero degrees horizontal.
DIRECTION: Displays compass direction.
DATE/TIME: Displays current date and time.
EVENT LABEL: Displays activated event.
A preset label is displayed when a preset is called. A zone label is displayed when the device moves into a zone. The zoom ratio label is displayed when zoom is activated. Azimuth/elevation and direction labels are displayed when pan/tilt is activated. An alarm message appears on the monitor when an alarm occurs. An event label appears on the monitor when an event occurs.
The following settings are available for each label except date and time:
OFF: Label is not displayed when activated.
CONSTANT: The label is continually displayed when activated.
2 SECONDS: The label is displayed for 2 seconds after activation.
5 SECONDS: The label is displayed for 5 seconds after activation.
10 SECONDS: The label is displayed for 10 seconds after activation.
The settings for date and time are ON or OFF.
*This setting applies to pressurized devices only.
†Azimuth is the pan angle from zero to 359 degrees.
‡Elevation is the tilt position from zero (horizon) to –90 degrees.
24 |
C1323M (5/12) |
Loading...