


 Loading...
I N S T A L L A T I O N
DX4000
Digital Video Recorder
C2601M-A (6/06)

Contents
Description . . . . . . . . . . . . . . . . . . . . . . . . . . . . . . . . . . . . . . . . . . . . . . . . . . . . . . . . . . . . . . . . . . . . . . . . . . . . . . . . . . . . . . . . . . . . . . . . . . . . . . . . . .5
Features . . . . . . . . . . . . . . . . . . . . . . . . . . . . . . . . . . . . . . . . . . . . . . . . . . . . . . . . . . . . . . . . . . . . . . . . . . . . . . . . . . . . . . . . . . . . . . . . . . . . . . . .6
Models . . . . . . . . . . . . . . . . . . . . . . . . . . . . . . . . . . . . . . . . . . . . . . . . . . . . . . . . . . . . . . . . . . . . . . . . . . . . . . . . . . . . . . . . . . . . . . . . . . . . . . . . .6
About This Manual . . . . . . . . . . . . . . . . . . . . . . . . . . . . . . . . . . . . . . . . . . . . . . . . . . . . . . . . . . . . . . . . . . . . . . . . . . . . . . . . . . . . . . . . . . . . . . .6
Before You Begin . . . . . . . . . . . . . . . . . . . . . . . . . . . . . . . . . . . . . . . . . . . . . . . . . . . . . . . . . . . . . . . . . . . . . . . . . . . . . . . . . . . . . . . . . . . . . . . . . . . . .7
Package Contents . . . . . . . . . . . . . . . . . . . . . . . . . . . . . . . . . . . . . . . . . . . . . . . . . . . . . . . . . . . . . . . . . . . . . . . . . . . . . . . . . . . . . . . . . . . . . . . .7
Front Panel Layout . . . . . . . . . . . . . . . . . . . . . . . . . . . . . . . . . . . . . . . . . . . . . . . . . . . . . . . . . . . . . . . . . . . . . . . . . . . . . . . . . . . . . . . . . . . . . . . . . . . .8 Video Control Buttons on the Front Panel of the DX4000 . . . . . . . . . . . . . . . . . . . . . . . . . . . . . . . . . . . . . . . . . . . . . . . . . . . . . . . . . . . . . . . . . .9
Remote Control Layout . . . . . . . . . . . . . . . . . . . . . . . . . . . . . . . . . . . . . . . . . . . . . . . . . . . . . . . . . . . . . . . . . . . . . . . . . . . . . . . . . . . . . . . . . . . . . . . .10
Connecting Devices to the DX4000 . . . . . . . . . . . . . . . . . . . . . . . . . . . . . . . . . . . . . . . . . . . . . . . . . . . . . . . . . . . . . . . . . . . . . . . . . . . . . . . . . . . . . .11
Overview of the System . . . . . . . . . . . . . . . . . . . . . . . . . . . . . . . . . . . . . . . . . . . . . . . . . . . . . . . . . . . . . . . . . . . . . . . . . . . . . . . . . . . . . . . . . . . . . . .13
Operation . . . . . . . . . . . . . . . . . . . . . . . . . . . . . . . . . . . . . . . . . . . . . . . . . . . . . . . . . . . . . . . . . . . . . . . . . . . . . . . . . . . . . . . . . . . . . . . . . . . . . . . . . .14
Starting and Stopping the DX4000 . . . . . . . . . . . . . . . . . . . . . . . . . . . . . . . . . . . . . . . . . . . . . . . . . . . . . . . . . . . . . . . . . . . . . . . . . . . . . . . . . .14
Configuring the System . . . . . . . . . . . . . . . . . . . . . . . . . . . . . . . . . . . . . . . . . . . . . . . . . . . . . . . . . . . . . . . . . . . . . . . . . . . . . . . . . . . . . . . . . . . . . . .15
Date and Time . . . . . . . . . . . . . . . . . . . . . . . . . . . . . . . . . . . . . . . . . . . . . . . . . . . . . . . . . . . . . . . . . . . . . . . . . . . . . . . . . . . . . . . . . . . . . . . . . .15
Network Settings . . . . . . . . . . . . . . . . . . . . . . . . . . . . . . . . . . . . . . . . . . . . . . . . . . . . . . . . . . . . . . . . . . . . . . . . . . . . . . . . . . . . . . . . . . . . . . . .16
Changing Network Settings . . . . . . . . . . . . . . . . . . . . . . . . . . . . . . . . . . . . . . . . . . . . . . . . . . . . . . . . . . . . . . . . . . . . . . . . . . . . . . . . . . .16
Entering an IP Address . . . . . . . . . . . . . . . . . . . . . . . . . . . . . . . . . . . . . . . . . . . . . . . . . . . . . . . . . . . . . . . . . . . . . . . . . . . . . . . . . . . . . . .18
Configuring Video Recording . . . . . . . . . . . . . . . . . . . . . . . . . . . . . . . . . . . . . . . . . . . . . . . . . . . . . . . . . . . . . . . . . . . . . . . . . . . . . . . . . . . . . . .18
Upgrading Firmware on the DX4000 . . . . . . . . . . . . . . . . . . . . . . . . . . . . . . . . . . . . . . . . . . . . . . . . . . . . . . . . . . . . . . . . . . . . . . . . . . . . . . . . . . . . .19 Upgrading Through a Network Connection . . . . . . . . . . . . . . . . . . . . . . . . . . . . . . . . . . . . . . . . . . . . . . . . . . . . . . . . . . . . . . . . . . . . . . . . . . . .19 Upgrading Through a Direct Connection . . . . . . . . . . . . . . . . . . . . . . . . . . . . . . . . . . . . . . . . . . . . . . . . . . . . . . . . . . . . . . . . . . . . . . . . . . . . . .21 Verifying Network Connections . . . . . . . . . . . . . . . . . . . . . . . . . . . . . . . . . . . . . . . . . . . . . . . . . . . . . . . . . . . . . . . . . . . . . . . . . . . . . . . .23
Installing and Updating the Remote Agent Application . . . . . . . . . . . . . . . . . . . . . . . . . . . . . . . . . . . . . . . . . . . . . . . . . . . . . . . . . . . . . . . . . . . . . . .26
Installing the Web Client . . . . . . . . . . . . . . . . . . . . . . . . . . . . . . . . . . . . . . . . . . . . . . . . . . . . . . . . . . . . . . . . . . . . . . . . . . . . . . . . . . . . . . . . . . . . . .29
Specifications . . . . . . . . . . . . . . . . . . . . . . . . . . . . . . . . . . . . . . . . . . . . . . . . . . . . . . . . . . . . . . . . . . . . . . . . . . . . . . . . . . . . . . . . . . . . . . . . . . . . . . .33
C2601M-A (6/06) |
3 |

List of Illustrations
1 Package Contents . . . . . . . . . . . . . . . . . . . . . . . . . . . . . . . . . . . . . . . . . . . . . . . . . . . . . . . . . . . . . . . . . . . . . . . . . . . . . . . . . . . . . . . . . . . . . . . . .7 2 Front Panel of the DX4000 . . . . . . . . . . . . . . . . . . . . . . . . . . . . . . . . . . . . . . . . . . . . . . . . . . . . . . . . . . . . . . . . . . . . . . . . . . . . . . . . . . . . . . . . . .8 3 Control Buttons on the Front Panel. . . . . . . . . . . . . . . . . . . . . . . . . . . . . . . . . . . . . . . . . . . . . . . . . . . . . . . . . . . . . . . . . . . . . . . . . . . . . . . . . . . .9 4 Remote Control Operation . . . . . . . . . . . . . . . . . . . . . . . . . . . . . . . . . . . . . . . . . . . . . . . . . . . . . . . . . . . . . . . . . . . . . . . . . . . . . . . . . . . . . . . . .10 5 Rear Panel of the DX4000. . . . . . . . . . . . . . . . . . . . . . . . . . . . . . . . . . . . . . . . . . . . . . . . . . . . . . . . . . . . . . . . . . . . . . . . . . . . . . . . . . . . . . . . . .11 6 Connecting Devices to the DX4000 . . . . . . . . . . . . . . . . . . . . . . . . . . . . . . . . . . . . . . . . . . . . . . . . . . . . . . . . . . . . . . . . . . . . . . . . . . . . . . . . . .13 7 Connecting Computers Across the Internet . . . . . . . . . . . . . . . . . . . . . . . . . . . . . . . . . . . . . . . . . . . . . . . . . . . . . . . . . . . . . . . . . . . . . . . . . . . .13 8 Logging In as the Administrator . . . . . . . . . . . . . . . . . . . . . . . . . . . . . . . . . . . . . . . . . . . . . . . . . . . . . . . . . . . . . . . . . . . . . . . . . . . . . . . . . . . . .14 9 Shutting Down the DX4000 . . . . . . . . . . . . . . . . . . . . . . . . . . . . . . . . . . . . . . . . . . . . . . . . . . . . . . . . . . . . . . . . . . . . . . . . . . . . . . . . . . . . . . . .14
10 System Menu . . . . . . . . . . . . . . . . . . . . . . . . . . . . . . . . . . . . . . . . . . . . . . . . . . . . . . . . . . . . . . . . . . . . . . . . . . . . . . . . . . . . . . . . . . . . . . . . . . .15 11 Date/Time Menu. . . . . . . . . . . . . . . . . . . . . . . . . . . . . . . . . . . . . . . . . . . . . . . . . . . . . . . . . . . . . . . . . . . . . . . . . . . . . . . . . . . . . . . . . . . . . . . . .16 12 Network Menu . . . . . . . . . . . . . . . . . . . . . . . . . . . . . . . . . . . . . . . . . . . . . . . . . . . . . . . . . . . . . . . . . . . . . . . . . . . . . . . . . . . . . . . . . . . . . . . . . .17 13 Additional Network Settings . . . . . . . . . . . . . . . . . . . . . . . . . . . . . . . . . . . . . . . . . . . . . . . . . . . . . . . . . . . . . . . . . . . . . . . . . . . . . . . . . . . . . . .18 14 Firmware Upgrade Message . . . . . . . . . . . . . . . . . . . . . . . . . . . . . . . . . . . . . . . . . . . . . . . . . . . . . . . . . . . . . . . . . . . . . . . . . . . . . . . . . . . . . . .19 15 Image Downloader Screen . . . . . . . . . . . . . . . . . . . . . . . . . . . . . . . . . . . . . . . . . . . . . . . . . . . . . . . . . . . . . . . . . . . . . . . . . . . . . . . . . . . . . . . . .19 16 Upgrade In Progress Message . . . . . . . . . . . . . . . . . . . . . . . . . . . . . . . . . . . . . . . . . . . . . . . . . . . . . . . . . . . . . . . . . . . . . . . . . . . . . . . . . . . . . .20 17 Upgrade Complete . . . . . . . . . . . . . . . . . . . . . . . . . . . . . . . . . . . . . . . . . . . . . . . . . . . . . . . . . . . . . . . . . . . . . . . . . . . . . . . . . . . . . . . . . . . . . . .20 18 Firmware Upgrade Message . . . . . . . . . . . . . . . . . . . . . . . . . . . . . . . . . . . . . . . . . . . . . . . . . . . . . . . . . . . . . . . . . . . . . . . . . . . . . . . . . . . . . . .21 19 Image Downloader Screen . . . . . . . . . . . . . . . . . . . . . . . . . . . . . . . . . . . . . . . . . . . . . . . . . . . . . . . . . . . . . . . . . . . . . . . . . . . . . . . . . . . . . . . . .21 20 Upgrade In Progress Message . . . . . . . . . . . . . . . . . . . . . . . . . . . . . . . . . . . . . . . . . . . . . . . . . . . . . . . . . . . . . . . . . . . . . . . . . . . . . . . . . . . . . .22 21 Upgrade Complete . . . . . . . . . . . . . . . . . . . . . . . . . . . . . . . . . . . . . . . . . . . . . . . . . . . . . . . . . . . . . . . . . . . . . . . . . . . . . . . . . . . . . . . . . . . . . . .22 22 Network Connections Screen . . . . . . . . . . . . . . . . . . . . . . . . . . . . . . . . . . . . . . . . . . . . . . . . . . . . . . . . . . . . . . . . . . . . . . . . . . . . . . . . . . . . . . .23 23 Local Area Connection Status Screen . . . . . . . . . . . . . . . . . . . . . . . . . . . . . . . . . . . . . . . . . . . . . . . . . . . . . . . . . . . . . . . . . . . . . . . . . . . . . . . .23 24 Local Area Connection Properties Screen . . . . . . . . . . . . . . . . . . . . . . . . . . . . . . . . . . . . . . . . . . . . . . . . . . . . . . . . . . . . . . . . . . . . . . . . . . . . .24 25 Internet Protocol (TCP/IP) Properties Screen . . . . . . . . . . . . . . . . . . . . . . . . . . . . . . . . . . . . . . . . . . . . . . . . . . . . . . . . . . . . . . . . . . . . . . . . . . .24 26 Running a Command. . . . . . . . . . . . . . . . . . . . . . . . . . . . . . . . . . . . . . . . . . . . . . . . . . . . . . . . . . . . . . . . . . . . . . . . . . . . . . . . . . . . . . . . . . . . . .25 27 Verifying an IP Address. . . . . . . . . . . . . . . . . . . . . . . . . . . . . . . . . . . . . . . . . . . . . . . . . . . . . . . . . . . . . . . . . . . . . . . . . . . . . . . . . . . . . . . . . . . .25 28 Remote Agent Installation Screen . . . . . . . . . . . . . . . . . . . . . . . . . . . . . . . . . . . . . . . . . . . . . . . . . . . . . . . . . . . . . . . . . . . . . . . . . . . . . . . . . . .26 29 Software License Agreement Screen. . . . . . . . . . . . . . . . . . . . . . . . . . . . . . . . . . . . . . . . . . . . . . . . . . . . . . . . . . . . . . . . . . . . . . . . . . . . . . . . .26 30 Select Install Folder Screen . . . . . . . . . . . . . . . . . . . . . . . . . . . . . . . . . . . . . . . . . . . . . . . . . . . . . . . . . . . . . . . . . . . . . . . . . . . . . . . . . . . . . . . .27 31 Installation Progress Screen. . . . . . . . . . . . . . . . . . . . . . . . . . . . . . . . . . . . . . . . . . . . . . . . . . . . . . . . . . . . . . . . . . . . . . . . . . . . . . . . . . . . . . . .27 32 Warning Message About Overwriting Files . . . . . . . . . . . . . . . . . . . . . . . . . . . . . . . . . . . . . . . . . . . . . . . . . . . . . . . . . . . . . . . . . . . . . . . . . . . .27 33 Microsoft DirectX Confirmation Dialog . . . . . . . . . . . . . . . . . . . . . . . . . . . . . . . . . . . . . . . . . . . . . . . . . . . . . . . . . . . . . . . . . . . . . . . . . . . . . . .28 34 Installation Complete Screen . . . . . . . . . . . . . . . . . . . . . . . . . . . . . . . . . . . . . . . . . . . . . . . . . . . . . . . . . . . . . . . . . . . . . . . . . . . . . . . . . . . . . . .28 35 Confirming the Installation . . . . . . . . . . . . . . . . . . . . . . . . . . . . . . . . . . . . . . . . . . . . . . . . . . . . . . . . . . . . . . . . . . . . . . . . . . . . . . . . . . . . . . . . .28 36 Internet Explorer Security Warning . . . . . . . . . . . . . . . . . . . . . . . . . . . . . . . . . . . . . . . . . . . . . . . . . . . . . . . . . . . . . . . . . . . . . . . . . . . . . . . . . .29 37 DX4000 Web Client . . . . . . . . . . . . . . . . . . . . . . . . . . . . . . . . . . . . . . . . . . . . . . . . . . . . . . . . . . . . . . . . . . . . . . . . . . . . . . . . . . . . . . . . . . . . . .29 38 DX4000 Resource CD Main Screen . . . . . . . . . . . . . . . . . . . . . . . . . . . . . . . . . . . . . . . . . . . . . . . . . . . . . . . . . . . . . . . . . . . . . . . . . . . . . . . . . .30 39 DX4000 Utilities . . . . . . . . . . . . . . . . . . . . . . . . . . . . . . . . . . . . . . . . . . . . . . . . . . . . . . . . . . . . . . . . . . . . . . . . . . . . . . . . . . . . . . . . . . . . . . . . .30 40 Web Client Utility Files . . . . . . . . . . . . . . . . . . . . . . . . . . . . . . . . . . . . . . . . . . . . . . . . . . . . . . . . . . . . . . . . . . . . . . . . . . . . . . . . . . . . . . . . . . . .31 41 Destination Folder for the Web Client . . . . . . . . . . . . . . . . . . . . . . . . . . . . . . . . . . . . . . . . . . . . . . . . . . . . . . . . . . . . . . . . . . . . . . . . . . . . . . . .31 42 Web Client Browser Window . . . . . . . . . . . . . . . . . . . . . . . . . . . . . . . . . . . . . . . . . . . . . . . . . . . . . . . . . . . . . . . . . . . . . . . . . . . . . . . . . . . . . . .32 43 Web Client Log In Screen . . . . . . . . . . . . . . . . . . . . . . . . . . . . . . . . . . . . . . . . . . . . . . . . . . . . . . . . . . . . . . . . . . . . . . . . . . . . . . . . . . . . . . . . . .32
4 |
C2601M-A (6/06) |

Description
The DX4000 Series digital video recorder (DVR) is an entry-level, professional digital video recorder that not only replaces the traditional VCR and multiplexer combination but also offers the benefits derived from the latest in digital video processing.
Designed to work with today's broadband networks, the DX4000 uses MPEG-4 compression, allowing the user the ability to view and control the DVR across a wide area network. Additionally, the smaller file size produced by the MPEG-4 compression standard, allows for longer storage times compared with traditional DVR technology.
With the ability to record at resolutions up to 704 x 480, the DX4000 Series DVR captures crystal clear pictures, creating effective footage for later use and retrieval. With the ability to record up to 120 images per second in CIF resolution (352 x 240 NTSC, 352 x 288 PAL), users can also record full-motion video if desired. Individual adjustments are possible on a per-input basis to optimize the DX4000 to meet a given installation’s requirements for length of video retention. Video critical for investigation and archiving can be easily exported to a USB flash memory device or an optional CD-RW.
With the ability to address and control pan/tilt/zoom (PTZ) equipment, such as the Spectra® domes and Esprit® positioning systems, the DX4000 becomes a powerful control point for the surveillance requirements of an installation. In addition, with the ability to trigger recording and alarms on motion or external contacts, the DX4000 series becomes an automated monitoring and notification engine as well.
The DX4000 video outputs provide for efficient control and effective deterrence. The choice of VGA, S-Video, or composite main monitor outputs provides flexibility for the user. The main monitor output can be adjusted to display in full screen or quad format. The DX4000's spot monitor can be used for public view applications, providing an effective deterrent to would-be criminals.
Finally, the DX4000 is designed to deliver robust and reliable performance for security professionals. From the ability to capture log entries detailing any faults or user-initiated changes to the system, to the inclusion of Pelco's world renowned customer service promise, the DX4000 embodies the ideal entry-level digital video recorder to protect assets and people.
C2601M-A (6/06) |
5 |
FEATURES
•4-channel, full duplex digital video recorder
•4-channel audio inputs with one audio output
•MPEG-4 compression
•Up to 704 x 480 Recording Resolution
•Up to 120 images per second recording rate at 352 x 240 resolution
•Independent channel resolution, quality, and frame rate settings
•Full-function remote agent with administration functions
•Up to 500 GB internal storage
•Support for continuous, motion, and scheduled recording for maximum utilization of hard disk drives
•Local or remote PTZ control via Pelco D and Pelco P protocols
•4 alarm inputs, 1 relay output
•Main monitor output configurable for multiple-camera displays for live and playback video
•Spot monitor for public view displays
MODELS
Model Number |
Camera Inputs |
Description |
|
|
|
DX4004-160 |
4 |
4-channel digital video recorder with 160 GB of storage space |
|
|
|
DX4004CD-160 |
4 |
4-channel digital video recorder with CD-RW and 160 GB of storage space |
|
|
|
DX4004-250 |
4 |
4-channel digital video recorder with 250 GB of storage space |
|
|
|
DX4004CD-250 |
4 |
4-channel digital video recorder with CD-RW and 250 GB of storage space |
|
|
|
DX4004-500 |
4 |
4-channel digital video recorder with 500 GB of storage space |
|
|
|
DX4004CD-500 |
4 |
4-channel digital video recorder with CD-RW and 500 GB of storage space |
|
|
|
ABOUT THIS MANUAL
This manual contains instructions for installing and configuring the DX4000. It also contains upgrade instructions for the DX4000 firmware and for the remote agent software application that is installed on a computer. For basic operation instructions, refer to Front Panel Layout on page 8. For details about operating the unit; instructions on how to search for, play back, and back up video; and information on installing and using the remote agent application, refer to the DX4000 Operation manual.
6 |
C2601M-A (6/06) |

Before You Begin
Before you install the DX4000, review the package contents to ensure that it contains all parts.
PACKAGE CONTENTS
SHIPPING BOX |
|
|
DX4000 |
ACCESSORY PACK |
SAFETY INSTRUCTIONS |
WITH OPTIONAL CD-RW |
|
INSTALLATION MANUAL |
ACCESSORY PACK |
12 VDC ADAPTER |
|
RESOURCE CD WITH |
|
|
|
|
|
OPERATION MANUAL |
|
|
|
|
CLIENT SOFTWARE |
USA |
EUROPEAN |
UK |
REMOTE |
AAA BATTERIES (2) |
STANDARD POWER |
STANDARD POWER |
STANDARD POWER |
CONTROL |
|
CORD (110 VAC) |
CORD (220 VAC) |
CORD (250 VAC) |
|
|
1 EA. |
1 EA. |
1 EA. |
|
|
Figure 1. Package Contents
Qty Description
1Digital video recorder with built-in hard disk drive. Some models contain two hard disk drives. Some models contain an optional writable CD drive (CD-RW).
3 Power cords (1 USA standard, 1 European standard, 1 UK standard) 1 12V adapter for use with power cords
1 Remote control
1 Battery pack (2 AAA batteries) for the remote control
1 Resource CD with operation manual and remote agent program software 1 Installation manual
C2601M-A (6/06) |
7 |

Front Panel Layout
|
|
|
|
|
Figure 2. Front Panel of the DX4000
The buttons on the front panel of the unit control PTZ and camera focus, to enter menus and adjust settings on the DX4000, and to search for and play back video. Refer to Figure 2 for the locations of the buttons on the front panel.
Remote control sensor input: Receives data from the remote control.
Power: Turns the unit on or off.
USB port: Connects a USB flash memory device to back up video.
CD-RW: Stores backup copies of recorded video on a writable compact disc (available on certain models).
Unit status indicators: Indicates operating status as follows:
•PWR: The system is on or off.
•REC: The system is recording.
•NET: The remote agent is connected to the DX4000.
•ALARM: The alarm sensor has detected an event.
Channel selection buttons: Selects a channel (1-4) or lets you input a password.
SCR MODE: Selects the screen layout mode or video sequencing mode.
MENU: Opens the system menus.
SEARCH: Starts the search mode for data searches.
PTZ/FOCUS: Accesses the PTZ/FOCUS controls for a camera.
Control buttons: Navigate through menu options or control recorded video. Refer to Video Control Buttons on the Front Panel of the DX4000 on page 9 for a description of the buttons.
RETURN: Cancels a setup operation or returns you to a previous menu or mode.
ENTER: Applies any changes that you enter and accesses selected menus.
8 |
C2601M-A (6/06) |

VIDEO CONTROL BUTTONS ON THE FRONT PANEL OF THE DX4000
Figure 3. Control Buttons on the Front Panel
Fast reverse: Plays the video backward at a fast speed.
Increase forward or reverse: Increases the speed of the currently playing direction (forward or reverse).
Play forward: Plays the video forward.
Fast forward: Plays the video forward at a fast speed.
Play reverse: Plays the video in reverse.
Decrease forward or reverse: Decreases the speed of the currently playing direction (forward or reverse).
Pause: Stops the video and displays the current frame of the video.
C2601M-A (6/06) |
9 |
Remote Control Layout
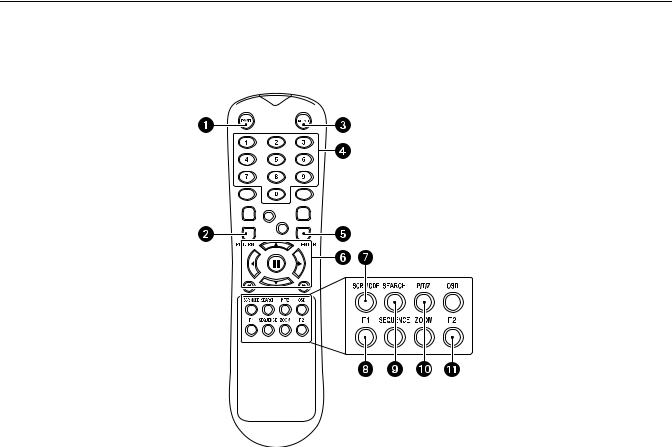
The diagram below describes the buttons on the remote control that operate the DX4000. Each button has a corresponding function on the front panel of the unit. The remote control is operable only when the remote control sensor on the DX4000 is enabled. If several DX4000 units are located close together, the remote control might operate more than one unit. Care should be taken to locate similar devices away from each other. Buttons that are not usable are not described.
Figure 4. Remote Control Operation
Power button: Turns the system on or off.
Return button: Cancels setup commands or returns to a previous menu or screen.
Menu button: Opens the main menu.
Channel selection buttons: Selects the available channels (up to a maximum of four).
Enter button: Applies any configuration changes made to the DX4000.
Direction control buttons: Navigate through menu options or control recorded video.
Screen Mode button: Changes the screen display between a full screen and four video panes (quad view).
F1: Creates a preset action.
Search button: Opens the search dialog box.
PTZ/Iris mode: Places the camera in PTZ or focus mode.
F2: Selects a preset action.
10 |
C2601M-A (6/06) |
Connecting Devices to the DX4000
Use the following diagram of the rear panel of the DX4000 to determine how to connect devices to the unit.
|
|
|
|
|
|
|
|
1 |
2 |
3 |
4 |
|
|
L |
|
|
|
|
1 |
3 |
|
|
|
1 2 3 4 |
L |
|
|
|
|
|
NTSC PAL |
|
|
|
|
|
2 |
4 |
|
|
12 |
|
SEQ |
|
|
|
|
|
|
|
|
|
|
|
Figure 5. Rear Panel of the DX4000 |
|
|
|
|
WARNING: To avoid electric shock, turn off the unit and unplug it while connecting devices to the DX4000. Adequate ventilation is required for proper operation of the DX4000. Allow two inches of space above the unit and on each side for air circulation.
1.Connect up to four cameras at the video inputs. Refer to Table A for video coaxial cable distances. The DX4000 features automatic termination of video if no loop out cables are attached. Remove all unused cables from the video output ports.
2.If desired, connect analog monitors to the video outputs (looping). Refer to Table A for video coaxial cable distances. You must terminate all monitors. If you connect a single monitor to an output, terminate the monitor at 75 ohms. If you connect more than one monitor to an output, terminate the farthest monitor at 75 ohms, and terminate the others at Hi-Z. Remove all unused cables.
3.If desired, connect an analog monitor to the main monitor output. Refer to Table A for video coaxial cable distances. If you connect more than one monitor to an output, terminate the farthest monitor at 75 ohms, and terminate the others at Hi-Z.
4.If desired, connect a spot monitor to the DX4000. Refer to Table A for video coaxial cable distances. If you connect more than one monitor to an output, terminate the farthest monitor at 75 ohms, and terminate the others at Hi-Z. Note that you can view live video from a spot monitor. To search for and play back video or to configure the DX4000, you must be working at the unit and main monitor or at a remote computer.
Table A. Video Coaxial Cable Requirements
Cable Type* |
Maximum Distance |
|
|
RG59/U |
750 ft (229 m) |
RG6/U |
1,000 ft (305 m) |
RG11/U |
1,500 ft (457 m) |
|
|
*Cable requirements: 75 ohms impedance
All-copper center conductor
All-copper braided shield with 95% braid coverage
5. Select the video stream type for the cameras. Choices are NTSC or PAL.
WARNING: Changing the video stream type from NTSC to PAL reformats the hard disk. Do not change video stream types until any recorded video has been backed up to CD or a removable USB flash memory device.
C2601M-A (6/06) |
11 |
Loading...