

Parkside PPS 40 A1 Operation And Safety Notes

PLASMA CUTTER PPS 40 A1
PLASMA CUTTER PLAZMAVÁGÓ
Last Information Update
Operation and Safety Notes
Kezelési és biztonsági hivatkozások
Az eredeti használati utasítás fordítása
GB HU
PLAZEMSKI REZALNIK PLAZMOVÁ ŘEZAČKA
Navodila za upravljanje in varnostna opozorila
Prevod originalnega navodila za uporabo
Návod k obsluze a bezpečnostní pokyny
Originální návod k obsluze
SI CZ
PLAZMOVÁ REZAČKA PLASMASCHNEIDER
Návod na obsluhu a bezpečnostné upozornenia
Originálny návod na obsluhu
Bedienungs- und Sicherheitshinweise
Originalbetriebsanleitung
SK DE AT CH
SI
SK
HU
CZ
IAN 307722
GB
Before reading, unfold the page containing the illustrations and familiarise yourself with all
functions of the device.
HU
Olvasás előtt hajtsa ki az ábrát tartalmazó oldalt, és ezután ismerje meg a készülék
mindegyik funkcióját.
SI
Pred branjem odprite stran s slikami in se nato seznanite z vsemi funkcijami naprave.
CZ
Než začnete číst tento návod k obsluze, rozložte stránku s obrázky a seznamte se se
všemi funkcemi zařízení.
SK
Prv než začnete čítať tento návod, rozložte si stranu s obrázkami a potom sa oboznámte
so všetkými funkciami zariadenia.
DE AT CH
Klappen Sie vor dem Lesen die beiden Seiten mit den Abbildungen aus und machen Sie
sich anschließend mit allen Funktionen des Gerätes vertraut.
GB Operation and Safety Notes Page 5
HU Kezelési és biztonsági hivatkozások Oldal 25
SI Navodila za upravljanje in varnostna opozorila Stran 45
CZ Návod k obsluze a bezpečnostní pokyny Strana 65
SK Návod na obsluhu a bezpečnostné upozornenia Strana 85
DE / AT / CH Montage-, Bedienungs- und Sicherheitshinweise Seite 105
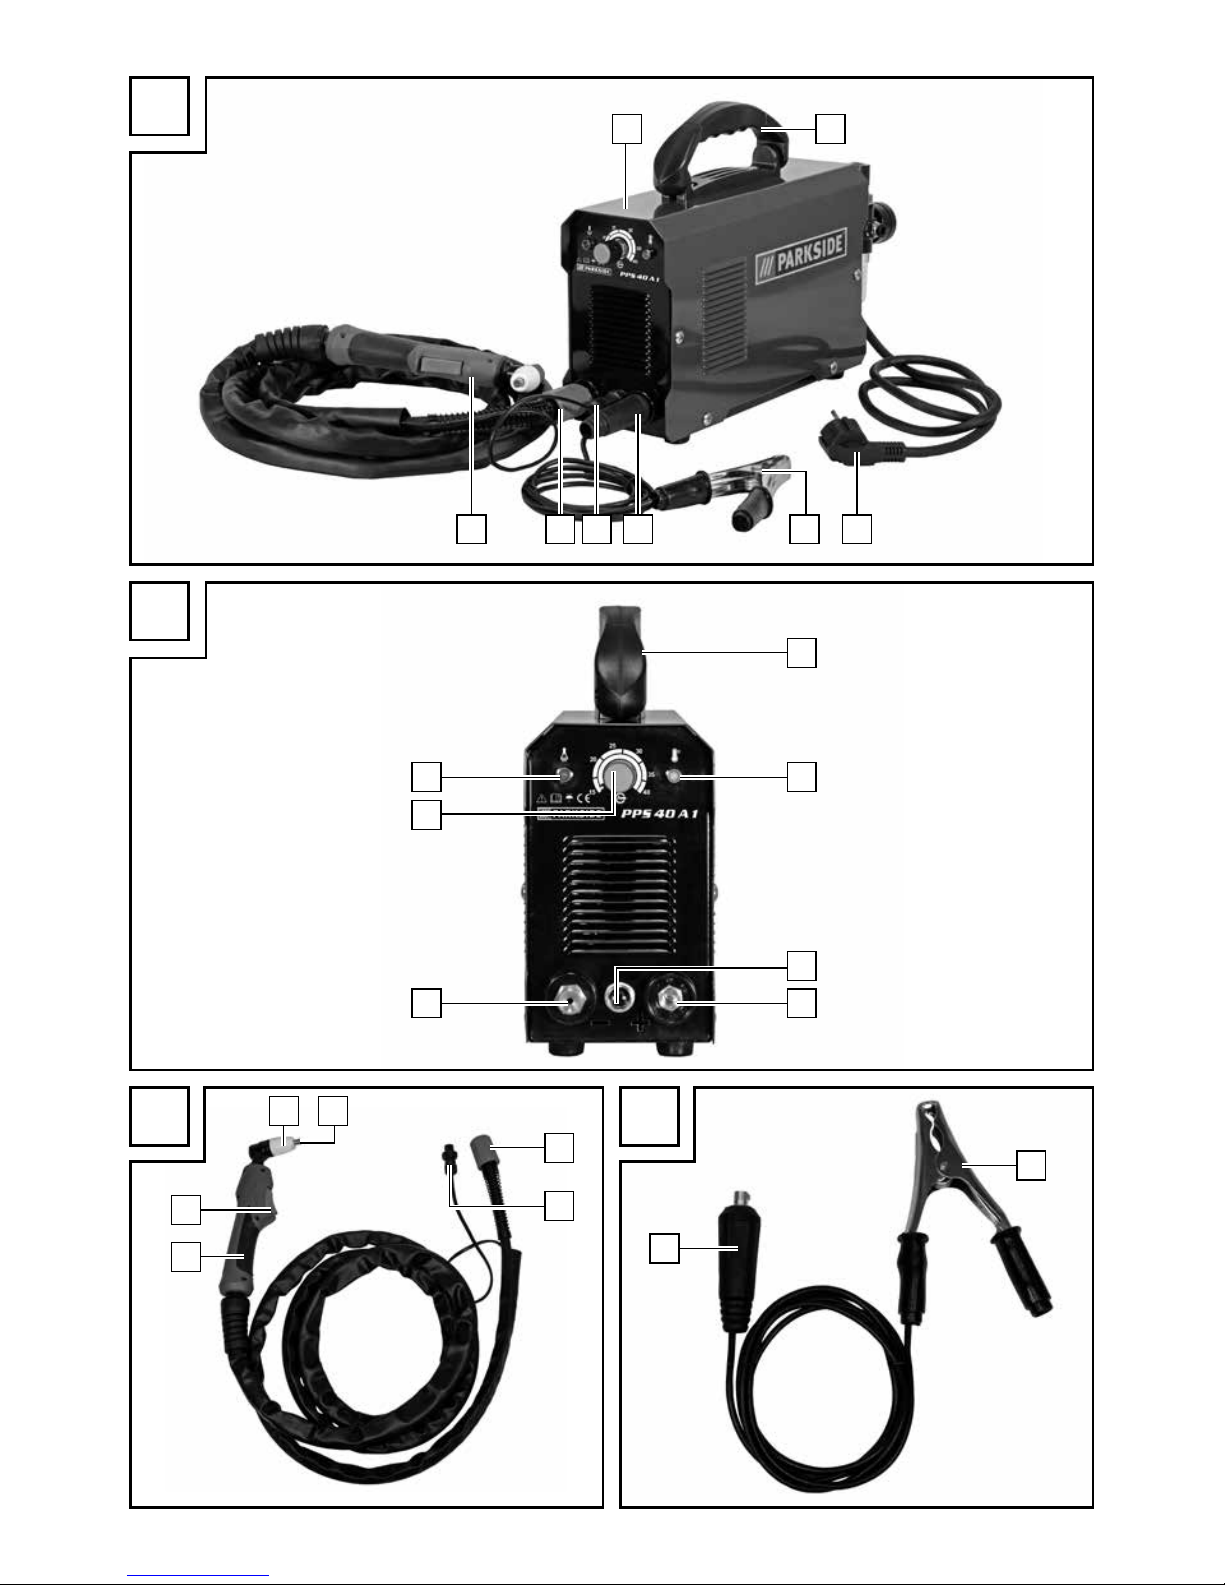
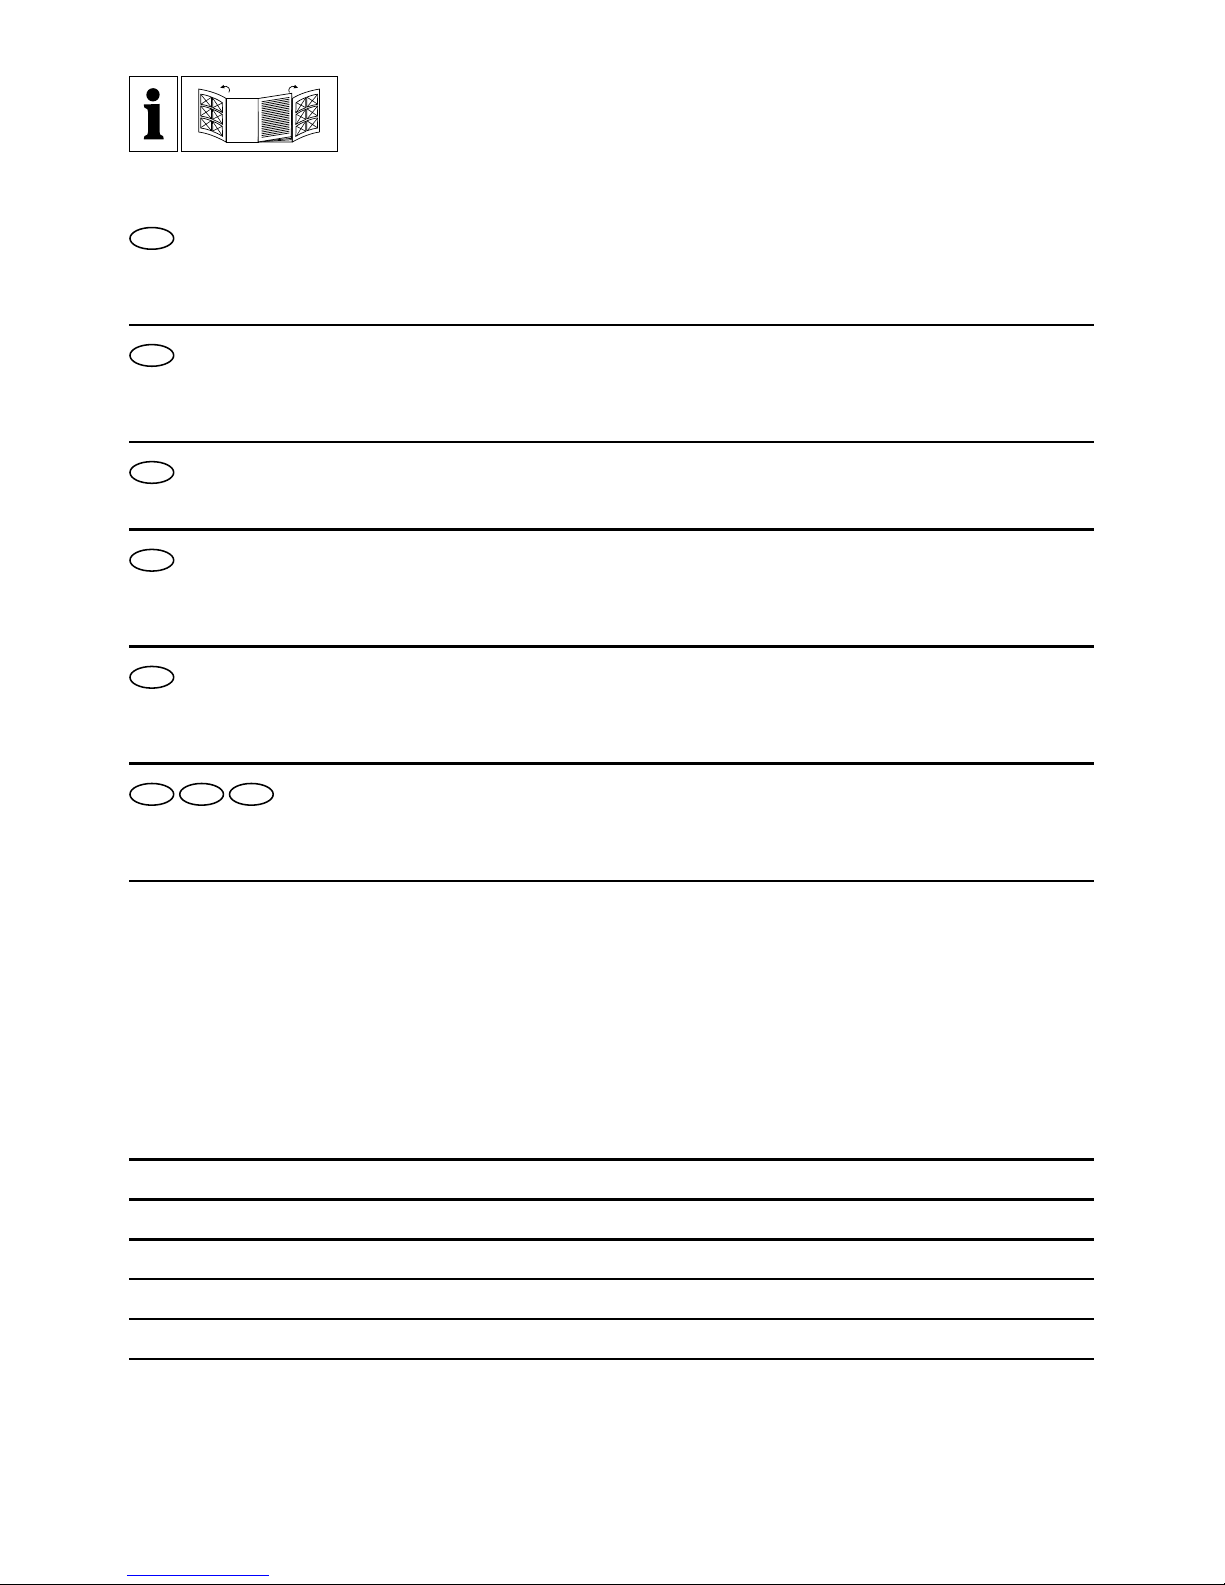
1 2
2
14 9
11
4
7
12
5
8
8a
35678 4
6
10
13
8b 8c
A
B
C D
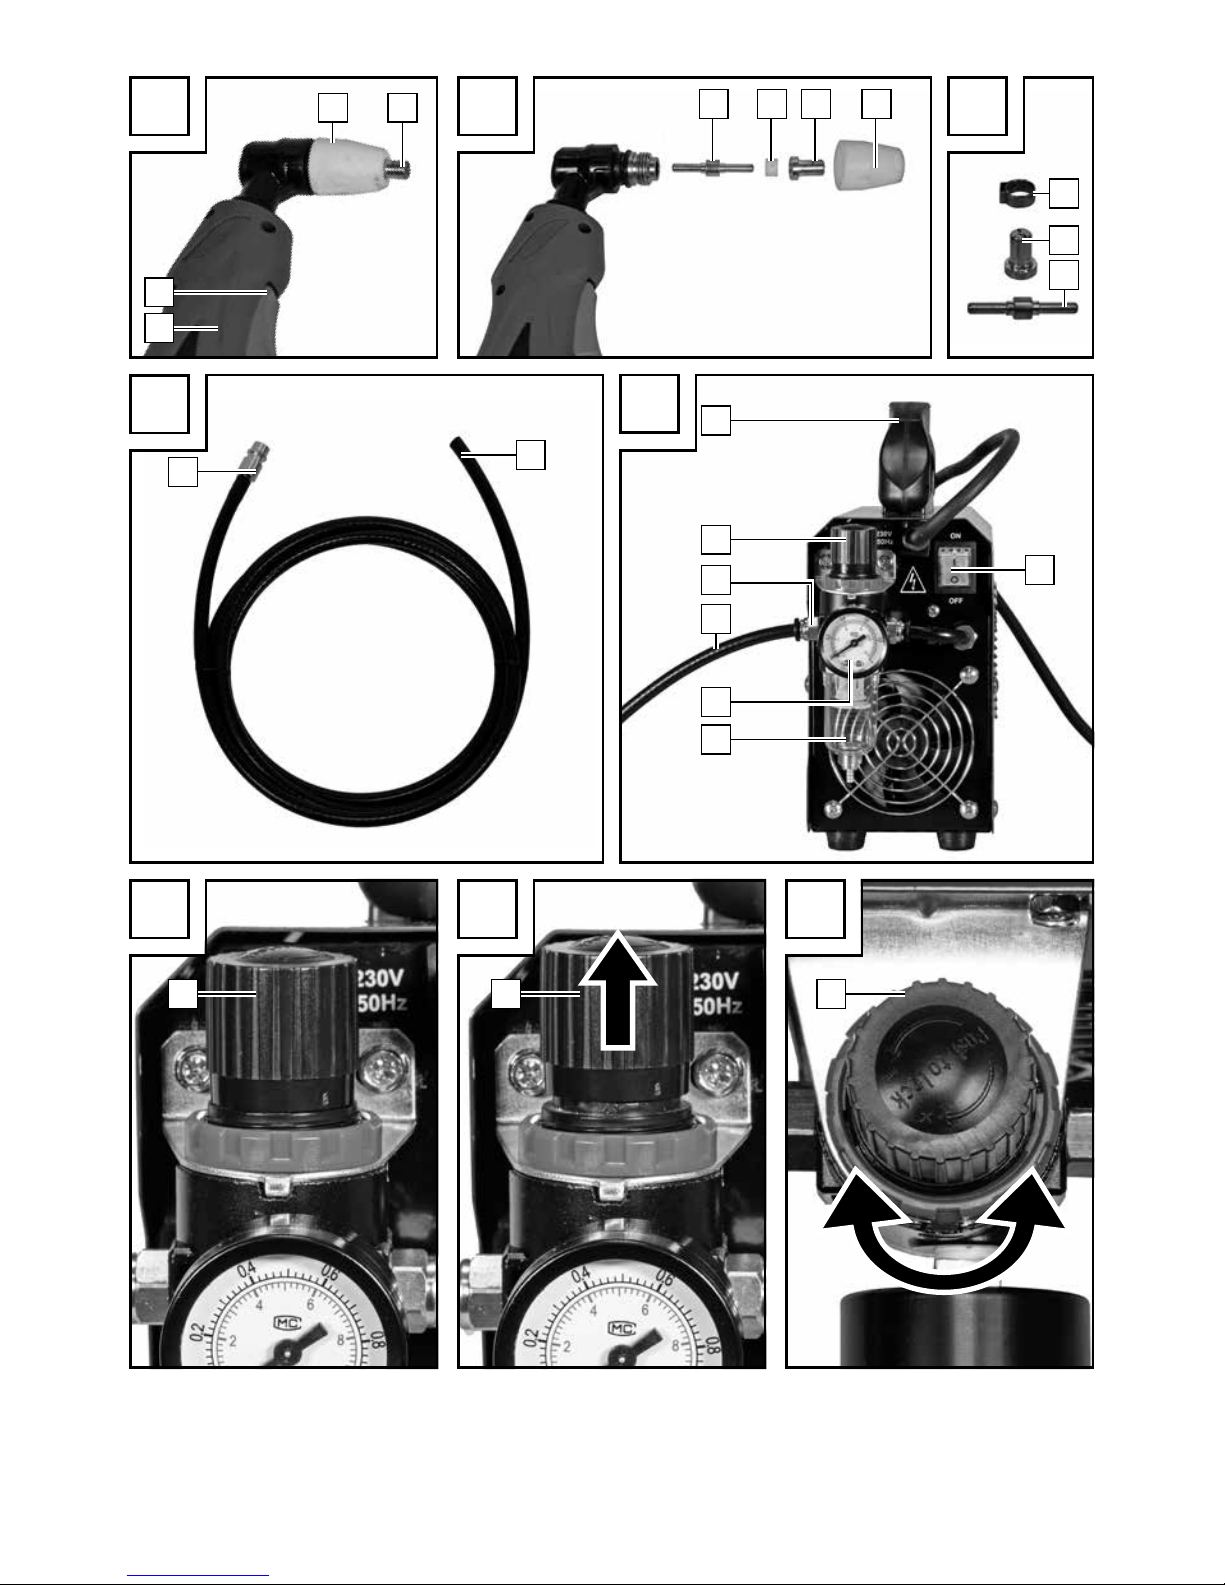
8c
8c
22
8e8d
8d
8b
8
8a
8b
8c
E F G
16
15
21 21 21
21
17
16
18
2
20
19
H
J K L
I

5
GB
Table of contents
Table of pictograms used ............................................................................... Page 6
Introduction ........................................................................................................... Page 7
Intended use ............................................................................................................... Page 7
Equipment .................................................................................................................. Page 7
Technical specifications ................................................................................................ Page 8
Package contents ......................................................................................................... Page 8
Safety instructions .............................................................................................. Page 8
General plasma explanations...................................................................... Page 13
Before use .............................................................................................................. Page 14
Installation environment ................................................................................................ Page 14
Connecting compressed air........................................................................................... Page 14
Connecting the cutting torch .......................................................................................... Page 15
Connecting the ground cable ........................................................................................ Page 15
Using the device .................................................................................................. Page 15
Operation................................................................................................................... Page 15
Plasma cutting types ..................................................................................................... Page 16
Troubleshooting ................................................................................................... Page 17
Maintenance and care ..................................................................................... Page 19
Maintaining the burner ................................................................................................. Page 19
Maintenance ............................................................................................................... Page 20
Storage ...................................................................................................................... Page 20
Warranty and service information ............................................................ Page 20
Warranty conditions .................................................................................................... Page 20
Extent of warranty ....................................................................................................... Page 20
Processing of warranty claims ....................................................................................... Page 21
Information about recycling and disposal ............................................. Page 21
Original EC Declaration of Conformity ..................................................... Page 22

6
GB
Table of pictograms used
• Table of pictograms used
Caution!
Read the operating
instructions!
Caution!
Risk of electric shock!
Warning: Potential hazards! Important note!
Do not dispose of any
electrical devices in
domestic waste!
Dispose of packaging
properly. Do not dispose of
the appliance in household
waste!
Made from recycling
material.
Never use the device in the
open or when it’s raining!
Electric shock from the
welding electrode can
be fatal!
Inhalation of welding fumes
can endanger your health!
Welding sparks can cause
an explosion or fire!
Arc beams can damage
your eyes and injure your
skin!
Electromagnetic fields
can disrupt the function of
cardiac pacemakers!
AC–mains connection.
H Insulation class.
Terminal for the external
(grounding) equipment
conductor.
Cutting with the plasma
cutter.
Gouging tool.
Cutting metal plates. Cutting expanded metal.
Indicator lamp – thermal
sensor.
Connection – ground
terminal - plug.
Indicator lamp – mains
connection.
Connection –
plasma burner - plug
Plasma burner - power plug.

7
GB
Plasma cutter PPS 40 A1
• Introduction
Congratulations! You have
purchased one of our high-quality
products. Please familiarise yourself
with the product before setup or first use.
Please also read the safety instructions
carefully. This product must be set up or used
only by people who have been trained to
do so.
Keep out of the reach of children!
PLEASE NOTE!
fThe use of the term ‘product’
or ‘device’ in the following text refers
to the plasma cutter named in these
operating instructions.
• Intended use
The device is intended for compressed-air
plasma cutting of all electrically conductive
metals. Observing the safety instructions
and assembly instructions and operating
information in the instructions for use is also
a component of intended use.
It is imperative to adhere to the applicable
accident prevention regulations. The device
must not be used:
in insufficiently ventilated rooms,
in moist or wet environments,
in explosive environments,
to defrost pipes,
in close proximity to people
with cardiac pacemakers and
in close proximity to easily
flammable materials.
Use the product only as described and
only for the specific applications as stated.
Keep these instructions in a safe place.
Ensure you hand over all documentation
when passing the product on to anyone else.
Any use that differs to the intended use as
stated above is prohibited and potentially
dangerous. Damage or injury caused by
misuse or disregarding the above warning
is not covered by the warranty or any
liability on the part of the manufacturer.
RESIDUAL RISK
Even if you operate the device as intended,
there will be residual risks.
Following hazards may occur in conjunction
with the construction and design of this plasma
cutter:
Eye injuries due to glare,
Touching hot parts of the device
or workpiece (burn injury),
In case of improper protection risk
of accident and fire through sparks
and slag particles,
Harmful emissions from smoke and gases
if there is a lack of air or if closed rooms
are insufficiently extracted.
Reduce the residual risk by carefully using
the device as intended and observing all
instruction.
• Equipment
PLEASE NOTE!
f After unpacking the product, please
check that all of the package contents
are present and that the device is in
perfect condition. Do not use the device
if it is defective.
Introduction
8
GB
1
Plasma cutter
2
Handle
3
Mains plug
4
Ground terminal
5
Ground terminal plug
6
Plasma burner - power plug
7
Plasma burner - plug
8
Plasma burner
8a
Plasma burner button
8b
Nozzle clamping sleeve
8c
Nozzles
8d
Electrode
8e
Diffuser
9
Overheat protection indicator lamp
10
Plasma burner - power socket
11
Ground terminal - connection socket
12
Plasma burner - connection socket
13
Current controller
14
Mains indicator lamp
15
Quick connector compressed air hose
16
Compressed air hose
17
On/off - switch
I switched on
O switched off
18
Condensation water tank
19
Manometer
20
Compressed air connection
21
Rotary knob to regulate the pressure
22
Hose clamp
• Technical specifications
Output: 15 - 40 A
Input: 230 V~ 50 Hz
Weight: approx. 5.2 kg
Dimensions 341 × 113 x 237 mm
Insulation class: H
Duty Cycle: 35 % at 40 A (25 °C)
20 % at 40 A (40 °C)
‘Real’ cutting
capacity: 0.1 mm – 12 mm
(depending on the material)
Copper:1 - 4 mm
Stainless steel: 1 - 8 mm
Aluminium:1 - 8 mm
Iron: 1 - 10 mm
Steel: 1 - 12 mm
Working
pressure: 4 - 4.5 bar
(4 bar preset)
• Package contents
1 plasma cutter
1 ground cable with terminal
1 cutting cable incl. cutting torch
1 compressed air hose with Quick-Connect
2 hose clamps
2 nozzles
3 electrodes (1 pre-assembled)
1 set of operating instructions
3 burner sleeves (1 pre-assembled)
• Safety instructions
WARNING!
f Please read through the
operating instructions
carefully before use.
Familiarise yourself with the
device, its proper use and
the safety notes based on
these operating instructions.
These form part of the
product and must be
available at all times.
Introduction / Safety instructions

9
GB
WARNING!
f RISK OF SERIOUS
INJURY OR DEATH
FOR INFANTS AND
CHILDREN!
Never leave children
unsupervised near packaging
material. There is a risk of
suffocation
.
This device may be used by
children aged 16 years and
older, and by persons with
reduced physical, sensory
or mental capacities, or a lack
of experience and knowledge,
if they are supervised or have
been instructed on how to
use the device safely and
understand the dangers that
may arise when using it.
Do not allow children to play
with the device. Cleaning and
day-to-day maintenance must
not be performed by children
without supervision.
Repairs and/or maintenance
work must only be carried
out by qualified electricians.
Only use the weld cable
provided in the scope of
delivery.
During operation, the device
should not be positioned
directly on the wall, covered
or jammed between other
devices so that sufficient air
can be absorbed through
the ventilation slats. Make
sure the device is correctly
connected to the supply
voltage. Avoid any form of
tensile stress of the power
cable. Disconnect the plug
from the socket prior to setting up the device in another
location.
If the device is not in
operation, always switch it
off by pressing the ON/OFF
switch. Place the electrode
holder on an insulated surface
and only remove it from the
holder after allowing it to cool
down for 15 minutes.
Hot metal and sparks are blown
off from the cutting arch.
Flying sparks, hot metal as well
as hot objects and hot device
equipment can cause fires or
burns. Check the working
environment and make sure
the workplace is suitable prior
to using the device.
Remove all flammable materials
within 10 m of the plasma
cutter. If this is not possible,
cover the objects meticulously
using suitable covers.
Safety instructions

10
GB
Do not make cuts where flying
sparks could come into contact
with flammable material.
Protect yourself and others from
flying sparks and hot metal.
Please be careful because
sparks and hot materials can
easily fall through small gaps
and openings while cutting
and land on adjacent areas.
Please be aware that
cutting on a ceiling, floor
or a partition can cause
a fire on the opposite side
that is not visible.
Connect the cable as practical
as possible with a socket
situated close to the workplace
to prevent the power cable
from being spread across the
whole room and located on
unknown ground which could
cause an electric shock, sparks
or fire outbreak.
Do not use the plasma cutter
to defrost frozen tubes.
Risk of electric shock:
WARNING!
f Electric shock from the
welding electrode can
be fatal.
Do not use the plasma cutter
when it is raining or snowing.
Wear dry insulating gloves.
Do not touch the electrodes
with bare hands.
Do not wear wet or damaged
gloves.
Protect yourself from electric
shock with insulation against
the workpiece.
Do not open the device
housing.
Danger from welding
fumes:
Inhalation of welding fumes
can endanger health.
Do not keep your head in the
fumes.
Use the equipment in open
areas.
Use extractors to remove the
fumes.
Danger from welding
sparks:
Welding sparks can cause
an explosion or fire.
Keep flammable substances
away from the welding
location.
Do not use the plasma cutter
near flammable substances.
Welding sparks can cause fires.
Keep a fire extinguisher close
by and an observer should
be present to be able to use
it immediately.
Safety instructions

11
GB
Do not weld on drums or any
other closed containers.
Danger from arc beams:
Arc beams can damage your
eyes and injure your skin.
Wear a hat and safety
goggles.
Wear hearing protection and
high, closed shirt collars.
Wear welding safety helmets
and filter sizes in perfect
condition.
Wear complete body
protection.
Danger from
electromagnetic fields:
Welding current generates
electromagnetic fields.
Do not use if you have
a medical implant.
Never wrap the welding
cable around your body.
Guide welding cables
together.
z Welding shield-specific
safety instructions
With the help of a bright light
source (e.g. lighter) examine
the proper functioning of the
welding shield prior to starting
with any welding work.
Weld spatters can damage the
protective screen. Immediately
replace damaged or scratched
protective screens.
Immediately replace damaged
or highly contaminated
or splattered components.
The device must only be
operated by people over the
age of 16.
Please familiarise yourself with
the welding safety instructions.
To that end, you must also
observe the safety instructions
of your plasma cutter.
Always wear a welding
helmet while welding. If it is
not used, you could sustain
severe lesions to the retina.
Always wear protective clothing
during welding operations.
Never use the welding shield
without the protective screen
because this could damage
the optical unit. There is a risk
of damage to the eyes!
Regularly replace the protective
screen to ensure good visibility
and fatigue-proof work
.
z Small and moist rooms
Insulating mats and pads
must be used when working
in small, moist or hot rooms.
Furthermore, leather gauntlet
gloves or other insulating
Safety instructions

12
GB
materials must be worn to
insulate the body against
ground.
When using plasma cutters
under electrically dangerous
conditions, e.g. tight spaces
made of electrically conductive
walls (boiler, pipes, etc.),
in wet rooms (soaking of work
clothes), the output voltage
of the plasma cutter must
be greater than 48 volt
when idling (effective value).
The plasma cutter may be
used in these cases due to the
output voltage.
z Protective clothing
At work, the welder must
protect his/her whole body
by using appropriate
clothing and face protection
against radiations and burns.
The following steps must be
observed:
– Wear protective clothing
prior to welding work.
– Wear gloves.
– Open windows to guarantee
air supply.
– Wear safety goggles.
Gauntlet gloves made of a
suitable material (leather) must
be worn on both hands. They
must be in perfect condition.
A suitable apron must be
worn to protect clothing
from flying sparks and burns.
When specific work, e.g.
overhead welding, is required,
a protective suit must be worn
and, if necessary, even head
protection.
z Protection against rays
and burns
A ‘Caution! Do not stand in
the flames!’ warning sign to
indicate an eye hazard must
be visible at the workplace.
The workplaces must be
shielded so that the persons
in the vicinity are protected.
Unauthorised persons must be
kept away from welding work.
The walls in the immediate
vicinity of fixed workplaces
should neither be bright
coloured or shiny. Windows
up to head height must be
protected to prevent rays
from penetrating or reflecting
through them, e.g. by using
suitable paint.
z EMC Device Classification
According to standard
IEC 60974-10, it has to do
Safety instructions

13
GB
with a plasma cutter with class A
electromagnetic compatibility.
Thus, it meets the appropriate
requirements in the industrial and
residential area. In residential
areas, it can be connected to
the public low-voltage supply
network.
Even if the plasma cutter complies
with the emission level as per the
standard, the plasma cutter can
still result in electromagnetic
disturbances in sensitive systems
and devices.
The operator is responsible for
malfunctions that occur through
the arc while welding and must
take suitable protective measures.
In doing so, the operator must
consider the following:
Power cables, control, signal
and telecommunication lines
Computer and other
microprocessor controlled
devices.
Television, radio and other
playback devices
Electronic and electrical safety
equipment
Persons with cardiac
pacemakers or hearing aids
Measurement and calibration
devices
Noise immunity of other
devices in the vicinity
The time of day at which the
welding work is performed.
The following is recommended
to reduce possible interference
radiation:
The plasma cutter must be
regularly maintained and kept
in a good condition
Welding cables should be
completely unwound and
installed parallel on the floor,
if possible
Devices and systems at risk
of interference radiation must
be removed from the welding
area if possible, or shielded.
• General plasma explanations
Plasma cutters are operated by
pushing pressurised gas,
e.g. air, through a small pipe.
In the centre of the pipe, there
is a negatively charged electrode
that is directly above the nozzle.
The vortex ring controls the speed
at which the plasma can rotate.
If you supply the negative
electrode with current and make
the tip of the nozzle touch the
metal, this connection creates
a closed, electrical circuit.
Safety instructions / General plasma explanations

14
GB
A powerful spark occurs between
the electrode and the metal.
While the gas flows into the pipe,
the spark heats up the gas until
it has reached the plasma
condition. This reaction causes
a current from the controlled
plasma with a temperature of
16,649 ºC or more that moves at
speed of 6.096 m/sec and the
metal transforms into steam and
molten discharge. The plasma
itself conducts electrical current.
The working circuit that allows
the arc to occur remains as
long as current is supplied to
the electrode and the plasma
remains in contact with the metal
to be processed.
The cutting nozzle has two types
of channels. These channels
generate a constant flow of
protective gas around the cutting
area. The pressure of the gas
flow controls the radius of the
plasma jet.
PLEASE NOTE!
fThis machine is only designed to use
compressed air as ‘gas’.
• Before use
• Installation environment
Make sure that working area is sufficiently
ventilated. If the device is used without
sufficient cooling, the power-on time reduces
and it can result in overheating.
Additional protection can be required for
this purpose:
The device must be free-standing with
a distance of at least 0.5 m all around.
Ventilation slots must not be blocked
or covered.
The device must not be used as a storage
place and tools or other items must not
be placed on the device.
It must be operated in a dry and well
ventilated working environment.
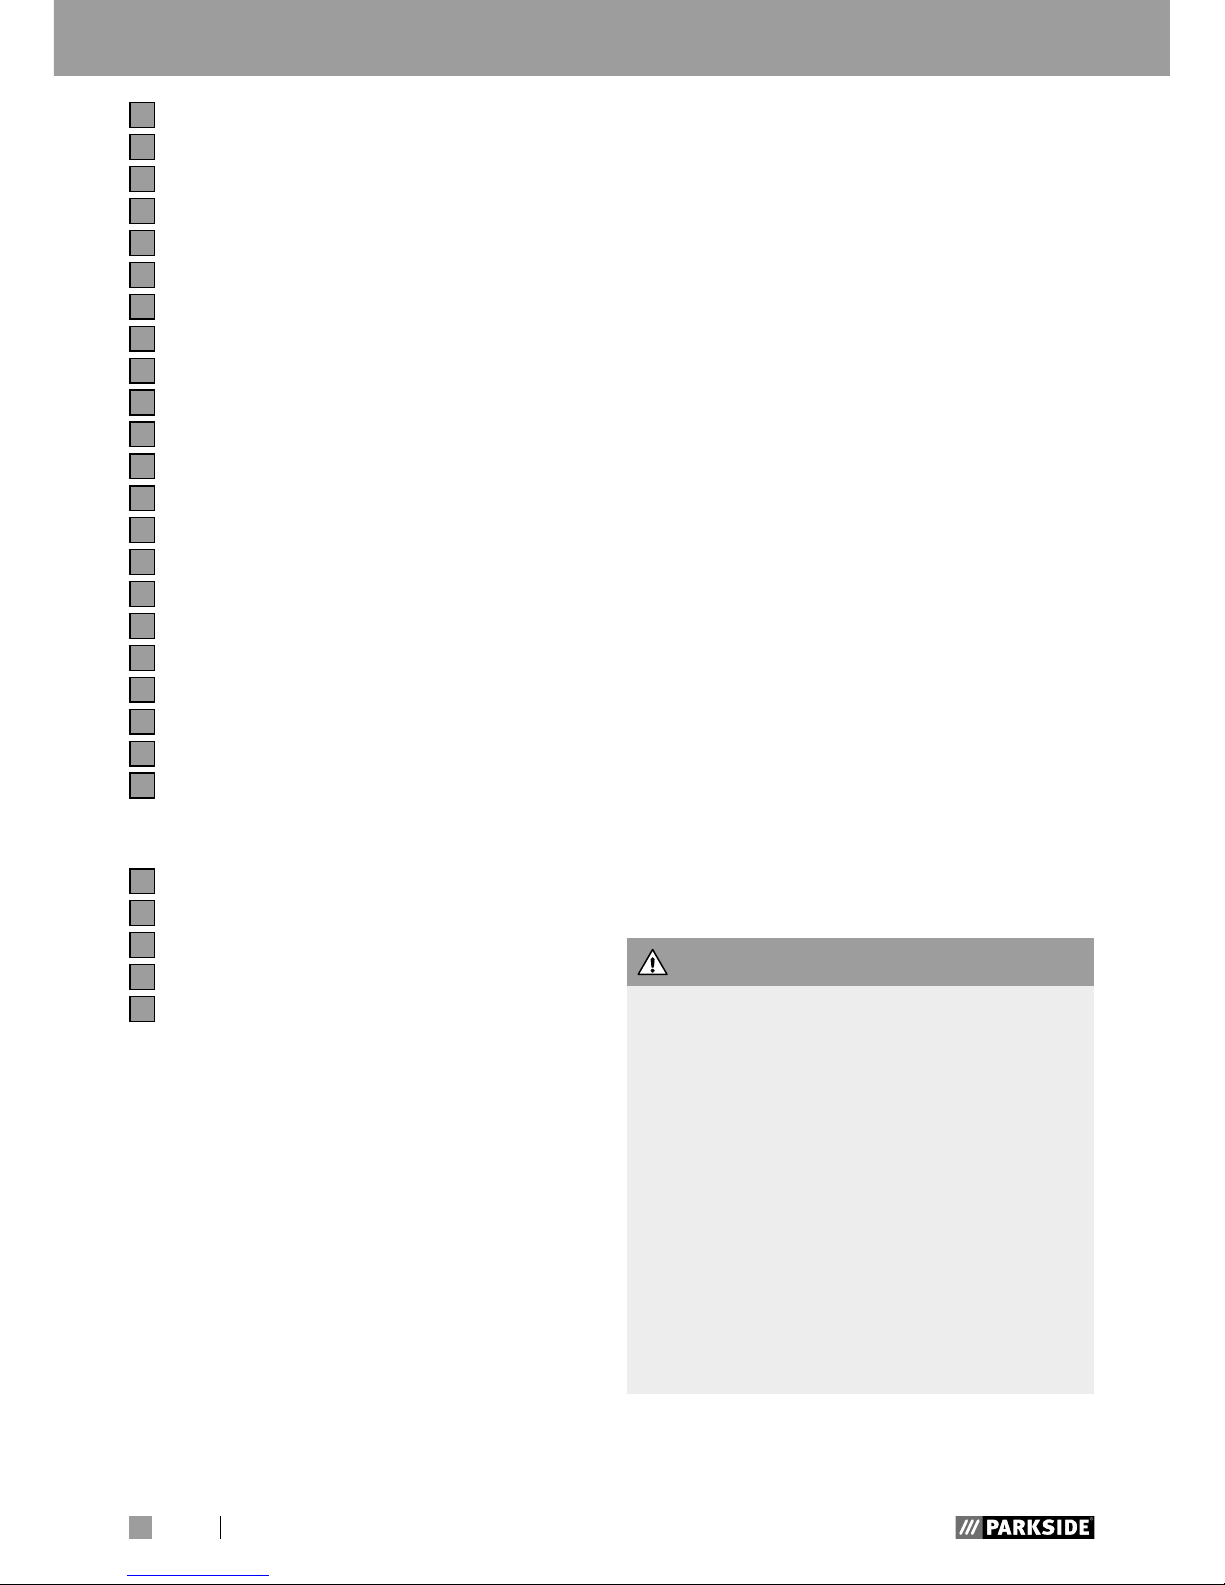
• Connecting compressed air
PLEASE NOTE!
fThis device is designed for operating
pressure of up to 6.3 bar. Please bear
in mind that the pressure can lower
while setting the air pressure.
Thus, in a hose length measuring
10 m and an internal diameter of 9 mm
it drops by approx. 0.6 bar.
The compressed air must be filtered,
lubricated and regulated.
Connect the compressed air hose
16
on
the back of the plasma cutter
1
to the
compressed air connection
20
. To do so,
insert the side of the compressed air hose
16
into the compressed air connection
20
of the plasma cutter 1 without a quick
connector.
The pressure can be set via the knob 21
on the condensate separator. (see Fig. J - L
)
In order to release the compressed air
General plasma explanations / Before use
15
GB
hose 16, you must press the locking
mechanism of the compressed air
connection
20
and pull out the
compressed air hose
16
.
• Connecting the cutting torch
Insert the plasma burner - plug 7 into
the plasma burner – connection socket
12
and tighten the union nut hand-tight.
Insert the plasma burner – power plug
6
into the plasma burner – power
socket
10
and tighten the union nut
hand-tight.
• Connecting the ground cable
Connect the ground terminal plug 5 with
the ground terminal connection socket
11
.
Make sure that the connecting shaft is first
connected and then turned. This does not
require force!
• Using the device
• Operation
1. Set the plasma cutter 1 up in a dry and
well ventilated area.
2. Position the machine in the vicinity of the
workpiece.
3. Press the on / off switch
17
.
4. Clamp the ground terminal
4
to the
workpiece to be cut and make sure that
there is a good electrical contact.
5. Set the cutting current on the current
controller
13
.
6. Position the plasma cutter
8
on the
workpiece so that the nozzle
8c
is free
and that a blowback of the molten metal
is not possible. Press the plasma burner
button
8a
. The transmitted cutting arch
is ignited on the edge of the sheet in this
manner.
7. Start cutting slowly and then increase the
speed in order to achieve the desired
cutting quality.
8. The speed must be regulated so that
a good cutting capacity can be
achieved. The plasma air creates
a straight arch (stainless steel, aluminium)
or a 5° arch of approach (soft steel).
9. While cutting make sure the nozzle is
always in contact with the workpiece.
To cut in the manual cutting mode,
pull the overlying burner across
the workpiece while maintaining
a constant speed. To achieve the perfect cut,
it is important for the material thickness to
comply with the correct cutting speed. If the
cutting speed is too low, the cutting edge
will be blunt due to the severe heat input.
The optimal cutting speed is achieved once
the cutting jet is slightly inclined towards
the rear while cutting. If the plasma burner
button
8a
is released, the plasma jet goes
out and the power source switches off.
The gas continues to flow for approx.
5 seconds in order to cool the burner.
The same process is followed when the
workpiece is pulled out with the plasma
burner button pressed
8a
. During the gas
post-flow time, the plasma cutter
1
must
not be switched off to avoid damaging the
plasma burner
8
as a result of overheating.
ATTENTION!
fThe device must be left on for approx.
2-3 minutes once the cutting work has
been completed. The cooler cools the
electronics.
Before use / Using the device

16
GB
• Plasma cutting types
Drag cutting
Hold the tip of the pistol low over the
workpiece and press the pistol switch.
Now move the pistol tip until there is contact
with the workpiece and the cutting arch
is fixed in position. Once the cutting arch
has been generated, move the pistol in the
desired direction. Makes sure that the pistol
tip is slightly angled and that contact with
the workpiece is maintained. This working
method is called drag cutting. Avoid quick
movements. Sparks falling off the top of the
workpiece is an indication of moving too
quickly. Move the pistol at a speed in which
the spark accumulation is concentrated on
the bottom side of the workpiece. Ensure
the material is completely separated prior to
continuing with this process. Set the necessary drag speed.
Distance cutting
In some cases, it is beneficial to cut while
holding the tip of the pistol at a height
of 1.5 mm to 3 mm above the workpiece.
This reduces the quantity of material that
is blown back into the tip. This makes it
possible to penetrate thicker material
strengths. Distance cutting should be used
if penetration or furrow work is carried out.
Furthermore, the ‘distance’ working technique can be used when you need to cut
sheet metal to minimise the risk of material
splashing back which could damage the tip.
Perforation
To drill through, place the tip approx.
3.2 mm above the workpiece. Hold the
pistol at a slight angle to guide the sparks
away from the pistol tip and your body.
Press the plasma burner button
8a
and lower
the tip of the pistol until there is a main
cutting arch and sparks begin to form. Test
the perforation on a test object that is no
longer needed and once there are no
problems start drilling through at the
previously defined cutting line on your
workpiece. Check the pistol for wear and
tear, cracks or exposed cable pieces.
Replace or repair them prior to using the
device. A badly worn pistol tip/nozzle
contributes to the reduction of speed, voltage
and unclean separation. An indication of a
badly worn pistol tip/nozzle is an extended
or oversized nozzle opening. The external
electrode must not be recessed by more
than 3.2 mm. Replace it if the wear is
greater than the specified dimensions.
If the protective cap is difficult to tighten,
check the thread.
Using the device

17
GB
Troubleshooting
Faults Cause of fault Troubleshooting
Indicator lamp
does not lit up?
No electrical connection.
ON/OFF switch set to off.
Check power cable.
Set switch to ON.
Ventilator does
not work?
Power line interrupted.
Power line ventilator faulty.
Ventilator faulty.
Check power line.
Warning lamp
switches on?
Overheating protection
switched on.
Input voltage too high.
Allow device to cool down.
Input voltage according
to type plate.
No output
current?
Machine faulty.
Overvoltage protection
activated.
Machine must be repaired.
Allow device to cool down.
Output current
does not
decrease?
Input voltage too low.
Connection cable cross-section
too low.
Observe input voltage
according to type plate.
Air current cannot
be regulated?
Compressed air hose
damaged or faulty.
Valve/manometer fails.
New connection of the hose.
HF-arc is not
created?
The burner switch is faulty.
Soldering point on the burner
switch or plug loosened.
Valve/manometer fails.
Renew electrode.
Bad ignition? Burner wear parts damaged
or worn.
Check HF spark gap.
Change wear parts.
Set spark gap.
Pistol is not ready
for operation?
Current switch is switched off.
Air transmission is restricted.
Workpiece is not connected to
the ground terminal.
Switch the current switch to
‘on’.
Another indication of this is
a green flame. Check the air
supply.
Check the connection.
• Troubleshooting

18
GB
Troubleshooting
Sparks fly
upwards,
instead of down
through the
material?
Plasma pistol does not
penetrate the material.
Pistol too far away from
the material.
Apparently material was
not grounded properly.
Lifting speed is too quick.
Increase the current.
Reduce the distance between
the pistol and material.
Check the connection
for correct grounding.
Reduce the speed.
Initial cut but not
completely drilled
through?
Potential connection problem. Check all connections.
Slag formation
on interfaces?
Tool/material creates heat.
Cutting speed too low
or current too high.
Individual parts of the pistol
are worn.
Allow the material to cool
down and then continue
cutting.
Increase the speed and/or
reduce the current until the
slag has been reduced to
a minimum.
Check and replace worn
parts.
Arc stops during
cutting?
Cutting speed too low.
Pistol is held too high and too
far away from the material.
Individual parts of the pistol
are worn.
Workpiece no longer
connected to the grounding
cable.
Increase the cutting speed until
the problem no longer exists.
Lower the pistol to the
recommended height.
Check and replace worn
parts.
Check the connections.
Insufficient
penetration?
Cutting speed too fast.
Pistol is not straight.
Metal is too thick.
Individual parts of the pistol
are worn.
Slow down the working
speed.
Adjust the inclination.
Several cycles necessary.
Check and replace worn
parts.

19
GB
Troubleshooting / Maintenance and care
• Maintenance and care
• Maintaining the burner
The parts displayed in Figure F are the
electrode
8d
, diffuser 8e and the nozzle
8c
. They can be replaced once the
nozzle clamping sleeve
8b
has been
unscrewed.
The electrode
8d
must be replaced
if there is a crater of approximately
1.5 mm depth in the centre.
ATTENTION!
fTo unscrew the electrode, do not apply
irregular pressure, gradually increase
pressure until the thread is released.
The new electrode must be screwed into
its bracket and blocked but not tightened
up to the stop.
The nozzle
8c
must be placed if the
central bore is damaged or if it has
expanded in comparison to a drilling of
a new nozzle. If the electrode
8d
or the
nozzle
8c
are replaced too late, this can
result in an overheating of the parts. This
can reduce the lift cycle of the diffuser 8e.
Once replaced, make sure the nozzle
clamping sleeve
8b
is tightened
sufficiently.
ATTENTION!
fThe nozzle clamp sleeve 8b must only
be screwed on to the burner
8
once
it has been equipped with the electrode
8d
, diffuser 8e and nozzle 8c.
fIf these parts are missing,
the device may malfunction
and it may create a hazard
for the operating personnel.
Consumables
wear quickly?
Performance was
overstretched.
Arc control time exceeded.
Incorrect pistol assembly.
Insufficient air supply,
pressure too low.
Faulty air compressor.
Material too thick, increase
the angle to avoid material
from being blown back into
the tip.
Do not control the arc for
more than 5 seconds.
You can also start with contact
between the pistol and metal
or with a 3.2 mm distance
to the metal.
See paragraph titled
‘Pistol set up’.
Check the air filter,
increase the air pressure.
Check the performance of the
air compressor and make sure
the inlet pressure is at least
100 PSI.

20
GB
• Maintenance
PLEASE NOTE!
fThe plasma cutter must be regularly
maintained for perfect function and
comply with the safety requirements.
Improper and wrong operation may
cause failures and damage to the
device.
Switch off the main power supply and
the main switch of the device prior to
carrying out maintenance or repair work
on the plasma cutter.
Regularly clean the outside of the plasma
cutter. Use compressed air, cotton waste
or a brush to remove dirt and dust.
• Storage
If you will not be using the device for
a while, protect it from dust by storing
it in a clean and dry place.
• Warranty and service
information
Warranty from Creative
Marketing & Consulting GmbH
We give you a warranty on this device of
3 years from the date of purchase. In the
event of product defects, you have legal
rights against the retailer of this product.
Your statutory rights are not affected in any
way by our warranty conditions, which are
described below.
• Warranty conditions
The warranty period begins on the date of
purchase. Please retain the original sales
receipt. This document is required as your
proof of purchase.
Should this product show any defect in
materials or manufacture within 3 years
from the date of purchase, we will repair
or replace it – at our discretion – free of
charge. This warranty service requires that
you retain proof of purchase (sales receipt)
for the defective device for the three year
period and that you briefly explain in writing
what the fault entails and when it occurred.
If the defect is covered by our warranty,
we will repair and return your product
or send you a replacement. The original
warranty period is not extended when
a device is repair or replaced.
• Extent of warranty
This device has been manufactured
according to strict quality guidelines and
carefully inspected before delivery.
The warranty applies to material and
manufacturing defects only. This warranty
does not cover product parts that are subject
to normal wear and tear and can therefore
be regarded as consumables, nor does
it cover damage to fragile parts such as
switches, rechargeable batteries or parts
made from glass.
This warranty is voided if the product
becomes damaged or is improperly used or
maintained. For proper use of the product,
all of the instructions given in the operating
Maintenance and care / Warranty and service information
21
GB
instructions must be followed precisely.
If the operating instructions advise you or
warn you against certain uses or actions,
these must be avoided in all circumstances.
The product is for consumer use only and
is not intended for commercial or trade use.
The warranty becomes void in the event
of misuse and improper use, use of force,
and any work on the device that has not
been carried out by our authorised service
branch.
• Processing of warranty
claims
To ensure prompt processing of your claim,
please follow the instructions given below.
Please retain your proof of purchase and
quote the product number (e.g. the EAN
code) in all correspondence.
The product number can be found on the
type plate, an engraving, the cover page
of your instructions (bottom left), or the
sticker on the back or underside of the
device. In the event of malfunctions or other
defects, please first contact our service
department below by phone or email.
If your product is found to be defective,
you can then send your product with proof
of purchase (till receipt) and a statement
describing what the fault involves and when
it occurred free of charge to the service
address given.
Please note:
On www.lidl-service.com you can
download this and several other
manuals, product videos and
software.
How to contact us:
GB
Name: C. M. C. GmbH
Website: www.cmc-creative.de
E-mail:
service.gb@cmc-creative.de
Phone: 0-808-189-0652
Registered office: Germany
IAN 307722
Please note that the following address is not
a service address. Please first contact the
service point given above.
C.M.C. GmbH
Katharina-Loth-Str. 15
66386 St. Ingbert
GERMANY
• Information about recycling
and disposal
Don’t throw away – recycle
Please return this device, accessories
and packaging
to your local recycling depot.
According to European Directive
2012/19/ EU, used electrical devices
must be collected separately for
environmentally compatible recycling
or recovery.Please return this device to
an approved waste management company
or use your municipal waste collection
service. Please ensure you comply with
local regulations. If you have any questions,
please contact your local authority or waste
management company.
Warranty and service ... / Information about recycling and disposal
22
GB
• Original EC Declaration
of Conformity
We,
C.M.C. GmbH
Responsible for documentation:
Alexander Hoffmann
Katharina-Loth-Str. 15
66386 St. Ingbert
Germany
hereby take sole responsibility for declaring
that the product
Plasma cutter PPS 40 A1
IAN: 307722
Year of manufacture: 04/19
Art. no.: 2163
Model: PPS 40 A1
meets the basic safety requirements
as specified in the European Directives
EC Guideline on Electromagnetic
Compatibility
2014 / 30 / EU
Machinery Directive
2006 / 42 / EC
and the amendments to these Directives.
The manufacturer will be solely responsible for
the creation of the declaration of conformity.
The object of the declaration described
above meets the requirements of Directive
2011/65/EU of the European Parliament
and of the Council of 8 June 2011 on the
restriction of the use of certain hazardous
substances in electrical and electronic
equipment.
This conformity assessment is based on the
following harmonised standards:
EN 60974-1:2012
EN 60974-10:2007
EN 55011:2009+A1:2010
EN 61000-3-11:2000
EN 61000-3-12:2011
St. Ingbert, 15/10/2018
On behalf of M. Sc. Alexander Hoffmann
– Quality Assurance –
Original EC Declaration of Conformity

23
GB

24
GB

25
HU
Tartalomjegyzék
A használt piktogramok táblázata ........................................................................... Oldal 26
Bevezetés............................................................................................................................. Oldal 27
Rendeltetésszerű használat .................................................................................................. Oldal 27
Felszereltség ......................................................................................................................... Oldal 28
Műszaki adatok ...................................................................................................................... Oldal 28
Szállítási terjedelem .............................................................................................................. Oldal 28
Biztonsági tudnivalók .................................................................................................... Oldal 29
Plazmával kapcsolatos általános magyarázatok.............................................. Oldal 34
Üzembe helyezés előtt................................................................................................... Oldal 35
Felállítási környezet ............................................................................................................... Oldal 35
A sűrített levegő csatlakoztatása ........................................................................................... Oldal 35
A vágóégő csatlakoztatása .................................................................................................... Oldal 35
A testkábel csatlakoztatása ................................................................................................... Oldal 35
Üzembe helyezés ............................................................................................................. Oldal 35
Kezelés .................................................................................................................................. Oldal 35
Plazmavágási módok ............................................................................................................ Oldal 36
Hibaelhárítás ...................................................................................................................... Oldal 37
Karbantartás és ápolás ................................................................................................. Oldal 39
Az égő karbantartása ............................................................................................................ Oldal 39
Karbantartás .......................................................................................................................... Oldal 40
Tárolás ................................................................................................................................... Oldal 40
Garanciával és szervizeléssel kapcsolatos tudnivalók................................. Oldal 40
Garanciális feltételek ............................................................................................................. Oldal 40
A garancia terjedelme ............................................................................................................ Oldal 41
Eljárás garanciális esetben .................................................................................................... Oldal 41
Környezettel kapcsolatos tudnivalók és ártalmatlanítási adatok ............ Oldal 42
Eredeti EK megfelelőségi nyilatkozat .................................................................... Oldal 42
Hu jótállási tájékoztató .................................................................................................. Oldal 43

26
HU
A használt piktogramok táblázata
• A használt piktogramok táblázata
Vigyázat!
Olvassa el az üzemeltetési
útmutatót!
Vigyázat! Veszély
elektromos áramütés miatt!
Figyelem, lehetséges
veszélyek!
Fontos tudnivaló!
Ne dobja az elektromos
készülékeket a háztartási
szemét közé!
Környezetbarát módon
ártalmatlanítsa a csomago-
lást és a készüléket!
Újrahasznosítható
anyagokból készült.
Ne használja a készüléket
szabadban és esőben!
A hegesztőelektróda általi
áramütés halálos lehet!
A hegesztési füstök
belélegzése veszélyeztetheti az egészséget!
A hegesztési szikrák
robbanást vagy tüzet
okozhatnak!
Az ívfénysugarak
károsíthatják a szemet,
és megsérthetik a bőrt.
Az elektromágneses
mezők megzavarhatják
a szívritmus-szabályozók
működését!
AC hálózati csatlakozó.
H Szigetelési osztály.
Kapocs a külső (földelő)
védővezetékhez.
Vágás a plazmavágóval. Fugavésés.
Fémlemezek vágása. Expandált fém vágása.
Hőmérséklet-gyelő
ellenőrzőlámpája.
Testkapocs dugasz
csatlakozója.
Hálózati csatlakozás
ellenőrzőlámpája.
Plazmaégő dugasz
csatlakozója
Plazmaégő áramdugasza.

27
HU
PPS 40 A1 plazmavágó
• Bevezetés
Gratulálunk! Kiváló minőségű
termék mellett döntött. A termékkel
még az első üzembe helyezés előtt
ismerkedjen meg. Figyelmesen olvassa el
a biztonsági utasításokat. A termék üzembe
helyezését csak oktatásban részesített
személy végezheti.
A BERENDEZÉS NE KERÜLJÖN
GYERMEKEK KEZÉBE!
TUDNIVALÓ!
fAz alábbi szövegben a „termék” vagy
„készülék” kifejezés a jelen kezelési
útmutatóban leírt plazmavágóra
vonatkozik.
• Rendeltetésszerű használat
A készülék minden elektromosan vesetőképes fém sűrített levegős plazmavágására
alkalmas. A rendeltetésszerű használat
részét képezi a biztonsági tudnivalók,
valamint a szerelési útmutató és a kezelési
útmutatóban található üzemeltetési tudnivalók gyelembevétele is.
A legszigorúbban be kell tartani az
érvényes baleset-megelőzési előírásokat.
Nem szabad használni a készüléket:
nem elegendően szellőztetett
helyiségekben,
vizes vagy nedves környezetben,
robbanásveszélyes környezetben,
csövek kiolvasztására,
szívritmus-szabályozót viselő emberek
közelében és
könnyen lobbanó anyagok közelében.
Csak a leírtak szerint, a rendeltetésszerű
használatnak megfelelően használja
a terméket. Őrizze meg ezt az útmutatót.
Ha átadja a terméket egy harmadik fél
számára, mellékelje az összes dokumentu-
mot. Minden rendeltetésszerű használattól
eltérő alkalmazás tilos, és adott esetben
veszélyes lehet. A garancia nem vonatko-
zik az útmutató be nem tartásából vagy
a nem rendeltetésszerű használatból eredő
károkra, és a gyártó céget nem terheli
felelősség ilyen esetben.
FENNMARADÓ KOCKÁZAT
Fennmaradó kockázatok mindig vannak,
még akkor is, ha a készüléket az előírásoknak megfelelően kezeli.
A következő veszélyek léphetnek fel a jelen
plazmavágó felépítésével és kivitelével
összefüggésben:
szem sérülése vakítás miatt,
a készülék vagy a munkadarab
forró részeinek megérintése
(égési sérülések),
szakszerűtlen biztosítás esetén
baleset- és tűzveszély a szétrepülő
szikrák vagy salakdarabok miatt,
füstök és gázok egészségre káros kibo-
csátása levegőhiány, ill. zárt terekben
a nem elegendő elszívás miatt.
Csökkentse a fennmaradó kockázatokat
azzal, hogy a készüléket gondosan, és
az előírásoknak megfelelően használja,
valamint minden utasítást betart.
Bevezetés

28
HU
• Felszereltség
TUDNIVALÓ!
f A kicsomagolást követően azonnal
ellenőrizze, hogy nem hiányzik semmi a csomagból, valamint a készülék
kifogástalan állapotú-e. Ha a készülék
hibás, ne használja.
1
Plazmavágó
2
Hordfogantyú
3
Hálózati dugasz
4
Testkapocs
5
Testkapocs dugasza
6
Plazmaégő áramdugasza
7
Plazmaégő dugasza
8
Plazmaégő
8a
Plazmaégő gombja
8b
Fúvókaszorító hüvely
8c
Fúvókák
8d
Elektróda
8e
Diúzor
9
Túlmelegedés elleni védelem
ellenőrzőlámpája
10
Plazmaégő áram-csatlakozóaljzata
11
Testkapocs csatlakozóaljzata
12
Plazmaégő csatlakozóaljzata
13
Áramszabályozó
14
Hálózat ellenőrzőlámpája
15
Sűrített levegő tömlőjének
gyorscsatlakozója
16
Sűrített levegő tömlője
17
BE/KI kapcsoló
I jelentése: bekapcsolva
O jelentése: kikapcsolva
18
Kondenzvíz tartálya
19
Nyomásmérő
20
Sűrített levegő csatlakozója
21
Nyomásszabályozó forgatógomb
22
Tömlőbilincs
• Műszaki adatok
Teljesítmény: 15 – 40 A
Bemenet: 230 V~ 50 Hz
Súly: kb. 5,2 kg
Méretek: 341 x 113 x 237 mm
Szigetelési osztály: H
Bekapcsolási
időtartam: 35% 40 A mellett
(25 °C)
20% 40 A mellett
(40 °C)
„Valóságos”
vágásteljesítmény: 0,1 mm – 12 mm
(anyagtól függően)
vörösréz: 1 – 4 mm
rozsdamentes acél:
1 – 8 mm
alumínium:1 – 8 mm
vas: 1 – 10 mm
acél: 1 – 12 mm
Munkanyomás: 4 – 4,5 bar
(4 bar előre beállítva)
• Szállítási terjedelem
1 plazmavágó
1 testkábel kapoccsal
1 vágókábel vágóégővel
1 sűrített levegős tömlő gyorscsatlakozóval
2 tömlőbilincs
2 fúvóka
3 elektróda (1 előszerelt)
1 kezelési útmutató
3 égőtakaró (1 előszerelt)
Bevezetés

29
HU
• Biztonsági tudnivalók
FIGYELMEZTETÉS!
f Kérjük, hogy a használat
előtt alaposan olvassa el
gondosan a kezelési útmu-
tatót. A kezelési útmutató
segítségével ismerje meg
a készüléket, annak megfelelő használatát, valamint
a biztonsági utasításokat.
Az útmutató a készülék
része, és mindig kéznél kell
lennie!
FIGYELMEZTETÉS!
f KISGYERMEKEK
ÉS GYERMEKEKRE
LESELKEDŐ ÉLET- ÉS
BALESETVESZÉLY!
Soha ne hagyja felügyelet
nélkül a gyermekeket
a csomagolóanyaggal.
Fennáll a fulladás veszélye.
Ezt a készüléket 16 évnél
idősebb gyermek, valamint
csökkent zikai, érzékszervi
vagy mentális képességekkel
bíró vagy tapasztalat vagy
tudás hiányában szenvedő
személyek csak akkor hasz-
nálhatják, ha felügyelet alatt
állnak, vagy a készülék
biztonságos használatáról
kioktatást kaptak, és a készülék használatából adódó
veszélyeket megértették.
Gyermekek nem játszhatnak
a készülékkel. A tisztítást és
a felhasználói karbantartást
gyermekek felügyelet nélkül
nem végezhetik.
Bízza a javítási és/vagy
karbantartási munkák elvég-
zését minősített elektromos
szakemberekre.
Csak a szállítási terjedelem
részét képező hegesztővezetékeket használja.
Üzemelés közben lehetőség
szerint ne álljon a készülék
közvetlenül a fal mellett,
ne legyen letakarva, és ne
legyen beszorítva más készülékek közé, hogy mindig
elegendő levegő jusson át
a szellőzőréseken. Győződjön
meg arról, hogy a készülék
helyesen csatlakozik a hálózati feszültséghez. Kerülje
a hálózati vezeték húzóterhelését. Húzza ki a készülék
dugaszát az aljzatból, mielőtt
más helyen állítaná fel
a készüléket.
Mindig kapcsolja ki a készü-
léket a BE/KI kapcsolóval,
ha nem használja azt.
Tegye szigetelt alátétre az
Biztonsági tudnivalók

30
HU
elektródatartót, és csak
15 percnyi lehűlés után húzza
ki az elektródákat a tartójukból
.
Forró fémet és szikrákat fújhat el
a vágóív. Ezek a szálló szikrák,
a forró fém, valamint a forró
munkadarabok és a készülék
forró részei tüzet vagy égési
sérüléseket okozhatnak.
Ellenőrizze a munkakörnyezetet,
és gondoskodjon alkalmas mun-
kahelyről a készülék használata
előtt.
Távolítson el minden éghető
anyagot a plazmavágó 10 m
sugarú környezetéből. Ha ez
nem lehetséges, akkor takarja
le ezeket a tárgyakat alkalmas
takaróval.
Ne vágjon olyan helyen, ahol
a szétrepülő szikrák éghető
anyagra eshetnek.
Védje saját magát és másokat
a szétrepülő szikrákkal és
a forró fémmel szemben.
Legyen óvatos, mert a szikrák
és a forró anyagok vágáskor
a réseken és nyílásokon
keresztül könnyen eljuthatnak
a szomszédos területekre.
Legyen tudatában annak,
hogy a mennyezeten, a tala-
jon vagy a köztes területen
végzett vágás tüzet okozhat
a szemben fekvő, nem látható
oldalon.
Csatlakoztassa a munkaká-
belt a munkahelyéhez
a lehető legközelebb eső
dugaszolóaljzatához, hogy
ne nyúljon át az áramkábel
a teljes helységen, és esetleg
olyan, ismeretlen hely felett
haladjon, ahol elektromos
áramütést, szikrázást vagy
tüzet okozhat.
Ne használja a plazmavágót
megfagyott vezetékek
kiolvasztására.
Veszély elektromos áramütés
miatt:
FIGYELMEZTETÉS!
f A hegesztőelektróda miatti
elektromos áramütés halálos
lehet.
Ha használja a plazmavágót
hóban vagy esőben.
Hordjon száraz, szigetelt
kesztyűt.
Ne fogja meg csupasz kézzel
az elektródát.
Na hordjon nedves vagy
károsodott kesztyűt.
Védje magát áramütés ellen
a munkadarab elszigetelésével.
Ne nyissa ki a készülék házát.
Biztonsági tudnivalók
 Loading...