

Parkside PBSD 600 A1 Translation Of The Original Instructions
BELT SANDER PBSD 600 A1
BELT SANDER
Translation of the original instructions
IAN 298810
BANDSCHLEIFER
Originalbetriebsanleitung

Before reading, unfold the page containing the illustrations and familiarise yourself with all functions of
the device.
Klappen Sie vor dem Lesen die Seite mit den Abbildungen aus und machen Sie sich anschließend mit allen
Funktionen des Gerätes vertraut.
GB / IE / NI Translation of t he original instructions Page 1
DE / AT / CH Originalbetriebsanleitung Seite 13
A

Contents
Introduction ......................................................2
Intended use ................................................................ 2
Depicted components ......................................................... 2
Package contents ............................................................ 2
Technical data .............................................................. 2
General Power Tool Safety Warnings ................................3
1. Work area safety .......................................................... 3
2. Electrical safety ........................................................... 3
3. Personal safety ............................................................ 4
4. Power tool use and care .................................................... 4
5. Service .................................................................. 5
Appliance-specific safety instructions for grinders ................................... 5
Operation .......................................................5
Tensioning/replacing the abrasive belt ........................................... 5
Adjusting the additional handle ................................................. 5
Flipping up the front cover ..................................................... 6
Attaching/removing a dust extraction unit ......................................... 6
Working procedures ..........................................................7
Use .............................................................7
Switching on and off .........................................................7
Emptying the dust collector. . . . . . . . . . . . . . . . . . . . . . . . . . . . . . . . . . . . . . . . . . . . . . . . . . . . . 7
Selecting speed and abrasive belt ............................................... 8
Stationary work ............................................................. 8
Tips and tricks ............................................................... 9
Maintenance and cleaning ..........................................9
Disposal .........................................................9
Kompernass Handels GmbH warranty ..............................10
Service .........................................................11
Importer .......................................................11
Translation of the original Conformity Declaration .....................12
PBSD 600 A1
GB│IE│NI
│
1 ■

BELT SANDER PBSD 600 A1
Introduction
Congratulations on the purchase of your new appliance. You have chosen a high-quality product. The
operating instructions are part of this product. They
contain important information about safety, usage
and disposal. Before using the product, please
familiarise yourself with all operating and safety
instructions. Use the product only as described and
for the range of applications specified. Please also
pass these operating instructions on to any future
owner.
Intended use
The belt grinder is designed for the dry surface
sanding of wood, plastic, metal and plaster and
painted surfaces (depending on the type of sandpaper used). The appliance may only be used
for dry sanding. Please note that you need to use
appropriate abrasive belts with different grains for
working different materials, and that you may need
to adapt the speed to suit the material. The appliance is not intended for commercial use. Any other
use of or modification to the appliance is deemed
to be improper and carries the risk of serious personal injury. The manufacturer accepts no responsibility for damage(s) attributable to misuse.
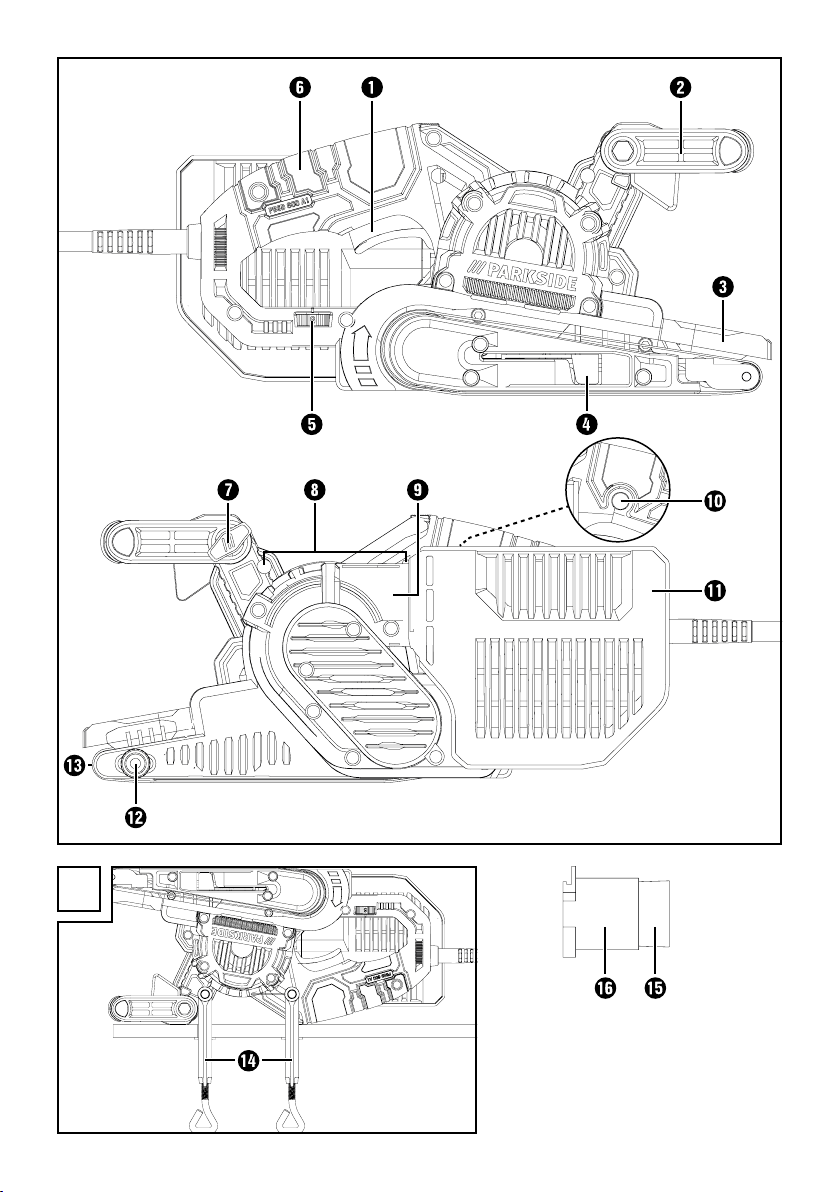
Depicted components
ON/OFF switch
Additional handle (rubberised grip)
Front cover
Clamping lever for abrasive belt
Belt speed adjusting wheel
Handle (rubberised grip)
Screw for adjusting the handle
Recesses for screw clamps
Connection for dust collector
Locking button for ON/OFF switch
Dust collector
Adjustment screw for belt tracking
Abrasive belt
Screw clamp
Reducer
Dust extraction adapter
Package contents
1 belt sander PBSD 600 A1
1 abrasive belt for wood (grain 80)
1 dust collector
1 dust extraction adapter and reducer (for external
dust extraction)
2 screw clamps
1 set of operating instructions
Technical data
Rated voltage: 230 V ∼50 Hz
(AC)
Rated power
consumption: 600 W
Idling belt speed: 170–250 m/min
Rated idling speed:
Abrasive belt: 75 x 457 mm
Protection class: II /
Noise emission value:
Noise measurement value determined in accordance with EN 60745. The A-rated noise level of
the power tool is typically as follows:
Sound pressure level: L
Uncertainty: K
Sound power level: L
Uncertainty: K
Wear hearing protection!
Total vibration value:
Total vibration value (vector total of three directions) determined in accordance with EN 60745:
Grinding with the grinding disc: a
Uncertainty K = 1.5 m/s
n0 360–560 rpm
(double insulation)
= 91 dB (A)
pA
= 3 dB
pA
= 102 dB (A)
WA
= 3 dB
WA
= 4.2 m/s
h
2
2
■ 2 │ GB
│IE│
NI
PBSD 600 A1

NOTE
► The vibration level specified in these instruc-
tions has been measured in accordance
with the standardised measuring procedure
specified in EN 60745 and can be used to
make equipment comparisons. The specified
vibration emission value can also be used to
make an initial exposure estimate. The vibration emission value varies in accordance with
the use of the power tool and may be higher
than the value specified in these instructions
in some cases. Regular use of the power tool
in this way may cause the user to underestimate the vibration.
WARNING!
► Try to keep the vibration loads as low as
possible. Measures to reduce the vibration
load are, e.g. wearing gloves and limiting
the working time. This applies to all states of
operation (e.g. times when the power tool is
switched off and times where the power tool
is switched on but running without load).
General Power Tool
Safety Warnings
WARNING!
► Read all safety warnings and all instruc-
tions. Failure to follow the warnings and
instructions may result in electric shock, fire
and/or serious injury.
Save all warnings and instructions for future
reference.
The term "power tool" in the warnings refers to your
mains-operated (corded) power tool or batteryoperated (cordless) power tool.
1. Work area safety
a) Keep work area clean and well lit.
Cluttered or dark areas invite accidents.
b) Do not operate power tools in explosive atmos-
pheres, such as in the presence of flammable
liquids, gases or dust. Power tools create sparks
which may ignite the dust or fumes.
c) Keep children and bystanders away while
operating a power tool. Distractions can cause
you to lose control.
PBSD 600 A1
2. Electrical safety
a) Power tool plugs must match the outlet.
Never modify the plug in any way.
Do not use any adapter plugs with earthed
(grounded) power tools. Unmodified plugs
and matching outlets will reduce risk of electric
shock.
b) Avoid body contact with earthed or grounded
surfaces, such as pipes, radiators, ranges and
refrigerators. There is an increased risk of elec-
tric shock if your body is earthed or grounded.
GB│IE│NI
│
3 ■

c) Do not expose power tools to rain or wet
conditions. Water entering a power tool will
increase the risk of electric shock.
d) Do not abuse the cord. Never use the cord
for carrying, pulling or unplugging the power
tool. Keep cord away from heat, oil, sharp
edges or moving parts. Damaged or entangled
cords increase the risk of electric shock.
e) When operating a power tool outdoors, use
an extension cord suitable for outdoor use.
Use of a cord suitable for outdoor use reduces
the risk of electric shock.
f) If operating a power tool in a damp location
is unavoidable, use a residual current device
(RCD) protected supply. Use of an RCD reduces
the risk of electric shock.
3. Personal safety
a) Stay alert, watch what you are doing and
use common sense when operating a power
tool. Do not use a power tool while you are
tired or under the influence of drugs, alcohol
or medication. A moment of inattention while
operating power tools may result in serious
personal injury.
b) Use personal protective equipment. Always
wear eye protection. Protective equipment such
as dust mask, non-skid safety shoes, hard hat,
or hearing protection used for appropriate
conditions will reduce personal injuries.
c) Prevent unintentional starting. Ensure the
switch is in the off-position before connecting
to power source and/or battery pack, picking
up or carrying the tool. Carrying power tools
with your finger on the switch or energising
power tools that have the switch on invites accidents.
d) Remove any adjusting key or wrench before
turning the power tool on. A wrench or a key
left attached to a rotating part of the power tool
may result in personal injury.
e) Do not overreach. Keep proper footing and
balance at all times. This enables better control
of the power tool in unexpected situations.
f) Dress properly. Do not wear loose clothing or
jewellery. Keep your hair, clothing and gloves
away from moving parts. Loose clothes, jewel-
lery or long hair can be caught in moving parts.
g) If devices are provided for the connection of
dust extraction and collection facilities, ensure
these are connected and properly used. Use of
dust collection can reduce dust-related hazards.
4. Power tool use and care
a) Do not force the power tool. Use the correct
power tool for your application. The correct
power tool will do the job better and safer at
the rate for which it was designed.
b) Do not use the power tool if the switch does
not turn it on and off. Any power tool that cannot be controlled with the switch is dangerous
and must be repaired.
c) Disconnect the plug from the power source
and/or the battery pack from the power tool
before making any adjustments, changing
accessories or storing power tools. Such
preventive safety measures reduce the risk of
starting the power tool accidentally.
d) Store idle power tools out of the reach of
children and do not allow persons unfamiliar
with the power tool or these instructions to
operate the power tool. Power tools are dan-
gerous in the hands of untrained users.
e) Maintain power tools. Check for misalignment
or binding of moving parts, breakage of parts
and any other condition that may affect the
power tool’s operation. If damaged, have
the power tool repaired before use. Many
accidents are caused by poorly maintained
power tools.
f) Keep cutting tools sharp and clean. Properly
maintained cutting tools with sharp cutting
edges are less likely to bind and are easier to
control.
g) Use the power tool, accessories and tool
bits etc. in accordance with these instructions,
taking into account the working conditions
and the work to be performed. Use of the
power tool for operations different from those
intended could result in a hazardous situation.
■ 4 │ GB
│IE│
NI
PBSD 600 A1

5. Service
a) Have your power tool serviced by a qualified
repair person using only identical replacement parts. This will ensure that the safety of
the power tool is maintained.
Appliance-specific safety instructions
for grinders
■ Hold the appliance by the insulated handles
as the abrasive belt can come into contact
with its own power cable. Damage to a live
wire may make exposed metal parts of the
power tool live and could give the operator an
electric shock.
WARNING!
■ Dusts from materials such as leaded paint,
some types of wood and metal can be harmful to your health.
■ Contact with or inhalation of these dusts can
represent a health hazard for the person
operating the appliance and other people in
the vicinity.
■ Wear safety goggles and a protective dust
mask!
Operation
Tensioning/replacing the abrasive
belt
WARNING! RISK OF INJURY
■ Always remove the power plug from the wall
socket before carrying out any work on the
belt grinder.
1. Loosen the clamping device for the abrasive
belt by swivelling the clamping lever
the way out. The abrasive belt can now be
removed.
2. Now fit a new abrasive belt
belt to work on a different material or to use a
different grain size.
IMPORTANT: The direction of the arrows on
the inside of the abrasive belt and on the
appliance housing must match.
3. Push the clamping lever
position.
Manually adjusting the abrasive belt
If the belt tracking is not centred when you switch
on the appliance, you may need to manually adjust it.
♦ To do this, turn the adjusting screw
front roller until the abrasive belt is running
centred.
IMPORTANT: It is important to ensure that
the abrasive belt does not rub against the
housing. Check the belt tracking regularly and
adjust it with the adjusting screw if required .
back into its initial
all
or swap the
:
on the
PBSD 600 A1
Adjusting the additional handle
You can position the additional handle in several
different positions.
♦ To reposition the additional handle
screw .
♦ Move the additional handle
position.
♦ Retighten the screw
.
GB│IE│NI
undo the
to the required
│
5 ■
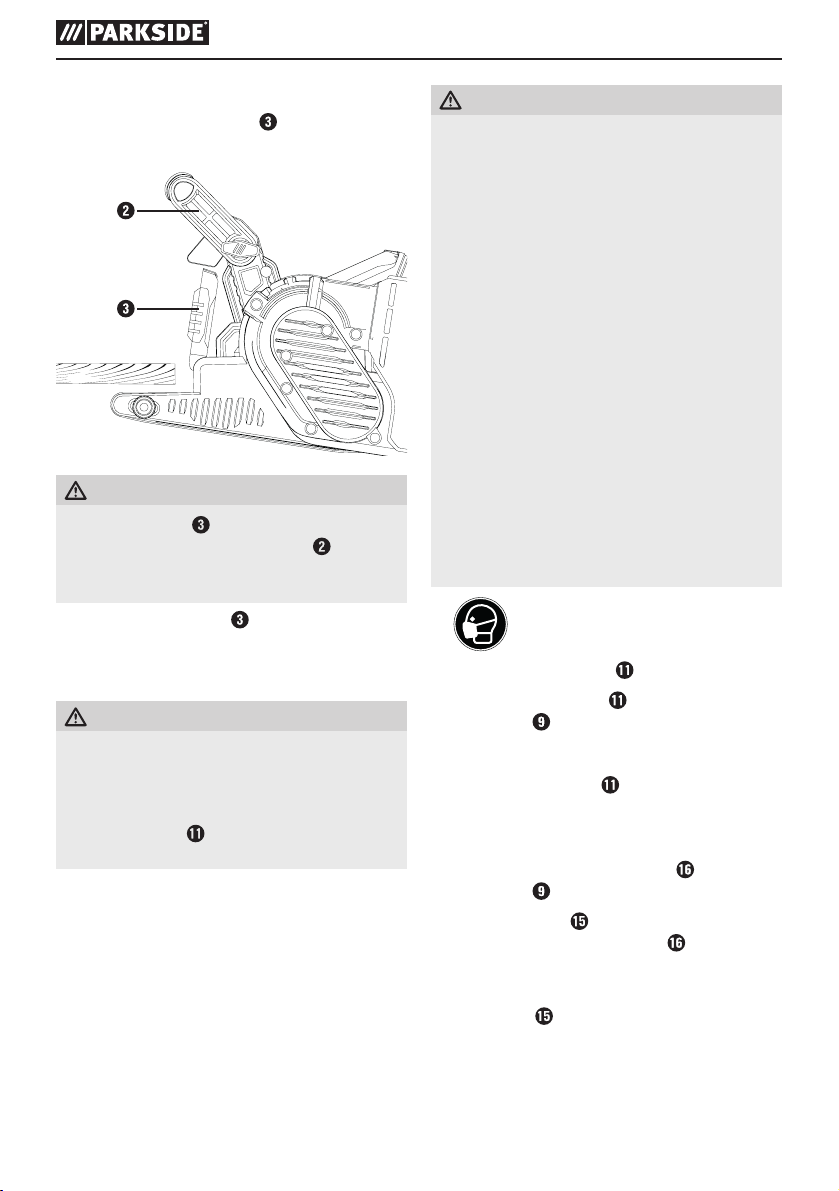
Flipping up the front cover
You can flip up the front cover to grind in hard-toreach areas (see illustration).
WARNING!
► The front cover
upwards if the additional handle is also
positioned upwards (see section "Adjusting
the additional handle").
♦ Flip up the front cover
can only be flipped
.
Attaching/removing a dust extraction unit
WARNING! RISK OF EXPLOSION!
■ If there is an explosive dust/air mixture, you
must use a specially designed extraction
appliance. RISK OF FIRE DUE TO FLYING
SPARKS! Do not use dust extraction systems
(dust collector
grinding metals.
■ Materials containing asbestos must not be pro-
cessed. Asbestos is a known carcinogen.
or vacuum cleaner) when
WARNING! RISK OF FIRE!
■ When working with power tools which
have a dust collector or can be connected
to a vacuum cleaner via a vacuum cleaner
adapter, there is a risk of fire! In unfavourable
conditions, e.g. when sparks are flying while
sanding metal or metal residues in wood,
wood dust in the dust collector (or the bag
of the vacuum cleaner) can spontaneously
ignite. This is a particular risk if the wood
dust is mixed with paint residues or other
chemicals and the workpiece has become hot
after being worked for a long time. Therefore,
do not allow the workpiece to overheat and
always empty the dust box or the dust bag
of the vacuum cleaner before taking a break
from work.
■ Ensure that your workplace is adequately
ventilated.
■ Observe the regulations applicable in
your country regarding the materials to be
worked.
■
Fitting the dust collector
♦ Push the dust collector
connection from above.
Dismantling/removing the dust collector:
♦ Pull the dust collector
Connecting a dust extraction adapter and
reducer for an external extraction appliance:
♦ Push the dust extraction adapter
connection .
♦ Push the reducer
adapter into the adapter fitting .
♦ Push the hose from a suitable dust extraction ap-
pliance (e.g. a workshop vacuum cleaner) onto
the reducer
Wear a dust mask.
:
onto the dust collector
off upwards.
onto the
for the dust extraction
for external vacuum extraction.
■ 6 │ GB
│IE│
NI
PBSD 600 A1
 Loading...