


Speaker System
Operating Instructions Instrucciones de funcionamiento Mode d’emploi
Bruksanvisning Bedienungsanleitung Istruzioni per l’uso Gebruiksaanwijzing Betjeningsvejledning
Návod k obsluze Instrukcja obsługi
Model No. SB-HTS250
SB-CSS250
SB-HTS250
SB-CSS250
E
Before connecting, operating or adjusting this product, please read these instructions completely. Please keep this manual for future reference.
Antes de conectar, operar o ajustar este producto, sírvase leer estas instrucciones completamente. Guarde este manual.
Avant de raccorder, faire fonctionner ou régler l’appareil, lire attentivement tout ce mode d’emploi.
Conserver ce manuel.
Läs denna bruksanvisning helt innan du ansluter, använder eller justerar denna produkt. Spara denna bruksanvisning.
DEUTSCH |
Siehe Seite 2, 10–15 und 19 |
|
sowie den hinteren Einband. |
ITALIANO |
Vedere alle pagg. 2, 10–15, 19 |
|
e la copertina posteriore. |
NEDERLANDS |
Zie bladzijden 3, 10–15, 19 en |
|
omslagpagina. |
DANSK |
Se side 3, 10–15, 19 og |
|
bagsiden. |
ČESKY |
Viz str. 3, 16–18 a zadní strana |
|
obalu. |
POLSKI |
Patrz strony 3, 16–18 i |
|
okładka tylna. |
Bitte lesen Sie diese Bedienungsanleitung vor dem
Anschließen, Inbetriebnehmen oder Einstellen dieses Gerätes vollständig durch.
Diese Anleitung bitte aufbewahren.
Prima di collegare, far funzionare o regolare l’apparecchio, leggere completamente queste istruzioni.
Conservare questo manuale.
Gelieve deze gebruiksaanwijzing volledig door te lezen alvorens dit product aan te sluiten, te bedienen of af te stellen. Bewaar deze gebruiksaanwijzing.
Læs venligst hele denne betjeningsvejledning, før du tilslutter, betjener eller indstiller dette apparat.
Gem vejledningen til senere brug.
Dâíve neƒ zaçnete jakékoli zapojování, operace nebo nastavování tohoto vÿrobku, prostudujte si prosím celÿ tento návod. Uschovejte si prosím tento návod k obsluze.
Przed uruchomieniem sprzètu prosimy o dokìadne zapoznanie siè z treøcià niniejszej instrukcji. Prosimy o zachowanie niniejszej instrukcji obsìugi.
Niniejsza instrukcja zostaìa opracowana na podstawie oryginalnej publikacji firmy MATSUSHITA ELECTRIC INDUSTRIAL CO., LTD.
RQT5893-E
1
RQT5893
Dear customer
Thank you for purchasing this product.
For optimum performance and safety, please read these instructions carefully.
System |
SB-HTS250 |
|
System |
SB-CSS250 |
|
|
|
|
|
Speakers × 5 |
SB-AFC250 |
|
Speakers × 3 |
SB-AFC250 |
|
|
|
|
|
Please check and identify the supplied accessories.
Contents |
|
Speaker Set-up |
.............................................................................. 4 |
Location ....................................................................................... |
6 |
Connections ................................................................................ |
6 |
Notes .............................................................................................. |
8 |
Specifications .............................................................................. |
19 |
Maintenance ................................................................. |
Back cover |
Kära kund
Tack för valet av denna produkt.
Läs igenom bruksanvisningen noga för bästa resultat och för säkerhets skull.
System |
SB-HTS250 |
|
System |
SB-CSS250 |
Högtalare × 5 |
SB-AFC250 |
|
Högtalare × 3 |
SB-AFC250 |
Kontrollera och identifiera de medföljande tillbehören.
Innehåll |
|
Uppsättning av högtalarna |
........................................................... 5 |
Placering ..................................................................................... |
7 |
Anslutningar ................................................................................ |
7 |
Anmärkningar ................................................................................ |
9 |
Tekniska data .............................................................................. |
19 |
Underhåll ........................................................ |
Omslagets baksida |
Estimado cliente
Muchísimas gracias por haber adquirido este aparato.
Lea con atención estas instrucciones para obtener las máximas prestaciones y seguridad.
Sistema |
SB-HTS250 |
Sistema |
SB-CSS250 |
5 altavoces |
SB-AFC250 |
3 altavoces |
SB-AFC250 |
Verifique e identifique los accesorios suministrados. |
|||
Índice |
|
|
|
Instalación de altavoces ............................................................... |
|
4 |
|
Ubicación ..................................................................................... |
|
|
6 |
Conexiones .................................................................................. |
|
|
6 |
Notas .............................................................................................. |
|
|
8 |
Especificaciones técnicas ......................................................... |
|
19 |
|
Mantenimiento ..................................................... |
|
|
Cubierta trasera |
Sehr geehrter Kunde
Wir möchten Ihnen dafür danken, daß Sie sich für diese Anlage entschieden haben.
Für optimale Leistung und Sicherheit lesen Sie bitte diese Bedienungsanleitung aufmerksam durch.
Anlage |
SB-HTS250 |
|
Anlage |
SB-CSS250 |
Lautsprecher × 5 |
SB-AFC250 |
|
Lautsprecher × 3 |
SB-AFC250 |
Bitte das mitgelieferte Zubehör auf Vollständigkeit überprüfen.
Inhalt |
|
Aufstellung der Lautsprecher |
.................................................... 10 |
Aufstellung ................................................................................. |
12 |
Anschlüsse ................................................................................ |
12 |
Hinweise ...................................................................................... |
14 |
Technische Daten ........................................................................ |
19 |
Pflege und Instandhaltung ................................ |
hinterer Einband |
Cher client
Nous vous remercions pour votre achat de cet appareil.
Pour en obtenir des performances idéales et pour votre sécurité, veuillez lire attentivement le présent manuel.
Système |
SB - HTS250 |
Système |
SB-CSS250 |
Enceintes × 5 |
SB - AFC250 |
Enceintes × 3 |
SB-AFC250 |
Cocher les accessoires pour vérifier qu’ils sont bien tous dans |
|||
l’emballage. |
|
|
|
Table des matières |
|
|
|
Installation des enceintes ............................................................ |
|
5 |
|
Positionnement |
............................................................................ |
|
7 |
Raccordements |
........................................................................... |
|
7 |
Remarques ..................................................................................... |
|
|
9 |
Données techniques ................................................................... |
|
19 |
|
Entretien .......................................................... |
|
Couverture de dos |
|
Caro cliente
La ringraziamo dell’acquisto di questo prodotto.
Per ottenerne le prestazioni migliori e per la sua sicurezza, legga attentamente queste istruzioni.
Sistema |
SB-HTS250 |
|
Sistema |
SB-CSS250 |
Diffusori × 5 |
SB-AFC250 |
|
Diffusori × 3 |
SB-AFC250 |
Verificare e identificare gli accessori in dotazione.
Sommario |
|
Sistemazione dei diffusori |
......................................................... 10 |
Collocazione .............................................................................. |
12 |
Connessioni ............................................................................... |
12 |
Note .............................................................................................. |
14 |
Dati tecnici ................................................................................... |
19 |
Manutenzione .............................................. |
Copertina posteriore |
|
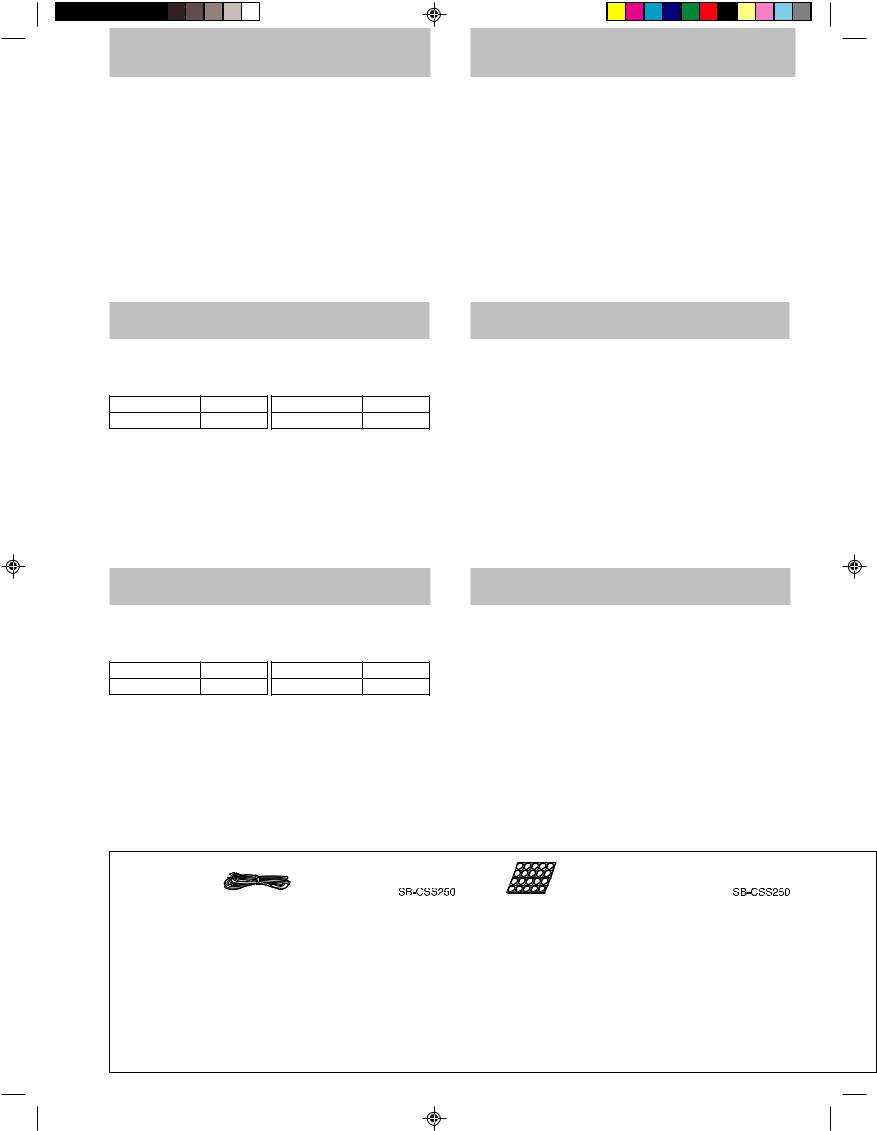
Accessories |
|
|
|
|
|
|
...................Speaker cable (short) |
3 pcs |
.......... 1 pc. |
|||
|
Accesorios |
Cable de altavoces (corto) ...... |
3 piezas |
..... 1 pieza. |
||
|
Accessoires |
Câble d’enceinte (court) ............... |
3 pc. |
.......... 1 pc. |
||
|
Tillbehör |
Högtalarkabel (kort) ...................... |
3 st. |
........... 1 st. |
||
|
Zubehör |
Lautsprecherkabel (kurz) .......... |
3 Stck. |
....... 1 Stck. |
||
|
Accessori |
Cavo diffusori (corto) .......................... |
3 |
1............... |
||
|
Accessoires |
Luidsprekerkabel (kort) ................. |
3 st. |
........... 1 st. |
||
|
Tilbehør |
Højttalerkabel (korte) .................... |
3 stk. |
......... 1 stk. |
||
|
Příslušenství |
Kabel reprosoustavy (krátký) |
........... 3 ks. |
........... 1 ks. |
||
2 |
Wyposażenie |
.............Kabel głośnikowy (krótki) |
3 szt. |
......... 1 szt. |
||
|
|
|
|
|
|
|
RQT5893
|
|
|
|
|
|
..................................Speaker feet (1 sheet) |
|
20 feet |
.............. |
12 feet |
|
Patas de los altavoces (1 hoja) ................. |
|
20 patas ........... |
|
12 patas |
|
Pieds d’enceinte (1 feuille) ........................ |
|
20 pieds ........... |
|
12 pieds |
|
Högtalarfötter (1 ark) ................................. |
|
20 fötter ............ |
|
12 fötter |
|
Lautsprecher-Untersetzer (1 Bogen) ... |
20 Untersetzer |
... 12 Untersetzer |
|||
Piedini diffusori (1 foglio) ......................... |
|
20 piedini ......... |
|
12 piedini |
|
Luidsprekervoetjes (1 vel) ......................... |
|
20 stuks ........... |
|
12 stuks |
|
Højttalerfødder (1 ark) ............................. |
|
20 fødder .......... |
|
12 fødder |
|
Nožky pod reprosoustavy (1 arch) ............. |
|
20 kusů ............ |
|
12 kusů |
|
Nóżki do zestawów głośnikowych (1 arkusz) 20 nóżek... ............ |
|
12 nóżek |
|||

Geachte klant |
|
Drogi Kliencie |
Hartelijk dank voor de aankoop van dit product. |
Dziękujemy Ci za zakupienie tego produktu. |
|
Gelieve deze gebruiksaanwijzing aandachtig door te lezen voor een |
Aby zapewnić optymalną pracę urządzenia i bezpieczną obsługę, |
|
optimale prestatie en een veilig gebruik van het systeem. |
prosimy o uważne przeczytanie niniejszej instrukcji obsługi. |
|
Systeem |
SB-HTS250 |
Systeem |
SB-CSS250 |
Luidspreker × 5 |
SB-AFC250 |
Luidspreker × 3 |
SB-AFC250 |
Controleer en identificeer de bijgeleverde accessoires. |
|
||
Inhoud |
|
|
|
Installeren van de luidsprekers |
................................................. |
11 |
|
Opstelling .................................................................................. |
|
|
13 |
Aansluitingen ............................................................................. |
|
|
13 |
Opmerkingen ............................................................................... |
|
|
15 |
Technische gegevens ................................................................. |
|
19 |
|
Onderhoud .............................................................. |
|
Omslagpagina |
|
Kære kunde
Tak fordi du har købt dette apparat.
For at få fuldt udbytte af apparatet og af hensyn til din sikkerhed, bør du læse denne betjeningsvejledning omhyggeligt.
System |
SB-HTS250 |
|
System |
SB-CSS250 |
Højttaler × 5 |
SB-AFC250 |
|
Højttaler × 3 |
SB-AFC250 |
Kontrollér venligst at du har modtaget det viste tilbehør sammen med apparatet.
Indholdsfortegnelse |
|
Højttaleropsætning ..................................................................... |
11 |
Opstilling .................................................................................... |
13 |
Tilslutninger ............................................................................... |
13 |
Praktiske oplysninger ................................................................. |
15 |
Tekniske specifikationer ............................................................ |
19 |
Vedligeholdelse ................................................................. |
Bagside |
Vážený zákazníku
Děkujeme za zakoupení tohoto výrobku.
Abyste jej mohl optimálním způsobem a bezpečně používat, přečtěte si prosím pozorně tento návod.
Systém |
SB-HTS250 |
|
Systém |
SB-CSS250 |
Reprosoustavy × 5 |
SB-AFC250 |
|
Reprosoustavy × 3 |
SB-AFC250 |
Zkontrolujte si prosím a identifikujte dodávané příslušenství.
Obsah |
|
Instalace reprosoustav |
............................................................... 16 |
Umístění reprosoustav |
.............................................................. 17 |
Připojení .................................................................................... |
17 |
Poznámky .................................................................................... |
18 |
Technické údaje .............................................. |
Zadní strana obalu |
Údržba přístroje .............................................. |
Zadní strana obalu |
Zestaw |
SB-HTS250 |
|
Zestaw |
SB-CSS250 |
Głośniki × 5 |
SB-AFC250 |
|
Głośniki × 3 |
SB-AFC250 |
Prosimy o sprawdzenie i zidentyfikowanie wyposażenia urządzenia.
Spis treści |
|
Ustawienie zestawu głośnikowego |
........................................... 16 |
Ustawienie ................................................................................. |
17 |
Połączenia ................................................................................. |
17 |
Uwagi ........................................................................................... |
18 |
Dane techniczne ..................................................... |
Okładka tylna |
Konserwacja ............................................................ |
Okładka tylna |
„Czynnoøci wykonywane przez zakìady usìugowe polegajàce na sprawdzeniu: dziaìania, parametrów technicznych, czyszczeniu gìowic i toru taømy, regulacji i czyszczeniu mechanizmu, strojeniu programatorów, wymianie ëarówek i bezpieczników—nie sà zaliczane do iloøci napraw stanowiàcych podstawè wymiany sprzètu zgodnie z §36, pkt. 1.3. Uchwaìy Nr. 71 Rady Ministrów z 1983.06.13., opublikowanej w Monitorze Polskim Nr. 21 z 1983.06.29.“
„Uszkodzenia mechaniczne, termiczne, chemiczne zewnètrznych czèøci metalowych i z tworzyw sztucznych oraz sznury przyìàczeniowe, sìuchawkowe—nie podlegajà gwarancji.“
(for surround speakers)
(para los altavoces de sonido ambiental)
(pour les enceintes surround)
(för surroundhögtalarna)
(für Surround-Lautsprecher)
(diffusori surround)
(voor surroundluidsprekers)
(til surround-højttalere)
(pro prostorové reprosoustavy)
(do głośników surround)
Speaker cables (long) ............. |
2 pcs. |
Metal wall mounts ............................... |
4 |
Screws ................. |
8 |
Cables de altavoces (largos) ... |
2 piezas |
Monturas metálicas para pared ........... |
4 |
Tornillos ................ |
8 |
Câbles d’enceinte (longs) .......... |
2 pc. |
Supports muraux en métal .................. |
4 |
Vis ........................ |
8 |
Högtalarkablar (långa) ............... |
2 st. |
Metallfästen för väggmontering ........... |
4 |
Skruvar ................. |
8 |
Lautsprecherkabel (lang) ....... |
2 Stck. |
Metallbügel für Wandmontage ... |
4 Stck. |
Schrauben ... |
8 Stck. |
Cavi diffusori (lunghi) ...................... |
2 |
Piastrina di montaggio su parete |
........ 4 |
Viti ........................ |
8 |
Luidsprekerkabels (lang) ............ |
2 st. |
Metalen muurklampen ........................ |
4 |
Schroeven ............ |
8 |
Højttalerkabler (lange) .............. |
2 stk. |
Metalvægbeslag .................................. |
4 |
Skruer .................. |
8 |
Kabely reprosoustav (dlouhé) |
... 2 ks. |
Kovové závěsy na stěnu ..................... |
4 |
Šrouby .................. |
8 |
Kable głośnikowe (długie) ........ |
2 szt. |
Metalowe zaczepy ścienne ................. |
4 |
Wkręty .................. |
8 |
3
RQT5893

ESPAÑOL ENGLISH
Speaker set-up
Attach the rubber feet to the speaker
The speakers are the same.
The speakers can be set-up either standing or lying down. Attach these rubber feet to prevent vibration causing the speakers to move or fall over.
(See below if you would prefer to hang the speakers on the wall.)
A Standing
One sheet of 20 rubber feet is included.
One sheet of 12 rubber feet is included.
a Rubber feet (4 per speaker, included) b Cloth (not included)
B Lying down
c Turn the logo so it is horizontal.
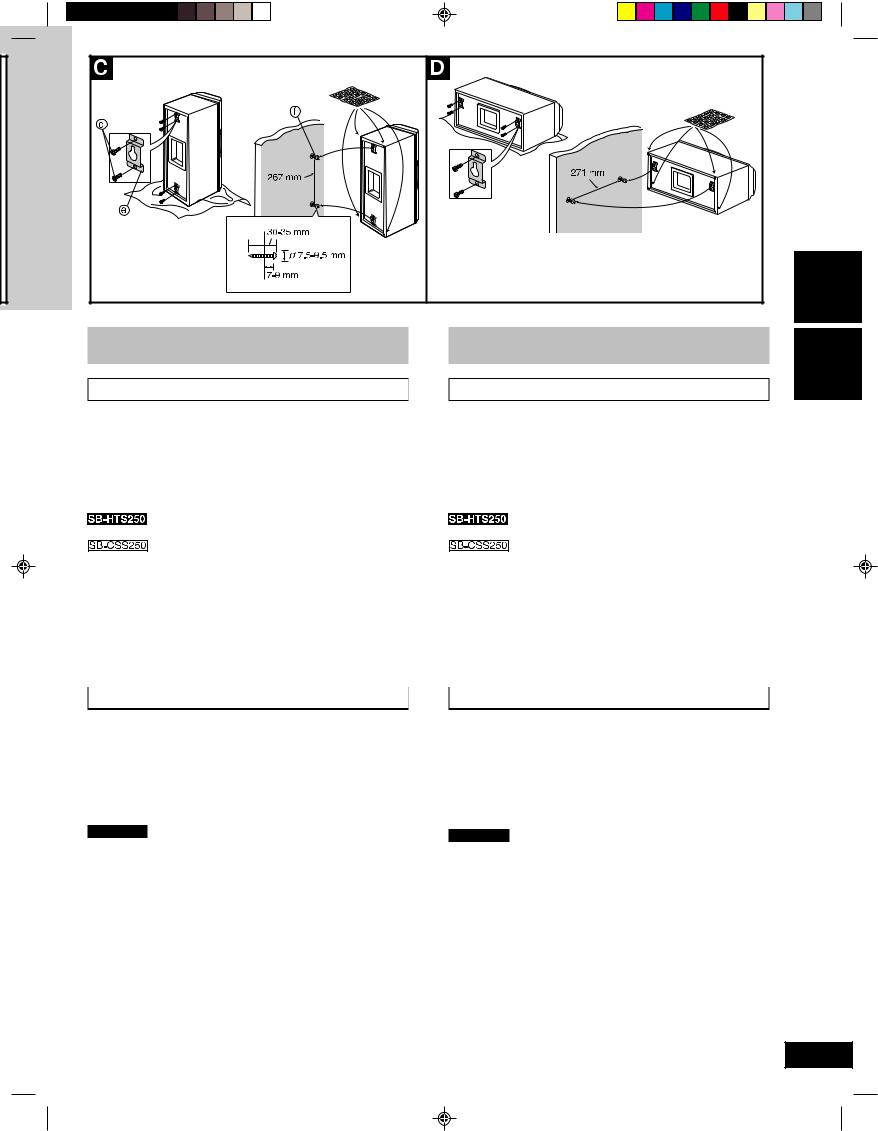
Attaching the surround speakers to the wall
C To attach vertically
d Screws (4 per speaker, included)
e Metal wall mounts (2 per speaker, included) f Screws (not included)
D To attach horizontally
Note
Screw the wood screw into a thick and hard part of the wall.
The surface you attach the speakers to must be able to support over 13 kg.
Instalación de altavoces
Colocación de las patas de goma en los altavoces
Los altavoces son idénticos.
Los altavoces pueden instalarse en posición horizontal o vertical.
Coloque estas patas de goma para impedir la vibración que puede ser la causa de que los altavoces se muevan o caigan.
(Consulte las ilustraciones de abajo si desea colocar los altavoces en una pared.)
A Vertical
Se incluye una hoja de 20 patas de goma.
Se incluye una hoja de 12 patas de goma.
a Patas de goma (4 piezas por altavoz incluidas) b Paño (opcional)
B Horizontal
c Ponga el logotipo en posición horizontal.
Colocación de los altavoces en una pared
C Para colocar los verticalmente
d Tornillos (4 piezas por altavoz incluidas)
e Monturas metálicas para pared (2 piezas por altavoz incluidas) f Tornillos (no incluidos)
D Para colocar los horizontalmente
Nota
Atornille el tornillo para madera en una parte gruesa y dura de la pared.
La superficie en la que coloque los altavoces deberá ser capaz de aguantar un peso superior a 13 kg.
4
RQT5893
Installation des enceintes
Fixez les pieds de caoutchouc aux enceintes
Les enceintes sont identiques.
Les enceintes peuvent être installées à la verticale ou à l’horizontale.
Fixez ces pieds de caoutchouc afin d’empêcher les vibrations de causer le déplacement ou la chute des enceintes.
(Voir ci-dessous si vous préférez les accrocher au mur.)
A Debout
Une feuille comportant 20 pieds de caoutchouc est fournie.
Une feuille comportant 12 pieds de caoutchouc est fournie.
a Pieds de caoutchouc (4 pièces par enceinte, fournies) b Chiffon (non fournie)
B Couchée
c Tournez le logo pour le mettre à l’horizontale.
Pour fixer les enceintes surround au mur
C Pour fixer à la verticale
d Vis (4 pièces par enceinte, fournies)
e Supports muraux en métal (2 pièces par enceinte, fournies) f Vis (non fournies)
D Pour fixer à l’horizontale
Remarque
Serrez la vis à bois dans une partie épaisse et dure du mur.
La surface à laquelle vous fixez les enceintes doit pouvoir supporter plus de 13 kg.
Uppsättning av högtalarna
Fäst gummifötterna på högtalarna
Högtalarna är likadana.
Högtalarna kan ställas upp antingen stående eller liggande. Fäst dessa gummifötter på högtalarna för att förebygga vibrationer som orsakar att högtalarna rör sig eller trillar omkull.
(Se nedan om du föredrar att ha högtalarna hängande på väggen.)
A Stående
Ett ark med 20 gummifötter medföljer.
Ett ark med 12 gummifötter medföljer.
a Gummifötter (4 st. per högtalare; medföljer) b Tygstycke (extra tillbehör)
B Liggande
c Vrid på tillverkarens logo så att det kommer horisontalt.
Montering av surroundhögtalarna på en vägg
C För montering vertikalt
d Skruvar (4 st. per högtalare; medföljer)
e Metallfästen för väggmontering (2 st. per högtalare; medföljer) f Skruvar (medföljer ej)
D För montering horisontalt
Observera
Skruva i träskruven i en tjock och hård del av väggen.
Den yta som högtalarna fästs på måste kunna bära upp mer än 13 kg.
SVENSKA FRANÇAIS
5
RQT5893

ESPAÑOL ENGLISH
Speaker set-up
How you connect and place them determines whether they are front, center or surround speakers.
a Front speaker (Left) 
b Center speaker 


 c Receiver or amplifier (not included)
d Front speaker (Right) 
e Surround speaker (Right) 


 f Surround speaker (Left)


 g Speaker cables (long) (for surround speakers)
h Speaker cables (short)
A Location
The front, center, and surround speakers should be placed at approximately the same distance from the listening position.
The angles in the diagram are approximate.
The position should be adjusted to your personal preference, because the effect varies to some degree depending upon the type of music and the music source.
•Place the speaker on a flat, level and secure base.
Use spacers or a similar item to stop the speaker from rocking.
•Surround speakers should be placed on the side of or slightly behind the listener, about one meter higher than ear level.
•Vibration may cause distortion in the picture if the speaker is placed directly on the television. Use a rack or shelf for the center speaker.
CAUTION
Do not attempt to attach these speakers to walls using methods other than those described in this manual.
B Connections
Confirm the colors of the cords to ensure correct connection. Incorrect connection can damage the unit.
•Before making the connections, switch OFF the power to the receiver or amplifier.
•Use with a receiver or amplifier having 6 Ω impedance for these speakers.
•Be sure to connect only positive (+) red wires to positive (+) terminals, and negative (–) black wires to negative (–) terminals.
C Connecting the cables i Before connection
To prepare the speaker cables, twist the vinyl tip and pull off. |
|
j Red (+) |
k Black (–) |
CAUTION |
|
To prevent damage to circuitry, never short-circuit positive (+) and negative (–) speaker wires.
Note
6 |
After you have completed set-up and connection, wind the excess |
|
cord and keep together with string. |
||
|
Instalación de altavoces
Cómo conecta y coloca los altavoces determina si éstos son delanteros, central o de sonido ambiental.
a Altavoz delantero (izquierdo) 
b Altavoz central 


 c Receptor o amplificator (opcional)
d Altavoz delantero (derecho) 
e Altavoz de sonido ambiental (derecho) 


 f Altavoz de sonido ambiental (izquierdo)


 g Cables de altavoces (largos) (para los altavoces de sonido ambiental) h Cables de altavoces (cortos)
A Ubicación
Los altavoces delanteros, central y de sonido ambiental deberán colocarse aproximadamente a la misma altura de la posición de escucha. Los ángulos del diagrama son aproximados.
La posición deberá ajustarse según sus preferencias, porque el efecto cambia en cierto grado dependiendo del tipo de música y de la fuente musical.
•Coloque los altavoces en una base plana, nivelada y segura.
Utilice espaciadores o accesorios similares para impedir que se muevan los altavoces.
•Recomendamos colocar los altavoces de sonido ambiental a los lados del oyente, o un poquito por detrás de él, y a un metro aproximadamente por encima del nivel de sus oídos.
•La vibración puede causar distorsión en la imagen si el altavoz se coloca directamente encima del televisor. Utilice un mueble o una
colocar el altavoz central.
PRECAUCIÓN
No intente colocar estos altavoces en paredes usando métodos que no sean los descritos en este manual.
B Conexiones
Confirme los colores de los cables para asegurar una conexión correcta. La conexión incorrecta puede estropear el aparato.
•Antes de realizar las conexiones, desconecte la alimentación del receptor o del amplificador.
•Utilice un receptor o amplificador con una impedancia de 6 Ω para estos altavoces.
•Asegúrese de conectar solamente los cables positivos (+) rojos a los terminales positivos (+) y los cables negativos (–) negros a los terminales negativos (–).
C Conexión de los cables
iAntes de conectar
Para preparar los cables de los altavoces, retuerza la punta de vinilo y retírela.
k Negro (–)
PRECAUCIÓN
Para no dañar el circuito, nunca se debe permitir que los conductores de altavoces positivo (+) y negativo (–) hagan cortocircuito.
Nota
Después de completada la instalación y la conexión, bobine el exceso de cable y manténgalo junto con una cuerda.
RQT5893
 Loading...