

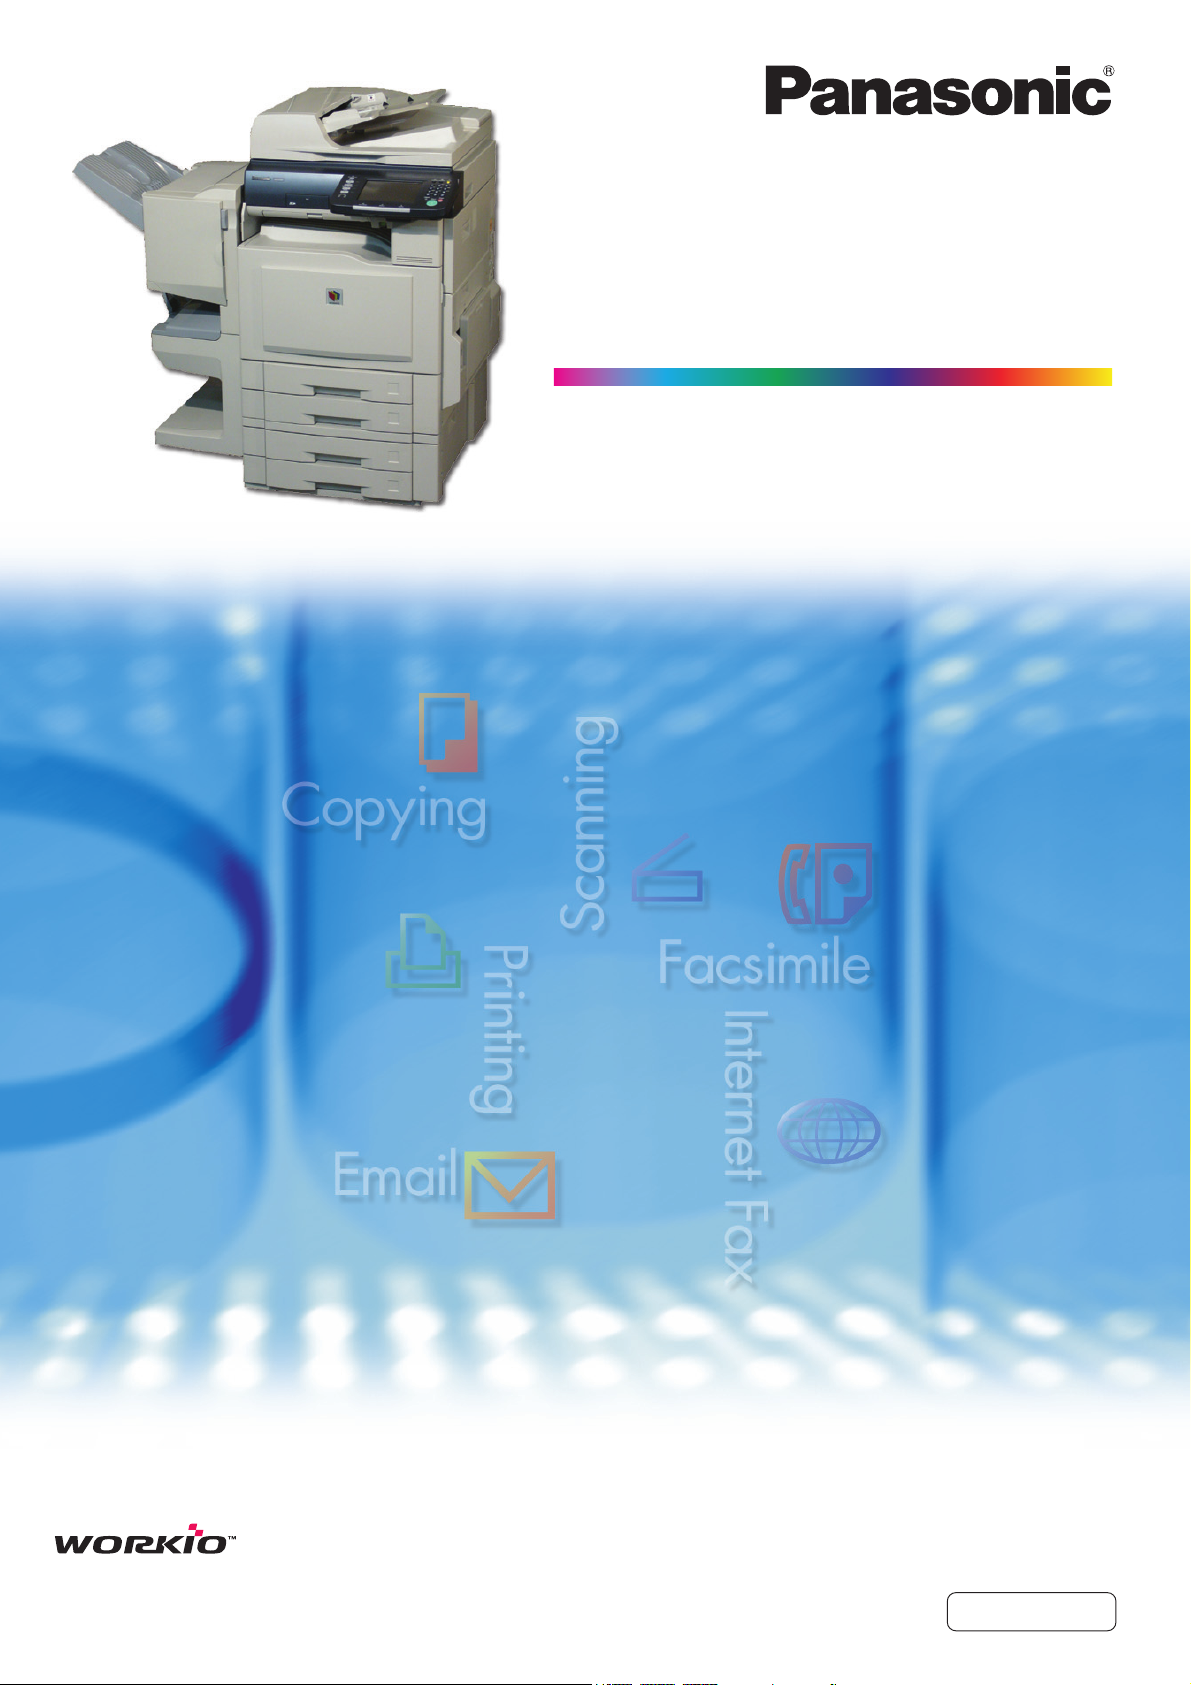
Page 1
Operating Instructions
(For Function Parameters)
Digital Color Imaging Systems
Model No.
DP-C323 / C263 / C213
Model No.
DP-C354 / C264
Before operating this machine, please carefully read this manual,
and keep this documentation in a safe place for future reference.
(Illustration shows optional accessories that may not be installed on your machine.)
English
Page 2
Operating Instructions
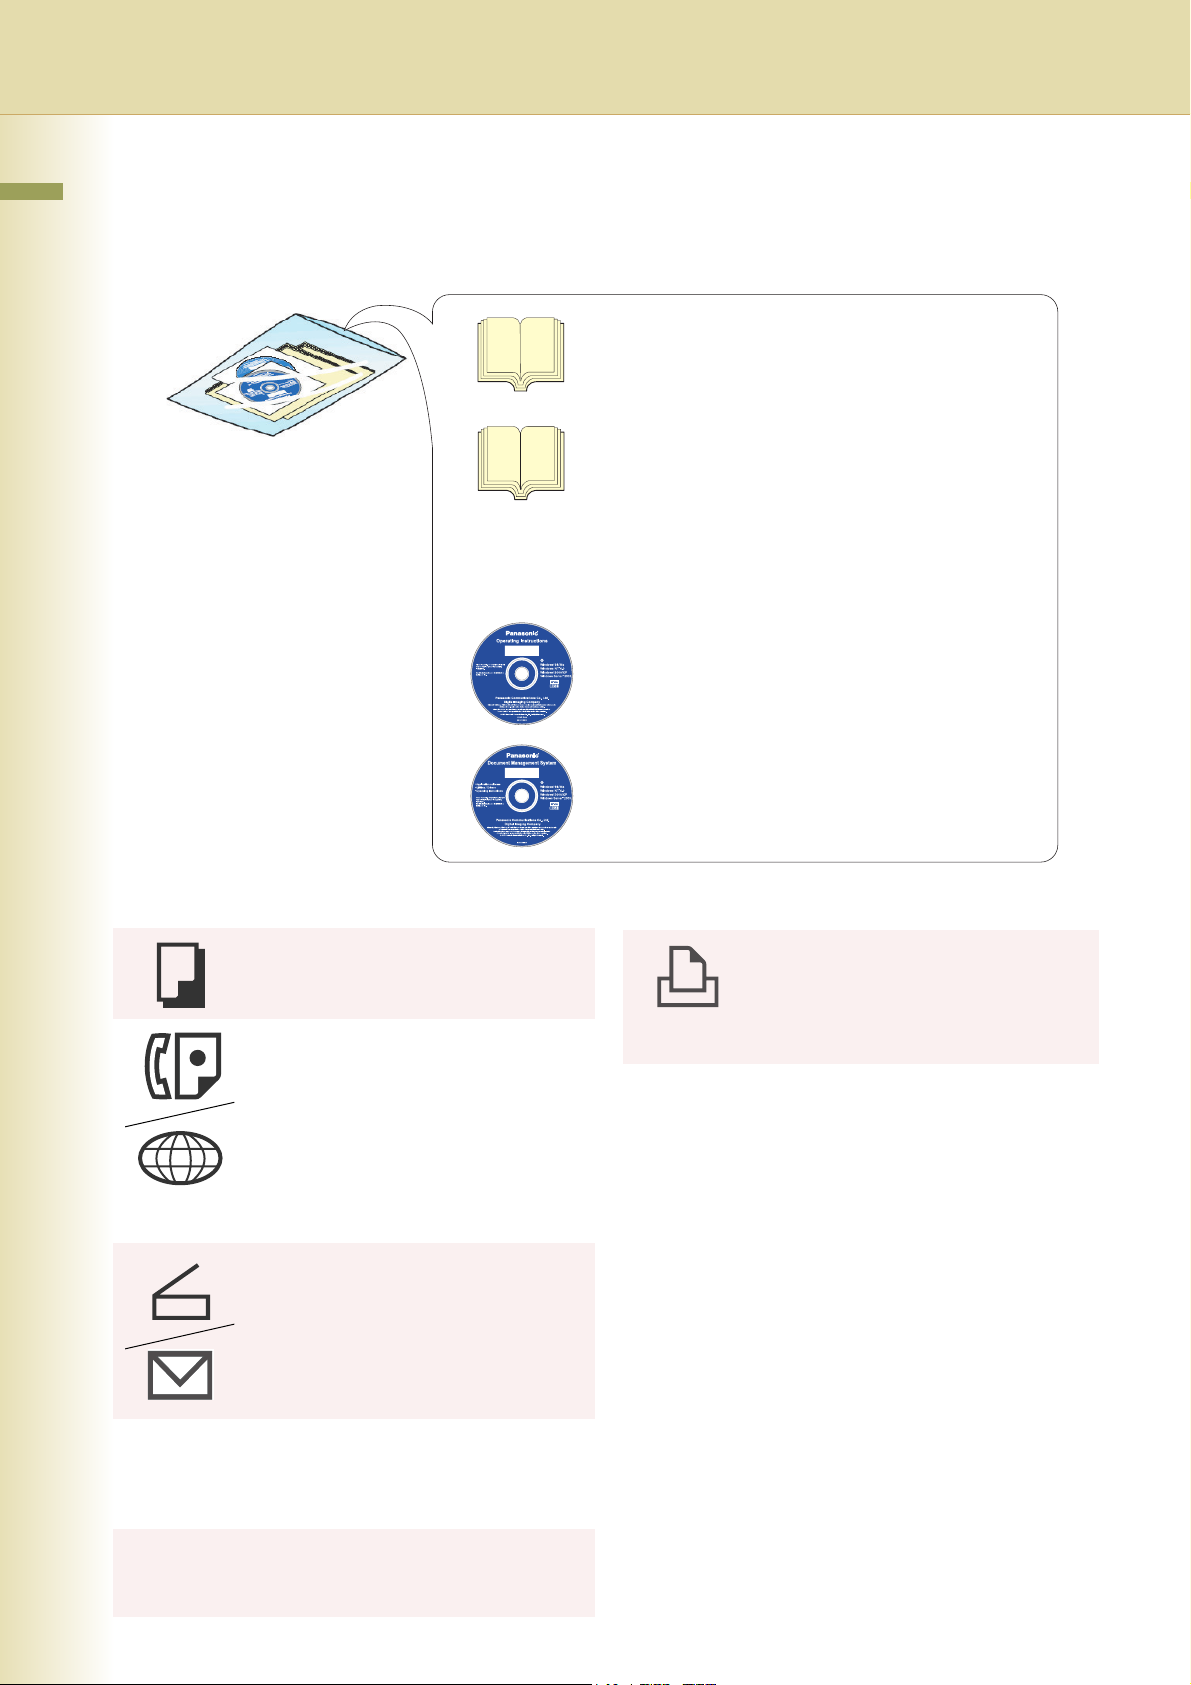
The following Operating Instruction manuals are included with this machine. Please refer to the appropriate manual
and keep all manuals for future reference. If you lose the manual, contact the authorized Panasonic dealer.
Operating Instructions (For Setting Up)
This manual contains essential information for setting
up the machine.
Accessories
Operating Instructions CD
Copy Function
Describes how to make a Color Copy with
creative features.
Facsimile and Internet Fax
Function
(These functions are available when the
optional G3 Fax Board/ Internet Fax
Module is installed.)
Describes how to send/receive a
Facsimile/Internet Fax, or describes the
course of action to take when a trouble
message appears, etc.
Scan and Email Function
(Standard on DP-C354/C264, for DPC323/C263/C213 when the optional
Network Scanner/Email Module, Hard
Disk Drive, Main Memory, and Image
Memory are installed.)
Describes how to scan, and send an Email.
Operating Instructions (For Basic Operations)
This manual contains essential information for proper
operation of the machine.
It describes basic Copy, Print, Facsimile/Internet Fax,
Scan/Email, and other functions.
For a more detailed explanation of each function, please
refer to the Operating Instruction manuals included on
two CD-ROM as illustrated below.
Operating Instructions CD
Contains manuals with detailed information for Copy,
Facsimile/Internet Fax, Scan/Email Functions, Function
Parameters and User Authentication.
Document Management System CD
Contains the PDMS Application Software, and manuals
with detailed information for the Print function, and
PDMS Application software.
Document Management System CD
Print Function
Describes how to print with color, change
default printer settings, or describes the
course of action to take when a problem
message appears, etc.
Application Software
Describes how to use the application
software.
Ex:Web Device Monitor, Panafax
Desktop, Document Manager/
Viewer, Client Device Monitor,
Network Config/Add Editor, Network
Setup Tool, Embedded Web
Launcher
2
Function Parameters
Describes how to change the default
settings of each function using the Control
Panel of the machine.
User Authentication
Describes how to enable and use the user
authentication function.
Page 3
Conventions
Icons
The following icons are used in this manual.
Icon Description
Indicates important information that must be read in detail.
Indicates reference Information.
Notation
The following notations are used in this manual.
Notation Description
For Keys and Buttons Hard buttons on the Control Panel are depicted as **** key, soft buttons on the Touch Panel are
depicted as “xxx”.
Ex:
Press the Start key and select “More Menus”.
3
Page 4

Table of Contents
Chapter 1 Before Starting
Function Setup Outline........................................................................................................ 6
Function Setup Menu Configuration................................................................................ 6
Using the Keyboard............................................................................................................. 7
Basic Operations for Function Setup................................................................................... 8
Chapter 2 General Settings
General Settings.................................................................................................................. 10
General User................................................................................................................... 10
Key Operator................................................................................................................... 11
Example : Dept. Counter Mode ........................................................................................... 20
Example : Departmental Counter ........................................................................................ 28
Example : Date Time Setting............................................................................................... 30
Chapter 3 Copier Settings
Copier Settings.................................................................................................................... 32
Copier User .....................................................................................................................32
Key Operator................................................................................................................... 36
Example : Digital Skyshot Mode.......................................................................................... 40
Example : Manual Skyshot Mode........................................................................................ 41
Chapter 4 Fax/Email Settings
Fax/Email Settings............................................................................................................... 42
Fax/Email Settings .......................................................................................................... 42
Address Book.................................................................................................................. 42
Program Keys ................................................................................................................. 42
Key Operator Mode......................................................................................................... 42
User Parameters............................................................................................................. 43
Fax Parameters............................................................................................................... 46
Example : LDAP Server....................................................................................................... 62
LDAP Server Name (User parameter 15) ....................................................................... 62
LDAP Server IP (User parameter 16) ............................................................................. 64
LDAP User Name
LDAP Password
LDAP Search Base
(User parameters 17, 18 and 19) .................................................................................... 66
4
Page 5

Example : Receive to Memory............................................................................................. 68
Example : Password-Transmit / Password-Receive............................................................ 70
Example : Select Receive.................................................................................................... 72
Example : Initial Sending Station (LAN Relay) .................................................................... 74
LAN RLY XMT Request (Fax parameter 140)................................................................. 74
Example : Relay Station (LAN Relay).................................................................................. 76
Relay XMT (Fax parameter 142)..................................................................................... 76
Relay XMT Report (Fax parameter 143) ......................................................................... 77
Relay XMT Password (User parameter 36)..................................................................... 78
Manager’s Email Addr (User parameter 37).................................................................... 79
Relay Domain 01 to 10 (User parameters 40 to 49)........................................................ 80
Chapter 5 Scanner Settings
Scanner Settings ................................................................................................................. 82
Scanner User................................................................................................................... 82
Key Operator ................................................................................................................... 83
Chapter 6 Printer Settings
Printer Settings .................................................................................................................... 84
Printer User ..................................................................................................................... 84
Key Operator ................................................................................................................... 86
Chapter 7 Counter View
Counter View ....................................................................................................................... 92
Example : Print Counter List ................................................................................................ 94
Example : Clear Toner Counter ........................................................................................... 95
Chapter 8 Appendix
Index.................................................................................................................................... 96
5
Page 6
Chapter 1 Before Starting
Chapter 1
Before Starting
Function Setup Outline
Use the function setting mode to change the Standard Settings of the machine. This section contains
the menu, and basic function setup operations.
Function Setup Menu Configuration
• The function setup operations are divided into General User Mode, and Key Operator Mode.
For Fax/Email Settings, the Address Book and Program Keys menus are also provided.
• The Key Operator Password is required before any changes can be made in the Key Operator Mode.
For security, the Key Operator is advised to setup, and manage the 8-digit password. To set the
password, consult with the authorized Panasonic dealer. (Default password is 00000000)
Function Setting
General Settings General User Mode
Key Operator Mode
Copier Settings General User Mode
Key Operator Mode
Fax/Email Settings Address Book Program Keys
(DP-C323/C263/C213 : Option)
General User Mode
Key Operator Mode
Scanner Settings General User Mode
(Option)
Key Operator Mode
Printer Settings General User Mode
Key Operator Mode
Counter View
Key Operator Mode Requires the Key Operator password (8-digit).
6
Page 7
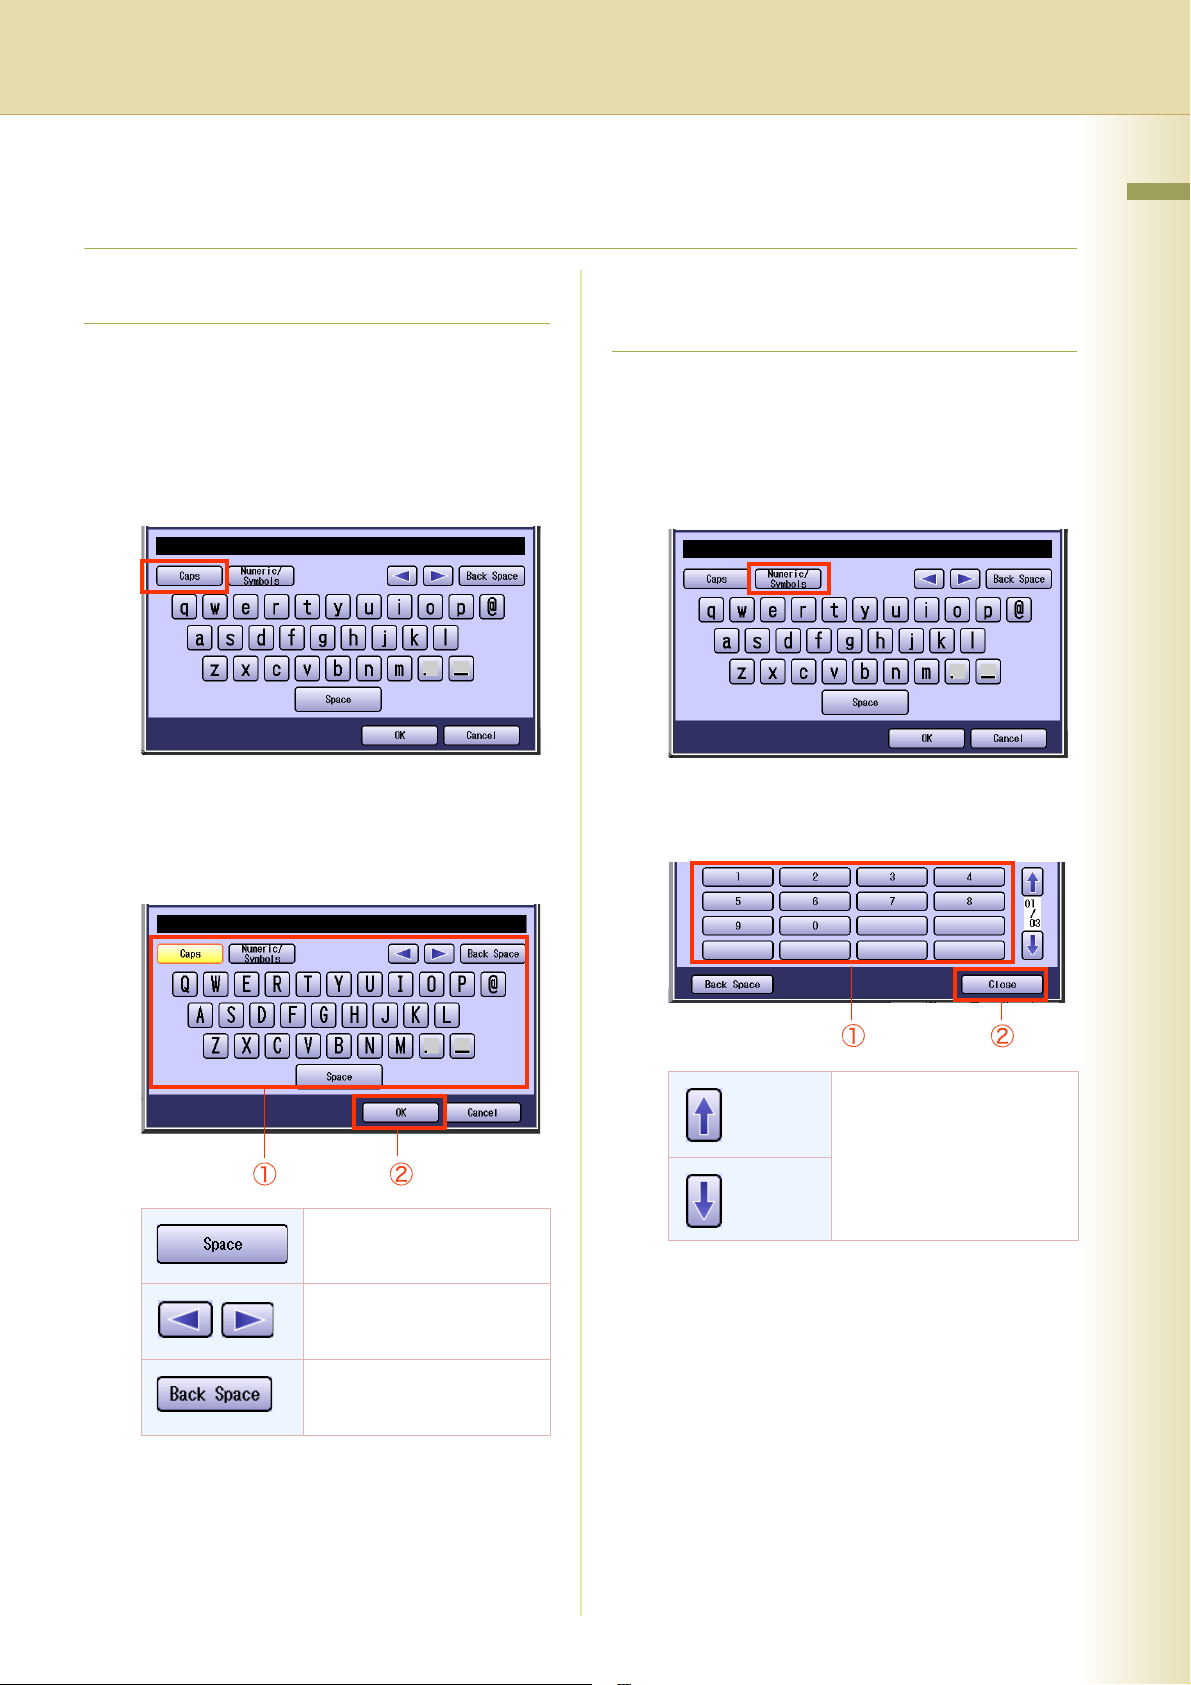
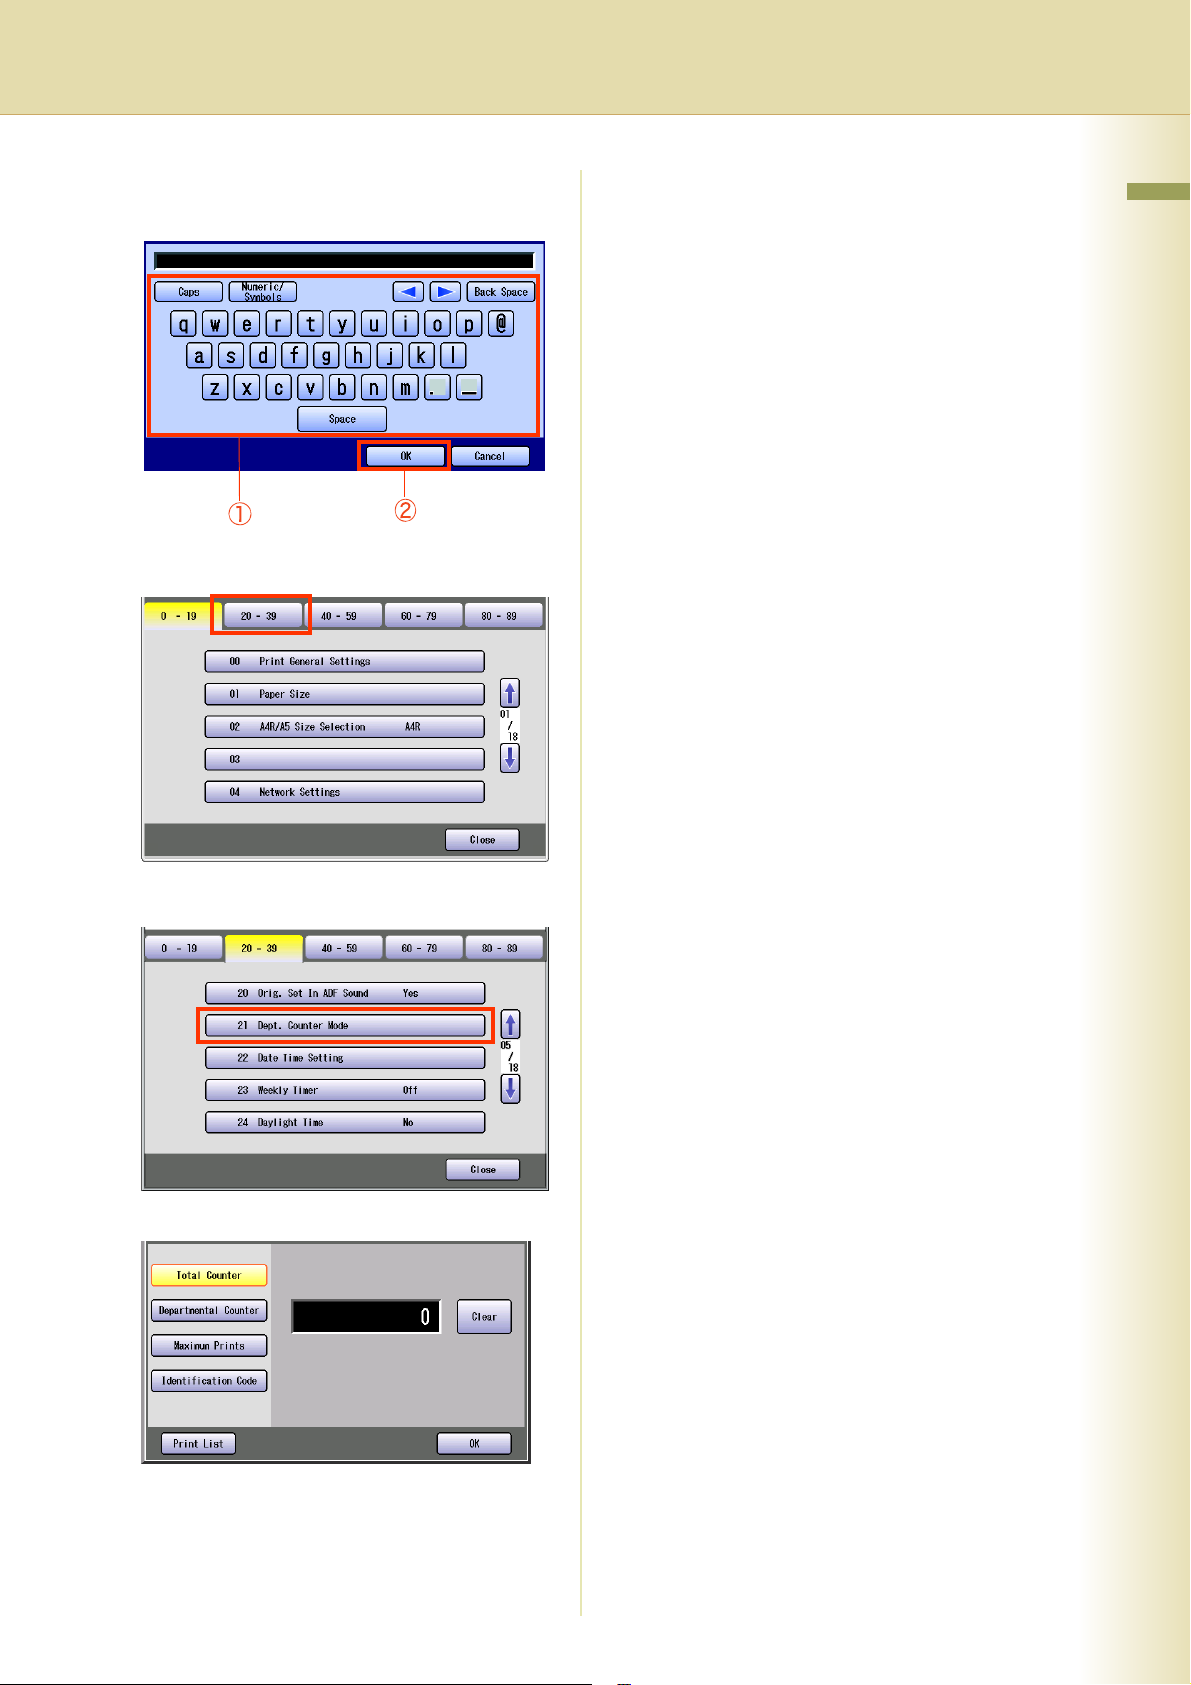
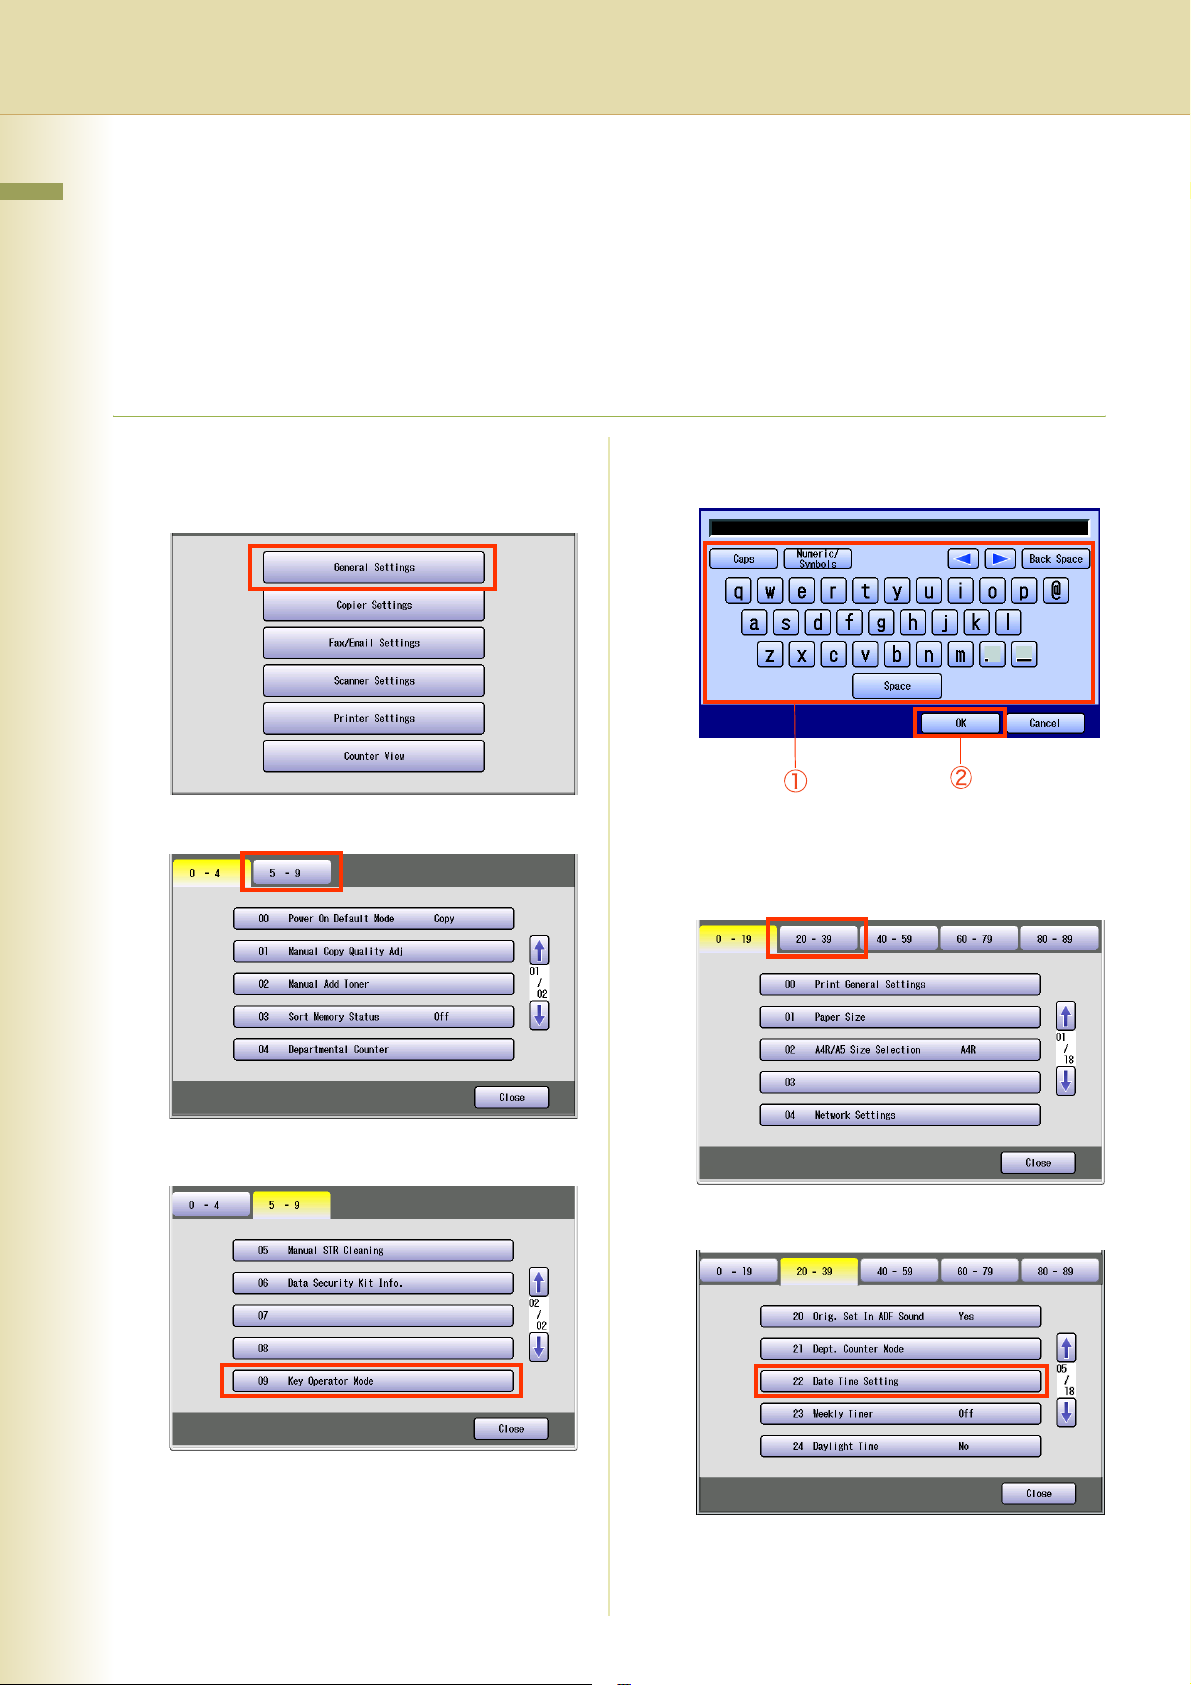
Using the Keyboard
Chapter 1 Before Starting
Entering Uppercase / Lowercase Letters
1
Select “Caps” to change the
characters between uppercase /
lowercase.
Ex: When setting “15 LDAP Server Name” in
Fax/Email Settings (see pages 44, 62, and
63).
z In the Standard Setting, lowercase is
selected.
2
Enter the characters, and then select
“OK”.
Entering Numeric Characters, and
Symbols
1
Select “Numeric/Symbols” to input
the numbers / symbols.
Ex: When setting “15 LDAP Server Name” in
Fax/Email Settings (see pages 44, 62, and
63).
2
Enter the numbers or symbols, and
then select “Close”.
To input a space between
characters.
To move the cursor ( | ) to
the left or right side.
To erase the character
before the cursor.
To change the entry screen
between numbers /
symbols.
7
Page 8
Chapter 1 Before Starting
Basic Operations for Function Setup
The following procedure is an example of setting up the function(s). To select a function, refer to the list
of Function Parameters described later.
1
Press the Function key.
2
Select the desired setting.
3
Select the desired tab.
5
Change the settings using the
following operations.
Selecting an item
Select a desired item, and then select “OK”.
Ex: When setting “01 Density(HOME)” in Fax/
Email Settings (see page 46).
4
Select an item.
z If a single tab has six or more items, a block
number is displayed as “01/02”.
Entering numbers
Select “Input”, and enter the number, and
then select “OK”.
Ex: When setting “14 Power Save Mode
Timer” in General Settings (see page 13).
8
z Select or to scroll items up, or down on
the screen.
z When setting the Key Operator Mode, enter
the password (8-digit), and then select “OK”.
Page 9
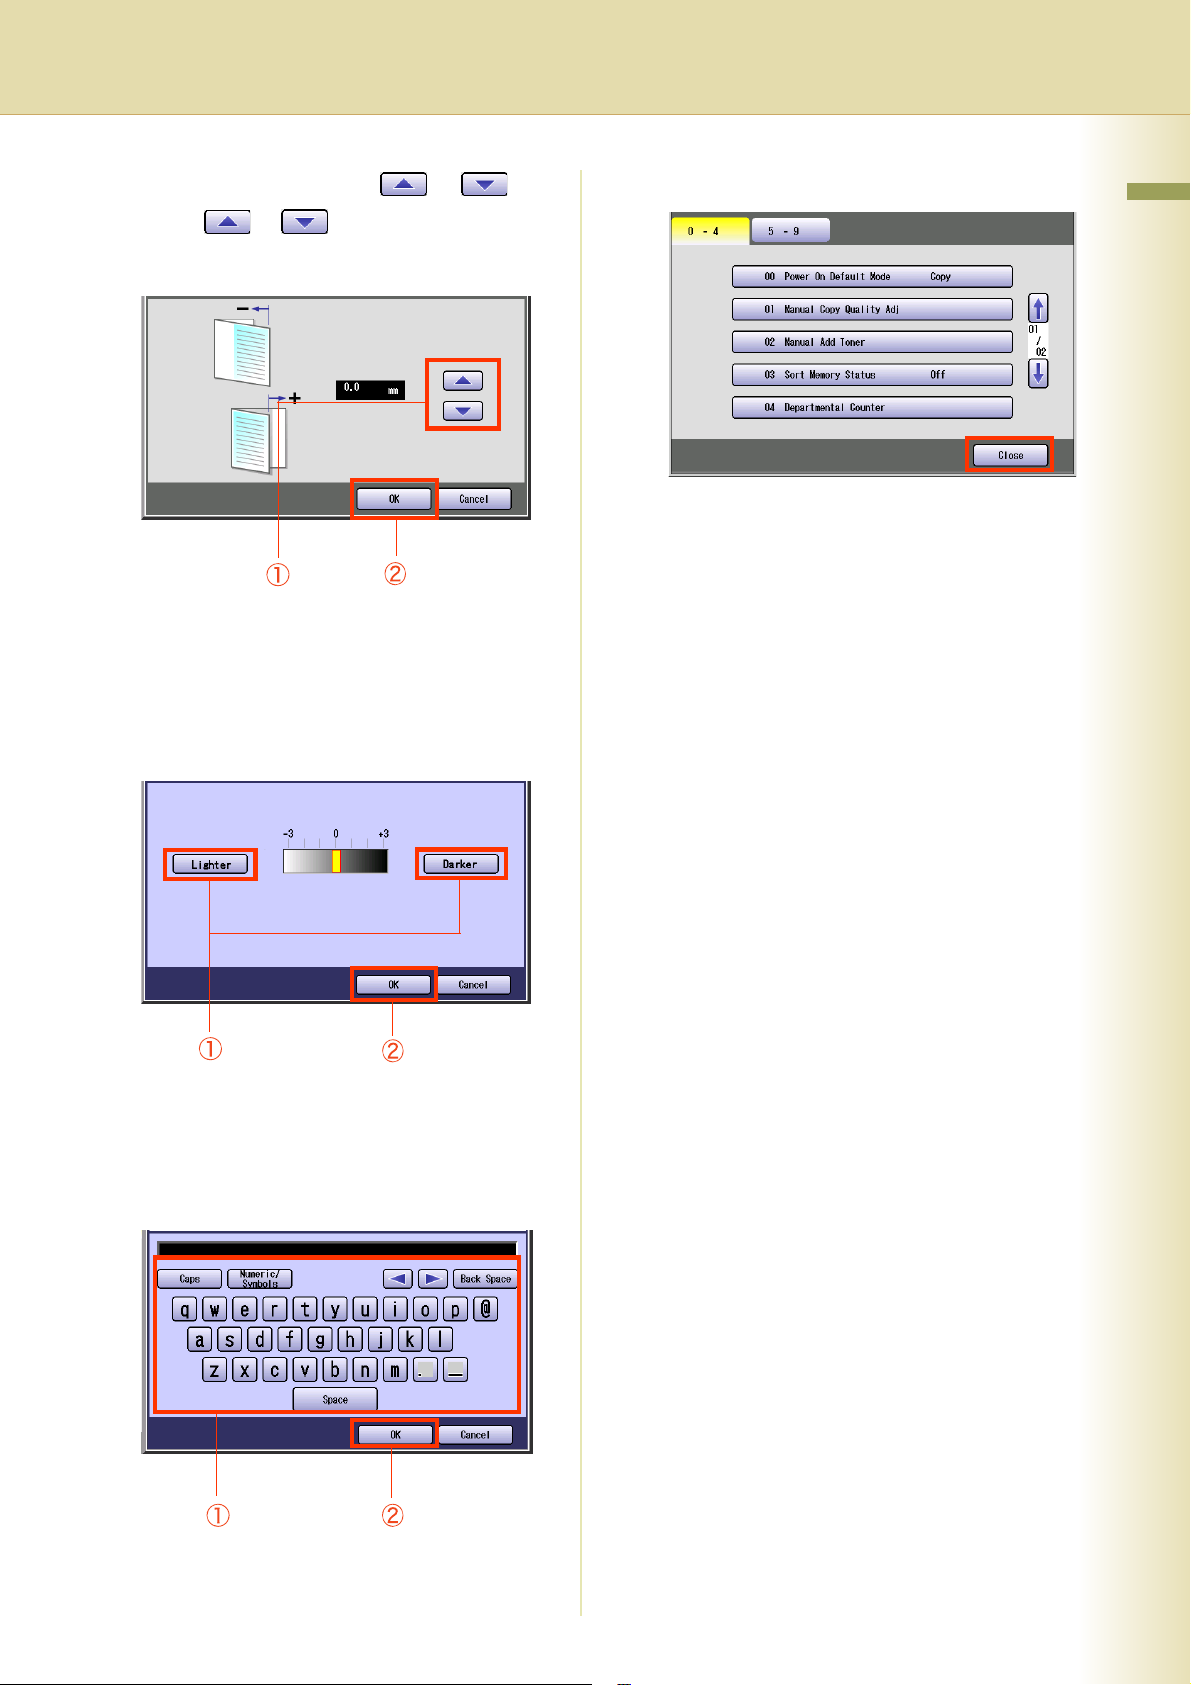
Entering numbers using or
Select or , and then select “OK”.
Ex: When setting “40 Fold Position(A3/
LDR)” in General Settings (see page 16).
Selecting a value using “Lighter” or
“Darker”.
Select “Lighter” or “Darker”, and then select
“OK”.
Ex: When setting “04 Text Density” in Copier
Settings (see page 36).
6
Select “Close”.
z After setting up the function(s), press the
Reset key to return the machine to the initial
screen of the current active mode.
Chapter 1 Before Starting
Entering characters
Enter characters, and then select “OK”.
Ex: When setting “15 LDAP Server Name” in
Fax/Email Settings (see pages 44, 62, and
63).
9
Page 10

Chapter 2
Chapter 2 General Settings
General Settings
In General User Mode, the following items can be changed.
General User
No. Parameter Comments Selective Item Standard
General Settings
Setting
0 - 4 00 Power On Default
Mode
01 Manual Copy Quality
Adj
02 Manual Add Toner Set whether to darken the printing manually
03 Sort Memory Status Set whether to display the percentage (%)
04 Departmental
Counter
5 - 9 05 Manual STR
Cleaning
06 Data Security Kit Info. z 00 DATA security kit ver.
09 Key Operator Mode Enter the key operator password to display
Set the initial function screen when turning
on the machine.
Set whether to adjust the copy density
manually.
by using more toner.
of sorting memory used.
Set whether to display departmental
counters, limit counters, and total counters.
Set whether to clean the transfer roller
manually.
The version is displayed.
z 01 Security settings
The security settings is displayed as
“Active / Inacvive”.
the Key Operator Mode (see page 11).
Copy, Fax, Print,
Scan
Off, On Off
Off, On Off
Off, On Off
z Consult with the authorized
Panasonic dealer on how to use
this item.
Off, On Off
Copy
00000000
10
Page 11
Key Operator
No. Parameter Comments Selective Item
0 - 19 00 Print General
Settings
01 Paper Size Set the paper size, and media type for
Print a list of General Settings.
To cancel printing the parameter setting list,
press “Stop” and “OK”.
While processing the cancellation, panel
operation is denied, and an error beep is
produced.
The feeding paper(s) will be ejected before
completing the above cancellation
operation.
If setting a parameter, an asterisk mark (*)
will be added before the parameter number.
Paper Trays 1-4.
Select the Paper Tray and the paper size,
and then select “Change Size / Media”.
z Only 8.5x11 , A4 , B5 is selectable
for Tray 1.
z To change the preset paper size used in
the Paper Tray, consult with the
authorized Panasonic dealer.
Stop, Start Start
“Change Size”
11x17 , Legal ,
8.5x11 , 8.5x11 ,
5.5x8.5 , A3 ,
B4 , A4 , A4 ,
B5 , B5 , A5 ,
8x13 , 8.5x13
Chapter 2 General Settings
Standard
Setting
02 A4R/A5 Size
Selection
Select the paper type. “Change Type”
Plain, Glossy,
Recycled
Set the smallest paper size that will be fed
to the Sheet Bypass.
A4R, A5 A4R
11
Page 12

Key Operator
Chapter 2 General Settings
No. Parameter Comments Selective Item
0 - 19 04 Network Settings The setting items increment automatically
to the next parameter setting when the
“OK” button is pressed.
General
DHCP Default, TCP/IP Address, TCP/IP
Subnet Mask, TCP/IP Default Gateway,
DNS Server Address, Community Name
(1), Community Name (2), WINS Server 1
IP, WINS Server 2 IP, Scope ID, IP Filter, IP
Filter mode, IP Filter Address,
Printer Domain
Browser
SMB, SMB Master Browser, SMB Device
Name, SMB Workgroup Name, SMB
Comment, Bonjour (Only PS), Bonjour
Name (Only PS), NetWare, NetWare
Frame Type,
Selected Frame Type, NetWare Mode,
NetWare Printer Name, Print Server Name,
Print Server Password, Job Polling Time,
Bindery Mode, File Server Name 1,
File Server Name 2, File Server Name 3,
File Server Name 4, File Server Name 5,
File Server Name 6, File Server Name 7,
File Server Name 8, NDS Tree,
NDS Context, Print Server Name 1,
Print Server Name 2, Print Server Name 3,
Print Server Name 4, Print Server Name 5,
Print Server Name 6, Print Server Name 7,
Print Server Name 8, Job Time Out
EMAIL
Email Address, SMTP Server Name, SMTP
Server IP, SMTP Authentication, SMTP
AUTH Name, SMTP AUTH Password,
POP Server Name, POP Server IP, POP
User Name, POP Password, POP before
SMTP, APOP Authentication
LDAP
LDAP Server Name, LDAP Server IP,
LDAP User Name, LDAP Password,
LDAP Search Base
z LDAP requires a FAX, IFAX, or Scanner
option to be installed.
Standard
Setting
12
Page 13

Key Operator
No. Parameter Comments Selective Item
Standard
Chapter 2 General Settings
Setting
0 - 19 05 Special Paper
Tray 1
06 Special Paper
Tray 2
07 Special Paper
Tray 3
08 Special Paper
Tray 4
09 Auto Paper Out
Rotate
10 Copy Output Tray Set an output tray for the copier function.
11 Printer Output
Tray
12 Fax/Email Output
Tray
Set the paper tray which will not be used as
the automatic document feeder tray.
Ex:
When you load color paper in Paper Tray 1,
select “Tray 1” not to be used for automatic
tray selection.
z Up to 4 paper trays can be selected for
exclusion from automatic tray selection.
Set whether to rotate the image, and print
when the selected paper tray is empty.
Ex:
Printing on letter paper when there is no
letter size paper
z Outer is available for selection when the
optional Paper Transport Unit is installed.
Set an output tray for the printer function.
z Outer is available for selection when the
optional Paper Transport Unit is installed.
Set an output tray for the Fax/Email function.
z Outer is available for selection when the
optional Paper Transport Unit is installed.
None, Tray 1,
Tray 2, Tray 3, Tray 4,
Bypass
Off, On Off
Inner, Outer Inner
Inner, Outer Inner
Inner, Outer Inner
None
None
None
None
13 Auto Reset Time If you do not select any key within a given
time period, the touch panel goes back to
the initial screen of the current active
function automatically.
14 Power Save Mode
Timer
15 Sleep Timer If you do not select any key within a given
16 Language Sel.
Priority
17 Language Default Set the display language.
18 Panel Beep
Sound
If you do not select any key within a given
time period, the machine is switched to
power save mode automatically.
time period, the machine is switched to
sleep mode automatically.
Set whether to give priority to the display
language.
If the language is changed, the system
automatically returns to the initial function
setup screen.
Set the volume of Beep Sound when the
panel is selected.
None, 30 sec.,
1 min., 2 min.,
3 min., 4 min.
1 to 240 min. 15 min.
None,
1 to 240 min.
Off, On Off
English,
C. French,
Spanish
Off, Soft, Loud Soft
1 min.
22 min.
English
13
Page 14
Key Operator
Chapter 2 General Settings
No. Parameter Comments Selective Item
Standard
Setting
0 - 19 19 Original Set Beep
Sound
20 - 39 20 Orig. Set In ADF
Sound
21 Dept. Counter
Mode
22 Date Time Setting Set the date and the time.
23 Weekly Timer
24 Daylight Time Set Daylight Time According to your local
Set whether to sound a confirmation tone
when the original is placed on the Platen
Glass.
z The volume level is the same as for
Panel Beep Sound.
z When “18 Panel Beep Sound” is set to
“Off”, the machine makes no sound.
Set whether to sound a confirmation tone
when the original is placed on the ADF.
z The volume level is the same as for
Panel Beep Sound.
z When “18 Panel Beep Sound” is set to
“Off”, the machine makes no sound.
Set whether to display departmental
counters, limit counters, and total counters.
Set the weekly On/Off timer using the
Keypad of the machine. At the selected time,
the machine will switch to/from sleep mode.
regulation.
•No
Daylight Time is not applied.
• MAR 2nd
From 2:00 AM on the 2nd Sunday in
March to 2:00 AM on the 1st Sunday in
November.
•APR 1st
From 2:00 AM on the 1st Sunday in April
to 2:00 AM on the Last Sunday in
October.
z This setting is applied from March 2007
year. You select “MAR 2nd” in 2006, but
the daylight time will automatically set to
“APR 1st”.
No, Yes No
No, Yes Yes
Consult with the authorized Panasonic
z
dealer on how to use this item.
Month, Day, Year, Time
Each day of the
week.
No, MAR 2nd,
APR 1st
Off
MAR 2nd
14
25 DHCP Default Select “Yes” when your network
environment is based on DHCP Server.
When using this machine as a network
shared printer, select “No”, and set “26
TCP/IP Address”, “27 TCP/IP Subnet
Mask”, and “28 TCP/IP Default Gateway”.
26 TCP/IP Address Set the IP address. 3-digit x 4 0. 0. 0. 0
TCP/IP Subnet Mask
27
28 TCP/IP Default
Gateway
29 DNS Server
Address
Set the subnet mask. 3-digit x 4 0. 0. 0. 0
Set the default gateway. 3-digit x 4 0. 0. 0. 0
Select “Yes”, and set the DNS Server
address (when using the optional Internet
Fax/Email function).
No. 25 to 29
After setting any of these parameters, turn the
machine’s power switch Off, and then On again.
No, Yes Yes
No, Yes Yes
Page 15

Key Operator
No. Parameter Comments Selective Item
20 - 39 30 MAC Address Display the MAC address (Ethernet
address).
z The MAC address is displayed only, but
cannot be set.
Standard
Chapter 2 General Settings
Setting
31 Routing Menu
Function
32 Doc. Dist. Server
Name
33 Doc. Dist. Server IPWhen “29 DNS Server Address” is set to
34 Hard Disk
Initialize
Set whether to use the Routing function.
z When the optional software (Document
Distribution System) is installed.
When “29 DNS Server Address” is set to
“Yes”, and “31 Routing Menu Function” is
set to “Yes”, enter the name of the
distribution system routing Server.
The default Port Number is changed by
setting SSL.
z When the optional software (Document
Distribution System) is installed.
“No” and “31 Routing Menu Function” is
set to “Yes”, enter the IP address of the
distribution system routing Server.
The default Port Number is changed by
setting SSL.
z When the optional software (Document
Distribution System) is installed.
z When the optional Hard Disk is installed.
Set the HDD format/deletion.
When selecting “Deletion”, set the deletion
security level of hard disk data. During the
deletion time, the machine cannot be used.
•Stop
Deletion is not executed.
•Medium
Deletion is completed within 2 hours.
•High
Deletion is completed within 3 hours.
z When the optional Hard Disk is installed.
No, Yes No
Up to 60 characters
“SSL”
Off:8083
On:8084
3 digits x 4
“SSL”
Off:8083
On:8084
Format : Stop, Start
Deletion: Stop,
Medium,
High
0. 0. 0. 0.
Format
(Stop)
35 Hard Disk Error
Check
36 Address Book
Group ID
Set the hard disk error check.
z Not required in copying mode, but
needed when installing options with
advanced functions.
z When the optional Hard Disk is installed.
Set the Address Book Group ID. 0 to 99 0
Stop, Start Start
15
Page 16
Key Operator
Chapter 2 General Settings
No. Parameter Comments Selective Item
Standard
Setting
20 - 39 37 Auto Reset
Information
38 Pap. Tray Priority
(B/W)
39 Pap. Tray Priority
(Col)
40 - 59 40 Fold Position (A3/
LDR)
Set whether to display the auto reset guide. No, Yes Yes
Set the paper tray priority for Black and
White copy or print job.
S: Optional paper feed unit
C: Paper tray of the main unit
B: Sheet bypass
Set the paper tray priority for Color copy or
print job.
S: Optional paper feed unit
C: Paper tray of the main unit
B: Sheet bypass
Set the binding margin for booklet copy.
(A3/Ledger).
S>C>B, C>S>B C>S>B
S>C>B, C>S>B C>S>B
-4.0 to +4.0 mm 0.0
A3 / Ledger(11x17)
41 Fold Position (B4) Set the binding margin for booklet copy.
(B4).
B4
42 Fold Position (A4/
LTR-R)
Set the binding margin for booklet copy.
(A4/Letter-R).
A4 / Letter-R(8.5x11)
-4.0 to +4.0 mm 0.0
-4.0 to +4.0 mm 0.0
16
Page 17
Key Operator
No. Parameter Comments Selective Item
Standard
Chapter 2 General Settings
Setting
40 - 59 44 Data Deletion of HDSet the deletion security level of hard disk
data for every copy/print job.
z When the optional hard disk unit is
installed, every copy/print job data is
automatically deleted after each job is
completed.
For higher security select Medium and
High, however, the deletion time
increases with the increase in security
level, and may take longer to erase the
data.
45 WINS Server 1 IP Set the IP address of WINS Server 1. 3 digits x 4 0. 0. 0. 0.
46 WINS Server 2 IP Set the IP address of WINS Server 2. 3 digits x 4 0. 0. 0. 0.
47 Scope ID Set the Net Bios Scope ID. Up to 223 characters
48 IP Filter Set whether the IP filter is to provide
security for network functions such as
printer or scanner.
49 IP Filter Mode Set whether the registered “50 IP Filter
Address” is allowed or denied for network
functions.
50 IP Filter Address Set the IP filter address.
Up to 4 addresses can be set.
z When setting only one IP filter address,
input the same IP address for both “Start
Address” and “End Address”.
Basic, Medium, High Basic
Off, On Off
Allow, Deny Allow
3 digits x 4 0. 0. 0. 0.
51 Community Name
(1)
52 Community Name
(2)
54 SysContact Set the system management name. Up to 31 characters
55 SysName Set the system name. Up to 31 characters Panasonic
56 SysLocation Set the system installation location. Up to 31 characters
59 SMB Set whether to use the machine on the
60 - 79 60 SMB Master
Browser
Set the SNMP community name (1). Up to 15 characters public
Set the SNMP community name (2). Up to 15 characters public
DP-XXXX
Off, On Off
Microsoft Network (SMB).
Set whether to use the SMB Master
Browser.
No. 45 to 60
After setting any of these parameters, turn the
machine’s power switch Off, and then On again.
Off, On Off
17
Page 18
Key Operator
Chapter 2 General Settings
No. Parameter Comments Selective Item
Standard
Setting
60 - 79 61 SMB Device
Name
62 SMB Workgroup
Name
63 SMB Comment Set comments about the machine
64 Bonjour Set the Bonjour.
Set the device name for Microsoft
Network (SMB).
There is no default value. When the
machine starts up under the following
parameter settings “59 SMB” is set to “On”,
“61 SMB Device Name”, and “62 SMB
Workgroup Name” are not set, then,
“Panasonic DP-XXXX and the lower six
figures of MAC Address” will be
automatically setup.
Set the working group name for
Microsoft Network (SMB).
There is no default value. When the
machine starts up under the following
parameter settings “59 SMB” is set to “On”,
“61 SMB Device Name”, and “62 SMB
Workgroup Name” are not set, then,
“DPCL-PRINTER” will be automatically
setup.
used for Microsoft Network (SMB).
z When the optional Printer Controller
Module (for Adobe
installed.
There is no default value. When the
machine starts up, and parameter “64
Bonjour” is set to “On”, then, “Panasonic
DP-XXXX and the lower six figures of MAC
Address” will be automatically setup.
®
PostScript® 3™ ) is
Up to 15 characters
Up to 15 characters
Up to 48 characters
Off, On Off
65 Bonjour Name Set the name of Bonjour.
z When the optional Printer Controller
Module (for Adobe
installed.
There is no default value. When the
machine starts up, and parameter “64
Bonjour” is set to “On”, then, “Panasonic
DP-XXXX and the lower six figures of MAC
Address” will be automatically setup.
66 IPv6 Set this parameter to “On” when using
the machine for IPv6.
z For details about setting IPv6, refer to
Embedded Web Server in the
Document Management System (For
Embedded Web Launcher, and Web
Server) on the provided CD-ROM.
®
PostScript® 3™ ) is
No. 61 to 66
After setting any of these parameters, turn the
machine’s power switch Off, and then On again.
Up to 31 characters
Off, On Off
18
Page 19
Key Operator
No. Parameter Comments Selective Item
Standard
Chapter 2 General Settings
Setting
60 - 79 70 Auto Tone Adjust If the colored image tone has deviated, set
the automatic tone adjustment.
<Procedure>
1. Execute this mode to print the calibration
sheet.
2. Place the calibration sheet on the platen,
and execute this mode again.
71 Tone Adjust Reset If “70 Auto Tone Adjust” has made the
original image tone indistinguishable,
execute this mode to reset the machine to
the original factory default setting.
73 Administrator
Name
74 Authentication
Method
75 User
Authentication
76 ID Timeout When “75 User Authentication” is set to
When “75 User Authentication” is set to
“On”, and a Local Machine is selected as
domain, set administrator’s name and,
password for authentication.
When “75 User Authentication” is set to
“On”, set the authentication method.
Set whether to use User Authentication,
and then select for which functions.
“On”, set at what phase the machine will
require the authentication.
Stop, Start Stop
Stop, Start Stop
Up to 40 characters
NTLM, Clr Text NTLM
Copy, Fax, Print,
Scan
(Off, On)
Auto Rst, EveryJob Auto Rst
77 Logon Attempts When “75 User Authentication” is set to
User Auth. Domain
78
79 Lockout Time When “75 User Authentication” is set to
80 - 89 85 Key Operator
Password
86 HD Drive Lock
Settings
0 to 9 0
“On”, set the number of permitted logon
attempts. (Set “0” for unlimited attempts.)
When “75 User Authentication” is set to
“On”, set the domain for authentication.
The default Port Number is changed by the
SSL setting.
“On”, set the lockout time.
If you failed to logon during specified times,
you cannot logon again during the lockout
time.
Set the 8-digit key operator password. Up to 8 characters
Set the 32-digit HD Drive Lock password.
z When the Set Drive Lock is selected.
The machine requires rebooting, and the
“Change Lock Password”, and “Release
Drive Lock Password” tasks must be
carried out.
No. 00 to 09
“SSL”
Off:389
On:636
1 to 60 min. 5 min.
Set Hard Drive Lock Set Hard
Drive Lock
19
Page 20

Example : Dept. Counter Mode
Chapter 2 General Settings
Registering passwords (department codes) of departments using the Dept. Counter Mode allows you
to manage the copy, print, and scan counts by department. Up to 1000 departments can be managed.
Let’s take a look at how to register/change passwords (department codes), clear the total counter, print
a departmental list or report such as a departmental counter list, and change a departmental limit of
copy count.
z To use the Dept. Counter Mode, a special service setting is required. Contact your authorized Panasonic
dealer.
z When the departmental counter function is enabled, the password (department code) entry screen appears on
the touch panel display. If you do not enter the password (department code), you cannot use the Copy, Fax,
Scan and Print function.
1
Press the Function key.
z The password (department code) entry
screen appears on the touch panel display.
Press the Function key on the Control
Panel without entering any code.
3
Select “5-9”.
2
Select “General Settings”.
4
Select “09 Key Operator Mode”.
20
Page 21
5
Enter the password (8-digit), and then
press “OK”.
6
Select “20-39”.
For the subsequent steps, refer to the relevant
section.
Chapter 2 General Settings
Registering/Changing the Password
(Department Code)
You can register/change the password
(department code) of each department.
Refer to Registering/Changing the
Password (Department Code) (see page
22).
Clearing the Total Counter
You can clear the total departmental counter.
Refer to Clearing the Total Counter (see
page 23).
Printing a Departmental List or Report
You can print a departmental counter list, a
user settings list, or a management settings
list by user.
Refer to Printing a Departmental List or
Report (see page 24).
7
Select “21 Dept. Counter Mode”.
The Dept. Counter Mode screen appears.
Changing the Departmental Count
You can change the departmental counter.
Refer to Changing the Departmental
Counter (see page 24).
Changing the Departmental Limit
You can change the departmental limit.
Refer to Changing the Maximum Prints (see
page 26).
21
Page 22
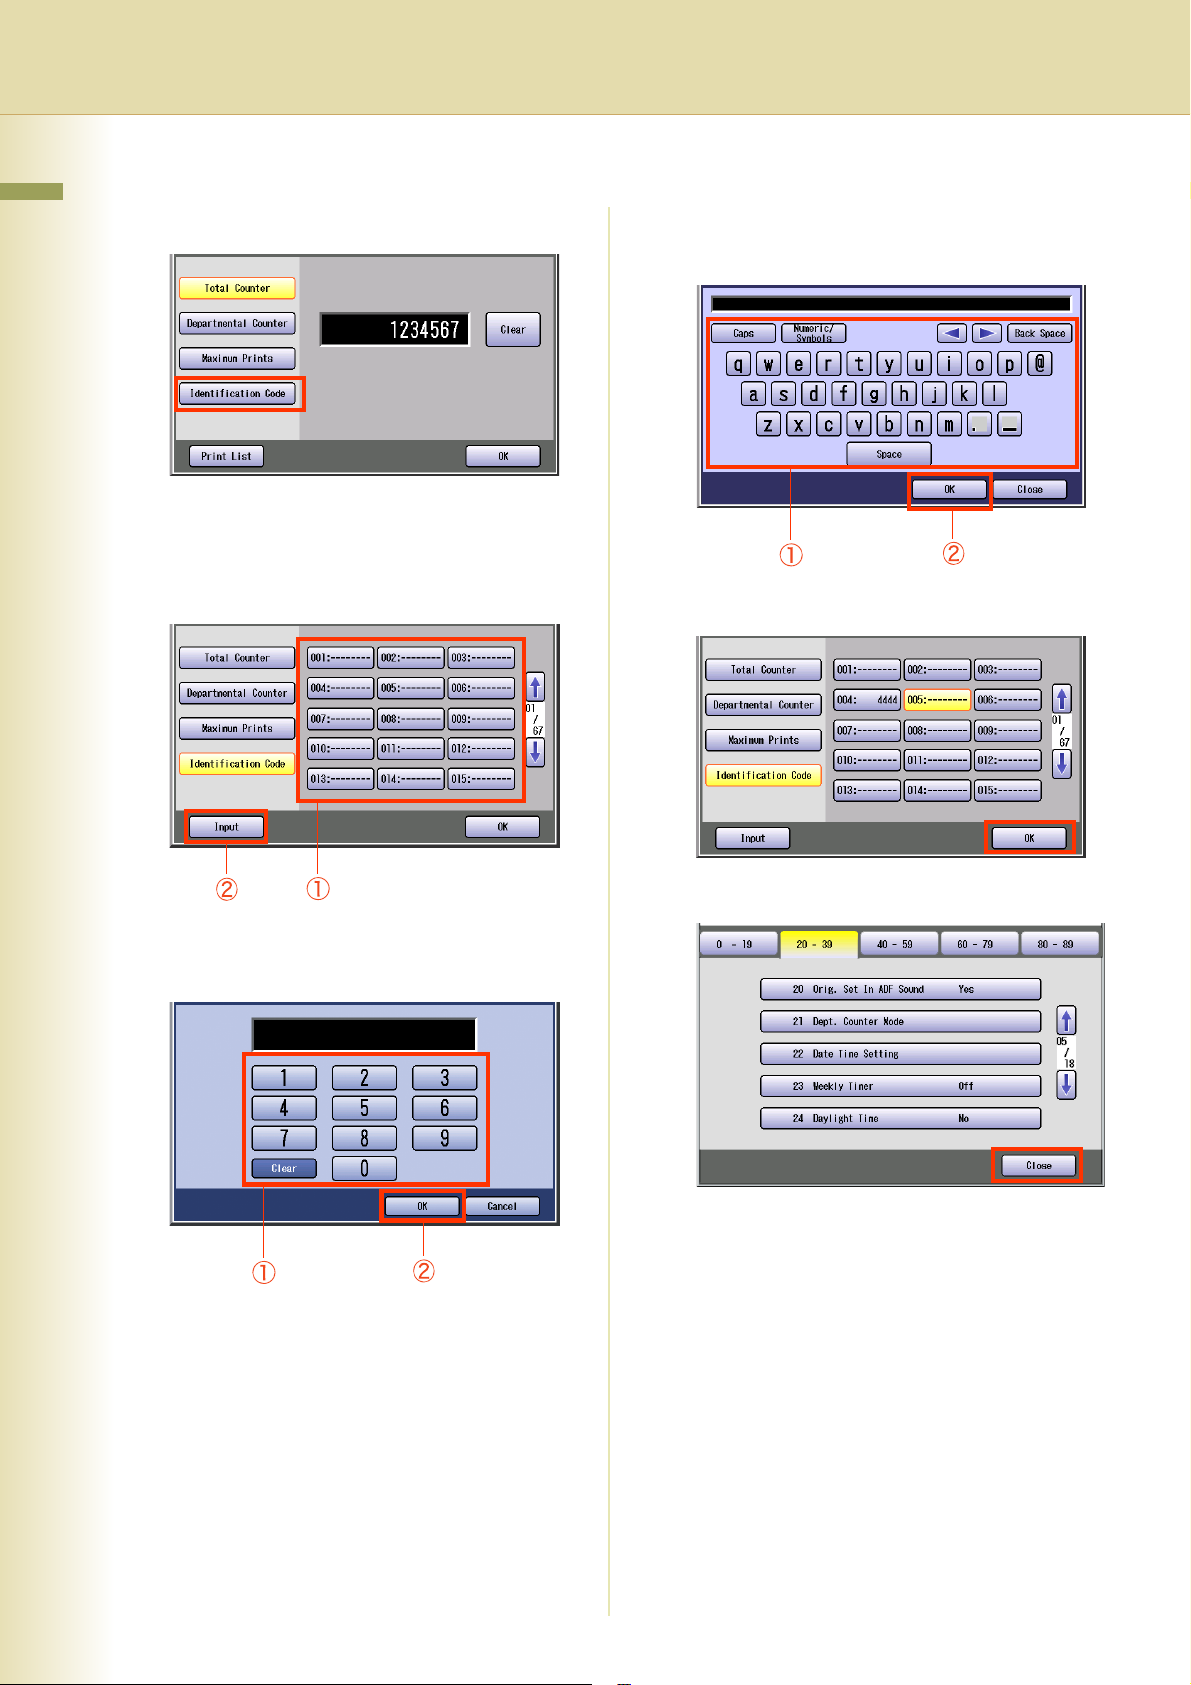
Registering/Changing the Password (Department Code)
Chapter 2 General Settings
1
Select “Identification Code”.
2
Select the department number subject
to password (department code)
registration/change, and then press
“Input”.
4
Enter the department name (up to 25
characters), and then select “OK”.
5
Select “OK”.
3
Enter the department code (up to 8digit), and then select “OK”.
6
Select “Close”.
z After setting up the function(s), press the
Reset key to return the machine to the initial
screen of the current active mode.
22
Page 23
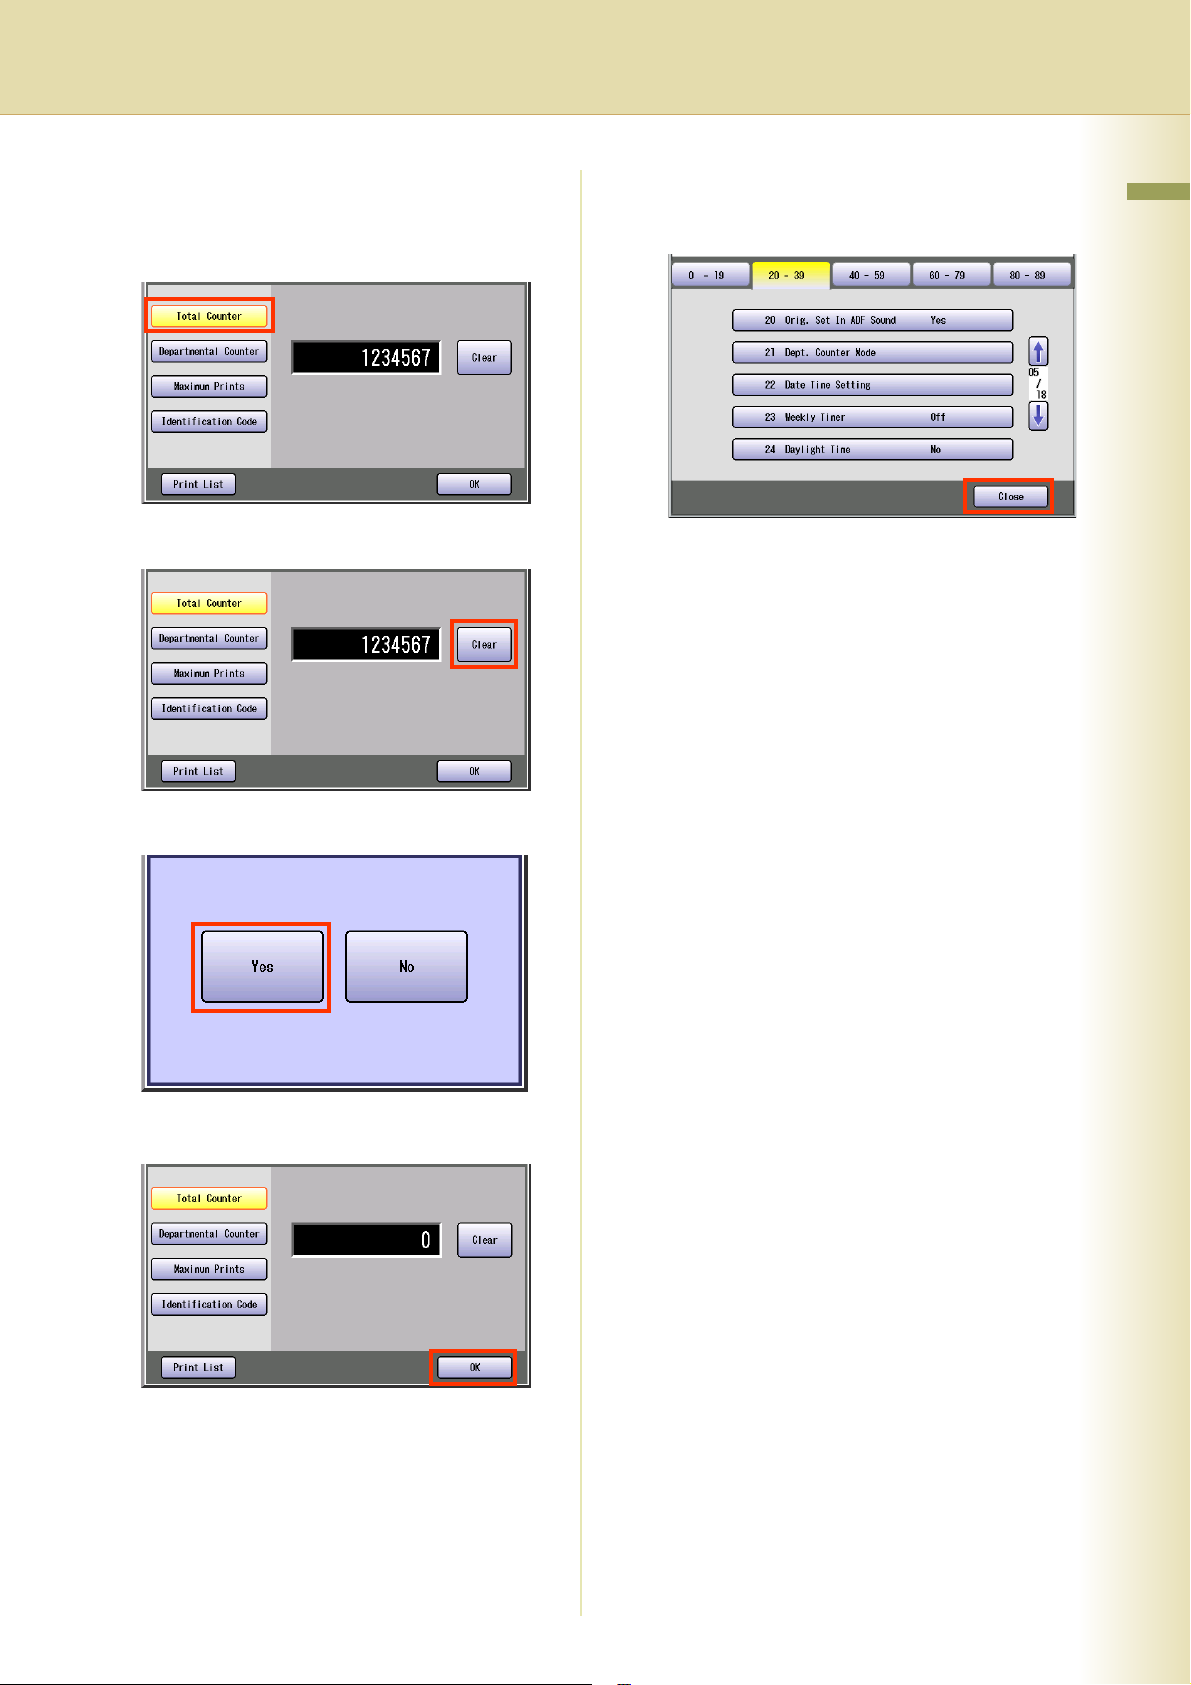
Clearing the Total Counter
1
If the total counter is not displayed,
select “Total Counter”.
2
Select “Clear”.
5
Select “Close”.
z After setting up the function(s), press the
Reset key to return the machine to the initial
screen of the current active mode.
Chapter 2 General Settings
3
Select “Yes” to clear the counter.
4
Select “OK”.
23
Page 24
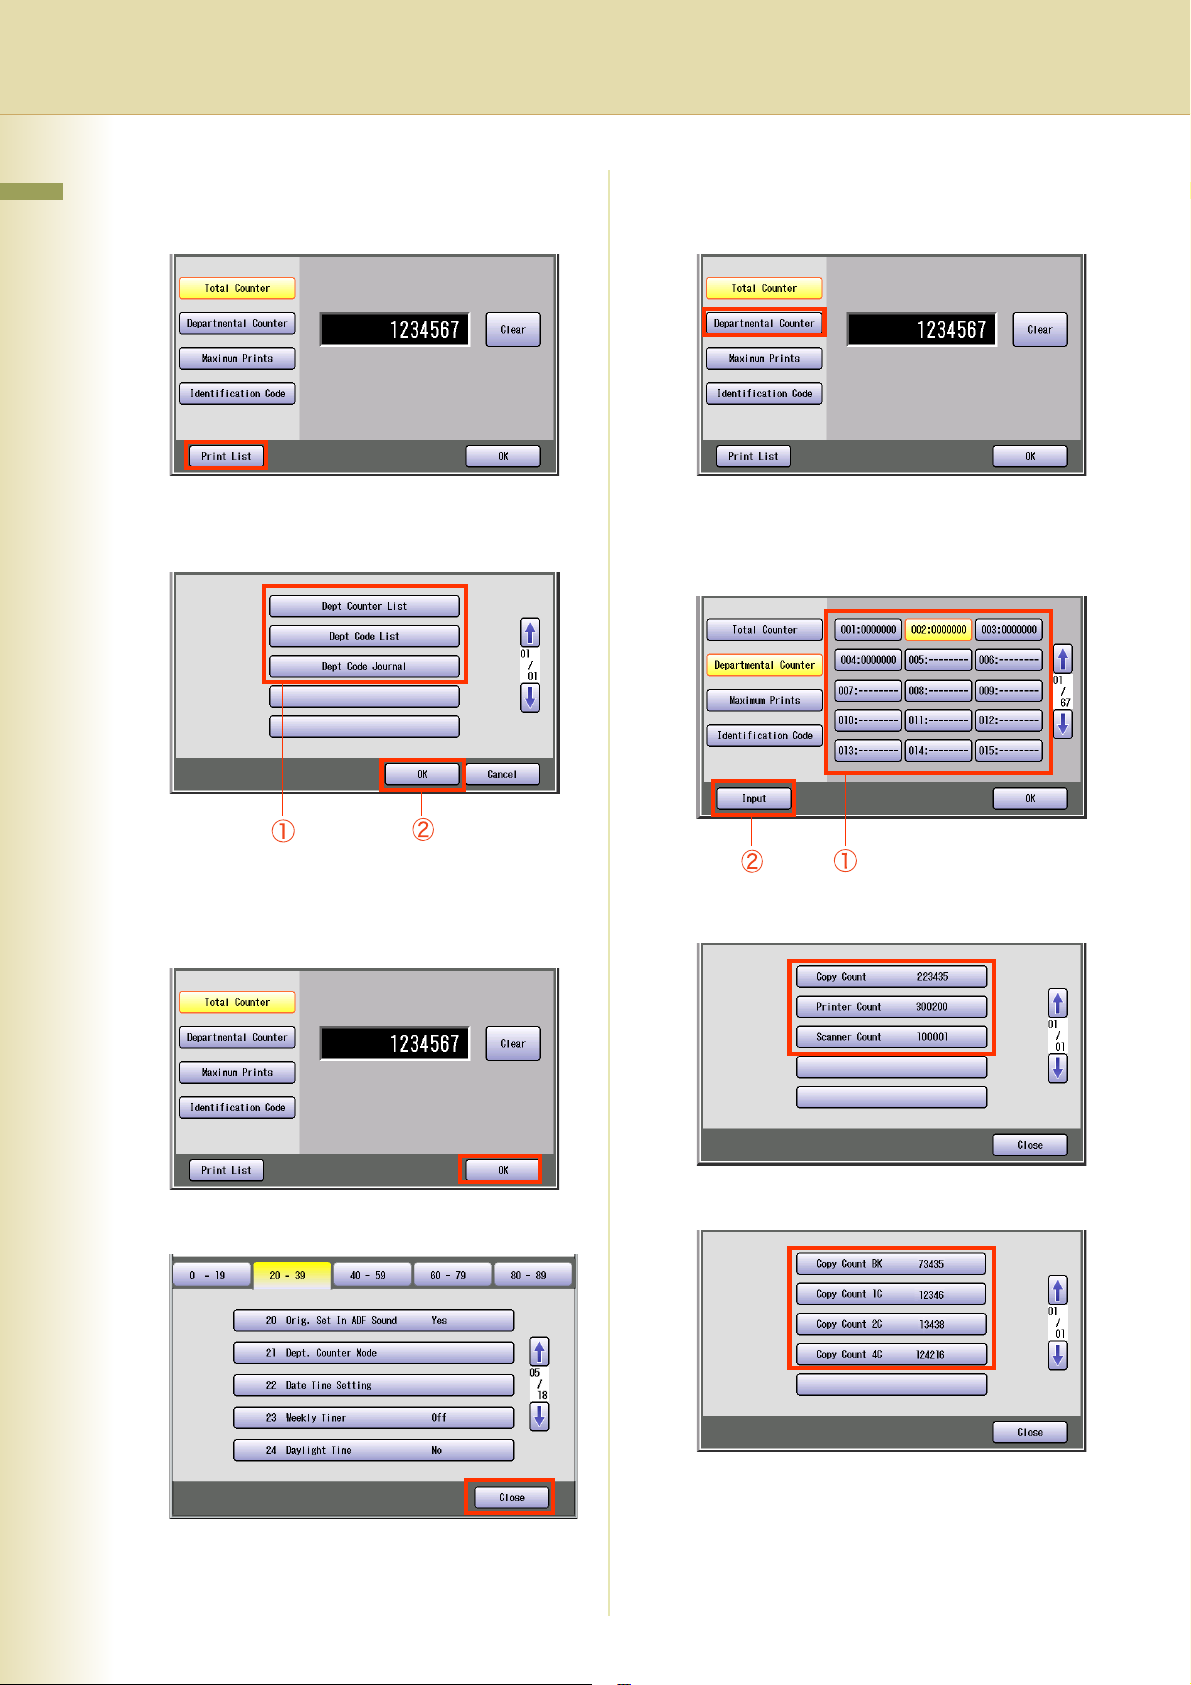
Printing a Departmental List or Report
Changing the Departmental Counter
Chapter 2 General Settings
1
Select “Print List”.
2
Select the list or report you want to
print, and then select “OK”.
1
Select “Departmental Counter”.
2
Select the department number subject
to departmental count change, and
then select “Input”.
z Printing of the selected list or report starts.
3
When printing is completed, select
“OK”.
4
Select “Close”.
3
Select the count you want to change.
4
Select the color you want to change.
24
z If you selected “Scanner Count” in step 3,
the color selection screen is not displayed.
z After setting up the function(s), press the
Reset key to return the machine to the initial
screen of the current active mode.
Page 25
5
Select “Input”, input a count (up to 7
digits) from the keypad, and then
select “OK”.
6
Select “Close”.
9
Select “Close”.
z After setting up the function(s), press the
Reset key to return the machine to the initial
screen of the current active mode.
Chapter 2 General Settings
7
Select “Close”.
8
Select “OK”.
25
Page 26
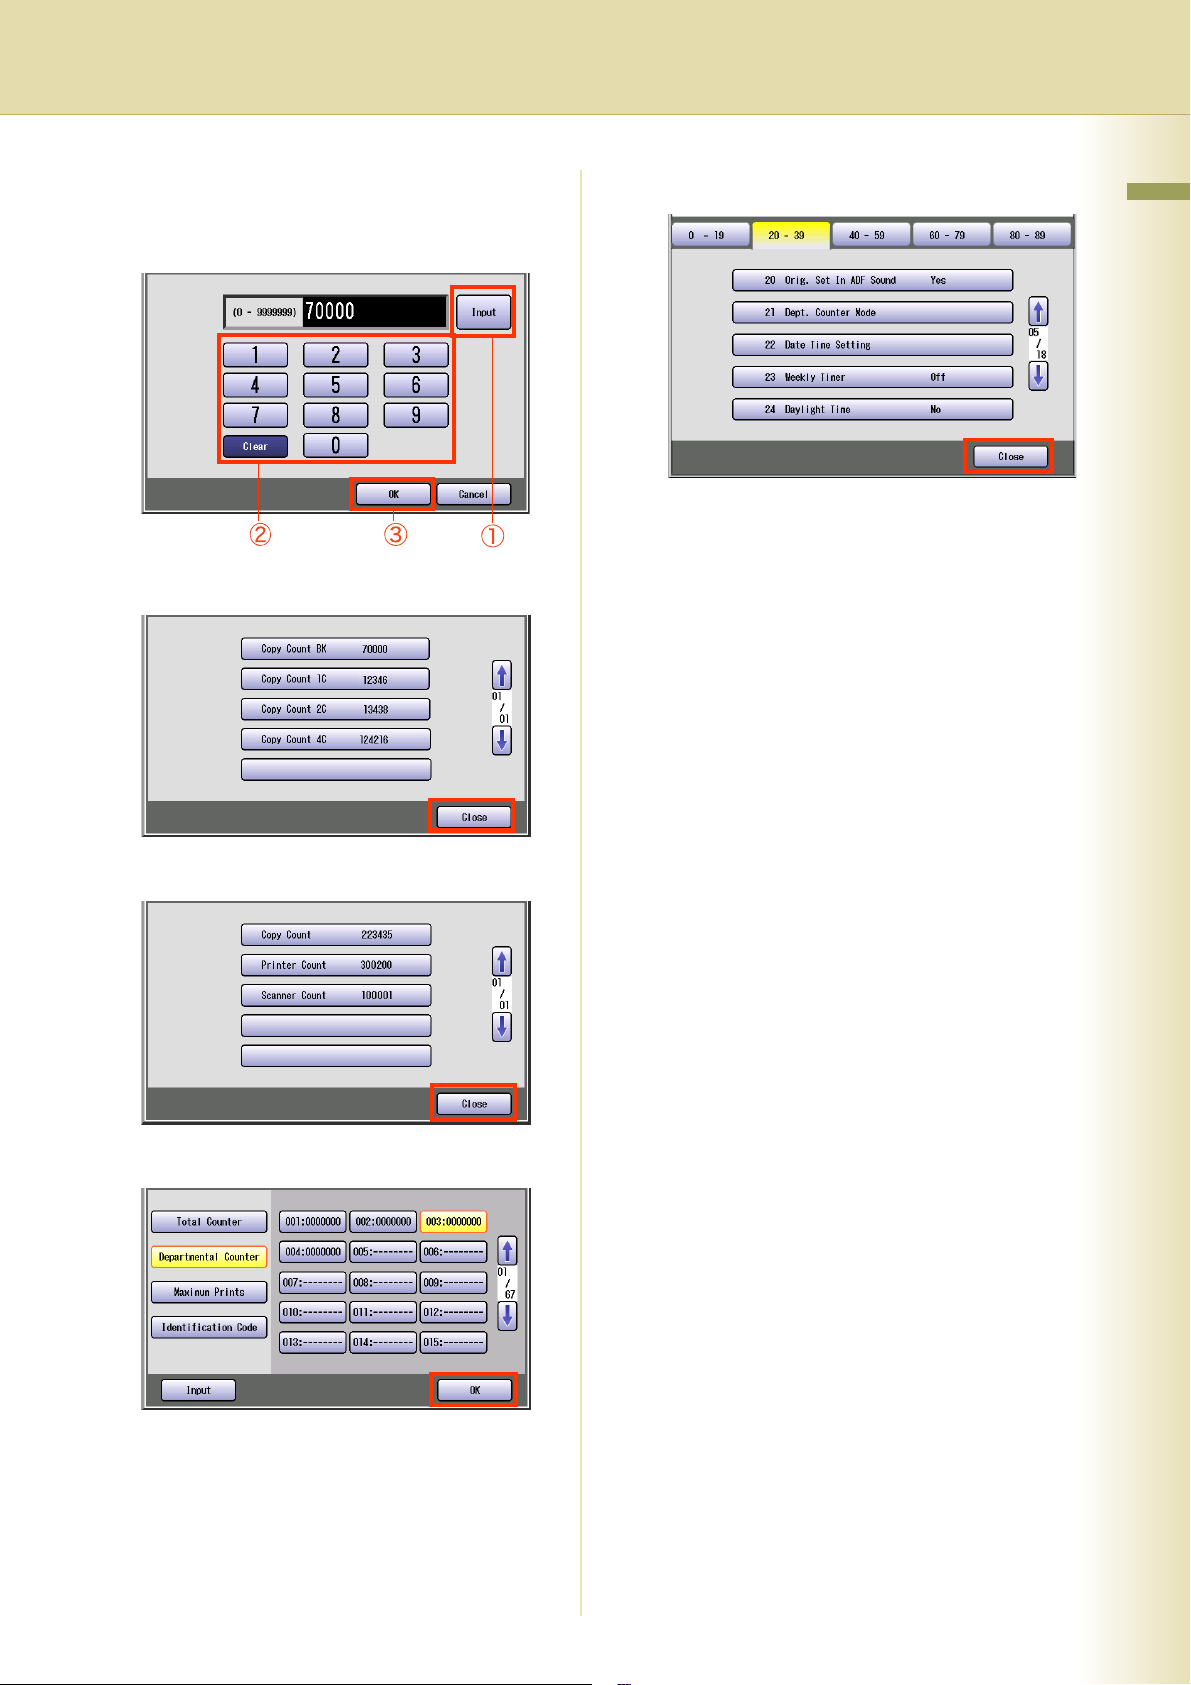
Changing the Maximum Prints
Chapter 2 General Settings
1
Select “Maximum Prints”.
2
Select the department number subject
to departmental limit change, and then
select “Input”.
z If you input “9999999”, the copy count limit
becomes infinite.
z If the set limit is exceeded, the machine
stops automatically.
5
Select “Close”.
6
Select “OK”.
3
Select the count limit you want to
change.
4
Select “Input”, input a new limit (up to
7 digits) from the keypad, and then
select “OK”.
7
Select “Close”.
z After setting up the function(s), press the
Reset key to return the machine to the initial
screen of the current active mode.
26
Page 27

Memo
Chapter 2 General Settings
27
Page 28
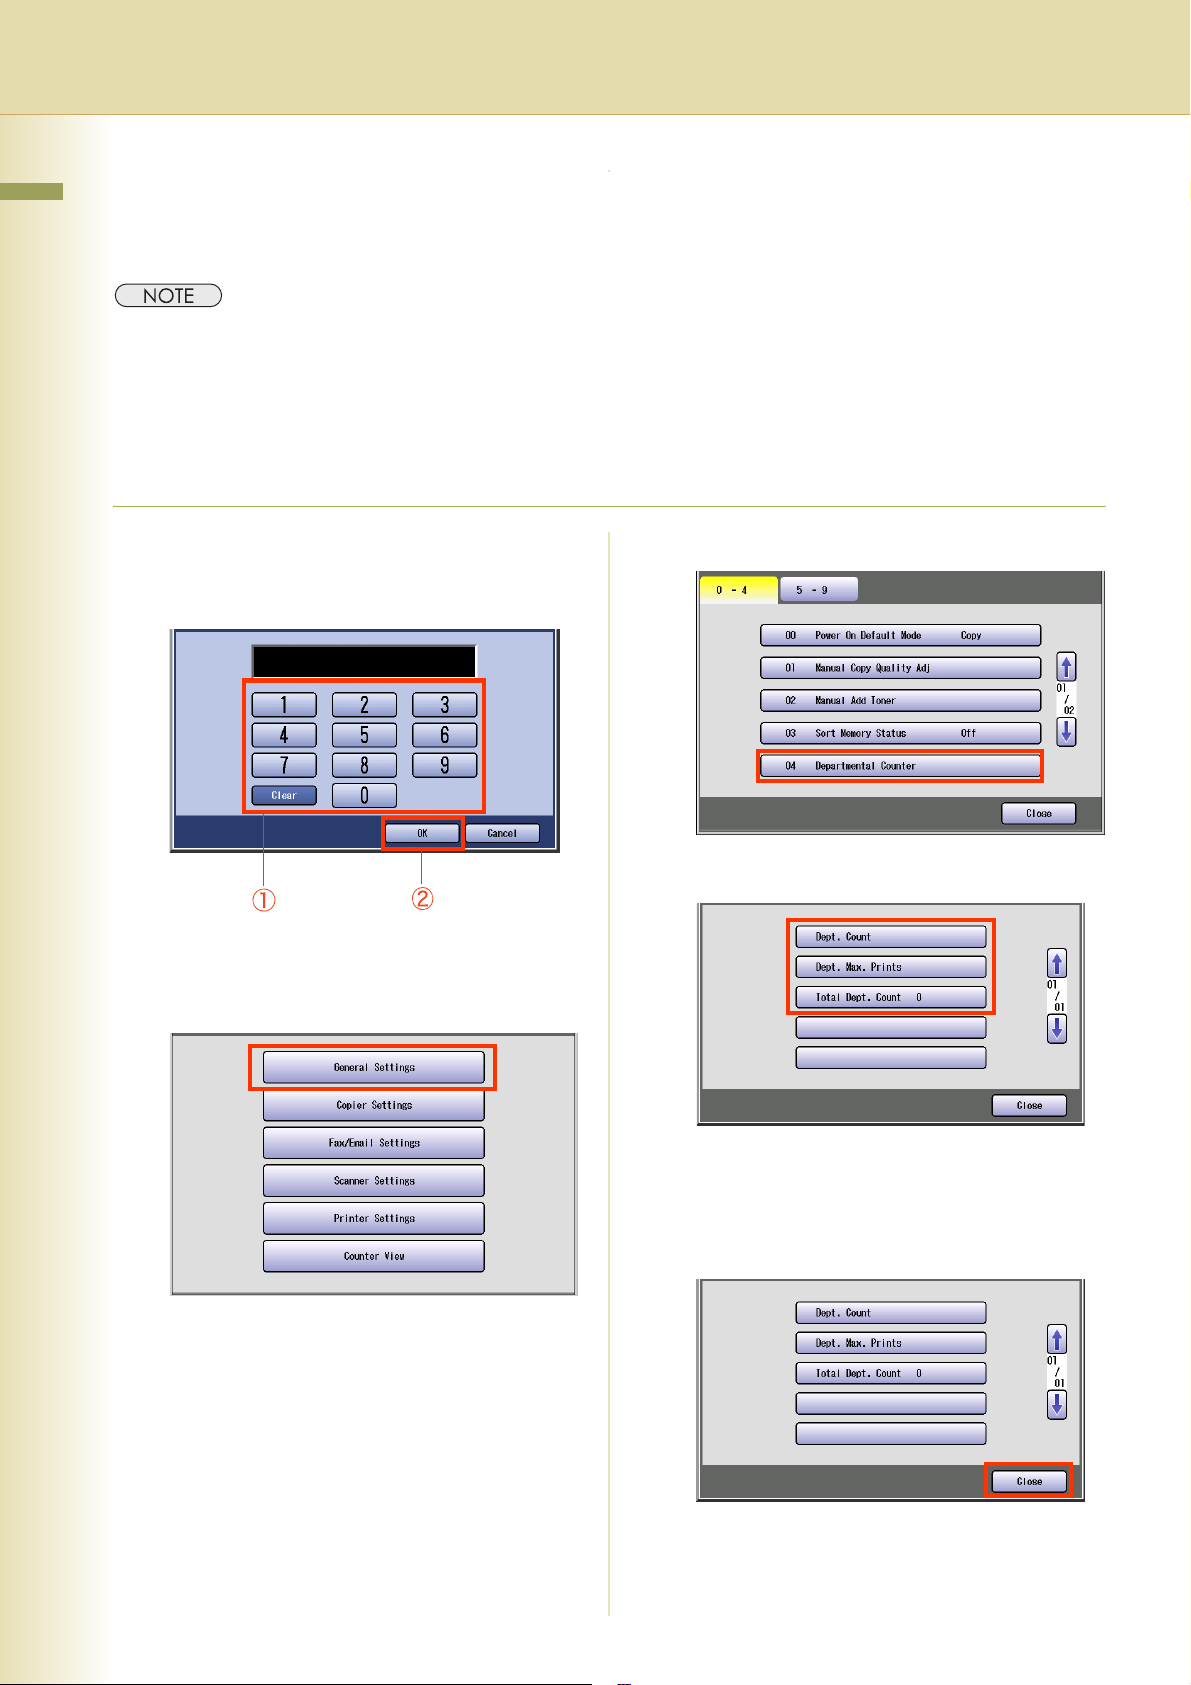
Example : Departmental Counter
Chapter 2 General Settings
When the Dept. Counter Mode is selected, you can display your selected departmental counter.
z To use the Dept. Counter Mode, a special service setting is necessary. Contact your authorized Panasonic
dealer.
z
For instruction on how to set departmental counters, refer to
z When the departmental counter function is enabled, the password (department code) entry screen appears on
the touch panel display. If you do not enter the password (department code), you cannot use the Copy, Fax,
Scan and Print function.
1
Enter the password (department code)
of the department subject to count
display, and then select “OK”.
Example : Dept. Counter Mode (see page 20)
4
Select “04 Departmental Counter”.
.
2
Press the Function key.
3
Select “General Settings”.
5
Select the counter you want to display.
z The total departmental counter is displayed
on the button. You cannot select this button.
6
After displaying the counter or copy
limit, select “Close”.
28
z After setting up the function(s), press the
Reset key to return the machine to the initial
screen of the current active mode.
Page 29

Memo
Chapter 2 General Settings
29
Page 30
Example : Date Time Setting
Chapter 2 General Settings
z The clock of your machine is equipped with D.S.T. (Daylight Saving Time) system. So, your clock will
automatically set the time forward from 2:00 AM to 3:00 AM on the first Sunday of April or on the 2nd Sunday of
March. At the end of the Daylight Saving Time (on the last Sunday of October or 1st Sunday of November), the
clock will set the time back from 2:00 AM to 1:00 AM. For setting the Daylight Time, refer to “24 Daylight Time”
in General Settings (see page 14).
z On occasion, the clock may need adjustment. (Lunar inequality : ±1 minute)
1
Press the Function key.
2
Select “General Settings”.
5
Enter the password (8-digit), and then
select “OK”.
3
Select “5-9”.
4
Select “09 Key Operator Mode”.
z For details on how to set the password,
consult with the key operator
6
Select “20-39”.
7
Select “22 Date Time Setting”.
30
Page 31

8
Select “Input”, and then enter the
Date and Time.
Ex: August/1st/2006 00:00
9
Select “OK”.
Chapter 2 General Settings
10
Select “Close”.
z After setting up the function(s), press the
Reset key to return the machine to the initial
screen of the current active mode.
31
Page 32

Chapter 3 Copier Settings
Chapter 3
Copier Settings
In Copier User Mode, the following items can be changed.
Copier User
No. Parameter Comments Selective Item Standard
Copier Settings
Setting
0 - 4 00 Margin Value
Default
01 Edge Value
Default
02 Book Value
Default
03 Margin Reduction
Def.
Set the default margin. 5 mm, 10 mm, 15
mm, 20 mm
Set the default edge. 5 mm, 10 mm, 15
mm, 20 mm
Set the default book. 15 mm, 20 mm, 25
mm, 30 mm
To copy with the binding margin, set
whether to reduce the copy image.
No, Yes No
•No
The copy image is not reduced.
When copying with wide margin, a part of the image may not be
copied.
10 mm
5 mm
20 mm
04 2-Sided Mode
Default
5 - 9 05 N in 1 Default
Mode
•Yes
The copy image is reduced according to the binding margin.
Set the default 2-sided Mode.
No : Single-sided copy
1 to 2 : 1 -> 2 Copy
2 to 2 : 2 -> 2 Copy
B to 2 : Book -> 2 Copy
Set the default N in 1 Mode. 2 in 1, 4 in 1, 6 in 1 2 in 1
No, 1 to 2, 2 to 2,
B to 2
No
32
Page 33

Copier User
No. Parameter Comments Selective Item Standard
Chapter 3 Copier Settings
Setting
5 - 9 06 Reduce N in 1 for
Space
07 Booklet Default
Mag.
For N in 1 Copy, set whether to leave a
margin between copy images.
•No
No margin is inserted.
•Yes
A margin is inserted.
Margin
For Booklet Copy, set whether to reduce
the copy image and add a center margin.
• 100%
8.5 x 11 sized originals are copied onto
11 x 17 sized paper without
reduction.
11x1 7
No, Yes No
100%, Reduce Reduce
8.5x11 8.5x11
• Reduce
8.5 x 11 sized originals are reduced to
5.5 x 8.5 in size and copied onto 8.5 x 11
sized paper.
8.5x11
5.5x8.5 5.5x8.5
Margin
33
Page 34

Chapter 3 Copier Settings
Copier User
No. Parameter Comments Selective Item Standard
Setting
5 - 9 08 Digital Skyshot
Mode
09 Manual Skyshot
Mode
Enable or disable Digital Skyshot Mode.
•No
Digital Skyshot Mode is disabled.
•Normal
Skyshots are used with standard quality.
• Quality
Skyshots are used with better quality
than in “Normal”.
z Refer to Example : Digital Skyshot
Mode (see page 40).
Enable or disable Manual Skyshot Mode.
•Off
Manual Skyshot Mode is disabled.
•M1,On
The image is copied in pre-registered M1
size.
(Standard setting : 70x160mm)
•M2,On
The image is copied in pre-registered M2
size.
(Standard setting : 95x220mm)
•M1,M2,On
Copied in pre-registered M1 or M2 size.
No, Normal, Quality Normal
Off,
M1,On,
M2,On,
M1,M2,On
Off
10 - 14 10 G-Cl. Detect
Mode
11 Sort Priority ADF Selects the sort priority when using the
12 Sort Priority Glass Selects the sort priority when using the
13 Stamping Default
Mode
14 Page Numbering
Style
z Refer to Example : Manual Skyshot
Mode (see page 41).
Set the ground color detection mode. Tip, Area Tip
None, Sort, Shift,
ADF.
z Shift, Staple, Group
When the optional paper Transport Unit
is outer, this setting is available.
Platen.
z Shift, Staple, Group
When the optional paper Transport Unit
is outer, this setting is available.
Set the default Stamping Mode. Page, Date, Issue,
Set the page numbering style. -n-,
Staple, Group
None, Sort, Shift,
Staple, Group
Tex t
n/m
Sort
None
Page
-n-
34
Page 35

Copier User
No. Parameter Comments Selective Item Standard
Chapter 3 Copier Settings
Setting
15 - 19 15 Img. Repeat
Dotted Line
16 Staple Position
Setting
Set whether to print perforations between
copy images in image repeat copying.
None, Print Print
• None
Perforations are not printed.
•Print
Perforations are printed.
Perforations
Set the default stapling position. Upper R, Upper L,
L Center, U Center,
R Center
(R: Right, L: Left,
U: Upper)
Upper L
17 Hole Punch
Default
18 Double Exposure Set the default double exposure. Off, On On
20 - 24 20 Add User Color Set the ratio of cyan, magenta, and yellow
21 Modify User Color Modify a registered color.
22 Delete User Color Delete a registered color.
24 Key Operator
Mode
Set the default punch. Off, On Off
and register the mixed color.
Enter the Key Operator password to display
the Key Operator Mode (see page 36).
00000000
35
Page 36

Chapter 3 Copier Settings
Key Operator
No. Parameter Comments Selective Item
Standard
Setting
0 - 9 00 Print Copier Settings Print a Copier Settings list.
To cancel printing the copier
setting list, press “Stop” and “OK”.
While processing the cancellation,
panel operation is denied, and an
error beep is produced.
The feeding paper(s) will be
ejected before completing the
above cancellation operation.
If setting a parameter, an asterisk
mark (*) will be added before the
parameter number.
01 Paper Size Priority Set the paper size priority.
02 Original Mode Default Set the default Original Type of
the quality adjustment.
• Text:
Text1 (Printed),
Text2 (Pencil)
• Text/Photo:
T/P1 (Commercial),
T/P2 (Photo Paper),
T/P3 (Laser Printed)
• Photo:
Photo1 (Commercial),
Photo2 (Photo Paper),
Photo3 (Laser Printed)
• Other Types:
Other1 (Map),
Other2 (Tracing Paper),
Other3 (News Paper)
Stop, Start Start
11x17 , Legal ,
8.5x11 , 8.5x11 ,
5.5x8.5 , A3 ,
B4 , A4 , A4 ,
B5 , B5 , A5 ,
8x13 , 8.5x13
Te x t1 , Tex t 2, T /P 1 ,
T/P2, T/P3, Photo1,
Photo2, Photo3,
Other1, Other2,
Other3
8.5x11
T/P1
36
03 Color Mode Default Set the default Color Mode. Auto, Black, Color,
2Color, 1Color
04 Text Density When Original Mode is “Text”,
set the default density.
05 T/P Density When Original Mode is “Text/
Photo”, set the default density.
06 Photo Density When Original Mode is “Photo”,
set the default density.
07 Density (Other Type) When Original Mode is “Other
Type s”, set the default density.
08 Overlay Density Set the default density for
overlay copying.
09 Background Removal Set the default Background
Removal.
-3 to +3 0
-3 to +3 0
-3 to +3 0
-3 to +3 0
-3 to +3 0
Off, Level:1 to Level:6 Level:3
Auto
Page 37

Key Operator
No. Parameter Comments Selective Item
Chapter 3 Copier Settings
Standard
Setting
10 - 19 10 Bleedthrough Prevention Set the default bleedthrough
prevention.
11 Contrast Set the default contrast. -3 to +3 0
12 Sharpness Set the default sharpness. -3 to +3 0
13 Saturation Set the default color saturation. -3 to +3 0
14 Tint Set the default tint. -3 to +3 0
15 Color Balance Set the default color balance for
Cyan, Magenta, Yellow and
Black.
(Darker, Medium and Lighter
Areas)
20 - 29 21 Page Insertion Default Set the default page insertion. Blank, Copy Blank
22 Cover Mode Default Set the default Cover Mode. F, Blank,
23 Job Build and SADF Mode Enable or disable SADF Mode. No, Yes Yes
Off, Level:1 to Level:6 Off
-3 to +3 0
F, B l a nk
F, C opy,
FB, Blank,
FB, Copy
(F: Front cover, FB:
Front & Back cover)
24 Maximum Copy Setting Set the limit copy count. 0 to 99
(0: No limit)
25 M1, Size Change the skyshot size
registered on the M1 key.
26 M2, Size Change the skyshot size
registered on the M2 key.
27 Memory Overflow Warning Set sort copying when the
memory is full.
X: 5 to 432mm
Y: 5 to 297mm
X: 5 to 432mm
Y: 5 to 297mm
Print, Cancel Print
•Print
The read original is copied.
• Cancel
The read original is deleted.
28 Color Spec (1Color) Set the default one color.
z “Preset 1 to 6” can be
selected when you set “20
Add User Color” in Copier
Settings.
29 Color Spec (2Color) Set the default two colors.
z “Preset 1 to 6” can be
selected when you set “20
Add User Color” in Copier
Settings.
Red, Yellow, Green,
Magenta, Blue, Cyan,
Preset1, Preset2,
Preset3, Preset4,
Preset5, Preset6
Red, Yellow, Green,
Magenta, Blue, Cyan,
Preset1, Preset2,
Preset3, Preset4,
Preset5, Preset6
0
70, 160
(mm)
95, 220
(mm)
Red
Red
37
Page 38

Chapter 3 Copier Settings
Key Operator
No. Parameter Comments Selective Item
Standard
Setting
30 - 39 30 Color Spec (Overlay) Set the default overlay color.
z “Preset 1 to 6” can be
selected when you set “20
Add User Color” in Copier
Settings.
31 Mono Color Judge Level Set the auto detection level for
color original.
1: Making an original easier to
detect as monochrome.
7: Making an original easier to
detect as colored.
32 Color Toner Save (T) In color mode, set the level
of toner saving when the
Original Type is “Text”.
33 Color Toner Save (T/P) In color mode, set the level
of toner saving when the
Original Type is “Text/Photo”.
34 Color Toner Save (P) In color mode, set the level
of toner saving when the
Original Type is “Photo”.
35 Color Toner Save (Other) In color mode, set the level
of toner saving when the
Original Type is “Other Types”.
Full, Red, Magenta,
Green, Cyan, Blue,
Black, Yellow, White,
Preset1, Preset2,
Preset3, Preset4,
Preset5, Preset6
1 to 7 4
None, Level 1, Level
2, Level 3, Level 4,
Level 5
None, Level 1, Level
2, Level 3, Level 4,
Level 5
None, Level 1, Level
2, Level 3, Level 4,
Level 5
None, Level 1, Level
2, Level 3, Level 4,
Level 5
Full
None
None
None
None
36 Mono Toner Save (T) In monochrome mode,
set the level of toner saving
when the Original Type is “Text”.
37 Mono Toner Save (T/P) In monochrome mode,
set the level of toner saving
when the Original Type is “Text/
Photo”.
38 Mono Toner Save (P) In monochrome mode,
set the level of toner saving
when the Original Type is
“Photo”.
39 Mono Toner Save (Other) In monochrome mode,
set the level of toner saving
when the Original Type is “Other
Type s”.
40 - 44 40 Copy Customize Set whether to indicate the More
Menus functions individually.
41 RSV. a Job Setting Clr The copy Job Setting of
reservation is clear.
No. 32 to 39
After setting any of these parameters, turn the
machine’s power switch Off,
None, Level 1, Level
2, Level 3, Level 4,
Level 5
None, Level 1, Level
2, Level 3, Level 4,
Level 5
None, Level 1, Level
2, Level 3, Level 4,
Level 5
None, Level 1, Level
2, Level 3, Level 4,
Level 5
No, Yes Yes
and then On again.
None
None
None
None
38
Page 39

Memo
Chapter 3 Copier Settings
39
Page 40

Chapter 3 Copier Settings
Example : Digital Skyshot Mode
Digital Skyshot Mode allows copying an original without generating dark borders even if the platen
cover is opened.
z When copying in “Quality” mode combined with “N in 1” or “2 Page”, the Quality mode will be changed to
“Normal” mode automatically.
1
Press the Function key.
2
Select “Copier Settings”.
5
Select the desired item, and then
select “OK”.
3
Select “5-9”.
4
Select “08 Digital Skyshot Mode”.
No Digital Skyshot Mode is
OFF.
Normal For standard quality.
Quality For better quality than
“Normal”.
6
Select “Close”.
z After setting up the function(s), press the
Reset key to return the machine to the initial
screen of the current active mode.
40
Page 41

Example : Manual Skyshot Mode
In Manual Skyshot Mode, the scanning area (size) is pre-registered into memory (M1 and M2) in
advance.This mode also allows copying an original without generating dark borders even if the platen
cover is opened.
z An incorrect exposure may occur when there is a black line at the edge of the original.
z Sort function (Sort, Shift-Sort, Rotate-Sort, Staple-Sort) is not available in Manual Skyshot Mode.
1
Press the Function key.
2
Select “Copier Settings”.
5
Select the desired item, and then
select “OK”.
Chapter 3 Copier Settings
3
Select “5-9”.
4
Select “09 Manual Skyshot Mode”.
“Off”
“M1, On”
“M2, On”
“M1, M2, On”
z For changing M1/M2 size, refer to “M1,
Size” or “M2, Size” (see page 37).
6
Select “Close”.
z After setting up the function(s), press the
Reset key to return the machine to the initial
screen of the current active mode.
Manual Skyshot Mode is OFF.
Copied in M1 size.
Copied in M2 size.
Copied in pre-registered size
(M1 or M2).
41
Page 42

Chapter 4
Fax/Email Settings
Chapter 4 Fax/Email Settings
In Fax/Email Settings Mode, the following items can be changed.
For registration of the Address Book or Program Keys, refer to Program Destinations/Program Keys
in the Operating Instructions (For Facsimile and Internet Fax) on the provided CD-ROM.
Fax/Email Settings
Fax/Email Settings
No.
0 - 4 00 Address Book To open the Address Book setting screen.
01 Program Keys To open the Program Keys setting screen.
04 Key Operator Mode To open the User Parameter or Fax Parameter mode.
Parameter Comments
z Enter the Key Operator password to display the Key Operator Mode.
Address Book
No.
0 - 4 00 Print Address Book List Refer to Address Book in the Operating Instructions (For Facsimile and
01 Add Telephone Number
02 Add Email Address
03 Modify Station
04 Delete Station
Parameter Comments
Internet Fax) on the provided CD-ROM.
Program Keys
No.
0 - 4 00 Print Program List Refer to Program Keys in the Operating Instructions (For Facsimile and
01 Group Dial
02 Program Dial
03 Modify Group Dial
04 Delete Program/GRP
5 - 9 05 Manual POP RCV
Parameter Comments
Internet Fax) on the provided CD-ROM.
Key Operator Mode
No.
0 - 4 00 User Parameters Refer to User Parameters (see page 43).
01 Fax Parameters Refer to Fax Parameters (see page 46).
Parameter Comments
42
Page 43

z For user parameter settings, refer to Facsimile Settings (Option) in the Operating Instructions (For Setting
Up) of provided booklet.
z Network Configuration should be setup by the System Administrator.
User Parameters
No. Parameter Comments Selective
Item
0 - 9 00 Print User Parameter List Print a User Parameter List. Stop, Start Start
01 Logo Set the Logo.
Ex: Panasonic
02 Character ID Set the Character ID.
Ex: HEAD OFFICE
03 ID No. Set the Numeric ID.
Ex: 555 1212
04 Time Zone
05 Email Address Set the Email Address of the machine. Up to 60
Set the current Time by selecting “ ” or
“”.
Up to 25
characters
Up to 16
characters
Up to 20
digits
characters
Standard
Setting
GMT-5
Eastern
US&CN
Chapter 4 Fax/Email Settings
06 SMTP Server Name When “29 DNS Server Address” in General
Settings is set to “Yes”, set the SMTP Server
Name.
07 SMTP Server IP When “29 DNS Server Address” in General
Settings is set to “No”, set the SMTP IP
Address.
08 SMTP AUTH Name When “170 SMTP Authentication” in Fax
Parameters is set to “Vali d”, set the name of
SMTP authentication.
09 SMTP AUTH Password When “170 SMTP Authentication” in Fax
Parameters is set to “Valid”, set the
password for SMTP authentication.
10 - 19 10 POP Server Name When “29 DNS Server Address” in General
Settings is set to “Yes”, set the POP Server
Name.
11 POP Server IP When “29 DNS Server Address” in General
Settings is set to “No”, set the POP Server
IP Address.
12 POP User Name Set the POP User Name. Up to 40
Up to 60
characters
3 digits x 4
Up to 40
characters
Up to 10
characters
Up to 60
characters
3 digits x 4
characters
13 POP Password Set the POP Password. Up to 10
characters
43
Page 44

User Parameters
Chapter 4 Fax/Email Settings
No. Parameter Comments Selective
Item
Standard
Setting
10 - 19 15 LDAP Server Name When “29 DNS Server Address” in General
Settings is set to “Yes”, set the LDAPServer
Name.
The default Port Number is changed by
setting SSL.
z Refer to Example : LDAP Server (see
page 62).
16 LDAP Server IP When “29 DNS Server Address” in General
Settings is set to “No”, set the LDAP Server
IP Address.
The default Port Number is changed by
setting SSL.
z Refer to Example : LDAP Server (see
page 62).
17 LDAP User Name Set the LDAP User Name.
z Refer to Example : LDAP Server (see
page 62).
18 LDAP Password Set the LDAP Password.
z Refer to Example : LDAP Server (see
page 62).
19 LDAP Search Base Set the LDAP database to search.
z Refer to Example : LDAP Server (see
page 62).
Up to 60
characters
“SSL”
Off:389
On:636
3 digits x 4
“SSL”
Off:389
On:636
Up to 40
characters
Up to 10
characters
Up to 60
characters
20 - 29 21 Default Subject Set the information added to the Subject
Line for all outgoing Emails.
22 Default Domain Set the Domain Name added to frequently
used or incomplete outgoing Email
Addresses.
Ex: panasonic.com
25 Selectable Domain (01) Set Domain Names to display on the domain
list. Up to 10 domain names can be set.
26 Selectable Domain (02)
27 Selectable Domain (03)
28 Selectable Domain (04)
29 Selectable Domain (05)
30 - 39 30 Selectable Domain (06)
31 Selectable Domain (07)
32 Selectable Domain (08)
33 Selectable Domain (09)
34 Selectable Domain (10)
After entering the part of the Email Address
preceding at mark “@”, select the desired
domain name.
Up to 40
characters
Up to 50
characters
Up to 30
characters
44
35 Remote Password Set the password for the remote registration
of the internet parameters, address book
and the acquisition of a communication
management report via Email.
Up to 10
characters
Page 45

User Parameters
No. Parameter Comments Selective
Item
Chapter 4 Fax/Email Settings
Standard
Setting
30 - 39 36 Relay XMT Password Set the LAN relay password to provide
network security to your Relay Station.
z Refer to Example : Relay Station (LAN
Relay) (see page 76).
37 Manager’s Email Addr Set the Department Manager’s Email
Address for notification of all Internet
relayed transmissions for supervision and
cost control purposes.
z Refer to Example : Relay Station (LAN
Relay) (see page 76).
39 Fax Server Mail Address Input/Change the Email Address for
RightFax Server. Initial setting can be done
at Fax Parameter No.132.
z This setting is displayed only when “132
Via Fax Server” in Fax Parameters is set
to “Valid”.
40 - 49 40 Relay Domain (01) When “142 Relay XMT” in Fax Parameters
41 Relay Domain (02)
42 Relay Domain (03)
43 Relay Domain (04)
44 Relay Domain (05)
is set to “Valid”, set the Domain Names that
are authorized to access your Internet Fax
for Relayed Transmission Request.
Up to 10 Domain Names can be set.
z Refer to Example : Relay Station (LAN
Relay) (see page 76).
Up to 10
characters
Up to 60
characters
Up to 30
characters
45 Relay Domain (06)
46 Relay Domain (07)
47 Relay Domain (08)
48 Relay Domain (09)
49 Relay Domain (10)
45
Page 46

Fax Parameters
Chapter 4 Fax/Email Settings
No. Parameter Comments Selective Item
Standard
Setting
0 - 39 00 Print FaxParameterList Print a fax parameter list.
To cancel printing the fax
parameter list, press “Stop” and
“OK”.
While processing the
cancellation, panel operation is
denied, and an error beep is
produced.
The feeding paper(s) will be
ejected before completing the
above cancellation operation.
If setting a parameter, an
asterisk mark (*) will be added
before the parameter number.
01 Density (HOME) Set the default density according
to the most-used original.
02 Resolution (HOME) Set the default resolution
according to the most-used
original.
z When installing the optional
Email / Fax, the standard
setting can be changed.
Stop, Start Sta rt
-3, -2, -1, 0, 1, 2, 3 0
STD, Fine, S-Fine Fine
03 Original (HOME) Set the default of original type
according to the most-used
original.
04 Stamp (HOME) When set to “On”, all
successfully transmitted
originals are stamped (Memory
or Direct transmission).
In order Not to stamp the
Memory transmitted originals,
set “28 Stamp At Memory XMT”
to “Invalid”.
05 Memory (HOME) Set the default for memory
transmission.
When set to “Off”, originals are
transmitted directly without
storing into memory first.
06 Dialing Method Select a dialing method
according to your telephone line.
Te xt ,
Txt/Pht (Text/Photo),
Photo
Off, On Off
Off, On On
Tone, Pulse Tone
Tex t
46
Page 47

Fax Parameters
No. Parameter Comments Selective Item
Chapter 4 Fax/Email Settings
Standard
Setting
0 - 39 07 Header Print Select the printing position of
sender’s information (Header)
on the received original.
• Outside
If there is no margin (about 10
mm from the edge) to print
the sender’s information, the
received image may be
reduced in size.
•Inside
Part of the received image
(about 10 mm from the edge)
may be missing because it is
overwritten with the sender’s
information print.
•No Print
Sender’s information is not
printed.
08 Header Format Select what contents to use for
the sender’s information.
09 RCV’D Time Print Select whether the machine
prints the received date & time.
When set to “Valid”, the
reception time is printed.
Inside, Outside,
No Print
Logo, ID
From To
Invalid, Valid Invalid
Inside
Logo, ID
12 Comm. Journal (HOME) Select the printing attributes for
the communication journal.
•Off
Communication journal is not
printed.
• Always
Prints whether
communication has
succeeded or failed.
• Inc Only
Prints only when
communication has failed.
13 Auto Print JRNL
• Invalid
Communication journal is not
automatically printed. If
required, view the
communication journal on the
touch panel display, or print it
manually.
• Valid
The machine prints the
journal automatically after
every 200 transactions.
z Refer to Transaction Journal
in the Operating Instructions
(For Facsimile and Internet
Fax) on the provided CD-ROM.
Off, Always, Inc Only Inc Only
Invalid, Valid Valid
47
Page 48

Fax Parameters
Chapter 4 Fax/Email Settings
No. Parameter Comments Selective Item
Standard
Setting
0 - 39 14 File Accept Report Set whether to print an
acceptance report when
memory transmission is
accepted.
The report states the number of
accepted originals and the
destination.
17 Receive Mode Select a fax reception method.
• Manual
Select manual reception.
•Auto
Select automatic reception.
For the fax reception methods,
refer to Receiving Documents
in the Operating Instructions
(For Facsimile and Internet Fax)
on the provided CD-ROM.
22 Substitute RCV Enable or disable substitute
memory reception.
This function allows storing the
received originals into memory if
printing is not possible due to no
recording paper, ran out of toner,
or paper jam occurred.
Invalid, Valid Invalid
Manual, Auto Auto
Invalid, Valid Valid
24 Print Reduction Set the reduction method for
received original.
• Fixed
Reduce received original
according to the setting of “25
Reduction Ratio”.
•Auto
Reduce received original
according to their length.
original.
z For the reduction methods,
refer to Print Reduction in the
Operating Instructions (For
Facsimile and Internet Fax) on
the provided CD-ROM.
25 Reduction Ratio Set the received original
reduction ratio when “24 Print
Reduction” is “Fixed”.
z For the reduction ratio setting
method, refer to Print
Reduction in the Operating
Instructions (For Facsimile
and Internet Fax) on the
provided CD-ROM.
Fixed, Auto Auto
70 to 100 100
48
26 Polling Password Set the 4-digit password for
polling.
Page 49

Fax Parameters
No. Parameter Comments Selective Item
Chapter 4 Fax/Email Settings
Standard
Setting
0 - 39 27 Polled File Save Set whether to delete an original
from memory after the polling
transmission.
• Invalid
After polling transmission, the
original is deleted from
memory.
• Valid
Even after polling
transmission, the original is
kept in memory.
28 Stamp at Memory XMT Set whether to stamp the
originals when storing them into
memory.
• Invalid
Originals are not stamped.
• Valid
Originals are stamped.
(Depending on the Stamp
setting on the Control Panel)
31 Incomplete File Save Set whether the machine retains
the document in memory if the
document is not successfully
transmitted.
• Invalid
A failed file is not saved.
• Valid
A failed file is saved and
retransmitted as required.
z For details about
retransmission, refer to
Resending an Incomplete
Document in the Operating
Instructions (For Facsimile
and Internet Fax) on the
provided CD-ROM.
Invalid, Valid Invalid
Invalid, Valid Valid
Invalid, Valid Invalid
33 XMT Reduction Enable or disable reduced
transmission.
• Invalid
No original is reduced for
transmission.
• Valid
When the transmitting original
is wider than the recording
paper used at the receiving
machine, the machine
performs reduction.
Invalid, Valid Valid
49
Page 50

Fax Parameters
Chapter 4 Fax/Email Settings
No. Parameter Comments Selective Item
0 - 39 37 Receive to Memory Set the 4-digit password for
printing a memory-received
original.
z If “Receive to Memory” in
“More Menus” is “ON”, this
setting can not be selected.
z Refer to Example : Receive
to Memory (see page 68).
Standard
Setting
39 PIN Code Access When the machine is connected
to PBX and Personal
Identification Number (PIN)
Code is required, select the
access method (Prefix or Suffix)
to dial a number with PIN Code.
• None
No PIN code is added.
• Suffix
A PIN code is added as a
suffix code.
•Prefix
A PIN code is added as a
prefix code.
z Refer to Getting an Outside
Line Using PIN Code
Access in the Operating
Instructions (For Facsimile
and Internet Fax) on the
provided CD-ROM.
40 - 79 42 Conf. File Save Set whether to save an original
in memory after the confidential
transmission.
• Invalid
After confidential
transmission, the original is
deleted from memory.
• Valid
Even after confidential
transmission, the original is
kept in memory.
None, Suffix, Prefix None
Invalid, Valid Invalid
50
43 Password-Transmit Register the 4-digit password
first.
Set whether the machine
performs and checks the
Password of the receiving
station when transmitting.
z Refer to Example :
Password-Transmit /
Password-Receive (see
page 70).
Off, On Off
Page 51

Fax Parameters
No. Parameter Comments Selective Item
Chapter 4 Fax/Email Settings
Standard
Setting
40 - 79 44 Password-Receive Register the 4-digit password
first.
Set whether the machine
performs and checks the
password of the transmitting
station when receiving.
z Refer to Example :
Password-Transmit /
Password-Receive (see
page 70).
46 Select Receive Enable or disable selective
reception.
When “Valid” is set, the machine
will receive only when the
sender’s address has been
programmed in address book.
z Refer to Example : Select
Receive (see page 72).
52 Diagnostic Password Set the diagnostic password. z Consult with the authorized
53 Sub-Address Password Set the sub-address password. Up to 20 digits
Off, On Off
Invalid, Valid Invalid
Panasonic dealer on how to use
this item.
54 Fax Forward Set whether the machine
performs Fax Forwarding to the
specified destination.
56 Cover Sheet (HOME) Set the default cover sheet.
When “
Cover Sheet
Cover Sheet Message
and “
On
set to “
z 60 Characters can be
z Printing Area
68 Dial Tone Check Set whether to detect dial tone
before dialing the telephone
number.
77 Department Code Enable or disable the
department management
function.
”, enter characters.
programmed for 1 line, and up
to 600 characters can be
printed on the cover sheet.
60 characters / line
Max. 10 lines
(Dot line will not be printed.)
” is set to “On”,
” is
Invalid, Valid Invalid
Off, On Off
Off, On On
Invalid, Valid Invalid
51
Page 52

Fax Parameters
Chapter 4 Fax/Email Settings
No. Parameter Comments Selective Item
Standard
Setting
40 - 79 78 Rotation XMT Enable or disable the
transmission rotation function.
• Invalid
An A4/Letter sized portrait original is transmitted as it
is. The received original will be reduced or printed on
A3 sized paper.
The original is set as ( ), the image is rotated by
90 and then transmitted as ( ).
Letter or
A4 Original
• Valid
A4/Letter sized portrait original is rotated and
transmitted as an A4-size landscape original.
z For details about rotational transmission, refer to
Rotated Transmission in the Operating Instructions
(For Facsimile and Internet Fax) on the provided CDROM.
80 - 119
82 Quick Memory XMT Enable or disable the quick
memory transmission function.
• Invalid
Transmission starts after all
originals are scanned.
• Valid
Transmission starts when the first
page has been scanned from the
ADF into memory. If there is
more than one destination,
however, quick memory
transmission will not work.
z For details about quick
memory transmission, refer to
Transmitting a Document
Stored in Memory in the
Operating Instructions (For
Facsimile and Internet Fax) on
the provided CD-ROM.
Invalid, Valid Valid
Sends with
70% Reduction
Invalid, Valid Valid
Receiving
Stati on
Letter or
A4 Paper
52
86 Ringer Volume Set the ringer volume.
Setting it to “Off” puts the ringer
on mute
89 List Output Tray Select an output tray for a
printed list.
z Outer is available when the
optional Paper Transport Unit
is installed.
Off, Soft, Medium,
Loud
Inner, Outer Inner
Soft
Page 53

Fax Parameters
No. Parameter Comments Selective Item
Chapter 4 Fax/Email Settings
Standard
Setting
80 - 119
95 Duplex Print Enable or disable the duplex
printing of a received original.
z For details about the duplex
printing of a received original,
refer to Print Reduction in the
Operating Instructions (For
Facsimile and Internet Fax) on
the provided CD-ROM.
97 Special Tray
99 Memory Size Display the status of optional
118 Fax Function Detect Enable the machine to switch
Select a Special Tray that will not be
used for printing received faxes
(Tray 1 - 4). One Tray must always
be available for receiving Faxes.
z
You can specify one Tray (1 - 4) for
each selection No.1, 2 and/or 3.
Ex:
Exclude Tray 1 if color paper
is loaded on Tray 1.
memory card.
(Base Memory + Optional Memory)
automatically to Fax Mode by
detecting fax number input on
the copy screen.
Set the number of digits to
interpret it as a fax number.
Invalid, Valid Invalid
NO. 1, NO. 2, NO. 3,
(None, Tray1, Tray2,
Tray3, Tray4)
Invalid, 4-digits,
5-Digits, 6-Digits,
7-Digits, 8-Digits
None
6-Digits
120 - 159
122 Dial Prefix Set the Dial Prefix number (up to
4-digit).
z When the machine detects a
10-digit telephone number
(excluding any characters
such as “-”) being dialed, it will
automatically append the
preset Dial Prefix number.
z When the telephone number
is Less or more than 10-digit
in length, the Dial Prefix
number is not appended.
131 Job Tracking Set the Job Tracking under the
following conditions.
z When the optional Internet
Fax or Network Scanner is
installed.
z When “75 User
Authentication” in General
Settings is set to “On”
(Copy,Fax,Scan or Print) and
“54 Fax Forward” in Fax
Parameters is set to “Invalid”.
None, Tx (Send), Rx
(Receive), Tx&Rx
(Send&Receive)
None
53
Page 54

Fax Parameters
Chapter 4 Fax/Email Settings
No. Parameter Comments Selective Item
Standard
Setting
120 - 159
132 Via Fax Server Set for RightFax function. Invalid, Valid Invalid
133 Job Build and SADF Mode Set “Yes” to use the Job Build
and SADF function.
z This function is only available
when “05 Memory (HOME)” in
Fax/Email Settings >Fax
Parameters is set to On.
z Function Parameters (Fax/
Email Settings>Fax
Parameters) “82 Quick
Memory XMT” is not available
for this function.
z Up to 255 pages can be
stored. When the number of
pages exceeds 255, the
memory becomes full.
140 LAN RLY XMT Request Enable or disable the LAN relay
transmission request function.
z Refer to Example : Initial
Sending Station (LAN Relay)
(see page 74).
141 LAN XMT Reduce Enable or disable reduced
transmission when transmitting
a large sized original via Internet
Fax.
When set to “Valid”, a B4/
Ledger sized original is reduced
and transmitted as A4/Letter
sized paper.
z Refer to Emailing a Ledger-
Sized Document in the
Operating Instructions (For
Facsimile and Internet Fax) on
the provided CD-ROM.
No, Yes No
Invalid, Valid Invalid
Invalid, Valid Invalid
54
142 Relay XMT Enable or disable the LAN
relayed transmission function.
z Refer to Example : Relay
Station (LAN Relay) (see
page 76).
143 Relay XMT Report
Select the printing attributes for a
LAN relayed transmission report.
•Off
Don’t send.
• Always
Always send.
• Inc Only
Send only if communication
has failed.
z Refer to Example : Relay
Station (LAN Relay) (see
page 76).
Invalid, Valid Valid
Off, Always, Inc Only Always
Page 55

Fax Parameters
No. Parameter Comments Selective Item
Chapter 4 Fax/Email Settings
Standard
Setting
120 - 159
144 Email Character Set Set the language when sending /
receiving Email.
145 Sender Selection Set whether to select a pre-
programmed sender’s name and
Email address before each
transmission.
• Invalid
Sender’s information can not
be selected. The Email
address of the machine is
used as sender’s address.
• Valid
Up to 25 user’s names (up to
25 characters) and addresses
(up to 60 digits) can be
selected.
z For details about the From
field, refer to Using Cc, Bcc
and From in the Operating
Instructions (For Facsimile
and Internet Fax) on the
provided CD-ROM.
146 POP Timer Set the time interval for the
machine to check Email on the
POP Server.
z For details about POP
reception, refer to Receiving
an Email in the Operating
Instructions (For Facsimile
and Internet Fax) on the
provided CD-ROM.
Japanese, English English
Invalid, Valid Invalid
0 - 60 (min.) 3 (min.)
147 Auto POP Receive Set whether to retrieve Email
automatically from the POP
Server.
z For details about POP
reception, refer to Receiving
an Email in the Operating
Instructions (For Facsimile
and Internet Fax) on the
provided CD-ROM.
Invalid, Valid Valid
55
Page 56

Fax Parameters
Chapter 4 Fax/Email Settings
No. Parameter Comments Selective Item
Standard
Setting
120 - 159
148 Del POP Receive Mail Set whether the Email will be
deleted automatically after
retrieval from the POP Server.
• Invalid
Even after reception from the
POP Server, the Email is kept
in the POP Server.
• Valid
After reception from the POP
Server, the Email is deleted
from the POP Server.
z For details about POP
reception, refer to Receiving
an Email in the Operating
Instructions (For Facsimile
and Internet Fax) on the
provided CD-ROM.
149 Del POP Error Mail Select whether to delete the
Email that includes an
incompatible file attachment
from the POP Server.
• Invalid
Non-receivable Email is
saved in POP Server.
• Valid
Non-receivable Email is
deleted from the POP Server.
z For details about POP
reception, refer to Receiving
an Email in the Operating
Instructions (For Facsimile
and Internet Fax) on the
provided CD-ROM.
Invalid, Valid Valid
Invalid, Valid Invalid
56
150 IFax Return Receipt Set whether to send a return
receipt when receiving from
another Internet Fax.
151 Email Header FMT
Set the header information to print
when an Email is received.
(Normally used for
Troubleshooting. It shows the
path of the Email transmission
before arriving at your machine.)
•All
All the header contents are
printed.
• S/F/T
Only Subject, From, and To
are printed.
•Off
The header contents are not
printed.
Invalid, Valid Valid
All,
S/F/T,
Off
S/F/T
Page 57

Fax Parameters
No. Parameter Comments Selective Item
Chapter 4 Fax/Email Settings
Standard
Setting
120 - 159
152 Sub-Addr Routing Set whether to automatically
route a received fax or Email
using sub-address.
Set “Valid” for routing.
153 TSI Routing Set whether to route a received
fax to a telephone number or an
Email address pre-programmed
in the Address Book using the
originating fax’s Numeric ID.
154 Route Header FMT Set the contents of the “From”
field when transferring Email to a
computer or internet fax on the
network by routing.
•Origi
Sender information is printed.
• Rly Stn
Relay station information is
printed.
155 Print Routed Doc Set whether to print a received
original designated to be routed.
• Inc Only
An original is printed only
when the routing operation
has failed.
• Always
An original is printed whether
the routing operation has
succeeded or failed.
Invalid, Valid Invalid
Invalid, Valid Invalid
Origi, Rly Stn Origi
Inc Only, Always Inc Only
156 Print Forward Doc Set whether to print a memory
received original designated for
forwarding.
• Inc Only
An original is printed only
when its memory transfer has
failed.
• Always
An original is printed whether
its memory transfer has
succeeded or failed.
157 Transaction JRNL Set whether to transfer a
communication journal to a
registered destination.
Inc Only, Always Inc Only
Invalid, Valid Invalid
57
Page 58

Fax Parameters
Chapter 4 Fax/Email Settings
No. Parameter Comments Selective Item
Standard
Setting
120 - 159
160 - 184
158 PC Remote Update
160 Default Domain Set whether the machine
162 TIFF Viewer URL Set a language for a URL
Set whether to accept commands from an Email application, to:
(a) Program the Internet Param-
eters
(b) Program the Auto Dialer
(c) Allow retrieval of the Journal
z Consult with the authorized
Panasonic dealer on how to
use this item.
accepts to insert the default
domain when entering the part
of Email address preceding at
mark(@).
Set “Valid ” to add a domain
name automatically to an Email
address whose domain name
was omitted.
address included in the Email
message.
Set “None” to insert no URL
address.
Invalid, Valid Invalid
Invalid, Valid Valid
None, English,
Eng+Jpn
English
163 Routing Header Set whether to add the header
information of the routing
station.
Set “Valid ” to add the header
information of the routing
station.
164 IFax XMT Header Set whether to include the
header when sending an original
to an address in the same
Domain as specified in the
Default Domain parameter. (This
is useful when using the
machine to scan originals back
to your PC)
z When sending to a Domain
other than as specified in the
Default Domain parameter,
the header will be included
regardless of the selection.
Set “Included” to use Cc or Bcc.
170 SMTP Authentication If you transmit to the SMTP
Server, User Name and
Password are used for
authentication. Select “Valid” to
set up the User Name and
Password.
Invalid, Valid Invalid
Included, Not Inc. Included
Invalid, Valid Invalid
58
Page 59

Fax Parameters
No. Parameter Comments Selective Item
Chapter 4 Fax/Email Settings
Standard
Setting
160 - 184
171 POP before SMTP If you transmit to the SMTP
Server, POP User Name and
POP Password are used for
authentication.
(For details, consult with the
network manager.)
172 Direct IFax XMT
173 Delivery Notice Set whether to request a
174 APOP Authentication Set whether to encrypt the
Set whether to be prompted during
Phone Book registration if the
station you are programming is to
receive Internet Fax directly without
going through a Mail Server.
Message Disposition Notification
(MDN) for a delivery processing
confirmation indicating that the
transmitted original (Email/
Internet Fax) was read.
This notice can be set at every
transmission. When this notice
is returned from the recipient,
the communication result is
recorded in the communication
journal.
protocol for the POP Password
security when connecting with
the POP Server.
(This setting depends on the
server. Consult with the network
manager.)
Invalid, Valid Invalid
Invalid, Valid Invalid
Off, On Off
Invalid, Valid Invalid
177 XMT File Type Set the default file format for
Internet Fax / Email
transmission.
z TIFF must be selected when
sending to Internet Fax.
z PDF can be selected only
when sending to computer.
182 Send Comm. JNL Select a communication journal
output method.
•Print
A communication journal is
printed.
•Email
A communication journal is
transmitted by Email.
•Both
A communication journal is
printed and also transmitted
by Email.
TIFF, PDF TIFF
Print, Email, Both Print
59
Page 60

Fax Parameters
Chapter 4 Fax/Email Settings
No. Parameter Comments Selective Item
Standard
Setting
160 - 184
183 Color Attachment Set the file format for the
scanned original attached to
Email.
z When the optional Network
Scanner is installed.
z This setting can be ignored
when sending to multi-stations
or attaching oversized file in
multi-page setting.
z High Compressed PDF can be
attached as a multi-page file
only.
• Single
Single-page files are attached.
Ex:
Scanning 3 pages:
Three files are attached to separate Email.
Single, Multi Single
First Email
Second
Email
•Multi
A multi-page file is attached.
Ex:
Scanning 3 pages:
Only one file is attached to single Email.
Third Email
Single Email
60
Page 61

Memo
Chapter 4 Fax/Email Settings
61
Page 62

Example : LDAP Server
Chapter 4 Fax/Email Settings
To search an Email Address or a Fax Number on LDAP Server, the following user parameter settings
are required.
LDAP Server Name User parameter 15: LDAP Server Name
LDAP Server IP User parameter 16: LDAP Server IP
LDAP User Name User parameter 17: LDAP User Name
LDAP Password User parameter 18: LDAP Password
LDAP Search Base User parameter 19: LDAP Search Base
Set the above items according to the descriptions below.
z For details about LDAP search, refer to Searching for a Destination in the Operating Instructions (For
Facsimile and Internet Fax) on the provided CD-ROM.
z LDAP can be setup in one sequence of procedure at “04 Network Settings” of General Setting Key Operator
Mode. (see page 12)
LDAP Server Name (User parameter 15)
This setting is required only when “29 DNS Server Address” in General Settings is set to “Yes”.
When the setting is “No”, set “16 LDAP Server IP” (see page 64).
1
Press the Function key.
2
Select “Fax/Email Settings”.
3
Select “04 Key Operator Mode”.
4
Enter the password (8-digit), and then
select “OK”.
5
Select “00 User Parameters”.
62
Page 63

6
Select “10-19”.
7
Select .
10
Select “Off” or “On” and then select
“OK”.
11
Enter the Port Number (up to 5 digits),
and then select “OK”.
Chapter 4 Fax/Email Settings
8
Select “15 LDAP Server Name”.
9
Enter the LDAP Server Name (up to
60 characters), and then select “OK”.
z Advance to 17 LDAP User Name, 18 LDAP
Password, 19 LDAP Search Base (see
page 66).
63
Page 64

LDAP Server IP (User parameter 16)
Chapter 4 Fax/Email Settings
This setting is required only when “29 DNS Server Address” in General Settings is set to “No”.
When the setting is “Yes” set “15 LDAP Server Name” (see page 62).
1
Press the Function key.
2
Select “Fax/Email Settings”.
5
6
3
Select “04 Key Operator Mode”.
Select “00 User Parameters”.
Select “10-19”.
4
Enter the password (8-digit), and then
select “OK”.
7
Select .
64
Page 65

8
Select “16 LDAP Server IP”.
9
Enter the LDAP Server IP Address (3digit x 4), and then select “OK”.
11
Enter the Port Number (up to 5 digits),
and then select “OK”.
z Advance to “17 LDAP User Name”, “18
LDAP Password”, “19 LDAP Search
Base”.
Chapter 4 Fax/Email Settings
10
Select “Off” or “On” and then select
“OK”.
65
Page 66

LDAP User Name
Chapter 4 Fax/Email Settings
LDAP Password
LDAP Search Base
(User parameters 17, 18 and 19)
1
Select “17 LDAP User Name”, “18
LDAP Password”, and “19 LDAP
Search Base”.
2
Enter LDAP User name (up to 40
characters), Password (up to 10
characters) and Search Base (up to 60
characters), and then select “OK”.
(Ex: LDAP Search Base screen)
66
3
Select “Close”.
z After setting up the function(s), press the
Reset key to return the machine to the initial
screen of the current active mode.
Page 67

Memo
Chapter 4 Fax/Email Settings
67
Page 68

Example : Receive to Memory
Chapter 4 Fax/Email Settings
Receive to Memory secures all received originals by storing them into memory.
To print the original(s) received in memory, the Key Operator must enter the correct password.
The procedure of setting Receive to Memory is described below.
For memory reception, refer to Receive to Memory in the Operating Instructions (For Facsimile and Internet
Fax) on the provided CD-ROM.
1
Press the Function key.
2
Select “Fax/Email Settings”.
5
Select “01 Fax Parameters”.
3
Select “04 Key Operator Mode”.
4
Enter the password (8-digit), and then
select “OK”.
6
Select (7 times).
z Fax Parameters can be directly selected
using a keypad for quick operation. If a
Parameter No. is known, enter the desired
Parameter No. with a keypad, and then
press the Start key.
Ex: In step 6, enter “37” with a keypad, and
press the “Start” key to select “37
Receive to Memory”.
68
Page 69

7
Select “
8
Enter the Identification Code (4-digit),
and then select “OK”.
(Ex: 1234)
37 Receive to Memory
”.
Chapter 4 Fax/Email Settings
z If you have made an input error, select
“Clear” on the screen to delete all
characters at a time.
9
Select “Close”.
z After setting up the function(s), press the
Reset key to return the machine to the initial
screen of the current active mode.
69
Page 70

Example : Password-Transmit / Password-Receive
Chapter 4 Fax/Email Settings
Password-Transmit : Send the original only when the recipient password matches the sender’s
password.
Password-Receive : Receive the original only when the sender’s password matches the recipient
password.
For setting the Password-Transmit / Password-Receive, set “43 Password-Transmit” or “44
Password-Receive” to “On” and follow the procedure described below.
For password-transmit, refer to Password Communication in the Operating Instructions (For Facsimile and
Internet Fax) on the provided CD-ROM.
For password-receive, refer to Convenient Reception Features in the Operating Instructions (For Facsimile and
Internet Fax) on the provided CD-ROM.
1
Press the Function key.
2
Select “Fax/Email Settings”.
4
Enter the password (8-digit), and then
select “OK”.
3
Select “04 Key Operator Mode”.
5
Select “01 Fax Parameters”.
70
Page 71

6
Select “40-79”.
7
Select “43 Password-Transmit” or
“44 Password-Receive”.
9
Select “On”, and then select “OK”.
10
Select “Close”.
Chapter 4 Fax/Email Settings
8
Enter the Identification Code (4-digit),
and then select “OK”.
(Ex: Password-Transmit screen,
password: 5678)
z If you have made an input error, select
“Clear” on the screen to delete all
characters at a time.
z After setting up the function(s), press the
Reset key to return the machine to the initial
screen of the current active mode.
71
Page 72

Example : Select Receive
Chapter 4 Fax/Email Settings
Select Receive can prevent the receiving of unnecessary originals (Ex: junk fax, direct mail, etc.).
The procedure of setting Select Receive is described below.
For more details about Select Receive, refer to Convenient Reception Features in the Operating Instructions
(For Facsimile and Internet Fax) on the provided CD-ROM.
1
Press the Function key.
2
Select “Fax/Email Settings”.
5
Select “01 Fax Parameters”.
3
Select “04 Key Operator Mode”.
4
Enter the password (8-digit), and then
select “OK”.
6
Select “40-79”.
z Fax Parameters can be directly selected
using a keypad for quick operation. If a
Parameter No. is known, enter the desired
Parameter No. with a keypad, and then
press the "Start" key.
Ex: In step 6, enter “46” with a keypad, and
press the “Start” key to select “46 Select
Receive”.
72
Page 73

7
Select .
8
Select “46 Select Receive”.
Chapter 4 Fax/Email Settings
9
Select “Valid”, and then select “OK”.
10
Select “Close”.
z After setting up the function(s), press the
Reset key to return the machine to the initial
screen of the current active mode.
73
Page 74

Example : Initial Sending Station (LAN Relay)
Chapter 4 Fax/Email Settings
The following setting is required for selecting whether the machine performs LAN Relay XMT Request:
Enabling the LAN relay request function Fax parameter 140: LAN RLY XMT Request
Set the above item according to the descriptions.
For more details about Initial Sending Station (LAN Relay), refer to Use the Relay Feature in the Operating
Instructions (For Facsimile and Internet Fax) on the provided CD-ROM.
LAN RLY XMT Request (Fax parameter 140)
Set the LAN relay transmission request function.
1
Press the Function key.
2
Select “Fax/Email Settings”.
4
Enter the password (8-digit), and then
select “OK”.
3
Select “04 Key Operator Mode”.
5
Select “01 Fax Parameters”.
74
Page 75

6
Select “120-159”, and then select
(4 times).
z Fax Parameters can be directly selected
using a keypad for quick operation. If a
Parameter No. is known, enter the desired
Parameter No. with a keypad, and then
press the "Start" key.
Ex: In step 6, enter “140” with a keypad, and
press the “Start” key to select “140 LAN
RLY XMT Request”.
7
Select “140 LAN RLY XMT Request”.
9
Select “Close”.
z After setting up the function(s), press the
Reset key to return the machine to the initial
screen of the current active mode.
Chapter 4 Fax/Email Settings
8
Select “Valid”, and then select “OK”.
75
Page 76

Example : Relay Station (LAN Relay)
Chapter 4 Fax/Email Settings
To set up your machine as a Relay Station, the following settings are required:
Enabling the LAN Relayed Transmission function Fax parameter 142: Relay XMT
Setting the Communication Journal Fax parameter 143: Relay XMT Report
Setting the LAN Relay Password User parameter 36: Relay XMT Password
Setting the manager’s Email Address User parameter 37: Manager’s Email Addr
Setting Relay Domains User parameters 40 to 49: Relay Domains 01 to 10
Set the above items according to the descriptions.
For more details about Relay Station (Lan Relay), refer to Use the Relay Feature in the Operating Instructions
(For Facsimile and Internet Fax) on the provided CD-ROM.
Relay XMT (Fax parameter 142)
Set the LAN Relay Transmission function.
1
Press the Function key.
2
Select “Fax/Email Settings”.
3
Select “04 Key Operator Mode”.
4
Enter the password (8-digit), and then
select “OK”.
5
Select “01 Fax Parameters”.
76
Page 77

6
Select “120-159”, and then select
(4 times).
z Fax Parameters can be directly selected
using a keypad for quick operation. If a
Parameter No. is known, enter the desired
Parameter No. with a keypad, and then
press the "Start" key.
Ex: In step 6, enter “142” with a keypad, and
press the “Start” key to select “142
Relay XMT”.
7
Select “142 Relay XMT”.
Relay XMT Report (Fax parameter 143)
Selecting how the Relay XMT Report is sent to
the originator.
1
Select “143 Relay XMT Report”.
2
Select how the Relay XMT Report is
sent, and then select “OK”.
Chapter 4 Fax/Email Settings
8
Select “Valid”, and then select “OK”.
z Advance to Relay XMT Report (Fax
parameter 143) (see page 77), and set the
relay XMT report.
3
Select “Close”.
z Advance to Relay XMT Password (User
parameter 36) (see page 78), and set the
relay transmission password.
77
Page 78

Relay XMT Password (User parameter 36)
Chapter 4 Fax/Email Settings
Enter a Relay XMT Password (up to 10 characters) to be used for protection against unauthorized
(outside) stations from accessing your machine to relay messages to a G3 fax machine via PSTN.
This password should be given out to authorized personnel only.
1
Select “00 User Parameters”.
2
Select “30-39”, and then select .
4
Enter the Password (up to 10
characters), and then select “OK”.
z Advance to Manager’s Email Addr (User
parameter 37) (see page 79), and set the
manager’s Email address.
3
Select “36 Relay XMT Password”.
78
Page 79

Manager’s Email Addr (User parameter 37)
Enter the Department Manager’s Email Address for notification of all Internet relayed transmissions for
supervision and cost control purposes.
1
Select “37 Manager’s Email Addr”.
2
Enter the Email Address (up to 60
characters), and then select “OK”.
Chapter 4 Fax/Email Settings
z Advance to Relay Domain 01 to 10 (User
parameters 40 to 49) (see page 80), and
set the Relay Domains.
79
Page 80

Relay Domain 01 to 10 (User parameters 40 to 49)
Chapter 4 Fax/Email Settings
Enter up to 10 Domain Name(s) that have been authorized to access your Internet Fax for Relayed
XMT Request.
1
Select .
2
Select domain names from “40 Relay
Domain (01)” to “49 Relay Domain
(10)”. (Up to 10 domain names)
4
Select “Close”.
z After setting up the function(s), press the
Reset key to return the machine to the initial
screen of the current active mode.
80
z Select to select from “45 Relay Domain
(06)” to “49 Relay Domain (10)”.
3
Enter a LAN relay domain name, and
then select “OK”. (Up to 30
characters)
Page 81

Memo
Chapter 4 Fax/Email Settings
81
Page 82

Chapter 5
Chapter 5 Scanner Settings
Scanner Settings
In Scanner User Mode, the following items can be changed.
For details about address book registration, refer to Editing the Address Book in the Operating Instructions (For
Scanner and Email) on the provided CD-ROM.
Scanner User
No. Parameter Comments Selective Item Standard
0 - 9 00 Print Scanner Addr List Print a Scanner Addr List. Stop, Start Start
Scanner Settings
Setting
01 Original Mode Default Set the default of Original Mode. Text, T/P (Text/
02 Color Mode Default Set the default of Color Mode. Color, Gray, Black Color
03 Density Default Set the default density. -3 to +3 0
04 Background Removal Set the default of Background
Removal.
05 Contrast Default Set the default contrast. -3 to +3 0
06 Compression Mode (Black) Set the default compression of
black-and-white image.
07 Compression Mode (Color) Set the default compression of
full-color image.
08 Compression Mode (Gray) Set the default compression of
gray-scale image.
09 File Type (Black) Set the default file type of black-
and-white image.
10 - 19 10 File Type (Color / Gray) Set the default file type of full-
color or gray-scale image.
T/P
Photo), Photo
Off, Level1 to Level6 Level: 3
MH, MR, MMR, JBIG MMR
Standard, Speed,
Quality
Standard, Speed,
Quality
TIFF, PDF PDF
JPEG, PDF,
Comp. PDF
Standard
Standard
JPEG
82
11 Resolution Def. (BK) Set the default resolution of
black-and-white image.
12 Resolution Def. (Cl/Gr) Set the default resolution of
color or gray-scale image.
13 Job Build and SADF Mode Set the default of Job Build and
SADF.
14 Bind Edge 2-Side Orig. Set the default binding position
on 2-sided original.
15 2-Sided Original Def. When it’s set to “Yes”, Default
setting enables to scan both
sides of the original document.
The button on display panel “2Sided Original” is highlighted.
200dpi, 300dpi,
400dpi, 600dpi
200dpi, 300dpi,
400dpi, 600dpi
No, Yes No
Long, Short Long
No, Yes No
300dpi
200dpi
Page 83

Scanner User
No. Parameter Comments Selective Item Standard
Chapter 5 Scanner Settings
Setting
20 - 29 20 Add New Address Append a computer IP Address
to the address book.
21 Add New Email Address Append an Email Address to the
address book.
23 Edit Address Book Edit a computer IP Address in
the address book.
24 Edit Address Book: Email Edit an Email Address in the
address book.
25 Delete Address: IP Delete a computer IP Address
from the address book.
26 Delete Address: Email Delete an Email Address from
the address book.
30-34 30 Edit Image Box Name Edit an image box name.
z When there is data stored in
the image box, the name can
not be changed.
34 Key Operator Mode Enter the key operator password
to display the Key Operator
Menu (see page 83).
*1
*2
*1
*3
*1
*3
*3
*1 Parameter No.20, 23, and 25 do
not require setting as the IP address
(for the Scanner) is managed (added
/ edited / deleted) automatically by
the configuration of the
Communication Utility Software on
your computer. Refer to Network
Scanner Settings in the Operating
Instructions (For Setting Up) of
provided booklet.
*2 Refer to Scanning / Email
(Option) in the Operating Instructions
(For Basic Operations) of provided
booklet.
*3 Refer to Adding to the Address
Book in the Operating Instructions
(For Scanner and Email) on the
provided CD-ROM.
00000000
Key Operator
No. Parameter Comments Selective Item Standard
0 - 4 00 Print Scanner Settings Print a Scanner Settings list.
To cancel printing the parameter
setting list, press “Stop” and
“OK”.
While processing the
cancellation, panel operation is
denied, and an error beep is
produced.
The feeding paper(s) will be
ejected before completing the
above cancellation operation.
If setting a parameter, an
asterisk mark (*) will be added
before the parameter number.
01 Delete All Image Files Delete all image files.
Stop, Start Sta rt
Setting
83
Page 84

Chapter 6 Printer Settings
Chapter 6
Printer Settings
Printer Settings
In Printer User Mode, the following items can be changed.
For printing, however, these settings are unnecessary as the computer application software is usually
used to setup printing.
Settings by computer application software have priority over the ones in this machine. If the Printer
Settings in the machine are required, consult with a computer literate person. After printing, it is
recommended to reset the settings to the default values.
Printer User
No. Parameter Comments Selective Item Standard
Setting
0 - 9 00 Number of Prints Set the number of prints. 1 to 999* 1
01 Paper Size Set the paper size. A3, B4, A4, B5, A5,
11x17, Legal, 8.5x11,
5.5x8.5, 8x13, 8.5x13,
7.25x10.5, 12x18,
Custom
02 Paper Tray Set the paper tray.
z Tray 3 or 4 is available when
the optional Paper Tray is
installed.
03 Print Direction Set the printing direction. Portrait, Landscap(e) Portrait
05 2-Sided Print Set duplex printing. Off, On Off
06 Bind Edge Set the binding position. Long, Short Long
07 Resolution Set the resolution. 1200dpi, 600dpi 600dpi
08 Font (PCL) Set the font (PCL). 0 to 99* 0
09 Symbol Table (PCL) Set the symbol table (PCL). 0 to 35* 11
10 - 19 10 Pitch (PCL) Set the pitch (PCL). 00.44 to 99.99* 10.00
11 Point Size (PCL) Set the point size (PCL). 004.00 to 999.75 012.00
12 Lines/Page (PCL) Set the number of lines per page
(PCL).
Auto, Bypass, Tray 1,
Tray 2, Tray 3, Tray 4
5 to 123* 60
8.5x11
Auto
84
13 Return Character (PCL) Set the return character (PCL). CR, CR+LF CR
*Select “Input”, and then enter the
desired value.
Page 85

Printer User
No. Parameter Comments Selective Item Standard
Chapter 6 Printer Settings
Setting
10 - 19 14 Mutual A4/LTR Set A4 and LTR substitute
printing.
15 Mailbox Memory Status Display the status of remaining
memory and remaining mailbox.
16 Print Data Print the specified data. Stop, Start Stop
17 PDF Password Input Set value to “On” to add a PDF
password.
18 SD Print Color Mode Set color mode for SD card
printing.
20 - 29 20 Custom Size Unit Set the user-defined unit. mm, inch inch
21 Custom X Size Set the user-defined size in the
X direction.
22 Custom Y Size Set the user-defined size in the
Y direction.
23 Wide A4 Set whether to use Wide A4. Off, On Off
25 Mono Page Detect Set whether to use Mono Page
Detect.
26 Toner Save Set whether to use Toner Save
mode.
Off, On Off
Off, On Off
Color, Black Color
03.94 to 12.00* 12.00
05.83 to 18.00* 18.00
Off, On On
Off, On Off
27 Auto Contrast Mode Set whether to use auto contrast
mode.
29 Key Operator Mode Enter the key operator password
to display the Key Operator
Menu (see page 86).
Off, On Off
00000000
*Select “Input”, and then enter the
desired value.
85
Page 86

Chapter 6 Printer Settings
Key Operator
No. Parameter Comments Selective Item Standard
Setting
0 - 14 00 Print Printer Settings Print a Printer Settings list.
To cancel printing the parameter
setting list, press “Stop” and “OK”.
While processing the
cancellation, panel operation is
denied, and an error beep is
produced.
The feeding paper(s) will be
ejected before completing the
above cancellation operation.
If setting a parameter, an
asterisk mark (*) will be added
before the parameter number.
01 Job Completion Time Set the time-out period if the
machine does not receive a print
signal from the computer for a
specified time.
Select “Input” and enter the job
completion time.
02 Page Protection Set value to “On” to use page
protection.
03 Error Page Print Set value to “On” to print the
data of an error job.
Stop, Start Sta rt
1 to 999 (Sec) 180 (Sec)
Off, On Off
Off, On On
04 Spool Function Set value to “On” to set the
spool function.
05 Text Print Set value to “On” to print a text
with no pictures.
07 Font List Print (PCL) Print the PCL font list. Stop, Start Stop
08 Font List Print (PS) Print the PS font list.
z When the optional Printer
Controller Module (for Adobe
PostScript
09 Mailbox Data Holding When the optional hard disk is
installed, set the limit of storing
the data in the mailbox. When
“Infinity” is set, data is not
deleted. (Hard disk drive is
Standard on DP-C354/C264)
10 Delete Mailbox Data Select the mailbox data to be
deleted.
® 3™
) is installed.
Off, On On
Off, On On
Stop, Start Stop
®
Infinity, 1 day, 2 days,
3 days, 4 days, 5
days, 6 days, 7 days
All, Before Before
7 days
•All
All data is deleted from the
mailbox.
•Before
Deletes the data which is
received before the specified
date.
86
Page 87

Key Operator
No. Parameter Comments Selective Item Standard
Chapter 6 Printer Settings
Setting
0 -14 11 Print Queue Delete Set an authorized person who
can delete the print job.
•Free
Any operator can delete the
print job.
• key Op.
Only Key Operator can delete
the print job.
14 Printer Language Set a printer language.
•Auto
The machine prints received
data by automatically judging
its printer language.
•PCL
The machine prints received
data by regarding its printer
language as PCL.
•PS
The machine prints received
data by regarding its printer
language as PostScript.
z When the optional Printer
Controller Module (for Adobe
PostScript® 3™) is installed.
Free, Key Op. Key Op.
Auto, PCL, PS Auto
®
15 - 29 18 AppleTalk Set “On” to use AppleTalk.
z When the optional Printer
Controller Module (for Adobe
PostScript
19 AppleTalk Zone Name Set the AppleTalk zone name.
z When the optional Printer
Controller Module (for Adobe
PostScript
There is no default value. When
the machine starts up under the
following parameter settings "18
Apple Talk" is set to "On", "19
AppleTalk Zone Name", and
"20 AppleTalk Printer Name"
are not set, then, "Zone Name*"
will be automatically setup.
® 3™
) is installed.
® 3™
) is installed.
No. 18 to 19
Off, and then On again.
Off, On On
®
Up to 31 characters *
®
After setting, turn the machine’s power switch
87
Page 88

Chapter 6 Printer Settings
Key Operator
No. Parameter Comments Selective Item Standard
Setting
15 - 29 20 AppleTalk Printer Name Set the AppleTalk printer
name.
z When the optional Printer
Controller Module (for Adobe
PostScript
There is no default value. When
the machine starts up under the
following parameter settings "18
Apple Talk" is set to "On", "19
AppleTalk Zone Name", and
"20 AppleTalk Printer Name"
are not set, then, “Panasonic
DP-XXXX and the lower six
figures of MAC Address” will be
automatically setup.
21 AppleTalk Type Name The machine detects, and
display the AppleTalk Type
Name on the Touch Panel.
z The Apple Talk Type Name is
displayed only, but cannot be
set.
z When the optional Printer
Controller Module (for Adobe
PostScript® 3™) is installed.
® 3™
) is installed.
Up to 31 characters Panasonic
DP-XXXXthe lower
®
®
six figures
of MAC
Address
22 NetWare Set “On” to use NetWare. Off, On Off
23 NetWare Frame Type Set the NetWare frame type. 802.3, 802.2, Ether-II,
SNAP
24 Selected Frame Type The machine detects, and
display the Frame Type on the
Touch Panel.
z Frame Type is displayed only,
but cannot be set.
25 NetWare Mode Select NetWare Mode.
Pserver, Rprinter Pserver
802.2
•Pserver
The machine is used as Print
Server, and prints the waiting
job stored in the machine.
•Rprinter
The machine is used as
Remote Printer, and prints
data which is sent from the
Print Server.
26 NetWare Printer Name Set the NetWare printer name. Up to 31 characters
27 Print Server Name Set the print server name. Up to 31 characters
88
28 Print Server Password Set the print server password. Up to 31 characters
No. 20 to 23, 25, to 28
After setting any of these parameters, turn the
machine’s power switch Off, and then On again.
Page 89

Key Operator
No. Parameter Comments Selective Item Standard
Chapter 6 Printer Settings
Setting
15 - 29 29 Job Polling Time Set the job polling time.
Select “Input” and enter the job
polling time.
30 - 44 30 Bindery Mode Set Bindery Mode when using
the NetWare.
31 File Server Name 1 Set file server names. Up to
eight names can be set.
32 File Server Name 2
33 File Server Name 3
34 File Server Name 4
35 File Server Name 5
36 File Server Name 6
37 File Server Name 7
38 File Server Name 8
39 NDS Tree Set the NDS tree. Up to 31 characters
40 NDS Context Set the NDS context. Up to 77 characters
2 to 255 (Sec) 4 (Sec)
Off, On Off
Up to 31 characters
41 Print Server Name 1 Set print server names. Up to
42 Print Server Name 2
43 Print Server Name 3
44 Print Server Name 4
45 - 59 45 Print Server Name 5
46 Print Server Name 6
47 Print Server Name 7
48 Print Server Name 8
49 Job Time Out Set the job time out.
50 Use MCP Server Set “Yes” to use MCP (Memory
Up to 31 characters
8 names can be set.
4 to 255 (Sec) 10 (Sec)
Select “Input”, and enter the job
time out.
No, Yes No
Card Printing) server.
No. 29 to 49
After setting any of these parameters, turn the
machine’s power switch Off, and then On again.
89
Page 90

Chapter 6 Printer Settings
Key Operator
No. Parameter Comments Selective Item Standard
Setting
45 - 59 51 MCP Server Name Set MCP (Memory Card
Printing) server names.
z When “29 DNS Server
Address” in General Settings
is set to “Yes”, and “50 Use
MCP Server” in Printer
Settings is set to “Yes”.
52 MCP Server IP Address Set IP address of MCP (Memory
Card Printing) server.
z When “29 DNS Server
Address” in General Settings
is set to “No”, and “50 Use
MCP Server” in Printer
Settings is set to “Yes”.
53 SD/Direct Use Sort Mem. Set the direct sort memory. Off, On On
55 Sort Set the default sort. None, Sort, Group,
56 Staple Set the default staple. None, U Center,
Up to 60 characters
3-digit x 4 0.0.0.0
Sort
Shift,
Rot. Grp, Rotate
None
Upper L, Upper R,
L Center, R Center,
Saddle
(R: Right, L: Left,
U: Upper)
57 Hole Punch Set the default hole punch. None, Left, Top, Right None
60 - 64 60 Banner Sheet Set the page position in banner
sheet.
z Print Job via PC only (included
MCP/DPS)
z Banner Sheet will not be
finished (Sort, Staple, Punch)
z Banner Sheet will be counted
with 1 count of monochrome
image.
z Print out orientation will be
fixed according to the paper
size.
Portrait : Ledger, Legal, Letter
Landscape : Invoice
z This settings is available only
from the machine setting.
61 Banner Sheet Tray Set the banner sheet tray. Tray 1, Tray 2, Tray 3,
None, Top, Last,
Top&Last
Tray 4
None
Tray 1
90
Page 91

Memo
Chapter 6 Printer Settings
91
Page 92

Chapter 7
Counter View
Chapter 7 Counter View
“Counter View” allows to confirm the number of prints, etc.
The Counter View items are listed below.
No. Parameter Comments
0 - 19 00 Print Counter List Print a Counter List.
Counter View
01 BK Total Print Count Count numbers of Black Print.
02 1C Total Print Count Count numbers of Mono Color Print.
03 2C Total Print Count Count numbers of 2-Color Print.
04 4C Total Print Count Count numbers of 4-Color Print.
05 Scanner Count (Flatbed) Count numbers of Scanning (Flatbed).
06 Scanner Count (ADF) Count numbers of Scanning (ADF).
07 PC Print Count BK Count numbers of PC Black Print.
08 PC Print Count 4C Count numbers of PC 4-Color Print
09 Fax Print Count Count numbers of Fax Print.
10 Yellow Drum Unit Usage rate of Drum Unit (Yellow).
11 Magenta Drum Unit Usage rate of Drum Unit (Magenta).
12 Cyan Drum Unit Usage rate of Drum Unit (Cyan).
13 Black Drum Unit Usage rate of Drum Unit (Black).
15 Yellow Toner Usage rate of Yellow Toner.
16 Magenta Toner Usage rate of Magenta Toner.
17 Cyan Toner Usage rate of Cyan Toner.
18 Black Toner Usage rate of Black Toner.
20 - 39 20 Yellow Image Area(Last) Ratio of Yellow Image Area in the last original.
21 Magenta Img. Area(Last) Ratio of Magenta Image Area in the last original.
22 Cyan Image Area(Last) Ratio of Cyan Image Area in the last original.
23 Black Image Area(Last) Ratio of Black Image Area in the last original.
25 Yellow Image Area(Avg.) Average rate of yellow image area.
92
26 Magenta Img. Area(Avg.) Average rate of magenta image area.
27 Cyan Image Area(Avg.) Average rate of cyan image area.
28 Black Image Area(Avg.) Average rate of black image area.
30 Clear Toner Counter Y Clear count numbers of Toner Counter (Yellow).
31 Clear Toner Counter M Clear count numbers of Toner Counter (Magenta).
32 Clear Toner Counter C Clear count numbers of Toner Counter (Cyan).
33 Clear Toner Counter BK Clear count numbers of Toner Counter (Black).
Page 93

No. Parameter Comments
20 - 39 35 Copy Print Count B/W Count numbers of Copy Black and White Print.
36 Copy Print Count 1C Count numbers of Copy 1-Color Print.
37 Copy Print Count 2C Count numbers of Copy 2-Color Print.
38 Copy Print Count 4C Count numbers of Copy 4-Color Print.
39 Copy Print Count Single Count numbers of Copy Single Print.
40 - 59 45 PC Print Count Single Count numbers of PC Single Print.
46 PC Scan Count Count numbers of PC Scan.
50 Fax Transmit Count Count numbers of Fax Transmit.
51 Fax Receive Count Count numbers of Fax Receive.
52 Fax Print Count Single Count numbers of Fax Single Print.
55 2-Sided Count Count numbers of 2-Sided.
56 A4/8.5x11 Count Count numbers of A4 and 8.5x11.
57 A4/8.5x11-R Count Count numbers of A4 and 8.5×11-R.
Chapter 7 Counter View
58 A3/11x17 Count Count numbers of A3 and 11×17.
59 B4/Legal Count Count numbers of B4 and Legal.
60 - 64 60 PM Count Count numbers of PM.
93
Page 94

Example : Print Counter List
Chapter 7 Counter View
Print Counter View information. Customer Name space, Signature & Date space, Customer ID, Fax
No. and Serial Number are printed on the lower right corner.
1
Press the Function Key.
4
Select "Start", and then select "OK".
2
Select "Counter View".
3
Select "00 Print Counter List".
Stop : Stop to printing counter list
Start : Start to print the counter list
z To cancel printing the parameter setting list,
press “Stop” and “OK”.
While processing the cancellation, panel
operation is denied, and an error beep is
produced.
The feeding paper(s) will be ejected before
completing the above cancellation
operation.
5
Select "Close".
When the list printing is completed, screen will
be returned to step 3.
94
Page 95

Example : Clear Toner Counter
After replacing the Toner Cartridge, the Toner Counter will be cleared automatically.
If you want to clear the Toner Counter manually, the following procedure is required.
1
Press the Function key.
2
Select “Counter View”.
3
Select “20-39”, and then select
(2 times).
5
Select “Yes” to clear the Toner
Counter.
z When clearing other color of toner counter,
repeat steps 4 and 5.
6
Select “Close”.
Chapter 7 Counter View
4
Select “30 Clear Toner Counter Y”.
(Ex: Clear Yellow Toner Counter)
z Select the desired color of Toner Counter.
z After Setting up the function(s), press the
Reset key to return the machine to the initial
screen of the current active mode.
95
Page 96

Chapter 8
Index
Chapter 8 Appendix
Numerics
1C Total Print Count ...................................................... 92
2C Total Print Count ...................................................... 92
2-Sided Count ................................................................ 93
2-Sided Mode Default .................................................... 32
2-Sided Original Def. ..................................................... 82
2-Sided Print .................................................................. 84
4C Total Print Count ...................................................... 92
A
A3/11x17 Count ............................................................. 93
A4/8.5x11 Count ............................................................ 93
A4/8.5x11-R Count ........................................................ 93
Add Email Address ........................................................ 42
Add New Address .......................................................... 83
Add New Email Address ................................................ 83
Add Telephone Number ................................................. 42
Add User Color .............................................................. 35
Address Book ................................................................ 42
Address Book Group ID ................................................. 15
Administrator Name ....................................................... 19
APOP Authentication ..................................................... 59
AppleTalk ....................................................................... 87
AppleTalk Printer Name ................................................. 88
AppleTalk Type Name ................................................... 88
AppleTalk Zone Name ................................................... 87
Authentication Method ................................................... 19
Auto Contrast Mode ....................................................... 85
Auto Paper Out Rotate .................................................. 13
Auto POP Receive ......................................................... 55
Auto Print JRNL ............................................................. 47
Auto Reset Information .................................................. 16
Auto Reset Time ............................................................ 13
Auto Tone Adjust ........................................................... 19
Appendix
Clear Toner Counter M ...................................................92
Clear Toner Counter Y ...................................................92
Color Attachment ............................................................60
Color Balance .................................................................37
Color Mode Default ..................................................36, 82
Color Spec (1Color) ........................................................37
Color Spec (2Color) ........................................................37
Color Spec (Overlay) ......................................................38
Color Toner Save (Other) ...............................................38
Color Toner Save (P) .....................................................38
Color Toner Save (T) ......................................................38
Color Toner Save (T/P) ..................................................38
Comm. Journal (HOME) .................................................47
Community Name (1) .....................................................17
Community Name (2) .....................................................17
Compression Mode (Black) ............................................82
Compression Mode (Color) ............................................82
Compression Mode (Gray) .............................................82
Conf. File Save ...............................................................50
Contrast ..........................................................................37
Contrast Default .............................................................82
Copy Customize .............................................................38
Copy Output Tray ...........................................................13
Copy Print Count 1C ......................................................93
Copy Print Count 2C ......................................................93
Copy Print Count 4C ......................................................93
Copy Print Count B/W ....................................................93
Copy Print Count Single .................................................93
Cover Mode Default .......................................................37
Cover Sheet (HOME) .....................................................51
Custom Size Unit ............................................................85
Custom X Size ................................................................85
Custom Y Size ................................................................85
Cyan Drum Unit ..............................................................92
Cyan Image Area(Avg.) ..................................................92
Cyan Image Area(Last) ..................................................92
Cyan Toner .....................................................................92
B
B4/Legal Count .............................................................. 93
Background Removal .............................................. 36, 82
Banner Sheet ................................................................. 90
Banner Sheet Tray ......................................................... 90
Bind Edge ...................................................................... 84
Bind Edge 2-Side Orig. .................................................. 82
Bindery Mode ................................................................. 89
BK Total Print Count ...................................................... 92
Black Drum Unit ............................................................. 92
Black Image Area(Avg.) ................................................. 92
Black Image Area(Last) ................................................. 92
Black Toner .................................................................... 92
Bleedthrough Prevention ............................................... 37
Bonjour .......................................................................... 18
Bonjour Name ................................................................ 18
Book Value Default ........................................................ 32
Booklet Default Mag. ..................................................... 33
C
Character ID .................................................................. 43
Clear Toner Counter BK ................................................ 92
Clear Toner Counter C .................................................. 92
96
D
Data Deletion of HD .......................................................17
Data Security Kit Info. .....................................................10
Date Time Setting ...........................................................14
Daylight Time .................................................................14
Default Domain .........................................................44, 58
Default Subject ...............................................................44
Del POP Error Mail .........................................................56
Del POP Receive Mail ....................................................56
Delete Address: Email ....................................................83
Delete Address: IP .........................................................83
Delete All Image Files ....................................................83
Delete Mailbox Data .......................................................86
Delete Program/GRP .....................................................42
Delete Station .................................................................42
Delete User Color ...........................................................35
Delivery Notice ...............................................................59
Density (HOME) .............................................................46
Density (Other Type) ......................................................36
Density Default ...............................................................82
Department Code ...........................................................51
Departmental Counter ....................................................10
Dept. Counter Mode .......................................................14
Page 97

DHCP Default .................................................................14
Diagnostic Password ......................................................51
Dial Prefix .......................................................................53
Dial Tone Check .............................................................51
Dialing Method ...............................................................46
Digital Skyshot Mode ......................................................34
Direct IFax XMT .............................................................59
DNS Server Address ......................................................14
Doc. Dist. Server IP ........................................................15
Doc. Dist. Server Name ..................................................15
Double Exposure ............................................................35
Duplex Print ....................................................................53
I
ID No. ............................................................................. 43
ID Timeout .....................................................................19
IFax Return Receipt .......................................................56
IFax XMT Header ........................................................... 58
Img. Repeat Dotted Line ................................................35
Incomplete File Save ..................................................... 49
IP Filter ........................................................................... 17
IP Filter Address ............................................................17
IP Filter Mode ................................................................. 17
IPv6 ................................................................................18
Chapter 8 Appendix
E
Edge Value Default ........................................................32
Edit Address Book: Email ...............................................83
Edit Image Box Name ....................................................83
Email Address ................................................................43
Email Character Set .......................................................55
Email Header FMT .........................................................56
Error Page Print ..............................................................86
F
Fax Forward ...................................................................51
Fax Function Detect .......................................................53
Fax Parameters ..............................................................42
Fax Print Count ..............................................................92
Fax Print Count Single ...................................................93
Fax Receive Count .........................................................93
Fax Server Mail Address ................................................45
Fax Transmit Count ........................................................93
Fax/Email Output Tray ...................................................13
File Accept Report ..........................................................48
File Server Name 1 ........................................................89
File Server Name 2 ........................................................89
File Server Name 3 ........................................................89
File Server Name 4 ........................................................89
File Server Name 5 ........................................................89
File Server Name 6 ........................................................89
File Server Name 7 ........................................................89
File Server Name 8 ........................................................89
File Type (Black) ............................................................82
File Type (Color / Gray) ..................................................82
Fold Position (A3/LDR) ...................................................16
Fold Position (A4/LTR-R) ...............................................16
Fold Position (B4) ...........................................................16
Font (PCL) ......................................................................84
Font List Print (PCL) .......................................................86
Font List Print (PS) .........................................................86
G
G-Cl. Detect Mode ..........................................................34
Group Dial ......................................................................42
H
Hard Disk Error Check ....................................................15
Hard Disk Initialize ..........................................................15
HD Drive Lock Settings ..................................................19
Header Format ...............................................................47
Header Print ...................................................................47
Hole Punch .....................................................................90
Hole Punch Default ........................................................35
J
Job Build and SADF Mode .................................37, 54, 82
Job Completion Time ..................................................... 86
Job Polling Time ............................................................ 89
Job Time Out ................................................................. 89
Job Tracking .................................................................. 53
K
Key Operator Mode ................................10, 35, 42, 83, 85
Key Operator Password ................................................. 19
L
LAN RLY XMT Request ................................................. 54
LAN XMT Reduce ..........................................................54
Language Default ........................................................... 13
Language Sel. Priority .................................................... 13
LDAP Password .............................................................44
LDAP Search Base ........................................................ 44
LDAP Server IP .............................................................. 44
LDAP Server Name .......................................................44
LDAP User Name .......................................................... 44
Lines/Page (PCL) ........................................................... 84
List Output Tray ............................................................. 52
Lockout Time ................................................................. 19
Logo ...............................................................................43
Logon Attempts ..............................................................19
M
M1, Size ......................................................................... 37
M2, Size ......................................................................... 37
MAC Address ................................................................. 15
Magenta Drum Unit ........................................................ 92
Magenta Img. Area(Avg.) ............................................... 92
Magenta Img. Area(Last) ............................................... 92
Magenta Toner ............................................................... 92
Mailbox Data Holding .....................................................86
Mailbox Memory Status .................................................85
Manager’s Email Addr ....................................................45
Manual Add Toner ......................................................... 10
Manual Copy Quality Adj ............................................... 10
Manual POP RCV .......................................................... 42
Manual Skyshot Mode ................................................... 34
Manual STR Cleaning ....................................................10
Margin Reduction Def. ...................................................32
Margin Value Default .....................................................32
Maximum Copy Setting .................................................. 37
MCP Server IP Address ................................................. 90
MCP Server Name ......................................................... 90
97
Page 98

Memory (HOME) ............................................................ 46
Memory Overflow Warning ............................................ 37
Chapter 8 Appendix
Memory Size .................................................................. 53
Modify Group Dial .......................................................... 42
Modify Station ................................................................ 42
Modify User Color .......................................................... 35
Mono Color Judge Level ................................................ 38
Mono Page Detect ......................................................... 85
Mono Toner Save (Other) .............................................. 38
Mono Toner Save (P) .................................................... 38
Mono Toner Save (T) ..................................................... 38
Mono Toner Save (T/P) ................................................. 38
Mutual A4/LTR ............................................................... 85
N
N in 1 Default Mode ....................................................... 32
NDS Context .................................................................. 89
NDS Tree ....................................................................... 89
NetWare ......................................................................... 88
NetWare Frame Type .................................................... 88
NetWare Mode ............................................................... 88
NetWare Printer Name .................................................. 88
Network Settings ............................................................ 12
Number of Prints ............................................................ 84
O
Orig. Set In ADF Sound ................................................. 14
Original (HOME) ............................................................ 46
Original Mode Default .............................................. 36, 82
Original Set Beep Sound ............................................... 14
Overlay Density ............................................................. 36
P
Page Insertion Default ................................................... 37
Page Numbering Style ................................................... 34
Page Protection ............................................................. 86
Panel Beep Sound ......................................................... 13
Pap. Tray Priority (B/W) ................................................. 16
Pap. Tray Priority (Col) .................................................. 16
Paper Size ..................................................................... 84
Paper Size Priority ......................................................... 36
Paper Tray ..................................................................... 84
Password-Receive ......................................................... 51
Password-Transmit ........................................................ 50
PC Print Count 4C ......................................................... 92
PC Print Count BK ......................................................... 92
PC Print Count Single .................................................... 93
PC Remote Update ........................................................ 58
PC Scan Count .............................................................. 93
PDF Password Input ...................................................... 85
Photo Density ................................................................ 36
PIN Code Access ........................................................... 50
Pitch (PCL) .................................................................... 84
PM Count ....................................................................... 93
Point Size (PCL) ............................................................ 84
Polled File Save ............................................................. 49
Polling Password ........................................................... 48
POP before SMTP ......................................................... 59
POP Password .............................................................. 43
POP Server IP ............................................................... 43
POP Server Name ......................................................... 43
POP Timer ..................................................................... 55
POP User Name ............................................................ 43
Power On Default Mode .................................................10
Power Save Mode Timer ................................................13
Print Address Book List ..................................................42
Print Copier Settings ......................................................36
Print Counter List ............................................................92
Print Data .......................................................................85
Print Direction .................................................................84
Print FaxParameterList ...................................................46
Print Forward Doc ..........................................................57
Print Printer Settings ......................................................86
Print Program List ...........................................................42
Print Queue Delete .........................................................87
Print Reduction ...............................................................48
Print Routed Doc ............................................................57
Print Scanner Addr List ..................................................82
Print Scanner Settings ....................................................83
Print Server Name ..........................................................88
Print Server Name 1 .......................................................89
Print Server Name 2 .......................................................89
Print Server Name 3 .......................................................89
Print Server Name 4 .......................................................89
Print Server Name 5 .......................................................89
Print Server Name 6 .......................................................89
Print Server Name 7 .......................................................89
Print Server Name 8 .......................................................89
Print Server Password ....................................................88
Print User Parameter List ...............................................43
Printer Language ............................................................87
Printer Output Tray .........................................................13
Program Dial ..................................................................42
Program Keys .................................................................42
Q
Quick Memory XMT ........................................................52
R
RCV’D Time Print ...........................................................47
Receive Mode ................................................................48
Receive to Memory ........................................................50
Reduce N in 1 for Space ................................................33
Reduction Ratio ..............................................................48
Relay Domain (01) .........................................................45
Relay Domain (02) .........................................................45
Relay Domain (03) .........................................................45
Relay Domain (04) .........................................................45
Relay Domain (05) .........................................................45
Relay Domain (06) .........................................................45
Relay Domain (07) .........................................................45
Relay Domain (08) .........................................................45
Relay Domain (09) .........................................................45
Relay Domain (10) .........................................................45
Relay XMT ......................................................................54
Relay XMT Password .....................................................45
Relay XMT Report ..........................................................54
Remote Password ..........................................................44
Resolution ......................................................................84
Resolution (HOME) ........................................................46
Resolution Def. (BK) .......................................................82
Resolution Def. (Cl/Gr) ...................................................82
Return Character (PCL) .................................................84
Ringer Volume ................................................................52
Rotation XMT .................................................................52
Route Header FMT .........................................................57
Routing Header ..............................................................58
98
Page 99

Routing Menu Function ..................................................15
RSV. a Job Setting Clr ...................................................38
S
Saturation .......................................................................37
Scanner Count (ADF) .....................................................92
Scanner Count (Flatbed) ................................................92
Scope ID .........................................................................17
SD Print Color Mode ......................................................85
SD/Direct Use Sort Mem. ...............................................90
Select Receive ...............................................................51
Selectable Domain (01) ..................................................44
Selectable Domain (02) ..................................................44
Selectable Domain (03) ..................................................44
Selectable Domain (04) ..................................................44
Selectable Domain (05) ..................................................44
Selectable Domain (06) ..................................................44
Selectable Domain (07) ..................................................44
Selectable Domain (08) ..................................................44
Selectable Domain (09) ..................................................44
Selectable Domain (10) ..................................................44
Selected Frame Type .....................................................88
Send Comm. JNL ...........................................................59
Sender Selection ............................................................55
Sharpness ......................................................................37
Sleep Timer ....................................................................13
SMB ................................................................................17
SMB Comment ...............................................................18
SMB Device Name .........................................................18
SMB Master Browser ......................................................17
SMB Workgroup Name ...................................................18
SMTP AUTH Name ........................................................43
SMTP AUTH Password ..................................................43
SMTP Authentication ......................................................58
SMTP Server IP .............................................................43
SMTP Server Name .......................................................43
Sort .................................................................................90
Sort Memory Status ........................................................10
Sort Priority ADF ............................................................34
Sort Priority Glass ..........................................................34
Special Paper Tray 1 ......................................................13
Special Paper Tray 2 ......................................................13
Special Paper Tray 3 ......................................................13
Special Paper Tray 4 ......................................................13
Special Tray ...................................................................53
Spool Function ...............................................................86
Stamp (HOME) ...............................................................46
Stamp at Memory XMT ...................................................49
Stamping Default Mode ..................................................34
Staple .............................................................................90
Staple Position Setting ...................................................35
Sub-Addr Routing ...........................................................57
Sub-Address Password ..................................................51
Substitute RCV ...............................................................48
Symbol Table (PCL) .......................................................84
SysContact .....................................................................17
SysLocation ....................................................................17
SysName ........................................................................17
Text Density ...................................................................36
Text Print ........................................................................ 86
TIFF Viewer URL ........................................................... 58
Time Zone ......................................................................43
Tint .................................................................................37
Tone Adjust Reset .........................................................19
Toner Save ....................................................................85
Transaction JRNL .......................................................... 57
TSI Routing .................................................................... 57
U
Use MCP Server ............................................................89
User Auth. Domain ......................................................... 19
User Authentication ........................................................ 19
User Parameters ............................................................ 42
V
Via Fax Server ............................................................... 54
W
Weekly Timer .................................................................14
Wide A4 .........................................................................85
WINS Server 1 IP ........................................................... 17
WINS Server 2 IP ........................................................... 17
X
XMT File Type ................................................................ 59
XMT Reduction .............................................................. 49
Y
Yellow Drum Unit ........................................................... 92
Yellow Image Area(Avg.) ............................................... 92
Yellow Image Area(Last) ................................................92
Yellow Toner .................................................................. 92
Chapter 8 Appendix
T
T/P Density .....................................................................36
TCP/IP Address ..............................................................14
TCP/IP Default Gateway ................................................14
TCP/IP Subnet Mask ......................................................14
99
Page 100

The following trademarks and registered trademarks are used throughout this manual:
Microsoft, Windows, Windows NT, Windows Server, Outlook & Windows logo are either registered trademarks or
trademarks of Microsoft Corporation in the USA and other countries.
Microsoft product screen shot(s) reprinted with permission from Microsoft Corporation.
Adobe, Acrobat Reader & Adobe logo are either registered trademarks or trademarks of Adobe Systems
Incorporated.
All other trademarks identified herein are the property of their respective owners.
Adobe, Post Script and Post Script 3 are either registered trademarks or trademarks of Adobe Systems
Incorporated in the United States and/or other countries.
PCL is either trademark or registered trademark of Hewlett-Packard Company and/or its subsidiaries.
PEERLESSPage
PEERLESSPrint
TM
is a trademark of the PEERLESS Systems Corporation; and,
TM
and Memory Reduction Technology® are registered trademarks PEERLESS Systems
Corporation; and, COPYRIGHT © 2002 PEERLESS Systems Corporation
Universal Font Scaling Technology (UFST) and all typefaces have been licensed from Agfa Monotype
®
Agfa
and the Agfa rhombus are registered trademarks of Agfa-Gevaert N.V. registered in the U.S. Patent and
®
Trademark Office and may be registered in other jurisdictions. Monotype
registered in the U.S. Patent and Trademark Office and may be registered in other jurisdictions. ColorTune
is a registered trademark of AMT
®
is a
registered trademark of Agfa-Gevaert N.V. registered in the U.S. Patent and Trademark Office and may be
registered in other jurisdictions. Profile Tool Kit
TM
, Profile StudioTM and Profile OptimizerTM are trademarks of
AMT and may be registered in certain jurisdictions.
Captaris and RightFax are trademarks of Captaris, Inc.
Novell and NetWare are registered trademarks of Novell, Inc. in the United States and other countries.
© 2006 Panasonic Communications Co., Ltd. All Rights Reserved.
Unauthorized copying and distribution is a violation of law.
The contents of these Operating Instructions are subject to change without notice.
USA Only
WARRANTY
PANASONIC DIGITAL DOCUMENT COMPANY MAKES NO WARRANTIES, GUARANTEES OR
REPRESENTATIONS, EXPRESSED OR IMPLIED, TO CUSTOMER WITH RESPECT TO THIS PANASONIC
MACHINE, INCLUDING BUT NOT LIMITED TO, ANY IMPLIED WARRANTY OF MERCHANTABILITY OR
FITNESS FOR A PARTICULAR PURPOSE.
PANASONIC DIGITAL DOCUMENT COMPANY ASSUMES NO RISK AND SHALL NOT BE SUBJECT TO
LIABILITY FOR ANY DAMAGE, INCLUDING, BUT NOT LIMITED TO DIRECT, INDIRECT, SPECIAL,
INCIDENTAL OR CONSEQUENTIAL DAMAGES OR LOSS OF PROFITS SUSTAINED BY THE CUSTOMER IN
CONNECTION WITH THE USE OR APPLICATION OF THIS PANASONIC MACHINE. SEE YOUR DEALER
FOR DETAILS OF DEALER’S WARRANTY.
For Service, Call:
Panasonic Digital Document Company,
Unit of Panasonic Corporation of North America
One Panasonic Way
Secaucus, New Jersey 07094
http://panasonic.co.jp/pcc/en
Panasonic Canada Inc.
5770 Ambler Drive, Mississauga,
Ontario L4W 2T3
http://www.panasonic.ca
C0606-1066(03)
PJQMC0594ZB
June 2006
Published in Japan
 Loading...