

Panasonic dp-1810, dp1810e Operation Manual
Digital Imaging System
Your Machine
Getting to Know
Operating Instructions
(For Facsimile)
Model No.
DP-1810F
Machine
Installing Your
Programming
Your Machine
Basic OperationsAdvanced
Features
Before operating this equipment, please read these instructions completely and keep these operating instructions for future reference.
English
Network FeaturesPrintout Journals
and Lists
Problem Solving Appendix
IMPORTANT INFORMATION
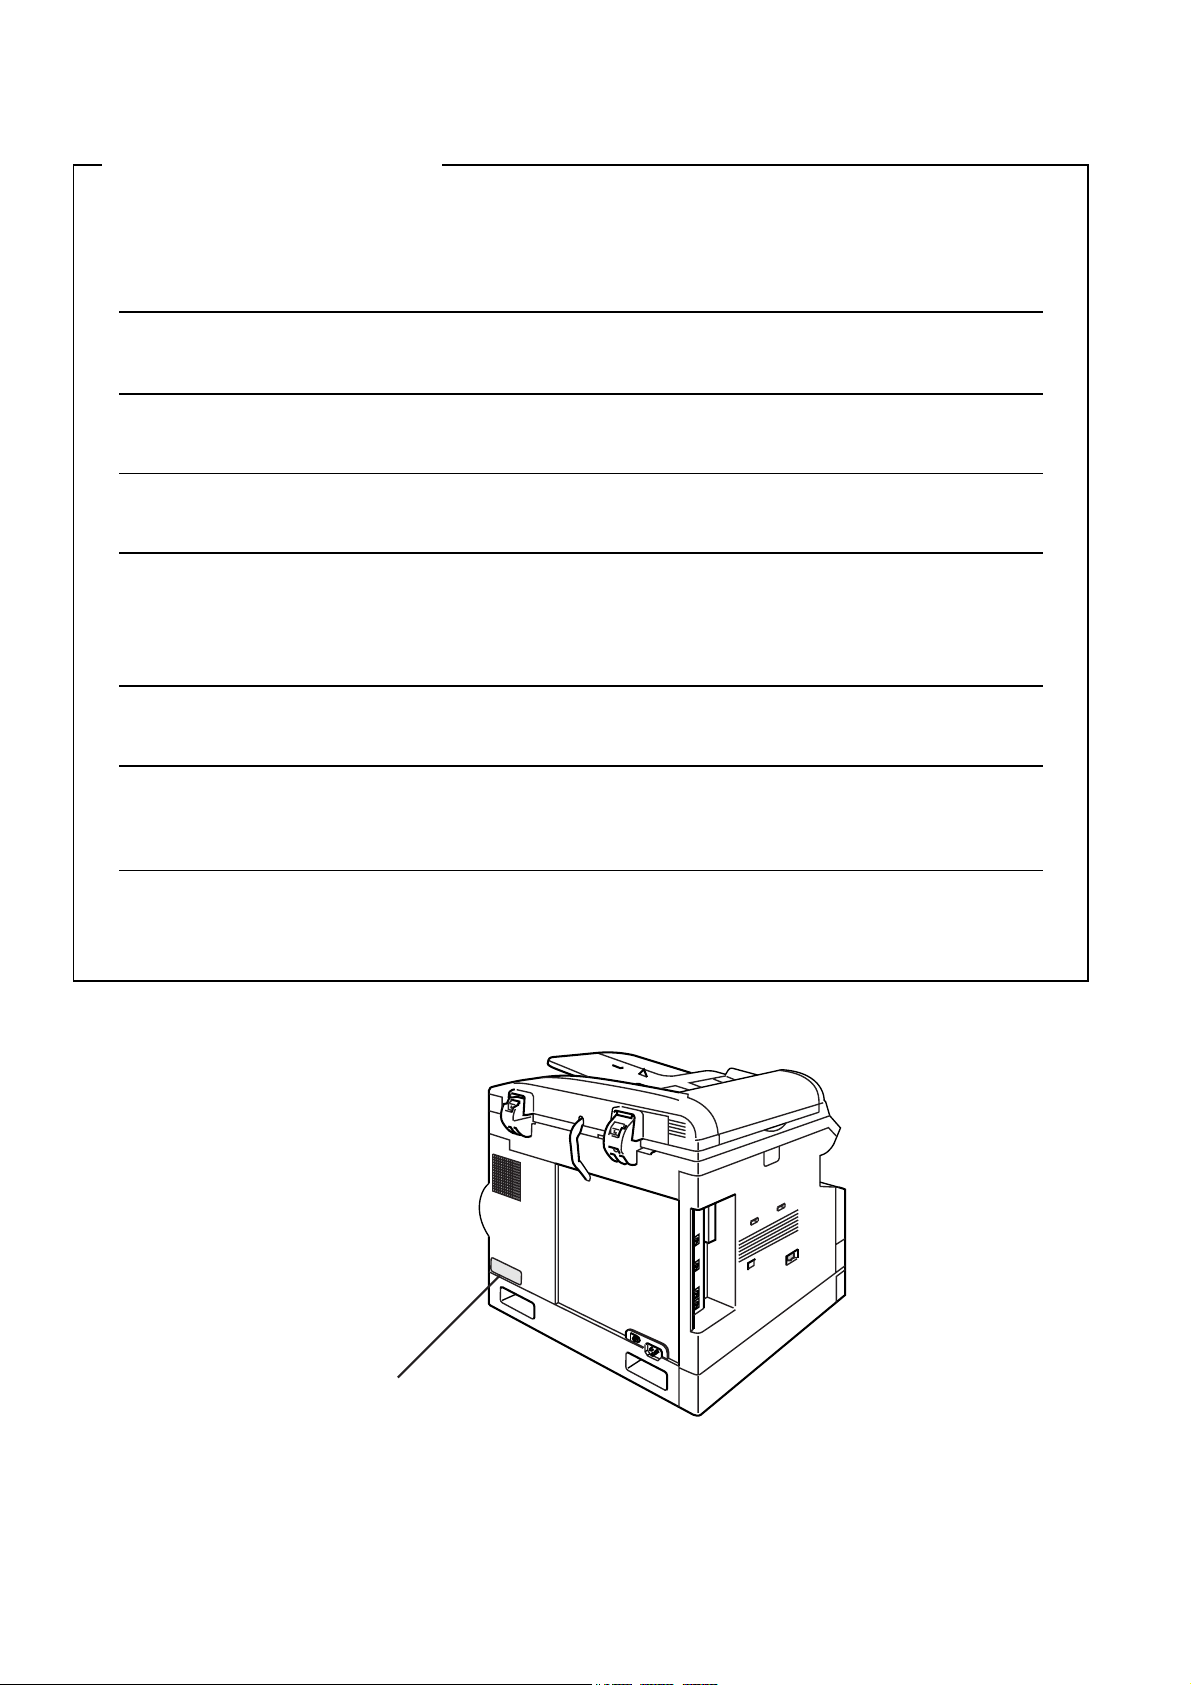
When requesting information, supplies or service always refer to the model and serial number of your
machine. The model and serial number plate (Main Name Plate) is located on the machine as shown below.
For your convenience, space is provided below to record information you may need in the future.
Model No.
Serial No.
Date of Purchase
Dealer
Address
Telephone Number
() -
Supplies Telephone Number
() -
Service Telephone Number
() -
Model and Serial Number
Copyright © 2002 by Matsushita Graphic Communication Systems, Inc.
All rights reserved. Unauthorized copying and distribution is a violation of law. Printed in Japan.
The contents of these Operating Instructions are subject to change without notice.

Table of Contents
Getting to Know Your Machine
Safety Information.......................................................................................................... 7
Function Key................................................................................................................... 10
External View .................................................................................................................. 11
Control Panel .................................................................................................................. 12
Installing Your Machine
Setting the Dialing Method (Tone or Pulse)................................................................. 14
■ General Description........................................................................................ 14
Adjusting the Volume .................................................................................................... 15
■ General Description........................................................................................ 15
■ Setting the Monitor Volume ............................................................................ 15
■ Setting the Ringer Volume ............................................................................. 16
User Parameters............................................................................................................. 17
■ How To Enter Characters............................................................................... 17
■ General Description........................................................................................ 18
■ Setting the Date and Time.............................................................................. 18
■ Setting Your LOGO ........................................................................................ 19
■ Setting Your Character ID .............................................................................. 20
■ Setting Your ID Number (Fax Telephone Number) ........................................ 21
Programming Your Machine
One-Touch/Abbreviated Dialing Numbers ................................................................... 23
■ Entering One-Touch/Abbreviated Dialing Numbers ....................................... 23
■ Changing or Erasing One-Touch/Abbreviated Dialing Numbers .................... 25
■ Printing Out Directory Labels ......................................................................... 27
Customizing Your Machine ........................................................................................... 28
■ General Description........................................................................................ 28
■ Setting the Fax Parameters............................................................................ 28
■ Fax Parameter Table...................................................................................... 29
Basic Operations
Loading Documents....................................................................................................... 33
■ How to Load Documents................................................................................ 33
■ Sending Non-Standard Size Documents........................................................ 33
■ Flatbed Scanning ........................................................................................... 33
Basic Transmission Settings ........................................................................................ 34
■ General Description........................................................................................ 34
■ Contrast.......................................................................................................... 34
■ Resolution ...................................................................................................... 34
■ Original (Text/Photo) ...................................................................................... 35
■ Verification Stamp .......................................................................................... 35
■ Communication Journal (COMM. JOURNAL) ................................................ 36
3

Table of Contents
Sending Documents....................................................................................................... 37
■ General Description ....................................................................................... 37
■ Memory Transmission.................................................................................... 37
■ Direct Transmission ....................................................................................... 47
■ Rotated Transmission .................................................................................... 51
■ Voice Mode Transmission.............................................................................. 52
■ Transmission Reservation ............................................................................. 54
■ Redialing ........................................................................................................ 58
Receiving Documents.................................................................................................... 60
■ General Description ....................................................................................... 60
■ Automatic Reception ...................................................................................... 60
■ Manual Reception .......................................................................................... 60
■ Print Reduction .............................................................................................. 61
■ Receiving Oversize Documents ..................................................................... 62
■ Substitute Memory Reception ........................................................................ 63
Advanced Features
Batch Transmission....................................................................................................... 65
■ General Description ....................................................................................... 65
Timer Controlled Communications .............................................................................. 66
■ General Description ....................................................................................... 66
■ Deferred Transmission................................................................................... 66
■ Deferred Polling ............................................................................................. 68
Polling ............................................................................................................................. 69
■ General Description ....................................................................................... 69
■ Setting the Polling Password ......................................................................... 69
■ Preparing to be Polled ................................................................................... 70
■ To Poll Documents from Another Station....................................................... 71
Program Keys ................................................................................................................. 72
■ General Description ....................................................................................... 72
■ Setting for Group Dialing................................................................................ 72
■ Setting for Deferred Transmission ................................................................. 73
■ Setting for Deferred Polling ............................................................................ 74
■ Setting for Normal Polling .............................................................................. 75
■ Setting for One-Touch Key ............................................................................ 76
■ Changing or Erasing the Program Key Settings ............................................ 77
Edit File Mode ................................................................................................................. 78
■ General Description ....................................................................................... 78
■ Printing a File List .......................................................................................... 78
■ Viewing the Contents of a File List................................................................. 79
■ Changing the Start Time or the Station of a File ............................................ 80
■ Deleting a File ................................................................................................ 82
■ Printing Out a File .......................................................................................... 83
■ Adding Documents into a File ........................................................................ 84
■ Retry an Incomplete File ................................................................................ 85
Access Code................................................................................................................... 86
■ General Description ....................................................................................... 86
■ Setting the Access Code................................................................................ 86
■ Operating Your Machine with the Access Code (Restrict All Operations) .... 87
■ Operating Your Machine with the Access Code
(Restrict Access of Fax Parameters Only)..................................................... 87
4

Table of Contents
Receive To Memory........................................................................................................ 88
■ General Description........................................................................................ 88
■ Setting the RCV To Memory Password.......................................................... 88
■ Setting RCV To Memory ................................................................................ 89
■ Printing Out Documents ................................................................................. 90
Distinctive Ring Detector (DRD) ................................................................................... 91
■ General Description........................................................................................ 91
■ Setting the Ring Pattern (DRD) ...................................................................... 92
PIN Code Access............................................................................................................ 93
■ General Description........................................................................................ 93
■ Selecting the Access Method (Prefix or Suffix) .............................................. 93
■ Dialing with a PIN Code ................................................................................. 94
Department Code ........................................................................................................... 95
■ General Description........................................................................................ 95
■ Setting the Department Code......................................................................... 95
■ Changing or Erasing the Department Code ................................................... 97
■ Sending a Document with Department Code ................................................. 99
■ Sending a Document with Department Code (Voice Mode Transmission) .... 100
■ Printing a Department Code List .................................................................... 101
■ Printing a Department Code Journal .............................................................. 102
Network Features
Password Communications .......................................................................................... 105
■ General Description........................................................................................ 105
■ Setting Password Transmission .................................................................... 106
■ Setting Password Reception .......................................................................... 107
■ Using Password Transmission ....................................................................... 108
Confidential Mailbox ...................................................................................................... 110
■ General Description........................................................................................ 110
■ Confidential Mailbox ....................................................................................... 110
■ Sending a Confidential Document to a Remote Station's Mailbox ................. 111
■ Polling a Confidential Document from a Remote Station's Mailbox ............... 112
■ Receiving a Confidential Document to Your Machine's Mailbox .................... 113
■ Storing a Confidential Document in Your Machine's Mailbox......................... 114
■ Printing Out a Confidential Document from Your Machine's Mailbox............. 115
■ Deleting a Confidential Document Stored in Your Machine's Mailbox ........... 116
Sub-Addressing.............................................................................................................. 118
■ General Description........................................................................................ 118
■ To set the Sub-address into a One-Touch/ABBR. Dialing Numbers .............. 119
■ To send a Document with Sub-address ......................................................... 120
5

Table of Contents
Printout Journals and Lists
Journals and Lists.......................................................................................................... 123
■ General Description ....................................................................................... 123
■ Transaction Journal ....................................................................................... 123
■ Individual Transmission Journal (IND. XMT JOURNAL)................................ 125
■ Communication Journal (COMM. JOURNAL)............................................... 129
■ One-Touch/Abbreviated and Directory Search List ....................................... 131
■ Program List................................................................................................... 134
■ FAX Parameter List........................................................................................ 135
Problem Solving
Troubleshooting ............................................................................................................. 137
■ Information Codes.......................................................................................... 139
■ Verification Stamp.......................................................................................... 141
■ Checking the Telephone Line ........................................................................ 142
Appendix
Specifications................................................................................................................. 143
Options and Supplies .................................................................................................... 145
FCC Notice for Users in USA ........................................................................................ 146
Notice to Users in Canada............................................................................................. 149
Glossary.......................................................................................................................... 151
ITU-T Image No. 1........................................................................................................... 154
Index ................................................................................................................................ 155
6
Getting to Know Your Machine
Safety Information
Your Machine
Getting to Know
!
WARNING
• TO PREVENT FIRE OR SHOCK, DO NOT EXPOSE THIS PRODUCT TO RAIN OR ANY TYPE OF
MOISTURE.
• TO MINIMIZE THE POSSIBILITY OF SHOCK OR DAMAGE TO THE MACHINE, IT MUST BE PROPERLY
GROUNDED.
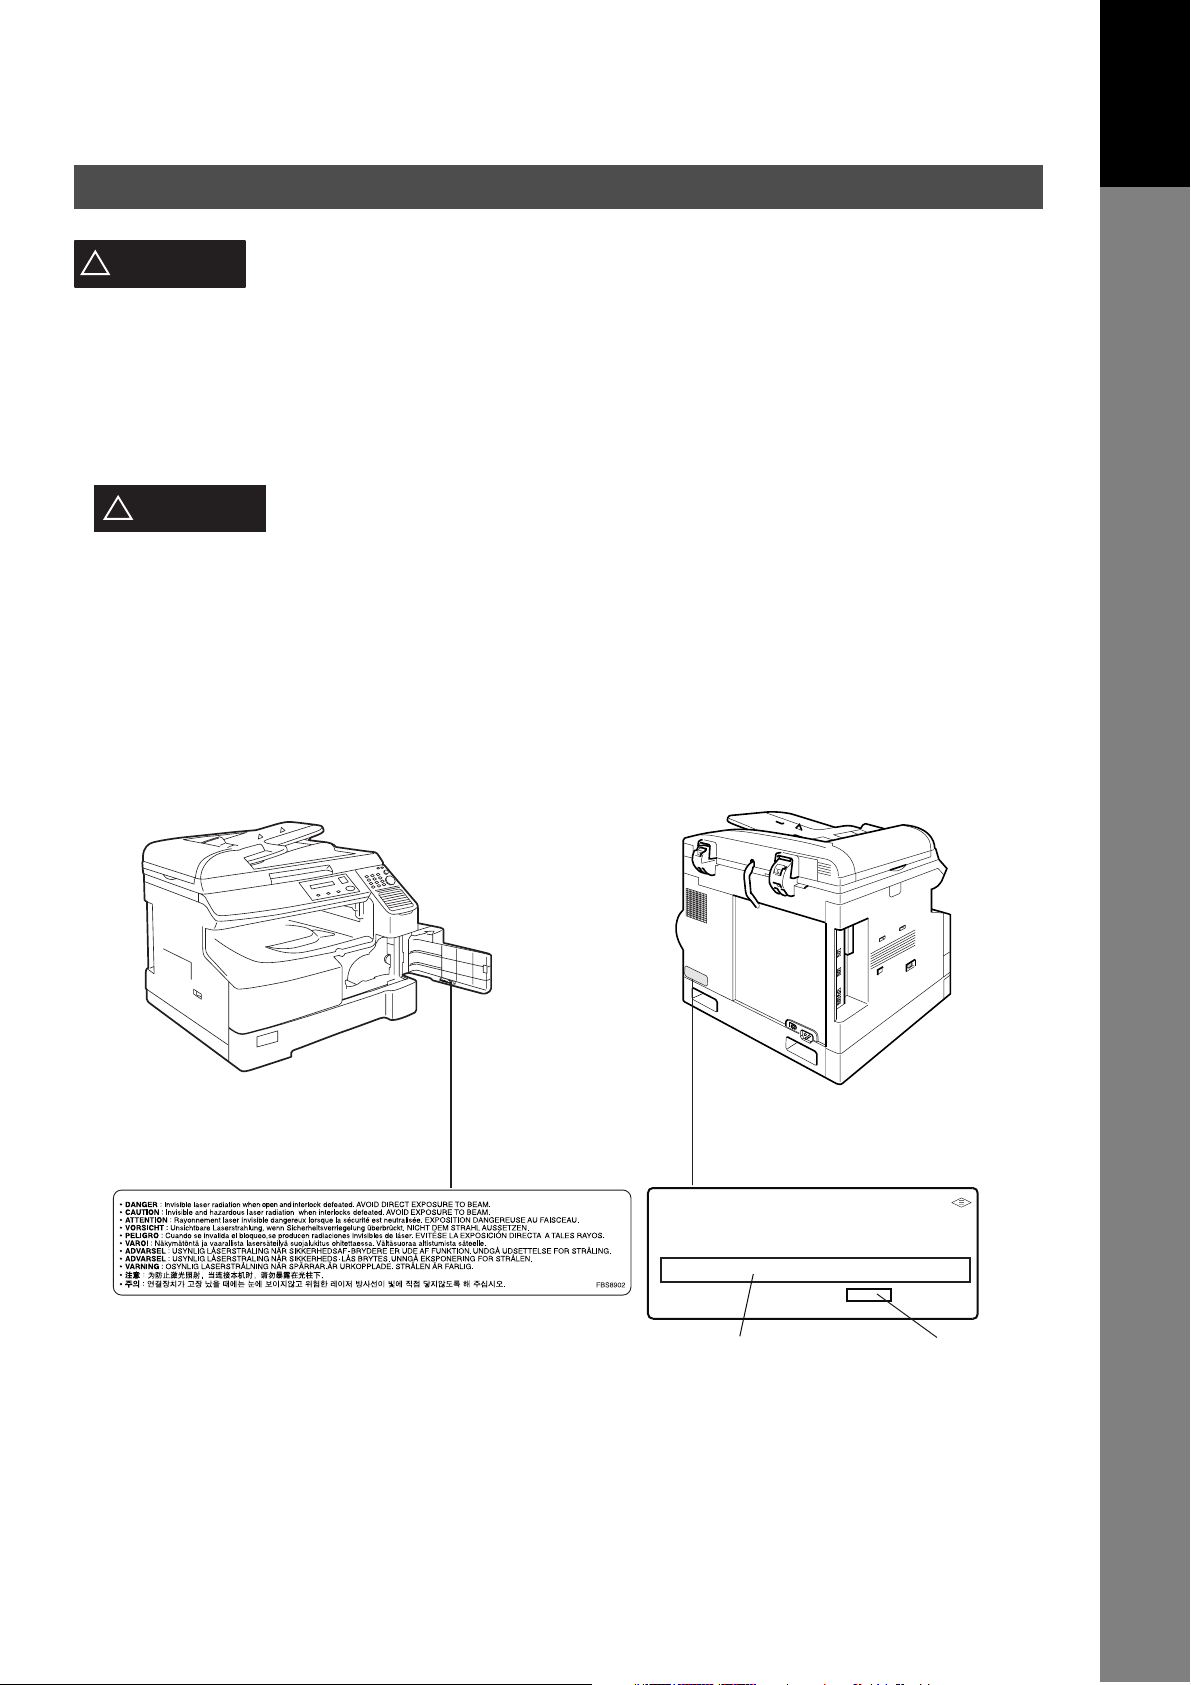
• THIS PRODUCT UTILIZES A LASER. ONLY QUALIFIED SERVICE PERSONNEL SHOULD ATTEMPT TO
SERVICE THIS DEVICE DUE TO POSSIBLE EYE INJURY.
CAUTION
!
OTHER THAN THOSE SPECIFIED HEREIN MAY RESULT IN HAZARDOUS
RADIATION EXPOSURE.
• THE POWER CORD ON THIS EQUIPMENT MUST BE USED TO DISCONNECT THE MAIN POWER.
PLEASE ENSURE THAT THE SOCKET OUTLET IS INSTALLED NEAR THE EQUIPMENT AND SHALL
BE EASILY ACCESSIBLE.
• MAKE SURE THAT THE MACHINE IS INSTALLED IN A SPACIOUS OR WELL VENTILATED ROOM SO
AS NOT TO INCREASE THE AMOUNT OF OZONE IN THE AIR. SINCE OZONE IS HEAVIER THAN AIR,
IT IS RECOMMENDED THAT AIR AT FLOOR LEVEL BE VENTILATED.
denotes a potential hazard that could result in serious injury or death.
- USE OF CONTROLS OR ADJUSTMENTS OR PERFORMANCE OF PROCEDURES
Product complies with DHHS Rules 21
CFR Subchapter J in effect at date
of manufacture.
Manufacturer's name and address
Factory ID
7

Safety Information
CAUTION
!
• THIS PRODUCT CONTAINS A LITHIUM BATTERY. DANGER OF EXPLOSION IF BATTERY IS
INCORRECTLY REPLACED.
REPLACE ONLY WITH THE SAME OR EQUIVALENT TYPE. DISPOSE OF USED BATTERIES
ACCORDING TO THE INSTRUCTIONS OF YOUR LOCAL SOLID WASTE OFFICIALS.
• TO REDUCE THE RISK OF SHOCK OR FIRE, USE ONLY NO. 26 AWG OR LARGER TELEPHONE LINE
CABLE.
• DISCONNECT ALL POWER TO THE MACHINE BEFORE COVER(S) ARE REMOVED. REPLACE THE
COVER(S) BEFORE THE UNIT IS RE-ENERGIZED.
IMPORTANT SAFETY INSTRUCTIONS
!
When using your telephone equipment, basic safety precautions should always be followed to reduce the
risk of fire, electric shock and injury to persons, including the following:
• DO NOT USE THIS PRODUCT NEAR WATER, FOR EXAMPLE, NEAR A BATH TUB, WASH BOWL,
KITCHEN SINK OR LAUNDRY TUB, IN A WET BASEMENT OR NEAR A SWIMMING POOL.
• AVOID USING A TELEPHONE (OTHER THAN A CORDLESS TYPE) DURING AN ELECTRICAL
STORM. THERE MAY BE A REMOTE RISK OF ELECTRIC SHOCK FROM LIGHTNING.
denotes hazards that could result in minor injury or damage to the machine.
• DO NOT USE THE TELEPHONE TO REPORT A GAS LEAK IN THE VICINITY OF THE LEAK.
• USE ONLY THE POWER CORD AND BATTERIES INDICATED IN THIS MANUAL. DO NOT DISPOSE
OF BATTERIES IN A FIRE, THEY MAY EXPLODE. CHECK WITH LOCAL CODES FOR POSSIBLE
SPECIAL DISPOSAL INSTRUCTIONS.
8
Safety Information
Your Machine
Getting to Know
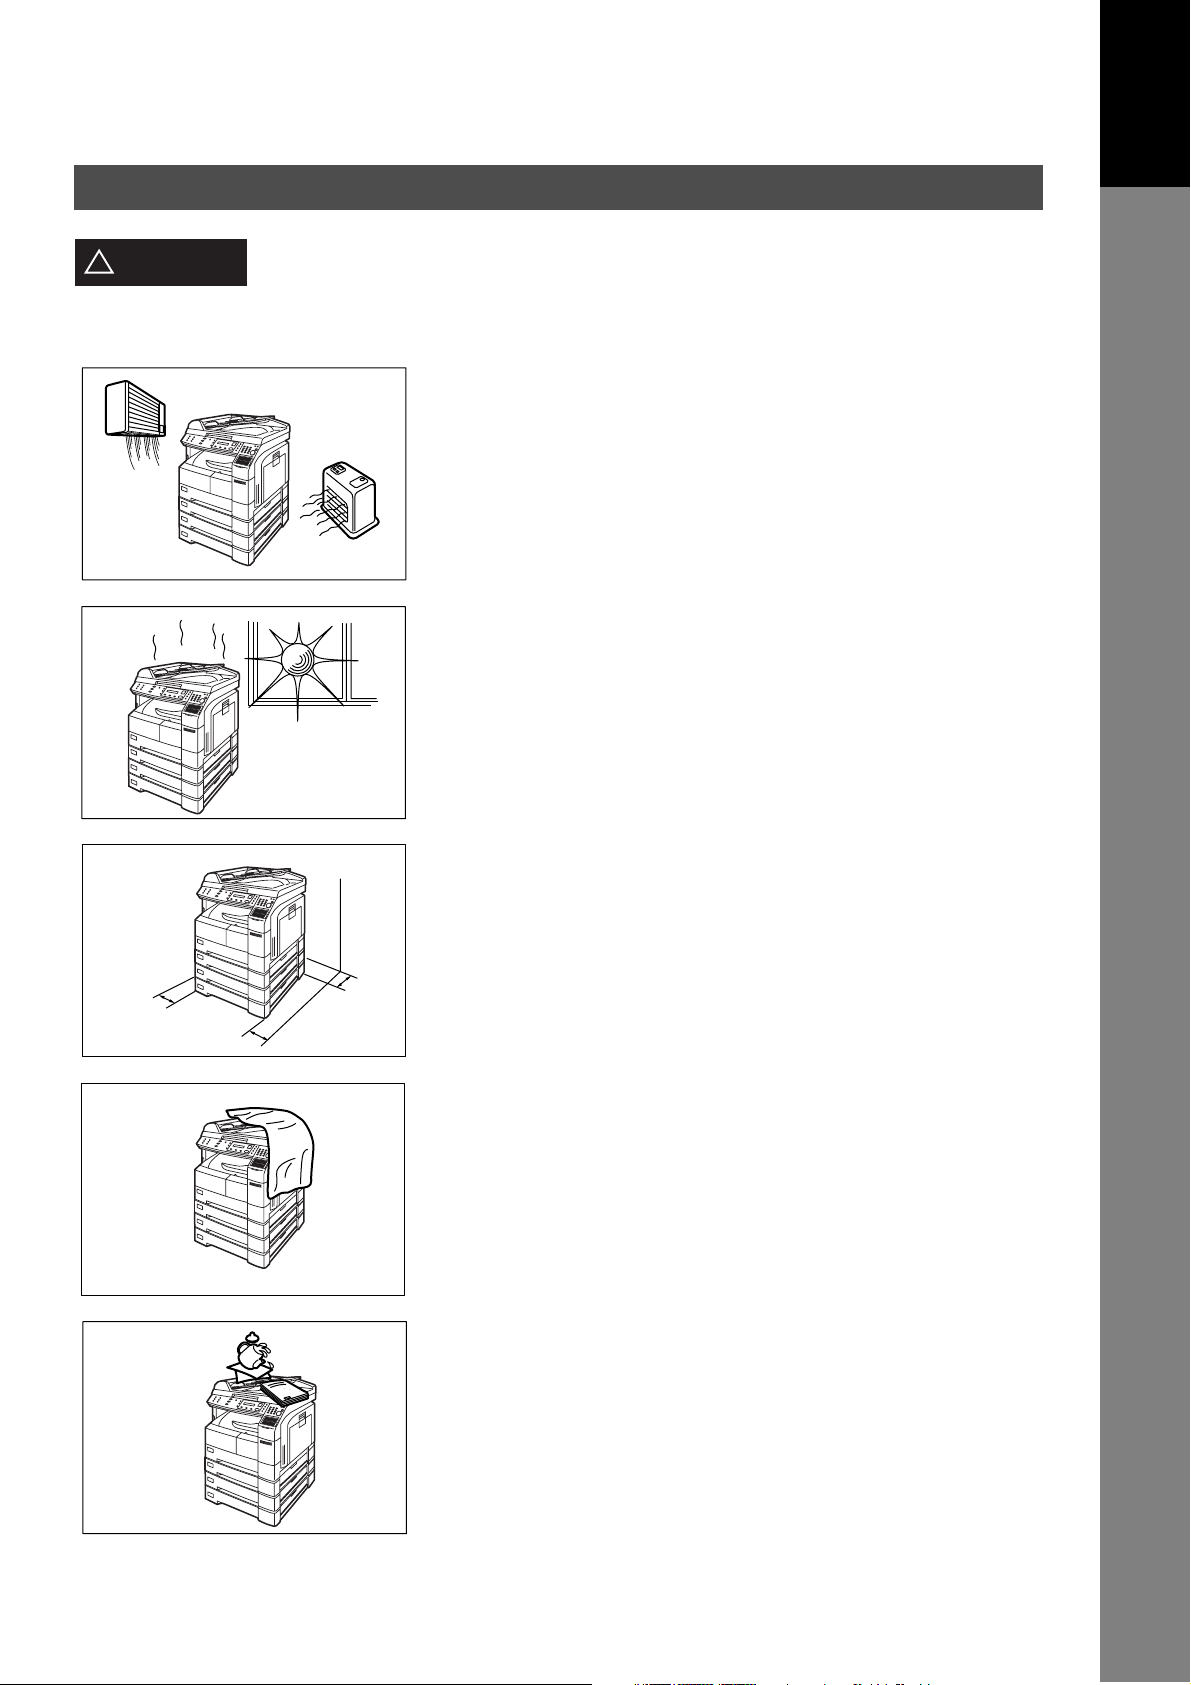
CAUTION
!
denotes hazards that could result in minor injury or damage to the machine.
Do not install the machine near heating or an air conditioning unit.
Avoid exposure to direct sunlight.
Install the machine on a flat surface, leave at least 4 inches (10 cm) of space
between the machine and other objects.
Do not block the ventilation openings.
Do not place heavy objects or spill liquids on the machine.
9
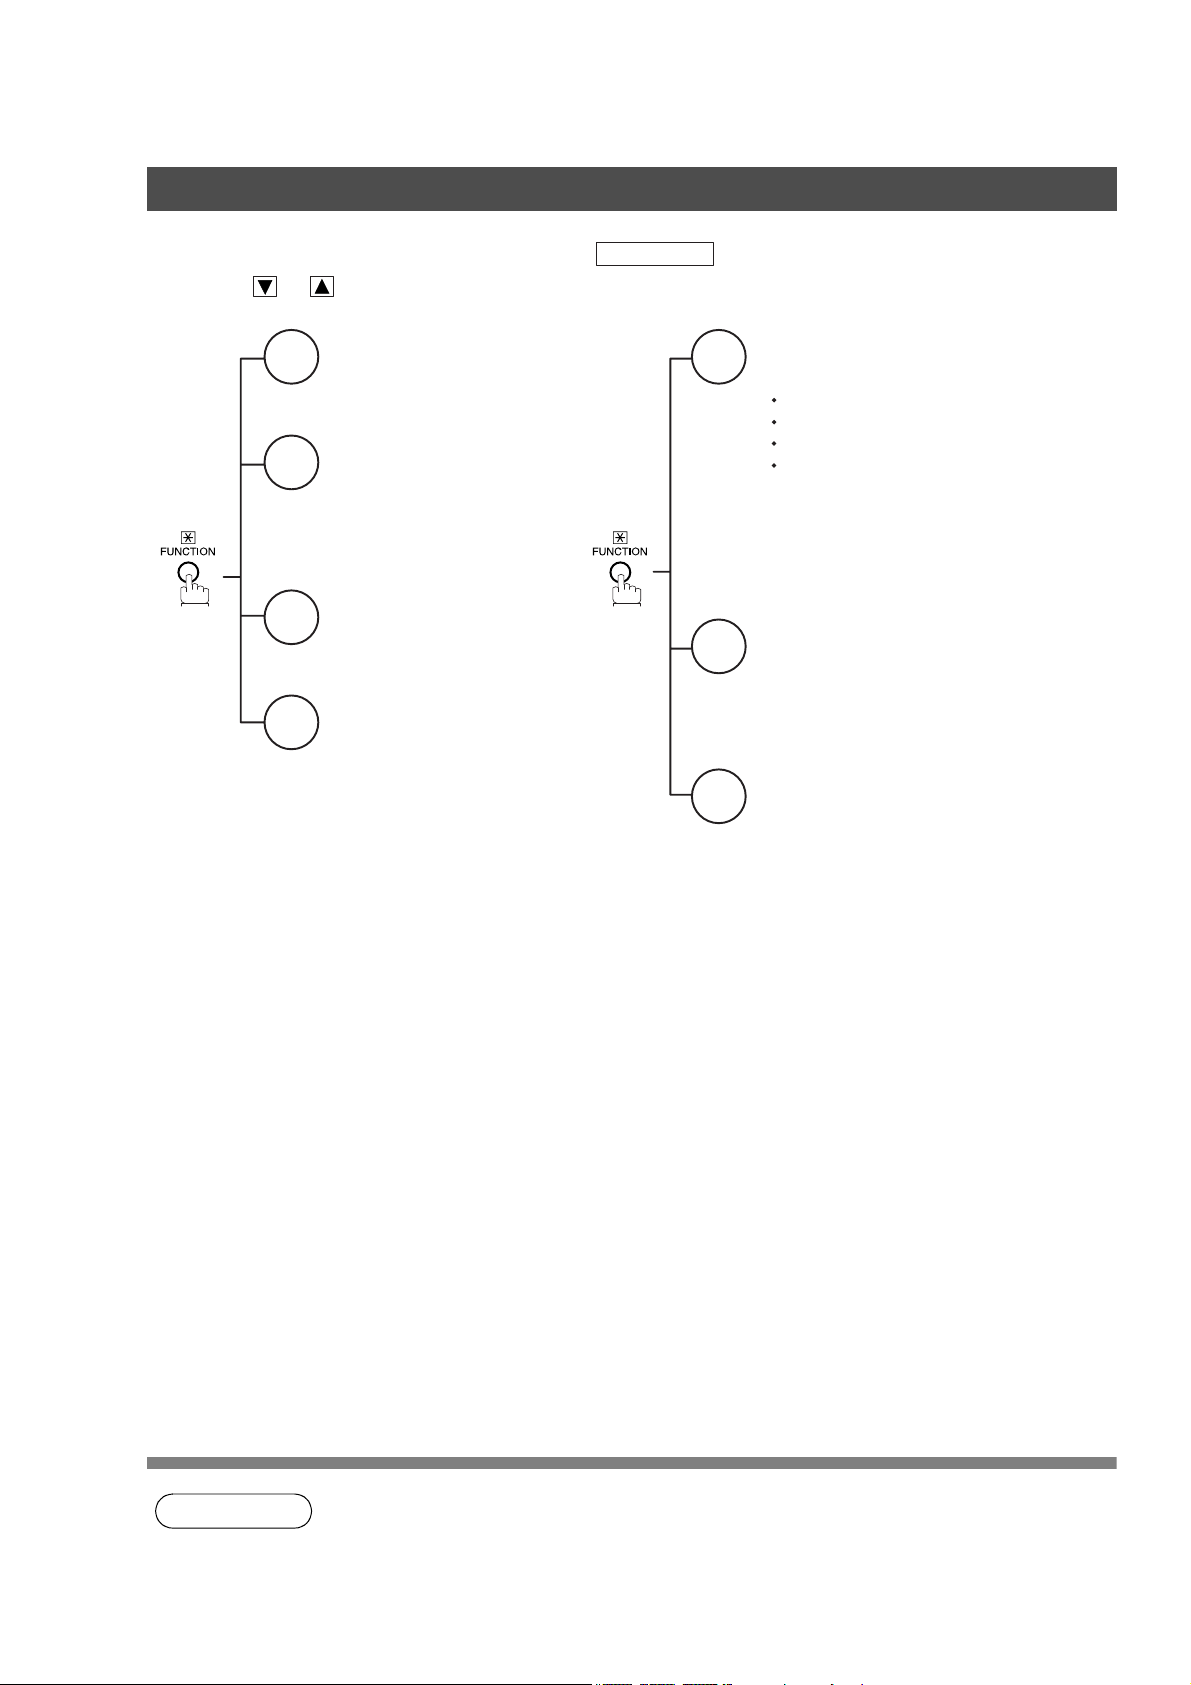
Function Key
Any function can be started by first pressing and then enter the function number, or by
pressing or scroll key repeatedly until the desired function appears on the display.
Deferred Communication
1
1 = XMT
2 = Polling
3 = Advanced Communication
Advanced Communication
2
2 = Confidential Communication
4 = Sub-Address XMT
Polling
3
1 = Polling
2 = Polled
Printout
6
1 = Journal (Print/View)
2 = One-Touch/Abbreviated/
Directory Search List
3 = Program List
4 = Fax Parameter List
5 = Not used
6 = Individual XMT Journal
7 = Directory Label
FUNCTION
Set Mode
7
1 = User Parameters
Date & Time
Logo
Character ID
ID Number (Fax Telephone Number)
2 = One-Touch/Abbreviated Numbers
3 = Program Keys
4 = Fax Parameters
Select Mode
8
1 = Communication Journal = OFF/ON/INC
4 = Password-XMT = OFF/ON (See Note 1)
5 = RCV to Memory = OFF/ON/PRINT
Edit File Mode
9
1 = File List (Print/View)
2 = Change Time/Station
3 = Delete File
4 = Print File
5 = Add Document
6 = Retry Incomplete File
10
NOTE
1. If Fax Parameter is not preset to a Valid position, which enables you to use the function, the
display will not show the function.
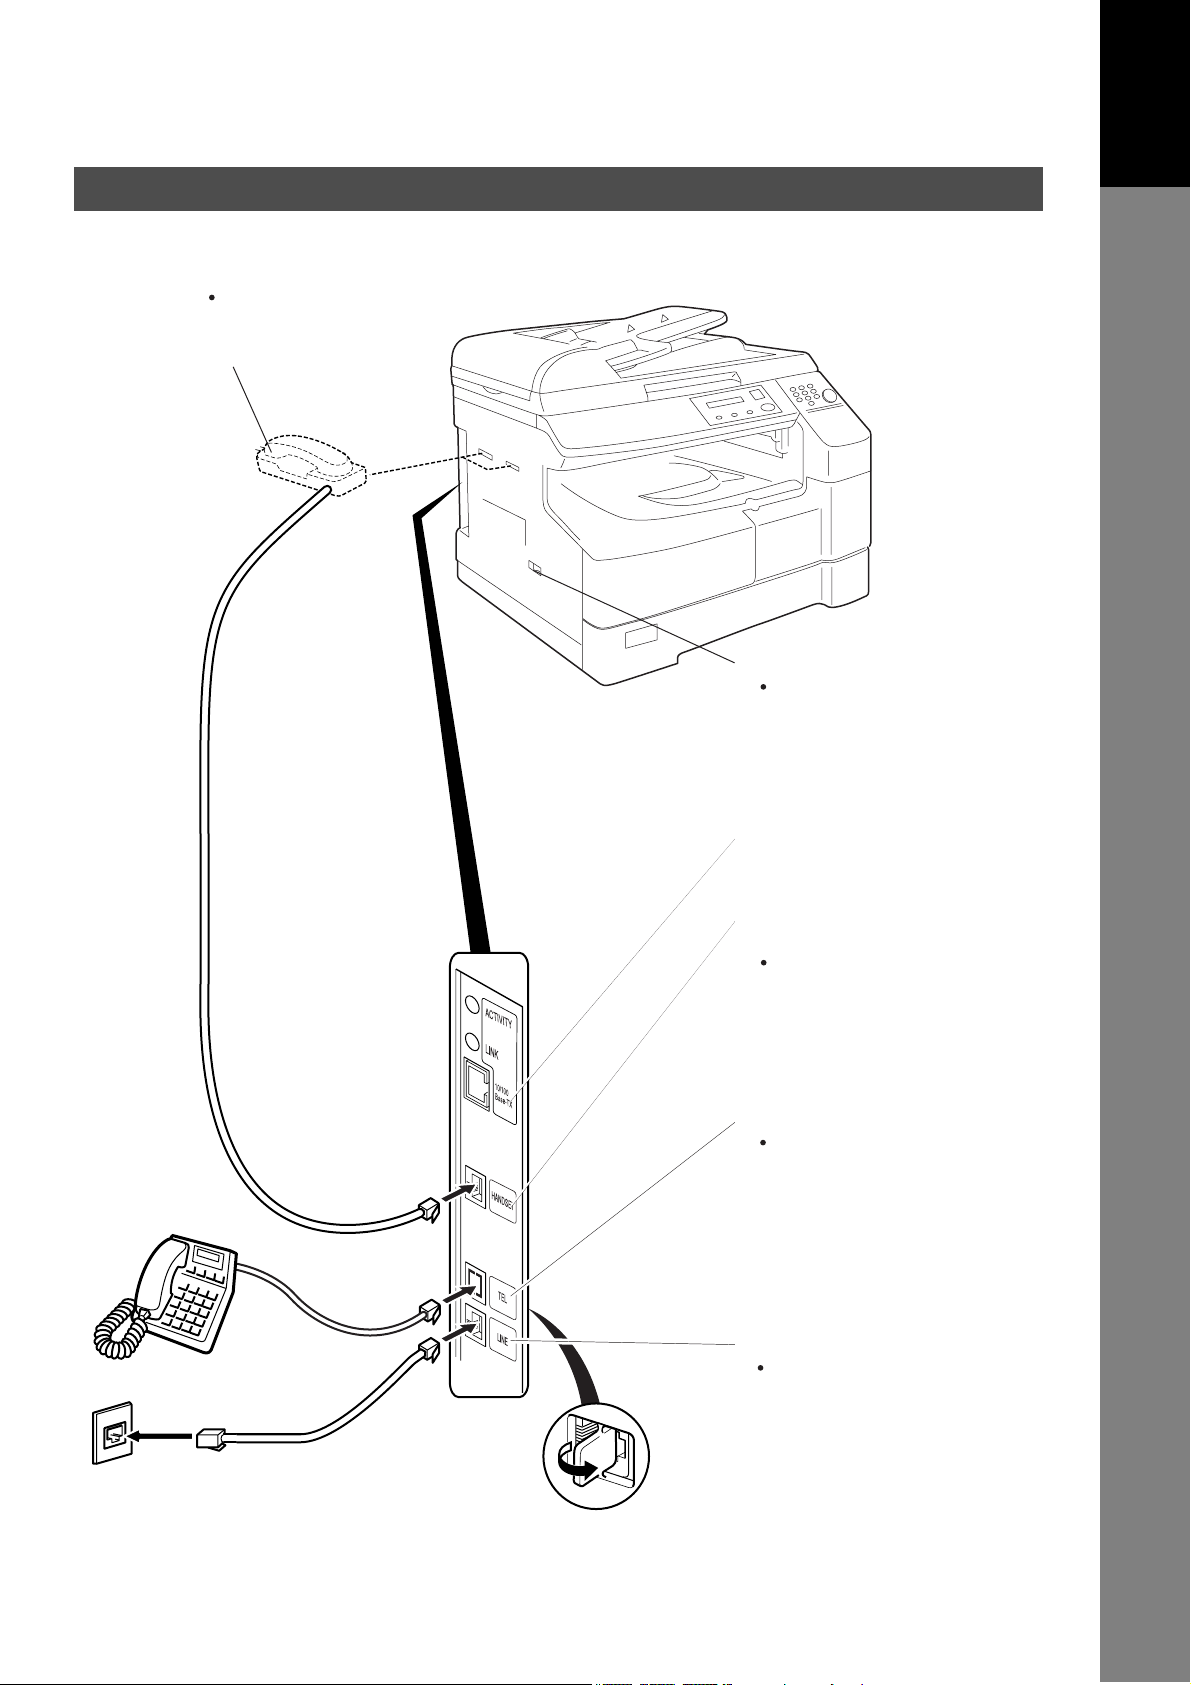
External View
Handset
(Available as an option, see
the Operating Instructions
(For Copier), page 51)
Your Machine
Getting to Know
To Handset
Power Switch
After connecting all cables
and the Power Cord, turn the
power switch ON.
LAN Connection Jack
(10Base-T/100Base-TX)
Optional Telephone
Handset Jack
Connect the telephone line
cable from the Optional
Handset into the
HANDSET jack on the
left side of the machine.
External Telephone Jack
You can connect an
additional standard single
line telephone to the
machine.
To connect the telephone,
break off the protective tab
on the TEL jack.
RJ-11C
Telephone Jack
Telephone Line Jack
Plug one end of the
telephone line cable into
the "RJ-11C" telephone
jack supplied by the
telephone company and
the other end into the LINE
jack on the left side of the
machine.
11
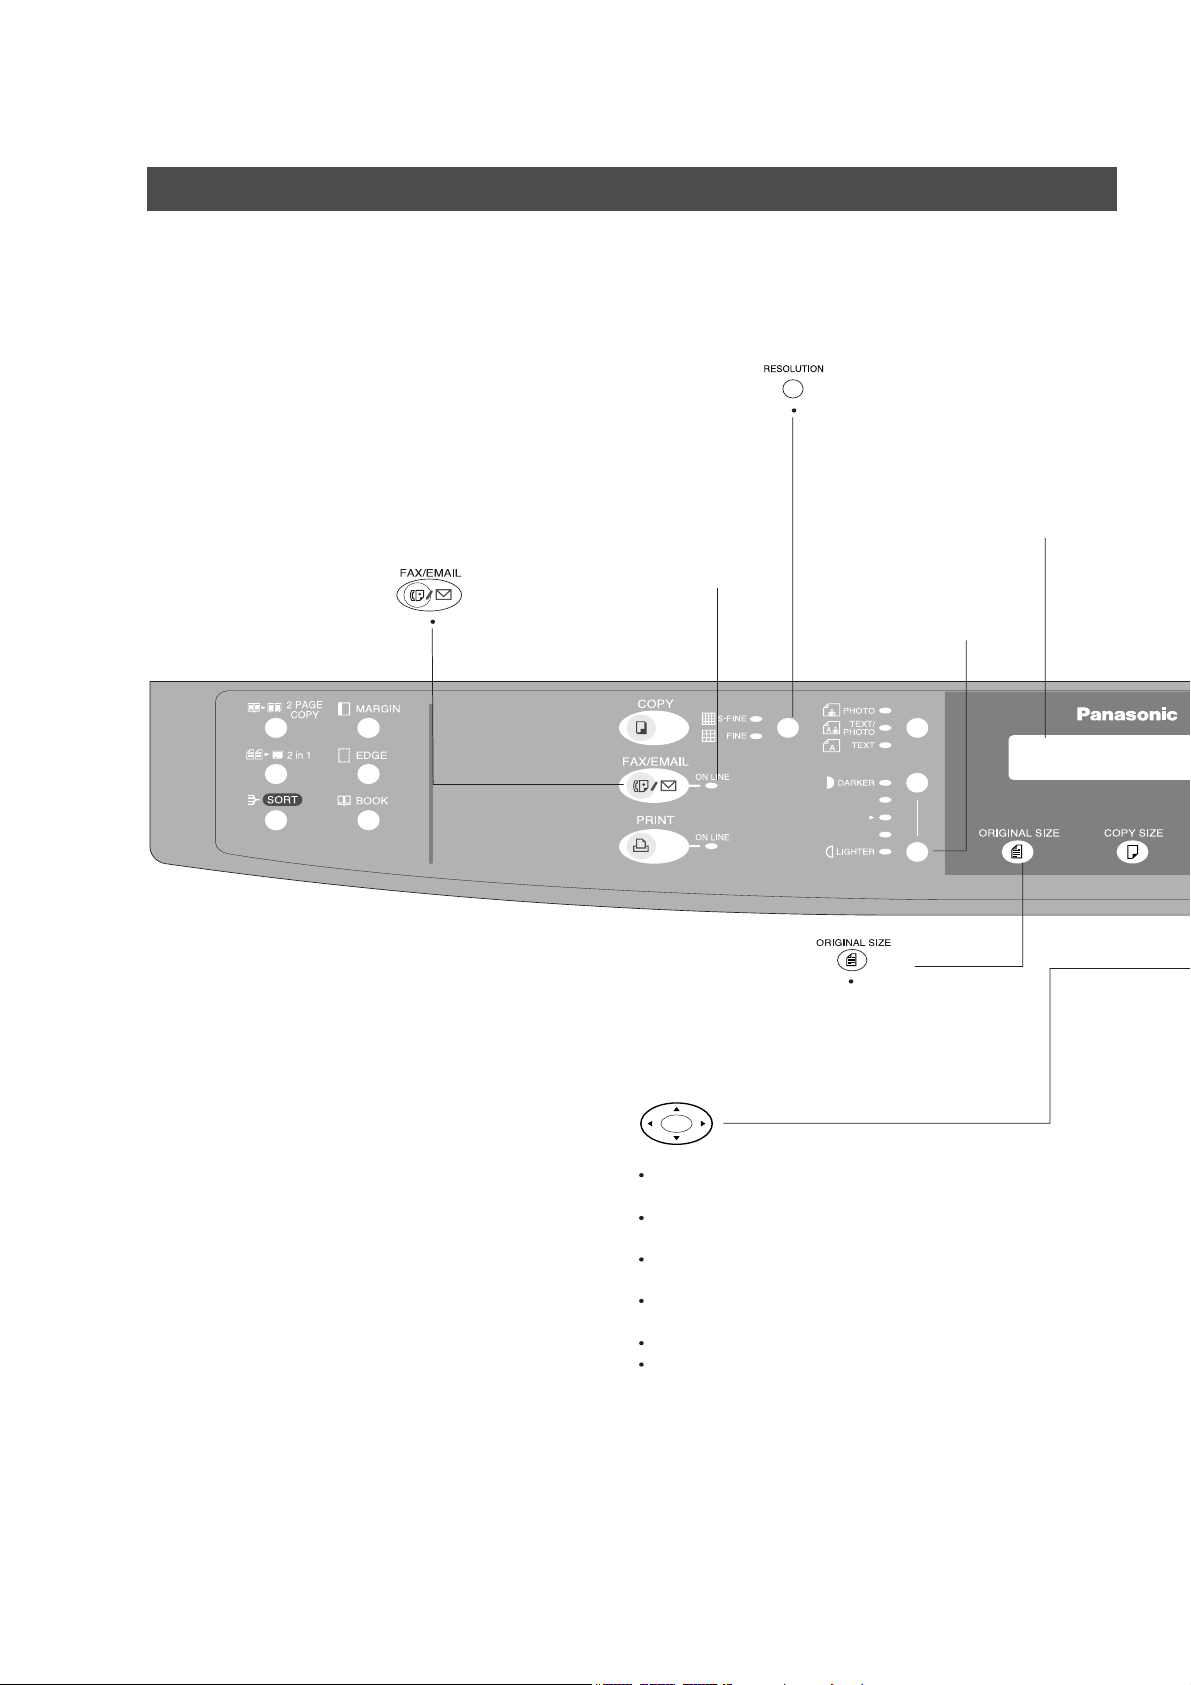
Control Panel
Used to select the
FAX or EMAIL mode.
ON LINE Indicator
Blinks : When sending or
receiving faxes.
Used to set Standard,
Fine, Super-Fine resolution.
(See page 34)
LCD Display
Indicates date and time, or
the current operation.
Used to adjust the
Contrast of the
Faxed/Emailed
document.
Used to select the
original size
manually.
Used for the following:
Adjust the monitor and ringer volume.
(See page 15 to 16)
Move the cursor while entering numbers and
characters.
Search the station name for Directory
Search Dialing.
Confirm the entered station for multi-station
communication.
Select functions.
Confirm the current communication modes
(e.g. Page number, ID, Dialed Telephone
number or Email address, File number)
when the unit is ON LINE.
12
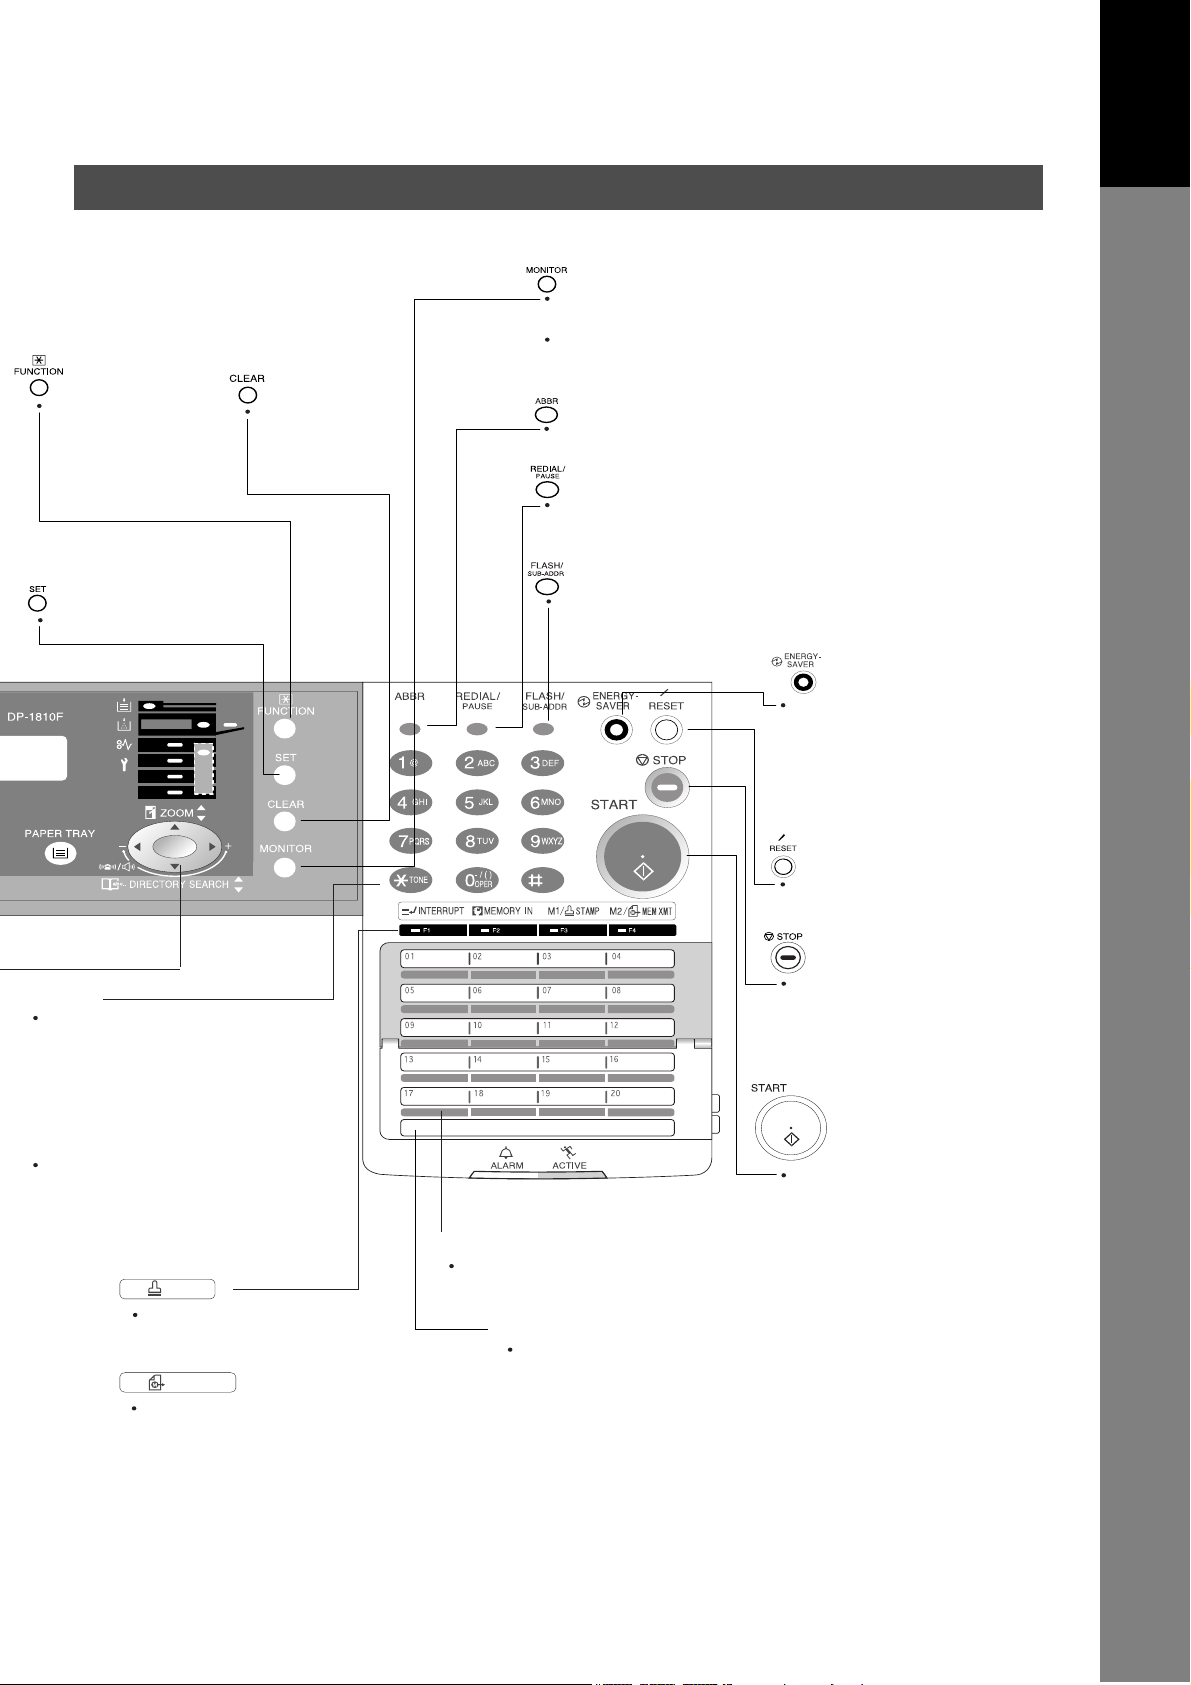
Used to start or
select the function
and subfunctions.
These functions are
explained in detail
on page 10.
Use this button
when correcting
entered numbers
or characters.
Control Panel
Used to start On-Hook Dialing or entering the space
between the characters or numbers. (See page 53)
Used to insert a space while entering User Parameters,
such as LOGO, character ID, station name and
telephone numbers.
Used to start Abbreviated Dialing.
(See page 42 and 49)
Used to enter a pause when recording or dialing
a telephone number, or to redial the last
dialed number.
Your Machine
Getting to Know
Used to set operations.
Keypad
Used for manual number dialing,
recording phone numbers,
character and symbols to record
your LOGO, Character ID, Station
Name and Email Address, and
numerical entries.
Tone Key
Used to temporarily change the
dialing mode to Tone when Pulse
mode is set. Also can be used to
enter a period "." during email and
IP address programming.
M1/ STAMP
Used to turn the verification
stamp ON or OFF.
(See page 35)
M2/ MEM XMT
Used to select either memory
or direct communication.
(See page 37 to 50)
Used to separate the Sub-Address from the telephone
number when dialing, or to access some features of
your PBX.
.
One-Touch Keys (01-52)
Used for One-Touch Dialing.
(See page 41 and 48)
Program Keys (P1-P8)
Used to record long dialing procedures or
Group Dialing Number keys.
Used to switch the
machine into energy
saving mode.
For more details, see
page 23 of the Operating
Instructions (For Copier.)
Used to reset all the
previously set functions.
Press this button when
you want to stop
the communication,
registration operation, or
audible tone.
Press this button to start
fax transmission or an Email
communication and manual
fax reception.
13
Installing Your Machine
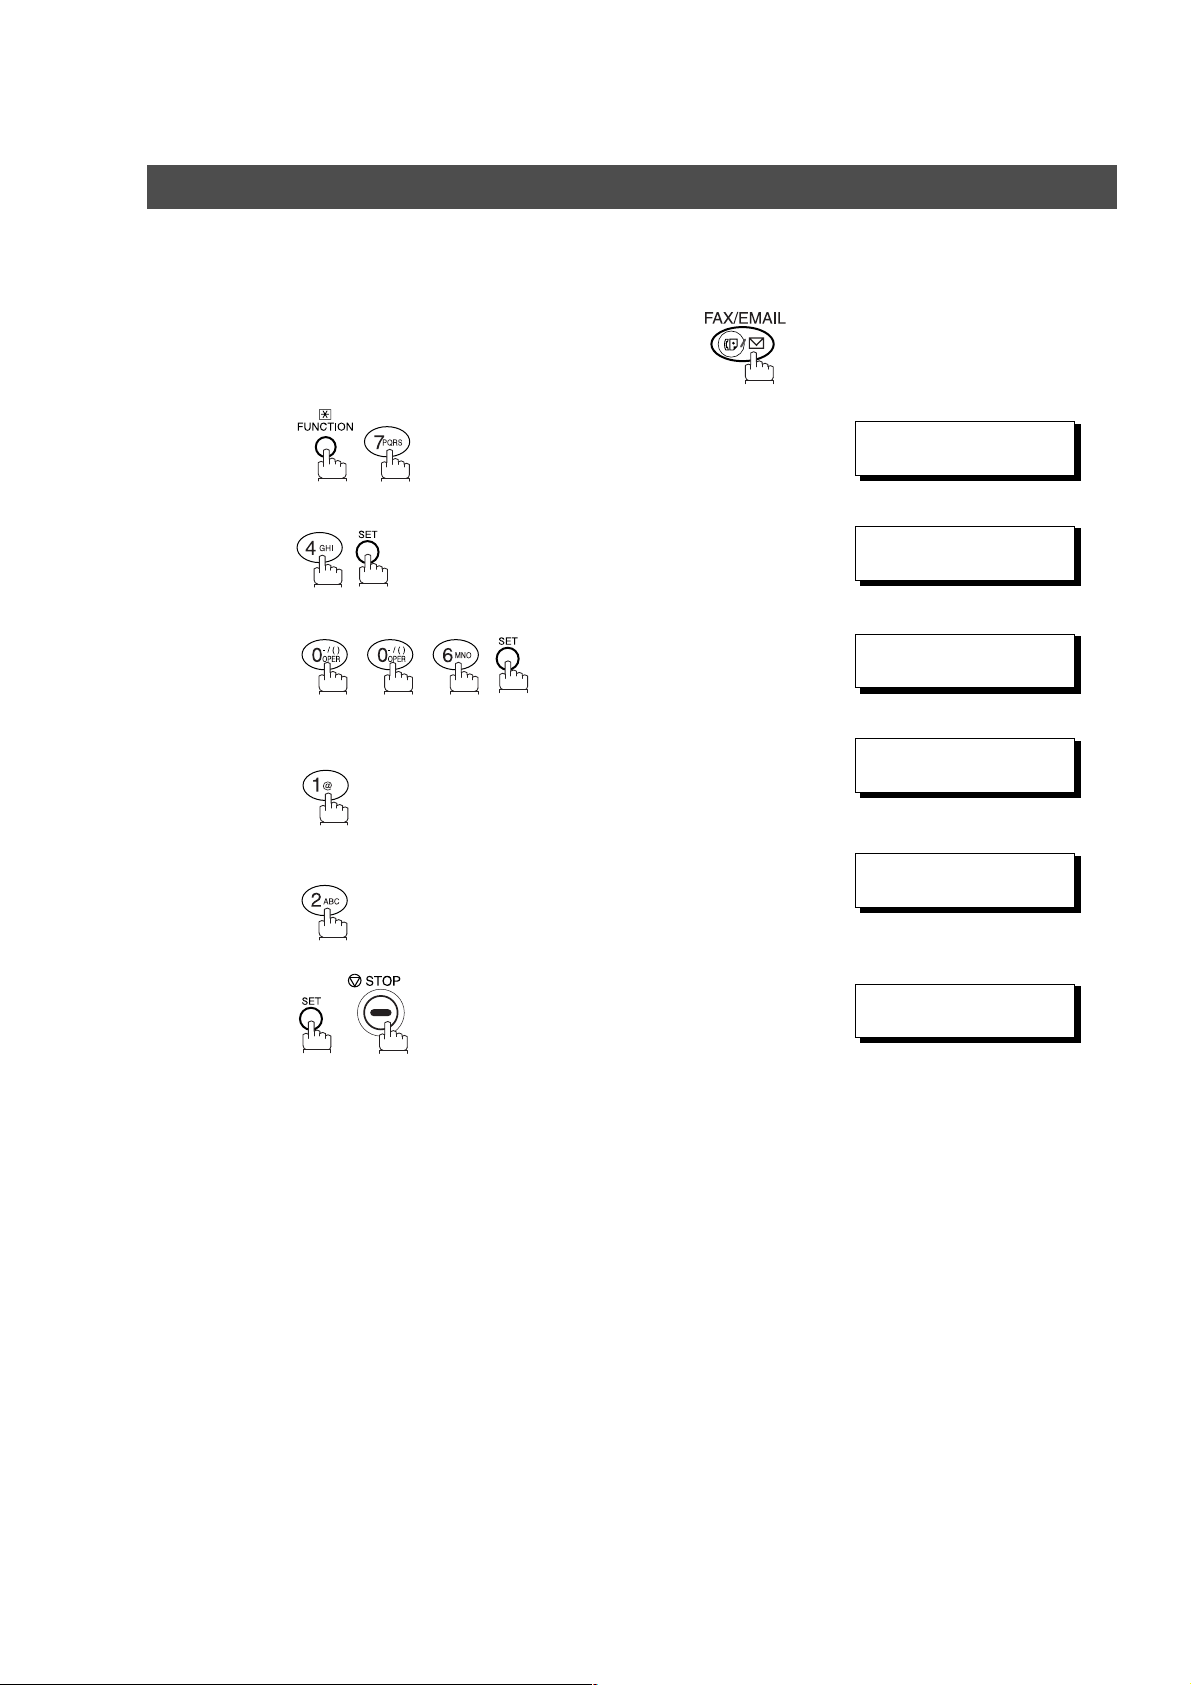
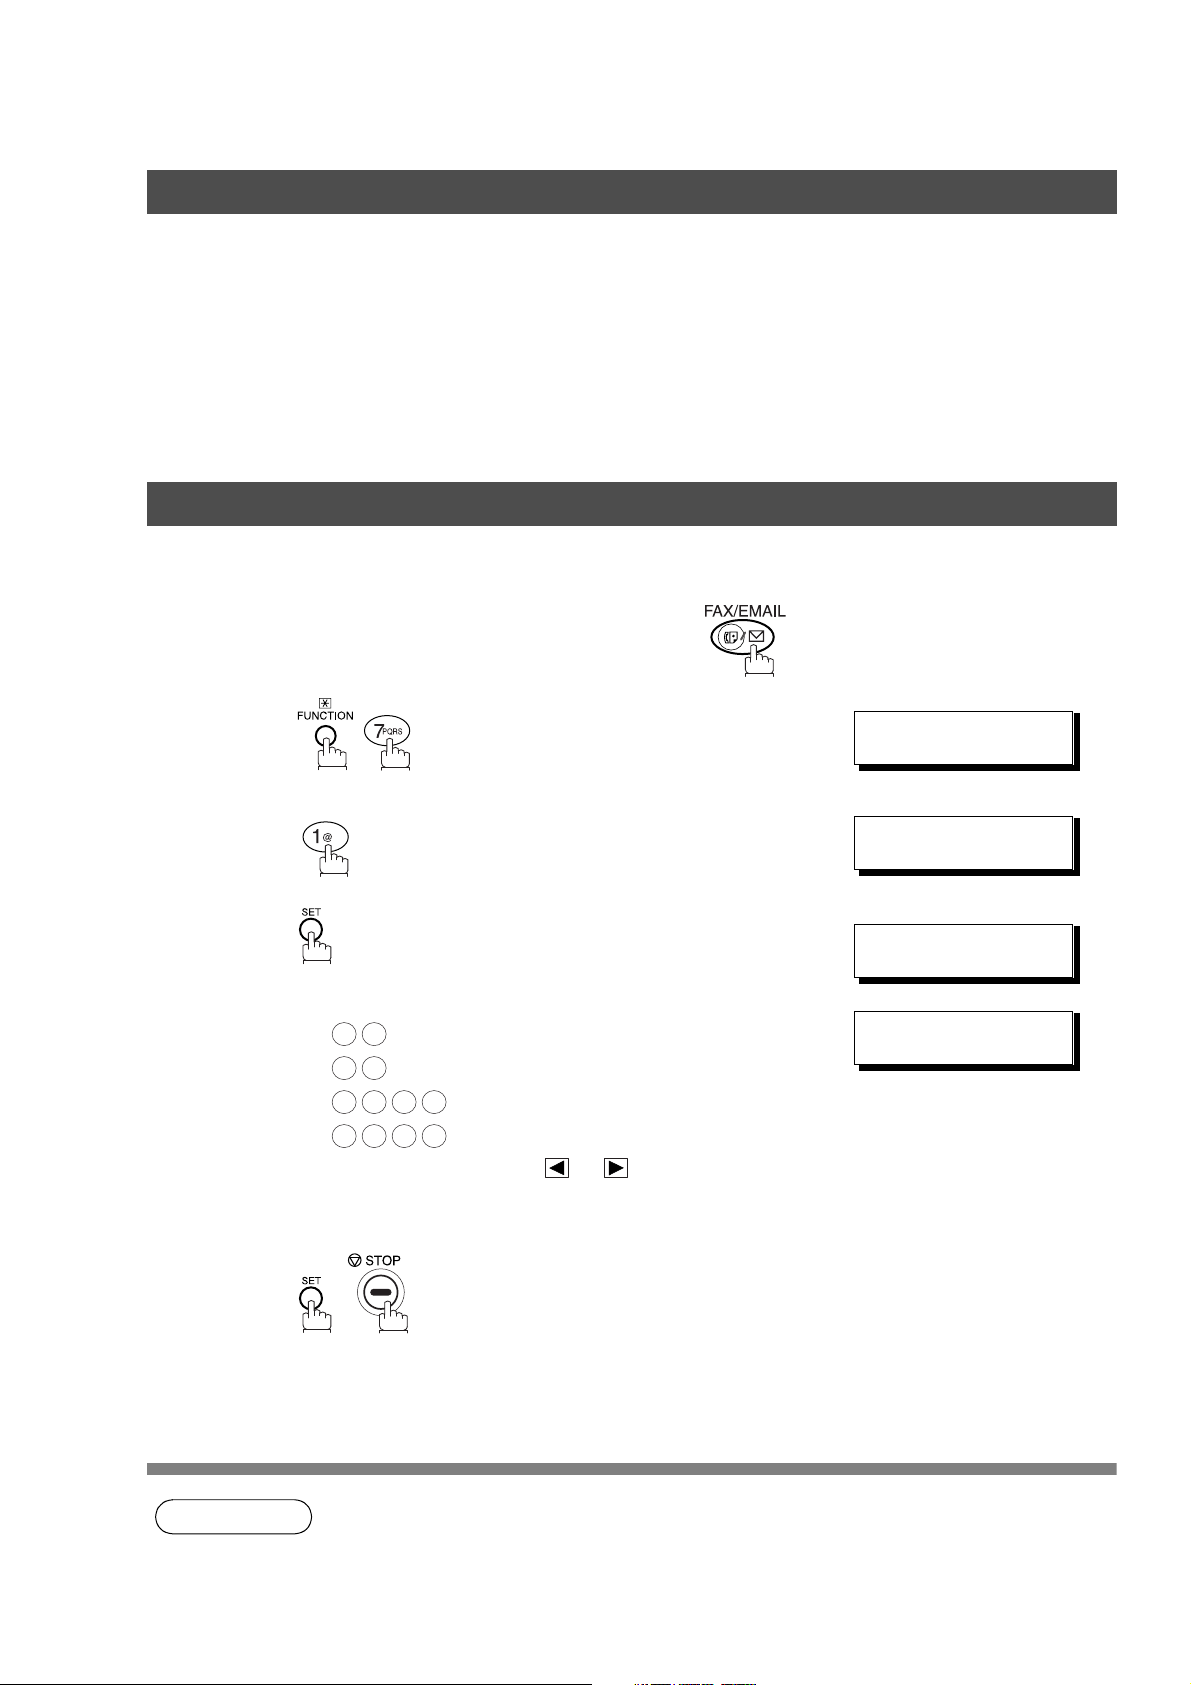
Setting the Dialing Method (Tone or Pulse)
General Description
Your machine can operate with either of two dialing methods (Tone or Pulse), depending on the type of
telephone line you are connected to. If you need to change the dialing method to Tone or Pulse, follow the
procedure below.
Make sure that the FAX/EMAIL lamp is ON. If not, press to select the "FAX/EMAIL MODE".
1
2
3
4
5
Set the dialing method for the Telephone Line.
.
for “PULSE“.
or
for ”TONE”.
SET MODE (1-4)
ENTER NO. OR
FAX PARAMETER(1-99)
06 DIALING METHOD
2:TONE
06 DIALING METHOD
1:PULSE
06 DIALING METHOD
2:TONE
06 DIALING METHOD
2:TONE
NO.=
or
∨∧
❚
14
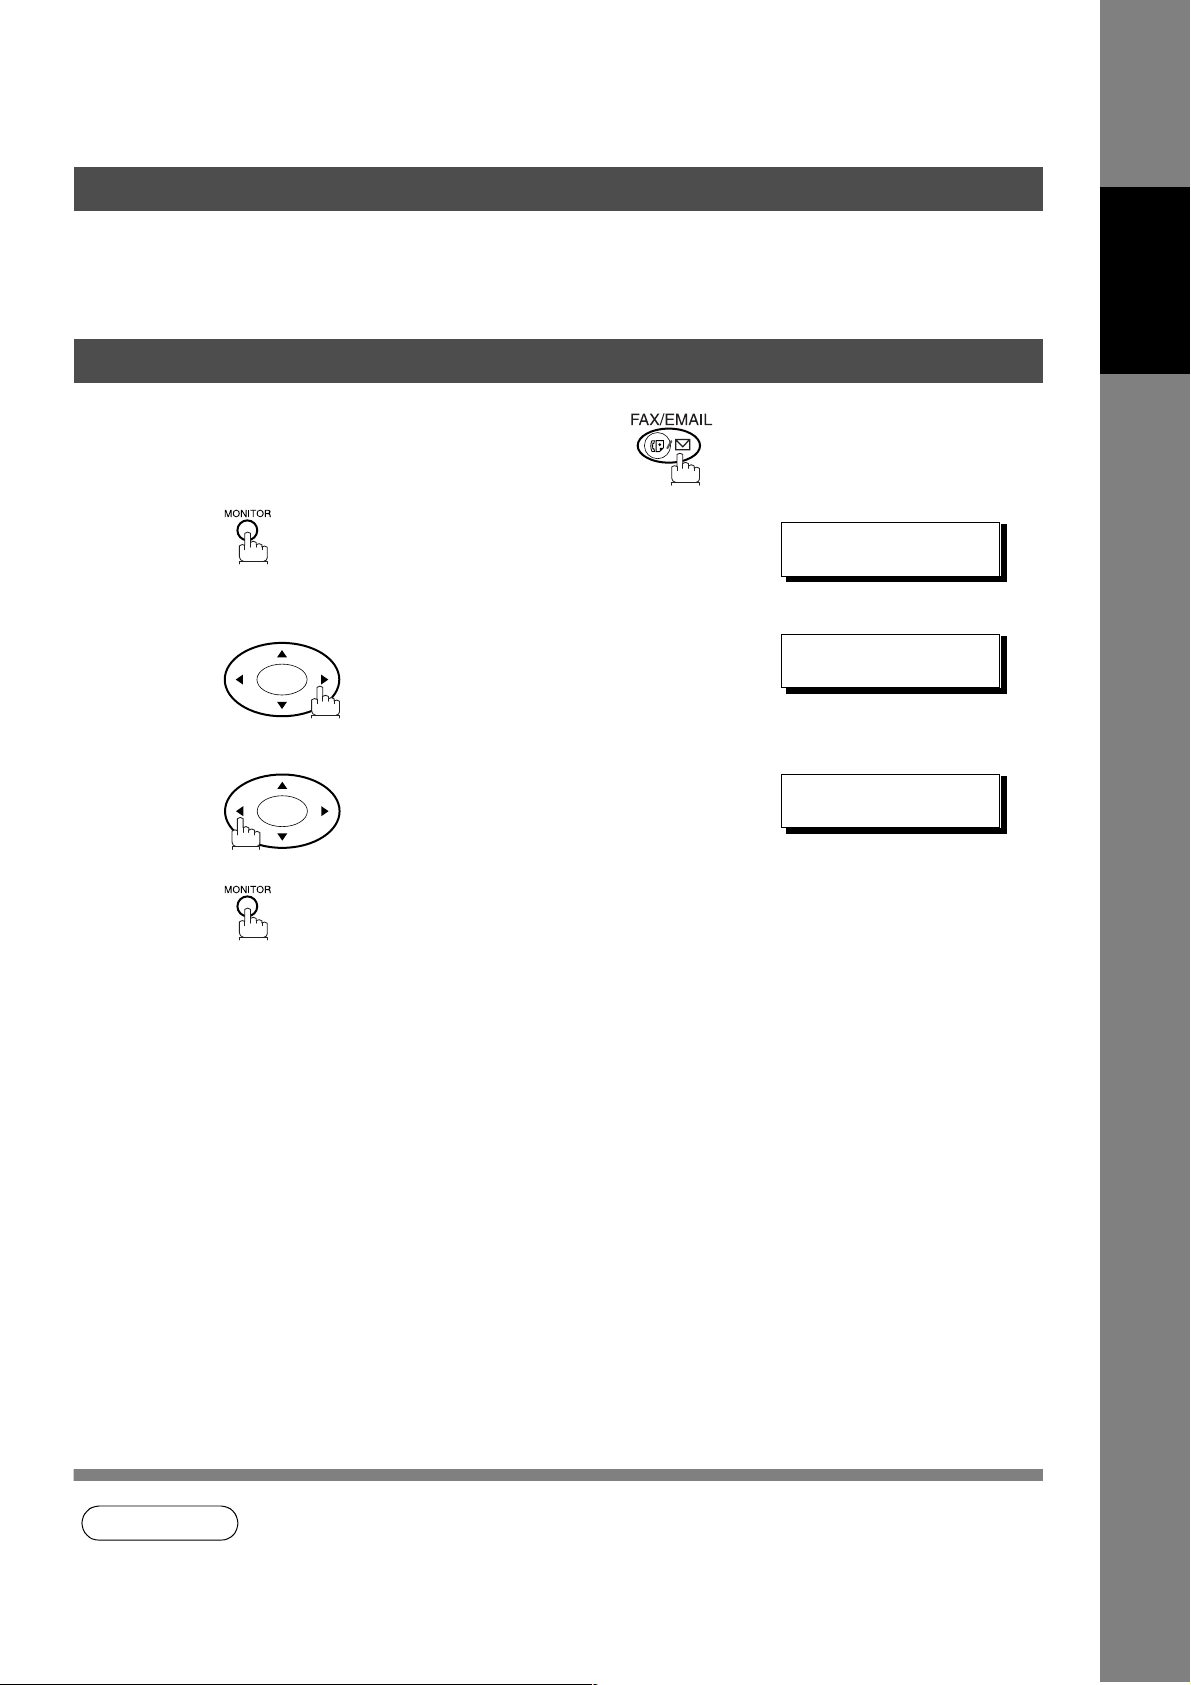
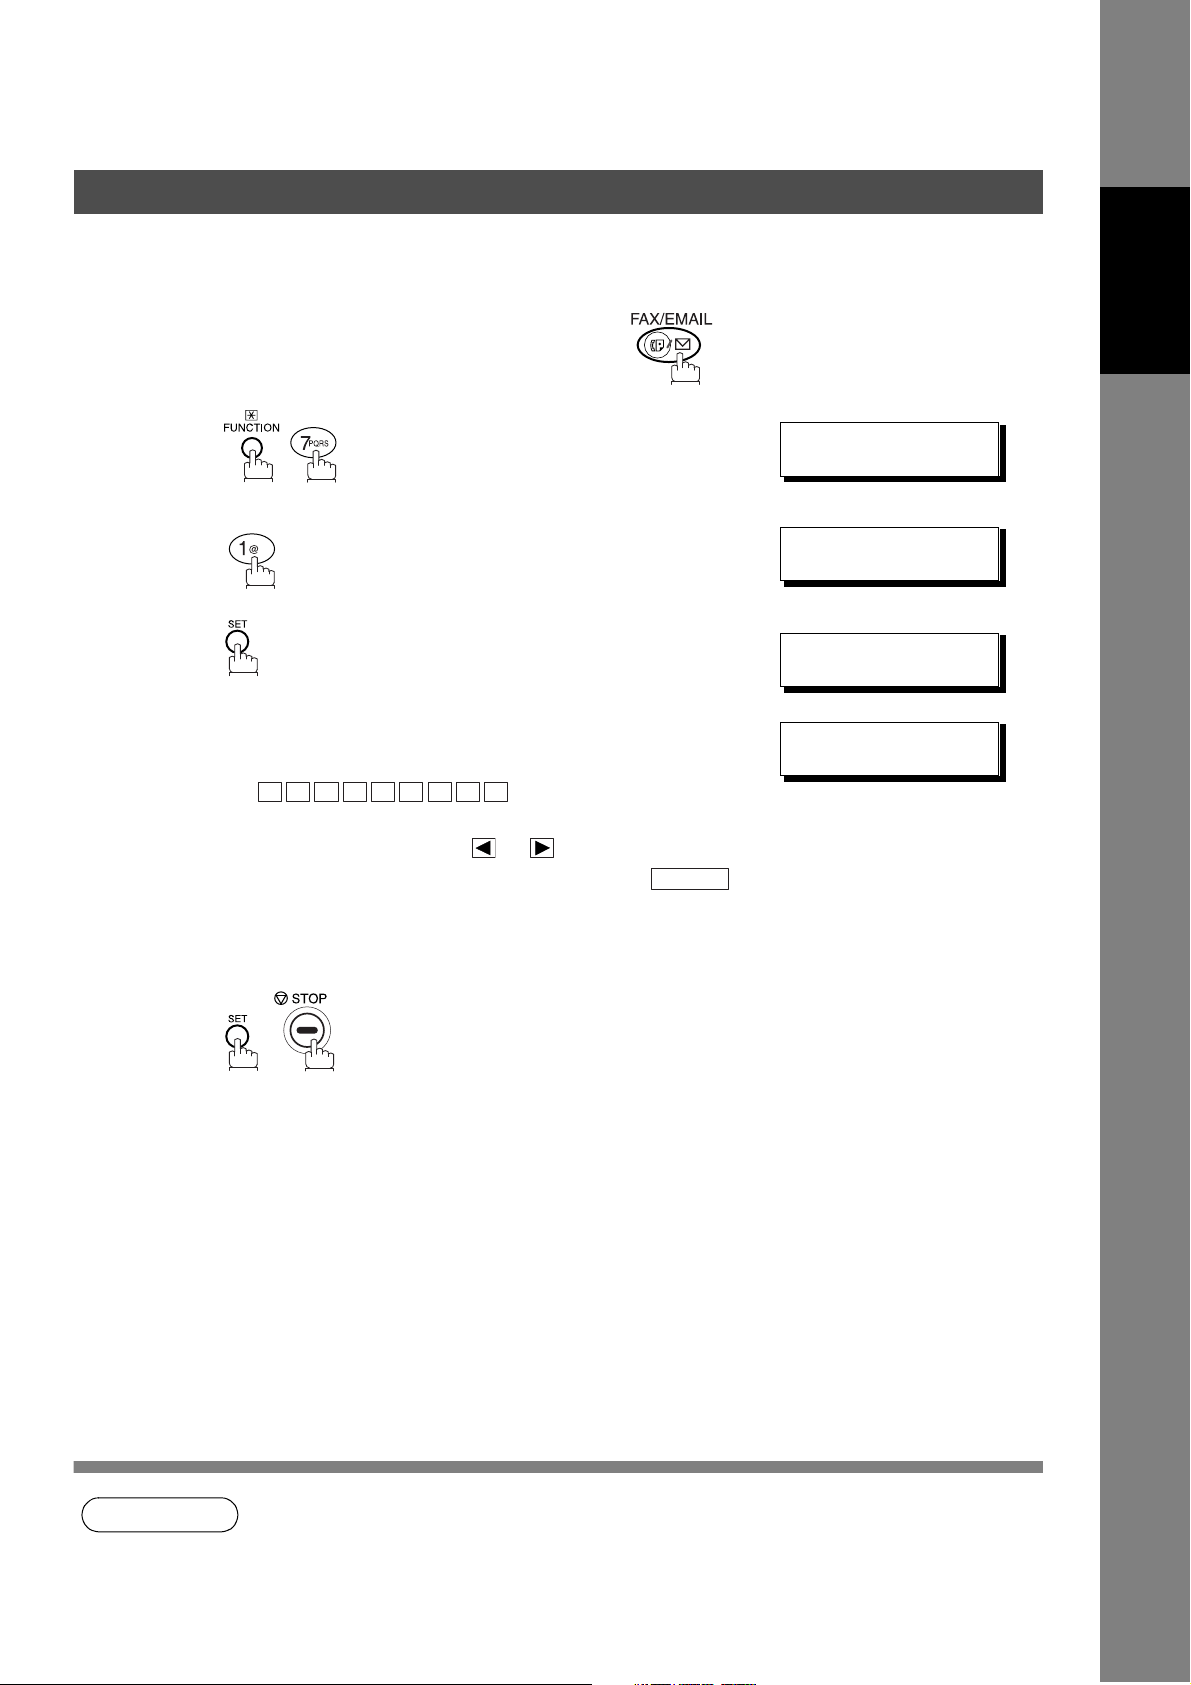
Adjusting the Volume
General Description
You can adjust the monitor and ringer volume on your machine. The built-in speaker enables you to hear the
dial tone, dialing signals, and busy tone. The ringer sounds when your machine receives a call.
Setting the Monitor Volume
Make sure that the FAX/EMAIL lamp is ON. If not, press to select the "FAX/EMAIL MODE".
Machine
Installing Your
1
2
3
You will hear the dial tone through the speaker.
repeatedly to raise the volume.
or
repeatedly to lower the volume.
* MONITOR *
❚
MONITOR VOLUME
❚❚❚❚❚❚❚❚
LOW [
MONITOR VOLUME
LOW [
]HIGH
]HIGH
NOTE
1. You can also adjust the volume of the key touch tone and the volume of the buzzer in the Fax
Parameter No. 10 (KEY/BUZZER VOLUME). (See page 29)
15
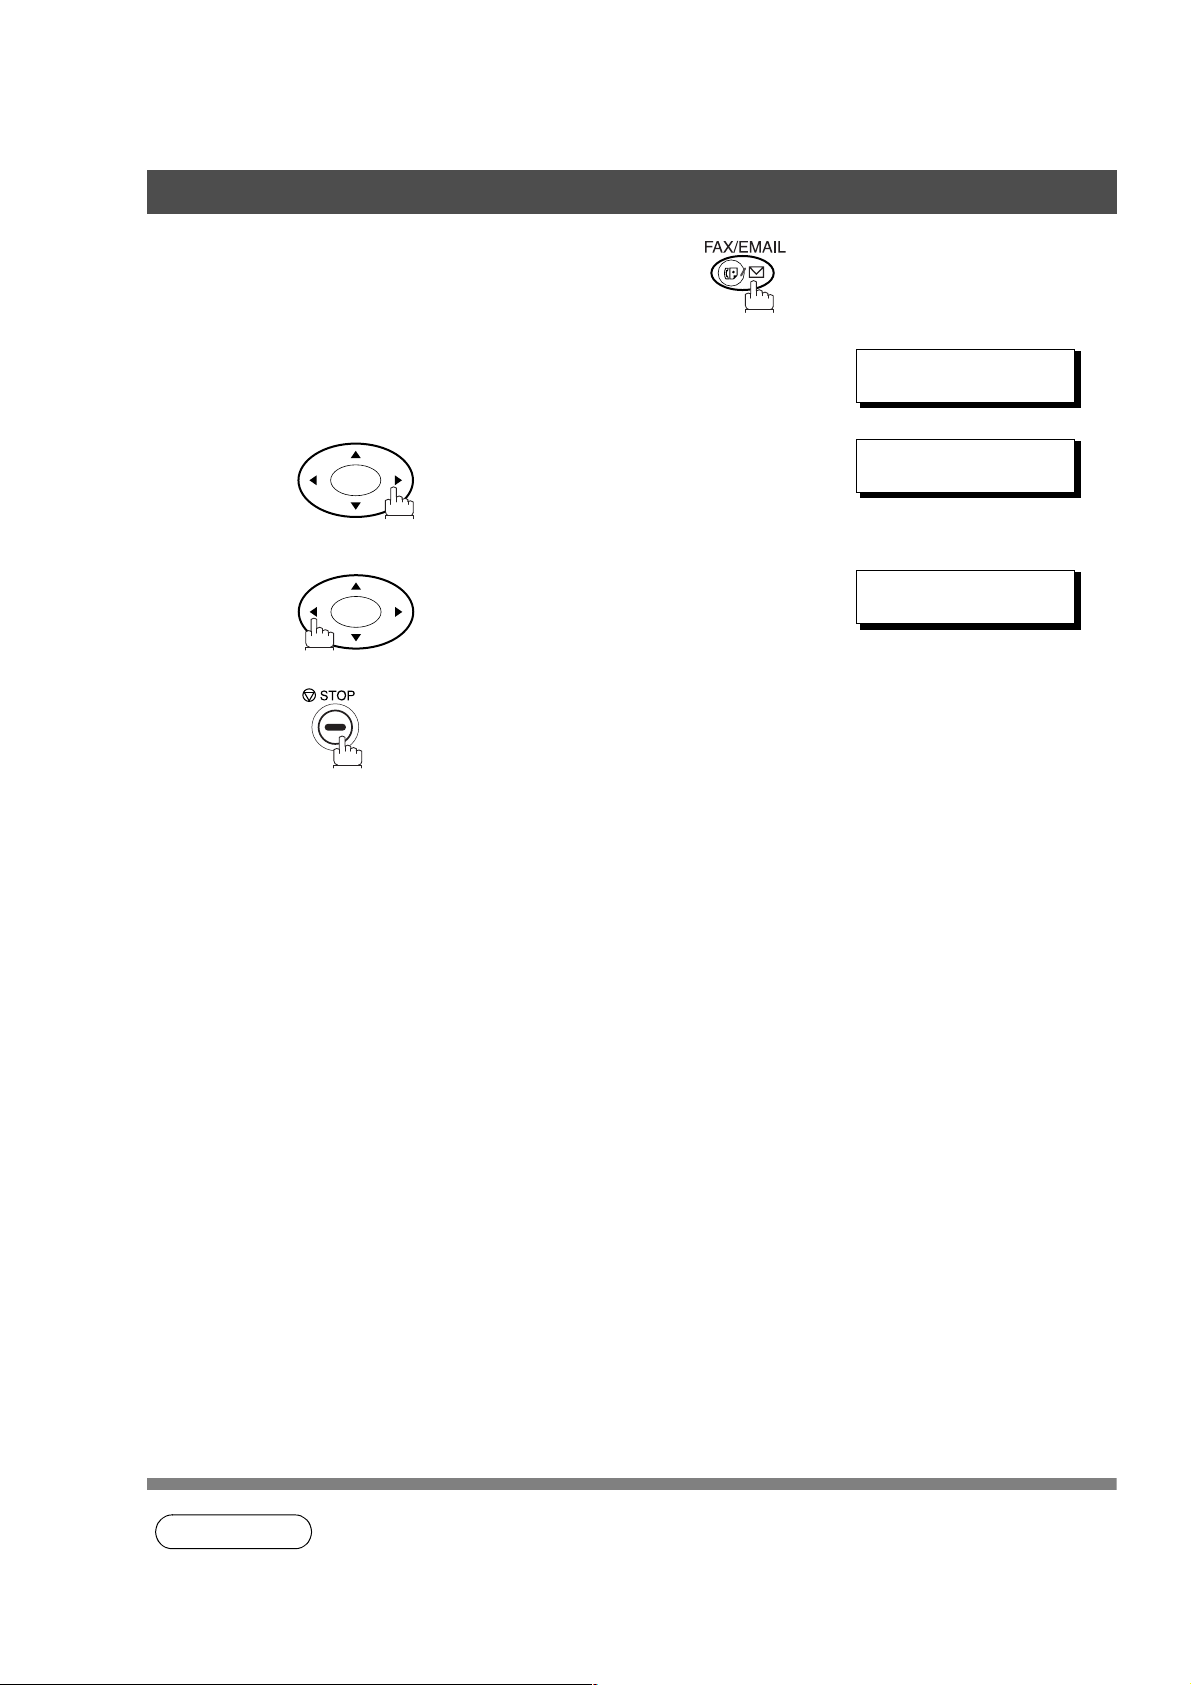
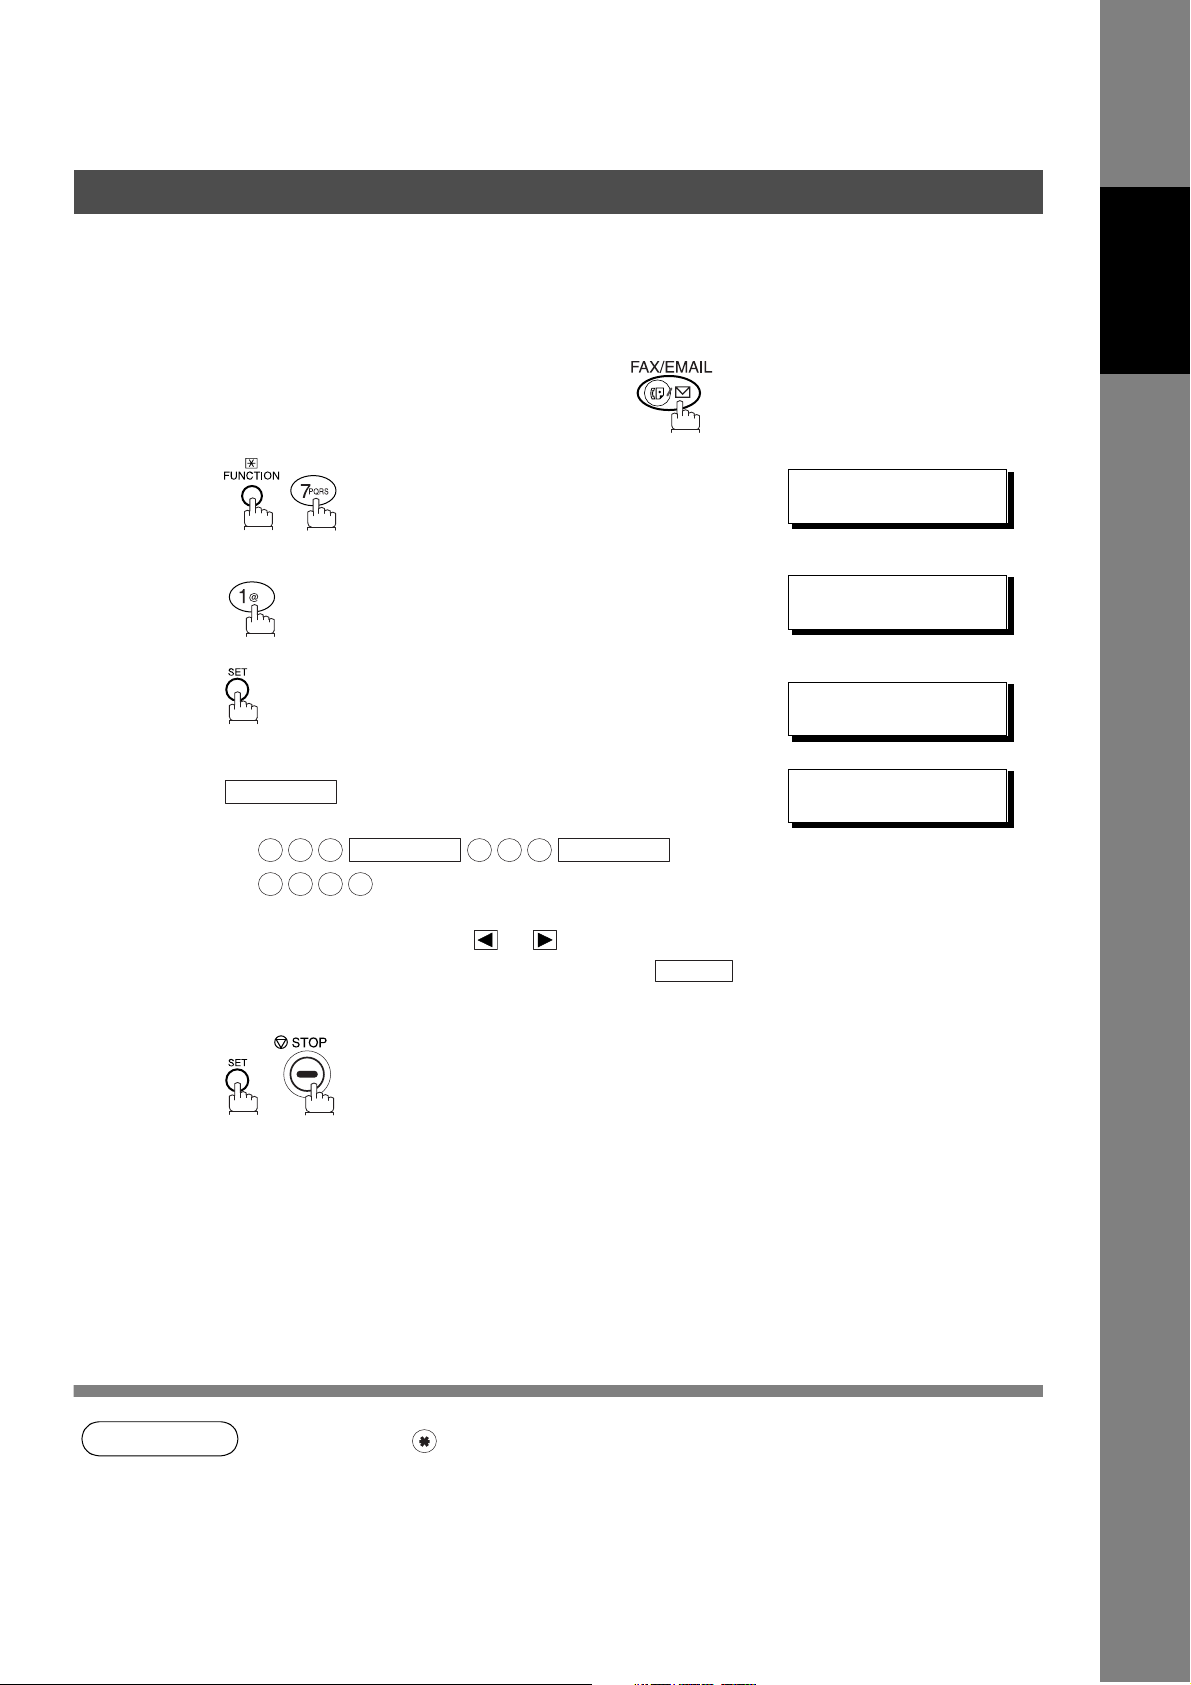
Adjusting the Volume
Setting the Ringer Volume
Make sure that the FAX/EMAIL lamp is ON. If not, press to select the "FAX/EMAIL MODE".
Standby
1
MAR-15-2002 15:00
00%
2
3
or
repeatedly to raise the volume.
repeatedly to lower the volume.
RINGER VOLUME
((((☎ ))))
RINGER VOLUME
((
))
☎
16
NOTE
1. You can also adjust the volume of the key touch tone and the volume of the buzzer in the Fax
Parameter No. 10 (KEY/BUZZER VOLUME). (See page 29)
User Parameters
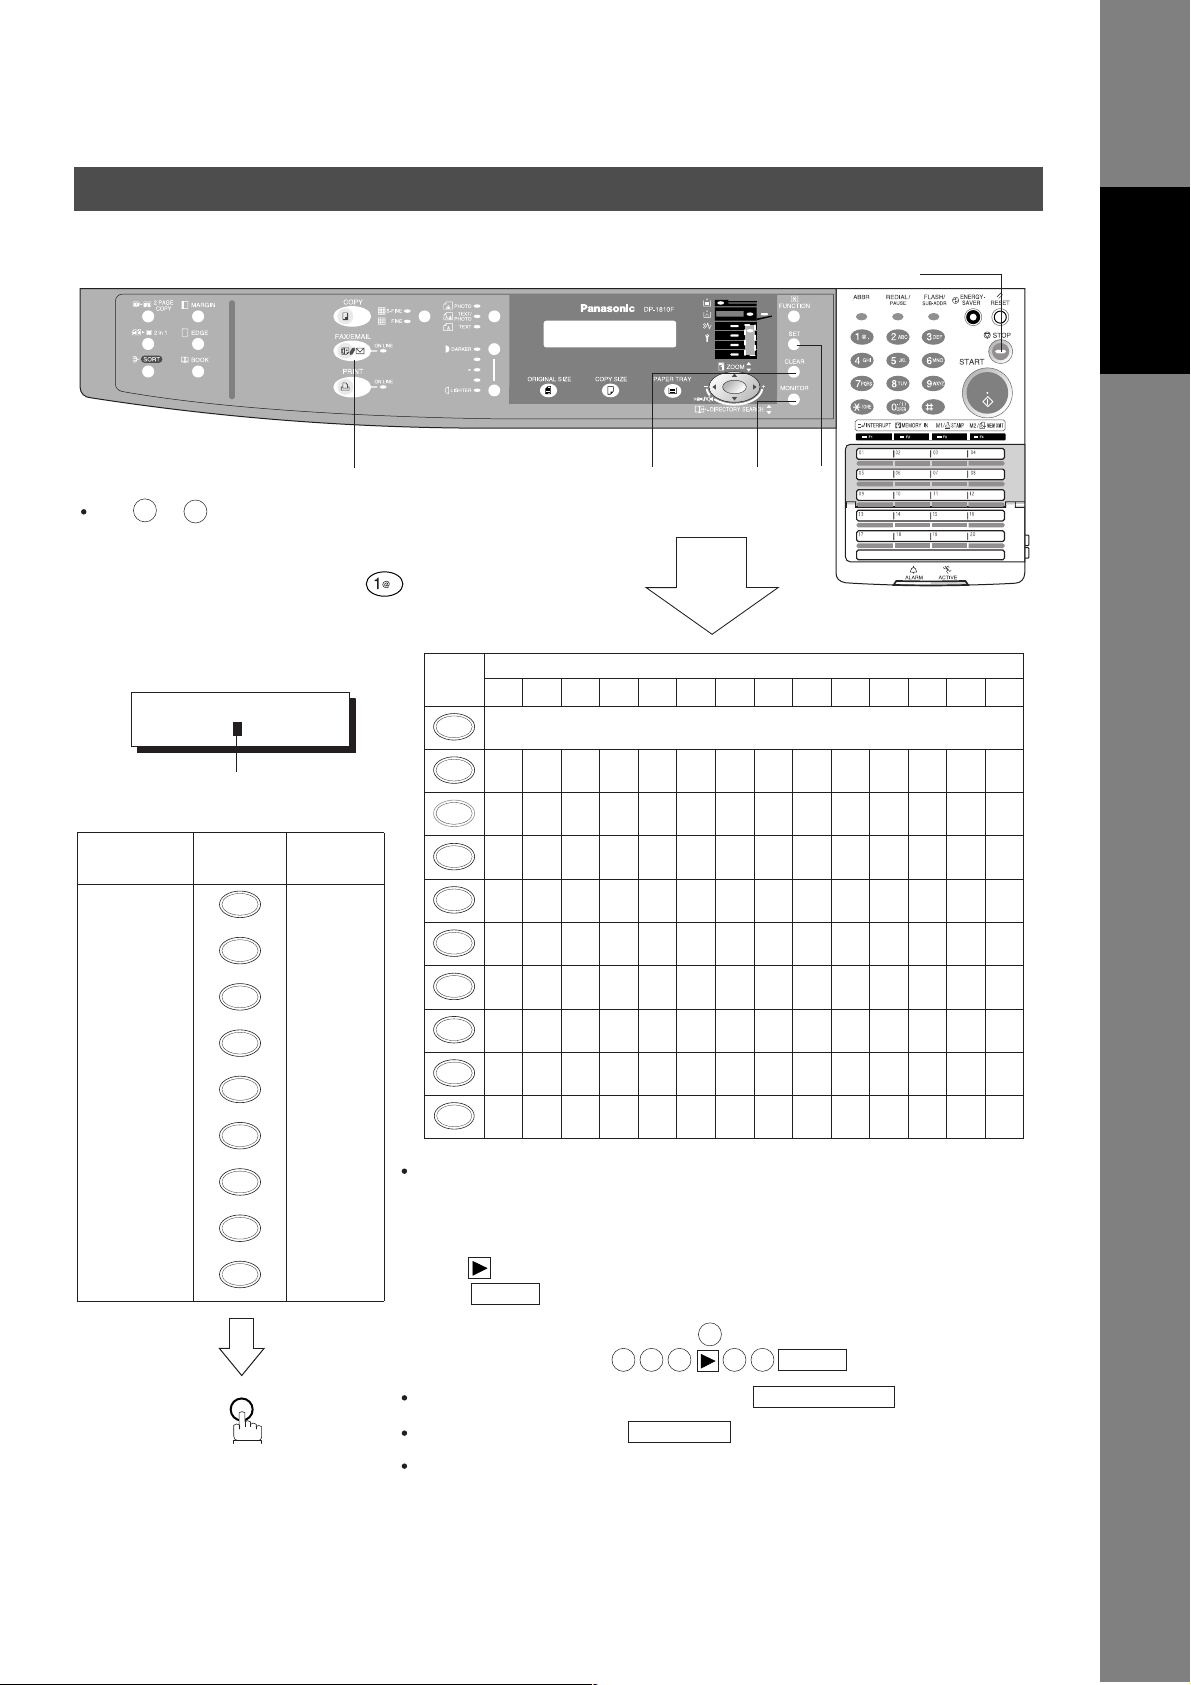
How To Enter Characters
To enter characters, numbers or symbols follow the steps below.
STOP
Machine
Installing Your
FAX/EMAIL
9
0
Use to on the keypad to enter
characters and symbols. The keypad
assignment for the characters and
symbols is shown below. The " "
key is also used to enter a period "."
during email or IP address input.
Ex: LOGO
LOGO
Panasonic
Cursor
To enter "Panasonic"
Character Keypad
P
a
n
a
s
o
7
2
6
2
7
6
Key
Strokes
6
1
2
1
4
3
CLEAR
.
SETMONITOR
Characters and number of key strokes
1234567891011121314
1
@. (Å å Ä ä Ö ö Ü ü È è É é Æ æ Ñ) 1
2
ab c2ABC
3
4
5
6
7
8
9
-/()
0
e
df3DEF
h
gi4GHI
k
jl5JKL
n
mo6MNO
q
prs7PQRS
u
tv8TUV
x
wyz9WXYZ
-/()
_ (, ) ’ : & + = 0
Select and continue pressing the appropriate key on the keypad until
n
i
6
4
2
3
the desired Character / Symbol is displayed, then select another key
on the keypad to enter the next Characters / Symbols. If the next
Character / Symbol that you wish to enter falls on the same key,
c
2
SET
3
press , to set the first Character / Symbol first before continuing.
Press to complete the registration.
Ex: To input an "o" and "n", the key is used for both Characters.
Enter as follows:
To delete a Character / Symbol, press
To enter a space, press
SET
6
6 6 6 6 6
MONITOR
SET
CLEAR/STOP
(Bracket characters) are not indicated when entering the email address.
17
User Parameters
General Description
Your machine has several basic settings (User Parameters) to help you keep records of the documents you
send or receive. For example, the built-in clock keeps the current date and time, and your LOGO and ID
Number help to identify you when you send or receive documents.
These parameters can be programmed via your PC by using the Configuration Editor included with the
Panasonic Document Management System software CD-ROM (included with the machine).
Follow the Operating Instructions included with the Panasonic Document Management System application.
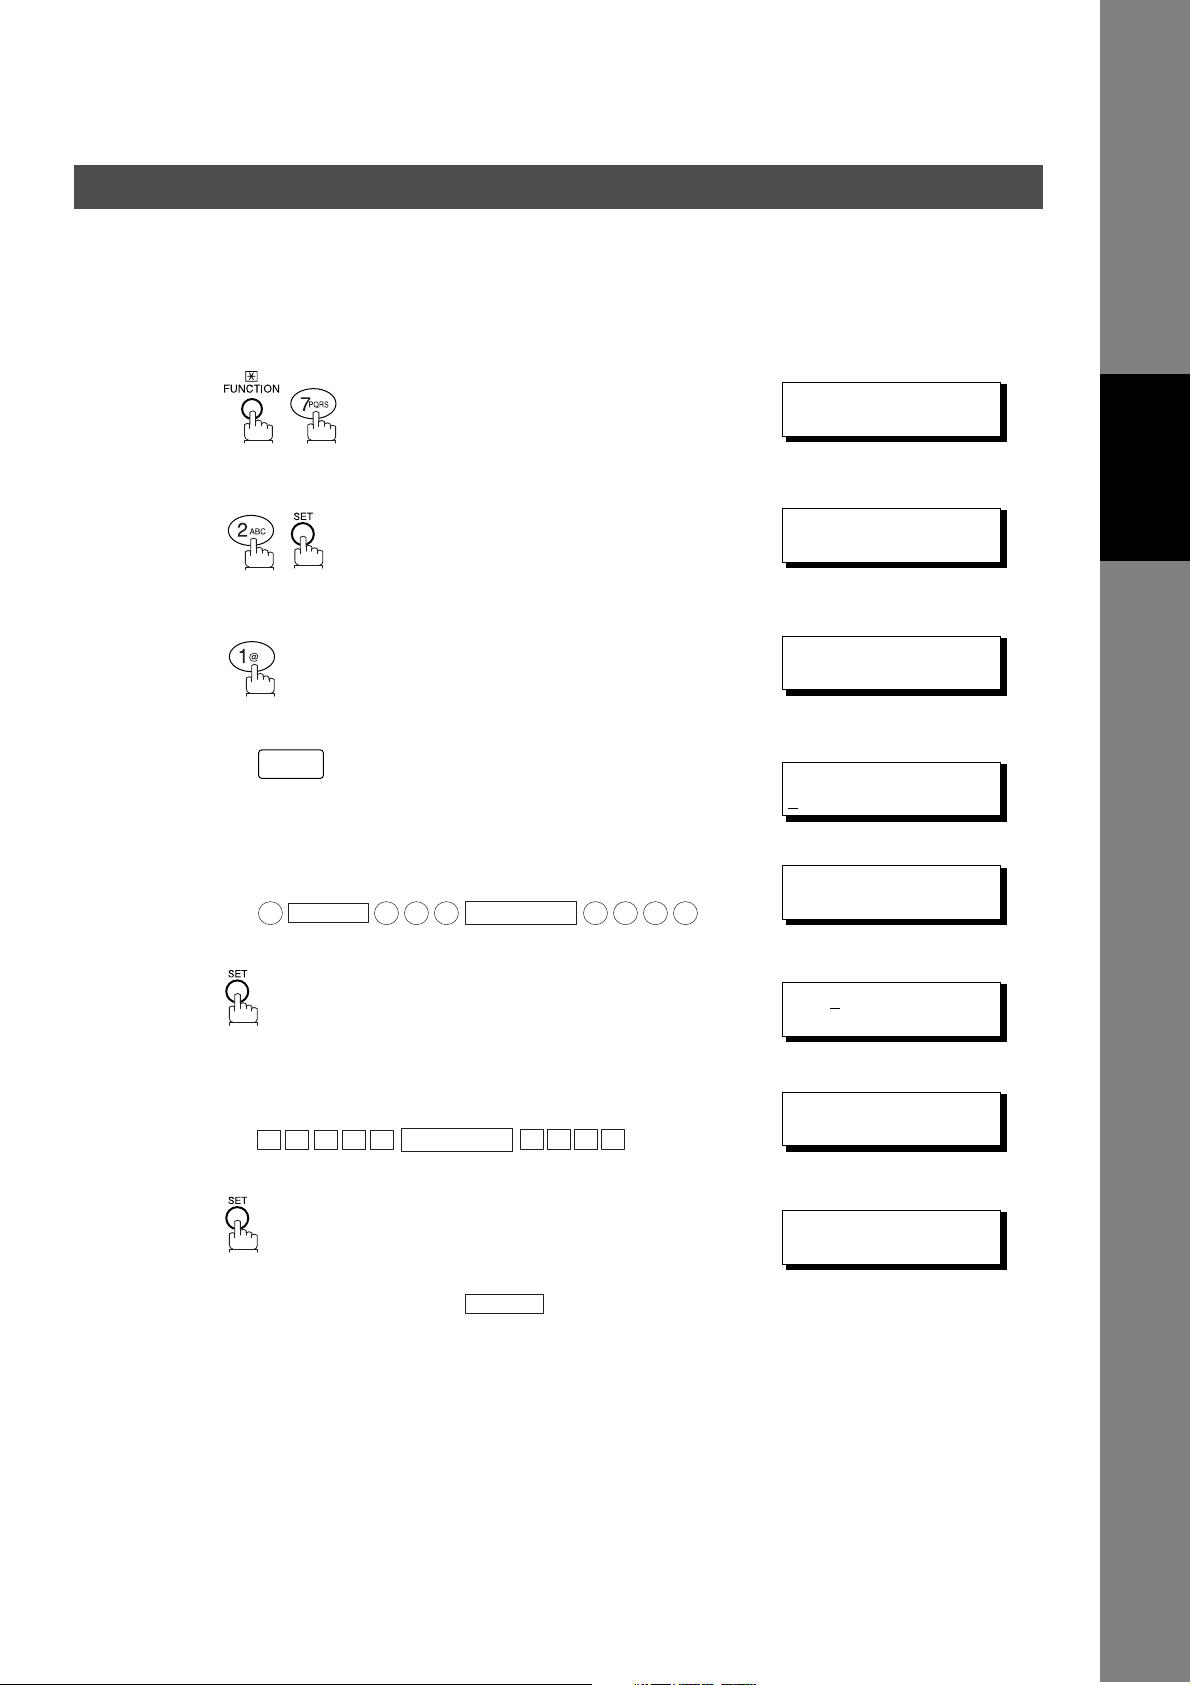
Setting the Date and Time
At standby the display will show the date and time. Once the standby display is set, it will automatically be
updated.
Make sure that the FAX/EMAIL lamp is ON. If not, press to select the "FAX/EMAIL MODE".
1
2
3
4
5
.
Enter the new date and time.
Ex: Month : March
0
3
Date : 15th
1 5
Year : 2002
2 0 0
1 5 0 0
If you make a mistake, use or to move the cursor
over the incorrect number, then overwrite it with a correct
one.
2
Time : 3:00 PM
SET MODE (1-4)
ENTER NO. OR
1:USER PARAMETERS?
PRESS SET TO SELECT
DATE & TIME
❚1-01-2001 00:00
DATE & TIME
3-15-2002 15:00
∨∧
18
NOTE
1. The current Date & Time must be set because it is required by the Telephone Consumer Act of
1991. (For details, see FCC NOTICE at the end of these Operating Instructions)
User Parameters
Setting Your LOGO
When you send a document, your LOGO appears on the top of the copy printed out at the other station.
The LOGO helps to identify you to someone who receives your transmission.
Make sure that the FAX/EMAIL lamp is ON. If not, press to select the "FAX/EMAIL MODE".
Machine
Installing Your
1
2
3
4
.
repeatedly until display shows;
Enter your LOGO (max. 25 characters and digits) by using
the Keypad. (See page 17)
Ex:
If you make a mistake, use or to move the cursor
one space beyond the incorrect character, press
then re-enter the new character.
If more than 19 characters are entered, the left side
characters will scroll off the display.
A N A S O N I C
P
CLEAR
SET MODE (1-4)
ENTER NO. OR
1:USER PARAMETERS?
PRESS SET TO SELECT
LOGO
❚
LOGO
PANASONIC
∨∧
❚
5
NOTE
1. Your Company Name or your name must be set because it is required by the Telephone
Consumer Act of 1991. (For details, see FCC NOTICE at the end of these Operating
Instructions)
19

User Parameters
Setting Your Character ID
If the remote machine has a Character ID capabilities, when you are sending or receiving, your Character ID
will appear on the remote machine's display and the remote machine's Character ID will appear on your
display.
Make sure that the FAX/EMAIL lamp is ON. If not, press to select the "FAX/EMAIL MODE".
1
2
3
4
5
.
repeatedly until display shows;
Enter your Character ID (max. 16 characters and digits)
by using the Keypad. (See page 17)
Ex:
If you make a mistake, use or to move the cursor
one space beyond the incorrect character, press
then re-enter the new character.
E A D MONITOR O F F I C E
H
CLEAR
SET MODE (1-4)
ENTER NO. OR
1:USER PARAMETERS?
PRESS SET TO SELECT
CHARACTER ID
❚
CHARACTER ID
HEAD OFFICE
∨∧
❚
NOTE
1. The special characters of Å, Ä, Ö, Ü, Æ, È, É and Ñ cannot be used for Character ID.
20
User Parameters
Setting Your ID Number (Fax Telephone Number)
If the remote machine does not have a Character ID but it has an ID Number, when sending or receiving,
your ID Number will appear on the remote machine's display and their ID Number will appear on your
display.
We suggest you use your facsimile telephone number as your ID number. (Max. 20 digits)
Make sure that the FAX/EMAIL lamp is ON. If not, press to select the "FAX/EMAIL MODE".
Machine
Installing Your
1
2
3
4
.
repeatedly until display shows;
Enter your ID (max. 20 digits) by using the keypad and
MONITOR
Ex:
2 0 1
1 2 1 2
If you make a mistake, use or to move the cursor
one space beyond the incorrect number, press
then re-enter the new number.
key to enter a space between numbers.
MONITOR
5 5 5
MONITOR
CLEAR
SET MODE (1-4)
ENTER NO. OR
1:USER PARAMETERS?
PRESS SET TO SELECT
ID NO.
❚
ID NO.
201 555 1212
∨∧
❚
5
NOTE
1. You may use to enter a "+" character at the beginning of the ID number to indicate the
following digit(s) for your country code.
Ex :+1 201 555 1212 +1 for U.S.A. country code.
+81 3 111 2345 +81 for Japan country code.
2. Your Fax Telephone Number must be set as your ID Number because it is required by the
Telephone Consumer Act of 1991. (For details, see FCC NOTICE at the end of these
Operating Instructions)
21

memo
22
Programming Your Machine
One-Touch/Abbreviated Dialing Numbers
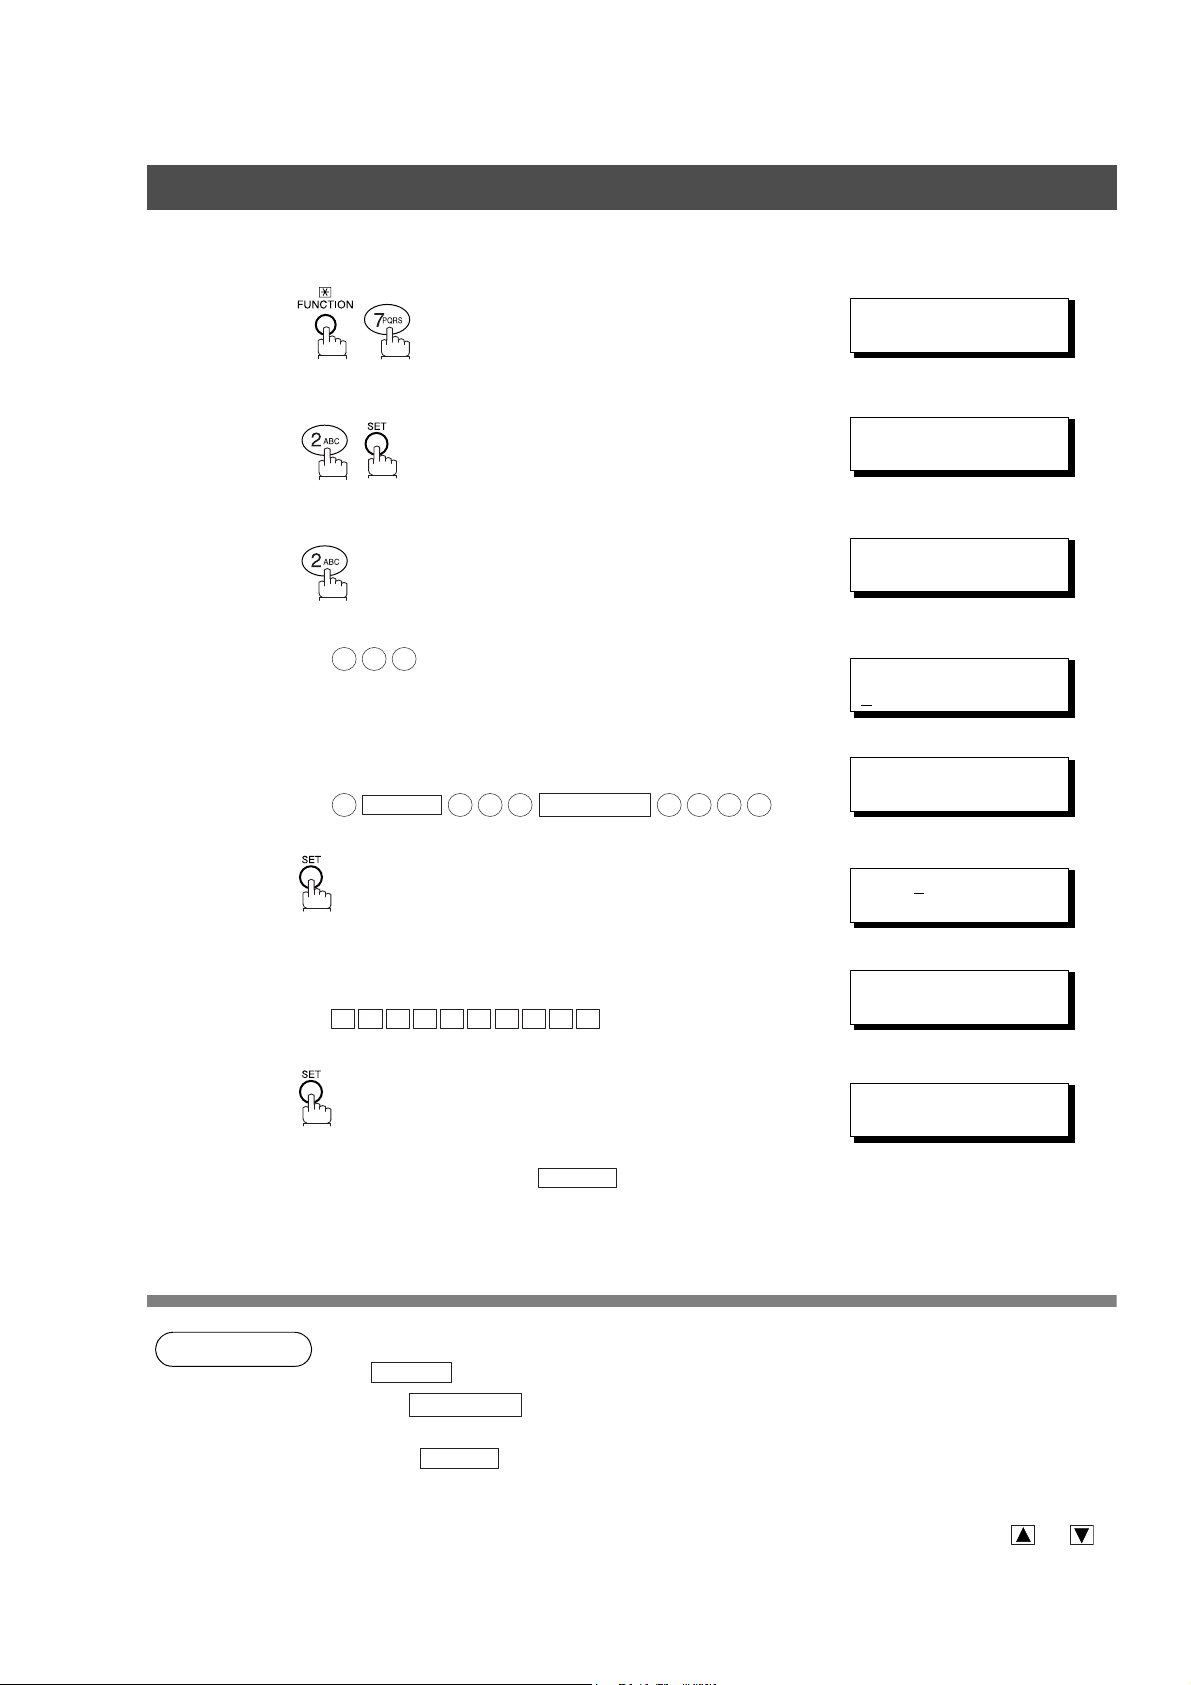
Entering One-Touch/Abbreviated Dialing Numbers
One-Touch and Abbreviated Dialing are two fast ways of dialing full telephone numbers. To use these
dialing methods, you must first store the telephone number using the following procedure or use the
Configuration Editor included with the Panasonic Document Management System application.
To enter a One-Touch key, follow the steps below
1
2
3
4
5
.
Ex:
01
Enter the telephone number
(up to 36 digits including pauses and spaces).
Ex:
9
PAUSE
5 5 5
MONITOR
1 2
SET MODE (1-4)
ENTER NO. OR
1:ONE-TOUCH
2:ABBR NO.
ONE-TOUCH< >
PRESS ONE-TCH OR
<01>
NTER TEL. NO.
E
<01>
4
3
9-555 1234
∨∧
Programming
Your Machine
∨ ∧
❚
6
7
8
Enter the station name using the Keypad
(up to 15 characters).
Ex:
To record another number, repeat Steps 4 to 10.
To return to standby, press .
A L E S
S
MONITOR
STOP
E P TD
<01>ENTER NAME
9-555 1234
<01> SALES DEPT
9-555 1234
ONE-TOUCH< >
PRESS ONE-TCH OR
❚
∨ ∧
23
One-Touch/Abbreviated Dialing Numbers
Entering One-Touch/Abbreviated Dialing Numbers
To set an Abbreviated Dialing Number, follow the steps below
1
2
3
4
5
6
Ex: (001 to 100)
0 2 2
Enter the telephone number
(up to 36 digits including pauses and spaces).
Ex:
9
PAUSE
5 5 5
MONITOR
2
SET MODE (1-4)
ENTER NO. OR
1:ONE-TOUCH
2:ABBR NO.
ABBR.[❚]
ENTER ABBR NO.
[022]
NTER TEL. NO.
E
[022]
4 5
3
9-555 2345
[022]ENTER NAME
9-555 2345
∨∧
❚
7
8
NOTE
Enter the station name using the Keypad
(up to 15 characters).
A C C O U N T I N G
Ex:
To record another number, repeat Steps 4 to 10.
To return to standby, press .
1. If you require a special access number to get an outside line, enter it first and then press
PAUSE
2. Use to enter a space between the numbers to make it easier to read.
3. If you are using Pulse dialing and you wish to change to Tone dialing in the middle of dialing,
press (represented by a"/"). The dialing method will be changed from Pulse to Tone
after dialing the digit "/".
Ex: 9 PAUSE TONE 5551234
4. You can search for an unused One-Touch key or ABBR. number by pressing or in
Steps 3 or 4.
. A hyphen "-" is displayed for pause.
MONITOR
TONE
STOP
[022]ACCOUNTING
9-555 2345
ABBR.[❚]
ENTER ABBR NO.
❚
24

One-Touch/Abbreviated Dialing Numbers
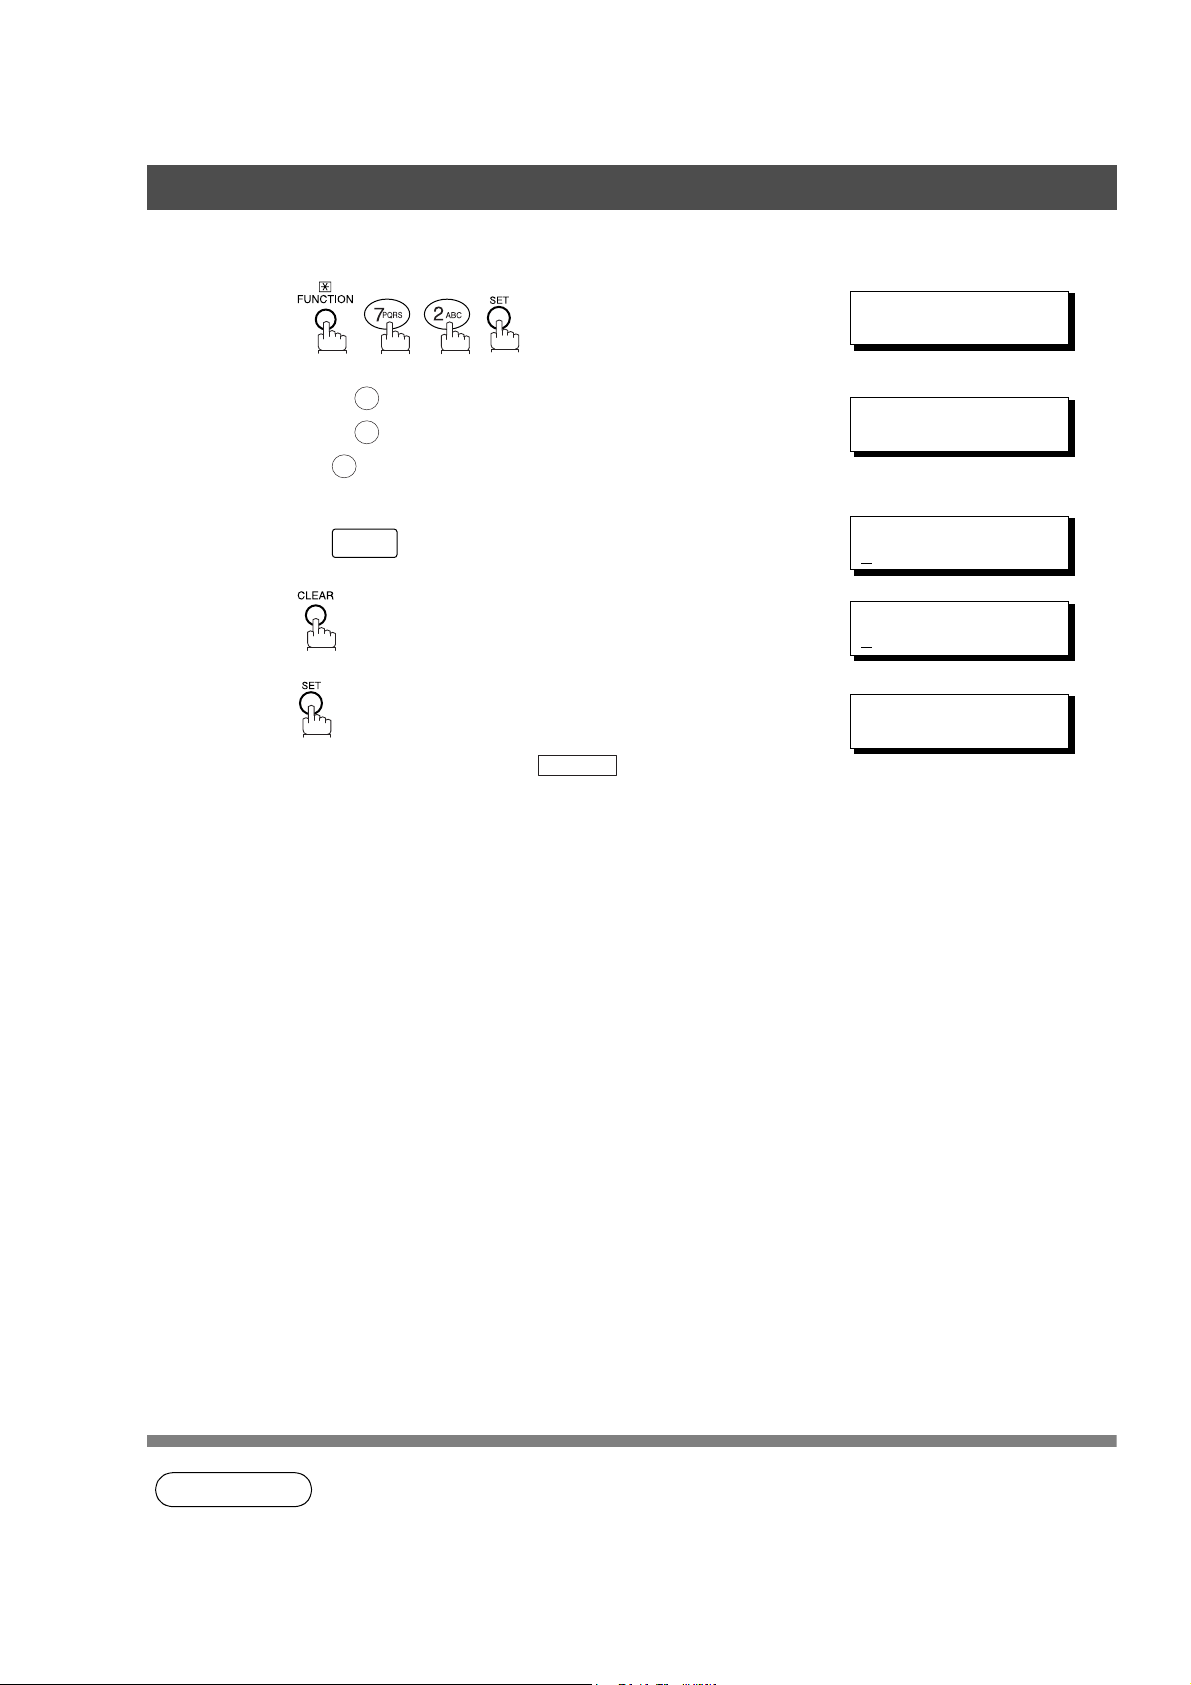
Changing or Erasing One-Touch/Abbreviated Dialing Numbers
If you have to change or erase any of the One-Touch/Abbreviated dialing numbers, follow the steps below or
use the Configuration Editor included with the Panasonic Document Management System application.
To change the settings of a One-Touch/ABBR dialing number
1
2
3
4
5
Press for One-Touch Dialing Number.
Press for ABBR. Dialing Number.
Ex:
Ex:
then enter a new telephone number. (See Note 1)
Ex:
1
01
9
1
2
PAUSE
5 5 5
MONITOR
4 5
3
1:ONE-TOUCH
2:ABBR NO.
ONE-TOUCH< >
PRESS ONE-TCH OR
<01> SALES DEPT
9-555 1234
<01> SALES DEPT
NTER TEL. NO.
E
6
<01> SALES DEPT
9-555 3456
<01>SALES DEPT
9-555 3456
❚
∨ ∧
Programming
Your Machine
6
7
NOTE
<01>ENTER NAME
9-555 3456
Ex:
P A N A F A X
<01> PANAFAX
9-555 3456
ONE-TOUCH< >
PRESS ONE-TCH OR
To record another number, repeat Steps 3 to 9.
To return to standby, press .
1. If you make a mistake, use or to move the cursor one space beyond the incorrect
number, press then re-enter the new number.
2. If the One-Touch/Abbreviated dialing number has been used for a communication reservation,
the settings cannot be changed or erased until the communication has finished.
To change or erase the settings, cancel the communication first by Edit File Mode. (See page
78)
STOP
CLEAR
❚
∨ ∧
25
One-Touch/Abbreviated Dialing Numbers
Changing or Erasing One-Touch/Abbreviated Dialing Numbers
To erase the settings of a One-Touch/ABBR dialing number
1
2
3
4
5
Press for One-Touch Dialing Number.
Press for ABBR. Dialing Number.
Ex:
Enter the station you wish to erase.
Ex:
To return to standby, press .
1
2
1
01
STOP
1:ONE-TOUCH
2:ABBR NO.
ONE-TOUCH< >
PRESS ONE-TCH OR
<01> SALES DEPT
9
-555 1234
<01> SALES DEPT
E
NTER TEL. NO.
ONE-TOUCH< >
PRESS ONE-TCH OR
∨ ∧
∨ ∧
26
NOTE
1. If the One-Touch/Abbreviated dialing number has been used for a communication reservation,
the settings cannot be changed or erased until the communication has finished.
To change or erase the settings, cancel the communication first by Edit File Mode. (See page
78)
One-Touch/Abbreviated Dialing Numbers
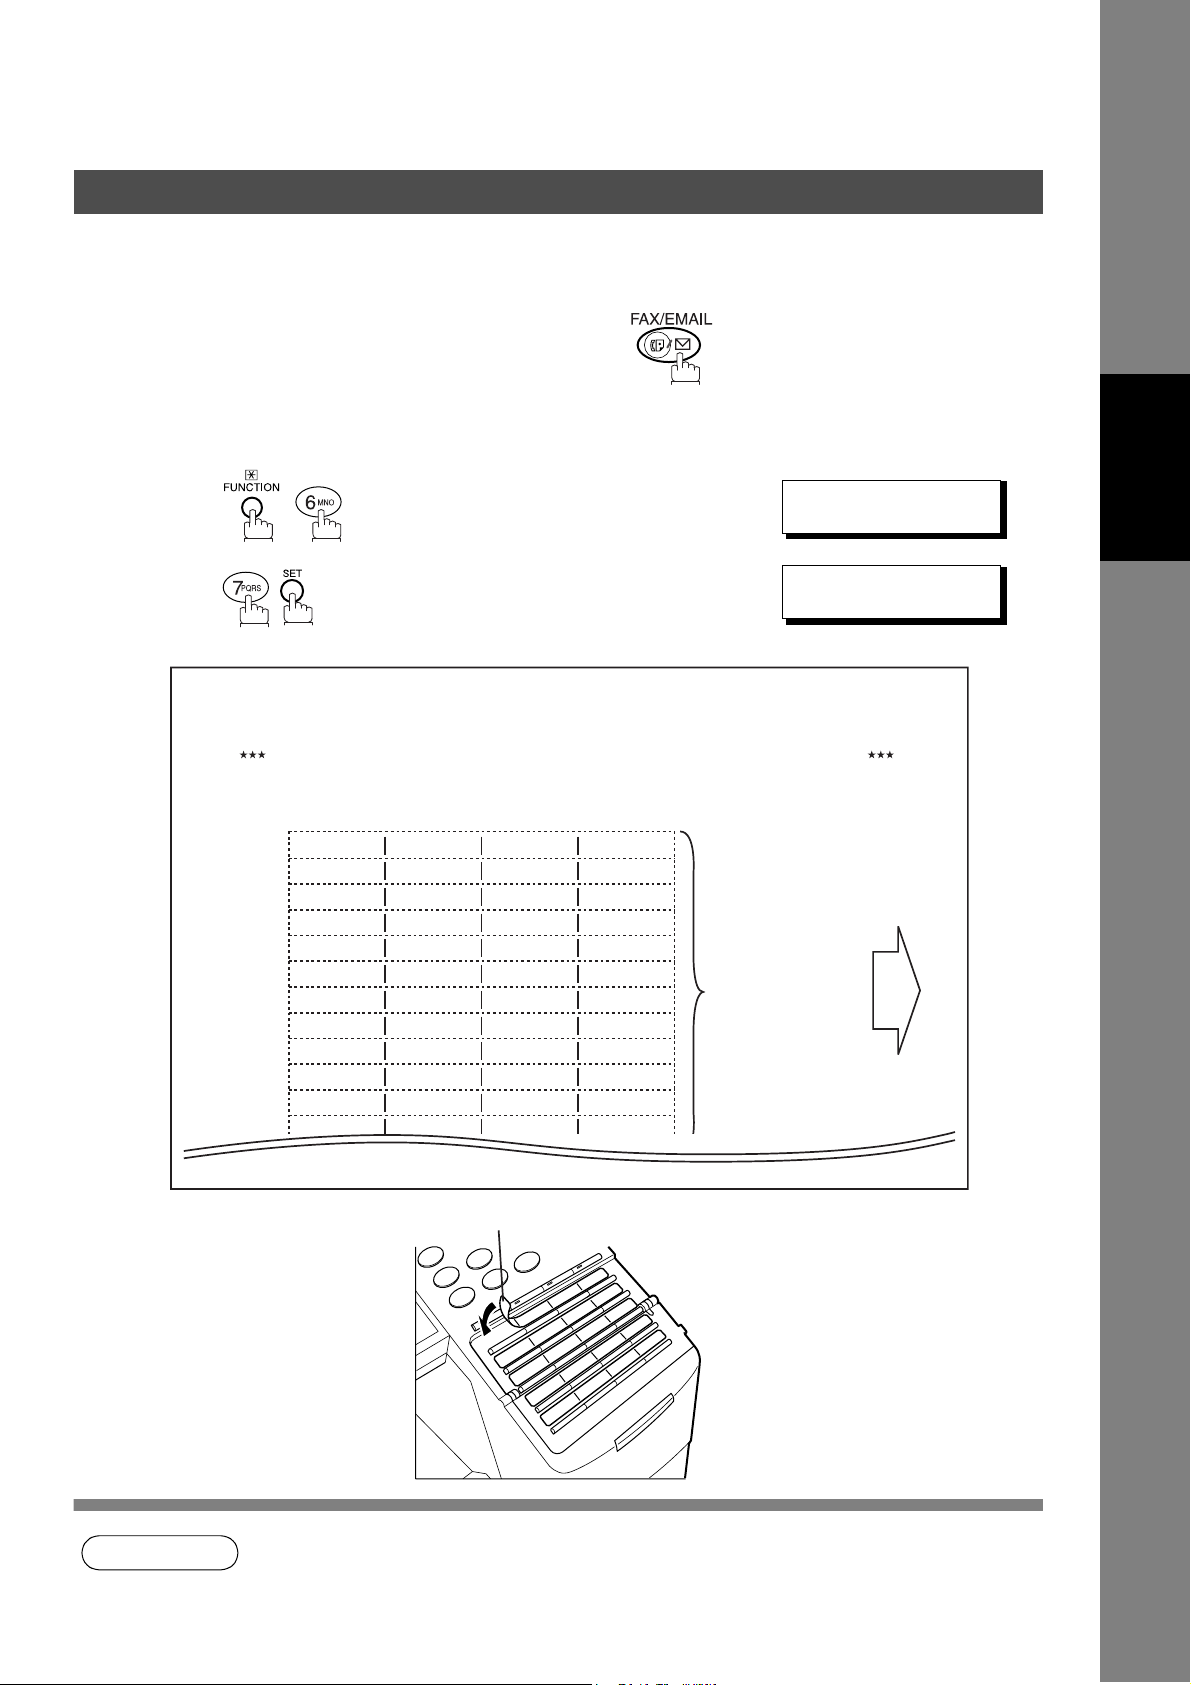
Printing Out Directory Labels
After programming the one-touch dialing numbers, you can print the Directory Labels which include the first
12 characters of each station name. Peel each printed label off the sheet and place it over its corresponding
One-Touch key on the panel. To print the Directory Labels, follow the steps below.
Make sure that the FAX/EMAIL lamp is ON. If not, press to select the "FAX/EMAIL MODE".
Insert the Directory Label sheet (FACE UP), into the
1
upper most drawer that is configured for Letter size paper
(PORTRAIT).
2
3
Your machine prints out the directory label.
Panasonic DP-1810F Directory Labels
Set this label sheet in the Letter size paper drawer, FACE UP
01 02 03 04
AMERICA AFRICA
05 06 07 08
CANADA JAPAN
09 10 11 12
13 14 15 16
17 18 19 20
21 22 23 24
25 26 27 28
29 30 31 32
33 34 35 36
37 38 39 40
41 42 43 44
45 46 47 48
ASIA BRASIL
The labels to the left will
be printed when feeding
in this direction.
PRINT OUT (1-7)
ENTER NO. OR
* PRINTING *
DIRECTORY LABEL
∨∧
Programming
Your Machine
NOTE
Directory Label
1. If attaching a new Directory Label, please remove the old one first.
27
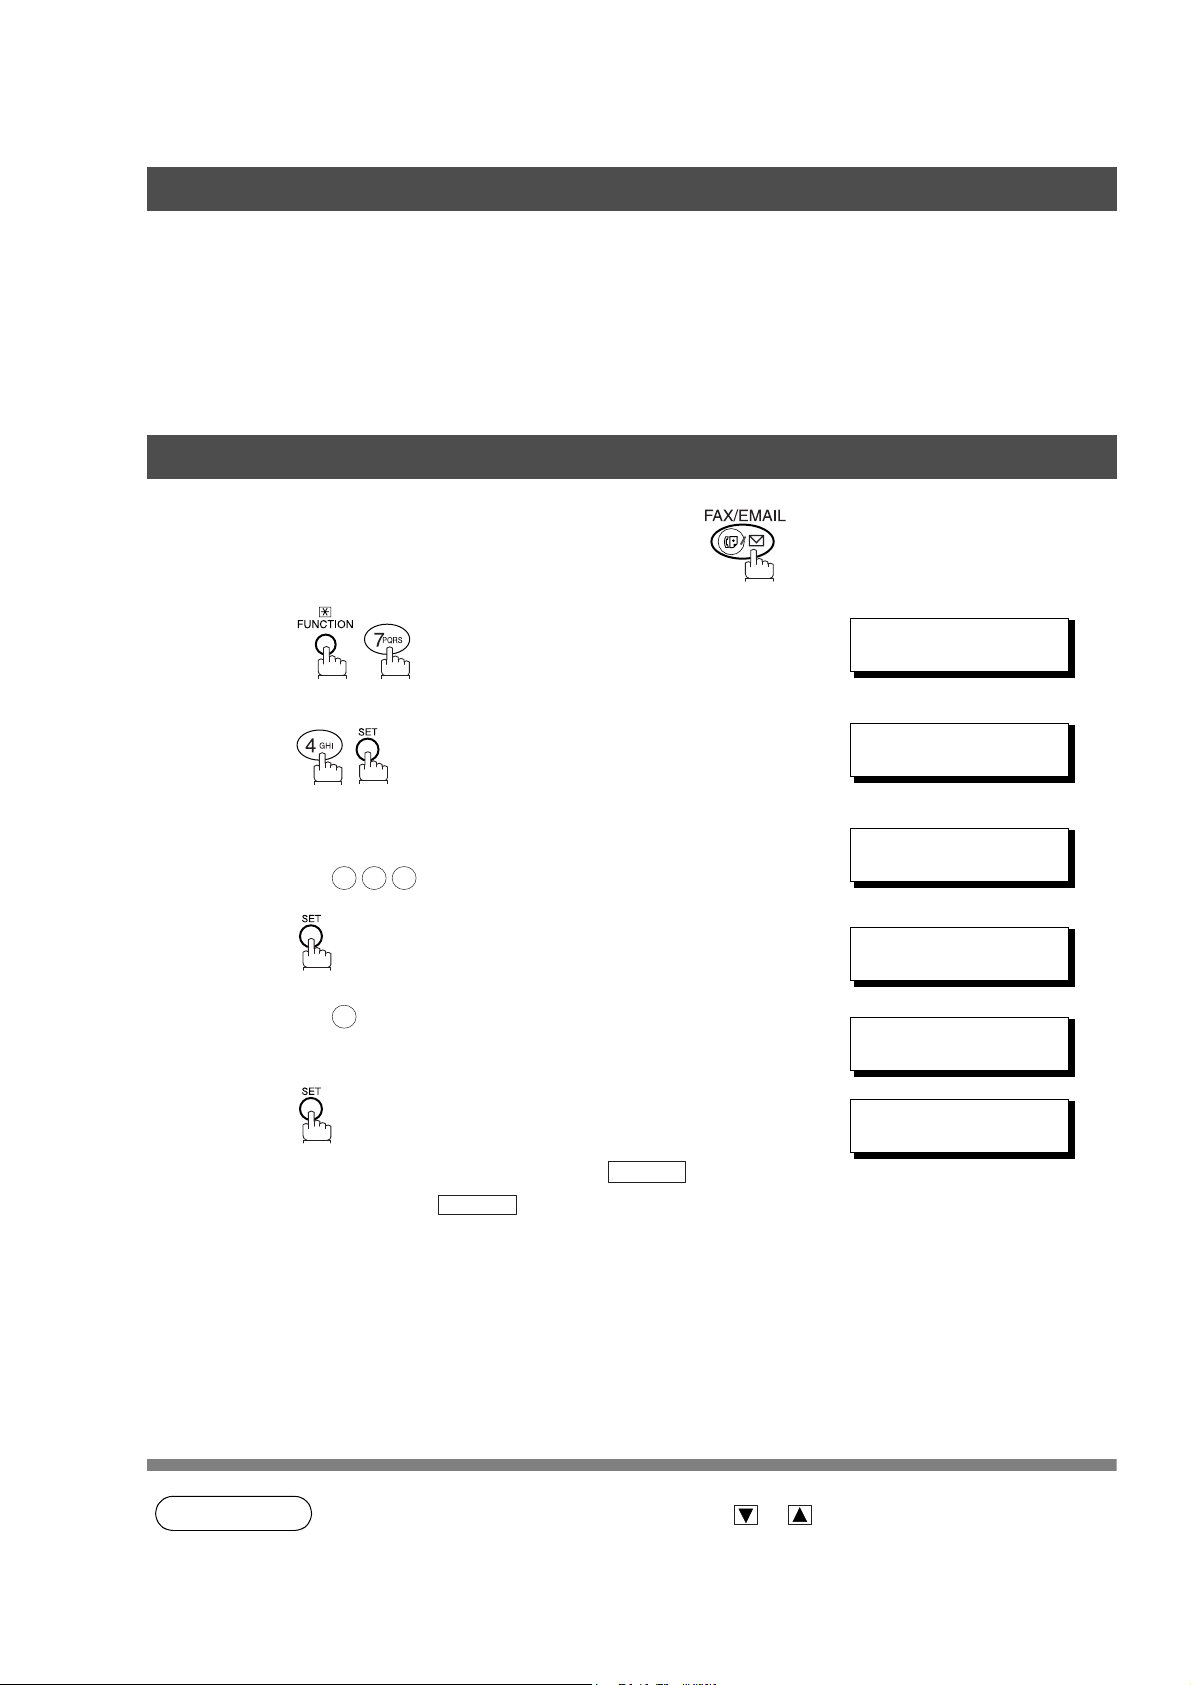
Customizing Your Machine
General Description
Your machine has a variety of adjustable Fax Parameters. These parameters, listed in the Parameter Table,
are preset for you and do not need to be changed. If you do want to make a change, read the table carefully.
Some parameters, such as the Resolution and Contrast parameters, can be temporarily changed by simple
key operation just before a transmission is made. When the transmission ends, however, these parameters
return to their preset values (Home position). Other parameters can only be changed by the procedure
described below.
Setting the Fax Parameters
Make sure that the FAX/EMAIL lamp is ON. If not, press to select the "FAX/EMAIL MODE".
1
2
3
4
5
6
Enter Fax Parameter number from the Parameter Table.
(See page 29 to 31)
Ex: for STAMP
0 0 4
Ex: for ON
2
To set another parameter, press to return to
Step 3 or press to return to standby.
STOP
CLEAR
SET MODE (1-4)
ENTER NO. OR
FAX PARAMETER(1-99)
FAX PARAMETER(1-99)
04 STAMP(HOME)
1:OFF
04 STAMP(HOME)
2:ON
05 MEMORY(HOME)
2:ON
∨∧
❚
NO.=
NO.=004
28
NOTE
1. To scroll the Fax Parameters in Step 2, press or .
2. To print out a Fax Parameter List, see page 135.

Fax Parameter Table
Customizing Your Machine
No. Parameter
001 CONTRAST 1 Lightest Setting the home position for the CONTRAST.
002 RESOLUTION *1 Standard Setting the home position for the RESOLUTION.
003 ORIGINAL *1 TEXT Setting the home position for the ORIGINAL.
004 STAMP *1 Off Setting the home position for the STAMP.
005 MEMORY 1 Off Setting the home position for the MEMORY.
006 DIALING METHOD 1 Pulse Selecting the dialing method.
007 HEADER PRINT *1 Inside Selecting the printing position of the header.
008 HEADER FORMAT *1 Logo, ID No. Selecting the header format.
009 RCV'D TIME PRINT *1 Invalid Selecting whether the machine prints the received date &
010 KEY/BUZZER
VOLUME
012 COMM. JOURNAL 1 Off Selecting the home position of printout mode for COMM.
013 AUTO JOURNAL
PRINT
014 FILE ACCEPTANCE
REPORT
017 RECEIVE MODE 1 Manual Setting the reception mode to automatic or manual.
Setting
Number
2 Lighter
3Normal
4Darker
5 Darkest
2Fine
3S-Fine
2 TEXT/
3PHOTO
2On
*2 On
*2 Tone
2Outside
3 No print
2From To
2Valid
1 Off Selecting the volume of the Key/Buzzer tone.
*2 Soft
3 Loud
2Always
*3 Inc. only
1 Invalid Selecting whether the machine prints the journal
*2 Valid
*1 Invalid Selecting whether the machine prints the file acceptance
2Valid
*2 Auto
Setting Comments
PHOTO
To select the stamp function when document is stored in
memory, see Fax Parameter No. 28.
Inside : Inside TX copy area.
Outside : Outside TX copy area.
No print : Header is not printed.
time, remote ID, percentage of reduction and page number
on the bottom of each received document.
Journal Off/Always/Inc. only.
Off : Does not print
Always : Always prints
Inc. only : Prints only when communication has failed.
automatically after every 100 transactions.
journal.
If you set this parameter to valid, a journal will print out
after any memory communication.
Programming
Your Machine
29

Customizing Your Machine
Fax Parameter Table
No. Parameter
022 SUBSTITUTE RCV 1 Invalid Selecting whether the machine receives to memory when
024 PRINT REDUCTION 1 Fixed Selecting print reduction mode.
025 REDUCTION RATIO 70 70% Selecting the fixed print reduction ratio from 70% to 100%.
026 POLLING PASSWORD (----) Setting a 4-digit password for secured polling. (See page
027 POLLED FILE SAVE *1 Invalid Selecting whether the machine retains the polled
028 STAMP AT MEM. XMT 1 Invalid Selecting whether the machine stamps the original
031 INCOMPLETE FILE
SAVE
033 XMT REDUCTION 1 Invalid Selecting whether the machine performs reduction when
036 RING PATTERN
DETECT (DRD)
(See Note 2)
037 RCV TO MEMORY (----) Enter a 4-digit password used to print out the received
038 ACCESS CODE (----) Enter a 4-digit Access Code to secure the machine from
039 PIN CODE ACCESS *1 None Selecting the access method (Prefix or Suffix) to dial a
042 CONF. POLLED FILE
SAVE
043 PASSWORD-XMT *1 Off Setting a 4-digit XMT-Password and selecting whether the
044 PASSWORD-RCV *1 Off Setting a 4-digit RCV-Password and selecting whether the
Setting
Number
*2 Valid
*2 Auto
---- ----
100 100%
2Valid
*2 Valid
1 Invalid Selecting whether the machine retains the document in
*2 Valid
*2 Valid
*1 Invalid All ring patterns.
2 Valid Select a ring pattern for automatic answering.
2Suffix
3Prefix
*1 Invalid Selecting whether the machine saves the confidential
2Valid
2On
2On
Setting Comments
the recording paper runs out, toner runs out or the
recording paper is jammed.
Fixed :Reduce received document according to setting of
Parameter No. 25.
Auto : Reduce received document according to the length
of received documents.
This parameter functions only when the fixed print
reduction is selected on Fax Parameter No. 24.
69)
document in memory even after the document is polled
once.
documents when storing the documents into memory.
(Depending on the Stamp setting on the Control Panel)
memory if the document is not successfully transmitted.
the transmitting original is wider than the recording paper
used at the receiving machine.
1: A Standard ring pattern.
2: B Double ring pattern.
3: C Triple ring pattern (Short-Short-Long).
4: D All other triple ring patterns, except the
type C described above.
document in memory by using F8-5 (RCV TO MEMORY).
When F8-5 is set to On, this parameter will not be shown
on the LCD display. (See page 88)
unauthorized use. (See page 86)
number with PIN Code. (See page 93)
polled file even after the file is polled once.
machine performs and checks the XMT-Password of the
receiving station when transmitting. (See page 106)
machine performs and checks the RCV-Password of the
transmitting station when receiving. (See page 107)
30
 Loading...