


DS810 HIGH DEFINITION DIGITAL-RECEIVER
ELECTRICAL INFORMATION (UK AND EIRE ONLY)
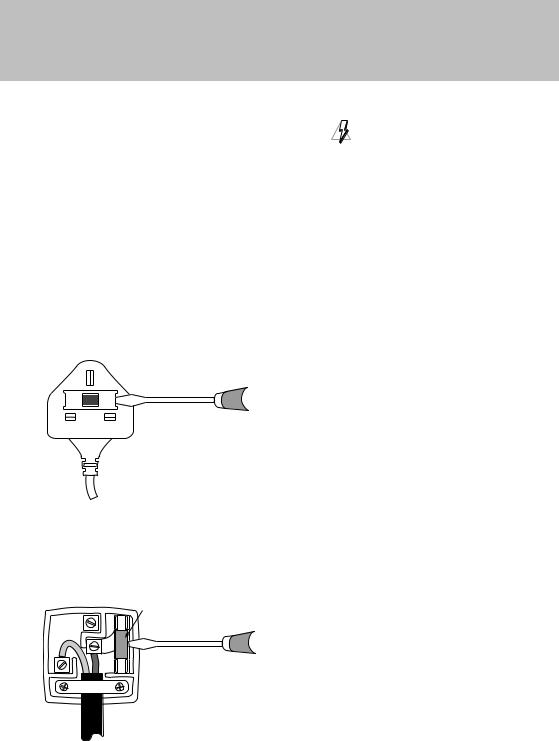
Mains plug and its fuse
The supplied mains plug is a non-rewireable type. If you need to replace the fuse, you must use an
ASTAor BSI-approved BS 1362 fuse, rated at 3 A and marked as shown below.
or
The plug has its fuse beneath a fuse cover on its face. Use a screwdriver to lever off the fuse cover, replace the fuse with a new one and refit its cover.
Never use a plug if its fuse cover is missing.
WARNING 
If the supplied mains plug is not suitable for your mains socket-outlet, DO NOT plug it in. Remove its fuse and then cut the plug off the lead. Destroy the severed plug immediately to avoid the shock hazard which would exist if this were to be plugged into a mains socket.
Fit an appropriate mains plug on the lead. If this plug contains a fuse, it should be as described left. If you are using a non-fused plug, an external fuse must not exceed 5 A.
AM
The fuse is inside the rewireable plug. Use a screwdriver to remove the plug’s back cover. Never put the plug into the mains socket when its cover is removed. Lever out the fuse and replace it with a new one. Replace the plug’s back cover.
|
|
FUSE of correct value |
|
E |
AMP 3 |
N |
L |
|
|
|

Contents
Recommendations.. . . . . . . . . . . . . . . . . . . . . . . . . . . . . .2 Environmental issues.. . . . . . . . . . . . . . . . . . . . . . . . . . . .2 Copyright notices.. . . . . . . . . . . . . . . . . . . . . . . . . . . . . . .2 Using equipment safely.. . . . . . . . . . . . . . . . . . . . . . . . .3 Connecting to the mains supply.. . . . . . . . . . . . . . . . .3 Your set-top box’s front panel .. . . . . . . . . . . . . . . . . . .4 Your set-top box’s rear panel .. . . . . . . . . . . . . . . . . . . .5 Connecting your set-top box.. . . . . . . . . . . . . . . . . . . .6
High-definition (HD) video connections.. . . . . . . . . 6 Standard-definition (SD) video connections.. . . . . 7 Audio connections. . . . . . . . . . . . . . . . . . . . . . . . . . . . . . 8 LNB and mains connections.. .. .. .. .. .. .. .. .. .. .. .. .. .. .. .. .. .. .. .. .. 8
Inserting your remote control’s batteries .. . . . . . . .9
Replacing the batteries in your remote control.. . 9
Switching on your set-top box.. . . . . . . . . . . . . . . . . . .9
Switch-on channel setting.. . . . . . . . . . . . . . . . . . . . . . 9
Opening the CI-module door.. . . . . . . . . . . . . . . . . . 10 Using a CI module .. . . . . . . . . . . . . . . . . . . . . . . . . . . . 10 Your set-top box tomorrow.. . . . . . . . . . . . . . . . . . . . 10 Setting up your set-top box .. . . . . . . . . . . . . . . . . . . 10
Language screen .. . . . . . . . . . . . . . . . . . . . . . . . . . . . . . 10 Resolution settings screen.. . . . . . . . . . . . . . . . . . . . . 11 Reception screen.. . . . . . . . . . . . . . . . . . . . . . . . . . . . . . 12 Network scan.. . . . . . . . . . . . . . . . . . . . . . . . . . . . . . . . . . 13
Using your remote control .. . . . . . . . . . . . . . . . . . . . 14
Daily use.. . . . . . . . . . . . . . . . . . . . . . . . . . . . . . . . . . . . . . . 14 Occasional use. . . . . . . . . . . . . . . . . . . . . . . . . . . . . . . . . 14 Remote control buttons.. .. .. .. .. .. .. .. .. .. .. .. .. .. .. .. .. .. .. .. .. .. .. .. 15
TV and radio channels.. . . . . . . . . . . . . . . . . . . . . . . . . 16 Changing channel .. . . . . . . . . . . . . . . . . . . . . . . . . . . . 16 What are Favourite channels?... ... ... ... ... ... ........... 16 What is the Channel List?.. . . . . . . . . . . . . . . . . . . . . . 17
Using the Channel List.. . . . . . . . . . . . . . . . . . . . . . . . . 17 Viewing channel information .. . . . . . . . . . . . . . . . . . 17
Using the Zapping Window .. . . . . . . . . . . . . . . . . . . 18
Navigating around.. . . . . . . . . . . . . . . . . . . . . . . . . . . . . 19 Symbols and codes that display.. . . . . . . . . . . . . . . . 19 Showing information.. . . . . . . . . . . . . . . . . . . . . . . . . . 19 Displaying Options. . . . . . . . . . . . . . . . . . . . . . . . . . . . . 19 Favourite Channels in the Zapping Window.. . . . 19 Removing the Zapping Window.. . . . . . . . . . . . . . . 19
Using the EPG .. . . . . . . . . . . . . . . . . . . . . . . . . . . . . . . . 20
Navigating around the EPG Grid.. .. .. .. .. .. .. .. .. .. .. .. .. .. .. .. 20 Symbols and codes that display.. . . . . . . . . . . . . . . . 21 Showing information.. . . . . . . . . . . . . . . . . . . . . . . . . . 21 Choosing a programme to watch.. . . . . . . . . . . . . . 21 Removing the EPG Grid.. . . . . . . . . . . . . . . . . . . . . . . . 21
Using the Options Window.. . . . . . . . . . . . . . . . . . . . 22 Using the Main menu.. . . . . . . . . . . . . . . . . . . . . . . . . 23
Using the settings screens .. . . . . . . . . . . . . . . . . . . . . 23 Displaying Help.. . . . . . . . . . . . . . . . . . . . . . . . . . . . . . . . 23
The Setup Menu.. . . . . . . . . . . . . . . . . . . . . . . . . . . . . . 24
CI-module.. . . . . . . . . . . . . . . . . . . . . . . . . . . . . . . . . . . . . 24 System .. . . . . . . . . . . . . . . . . . . . . . . . . . . . . . . . . . . . . . . . 24 Software update.. . . . . . . . . . . . . . . . . . . . . . . . . . . . . . . 24 Antenna.. . . . . . . . . . . . . . . . . . . . . . . . . . . . . . . . . . . . . . . 24 TV settings. . . . . . . . . . . . . . . . . . . . . . . . . . . . . . . . . . . . . 24 Digital Audio Output. . . . . . . . . . . . . . . . . . . . . . . . . . . 24 Factory reset.. . . . . . . . . . . . . . . . . . . . . . . . . . . . . . . . . . . 24
Using the Setup menu .. . . . . . . . . . . . . . . . . . . . . . . . 24
Displaying the Setup menu.. . . . . . . . . . . . . . . . . . . . 25 Viewing CI module Information.. . . . . . . . . . . . . . . . 25 Viewing System information.. . . . . . . . . . . . . . . . . . . 25 Updating the software.. . . . . . . . . . . . . . . . . . . . . . . . . 25 Changing antenna settings.. . . . . . . . . . . . . . . . . . . . 25 Changing the TV settings.. . . . . . . . . . . . . . . . . . . . . . 26 Changing the digital-audio output settings .. . . . 28 Resetting your set-top box.. . . . . . . . . . . . . . . . . . . . . 28
Using the other menus.. . . . . . . . . . . . . . . . . . . . . . . . 29
Types of scan.. . . . . . . . . . . . . . . . . . . . . . . . . . . . . . . . . . 29 Carrying out a network scan.. . . . . . . . . . . . . . . . . . . 29 Organising your Favourites.. . . . . . . . . . . . . . . . . . . . . 30 Selecting the switch-on channel.. . . . . . . . . . . . . . . 31 Changing the display settings.. . . . . . . . . . . . . . . . . . 31 Changing the local time setting.. . . . . . . . . . . . . . . . 32 Choosing a language.. . . . . . . . . . . . . . . . . . . . . . . . . . 32
Updating the software.. . . . . . . . . . . . . . . . . . . . . . . . 33
Using the menus to update the software.. . . . . . . 33
Troubleshooting.. . . . . . . . . . . . . . . . . . . . . . . . . . . . . . 34 HDCP content protection .. . . . . . . . . . . . . . . . . . . . . 37 Technical specification.. . . . . . . . . . . . . . . . . . . . . . . . 38
General.. . . . . . . . . . . . . . . . . . . . . . . . . . . . . . . . . . . . . . . . 38 Rear-panel connectors.. . . . . . . . . . . . . . . . . . . . . . . . . 38 Front-panel connector.. . . . . . . . . . . . . . . . . . . . . . . . . 38
Introduction
Please follow the instructions in this manual carefully to enjoy all the advantages of high-definition (HD) digital television. We advise following the user instructions and recommendations supplied with your set-top box, especially for first-time use.
Your set-top box fully complies with international DVB (Digital Video Broadcasting) standards. In order to view programmes broadcast in high-definition, you must connect your set-top box to a suitable HDTV or computer monitor. (This is why the menus and screens sometimes refer to an HD device.) Your set-top box is also compatible with standard-definition televisions and VCRs equipped with a SCART connector.
Recommendations
Storage
If your set-top box is not used directly after purchase, it can be stored in its original packaging, in a cool dry place, at a temperature between –25 °C and +55 °C.. Before use, wait until your set-top box has reached room temperature..
Maintenance
Before cleaning, always disconnect the mains power from your set-top box and disconnect the LNB input.. To clean your set-top box, dust with either a clean dry cloth, or one that has been slightly dampened with distilled water.. Never use detergents of any kind..
Copyright notices
This document is copyrighted and may not, in whole or part, be copied, photocopied, reproduced, translated or reduced to any electronic or machinereadable form without prior consent in writing from Pace Micro Technology plc..
© Pace Micro Technology 2006.. All rights reserved..
Pace and  are trademarks and/or registered trademarks of Pace Micro Technology plc..
The set-top box software includes certain opensource software.. Open-source software is licensed to you on the licence terms of the applicable licensor, available to view at:
http://www..pacemicro..com/opensource/DS810XE
Environmental issues
Packaging - When disposing of this product packaging, please ensure that it is recycled
This will reduce the demand for virgin wood pulp, whilst diverting material that would otherwise end up in landfill..
Set-top Box Recycling - Do not dispose of this product with your domestic rubbish
At the end of its useful life, this product contains materials that, when processed correctly, can be recovered and recycled.. By participating in the responsible recycling of this product, you will be
reducing the requirement for new raw materials and reducing the amount of material that would otherwise end up in landfill..
When you purchase a new, similar product your retailer may offer to take this old one from you.. Alternatively, you can take it to your local recycling centre.. Your retailer or local municipal authority will advise you of the collection facilities available in your area for waste electronic products.. Use of this service will be free to you..

Important
Using equipment safely
Your set-top box has been manufactured to meet international safety standards, but you must take care to operate it safely..
It is important that you read these safety instructions..
WARNING: Remember that contact with AC mains can be lethal or can cause severe electric shock. To avoid the risk of electric shock:
 Never remove the top cover from your set-top box as there are high-voltage live parts inside.. There are no user-serviceable parts inside your set-top box..
On the rear panel of your set-top box there is a tamper-evident label that states ‘Warranty void if broken or removed’..
 Make sure all electrical connections are properly made..
 Do not connect any equipment to the mains supply until you have properly connected all the other leads..
 Disconnect your set-top box from the mains supply (by disconnecting its mains lead from the mains socket on the wall) before you disconnect any other equipment from its rear panel..
 Never push anything into holes, slots or other openings in the case (except a CI module into the slot provided, and only when you are requested to do so)..
CAUTION:
 Do not use or store your set-top box in hot, cold, damp or dusty places..
 Do not block the ventilation holes of your set-top box.. Leave a gap of at least 5 cm above and around it to allow for adequate ventilation.. Never stand it on soft furnishings..
 Do not put anything on your set-top box which might drip or spill into it.. Never stand objects filled with liquids, such as vases, on top of your set-top box..
 Do not place your set-top box in an unventilated cabinet or on top of a unit which emits heat (e..g.. a VCR)..
 Never place naked flame sources, such as lighted candles, on top of your set-top box..
Connecting to the mains supply
•Your set-top box operates with a 230 V AC, 50 Hz mains supply..
•Do not connect your set-top box to any supply other than this..
•The supplied mains lead has a 2-way connector at one end and a mains plug at the other.. You should always insert the 2-way connector into your set-top box before you insert the plug into the mains supply..
•The only way to disconnect your set-top box from the mains is to remove the mains lead.. Your set-top box must therefore be installed near to the mains socket-outlet, which should be easily accessible..
•If you are in any doubt about the mains lead, its plug or its connection, consult a competent electrician..
•Please follow the instructions in the following sections, which guide you through connecting and setting it up..
•See also pages 14 and 15, which describe your set-top box’s remote control..

Your Pace set-top box
Your set-top box’s front panel
EXIT button
To remove the EPG or channel list from the screen
EPG button
To display the EPG
(Electronic Programme Guide)
U D (arrow buttons)
To display the Zapping Window
To highlight the previous or next item in a list or on-screen menu
L R (arrow buttons)
To move to the left and the right through on-screen menus, lists or items
To change settings on the screens
OK
To display the on-screen channel list
To confirm a choice
To save settings
Before you start installing your set-top box, please check you have the following items:
Your Pace set-top box; Your remote control; 1 SCART lead;
1 HDMI lead;
1 mains lead;
2 ‘AA’ batteries for the remote control..
Standby button (S)
To switch your set-top box on and off
Indicator light
Red |
= |
in standby |
Blue |
= |
switched on and out of standby |
IR RECEIVE light
Red - flashes when your set-top box is receiving a signal from your remote control
LED display
-shows the current time when your set-top box is in standby
-shows the channel number when tuned to a TV or radio channel
CI-module door
Push to open door to access the
CI-module slot..
See page 10 for details
NOTE: The front panel of your set-top box is covered with a protective clear plastic film.
You should carefully remove this film before using your set-top box.

Your Pace set-top box
Your set-top box’s rear panel
SATELLITE IN
Connect the LNB lead from your satellite dish here
AUDIO L + R
(Left and right stereo audio)
Connect phono leads (not supplied) between here and a TV, VCR or hi-fi amplifier
Mains input
Do not connect the mains plug to the wall socket until you have made ALL the other connections
TV SCART (out) |
COMPONENT VIDEO-OUT |
Connect to the SCART |
Connect to the component video connectors |
connector on your TV |
on your TV, if it has no HDMI |
|
|
R |
Y |
|
|
|
|
|
|
|
COMPONENT |
|
|
|
VIDEO-OUT |
13/18V DC |
TV SCART |
L |
Pb |
400mA max. |
|
|
|
|
|
|
AUDIO |
|
|
Pr |
|
230V |
50Hz |
|
|
|
|
||
|
|
VCR SCART |
USB |
|
|
SATELLITE OUT |
SATELLITE IN |
OPTICAL |
TELEPHONE |
|
|
AUDIO OUT |
+5V DC |
LINE |
|
||
|
|
500mA Max. |
|
VCR SCART (in/out)
Connect to the SCART connector on your VCR or to another item of equipment that has a SCART connector
SATELLITE OUT
You can connect an RF lead from here to the satellite input of another set-top box..
When this set-top box is in standby, the connected set-top box can receive signals from your satellite dish..
|
|
|
|
|
|
|
|
|
|
|
|
|
|
|
|
|
|
HDMI |
|
|
|
TELEPHONE LINE |
||||
Connect to the HDMI |
|
|
|
Not currently used |
||||
connector on your TV |
|
|
|
|
|
|
||
using the HDMI lead |
|
|
|
|
|
|
||
supplied |
|
|
|
|
|
|
||
|
|
|
|
|
|
|
|
|
|
|
|
|
|
|
|
|
|
OPTICAL AUDIO OUT. |
|
|
|
|
USB |
|||
|
||||||||
Connect an optical digital-audio lead |
|
Not currently used |
||||||
(not supplied) between the optical- |
|
|
|
|||||
audio connector and a home cinema |
|
|
|
|||||
system |
|
|
|
|||||
Connecting up
Connecting your set-top box
Before starting, choose a suitable position for your set-top box, observing the ventilation requirements set out on page 3..
WARNING: Before you connect or disconnect your set-top box to/from any other equipment, make sure you disconnect all the equipment from the mains supply.
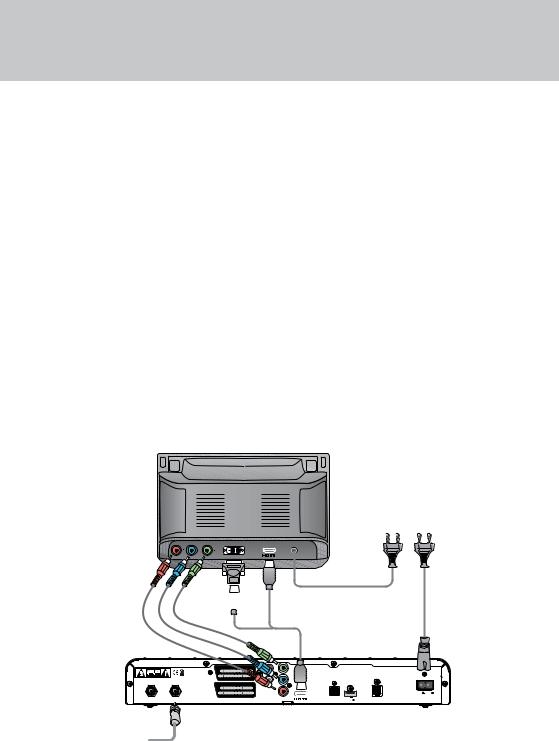
High-definition (HD) video connections
If you have a high-definition TV (HDTV), use only one of the following HD-video connection methods.. The methods are listed in order of preference..
AConnect the supplied HDMI lead between the HDMI socket on your set-top box and the HDMI socket on your HDTV..
or:
HDTV
C B  A
A
BConnect the supplied HDMI lead to the HDMI socket on your set-top box, then use an HDMIDVI adapter (not supplied) between the HDMI lead and the DVI socket on your HDTV..
or:
CConnect component video leads (not supplied) between the connectors marked
COMPONENT VIDEO-OUT
(YPbPr) and the component video connectors on your HDTV..
NOTE: If you use method B or C, you must also make additional audio connections between your set-top box and your HDTV or audio equipment. See page 8.
If you also want to connect a VCR or DVD recorder to your set top box, use the connection method shown on page 7.
Mains lead
Mains lead
13/18V DC |
TV SCART |
400mA max. |
|
|
O |
VCR SCART
SATELLITE OUT |
SATELLITE IN |
LNB lead
Y
COMPONENT
VIDEO-OUT
Pb |
|
|
|
Pr |
|
230V |
50Hz |
OPTICAL |
USB |
TELEPHONE |
|
+5V DC |
|
||
AUDIO OUT |
500mA Max. |
LINE |
|
Set-top box
Connecting up
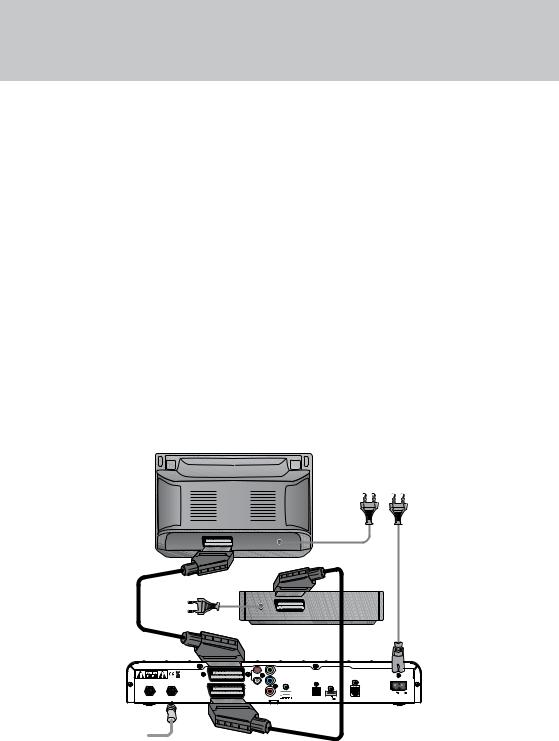
Standard-definition (SD) video connections
If you have a standard-definition TV, a VCR or a DVD recorder, use the connection methods described below..
•Connect the supplied SCART lead between the TV SCART socket on your set-top box and the SCART socket on your TV..
•Connect another SCART lead (not supplied) between the VCR SCART socket on your settop box and the SCART socket on your VCR or DVD recorder..
NOTE: If you want to make additional audio connections between your set-top box and your audio equipment, see page 8.
TV
Mains lead
Mains lead
|
|
|
|
|
VCR or |
|
|
|
|
|
DVD |
Mains lead |
|
|
|
recorder |
|
|
|
|
|
||
SCART lead |
|
|
|
|
|
|
|
|
SCART lead |
|
|
|
|
R |
Y |
|
|
|
|
|
COMPONENT |
|
|
|
|
|
VIDEO-OUT |
|
|
13/18V DC |
TV SCART |
L |
Pb |
|
|
400mA max. |
|
|
|
|
|
|
|
|
AUDIO |
|
|
|
|
|
Pr |
|
230V 50Hz |
SATELLITE OUT SATELLITE IN |
VCR SCART |
|
OPTICAL |
USB |
TELEPHONE |
|
|
+5V DC |
|||
|
|
AUDIO OUT |
500mA Max. |
LINE |
|
Set-top box
LNB lead

Connecting up
Audio connections
To make the most of your set-top box and digital television, you may also wish to connect your settop box to audio equipment, such as a hi-fi amplifier or home cinema system..
If you have connected an HDTV using method B or C on page 6, you must also make at least one of the audio connections described below..
•For best results, connect an optical digital audio lead (not supplied) between the connector marked OPTICAL AUDIO OUT on your set-top box and the corresponding connector on your home cinema system..
•Or, connect stereo phono leads (not supplied) between the AUDIO L + R sockets on your set-top box and the corresponding audio-in sockets on your HDTV or hi-fi amplifier..
NOTE: If you are using an HDTV and then make additional audio connections, you may have to adjust the “Lip Sync” setting of your set-top box. See page 27 for details.
LNB and mains connections
•Connect the LNB lead from your satellite dish to the connector marked SATELLITE IN on your set-top box..
•Plug the 2-way connector on the supplied mains lead into the mains socket (marked 230V  50Hz) on your set-top box..
•When all the connections are properly made, connect all the equipment to the mains supply..
HDTV
Hi-fi amplifier
Stereo phono leads
Home cinema system
R 
 Y
Y
COMPONENT
VIDEO-OUT
|
13/18V DC |
TV SCART |
L |
Pb |
|
|
|
400mA max. |
|
|
|
|
|
|
|
|
|
AUDIO |
|
|
|
|
|
|
Pr |
230V |
50Hz |
|
|
|
|
|
||
SATELLITE OUT |
SATELLITE IN |
VCR SCART |
|
USB |
TELEPHONE |
|
|
|
+5V DC |
|
|||
|
|
|
|
500mA Max. |
LINE |
|
Optical digital audio lead
Getting started
Inserting your remote control’s batteries
Insert the two batteries into your remote control..
Make sure you insert them the correct way round, as shown by the + and – symbols in the battery compartment..
Switching on your set-top box
When you have connected your set-top box to the mains supply, its indicator light, just below the Standby button (S), will light up..
If your set-top box is in standby, the light will be red; if your set-top box is out of standby, the light will be blue..
If the indicator light is red, switch on your TV, then press the Standby button (S) on the front panel of your set-top box..
Whenever you are not using your set-top box, you should put it into standby by pressing the Standby button (S)..
Switch-on channel setting
The factory setting for your set-top box is for it to always tune to the last-viewed channel when you bring it out of standby.. You can change this setting, so that your set-top box tunes to a specific channel instead (see page 31)..
Replacing the batteries in your remote control
•Always replace both batteries at the same time..
•Please dispose of batteries in an environmentally-friendly way..
•Used alkaline batteries must never be thrown into a fire..
Getting started
Opening the CI-module door
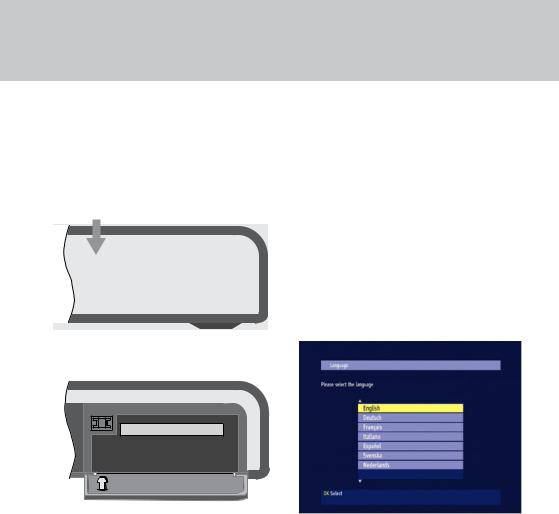
Push on the top left-hand side of the CI-module door to open it, as shown below..
To open, push here
Using a CI module
If you want to view encrypted channels, you can use a common interface (CI) module (with associated smartcard inside it) to provide the appropriate conditional access..
Open the CI-module door (see previous section)..
Hold your CI module with the arrow pointing towards the slot in the front panel of your set-top box..
Insert your CI module into the slot, as far as it will go without forcing it.. The CI module is designed to go in only one way round..
Close the CI-module door..
Your set-top box tomorrow
Your set-top box comes with the latest digital TV technology.. To keep up with new technology, new features may be developed which may then be transmitted to your set-top box as software updates..
For more information, see page 33..
Setting up your set-top box
Language screen
When you first switch your set-top box on, the Language screen appears (factory setting is English).. This allows you to choose the language you want to appear on all menus and screens..
Use the U D buttons on your remote control (see page 14) to highlight a language, then press the OK button to save the setting..
10
Getting started
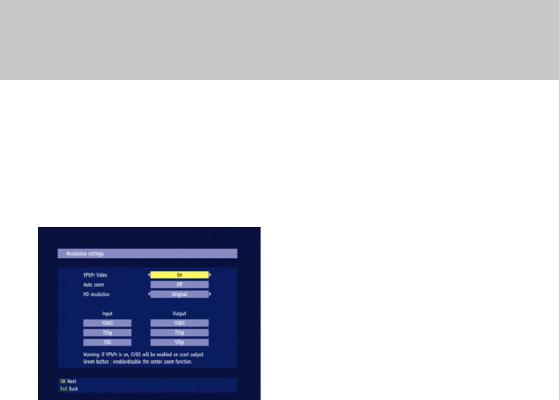
Resolution settings screen
On this screen, you set up your set-top box to match your HDTV with regard to resolution (how crisp
and clear the picture appears).. Generally, higher resolution settings give better quality pictures.. However, the quality will also always depend on how the programme was originally transmitted..
YPbPr video
If your HDTV is connected to your set-top box by component video (YPbPr) leads, use the L R buttons to set YPbPr video to “On”.. Otherwise, change this setting to “Off”..
NOTE: When YPbPr video is set to “On”, CVBS video is automatically output at your set-top box’s SCART connector.
Auto zoom
(This feature is not yet enabled..)
HD resolution
You can also choose the method that your set-top box uses to handle different video resolutions.. Use the U D buttons to highlight the HD resolution setting.. The available settings are..
•Original – your set-top box will always output the same resolution as the original video input, with one exception: an input resolution of 576i becomes 576p at the output..
•Standard – your set-top box will always output 720p, regardless of the input video resolution..
•User-defined – in this case, you can choose the resolution (576p, 720p or 1080i) that will be output to your HDTV, regardless of the input resolution..
Use the L R buttons to display the setting you want..
If you need to go back to the previous screen, press EXIT.. Or, press OK to continue..
11
 Loading...