


Weather@Home
Bluetooth-enabled Weather Station
Model: BAR218HG
User Manual

Weather@Home |
|
Bluetooth-enabled Weather Station |
|
Model: BAR218HG |
|
User Manual |
|
TABLE OF CONTENT |
|
Introduction----------------------------------------------------------------- |
3 |
Overview--------------------------------------------------------------------- |
3 |
Front view---------------------------------------------------------------- |
3 |
Rear view----------------------------------------------------------------- |
4 |
Remote sensor (THGN132N)--------------------------------------- |
4 |
Getting started------------------------------------------------------------- |
4 |
Insert batteries---------------------------------------------------------- |
4 |
Remote sensor------------------------------------------------------------- |
5 |
Sensor data transmission-------------------------------------------- |
5 |
Clock--------------------------------------------------------------------------- |
5 |
Manually set clock------------------------------------------------------ |
5 |
Weather forecast---------------------------------------------------------- |
6 |
Weather warning message--------------------------------------------- |
6 |
Temperature and humidity--------------------------------------------- |
6 |
Ice warning--------------------------------------------------------------- |
7 |
Weather trends---------------------------------------------------------- |
7 |
EN
Moon phase----------------------------------------------------------------- |
7 |
Backlight--------------------------------------------------------------------- |
7 |
Reset--------------------------------------------------------------------------- |
7 |
Connect with your mobile device------------------------------------ |
7 |
Pairing your weather station----------------------------------------- |
8 |
Settings------------------------------------------------------------------- |
8 |
View current readings------------------------------------------------- |
9 |
View history readings-------------------------------------------------- |
10 |
Precautions------------------------------------------------------------------ |
10 |
Specifications-------------------------------------------------------------- |
11 |
About Oregon Scientific------------------------------------------------ |
12 |
Eu-Declaration of conformity------------------------------------------ |
12 |
FCC & IC statement------------------------------------------------------- |
12 |
Declaration of conformity--------------------------------------------- |
13 |
EN
introduction
Thank you for selecting our Oregon ScientificTM
Weather@Home Bluetooth-enabled Weather Station. In addition, it is also carried out the changeable display between indoor and outdoor temperatures.
NOTE Please keep this manual handy as you use your new product. It contains practical step-by-step instructions, as well as technical specifications and warnings you should know about.
OVERVIEW
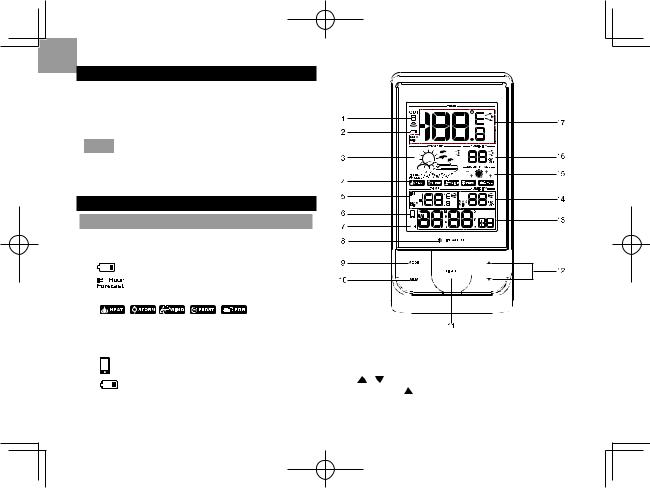
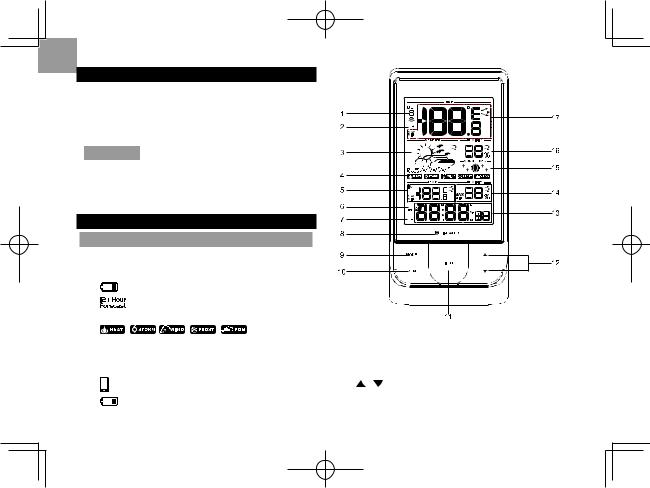
FRONT VIEW
1. Remote sensor reception indicator and outdoor selected
remote sensor battery low
: Next 12 hour Weather forecast and
: weather
warning message
5.Indoor temperature reading (current/MAX/MIN) with temperature trend
connection indicator
:Main unit battery low
8.Ice alert LED indicator
9.MODE: Change settings / display
10.MEM: View current, maximum and minimum temperature / humidity
11.Activate backlight
: Increase / decrease value of the settings; toggle button to select outdoor channels (1-5); activate / deactivate pairing mode.
13. AM/PM : Morning/afternoon
MD/DM/Yr: Calendar / clock with weekday (hour : minute with second display)
14.Indoor humidity reading (current / MAX / MIN) with humidity trend
15.Moon phase display
16.Outdoor humidity (current /MAX/MIN) with humidity trend
17.Outdoor temperature reading (current/MAX/MIN) with temperature trend
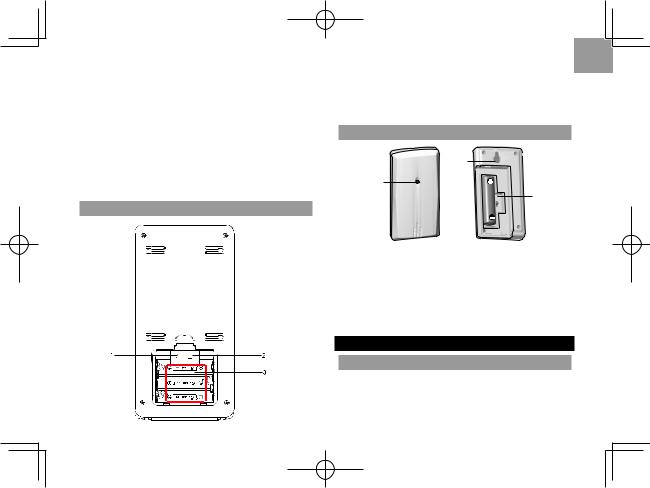
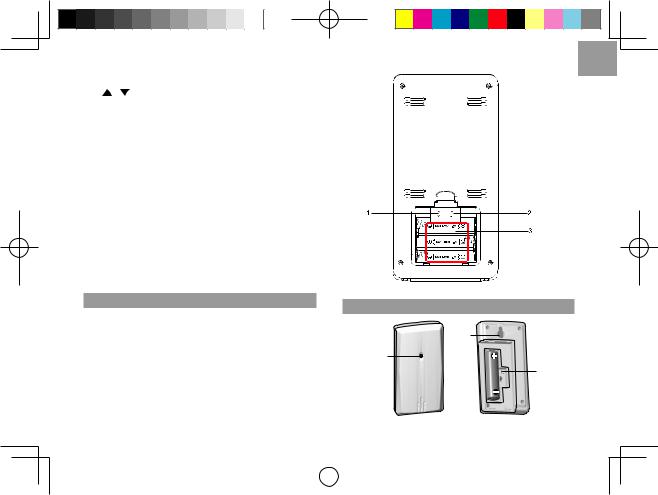
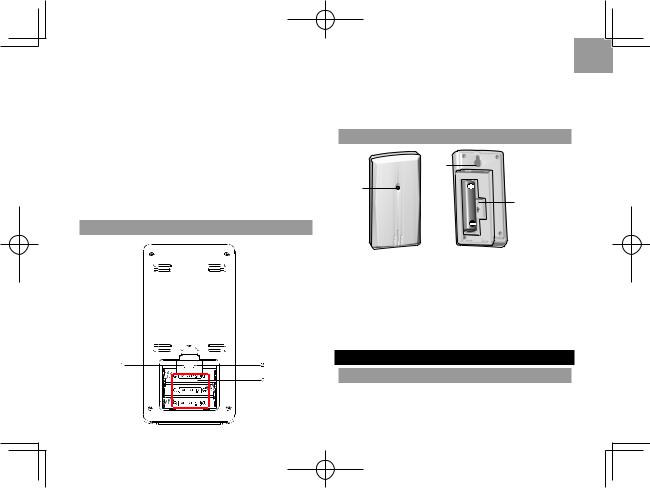
REAR VIEW
EN
1.°C / °F: Select temperature unit
2.RESET: Reset the unit to default settings
3.Battery compartment
REMOTE SENSOR (THGN132N)
2
1
4
3
 5
5
1.LED status indicator
2.Wall mount hole
3.Battery compartment
4.RESET hole
5.CHANNEL switch
GETTING STARTED
INSERT BATTERIES
1.Remove the battery compartment.
2.Insert the batteries, matching the polarities (+/-).
3.Press RESET after each battery change.
EN
LOCATION |
MEANING |
Clock / alarm area |
Main unit batteries low |
Outdoor temperature area |
Sensor batteries low |
|
|
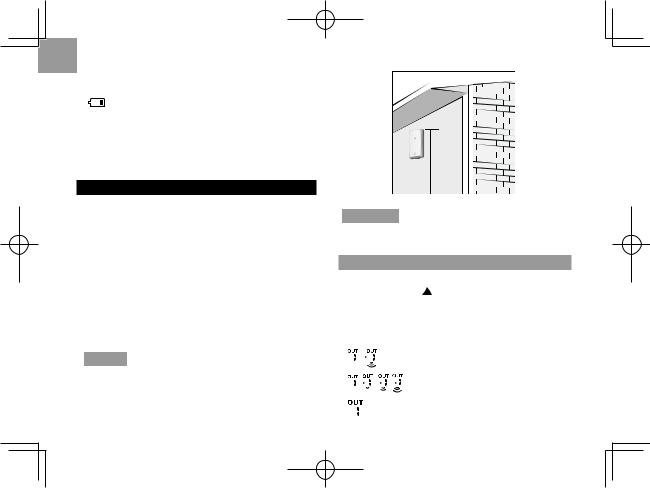
REMOTE SENSOR
The main unit can collect data from up to 5 sensors.
To set up the sensor:
1.Open the battery compartment.
2.Select a channel then press RESET.
3.Close the battery door.
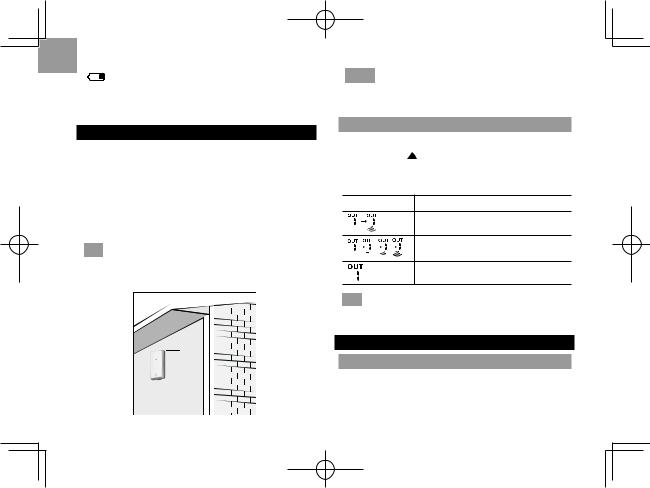
4.Place the sensor within 98 ft (30 m) of the main unit using the table stand or wall mount.
TIP Ideal placements for the sensor would be in any location on the exterior of the home at a height of not more than 5 ft (1.5 m) and which can shield it from direct sunlight or wet conditions for an accurate reading.
1.5 m (5 ft)
NOTE Use alkaline batteries for longer usage and consumer grade lithium batteries in temperatures below freezing.
SENSOR DATA TRANSMISSION
To search for
Press and |
and MODE at a time. |
The sensor reception icon in the remote sensor area shows the status:
ICON DESCRIPTION
Main unit is searching for sensor(s).
A channel has been found.
The sensor cannot be found.
TIP The transmission range may vary depending on many factors. You may need to experiment with
various locations to get the best results.
CLOCK
MANUALLY SET CLOCK
1.Press and hold MODE.
2.Press  or
or  to change the settings.
3.Press MODE to confirm.
4.The settings order is: 12/24 hour format, hour, minute, year, calendar format (day-month / monthday), month, day and language.
The language options are English (E), German (D), French (F), Italian (I), and Spanish (S).
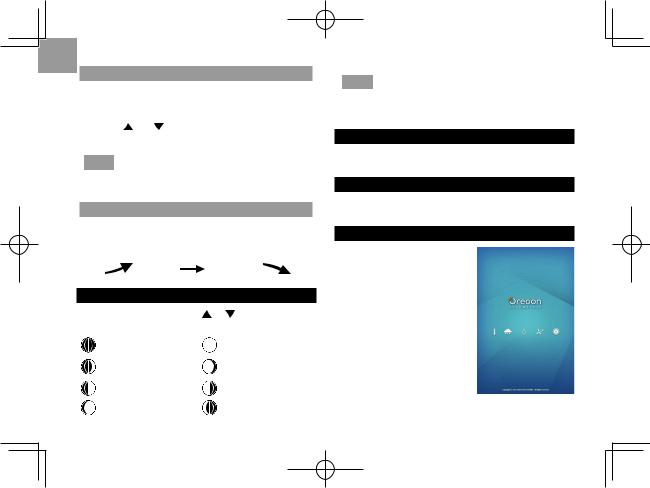
To select display mode:
Toggle MODE to choose among clock with seconds / weekday / calendar / moon phase.
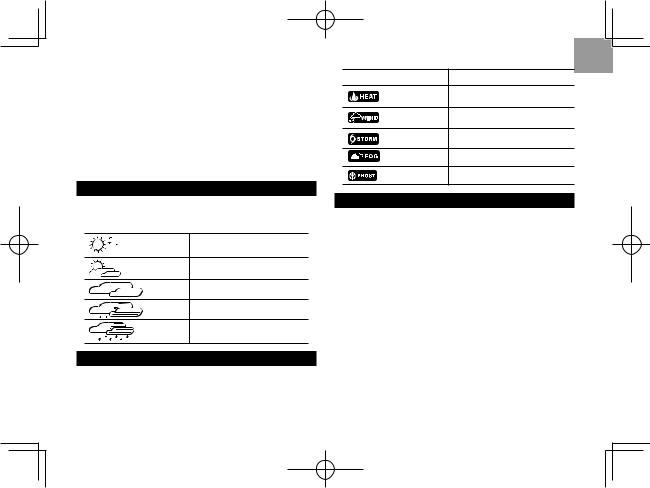
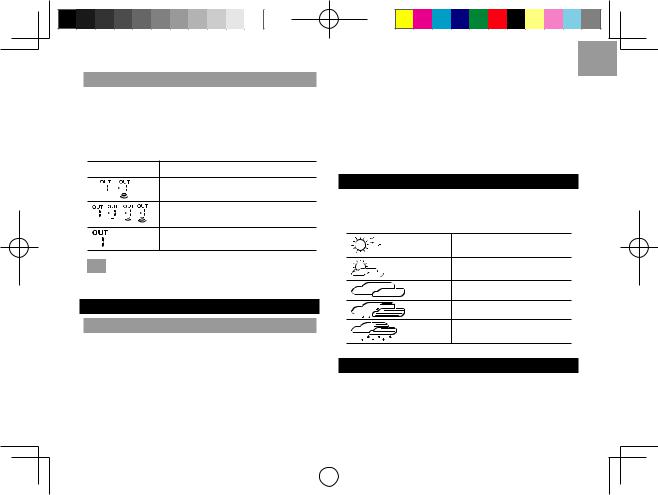
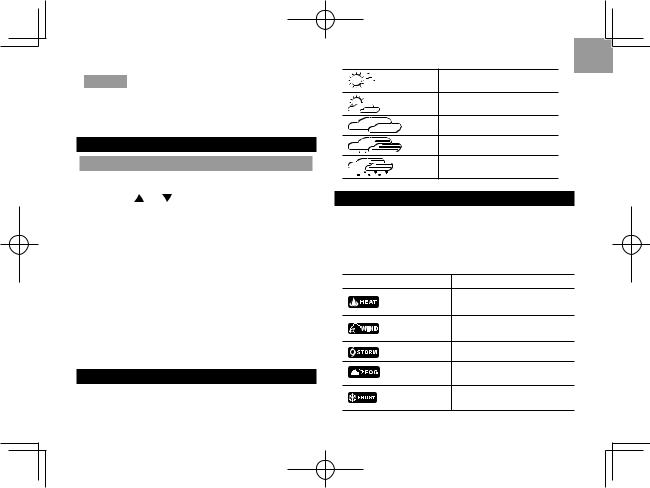
WEATHER FORECAST
This product forecasts the next 12 hours of weather within a 19-31 mile (30-50 km) radius.
Sunny
Partially Cloudy
Cloudy
Rainy
Snowy
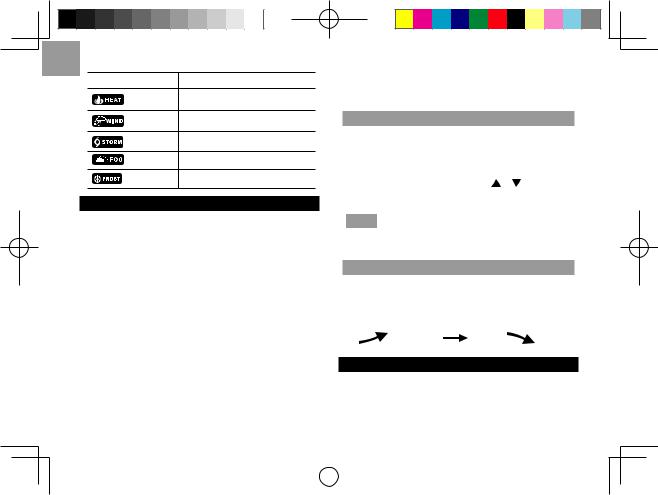
WEATHER WARNING MESSAGE
The weather warning messages provide indications of probable circumstances that may arise based on the weather station’s calculations. The meanings for the warnings are illustrated below:
EN
WARNING MESSAGE
Risk of high temperatures
Risk of fast wind speeds
Risk of a storm
Risk of foggy conditions
Risk of icy conditions
TEMPERATURE AND HUMIDITY
To select temperature unit:
•Select °C or °F for temperature readings by a pin or the top of a pen.
To select an outdoor sensor’s readings:
•Toggle  to select your desired sensor reading.
To auto-scan among sensors:
•Press and hold  and MEM at a time to display each sensor’s data for 3 seconds.
•To end, press  .
.
To display current, minimum and maximum records of the day from a selected sensor:
•Toggle MEM.
To clear the records:
•Press and hold MEM.
EN
ICE WARNING
If the channel 1 sensor falls from 37°F to 28°F (3°C to
-2°C), LED indicator will flash, and will stop flashing once the temperature is out of this range.
• |
at the same time to disable the ice |
alert warning.
NOTE As ice alert is only applicable to channel 1, to prevent flashing of LED, select channel 2-5 on outdoor sensor.
WEATHER TRENDS
The temperature, humidity and pressure trend icons are based on recent sensor readings.
RISE |
STEADY |
FALL |
|
|
|
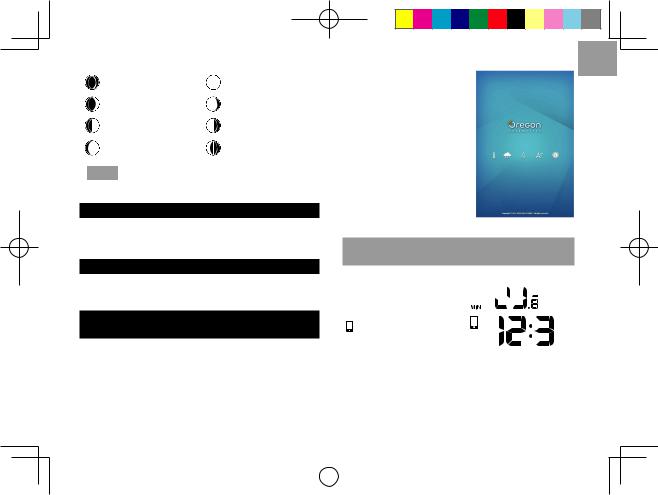
MOON PHASE
In moon phase mode, press |
or to scan through |
|||
the years (2001 to 2099). |
|
|
||
|
|
|
|
|
|
New moon |
|
|
Full moon |
|
|
|
|
|
|
Waxing crescent |
|
|
Waning gibbous |
|
|
|
|
|
|
First quarter |
|
|
Third quarter |
|
|
|
|
|
|
Waxing gibbous |
|
|
Waning crescent |
|
|
|
|
|
NOTE Star icons around the moon phase will be displayed from 6 o’clock in the evening to 6 o’clock
the next morning.
BACKLIGHT
Press LIGHT to activate backlight for 5 seconds.
RESET
Press RESET to return to the default settings.
CONNECT WITH YOUR MOBILE DEVICE
You can remotely set the weather station and read the weather information through Bluetooth 4.0 using your mobile device with the downloaded application from the Apple Store and the Google Play Store. To quickly find the application, type
‘Weather@Home’ as keyword in the search engine.
Ensure your mobile device is compatible with iOS 5 or
Android 4.3 with Bluetooth 4.0.
PAIRING YOUR WEATHER
First of all, you need to pair |
|
|
|
|
|
|
|
|
|
||
your weather station with |
|
||||
mobile device |
will flash |
|
|||
on the screen of the weather |
|
||||
station while pairing and be on |
|
||||
after successful pairing. |
|
||||
to enable a pair-up for the |
30 |
||||
seconds. |
|
|
|
|
|
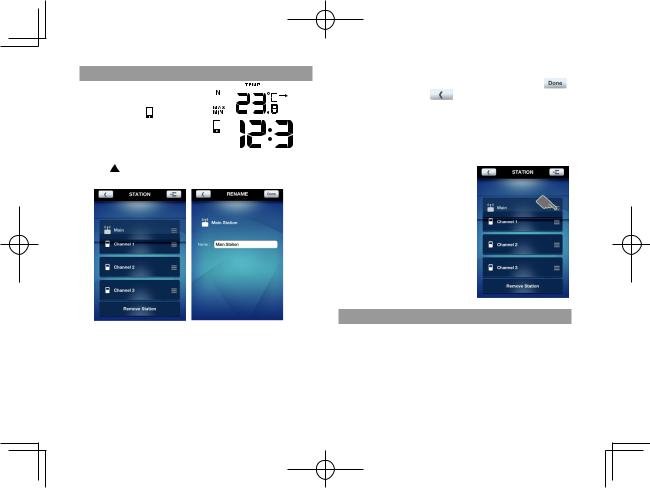
1.Tap  to enter SETTINGS screen
2.Tap on STATION area.
3.Tap Pair Up. Searching… displays. If you want to cancel the pairing, tap Cancel.
4.Once the pairing is successful, it will return to
STATION screen.
|
|
|
|
|
|
|
|
|
|
|
|
|
|
|
|
|
|
5. Tap on each channel to rename it. (Up to 20 |
EN |
|
|
||
|
|
|
|
||
|
|
|
|
||
characters including space are allowed). Tap |
|
|
|||
if completed. Tap |
to exit. |
|
|
||
To remove sensor:
To remove any sensor from the weather station, Tap Remove Station on STATION screen, all the sensors will be removed at the same time.
To reposition the sensors on screen:
1.On STATION screen, tap
 .
.
2.Press and hold  at the right side of a sensor. Drag it to your desired position.
3.Tap  to confirm.
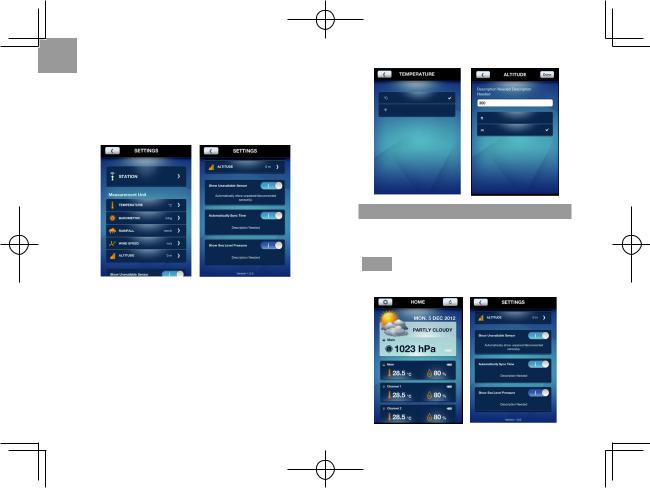
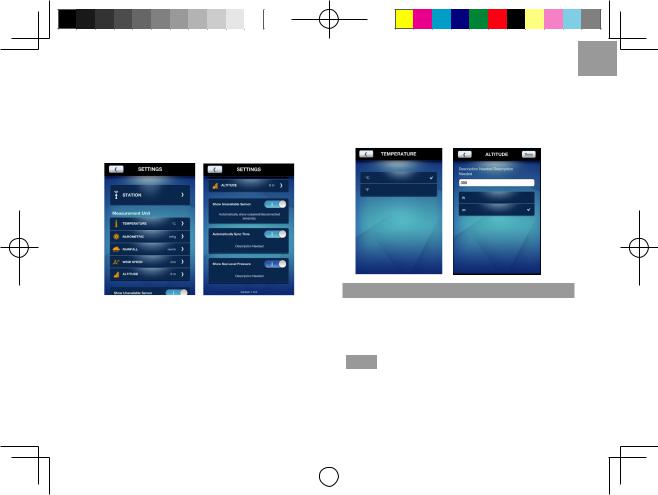
SETTINGS
You can set your weather station through the application, such as measurement units.
The settings are as follows:
•Temperature
•Barometric
•Rainfall (not available in BAR218HG)
EN
•Wind speed (not available in BAR218HG)
•Altitude
•Show Unavailable Sensor
•Automatically Sync Time
•Show Sea Level Pressure
To select the measurement unit:
1.Tap  to view the measurement unit options.
2.Tap on your desired unit.
3.Tap  to go back to the previous screen.
To set altitude:
The altitude reflects the distance from sea level at your position.
1.Fill in the altitude of your main unit in the blank.
2.Tap Done.
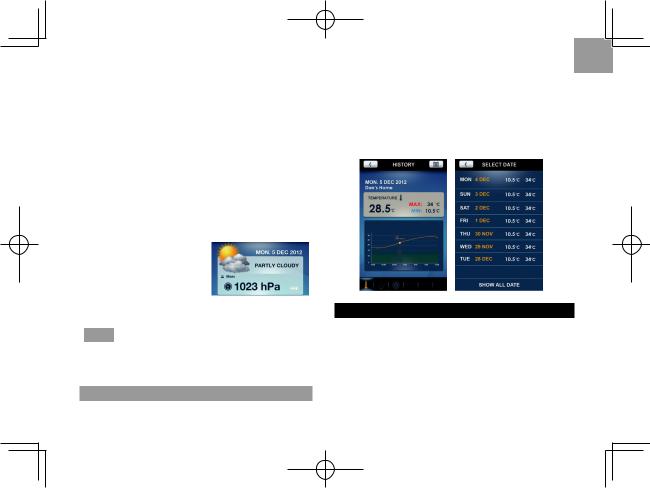
VIEW CURRENT READINGS
You can directly view all the weather readings from different sensors through the application at a time. The readings are in HOME screen.
NOTE If low battery icon  displays on
the screen, please replace the batteries for the corresponding device.
To show unavailable sensor:
If the sensor is out of range, the readings are interrupted and (dash mode) displays on the screen. If you do not want to show the unavailable sensor:
•On SETTINGS screen, touch and slide the button to right to turn on the function, or sliding to left to turn it off.
To automatically synchronize time:
Time and date on your weather station could be automatically synchronized by your mobile device.
•On SETTINGS screen, touch and slide the button to right to turn on the function, or sliding to left to turn it off.
To show sea level pressure:
After the altitude is input, you can view the sea level
pressure on the HOME screen.
•On SETTINGS screen, touch and slide the button to right to turn on the
function, or sliding to left to turn it off.
NOTE When altitude is set to 0 meter, the pressure reading is the local pressure. If the altitude is set to the current location, the new pressure reading will be displayed as a sea level pressure.
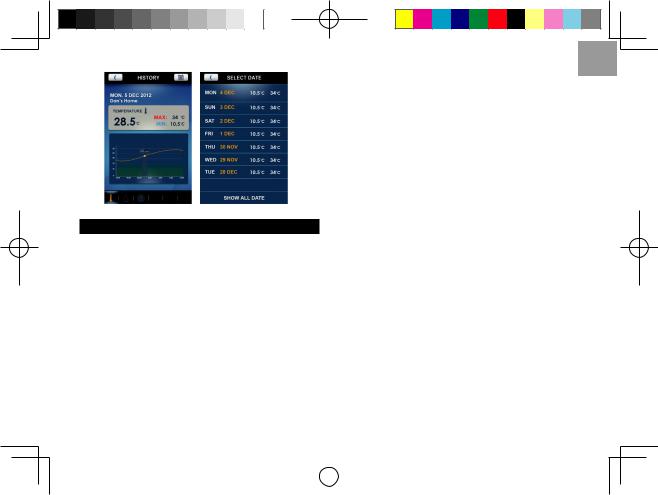
VIEW HISTORY READINGS
You can view history through the application. The
history could also be presented in graphs (past 24 hours or past 7 days).
To view the history:
1.Tap on your desired sensor area on the screen.
2.Tap 

 to select your desired data or tap
 to sort the data by date.
PRECAUTIONS
•Do not subject the unit to excessive force, shock, dust, temperature or humidity.
•Do not cover the ventilation holes with any items such as newspapers, curtains etc.
•Do not immerse the unit in water. If you spill liquid over it, dry it immediately with a soft, lint-free cloth.
EN
10
EN
•Do not clean the unit with abrasive or corrosive materials.
•Do not tamper with the unit’s internal components. This invalidates the warranty.
•Only use fresh batteries. Do not mix new and old batteries.
•Images shown in this manual may differ from the actual display.
•When disposing of this product, ensure it is collected separately for special treatment and not as household waste.
•Placement of this product on certain types of wood may result in damage to its finish for which Oregon Scientific will not be responsible. Consult the furniture manufacturer's care instructions
for information.
•The contents of this manual may not be reproduced without the permission of the manufacturer.
•Do not dispose old batteries as unsorted municipal waste. Collection of such waste separately for special treatment is necessary.
•Please note that some units are equipped with a battery safety strip. Remove the strip from the battery compartment before first use.
NOTE The technical specifications for this product and the contents of the user manual are subject to change without notice.
NOTE Features and accessories will not be available in all countries. For more information, please contact your local retailer.
SPECIFICATIONS
TYPE |
DESCRIPTION |
|
MAIN UNIT |
|
|
L x W x H |
7.32 x3.7 x 2.13 in |
|
186 x 94 x 54 mm |
||
|
||
Weight |
223 g without battery |
|
Temperature range |
-5°C to 50°C (23°F to 122°F) |
|
|
|
|
Signal frequency |
433 MHz |
|
Humidity range |
25% - 95% |
|
Power |
3 x UM-3 (AA) 1.5V batteries |
|
Temperature range |
3°C to -2°C |
|
REMOTE UNIT (THGN132N) |
||
L x W x H |
50 x 22 x 96 mm |
|
(1.97 x 0.87 x 3.78 in) |
||
|
||
Weight |
62 g (2.22 ounces) without battery |
|
Transmission range |
98 ft (30 m) unobstructed |
|
Temperature range |
-20°C to 60°C (-4°F to 140°F) |
|
Humidity range |
25% - 95% |
|
Power |
1 x UM-3 (AA) 1.5 V battery |
|
11
ABOUT OREGON SCIENTIFIC
Visit our website www.oregonscientific.com to learn more about Oregon Scientific products.
For any enquiry, please contact our Customer Services at info@oregonscientific.com.
Oregon Scientific Global Distribution Limited reserves the right to interpret and construe any contents, terms and provisions in this user manual and to amend it, at its sole discretion at any time without prior notice. To the extent that there is any inconsistency between the English version and any other language versions, the English version shall prevail.
EU-DECLARATION OF CONFORMITY
Hereby, Oregon Scientific, declares that Weather@
Home Bluetooth-enabled Weather Station (model: BAR218HG) is in compliance with the essential requirements and other relevant provisions of Directive 1999/05/EC. A copy of the signed and dated Declaration of Conformity is available on request via our Oregon Scientific Customer Service.
COUNTRIES RTTE APPROVED COMPLIED
All EU countries, Switzerland CH and Norway N
FCC & IC STATEMENT
This device complies with Part 15 of the FCC Rules. Operation is subject to the following two conditions:
(1) This device may not cause harmful interference, and (2) This device must accept any interference received, including interference that may cause undesired operation.
WARNING Changes or modifications not expressly approved by the party responsible for compliance could
void the user's authority to operate the equipment.
NOTE This equipment has been tested and found to comply with the limits for a Class B digital device, pursuant to Part 15 of the FCC Rules. These limits
are designed to provide reasonable protection against harmful interference in a residential installation.
This equipment generates, uses and can radiate radio frequency energy and, if not installed and used in accordance with the instructions, may cause harmful interference to radio communications. However, there is no guarantee that interference will not occur in a particular installation. If this equipment does cause harmful interference to radio or television reception, which can be determined by turning the equipment off and on, the user is encouraged to try to correct the
interference by one or more of the following measures: Reorient or relocate the receiving antenna.
Increase the separation between the equipment
and receiver.
12
EN
EN
Connect the equipment into an outlet on a circuit different from that to which the receiver is connected.
Consult the dealer or an experienced radio / TV technician for help.
DECLARATION OF CONFORMITY
The following information is not to be used as contact for support or sales. Please call our customer service number (listed on our website at
www.oregonscientific.com), or on the warranty card for this product) for all inquiries instead.
We |
|
Name: |
Oregon Scientific, Inc. |
Address: |
10778 SW Manhasset Drive, |
|
Tualatin, OR 97062,USA |
Telephone No.: |
1-800-853-8883 |
Declare that the product |
|
Product No.: |
Model: BAR218HG |
Product Name: |
Weather@Home |
Station |
Bluetooth-enabled Weather |
|
|
Manufacturer: |
IDT Technology Limited |
Address: |
Block C, 9/F, Kaiser Estate, |
|
Phase 1,41 Man Yue St., |
|
Hung Hom, Kowloon, |
|
Hong Kong. |
13
Weather@Home
Stazione meteorologica con connessione Bluetooth
Model: BAR218HG
Manuale utente |
|
INdice |
|
Introduzione----------------------------------------------------------------- |
2 |
Panoramica------------------------------------------------------------------ |
2 |
Vista anteriore----------------------------------------------------------- |
2 |
Vista posteriore--------------------------------------------------------- |
3 |
Sensore remoto--------------------------------------------------------- |
3 |
Come iniziare--------------------------------------------------------------- |
4 |
Inserire le batterie------------------------------------------------------ |
4 |
Sensore remoto------------------------------------------------------------ |
4 |
Trasmissione dati del sensore-------------------------------------- |
5 |
Orologio---------------------------------------------------------------------- |
5 |
Impostazione manuale dell’orologio------------------------------- |
5 |
Previsioni del tempo----------------------------------------------------- |
5 |
Messaggio avviso meteo----------------------------------------------- |
5 |
Temperatura e umidità--------------------------------------------------- |
6 |
Allarme gelo------------------------------------------------------------- |
6 |
Tendenze atmosferiche----------------------------------------------- |
6 |
1
IT
Fase lunare------------------------------------------------------------------ |
6 |
Retroilluminazione-------------------------------------------------------- |
7 |
Reset (Ripristino)---------------------------------------------------------- |
7 |
Collegamento al vostro Dispositivo mobile---------------------- |
7 |
Sincronizzazione della vostra Stazione meteo------------------ |
7 |
Impostazioni------------------------------------------------------------- |
8 |
Visualizzazione dei dati attuali-------------------------------------- |
9 |
Visualizzazione dello storico dei dati------------------------------ |
10 |
Precauzioni------------------------------------------------------------------ |
11 |
Specifiche-------------------------------------------------------------------- |
12 |
Informazioni su Oregon Scientific ---------------------------------- |
12 |
Dichiarazione di conformitá ue--------------------------------------- |
12 |
|
|
|
|
02-300103545-00004-10-IT_R1.indd 1 |
|
14-3-13 11:07 |
|
|
|
|
|

IT
INTRODUZIONE
Grazie per aver scelto il nostro Oregon Scientific Weather@Home Stazione meteorologica con connessione Bluetooth e indicazione della temperatura interna ed esterna.
NOTA Si consiglia di tenere questo manuale a portata di mano durante l’utilizzo del prodotto. Il
manuale contiene pratiche istruzioni dettagliate, dati tecnici e avvertenze che è necessario conoscere.
PANORAMICA
VISTA ANTERIORE
1.Indicatore ricezione sensore remoto e canale esterno selezionato
scarica del sensore remoto esterno : Previsioni meteorologiche per le prossime
: messaggio
avviso meteo
5. Visualizzazione temperatura interna (corrente/ /MIN) con andamento temperature
connessione Bluetooth
:batteria scarica unità principale
8.Indicatore LED per allarme ghiaccio
2
9.MODE(MODALITÀ): modifica impostazioni / visualizzazione
10.MEM: visualizzazione valori attuali, massimi e minimi di temperatura / umidità
|
|
|
|
02-300103545-00004-10-IT_R1.indd 2 |
|
14-3-13 11:07 |
|
|
|
|
|
11.LIGHT (LUCE): attivazione retroilluminazione
12./ : aumento / diminuzione valore delle impostazioni; selezionare canali esterni (1-5); attivazione / disattivazione MODE (MODALITÀ) di accoppiamento.
13.AM/PM: mattina/pomeriggio.
MM-GG / GG-MM / AA: calendario / orologio con giorno della settimana (ora: minuti con visualizzazione secondi)
14.Visualizzazione umidità interna (valori attuali/MAX/ MIN) con andamento umidità
15.Visualizzazione fase lunare
16.Visualizzazione umidità esterna (valori attuali/MAX/ MIN) con andamento umidità
17.Visualizzazione temperatura esterna (corrente/ MAX/MIN) con andamento temperatura
VISTAPOSTERIORE
1.°C / °F: selezionare unità di misura temperatura
2.RESET (RIPRISTINO): ripristino dell’unità alle impostazioni di default
3.Compartimento batterie
3
IT
SENSORE REMOTO
2
1
4
3
 5
5
|
|
|
|
02-300103545-00004-10-IT_R1.indd 3 |
|
14-3-13 11:07 |
|
|
|
|
|

IT
1.Indicatore LED di stato
2.Foro di montaggio a parete
3.Compartimento batterie
4.Foro per RESET (RIPRISTINO)
5.Interruttore di CHANNEL (CANALE)
COME INIZIARE
INSERIRE LE BATTERIE
1.Rimuovere il compartimento batterie.
2.Inserire le batterie, rispettando le polarità (+/-).
3.Premere RESET (RIPRISTINO) dopo ogni sostituzione di batterie
UBICAZIONE |
SIGNIFICAT |
|
|
|
|
Area orologio / sveglia |
Batterie scariche unità |
|
principale |
||
|
||
|
|
|
Area temperatura esterna |
Batterie sensore |
|
scariche |
||
|
SENSORE REMOTO
L’unità principale può raccogliere dati da fino a 5 sensori.
Per impostare il sensore:
1.Aprire il compartimento batterie.
2.Selezionare un canale quindi premere RESET (RIPRISTINO).
3.Chiudere il coperchio delle batterie.
4.Mettere il sensore entro 98 piedi (30 m) dall’unità principale usando il supporto da tavolo oppure il montaggio a parete.
TIP La posizione ideale per il sensore sarebbe qualsiasi posizione all’esterno della casa ad un’altezza non superiore a 5 piedi (1.5 m) ed al riparo dalla luce solare diretta o dall’umidità per una lettura accurata.
1.5 m (5 ft)
NOTA Usare batterie alcaline per un funzionamento più lungo e batterie al litio d’uso comune per temperature al disotto del punto di congelamento.
4
|
|
|
|
02-300103545-00004-10-IT_R1.indd 4 |
|
14-3-13 11:07 |
|
|
|
|
|
TRASMISSIONE DATI DEL SENSORE
Come ricercare un sensore:
Premere e tener premuto e MODE (MODALITÀ) contemporaneamente.
L’icona di ricezione del sensore nell’area del sensore remoto mostra lo stato:
ICONA DESCRIZIONE
L’unità principale sta cercando i(l) sensore(i).
È stato trovato un canale.
Non si trova il sensore.
TIP La portata di trasmissione può variare in dipendenza di molti fattori. Potreste dover provare con diverse posizioni per ottenere i risultati migliori.
OROLOGIO
IMPOSTAZIONE MANUALE DELL’OROLOGIO
1.Premere e tener premuto MODE (MODALITÀ).
2.Premere oppure
 per cambiare le impostazioni.
3.Premere MODE (MODALITÀ) per confermare.
4.L’ordine delle impostazioni è: formato ora 12/24, ora, minuti, anno, formato calendario (giorno-mese / mese-giorno), mese, giorno e lingua.
5
IT
Le opzioni della lingua sono Inglese (E), Tedesco (D), Francese (F), Italiano (I), e Spagnolo (S).
Per selezionare MODE (MODALITÀ) di visualizzazione:
Azionare MODE (MODALITÀ) per scegliere tra orologio con secondi / giorno della settimana / calendario / fase lunare.
PREVISIONI DEL TEMPO
Questo prodotto fornisce le previsioni del tempo per le successive 12 ore, entro un raggio di 19-31 miglia (30-50 km).
Soleggiato
Parzialmente nuvoloso
Nuvoloso
Piovoso
Nevoso
MESSAGGIO AVVISO METEO
I messaggi di avviso meteo forniscono indicazioni di probabili circostanze che possono sorgere sulla base dei calcoli della stazione meteo. I significati degli avvisi sono illustrati di seguito:
|
|
|
|
02-300103545-00004-10-IT_R1.indd 5 |
|
14-3-13 11:07 |
|
|
|
|
|
IT
AVVISO MESSAGGIO
Rischio di alte temperature
Rischio di venti ad alta velocità
Rischio di una tempesta
Rischio di nebbia
Rischio di ghiaccio
TEMPERATURA E UMIDITÀ
Selezionare unità di misura temperatura:
•Selezionare °C oppure °F per lettura temperature usando uno spillo o la punta di una penna.
Per selezionare le letture di un sensore esterno:
• Azionare per selezionare la lettura del sensore desiderato.
Per fare una scansione automatica dei sensori:
• Premere e tener premuto e MEM contemporaneamente per visualizzare i dati di ogni sensore per 3 secondi.
• Per terminare premere .
.
Per visualizzare le registrazioni correnti, minime e massime del giorno di un sensore selezionato:
•Azionare MEM.
6
Per cancellare le registrazioni:
•Premere e tener premuto MEM.
ALLARME GELO
Se il sensore del canale 1 scende da 37°F a 28°F (da 3°C a -2°C), l’indicatore LED lampeggerà; l’indicatore smetterà di lampeggiare una volta che la temperatura esce da quell’intervallo.
•Premere contemporaneamente e per disarmare l’avviso di allarme ghiaccio.
NOTA Poiché l’allarme ghiaccio si applica solo al canale 1, per impedire il lampeggiamento del LED, selezionare il canale 2 o 5 per un sensore esterno.
TENDENZE ATMOSFERICHE
Le icone delle tendenze della temperatura, umidità e pressione sono basate sulle letture recenti del sensore.
IN AUMENTO |
STABILE |
IN DIMINUZIONE |
|
|
|
|
|
|
FASE LUNARE
Selezionare MODE (Modalità) fino ad accedere alla
funzione FASE LUNARE; premere oppure
 per scorrere velocemente gli anni (dal 2001 al 2099).
|
|
|
|
02-300103545-00004-10-IT_R1.indd 6 |
|
14-3-13 11:07 |
|
|
|
|
|
|
|
|
|
|
|
|
|
|
|
|
|
|
|
|
|
|
|
|
|
|
|
|
|
|
|
|
|
|
Luna nuova |
|
|
Luna piena |
||||||
|
|
|
|
|
|
|
|
|
|
|
|
|
|
|
|
Falce di luna |
|
|
Luna gibbosa |
||||||
|
|
|
crescente |
|
|
calante |
||||||
|
|
|
Primo quarto |
|
|
Ultimo quarto |
||||||
|
|
|
|
|
|
|
|
|
|
|
|
|
|
|
|
Luna gibbosa |
|
|
Falce di luna |
||||||
|
|
|
crescente |
|
|
calante |
||||||
NOTA Le icone delle stelle intorno alla fase lunare saranno visualizzate dalle 6 della sera alle 6 del mattino successivo.
RETROILLUMINAZIONE
Premere LIGHT (LUCE) per attivare la retroilluminazione per 5 secondi.
RESET (RIPRISTINO)
Premere RESET (RIPRISTINO) per ritornare alle impostazioni di default.
COLLEGAMENTO AL VOSTRO
DISPOSITIVO MOBILE
Potete impostare da remoto la vostra stazione meteo e leggere le informazioni sul tempo via Bluetooth 4.0 usando il vostro dispositivo mobile e scaricando l’applicazione da Apple Store e Google Play Store. Per trovare rapidamente l’applicazione scrivete
7
IT
‘Weather@Home’ come parola chiave nel motore di ricerca.
Assicuratevi che il vostro dispositivo mobile sia compatibile con iOS 5 oppure Android 4.3 con Bluetooth 4.0.
SINCRONIZZAZIONE DELLA VOSTRA
STAZIONE METEO
Prima di tutto dovete 


 sincronizzare la vostra


 stazione meteo con il vostro

 dispositivo mobile. Il simbolo
lampeggerà sullo schermo della stazione meteo mentre
la sincronizzazione è in corso e resterà acceso dopo che la
sincronizzazione è terminata.
Premere per 30 secondi al fine di effettuare la sincronizzazione con l'unità principale.
|
|
|
|
02-300103545-00004-10-IT_R1.indd 7 |
|
14-3-13 11:08 |
|
|
|
|
|
IT
1. Ciccare su  per entrare nello schermo di SETTINGS (IMPOSTAZIONI).
2.Ciccare sull’area STATION (STAZIONE).
3.Ciccare su Pair Up (Accoppia). Apparirà la scritta Searching… (sto cercando….) Se volete annullare la sincronizzazione, cliccare su Cancel (Cancellazione).
4.Una volta che la sincronizzazione ha avuto successo, lo schermo ritornerà su STATION (STAZIONE).
5.Cliccate su ogni canale per rinominarlo. (Sono
ammessi fino a 20 caratteri inclusi gli spazi). Ciccare su  se completato. Ciccate su
  per uscire.
8
Per rimuovere un sensore:
Per rimuovere qualsiasi sensore dalla stazione meteo, cliccate su Remove Station (Rimuovere stazione) sullo schermo STATION (STAZIONE), tutti I sensori saranno rimossi contemporaneamente.
Per riposizionare i sensori sullo schermo:
1.Sullo schermo STATION (STAZIONE), cliccate su  .
.
2.Premere e temere premuto su sul lato destro di un sensore. Trascinatelo nella posizione desiderata.
3.Cliccate su  per confermare.
IMPOSTAZIONI
Potete impostare la vostra stazione meteo tramite l’applicazione, come per esempio le unità di misura.
Le impostazioni sono le seguenti:
•Temperatura
•Barometro
|
|
|
|
02-300103545-00004-10-IT_R1.indd 8 |
|
14-3-13 11:08 |
|
|
|
|
|
•Piovosità (non disponibile in BAR218HG)
•Velocità del vento (non disponibile in BAR218HG)
•Altitudine
•Mostra sensori non disponibili
•Sincronizzazione automatica dell’ora
•Mostra pressione a livello del mare
Per selezionare l’unità di misura:
1.Cliccare su  per visualizzare le opzioni delle unità di misura.
2.Cliccate sull’unità di misura desiderata.
3.Cliccate su  per tornare allo schermo precedente.
9
IT
Per impostare l’altitudine:
L’altitudine rispecchia la distanza dal livello del mare alla vostra posizione.
1.Immettere l’altitudine della vostra unità principale nello spazio vuoto.
2.Cliccate su Done (Completato).
VISUALIZZAZIONE DEI DATI ATTUALI
Direttamente dall’applicazione, potete visualizzare contemporaneamente tutti i dati rilevati dai sensori remoti. I dati vengono visualizzati sulla HOME (principale).
NOTA Se l’icona di batterie scariche  appare
sullo schermo, sostituite le batterie per il dispositivo corrispondente.
|
|
|
|
02-300103545-00004-10-IT_R1.indd 9 |
|
14-3-13 11:08 |
|
|
|
|
|

IT
Per mostrare la pressione a livello del mare:
Dopo che avete immesso l’altitudine potete visualizzare la pressione al livello del mare
sullo schermo HOME (PRINCIPALE).
• Sullo schermo SETTINGS (IMPOSTAZIONI), toccate e fate scorrere verso destra il tasto per attivare la funzione oppure verso sinistra per disattivarla.
Per visualizzare il sensore non disponibile:
Se il sensore è fuori portata le letture sono interrotte e lo schermo va in MODE (MODALITÀ) trattini Se non volete mostrare il sensore non disponibile:
•Sullo schermo SETTINGS (IMPOSTAZIONI), toccate e fate scorrere verso destra il tasto per attivare la funzione oppure verso sinistra per disattivarla.
Per sincronizzare l’ora automaticamente:
Data e ora sulla tua stazione meteo possono essere sincronizzate automaticamente dal tuo dispositivo mobile.
•Sullo schermo SETTINGS (IMPOSTAZIONI), toccate e fate scorrere verso destra il tasto per attivare la funzione oppure verso sinistra per disattivarla.
10
NOTA Quando l’altitudine è impostata a 0 metri, la lettura della pressione è la pressione locale. Se l’altitudine è impostata alla posizione corrente, la nuova lettera della pressione sarà visualizzata come pressione a livello del mare.
VISUALIZZAZIONE DELLO STORICO DEI DATI
Potete visualizzare lo storico tramite l’applicazione. Lo storico può anche essere presentato come grafici (le ultime 24 ore o gli ultimi 7 giorni).
Per visualizzare lo storico:
1.Cliccate sull’area del sensore desiderato sullo schermo.
2.Cliccate su 

 per selezione i dati
desiderati o cliccate su |
per ordinare i dati |
per data. |
|
|
|
|
|
02-300103545-00004-10-IT_R1.indd 10 |
|
14-3-13 11:08 |
|
|
|
|
|
PRECAUZIONI
•Non sottoporre il prodotto a forza eccessiva, urti, polvere, temperatura o a umidità.
•Non otturare i fori di aerazione con oggetti come giornali, tende, etc.
•Non immergere l’unità in acqua. Se si versa del liquido sul prodotto, asciugarlo immediatamente con un panno morbido e liscio.
•Non pulire l’unità con materiali abrasivi, corrosivi o alcolici.
•Non graffiare il display LCD con oggetti duri in quanto si potrebbero causare danni.
•Non manomettere i componenti interni dell’unità. In questo modo si invalida la garanzia.
11
IT
•Utilizzare solo batterie nuove. Non mescolare batterie nuove con batterie vecchie.
•Le immagini del manuale possono differire dalla realtà.
•Al momento dello smaltimento del prodotto, conferirlo ai centri di raccolta specifici.
•Decliniamo ogni responsabilità per eventuali danni causati dal posizionamento del prodotto su determinati tipi di legno. Consultare le istruzioni fornite dal fabbricante del mobile per ulteriori informazioni.
•Il contenuto di questo manuale non può essere riprodotto senza l’autorizzazione del fabbricante.
•Non smaltire le batterie vecchie come rifiuto non differenziato. È necessario che questo tipo di rifiuto venga smaltito separatamente per essere trattato in modo specifico.
•Alcune unità sono dotate di una striscia protettiva per le batterie. Rimuoverla dal vano batterie prima dell’utilizzo.
Le specifiche tecniche del prodotto e il contenuto del manuale per l’utente possono essere modificati senza preavviso.
|
|
|
|
02-300103545-00004-10-IT_R1.indd 11 |
|
14-3-13 11:08 |
|
|
|
|
|
IT
SPECIFICHE
TIPO |
DESCRIZIONE |
|
UNITÀ PRINCIPALE |
|
|
|
|
|
L x W x H |
7.32 x3.7 x 2.13 pollici |
|
(186 x 94 x 54 mm) |
||
|
||
Peso |
223 g (7.87once) senza batterie |
|
|
|
|
Intervallo |
da -5°C a 50°C (da 23°F a 122°F) |
|
temperature |
||
|
||
Frequenza segnale |
433 MHz |
|
Intervallo umidità |
25% - 95% |
|
|
|
|
Alimentazione |
3 batterie UM-3 (AA) da 1,5V |
|
Intervallo |
da 3°C a -2°C |
|
temperature |
||
|
||
UNITÀ REMOTA (THGN132N) |
||
|
|
|
L x W x H |
50 x 22 x 96 mm |
|
(1.97 x 0.87 x 3.78 pollici) |
||
|
||
|
|
|
Peso |
62 g (2,22 once) senza batterie |
|
|
|
|
Campo di |
98 piedi (30 m) senza ostruzioni |
|
trasmissione |
||
|
||
Intervallo |
da -20°C a 60°C (da -4°F a |
|
temperature |
140°F) |
|
|
|
|
Intervallo umidità |
25%-95% |
|
|
|
|
Alimentazione |
1 batteria UM-3 (AA) da 1,5 V |
|
|
|
|
12
INFORMAZIONI SU OREGON SCIENTIFIC
Per ulteriori informazioni sui prodotti Oregon Scientific, visitate il nostro sito web www.oregonscientific.com.
Per richiedere informazioni, contattate il nostro Servizio Clienti all’indirizzo info@oregonscientific.it
Oregon Scientific Global Distribution Limited si riserva il diritto di interpretare e definire eventuali contenuti, termini e disposizioni contenuti in questo manuale per l'utente e di modificarli, a sua esclusiva discrezione, in qualsiasi momento e senza preavviso. Nella misura in cui risultassero incongruenze tra la versione in inglese e quelle in altre lingue, farà fede la versione in inglese.
DICHIARAZIONE DI CONFORMITÁ UE
Con la presente Oregon Scientific dichiara che questo Weather@Home Stazione meteorologica con
connessione Bluetooth(Model: BAR218HG) è conforme ai requisiti essenziali ed alle altre disposizioni pertinenti stabilite dalla direttiva 1999/05/CE. Una copia firmata e datata della Dichiarazione di Conformità è disponibile, su richiesta, tramite il servizio clienti della Oregon Scientific.
PAESI CONFORMI ALLA DIRETTIVA R&TTE
Tutti i Paesi Europei, Svizzera CH
e Norvegia N
|
|
|
|
02-300103545-00004-10-IT_R1.indd 12 |
|
14-3-13 11:08 |
|
|
|
|
|
Weather@Home
Station météo mobile compatible à Bluetooth Modèle : BAR218HG
Manuel de l’Utilisateur
TABLE DES MATIÈRES |
|
Introduction----------------------------------------------------------------- |
2 |
Vue d’ensemble------------------------------------------------------------ |
2 |
Vue de face-------------------------------------------------------------- |
2 |
Vue arriere--------------------------------------------------------------- |
3 |
Sonde sans fil----------------------------------------------------------- |
3 |
Comment demarrer------------------------------------------------------- |
3 |
Insérer les piles--------------------------------------------------------- |
3 |
Sonde sans fil-------------------------------------------------------------- |
4 |
Transmission des donnees de la sonde-------------------------- |
4 |
Horloge----------------------------------------------------------------------- |
5 |
Horloge regler manuellement--------------------------------------- |
5 |
Previsions meteorologiques------------------------------------------ |
5 |
Message d’avertissement de la météo ---------------------------- |
5 |
Température et humidité------------------------------------------------ |
6 |
Avertissement de gel-------------------------------------------------- |
6 |
Tendances meteorologiques----------------------------------------- |
6 |
FR
Phase de la lune----------------------------------------------------------- |
6 |
Backlight (rétroéclairage)---------------------------------------------- |
7 |
Réinitialiser------------------------------------------------------------------ |
7 |
Connectez-vous a un telephone mobile--------------------------- |
7 |
Appariement de votre station meteomobile---------------------- |
7 |
Réglages----------------------------------------------------------------- |
8 |
Voir les affichages en cours----------------------------------------- |
9 |
Voir l’historique des affichages ------------------------------------- |
10 |
Specifications-------------------------------------------------------------- |
10 |
À propos d’Oregon Scientific ---------------------------------------- |
11 |
Europe - déclaration de conformité--------------------------------- |
11 |
FR
INTRODUCTION
Merci d'avoir choisi notre de Oregon Scientific Weather@Home Station météo mobile compatible à Bluetooth. En outre, il est également procédé à l'affichage d'images variables entre les températures intérieure et extérieure.
REMARQUE Veuillez conserver ce manuel à portée de main lorsque vous utilisez votre nouveau
produit. Il contient des instructions étape par étape instructions, ainsi que les spécifications techniques et avertissements que vous vous devez de connaître.
VUE D'ENSEMBLE
VUE DE FACE
1.L'indicateur de réception de la sonde sans fil et le canal extérieur sélectionné
faible de la sonde sans fil extérieure :: Plus de 12 heures de prévisions
météorologiques |
de pression |
d'avertissement de la météo |
: Message |
|
5.Affichage de la température intérieure (en cours/
MAX/MIN) avec la tendance de la température
Indicateur de connexion BLE
:pile faible de l'unité principale
8.Indicateur LED d'alerte du gel
9.MODE: réglages de modification / d'affichage
10.MEM: voir la température / l'humidité maximale, minimale ou en cours
11.(ECLAIRAGE): activer le rétro-éclairage
:augmenter/ réduire la valeur du réglage, basculer seulement le bouton pour sélectionner les canaux extérieurs (1-5); activer / désactiver le mode d'appariement.
13.AM/PM : matin/soir
MD/DM/Yr: calendrier / horloge avec les jours de la semaine (heure : minute avec un affichage de seconde)
14.Affichage de l'humidité intérieure (en cours/MAX/ MIN) avec la tendance de l'humidité
15.Affichage de la phase de la lune
16.Humidité extérieure (en cours/MAX/MIN) avec la tendance de l'humidité
17.Affichage de la température extérieure (en cours/
MAX/MIN) avec tendance de la température
VUE ARRIERE
1.°C / °F: Sélectionner une unité de température
2.RESET (REINITIALISER): réinitialiser l’appareil aux réglages par défaut.
3.Compartiment des piles
SONDE SANS FIL
2
1
4
3
 5
5
FR
1.Indicateur LED d'état
2.Trou de montage mural
3.Compartiment des piles
4.RESET (REINITIALISER) trou
5.CHANNEL (CANAL) interrupteur
COMMENT DEMARRER
INSÉRER LES PILES
1.Retirer le compartiment des piles.
2.Insérer les piles, faire correspondre les polarités (+/-).
FR
3.Appuyer sur RESET (REINITIALISER) après chaque changement de pile.
EMPLACEMENT |
SIGNIFICATION |
|
|
|
|
Zone Horloge / Alarme |
Pile faible de l'appareil |
|
principal |
||
|
||
Zone de température |
Piles faibles de la |
|
extérieure |
sonde sans fil |
|
|
|
SONDE SANS FIL
L'appareil principal peut collecter les données en provenance de jusqu'à 5 sondes.
Régler la sonde:
1.Ouvrir le compartiment des piles.
2.Sélectionner un canal puis appuyer RESET (REINITIALISER).
3.Fermer le compartiment des piles.
4.Placer la sonde sans fil à 98 pieds (30 m) de l'appareil principal à l'aide d'un support de table ou d'une fixation murale.
ASTUCE Les positions indiquées pour la sonde seront dans tout emplacement à l'extérieure de la maison à une hauteur inférieure à 5 pieds (1,5) et qui peut la protéger des rayons directs du soleil ou des conditions humides pour une lecture précise.
1.5 m (5 ft)
REMARQUE Utiliser des piles alcalines pour une plus grande longévité et des piles au lithium pour des températures en dessous de 0°c.
TRANSMISSION DES DONNEES DE LA SONDE
Rechercher une sonde:
Appui prolongé |
et sur MODE au même moment. |
L'icône de réception de la sonde dans la zone de la sonde sans fil présente l'état:
ICÔNE |
DESCRIPTION |
|
L'appareil principal recherche |
|
le(s) capteur(s). |
|
Un canal a été trouvé. |
|
|
|
Le capteur est introuvable. |
|
|
ASTUCE La plage de transmission peut varier en fonction de plusieurs facteurs. Vous pourrez avoir besoin d'expérimenter les différents emplacements pour obtenir de meilleurs résultats.
HORLOGE
HORLOGE REGLER MANUELLEMENT
1. |
Appui prolongé |
MODE. |
2. |
Appuyer |
ou sur changer le réglage. |
3.Appuyer sur MODE pour confirmer.
4.L'ordre de réglage est le suivant: format 12/24 heures, heure, minute, année, format du calendrier (jour-mois / mois-jour), mois, jour et langue.
Les options de langues disponibles sont l'anglais (E), l'allemand (D), le français(F), l'italien (I) et l'espagnol (S).
Sélectionner le mode d'affichage:
Alterner MODE pour choisir entre l'horloge avec secondes / jours de la semaine/ calendrier / phase de la lune.
PREVISIONS METEOROLOGIQUES
Ce produit prévoit plus de 12 heures de tendance météorologique dans un rayon de 19-31 miles (30-50 km).
FR
Ensoleillé
Partiellement nuageux
Nuageux
Pluvieux
Neigeux
MESSAGE D'AVERTISSEMENT DE LA MÉTÉO
Les messages d'avertissement de la météo fournissent des indications sur les éventuelles circonstances qui peuvent survenir en fonction des calculs de la station météo. Les significations des avertissements sont illustrées ci-après:
AVERTISSEMENT MESSAGE
Risque de hautes températures
Risque des vitesses de vent rapide
Risque d'orage
Risque de conditions brumeuses
Risque de conditions de glace
 Loading...