


 Loading...
Ohaus EP6102, EP612-220V, EP612, EP6102-220V, EP413D Instruction Manual
...
Ohaus Corporation
29 Hanover Road Florham Park, NJ 07932-0900
INSTRUCTION MANUAL
Balances
1

Ohaus Corporation, 29 Hanover Road, Florham Park, New Jersey, 07932, USA
DeclarationofConformity We,OhausCorporation,declareunderoursoleresponsibilitythatthebalancemodelslistedbelowmarkedwith“CE”-areinconformity withthedirectivesandstandardsmentioned.
Konformitätserkärung Wir,dieOhausCorporation,erkläreninalleinigerVerantwortung,dassdieuntenstehendenWaagentypen,gekennzeichnetmit“CE”-mitden genanntenRichtlinienundNormenübereinstimmen.
DéclarationdeconformitéNous,OhausCorporation,déclaronssousnotreseuleresponsabilité,quelestypesdebalanceci-dessouscité-munisdelamention
«CE»-sontconformesauxdirectivesetauxnormesmentionnéesci-après.
DeclaracióndeConformidad Nostras,OhausCorporation,declaramosbajoresponsabilidadexclusivaquelosmodelosdebalanzasindicadosacontinuación- coneldistintivo,CE’-estánconformesconlasdirectivasynormascitadas.
Dichiarazionediconformità Noi,OhausCorporation,U.S.A,dichiariamosottonostraunicaresponsabilità,cheitipidibilancespecificatidiseguito- contrassegnaticonlamarcatura“CE”-sonoconformialledirettiveenormecitate.
Balance Type/Waagentyp/Type de balance/Modelo de balanza/Tipo di biliancia Explorer and Voyager
|
|
|
|
|
|
|
|
|
|
|
|
Marked with: |
Directive |
Standard |
|
||||||
|
Gekennzeichnet mit: |
Richtlinie |
|
Norm |
|
|||||
|
Munis de la mention: |
Directive |
|
Norme |
|
|||||
|
Con el distintivo: |
Directiva |
|
Norma |
|
|||||
|
Contrassegnati con la |
Direttiva |
|
Norma |
|
|||||
|
Marcatura: |
|
|
|
|
|
|
|
|
|
|
|
|
|
|
|
|
|
|
|
|
|
|
|
EU |
73/23 Low Voltage |
IEC1010-1 & EN60950:1992 Safety Regulations |
|
||||
|
|
|
EU |
73/23 Niederspannung |
IEC1010-1 & EN60950:1992 Sicherheitsbestimmungen |
|
||||
|
|
|
EU |
73/23 Basse tension |
|
IEC1010-1 & EN60950:1992 Consignes de sécurité |
|
|||
|
|
|
EU |
73/23 Baja tensión |
|
IEC1010-1 & EN60950:1992 Disposiciones sobre seguridad |
|
|||
|
|
|
EU |
73/23 Bassa tensione |
|
IEC1010-1 & EN60950:1992 Prescrizioni . di sicurezza |
|
|||
|
|
|
|
|
|
|
|
|
||
|
|
|
EU |
89/336, 92/31, 93/68 |
|
EN55022:1987 Emissions |
|
|||
|
Year of attachment of |
|
Electromagnetic compatibility |
EN45501:1992, EN50082-1:1992 Immunity |
|
|||||
|
the CE mark |
|
EU 89/336, 92/31, 93/68 |
|
EN55022:1987 Funkstörungen |
|
||||
|
Jahr der ersten |
|
Elektromagnetische Verträglichkeit |
EN45501:1992, EN50082-1:1992 Immunität |
|
|||||
|
Eichung |
|
EU 89/336, 92/31, 93/68 |
|
EN55022:1987 Emissions parasites |
|
||||
|
Année de la premère |
|
Compatibilité électromagnétique |
|
EN45501:1992, EN50082-1:1992 Immunité |
|
||||
|
vérification |
|
EU 89/336, 92/31, 93/68 |
|
EN55022:1987 Radiointerferencias |
|
||||
|
Año de la primera |
|
Compatibilidad electromagnética |
|
EN45501:1992, EN50082-1:1992 Inmunidad |
|
||||
|
verificación |
|
EU 89/336, 92/31, 93/68 |
|
EN55022:Verträglichkeit 1987 Radiointerferenze |
|
||||
|
annodella prima |
|
Compatibilità elettromagnetica |
|
EN45501:1992, EN50082-1:1992 Immunità |
|
||||
|
verifica |
|
|
|
|
|
|
|
|
|
|
|
EU 90/384 NAWI |
|
EN45501:1992 Non Automatic Weighing Instruments |
|
|||||
|
|
|
|
|
||||||
|
|
|
EU 90/384 FNSW |
|
EN45501:1992 Für nicht selbsttätige Waagen |
|
||||
|
|
|
EU 90/384 BFNA |
EN45501:1992 Balances à fonctionnement non automatique |
|
|||||
|
|
|
EU 90/384 PBNA |
EN45501:1992 Para balanzas no automátäcas |
|
|||||
|
|
|
EU 90.384 BFNA |
EN45501:1992 Per bilance a funzionamento non automatics |
|
|||||
|
|
|
|
|
|
|
|
|
|
|
|
|
|
|
|
|
|
|
|
|
|
ISO9001CertificateforOhausCorporation. OhausCorporation,USA,wasexaminedandevaluatedin1994bytheBureauVeritasQualityInternational,BVQI, andwasawardedtheISO9001certificate. ThiscertifiesthatOhausCorporation,USA,hasaqualitysystemthatconformswiththeinternationalstandardsforquality managementandqualityassurance(ISO9000series). RepeatauditsarecarriedoutbyBVQIatintervalstocheckthatthequalitysystemisoperatedinthepropermanner. ISO9001-ZertifikatfürOhausCorporation. DieFirmaOhausCorporation,USA,wurde1994durchdasBureauVeritasQualityInternationalBVQIgeprüft,und erhieltdasISO9001Zertifikat. Diesesbescheinigt,dassOhausCorporation,USAübereinQualitätssystemverfügt,welchesdeninternationalenNormenfürQualitätsmanagement undQualitätssicherung(ISO9000er-Reihe)entspricht. AnlässlichvonWiederhol-AuditsdurchdasBVQIwirdperiodischüberprüft,obdasQualitätssystemzweckmässig gehandhabtwird.
CertificatISO9000pourOhausCorporation. LasociétéOhausCorporation,USA,aétécontrôléeen1994parBureauVeritasQualityInternationalBVQIeta obtenulecertificat,degréISO9001. Celui-ciattestequeOhausCorporation,USA,disposed’unsystèmequalitécorrespondantauxnormesinternationalespourlagestionde laqualitéetpourI’assurancequalité(degréISO9000). DesauditsrégulierseffectuésparlaBVQIvérifientsilesystèmequalitéestappliquédefaconappropriée. CertificadoISO9001paraOhausCorporation. LafirmaOhausCorporation,USA,hasidoinspeccionadaporlaBureauVeritasQualityInternational(BVQI)yha obtenidoelcertificadoISO9001. EstoacreditaqueOhausCorporation,USA,disponedeunsistemadecalidadquecumplelasnormasinternacionalesparagestiónygarantfa decalidad(ISOserie9000). ConocasióndelasinspeccionesderepetibilidadporpartedelaBVQI,secompruebaperiódicamentsielsistemadecalidadsemanipuladeforma correcta.
CertificatoISO9001perlaOhausCorporation.llsistemadigaranziadellaqualitàdellaSocietàOhausCorporation,USAècertificatoISO9001sindal1994dall
BureauVeritasQualityInternationalBVQI,ecosìfomiceladimostrazionecheilsuosistemadieGaranziaQualitàsoddisfaimassimirequisite. llsistemadellagaranziadella qualitàOhausCorporationvieneverificatoperiodicamentedallBVQI,dandocosievidenzadi.
2
Notice
Certifiedscales,scalesusedforlegalapplicationshavethegeneraltypedesignationE...5 /V...5andEUtypeApproval(T2914).The year
oftheinitialverificationisshownnexttotheCEmark. Suchscalesareverifiedinthefactoryandcarrythe"M"markontheactualscaleandthepackaging. Theyear oftheinitialverificationisshownnexttotheCEmark. IftheletterMisshownagainstasolidbackground,thescalemaybeputintooperationimmediately. Shouldthe backgroundbepartitionedandhatched,thescalemustbeverifiedatitsplaceofusebythecertifiedOhausservice. Ifnationalregulationslimitthedurationofthevalidity oftheverificationcertificateinindividualcountries,theenduserofsuchascaleispersonallyresponsibleforarrangingtherepeatverificationingoodtime.
Hinweise
Geeichte/eichpflichtigeWaagentragendieallgemeineTypenbezeichnungE... 5 / V...5. FürsieliegteineEUBauartzulassungvor(T2914). DasJahrdererstenEichung istnebendemCEZeichenaufgeführt. SolcheWaagensindabWerkgeeichtundtragendieKennzeichnung"M"aufdemGerätselbstundaufderVerpackung. Erscheint derBuchstabeMaufvollemGrund,darfdieWaagesofortinBetriebgenommenwerden. IstderGrundgeteiltundschraffiert,mussdieWaageamVerwendungsortdurch denzertifiziertenOhausServiceortsgeeichtwerden. SoferngemässdennationalenVorschriftenindeneinzelnenStaatendieGültigkeitsdauerderEichungbeschränkt ist,istderBetreibereinersolchenWaagefürdierechtzeitigeNacheichungselbstverantwortlich.
Remarques
Lesbalancesvérifiées/admissiblesàlavérificationportentladésignationdemodèlegénéraleE...5 / V...5.Ellesfontobjetl’ d’uneapprobationdemodèleUE(T2914). L’annéedelavérificationprimitiveestindiquéeàcôtédelamarqueCE. Cesbalancessontvérifidéesd’origineetportentmarquela "M"surI’appareillui-mêmeetsur l’emballage,SilalettreMapparaîtsurunfondtotalementvert,labalancepeutêtremiseenserviceimmédiatement. Silefondestdiviséethachuré,labalancedoitêtre vérifiéesurlelieud’ustilisationparleserviceaprès-venteOhauscertifié. Danslespaysoùladuréedevaliditédelavérificationestlimitéepardesprescriptions nationales,l’utilisateurestlui-mêmeresponsabledelavérificationultérieured’unetellebalanceentempsvoulu.
Notas
Lasbalanzasverificadas/verificablesllevanladesignatióngeneralE...5 /V...5ycuentanconunaaprobacióndemodeloUET2914)( .ELañodelaprimeraverficación estáindicadoalladodeldistintivoCE. EstasbalanzasestánverificadasenfábricayIlevanladesignatión"M"sobreelprop ioaparatoysobreelembalaje. Cuandola letraMaparecesobrefondosólido,labalanzasepuedeponerinmediatamenteenfuncionamiento. Sielfondoestádivididoyrayado,labalanzahadeserverificadaen ellugardeusoporelseviciotécnicoOhauscertificado. Siladuracióndelavalidezdelaverificaciónestálimitadadeacuerdoconlasnormasdelosdistintospaíses, elpropiousuariodetalbalanzaesresponsabledelaverificaciónposteriorasudebidotiempo.
Avvertenza
LebilanceapprovatehannoladenominazionedelmodelloE... 5 / V...5. Peresseesisteun’appprovazioneCEdeltipo. L’annodeliaprimaverificaèindicatoafiancodella marcaturaCE. Itipimarcaticonuncontrassegno"M"susfondoverdepienopossonoessereimpiegatidasubito. Itipimarcaticoniicontrassegno"M"susfondonero/ barratodiagonalmentedovrannoessereverificatisulluogod’installazionedaparted’untecnicoautorizzatodalServizioAssistenzaOhausoispettoredell’UfficioMetrico.
Questebilancesonostateverificateinfabbrica
erecanoilcontrassegno"M"sull’apparecchiostesso,esull’imballo.Éobbligodell’untentedenunciareladetenzionedellostrumentoall’ufficiometricocompetenteper territorioesottoporioaliaprescrittaverificaperiodicacomedadisposizioniministeriali.
3
NOTE: THIS EQUIPMENT HAS BEEN TESTED AND FOUND TO COMPLY WITH THE LIMITS FOR A CLASS A DIGITAL DEVICE, PURSUANT TO PART 15 OF THE FCC RULES.
THESE LIMITS ARE DESIGNED TO PROVIDE REASONABLE PROTECTION AGAINST HARMFUL INTERFERENCE WHEN THE EQUIPMENT IS OPERATED IN A COMMERCIAL ENVIRONMENT. THIS EQUIPMENT GENERATES, USES, AND CAN RADIATE RADIO FREQUENCY ENERGY AND, IF NOT INSTALLED AND USED IN ACCORDANCE WITH THE INSTRUCTION MANUAL, MAY CAUSE HARMFUL INTERFERENCE TO RADIO COMMUNICATIONS. OPERATION OF THIS EQUIPMENT IN A RESIDENTIAL AREA IS LIKELY TO CAUSE HARMFUL INTERFERENCE IN WHICH CASE THE USER WILL BE REQUIRED TO CORRECT THE INTERFERENCE AT HIS OWN EXPENSE.
THIS DIGITAL APPARATUS DOES NOT EXCEED THE CLASS A LIMITS FOR RADIO NOISE EMISSIONS FROM DIGITAL APPARATUS AS SET OUT IN THE INTERFERENCE-CAUSING EQUIPMENT STANDARD ENTITLED “DIGITAL APPARATUS”, ICES-003 OF THE DEPARTMENT OF COMMUNICATIONS.
CET APPAREIL NUMERIQUE RESPECTE LES LIMITES DE BRUITS RADIOELECTRIQUES APPLICABLES AUX APPAREILS NUMERIQUES DE CLASSE A PRESCRITES DANS LA NORME SUR LE MATERIEL BROUILLEUR : “APPAREILS NUMERIQUES”, NMB-003 EDICTEE PAR LE MINISTRE DES COMMUNICATIONS.
Unauthorized changes or modifications to this equipment are not permitted.
4
|
TABLE OF CONTENTS |
|
|
OVERVIEW OF CONTROLS ........................................................................................................................ |
7 |
|
OVERVIEW OF DISPLAY INDICATORS ...................................................................................................... |
8 |
1. |
GETTING TO KNOW YOUR BALANCE .............................................................................................................. |
9 |
1.1 |
Introduction ....................................................................................................................................................... |
9 |
2. |
INSTALLATION ................................................................................................................................................... |
9 |
2.1 |
Unpacking and Checking the Standard Equipment ............................................................................................. |
9 |
2.2 |
Selecting the Location ...................................................................................................................................... |
10 |
2.3 |
Setting Up and Leveling the Balance ................................................................................................................ |
10 |
2.4 |
Installing Cover Plate and Pan .......................................................................................................................... |
11 |
2.5 |
Installing Wind Shield ........................................................................................................................................ |
11 |
2.6 |
Connecting Power ............................................................................................................................................. |
11 |
3. |
OPERATING YOUR BALANCE ......................................................................................................................... |
12 |
3.1 |
The Menu (Basic Settings of the Instrument) ................................................................................. .................. |
12 |
3.2 |
Turning On the Balance ..................................................................................................................................... |
13 |
3.3 |
Calibration ..................................................................................................................................................... |
13 |
|
3.3.1 Internal Calibration (InCALTM) .................................................................................................................. |
15 |
|
3.3.2 Calibration Message ............................................................................................................................... |
16 |
|
3.3.3 Calibration Adjust ................................................................................................................................... |
17 |
|
3.3.4 Span Calibration ..................................................................................................................................... |
18 |
|
3.3.5 User Calibration ...................................................................................................................................... |
19 |
|
3.3.6 Linearity Calibration ................................................................................................................................ |
20 |
|
3.3.7 Calibration Test ....................................................................................................................................... |
21 |
|
3.3.8 Calibration GLP Printout ......................................................................................................................... |
22 |
3.4 |
Weighing ..................................................................................................................................................... |
23 |
3.5 |
Percent Weighing .............................................................................................................................................. |
24 |
3.6 |
Parts Counting .................................................................................................................................................. |
25 |
3.7 |
Animal Weighing ............................................................................................................................................... |
26 |
3.8 |
Weigh Below ..................................................................................................................................................... |
27 |
3.9 |
Printing Data ..................................................................................................................................................... |
27 |
4. |
SETTING UP YOUR BALANCE ........................................................................................................................ |
28 |
4.1 |
Setting Date and Time ...................................................................................................................................... |
28 |
4.2 |
Readout ..................................................................................................................................................... |
29 |
5
TABLE OF CONTENTS (Cont.)
4.3 |
Good Laboratory Practices (GLP) Data ............................................................................................................. |
30 |
|
4.4 |
Good Laboratory Practices (GLP) Set .............................................................................................................. |
30 |
|
4.5 |
Print ..................................................................................................................................................... |
31 |
|
4.6 |
RS232 ..................................................................................................................................................... |
32 |
|
4.7 |
Legal for Trade (LFT) ......................................................................................................................................... |
34 |
|
4.8 |
Mode ..................................................................................................................................................... |
35 |
|
4.9 |
Units ..................................................................................................................................................... |
36 |
|
4.10 |
Global ..................................................................................................................................................... |
36 |
|
4.11 |
Custom Unit ............................................................................................................................................... |
38 |
|
4.12 Menu Lock-Out Protection .......................................................................................................................... |
40 |
||
5. |
CARE AND MAINTENANCE ............................................................................................................................ |
41 |
|
5.1 |
Troubleshooting ................................................................................................................................................. |
41 |
|
5.2 |
RS232 Interface ................................................................................................................................................ |
42 |
|
5.3 |
Error Codes List ................................................................................................................................................ |
45 |
|
5.4 |
Information Messages ...................................................................................................................................... |
45 |
|
5.5 |
Service Information ........................................................................................................................................... |
46 |
|
5.6 |
Replacement Parts ........................................................................................................................................... |
46 |
|
5.7 |
Accessories ..................................................................................................................................................... |
46 |
|
5.8 |
Specifications ................................................................................................................................................... |
47 |
|
6
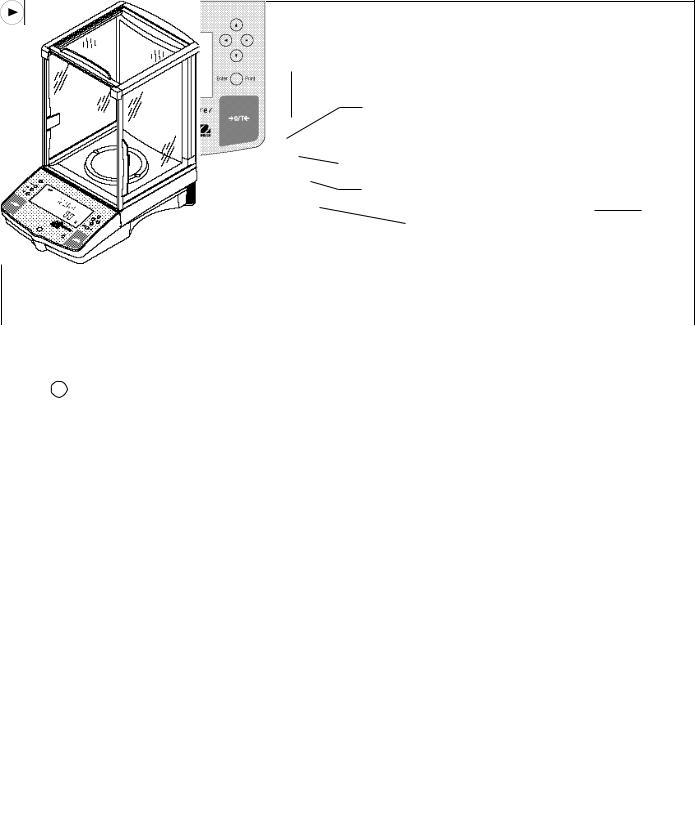
OVERVIEW OF CONTROLS
|
1 |
|
|
|
6 |
|
|
|
8 |
||
2 |
|
|
|
|
9 |
||
3 |
|
|
|
7 |
|||
4 |
10 |
||
11
5
|
|
|
12 |
|
|
|
|
|
|
|
|
|
|
|
No. |
Designation |
Function |
|
|
|
|
|
|
|
1 |
I |
Power on off button. |
|
|
2 |
Mode button |
Selects standard weighing, percent, parts counting and animal weighing modes. |
|
|
3 |
Units button |
Selects weighing units. |
|
|
4 |
Setup button |
Selects various submenus: calibration, date, time, readout, GLP data, GLP set, print, |
|
|
|
|
RS232, LFT, function, units, global, custom. |
|
|
5 |
>O/T< button |
When pressed, performs tare function and a center of zero function. |
|
|
6 |
button |
When pressed, travels up through submenus. |
|
|
7 |
button |
When pressed, travels down through submenus. |
|
|
8 |
button |
When pressed, travels to the left through menus. |
|
|
9 |
button |
When pressed, travels to the right through menus. |
|
|
10 |
Enter/Print button |
When in menus, selects item on display, otherwise prints data. |
|
|
11 |
Leveling feet |
Used to level the balance. |
|
|
12 |
Leveling indicator |
Indicates leveling position of the balance. |
|
|
|
|
|
|
|
7
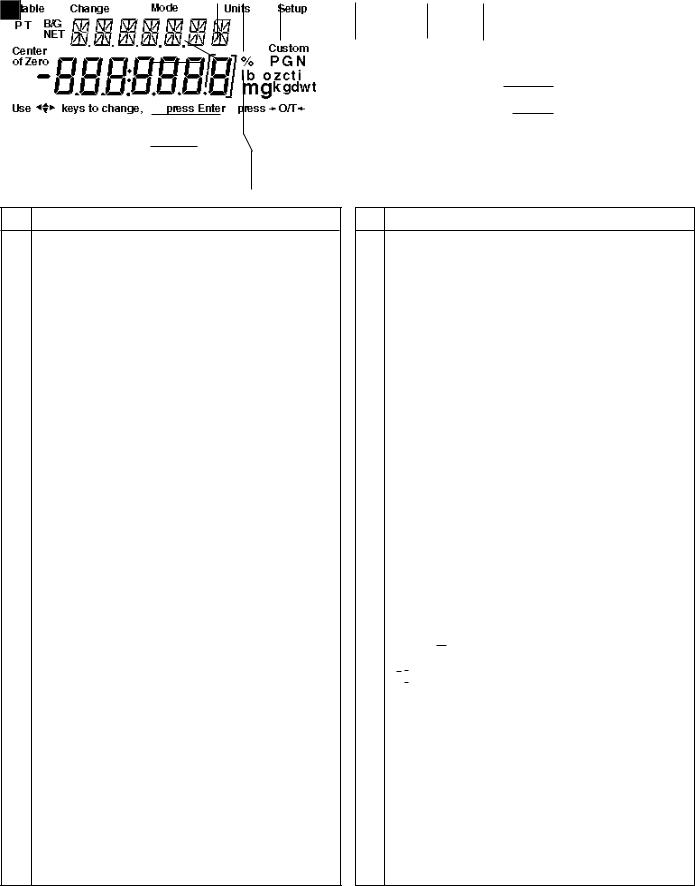
OVERVIEW OF DISPLAY INDICATORS
6 |
7 |
8 |
9 |
|
10 |
11 |
|
|
|
|
||||||||||||||
|
|
|
|
|
|
|
|
|
|
|
|
|
|
|
|
|
|
|
|
|
|
|
|
|
|
|
|
|
|
|
|
|
|
|
|
|
|
|
|
|
|
|
|
|
|
|
|
||
|
5 |
|
|
|
|
|
|
|
|
|
|
|
|
|
|
|
|
|
|
|
|
|
|
|
|
|
|
|
|
|
|
|
|
|
|
|
|
|
|
|
|
|
|
|
|
|
|
||
4 |
|
|
|
|
|
|
|
|
|
|
|
|
|
|
|
|
|
|
|
|
12 |
|
||
|
|
|
|
|
|
|
|
|
|
|
|
|
|
|
|
|
|
|
|
|
|
|
13 |
|
3 |
|
|
|
|
|
|
|
|
|
|
|
|
|
|
|
|
|
|
|
|
||||
|
|
|
|
|
|
|
|
|
|
|
|
|
|
|
|
|
|
|
|
|||||
|
|
|
|
|
|
|
|
|
|
|
|
|
|
|
|
|
|
|
|
|
|
|||
2 |
|
|
|
|
|
|
|
|
|
|
|
|
|
|
|
|
|
|
|
|
14 |
|
||
|
|
|
|
|
|
|
|
|
|
|
|
|
|
|
|
|
|
|
||||||
1 |
|
|
|
|
|
|
|
|
|
|
|
|
|
|
|
|
|
|
|
|
|
|
||
|
|
|
|
|
|
|
|
|
|
|
|
|
|
|
|
|
|
|
|
|
|
|||
|
|
|
|
|
|
|
|
|
|
|
|
|
|
|
|
|
|
|
|
|
||||
|
|
|
|
|
|
18 |
|
|
17 |
16 |
|
15 |
|
|
|
|
|
|
|
|||||
|
|
|
|
|
|
|
|
|
|
|
|
|
|
|
|
|
|
|
|
|
|
|
|
|
No. Function
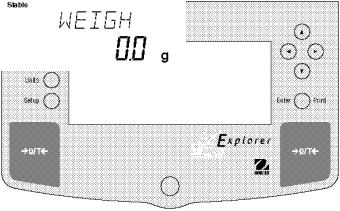
1Use (Pointer Group) key to change - used to prompt the user while navigating through the menu system.
2Standard (7) segment numeric characters. Seven characters are available and are used for display ing weight values.
3Center of Zero - Indicates Center of Zero in Legal For Trade (LFT) has been selected in menu.
4P - This symbol is not used.
5T - This symbol is not used.
6Stable - Indicates that the measured value has become stable.
7B/G - This symbol is not used.
8Change - Is displayed together with Mode, Units or Setup signifying that a change to balance settings is being performed.
9Mode - Is displayed when the Mode button is pressed. Allows the user to know what area of the balance menu is being addressed.
10Units - Is displayed when the Units button is pressed. Allows the user to know what area of the balance menu is being addressed.
11Setup - Is displayed when the Setup button is pressed. Allows the user to know what area of the balance menu is being addressed.
No. Function
12(British Flag) - Are (14) segment alpha numeric characters. Seven characters are used to present features and functions.
13Custom - The user can input a factor to meet unique unit measure applications.
14Symbols for weighing modes, include: % - Percent weighing.
PC |
- Parts counting. |
GN |
- Grain. |
N |
- Newtons. |
m |
- Mommes. |
mg |
- Milligrams. |
g |
- Grams. |
kg |
- Kilograms. |
dwt |
- Pennyweight. |
lb |
- Pounds. |
oz |
- Ounces. |
ct |
- Carats. |
t- Taels. Taels are available in three types; Hong Kong, Singapore, and Taiwan.
ti - Tical.
oz t - Ounces troy.
15press >O/T< -This symbol is not used.
16
 - Differentiated digit for LFT.
17press Enter - Used as a prompt to the user to press the Enter button. The menu item displayed is accepted/selected.
18NET - Not Used
8
1. GETTING TO KNOW YOUR BALANCE
Please read through this section carefully, as it contains important information for safe and economical operation of your Explorer Balance.
1.1 Introduction
Thank you for deciding to purchase an Explorer Balance from Ohaus. Thanks to a new modular design, your Explorer Balance lets you adapt the balance to your changing needs. Remote displays, upgraded displays which can be table, wall or tower mounted are available as accessories. It offers a high level of operating convenience and useful functions to make accurate measurements. A unique LCD panel has a large 7 digit, 7 segment display which indicates the weight value of an item being measured and a 7 digit British Flag display (14 segments) which spells out items selected in the submenus. In addition, the display contains English words to indicate the status of the balance. Arrow indicators in the display prompt the user as to what panel keys are to be pressed to initiate a change. Panel controls are clearly marked as to their function with large Tare buttons on either side of the front panel. Operation and setup of the balance is straightforward and easy. The Explorer Balance is available in a variety of full scale capacities ranging from 62 grams to 8,100 grams with FineRangeTM range models available. Legal for Trade versions are available.
Behind your instrument stands OHAUS, a leading manufacturer of precision scales and balances. An Aftermarket Department with trained instrument technicians is dedicated to provide you with the fastest service possible in the event your instrument requires servicing. OHAUS also has a Customer Service Department to answer any inquiries regarding applications and accessories.
To ensure you make full use of the possibilities offered by your Explorer balance, we advise you to read through these operating instructions very carefully.
2. INSTALLATION
2.1 Unpacking and Checking the Standard Equipment
Open the package and remove the instrument and the accessories. Check the completeness of the delivery. The following accessories are part of the standard equipment of your new Explorer balance.
|
Analytical |
|
Top Loader |
|
Equipment |
62g, 110g, 162, |
210, 410, |
610g, 1550g, 2100g, |
6100g, 4100g, |
|
210g, 210/100g |
410/100g· |
4100g, 4100/1000g |
8100g |
∙ Pan 3.5 |
|
|
|
|
∙ Pan 4.75" |
|
|
|
|
∙ Pan 6" (0.01g units) |
|
|
|
* |
∙ Pan 8" (0.1g units) |
|
|
|
|
∙ Draft Shield |
|
|
|
|
∙ Wind Shield (6" Pan Units, 0.01g) |
|
|
|
* |
∙ AC Power Adapter |
|
|
|
|
∙ Instruction Manual |
|
|
|
|
∙ Warranty Card |
|
|
|
|
* 4100g, 6100g and 8100g balances with internal calibration are equipped with a 6" Pan and Windshield.
•Remove packing material from the instrument.
•Check the instrument for transport damage. Immediately inform your Ohaus dealer if you have complaints or parts are missing.
•Store all parts of the packaging. This packaging guarantees the best possible protection for the tranport of your instrument.
9
2.2 Selecting the Location
The balance should always be used in an environment which is free from excessive air currents, corrosives, vibration, and temperature or humidity extremes. These factors will affect displayed weight readings.
DO NOT install the balance:
∙ Next to open windows or doors causing drafts or rapid temperature changes.
∙ Near air conditioning or heat vents.
∙ Near vibrating, rotating or reciprocating equipment.
∙ Near magnetic fields or equipment that generates magnetic fields.
∙ On an unlevel work surface.
∙ Allow sufficient space around the instrument for ease of operation and keep away from radiating heat sources.
2.3 Setting Up and Leveling the Balance
Exact horizontal positioning and stable installation are prerequisites for repeatable results. To compensate small irregularites or inclinations at the location, the instrument can be leveled.
Leveling
Indicator
Leveling
Foot
For exact horizontal positioning, the balance is equipped with a level indicator located at the front on the control panel and two leveling feet located at the rear of the balance.
Position the balance in the intended operating location. Adjust the leveling feet at the rear of the balance until the air bubble in the indicator is centered.
NOTE: The instrument should be leveled each time its location is changed.
10
2.4 Installing Cover Plate and Pan
Balances in the range of 62g to 410g are shipped with the pan and the protective cover plate not installed. On balances equipped with a draft shield, slide open the side door and place the cover plate into position. Then, insert the pan into the center hole which is the measuring transducer. Higher capacity balances with 6" or 8" pans do not have a cover plate.
Pan
Cover Plate
2.5 Installing Wind Shield
Wind Shield
On 610g to 4100g balances with 0.01g resolution, a wind shield is required to reduce the possibility of air currents from disturbing the pan. When the wind shield is in place, air currents are deflected up over the pan.
Make sure the wind shield is firmly snapped into place.
NOTE: 4100g, 6100g and 8100g balances with internal calibration are equipped with a 6" Pan and Windshield.
2.6 Connecting Power
Connect the AC Adapter supplied to the three pin connector located at the rear of the balance.
The balance is now ready for operation.
AC Adapter Connection
Rear of Balance
11
3 OPERATING YOUR BALANCE
3.1 The Menu (Basic Settings of the Instrument)
The Explorer balance has three basic menus; each is selected by front panel buttons marked Mode, Units and Setup.
Mode Button
The Mode button, when pressed, permits the selection of four weighing modes which are: weigh, percent, count and animal weighing. These modes are controlled by an on or off selection made in the Setup menu under the submenu Mode as displayed.
Units Button
The Units button, when pressed, allows the balance to display values in selected measuring unit.
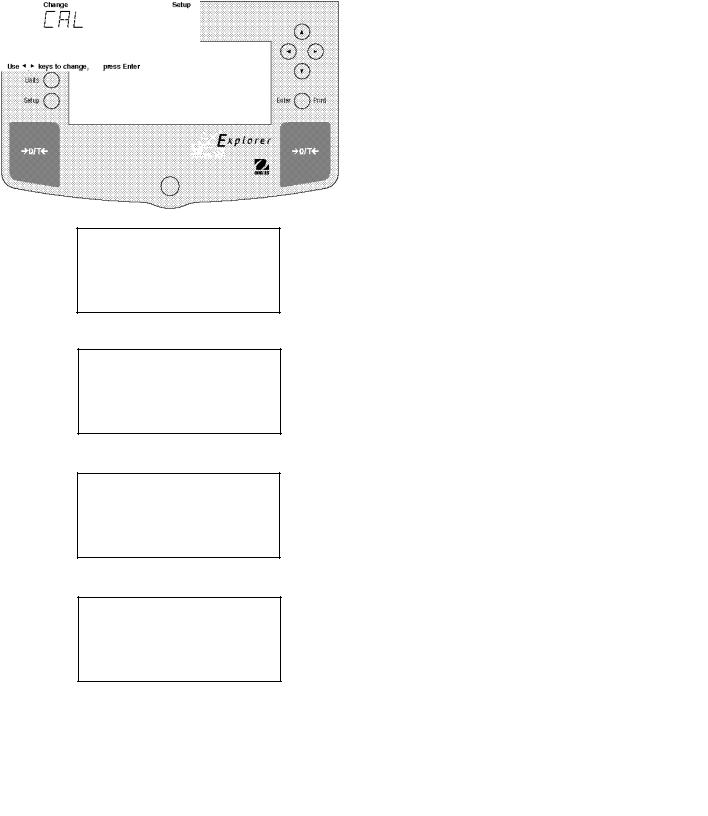
Setup Button
The Setup button, when pressed, allows entry into thirteen submenus which allows you to set the balance for specific operating parameters. Each of the thirteen submenus contain settings which are user selectable. The table below illustrates the various submenus and the functions which are selectable. The items shown on the menu, which are bolded, are the factory default settings. In other words, if you did not enter the Setup menu, the balance would function in the basic manner shown by the various settings which are bolded. The setup submenus shown below are arranged in the order as displayed in the balance.
START
CALIBRATION
InCALTM Calibration (No Lock)*
Span Calibration
User Calibration
Linearity Calibration
Calibration Test (No Lock)
Calibration Msg ON/OFF
Calibration Adj + 100 (0)
Lock ON/OFF
Exit
* (If option is installed.)
READOUT
Filter -0-, -1-, -2-, -3-
Stable .5d, 1d, 2d, 5d
Auto 0 OFF, .5d, 1d, 5d
Lock ON/OFF
Exit
Auto Print OFF, Cont, Inter, On Stb Interval Enter 1 seconds
Stable |
ON/OFF |
Numeric |
ON/OFF |
GLP Cont |
ON/OFF |
GLP Tare |
ON/OFF |
Reference |
ON/OFF |
Lock |
ON/OFF |
Exit
|
MODE |
Weigh |
ON/OFF |
Percent |
ON/OFF |
Count |
ON/OFF |
Animal |
ON/OFF |
Lock |
ON/OFF |
Exit |
|
|
|
SETUP SUBMENUS
DATE
Type m/d/y
Set Date
Exit
GLP DATA
User Number |
Enter 7 digits |
Project Number |
Enter 7 digits |
Lock |
ON/OFF |
Exit |
|
|
RS232 |
Baud |
300, 1200, 2400, 4800, 9600 |
Parity |
None, -E-, -Odd-, -0-, -1- |
Data |
7,8 |
Stop |
1, 2 |
Lock |
ON/OFF |
Exit |
|
|
|
|
UNITS |
Units |
ON/OFF |
Lock |
ON/OFF |
Exit |
|
|
|
TIME
Type 12 Hour/24 Hour
Set Time
Adjust Enter xx seconds
Exit
GLP SET
Time |
ON/OFF |
Balance ID |
ON/OFF |
User Number |
ON/OFF |
Project Number |
ON/OFF |
Difference |
ON/OFF |
Name |
ON/OFF |
Lock |
ON/OFF |
Exit |
|
LEGAL FOR TRADE
|
LFT LOCK |
ON/OFF |
|
|
(Locked using switch) |
||
|
|
|
|
|
|
|
|
|
GLOBAL |
||
|
List |
NO/YES |
|
|
Reset |
NO/YES |
|
|
Version |
Software No. |
|
|
Lock |
ON/OFF |
|
|
|
|
|
|
|
|
|
|
CUSTOM |
|
|
|
Factor |
Enter 7 digits |
|
|
Exponent |
Enter +3 to -3 |
|
|
LSD |
Enter .5 to 100 |
|
|
Lock |
ON/OFF |
|
|
Exit |
|
|
|
|
|
|
12
3.2 Turning On the Balance
The Explorer balance is ready to operate after the installation procedures are performed. When the balance is first turned on and it completes its checks, it can be used to weigh or tare materials without setting the menus.
It is recommended that you read this manual carefully and set the balance to operate for your specific applications using the procedures in Chapter 4 Setting up Your Balance and calibrate the balance before using.
The balance is a high precision instrument and will give you years of service if kept clean and handled carefully. If you have any problems operating the instrument or require additional information, please feel free to contact our Product Service Department at (800) 526-0659.
In this section, you will enter the menu for the first time. Do not worry if you are unfamiliar with the function of the buttons on the panel, the display provides the necessary coaching as you go along.
Power On/Off
To turn the balance ON, press the ON/OFF button (circled button with an I inside) located at the upper lefthand corner of the panel once. To turn OFF, press button again.
Stabilization
Before initially using the balance, allow time for it to adjust to its new environment. The balance only requires to be plugged in to warm up. Recommended warm up period is twenty (20) minutes. Analytical Class I balances require at least 2 hours. The internal circuits of the balance are powered whenever it is plugged into a power source.
Calibration
3.3 Calibration
Refer to paragraph 3.3 and calibrate the balance before proceeding.
Explorer balances offer a choice of five calibration methods: Internal Calibration (InCALTM), Span Calibration, User Calibration, Linearity Calibration, and CalTestTM.
• |
InCal TM |
Internal calibration (InCALTM) of the balance is accomplished by an internal mass (If option is |
|
|
installed). When CAL MSG is selected and set ON, CAL NOW is displayed when the |
|
|
balance requires calibration. When CAL MSG is set OFF, the message CAL NOW is not |
|
|
displayed. |
• |
Span - |
Span calibration ensures that the balance reads correctly within specifications using two |
|
|
weight values: zero and a weight value at incremental values of full capacity and or 100% of |
|
|
the balance’s full capacity. |
• |
User - |
User calibration is a method where the balance can be calibrated using a mass of known |
|
|
value and by entering that numeric value into the balance. |
•Linearity - Linearity calibration minimizes deviation between actual and displayed weights within the
balance’s weighing range. Three weight values are used: zero, a weight value at midpoint of the balance's weighing range, and a weight value at or near the balance’s specified capacity.
• |
Cal Test - |
Calibration test allows the stored calibration data to be tested against the current mass being |
|
|
used for the test. |
• |
Lock - |
Can be set on or off. When set on, Span, User and Linearity are locked out and cannot be |
|
|
used. |
13

3.3 Calibration (Cont.)
Calibration Menu Protection
NOTES:
•Calibration may be locked out to prevent unauthorized personnel from changing calibration. If calibration has been locked out, you can only access Cal Test and when installed, Internal Calibration (InCALTM) .
•To lock out calibration menu, after calibration, refer to the section titled Menu Lock-Out Protection.
Calibration Masses
Before beginning calibration, make sure masses are available. If you begin calibration and realize calibration masses are not available, exit the menu. The balance will retain previously stored calibration data. Calibration should be performed as necessary to ensure accurate weighing. Masses required to perform the procedures are listed in the adjacent table.
NOTE:
Any of the calibration modes can be terminated at any time by pressing either the Mode, Units or Setup buttons.
CALIBRATION MASSES
|
LINEARITY |
SPAN ONLY |
CAPACITY |
MASSES |
MASSES |
62g |
20g/50g |
50g |
162g |
50g/150g |
150g |
110g |
50g/100g |
100g |
210g |
100g/200g |
200g |
410g |
200g/400g |
400g |
610g |
200g/500g |
500g |
1550g |
500g/1500g |
1500g |
2100g |
1000g/2000g |
2000g |
4100g |
2000g/4000g |
4000g |
6100g |
2000g/5000g |
5000g |
8100g |
4000g/8000g |
8000g |
|
|
|
It is recommended that masses must meet or exceed ASTM Class 1 Tolerance. Calibration masses are available as accessories.
14
3.3.1 Internal Calibration (InCALTM)
On Explorer balances equipped with the InCalTM feature, calibration can be accomplished using the internal calibration mass. When the balance requires calibration, a screen prompt of CAL NOW appears. This display can be turned off as described in paragraph 3.3.2. Also, a software adjust feature is incorporated which permits the internal calibration mass to be adjusted to +100 counts. The adjust feature is described in paragraph 3.3.3. Internal calibration can be performed at any time providing the balance has warmed up to operating temperature.
Procedure
• Press the Setup button, CAL is displayed.
• Press Enter button, CAL TYPE is displayed.
• Press Enter button, CAL TYPE InCAL is displayed.
• Press Enter button, INCAL is displayed.
IMPORTANT !
DO NOT DISTURB THE BALANCE DURING
CALIBRATION. IF THE MESSAGE UNSTBLE
IS DISPLAYED,THE BALANCE WAS UNABLE
TO ACQUIRE STABLE DATA DURING INTER-
NAL CALIBRATION. THE BALANCE WILL
CONTINUE TO PERFORM INTERNAL CALI-
BRATION UNTIL READINGS STABILIZE. THE
BALANCE WILL THEN COMPLETE THE IN-
TERNAL CALIBRATION FUNCTION.
TO EXIT INTERNAL CALIBRATION MODE
BEFORE COMPLETION, PRESS ENTER OR
SETUP BUTTONS.
STABILITY CAN BE AFFECTED BY TEM-
PERATURE, AIR CURRENTS, VIBRATION,
ETC...
NOTE: If a weight is left on the pan, the balance will display CLR PAN (remove the weight from the pan). The balance automatically resumes calibration.
The internal mass is positioned several times during calibration and then removed, then after a few seconds, CAL SET is displayed indicating a successful calibration. The display then returns to WEIGH mode.
15
Loading...