

Page 1

SUPERSCRIPT 4400 SERIES
ONLINE USER’S GUIDE
September, 1998
Page 2

Proprietary Notice and Liability Disclaimer
The information disclosed in this document, including all
designs and related materials, is the valuable property of
NEC Technologies and/or its licensors, as appropriate,
reserve all patent, copyright and other proprietary rights to
this document, including all design, manufacturing,
reproduction, use and sales rights thereto, except to the
extent said rights are expressly granted to others.
The NEC T echnologies product(s) discussed in this document
are warranted in accordance with the terms of the Limited
Warranty Statement accompanying each product. However,
actual performance of each such product is dependent upon
factors such as system configuration, customer data and
operator control. Since implementation by customers of each
product may vary, the suitability of specific product
configurations and applications must be determined by the
customer and is not warranted by NEC Technologies.
To allow for design and specification improvements, the
information in this document is subject to change at any time
without notice. Reproduction of this document or portions
thereof without prior approval of NEC Technologies is
prohibited.
© NEC Technologies, Inc., 1998.
Microsoft, Windows, Windows 95, Windows 98,
Windows NT, Windows for Workgroups, and MS-DOS are
registered trademarks of Microsoft Corporation.
Adobe PostScript® 3 is a trademark of Adobe Systems
Incorporated.
All other product, service, brand, or trade names used in this
publication are the trademarks or registered trademarks of
their respective companies or organizations. NEC disclaims
any responsibility for specifying which marks are owned by
which companies or organizations.
Copyright 1998
NEC Technologies, Inc.
1250 N. Arlington Heights Rd.
Itasca, IL 60143
All Rights Reserved.
Copyright 1998
NEC Corporation
7-1 Shiba 5-Chome, Minato-Ku
Tokyo 108-01, Japan
All Rights Reserved.
ii SuperScript 4400 Series — User’s Guide
Page 3

USING THIS GUIDE
This user’s guide includes the information you need to
operate and maintain your NEC SuperScript™ 4400 or 4400N
printer. The chapters in this guide are described below.
Chapter 1, “Features”
Describes SuperScript printing capabilities, printer options,
settings, and operating requirements.
Chapter 2, “Getting Started”
Describes how to assemble your printer, print a test page,
connect the printer to your computer or network, and begin
printing your documents.
Chapter 3, “Printer Options”
Provides instructions for installing and using printer options,
including the network interface card (NIC), Paper Tray 2, the
Legal Tray, and SIMM.
Chapter 4, “Printer Drivers”
How to install and use software on your computer to select
printer settings and monitor printer status.
Chapter 5, “The Operator Panel”
Describes how to use the operator panel to change printer
settings and perform other tasks.
Chapter 6, “Web Printing Setup”
Provides instructions for system administrators to set up Pull
Printing and PrintAgent™ software on your network.
Chapter 8, “Maintaining Your Printer”
Gives a schedule and instructions for performing routine
maintenance tasks that will keep your printer operating
efficiently.
Chapter 9, “Troubleshooting”
Shows how to diagnose and respond to operating difficulties,
including paper jams, printer errors, and print quality
problems.
Chapter 10, “Technical Support”
Tells how to contact NEC for service, support, and supplies
for your printer. Also provides information about the
SuperScript 4400 Limited Warranty and obtaining service
contracts.
Appendix A, “Printer Specifications”
Detailed information about printer operations.
Appendix B, “Media Specifications”
Information for using different media in your printer.
Appendix C, “Safety Information”
Information about safety precautions.
Appendix D, “Moving Your Printer”
Important instructions for safely moving, repacking, and
shipping the printer.
Index, “Hyperlinks”
Click on the page numbers in the index and connect with
those pages.
Chapter 7, “Network Setup”
Provides instructions for system administrators to set up
network printing over NetWare, TCP/IP, EtherTalk,
Windows 3.x and above, Windows NT 4.0, and NetBEUI/
NetBIOS.
iii
Page 4

iv SuperScript 4400 Series — User’s Guide
Page 5

CONTENTS
USING THIS GUIDE iii
CONTENTS v
CHAPTER 1: FEATURES 1
Overview 1
SuperScript 4400 Series Highlights 1
SuperScript 4400N Enhancements 1
Printer Options 1
Your Starting Point 1
System Requirements 2
Supported Printing Environments 2
Hardware Requirements 2
Energy Saving 2
SuperScript 4400 Series CD 3
Printing Software for Windows 3
4400N Printer Web Pages 4
Paper Handling and
Special Media 5
SuperScript 4400 Settings 6
Printer Settings 6
Using the Printer Operator Panel 6
Using Printer Drivers 6
PostScript 3 Features 7
Color Processing 7
Watermarks 7
Paper Handling 7
Graphics 7
PostScript Options 8
Device Options 8
PCL 5e Features 9
Working with Fonts In Windows 10
PostScript 3 Font Settings 10
PCL 5e Font Settings 10
CHAPTER 2: GETTING STARTED 11
Overview 11
Safety Instructions 11
Selecting a Location 11
Unpacking 12
Checking Printer Contents 13
Identifying Printer Parts 14
Front View 14
Front Internal View 14
Back View 14
Back Internal View 14
Top Internal View 14
Installing the Belt Cartridge 16
Installing the Fuser Oil Bottle and Fuser
Cleaning Roller 17
Installing the Toner Modules 18
Loading The Paper Tray 19
Printing a Startup Page 20
Connecting the Printer to Your Computer
or Network 21
Connecting the 4400 Printer 21
Connecting the 4400N Network Printer 21
Printing with the 4400 Printer 22
Easy/Local Setup for Windows 95/98 and
Windows NT 4.0 22
Easy/Local Setup for Windows 3.x 22
Printing a Document from Your Application 22
Quick Web Printing with the
4400N Network Printer 23
First, Set the Printer’s IP Address 23
Easy Remote Printing Setup 23
Printing Envelopes 24
Printing on Thick Paper 24
Printing Transparencies 25
Printing Labels 25
CONTENTS
v
Page 6

CHAPTER 3: PRINTER OPTIONS 27
Overview 27
Installing the Network Interface Card (NIC) 27
First, Prepare the Printer 28
Second, Install the NIC 28
Third, Test the NIC 30
Installing the Legal Paper Tray 30
Adding the Paper Tray 2 Unit 31
Adding Memory (SIMM) 33
Installing SIMM 34
CHAPTER 4: PRINTER DRIVERS 35
Overview 35
Windows 95/98 36
Installing Printing Software 36
Printing a Document 36
Accessing a Printer Driver 36
Changing Settings in the Printer Driver 36
Setting Another Printer Driver as Default 36
Using the Windows 95/98 Printer Drivers 37
Windows NT 4.0 41
Installing Printing Software 41
Printing a Document 41
Accessing Printer Properties 41
Accessing Document Properties 41
Changing Settings in the Printer Driver 41
Setting Another Printer Driver as Default 41
Using the Windows NT 4.0 Printer Driver 42
Windows 3.x 45
Installation for Windows 3.x 45
Printing a Document 45
Accessing the Printer Driver 45
Mac OS 48
Installing Printing Software 48
Choosing the Printer 48
Configuring the PPD 48
Renaming Your Printer 48
Printing 48
Page Setup 48
CHAPTER 5: THE OPERATOR PANEL 51
Overview 51
Operator Panel Features 51
Indicator Lights 51
The Message Display 52
Operator Panel Buttons 53
Using the Menu Tree 54
An Example of Using the Menu Tree 54
Operator Panel Menus 55
Operator Panel Tasks 57
Taking the Printer Offline and Online 57
Setting Media Type 57
Stopping a Job 57
Clearing the Print Buffer 57
Resetting the Printer 57
Resetting the NIC 57
Restoring Factory Defaults 57
Printing 4400 Information Pages 58
Resetting Usage Reports 58
TCP/IP Setup 58
CHAPTER 6: WEB PRINTING SETUP 59
Overview 59
NEC PrintAgent Remote Printing 59
NEC PrintAgent Pull Printing 59
Remote Printing 60
System Requirements 60
Easy Remote Printing Setup 60
Remote Printing From Your Desktop 60
Getting Printer Status 60
Getting Help 60
PrintAgent Features 61
PrintAgent Program Menus 61
PrintAgent Window Menus 62
Pull Printing 63
vi SuperScript 4400 Series — User’s Guide
Page 7

Server System Requirements 63
PrintAgent Core and Server Installation 63
Configuring URLs 64
Changing PWS Settings 65
Plug Ins 66
Pull Printing from Your Desktop 67
Pull Printing User Settings 69
CHAPTER 7: NETWORK SETUP 71
Overview 71
Setup Options 71
Network Printer Features 72
Network Settings Page 72
Setting The Printer IP Address 73
Resetting the NIC 74
Restoring Factory Default Settings 74
NIC Status Lights 74
Network Administration Page 75
Going to the Network Administration Page 75
Using MAP 77
MAP Operating Requirements 77
Installing MAP 77
Running MAP and Selecting a 4400N 77
Windows 78
Installing SuperScript 4400 Printer Drivers 78
TCP/IP Requirements for Windows Configuration78
Network Configuration Options 78
TCP/IP Setup in Windows 95/98 and
Windows NT 4.0 79
Windows Peer to Peer Printing Setup 80
Moving a Peer to Peer Printer 80
Removing Peer to Peer Software 81
Setting lpr Printing on an NT Network 81
Shared Printing in Windows 95/98 82
Dynamic Host Configuration Protocol 83
NetWare 4.x 84
Using NWADMIN 84
NetWare 3.x 86
Web JetAdmin 87
First, Go to the File Location 87
Second, Copy Files to WebJetAdmin Folders 87
Third, Reset Web JetAdmin Discovery 87
UNIX 88
First, Configure the IP Address on the 4400N 88
Second, Set Up Your Printing Mode 88
CHAPTER 8: MAINTAINING
YOUR PRINTER 91
Overview 91
Precautions 91
Maintenance Schedule 92
Service Visit Schedule 92
Replacing the Toner Modules 93
Replacing the Fuser Oil Bottle 94
Replacing the Fuser Cleaning Roller 95
Cleaning the Belt Cartridge 96
Replacing the Belt Cartridge 97
Cleaning Inside the Back Cover 98
Replacing the Fuser Unit 99
Cleaning the Laser Lens 100
Replacing the Ozone Filter 101
Replacing the Toner Collector 101
Cleaning the Outside of the Printer 102
CHAPTER 9: TROUBLESHOOTING 103
Overview 103
Print Quality Maintenance 103
Simple Troubleshooting 103
Printer Messages 103
Preventing Paper Jams 105
Understanding the Paper Path 105
Removing Paper Jams 106
Misfeed Jams 106
Inner Jams 107
CONTENTS
vii
Page 8

Outer Jams 108
Drum Jams 108
Print Quality 109
Background is Smeared 109
Image Edges are Missing or Peeling 109
Horizontal Jitter 109
Horizontal Ribbing 109
Image Shows Banding, Shadows, or Shifting 109
White Line 109
Vertical Streaks 109
Vertical White Band 109
Black Line 110
Vertical Line 110
Image Staggered Vertically 110
Horizontal Banding 110
Horizontal White Band 110
Toner Spots 110
Mixed Color Image 110
Color Misregistration 111
Toner Streak 111
Mottled Image 111
Shadowing 111
Insufficient Gloss 111
Back of Paper is Stained 111
Missing Print 111
Partial Printing 111
Network Printing Problems 112
Check the Printer Operation 112
Check the Network Settings Page 112
Check other Network Users 112
Review Recent System Changes 112
Check Hardware Connections 112
Check NIC Status Lights 112
Troubleshooting for NetWare 113
Troubleshooting for MacOS 114
CHAPTER 10: TECHNICAL SUPPORT 115
Overview 115
Assistance Nearby 115
Help From Within Your Company 115
Help From Your Dealer 115
NEC Technical Support 115
How to Contact NEC 115
Ordering Supplies 116
NEC Warranty and Service 117
NEC Service Contracts 117
SuperScript 4400 Printer Limited Warranty 117
Warranty Period 117
Warranty Coverage 117
Warranty Support 118
Obtaining Warranty Service 118
Limitation of Damages and
Implied Warranties 118
APPENDIX A:
PRINTER SPECIFICATIONS i
APPENDIX B:
MEDIA SPECIFICATIONS iii
APPENDIX C:
SAFETY INFORMATION v
APPENDIX D:
MOVING YOUR PRINTER vii
viii SuperScript 4400 Series — User’s Guide
Page 9

CHAPTER 1
FEATURES
O
VERVIEW
The innovative NEC SuperScript™ 4400 color laser printer is
the best value today for fast color and monochrome printing.
The 4400 delivers high resolution, laser color output for
business presentations and reports and is adaptable to
changing business needs. The SuperScript 4400N network
printer introduces the first web-based printing capability.
This allows you to print jobs to remote locations—across the
building or across the country! This section reviews the
features and options of each printer that will make it the
busiest machine in your office.
SuperScript 4400 Series Highlights
• Prints from 4 to 8 color pages per minute and up to 16
monochrome pages.
• With PostScript 3 or PCL5e printing languages, you can
print almost anything. The printer automatically selects
the appropriate printer language for incoming jobs.
note:
printer driver for your system. The PCL 5e printer driver is
for monochrome printing only.
• 600 x 600 dpi printing is standard
• 1200x1200 dpi printing is available when a total of 80 MB
of RAM is installed (96 MB for legal size paper).
• 32 MB of RAM standard, extendable to 128 MB
• 2.1 GB internal hard disk for storing fonts and forms.
• Year-2000 compliant
For color printing, you must use the PostScript 3
SuperScript 4400N Enhancements
With the network printer, you can take advantage of the
latest printing technology.
• Printer Home Page provides access to web-based
printing software, online Help, and other features.
• Using NEC’s PrintAgent™ software, configuration and
monitoring can be done from your workstation.
• Supports traditional network printing over NetWare,
TCP/IP, EtherTalk, Windows 3.x and above,
Windows NT 4.0, and NetBEUI/NetBIOS
• 96 MB of RAM standard, extendable to 128 MB
Printer Options
You can add these features to increase productivity.
• 250-sheet standard size Paper Tray 2
• 250-sheet Legal Tray
• Network Upgrade Kit with Network Interface Card
(NIC)
Your Starting Point
The instructions in this guide assume that you are familiar
with your computer and/or network operating systems, and
that your system is configured and operating properly.
1
Page 10
System Requirements
Y our SuperScript 4400 printer and software can operate using
the following minimum system configurations.
Windows Operating System
• Microsoft Windows 3.x, Windows 95/98,
or Windows NT 4.0
• 486 or higher CPU
• CD-ROM drive
• 5 MB of free hard disk space
• 8 MB or more of RAM
• Parallel Port (for the 4400)
• Ethernet connection (for the 4400N)
Mac OS
• Mac OS 7.1 or higher
• 68040 or higher CPU
• CD-ROM drive
• 5 MB of free hard disk space
• 8 MB or more of RAM
• Ethernet connection on the 4400N
Web-Based Printing Requirements
To use the web-based Pull Printing and NEC PrintAgent
features, you need to have Microsoft’s Internet Explorer 4.01
SP1 web browser. Other requirements are described in
Chapter 6, “Web Printing Setup.”
Supported Printing Environments
The SuperScript 4400 comes with software for using the
printer on several operating systems and network.
• Microsoft® Windows® 3.x, Windows 95/98, and
Windows NT® 4.0
• NetWare® versions 3.x and 4.x
• Mac™ OS 7.1 and higher using EtherTalk
• Peer to peer printing for Windows 95/98
• UNIX®
®
For network setup, your workstation and network operating
system should be configured and operating correctly, and
your SuperScript 4400 printer drivers should already be
properly installed.
Hardware Requirements
You need to provide the following additional hardware to
setup and connect your printer.
• For standard connection, a IEEE 1284 compliant parallel
cable.
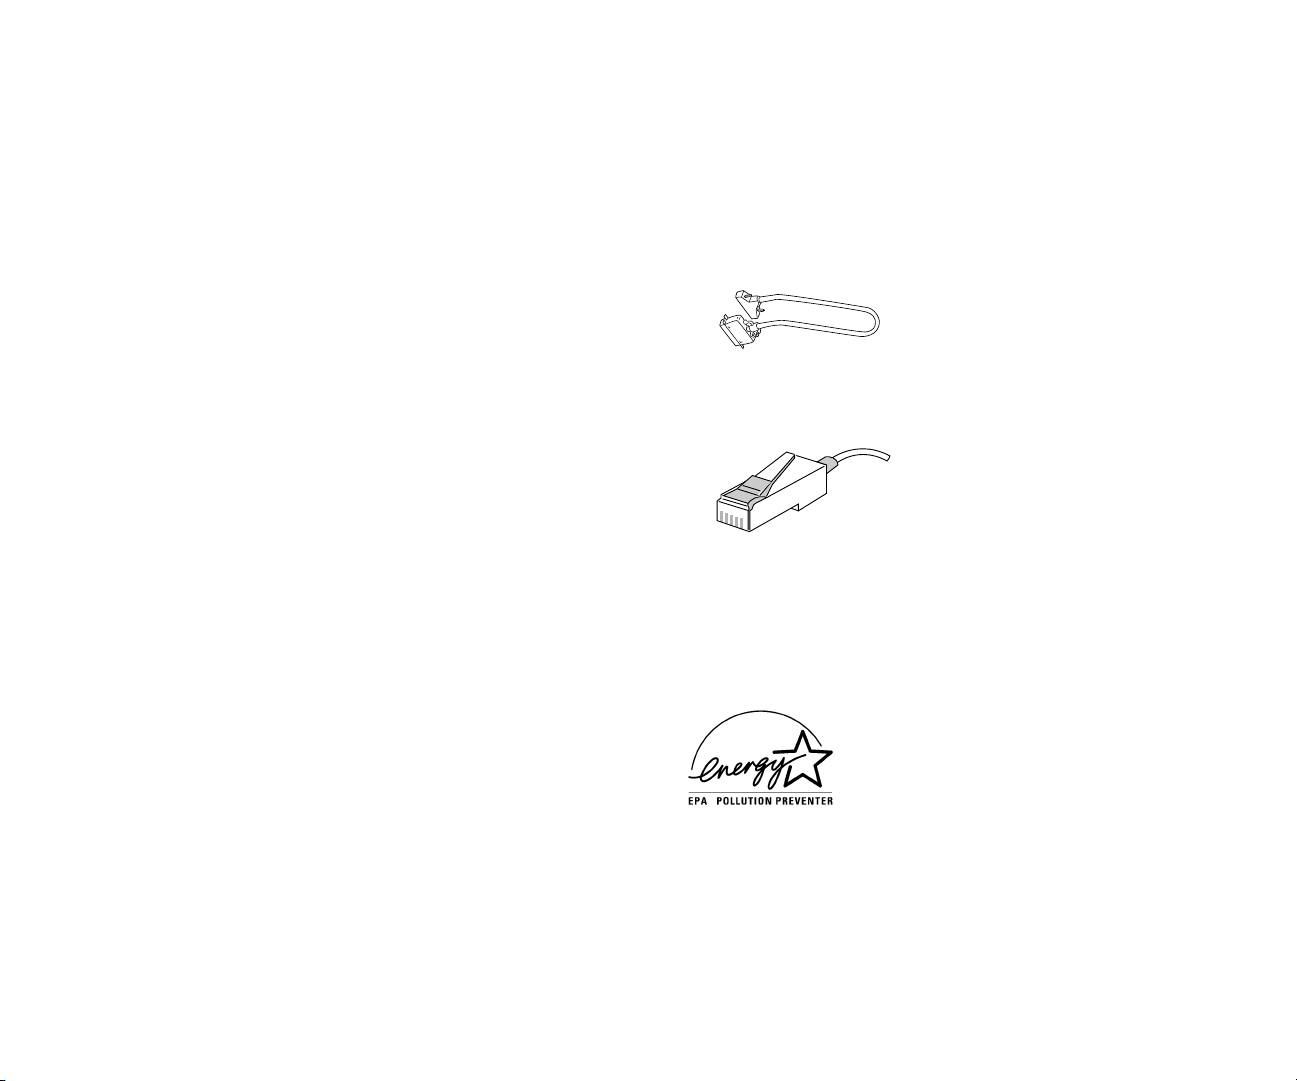
• For network connection, Category 5 twisted pair cable
with RJ-45 connectors for 10/100Base-T Ethernet, shown
here.
note:
detects whether you have a 10 Mbps or 100 Mbps Ethernet
connection. For better performance, NEC recommends
that you use shielded cable and connectors when
connecting to 100 Mbps Ethernet.
The network interface card (NIC) automatically
Energy Saving
The SuperScript 4400 and 4400N printers
meet the requirements of the
Environmental Protection Agency’s
Energy Star Computers program for
printers. The purpose of this program is
to promote the manufacturing and
marketing of energy-efficient office automation equipment,
thereby potentially reducing combustion-related pollution.
(The Energy Star emblem does not represent EPA
endorsement of any product or service.)
2 SuperScript 4400 Series — User’s Guide
Page 11

UPERSCRIPT
S
The
SuperScript 4400 Series CD
provides three options for installing printer drivers and
printing utilities in Windows.
• Easy/Local Setup
• Custom/Network Client Setup
• Administrator Setup
Choose the one that best suits your needs.
4400 S
that comes with your printer
ERIES
CD
Printing Software for Windows
Easy/Local Setup
Use this option to quickly install the basic printing tools for
your operating system. This is appropriate if you are
connected to a SuperScript 4400 from the parallel port. Using
this option, you can install
• PostScript 3 and PCL 5e printer drivers
• Adobe Acrobat Reader 3.01
• Onlinedoc.pdf—A
print out
note:
printer driver.
Also, the advanced setting, Image Color Matching (ICM), is
not available with this setup.
Custom/Network Client Setup
If you are a network client with access to a SuperScript 4400N
printer, you can use this setup to access web-based printing
tools and network utilities. Using this option, you can install
• PostScript 3 printer driver with Image Color Matching
• PostScript 3 printer driver without Image Color
Matching
• PCL 5e printer driver
• NEC PrintAgent for Remote Printing
• Utilities for peer to peer printing
• Internet Explorer 4.01 SP1
• Adobe Acrobat Reader 3.01
• Onlinedoc.pdf—A
print out
For color printing, you must use the PostScript 3
User’s Guide
User’s Guide
you can view online, or
you can view online, or
Administrator Setup
This setup should only be used by system administrators
who are familiar with the procedures for installing server
software and network configuration. Use it to install and use
network utilities, and set up servers for NEC PrintAgent Pull
Printing.
In addition to all the items available in the Custom/Network
Client Setup, the following tools are provided.
• PrintAgent Pull Printing Server software
• PrintAgent Secondary File Server software
note:
must also install Microsoft’s Personal Web Server. You can
download this from Microsoft’s web site at this URL
http://www.microsoft.com/ie/pws
• SuperScript MAP utility for Windows 95/98, and
Windows NT 4.0
• BOOTP 32 for Windows 95/98 and Windows NT 4.0
To use the NEC PrintAgent Server software, you
Printing Software for Mac OS
The
SuperScript 4400 Series CD
provides the following software for Mac OS users.
• The AdobePS printer driver
• The SuperScript 4400 printer description file
• ICC files for Color Sync
Instructions for installing Mac OS software are on page 48.
that comes with your printer
FEATURES
SuperScript 4400 Series CD 3
Page 12
4400N P
RINTER
WEB P
AGES
Every SuperScript 4400N network printer has a built-in web
server and
Printer Home Page
you can use for a variety of
tasks, including
• Pull Printing from your desktop
• Installing the NEC PrintAgent Remote Printing driver
• Monitoring 4400N PrintAgent printers
• Performing network administration tasks
• Configuring URLs for 4400N printers and servers
• Downloading Pull Printing Server software
• Downloading Secondary File Server software
• Getting information and Help
Once you assign an IP Addr ess to the printer, you can browse
to it using Micosoft’s Internet Explorer 4.01. The URL uses
the printer’s IP Address. It is
for example
http://131.241.045.027
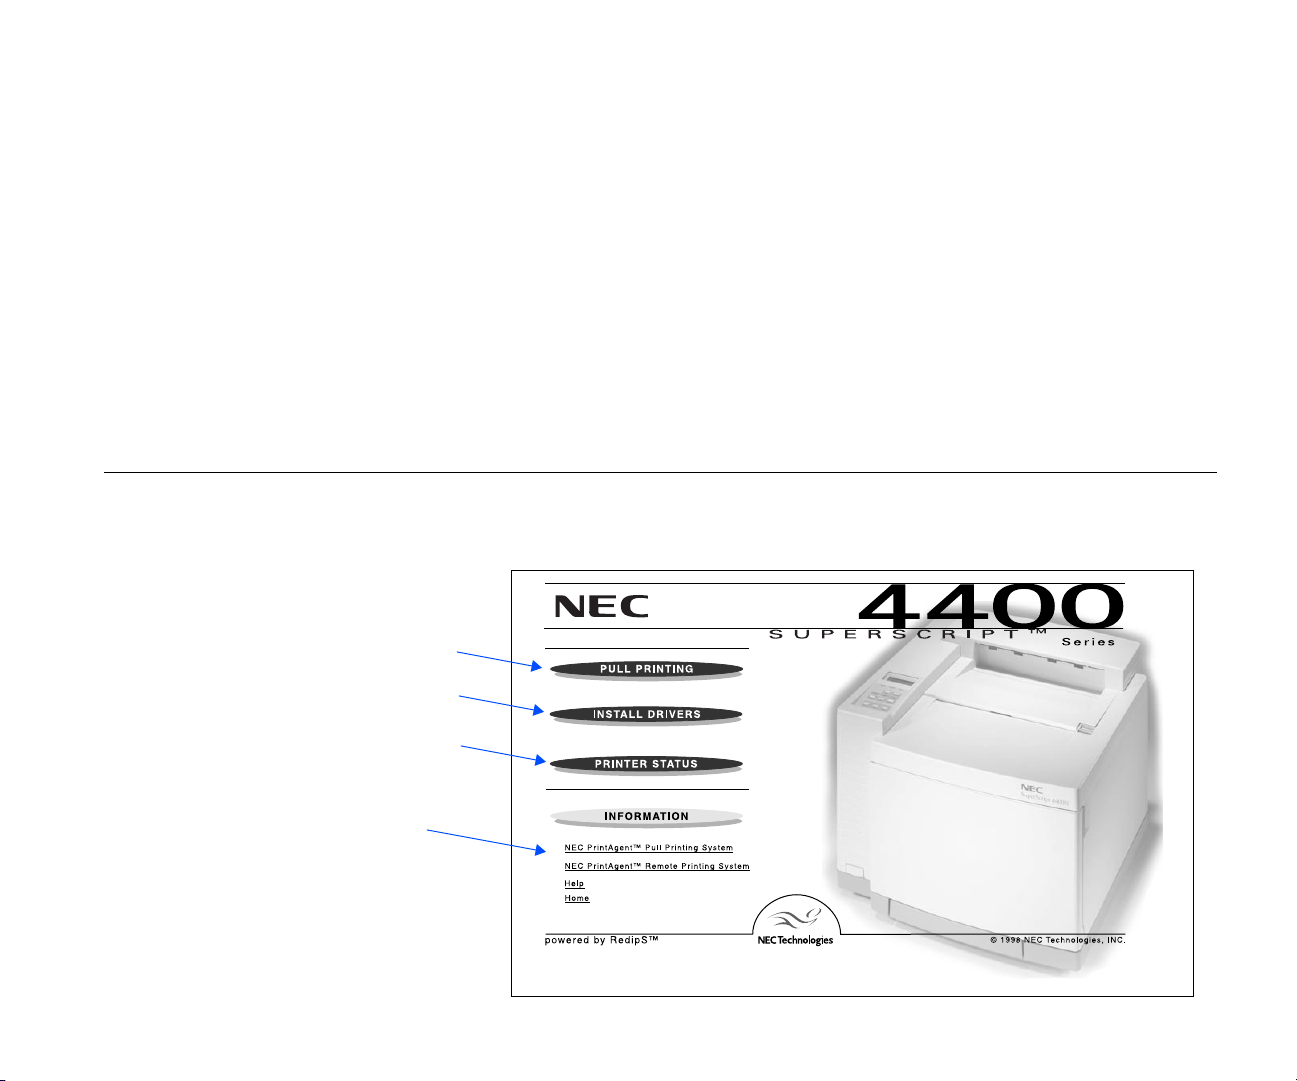
Two other useful printer web pages are
• The
URL Configuration Page
install and configure Pull Printing Servers. The URL is
http://<Printer IP Address>/configure.html
See page 64 for more information.
• The
Network Administration Page
to configure the printer network settings. To access this,
go the URL configuration page and click the
Administration
The Printer Home Page
You can view the Printer Home Page from Windows, Mac OS, or UNIX.
The URL is the IP address you assign to the printer, for example, http://131.241.45.65.
Click here to display the Pull Printing Page
to print over the web without a driver
http://<Printer IP Address>
, which you can use to
, which you can use
Network
link. See page 75 for more information.
Click here to install the NEC PrintAgent
driver for remote printing over the web
Click here to display the NEC PrintAgent
window to monitor other web printers
Use these links to learn more about
Pull Printing and Remote Printing
using the NEC PrintAgent
4 SuperScript 4400 Series — User’s Guide
Page 13
P
A
APER HANDLING AND
PECIAL
S
You can use the 4400 to print on a wide variety of media and
sizes. SuperScript 4400 paper handling features let you
manage print jobs and office tasks efficiently.
Supported Media
Use any light or medium weight copier paper to print out
draft copies of your documents. Then, for the best results on
final documents, you should consider using NEC’s Premium
papers.
Premium Color Laser Paper - 24 lb. Bond: A bright
paper with a super smooth finish for brilliant color
reproduction. Use this for correspondence, proposals,
charts, graphs, and illustrations.
Premium Color Laser Paper - 60 lb. Cover: A heavier
stock that is ideal for report covers, mailers, greeting
cards and invitations.
Ultra Glossy Color Laser Paper - 100 lb. Text: Has a
double-sided glossy finish that is preferred for
professional printing and photographic art. Use this for
data sheets, brochures, and client presentations.
Premium Overhead Transparencies: Use this for
brilliant projected images.
Your Starter Kit includes a sampler of NEC Premium papers.
See page 116 for information about ordering NEC premium
papers and other printer supplies. If you do not have the
NEC Premium papers, try to match them as closely as
possible for the best printing results. Appendix B, “Media
Specifications,” has more information about choosing media.
When printing special media, be sure to load the paper tray
only to the mark indicated for that media. When printing on
thick or glossy stock, set the Media Type to Thick Stock on
the printer Operator Panel, and reset it to Paper when your
are done (see page 57 for instructions).
M
EDIA
Supported Paper Sizes
You can print on a variety of paper sizes including
Paper Size
Letter 8.5 x 11 216 x 279
Legal 8.5 x 14 216 x 356
A4 8.3 x 11.7 210 x 297
Executive 7.25 x 10.5 184 x 267
UK Quarto* 8 x 10 203 x 254
Folio* 8.5 x 13 216 x 330
Commercial #10 Env. 4.13 x 9.5 105 x 241
*Not available in PCL printer drivers.
note: To print Legal size paper, you must install the
optional Legal Paper Tray into Paper Tray 1 or Paper Tray 2.
Paper Source Selections
In your printer driver, you can specify which paper tray the
printer should use for your print job: Tray 1, Tray 2 (option),
or AutoSelect. When you specify AutoSelect, the printer
automatically selects the right tray based on the media type
in the trays. The printer can detect paper sizes based on how
the trays are adjusted. Therefore, it is important to adjust the
paper trays properly.
Orientation
Orientation describes the position of images on a page with
respect to the long and short edges of the paper . You can print
three ways.
Portrait means the page has a vertical orientation
(the default).
Landscape means the page has a horizontal
A
orientation.
Rotated Landscape means the page has a horizontal
A
orientation and is flipped.
Inches Millimeters
FEATURES
Number of Copies
You can set the number of copies to be printed up to 999
(99 for PCL).
Paper Handling and Special Media 5
Page 14

S
UPERSCRIPT
4400 S
ETTINGS
Printer Settings
SuperScript 4400 printer settings give you many ways to
customize your print job. There is often more than one place
to change the same printer setting. These include
• The SuperScript PostScript 3 and PCL 5e printer drivers
• The Operator Panel on your printer
Using the Printer Operator Panel
Y ou can use the printer Operator Panel to cancel a print job or
change settings that are not available in your printer driver.
You can view messages on the Operator Panel to help
diagnose printing problems. In addition, the printer operator
panel allows you to print out font lists and test pages and
view the total page count. You can also set the printer’s TCP/
IP address or reconfigure network settings. Chapter 5, “The
Operator Panel,” provides instructions for using the printer
operator panel.
Using Printer Drivers
Your printer software includes the PostScript 3 printer
drivers for Windows 3.x, Windows 95/98, Windows NT 4.0,
and Mac OS and the PCL 5e printer driver for Windows 3.x,
Windows 95/98, and Windows NT 4.0. They offer a wide
range of features for setting up your print job and printer
settings.
Most of these features and settings are described in this
chapter. A particular feature may be implemented slightly
differently, depending on which driver you are using.
note: If you are unsure about a setting in your printer
driver, be sure to use the driver’s Online Help feature.
Chapter 4, “Printer Drivers,” provides complete
information about using your printer driver software.
When to Use the PostScript 3 or PCL 5e Printer Driver
Use the PostScript 3 driver for color documents and
documents that contain many complex graphic images or
extensive page layout formatting. The PostScript driver has
more options and delivers better graphic processing.
Use the PCL 5e driver for monochrome documents that
contain mostly text and limited formatting. The PCL5e driver
processes this type of document quickly.
note: For color printing, you must use the PostScript 3
printer driver for your system. The PCL 5e printer driver is
for monochrome printing only.
6 SuperScript 4400 Series — User’s Guide
Page 15

P
OSTSCRIPT
These are general descriptions of settings available in the
PostScript 3 printer drivers. The interface of the printer
driver depends on the operating system you use. Not all
settings are available for all drivers, or they may appear on
different tabs in the printer driver. All printer drivers have
Online Help available at the click of a button, with more
information about specific settings. Chapter 4, “Printer
Drivers,” shows the PostScript printer drivers and explains
how to use them.
3 F
EATURES
Color Processing
Color Control
Use these settings to define color in your print job.
Color Photo: Produces smooth color images, for the best
reproduction of photographic images.
Color Business Graphics: Produces bright, solid colors,
suitable for presentation graphics, charts, and posters.
Color Transparency: Use this for the best results when
printing color presentations on overhead transparency film.
Grayscale: Converts all colors in the document to black and
shades of gray for monochrome printing.
Unadjusted: Does not apply any of the special color control
features.
Image Color Matching
This feature is available for advanced users (except for
Windows NT). You must install it from the SuperScript 4400
Series CD using the Custom Install feature. It will not appear
on the printer driver until you install it.
Watermarks
A watermark is text that appears on pages in your print job,
such as DRAFT or CONFIDENTIAL. Use these settings to
apply watermarks to your print job, create new watermarks,
or modify existing watermarks. A preview area shows how
the watermark will appear. You can also specify whether the
watermark appears in the foreground or background, and on
which pages it appears. This feature is not available for
Windows NT.
Paper Handling
Layout
Use this feature to print multiple page images on the printed
page, including 1, 2, 4, 6, 9, and 16. This gives you the ability
to print pamphlets, storyboards, or thumbnail layouts. You
can also print a border around the page image (except for 1
page only).
Unprintable Area
Use this setting to specify the area on the edge of the paper
that cannot be printed on. This setting overrides margins set
in the application.
Graphics
Resolution
Print resolution is measured by the number of dots per inch
(dpi) in an image. The higher the number is, the finer the
resolution. Resolution can be set to 600 dpi (the default) or
1200 dpi.
note: 1200 dpi is only available when 80 MB of RAM are
installed in the printer (96 MB of RAM are required for
printing legal size paper).
Sharp Edge Technology
Specifies whether or not NEC’s Sharp Edge T echnology (SET)
should be used. SET is only available with 600dpi. It refines
the print quality of characters and line art by smoothing the
fine gradations along the edge of the printed image. It is best
to turn this feature OFF for color photo images.
Halftoning
If graphic images in your document do not print correctly,
use these settings to adjust screen frequency and angle. For
example, use this when screened images show a moiré
pattern.
Negative Image
If you select this, black and white values are reversed and
RGB colors print as their complements.
FEATURES
PostScript 3 Features 7
Page 16

Mirror Image
If you select this, pages are “mirrored” on the horizontal axis.
Scaling
You can enlarge or reduce the page image. A value of 100%
(the default) means no enlargement or reduction. A value of
50% reduces the page image to half its normal size. A value of
200% doubles the size of the page image.
PostScript Options
There are several settings you can use to customize the way
the driver processes print jobs
PostScript Output Format
These settings control the way the driver creates the
PostScript language descriptions for page images.
Optimize for Speed: Check this for faster printing. This
option may cause a problem for some print jobs if the
printer does not have enough memory.
Optimize for Portability-ADSC: Check this to ensure
that the document can be printed on any PostScript
printer. Documents may take longer to print when this
option is selected. This option is useful if the printer has
limited memory, because it creates smaller documents.
Encapsulated PostScript (EPS): Use this to print your
document as a single-page image that will be
incorporated into another file. You must also select
Output to File.
Archive Format: Use this to create a PostScript data
stream that gets stored in a file to be used later.
PostScript Header
You can control whether the driver sends a PostScript header
with each document. If the printer is shared on a network,
this option should not be used. However , if you are on a local
printer, you can save time by sending the header just once to
the printer, where it is retained and printed with each job.
Error Handling
You can send an error handler with each print job. Then, if an
error occurs, the printer prints a page with a message
describing the nature of the error. Y ou or a technician can use
this information to diagnose the problem.
PostScript Timeout Values
These settings define timeout periods allowed when the
driver communicates with the printer . Enter a value from 0 to
999 seconds (32,767 seconds for NT). When zero is entered,
the printer will wait indefinitely. If you printer is shared, do
not specify a value of zero.
Job Timeout: This is the maximum number of seconds
the printer can take to print a single job. If the print job
takes more time to print than the timeout value, the
printer may stop printing and prepare to receive a new
document.
Wait Timeout: This is the maximum number of seconds
the printer will wait for data from the computer. While
receiving a print job, the printer driver may pause to
build a PostScript language description of each page. For
complicated pages, which take longer to build, you may
need to set a higher wait time.
Advanced Options
Advanced options allow you to optimize printer
performance, but generally should not be changed unless
you have specific reasons to do so. Use the driver Online
Help feature for more information on these settings.
Device Options
You can use settings on the Device Options to match the
attached printer configuration so that the printer driver can
generate optimized PostScript code.
Available printer memory
Set this to match the amount of memory you have installed in
the printer.
Available font cache
The driver automatically adjusts the font cache size based on
installed memory. Increase this amount for better
performance of Type 32 bitmap fonts.
Installable options
Use this area to change the settings to match the printer’s
hardware setup when you add options to the printer,
including Tray 2, or more RAM memory.
8 SuperScript 4400 Series — User’s Guide
Page 17

PCL 5E F
These are general descriptions of settings available in the
PCL 5e printer drivers. The interface of the printer driver
depends on the operating system you use. Not all settings are
available for all drivers, or they may appear on different tabs
in the printer driver. All printer drivers have Online Help
available at the click of a button, with more information
about specific settings. Chapter 4, “Printer Drivers,” shows
the PCL 5e printer drivers and explains how to use them.
Resolution
Print resolution is measured by the number of dots per inch
(dpi) in an image. The higher the number is, the finer the
resolution. Resolution can be set to 600 (the default), 300, 150,
and 75 dpi. Lower resolutions require less memory and
processing time.
Dithering
Select a dithering pattern for converting images from one
format to another, for example, for printing color documents
in black and white. Dithering, along with the intensity and
resolution settings, effect the overall appearance of graphics
in printed documents.
Halftone Color Adjustment
In the Windows NT driver this is an advanced feature for
controlling how color appears in a document and is
converted to monochrome when printed.
EATURES
Reserved printer memory
Specify how much memory to reserve for special printer
functions, such as macros, front panel settings, etc. The
reserved memory is not used for printing.
Printer memory tracking
Before printing a document, the printer driver calculates how
much memory is required to print. If the document requires
more memory than is available in the printer, the document
is rejected. Use this setting to define how this calculation is
made. A conservative calculation ensures that printer
memory is never over-committed. A more aggressive
calculation allows the printer to attempt printing a complex
document, but memory may be over-exceeded and the print
job may not be completed.
Printer Memory
This feature appears on the driver, but does not apply to the
SuperScript 4400 printer and does not need to be adjusted.
Cartridges
This feature appears on the driver, but does not apply to the
SuperScript 4400 printer and does not need to be adjusted.
FEATURES
Intensity
Adjust this setting to control the darkness of graphics in the
printed document.
PCL 5e Features 9
Page 18

W
ORKING WITH FONTS IN
INDOWS
W
Under most conditions your documents will print out well
without any adjustment to font settings in your printer
drivers. The Windows printer drivers have settings for
specifying how TrueType fonts in your document are
matched to PostScript fonts in the printer. You may want to
adjust these if your documents take a long time to print or the
quality of the font is not satisfactory. Font settings vary
slightly on the Windows 3.x, Windows 95/98, and Windows
NT 4.0 printer drivers.
PostScript 3 Font Settings
Send TrueType fonts to printer according to the font
Substitution Table: Instead of downloading all
TrueType fonts to the printer, this selection substitutes
PostScript fonts resident in the printer for the TrueType
fonts used in the document according to a table you
define.
Using the Substitution Table: The substitution utility
allows you to view or edit which fonts in the printer
should be substituted for the TrueType fonts in your
document. Using resident printer fonts speeds printing.
Always use built-in printer fonts instead of TrueType
fonts: Select this and the printer substitutes its closest
matching resident fonts. This speeds printing, but the
document may not print out exactly as it appears on the
screen
Always use TrueType fonts: Downloads bitmap
TrueType fonts to the printer to print the document. This
ensures the printed document will look the same as it
does on the screen, but it may take longer to print.
PCL 5e Font Settings
Download TrueType fonts as outline fonts: TrueType
fonts used in your document are processed by the driver
and downloaded to the printer as outline fonts. This
provides the quickest printing time, but lowest quality
for text output.
Download TrueType fonts as bitmap fonts: TrueType
fonts used in your document are processed by the driver
and downloaded to the printer as bitmapped fonts.
Formatting is very accurate at small point sizes. Printing
is faster, but not portable if printing to a file.
Print TrueType Text as graphics: TrueType fonts used
in your document are processed by the driver and
downloaded to the printer as graphics. This produces the
best text quality, but can slow printing. This is best for
documents with several graphics and little or no
repeating text.
Install Printer Fonts: Use this to download soft fonts to
the printer.
The Update Soft Fonts feature updates the driver to
recognize new fonts. Use this if you have added new
fonts to your system after you installed the driver.
10 SuperScript 4400 Series — User’s Guide
Page 19
CHAPTER 2
GETTING STARTED
O
VERVIEW
This chapter tells you how to safely set up your printer and
begin printing right away. Included are instructions for
• Selecting a location and unpacking
• Checking printer contents and identifying printer parts
• Installing the Belt Cartridge, Fuser Oil Bottle and Fuser
Cleaning Roller, and Toner Modules
• Loading the Paper Tray
• Printing a Startup Page
• Connecting the printer to your computer or network
• Printing with the 4400 printer
• Quick web printing with the 4400N network printer
• Printing envelopes, transparencies, and labels
S
AFETY INSTRUCTIONS
To protect yourself and your equipment from possible
damage, always follow these precautions.
• Protect the printer from dampness or spills.
• Save the printer box and all packing materials that came
with your printer in case you need to ship it later.
• Lifting or moving the printer requires two adults!
• Read the installation instructions carefully before you
plug in your printer, and follow all warnings.
• Keep this user’s guide handy for reference.
• Keep the printer level at all times, especially when the
Fuser Oil Bottle is installed. Do not tilt more than 1.5°!
• The fuser area, under the Top and Back Covers is very
hot. Let the printer cool at least 15 minutes before
touching these areas.
WARNING! This printer is intended to be electrically
grounded. It comes with a three-wire grounding plug. This
plug will only fit a grounded AC outlet or power strip. This
is a safety feature. Do not defeat the purpose of the
grounding plug by removing the third pin.
S
ELECTING A LOCATION
Select a level, stable place with adequate space for air
circulation and opening covers and trays. The area should be
well ventilated and away from direct sunlight or sources of
heat, cold, and humidity. Do not set the printer close to the
edge of your desk or table!
Safety Precautions
The printer and packaging weighs approximately 100 lbs.
Moving and unpacking the printer requires two adults.
28”
10”
Keep printer vents
unobstructed
10”
For more details on printer
dimensions see Appendix A,
“Printer Specifications.”
11
Page 20
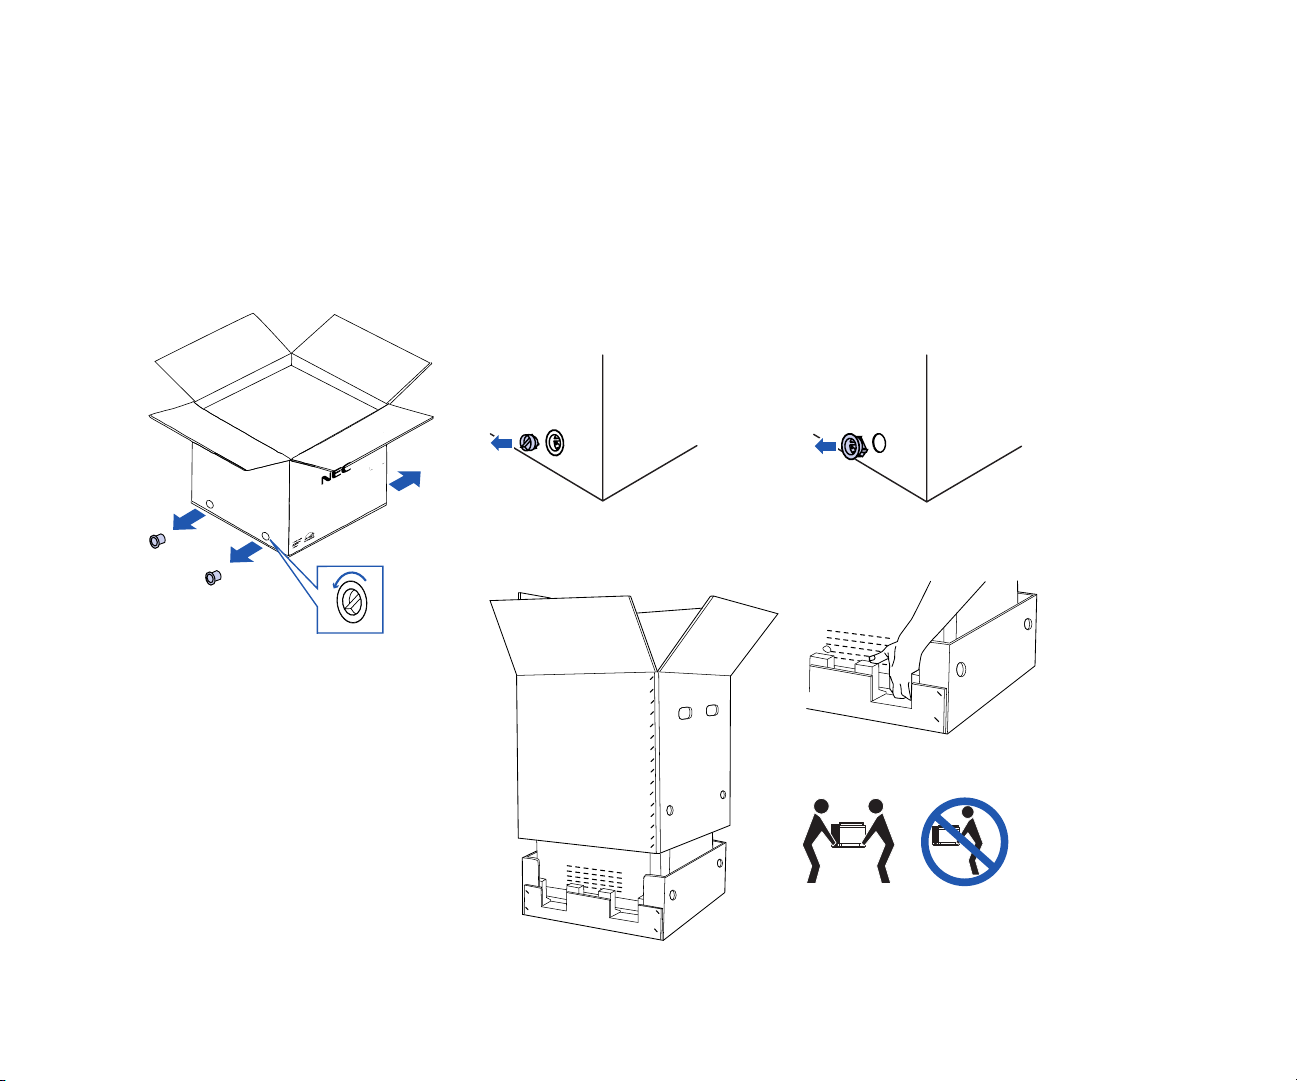
U
NPACKING
Follow these steps to safely unpack the printer.
1. Open the top cover of the packing box and remove the
QuickStart poster.
2. Remove the Accessory kit and Starter kit from the top of
the printer.
3. Turn the large plastic box screws at the bottom of the box
to the left (A) and pull out to remove (B).
Unpacking the Printer Box
BC
A
4. Using your thumb and finger, remove the plastic screw
sleeves from the box (C).
5. Lift off the outer box (D).
6. Open the plastic bag that contains the printer and slide it
down.
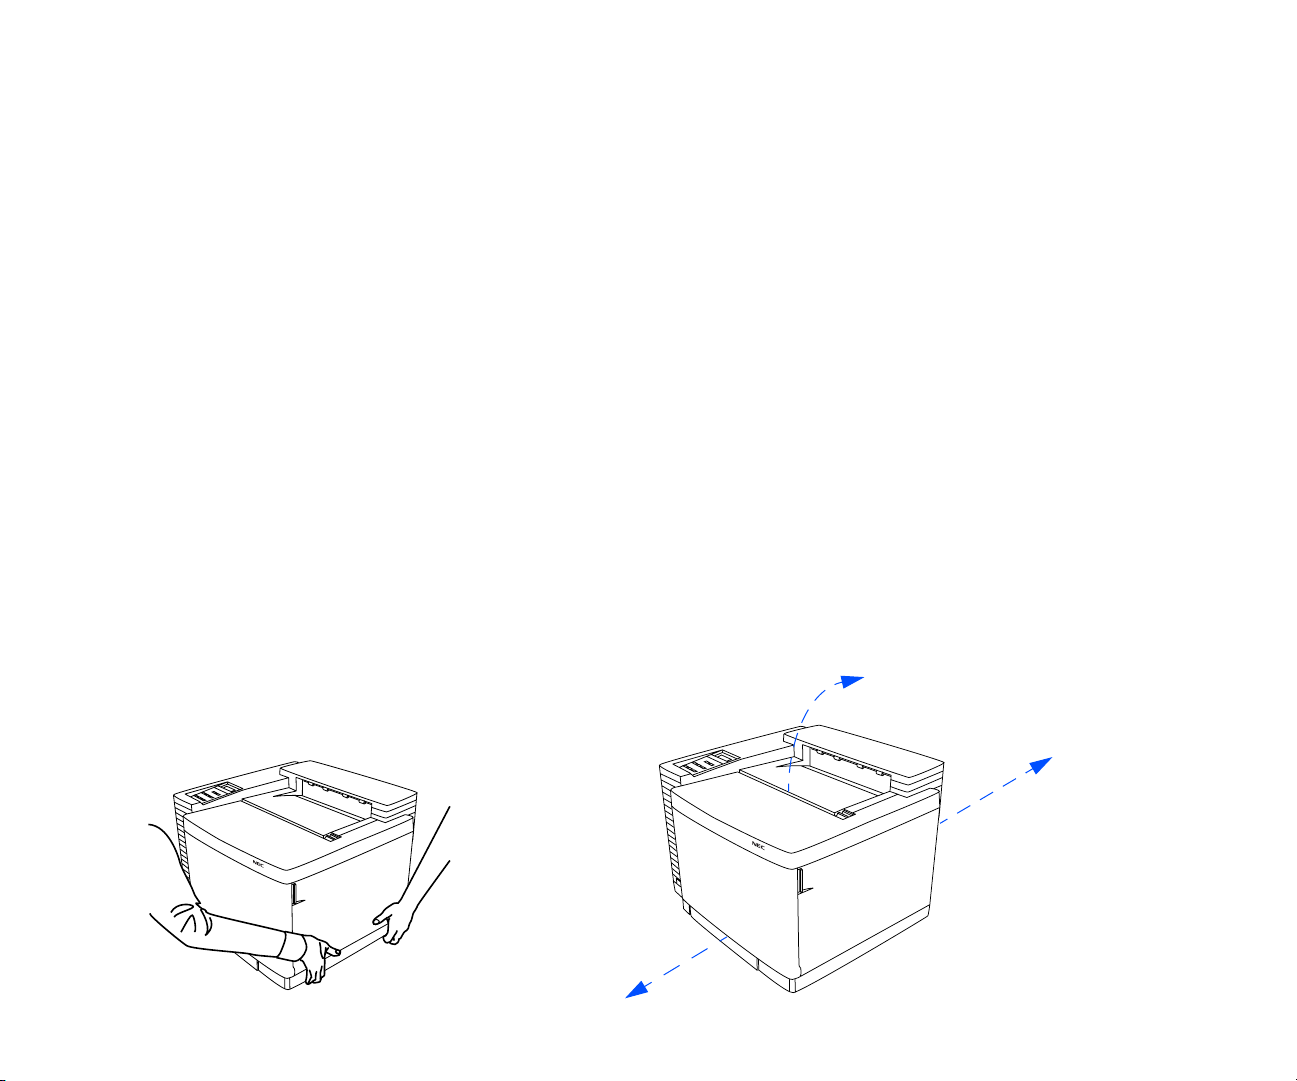
7. With one person on each side of the printer, grasp the
printer at the hand grips where they are exposed by
notches in the foam padding (E).
8. Lift the printer and place it on a sturdy, level surface.
D
note: Save the box, box screws,
and packing material. If you ship
the printer in the future, be sure to
follow the special packing
instructions in Appendix D to
safeguard internal components.
12 SuperScript 4400 Series — User’s Guide
E
Caution! The printer and packaging
weigh approximately 100lbs. To set up the
printer and move it requires two adults.
Page 21
C
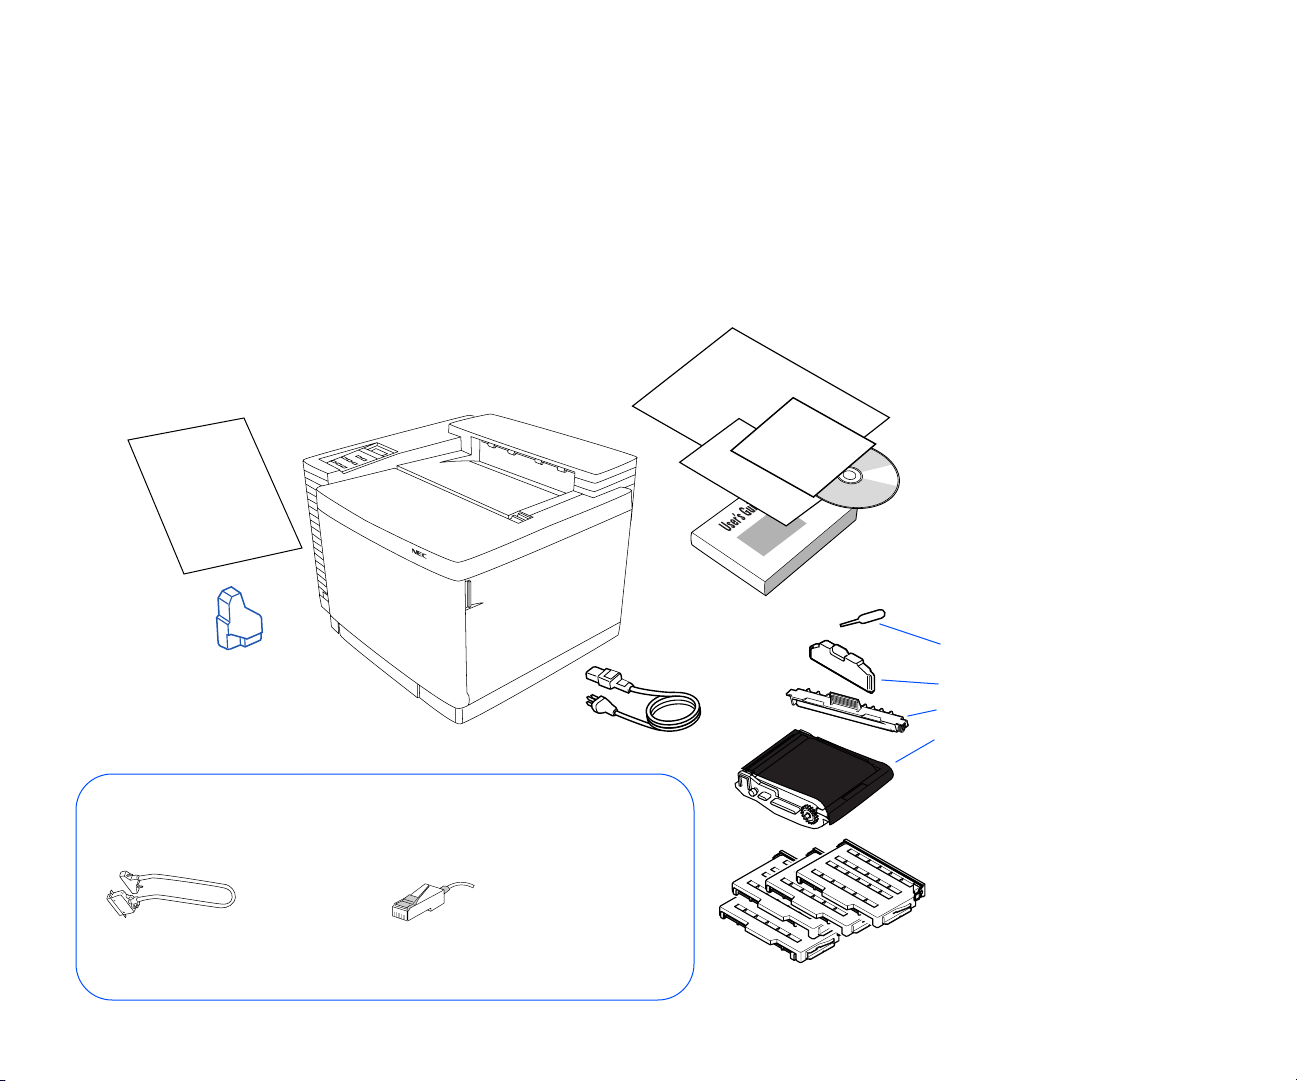
HECKING PRINTER CONTENTS
Take a moment to verify that the following items were
included in your printer box.
• SuperScript 4400 printer with 250-sheet Paper Tray 1
• QuickStart Poster
• Accessory Kit (see contents below)
• Starter Kit (see contents below)
QuickStart Poster
Toner Collector–
installed inside
printer
Printer with
Standard
250-sheet Paper Tray 1
Power Cord
• SuperScript 4400 software in a license envelope
• Power Cord
• Toner Collector (installed next to the Toner Modules
inside Front Cover of printer)
Starter Kit
NEC Paper Sample Pack
Software Envelope
•SuperScript 4400 User’s Guide
•SuperScript 4400 Series CD
•Adobe® Photo Deluxe CD
Accessory Kit
Fuser Oil Syringe
(Save for future use!)
Fuser Oil Bottle
Fuser Cleaning Roller
Belt Cartridge
GETTING STARTED
Not Included …
To connect your printer, you need to provide the proper
parallel and/or network cable.
IEEE 1284 Bidirectional
Parallel Cable
Category 5 Twisted Pair
Cable with RJ-45 Connectors
for 10/100Base-T Ethernet.
1 Black Toner Module
1 Cyan Toner Module
1 Magenta Toner Module
1 Yellow Toner Module
Checking Printer Contents 13
Page 22

I
DENTIFYING PRINTER PARTS
Use the illustrations on the facing page to identify standard
parts for the SuperScript 4400.
Front View
• Operator Panel—for displaying messages and
configuring the printer
• Power button—for turning on and off the printer
• Top Cover—provides access to the Fuser Unit and inside
of the printer (also serves as the Output Tray)
• Output Tray —holds up to 250 printed sheets
• Top Cover Release button—unlocks and opens the Top
Cover
• Front Cover—provides access to Toner Modules and
Toner Collector
• Front Cover Latch—unlocks and opens the Front Cover
• Paper Tray 1—standard input tray, holds 250 sheets of
paper
Front Internal View
• Toner Module Racks—holds Toner Modules
• Toner Collector—collects used toner
• Paper Transfer Rollers—moves the paper from the inside
of the printer to the Output Tray
Back Internal View
• Transfer Drum—transfers image to paper
• Registration Rollers—keeps the paper straight
• Transfer Roller—works with the Transfer Drum to
transfer the image to the paper
• Paper Discharger—removes the static electricity from the
paper
• Transfer Unit—consists of the above four parts
Top Internal View
• Fuser Unit—uses heat and pressure to adhere the toner
image to the paper. Contains two Fuser Rollers.
• Fuser Oil Bottle—holds the oil that helps adhere the
toner image to the paper
• Fuser Cleaning Rollers—helps keep the Fuser Rollers
clean
• Belt Cartridge—also known as the Photoconductor Belt
Module or OPC Unit.
Back View
• Serial Number—necessary for warranty registration
• Back Cover—provides access to clear paper jams
• Back Cover Latch—lift to open back of printer
• Filter Cover—contains the Ozone Filter
• Bidirectional parallel interface—for attaching
bidirectional parallel cable from your computer
• Ethernet interface—for attaching the Ethernet 10/100
Base-T connectors from your network
• Interface Panel—contains the controller board, hard
drive and network interface card (if installed)
• Power Cord Connector—for attaching the power cord
• Back Vent—allows ventilation
14 SuperScript 4400 Series — User’s Guide
Page 23

Important Printer Parts
FRONT VIEW
GETTING STARTED
FRONT INTERNAL VIEW
Operator Panel
Power
Button
Front Cover
Paper Tray 1
BACK VIEW
Back Vent
Top Cover
Output Tray
Top Cover
Release Button
Front Cover
Latch
BACK INTERNAL VIEW
Transfer Unit consists of:
Transfer Drum
Registration Rollers
Transfer Roller
Paper Discharger
Toner Module
Racks
TOP INTERNAL VIEW
Fuser Oil Bottle
Paper Transfer
Rollers
Toner Collector
Fuser Cleaning Roller
Fuser Unit
Serial Number
Filter Cover
Back Cover
Latch
Power Cord
Connector
Belt Cartridge
Bidirectional Parallel
Interface
SCSI Interface
Ethernet
Interface
Interface panel
Identifying Printer Parts 15
Page 24
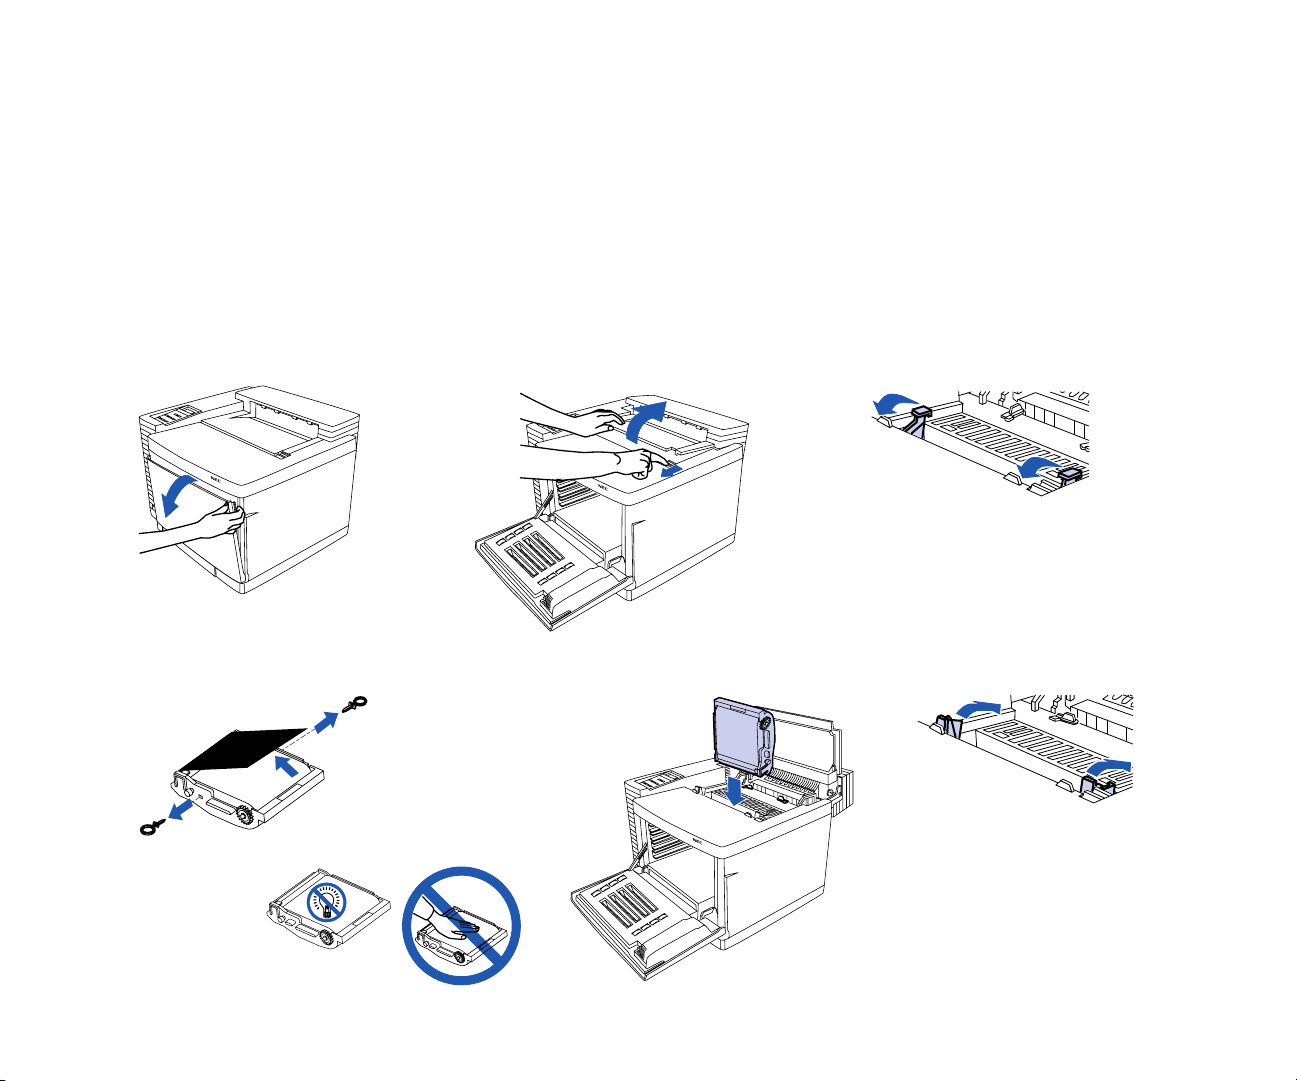
I
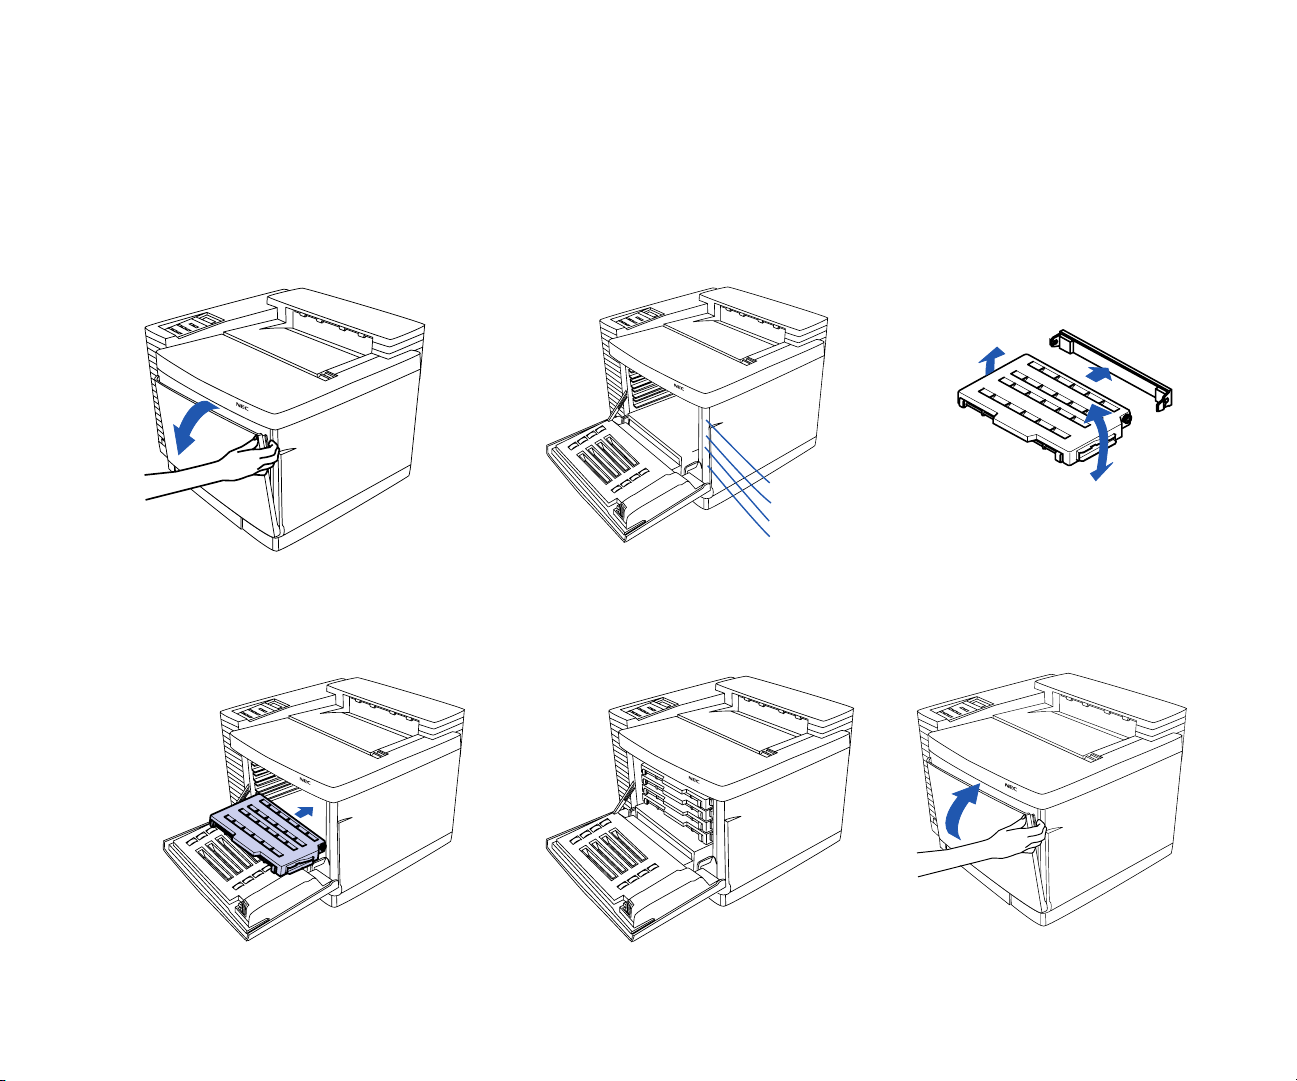
NSTALLING THE BELT CARTRIDGE
1. Make sure all packing materials and tape are removed
from the printer.
2. Open the Front Cover of the printer with the Front Cover
Release Latch (A).
3. Open the Top Cover of the printer by sliding the Top
Cover Release button forward (B)
4. Flip up the Belt Cartridge Locking Levers inside the
printer (C).
5. Remove the Tension Release Pins from both sides of the
Belt Cartridge (D).
6. Remove the black protective sheet from around the Belt
Cartridge.
7. Slide the Belt Cartridge into the guides, as shown (E).
(The flat side of the cartridge should face the front of the
printer.)
8. Snap the Belt Cartridge Locking Levers into place (F).
9. Close the Top Cover and then the Front Cover of the
printer.
note: The Belt Cartridge is sometimes called the
Photoconductor Belt Module or OPC Unit.
A
D
B
C
FE
Caution The Belt Cartridge should
slide easily into the printer. Do not
force it!
16 SuperScript 4400 Series — User’s Guide
Page 25
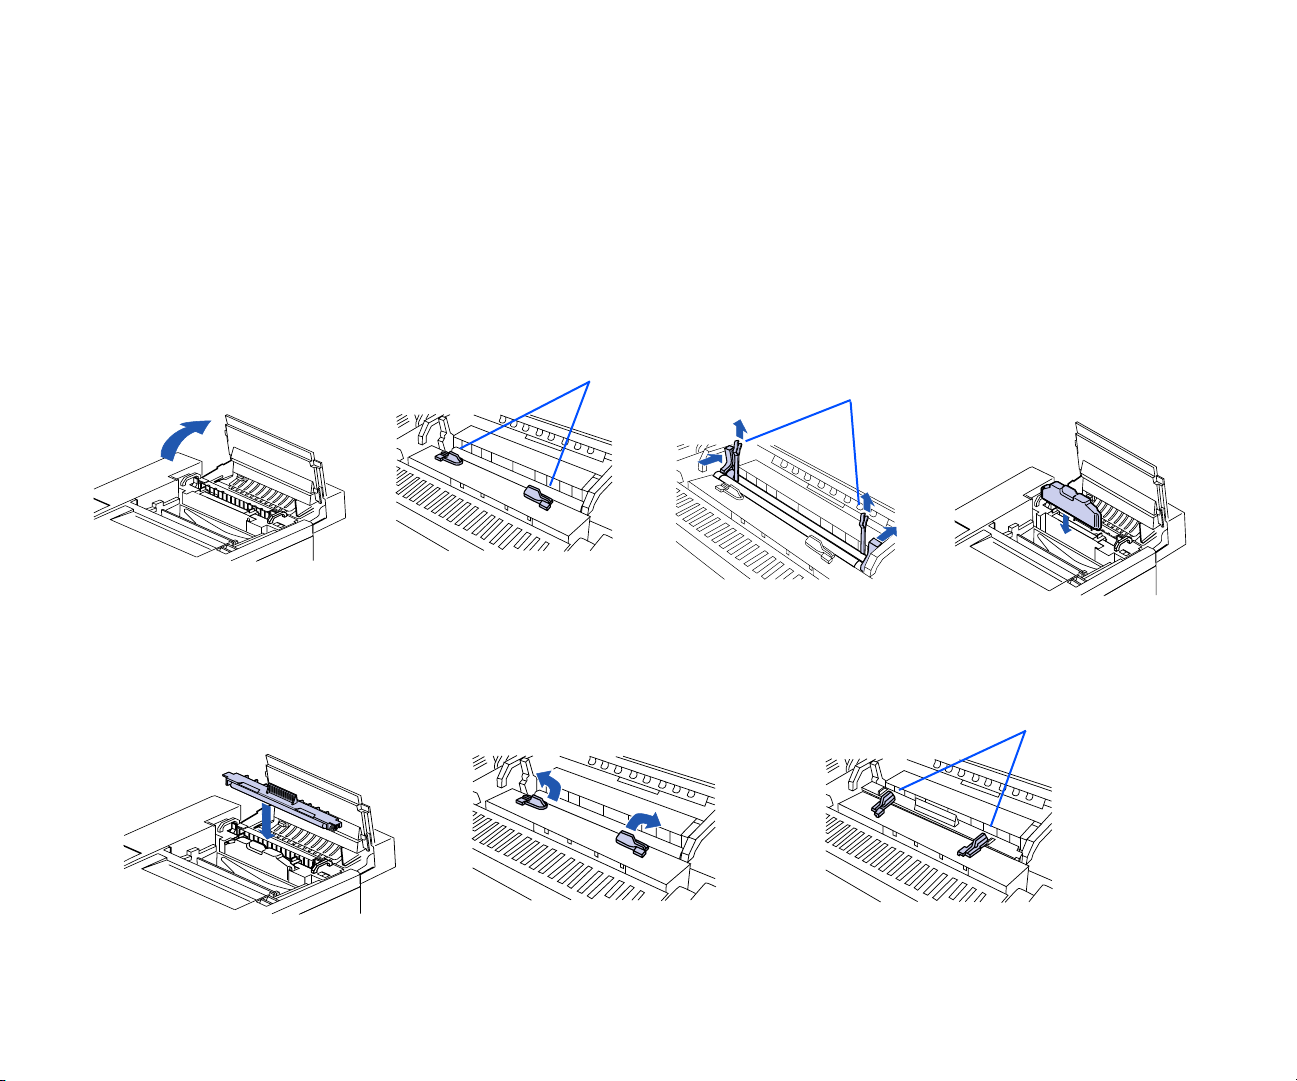
I
NSTALLING THE FUSER OIL BOTTLE
AND FUSER CLEANING ROLLER
1. Open the Top Cover of the printer (A).
2. Make sure the Lock Tabs are in the open position (B).
3. Remove the orange Tension Release Pins from the ends
of the Fuser Rollers. Open the Pressure Release Tabs and
pull the pins up and out (C).
note: You may have to pull hard to remove these.
4. Remove the Fuser Oil Bottle from its plastic bag and set
into place with the shunt valve down and the labeled
A
B
Lock
Tabs Open
C
side facing the front of the printer (D). The tab on the
bottle should face right when viewed from the printer’s
front. Place in front of the Lock Tabs.
5. Remove the Fuser Cleaning Roller from its plastic bag
and set into place with the exposed part of the roller
facing the front of the printer (E). The extra tab should be
on the left. Place in back of the Lock Tabs over the Fuser
Rollers.
6. Turn the Lock Tabs to the closed position holding the
Fuser Oil Bottle and Fuser Cleaning Roller in place (F).
7. Close the Top Cover of the printer.
Tension Release Pins
D
GETTING STARTED
EF
Installing the Fuser Oil Bottle and Fuser Cleaning Roller 17
Lock
Tabs Closed
G
Page 26
I
NSTALLING THE TONER
M
ODULES
1. Open the Front Cover of the printer(A).
2. Note the color labels inside indicating where to slide the
different color Toner Modules (B) (C=Cyan, M=Magenta,
Y=Yellow, and K=Black).
3. Begin with Cyan. Remove the Toner Module from its
plastic bag and rock it gently three or four times (C).
4. Remove the protective tape from the module.
5. Remove (and save) the orange protective cover.
6. Hold the module level and slide into place along the
racks in the printer (D).
7. Repeat steps 3 through 6 for the remaining color Toner
Modules (E).
8. Close the Front Cover, making sure it clicks into place (F).
A
D
B
K (Black)
Y (Yellow)
M (Magenta)
C (Cyan)
E
C
F
18 SuperScript 4400 Series — User’s Guide
Page 27
L
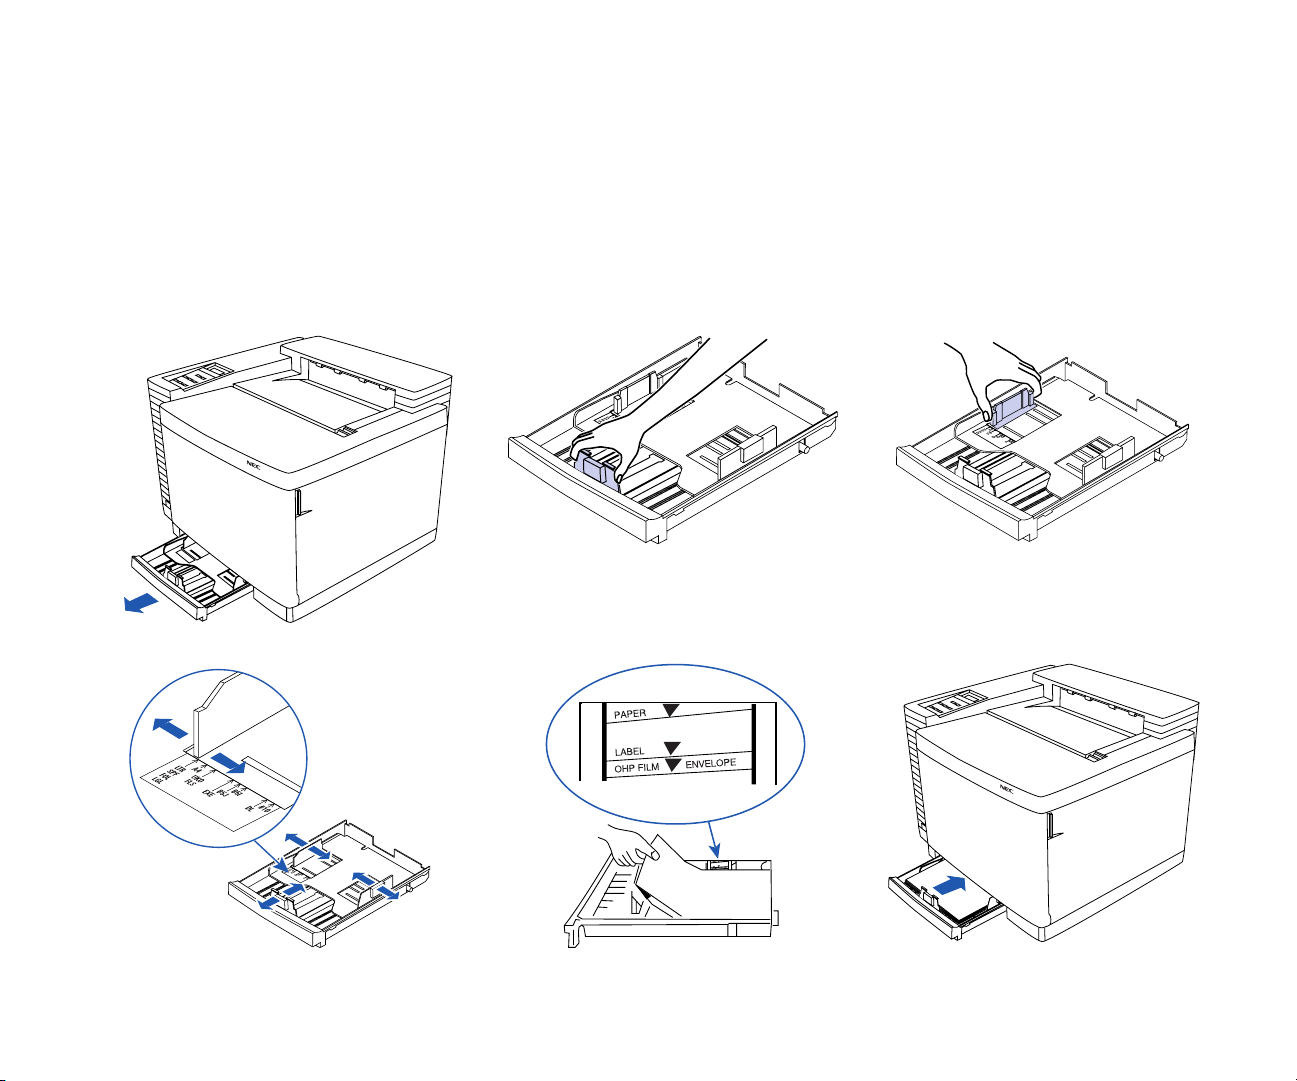
OADING THE PAPER TRAY
Paper Tray 1 can hold up to 250 sheets of medium weight
paper—U.S. letter size, executive, UK quarto, folio, or A4. It
also holds envelopes, transparencies, and sheets of labels. See
Appendix B, “Media Specifications,” for a complete list of
media that can be used. The exact number of sheets Paper
Tray 1 can hold depends on the weight of the paper.
1. Remove Paper Tray 1(A).
2. Squeeze on both sides of the length tab and slide it into
place. The outside of the tab should match the desired
size marked on the inside of the tray (B).
3. Squeeze the left side guide and slide it to match your
paper’s width (C). The inside of the tab should match the
desired size on the tray (D).
4. Insert the paper into Paper Tray 1(E).
5. Reinsert Paper Tray 1 into the printer (F).
GETTING STARTED
A
D
B
Do not overfill Paper Tray!
E
C
F
Loading The Paper Tray 19
Page 28
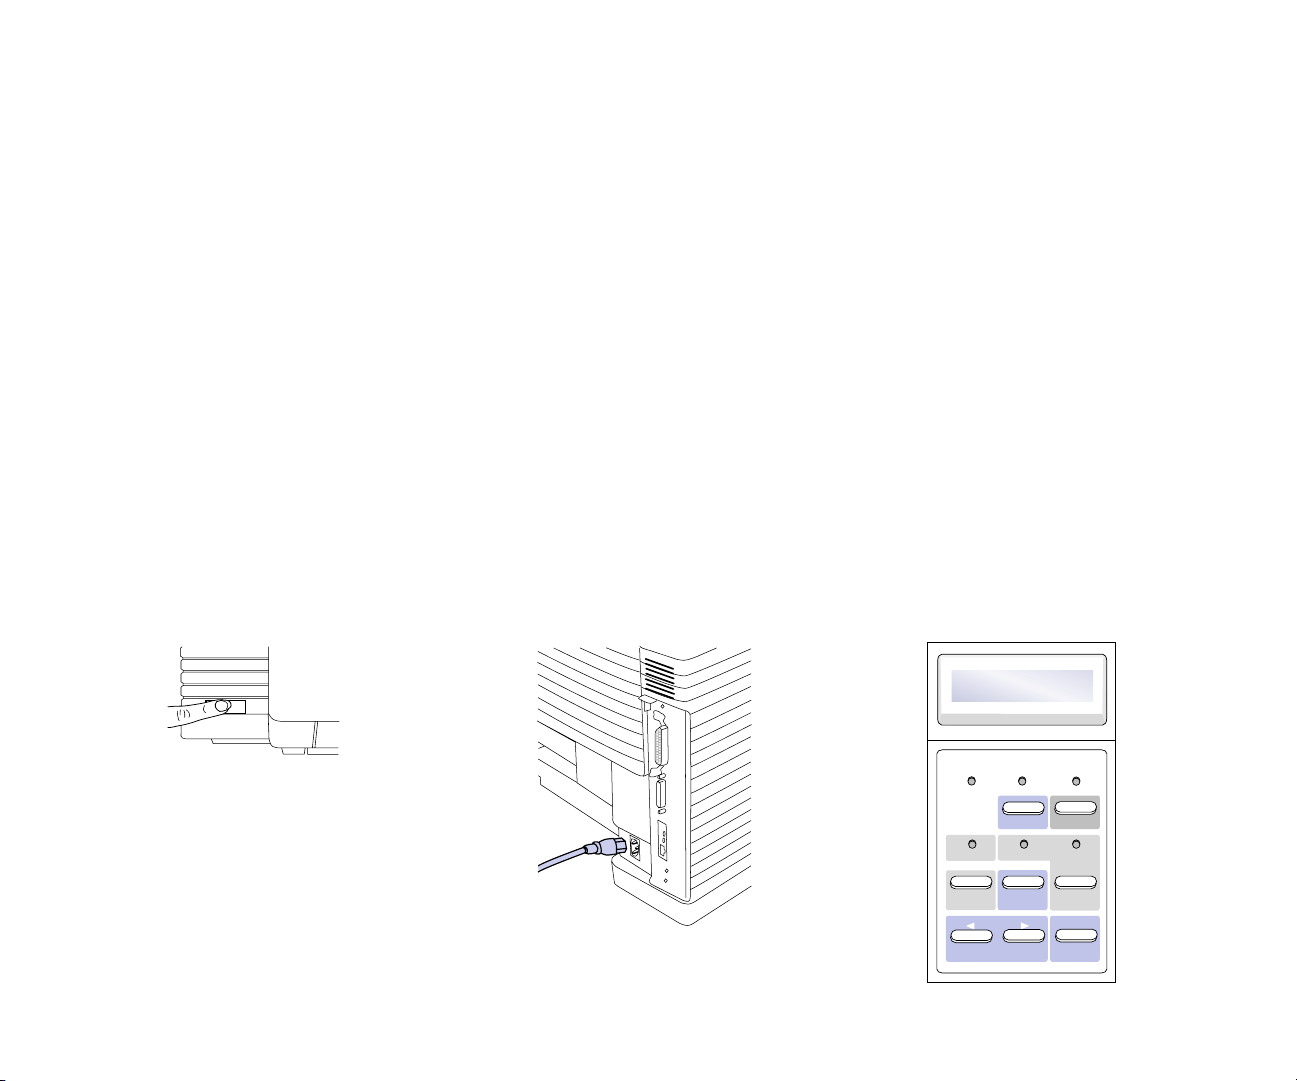
P
RINTING A STARTUP PAGE
Follow these steps to connect your printer to AC Power and
print a Startup Page.
1. Make sure the power switch is turned off (button is out).
2. Connect the Power Cord to the rear of the printer.
3. Plug the other end of the Power Cord into a properly
grounded outlet.
WARNING! This printer is intended to be electrically
grounded. It comes with a three-wire grounding plug. This
plug will only fit a grounded AC outlet or power strip. This
is a safety feature . If you are unable to insert the plug into
the outlet, contact a licensed electrician to replace the
outlet with a properly grounded outlet. Do not defeat the
purpose of the grounding plug by removing the third pin!
4. Turn on the printer power.
5. Indicator lights cycle and the following messages appear
on the Operator Panel display in sequence.
Self Test
SuperScript 4400 booting...
INITIALIZING
WARMING UP
PRINTING
6. The printer issues the Startup Page and the following
message appears on the Operator Panel display.
READY
A
20 SuperScript 4400 Series — User’s Guide
B
C
Power Warning Online
Menu OnLine
Data OHT Label
Feed Item Media
Previous Next
Select
Page 29
C
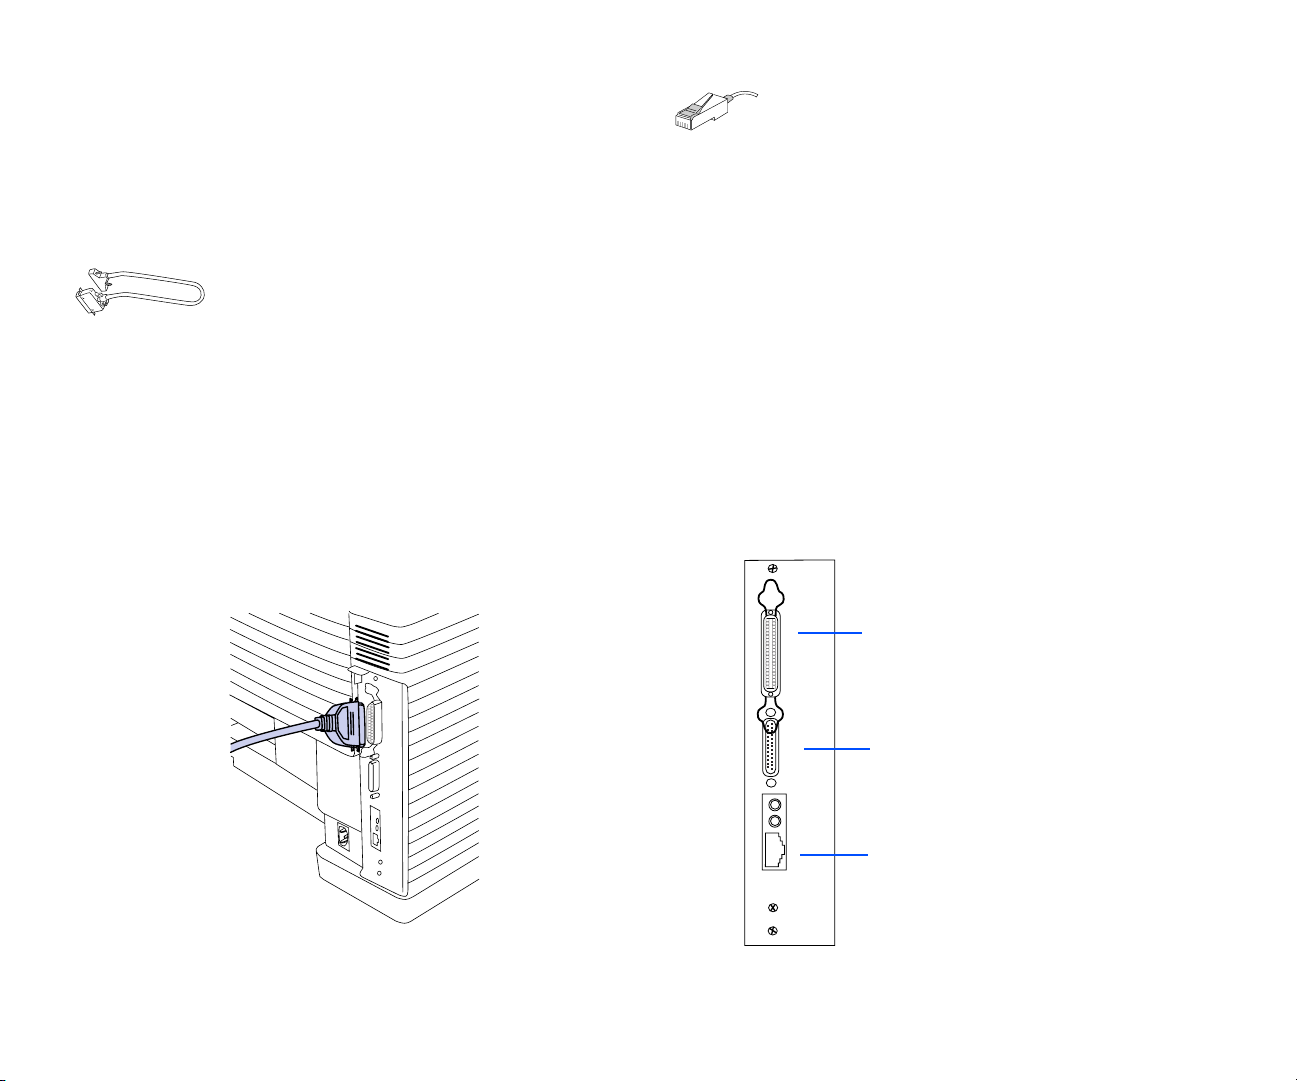
ONNECTING THE PRINTER TO YOUR
OMPUTER OR NETWORK
C
This section shows you how to connect your SuperScript
4400 Series printer to your computer or network.
note: You can be connected to and receive data at the
parallel port and Ethernet port at the same time.
Connecting the 4400 Printer
If you have a SuperScript 4400, you can
connect to an IBM®-compatible computer
using the bidirectional parallel interface. We
recommend an IEEE 1284 bidirectional parallel cable that is
no more than 6 feet in length. If you use a cable that is longer
than 6 feet, it should be certified as bidirectional. Use the wire
clips to fasten the cable to the printer.
Follow these basic steps
1. Make sure your computer and printer are turned off.
2. Plug the parallel cable into the parallel port on your
computer and printer.
3. Turn on your printer, wait until it displays the READY
message, then turn on your computer.
Continue to page 22 for printing instructions.
Connecting the 4400N Network Printer
If you have a SuperScript 4400N, you can
connect to an Ethernet network. Use a
Category 5 twisted pair cable with RJ-45
connectors for 10/100Base-T Ethernet.
Follow these basic steps to connect the printer and verify that
the NIC is installed and operating properly.
1. Make sure your computer and printer are turned off.
2. Connect the network’s twisted pair cable with
RJ-45 connectors to the new network port on your
printer. Reattach the power cord to the printer, plug in
the printer.
3. Turn on the printer. It may take up to 90 seconds to warm
up, and then it prints a Network Settings page with NIC
status information (shown on page 72).
note: Keep the Network Settings page. You will need
this information when configuring the NIC for your
network.
Continue to page 23 for printing instructions.
Interface Panel
Bidirectional Parallel
(4400 and 4400N)
GETTING STARTED
SCSI Port
Ethernet 10/100Base-T
(4400N only)
Connecting the Printer to Your Computer or Network 21
Page 30

P
RINTING WITH THE
Once you have printed a Startup Page, you can install a
printer driver from the SuperScript 4400 Series CD and begin
printing.
There are three types of setup available for SuperScript 4400
Series printer software: Easy/Local, Custom/Network
Client, and Administrator.
To get started, you can use the Easy/Local setup. This setup
quickly installs the basic printing tools for your operating
system. All setup options are described in more detail on
page 3.
4400 P
RINTER
Easy/Local Setup for Windows 95/98 and
Windows NT 4.0
Follow these steps.
1. Insert the SuperScript 4400 Series CD into the CD-ROM
drive.
2. The Installer will launch automatically.
3. When prompted, select the Easy/Local installation option
and click Next.
4. Continue responding to the selections displayed in the
dialog boxes until installation is complete.
PostScript Driver Setup for Windows 3.x
Follow these steps to install and use the PostScript printer
driver in Windows 3.x.
1. Boot your system and start Windows.
2. Insert the SuperScript 4400 Series CD into the appropriate
drive (in this example we use drive E:).
3. In the Windows Program Manager, select Run from the
File menu. Windows displays the Run dialog box.
4. Type E:\WIN31\PS\SETUP.EXE in the Command Line
field.
5. Click the OK button. This launches the Installer.
6. Respond to the selections displayed in the installation
dialog boxes.
7. When installation is complete the installer will prompt
you to restart Windows. Click the Restart Windows
button.
8. After Windows restarts the Install PostScript Printer
From PPD dialog box will appear.
9. Select NEC SuperScript 4400 PS. Click on Install.
10. When installation is complete click on Close.
Printing a Document from Your Application
You can do this using the print command of the application
used to create your document.
1. Open a document you wish to print.
2. Select Print from the File menu. The Print dialog box
appears.
3. Select the options you want in the Print dialog box,
including the number of copies and page range.
4. When the options are selected, click OK to print the
document.
22 SuperScript 4400 Series — User’s Guide
Instructions for setup and printing from a Mac OS
computer are on page 48.
Page 31
Q
UICK
4400N N
The fastest way to begin printing over the network is to use
NEC’s PrintAgent software and a web browser. This section
shows how to set up NEC PrintAgent Remote Printing.
To use Remote Printing, you must have on your computer
• Microsoft Internet Explorer 4.01 SP1
• The Windows 95/98 operating system
WEB P
RINTING WITH THE
ETWORK PRINTER
First, Set the Printer’s IP Address
There are several ways to do this. The steps below show how
to use the Operator Panel to set your printer’s IP Address.
1. Press the Online button of the Operator Panel. OFFLINE
appears on the display.
2. Press the Menu button to enter menu mode. CONTROL
appears on the display.
3. Press the Next button until COMMUNICATIONS appears
on the display, and press the Select button.
4. Press the Next button until NETWORK appears on the
display, and press the Select button.
5. Press the Next button until TCP/IP appears on the display,
and press the Select button.
6. Press the Next button until NET ADDRESS appears on the
display, and press the Select button.
7. Use the Operator Panel buttons to set values for each of
the 12 digits in this manner.
First press Next to set the cursor to the first digit.
For the first digit, press Select to increment to the correct
value. Then press Next to move to the next digit and
press Select to increment to its correct value. Continue
until all twelve digits are set. When the final digit is set,
press Next to confirm the Net Address you set and then
press Select.
8. Press Menu to exit menu mode and press Online to
bring the printer online.
9. To validate any changes to network settings, you must
turn the printer off, and then on again.
Easy Remote Printing Setup
Once the IP address is assigned to the printer, you can go to
the Printer Home Page to download and install the NEC
PrintAgent software and driver.
1. Launch your web browser.
2. Enter Printer’s IP Address as the URL to r each the Printer
Home Page for example
http://131.241.045.027
3. Click on the Install Drivers button to download
PrintAgent software.
4. In the File Download dialog box that appears, check Run
this program from its current location. and then click
OK to begin downloading and installing.
5. During installation, you will be prompted to enter the
URL (IP Address) of your printer so it can be added to
your system as the default printer. When installation is
finished, you can see the special NEC PrintAgent driver
by selecting Settings and then Printers from the
Windows Start menu.
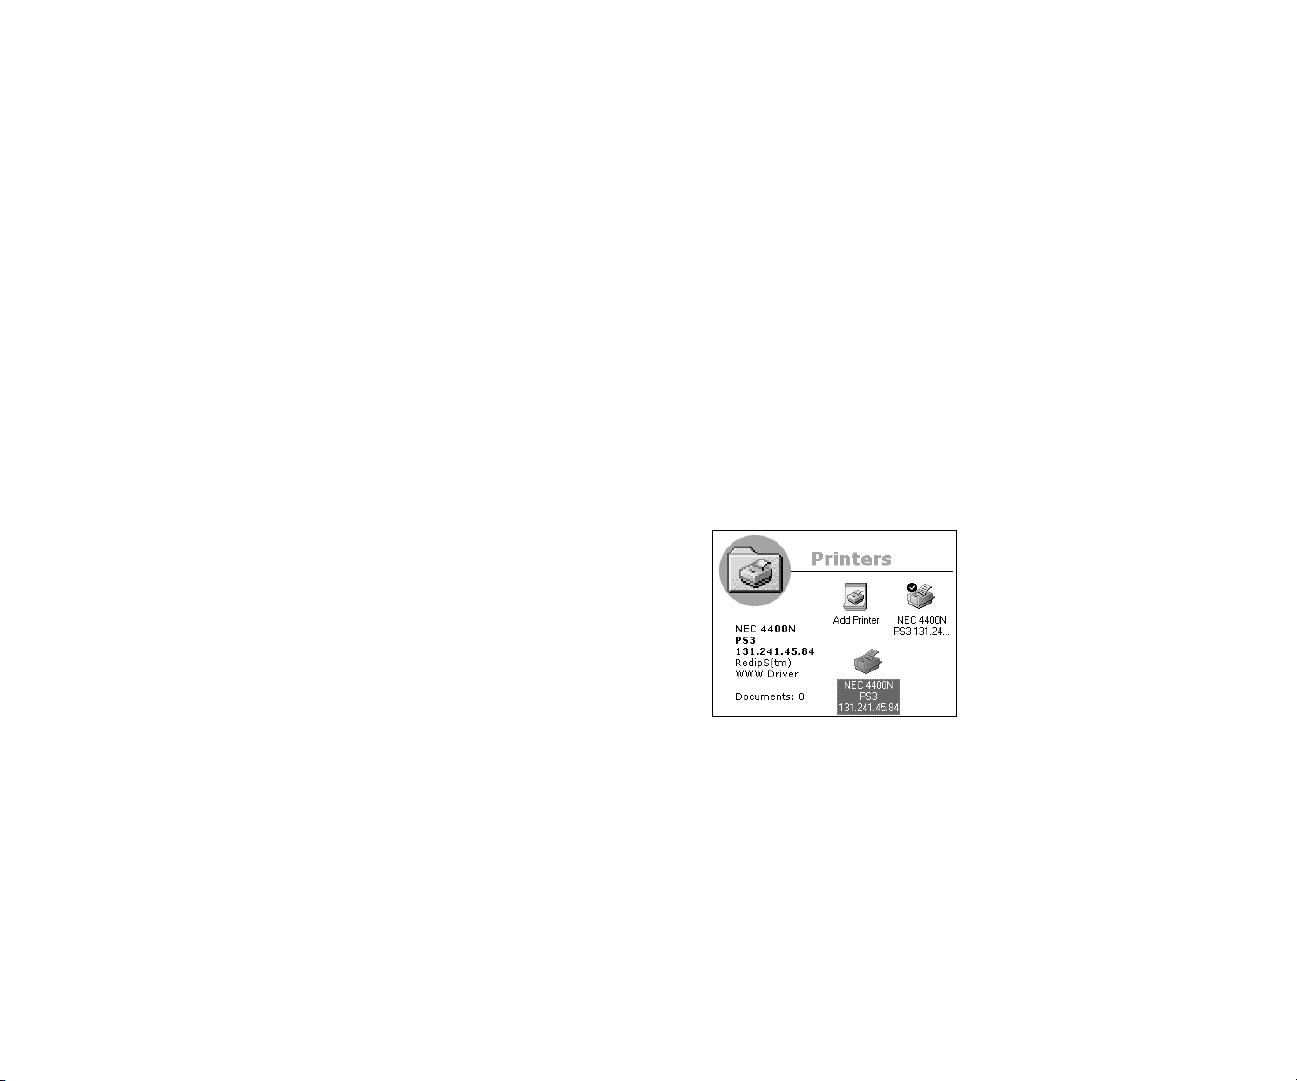
The Printers Window
6. Restart for the new Driver to take effect.
note: You can also install Remote Printing software
from the
For more information on NEC PrintAgent Remote Printing
and Pull Printing, see Chapter 6, “Web Printing Setup.”
SuperScript 4400 Series CD
.
GETTING STARTED
Quick Web Printing with the 4400N Network Printer 23
Page 32

P
RINTING ENVELOPES
1. Format your envelopes in your computer application.
2. Remove Paper Tray 1 and adjust the paper guides to the
envelope size you want to load.
3. Load no more than 15 envelopes into Paper Tray 1. Make
sure the envelope stack is flat and even.
4. The following illustration shows how to load a stack of
envelopes in Paper Tray 1.
Stack the envelopes with flaps down
and facing left
6. Press the Online button on the Operator Panel to take the
printer off line. Press the Media button once. The
message MEDIA TYPE THICK appears. Press the Online
button again.
Power Warning Online
Menu OnLine
Data OHT Label
Feed Item Media
Previous Next
Select
7. To return to printing regular weight paper again press
the Online button. Press the Media button. The message
MEDIA TYPE PAPER appears. Press the Online button
again.
note: If envelopes are wrinkling, try envelopes made
from a different kind of paper. Generally, textured
envelopes do not print well in laser printers.
P
RINTING ON THICK PAPER
Printing on thick stock or heavy paper is basically the same
as printing on envelopes. Follow the Printing Envelopes
directions above. Adjust the paper guides inside the tray to
match your paper size.
WARNING! Do not use envelopes that have fasteners,
snaps, or windows. Also, do not use envelopes that seal
with peel-off strips or pressure-sensitive adhesives.
Printing on such envelopes can damage the printer.
5. Put Paper Tray 1 or Legal Tray back in the printer.
note: You can load envelopes in Paper Tray 1 or the
optional Legal Tray as long as the tray is inserted in the
Paper Tray 1 Feeder.
24 SuperScript 4400 Series — User’s Guide
Page 33

P
RINTING TRANSPARENCIES
• Create the information you need printed on the
transparencies within your application. Try printing on a
plain sheet of paper first for proper placement.
• Print transparencies from Paper Tray 1 only.
• Load up to 50 sheets in Paper Tray 1.
• Keep the paper path clean. Transparencies are especially
sensitive to dirt. If shadows appear on either the top or
bottom of the sheets, refer to Chapter 8, “Maintaining
Your Printer,” for instructions on how to clean the
printer.
• If the manufacturer put a removable strip at the edge of
the transparencies, load the transparencies with the strip
toward the front of the printer (even if they recommend
that the striped edge faces the back of the printer).
• The printer will automatically detect transparencies in
Paper Tray 1.
• The best quality printing will be inside a 10 mm border
around the edge of the transparency
10mm
P
RINTING LABELS
Print labels as you would thick paper. Printing labels,
envelopes, thick paper , or transparencies takes slightly longer
than plain paper.
Be careful to fan and align the label sheets in Paper Tray 1.
When adding more label sheets, remove the ones already in
the tray. Stack and fan together before putting them back.
1. Remove Paper Tray 1 and load no more than 80 label
sheets.
GETTING STARTED
Best Print Area
note: The terms OHT (found on Operator Panel) and
OHP (found inside Paper Tray 1) both refer to
transparencies.
• The OHT light on the Operator Panel will start blinking
when the printer detects transparencies in Paper Tray 1.
2. Reinsert Paper Tray 1 into the feeder.
note: You can load label sheets in Paper Tray 1 or the
optional Legal Tray as long as the tray is inserted in the
Paper Tray 1 Feeder.
3. Press the Online button on the Operator Panel to take the
printer off line. Press the Media button once. The
message MEDIA TYPE THICK appears. Press the Online
button again.
4. To return to printing regular weight paper, press the
Online button. Press the Media button. The message
MEDIA TYPE PAPER appears. Press the Online button
again.
note: Load label sheets face up in the tray.
Printing Transparencies 25
Page 34

26 SuperScript 4400 Series — User’s Guide
Page 35

CHAPTER 3
PRINTER OPTIONS
O
VERVIEW
This chapter provides instructions for installing and using
printer options, including
• Installing the Network Interface Card (NIC)
• Installing the Legal Paper Tray
• Adding the Paper Tray 2 Unit
• Adding Memory (SIMM)
See page 116 for information about ordering printer options
and supplies.
I
NSTALLING THE NETWORK
NTERFACE CARD
I
Part # 4010
If you have the SuperScript 4400N printer, it is already
equipped with a Network Interface Card (NIC). If you
purchased the NEC SuperScript 4400, you can upgrade it by
installing a network interface card (NIC). Use the directions
in this section for installation.
See Chapter 6, “Web Printing Setup,” for information
about using NEC PrintAgent software for web printing.
See Chapter 7, “Network Setup,” for information about
configuring different network protocols.
(NIC)
SuperScript 4400 Network Interface Card
27
Page 36

First, Prepare the Printer
1. Turn off the printer, r emove the power cor d from the r ear
panel of the printer, and disconnect the printer cable
from the port (A). Position the printer so you are facing
the side and back corner where the cable port is located.
Make sure that you have enough room to work.
2. Using a small phillips-head screw driver remove the two
screws from the Interface Panel (expansion slot) on the
rear of the printer (B), and pull out the Controller Board.
3. Remove the screw that holds the small 1.5” x 3.75” plate
over the Network Slot. Remove the plate. Keep the screw
(C).
Preparing the Printer
Second, Install the NIC
These steps are illustrated on the opposite page.
4. Remove the mounting screws and small bracket from the
end of the standoff pins on the Controller Board (D).
Avoid touching the Controller Board circuitry and
components!
5. Remove the NIC from its protective bag (E). Handle the
NIC only by its edges.
6. Hold the NIC so that its circuitry faces inside the printer
and its LED’s face the back of the printer. Carefully align
the standoff pin with the lower right corner of the NIC.
7. Plug the NIC’s connector to the Controller Board as
shown (F).
8. Use the mounting screws and bracket (removed in step 4)
to fasten the NIC to the standoff pins as shown. Attach
the screw removed from the front in step 3 (G).
9. Slide the Controller Board back in the expansion slot.
Reinstall and tighten the screws (H).
A
28 SuperScript 4400 Series — User’s Guide
B
Network Slot
C
Page 37

Installing the NIC
PRINTER OPTIONS
D
Bracket
G
E
H
F
Installing the Network Interface Card (NIC) 29
Page 38

Third, Test the NIC
Follow these steps to verify that the NIC is installed and
operating properly.
1. Connect the network’s twisted pair cable with RJ-45
connectors to the new network port on your printer (A).
Reattach the power cord to the printer (B), plug in the
printer.
2. Turn on the printer (C). It may take up to 90 seconds to
warm up, and then it prints a Network Settings page
with NIC status information (shown on page 72).
note: Keep the Network Settings page. You will need
this information when configuring the NIC for your
network.
Your 4400 Printer is now a network printer. See Chapter 7,
“Network Setup,” for configuring your system to use the
network printer.
Testing the NIC
I
NSTALLING THE LEGAL PAPER TRAY
Part #4004
Installation of the optional Legal Paper Tray is simple.
Remove the standard paper tray from the main feeder or the
optional Paper Tray 2 unit. Fill your new Legal Paper Tray
and install as you would the standard tray (see page 19).
Legal Paper Tray
A
C
30 SuperScript 4400 Series — User’s Guide
B
Page 39

A
DDING THE PAPER TRAY
Part #4005
1. Make sure the printer is turned off and disconnected.
2. Make sure there is plenty of room around and above the
printer to work. Remove the optional Paper Tray 2 unit
from its packaging. Find the packet of brackets and
thumb screws and set aside.
3. Remove the .75”x 2” Connector Cable Door from the
unit. Extent the Connector Cable away from the unit.
4. Set the Paper Tray 2 unit next to the printer. Carefully
align the Paper Tray 2 unit to the printer. Keeping the
printer level, lift the printer up and onto the Paper Tray 2
Unit as shown (A).
Adding Paper Tray 2 Unit
2 U
NIT
WARNING! It takes two adults to lift the printer and
assure that it is level. If the printer is tipped more than 1.5
degrees, oil will spill inside and cause damage.
5. Locate the metal tab with screw hole on each side of the
Paper Tray 2 unit (A).
6. Take a metal bracket from the packet and hold it at a
slight angle away from you. Slide the bracket up into the
hole underneath the printer (B).
7. Make sure the hole in each metal bracket is lined up with
the corresponding screw hole on the Paper Tray 2 unit.
Insert and tighten the thumb screws (C).
PRINTER OPTIONS
A
Connector Cable
Screw Hole
BC
Adding Paper Tray 2 will increase
the printer’s height by 4 inches
Adding the Paper Tray 2 Unit 31
Page 40

8. Facing the back of the printer , locate the Connector Cable
at the rear of the Paper Tray 2 unit.
9. Remove the Cable Connector Door at the rear of the
printer (D) and plug the cable in to the printer socket (E).
10. Place the Cable Connector Door that you removed from
the printer over the opening on the Paper Tray 2 unit.
Place the Cable Connector Door that you removed in step
3 over the cable plug opening on the back of the printer.
Adding Paper Tray 2 Unit
11. Snap on the left and right Paper Tray 2 unit covers (F).
12. Reconnect the power and interface cables to your printer.
13. Load paper into your new Paper T ray 2, turn your printer
on and send a print job to the printer using paper from
both trays.
D
Switch Cable Connector Doors
after connecting cable!
F
E
G
32 SuperScript 4400 Series — User’s Guide
Page 41

A
DDING
M
EMORY
(SIMM)
The SuperScript 4400 and 4400N have four Single Inline
Memory Module (SIMM) slots. The 4400 comes with 32MB
RAM. The 4400N comes with 96MB RAM. However , you can
upgrade either model to a maximum of 128MB of RAM
through the installation of additional SIMMs.
note: You may need additional memory to print on legal
size paper or at higher resolutions. See the following
table.
See your local computer reseller to purchase expansion
SIMMs.Use 72 pin, 60ns high-quality SIMMs. You can use
both parity and non-parity DRAM SIMMs.
The following table lists the memory requirements, SIMM
specifications, and advantages of added memory.
Desired
Memory
40MB Two 16MB and
48MB Two 16MB and
64MB Four 16MB or
SIMMs to Use Advantages
Improved print speed
Two 4MB SIMMs
Two 8MB SIMMs
Two 32MB SIMMs
and performance
Improved print speed
and performance
Improved print speed
and performance
PRINTER OPTIONS
Adding additional memory will help ensure that your printer
has enough memory to print the most complex graphic print
jobs without sacrificing resolution. Added memory will also
increase print speed.
If you install the optional SuperScript 4400 NIC, you should
also upgrade your memory from 32MB to 96MB. The easiest
way to do this is to first remove the two 16MB SIMMs that
came with your printer. Then install two 32MB SIMMs in the
first two memory sockets. Reinstall the first two 16MB
SIMMs (that you removed) under these. Your printer now
has 96MB of RAM.
Remove SIMMs from the bottom memory sockets first. Install
SIMMs to the top memory sockets first.
The instructions that follow explain how to install memory in
your printer yourself. You can also contact an NECauthorized dealer and have more memory installed for a
service fee. Call 800-632-4650.
80MB Two 32MB and
Two 8MB SIMMs
96MB Two 32MB and
Two 16MB SIMMs
128MB Four 32MB SIMMs Improved print speed
Can print full color
letter size at 1200 x
1200 dpi
Can print full color
legal size at 1200 x
1200 dpi
and performance
note: If you are installing SIMMs of different capacities
you need to use the top two memory sockets marked “A”
for the larger capacity SIMMs.
When you turn on your printer it will automatically
recognize the added memory and show up on the Start Up
page. Make sure the printer driver knows about your added
memory. See page 40 about Device Options.
Adding Memory (SIMM) 33
Page 42

Installing SIMM
1. Turn the printer off and disconnect it.
2. Using a small phillips-head screw driver remove the two
screws from the expansion slot on the rear of the printer
(A), and pull out the Controller Board part way (B).
3. To remove any un-needed SIMMs start from the bottom:
Open the metal release brackets on each side of the
memory socket at the same time (C).
The SIMM will be released from the memory socket(D).
4. To add SIMMs:
Make sure the metal brackets on both sides of the
memory socket are open.
note: SIMMs of different values must be installed in
pairs.
Hold the SIMM so that the metal edge faces toward the
memory socket and the notched side of the SIMM faces
the right.
Hold the SIMM at a slight upward angle, being careful
not to touch the connection points along the edge of the
SIMM.
Insert the SIMM in the memory socket (E).
Press the SIMM in and up until it clicks into place.
Make sure the SIMM is seated securely and that the
metal brackets are closed.
5. Slide the controller board back into the printer and
reinstall the screws (F).
6. Connect the interface cable and power cord.
A
Make sure notch is on the right!
D
34 SuperScript 4400 Series — User’s Guide
B
E
C
F
Page 43

CHAPTER 4
PRINTER DRIVERS
O
VERVIEW
A printer driver is software that translates your computer
data into a format that the printer can read and print out. You
can access the printer driver software to change printer and
document settings and manage fonts. First, you need to
install the right printer driver for your system.
The SuperScript 4400 Series CD provides the following printer
drivers.
• PostScript 3 for Window 3.x
• PCL 5e for Window 3.x
• PostScript 3 for Windows 95/98
• PCL 5e for Windows 95/98
• PostScript 3 for Windows NT 4.0
• PCL 5e for Windows NT 4.0
• PostScript 3 for Mac OS (on EtherTalk networks)
In this chapter , you learn how to install, access, and use these
printer drivers to control printer settings. For definitions of
the different settings available on printer drivers, see
Chapter 1, “Features.” You can also use the online Help
feature on any printer driver.
The SuperScript 4400 Series CD also provides software for
configuring and using the printer on NetWare, TCP/IP, and
EtherTalk networks. Network setup is described in
Chapter 7. Network printing, in most cases, requires the
installation and use of printer drivers.
When to Use the PostScript 3 or
PCL 5e Printer Driver
Use the PostScript 3 driver for color documents and
documents that contain many complex graphic images or
extensive page layout formatting. The PostScript driver has
more options and delivers better graphic processing.
Use the PCL 5e driver for monochrome documents that
contain mostly text and limited formatting. The PCL5e driver
handles this type of document well and delivers faster
printing than the PostScript3 driver.
note: For color printing, you must use the PostScript 3
printer driver for your system. The PCL 5e printer driver is
for monochrome printing only.
Installation Options
There are three types of setup available for SuperScript 4400
Series printer software: Easy/Local, Custom/Network
Client, and Administrator. This chapter provides instructions
for using the Easy/Local setup. This setup quickly installs
the basic printing tools for your operating system. This is
appropriate if you are connected to a SuperScript 4400 from
the parallel port. All setup options are described in more
detail on page 3.
35
Page 44

W
INDOWS
95/98
Installing Printing Software
Follow these steps to use the SuperScript Installer in
Windows 95/98.
1. Insert the SuperScript 4400 Series CD into the CD-ROM
drive.
2. The Installer will launch automatically.
3. When prompted, select the Easy/Local installation option
and click Next.
4. Continue responding to the selections displayed in the
installation dialog boxes.
5. When installation is complete, restart Windows.
Printing a Document
You can do this using the print command of the application
used to create your document.
1. Open a document you wish to print.
2. Select Print from the File menu. The Print dialog box
appears.
3. Select the options you want in the Print dialog box,
including the number of copies and page range.
4. When the options are selected, click OK to print the
document.
Accessing a Printer Driver
You can access the printer driver from your application, or
the Windows Printer folder.
From your application
Different applications have different methods for accessing
the Printer Setup. Below is one common example. If it does
not work with your application, consult your software
manual.
1. Select Print from the File menu of your application.
2. In the Print dialog box that appears, click the Name pulldown menu and select a printer from the list.
3. Then click the Properties button in the Print dialog box
to display the printer driver.
From the Printers folder
1. Press the Start button and point to Settings in the Start
pop-up menu. In the menu that appears, click Printers.
2. In the Printers folder , select the printer driver you wish to
view .
3. From the File menu, select Properties.
Changing Settings in the Printer Driver
In the Properties folder, you simply point and click to change
printer settings.
1. Select a category of settings that you want to change by
clicking its name tab.
2. Click to select new settings in the property sheet.
3. Click OK to save the changes you made in all property
sheets and close the printer driver.
Click Apply to save the changes you made in a property
sheet. The printer driver remains open.
Click Cancel to close the printer driver. Y our changes will
not be implemented.
Setting Another Printer Driver as Default
You can change printer drivers using the Printers folder.
1. Press the Start button and point to Settings in the Start
pop-up menu. In the menu that appears, click Printers.
2. In the Printers folder, double-click a new printer driver.
3. In the folder that appears, select Set As Default from the
Printer menu.
36 SuperScript 4400 Series — User’s Guide
Page 45

Using the Windows 95/98 Printer Drivers
Windows 95/98 Printer Driver - System Tabs
The General, Details, and Sharing tabs provide access to Windows features for setting up your printer. A brief
description is provided here. For more information about settings on these tabs, see the Windows manual.
General Tab
This tab provides general
information about the printer. Use
the Comment area to add
comments about the printer. You
can specify a separator page to be
sent between jobs, and print a test
page to troubleshoot problems.
Details Tab
Use this tab to customize the
local and network port
connections to the printer and
specify print spooling settings.
Click the Help button to
view the complete Help file.
Click any tab to view
more printer settings.
Sharing Tab
Use this tab to customize the local
and network port connections.
PRINTER DRIVERS WINDOWS 95/98
Click OK to save changes
and close the driver.
Click Cancel to discard changes
and close the driver.
Click Apply to save changes
and leave the driver open.
Click the ? Help icon and click
a setting on the driver to view
more information about it.
Windows 95/98 37
Page 46

Windows 95/98 Printer Driver - PostScript 3 Tabs (I)
PostScript Tab
Use these settings to configure options
for the PostScript printing language.
Watermarks Tab
A watermark is text that appears on pages
in your print job, such as DRAFT or
CONFIDENTIAL. Use these settings to
customize watermarks for your print job.
Click here to customize
advanced features.
Paper Tab
Use the Paper tab to customize
paper handling for the print job.
NEC Features Tab
This tab allows you to control
the special features of the
SuperScript 4400 printer.
This preview area shows
the effect of your selections.
Click the Help button to view the complete Help file.
Click the ? Help icon and click a setting on the
driver to view more information about it.
Click any tab to view more printer settings.
Click the Restore Defaults button to replace current
settings on the tab with factory defaults.
38 SuperScript 4400 Series — User’s Guide
Click here to
print page borders
on your job.
To order NEC Premium
papers call 800-632-2326
Page 47

Windows 95/98 Printer Driver - PostScript 3 Tabs (II)
Graphics Tab
Use the Graphics tab settings
to define print quality.
Fonts Tab
You can use the Fonts tab to
specify how TrueType fonts in
your document will be processed
by the printer.
PRINTER DRIVERS WINDOWS 95/98
Click the Help button to view the complete Help file.
Click the ? Help icon and click a setting on the
driver to view more information about it.
Click any tab to view more printer settings.
Click the Restore Defaults button to replace current
settings on the tab with factory defaults.
Device Options Tab
You can use settings on the Device
Options tab to match the attached
printer configuration so that the
printer driver can generate
optimized PostScript code.
Click here to display the
Font Substitution Table.
Windows 95/98 39
Page 48

Windows 95/98 Printer Driver - PCL 5eTabs
Paper Tab
Use the Paper tab to customize
paper handling for the print job.
Graphics Tab
Use the Graphics tab settings
to define print quality.
Fonts Tab
You can use the Fonts tab to specify
how TrueType fonts in your document
will be processed by the printer.
Device Options Tab
You can use settings on the
Device Options to match the
attached printer
configuration so that the
printer driver can generate
optimized PostScript code.
Click the Help button to view the complete Help file.
Click the ? Help icon and click a setting on the
driver to view more information about it.
Click any tab to view more printer settings.
Click the Restore Defaults button to replace current
settings on the tab with factory defaults.
40 SuperScript 4400 Series — User’s Guide
Page 49

W
INDOWS
NT 4.0
Installing Printing Software
Follow these steps to use the SuperScript Installer in
Windows NT 4.0.
1. Insert the SuperScript 4400 Series CD into the CD-ROM
drive.
2. The Installer will launch automatically.
3. When prompted, select the Easy/Local installation option
and click Next.
4. Continue responding to the selections displayed in the
installation dialog boxes.
5. When installation is complete, restart Windows.
Printing a Document
You can do this using the print command of the application
used to create your document.
1. Open a document you wish to print.
2. Select Print from the File menu. The Print dialog box
appears.
3. Select the options you want in the Print dialog box,
including the number of copies and page range.
4. When the options are selected, click OK to print the
document.
Accessing Printer Properties
Y ou can access the Printer Pr operties page from the Windows
Start menu.
1. Press the Start button and point to Settings in the Start
pop-up menu. In the menu that appears, click Printers.
2. In the Printers folder , select the printer driver you wish to
view .
3. From the File menu, select Properties.
Accessing Document Properties
You can access the Document Properties page from an
application, such as Word or Excel.
1. Select Print or Print Setup from the File menu of your
application.
2. In the Print dialog box that appears, click the Name pulldown menu and select a printer from the list.
3. Then click the Properties button in the Print dialog box
to display the printer driver.
Changing Settings in the Printer Driver
In the Document Properties page, you simply point and click
to change printer settings.
1. Select the Page Setup or Advanced tab to find the setting
you want to change.
2. Click to select new settings. In the Advanced tab, when
you click a setting in the scrolling menu, more specific
options are shown in the lower portion of the window.
3. Click OK to save the changes you made in all property
sheets and close the printer driver.
Click Cancel to close the printer driver. Y our changes will
not be implemented.
Setting Another Printer Driver as Default
You can change printer drivers using the Printers folder.
1. Press the Start button and point to Settings in the Start
pop-up menu. In the menu that appears, click Printers.
2. In the Printers folder, double-click a new printer driver.
3. In the folder that appears, select Set As Default from the
Printer menu.
PRINTER DRIVERS WINDOWS NT 4.0
Windows NT 4.0 41
Page 50

Using the Windows NT 4.0 Printer Driver
Windows NT 4.0 Printer Properties
The General, Ports, Scheduling, Sharing,
and Security tabs provide access to
Windows features for setting up your
printer. For information about settings on
these tabs, see the Windows manual.
Click the ? Help icon and click
a setting on the driver to view
more information about it.
Click the Help button to
view the complete Help file.
Click any tab to view
more settings.
The Device Settings tab lets you change printer properties
specific to the SuperScript 4400. (More settings are available
when you select Print or Print Setup from your application’s File
menu.) The Device Settings tabs are different for the PostScript 3
and PCL 5e printer drivers, and are shown below.
PostScript 3 Device Settings
PCL 5e Device Settings
Click any setting in the scrolling menu
and the lower portion of the tab
displays more options for that setting.
Click OK to save changes
and close the driver.
42 SuperScript 4400 Series — User’s Guide
Click Cancel to discard changes
and close the driver.
Page 51

Windows NT 4.0 Document Properties - PostScript 3
You can change document settings using the Document Properties pages. To access these, select Print or Print
Setup from your application’s File menu
Page Setup Tab
Use this tab for general page setup options.
Advanced Tab
Use this tab to access all Windows NT 4.0
printer driver settings. PostScript settings are
described in Chapter 1.
PRINTER DRIVERS WINDOWS NT 4.0
Click OK to save changes
and close the driver.
Click Cancel to discard changes
and close the driver.
Click any setting in the scrolling menu
and the lower portion of the tab
displays more options for that setting.
Windows NT 4.0 43
Page 52

Windows NT 4.0 Document Properties - PCL 5e
You can change document settings using the Document Properties pages. To access these, select Print or Print
Setup from your application’s File menu
Page Setup Tab
Use this tab for general page setup options.
Advanced Tab
Use this tab to access all Windows NT 4.0
printer driver settings. PCL 5e settings are
described in Chapter 1.
Click OK to save changes
and close the driver.
Click Cancel to discard changes
and close the driver.
44 SuperScript 4400 Series — User’s Guide
Click any setting in the scrolling menu
and the lower portion of the tab
displays more options for that setting.
Page 53

W
INDOWS
3.
X
Installation for Windows 3.x (PostScript)
1. Boot your system and start Windows.
2. Insert the SuperScript 4400 Series CD into the appropriate
drive (in this example we use drive E:).
3. In the Windows Program Manager, select Run from the
File menu. Windows displays the Run dialog box.
4. Type E:\WIN31\PS\SETUP.EXE in the Command Line
field.
5. Click the OK button. This launches the Installer.
6. Respond to the selections displayed in the installation
dialog boxes.
7. When installation is complete the installer will prompt
you to restart Windows.
8. After Windows restarts, the Install PostScript Driver
From PPD dialog box appears.
9. Select NEC SuperScript 4400 PS. Click on Install.
10. When installation is complete, click on Close.
Printing a Document
You can do this using the print command of the Windows
application used to create your document.
1. Open a document you wish to print.
2. Select Print from the File menu. The Print dialog box
appears.
3. Select the options you want in the Print dialog box,
including the number of copies and page range.
4. When the options are selected, click OK to print the
document.
Accessing the Printer Driver
You can access the printer driver from your application and
the Windows Control Panel.
From your application
Different applications have different methods for accessing a
printer driver. Below is one common example. If it does not
work with your application, consult your software manual.
1. Select Print from the File menu of your application.
2. In the Print dialog box that appears, click the Setup
button.
3. In the Print Setup dialog box that appears, select the
appropriate SuperScript printer driver in the Printers list
and then click the Setup button.
From the Windows Control Panel
1. In the Windows Control Panel double-click the Printers
icon.
2. In the Printers dialog box that appears, select the driver
you wish to view from the Installed Printers list. Then
click the Setup button.
Changing Settings in the Printer Driver
In the printer driver, you simply point and click to change
printer settings.
1. In the PostScript 3 driver, select a category of settings
that you want to change by clicking its name tab. In the
PCL 5e driver, press the Options button to display more
settings.
2. Click on any setting to select it.
3. Click OK to save the changes you made in all property
sheets and close the printer driver.
Click Apply (PostScript driver only) to save the changes
you made in a property sheet. The printer driver remains
open.
Click Cancel to close the printer driver . Y our changes will
not be implemented.
Setting Another Printer Driver as Default
You can change printer drivers using the Windows Control
Panel.
1. In the Windows Control Panel double-click the Printers
icon.
2. In the Printers dialog box that appears, select the driver
you wish to use in the Installed Printers list.
3. Click the Set As Default Printer button.
4. Click on the Close button to close the Printers dialog box.
PRINTER DRIVERS WINDOWS 3.X
Windows 3.x 45
Page 54

The Windows 3.x PostScript 3 Printer Driver
Paper Tab
Use the Paper tab to customize
paper handling for the print job.
PostScript Tab
Use these settings to configure options
for the PostScript printing language.
Features Tab
This tab allows you to control the
special printer features.
Job Control
Use these settings to configure more
options for PostScript printing.
Fonts Tab
You can use the Fonts tab to specify
how TrueType fonts in your document
will be processed by the printer.
Watermarks Tab
A watermark is text that appears on
pages in your print job, such as DRAFT or
CONFIDENTIAL. Use these settings to
customize watermarks for your print job.
Click the Help button to view
the complete Help file.
46 SuperScript 4400 Series — User’s Guide
Click Cancel to discard changes
and close the driver.
Click OK to save changes
and close the driver.
Page 55

Windows 3.x - PCL 5e Printer Driver
PRINTER DRIVERS WINDOWS 3.X
The PCL 5e printer driver window has general document settings. Press the
button to display more settings for adjusting graphic output.
Click the Help button to view the complete Help file.
Click Cancel to discard changes and close the driver.
Click OK to save changes and close the driver.
Click About to view version and copyright information.
Options
Windows 3.x 47
Page 56

M
AC
OS
You can print from Mac OS version 7.1 and higher, to the
SuperScript 4400N network printer over EtherTalk.
Installing Printing Software
1. Insert the SuperScript 4400 Series CD in your drive and
double-click the AdobePS Installer icon.
2. Follow the installation instructions for the AdobePS laser
printer driver.
3. After you have installed the AdobePS software, doubleclick the SuperScript 4400 Installer icon.
4. The installer prompts you to select install preferences
and places the software on your hard drive.
Choosing the Printer
1. Select Chooser from the Apple menu and make sure the
AppleTalk Active button is selected.
2. In the Chooser, select the AdobePS printer icon, select
the AppleTalk zone your printer is on, then select the
printer’s name, SuperScript 4400, in the printer list.
Configuring the PPD
1. Click the Setup button in the Chooser.
2. In the Setup dialog box, click Auto Setup. The driver will
attempt to determine the correct PPD (PostScript Printer
Description) file to associate with the printer.
3. In the Printer Descriptions dialog box, select
SuperScript 4400 and click Select.
4. When the Setup dialog box reappears, click the
Configure button.
5. In the Configure dialog box, use the pull-down menus to
specify options currently installed in your printer.
Renaming Your Printer
Rename your printer if you have more than one SuperScript
4400 printer on your network. To do this you need a copy of
Apple Printer Utility. Obtain this online from Apple
Computer at this URL:
http://http.info.apple.com/ftp/
Apple_Support_Area/Apple_Software_Updates/
US/Macintosh/Printing/LaserWriter/
Apple_Printer_Utility_2.2.img.bin
…or by requesting the Apple LaserWriter 8.5.1 driver
installer disk set from Apple by calling 800-SOS-APPL.
Then perform a custom install of the Apple Printer Utility.
1. Launch the Apple Printer Utility.
2. Select the zone in which your SuperScript 4400 printer
resides.
3. Select the printer you wish to rename and click Open
Printer.
4. Select the Name section of the window by clicking the
arrow.
5. Type your desired name into the field labeled AppleTalk
Name.
6. Click the Send button.
Printing
To print a document from your Mac OS computer
1. Select Print from the File menu.
2. A Print dialog box appears that allows you to select the
settings you want. Change the center “Panel” of settings
by selecting categories from the Settings pull-down
menu.
3. Select one of the following options from the Destination
pull-down menu.
Printer: Your document is printed out on your printer
(the default).
File: The document canbe saved as either a PostScript
Job or an Encapsulated PostScript file.
4. When all settings are specified, click the Print button to
print the document.(See the Print dialog on page 49.)
Page Setup
To view and change Page Setup settings
1. Select Page Setup from the File menu.
2. A dialog box appears that allows you to select the
settings you want. Change the center “Panel” of settings
by selecting Page Attributes or PostScript Options from
the pull-down menu.
3. Select options and click OK to return to the document.
48 SuperScript 4400 Series — User’s Guide
Page 57
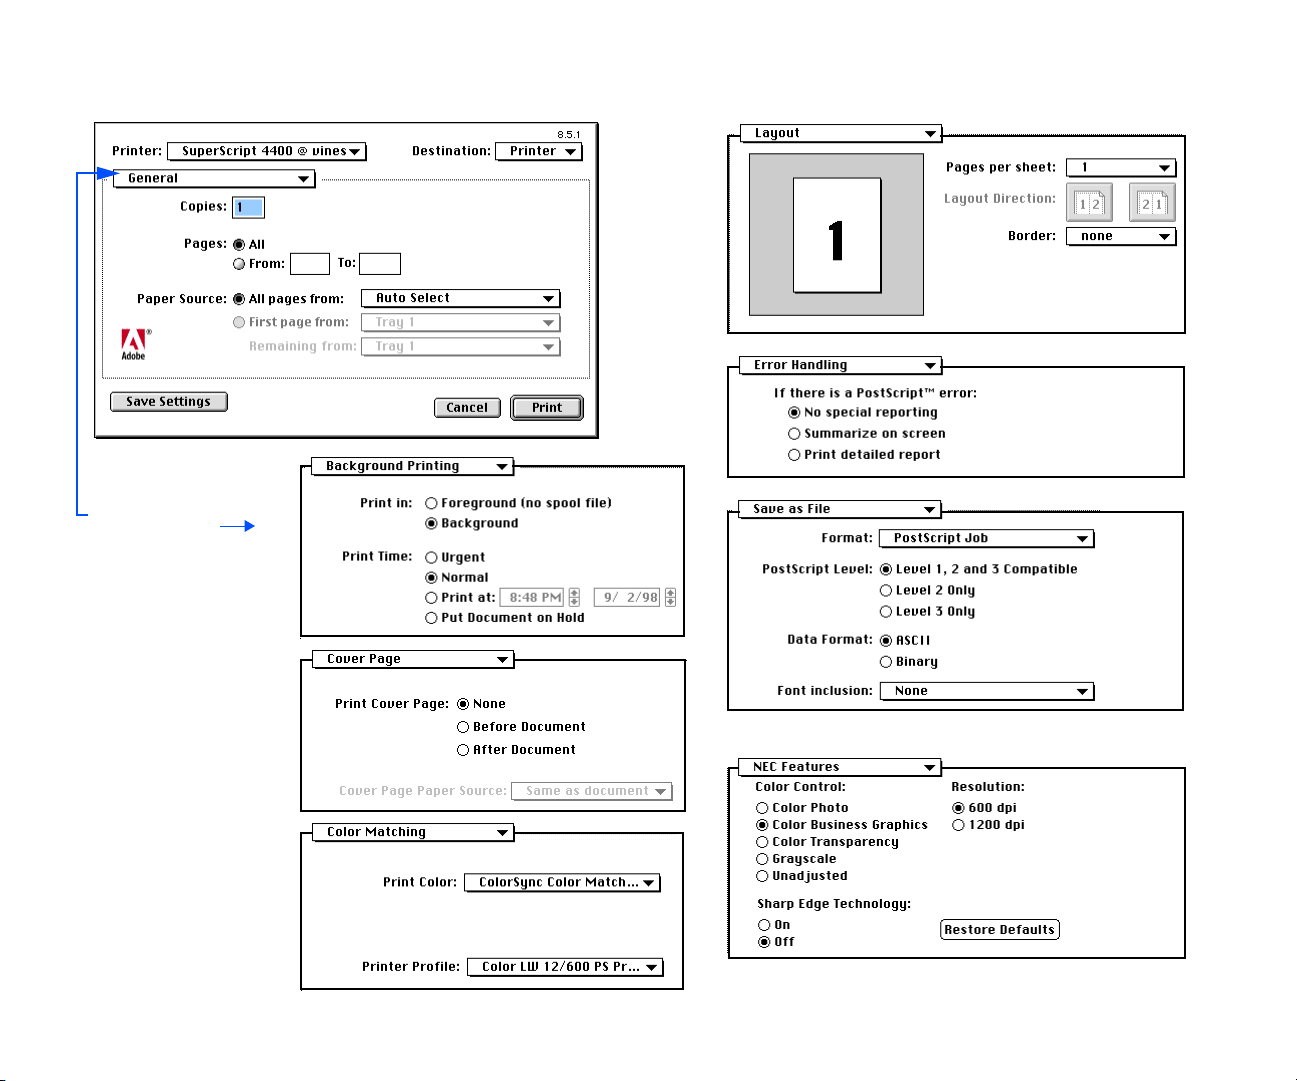
Mac OS -Print Dialog Box
Pull down the
Settings menu
to view more
categories in the
center panel.
PRINTER DRIVERS MAC OS
Mac OS 49
Page 58

50 SuperScript 4400 Series — User’s Guide
Page 59

CHAPTER 5
O
PERATOR PANEL FEATURES
THE OPERATOR PANEL
O
VERVIEW
The printer Operator Panel allows you to read printer
messages and change printer settings directly at the printer.
The diagram below identifies the different areas of the
Operator Panel.
This chapter describes
• Operator Panel features, including indicator lights, the
message display, and buttons
• Using the Operator Panel menu tree
• Important tasks you perform using the Operator Panel
and menu tree settings.
Power Warning Online
Menu OnLine
Data OHT Label
Feed Item Media
Previous Next
Select
Indicator Lights
The indicator lights on the Operator Panel communicate the
operating status of the printer.
Light Mode Status
Power On Printer power is on or in POWER SAVE
mode.
(Green) Off Printer power is off.
Warning On Call for service (see page115).
(Red) Off Normal state, no action is required.
Blinking The printer has a problem. See the
message display. If there is no
message, call for service (see
page115).
Online On Printer is online and ready to print.
(Green) Off Printer is offline or in menu mode.
Blinking Printer is warming up.
Data On Print buffer contains data.
(Orange) Off Print job has ended or print buffer has
been cleared by pressing the Feed
button.
Blinking Data is being sent to the printer.
OHT
(Green)
Label
(Green)
On
Off
On
Off
Media type is set to Over Head
Transparency (OHT).
Media type is not set to OHT.
Media type is set to Label.
Media type is not set to Label.
51
Page 60

The Message Display
The Operator Panel status display is an LCD panel that
shows status messages, alert messages, media types, and
menu selections. When the printer is performing a job, the
Status messages with their explanation. Alert messages are
explained on page 104. Service messages require that you call
an authorized service representative. See page 115 for
information about service and technical support.
display indicates a printer status message, such as
PROCESSING, PRINTING, etc. The standard display is READY,
meaning the printer is ready for use. The table below lists
Status Message Explanation
INITIALIZING
RESETTING
WARMING UP
Indicates that the printer is initializing.
Indicates that the printer settings are being restored to their factory defaults.
Printer is not yet ready to operate. It is performing an initial power up check or the fuser
unit is warming up to operating temperature.
READY
PRINTING
PROCESSING
WAITING
POWER SAVE
MODE
MEDIA TYPE <type>
SELECTED
TEST PRINT
FIRST JOB
RESETTING JOB
OFFLINE
PRESS SELECT TO
CANCEL JOB
Printer is online and ready to print under Auto Emulation Switching mode.
Printer is printing a page.
Printer is processing a job.
Printer is waiting for additional input to complete the print job.
Printer is in Power Saving mode. When the printer receives data or you press any button,
the display restores ordinary printer messages.
Shows the current paper type <PAPER OR THICK STOCK> when user presses Media button.
Appears when a setting is selected.
Printer is printing a test page.
Start page is printing (if enabled).
Printer is resetting a job.
Printer is offline.
This appears if you press the Online button while the printer is processing a job or waiting
for additional input to complete the print job. Then press the Select button to cancel the job.
52 SuperScript 4400 Series — User’s Guide
Page 61

Operator Panel Buttons
Operator panel buttons have different functions depending
on whether the printer is online, offline, or in menu mode.
The table below summarizes Operator Panel buttons. The
Button Mode Function
Online Offline Press to bring printer online.
Online Press to take printer offline.
Menu Button is not active.
Feed Offline In PCL emulation or Automatic Emulation Switching (AES) mode, pressing this button with the DATA
indicator light on allows data stored in the print buffer to be printed out. This button is not active in
PostScript emulation mode.
Online Button is not active.
Menu Button is not active.
Menu Offline Press to enter the menu mode. The menu category, CONTROL appears on the status display.
Online Button is not active.
Menu Press to exit menu mode.
Media Offline Press once to change media to Thick stock (use for en velopes and labels too) Green LED light turns on.
Press again to return to plain paper. When the printer detects overhead transparencies in the paper tray,
the button is not active, and the green OHT indicator light goes on. When the transparencies are
removed from the paper tray, the status returns to whatever media was being used previously.
Online Button is not active.
Menu Button is not active.
Item Offline Button is not active.
Online Button is not active.
Menu Press to go up one menu level.
Previous Offline Button is not active.
Online Button is not active.
Menu Press to display previous item in a menu.
Next Offline Button is not active.
Online Button is not active.
Menu Press to display next item in a menu.
Select Offline Button is not active.
Online Button is not active.
Menu Enables changes made to settings in the menu tree.
Operator Panel menu tree and procedures for changing
printer settings are discussed beginning on page 54.
THE OPERATOR PANEL
Operator Panel Features 53
Page 62
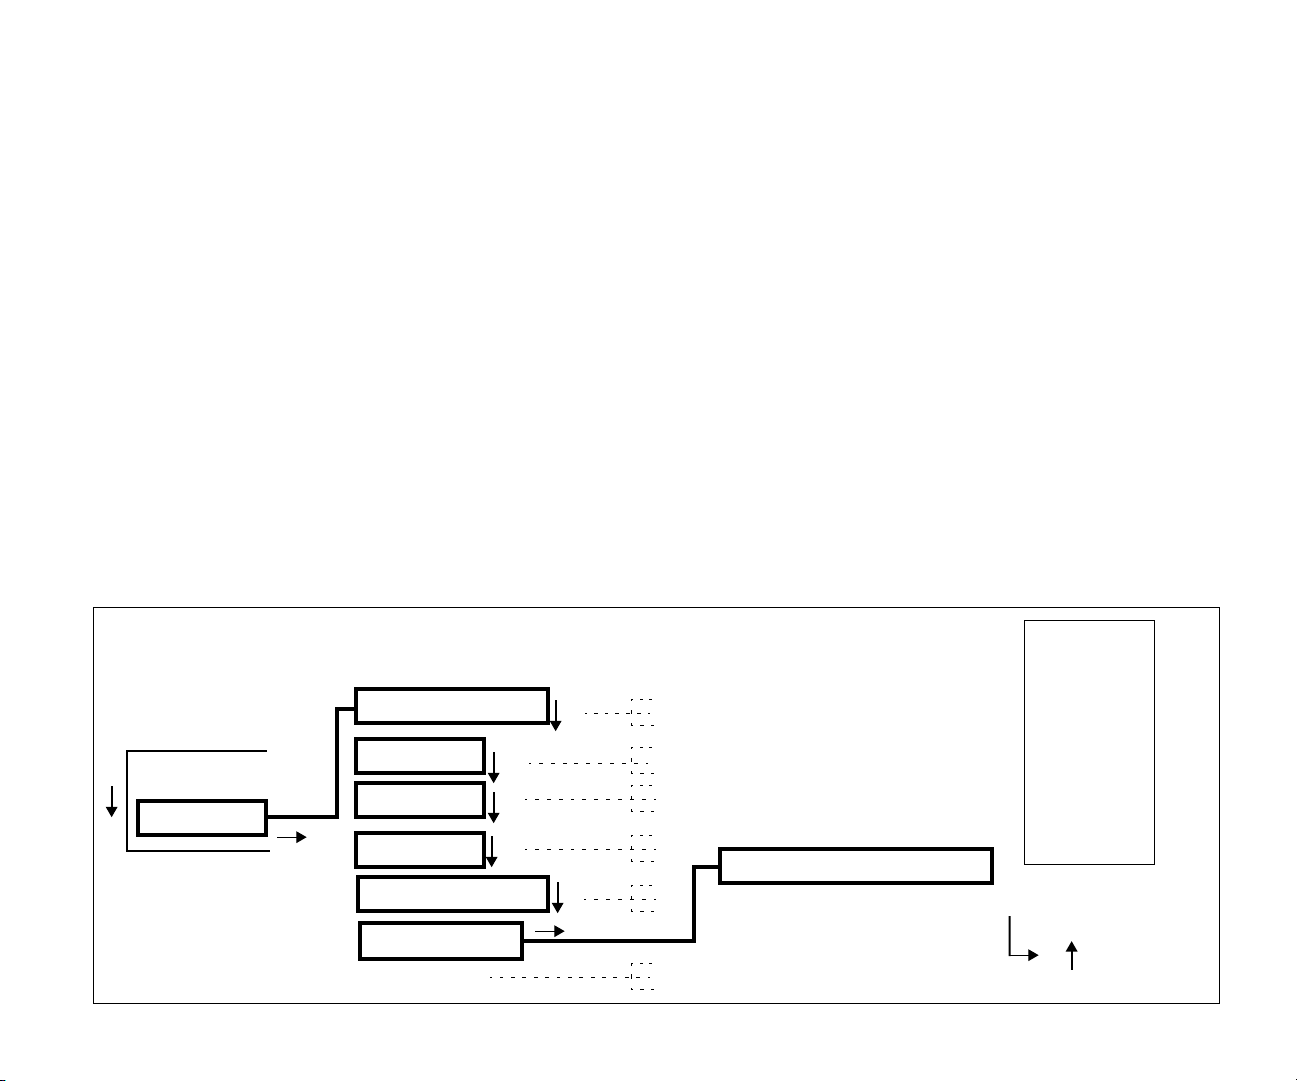
U
SING THE
M
ENU TREE
You can use the Operator Panel to set communications
channels, print forms or pages, view usage reports, use
special features, or change printer settings. (However, in
most cases, you will use your printer drivers to change
printer settings.) Follow these three basic steps to enter menu
mode and navigate through the menu tree
1. Turn on the printer, if necessary.
2. Press Online to turn the indicator light off and take the
printer offline. The display changes from READY to
OFFLINE.
3. Press Menu. The display changes to MENU CONTROL.
4. You navigate through the menu tree by pressing the
menu selection buttons on the operator panel.
• Press Next to go to the next item in a menu.
• Press Previous to go to the previous item in a menu.
• Press Select to go to the next menu level or to choose the
displayed setting if you are at the lowest menu level.
• Press Item to move back to the previous menu level.
• Press Menu to exit menu mode. If you changed any
network settings, you must restart the printer to validate
the new settings.
An Example of Using the Menu Tree
The Operator Panel menu tree has seven top-level menu
categories. Each category contains items you can select, and
some of these items contain even more options. These form a
menu tree, but as you navigate through the menu tree, only
the currently selected item is shown on the status display.
Checking Total Page Count
This example illustrated below shows the steps you take to
view the total page count. Follow these steps
1. Press Online. OFFLINE appears on the display.
2. Press Menu. MENU - CONTROL appears on the display.
3. Press Next. MENU - SETUP appears on the display.
4. Press Next. MENU - POSTSCRIPT appears on the display.
5. Press Next. MENU - PCL appears on the display.
6. Press Next. MENU - COMMUNICATIONS appears on the
display.
7. Press Next. MENU - USAGE STATUS appears on the
display.
8. Press Select. Press Next until TOTAL PAGE COUNT
appears on the display. appears on the display.
9. Press Select and the number of pages printed appears on
the display.
Using the Operator Panel Menu Tree
Press Next to display the
Press the Online
button to take the
Printer Offline
O
READY
OFFLINE
M
Press Menu
to enter
menu mode
54 SuperScript 4400 Series — User’s Guide
next item in a menu
CONTROL
SETUP
POSTSCRIPT
PCL
COMMUNICATIONS
USAGE STATUS
PRINT FORM
Press Select to move to a lower
menu or to select a setting when
you are at the lowest level in
N
N
N
N
N
S
a menu
Press Previous to display the
previous item in a menu
Press Item to move back
to the previous menu level
TOTAL PAGE COUNT
S
M
Key
Online
=
O
Offline
I
= Item
= Menu
M
= Select
S
N
= Next
P
= Previous
O
Page 63

Operator Panel Menus
The Operator Panel has the seven main menus, described
below (Default selections for each setting are marked with an
asterisk (*).
Control Menu
Use this menu to cancel the current print job or reset the
printer when the printer is in an error state. Selecting RESET
PRINTER
perform a self-test. RESET NIC allows you to reset the
network interface parameters without rebooting.
Setup Menu
Use this menu to configure the default settings for jobs that
are not sent using printer driver software, or restore the
factory default settings. The JOB DEFAULTS submenu allows
you to set the appearance of print jobs. The MISCELLANEOUS
menu allows you to set printer operation settings. Select
RESTORE DEFAULTS to return printer settings to their factory
defaults (except communications parameters).
restarts the printer and causes it to reinitialize and
CONTROL
RESET PRINTER
RESET NIC
SETUP
JOB DEFAULTS
RESOLUTION**
EDGE SMOOTHING
COPIES
CONFIRM
PARAMETERS*
600 x 600* / 1200 x 1200
ENABLE* / DISABLE
1* to 999
PostScript Menu
Use this menu to configure the printer’s settings for the
PostScript interpreter.
POSTSCRIPT
STARTUP PAGE
PRINT PS ERRORS
JOB TIMEOUT
WAIT TIMEOUT
NEVER*, 20, 40, 60, 80, ... 280, 300
NEVER, 20, 40, 60, 80, ... 240*,280, 300
YES* / NO
YES* / NO
PCL Menu
Use this menu to configure the printer’s settings for the
PostScript interpreter.
PCL
SET FONT
SOURCE
NUMBER
PITCH ✝
HEIGHT ✝
SYMBOL SET
TIMEOUT
0, 5, 10, 15, 60*... 300
INTERNAL / DOWNLOAD
0*, 1, 2, 3, ... 50
0, 0.44,10*, ... 999.99
2.00,4.25, … 12.00*, ... 999.75
Roman-8*, etc.
THE OPERATOR PANEL
MISCELLANEOUS
POWER SAVE
JAM RECOVERY
MEMORY
RESTORE DEFAULTS
NEVER, 30 MIN., 1HOUR*,
1.5HOURS, 2HOURS, 3HOURS
NO / YES*
32MB, 40MB, 48MB, 64MB,
72MB, 80MB, 96MB, 128MB
*Default selection for the setting.
** 1200 x 1200 resolution will be available when 80MB or
more memory is installed.
✝ Either PITCH or HEIGHT will be displayed depending on the
default font selected by the ID number.
Using the Menu Tree 55
Page 64

Communications Menu
This menu has settings that enable the printer to receive print
job from Parallel port or NIC, and to configure emulations
and networking protocols. See page 58 for instructions on
configuring TCP/IP parameters such as the network IP
address.
COMMUNICATIONS
PARALLEL PORT
ENABLE
YES* / NO
Usage Status Menu
Use the Usage Status menu to view the total number of pages
printed. The printer resets the count whenever a Fuser Unit,
or Belt Module is installed and you reset its status in the
Operator Panel.
USAGE STATUS
TOTAL PAGE COUNT
ROLLER REPLACE?
BELT REPLACE?
FUSER REPLACE?
PERSONALITY
BIDI
NETWORK
ETHERTALK
NOVELL IPX
TCP/IP
ENABLE* /DISABLE
NET ADDRESS
SUBNET MASK
GATEWAY
PERSONALITY
PS STANDARD
PS BINARY
PS TBCP
PCL
AIS RAW*
AIS BINARY
AIS TBCP
ON / OFF*
ENABLE* / DISABLE
ENABLE* / DISABLE
AIS* / POSTSCRIPT / PCL
Print Form Menu
Use the Print Form menu to select and print documents
stored in the printer.
PRINT FORM
DEMO PAGE
PS START PAGE
PS FONT PAGE
SUPPLY ORDER
*Default selection for the setting.
56 SuperScript 4400 Series — User’s Guide
Page 65

O
PERATOR PANEL TASKS
This section describes important tasks you perform using the
operator panel buttons and menu selections.
Taking the Printer Offline and Online
Press the Online button to switch between the online and
offline states.
note: The printer must be offline before you can change
any printer settings. It must be online (indicator light on)
to print.
While the printer is offline, it continues to receive data until
its input buffer is full. If you press the Online button while
the printer is printing, it finishes the current page, and then
waits for you to bring it online again.
Setting Media Type
When you load a new paper type into the tray, you should set
the Media type. If you do not specify the correct media type,
print quality may be poor, because the printer will move the
paper at the wrong speed. To change the Media type, on the
operator panel press the Online button to take the printer
offline. Then, press the Media button to display PAPER or
THICK STOCK. When the correct type is displayed, press the
Online button to select it and bring the printer online again.
Stopping a Job
If you wish to stop a print job before it is complete
1. Press the Online button to take the printer offline.
2. PRESS SELECT TOCANCEL JOB appears on the message
display.
3. Press the Select button to cancel the job.
Clearing the Print Buffer
The print buffer is an electronic memory in the printer where
data is kept before processing. When the Data light is
blinking, this indicates there is still data in the printer buffer.
To print out any data that is in the print buffer, press the
Online button to take the printer offline; then press the Feed
button to eject the page. (Not available in PostScript
emulation.)
Resetting the Printer
Y ou can r eset the printer to its pr evious settings. Follow these
steps.
1. Press Online. OFFLINE appears on the display.
2. Press Menu. MENU - CONTROL appears on the display.
3. Press Next until RESET PRINTER appears on the display.
4. Press Select, and when the panel displays CONFIRM,
press Select again.
Resetting the NIC
Y ou can r eset the printer to its factory default settings. Follow
these steps.
1. Press Online. OFFLINE appears on the display.
2. Press Menu. MENU - CONTROL appears on the display.
3. Press Next until RESET NIC appears on the display.
4. Press Select, and when the panel displays PARAMETERS,
press Select again.
Restoring Factory Defaults
To restore factory default settings to the printer
1. Turn off the printer.
2. While pressing the Online and Media buttons, turn on
the printer. When the display changes to INITIALIZE
NVRAM
Or follow these steps.
1. Press Online. OFFLINE appears on the display.
2. Press Menu. MENU - CONTROL appears on the display.
3. Press Next until SETUP appears on the display, and press
the Select button.
4. Press Next until RESTORE DEFAULTS appears on the
display, and press the Select button.
5. When the panel displays CONFIRM, press Select again.
Except those under Communications Menu will be
restored to their default.
, release the button.
THE OPERATOR PANEL
Operator Panel Tasks 57
Page 66

Printing 4400 Information Pages
You can print a number of different pages preformatted with
useful information about your printer. Follow these steps.
1. Press Online. OFFLINE appears on the display.
2. Press Menu. MENU - CONTROL appears on the display.
3. Press Next until PRINT FORM appears on the display.
4. Press Select.
5. Press Next until you see the page you want to print. Your
choices are, DEMO PAGE, PS START PAGE, PS FONT PAGE,
and SUPPLY ORDER.
6. Press Select, and when the panel displays CONFIRM,
press Select again.
Resetting Usage Reports
You should reset the Usage Status any time you replace the
Belt Cartridge, Fuser Cleaning Roller, or Fuser Unit. Follow
these steps. The example below shows how to reset the Usage
Report when you replace the Fuser Unit.
1. Press Online. OFFLINE appears on the display.
2. Press Menu. MENU - CONTROL appears on the display.
3. Press Next until USAGE STATUS appears on the display.
4. Press Select.
5. Press Next until REPLACE FUSER appears on the display.
6. Press Select, and when the panel displays CONFIRM,
press Select again.
TCP/IP Setup
You can use the operator panel to enable and set up the TCP/
IP networking parameters for the printer. This is particularly
useful for setting the network IP address so you can use it as
the printer’s URL in web-based printing. Follow these steps.
1. Press the Online button of the Operator Panel. OFFLINE
appears on the display.
2. Press the Menu button to enter menu mode. CONTROL
appears on the display.
3. Press the Next button until COMMUNICATIONS appears
on the display, and press the Select button.
4. Press the Next button until NETWORK appears on the
display, and press the Select button.
5. Press the Next button until TCP/IP appears on the display,
and press the Select button.
6. Press the Next button until NET ADDRESS appears on the
display, and press the Select button.
7. Use the Operator Panel buttons to set values for each of
the 12 digits in this manner.
First press Next to set the curser to the first digit.
For the first digit, press Select to increment to the correct
value. Then press Next to move to the next digit and
press Select to increment to its correct value. Continue
until all twelve digits are set. When the final digit is set,
press Next to confirm the Net Address you set and then
press Select.
8. Press Menu to exit menu mode and press Online to
bring the printer online.
SUBNET MASK, and GATEWAY are set in the same way. If you
select ENABLE, the TCP/IP protocol is enabled.
To validate any changes to network settings, you must turn
the printer off, and then on again.
58 SuperScript 4400 Series — User’s Guide
Page 67

CHAPTER 6
WEB PRINTING SETUP
O
VERVIEW
The NEC PrintAgent is innovative software that allows you
to print over the web in two ways, Remote Printing and Pull
Printing. The NEC PrintAgent is powered by Redips® Core
software, and available just by browsing to your Printer
Home Page.
Printer Home Page Features
The URL is the IP address or host name
you assign to the Printer,
for example, http://131.241.045.065
NEC PrintAgent Remote Printing
Remote Printing is the easiest way for Windows 95/98 users
to print over the web and get instant printer status at your
desktop. You can print to any SuperScript 4400N printer
anywhere, as long as you have its URL.
All you do is browse to the printer’s Home Page and
download/install the NEC PrintAgent software to your
system. When you print with that special driver, the job goes
over the web to the printer, and printer status comes back to
your desktop on the PrintAgent window . The first part of this
chapter covers the following topics about Remote Printing.
• System Requirements
• Easy Remote Printing Setup
• Remote Printing From Your Desktop
• Getting Printer Status
• PrintAgent Features
NEC PrintAgent Pull Printing
Pull Printing is an ideal solution for busy offices that print
long, complex, or color rich documents. With Pull Printing,
your job is sent to a Pull Printing server to be processed. Then
the Pull Printing server delivers the job to the printer. This
frees your computer faster, and reduces network traffic. You
can also set up a secondary server to deliver printer Help files
and drivers to users, making the printer more efficient.
Pull Printing is also called “driverless” printing because you
don’t need a SuperScript 4400 printer driver on your system.
You can pull print any Microsoft Office 97, .PDF file, or web
page without opening it— just by sending its location to the
Pull Printing server. The server does all the work and leaves
your computer free for other tasks. The second part of this
chapter covers the following topics about Pull Printing.
• System Requirements
• Server Installation
• Configuring URLs
• Changing PWS settings
• Starting the Pull Printing Server
• Pull Printing from Your Desktop
59
Page 68

R
EMOTE PRINTING
System Requirements
You must have on your computer
• Microsoft Internet Explorer 4.01 SP1.
• A Windows 95/98 operating system.
Easy Remote Printing Setup
First, you or the system administrator must set the IP
Address on the printer. For instructions, see page 73.
Once the IP address is assigned to the printer, you can go to
the Printer Home Page to download and install the NEC
PrintAgent software and driver.
1. Launch your web browser.
2. Enter Printer’s IP Address as the URL to r each the Printer
Home Page.
3. Click on the Install Drivers button to download
PrintAgent software.
4. In the File Download dialog box that appears, check Run
this program from its current location. and then click
OK to begin downloading and installing.
5. During installation, you will be prompted to enter the
URL (IP Address) of your printer so it can be added to
your system as the default printer. When installation is
finished, you can see the special NEC PrintAgent driver
by selecting Settings and then Printers from the
Windows Start menu.
Remote Printing From Your Desktop
Now you can print as usual from your applications—just
select Print from the File menu. The jobs will be sent to the
printer using browser technology, and you can receive
instant Printer Status reports.
Getting Printer Status
When you send a print job, the PrintAgent window opens
automatically with status information. The animated printer
image shows the printer status.
Eyebrows Moving: The Status Monitor and the printer
are successfully communicating.
Eyebrows Stop, Printer Looks Sad: Check the power
to the printer.
Pages Printing Out: The printer is printing.
Printer Sleeping: The printer is warming up.
Critical messages, such as PAPER TRAY EMPTY, OUT OF
TONER
are shown with a descriptive image and an error message in
the text field. Non-critical messages, such as LOW TONER and
some service errors, will appear only in the text field.
, or TOP COVER OPEN, will interrupt a print job. These
Getting Help
When a message is present in the PrintAgent window, press
the Help button for more details or instructions. When no
messages are present, clicking on the Help button displays
the Help Index.
The Printers Window
6. Restart for the new Driver to take effect.
note: You can also install Remote Printing software
from the
60 SuperScript 4400 Series — User’s Guide
SuperScript 4400 Series CD
.
The PrintAgent Window
Window Menus
Printer Status
Reports Here
Page 69

P
RINTAGENT FEATURES
In addition to providing printer status and Help, PrintAgent
buttons and menus provide access to the features described
below.
Details Button
Click this to view more information about the printer. Tray
information, emulations, pages per minute, and printer IP
address are available. Service messages are described in mor e
detail.
Home Button
Click this to display a web page specified by your
administrator—possibly the manufacturer’s home page or
the printer’s home page.
Admin Button
Click this to perform administrative functions, including,
changing the printer name, password, changing the reference
URLs, cancelling a print job, or sending files to the printer.
You must enter the Administration Password. The default
password is Seattle.
Help Button
When a message is present in the PrintAgent window, press
the Help button for more details or instructions. When no
messages are present, clicking on the Help button displays
the Help Index.
Admin Button
PrintAgent
Tool Tray Icon
PrintAgent Program Menus
PrintAgent program menus are available two ways.
• In Windows 95/98, press the Start button, select
Programs, and select NEC PrintAgent System to display
PrintAgent commands.
• Once you have started the PrintAgent, you can click on
the PrintAgent icon (the green spider in the coffee cup) in
the T ool Tray at the bottom right corner of your Windows
95/98 desktop.
Menu commands are described below.
Start
PrintAgent starts automatically when you try to print or use
the property pages. Keeping it running speeds print time
because you won’t have to wait for PrintAgent to start up
every time you print. To monitor the printer status,
PrintAgent must be running. To start PrintAgent, press the
Windows Start button, select Programs, and select NEC
PrintAgent System to display PrintAgent commands.
Choose Start. A red spider in a coffee cup appears in the
Windows Tool Tray in the lower right-hand corner of the
screen. If the spider doesn’t turn green after five seconds,
PrintAgent did not launch properly. Restart your computer
and try again.
Stop
To stop PrintAgent, select Stop from the Tool Tray menu or
Program menu.
Monitor a Printer
Select this from the Tool Tray menu to monitor any 4400N
PrintAgent printer on your network.
WEB PRINTING SETUP
Add Printers
Once the PrintAgent software is installed, you can add any
4400N printer to your system. Select Add Printer, enter the
URL of the 4400N printer and click Install.
If you get a message box indicating that the PrintAgent could
not access the printer, first verify that the URL you typed is
correct. An easy way to verify a correct URL is to try adding
the printer again.
If the URL was correct and PrintAgent still cannot establish
PrintAgent Features 61
Page 70

communication, click on the Network Properties button in
the Add Printer dialog box and check your proxy settings. If
you are trying to reach a printer using a proxy server, you
must check the Default Proxy host and port box, then enter
your proxy host and port. To reach a printer without using a
proxy, you must either de-select the Default Proxy host and
port checkbox, or enter the URL or domain name in the No
Proxy For text area.
If PrintAgent is still unable to establish communication with
the printer, go to the Printer’s Home Page using your Web
browser. If the proxy settings are correct in the browser and
the Web page is not found, the problem is with the printer,
and you should contact the network administrator.
Remove Printers
To remove a PrintAgent printer, select Remove Printer. In
the Printer Selectiondialog box that appears, select the printer
you wish to remove and press OK. Reset the PrintAgent for
the removal to take effect.
Reset
If there are any communications or animation problems and
the printer has power , select Reset and see if that r esolves the
problem.
About
Select this to view copyright and version information.
unInstall
To uninstall the NEC PrintAgent System, including all
PrintAgent printers and the NEC PrintAgent System, press
the Windows Start button, select Programs, and select NEC
PrintAgent System to display PrintAgent commands.
Choose Uninstall . Respond Yes to the confirmation dialog
boxes, and PrintAgent will be removed from your computer.
PrintAgent Window Menus
The menu bar at the top of the PrintAgent window provides
several options for configuring the PrintAgent and managing
print jobs.
File Menu
Select Cancel Print Job to cancel the job currently being
monitored.
Select Print PostScript File to display a browser for selecting
a PostScript file to transfer to the printer.
Select Print Queue to display the Print Queue window to
view and delete jobs.
Select Exit to quit the PrintAgent program.
View Menu
Select options from this menu to view Text Only, Text and
Animation, or Full View of the PrintAgent window.
Options Menu
Select General to display a dialog box for setting preferences
about version updates, Status Monitor frequency and
display, and the web browser path.
Select Network to display a dialog box for setting prefer ences
about proxy host, port, domain, and host name.
Help Menu
Select Index to display a list of online Help topics.
Select About to view information about copyright,
manufacturer model number, and software version.
62 SuperScript 4400 Series — User’s Guide
Page 71

P
ULL PRINTING
This section shows system administrators how to configure a
Pull Printing Server to support clients.
Server System Requirements
Prior to server installation, the Pull Printing Server must
already have installed
• A Windows 95 operating system.
• Microsoft Office 97
• Microsoft’s Personal Web Server, which you can obtain
from Microsoft at this URL:
http://www.microsoft.com/ie/pws
• Internet Explorer 4.01 (this is available on the SuperScript
4400 Series CD)
Then, to use Pull Printing, you must
1. Set the IP Address on the printer. For instructions, see
page 73.
2. Install the NEC PrintAgent core software, Pull Printing
Server and/or Secondary File Server software.
3. Configure URLs.
4. Configure Personal Web Server (PWS) settings.
This section also provides instructions for
• Setting Local User’s Web Browser Preferences (optional).
• Pull Printing from Your Desktop
PrintAgent Core and Server Installation
You must install the NEC PrintAgent core software, and the
Pull Printing Server software. You can also install the
Secondary File Server software. You can install all three at
once using the Administrator Setup option. Follow these
steps.
1. Insert the SuperScript 4400 Series CD into the CD-ROM
drive. The Installer will launch automatically.
2. When prompted, select the Administrator setup option
and click Next.
3. When the Components list is displayed, select
PrintAgent and click the Change button.
4. In the sub-components list, make sure that PrintAgent,
Pull Printing Server, and optionally, Secondary File
Server are selected. Then click Continue.
5. Continue responding to the selections displayed in the
installation dialog boxes.
6. When installation is complete, restart Windows.
note: You can also install the PrintAgent Pull Printing
Server, and Secondary File Server software from links on
the URL Configuration Page.
About the Secondary File Server
The NEC PrintAgent Driver, Help files, and the PrintAgent
Core software reside on the printer. However, you have the
option of putting these files on a secondary server and then
changing the URLs to point to that server. This frees the
printer to process print jobs.
When Secondary File Server installation is complete, the
PrintAgent core files have been copied into the htdocs
directory, so the Secondary File Server is ready to respond to
file transfer requests. However, if you want the Secondary
File Server to deliver the Online Help, you must manually
copy the Help files from
<CD-ROM Drive>:\nec_disk\ncss44rm\help to
inetpub\htdocs\ncss44rn\help, (keeping the
directory structures intact).
note: You can also install the Secondary Server
Software from a link on the URL Configuration Page.
Starting the Pull Printing Server
When a client opens the Pull Printing Page, the associated
Pull Printing Server is automatically activated. You can also
launch it by pressing the Windows Start button, selecting
Programs, selecting Pull Printing Server, and then selecting
Start.
WEB PRINTING SETUP
Pull Printing 63
Page 72

Configuring URLs
Once the IP address is assigned to the printer, you can go to
the printer URL Configuration Page to set URLs for the
server(s).
1. Launch your web browser and enter this URL
http://<Printer IP Address>/configure.html
This displays the printer’s URL Configuration Page.
2. In the Pull Print Server text field, enter the IP Address of
the Pull Printing Server as its URL.
Pull Printing will NOT work unless the Pull Print Server
URL has been entered. The Driver, Help files, and the
PrintAgent core software reside on the printer, which is
identified as localhost. However, you have the option
of putting these files on a Secondary File Server and then
changing the URLs to point to that server.
note: To specify the printer as the file source, you must
enter
localhost in the text field, (not the printer’s IP
address).
URL Configuration Page
You must enter a URL
for the Pull Printing Server
3. If you have a Secondary File Server, enter its IP Address
as URL for the Driver, Help files, andPrintAgent
software.
4. You can also specify any URL as the Home Page for
clients.
5. Click on the Submit Values to Printer button.
note: Printer URLs can use either the printer’s IP
Address, or the printer’s Domain Server Name (DSN), if
one has been assigned. For example:
http://4400NSecondFloor/configure.html.
Install Pull Printing Server
and
Secondary File Server software
from the
SuperScript 4400 Series CD.
You can also download them by
clicking these links.
64 SuperScript 4400 Series — User’s Guide
Page 73

Changing PWS Settings
This section describes changes you must make to Microsoft’s
Personal Web Server for it to work as a Pull Printing Server.
You will need to
• Set the home directory
• Add two virtual directories.
Setting the Home directory
1. If there is a Personal Web Server icon in the tool tray
(lower right-hand corner of your screen), double-click the
icon to bring up the Personal Web Manager. Otherwise,
press the Windows Start button, select Programs, select
Microsoft Personal Web Server, and select the Personal
Web Manager.
2. Click on the Advanced button located on the left-hand
side of the screen.
3. In the V irtual Directories groupbox, highlight Home and
click the Edit Properties button.
4. You need to select the htdocs directory as your home
directory. If you already have an htdocs directory,
specify it as your home directory. If not, the Installation
Program for the Pull Printing Server added one for you
under your Personal Web Server’s root directory (i.e.
C:\Inetpub\). Enter that as the path to the htdocs
directory, i.e.,
C:\Inetpub\htdocs
note: If you were previously using the Personal Web
Server as a web server, you must move any files you need
from your original home directory to the
directory.
5. In the Access groupbox, select Read and Scripts and
de-select Execute.
htdocs
Adding Virtual Directories
If you already have a cgi-gin directory at the same level as the
htdocs directory, and a virtual directory called cgi-bin which
points to the cgi-bin directory, you can skip the first five steps
below .
If the Pull Printing Server Installation Program did not detect
a cgi-bin directory on the same level as the htdocs directory, a
cgi-bin directory was added for you.
Follow the steps below create a virtual directory which
points to the cgi-bin directory.
1. Click the Add button in Advanced Options.
2. Enter the fully qualified path of your cgi-bin directory
(e.g. C:\Inetpub\cgi-bin).
3. Enter cgi-bin as the Alias.
4. In the Access groupbox, select Read and Execute and
de-select Scripts.
5. Click OK.
You will now add a wwwprnt virtual directory.
1. Click the Add button in Advanced Options.
2. Enter the path to your wwwprnt directory. This is located
in your \windows\system directory.
3. Enter wwwprnt as the Alias.
4. In the Access groupbox, select Read and
de-select Scripts and Execute.
5. Click OK.
6. Exit the Personal Web Manager.
WEB PRINTING SETUP
Pull Printing 65
Page 74

Modifying the Registry Entry
If Pull Printing clients are experiencing problems getting
status information, and there is a Proxy server between the
Pull Printing Server and those clients, you should make the
following registry changes in the Personal Web Server.
1. Press the Windows Start button, select Run, and enter
regedit to run the Registry Editor.
2. Go to HKEY_LOCAL_MACHINE\System
\CurrentControlSet\Services
\W3SVC\Parameters.
3. On the right side of the Registry Editor, if you find a
registry named ReplyWithHTTP1.1,
a. Right-click on the registry name and choose Modify.
b. Change the Data Value to 0, and click OK to save the
change.
4. If you cannot find the registry named
ReplyWithHTTP1.1, add the registry, using these steps
a. On the left side of the Registry Editor, right-click on
the Parameters folder and select New\DWORD
Value.
b. Set the registry name to ReplyWithHTTP1. and the
Data Value to 0.
5. Close the Registry Editor and restart the Personal Web
Server.
If you do modify the registry, those users accessing the Pull
Printing Server without going through the proxy must turn
off HTTP1.1. Follow these steps.
1. In Internet Explorer 4.01, select Internet Options from
the View menu.
2. Click on the Advanced Tab.
3. Deselect HTTP1.1.
Plug Ins
If you have Microsoft Office 97 installed on the Pull Printing
Server, clients can print Word, Excel, and PowerPoint
documents from the Pull Printing Page. For clients to print
.PDF files, Adobe Acrobat Reader must be installed on the
Pull Printing Server. Acrobat Reader is provided on the
SuperScript 4400 Series CD.
You can find out what file types are currently supported by
the Pull Printing Server by reviewing the kickIE.ini file
located in the cgi-bin directory on the Pull Printing Server.
If you find other plug-ins for Internet Explore 4.01, you can
add the file types supported by the plug-ins to the
inetpub\cgi-bin\kickIE.ini file, under the Support
Type tag. Please remember to increase the value of the
NumberOfTypes variable.
66 SuperScript 4400 Series — User’s Guide
Page 75
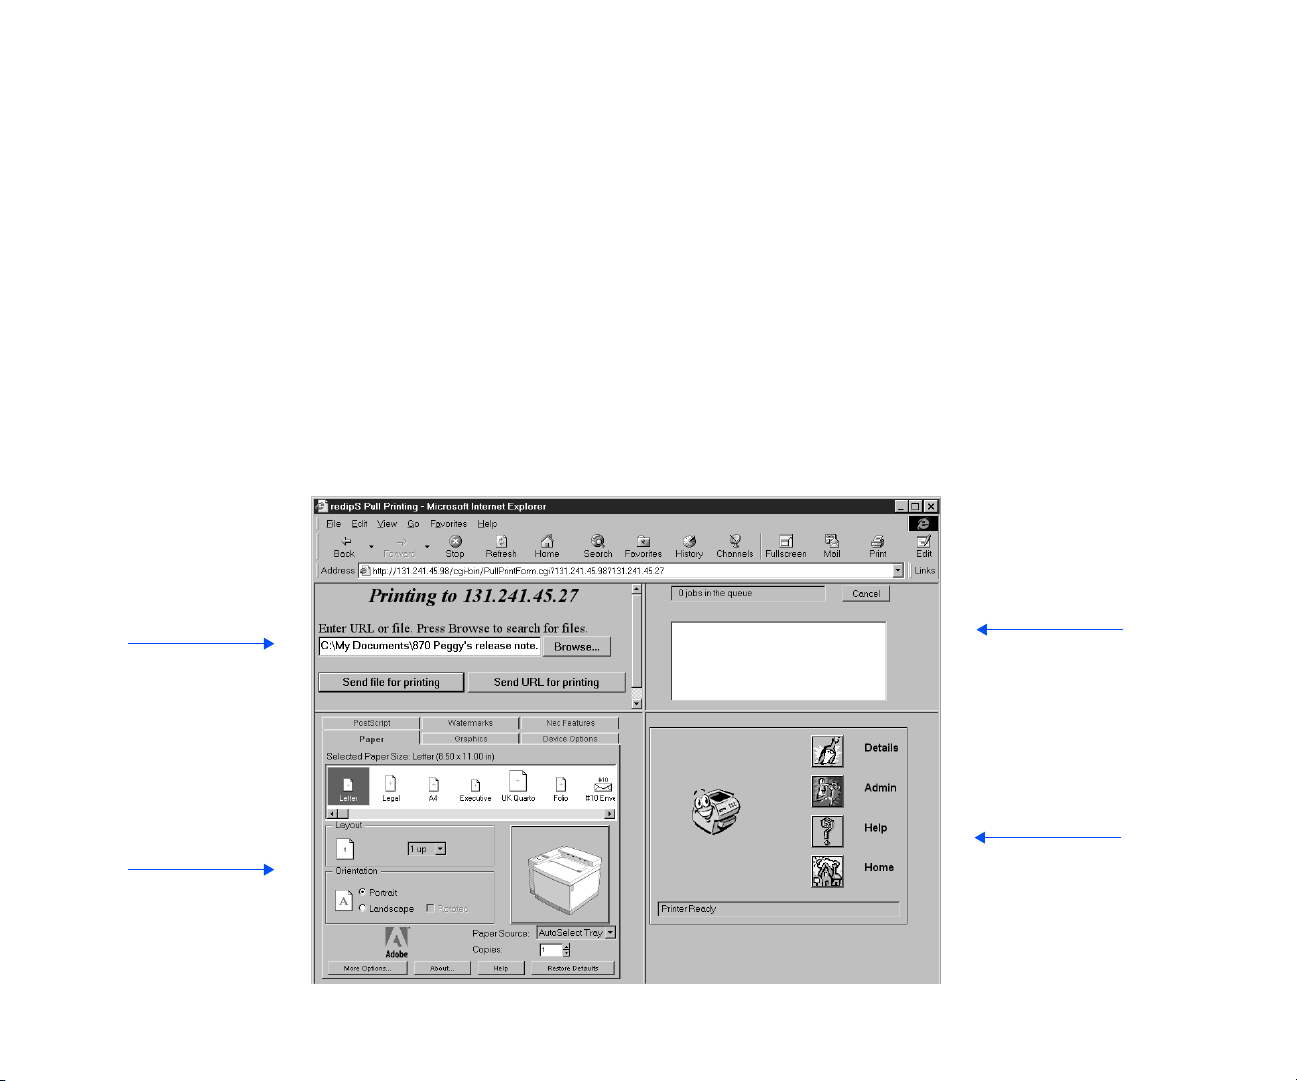
Pull Printing from Your Desktop
Once the Pull Printing Server is running, any local user can
Pull Print just by browsing to the Pull Printing Page. To pull
print from your desktop, you must have
• Microsoft’s Internet Explorer 4.01 SP1 and above
(preferred) with Java 1.1 support.
Pull Printing Page
Go to your printer’s Home Page and select Pull Printing.
You can print the following types of documents using the
Pull Printing Page.
• Word, Excel, and PowerPoint files*
• .PDF files*
• Any web page on the Internet.
• .gif, .jpg, .jpeg, .txt, .c, .cpp, .h, .java, .bak, .html, and .htm
files can also be printed.
*Microsoft Office 97 and PDF file types can be printed if your
system administrator installed the corresponding applications
or plug-ins on the Pull Printing Server. Otherwise, a message
will appear, notifying you that you cannot print that file type.
WEB PRINTING SETUP
Use the Browser frame
to enter a file location
or the URL of a
web page.
The Properties frame
lets you change
document and
printer settings.
The Print Queue frame
lists jobs waiting to be
printed.
The PrintAgent frame
gives real-time reports on
your print job and printer
and access to network
settings and Help.
Pull Printing 67
Page 76

Sending a Job
1. Launch the Web Browser.
2. Enter Printer’s URL to reach the Printer Home Page.
3. Click on Pull Printing.
4. Enter a File Location or URL in the Browser frame.
To print a web page, type the URL in the text entry field.
Typing “http://” in front of the URL is not required.
To print a local file, type the drive, path and name of the
file in the text entry field, or use the Browse button to
select a file. The drive and full path must be specified. If
the plug-in for that particular type of file has been
installed on the secondary server , the file is r ender ed and
sent to the printer. If the plug-in is not installed, you will
be notified.
5. Make any settings changes in the Properties frame.
6. Click Send File for Printing or Send URL for Printing.
The job will be rendered by the Pull Printing server and
sent to the printer.
Changing Properties and Saving Settings
The Properties frame functions in the same way as the local
printer drivers described in Chapter 4. You simply point and
click to change settings for your print job. Click on any tab to
view more settings.
With Pull Printing, you can save different preferences for
each printer you use. If you are accepting cookies, the
property settings, along with any watermarks you may have
created, will be saved upon sending the print job. The next
time you pull print to that particular printer, the property
pages will preset to match your previous preferences.
Viewing the Print Queue
The Print Queue frame lists jobs that are either waiting to be
rendered by the secondary server or waiting in the status
monitor to be sent to the printer . A job disappearing from the
print queue does not signify that your job is done printing. If
the print job is large, there may be a significant delay from
the time a job is sent to the printer to when it is printed.
You can distinguish your print job from others if you accept
the PrintAgent cookies. Your print job will display the name
of the file or URL you sent, while other print jobs will show
only the URL of the printer to which the job will be sent. To
see which printer your jobs will be sent to, place the mouse
over the icon next to your print job. The name of the printer
will be displayed, along with the name of the file or URL of
the web page. It will also signify whether your job is waiting
to be rasterized or has already been sent to the status
monitor.
Canceling a Job
You can cancel a print job before it is rendered as long as you
are accepting cookies. To cancel, click on the print job in the
Print Queue frame. You will see a yellow highlight around
the text. Click the Cancel button. After it is sent to the
secondary server, the job can only be canceled using the the
Admin dialog box from the NEC PrintAgent window.
Getting Printer Status
The lower right frame of the Pull Printing Page shows the
NEC PrintAgent window . The animated printer image shows
the printer status.
Eyebrows Moving: The Status Monitor and the printer
are successfully communicating.
Eyebrows Stop, Printer Looks Sad: Check the power
to the printer.
Pages Printing Out: The printer is printing.
Printer Sleeping: The printer is warming up.
Getting Help
When a message is present in the PrintAgent window, press
the Help button for more details or instructions. When no
messages are present, clicking on the Help button displays
the Help Index.
For more information about the NEC PrintAgent window,
see page 61.
68 SuperScript 4400 Series — User’s Guide
Page 77

Pull Printing User Settings
You can customize your web browser settings to enhance
your Pull Printing capabilities.
Cookies
If you would like the ability to save your printer settings and
any watermarks you make, you must accept any cookies we
set. This also gives you the ability to cancel any print jobs you
send that are still in the print queue. A cookie is a small piece
of data that the browser stores on your hard drive. Each
cookie has a maximum limit of 4 kilobytes. Although
driverless printing will work if cookies are not accepted, it
will not be customized for your needs. You can choose to
always accept a cookie, which will allow all web pages to set
cookies. You can choose to have a message box appear each
time a cookie is set and you will then have the option of
accepting or rejecting the cookie.
Accepting Cookies in Internet Explorer 4.01: Click on
the view menu item and select Internet Options. Click on
the Advanced tab. In the Security section, there ar e thr ee
cookie options.
WEB PRINTING SETUP
Pull Printing 69
Page 78

70 SuperScript 4400 Series — User’s Guide
Page 79

CHAPTER 7
NETWORK SETUP
O
VERVIEW
To begin using the SuperScript 4400 Printer as a network
printer, you must do the following setup tasks.
1. Connect the 4400N to your network (see page 21).
note: The 4400N printer already has a network interface
card (NIC) installed. If you have a 4400 printer, you can
purchase a Network Interface Upgrade Kit and install a
NIC yourself. See page 27 for installation instructions.
2. Assign an IP address to the 4400N printer. (This step is
not necessary for Mac OS users.)
3. Configure your network and workstations to use the
4400 network printer.
This Chapter contains the following sections
• Network Printer Features
• Network Administration Page
• Using MAP
• Windows TCP/IP Setup
• Windows Peer to Peer Printing
• lpr Printing Setup in Windows NT
• Windows 95/98 Shared Printing Setup
• DHCP
• NetWare 4.x Setup
• NetWare 3.x Setup
• Web JetAdmin
• UNIX Setup
Setup Options
The SuperScript 4400 Series CD contains network printing
tools to support the following configurations.
Windows
TCP/IP is required if you want to access and use the
Network Administration Page to monitor and manage
network printers. TCP/IP is also required to operate the
printer in an IP protocol network (such as for peer to peer
printing). See the instructions on page 79 for setting up
TCP/IP for Windows 95/98, and Windows NT 4.0.
NetWare
See the instructions beginning on page 84 for configuring
NetWare 4.x or 3.x and the 4400N to work with
Windows 95/98 and Windows NT 4.0.
Peer to Peer Printing
If you do not have a network server , you can use peer to peer
printing to print directly to a networked printer from
Windows 95/98. You must have the SuperScript 4400 printer
driver installed. For IP peer to peer printing, the Microsoft
TCP/IP protocol stack must be installed and properly
configured on your workstation. See the instructions on
page 80 for peer to peer printing.
lpr Printing in Windows NT Networks
In Windows NT networks, you can use lpr printing. See
page 81 for setup instructions.
Mac OS
Mac OS information is provided in Chapter 4. See the
instructions on page 48 to set up and print from Mac OS
computers over EtherTalk.
71
Page 80

N
ETWORK PRINTER FEATURES
Network Settings Page
Each time you turn on the printer, the 4400N prints a
Network Settings page. Another way to print a Network
Settings page is:
1. Go to the URL Configuration Page, the URL is
http://<IP address>/configure.html.
2. Click on the Network Administration link. This displays
the Network Administration Page.
3. Click Configure Status Page, then click Generate Now.
(The Network Administration Page is described
beginning on page 75.)
The Network Settings page provides information about the
network printer settings and network connections. You
should review this page immediately after NIC installation
and any time you change the configuration to verify that the
procedure was done properly.
In the illustration at the right, important features are circled.
The Unit Serial No. (which is also on the back of the NIC), is
used for printer identification in peer to peer and NetWare
protocols. The Network Address is the hardware address or
MAC address. The Protocol Address is the IP address you
assign the 4400N printer. You can set a new AppleTalk
Printer Name using the Apple Printer Utility.
The Network Settings Page
- - - - - - - - - - - - - - - - - - - - - - - - - - - - - - - - - - - - - - Unit Serial No: 992048 Version: 05.20
Network Address: 00:40:af:79:19:80
Network Topology: Ethernet Connector:RJ45
Network Speed: 10 Megabits
Novell Network Information enabled
Print Server Name: NEC_992048
Password Defined: No
Preferred Server Name not defined
Directory Services Context not defined
Frame Type: Novell 802.3
Peer-to-Peer Information enabled
Frame Type: 802.03
Network ID: 32803
TCP/IP Network Information enabled
Frame Type: Ethernet II Protocol Address: 131.241.45.84
Subnet Mask: 255.255.255.0 Default Gateway: 131.241.45.254
DNS Address: 0.0.0.0
AppleTalk Network Information enabled
Frame Type: 802.2 SNAP On 802.3
Preferred Appletalk Zone:* San Jose EtherNet
- - - - - - - - - - - - - - - - - - - - - - - - - - - - - - - - - - - - - - -
Novell Connection Information
Printer Name: NEC_992048_P
File Server: LABNW312
Queue: NEC_992048_Q Priority: 1 Attached: Yes
No Notify Defined
Peer-to-Peer Connection Information
Printer Name: NEC_992048
AppleTalk Connection Information
AppleTalk Printer Name: SuperScript 4400 4
TCP/IP Connection Information
Port Number: 10001
- - - - - - - - - - - - - - - - - - - - - - - - - - - - - - - - - - - - - - -
72 SuperScript 4400 Series — User’s Guide
Page 81

Setting The Printer IP Address
To take advantage of many of the network printer features,
you must assign an IP address to the printer network
interface card. There are several ways to do this.
Using the Operator Panel to set the IP Address
You can use the operator panel to enable and set up the TCP/
IP networking parameters for the printer. This is particularly
useful for setting the network IP address so you can use it as
the printer’s URL in web-based printing. Follow these steps.
1. Press the Online button of the Operator Panel. OFFLINE
appears on the display.
2. Press the Menu button to enter menu mode. CONTROL
appears on the display.
3. Press the Next button until COMMUNICATIONS appears
on the display, and press the Select button.
4. Press the Next button until NETWORK appears on the
display, and press the Select button.
5. Press the Next button until TCP/IP appears on the display,
and press the Select button.
6. Press the Next button until NET ADDRESS appears on the
display, and press the Select button.
7. Use the Operator Panel buttons to set values for each of
the 12 digits in this manner.
First press Next to set the curser to the first digit.
For the first digit, press Select to increment to the correct
value. Then press Next to move to the next digit and
press Select to increment to its correct value. Continue
until all twelve digits are set. When the final digit is set,
press Next to confirm the Net Address you set and then
press Select.
8. Press Menu to exit menu mode and press Online to
bring the printer online.
To validate any changes to network settings, you must turn
the printer off, and then on again.
Using MAP to set the IP Address
The Management Access Program (MAP), runs only under
Windows 95/98 and Windows NT 4.0. You can use MAP to
locate and list SuperScript 4400 network printers connected
to your network. Then you select one to go to its Network
Administration Page and configure TCP/IP Setup. See page
75 for more information.
Using Software Tools to set the IP Address
A number of software tools allow you to set the printer IP
address from your workstation.
See page 79 for information on using BOOTP 32 to set
TCP/IP Parameters in Windows 95/98 or Windows NT 4.0.
See page 83 for information about DHCP.
Using ARP to set the IP Address
You can use the following procedure to set the IP address on
the 4400N printer. Then, you can set the other IP parameters
from the Network Administration Page. The network printer
must be on the same network segment as the workstation
that you are using to configure it. The TCP/IP stack must be
installed and operating.
1. From Windows, start an MS DOS session.
2. At the command prompt enter: arp -s
[IP address] [Hardware Address]
(for the hardware address, use hyphens as separators,
instead of colons.)
Then enter ping [IP address]
(request should time out)
3. Turn the printer off and on, and use the ping command
again to verify that the 4400N printer has its IP address.
If it has the address, the result is a confirmation message:
[IP address] is alive
4. Remove the entry from the ARP cache using this
command: arp -d [IP address]
NETWORK SETUP NETWORK PRINTER FEATURES
Network Printer Features 73
Page 82

Resetting the NIC
If you change network settings, you may need to reset the
printer NIC for the new settings to take effect. To reset
1. Go to the URL Configuration Page, the URL is
http://<IP address>/configure.html.
2. Click on the Network Administration link. This displays
the Network Administration Page.
3. Click Reset in the System column,
or
• Turn the printer off and then on again.
Restoring Factory Default Settings
You can reset the NIC to its factory default settings. This
means that the NIC clears data such as names and IP
addresses. It does not lose its serial number or Network
Address. If you have changed the printer’s name, it will
revert to its default name.
note: You should restore factory defaults when the
printer is moved to a different network.
To reset the NIC to factory default settings
• Go to the Network Administration Page and click
Factory Defaults in the System column. You will need to
enter a password (the default is sysadm). Then turn the
printer off and on again. (The Network Administration
Page is described beginning on page 75, passwords are
explained on page 76.)
NIC Status Lights
When the NIC is installed, its two status lights, amber and
green, are located on the interface panel on the back of the
printer. Light patterns for normal operation are
Green light is on solid: This shows normal operation
while the printer is awaiting print jobs.
Amber light blinks continuously: This shows that the
NIC is receiving a print job.
Green light blinks 3 times and stays on: This occurs
when the printer has performed a successful self-test. It
then prints a Network Settings page.
Light patterns that identify error conditions are
described on page 112.
74 SuperScript 4400 Series — User’s Guide
Page 83

N
ETWORK ADMINISTRATION PAGE
Each 4400N printer has a built-in web page that allows you to
perform network administration tasks.
Going to the Network Administration Page
You must assign an IP address to your printer. Then you can
use a web browser, such as Navigator or Internet Explorer, to
access the Network Administration Page.
note: See page 73 for instructions on assigning the
printer IP address. The printer IP address then appears on
the Network Settings page under TCP/IP Network
Information/Protocol Address.
To access the Network Administration Page, open your
browser by double-clicking on its icon.
1. Go to the URL Configuration Page, the URL is
http://<IP address>/configure.html.
2. Click on the Network Administration link. This displays
the Network Administration Page.
The Network Administration Page has the following
features.
System Functions
Reset: Click here to reset the NIC and allow new
settings to take effect. The NIC’s connection with the
network is fully reinitialized, but its connection with the
printer controller is not. To reset the connection with the
printer controller, turn the printer off and on.
Factory Defaults: Click here to restore factory default
values on all NIC parameters. You should restore factory
defaults if you move the 4400N to a new network or if the
NIC was set up improperly the first time. Remember that
this option clears all settings you have defined for the
NIC. You must turn the printer off and on again for the
factory default settings to take effect.
NETWORK SETUP NETWORK ADMINISTRATION PAGE
The Network Administration Page
Network Administration Page 75
Page 84

Unit Status: Click here to view the current state for each
protocol and NIC port available on your NIC. For each
supported protocol (Novell NetWare, TCP/IP, or
AppleT alk), the top line displays the pr otocols supported
and if the protocol is enabled or disabled.
Network Address: Click here to view the serial number
and the Ethernet MAC (Media Access Control) address
for the 4400N.
Change Password: Changing any parameters using the
Network Administration Page requir es a password. Click
here to change your password. The default password is
sysadm. Your password can contain letters, numbers, and
punctuation, and is case sensitive.
note: If you forget your password, you can restore
factory defaults manually. See page 74.
Protocol Functions
The Protocols feature is for setting up network options and
parameters. It provides extensive access to NIC parameters,
and allows you to setup IP parameters (IP address, subnet
mask, and default gateway). You can enable/disable
AppleTalk and NetWare, but not TCP/IP. (We recommend
that you disable any protocol that you are not using.)
Other Functions
Test Printer: Click here, and then click on the Start Test
button in the dialog box that appears, to send a test
document to the printer.
Configure Status Page: Click here to configure
Network Settings page options. In the dialog box that
appears, select the checkbox by Print Status Page on
Startup to generate a status page (the Network Settings
page) each time you turn on the printer or reset the NIC.
note: We recommend that you leave this setting
checked to print at power-on.
To print out a Network Settings page immediately, click
Generate Now.
Printer Status: Click here to display status information
for the printer and NIC, as well as errors and messages.
76 SuperScript 4400 Series — User’s Guide
Page 85

U
SING
MAP
The Management Access Program (MAP), runs only under
Windows 95/98 and Windows NT 4.0. You use MAP to list
SuperScript 4400 network printers connected to your
network. Then you select one to go to its Network
Administration Page for network administration options.
MAP Operating Requirements
To use MAP, you must have installed on your PC
• Netscape Navigator or Internet Explorer
• The Microsoft TCP/IP protocol stack, if printer is going
to support TCP/IP.
For IPX Search Functions: The IPX protocol must be
installed and enabled on your PC. Both Microsoft and the
NetWare 32-bit stacks are supported. You must log in to
the Novell Server.
For IP Peer to Peer Printing: Both your workstation
and printer must have an IP address and subnet mask
entered. If communicating across subnets, the default
gateway must also be identified.
For IPX Peer to Peer Printing: Your PC must have the
IPX/SPX compatible protocol installed and enabled.
Installing MAP
MAP is available on the SuperScript 4400 Series CD that comes
with your printer. MAP must be installed from Windows 95/
98 or Windows NT 4.0. It cannot be installed from the
MS-DOS® command prompt.
a. Insert the SuperScript 4400 Series CD.
b. Use the Administrator installation option to install
the MAP utility.
Running MAP and Selecting a 4400N
a. In Windows 95/98 or Windows NT 4.0, press the
Start button. Select MAP from the program group
you specified during installation.
When MAP starts, a list of all available units on the
network is displayed by unit IP address or serial number.
The unit listing will be divided by TCP/IP units and
IPX/SPX units. See the illustration below.
note: If a unit is enabled for both IP and IPX, it will
appear in both lists.
b. Click on a unit under IPX/SPX in the list to display
its Network Administration Page. Click on a unit
under TCP/IP to display the printer’s Home Page.
The Network Administration Page options are explained
beginning on page 75.
An example using MAP and the Network Administration
Page to configure the printer for NetWare 4.x is shown on
page 85.
Management Access Program 3.20
[Refresh] [Help]
Units supporting TCP/IP
http://131.241.45.61/NEC_991142 NEC SuperScript 4400 Ethernet Card
http://131.241.45.203/NEC_991149 NEC SuperScript 4400 Ethernet Card
http://131.241.45.64/NEC_991151 NEC SuperScript 4400 Ethernet Card
http://131.241.45.83/NEC_991650 Print Server Card
http://131.241.45.191/NEC_991653 Print Server Card
http://131.241.45.189/NEC_991655 NEC SuperScript 4400 Ethernet Card
http://131.241.45.127/NEC_999999 Print Server Card
NETWORK SETUP USING MAP
Units supporting IPX/SPX
NEC 991142 NEC SS 4400
NEC 991149
NEC 991151
NEC 991650
NEC 991653
The MAP lists the 4400N printers on your network.
Select one to display its Network Administration Page.
NEC SS 4400
NEC SS 4400
NEC SS 4400
NEC SS 4400
Using MAP 77
Page 86

W
INDOWS
There are several ways you can configure your Windows
workstation to access the 4400 network printer , depending on
which version of Windows you are using and your system
configuration. Below, under “Network Configuration
Options,” are possible scenarios.
Installing SuperScript 4400 Printer Drivers
As you configure your network operating system, you will
need to install a copy of the SuperScript 4400 printer driver
onto each workstation that will be accessing the network
printer.
TCP/IP Requirements for Windows
Configuration
TCP/IP is required for Windows 95/98, Windows NT 4.0 and
Windows for Workgroups, if you want to access and use the
Network Administration Page to view printer status and
manage network printers. TCP/IP is also required to operate
the printer in an IP protocol network (such as for peer to peer
printing). TCP/IP setup for Windows 95/98 and
Windows NT 4.0 is explained on page 79.
Network Configuration Options
Windows 95/98
• If you have a NetWare network, see page 84 for
NetWare 4.x setup, or page 86 for Netware 3.x setup.
• If you have no network server, you can print directly to
the network printer using the peer to peer software
provided on the SuperScript 4400 Series CD. See page 80.
• You can also set up shared printing (see page 82).
Windows NT 4.0
• If you have a NetWare network, see page 84 for
NetWare 4.x setup, or page 86 for Netware 3.x setup.
• In a Windows NT network you can use lpr printing. See
page 81.
Windows for Workgroups
• If you have a NetWare network, see page 84 for
NetWare 4.x setup, or page 86 for Netware 3.x setup. Y ou
can also use shared printing.
78 SuperScript 4400 Series — User’s Guide
Page 87

TCP/IP Setup in Windows 95/98 and
Windows NT 4.0
First, Install the TCP/IP Protocol
1. In Windows, open the Network control panel.
2. If TCP/IP Protocol is not installed, add it, and configure
the workstation’s TCP/IP settings.
3. Restart. The new protocols and services will not be
available until the system is restarted.
Second, Assign the IP Address and Other TCP/IP
Parameters to the 4400N
If you have a DHCP server, the 4400N will retrieve an IP
address automatically from the network server when you
turn on the printer. Here we provide instructions for using
BOOTP 32 to set the IP address manually. You can also use
ARP/ping commands if you prefer.
note: For other ways to set the IP address, see page 73.
1. Insert the SuperScript 4400 Series CD.
2. Launch BOOTPL32
In Windows pr ess the Start button, select Programs, then
SuperScript 4400, and then select BOOTPL32.
or Type E:\BOOTP\BOOTPL32.EXE
note: If you have not yet installed BOOTPL32, it is
available on the
Custom/Network Client installation.
SuperScript 4400 Series CD
, using the
3. Select Configure from the Admin menu.
a. Enter the IP address to assign to the 4400N.
b. Enter the subnet mask.
c. Enter the default gateway address (if applicable) or
leave blank.
d. Enter the hardware address of the 4400N. This
address is listed on the Network Settings page under
Network Address, for example,
00:40:af:c9:f0:d8. Enter it exactly as it appears
on the Network Settings page.
4. Click on Go to send the new settings to the 4400N.
After a few minutes (usually between 1 and 2 minutes, but
possibly up to 5 minutes on very large or busy networks), the
4400N will reset and print its Network Settings page. The
new IP settings will be listed in the TCP/IP Network
Information section of the Network Settings page.
If the new IP address does not appear on the Network
Settings page under “Protocol Address,” you may have
entered the hardware address incorrectly in BOOTPL32.
Repeat Steps 2 and 3, and check the IP address on the new
Network Settings page.
The new IP address can also be verified in BootPL32 by
turning the printer off and on, and selecting Verify from the
Admin menu. It should report that the Unit is Active.
NETWORK SETUP WINDOWS
Windows 79
Page 88

Windows Peer to Peer Printing Setup
Peer to peer printing allows Windows 95/98 computers to
print directly to a networked printer without an intervening
file server. Below are the main features of peer to peer
printing.
• Runs on Windows 95/98 and workstations or servers
“out of the box.”
• Runs on networks with or without a NetWare file server.
• Implements peer to peer direct printing between
Windows computers and networked printers.
• You can configure network printers the same way you
configure printers directly attached to a computer.
note: In isolated, serverless networks, the NIC should be
used with its factory default settings.
IP vs. IPX Peer to Peer Printing
Your network configuration will dictate whether IP or IPX is
more appropriate. However, we recommend you use IP peer
to peer printing if possible.
For IP Peer to Peer Printing: You must install
PeerToPeer-IP. This protocol allows you to access the
network printer over an IP network. The Microsoft TCP/
IP protocol stack must also be installed and properly
configured on your workstation. The network and the
network print servers must support IP.
For IPX Peer to Peer Printing: You must install
PeerToPeer-IPX. It is not necessary to have a NetWare file
server on the network to use this IPX protocol.
Second, Add the Peer to Peer Printer in Windows
1. In Windows 95/98, press the Start button, select
Settings, then select Printers.
2. In the Printers window, double-click Add Printer. This
launches the Add Printer wizard which prompts you to
make selections.
note: SuperScript 4400 printer drivers are provided on
the
SuperScript 4400 Series CD
printer.
that comes with the 4400
When the Add Printer wizard asks how the printer is
attached, select Local printer.
Specify NEC as the Manufacturer and NEC SuperScript
4400 as the Printer.
3. Your peer to peer network printer will be listed under
local printer ports and identified using the 4400N serial
number. For example, NEC_911499.
Select your new peer to peer printer.
4. Continue responding to the Add Printer wizard until the
process is complete.
Moving a Peer to Peer Printer
If you move your printer to a new network, you must restore
the NIC to its factory defaults (see page 74). If you have
changed your printer’s name, it will revert to its original
factory name.
First, Install Peer to Peer Software
Follow these steps to install the correct software.
1. Insert the SuperScript 4400 Series CD.
2. Use the Administrator installation option to install the
Peer to Peer IP or Peer to Peer IPX utility.
3. Follow the Installation prompts. When installation is
complete, click OK.
80 SuperScript 4400 Series — User’s Guide
Page 89

Removing Peer to Peer Software
You should delete all printers which have been installed to
use peer to peer printing before you delete the peer to peer
software. Follow these steps.
1. Press the Windows Start button, select Settings, then
select Printers.
2. In the Printers window, select a printer to delete.
3. Select Delete from the File menu.
Removing
To remove the IP peer to peer software from your computer,
use the Add/Remove Programs control panel.
1. Press the Windows Start button, select Settings, then
select Control Panel.
2. Open Add/Remove Programs. Select P2P-IP in the list
and click Remove.
Removing
T o r emove the IPX peer to peer software fr om your computer,
use the PeerToPeer-IPX Uninstall program. Follow these steps.
1. Insert the SuperScript 4400 Series CD into the drive.
2. Press the Windows Start button and select Run.
3. At Run, type:
<drive>:\PZPIPX\UNINSTAL.EXE
Then click OK.
Follow the Uninstall wizard prompts. When removal is
complete, click OK.
P2P-IP
PeerToPeer-IPX
Setting lpr Printing on an NT Network
The following procedure can be used to set up the lpr spooler
for a Windows NT 4.0 workstation/server.
1. In the Windows Network control panel, install the
Microsoft TCP/IP Printing service.
2. Use the Windows Add Printer wizard to install the
SuperScript 4400 printer driver for Windows NT 4.0.
note: SuperScript 4400 printer drivers are provided on
the
SuperScript 4400 Series CD
printer.
3. In Windows NT 4.0, click the Start button, select
Settings, then select Printers.
4. Select the NEC SuperScript 4400 printer icon, and then
select Properties from the File menu.
5. Click on the Ports tab (the SuperScript 4400 driver
installs to LPT1 by default).
6. Then select Add Port.
7. Under Available Printer Port select LPR Port and click
the New Port button.
8. In the Name or address of server providing lpd field,
enter the IP (Protocol) address of the printer, for example,
128.191.184.50.
9. In the Name of printer or print queue on that server
field, enter PORT1 (the word “PORT” must be in
uppercase). Click OK, then click Close to assign that
newly created port to the SuperScript 4400.
10. Click on the Sharing tab in the NEC SuperScript 4400
Properties window.
11. Click on the radio button Shared and enter a name for
your SuperScript 4400 printer.
12. Click OK to apply these settings to your printer.
that comes with the 4400
NETWORK SETUP WINDOWS
Windows 81
Page 90

Shared Printing in Windows 95/98
Use these steps to set up shared printing in Windows 95/98.
1. Install the printer as a “local” printer using LPT1 port.
2. Press the Windows Start button, select Settings, then
select Control Panel.
3. In the Control Panel window, double-click the Network
icon.
4. Click on the File and Print Sharing button and in the
dialog box that appears, make sure that I want to be able
to allow others to print to my printer(s) is checked.
5. Click OK and Click OK in the Network window.
6. Next, press the Windows Start button, select Settings,
then select Printers.
7. In the Printers window, select the printer installed on
LPT1. Click on it with the right mouse button and select
Sharing from the pop-up menu.
8. Select Shared as and enter a name to identify the printer
on the network. Then click OK.
9. On another PC, press the Windows Start button, select
Settings, then select Printers.
10. In the Printers window, double-click the Add Printer
icon.
11. Click Next to begin installation and specify Network
when prompted.
12. When prompted for Network Path or Queue Name, click
on Browse, and browse to the name of the computer
where the printer was installed locally.
13. Select the name of the shared printer and click OK.
14. Then proceed with normal installation as directed.
82 SuperScript 4400 Series — User’s Guide
Page 91

Dynamic Host Configuration Protocol
Dynamic Host Configuration Protocol (DHCP) allows
automatic assignment of IP address and other IP parameters
for attached devices. The 4400N works with DHCP in the
following way.
At power-up, the 4400N NIC broadcasts a DHCP request for
an IP address. If a DHCP server is pr esent, the request will be
processed, and an IP address will be returned to the NIC.
Upon receipt of the IP address, the NIC resets, and prints a
Network Settings page. This shows the new IP address (and
subnet mask, and default gateway, if any). Under factory
default settings, once an IP address has been assigned to it, the NIC
will no longer broadcast DHCP requests. If you uncheck IP
Address in NVRAM, in the Network Administration Page, the
printer will broadcast a DHCP request each time you turn on the
printer.
The DHCP server may grant a temporary IP address, called a
temporary lease or temporary reservation, which expires
later, or may grant a permanent or unlimited lease or
reservation which does not expire.
Devices that are granted a temporary lease will be notified
before the lease expires and asked if they would like to
extend the lease. The NIC will continue extending its lease
indefinitely (unless prohibited by your DHCP server
configuration), and thus maintain a consistent IP address.
Important: If the NIC is not turned on or is not connected to the
network when the DHCP server is sending requests to extend the
lease, the lease will not be extended. The DHCP server will cancel
the lease and may assign the IP address to another device.
Therefore, it is highly recommended to explicitly specify the NIC
lease as permanent or unlimited in your DHCP server
configuration.
DHCP Settings in the Network Administration Page
You can control the way the NIC handles DHCP from the
Network Administration Page. To go there,
1. Go to the URL Configuration Page, the URL is
http://<IP address>/configure.html.
2. Click on the Network Administration link. This displays
the Network Administration Page.
3. Under Protocols, click Setup TCP/IP. The two DHCP
Settings are shown here.
The factory default is that both settings are checked.
When Enable DHCP is not checked, the NIC will not
make DHCP requests.
When IP Address in NVRAM is not checked, the NIC
will always make a new DHCP address request at printer
power on.
NETWORK SETUP WINDOWS
Windows 83
Page 92

NETW
ARE
4.
X
Using NWADMIN
First, Attach the Printer
1. Log in to NetWare 4.x with administrator rights and
open the NetWare Administrator window.
2. Create Printer Object.
a. Highlight the Organizational Unit or Organization
where you want to create the print service in the
Directory Tree. From the Object menu, select Create.
b. In the New Object window that appears, scroll down
the Class of New Object list, select the Printer icon
and click the OK button.
c. When the Create Printer window appears, type a
name in the Printer Name field and click on the
Create button.
3. Create Print Server Object.
a. Highlight the Organizational Unit. From the Object
menu, select Create.
b. In the New Object window appears, scroll down the
Class of New Object list, select the Print Server icon,
and click the OK button.
c. At the Create Print Server window, type a name in
the Print Server Name field and click the Create
button.
note: The Print Server name you enter should match the
name shown on the Network Settings page under Novell
Network Information.
4. Create Print Queue Object.
a. Highlight the Organizational Unit. From the Object
menu, select Create.
b. In the New Object window that appears, scroll down
the Class of New Object list, select the Print Queue
icon, and click the OK button.
c. At the Create Print Queue window, click the
Directory Service Queue button, then type in a
name for Print Queue Name.
d. Click the icon to the right of Print Queue Volume
field to display the browser, and select a specific
Print Queue Volume (or type the name in the field).
e. Click the Create button.
5. Assign Printer Object
a. In the Directory Tree, double click on the printer
object just created to open its Printer window. Click
on the Assignments button on the right-side of the
window and click on the Add button.
b. In the Select Object window that appears, find the
print queue object just created among the choices
listed in the Objects box and select it by clicking on it.
c. Click on the OK button and the print queue is added
to the Print Queues: box in the Printer: window.
Click on the OK button again.
6. Assign Print Server Object
a. In the Directory Tree, double-click on the print server
object you just created to open its Print Server
window.
b. In the Print Server window that appears, click on the
Assignments button and Add button to bring up the
Select Object window. Select the printer object just
created from the Objects box and click on the OK
button. Now the printer (with its context) appears in
the Printers: box of the Print Server window. Click
on the OK button.
7. Check Assignments
a. At the Directory Tree, double click on the Print
Queue object you just created. At the Print Queue
window, click on the Assignments button.
b. If you configured the print queue and printer
correctly they will appear in the proper boxes on the
Print Queue window. Press the Cancel button.
84 SuperScript 4400 Series — User’s Guide
Page 93

Second, Install the Printer Driver
In Windows, use the Add Printer feature to install and
configure a SuperScript 4400 printer driver in each
workstation that will access the network printer.
note: SuperScript 4400 printer drivers are on the
SuperScript 4400 Series CD
that comes with the printer.
Specify that the printer will be attached as a Network Printer,
and set the Port to the printer queue you just created. (The
Windows NT 4.0 driver installs automatically to LPT1:. After
installation, you can manually reset the port to your NetWare
queue.)
Third, use MAP and the Network Administration Page to
Configure the Network Printer
Now you must specify the Print Server Name, Preferred
NDS Context, and Preferred NDS Tree using the Network
Administration Page options. Continue with the instructions
below, to do this.
1. Run MAP.
a. If you have not yet installed MAP, follow the
instructions on page 77.
b. In Windows 95/98 or W indows NT 4.0, click the Start
button. Select MAP from the program group you
specified during installation. When MAP starts, a list
of all available units on the network is displayed by
unit serial number.
2. Select the 4400N to configure.
a. Click on a 4400N in the list to display its Network
Administration Page.
3. NetWare 4.x (NDS) Configuration
a. On the Network Administration Page, click on
Setup NetWare in the Protocols column.
b. In the NetWare Configuration menu that appears,
enter a name in the Print Server Name field, enter a
name in the Preferred NDS Context field, and enter
a name in the Preferred NDS Tree field. (Leave the
Preferred File Server field blank.)
c. Enter the password and click on the Accept Settings
button. (The default password is sysadm.)
4. Turn the printer off and then on again to validate
network settings changes.
5. Confirm Successful Configuration.
a. In the Systems column, click on Reset. After the
Reset, turn the printer off and then on again.
b. Go back to the Network Administration Page, click
the Network Administration button. Then, in the
System column, click on Unit Status.
c. In the dialog box that appears, scroll down to display
the NetWare Status. The Queue Status should be
Attached.
d. If the Queue Status is not shown as Attached, please
verify that the entries for Print Server Name,
Preferred NDS Context, and Print Server Password
match those defined in NWADMIN.
NETWORK SETUP NETWARE 4.X
NetWare 4.x 85
Page 94

NETW
Complete these basic tasks to configure NetWare 3.x binderybased services for your printer.
1. Log in to NetWare 3.x with Administrator rights and
start PCONSOLE.
2. Define the Print Queue.
a. Select Print Queue Information from the Available
b. Press INSERT, type a name for the new queue to be
3. Define the Print Server.
a. Select Print Server Information from the Available
b. Press INSERT, type the NIC Print Server Name and
note: The Print Server Name you enter should match
the name shown on the Network Settings page under
Novell Network Information.
4. Define the Printer.
a. Press ENTER with the new Print Server Highlighted,
b. In the Configured Printers list, select an unused
c. Press ESCAPE to exit and select Yes to save the
ARE
3.
X
Options menu and press ENTER.
serviced by the NIC and press ENTER. Press ESCAPE
to return to the Available Options Menu.
Options menu and press ENTER.
press ENTER.
select Print Server Configuration and press ENTER,
then select Printer Configuration and press ENTER.
printer number and press ENTER. In the Printer <#>
Configuration screen, define a new name for the
printer if desired. (The printer name is displayed in
various NetWare printing messages.)
changes. Press ESCAPE again to return to the Printer
Server Configuration menu.
5. Assign the Print Queue.
a. Select Queues Serviced By Printer and press ENTER.
Highlight the desired printer on the Defined Printers
list and press ENTER.
b. Press INSERT to display the Available Queues list.
Select the desired queue and press ENTER. Assign a
Priority level (recommended choice is 1) and press
ENTER.
c. Press Alt-F10 to exit PCONSOLE.
6. Configure the network printer using MAP and the
Network Administration Page. The instructions are
shown on page 85.
7. Confirm Successful Configuration.
a. Turn the printer off and on and wait for a Network
Settings page to print. If the network is large, this
may take several minutes.
b. The Novell Connection Information area on the
Network Settings page displays the printer name, file
server, queue, etc. If it displays Attached: Yes, this
confirms that the NIC Print Server is ready to accept
print jobs. If not, verify that the Print Server name
matches exactly the Print Server name that was
entered in PCONSOLE.
8. Install and Configure Your Printer Driver
In Windows, use the Add Printer feature to install and
configure a SuperScript 4400 printer driver in each
workstation that will access the network printer.
note: SuperScript 4400 printer drivers are on the
SuperScript 4400 Series CD
Specify that the printer will be attached as a Network Printer,
and set the Port to the printer queue you just created. (The
Windows NT 4.0 driver installs automatically to LPT1:. After
installation, you can manually reset the port to your NetWare
queue.)
that comes with the printer.
86 SuperScript 4400 Series — User’s Guide
Page 95

WEB JETA
If you are using Web JetAdmin, you must copy certain
NEC SuperScript files to Web JetAdmin folders so that the
NEC SuperScript 4400 will appear properly.
DMIN
First, Go to the File Location
(This assumes your CDROM is drive E:)
E:\WebJetAD\nec_super_script_4400.gif
E:\WebJetAD\ Icons\Nss4400i.gif
E:\WebJetAD\ Images\Nss4400.gif
E:\WebJetAD\ nec_super_script_4400\CoverOpen.gif
E:\WebJetAD\ nec_super_script_4400\NoPaper.gif
E:\WebJetAD\ nec_super_script_4400\NoToner.gif
E:\WebJetAD\ nec_super_script_4400\Offline.gif
E:\WebJetAD\ nec_super_script_4400\PaperJam.gif
Second, Copy Files to WebJetAdmin Folders
(Path may vary depending on your Web JetAdmin version)
C:\Program Files\HP Web JetAdmin4.0\doc\devices
\nec_super_script_4400.gif
C:\Program Files\HP Web JetAdmin4.0\doc\devices\
Icons\Nss4400i.gif
C:\Program Files\HP Web JetAdmin4.0\doc\devices\
Images\Nss4400.gif
C:\Program Files\HP Web JetAdmin4.0\doc\devices\
nec_super_script_4400\CoverOpen.gif
C:\Program Files\HP Web JetAdmin4.0\doc\devices\
nec_super_script_4400\NoPaper.gif
C:\Program Files\HP Web JetAdmin4.0\doc\devices\
nec_super_script_4400\NoToner.gif
C:\Program Files\HP Web JetAdmin4.0\doc\devices\
nec_super_script_4400\Offline.gif
C:\Program Files\HP Web JetAdmin4.0\doc\devices\
nec_super_script_4400\PaperJam.gif
Third, Reset Web JetAdmin Discovery
1. Display Web JetAdmin 4.0.
2. In the Web JetAdmin Main page, click on Web JetAdmin
Settings.
3. Click on Modify Discovery Settings on the right side
under HP Web JetAdmin Global Settings.
4. This displays the Discovery Mechanics page. Scroll down
to the Clear Database section and click on the Clear!
button.
5. The Success page appears. At the top of the frame, click
the Discovery Settings button to re-enter the Discovery
Mechanics page.
6. Scroll down to the Start New Discovery section and click
on the Start! button.
Now, you should be able to see the NEC SuperScript 4400
when you search devices.
NETWORK SETUP WEB JETADMIN
Web JetAdmin 87
Page 96

UNIX
Here we provide basic instructions for installing the printer
on your UNIX system in Solaris 2.x and SCO. For additional
information, refer to your operating system administration
manuals.
First, Configure the IP Address on the 4400N
The 4400N must be assigned an IP address and routing
parameters. We suggest you use the instructions on page 73
for using the printer Operator Panel to set the Net (IP)
Address.
Second, Set Up Your Printing Mode
Use these instructions to set up the printer for SCO Open
Server Enterprise 5.0 and Solaris 2.x.
Installing the Printer in Your System
lpd is an implementation of the standard UNIX line printer
daemon which lets you print across a TCP/IP network,
without the need to install software on your workstation, and
with all filtering and banners done by the 4400N. Remote
printing uses the same commands (lpr, lpq, lpc) as local
printing.
The process begins when the lpr call finds a printer on a
remote system by looking at the remote (rm) entry in the
/etc/printcap file for that printer. lpr handles a print job
for a remote printer by opening a connection with the lpd
process on the remote system and sending the data file
(followed by the control file containing control information
for this job) to the remote system. The printer-based lpd then
filters the data and prints the job according to information
contained in the control file and its own printcap file.
The following sections give specific lpd setup instructions for
various systems. You must log in as root in order to execute
the commands.
Adding a SuperScript 4400N to Solaris 2.x
Log into your system as root. Add the printer’s IP address
you already assigned into the /etc/hosts file. Using
lpsystem follow these steps to open a terminal and enter
the printer’s IP address from the command line.
1. lpsystem -t bsd <IP address of printer>
[ENTER]
Enter the 4400N print server host name from the
/etc/hosts file. Your system may want its IP address
instead of the remote host name.
2. lpadmin -p <printername> -s <remote host
name or IP address>!PORT1 [ENTER]
note: There is no space after the remote host name.
3. Enable<printername> [ENTER]
4. Accept<printername> [ENTER]
Then, make sure that the printer content type is set to PS” by
typing lpstat -p -l to display the current printer settings. If it
is not set to PS, type the following on the command line to
change the printer settings.
5. lpadmin -p <printername> -I ps [ENTER]
6. lpadmin -p <printername> -T PS [ENTER]
To test that the printer was installed into the system, send a
print job using any application in your operating system.
Make sure that the printer you choose is the SuperScript
4400N that you installed earlier.
88 SuperScript 4400 Series — User’s Guide
Page 97

Adding a SuperScript 4400N to SCO OpenServer 5.x
Log into your system as root. Add the printer’s IP address
you already assigned into the /etc/hosts file. Using
lpsystem follow these steps to open a terminal and enter
the printer’s IP address from the command line.
1. Set up the SuperScript 4400N printer as a remote printer
on a host that sends jobs to a Print Server using lpd. Use
the following procedures to do this:
At the prompt, type: mkdev rlp
note: You cannot run
additional printers to be configured, use the
command.
mkdev rlp
twice. If you have
rlpconf
2. You will now be asked a series of questions. Respond as
follows. Do you want to install or remove a remote
printer? Type: I
3. Do you want to change printer description file
/etc/printcap? Type: Y
4. Write a printer name. For example,
type: lprprinter1
5. Is lprprinter1 a remote printer or a local printer? Type: R
6. Enter remote host name: type host name entered in
printcap for the 4400N. For example, type: lprprinter
7. Confirm the information you have entered. Type: Y
8. Confirm the preceding connection as your system
default. Type: Y
9. Enter another printer name or quit setup. Type: Q
10. Do you want to start the remote daemon now? Type: Y
11. Using a line editor of your choice, verify the following on
your /etc/printcap file. If necessary, use the
following steps to change the “rp” entry.
lprprinter1:\
:lp=:\
:rm=lprprinter:\
:rp=PORT1:\
:sd=/usr/spool/lpd/lprprinter1:
12. Change the :rp=lprprinter: entry to :rp=PORT1.
13. Set this printer as the default printer and print a page, for
example, from a browser, to verify that the installation
was successful.
note: This information was based on the sample input
in the earlier steps. Actual parameters may vary
depending on prior setup.
NETWORK SETUP UNIX
UNIX 89
Page 98

90 SuperScript 4400 Series — User’s Guide
Page 99

CHAPTER 8
MAINTAINING YOUR
PRINTER
O
VERVIEW
This printer is designed for easy use and maintenance. Be
sure to review the maintenance and service schedules on
page 92. These show when parts should be cleaned or
replaced. Your Operator Panel will also remind you when
replacement of parts or consumables is due.
This chapter explains basic maintenance and cleaning
procedures you must follow to maintain the high print
quality and efficient operation of your NEC SuperScript 4400
printer. Included are instructions for the following
maintenance tasks
• Replacing the Toner Modules
• Replacing the Fuser Oil Bottle, Fuser Cleaning Roller,
and Fuser Unit
• Cleaning and Replacing the Belt Cartridge
• Cleaning inside the Back Cover
• Cleaning the Laser Lens
• Replacing the Ozone Filter
• Replacing the Toner Collector (Waste Toner Bottle)
• Cleaning the Paper Exit Roller
• Cleaning the outside of the printer
The life expectancy of each replaceable part is based on
printing under specific operating conditions, such as media
type, number of colors used, humidity, page size, and page
coverage (usually 5% coverage as in an average business
letter).
P
RECAUTIONS
Please take the following precautions when performing
maintenance tasks
• Do not work inside Top or Back Covers of printer until it
has cooled at least 15 minutes.
• Do not use ammonia-based cleaners. They may react
with the toner in the module.
• Do not use alcohol-based cleaners on the printer exterior .
They may damage the plastic case.
• Do not expose the Belt Cartridge or Transfer Drum to
direct sunlight or bright room light.
• Do not spill any liquid inside the printer or in the Power
Cord connector.
• T urn of f and unplug the printer while working inside the
covers.
• Follow all directions carefully. Save this user’s guide for
future reference.
• Do not attempt to service the printer yourself since
opening some internal parts may expose you to high
voltage or other hazards. Refer all servicing not
explained in this user’s guide to qualified technicians.
Call NEC Technical Support at 800-632-4650 for help.
note: See page 116, for information about ordering
printer supplies.
91
Page 100

Maintenance Schedule
Follow this schedule to keep your printer in good operating
condition.
Ongoing—As Needed
• Clean the outside of the printer with a soft cloth and mild
solvent when dusty or soiled.
• When printed output becomes too light or TONER EMPTY
message appears on the Operator Panel display, take out
the Toner Module and gently rock it from side to side to
redistribute the toner (about every 6,000 pages for color
toner and every 10,000 pages for black toner).
• Clean the Registration Rollers using the procedure on
page 98.
• Clean the Transfer Roller (see page 98).
• Clean the Paper Exit Roller using the procedure on page
102.
• Clean the Belt Cartridge (OPC Belt) when the charge
wire gets stained or printouts show vertical streaks. Use
the procedure on page 96.
• Clean the Laser Lens using the procedure on page 100 if
printouts show vertical streaks.
Every 12,000 Pages
• Replace the Fuser Oil Bottle when shipping the printer,
after 12,000 pages, or when indicated on the Operator
Panel display.
• Replace the Toner Collector (Waste Toner Bottle) after
12,000 pages.
• Replace the Fuser Cleaning Roller after 12,000 pages (see
page 95).
Every 12 Months or By Page Count
• Clean inside the Back Cover of the printer, after 20,000
prints or every 12 months, using the instructions on page
98.
• Wipe down the Paper Guides in the paper trays with a
soft cloth and mild solvent (after 20,000 prints or sooner
if needed).
• Replace the Belt Cartridge after 50,000 color planes* or
every 12 months, using the procedure on page 97.
• Replace the Ozone Filter using the procedure on page
101.
• Replace the Fusing Unit after 60,000 pages using the
procedure on page 99.
Service Visit Schedule
Certain printer parts must be maintained or replaced by an
authorized NEC field service engineer. When this is
necessary call NEC Technical Support at 800-632-4650. They
will put you in touch with an engineer in your area who can
service your printer.
Every 120,000 pages: Paper Discharger , Dr um Cleaner,
Paper Pick-up Roller, and Transfer Roller must be
replaced by a field service engineer.
Every 300,000 planes: Transfer Drum must be replaced
by a field service engineer.
*Every color laid down on a page is considered a plane. There
are four planes to a full color page using cyan, magenta,
yellow, and black.
92 SuperScript 4400 Series — User’s Guide
 Loading...