

Page 1
Page 2

Table of Contents
1. Disclaimer .................................................................................................................. 1
2. Welcome to TRAKTOR KONTROL S3 ......................................................................... 2
2.1. Document Conventions ..................................................................................... 2
3. Setting up TRAKTOR KONTROL S3 ............................................................................ 3
3.1. Connecting to the Computer .............................................................................. 3
3.2. Connecting an Amplification System .................................................................. 3
3.3. Connecting Monitors for DJ Booth ..................................................................... 4
3.4. Connecting Headphones ................................................................................... 4
3.5. Connecting to the Power Supply ........................................................................ 4
3.6. Final Preparation .............................................................................................. 4
3.7. Importing Music into the Track Collection ........................................................... 6
4. TRAKTOR KONTROL S3 Overview ............................................................................. 7
4.1. Decks .............................................................................................................. 8
4.1.1. Browse Controls ..................................................................................... 9
4.1.2. Pad Section ......................................................................................... 10
4.2. Mixer ............................................................................................................. 10
4.2.1. Mixer Channel ...................................................................................... 13
5. Tutorials ................................................................................................................... 15
5.1. Mixing Your First Tracks using Sync ................................................................. 16
5.1.1. Prerequisites ........................................................................................ 16
5.1.2. Loading the First Track into Deck A ....................................................... 16
5.1.3. Starting Playback of Deck A .................................................................. 17
5.1.4. Loading the Second Track into Deck B ................................................... 18
5.1.5. Syncing the Track Tempos .................................................................... 18
5.1.6. Starting Playback of the Second Track ................................................... 19
5.1.7. Mixing in the Audio Signal ..................................................................... 19
5.2. Browsing and Loading Tracks .......................................................................... 20
5.3. Controlling Track Playback .............................................................................. 21
5.4. Previewing Tracks using the Cue Channel ....................................................... 22
5.5. Adjusting Volume Levels ................................................................................. 22
5.6. Using the Equalizer to Tweak Your Sound ........................................................ 23
5.7. Adjusting Track Tempo .................................................................................... 23
5.8. Locking the Key of Tracks ............................................................................... 24
5.9. Playing with Mixer Effects ................................................................................ 24
5.10. Playing with Cue Points ................................................................................. 25
5.11. Playing with Loops ........................................................................................ 26
5.12. Mixing Tracks Using Jog Wheels ................................................................... 27
5.12.1. Prerequisites ...................................................................................... 27
5.12.2. Loading the First Track into Deck A ...................................................... 27
5.12.3. Starting Playback of Deck A ................................................................ 28
5.12.4. Loading the Second Track into Deck B ................................................. 29
5.12.5. Syncing Tracks Manually ..................................................................... 30
Page 3

5.12.6. Cuing the Next Track using the Jog Wheels ......................................... 33
5.12.7. Mixing in the Next Track ...................................................................... 34
5.13. Using Flux and Reverse Modes ..................................................................... 34
5.14. Working with the Preparation List ................................................................... 35
5.15. Correcting Beatgrids of Tracks ....................................................................... 35
Page 4

Disclaimer
1. DISCLAIMER
The information in this document is subject to change without notice and does not represent a
commitment on the part of Native Instruments GmbH. The software described by this document is
subject to a License Agreement and may not be copied to other media. No part of this publication
may be copied, reproduced or otherwise transmitted or recorded, for any purpose, without prior
written permission by Native Instruments GmbH, hereinafter referred to as Native Instruments.
“Native Instruments”, “NI” and associated logos are (registered) trademarks of Native Instruments
GmbH.
Mac, macOS, iPad, Logic and iTunes are registered trademarks of Apple Inc., registered in the
U.S. and other countries.
Windows and DirectSound are registered trademarks of Microsoft Corporation in the United States
and/or other countries.
All other trademarks are the property of their respective owners and use of them does not imply
any affiliation with or endorsement by them.
Document authored by: Native Instruments
Software version: 3.3 (12/2019)
Hardware version: TRAKTOR KONTROL S3
Special thanks to the Beta Test Team, who were invaluable not just in tracking down bugs, but in
making this a better product.
1
Page 5
Welcome to TRAKTOR KONTROL S3
2. WELCOME TO TRAKTOR KONTROL S3
Thank you for choosing TRAKTOR KONTROL S3, it is because of customers like you that we can
continue developing groundbreaking music software and hardware. TRAKTOR KONTROL S3 is a
fully integrated hardware and software DJ performance system tailored for both TRAKTOR PRO 3
and TRAKTOR DJ 2.
This documentation provides you with all the information you need to get started mixing, syncing
and looping. If you are already familiar with TRAKTOR, this guide will also help you use the more
advanced features of TRAKTOR KONTROL S3.
In addition to this manual, we have provided you with a collection of other learning resources:
To get to know TRAKTOR PRO 3 in detail, check out the manual.
To get a quick introduction to 4-channel mixing and tips from the pros read this blog post.
To learn how to use TRAKTOR DJ on iPad visit this guide.
2.1. Document Conventions
This document uses particular formatting to point out special facts and to warn you of potential issues. The icons introducing the following notes let you see what kind of information can be expected:
The speech bubble icon indicates a useful tip that may help you to solve a task more
efficiently.
The exclamation mark icon highlights important information that is essential for the
given context.
The warning icon warns you of serious issues and potential risks that require your
full attention.
Furthermore, the following formatting is used:
▪ Paths to locations on your hard disk or other storage devices are printed in italics.
▪ Important names and concepts are printed in bold.
▪ Square brackets are used to reference keys on a computer’s keyboard, e.g., Press [Shift] +
[Enter].
2
Page 6
Setting up TRAKTOR KONTROL S3
3. SETTING UP TRAKTOR KONTROL S3
To configure the S3 for use, you should have already installed TRAKTOR PRO 3 software using
NATIVE ACCESS. If this is not the case, follow the instructions under this link Registering and In-
stalling a Native Instruments Product using NATIVE ACCESS.
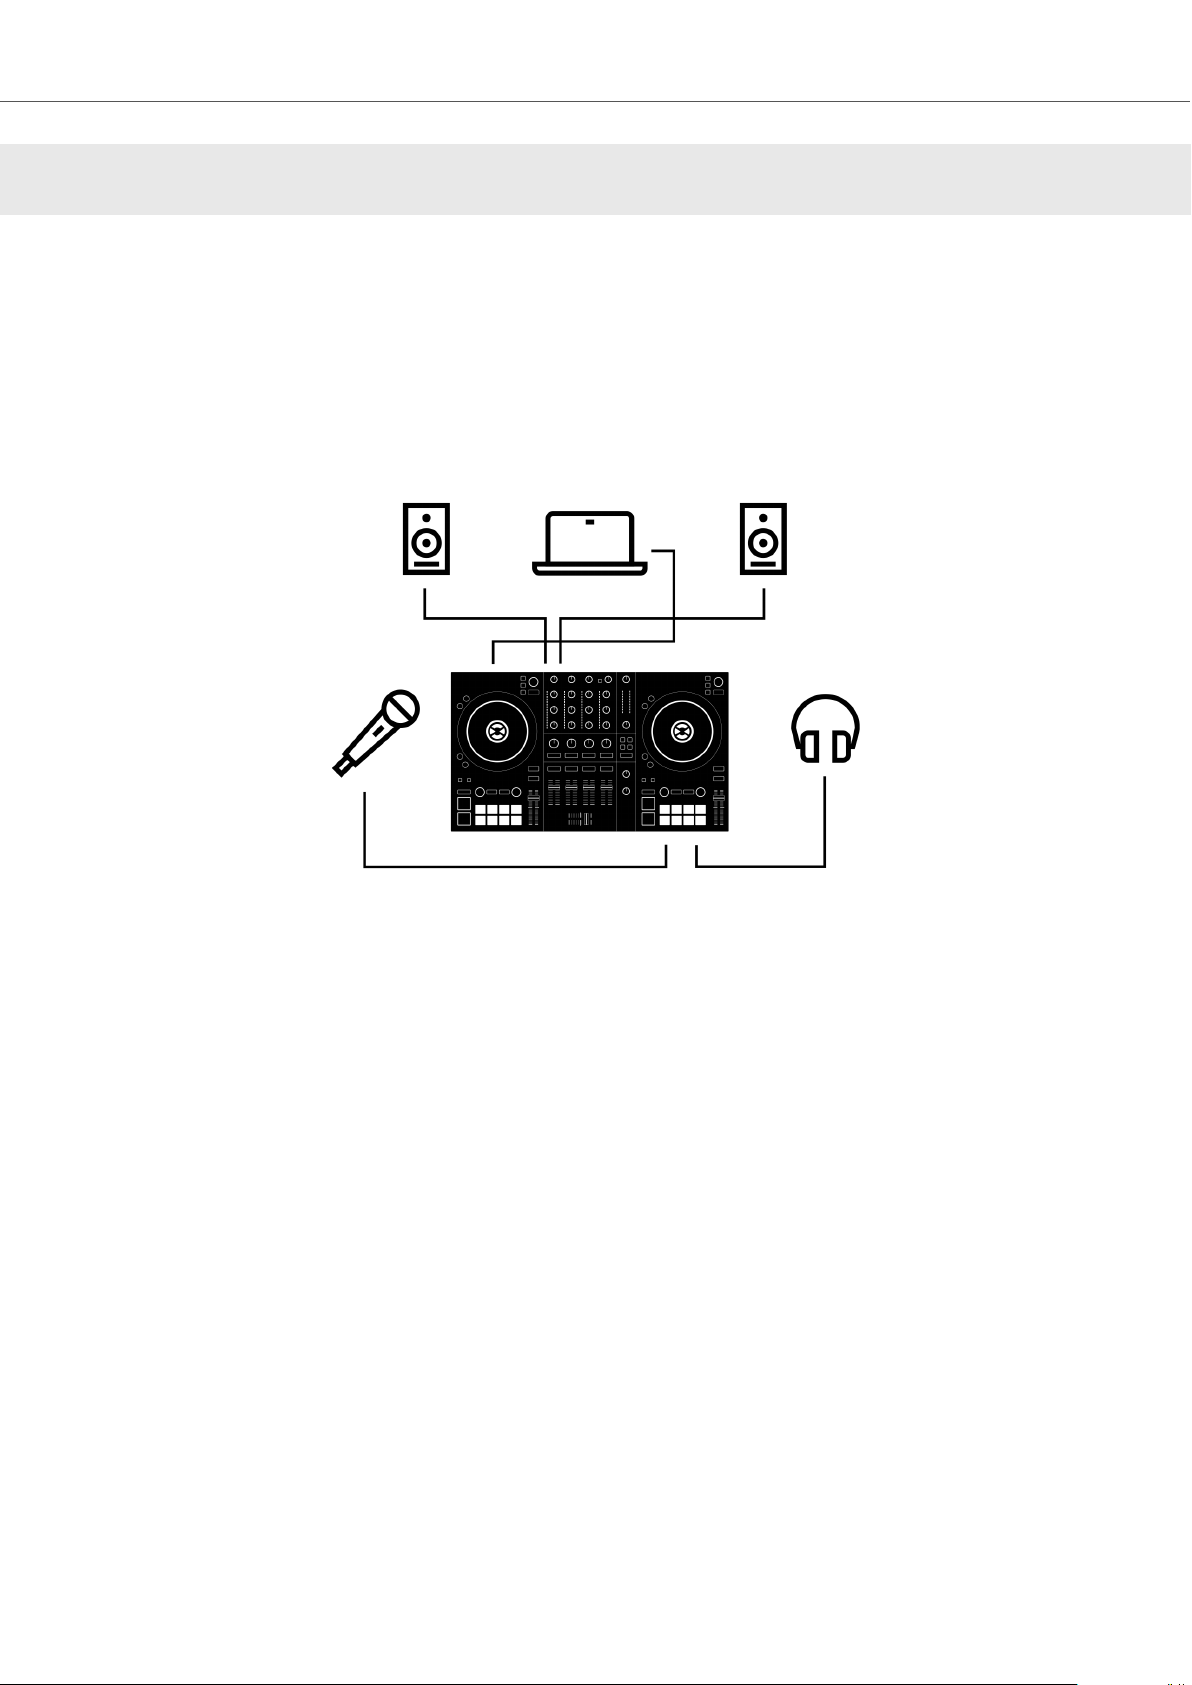
This section describes how to set up the TRAKTOR KONTROL S3. When all devices are connected your setup will look like a typical setup as depicted in the following illustration:
TRAKTOR KONTROL S3 setup.
3.1. Connecting to the Computer
To connect the TRAKTOR KONTROL S3 to your computer:
1. Connect the device end of the included USB cable to the USB socket on the rear panel of
your S3.
2. Connect the computer end of the USB cable to an available USB 2.0 port (or later) on your
computer.
3.2. Connecting an Amplification System
To connect your power amplifier system to the TRAKTOR KONTROL S3:
• Connect the MAIN OUT XLR or RCA outputs on the rear panel of the TRAKTOR KONTROL
S3 to the inputs of your amplification system using the appropriate cables.
3
Page 7

Setting up TRAKTOR KONTROL S3
3.3. Connecting Monitors for DJ Booth
To connect your monitor speakers or a second power amplifier to the TRAKTOR KONTROL S3 for
use in a DJ booth:
• Connect the BOOTH OUT outputs on the rear panel of the TRAKTOR KONTROL S3 to the
inputs of your monitoring system using appropriate cables.
3.4. Connecting Headphones
To connect headphones to the TRAKTOR KONTROL S3:
• Connect your headphones to the PHONES OUT socket on the front panel of the TRAKTOR
KONTROL S3 using a 1/4" or a 1/8" connector.
3.5. Connecting to the Power Supply
To connect the Power supply to the TRAKTOR KONTROL S3:
1. Connect the device end of the power supply cable to the power socket on the rear panel of
your S3.
2. Connect the power supply unit to a power outlet.
3.6. Final Preparation
After successfully setting up the TRAKTOR KONTROL S3 system, you need to complete the final
steps before you can start using your S3. First, switch on your devices and then configure the
TRAKTOR software to be used with your S3.
Switching on Devices and Starting TRAKTOR
You can now switch on the devices. We recommended that you follow the order in the instructions
below:
1. On your S3 turn down the volume controls to the minimum position by using the MASTER
knob, the BOOTH knob, and the VOL knob.
2. Switch on your amplification system.
3. Switch on your computer.
4. Switch on your S3.
5. Start TRAKTOR by double-clicking the TRAKTOR application icon on your desktop.
The TRAKTOR software opens.
Importing Data from Your Previous TRAKTOR Version
When you start TRAKTOR for the first time, TRAKTOR checks if a previous version of TRAKTOR
is installed on your system. In this case, TRAKTOR asks if you want to import your previous data
from the existing user content into a new folder in your user folder. Your previous data will not be
changed if you import it to the new default folder.
If you want to import data from your previous TRAKTOR installation:
4
Page 8

Setting up TRAKTOR KONTROL S3
• Click Yes to confirm.
The data is imported.
Switching to TRAKTOR Default Settings
When you start TRAKTOR with the S3 for the first time, TRAKTOR asks if you want to switch Mixer FX selection and the Tempo fader range to the default setting. This is necessary to get the intended user experience of your S3:
• Click Yes to switch to the default settings.
The Mixer FX and the TEMPO fader range are set to default settings.
Configuring TRAKTOR using the Setup Wizard
The Setup Wizard dialog appears automatically when you start TRAKTOR for the first time after
installation. The Setup Wizard helps you to configure the software to your needs only with a few
clicks. To configure TRAKTOR to be controlled with your S3 controller, perform the following actions:
1. On the WELCOME page of the Wizard, click Next to proceed.
2. On the DECK LAYOUT page select the Deck setup to control with your S3, for example, 2
Track Decks + 2 Remix Decks.
3. Click Next to proceed.
The SUMMARY page shows you the configuration of TRAKTOR.
4. Click Finish to confirm your configuration.
The TRAKTOR window now appears in the Essential layout.
5
Page 9

Setting up TRAKTOR KONTROL S3
3.7. Importing Music into the Track Collection
You can import your music into TRAKTOR's Track Collection in several ways. You can drag and
drop your music files from your computer into the Track Collection, you can use the context menu
in the Browser tree to import the music from your local music folders, and you can use the context
menu to import Remix Sets.
Importing Music using Drag and Drop
To import your music files into your Track Collection using drag and drop:
• Drag the music files from the location on your computer and drop them in the Track Collec-
tion folder in TRAKTOR's Browser tree.
TRAKTOR now analyzes the music files and imports the metadata into the Track Collection.
Importing Music Folders using the Context Menu
To import your music from your local music folders into the Track Collection:
1. Right-click the Track Collection root folder in the folder tree to open the context menu.
2. Select Import Music Folders.
TRAKTOR now analyzes the music files in the local music folders and imports the metadata
into the Track Collection.
The local music folders can be added to the File Management Page in the Preferences.
6
Page 10
TRAKTOR KONTROL S3 Overview
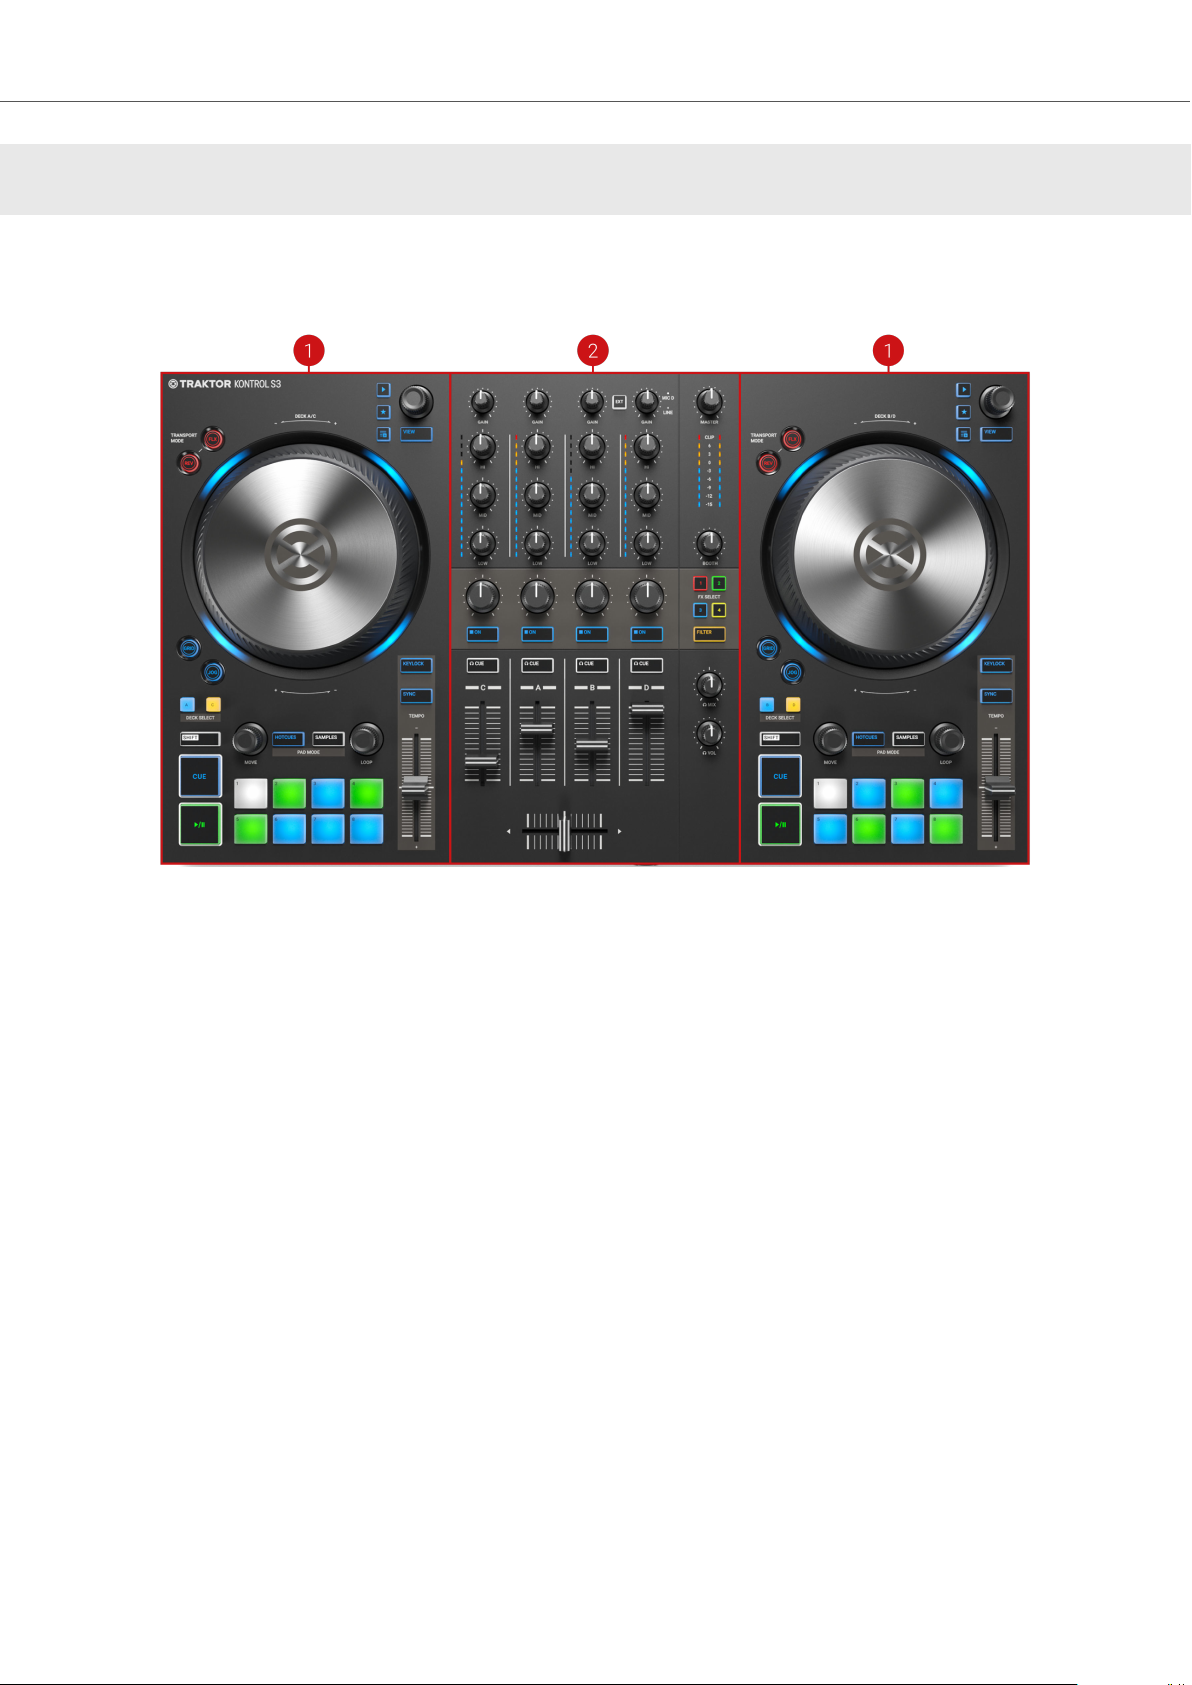
4. TRAKTOR KONTROL S3 OVERVIEW
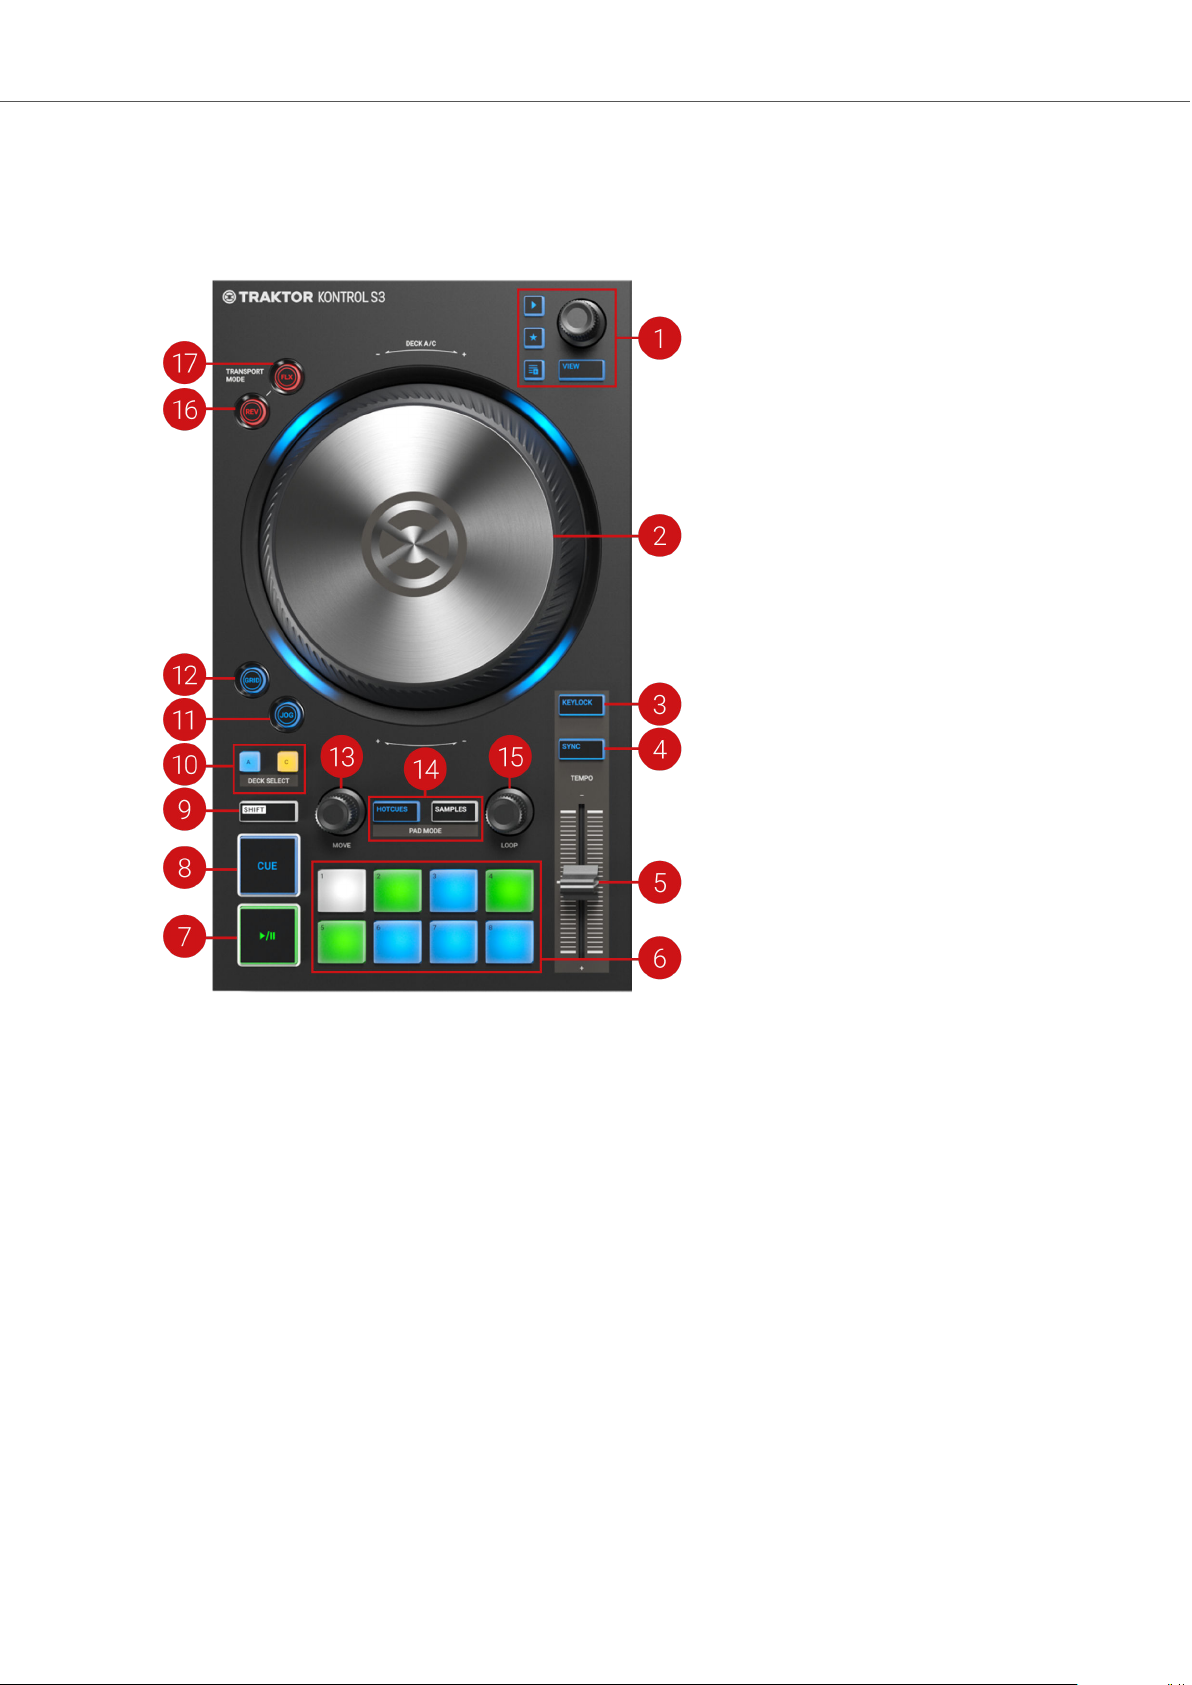
This section introduces you to the TRAKTOR KONTROL S3 and all its control elements and connectors.
(1) Decks: You can use the Decks to control tracks and Samples, similar to DJ turntables or CD
players but with additional features. TRAKTOR controls four virtual Decks and each of them can
be operated in several Deck Types.
TRAKTOR provides you with four virtual decks. The two Decks on your S3 hardware controller allow you to control the four software Decks A, B, C and D in TRAKTOR: the left Deck on your S3
controls Decks A and C in the software. The right Deck on your S3 controls Decks B and D in the
software. For more information on the Deck control elements, refer to Decks.
(2) Mixer: You can use the Mixer to mix the audio signals coming from the Decks. The Mixer sits in
the middle of the TRAKTOR software as well as on your TRAKTOR KONTROL S3 controller. On
the S3, the Mixer consists of the four Mixer channels A, B, C, and D which receive the individual
audio signals from the corresponding Decks. Each Mixer channel contains controls to modulate
the audio signal and to adjust the outgoing volume before the audio signal is sent to the MASTER
output. Furthermore, the Mixer provides a crossfader to let you fade between the audio signals in
the Mixer channels.
For more information on the Mixer control elements, refer to Mixer.
7
Page 11
TRAKTOR KONTROL S3 Overview
4.1. Decks
TRAKTOR KONTROL S3 provides you with two physical Decks to control the TRAKTOR Decks.
Each Deck provides you with the following control elements:
(1) Browse controls: Allow you to scroll through the Track Collection to find and load tracks, as
well as previewing tracks and preparing playlists.
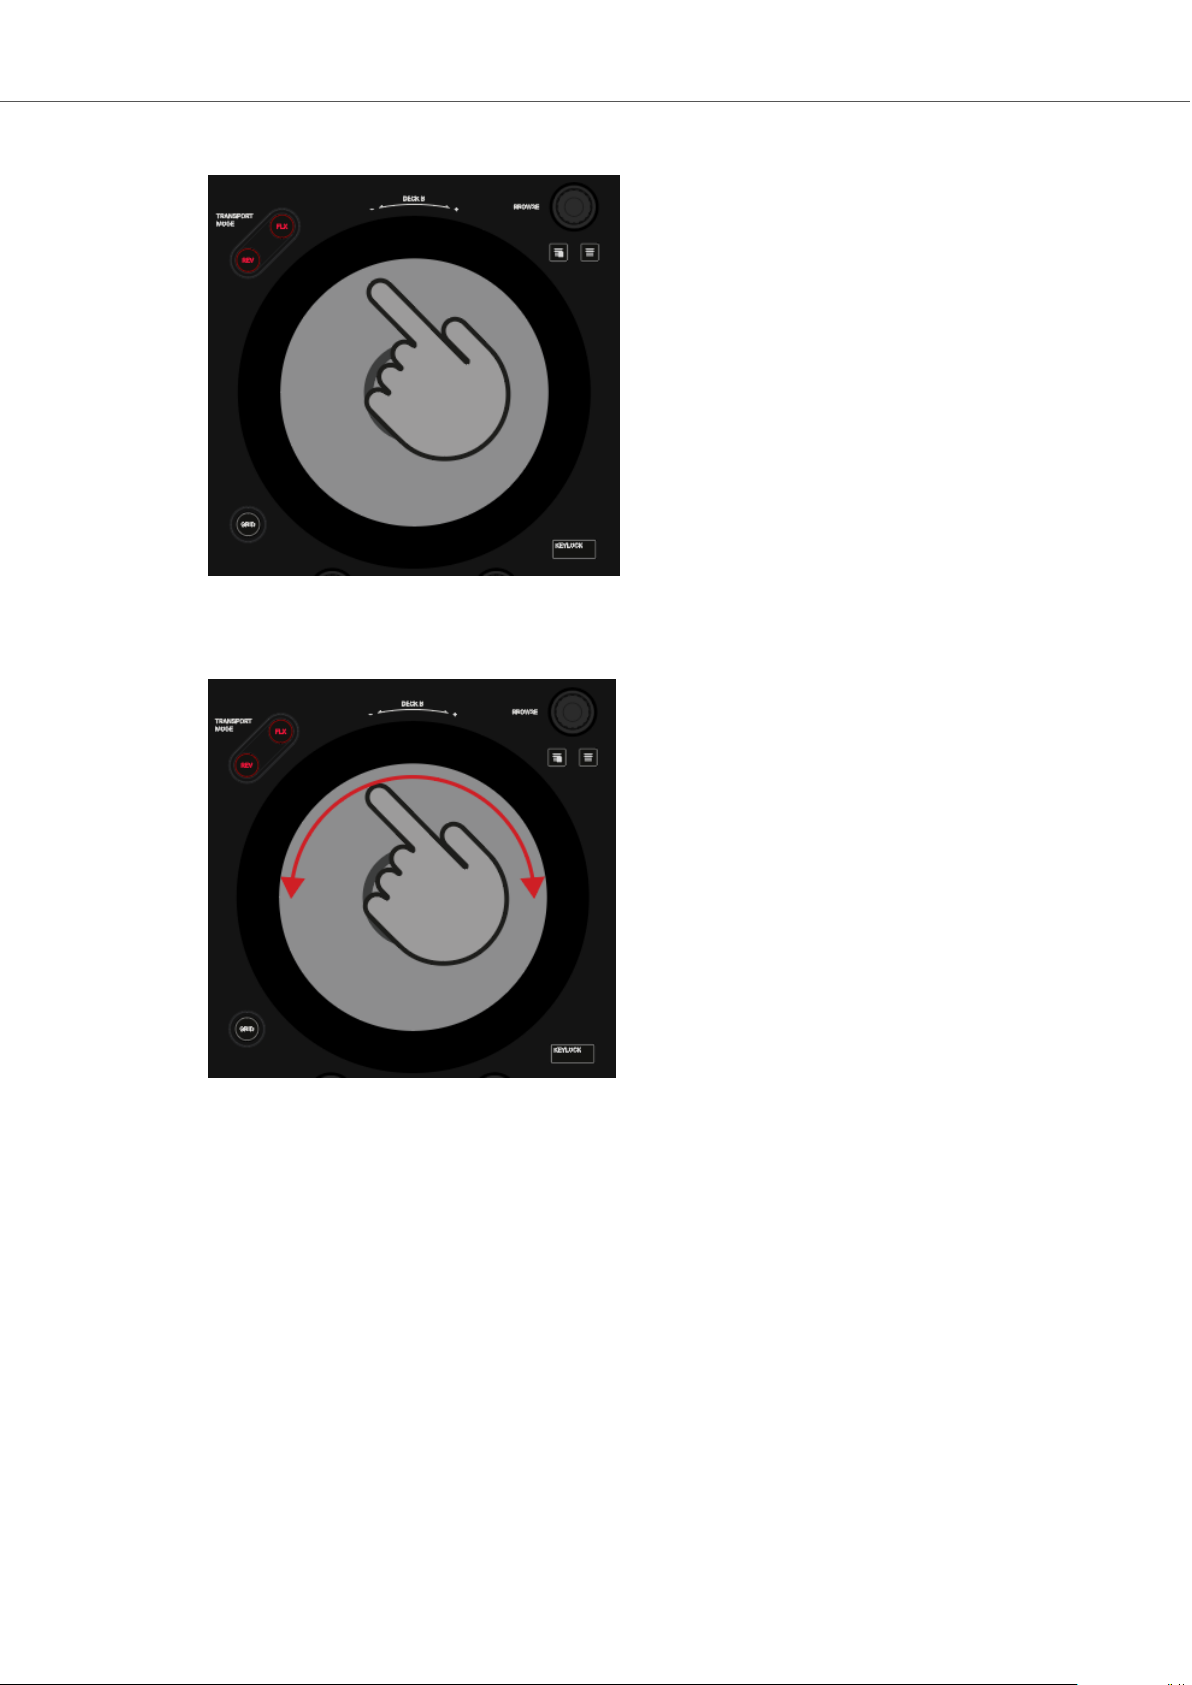
(2) Jog Wheel: The Jog Wheel provides advanced control over track transport. As with a conventional CD player or turntable, you can manually hold playback, nudge and bend, and start scratching by touching and turning the Jog Wheel and the outer rim. Furthermore, you can manually correct the tracks' Beatgrids.
(3) KEYLOCK button: Lock the track's current key value. When you then move the TEMPO fader
up or down, you change the track tempo but the track's key remains at the locked value.
(4) SYNC (Lock): Syncs the Deck to the Tempo Master. Using SHIFT and SYNC (Lock) locks the
TEMPO fader for the Deck.
(5) TEMPO fader: Lets you manually adjust the track tempo on that Deck. The TEMPO fader can
be operated in Absolute mode and in Relative mode. If the Deck is synced to the Tempo Master,
the TEMPO fader has no effect. When the Deck is playing at the original track tempo, the LED
lights up blue independently from the current TEMPO fader position. When the Deck tempo is faster or slower than the original tempo, the LED is unlit. When the tempo is locked for the Deck, the
LED lights up red.
8
Page 12
TRAKTOR KONTROL S3 Overview
(6) Pad section: You can use the Pads to store and trigger Cue Points and Loops, and to control
Samples and STEM Files. The individual function depends on the selected Pad mode and on the
selected Deck Type.
(7) Play/Pause: Lets you start or pause the track playback on that Deck. The button brightly lights
up green during playback.
(8) CUE: Lets you start track playback from the Floating Cue Point when the Deck is stopped.
Moves the playback position back to the Cue point during playback.
(9) SHIFT: When you hold SHIFT, you are provided with the secondary functions of some control
elements on the S3.
(10) DECK SELECT buttons: Allow you to switch between TRAKTOR Decks A and C on the left
Deck, and between TRAKTOR Decks B and C on the right Deck.
(11) JOG button: Enables JOG mode (Jog Wheel mode) for the Jog Wheel.
(12) GRID button: Enables GRID mode to manually correct the beatgrid for the current track using
the Jog Wheel.
(13) MOVE encoder: Allows you to jump within the track. When looping is enabled, the MOVE
encoder allows you to move the Loop forward and backward in the track.
(14) PAD MODE: Determines whether you are triggering and saving cue points and loops or controlling samples with Pads.
(15) LOOP encoder: Allows you to enable/disable Looping as well as changing the Loop size.
(16) REV button: Plays back the track in reverse when in Flux mode. When you press the REV
button, this automatically enables Flux mode as long as the REV button is pressed.
(17) FLX button: Enables Flux mode for that Deck.
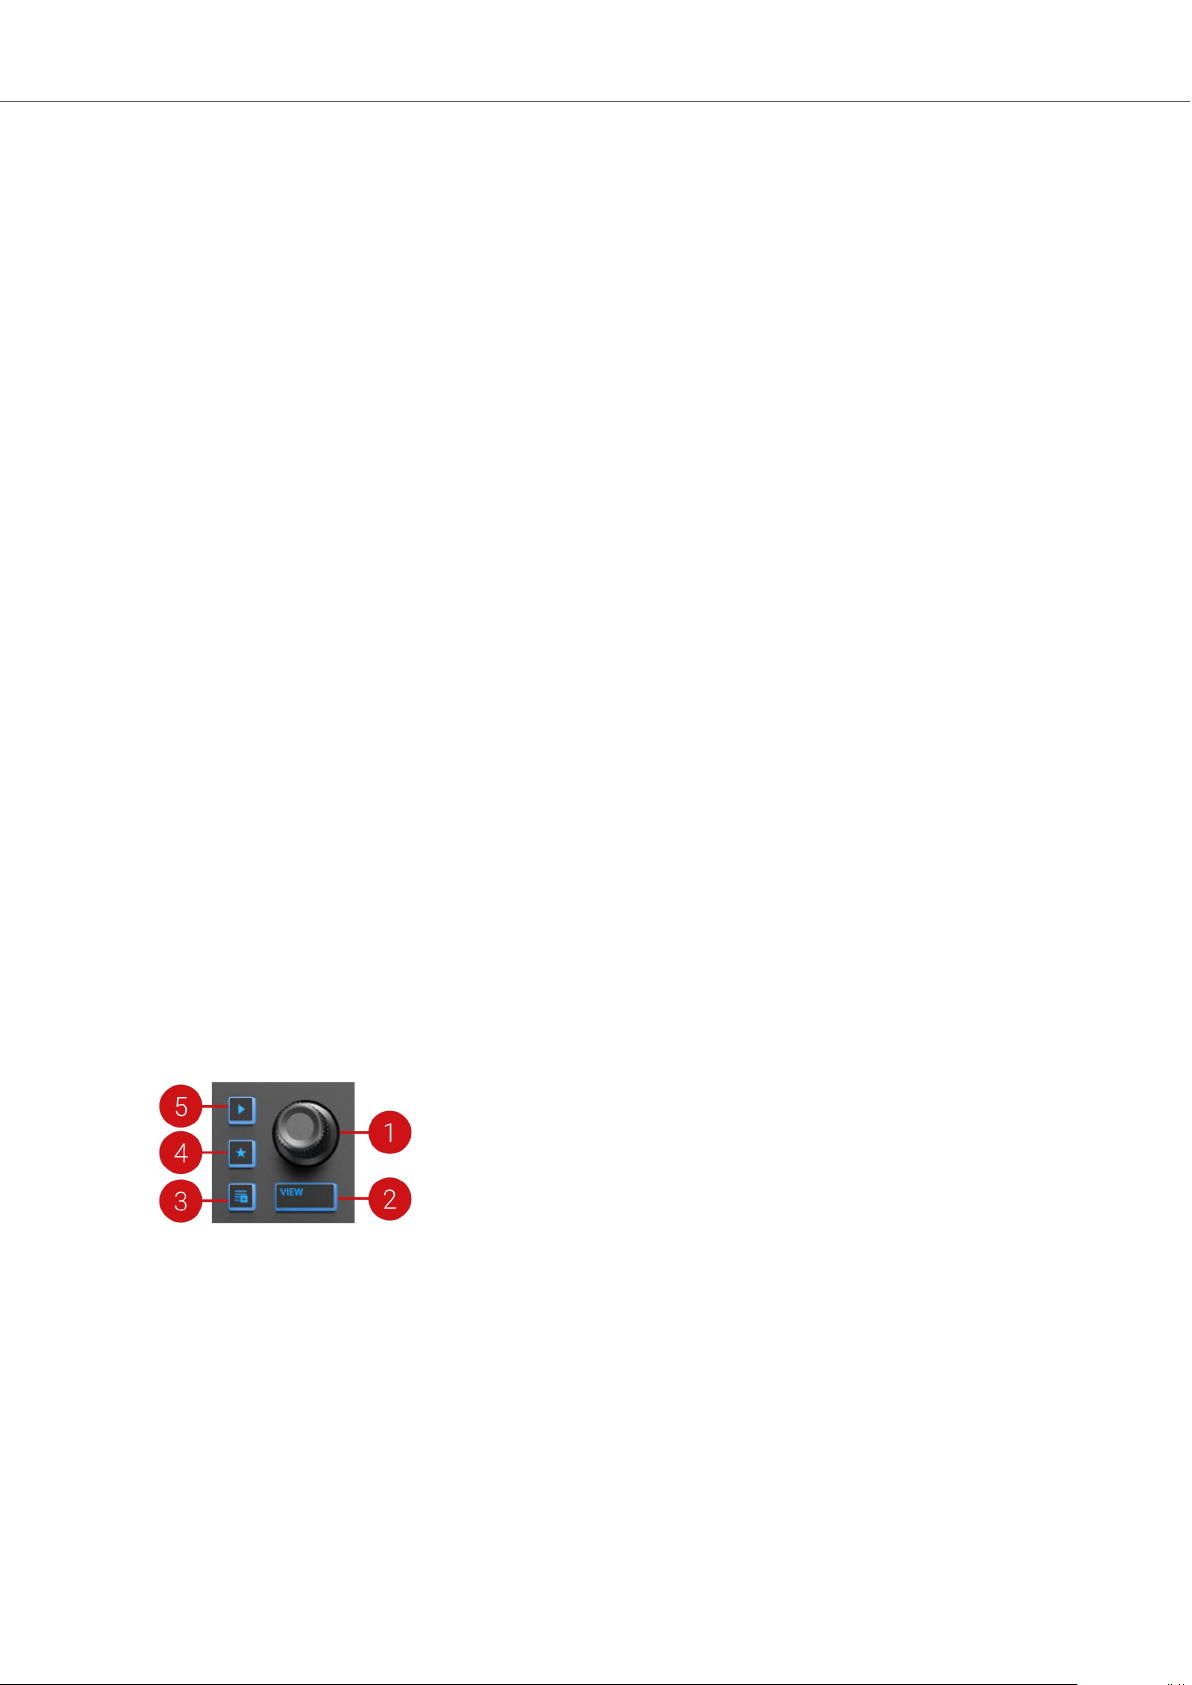
4.1.1. Browse Controls
The Browse controls let you browse the Track Collection to find and load tracks as well as preview
tracks and prepare playlists.
(1) Browse encoder: You select tracks in the Track List by turning the Browse encoder and you
can load the selected track into the Deck by pressing the Browse encoder. You can also use the
Browse encoder to seek within the track that is playing in the Preview Player.
(2) VIEW button: Maximizes or minimizes the Browser view in the TRAKTOR software.
(3) Preparation List button: Assigns a track to the Preparation List.
(4) Star button: When this button is held the Browse encoder then selects favorites.
(5) Preview Player: Loads a track into the Preview Player in TRAKTOR's Browser and plays it
back.
9
Page 13

TRAKTOR KONTROL S3 Overview
4.1.2. Pad Section
The Pads can be used to store and trigger Cue Points and Loops, as well as to trigger Samples.
The individual function depends on the selected Pad mode as well as on the selected Deck Type.
(1) HOTCUES button: Enables HOTCUES mode. In this mode, you can store and trigger Cue
Points and Loops within tracks using the Pads. On Decks A and B the HOTCUES button lights up
blue whereas on Decks C and D the HOTCUES button lights up orange. The HOTCUES mode is
the default mode for Track Decks.
(2) SAMPLES button: Enables SAMPLES mode. The SAMPLES mode can only be enabled when
the underlying Deck is configured as Remix Deck. Otherwise the SAMPLES button remains unlit.
(3) Pads: Depending on the current Pad mode, the eight Pads have individual functions:
▪ When in HOTCUES mode the Pads store and trigger Cue Points and Loops for Track Decks
and STEM Decks.
▪ When in SAMPLES mode the Pads control the first four SAMPLE Slots of Remix Decks.
4.2. Mixer
Sitting in the middle of the TRAKTOR KONTROL S3 controller, the Mixer receives the audio signals coming from Decks. There is one channel for each Deck. The Mixer’s purpose is to adjust the
relative level of each channel to generate the mix that is sent to your audience. The Mixer also
provides you with a crossfader, which allows you to make seamless transitions between various
channels.
10
Page 14

TRAKTOR KONTROL S3 Overview
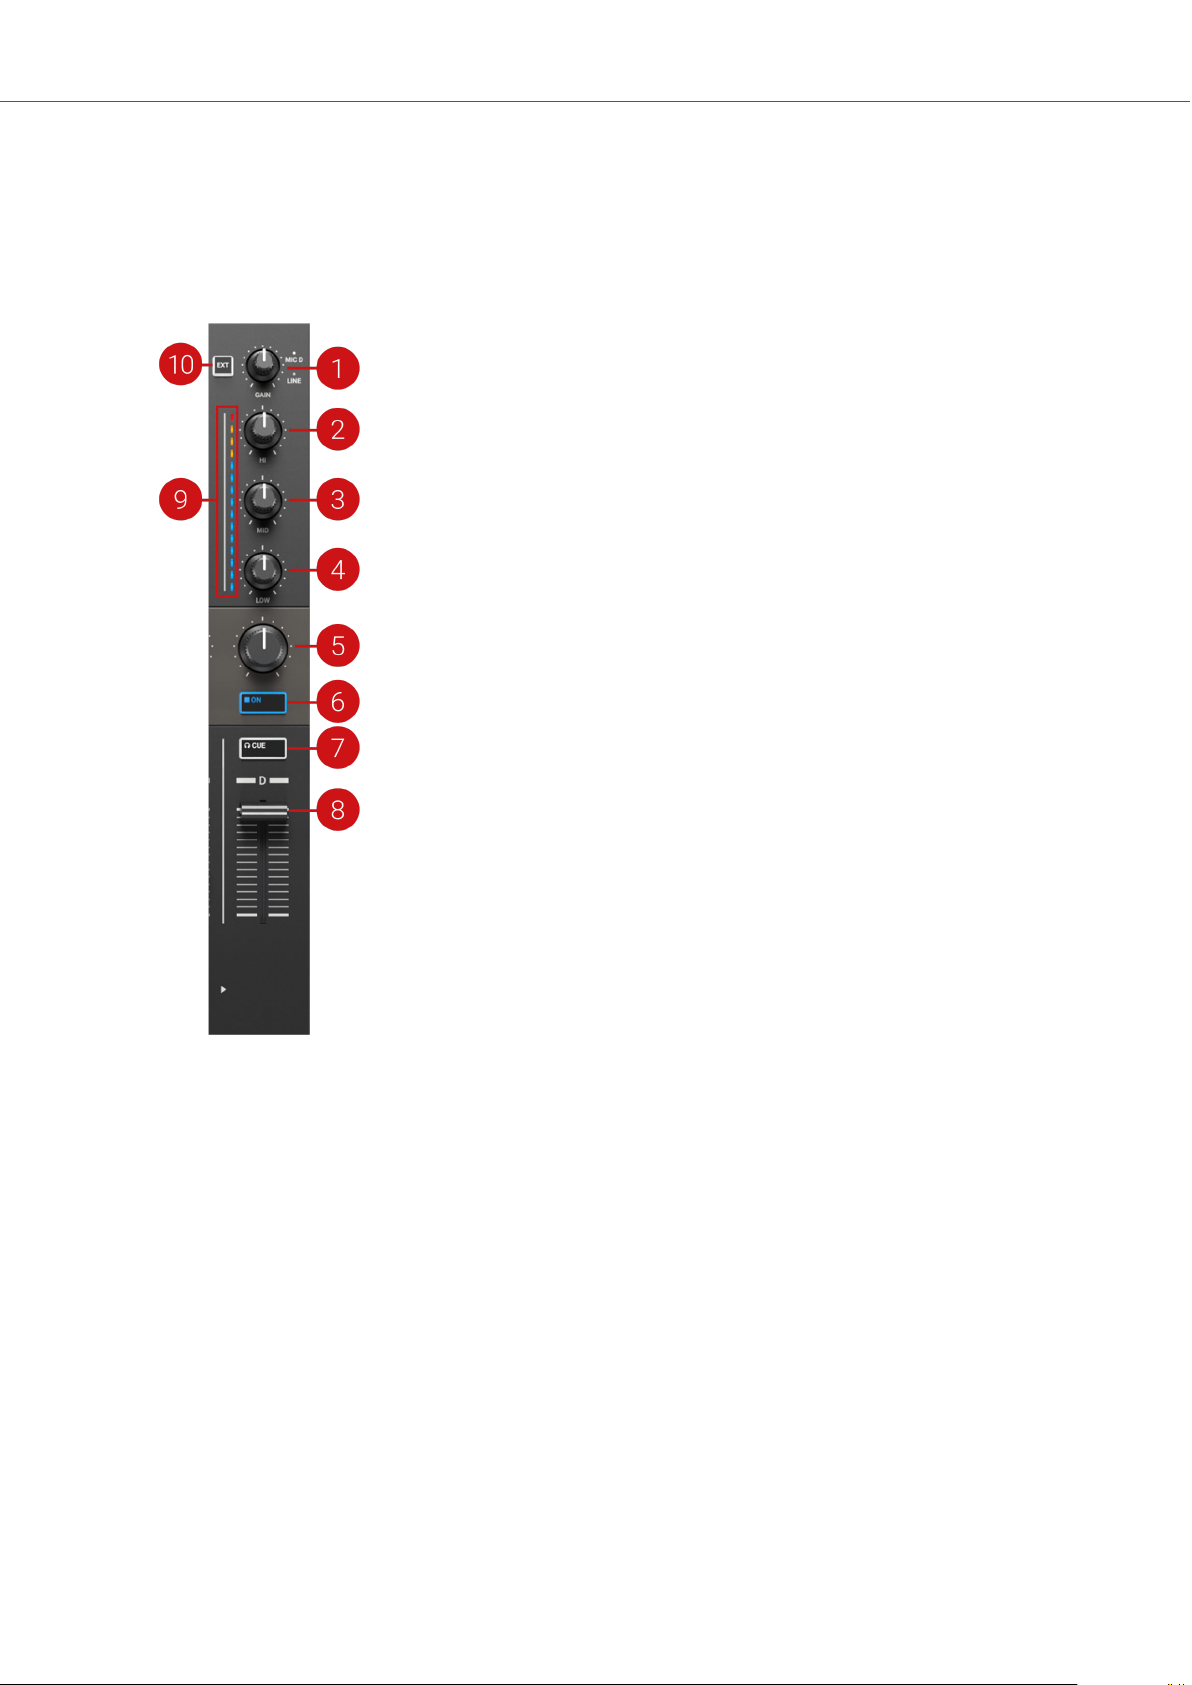
(1) Mixer Channel A, B, C, D: The Mixer channels receive the individual audio signals from the
Decks. Each Mixer channel contains controls to adjust the audio signal's frequency content and to
adjust the outgoing volume before the audio signal is sent to the MASTER output.
(2) MASTER knob: Adjusts the MASTER signal level.
(3) Master Level Meter: Provides visual feedback on the current Master Output volume level. The
blue LEDs indicate if the signal is below the Headroom area. The red LED indicates if the signal is
clipping. The yellow LEDs indicate if the audio signal is currently within the Headroom area before
the audio signal starts clipping.
(4) BOOTH knob: Adjusts the volume of the Booth output signal for the DJ monitors.
(5) MIXER FX SELECT buttons: Select the MIXER FX to be controlled by the individual MIXER
FX controls in the Mixer channels.
(6) MIX knob: Adjusts the signal mix between the MASTER signal and the CUE channel signal in
the headphones.
(7) VOL knob: Adjusts the level for the CUE channel.
11
Page 15

TRAKTOR KONTROL S3 Overview
(8) Crossfader: Controls the mix between the Mixer channels’ signals that are assigned to the left
crossfader side and the right crossfader side. At each crossfader’s end, the opposite signals are
totally silent. Moving the crossfader gradually fades in and fades out the relevant audio signal in
the master output. At the center position, both audio signals are fully audible.
12
Page 16
TRAKTOR KONTROL S3 Overview
4.2.1. Mixer Channel
The Mixer channels receive the individual audio signals from the Decks. Each Mixer channel contains controls to adjust the incoming and outgoing levels, and the audio signal's frequency content.
The Mixer channels provide you with the following control elements:
(1) GAIN knob: Adjusts the input level for the incoming signal of the corresponding Deck, before it
passes the channel fader.
(2) HI knob: Emphasizes, attenuates, or removes the high frequency band of the audio signal.
(3) MID knob: Emphasizes or attenuates the middle frequency band of the audio signal.
(4) LOW knob: Emphasizes, or attenuates, or removes the low frequency band of the audio signal.
(5) MIXER FX Amount knob: The MIXER FX Amount knob controls the amount of the MIXER FX
to be applied to the audio signal. In center position the MIXER FX is disabled for the individual
Mixer channel.
(6) MIXER FX ON button: Enables or disables the MIXER FX for the individual Mixer channel.
(7) CUE button: Routes the audio signal of the Mixer channel into the CUE channel.
(8) Channel fader: Adjusts the Mixer channel’s level before the audio signal is sent to the crossfader and MASTER volume knob.
13
Page 17

TRAKTOR KONTROL S3 Overview
(9) Channel Level Meter: The Channel Level Meter gives you visual feedback on the current
channel volume. The blue LEDs indicate if the audio signal is below Headroom area. The red LED
indicates if the audio signal is clipping. The yellow LEDs indicate if the audio signal is currently in
the Headroom area before the audio signal starts to clip.
(10) EXT button: Switches the Mixer channel to insert the audio signal coming from the external
audio source.
14
Page 18

Tutorials
5. TUTORIALS
The tutorials in this section introduces you the several functions and features of the S3. The following list provides you with an overview of the tutorials including the link to it:
▪ Browsing and Loading Tracks: By having your music imported in TRAKTOR, you can use
the Browse controls on the S3 to find tracks for your mix. When loading a track into a Deck,
TRAKTOR starts to analyze the track, calculating its exact tempo and key information. From
this analysis, TRAKTOR creates the Beatgrid and the Waveform. This information is then stored for the track in the Track Collection. For more information, refer to Browsing and Loading
Tracks.
▪ Controlling Track Playback: The S3 lets you control the playback of your tracks using trans-
port controls and the Jog Wheels. For more information, refer to Controlling Track Playback.
▪ Adjusting Levels: The Mixer lets you adjust volumes of your tracks and tweak the frequency
bands of the audio signals using the equalizer. For more information, refer to Adjusting Volume
Levels, and Using the Equalizer to Tweak Your Sound.
▪ Adjusting Tempo: You can use the TEMPO faders to adjust the tempo on each Deck manual-
ly. The TEMPO faders can be operated in two modes. For more information, refer to Adjusting
Track Tempo.
▪ Locking Key of Tracks: When adjusting the track tempo, then the pitch changes accordingly.
Using Key Lock you can adjust the track tempo without changing the pitch. For more information, refer to Locking the Key of Tracks.
▪ Working with Mixer FX: You can modulate the sound of your tracks using Mixer FX. For more
information, refer to Playing with Mixer Effects.
▪ Working with Cue Points: By triggering stored Hotcues from the Pads, you are able to jump
to specific sections within the track. For more information, refer to Playing with Cue Points.
▪ Working with Loops: To extend the playback of tracks or to loop a specific part in a track, you
can make use of the looping functions on your S3. For more information, refer to Playing with
Loops.
▪ Using Flux and Reverse mode: Flux mode and Reverse mode allow you to create a parallel
playhead that you can use to perform with Hotcues and Loops. The parallel playhead ensures
you don't lose the original track playhead position in the track. For more information, refer to
Using Flux and Reverse Modes.
▪ Previewing Tracks using the CUE Channel: The CUE channel and its controls on the Mixer
enable you to preview your tracks and your sound adjustments before you transition to the next
track. For more information, refer Previewing Tracks using the Cue Channel.
▪ Working with the Preparation List: TRAKTOR's Browser allows you to prepare for your next
mix. The S3 has a dedicated control so you can easily add tracks to the Preparation List. For
more information, refer to Working with the Preparation List.
▪ Correcting Beatgrids of Tracks: If the SYNC function is enabled but the playing tracks are
not synced, it is likely that the Beatgrids were miscalculated. The S3 allows you correct Beatgrids manually. For more information, refer to Correcting Beatgrids of Tracks.
▪ Mixing Tracks using the Jog Wheels: This tutorial introduces you to the workflow of mixing
two tracks manually, using the Jog wheels and the Headphone CUE channel. For more information, refer to Mixing Tracks Using Jog Wheels.
15
Page 19

Tutorials
5.1. Mixing Your First Tracks using Sync
In this section you will learn to mix your first two tracks, using Deck A and Deck B, and the SYNC
function. For this method, you will not need to use Jog Wheels or your headphones. If you want to
try a more advanced method of mixing, using the Jog Wheels and headphones, refer to section
Mixing Tracks Using Jog Wheels.
At first, you prepare the Mixer by adjusting the control elements for mixing from Deck A to B. Then
you will load the first track into Deck A, and begin to perform step by step.
5.1.1. Prerequisites
1. Set the crossfader to the left-most position.
2. Set Channel fader A and Channel fader B to maximum position.
3. Set the MASTER knob to center position at 0.0 dB.
4. Set the volume of your audio system or active speakers to minimum level.
5.1.2. Loading the First Track into Deck A
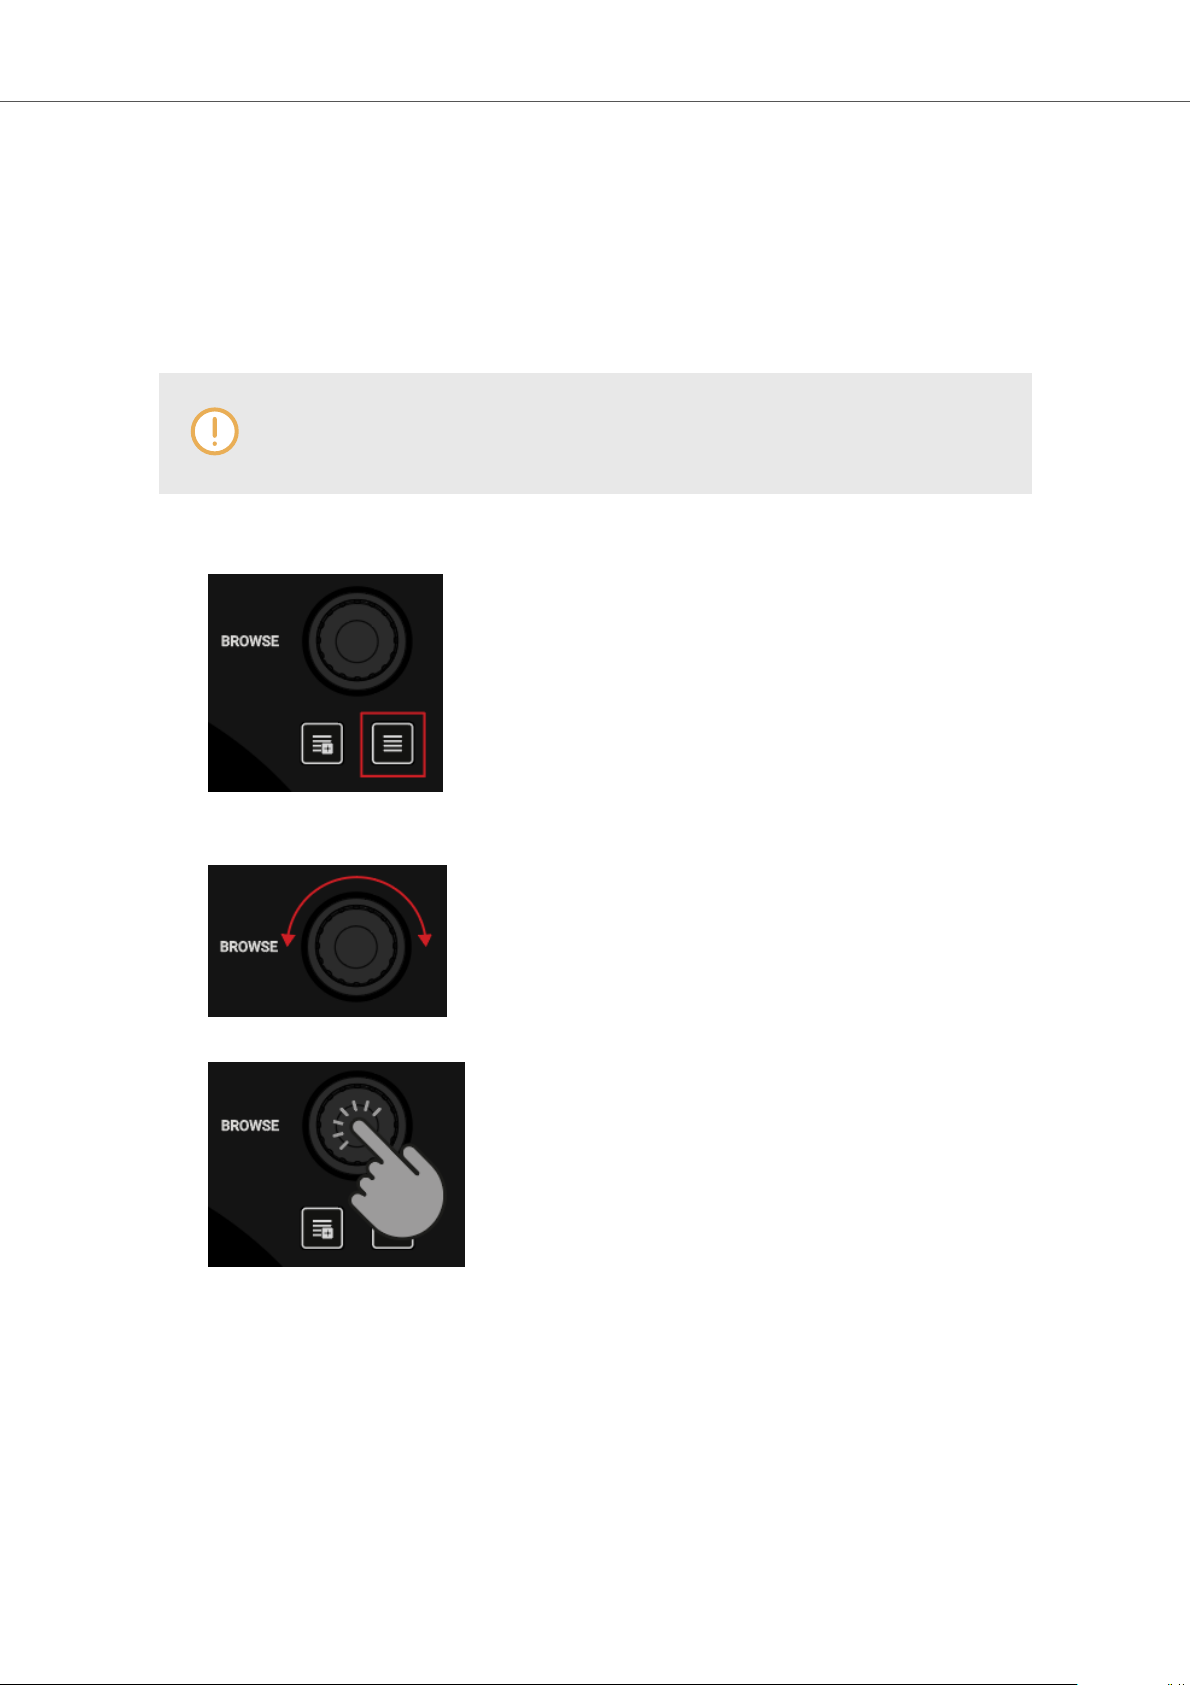
1. Press the Browser View button to maximize the Browser view in the software.
2. Turn the BROWSE encoder to select one of your tracks, or a demo track, for example Berlin
Hauptbahnhof by Native Instruments.
16
Page 20

3. Press the BROWSE encoder to load the track into the Deck.
TRAKTOR now analyzes the track to determine its tempo, and to create the Beatgrid and the
Waveform.
4. Press the Browser View button again to minimize the Browser View.
Tutorials
5.1.3. Starting Playback of Deck A
To start playback on Deck A:
1. Press the Play/Pause button on Deck A.
The Waveform starts moving and the Channel Level Meter LEDs in the left Mixer channel A
illuminate.
17
Page 21
Tutorials
2. Slowly increase the volume of your audio system or active speakers to a moderate listening
level.
You now hear the audio of the track in your speakers.
5.1.4. Loading the Second Track into Deck B
The next track you want to mix must have a similar tempo like the playing track.
1. Press the Browser View button to maximize the Browser view in the software.
2. Turn the BROWSE encoder to select one of your tracks, or a demo track, for example Lisa
by Native Instruments.
3. Press the BROWSE encoder to load the track into the Deck.
TRAKTOR now analyzes the Track to determine its tempo, and to create the Beatgrid and
the Waveform.
5.1.5. Syncing the Track Tempos
In order to sync the tempos of both tracks:
• Press the SYNC button on Deck B.
18
Page 22

The tempo of the track in Deck B is now synced to the running track, indicated by the equal
tempo value in the software's Deck Header. The SYNC button lights up on Deck B.
5.1.6. Starting Playback of the Second Track
When the track in Deck A is almost over you can start the playback of the next track:
• Press the Play/Pause button on Deck B to start playback.
Tutorials
The waveform starts moving and the Channel Volume Meter LEDs in Mixer channel B illuminate. The tracks in Deck A and Deck B play in sync.
5.1.7. Mixing in the Audio Signal
You can now mix the audio signal of Mixer channel B into the Master signal:
1. Move the crossfader slowly towards center position and hold for a moment.
The audio signal of the track in Mixer channel B fades into the Master signal.
2. While the track in Deck A reaches its end, slowly move the crossfader towards the right-most
position.
19
Page 23

Tutorials
The audio signal of Mixer channel A slowly fades out of the Master signal. Only Mixer channel B is now audible.
When the playback of Deck A ends, Deck B automatically becomes the Tempo Master and is
ready to transition to the next track.
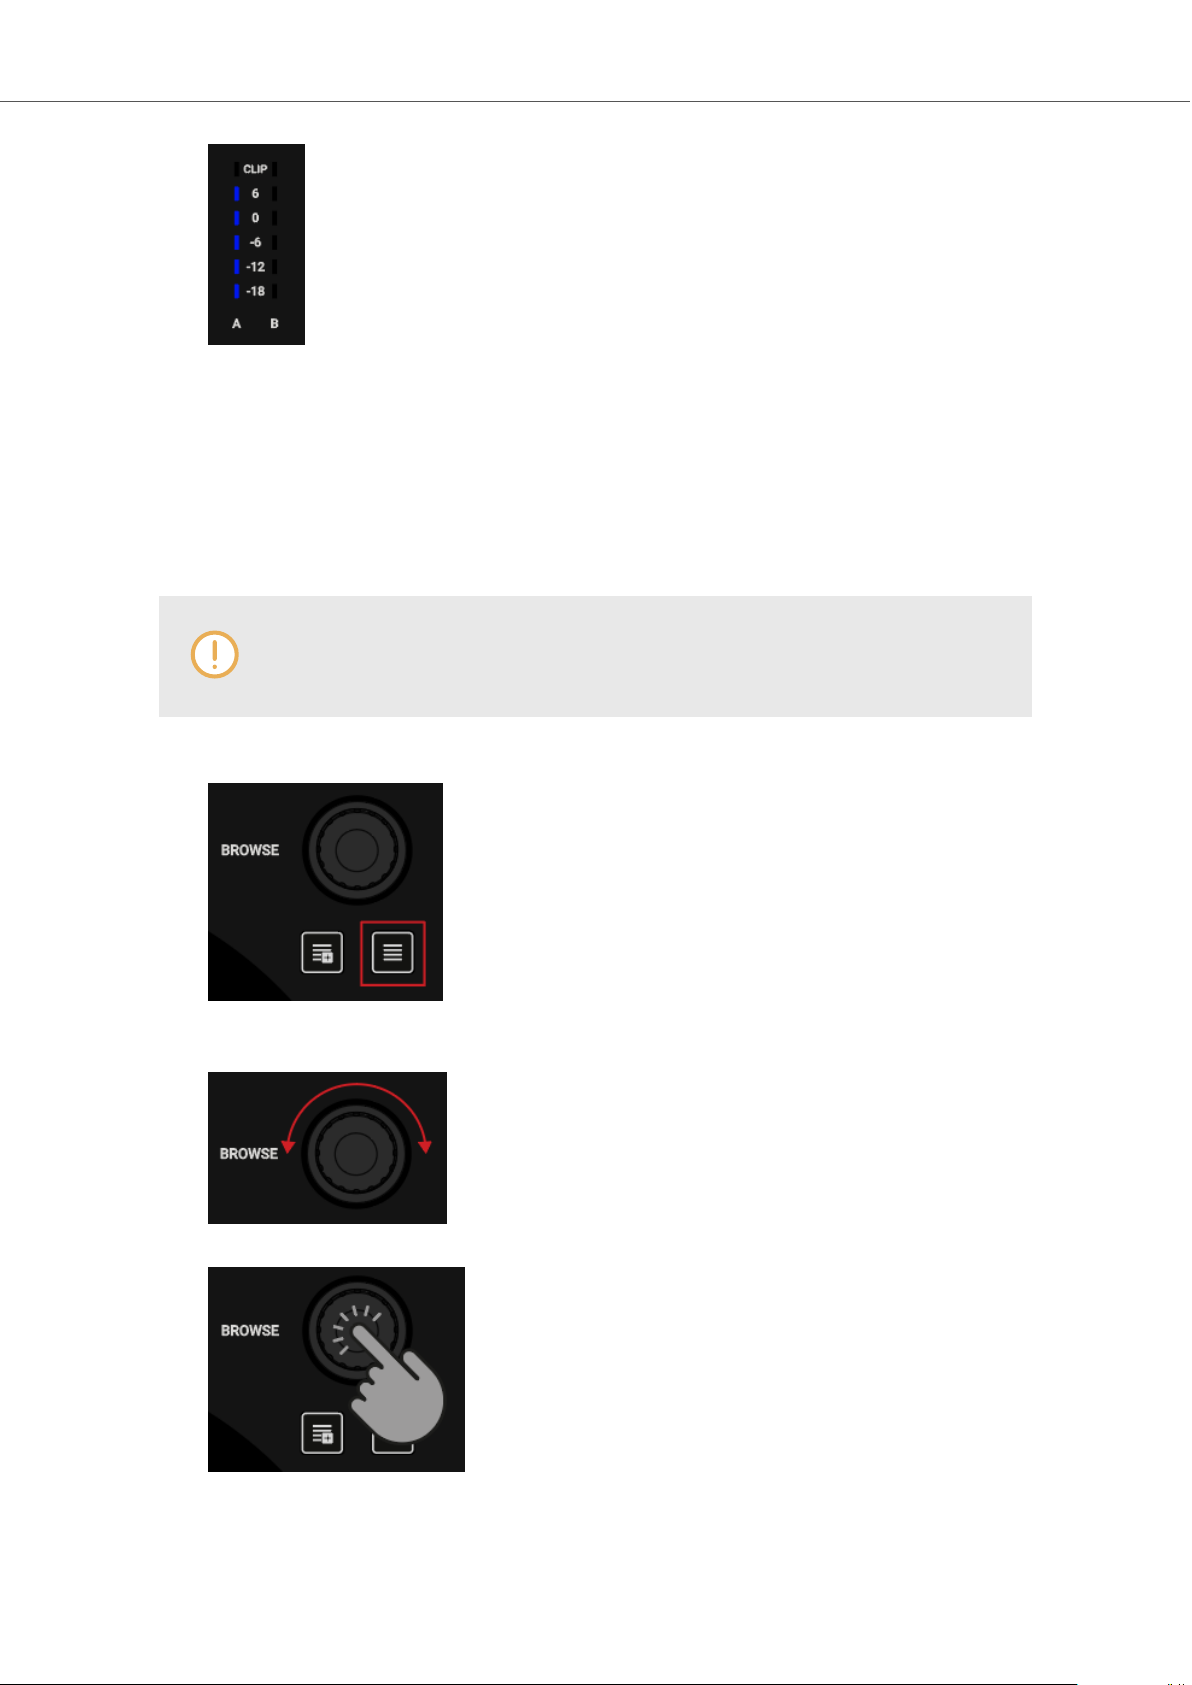
5.2. Browsing and Loading Tracks
The S2 lets you conveniently browse for your music in TRAKTOR. Using the BROWSE controls
on the Decks, you can quickly maximize the Browser in TRAKTOR, navigate in the Track List, and
select Favorite folders and Playlists for loading your desired tracks.
Selecting a Track in the Track List
To select a track in the TRAKTOR Browser's Track List:
• Turn the BROWSE encoder to scroll through the Track List and to select a track.
Loading the Track into a Deck
To load the selected track on the selected Deck:
• Push the BROWSE encoder of that Deck.
The track is loaded into the Deck.
If the track is loaded into the Deck for the first time, TRAKTOR starts to analyze the track to determine its tempo, and then calculate the Beatgrid and Waveform. The moment of the analysis can
be switched to another context in the Preferences.
Depending on the selected track or STEM File, the Deck Type switches accordingly when loading
it.
Maximizing the Browser in TRAKTOR
To get a better overview of the Track List you can maximize the Browser in TRAKTOR:
1. Press the Browser View button.
The Browser maximizes in the TRAKTOR.
2. Press the Browser View button again to minimize the Browser in TRAKTOR.
Selecting a Favorite Folder
At the top of TRAKTOR's Browser you can find the favorite folders of the Browser, for example All
Tracks or Preparation. You can use the BROWSE controls on your S3 to select a favorite folder:
• Press and hold SHIFT + turn the BROWSE encoder to select another favorite folder.
The Track List content changes accordingly.
20
Page 24

Tutorials
Rather than selecting a Favorite folder using SHIFT, you can also scroll along the Browser Tree to
select the subfolders. To implement this, you need to switch the Browse behavior for the SHIFT
button on the TRAKTOR S3 page in the Preferences.
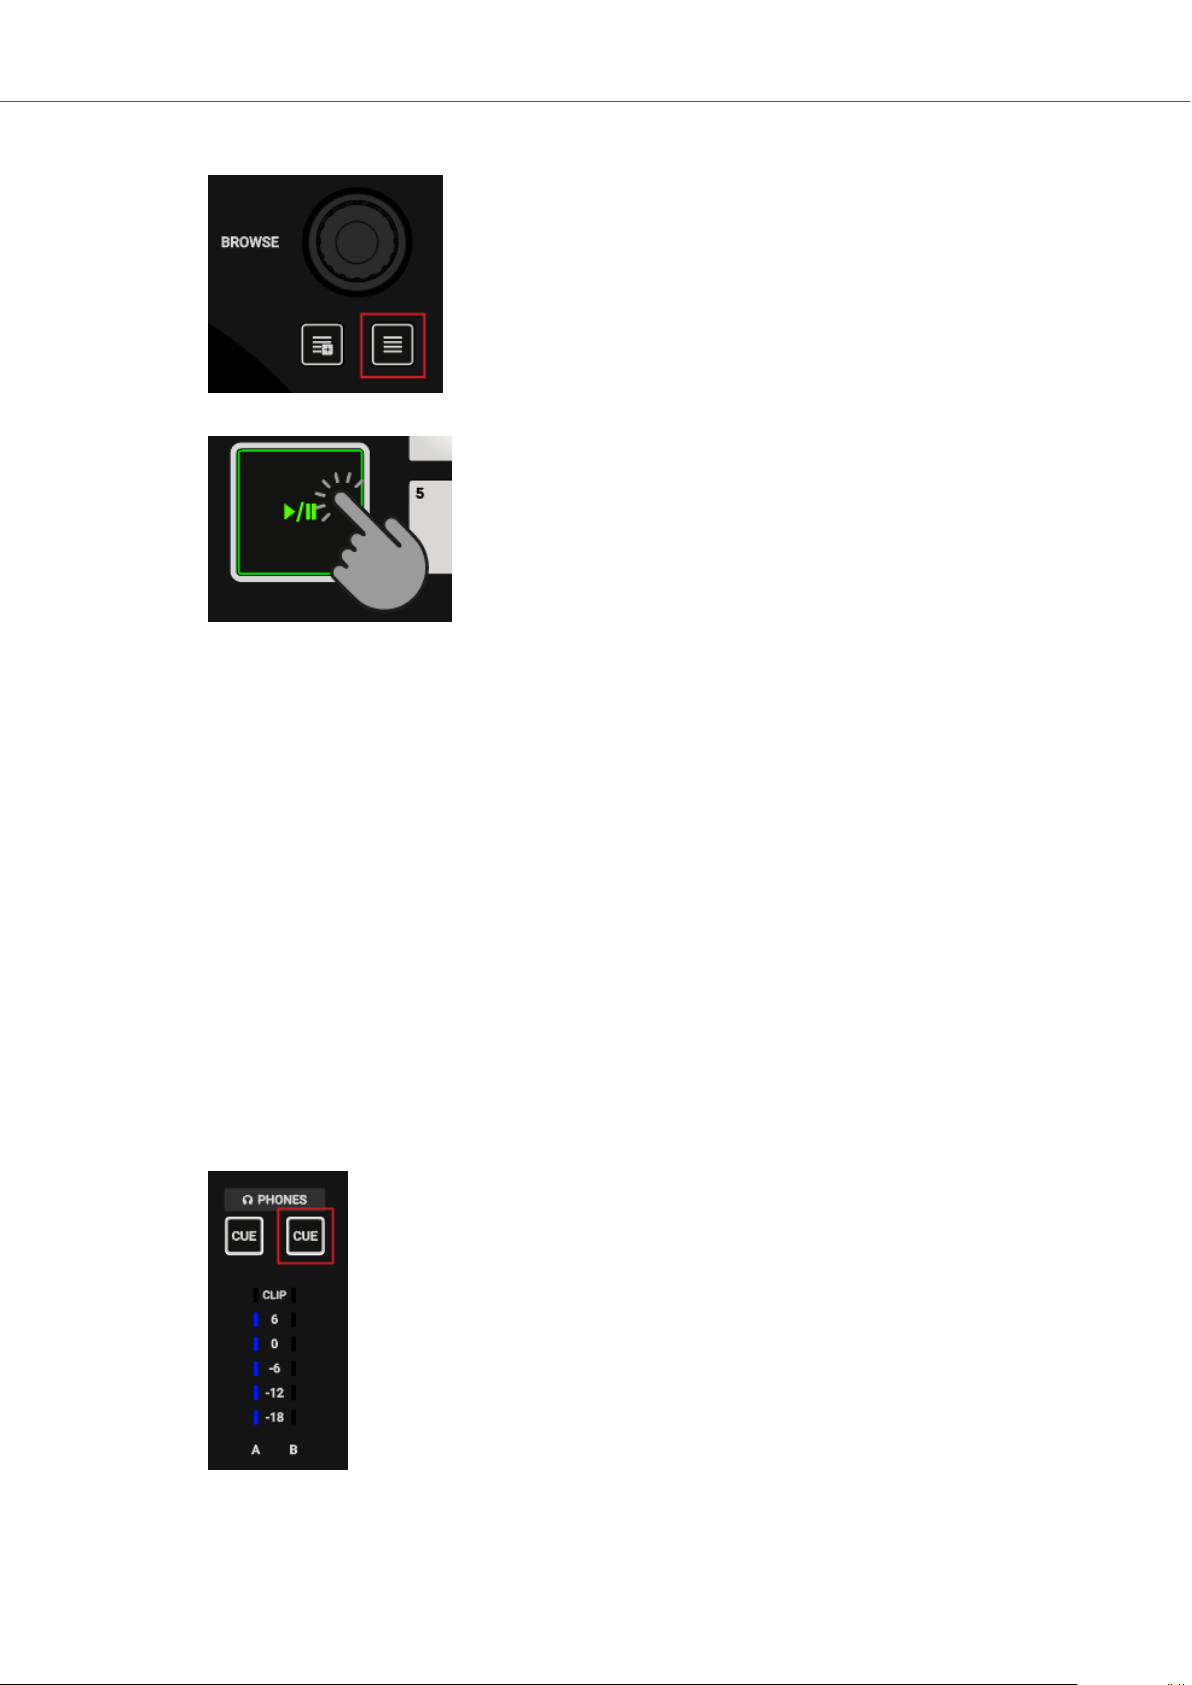
5.3. Controlling Track Playback
The Transport Controls and the Jog Wheels on the S3 let you control the playback behavior of
tracks. This section describes several ways to control track playback and how to preview tracks in
the CUE channel when creating transitions.
Starting or Pausing Playback
To start the playback of the loaded track:
• Press the Play/Pause button.
To pause the playback:
• Press the Play/Pause button again.
Holding Track Playback
You can use the Jog Wheel to hold the playback of the track, just like a record on a turntable:
1. Touch the top plate of the Jog Wheel and keep hold of it.
The playback of the track held in place.
2. Release the top plate to continue playback.
Scratching the Track
You can use the Jog Wheel to perform scratch routines on the track:
1. Hold the top plate of the Jog Wheel and then quickly turn it clockwise and counterclockwise
in slight movements.
You will hear the typical vinyl scratch sound.
2. Release the top plate to continue playback.
Seeking within the Track
You can use the Jog Wheel to seek within the track:
• Touch the top plate of the Jog Wheel and turn it clockwise or counterclockwise.
While turning the Jog Wheel the track now quickly winds forward or backward, respectively.
To seek in bigger steps through the track:
• Press and hold SHIFT and turn the Jog Wheel clockwise or counterclockwise.
Cueing the Track using the CUE Button
▪ When pressing and holding the CUE button, playback continues from the position of the Float-
ing Cue Point.
21
Page 25

Tutorials
▪ When releasing the CUE button, the playback position jumps back to the Cue Point and play-
back stops immediately.
▪ When pressing and holding the CUE button and later pressing the Play/Pause button, the play-
back continues as normal.
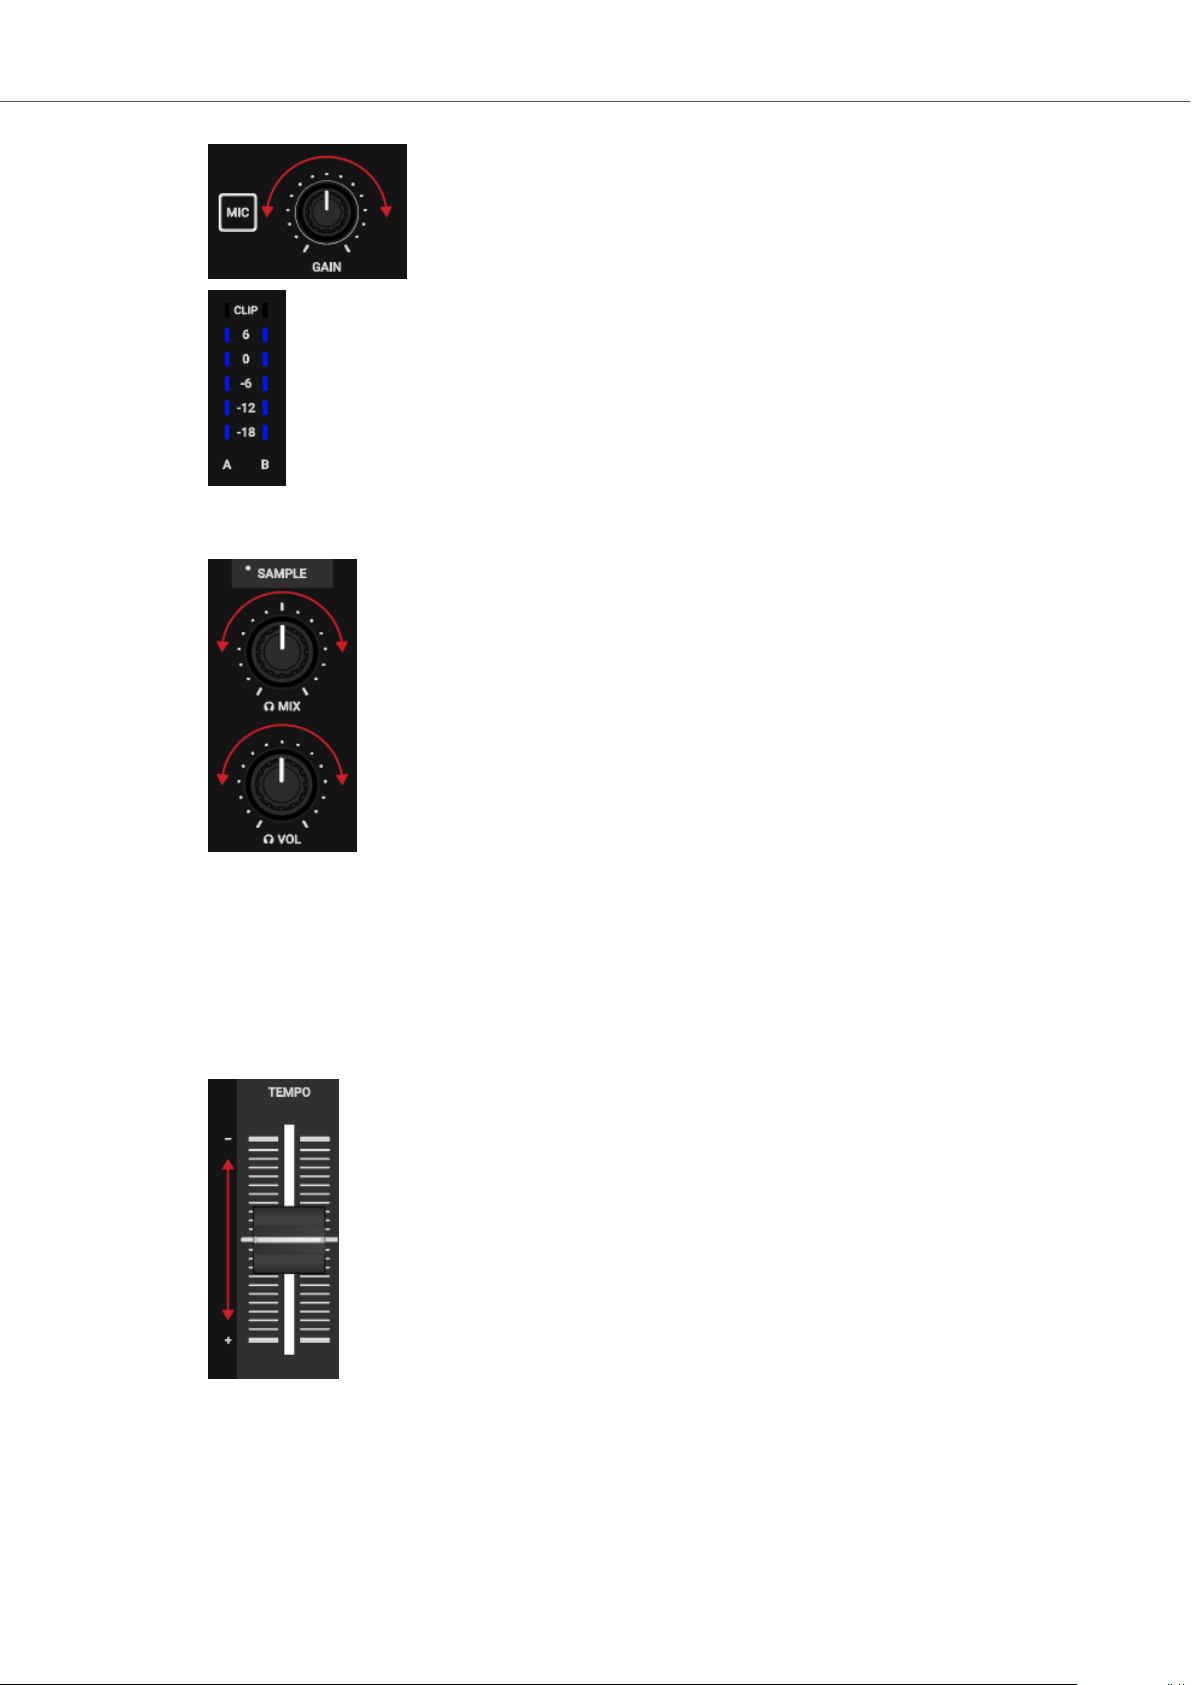
5.4. Previewing Tracks using the Cue Channel
With the CUE channel on your S3 and your headphones connected to your S3 , you can preview
tracks to prepare for the next transition. When you press the CUE buttons on Mixer channel A and
B you send the audio signals from the Mixer channel A and B into the CUE channel. The CUE
channel's audio signal is send to the headphones output on your S2.
To preview the track in your headphones:
1. Put on your headphones.
2. Press the CUE button of the Mixer channel you want to route into the CUE channel.
The Mixer channel's audio signal is now audible in your heaphones
3. Adjust the volume and the cue-master-mix signal by turning the VOL knob and MIX knob, so
that you hear both tracks by the desired amount in your headphones.
5.5. Adjusting Volume Levels
When mixing tracks you need to make sure that the volumes of both tracks are at the same level
for flawless transitions. For this, you can define the volume level for the incoming audio signal into
the Mixer channel (GAIN) on the one side, and you can define the volume for the outgoing signal
to the MASTER output on the other side.
Adjusting the GAIN Levels for Incoming Audio Signals
To adjust the volume level for incoming audio signals, you need to use the GAIN knob:
• Turn the GAIN knob to a position so that the LEDs stay between 0 dB and 6 dB.
Adjusting Channel Volume Levels
To adjust the volume of the mixer channels:
• Move the channel faders up or down.
Adjusting the MASTER Output Level
To adjust the MASTER volume level:
• Turn the MASTER knob clockwise or counterclockwise.
To avoid damaging your ears, always set the connected speakers or power amplifier
to a comfortable listening level.
22
Page 26

Tutorials
5.6. Using the Equalizer to Tweak Your Sound
You can use the equalizer for adjusting the sound of your tracks while mixing. You can, for example, take out the bass frequency band of one track in order to let the bass of the other track dominate the mix. Or you can slightly adjust the middle frequencies to attenuate, for example, vocals.
The EQ knobs adjust the high, middle, or low frequencies in the audio signal.
Taking out Frequency Bands of the Audio Signal
• Turn the EQ knobs counterclockwise to take out the individual frequency band.
Turning the EQ knobs entirely counterclockwise would remove the individual frequency band
from the audio signal.
Using EQ to remove frequencies can help to avoid the clipping that can occur when
two tracks play together at full volume.
Attenuating Frequency Bands in the Audio Signal
• Turn the EQ knobs clockwise to attenuate the individual frequency band.
Using the equalizer while cueing a track can support manual tempo alignment of complex tracks.
For example, you can remove the high and middle frequency bands from the next track to focus on
the bassline.
5.7. Adjusting Track Tempo
Besides using SYNC to adjust the track tempo, you can also adjust the track tempo for the Decks
individually by using the TEMPO fader on each Deck. The TEMPO faders be can operated in two
different modes: in Relative mode and Absolute mode. By default, the TEMPO faders operate in
Relative mode.
Relative mode
In this mode, The TEMPO fader position on your S2 Deck has not necessarily have to match the
Tempo fader position of the software Deck. When loading tracks in Relative mode, then the Tempo
fader in the software Deck always resets to center position and the track will play at its original
tempo. When moving the TEMPO fader on the S3 Deck, then the Tempo fader on the software
Deck moves accordingly.
Absolute Mode
You can also operate the Tempo faders in Absolute mode. In this mode, whenever you move the
TEMPO fader on your S3, its position is transmitted 1:1 to the Tempo fader of the software Deck,
no matter what the current position of the Tempo fader in the software is.
In Absolute mode, the software Deck’s tempo always matches the TEMPO fader position on your
S3, unless you have somehow changed the software Deck’s tempo.
23
Page 27

Tutorials
The TEMPO fader mode can be changed on the Kontrol S3 page in the TRAKTOR Preferences.
5.8. Locking the Key of Tracks
When synchronizing tracks, you change their tempos and, consequently, their pitches (or keys).
Slowing down a track will cause its pitch to drop while speeding up the track will cause its pitch to
rise. This is not problematic for small tempo adjustments, but if the tempo change is more drastic,
the resulting pitch shift might sound unnatural, especially for vocals.
To avoid this, you can use the KEYLOCK function on the S3 Deck to lock the track's current key
value. When you then move the TEMPO fader up or down, you change the track tempo but the
track's key remains at the locked value.
To lock the key for a track:
1. Load a track into a Deck.
2. Set the TEMPO fader to center tempo position.
3. Press the KEYLOCK button on the Deck to lock the key for the track.
4. Move the TEMPO fader up or down to change the track tempo.
The track tempo changes but the key value remains at the locked value.
5.9. Playing with Mixer Effects
A Mixer FX is a grouped effect that can be applied to the audio signal in the Mixer channel using
the Mixer FX Amount knob. You can choose one of four preselected Mixer FX using the FX SE-
LECT buttons:
▪ Filter: The FX SELECT 1 button lights up red.
▪ Reverb: The FX SELECT 2 button lights up green.
▪ Dual Delay: The FX SELECT 3 button lights up blue.
▪ Flanger: The FX SELECT 4 button lights up red.
Besides the Filter Effect, each Mixer FX consists of the individual Effect and a Filter Effect. Depending on the direction you turn the FX Amount knob, you either apply the Mixer FX in combination with a low-pass Filter, or with a high-pass Filter.
Selecting a Mixer FX
To select a Mixer FX:
• Press the FX SELECT button corresponding to the Mixer FX you want to add.
The FX SELECT button brightly lights up, indicating the Mixer FX is selected.
Applying the Mixer FX to the Audio Signal
To apply the selected Mixer FX in combination with a low-pass Filter to the audio signal:
• Turn the Mixer FX Amount knob counterclockwise.
To apply the selected Mixer FX in combination with a high-pass Filter to the audio signal:
24
Page 28

Tutorials
• Turn the Mixer FX Amount knob to center position.
5.10. Playing with Cue Points
When mixing tracks a common technique is to mix in the next track from a particular position in
that track instead from its start, for example, at a certain beat. Mixing in tracks from a particular
position in that track is called “cueing”. The S3 enables you to set points for cueing and for directly
jumping to these particular positions: Cue Points. You can store Cue Points as Hotcues using the
Pads on the Deck. This allows you to gain instant access to your Cue Points.
Enabling HOTCUES Mode
In order to work with Cue Points you need to ensure you are in HOTCUES mode:
• Press the HOTCUES button to enable HOTCUES mode for the selected Deck.
Storing Cue Points as Hotcues
To store a Cue Point as Hotcue:
• At the desired position in the track, press a Pad.
The Cue Point is set at the current playback position in the track and stored as Hotcue on the
Pad. This Pad lights up blue.
Triggering Cue Points on a Deck During Playback
To trigger Cue Points on a Deck during playback:
• Press a blue lit Pad.
The playback position jumps the stored Cue Point and playback continues.
Triggering Cue Points on a Stopped Deck
On a stopped Deck, triggering Cue Points result in a different playback behavior:
▪ When pressing and holding a blue lit Pad, the playback continues from the position of the stor-
ed Cue point as long as the Pad is kept depressed.
▪ When releasing the Pad, the playback position jumps back to the Cue Point and playback
stops immediately.
▪ When pressing and holding a blue lit Pad and later pressing the Play/Pause button, the play-
back continues as normal.
Removing Cue Points
To remove a Cue Point from the track and so the Hotcue:
• Press SHIFT and press a blue lit Pad.
The Hotcue is removed and the Cue Point is deleted from the track. The pad is now unlit.
25
Page 29

Tutorials
5.11. Playing with Loops
A Loop is a snippet of audio that repeats (loops). Loops are used as tools for remixing parts of
tracks and can be used to extend track transitions. In this section you learn to play with Loops on
the S3 . Besides enabling Loops, you can store Loops as Hotcues in the track using the Deck's
Pads. This allows you to gain instant access to your most important Loops.
Enabling a Loop
To enable a Loop:
1. Press the LOOP encoder.
The Loop is enabled. The playback is looping by the selected Loop size. The Loop appears
as the green area in the Waveform. When the playhead position reaches the Loop out point,
the playback position seamlessly jumps back to to Loop In point. Looping continues as long
as as the Loop is enabled.
2. To disable the Loop, press the LOOP encoder again.
The playback continues as normal.
Changing the Loop Size
You can change the size of the enabled or disabled Loop:
• Turn the LOOP encoder clockwise or counterclockwise.
The Loop size for the enabled Loop instantly changes by the value displayed in the Loop
Control bar.
If there is no Loop enabled, turning the LOOP encoder only selects a Loop size.
Storing a Loop as Hotcue
To store a Loop as a Hotcue:
1. Press the LOOP encoder to enable a Loop.
2. Press an unlit Pad.
The Loop is stored as Hotcue in the track. The Pad lights up green.
Triggering a Stored Loop
To trigger a stored Loop:
• Press a green lit Pad.
The Loop is enabled. The playback position jumps to the stored Loop In point and playback
loops by the selected Loop size.
Moving the Loop within the Track
You can move an enabled or disabled Loop forwards or backwards within the track:
• Turn the MOVE encoder clockwise or counterclockwise.
This instantly moves the Loop within the track by the selected Loop size.
26
Page 30

Tutorials
Removing a stored Loop
To remove a stored Loop from the Hotcue and from the track:
• Press SHIFT and press a green lit Pad.
The Loop is removed from the Hotcue and from the track. The Pad is now unlit.
5.12. Mixing Tracks Using Jog Wheels
In this section, you learn how to mix your first two tracks using Deck A and Deck B, the Jog
Wheels and your headphones. At first, you will prepare the Mixer by adjusting the control elements
for mixing from Deck A to B. Then you will load the first track into Deck A, and begin to perform
step by step.
5.12.1. Prerequisites
Before you can start to mix your first tracks, you need to prepare the Mixer on your S3 :
1. Set the crossfader to the left-most position.
2. Set Channel fader A and Channel fader B to maximum position.
3. Set the MASTER knob to center position.
4. Set the volume of your audio system or active speakers to minimum level.
5.12.2. Loading the First Track into Deck A
To load a track into Deck A:
1. Press the Browser View button to maximize the Browser view in the software.
2. Turn the BROWSE encoder to select one of your tracks in the Track List, or a demo track, for
example, Berlin Hauptbahnhof by Native Instruments.
27
Page 31

3. Press the BROWSE encoder to load the track into the Deck.
TRAKTOR now analyzes the Track to determine its tempo and to create the Beatgrid and the
Waveform.
4. Press the Browser View button again to minimize the Browser View.
Tutorials
5.12.3. Starting Playback of Deck A
To start playback of the track on Deck A:
1. Press the Play/Pause button on Deck A.
The Waveform starts moving and the Channel Level Meter LEDs in the left Mixer channel A
illuminate.
2. Adjust the Mixer channel's GAIN level by turning its GAIN knob, so that the LEDs stay between 0 dB and 6 dB.
28
Page 32
Tutorials
3. Slowly increase the volume of your audio system or active speakers to a moderate listening
level.
You now hear the audio of the track in your speakers.
5.12.4. Loading the Second Track into Deck B
To load the second track into Deck B:
The next track you want to mix should have a similar tempo like the track currently
playing. Otherwise
1. Press the Browser View button to maximize the Browse View in the software.
2. Turn the BROWSE encoder to select one of your tracks in the Track List, or a demo track, for
example, Lisa by Native Instruments.
3. Press the BROWSE encoder to load the track into the Deck.
TRAKTOR now analyzes the Track to determine its tempo and to create the Beatgrid and the
Waveform.
29
Page 33
4. Press the Browser View button again to minimize the Browser View.
5. Press the Play/Pause button on Deck B to start playback.
The Waveform starts moving and the Channel Volume Meter LEDs in Mixer channel B illuminate.
Tutorials
5.12.5. Syncing Tracks Manually
The process of manually syncing tracks consists of several steps. At first you need to align the
next track's audio signal level in Mixer channel B so that it matches to the running track's level in
Mixer channel A. Then you adjust the next track's tempo so that it matches to the running track's
tempo.
The you route the audio signal of Mixer channel B to the CUE channel to preview the next track
and adjust the audio signal level. Then you can manually sync next track's tempo to the running
track's tempo using the TEMPO fader and the Jog Wheel on that Deck.
Adjusting the Tracks' Audio Signal Levels
To adjust the the audio signal levels:
1. Put on your headphones.
2. Press the CUE button of Mixer channel B.
3. Adjust the Mixer channel's GAIN level by turning its GAIN knob, so that it matches to Mixer
channel A.
30
Page 34
Tutorials
4. Adjust the volume and the cue-master-mix signal by turning the VOL knob and MIX knob, so
that you hear both tracks equally in your headphones.
Adjusting the Track Tempo
The Deck Headers in the software Decks indicate the current track tempos. To adjust the track
tempo in Deck B to match the track tempo in Deck A, perform the following actions:
1. If the tempo needs to be faster, move the TEMPO fader down.
2. If the tempo needs to be slower, move the TEMPO fader up.
Checking the Tempo Adjustment
You can check if the tempos of both tracks perfectly match before you perform the transition:
31
Page 35
Tutorials
1. Hold the top plate of the Jog Wheel of Deck B.
The playback of the track is held in place.
2. While holding the Jog Wheel, turn it into any direction until you hear a beat in your headphones.
3. Turn the Jog Wheel counterclockwise to place the playhead position directly before that beat
and hold the Jog Wheel.
4. At the moment you hear the downbeat in the track, release the top plate.
Ideally the tracks now play in sync. The Phase meters in the Decks also indicate if the track
in Deck B is still playing faster or slower. If they do not move, the tempos are perfectly
synced. If the tracks are not in sync, you need to fine adjust the tempo as explained in the
next steps.
Fine Adjusting Tempo
If the tracks are not in sync, you need to fine adjust the track tempos:
1. To slightly speed up the track's tempo, touch the outer rim of the Jog Wheel and slightly turn
it clockwise. Simultaneously, move the TEMPO fader slightly down.
32
Page 36

Tutorials
2. To slightly slow down the track's tempo, touch the outer rim of the Jog Wheel and turn it
counterclockwise. Simultaneously, move the TEMPO fader slightly up.
3. Repeat the aforementioned steps until both tracks play perfectly in sync.
5.12.6. Cuing the Next Track using the Jog Wheels
When the tracks are in sync, use your headphones and the Jog Wheel to find the right position in
the next track for fading it in:
1. Touch and hold the Jog Wheel on its top plate.
The playback is held at the current position.
2. While touching the top plate turn the Jog Wheel clockwise to seek in the track.
While turning the Jog Wheel the playhead moves slightly.
3. To seek in bigger steps, press and hold SHIFT and turn the Jog Wheel.
The playhead now moves in bigger steps.
4. When you have found the right position, turn the Jog Wheel counterclockwise to place the
playhead position closely before that beat and hold it.
5. At the moment you hear a downbeat, release the top plate.
33
Page 37

Tutorials
Ideally the tracks now play in sync. If necessary nudge or bend the tempo by turning the Jog
Wheel using its rim.
5.12.7. Mixing in the Next Track
You can now mix in the next track by using the crossfader:
1. Move the crossfader slowly towards center position:
The audio signal of the track in Mixer channel B is fading into the MASTER signal.
2. While the track in Deck A reaches its end, slowly move the crossfader to the right-most position.
The audio signal of Mixer channel A slowly fades out of the Master signal. Only Mixer channel B is now audible.
5.13. Using Flux and Reverse Modes
Flux mode lets you jump to Cue Points and Loops without loosing the phrasing of your tracks. It is
a timeline-based transport technique that enables you to interact with TRAKTOR's transport controls, and then immediately jump back to the position in the timeline where the track would have
been if the transport action had not been used. In other words, it is as if a second, virtual playhead
continues forwards in the track, while TRAKTOR loops or jumps to a Cue Point.
When you release the Loop or Cue Point, by releasing the relevant Pad with the Hotcue, playback
resumes at this playhead position. The longer you loop, the further ahead the playhead position
will move and therefore the further ahead playback will jump to when you release Pad. The virtual
Flux mode timeline is represented by a green playhead in the Waveform view.
An expansion to the Flux mode is the Reverse mode. When you enable Reverse mode while in
Flux mode, you can let the track playback reversely from the current playhead position. The second, virtual playhead continues forwards in the track.
Working with Flux Mode
To enable Flux mode for the selected Deck:
1. Press the FLX button on the selected Deck.
Flux mode is enabled. The second, virtual playhead continues forwards in the track.
2. Press and hold a Pad with the Hotcue.
The playback continues from the stored Cue Point or Loop.
3. Release the Pad.
34
Page 38

The playback resumes to the original playback position.
Enabling Reverse Mode
To enable Reverse mode:
1. Press and hold the REV mode button on the selected Deck.
The track begins to playback in reverse. The second, virtual playhead continues forwards in
the track.
2. While holding the REV button, press and hold a Pad with a stored Hotcue.
The playback reversely continues from the stored Cue Point or Loop.
3. Release the REV button.
The playback resumes at the playhead position created by Flux mode.
Enabling Reverse mode also enables Flux mode.
Tutorials
5.14. Working with the Preparation List
In TRAKTOR's Browser you can prepare for your next mix by adding tracks to it's Preparation List.
In TRAKTOR you can do this by tagging the selected track in the Track List. The track is then added to the Preparation List. When you select the Preparation List in the Browser, you are then provided with all the tracks contained in the Preparation List. On your S2 you can add the selected
track in the Track List to the Preparation List using the Preparation List buttons on the S2 Decks.
Adding Tracks to the Preparation List
To add tracks to the Preparation List:
1. Turn the BROWSE encoder to select a track in the Track List.
2. Press the Preparation List button on the Deck.
The track is added to the Preparation List. A diamond icon appears in the first column in the
Track List in TRAKTOR indicating that track is added to the Preparation List.
Displaying the Preparation List
To display the Preparation List:
• Press and hold SHIFT and press the BROWSE encoder to directly select the Preparation
List in the Browser.
5.15. Correcting Beatgrids of Tracks
When a track contains a complex rhythm or an uneven timing, it can happen that the Beatgrid calculated by TRAKTOR does not precisely match the beat of the track. It is then not possible to
match the beats of that track when mixing it using the SYNC function. Miscalculated Beatgrids can
be corrected using the GRID mode on the S3.
35
Page 39

Tutorials
Checking Beatgrid
To check the Beatgrid for the selected track:
1. Load the track into a Deck.
2. Press Play/Pause to start playback of the track.
3. Press the CUE button of the Mixer channel corresponding to that Deck.
4. Press and hold the GRID button on that Deck to make the Beatgrid tick audible.
Besides the beat of the track, you now hear a second beat tick (like a metronome tick) representing the Beatgrid. If the beat tick does not match the beat of the track, the Beatgrid is set
incorrectly.
Correcting Beatgrid
To correct the Beatgrid setting, proceed as follows:
1. While holding the GRID button, slightly turn the Jog Wheel clockwise or counterclockwise to
move the Beatgrid forward or backward, respectively.
By turning the Jog Wheel you are able to adjust the Beatgrid, so that the beat tick matches
the beat of the track.
2. Release the GRID button.
The track's Beatgrid is corrected and saved with the track.
36
 Loading...