

Page 1

MANUAL
Page 2

The information in this document is subject to change without notice and does not represent a
commitment on the part of Native Instruments GmbH. The software described by this document is subject to a License Agreement and may not be copied to other media. No part of this
publication may be copied, reproduced or otherwise transmitted or recorded, for any purpose,
without prior written permission by Native Instruments GmbH, hereinafter referred to as Native
Instruments.
“Native Instruments”, “NI” and associated logos are (registered) trademarks of Native Instruments GmbH.
Ableton is a trademark of Ableton AG.
VST, HALion, Cubase, and Nuendo are registered trademarks of Steinberg Media Technologies
GmbH. ASIO is a trademark and software of Steinberg Media Technologies GmbH.
Mac, macOS, GarageBand, Logic, iTunes and iPod are registered trademarks of Apple Inc.,
registered in the U.S. and other countries.
Windows, Windows Vista and DirectSound are registered trademarks of Microsoft Corporation
in the United States and/or other countries.
All other trademarks are the property of their respective owners and use of them does not imply
any affiliation with or endorsement by them.
Disclaimer
Document authored by: Jan Ola Korte, Christian Schulz, Gustav Sto. Tomas, David Gover, and
Nicolas Sidi
Software version: 2.0.5 (10/2018)
Hardware version: KOMPLETE KONTROL S-Series MK2
Special thanks to the Beta Test Team, who were invaluable not just in tracking down bugs, but
in making this a better product.
Page 3

Contact
NATIVE INSTRUMENTS GmbH
Schlesische Str. 29-30
D-10997 Berlin
Germany
www.native-instruments.de
NATIVE INSTRUMENTS K.K.
YO Building 3F
Jingumae 6-7-15, Shibuya-ku,
Tokyo 150-0001
Japan
www.native-instruments.co.jp
NATIVE INSTRUMENTS FRANCE SARL
113 Rue Saint-Maur
75011 Paris
France
www.native-instruments.com
NATIVE INSTRUMENTS North America, Inc.
6725 Sunset Boulevard
5th Floor
Los Angeles, CA 90028
USA
www.native-instruments.com
NATIVE INSTRUMENTS UK Limited
18 Phipp Street
London EC2A 4NU
UK
www.native-instruments.co.uk
SHENZHEN NATIVE INSTRUMENTS COMPANY Limited
5F, Shenzhen Zimao Center
111 Taizi Road, Nanshan District, Shenzhen,
Guangdong
China
www.native-instruments.com
© NATIVE INSTRUMENTS GmbH, 2019. All rights reserved.
Page 4

Table of Contents
Table of Contents
1 Welcome to KOMPLETE KONTROL ...............................................................................
1.1 Document Conventions ............................................................................................................... 12
1.2 Box Contents .............................................................................................................................. 15
1.3 System Requirements ................................................................................................................. 15
1.4 Accessibility ............................................................................................................................... 16
1.4.1 Keyboard Overview ..................................................................................................... 16
1.4.2 Activating Accessibility Features ............................................................................... 19
1.4.3 Training Mode ............................................................................................................ 20
1.4.4 Feature Overview and Keyboard Shortcuts ................................................................. 20
2 The KOMPLETE KONTROL Workflow ............................................................................
3 Setting up KOMPLETE KONTROL ..................................................................................
3.1 Connecting the Keyboard to the Computer .................................................................................. 26
3.2 Setting up the Stand-Alone Application ...................................................................................... 27
3.3 Setting up Host Integration ........................................................................................................ 29
3.4 Connecting Pedals to the Keyboard ............................................................................................ 35
3.5 Connecting External MIDI Equipment to the Keyboard ................................................................ 38
3.3.1 Setting up Apple Logic Pro X and GarageBand .......................................................... 30
3.3.2 Setting up Steinberg Cubase/Nuendo ........................................................................ 30
3.3.3 Setting up Ableton Live (macOS) ............................................................................... 31
3.3.4 Setting up Ableton Live (Windows) ............................................................................ 33
4 Software Overview .....................................................................................................
12
23
25
40
4.1 Header ........................................................................................................................................ 41
4.2 Browser ...................................................................................................................................... 43
4.2.1 Library Pane .............................................................................................................. 44
4.2.2 Product Selector ........................................................................................................ 46
KOMPLETE KONTROL S-Series - Manual - 4
Page 5

Table of Contents
4.3 Perform Panel ............................................................................................................................. 50
4.4 Plug-in Panel ..............................................................................................................................51
4.5 Plug-in Chain Panel ................................................................................................................... 52
4.6 MIDI Assignment Editor .............................................................................................................. 53
4.7 Plug-in Area ............................................................................................................................... 55
4.2.3 Files Pane .................................................................................................................. 48
4.2.4 Browser on the Keyboard ........................................................................................... 49
5 Keyboard Overview ....................................................................................................
5.1 Perform and Edit Section ............................................................................................................ 59
5.2 Transport Section ....................................................................................................................... 61
5.3 Control Section ........................................................................................................................... 62
5.4 Mode Buttons ............................................................................................................................. 63
5.5 4-D Encoder ................................................................................................................................65
5.6 Keybed and Light Guide .............................................................................................................. 66
5.7 Touch Strip ................................................................................................................................. 67
5.8 Transpose and Fixed Velocity Buttons ......................................................................................... 68
6 Global Controls and Preferences ................................................................................
56
69
6.1 Instrument Views ........................................................................................................................ 69
6.2 Switching Instances ................................................................................................................... 73
6.3 Transport and Tempo .................................................................................................................. 75
6.4 Adjusting Master Volume ............................................................................................................ 77
6.1.1 Default View .............................................................................................................. 70
6.1.2 Additional View .......................................................................................................... 70
6.1.3 Edit View ................................................................................................................... 72
6.3.1 Resetting the Clock ................................................................................................... 76
6.3.2 Adjusting Tempo ........................................................................................................ 76
KOMPLETE KONTROL S-Series - Manual - 5
Page 6

6.5 Preferences .................................................................................................................................78
6.6 Keyboard Settings .......................................................................................................................92
6.7 Loading a Plug-in in Default State ............................................................................................. 93
6.5.1 Preferences – Audio Page .......................................................................................... 78
6.5.2 Preferences – MIDI Page ............................................................................................ 81
6.5.3 Preferences – General Page ....................................................................................... 82
6.5.4 Preferences – Library Page ........................................................................................ 84
6.5.5 Preferences – Plug-ins Page ..................................................................................... 89
7 MIDI Communication .................................................................................................
7.1 Host Automation ......................................................................................................................... 96
7.2 Using the Keyboard in MIDI Mode ............................................................................................... 98
7.3 Using the Keyboard as Stand-Alone MIDI Controller ................................................................... 99
7.1.1 Recording Automation ............................................................................................... 96
7.1.2 Automation IDs for the Perform Panel ........................................................................ 97
8 Using the MIDI Assignment Editor ...............................................................................
Table of Contents
95
102
8.1 The Mapping System .................................................................................................................. 102
8.2 Opening the MIDI Assignment Editor .......................................................................................... 103
8.3 Assigning MIDI Messages to Control Elements ........................................................................... 105
8.4 Renaming Control Elements ....................................................................................................... 107
8.5 Creating a New MIDI Template ................................................................................................... 107
8.6 Renaming MIDI Templates .......................................................................................................... 109
8.7 Creating Key Zones ..................................................................................................................... 110
8.7.1 About Key Zones ........................................................................................................ 110
8.7.2 Splitting a Key Zone ................................................................................................... 112
8.7.3 Selecting another MIDI Channel for a Key Zone ......................................................... 114
8.7.4 Recoloring Key Zone ................................................................................................... 115
KOMPLETE KONTROL S-Series - Manual - 6
Page 7

Table of Contents
8.8 MIDI Message Types and Assignments ....................................................................................... 122
8.7.5 Resizing Key Zones .................................................................................................... 116
8.7.6 Disabling a Key Zone ................................................................................................. 117
8.7.7 Deleting a Key Zone ................................................................................................... 119
8.7.8 Transposing Key Zones .............................................................................................. 120
8.8.1 MIDI Message Types – Type Menu .............................................................................. 122
8.8.2 Assignments for Knobs .............................................................................................. 123
8.8.3 Assignments for Buttons ........................................................................................... 125
8.8.4 Assignments for Key Zones ........................................................................................ 126
8.8.5 Assignments for the Touch Strip ................................................................................ 127
8.8.6 Assignments for Pedals (Switch) ............................................................................... 128
8.8.7 Assignments for Pedals (Continuous) ........................................................................ 129
9 Host Integration ........................................................................................................
9.1 Integration with MASCHINE ........................................................................................................ 131
9.2 Integration with Apple Logic Pro X and GarageBand .................................................................. 143
9.3 Integration with Ableton Live ...................................................................................................... 146
9.4 Integration with Steinberg Cubase and Nuendo ......................................................................... 149
9.1.1 Basic Control Functions ............................................................................................. 131
9.1.2 Advanced Integration Control Functions .................................................................... 135
10 Browsing the Library ..................................................................................................
130
152
10.1 Browser Basics ........................................................................................................................... 153
10.2 Opening the Browser .................................................................................................................. 156
10.3 Loading Preset Files ................................................................................................................... 157
10.1.1 Product Types: Instrument and Effect ........................................................................ 153
10.1.2 About the Library and Meta-Information .................................................................... 153
10.1.3 Browsing the Library vs. Browsing Your Hard Disks ................................................... 154
KOMPLETE KONTROL S-Series - Manual - 7
Page 8

10.4 Choosing Between Factory Content and User Content ................................................................ 158
10.5 Filtering Preset Files by Product ................................................................................................. 159
10.6 Filtering Preset Files by Bank ..................................................................................................... 163
10.7 Resetting the Product Selection .................................................................................................. 166
10.8 Types and Modes Tag Filters ....................................................................................................... 167
10.9 Working with Favorites ............................................................................................................... 175
10.10 Performing a Text Search ............................................................................................................ 181
10.11 Displaying Preset File Information .............................................................................................. 181
10.12 Auditioning your Preset Files ...................................................................................................... 182
10.8.1 Filtering Preset Files by Types and Modes .................................................................. 170
10.8.2 Selecting Multiple Tags from the Same Level ............................................................ 174
10.9.1 Adding Preset Files to the Favorites ........................................................................... 175
10.9.2 Displaying Favorites in the Results List ..................................................................... 178
10.9.3 Removing Preset Files from the Favorites .................................................................. 180
11 Working with Effects .................................................................................................
Table of Contents
184
11.1 Opening the Plug-in Chain Panel ............................................................................................... 184
11.2 Adding Effects ............................................................................................................................ 185
11.3 Selecting Plug-in Slots ............................................................................................................... 188
11.4 Reordering Effects ...................................................................................................................... 189
11.5 Scrolling the Plug-in Chain ........................................................................................................ 190
11.6 Bypassing Effects .......................................................................................................................191
11.7 Removing Effects ....................................................................................................................... 193
12 Managing the Library .................................................................................................
12.1 Saving Preset Files to the User Library ....................................................................................... 195
12.2 Deleting User Preset Files from the User Library ......................................................................... 197
12.3 Editing the Tags and Properties of User Preset Files .................................................................. 198
KOMPLETE KONTROL S-Series - Manual - 8
195
Page 9

12.4 Working with the Files Pane ........................................................................................................ 201
12.5 Loading VST Plug-ins ................................................................................................................. 206
12.6 Installing NKS Instruments ......................................................................................................... 207
12.7 Importing KOMPLETE KONTROL-Compatible User Files ............................................................... 210
12.4.1 Additional Results List Features List in the Files Pane .............................................. 202
12.4.2 Navigating to File Locations with the Location Bar .................................................... 203
12.4.3 Navigating to Recent File Locations .......................................................................... 204
12.4.4 Working with File Location Favorites .......................................................................... 205
13 Controlling Instrument and Effect Parameters ..............................................................
13.1 About Pre-Mapped Instruments and Effects ............................................................................... 212
13.2 Adjusting Parameters ................................................................................................................. 212
13.3 Switching Parameter Pages ........................................................................................................ 213
13.4 Customizing Parameter Mappings using the Plug-in Panel ........................................................ 213
14 Smart Play – Playing and Editing Scales and Chords ...................................................
Table of Contents
212
216
14.1 A Note about Music Theory .......................................................................................................... 216
14.2 Activating the Scale Engine ........................................................................................................218
14.3 Selecting and Playing a Scale .................................................................................................... 219
14.4 Playing Chords ........................................................................................................................... 219
14.5 Editing Scales and Chords ......................................................................................................... 220
14.6 Setting the SCALE Parameters .................................................................................................... 221
14.7 Setting the KEY MODE Parameter ............................................................................................... 230
14.8 Setting the CHORD Parameters .................................................................................................. 233
14.6.1 SCALE Root Note ........................................................................................................ 221
14.6.2 SCALE Bank and Type ................................................................................................ 222
14.8.1 CHORD Mode ............................................................................................................. 233
14.8.2 CHORD Type ............................................................................................................... 234
KOMPLETE KONTROL S-Series - Manual - 9
Page 10

Table of Contents
14.8.3 CHORD Position ......................................................................................................... 238
15 Smart Play – Playing and Editing Arpeggiator Sequences ............................................
15.1 Playing Arpeggiator Sequences .................................................................................................. 241
15.2 Using a Sustain Pedal to Control the Arpeggiator ....................................................................... 242
15.3 Using Arpeggiator Snapshots on the Keyboard ........................................................................... 242
15.4 Editing the Arpeggiator .............................................................................................................. 243
15.5 MAIN Parameters ........................................................................................................................ 244
15.6 RHYTHM Parameters ................................................................................................................... 245
15.7 OTHER Parameters ..................................................................................................................... 248
15.8 ADVANCED Parameters ............................................................................................................... 250
15.9 RANGE Parameters ..................................................................................................................... 252
15.5.1 MAIN Mode ................................................................................................................. 244
15.5.2 MAIN Type .................................................................................................................. 245
15.6.1 RHYTHM Rate ............................................................................................................ 246
15.6.2 RHYTHM Sequence ..................................................................................................... 247
15.6.3 RHYTHM Swing .......................................................................................................... 248
15.7.1 OTHER Octaves .......................................................................................................... 249
15.7.2 OTHER Dynamic ......................................................................................................... 249
15.7.3 OTHER Gate ............................................................................................................... 250
15.8.1 ADVANCED Retrigger ................................................................................................. 251
15.8.2 ADVANCED Repeat ..................................................................................................... 251
15.8.3 ADVANCED Offset ...................................................................................................... 251
15.8.4 ADVANCED Inversion .................................................................................................. 252
15.9.1 RANGE Min. Key ......................................................................................................... 253
15.9.2 RANGE Max. Key ......................................................................................................... 253
240
KOMPLETE KONTROL S-Series - Manual - 10
Page 11

15.10 HOLD Parameter ......................................................................................................................... 253
Index ........................................................................................................................
Table of Contents
255
KOMPLETE KONTROL S-Series - Manual - 11
Page 12

Welcome to KOMPLETE KONTROL
Document Conventions
1 Welcome to KOMPLETE KONTROL
Thank you for choosing KOMPLETE KONTROL!
The KOMPLETE KONTROL software and its dedicated keyboard—the KOMPLETE KONTROL
S-Series—form a tightly integrated music production and performance system that brings all
the sounds from KOMPLETE and the Native Kontrol Standard (NKS) to the heart of your workflow.
KOMPLETE KONTROL offers advanced integration with a number of hosts and provides full
control of any Instruments supporting NKS, both from Native Instruments and partners. The
keyboard lets you browse your Instruments and Effects in an intuitive way and play them creatively with KOMPLETE KONTROL’s unique Scale engine and Arpeggiator.
We hope you enjoy this fantastic instrument as much as we do.
—The team at Native Instruments
1.1 Document Conventions
This document uses particular formatting to point out special facts and to warn you of potential issues. The icons introducing the following notes let you see what kind of information can
be expected:
The speech bubble icon indicates a useful tip that may often help you to solve a task more efficiently.
The exclamation mark icon highlights important information that is essential for the given context.
The red cross icon warns you of serious issues and potential risks that require your full attention.
Furthermore, the following formatting is used:
KOMPLETE KONTROL S-Series - Manual - 12
Page 13

Welcome to KOMPLETE KONTROL
Document Conventions
▪ Text appearing in (drop-down) menus (such as Open…, Save as… etc.) in the software and
paths to locations on your hard disk or other storage devices is printed in italics.
▪ Text appearing elsewhere (labels of buttons, controls, text next to checkboxes etc.) in the
software is printed in blue. Whenever you see this formatting applied, you will find the
same text appearing somewhere on the screen.
▪ Text appearing on the displays of the controller is printed in light grey. Whenever you see
this formatting applied, you will find the same text on a controller display.
▪ Text appearing on labels of the hardware controller is printed in orange. Whenever you see
this formatting applied, you will find the same text on the controller.
▪ Important names and concepts are printed in bold.
▪ References to keys on your computer’s keyboard you’ll find put in square brackets (e.g.,
“Press [Shift] + [Enter]”).
► Single instructions are introduced by this play button type arrow.
→ Results of actions are introduced by this smaller arrow.
Naming Convention
Throughout the documentation we will refer to KOMPLETE KONTROL keyboard (or just keyboard)
as the hardware controller and KOMPLETE KONTROL software as the software installed on your
computer.
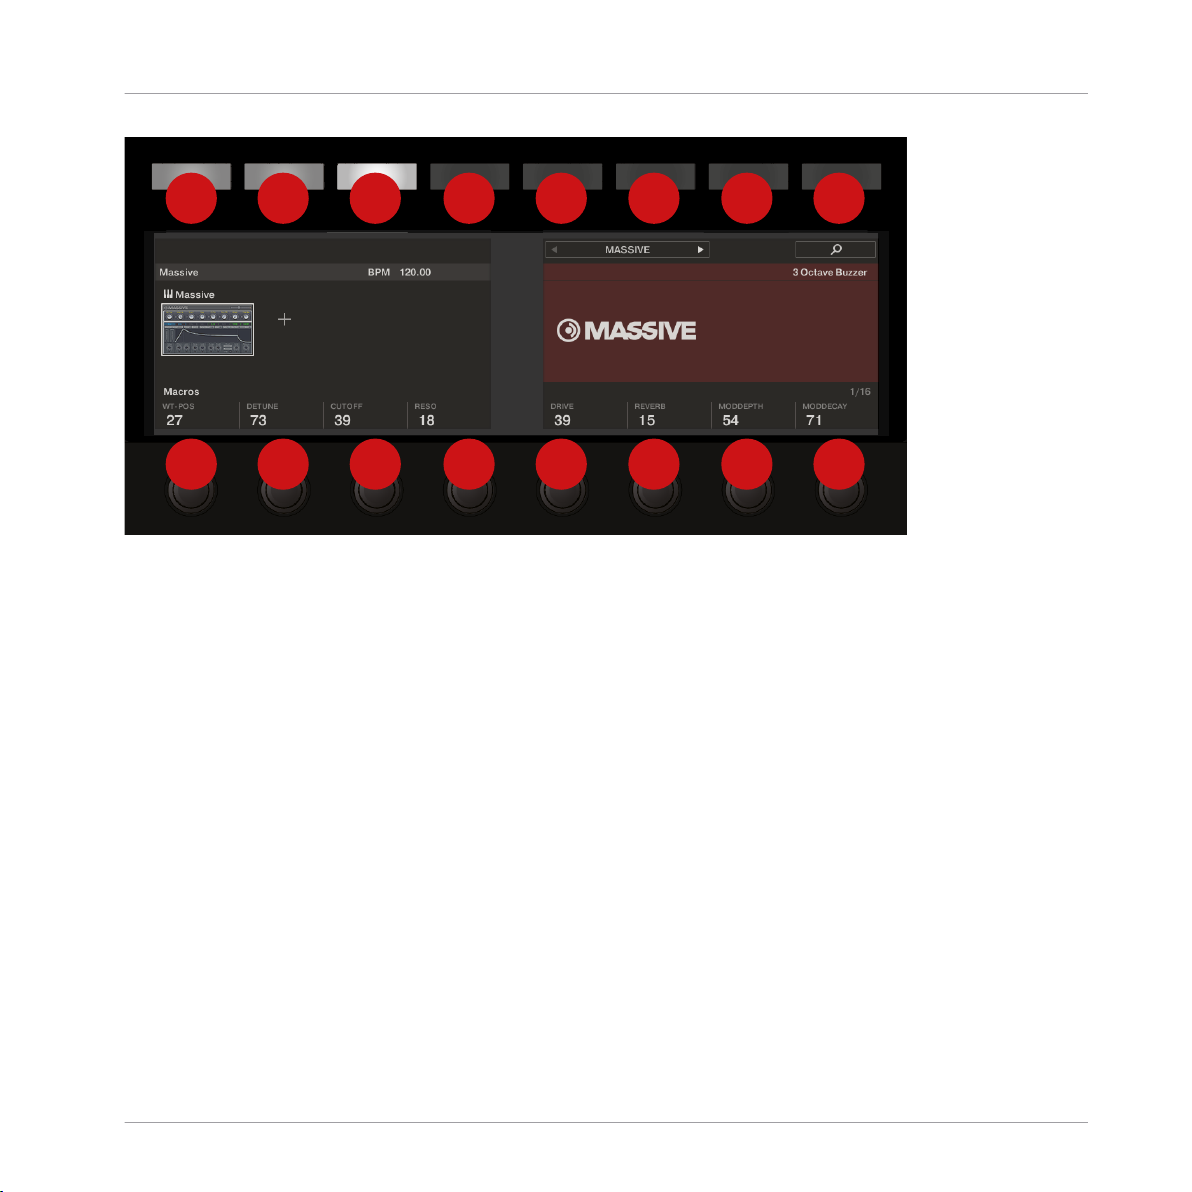
Unlabeled Buttons on the Keyboard
The buttons and knobs above and below the displays on the KOMPLETE KONTROL keyboard
do not have labels.
KOMPLETE KONTROL S-Series - Manual - 13
Page 14
1 2 3 4 5 6 7 8
1 2 3 4 5 6 7 8
Welcome to KOMPLETE KONTROL
Document Conventions
The unlabeled buttons and knobs on the KOMPLETE KONTROL keyboard.
For better reference, we applied a special formatting here: throughout the document, the elements are capitalized and numbered, so the buttons above the displays are written Button 1 to
Button 8, while the knobs under the displays are written Knob 1 to Knob 8.
KOMPLETE KONTROL S-Series - Manual - 14
Page 15

Welcome to KOMPLETE KONTROL
1.2 Box Contents
The box contains the following items:
▪ KOMPLETE KONTROL keyboard
▪ USB cable
The included 3 meter USB cable only works in conjunction with the KOMPLETE KONTROL S88
keyboard.
▪ Power supply (only included in the KOMPLETE KONTROL S88 box)
▪ Information flyer providing:
◦ the hardware serial number of the KOMPLETE KONTROL keyboard
◦ a web link for downloading the KOMPLETE KONTROL software and the KOMPLETE SELECT
software bundle
▪ Safety Instructions flyer
Box Contents
1.3 System Requirements
For KOMPLETE KONTROL to fully function as indented, your system needs to meet certain requirements. The latest KOMPLETE KONTROL system requirements and compatibility information is available here:
http://www.native-instruments.com/komplete-kontrol-s-series/specifications/
KOMPLETE
KOMPLETE KONTROL is optimized for use with KOMPLETE SELECT, KOMPLETE and KOMPLETE ULTIMATE.
The latest KOMPLETE system requirements and compatibility information is available here:
http://www.native-instruments.com/products/komplete/
KOMPLETE KONTROL S-Series - Manual - 15
Page 16
Welcome to KOMPLETE KONTROL
1.4 Accessibility
KOMPLETE KONTROL offers a set of accessibility features for visually-impaired users. These
are focused exclusively on the KOMPLETE KONTROL keyboard itself and include speech output via your computer for the following features:
▪ Perform, Transpose, Page left / right buttons
▪ All Browser functions
▪ Instance switching
▪ The current edit mode, including the Plug-in panel and the Perform panel (Scale, Arp)
▪ Names of parameters and parameter sections when touching knobs, including all edit
modes
▪ Tempo (KOMPLETE KONTROL stand-alone application only)
The accessibility features are particularly useful when combined with KOMPLETE KONTROL’s host
integration and Apple VoiceOver in Apple Logic Pro X and GarageBand.
Accessibility
1.4.1 Keyboard Overview
The buttons and knobs on the KOMPLETE KONTROL keyboard are organized in the following
groups:
▪ Perform and Edit section
▪ Transport section
▪ Solo and Mute buttons
▪ Preset and Page buttons
▪ Arrange buttons (only functional in MASCHINE)
▪ Control section
▪ Navigation and Mode buttons
▪ 4-Directional Push Encoder (referred to as the 4-D encoder)
KOMPLETE KONTROL S-Series - Manual - 16
Page 17

Welcome to KOMPLETE KONTROL
▪ Transpose and Fixed Velocity buttons
The Perform and Edit section is located at the top left of the keyboard. It contains six buttons
that are arranged in two rows.
The buttons in the first row are (from left to right):
▪ SHIFT
▪ SCALE (Edit)
▪ ARP (Edit)
The buttons in the second row are (from left to right):
▪ UNDO (Redo)
▪ QUANTIZE
▪ AUTO
The Transport section is located directly below the Perform and Edit section. It contains six
buttons that are arranged in two rows.
The buttons in the first row are (from left to right):
Accessibility
▪ LOOP
▪ METRO
▪ TEMPO
The buttons in the second row are (from left to right):
▪ PLAY (Restart)
▪ REC (Count-In)
▪ STOP
The Solo and Mute buttons are located to the top right of the Perform and Edit section. The
two buttons are arranged in a row.
The buttons are (from left to right):
▪ Mute
▪ Solo
KOMPLETE KONTROL S-Series - Manual - 17
Page 18

Welcome to KOMPLETE KONTROL
The Preset and Page buttons are located to the bottom right of the Perform and Edit section,
below the Solo and Mute buttons. The four buttons are arranged in a column.
The buttons are (from top to bottom):
▪ PRESET Up
▪ PRESET Down
▪ Page Left and Page Right (next to each other)
The Arrange buttons, which are only functional in MASCHINE, are located to the right of the
Solo and Mute buttons and the Preset and Page buttons. The five buttons are arranged in a
column.
The buttons are (from top to bottom):
▪ SCENE
▪ PATTERN
▪ TRACK
▪ KEY MODE
▪ CLEAR
Accessibility
The Control section is located in the center of the KOMPLETE KONTROL keyboard. It contains
eight buttons and eight knobs. The buttons are arranged in a row at the very top of the keyboard. The knobs are arranged in a row directly above the keybed.
The Navigation and Mode buttons are on the top right of the KOMPLETE KONTROL keyboard.
The six buttons are arranged in two rows.
The buttons in the first row are (from left to right):
▪ BROWSER
▪ PLUG-IN
▪ MIXER
The buttons in the second row are (from left to right):
▪ INSTANCE
▪ MIDI
KOMPLETE KONTROL S-Series - Manual - 18
Page 19
Welcome to KOMPLETE KONTROL
▪ SETUP
The 4-D encoder is located directly below the Navigation and Mode buttons.
The Transpose and Fixed Velocity buttons are located at the far left of the keyboard next to the
keybed and directly above the Pitch and Modulation wheels. The three buttons are arranged in
a row.
The buttons are (from left to right):
▪ FIXED VEL (TS Mode)
▪ OCT Down
▪ OCT Up
1.4.2 Activating Accessibility Features
In order to activate or deactivate the accessibility features from the KOMPLETE KONTROL keyboard while the KOMPLETE KONTROL software is running:
1. Press and hold the SHIFT button on the top left of the keyboard.
2. While holding SHIFT, press the MIXER button on the top right of the keyboard.
Accessibility
→ The accessibility features are activated or deactivated.
When the accessibility features are activated, you can choose whether or not speech output
should be enabled for names of Preset files while browsing:
1. Press and hold the SHIFT button on the top left of the keyboard.
2. While holding SHIFT, press Button 5 in the Control section.
→ Speech output for names of Preset files while browsing is enabled or disabled.
The accessibility features are designed to be used with the KOMPLETE KONTROL plug-in. However,
the KOMPLETE KONTROL stand-alone application must be opened after initial installation and after installing additional Instruments and Effects. This will ensure that all Instruments and Effects
are displayed correctly in the KOMPLETE KONTROL Browser.
KOMPLETE KONTROL S-Series - Manual - 19
Page 20
Welcome to KOMPLETE KONTROL
1.4.3 Training Mode
KOMPLETE KONTROL Training Mode makes it easy to locate a specific button or parameter
without accidentally triggering an action. When Training Mode is activated, all button presses
and parameter names are announced but the corresponding action is not triggered.
Activating Training Mode
► To activate or deactivate Training Mode from the KOMPLETE KONTROL keyboard while
the KOMPLETE KONTROL software is running, double-press the SHIFT button on the top
left of the keyboard.
Training Mode is only available when the accessibility features have been activated.
1.4.4 Feature Overview and Keyboard Shortcuts
The following overview outlines the availability of accessibility features for different aspects of
KOMPLETE KONTROL from both the KOMPLETE KONTROL keyboard and the KOMPLETE KONTROL software. In the table you also can find the relevant keyboard shortcut.
Accessibility
KOMPLETE KONTROL S-Series - Manual - 20
Page 21
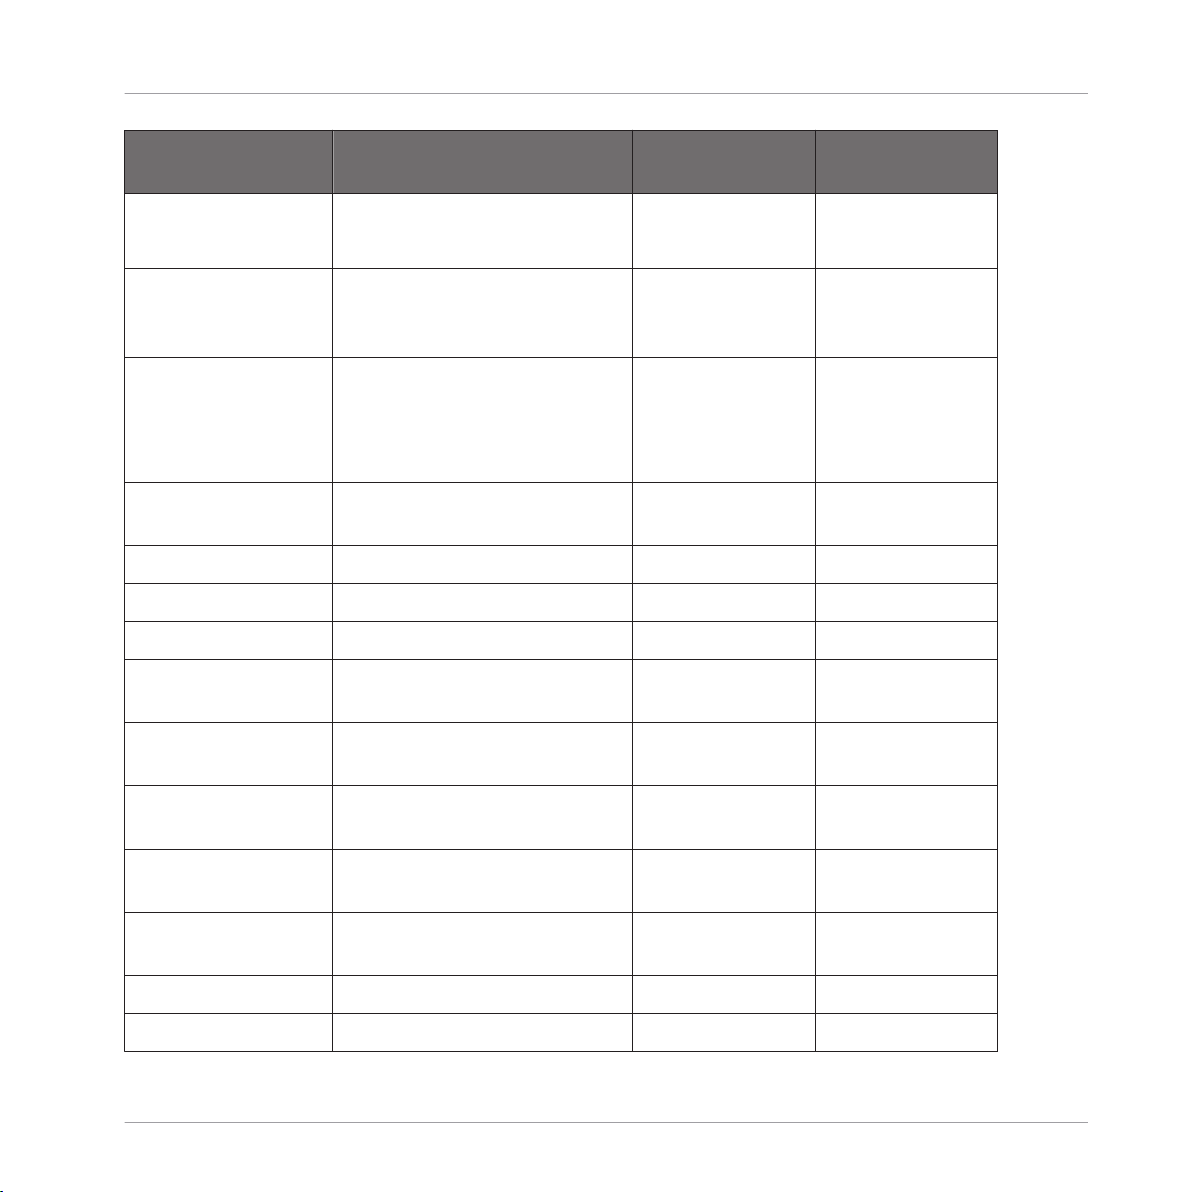
Welcome to KOMPLETE KONTROL
Accessibility
Feature Accessible from
Keyboard Shortcut
Keyboard
Accessibility Mode Enable or disable Accessibility
mode
Enable or disable speech
output for names of Preset
files
Browser Browse for Factory and User
Preset files
Yes SHIFT + MIXER
SHIFT + Button 5
Yes Page left button
or Page right
button
Switch between Category and
Yes SHIFT + Knob 1
Vendor sorting
Set Preset file Favorites Yes SHIFT + Knob 4
Sort by Favorites SHIFT + Knob 3
Save and edit User Preset files No
Browse for NKS plug-ins from
other vendors
Yes Supported by
default
Instrument control Adjust key Instrument
Yes Knob 1 – 8
parameters
Custom map Instrument
No
parameters
Smart Play Accessing Scale and Chord
Parameters
Adjust Scale & Chord
Yes SHIFT + SCALE
Edit
Knob 1 – 8
parameters
Accessing Arp Parameters Yes SHIFT + ARP Edit
Adjust Arp parameters Knob 1 – 8
KOMPLETE KONTROL S-Series - Manual - 21
Page 22

Welcome to KOMPLETE KONTROL
Accessibility
Feature Accessible from
Keyboard Shortcut
Keyboard
Selecting Parameter Pages Page left or Page
right
Touch Strips Adjust Touch Strip parameters No
Tempo Adjust BPM Yes TEMPO + Knob 1
Training mode Find a control without
Yes
accidentally triggering actions
Enabling or disabling Training
mode
Preferences Adjust software & hardware
Yes Double-press
SHIFT
No
preferences
Software dialog Be notified if a dialog box
opens in the software (dialog
Yes Supported by
default
content is not available for
speech output)
Accessibility for KOMPLETE KONTROL’s host integration is only available when using Apple VoiceOver in Logic Pro X and GarageBand. For more information about KOMPLETE KONTROL’s host integration features, refer to ↑9, Host Integration.
KOMPLETE KONTROL S-Series - Manual - 22
Page 23

The KOMPLETE KONTROL Workflow
2 The KOMPLETE KONTROL Workflow
KOMPLETE KONTROL brings all the sounds from KOMPLETE and the Native Kontrol Standard
(NKS) to the center of your workflow. Its advanced integration in a number of hosts enables
you to quickly capture ideas, with immediate access to the sounds you need, all directly from
the KOMPLETE KONTROL keyboard.
The KOMPLETE KONTROL workflow is streamlined to remove any obstacles when sketching
out a new song in a supported host:
1. Select a track that hosts the KOMPLETE KONTROL plug-in with the navigation controls
on the keyboard. This is made possible by KOMPLETE KONTROL’s advanced host integration.
2. Find Preset files you like from any of the Instruments and Effects in your KOMPLETE KONTROL Library by browsing with the keyboard, supported by the Browser’s filters and Preview functions.
3. Use the keyboard’s Control section to adjust the loaded Instrument and Effect(s) and create your own unique sound.
4. Optionally, you can enable KOMPLETE KONTROL’s Smart Play features to enrich your
playing with the Scale engine and the Arpeggiator.
5. Record a new clip in the host, conveniently controlling transport and loop functions directly from the keyboard. Again, made possible by KOMPLETE KONTROL’s advanced host
integration.
6. If you need to start over, undo and redo functions are right at your fingertips. To further
refine your recording, you can apply quantization and automation to a clip by pressing the
corresponding buttons on the keyboard.
→ You have quickly captured a musical idea and can continue sketching out a new song by
repeating the process and layering more tracks.
KOMPLETE KONTROL S-Series - Manual - 23
Page 24

The KOMPLETE KONTROL Workflow
Key Features
The following key features facilitate the KOMPLETE KONTROL workflow:
▪ Browser: The Browser is your interface for finding, loading and organizing Instruments, Ef-
fects, and Preset files from the KOMPLETE KONTROL Library. For more information, refer
to ↑10, Browsing the Library, ↑11, Working with Effects, and ↑12, Managing the Library.
▪ Instrument and Effect control: The Touch Strip and knobs on the keyboard are pre-mapped to
all KOMPLETE and NKS Instruments and Effects for immediate control. For more information, refer to ↑13, Controlling Instrument and Effect Parameters and ↑8.8.5, Assignments
for the Touch Strip.
▪ Smart Play: The Scale engine and the Arpeggiator let you play and generate scales, chords,
and arpeggiator sequences. For more information, refer to ↑14, Smart Play – Playing and
Editing Scales and Chords and ↑15, Smart Play – Playing and Editing Arpeggiator Sequences.
▪ Host integration: Advanced integration in a number of hosts allows you control core func-
tionality directly from the keyboard. For more information, refer to ↑3.3, Setting up Host
Integration and ↑9, Host Integration.
KOMPLETE KONTROL S-Series - Manual - 24
Page 25
Setting up KOMPLETE KONTROL
3 Setting up KOMPLETE KONTROL
This section provides basic setup information for using the KOMPLETE KONTROL stand-alone
software, and guides you through the process of integrating KOMPLETE KONTROL in supported hosts.
The KOMPLETE KONTROL software is installed both as a stand-alone application as well as a
VST, Audio Unit, and AAX plug-in.
The KOMPLETE KONTROL stand-alone application must be opened once before using the plug-in
within your DAW for the first time, and after installing new Instruments and Effects.
The KOMPLETE KONTROL stand-alone application directly communicates with your audio and
MIDI interfaces, which you can configure in the KOMPLETE KONTROL Preferences. When
KOMPLETE KONTROL is used as a plug-in within a host, the communication with your audio
and MIDI interfaces is managed by the host.
For details about the audio and MIDI configuration of the host, and how to load plug-ins, please
refer to its documentation.
KOMPLETE KONTROL S-Series - Manual - 25
Page 26
Setting up KOMPLETE KONTROL
Connecting the Keyboard to the Computer
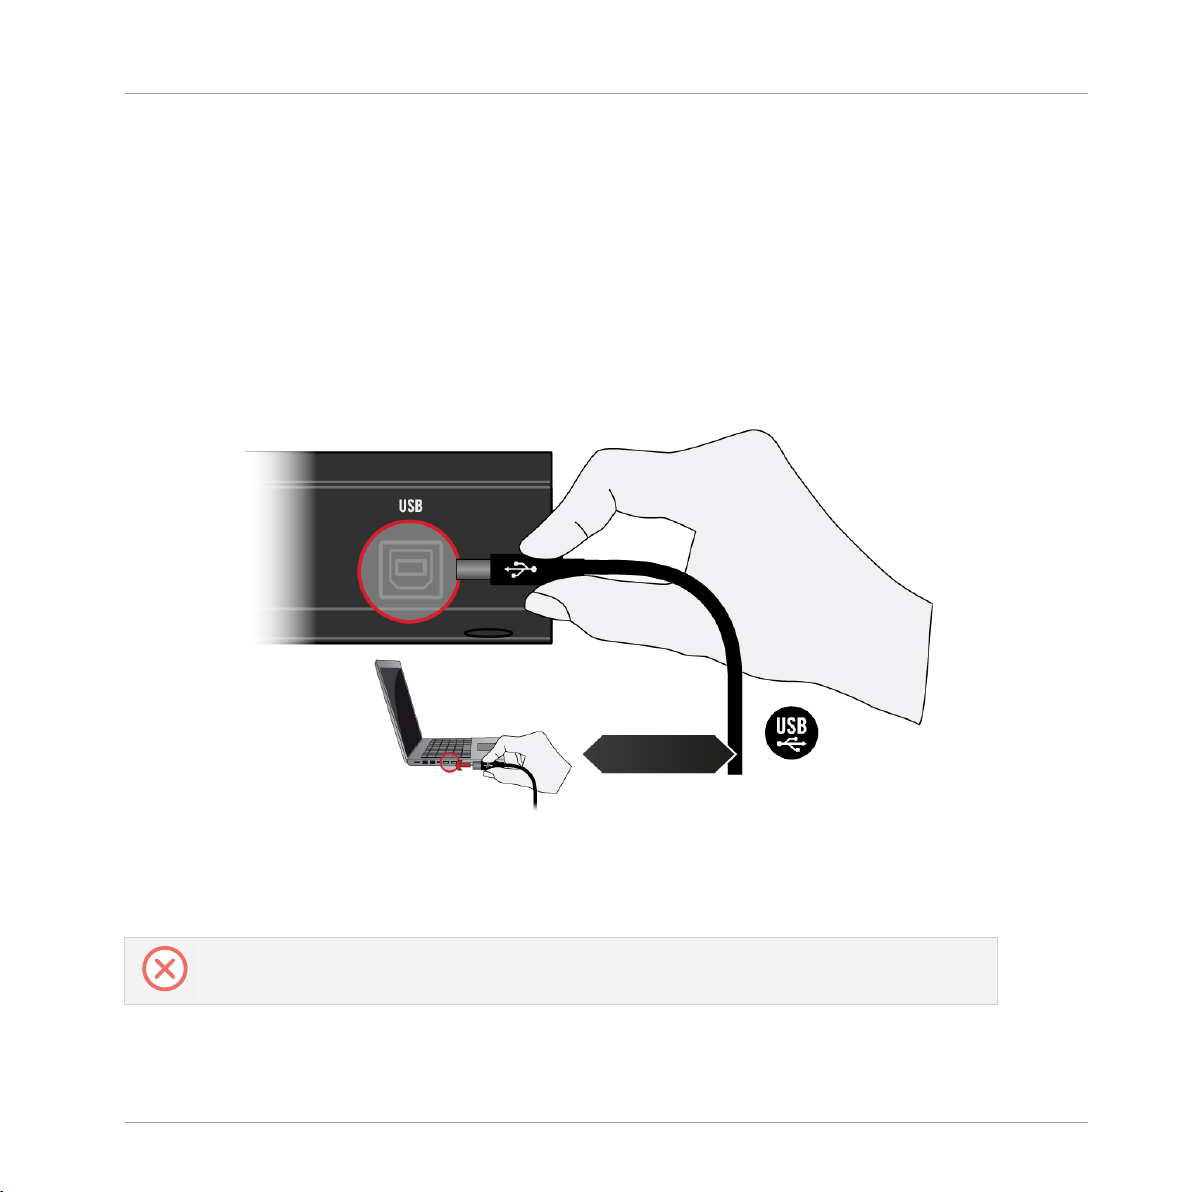
3.1 Connecting the Keyboard to the Computer
To connect the KOMPLETE KONTROL keyboard to your computer:
1. Attach the device end of the included USB cable to the USB socket on the rear panel of
the keyboard.
2. Attach the computer end of the USB cable to an available USB 2.0 (or later) port on your
computer.
3. Press the power switch on the rear panel of the keyboard to switch it on.
→ The keyboard is now detected by the operating system.
Non-powered USB hubs are not supported. The keyboard should always be connected directly to the
USB port of the computer, or be used with a powered USB hub.
KOMPLETE KONTROL S-Series - Manual - 26
Page 27

Setting up KOMPLETE KONTROL
Setting up the Stand-Alone Application
3.2 Setting up the Stand-Alone Application
When you launch the KOMPLETE KONTROL software from its installation directory, it starts as
a stand-alone application independently from a host.
By default, the application uses the standard audio interface of your computer. In order to use
another audio interface, and receive MIDI notes from the keyboard, you need to configure the
application in the Preferences.
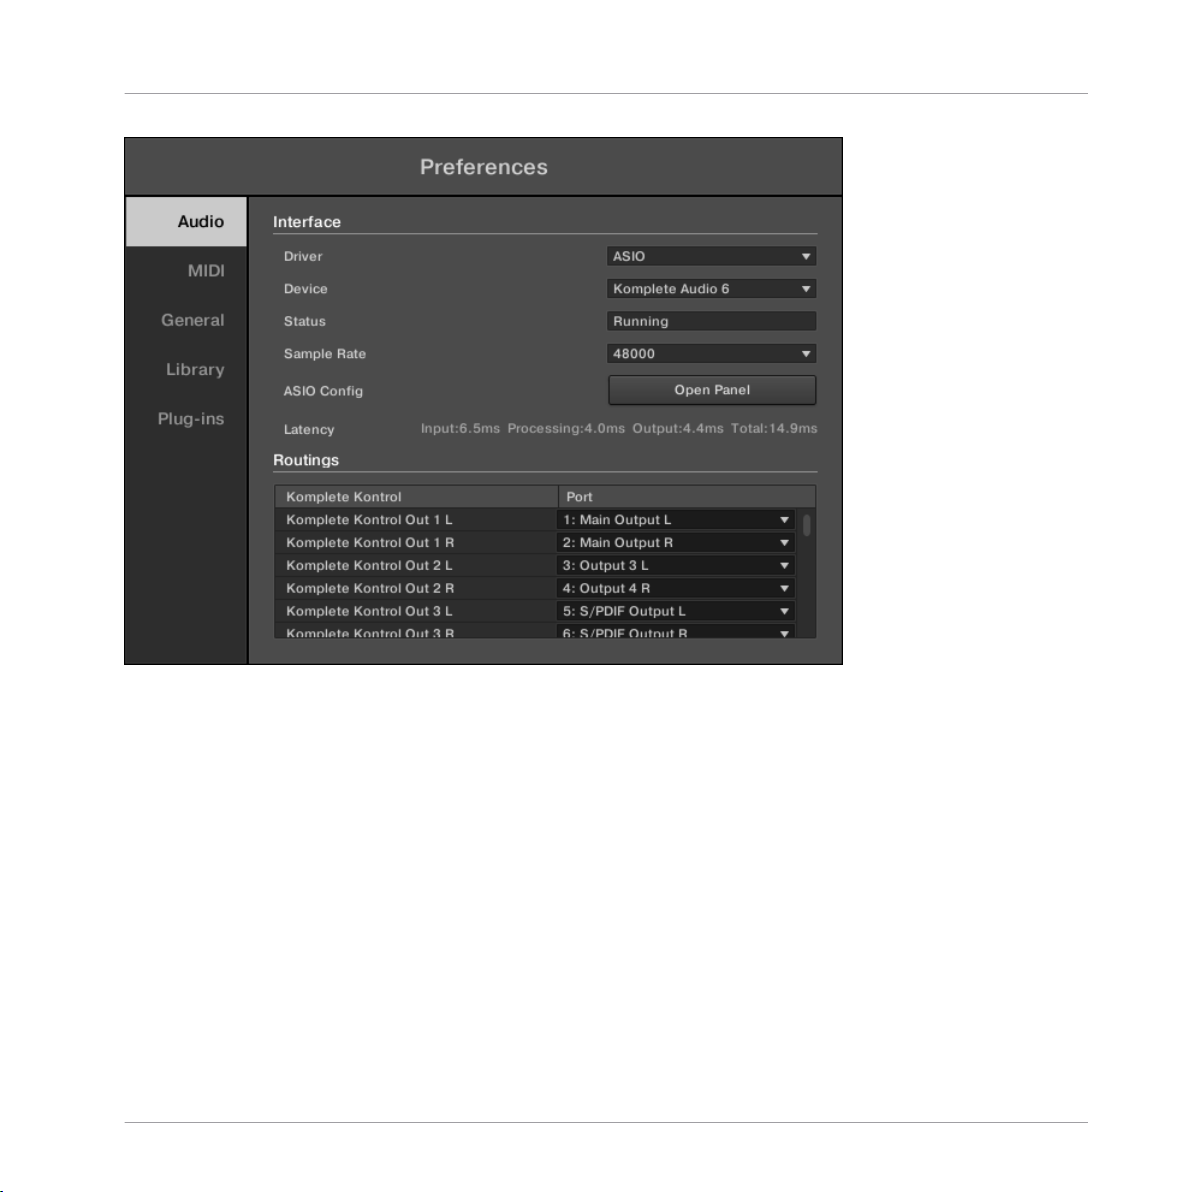
Configuring Audio Interface
1. In the KOMPLETE KONTROL menu click on Edit > Preferences to open the Preferences.
2. Click on Audio to display the Audio page.
3. Select the hardware driver supported by your audio interface from the Driver drop-down
menu.
4. Select the audio interface from the Device drop-down menu.
5. Under Routings, select the left and right output channels of your audio interface you want
to use for KOMPLETE KONTROL’s master output in the Komplete Kontrol Out 1 L and
Komplete Kontrol Out 1 R drop-down menus.
KOMPLETE KONTROL S-Series - Manual - 27
Page 28
Setting up KOMPLETE KONTROL
Setting up the Stand-Alone Application
Preferences panel — Audio page
Enabling MIDI Control
1. Click on MIDI to display the MIDI page.
2. Click on Input to display the available devices for incoming MIDI signals.
3. Click the Komplete Kontrol checkboxes to activate incoming MIDI signals from the keyboard.
KOMPLETE KONTROL S-Series - Manual - 28
Page 29

Setting up KOMPLETE KONTROL
Setting up Host Integration
Preferences panel — MIDI page (entries may vary on your computer)
→ The software is configured and ready to be controlled with the keyboard.
The MIDI Output settings are required for using KOMPLETE KONTROL’s Smart Play features with
other MIDI instruments.
3.3 Setting up Host Integration
KOMPLETE KONTROL integrates with a number of hosts to facilitate a fluent workflow for performing and recording music with your KOMPLETE KONTROL Library.
Advanced integration of KOMPLETE KONTROL is available in the following hosts:
▪ MASCHINE 2
KOMPLETE KONTROL S-Series - Manual - 29
Page 30

Setting up KOMPLETE KONTROL
Setting up Host Integration
▪ Apple Logic Pro X
▪ Apple GarageBand
▪ Ableton Live 9
▪ Steinberg Cubase Artist 8.5/9/9.5
▪ Steinberg Cubase Pro 8.5/9/9.5
▪ Steinberg Nuendo 7/8
Before using the KOMPLETE KONTROL keyboard to control a supported host, a few configuration steps are required:
3.3.1 Setting up Apple Logic Pro X and GarageBand
Apple Logic Pro X and GarageBand are automatically configured for advanced integration with
KOMPLETE KONTROL once you launch the respective application for the first time after installing the KOMPLETE KONTROL software. Ensure that the keyboard is connected and
switched on before launching the application.
A dialog asks you to confirm this after launching the application:
► When the message OSC app “KOMPLETE KONTROL S-Series” wants to connect to Logic
Pro X / GarageBand appears on screen, click OK.
The KOMPLETE KONTROL stand-alone application must be opened once before using the plug-in
within your DAW for the first time, and after installing new Instruments and Effects.
For a detailed overview of Integration controls for Logic Pro X / GarageBand refer to ↑9.2, Inte-
gration with Apple Logic Pro X and GarageBand.
3.3.2 Setting up Steinberg Cubase/Nuendo
Steinberg Cubase/Nuendo must be configured for advanced integration with KOMPLETE KONTROL.
1. Ensure that the keyboard is connected and switched on before launching the application.
2. Launch Steinberg Cubase/Nuendo.
KOMPLETE KONTROL S-Series - Manual - 30
Page 31

Setting up KOMPLETE KONTROL
Setting up Host Integration
3. In Steinberg Cubase/Nuendo, open the Device Setup. from the Devices menu (Steinberg
Cubase 9.5: Studio Setup from the Studio menu).
4. Click the + button in the upper left corner of the Device Setup and select Komplete Kon-
trol S-Series from the drop-down menu.
5. Set MIDI Input and MIDI Output for Komplete Kontrol S-Series to the ports named Kom-
plete Kontrol DAW (macOS) / KOMPLETE KONTROL (not KOMPLETE KONTROL EXT,
Windows).
→ Steinberg Cubase Nuendo is now ready to be used with KOMPLETE KONTROL.
The KOMPLETE KONTROL stand-alone application must be opened once before using the plug-in
within your DAW for the first time, and after installing new Instruments and Effects.
For a detailed overview of Integration controls for Steinberg/Nuendo refer to ↑9.4, Integration
with Steinberg Cubase and Nuendo.
3.3.3 Setting up Ableton Live (macOS)
Ableton Live must be configured for advanced integration with KOMPLETE KONTROL.
Installing the MIDI Remote Script
The MIDI Remote Script allows Ableton Live to recognize KOMPLETE KONTROL as a control
surface. It must be copied into Live’s MIDI Remote Scripts directory:
1. Ensure that Ableton Live is not running.
2. Navigate to the following folder: Macintosh HD/Library/Application Support/Native Instru-
ments/Host Integration/Ableton Live/
3. Copy the _NativeInstruments folder, as well as the Komplete_Kontrol_Mk2 folder to the
clipboard.
4. Open your Applications folder and right-click the Ableton Live application symbol. In the
context menu, click Show Package Contents.
5. In the Ableton Live package, navigate to Contents > App-Resources > MIDI Re-
mote Scripts.
KOMPLETE KONTROL S-Series - Manual - 31
Page 32

Setting up KOMPLETE KONTROL
Setting up Host Integration
6. Paste the folders you have copied to the clipboard into the MIDI Remote Scripts folder.
Installing the KOMPLETE KONTROL Instrument Racks
KOMPLETE KONTROL is loaded into Ableton Live in the form of an Instrument Rack. In order
to make the required Instrument Rack available in Ableton Live’s browser, it must be added to
your Ableton Live User Library:
1. Navigate to the following folder: Macintosh HD/Library/Application Support/Native Instru-
ments/Host Integration/Ableton Live/.
2. Copy the KOMPLETE KONTROL VST.adg file to the clipboard.
3. Paste the file you have copied to the clipboard into your Ableton Live Instrument Rack
folder. By default this folder is located here: Macintosh HD/Users/*Username*/Music/
Ableton/User Library/Presets/Instruments/Instrument Rack/.
Configuring Ableton Live for KOMPLETE KONTROL
Once the MIDI Remote Script and the Instrument Rack file are installed in the correct location, you need to add KOMPLETE KONTROL as a control surface in Ableton Live's preferences.
1. Launch Ableton Live.
2. In Ableton Live, go to the Preferences and open the MIDI / Sync tab.
3. Assign a free Control Surface slot to KOMPLETE KONTROL by selecting KOM-
PLETE KONTROL MK2 from the drop-down menu.
4. Leave both the Input and the Output for the KOMPLETE KONTROL control surface set to
None.
Loading KOMPLETE KONTROL in Ableton Live
The KOMPLETE KONTROL stand-alone application must be opened once before using the plug-in
within your DAW for the first time, and after installing new Instruments and Effects.
1. Ensure that the keyboard is connected and switched on.
KOMPLETE KONTROL S-Series - Manual - 32
Page 33

Setting up KOMPLETE KONTROL
Setting up Host Integration
2. To load KOMPLETE KONTROL in Ableton Live, drag the KOMPLETE KONTROL Instrument Rack from the browser to an empty MIDI track. You can find it here in the Ableton
Live browser: Instruments/Instrument Rack/KOMPLETE KONTROL VST.adg.
→ You are now ready to use KOMPLETE KONTROL within Ableton Live.
You must use the KOMPLETE KONTROL Instrument Rack (KOMPLETE KONTROL VST.adg) to ensure a reliable connection with the KOMPLETE KONTROL keyboard.
For a detailed overview of Integration controls for Ableton Live refer to ↑9.3, Integration with
Ableton Live.
3.3.4 Setting up Ableton Live (Windows)
Ableton Live must be configured for advanced integration with KOMPLETE KONTROL.
Installing the MIDI Remote Script
The MIDI Remote Script allows Ableton Live to recognize KOMPLETE KONTROL as a control
surface. It must be copied into Live’s MIDI Remote Scripts directory:
1. Ensure that Ableton Live is not running.
2. Navigate to the following folder: C:\Program Files\Common Files\Native Instruments\Host
Integration\Ableton Live\
3. Copy the _NativeInstruments folder, as well as the Komplete_Kontrol_Mk2 folder to the
clipboard.
4. Navigate to the MIDI Remote Scripts folder in Ableton Live’s installation directory: C:\Pro-
gramData\Ableton\Live 9\Resources\MIDI Remote Scripts
5. Paste the folders you have copied to the clipboard into the MIDI Remote Scripts folder.
Installing the KOMPLETE KONTROL Instrument Racks
KOMPLETE KONTROL is loaded into Ableton Live in the form of an Instrument Rack. In order
to make the required Instrument Rack available in Ableton Live’s browser, it must be added to
your Ableton Live User Library:
KOMPLETE KONTROL S-Series - Manual - 33
Page 34

Setting up KOMPLETE KONTROL
Setting up Host Integration
1. Navigate to the following folder: C:\Program Files\Common Files\Native Instruments\Host
Integration\Ableton Live\
2. Copy the KOMPLETE KONTROL VST.adg file to the clipboard.
3. Paste the file you have copied to the clipboard into your Ableton Live Instrument Rack
folder. By default this folder is located here: C:\Users\*Username*\Documents\Ableton
\User Library\Presets\Instruments\Instrument Rack\
Configuring Ableton Live for KOMPLETE KONTROL
Once the MIDI Remote Script and the Instrument Rack file are installed in the correct location, you need to add KOMPLETE KONTROL as a control surface in Ableton Live's preferences.
1. Launch Ableton Live.
2. In Ableton Live, go to the Preferences and open the MIDI / Sync tab.
3. Assign a free Control Surface slot to KOMPLETE KONTROL by selecting it from the dropdown menu.
4. Leave both the Input and the Output for the KOMPLETE KONTROL control surface set to
None.
Loading KOMPLETE KONTROL in Ableton Live
The KOMPLETE KONTROL stand-alone application must be opened once before using the plug-in
within your DAW for the first time, and after installing new Instruments and Effects.
► To load KOMPLETE KONTROL in Ableton Live, drag the KOMPLETE KONTROL Instru-
ment Rack (KOMPLETE KONTROL VST.adg) from the browser to an empty MIDI track.
You can find it here in the Ableton Live browser: Instruments/Instrument Rack/KOM-
PLETE KONTROL VST.adg
For a detailed overview of Integration controls for Ableton Live refer to ↑9.3, Integration with
Ableton Live.
KOMPLETE KONTROL S-Series - Manual - 34
Page 35

Setting up KOMPLETE KONTROL
Connecting Pedals to the Keyboard
3.4 Connecting Pedals to the Keyboard
The KOMPLETE KONTROL keyboard provides you two pedal inputs (in the form of 1/4" sockets) on its rear panel: PEDAL A and PEDAL B.
The pedal inputs on the rear panel of the keyboard.
These inputs both allow you to connect either a continuous or a switch pedal in order to further
refine your performance. They can be freely configured for sustain or expression behavior.
You can define the MIDI messages assigned to the pedal inputs in KOMPLETE KONTROL’s MIDI
Assignment editor. For more information, refer to ↑8, Using the MIDI Assignment Editor.
Connecting Pedals
► Connect a continuous or switch pedal to the PEDAL A or PEDAL B inputs on the rear pan-
el of the keyboard.
Configuring the Pedal Input for a Sustain Pedal
When a switch pedal is connected:
1. Click the MIDI Assignment editor button in the Header to open the MIDI Assignment editor.
2. Select the control element type PEDALS.
KOMPLETE KONTROL S-Series - Manual - 35
Page 36

Setting up KOMPLETE KONTROL
Connecting Pedals to the Keyboard
3. Select the pedal input you want to configure, either Pedal A or Pedal B.
4. Select Switch from the Mode drop-down menu.
5. Depending on inverted tip/ring connectivity of the pedal, select either Tip or Ring.
→ The pedal input is configured for a switch pedal with sustain behavior. If you need to
change the MIDI Control Change message assigned to the pedal input, refer to ↑8, Using
the MIDI Assignment Editor.
Configuring the Pedal Input for an Expression Pedal
When a continuous pedal is connected:
1. Click the MIDI Assignment editor button in the Header to open the MIDI Assignment editor.
KOMPLETE KONTROL S-Series - Manual - 36
Page 37

Setting up KOMPLETE KONTROL
Connecting Pedals to the Keyboard
2. Select the control element type PEDALS.
3. Select the pedal input you want to configure, either Pedal A or Pedal B.
4. Select Continuous from the Mode drop-down menu.
→ The pedal input is configured for a continuous pedal with expression behavior. If you need
to change the MIDI Control Change message assigned to the pedal input, refer to ↑8, Us-
ing the MIDI Assignment Editor.
Depending on the type of pedal, you need to make further adjustments by using the provided
options. The following table gives you an overview of these options:
KOMPLETE KONTROL S-Series - Manual - 37
Page 38

Setting up KOMPLETE KONTROL
Connecting External MIDI Equipment to the Keyboard
Option Description
Invert toggle switch Some continuous pedals internally support the inverted pedal
range but cannot be configured on the pedal directly. The
Invert Range function allows you to invert the range of the
pedal connected to the keyboard.
Swap T/R toggle switch Allows you to use pedals with inverted tip/ring connectivity.
Recalibrate button Allows you to recalibrate the input.
When using the MIDI Assignment editor, all keyboard controls (i.e. navigation, transport, etc.) are
blocked.
3.5 Connecting External MIDI Equipment to the Keyboard
The KOMPLETE KONTROL keyboard has dedicated MIDI sockets that allow you to directly
connect other MIDI devices using a 5-pin DIN MIDI cable and integrate the keyboard into your
MIDI setup.
The MIDI sockets on the rear panel of the KOMPLETE KONTROL keyboard.
To connect your external MIDI equipment:
1. Connect the device receiving MIDI signals to the MIDI OUT socket on the rear panel of
the keyboard using a 5-pin DIN MIDI cable.
2. Connect the device sending MIDI signals to the MIDI IN socket on the rear panel of the
keyboard using a 5-pin DIN MIDI cable.
→ The MIDI equipment is connected.
Depending on your use case, additional configuration is required in the software:
KOMPLETE KONTROL S-Series - Manual - 38
Page 39

Setting up KOMPLETE KONTROL
Connecting External MIDI Equipment to the Keyboard
▪ If KOMPLETE KONTROL is running as a stand-alone application, you need to activate the
corresponding MIDI inputs and outputs of the keyboard on the MIDI page of the Preferen-
ces. For more information refer to ↑7.3, Using the Keyboard as Stand-Alone MIDI Control-
ler.
▪ If KOMPLETE KONTROL is running as a plug-in in a host, the MIDI configuration is man-
aged by the host. For more information refer to ↑7.2, Using the Keyboard in MIDI Mode.
▪ If you are using the keyboard as MIDI controller without a USB connection, MIDI data is
directly sent and received via the keyboard’s MIDI IN and MIDI OUT sockets. For detailed
information on MIDI mapping refer to ↑8, Using the MIDI Assignment Editor.
KOMPLETE KONTROL S-Series - Manual - 39
Page 40

1
3 2
Software Overview
4 Software Overview
This section gives an overview of the areas and controls of the KOMPLETE KONTROL software.
Overview of the KOMPLETE KONTROL software.
(1) Header: Provides access to general functions like the Main menu, the Preset display, the
Transport and Master Volume controls, as well as options to show and hide user interface
areas. For more information, refer to ↑4.1, Header.
(2) Plug-in area: Shows your loaded Instrument or Effect and lets you control it directly in the
software. For more information, refer to ↑4.7, Plug-in Area.
(3) Browser: Lets you browse for Instruments and Effects, and manage all your Preset files. For
more information, refer to ↑4.2, Browser.
KOMPLETE KONTROL S-Series - Manual - 40
Page 41

1 2
3
4 567
8
9 11
12
13
10 14
15
Software Overview
4.1 Header
The header is where you find general settings that affect KOMPLETE KONTROL globally. It also lets you access additional user interface areas.
The header.
(1) KOMPLETE KONTROL logo: Opens the About screen, which shows the version number of the
KOMPLETE KONTROL software.
(2) Browser button: Shows or hides the Browser. For more information, refer to ↑4.2, Browser.
(3) KOMPLETE KONTROL menu: Opens the KOMPLETE KONTROL menu, which contains a number of general functions and settings, including the Preferences.
(4) Preset display: Displays the name of the loaded Preset file or KONTAKT key switch. The arrow buttons on the right skip to the next Preset file in the Browser’s Results list.
Header
(5) Perform panel button: Shows or hides the Perform panel, which gives you access to the parameters of the Scale engine and the Arpeggiator. The Perform panel button lights up blue
when the Scale engine and/or the Arpeggiator are enabled. For more information, refer to ↑4.3,
Perform Panel.
(6) Plug-in panel button: Shows or hides the Plug-in panel, which allows you to customize the
parameter mapping for the Control section on the keyboard for every Preset file. For more information, refer to ↑4.4, Plug-in Panel.
(7) Plug-in chain panel button: Shows or hides the Plug-in chain panel and lights up white when
enabled. For more information, refer to ↑4.5, Plug-in Chain Panel.
(8) View button: Switches between Default view and Additional view of the loaded Instrument.
The View button only appears if the loaded Instrument contains an Additional view. The View
button is not available when an Effect is selected.
KOMPLETE KONTROL S-Series - Manual - 41
Page 42

Software Overview
(9) Keyboard button: Shows the currently connected keyboard, S49, S61, or S88. If multiple
instances of the KOMPLETE KONTROL software are running (for example in a host), clicking
the button connects the keyboard to this instance. This indicator only appears if at least one
compatible device is connected. For more information, refer to ↑6.2, Switching Instances.
(10) Transport controls: Lets you start, stop, and reset the internal clock. When KOMPLETE KONTROL is loaded as a plug-in in a host, the transport automatically follows the host
transport and this feature is greyed out. For more information, refer to ↑6.3, Transport and
Tempo.
(11) Tempo control: Lets you adjust the tempo in BPM (beats per minute). For more information, refer to ↑6.3, Transport and Tempo.
(12) Master Volume control: Lets you adjust the overall output volume of KOMPLETE KONTROL. The meter shows the current peak level of the output signal. For more information, refer
to ↑6.4, Adjusting Master Volume.
(13) CPU meter: Represents the current load on your computer’s processor; it should not go
above 70% to avoid clicks and interruptions.
(14) MIDI Assignment editor button: Lets you to access all the settings related to the keyboard’s
MIDI mode, as well as pedals. This button only appears in the KOMPLETE KONTROL standalone application. For more information, refer to ↑8, Using the MIDI Assignment Editor.
Header
(15) NI logo: The NI logo opens the About screen, which shows the version number of the
KOMPLETE KONTROL software.
KOMPLETE KONTROL S-Series - Manual - 42
Page 43

Software Overview
4.2 Browser
The Browser provides you access to your KOMPLETE KONTROL Library and lets you add, edit,
and organize Preset files. It consists of the Library pane together with the Product selector,
and of the Files pane which are explained in the following overviews.
For more information on using the Browser and managing your Preset files, refer to ↑10,
Browsing the Library, ↑11, Working with Effects, respectively ↑12, Managing the Library.
Browser
KOMPLETE KONTROL S-Series - Manual - 43
Page 44

1
3
4
5
6
7
8
9
10
11
2
Software Overview
4.2.1 Library Pane
The Library pane is where you browse for Instruments, Effects, and Preset files. It consists of
the following elements:
Browser
The Library pane.
(1) Library: Displays the Library pane.
(2) Product Type icon: Displays the current context either of browsing for Instruments or browsing for Effects. This is determined automatically by the currently selected Plug-in slot in the
Plug-in chain. For more information on switching between Product Types, refer to ↑10.1.1,
Product Types: Instrument and Effect.
(3) Content selector: The Globe icon selects factory content and the User icon selects user content. Only Preset files of the selected content type are displayed in the Results list (8). For
more information, refer to ↑10.4, Choosing Between Factory Content and User Content.
KOMPLETE KONTROL S-Series - Manual - 44
Page 45

Software Overview
(4) Product selector: Selects a particular Instrument or Effect, Instrument category, and Bank
of the selected Product. Only Preset files matching your selection are displayed in the Results
list (8). For more information, refer to ↑4.2.2, Product Selector.
(5) TYPES: Lets you browse for Preset files based on Type and Sub-Type tags that have been
applied to them. You can collapse or expand this section by clicking on the little arrow next to
TYPES. For more information, refer to ↑10.8, Types and Modes Tag Filters.
(6) MODES: Lets you browse for Preset files based on Mode tags that have been applied to
them. You can collapse or expand this section by clicking on the little arrow next to MODES.
For more information, refer to ↑10.8, Types and Modes Tag Filters.
(7) Favorites: Lets you filter the search results by Favorites. When enabled, only favorite Preset
files are displayed in the Results list (8). For more information, refer to ↑10.9, Working with
Favorites.
(8) Results list: Displays all Preset files that match your entered search criteria. For more information, refer to ↑10.3, Loading Preset Files.
(9) Control bar: Provides useful tools when browsing and editing the KOMPLETE KONTROL Library:
▪ The Information button (i) displays additional information for the selected Preset file(s).
Browser
▪ The EDIT button opens the Attribute editor for displaying and editing the tags and properties
of the selected Preset file(s).
For more information, refer to ↑10.11, Displaying Preset File Information.
(10) Prehear controls: Lets you audition Preset files. For more information, refer to ↑10.12, Au-
ditioning your Preset Files.
(11) Search field: Lets you perform a text search. For more information, refer to ↑10.10, Per-
forming a Text Search.
KOMPLETE KONTROL S-Series - Manual - 45
Page 46

3
2
1
Software Overview
4.2.2 Product Selector
When browsing for Instruments or Effects the Product selector allows you to limit your search
to a certain category, a particular Product, and Banks of Instruments.
Browser
The Product selector.
(1) Product selector header: The header displays the selected Product. If there is no selection it
shows a generic label (All Instruments or All Effects). A click on the header opens or closes the
Product selector.
KOMPLETE KONTROL S-Series - Manual - 46
Page 47

Software Overview
(2) Category / Vendor selector: Allows you to sort the Product list by Category or by Vendor.
(3) Product list: Displays all Products that are available in your KOMPLETE KONTROL Library.
If Category is selected in the Category / Vendor selector, the Product list is sorted by the following categories:
▪ DRUMS & PERCUSSION
▪ SAMPLED INSTRUMENTS
▪ SYNTHESIZERS
▪ NO CATEGORY
If Vendor is selected in the Category / Vendor selector, the Product list is sorted by the names
of the manufacturers.
For more information, refer to ↑10.5, Filtering Preset Files by Product and ↑10.6, Filtering
Preset Files by Bank.
Browser
KOMPLETE KONTROL S-Series - Manual - 47
Page 48

4.2.3 Files Pane
2
3
5
6
1
4
The Files pane contains following elements:
Software Overview
Browser
The Files pane in the Browser.
(1) Files: Displays the Files pane. For more information, refer to ↑12.4, Working with the Files
Pane.
KOMPLETE KONTROL S-Series - Manual - 48
Page 49

Software Overview
(2) Favorite bar: Displays all your favorite folders. A click on any favorite folder lets you jump
directly to that particular path and display its content in the Result list (5). For more information, refer to ↑12.4.4, Working with File Location Favorites.
(3) Location bar: Displays the selected path. The Location bar provides various tools to quickly
navigate your file system. For more information, refer to ↑12.4.2, Navigating to File Locations
with the Location Bar.
(4) Recent Locations button: Opens a list of the last visited locations for quickly jumping to any
of them. For more information, refer to ↑12.4.3, Navigating to Recent File Locations.
(5) Results list: Displays the content (files and folders) of the folder shown in the Location bar.
Only files compatible with KOMPLETE KONTROL are displayed. For more information, refer to
↑12.4.1, Additional Results List Features List in the Files Pane.
(6) Control bar: Provides useful tools when browsing your file system:
▪ The Information button (i) displays additional information about the selected files.
▪ The IMPORT button lets you import the content of the selected folder to the KOM-
PLETE KONTROL Library. Before any files are imported, you can choose which tags will be
assigned to the files in the Attribute editor.
For more information, refer to ↑12.3, Editing the Tags and Properties of User Preset Files and
↑12.7, Importing KOMPLETE KONTROL-Compatible User Files.
Browser
4.2.4 Browser on the Keyboard
On the keyboard displays, the Browser is organized as follows:
The Browser on the keyboard´s displays.
KOMPLETE KONTROL S-Series - Manual - 49
Page 50

1 2 3
Software Overview
▪ The left display shows the Product selector parameters which allow you to narrow your
search by selecting the content type (factory or user content), as well as a Product category, a Product, a BANK, and a SUB-BANK.
▪ The right display shows the parameters to further refine your search by selecting the de-
sired TYPE and possibly MODE tags. It also shows you the corresponding Results list.
4.3 Perform Panel
The Perform panel lets you access all the parameters related to the Scale engine and the Arpeggiator.
Perform Panel
The Perform panel.
(1) SCALE: Clicking the round button left of SCALE switches the Scale engine on or off. Clicking the SCALE label displays the Scale engine’s parameters. See ↑14, Smart Play – Playing
and Editing Scales and Chords for details.
(2) ARP: Clicking the round button left of ARP switches the Arpeggiator on or off. Clicking the
ARP label displays the Arpeggiator’s parameters. See ↑15, Smart Play – Playing and Editing
Arpeggiator Sequences for details.
(3) Parameter pages: If multiple pages of parameters are available, you can switch between
them here.
KOMPLETE KONTROL S-Series - Manual - 50
Page 51

Software Overview
(1) SCALE: Clicking the round button left of SCALE switches the Scale engine on or off. Clicking the SCALE label displays the Scale engine’s parameters. See ↑14, Smart Play – Playing
and Editing Scales and Chords for details.
(2) ARP: Clicking the round button left of ARP switches the Arpeggiator on or off. Clicking the
ARP label displays the Arpeggiator’s parameters. See ↑15, Smart Play – Playing and Editing
Arpeggiator Sequences for details.
(3) Parameter pages: If multiple pages of parameters are available, you can switch between
them here.
For more information, refer to ↑14, Smart Play – Playing and Editing Scales and Chords.
4.4 Plug-in Panel
The Plug-in Panel lets you view and customize the parameters mapped to the Control section
on the KOMPLETE KONTROL keyboard for individual Preset files. The amount of pages and
parameters vary depending on the loaded Instrument or Effect.
Plug-in Panel
The Plug-in Panel.
For more information, refer to ↑13.4, Customizing Parameter Mappings using the Plug-in Pan-
el.
KOMPLETE KONTROL S-Series - Manual - 51
Page 52

1
2
Software Overview
Plug-in Chain Panel
4.5 Plug-in Chain Panel
The Plug-in chain panel is situated at the top of the Plug-in area. The Plug-in chain is the
place where you can directly load Instrument Plug-ins (Plug-in slot 1) and Effect Plug-ins
(Plug-in slot 2 onwards) and arrange them in horizontal series. Each Plug-in is loaded into a
Plug-in slot to create the Plug-in chain. The arrangement of the Plug-ins is customizable, but
only an Instrument can be loaded in to the first Plug-in slot.
Overview of the Plug-in Chain Panel
(1) Plug-in chain: Displays the loaded Instrument and Effects.
(2) Plug-in slot: Each Plug-in slot represents a Plug-in and displays the Product’s name and image. Use the Plug-in slots to directly load Plug-ins, bypass Effects and customize the order.
For more information, refer to ↑11, Working with Effects.
KOMPLETE KONTROL S-Series - Manual - 52
Page 53

1 32 4
5
6
Software Overview
MIDI Assignment Editor
4.6 MIDI Assignment Editor
The MIDI Assignment editor allows you to define what kind of MIDI messages are assigned to
the controls on the KOMPLETE KONTROL keyboard in MIDI mode. This way you can use the
keyboard with MIDI applications or MIDI devices that require specific MIDI messages to be
sent in order to control certain parameters or functions. Multiple templates can be configured
for quick recall, allowing you to prepare controller assignments for different applications and/or
devices. The MIDI Assignment editor lets you change the assignments for the knobs, buttons,
the Touch Strip in the keyboard’s Control section, as well as for connected pedals.
Overview of the MIDI Assignment editor.
(1) Templates pane: Allows you to create and manage your Templates for MIDI assignments.
(2) Templates pane button: Shows/hides the Templates pane.
(3) KNOBS, BUTTONS, PEDALS, TOUCHSTRIP: Here you can select the type of control element to which you can make MIDI assignments.
(4) Pages / Pedal A and Pedal B: For the knobs and buttons you can have multiple assignments, organized in pages. Here you can select and manage up to four pages. Pedal Assignments are global and not distinct per Template. Pedals A and B can be independently configured.
For the pedals it is not possible to have multiple assignments.
KOMPLETE KONTROL S-Series - Manual - 53
Page 54

MIDI Assignment Editor
(5) Control elements: Here you can select the control element for a MIDI assignment.
(6) Definition area: Defines the MIDI assignment properties for the selected control element.
For more information, refer to ↑8, Using the MIDI Assignment Editor.
Software Overview
KOMPLETE KONTROL S-Series - Manual - 54
Page 55

Software Overview
4.7 Plug-in Area
The Plug-in area of the KOMPLETE KONTROL software is where your Instruments and Effects
are displayed once you have loaded them from the Browser. Each Instrument offers a different
set of controls and parameters that are all easily controlled directly on the computer screen or
from the keyboard. Parameter changes are mutually reflected by both the displays on the keyboard and the Instrument’s user interface in the Plug-in area.
For most Instruments, additional views are available that give you access to another set of controls.
See ↑6.1, Instrument Views for details.
Plug-in Area
The Plug-in area displaying the Instrument Form.
KOMPLETE KONTROL S-Series - Manual - 55
Page 56

1 2 5 6
7
8
9
10
43
11
Keyboard Overview
5 Keyboard Overview
The KOMPLETE KONTROL keyboard is tightly integrated into the software and can be used to
browse, control and play your Products as well as to control supported hosts.
The keyboard is available in three sizes: The S49, and S61 are equipped with the same topquality semi-weighted Fatar keybed with aftertouch. The S88 comes with professional, fullyweighted, hammer-action keys, also made by Fatar. Beyond the keybed, all keyboards come
with identical features.
The keyboard is equipped with the following sections:
Top View
KOMPLETE KONTROL S49
(1) Transport section: Controls the transport of supported hosts when KOMPLETE KONTROL is
used as a plug-in. For more information, refer to ↑5.2, Transport Section.
KOMPLETE KONTROL S-Series - Manual - 56
Page 57

Keyboard Overview
(2) Perform and Edit section: Lets you edit and control the Smart Play features, e.g., playing
scales, chords, and arpeggiator sequences. The settings made in the Perform and Edit section
are displayed in the Control section (5) and are reflected by the Light Guide and keybed (7).
For more information, refer to ↑5.1, Perform and Edit Section.
(3) Solo and Mute buttons: Let you instantly solo and mute any Sound or Group in supported
hosts. For more information, refer to ↑9, Host Integration.
(4) Arrange buttons: Let you switch between the different arrangement views and modes in supported hosts. For more information, refer to ↑9, Host Integration.
(5) Control section: The knobs and displays are automatically assigned to parameters of the
loaded Product or selected mode. For more information, refer to ↑5.3, Control Section.
(6) Navigation and Mode buttons: Lets you browse your KOMPLETE KONTROL Library and navigate in your DAW with the 4-D encoder, as well as directly access functions like the Mixer and
MIDI mode. For more information, refer to ↑5.5, 4-D Encoder and ↑5.4, Mode Buttons.
(7) Keybed and Light Guide: Reflect the Smart Play functions by switching LEDs on or off to
indicate active and inactive keys. The Light Guide also reflects the settings of the loaded Instrument and can be very helpful to illustrate e.g., BATTERY or KONTAKT mappings. For more
information, refer to ↑5.6, Keybed and Light Guide.
(8)Touch Strip: The Touch Strip can be assigned to parameters via the MIDI learn function of
the loaded Instrument. For more information, refer to ↑5.7, Touch Strip.
(9) Pitch and Modulation Wheels: The Pitch Wheel on the left lets you adjust the pitch of the
loaded Instrument. The Modulation Wheel on the right lets you adjust the default modulation
parameter of the loaded Instrument.
(10) Transpose and Fixed Velocity buttons: The FIXED VEL (TS Mode) button sets the note velocity for all keys to a fixed value of 127. The OCTAVE (Semi) down / up buttons transpose the
entire keybed an octave down / up. Pressing SHIFT + OCTAVE (Semi) down / up transposes the
entire keybed a semitone down / up. For more information, refer to ↑5.8, Transpose and Fixed
Velocity Buttons.
(11) Preset and Page buttons: The PRESET up / down buttons let you skip to the next or previous Preset file of the loaded Product. The Page left / right buttons let you skip to the next parameter page and thus remap the knobs and displays to another set of parameters.
KOMPLETE KONTROL S-Series - Manual - 57
Page 58

1 2 3 4 5 6
Keyboard Overview
Rear View
Keyboard Interface rear view.
(1) Kensington Lock: Allows you to attach a Kensington Lock to secure your device from theft.
(2) MIDI IN/OUT socket: Connect devices for MIDI control. For more information, refer to ↑3.5,
Connecting External MIDI Equipment to the Keyboard.
(3) Pedal A and Pedal B sockets: Connects sustain and expression pedals. For more information, refer to ↑3.4, Connecting Pedals to the Keyboard.
(4) PSU socket (15V - 1.2A): Connects the optional power supply which can be purchased separately in the Native Instruments online shop.
(5) USB connector: Connects the keyboard to your computer with the supplied USB cable.
(6) Power button: Switches the keyboard on and off.
KOMPLETE KONTROL S-Series - Manual - 58
Page 59

1 2 3
45
6
Keyboard Overview
Perform and Edit Section
5.1 Perform and Edit Section
The buttons in the Perform and Edit section on the far left of the KOMPLETE KONTROL keyboard allow you to activate the Scale engine, the Arpeggiator, and also access their parameters. The parameters are visible in the display and can be adjusted using the knobs in the Control section.
The Perform and Edit section.
(1) SHIFT: Lets you access the secondary functions of buttons labeled as such, for example,
the Edit functions of the SCALE (Edit) and ARP (Edit) buttons.
(2) SCALE (Edit): Switches the Scale engine on or off, and lets you edit the Scale engine parameters. For more information, refer to ↑14, Smart Play – Playing and Editing Scales and
Chords.
(3) ARP (Edit): Switches the Arpeggiator on or off, and lets you edit the Arp parameters. For
more information, refer to ↑15, Smart Play – Playing and Editing Arpeggiator Sequences.
(4) AUTO: Lets you activate or deactivate automation in supported hosts. For more information,
refer to ↑9, Host Integration.
(5) QUANTIZE: Lets you quantize events to the step grid in supported hosts. For more information, refer to ↑9, Host Integration.
KOMPLETE KONTROL S-Series - Manual - 59
Page 60

Keyboard Overview
Perform and Edit Section
(6) UNDO (Redo): Lets you undo or redo your last action in supported hosts. For more information, refer to ↑9, Host Integration.
KOMPLETE KONTROL S-Series - Manual - 60
Page 61

1 2 3
45
6
Keyboard Overview
Transport Section
5.2 Transport Section
In supported hosts, the TRANSPORT section at the far left on the keyboard provides you quick
and easy access to functions like play, record, loop, etc.
Transport section.
(1) LOOP: Switches between standard and loop playback.
(2) METRO: Switches the metronome on or off.
(3) TEMPO: Tapping this button lets you set the tempo.
(4) STOP: Ends playback.
(5) REC (Count-in): REC (Count-in) switches record on or off. SHIFT + REC (Count-in) switches
the count-in on or off.
(6) PLAY (Restart): PLAY (Restart) starts playback. SHIFT + PLAY (Restart) starts playback
from the beginning.
KOMPLETE KONTROL S-Series - Manual - 61
Page 62

1
2
3
Keyboard Overview
Control Section
5.3 Control Section
The Control section is located at the center of the KOMPLETE KONTROL keyboard. The knobs,
buttons, and displays are automatically assigned to parameters of the loaded Product or selected mode. They provide immediate control and allow for deep editing of various aspects of
KOMPLETE KONTROL.
The controls of the Control section.
(1) Buttons 1-8: The eight buttons dynamically adapt their assignment to the selected mode,
allowing for direct access to the most important functions and sub-sections. The displays show
the current assignment below each button.
(2) Displays: The displays give you information related to the shown Product or selected mode,
and show the functions and parameters assigned to the buttons and knobs.
(3) Knobs 1-8: The eight knobs dynamically adapt their assignment to the selected mode, allowing for direct access to the available parameters. The displays show the current assignment
above each knob. As the knobs are touch-sensitive, you can tap them to see additional information.
KOMPLETE KONTROL S-Series - Manual - 62
Page 63

1 2 3
6
5 4
Keyboard Overview
5.4 Mode Buttons
The Mode buttons let you browse your KOMPLETE KONTROL Library as well as directly access
functions like the Mixer and MIDI mode.
Mode Buttons
Mode Buttons.
(1) BROWSER: Displays the Browser in the Control section. For more information, refer to ↑10,
Browsing the Library.
(2) PLUG-IN: Displays the Plug-in Chain and the selected plug-in the Control section. For more
information, refer to ↑11, Working with Effects.
(3) MIXER: Displays the mixer of supported hosts in the Control section. For more information,
refer to ↑9, Host Integration.
(4) SETUP: Displays the hardware serial number and the firmware version, and lets you change
the display brightness. For more information, refer to ↑6.6, Keyboard Settings.
(5) MIDI: Accesses MIDI mode that allows you to use the KOMPLETE KONTROL keyboard as a
MIDI controller. For more information, refer to ↑7, MIDI Communication.
KOMPLETE KONTROL S-Series - Manual - 63
Page 64

Keyboard Overview
(6) INSTANCE: When using KOMPLETE KONTROL as a plug-in in a host without advanced integration, this button lets you switch between KOMPLETE KONTROL instances and MIDI
Mode. For more information, refer to ↑6.2, Switching Instances and ↑9, Host Integration.
Mode Buttons
KOMPLETE KONTROL S-Series - Manual - 64
Page 65

Keyboard Overview
5.5 4-D Encoder
The 4-Directional Push Encoder (referred to as the 4-D encoder) combines the functionalities
of a conventional joystick, of a button, and of a continuous encoder. These aspects make it a
multi-functional control element that can be used for navigation, for adjusting values of parameters, and for controlling Products. Hence, it can be pushed to the four directions: up, down,
left, and right, as well as being pressed and rotated.
4-D Encoder
The 4-D encoder situated below the Mode buttons.
Depending on the menu or context, the available actions differ:
▪ The displays are navigated by pushing the 4-D encoder in a direction indicated by the four
LEDs.
▪ Entries in a list are browsed by turning the 4-D encoder.
▪ The value of a highlighted parameter is adjusted by turning the 4-D encoder.
▪ A selection is confirmed by pressing the 4-D encoder.
For more information, refer to ↑10, Browsing the Library, ↑11, Working with Effects, and ↑13,
Controlling Instrument and Effect Parameters.
KOMPLETE KONTROL S-Series - Manual - 65
Page 66

Keyboard Overview
Keybed and Light Guide
5.6 Keybed and Light Guide
The keybed lets you play the loaded Instrument. The Light Guide above the keybed visualizes
the key mapping of loaded Instruments and samples by color coding. Active and inactive keys
respectively sample based Instruments are indicated by the LEDs. The Light Guide also reflects the Smart Play settings. This means when you select e.g., a scale or chord, the LEDs
corresponding to the keys contained in that scale or chord will light up, whereas inactive keys
remain unlit. The Light Guide also gives you visual feedback when you play back incoming
MIDI note patterns from the host.
The Light Guide.
For more information, refer to ↑13, Controlling Instrument and Effect Parameters, ↑14, Smart
Play – Playing and Editing Scales and Chords, and ↑15, Smart Play – Playing and Editing Arpeggiator Sequences.
KOMPLETE KONTROL S-Series - Manual - 66
Page 67

Keyboard Overview
5.7 Touch Strip
The Touch Strip is an intuitive control element that gives you immediate control over Instrument parameters. It can send MIDI pitch bend or control change messages and can be configured in the MIDI Assignment editor.
The Touch Strip.
For more information, refer to ↑8, Using the MIDI Assignment Editor.
Touch Strip
KOMPLETE KONTROL S-Series - Manual - 67
Page 68

1 2 3
Keyboard Overview
Transpose and Fixed Velocity Buttons
5.8 Transpose and Fixed Velocity Buttons
Transpose and Fixed Velocity Buttons.
(1) FIXED VEL (TS Mode) : Sets the note velocity for all keys to a fixed value of 127. By default, the keys are sensitive to velocity: The harder you hit them, the louder the sound will be.
With Fixed Velocity enabled, your pads play at the same volume no matter how hard you hit
them.
(2 - 3) OCTAVE (Semi) down and OCTAVE (Semi) up : Transpose the entire keybed one octave
down / up. Pressing SHIFT + OCTAVE (Semi) down / up transposes the entire keybed a semitone down / up. Pressing both buttons simultaneously resets the keybed to the central octave.
KOMPLETE KONTROL S-Series - Manual - 68
Page 69

Global Controls and Preferences
Instrument Views
6 Global Controls and Preferences
This sections introduces the global controls and the Preferences you can access via the Header
of KOMPLETE KONTROL.
6.1 Instrument Views
Once you have loaded an Instrument from the Browser, it appears in the Plug-in area of the
KOMPLETE KONTROL software. Most KOMPLETE Instruments come equipped with more than
one view, giving you access to another set of controls or letting you edit certain features in finer detail. The three possible Instrument views are Default View, Additional View, and Edit View
which can be selected directly in the KOMPLETE KONTROL menu.
Instrument views in the KOMPLETE KONTROL menu.
► Alternatively, you can switch between Default View and Additional View by clicking on the
View button in the Header (+ icon).
All Instrument parameters can be controlled at all time from the KOMPLETE KONTROL keyboard, regardless of the selected Instrument view in the KOMPLETE KONTROL software.
The available views may vary with the loaded Instrument.
KOMPLETE KONTROL S-Series - Manual - 69
Page 70

Global Controls and Preferences
Instrument Views
6.1.1 Default View
The Default View is the view that first appears when you load an Instrument from the Browser.
It gives you access to some of the most important features of each NKS Instrument with an
easy-to-use interface.
POLYPLEX in Default View.
6.1.2 Additional View
Most NKS Instruments have more parameters that can be displayed at once in small surface
and therefore come with a second, Additional View. The Additional View can give you access to
detailed edit controls or to a completely different set of controls altogether depending on the
loaded Instrument.
KOMPLETE KONTROL S-Series - Manual - 70
Page 71

Global Controls and Preferences
Instrument Views
POLYPLEX in Additional View.
Besides of selecting Additional View via the KOMPLETE KONTROL Menu and the application
menu, you can also do this by clicking the + button in the KOMPLETE KONTROL header.
Clicking it again will return to the Default View.
The + button opens and closes the Additional View.
KOMPLETE KONTROL S-Series - Manual - 71
Page 72

Global Controls and Preferences
Instrument Views
6.1.3 Edit View
Edit view is only available for Instruments powered by KONTAKT or REAKTOR.
In the Edit View you have also the possibility to open any KOMPLETE Instrument that can be
loaded or played by either the KONTAKT PLAYER or REAKTOR PLAYER. This gives you access
to all the flexible controls and features you would normally have when using KONTAKT or REAKTOR in stand-alone mode.
POLYPLEX in Edit View.
Edit view enables you to access files that cannot be loaded from the KOMPLETE KONTROL Browser, e.g., KONTAKT Multis which can be loaded from the KONTAKT Browser in edit view.
KOMPLETE KONTROL S-Series - Manual - 72
Page 73

Global Controls and Preferences
Switching Instances
6.2 Switching Instances
When two or more instances of the KOMPLETE KONTROL software are running (e.g., as a
plug-in on different tracks of the host), you can choose which instance you want to control
from the KOMPLETE KONTROL keyboard.
Switching to an Instance from the Software
► To switch the keyboard to a particular instance of the KOMPLETE KONTROL software,
click the Connect button (keyboard icon) in the header of that instance.
Automatic Switching in a Host
When using KOMPLETE KONTROL as a plug-in in a host with advanced integration, the keyboard automatically switches between controlling the KOMPLETE KONTROL software and
MIDI mode, depending on the content of the selected track.
▪ If you select a track that hosts the KOMPLETE KONTROL plug-in, the keyboard automati-
cally switches to this instance of the KOMPLETE KONTROL software. This allows you to
immediately control all of your Product’s parameters from the keyboard.
▪ If you select a track that does not host the KOMPLETE KONTROL plug-in, the keyboard
automatically switches to MIDI mode. This allows you to assign the available controls on
the keyboard to parameters in the host or in an inserted plug-in via MIDI learn (if supported).
► To select a track in a supported host from the keyboard, push the 4-D encoder up or down
until the track is highlighted.
KOMPLETE KONTROL S-Series - Manual - 73
Page 74

Global Controls and Preferences
Switching Instances
Switching to an Instance from the Keyboard
If you use KOMPLETE KONTROL as a plug-in in a host without advanced integration, you cannot rely on automatic switching between instances. However, you can still select a particular
instance of the KOMPLETE KONTROL software from the keyboard using its displays and 4-D
encoder.
To display and switch between KOMPLETE KONTROL instances from the keyboard, follow the
instructions below:
1. Press the INSTANCE button to show all active instances of the KOMPLETE KONTROL
software on the keyboard displays.
2. Use the 4-D encoder to select an instance.
3. Press the 4-D encoder to switch to the selected instance.
→ You can now control the selected instance of the KOMPLETE KONTROL software from the
keyboard.
KOMPLETE KONTROL S-Series - Manual - 74
Page 75

2 3
1
Global Controls and Preferences
Transport and Tempo
6.3 Transport and Tempo
If KOMPLETE KONTROL is used as a stand-alone application, it features its own Transport
and Tempo controls. They are used by sequenced KONTAKT and REAKTOR Instruments as
well as the Arpeggiator. Additionally, the tempo is used by all Instruments that allow you to set
timing parameters in relation to the musical tempo (e.g., rhythmic modulation, delay effects).
You can find the Transport and Tempo controls in the Header:
Transport and tempo controls in KOMPLETE KONTROL.
(1) Play button: Starts and stops the internal clock. This can be used to control the playback of
sequenced KONTAKT and REAKTOR Instruments.
(2) Reset button: Resets the internal clock to its start position. Consequently, sequencers in
KONTAKT and REAKTOR Instruments will start their playback from the beginning. The same
applies to the Arpeggiator.
(3) Tempo control: Sets the tempo in BPM (beats per minute).
When using KOMPLETE KONTROL as a plug-in, it is automatically synchronized to the host. Therefore the Transport and Tempo controls are grayed out and inactive.
KOMPLETE KONTROL S-Series - Manual - 75
Page 76

Global Controls and Preferences
Transport and Tempo
6.3.1 Resetting the Clock
You can reset the clock in the software and from the keyboard.
Resetting the Clock in the Software
▪ When the internal clock is stopped, clicking the Reset button allows you to reset the inter-
nal clock. Clicking the Play button will start playback from the beginning.
▪ When the internal clock is running, clicking the Reset button allows you to reset the inter-
nal clock and resume playback from the beginning.
Resetting the Clock from the Keyboard
▪ When the internal clock is stopped, pressing STOP allows you to reset the internal clock.
Pressing PLAY (Restart) will start playback from the beginning.
▪ When the internal clock is stopped, pressing SHIFT + PLAY (Restart) allows you to reset
the internal clock and start playback from the beginning.
▪ When the internal clock is running, pressing SHIFT + PLAY (Restart) allows you to reset
the internal clock and resume playback from the beginning.
6.3.2 Adjusting Tempo
You can adjust the tempo in the software and from the keyboard.
Adjusting Tempo in the Software
The Tempo control allows you to set the tempo in BPM (beats per minute):
1. Click the display and drag the mouse up or down.
2. Alternatively, you can double-click the display and enter a value numerically.
→ The tempo adjusts in increments of one.
KOMPLETE KONTROL S-Series - Manual - 76
Page 77

Global Controls and Preferences
Adjusting Master Volume
Adjusting Tempo from the Keyboard
You can also use the KOMPLETE KONTROL keyboard to set the tempo in BPM (beats per minute):
► Hold TEMPO + turn Knob 1 in the Control section.
→ The tempo is adjusted in increments of 1 BPM.
6.4 Adjusting Master Volume
The Master Volume slider lets you adjust the overall output volume of KOMPLETE KONTROL.
The Volume meter shows the current peak level of the output signal.
Master Volume controls.
In order to adjust the output volume:
► Click and drag the slider to the left or to the right.
→ This will adjust the output volume in 0.5dB increments from -30dB to +10dB. Below
-30dB, the keyboard’s volume control is exponentially scaled and quickly lowers the output signal to complete silence.
Adjusting Master Volume with the Keyboard
To adjust the output volume on the keyboard:
► Press and hold SHIFT + turn the Knob 1.
KOMPLETE KONTROL S-Series - Manual - 77
Page 78

Global Controls and Preferences
6.5 Preferences
In the Preferences you can specify various settings for KOMPLETE KONTROL.
To open the Preferences:
► Click Edit > Preferences in the KOMPLETE KONTROL menu:
6.5.1 Preferences – Audio Page
The Audio page holds settings related to your audio interface when KOMPLETE KONTROL is
running as a stand-alone application.
Preferences
When using KOMPLETE KONTROL as a plug-in, the audio configuration is managed by the host,
and the Audio page is not available.
The Routings section allows you to configure the connections between the virtual outputs of
KOMPLETE KONTROL and the physical outputs of your audio interface.
KOMPLETE KONTROL S-Series - Manual - 78
Page 79

Global Controls and Preferences
Preferences
Preferences panel — Audio page
Setting Description
Driver Here you can select the audio driver.
Device This allows you to choose from the available devices if you have
connected more than one audio interface.
Status This shows you whether your audio interface is currently
running.
Sample Rate This displays the selected sample rate of your audio interface.
Please restart KOMPLETE KONTROL after changing the sample
rate.
KOMPLETE KONTROL S-Series - Manual - 79
Page 80

Global Controls and Preferences
Setting Description
Buffer Size macOS: This slider allows you to adjust the buffer size of your
audio interface in samples. Lower values result in a more
immediate playing response but increase the CPU load, and
may result in audible clicks and pops. Larger values decrease
the CPU load but introduce a larger latency (a small delay
between hitting a pad and hearing it). It is recommended to find
the lowest value that does not cause clicks and pops even when
playing more demanding Products.
Windows: When using an ASIO driver, the Audio page shows an
ASIO Config button instead of the Buffer Size slider. Click this
button to open the settings window of the selected ASIO driver.
Preferences
Latency
This shows the delays introduced by the current Buffer Size
setting.
Routings Under Routings, you will be presented with a list of the 16
stereo outputs from KOMPLETE KONTROL: In the right column,
you can assign them to the outputs of your audio interface.
Click the fields in the right column to select the desired outputs
via a drop-down menu.
KOMPLETE KONTROL S-Series - Manual - 80
Page 81

Global Controls and Preferences
6.5.2 Preferences – MIDI Page
The MIDI page allows you to set up the MIDI input and output ports that you want to use when
KOMPLETE KONTROL is running as a stand-alone application.
When using KOMPLETE KONTROL as a plug-in, the MIDI configuration is managed by the host,
and the MIDI page is not available.
Preferences
Preferences panel — MIDI page (entries may vary on your computer)
KOMPLETE KONTROL S-Series - Manual - 81
Page 82

Global Controls and Preferences
Element Description
Input Clicking Input displays a list of all the available MIDI inputs of
your system. You can activate/deactivate each input by clicking
the checkbox next to its name.
Output Clicking Output displays a list of all the available MIDI outputs
of your system. You can activate/deactivate each input by
clicking the checkbox next to its name.
The MIDI Output settings are required for using KOMPLETE KONTROL’s Smart Play features
with other MIDI instruments.
6.5.3 Preferences – General Page
The General page holds Usage Data Tracking settings. Usage Data Tracking technology enables
KOMPLETE KONTROL to automatically track anonymous usage data that you can choose to
share with us.
Usage Data Tracking can be enabled or disabled in the General page of the Preferences in the
KOMPLETE KONTROL software. However, we encourage all users to keep Data Tracking enabled as it provides a valuable tool for understanding the performance of Native Instruments applications when they are used in real life situations. The data sent to Native Instruments is one
hundred percent anonymous and will not affect performance.
Preferences
For more detailed information about Usage Data Tracking, please refer to the following Knowledge Base article on the Native Instruments website:
https://support.native-instruments.com/hc/en-us/articles/209545029
KOMPLETE KONTROL S-Series - Manual - 82
Page 83

Global Controls and Preferences
Preferences
Usage Data Tracking in the KOMPLETE KONTROL Preferences.
Enabling or Disabling Usage Data Tracking
To enable or disable Usage Data Tracking:
1. Open the General page of the Preferences by clicking Preferences… in the KOMPLETE KONTROL menu.
2. Click the Allow usage data tracking checkbox to enable or disable user data tracking.
KOMPLETE KONTROL S-Series - Manual - 83
Page 84

Global Controls and Preferences
6.5.4 Preferences – Library Page
The Library page allows you to edit the locations of all KOMPLETE KONTROL Library files
(both Factory and User) that appear in the Library pane of the Browser.
At the top of the page, the Factory and User buttons allow you to switch between the Factory
pane and the User pane.
Factory Pane
The Factory pane shows all factory libraries available. These libraries will appear in the Factory
view of the Browser’s Library pane.
Preferences
Preferences panel – the Library page’s Factory pane.
KOMPLETE KONTROL S-Series - Manual - 84
Page 85

Global Controls and Preferences
Element Description
Location column Shows the path of each library. If you have moved any library
to another location on your computer, click the folder icon on
the left of that library and select its new path.
Product column Shows the name of each product. These names cannot be
edited.
Rescan button If you have made any change to a library (e.g., changed its
location), select it in the list and click the Rescan button to
rescan that library.
Preferences
KOMPLETE KONTROL S-Series - Manual - 85
Page 86

Global Controls and Preferences
User Pane
The User pane shows all user libraries currently used. These include KOMPLETE KONTROL’s
standard user directory as well as any other user directory you might have defined. These libraries will appear in the User view of the Browser’s Library pane.
Preferences
Preferences panel – the Library page’s User pane.
KOMPLETE KONTROL S-Series - Manual - 86
Page 87

Global Controls and Preferences
Element Description
Location column Shows the path of each library. If you have moved any library
to another location on your computer, click the folder icon on
the left of that library and select its new path.
Alias column Shows the alias stored for each library. Click an alias to edit it.
Defining aliases for your user folders is not mandatory, but it
can be of great help when working on different computers (see
description below). After adding a location (see Add below),
click the field in the new row and in the Alias column to set
the alias for that new location. The alias of the default user
folder, Native Instruments User Directory, cannot be edited —
this is the location where all your user files will be stored by
default.
Preferences
Scan user content
for changes at start-
Enabled by default, this option automatically detects any new
added user content when starting KOMPLETE KONTROL.
up
Add button Click Add to manually add directories to the user library. See
below for more details.
Remove button Click Remove to remove the selected user library. Files will
only be removed from the KOMPLETE KONTROL Browser, not
from your hard disk.
Rescan button If you have made any change to a library (e.g., added/removed
files), select it in the list and click the Rescan button to
rescan that library.
You can resize the Preferences panel at your convenience using the usual method on your operating
system. You can also resize each column by clicking and dragging the limit between both column
headers.
KOMPLETE KONTROL S-Series - Manual - 87
Page 88

Global Controls and Preferences
Adding Folders to the User Library
In the User pane of the Library page, you can add other folders to the user content of your
KOMPLETE KONTROL Library. To do this:
1. Click Add at the bottom of the pane.
A folder selection dialog opens up.
2. In the dialog, navigate to the desired folder on your computer and click OK (Choose on
macOS).
→ All KOMPLETE KONTROL-compatible files found in the selected folder are added to your
user content in KOMPLETE KONTROL.
KOMPLETE KONTROL-compatible files include ens, rkplr, nrkt, nksn, nfm8, nabs, nki, nmsv, nbkt,
nis.
Furthermore, the attributes (Instrument/Bank/Sub-Bank, Type/Sub-Type/Mode tags, as well as
properties) of all imported files will be retained.
By adding a folder to the user content of your KOMPLETE KONTROL Library, you make their
files available in the Browser’s Library pane for quick searching and loading.
Preferences
Paths to folders added via the IMPORT button in the Browser’s Files pane will also show up here.
The only difference between adding folders via the Add button in Preferences panel described here,
and via the IMPORT button in the Files pane of the Browser is that the latter allows you to directly
tag the files as they are imported.
Note that the selected folder cannot contain, or be contained within, a folder already listed in
the User or Factory pane. If KOMPLETE KONTROL detects such a folder as you press OK
(Choose on macOS) in the folder selection dialog, a Duplicate Location message appears: Click
OK to return to the folder selection dialog and select another folder on your computer.
Removing Folders from the User Library
You can also remove any user folder from your library—except the default user content directory Native Instruments User Content.
KOMPLETE KONTROL S-Series - Manual - 88
Page 89

Global Controls and Preferences
6.5.5 Preferences – Plug-ins Page
The Plug-ins page allows you to manage your VST plug-ins in KOMPLETE KONTROL.
At the top of the page, the Manager and Locations buttons allow you to switch between the
Manager pane and the Locations pane.
Manager Pane
The Manager Pane allows you to view and manage all VST plug-ins available in KOMPLETE KONTROL. By default, all available plug-ins are activated for use in KOMPLETE KONTROL.
► To deactivate a plug-in for use in KOMPLETE KONTROL, click on the checkbox icon next
to its name so it is unchecked.
The option to Always use latest version of NI Plug-ins selects whether or not your Library content is always loaded with the latest version of the associated plug-in. If this option is disabled,
your Library content is loaded with the lowest required version of the associated plug-in found
on the computer.
Preferences
For example, this option is required if you have installed both the full version of REAKTOR 5 as well
as a KOMPLETE Instrument that came with REAKTOR 6 Player. By disabling the option, the REAKTOR 5 Factory Library will be loaded with the full version of REAKTOR 5, while the KOMPLETE Instrument will be loaded with REAKTOR 6 Player. This is necessary since the REAKTOR 5 Factory
Library is not authorized for use with REAKTOR 6 Player.
KOMPLETE KONTROL S-Series - Manual - 89
Page 90

Global Controls and Preferences
Preferences
Preferences panel — the Plug-ins page's Manager pane.
Element Description
Checkbox column Activates or deactivates a plug-in for use in
KOMPLETE KONTROL.
Plug-in column Lists all available VST plug-ins in KOMPLETE KONTROL.
Always use latest
version of NI Plugins
If this option is enabled (default), Library content is loaded
with the latest version of the associated plug-in.
If this option is disabled, Library content is loaded with the
lowest required version of the associated plug-in.
KOMPLETE KONTROL S-Series - Manual - 90
Page 91

Global Controls and Preferences
Locations Pane
The Locations pane allows you manage the folders containing your plug-ins on the hard drive.
KOMPLETE KONTROL scans these folders for VST plug-ins and adds them to the Manager
pane. You can Add and Remove folders from the list, as well as use the Rescan function to
update the available plug-ins in KOMPLETE KONTROL according to any changes made to the
folders or their contents.
► To display the Locations pane, click the Locations button at the top of the Plug-ins page.
Preferences
Preferences panel — the Plug-ins page's Locations pane.
KOMPLETE KONTROL S-Series - Manual - 91
Page 92

Global Controls and Preferences
Keyboard Settings
Setting Description
Plug-in column Lists all folders that KOMPLETE KONTROL scans for VST
plug-ins.
Add Opens a file dialogue that lets you add another folder to the
list.
Remove Removes the selected folder from the list.
Rescan Scans all folders in the list for compatible plug-ins and
updates the Manager pane accordingly.
6.6 Keyboard Settings
The KOMPLETE KONTROL keyboard’s SETUP page gives you access to information and settings related to the hardware.
► To open the SETUP page, press the SETUP button on the keyboard.
The following information and settings are available:
▪ Firmware: The version number of the firmware installed on the keyboard.
▪ Serial Nr.: The hardware serial number of the keyboard.
KOMPLETE KONTROL S-Series - Manual - 92
Page 93

Global Controls and Preferences
Loading a Plug-in in Default State
▪ Velocity / SCALING: Lets you adjust the velocity response curve of the keybed. Use the
Soft 3, Soft 2, Soft 1 settings to compensate for gentle playing (velocity response is more
sensitive), and the Hard 1, Hard 2, Hard 3 settings to compensate for strong playing (velocity response is insensitive).
▪ Displays / BRIGHTNESS: Lets you adjust the brightness of the keyboard’s displays.
6.7 Loading a Plug-in in Default State
You can load a Plug-in in default state directly from the KOMPLETE KONTROL menu:
► In the KOMPLETE KONTROL menu select e.g., Plug-ins > Native Instruments > Massive.
KOMPLETE KONTROL S-Series - Manual - 93
Page 94

→ The Plug-in is loaded. All parameters are set to their default values.
Global Controls and Preferences
Loading a Plug-in in Default State
Loading Plug-ins in default state is only possible in the software.
KOMPLETE KONTROL S-Series - Manual - 94
Page 95

MIDI Communication
7 MIDI Communication
KOMPLETE KONTROL provides you with flexible MIDI control and host automation capabilities for easy integration with your MIDI environment. In this section you are provided with overall information about MIDI communication and Host automation and you learn how to use the
keyboard in MIDI mode and as stand-alone MIDI controller.
Incoming MIDI
KOMPLETE KONTROL and the Instruments you load inside it can be controlled via MIDI and
the host (when KOMPLETE KONTROL is loaded as a plug-in):
▪ Triggering Instruments via MIDI notes: By default, incoming MIDI notes trigger the loaded In-
strument and will also be visually reflected by the Light Guide.
▪ Controlling parameters via host automation: You can control parameters of both KOM-
PLETE KONTROL and your loaded Instruments via host automation (when KOMPLETE KONTROL is loaded as a plug-in).
Receiving MIDI Clock
KOMPLETE KONTROL does not receive MIDI Clock. However, when using KOMPLETE KONTROL as a plug-in, it is automatically synchronized to the host tempo. The tempo display in
KOMPLETE KONTROL’s header is grayed out and tempo is adjusted in the host.
Outgoing MIDI
You can also send MIDI data from KOMPLETE KONTROL:
▪ Triggering MIDI instruments and recording MIDI notes: KOMPLETE KONTROL sends MIDI
Note, Pitch Bend, and Channel Pressure (aftertouch) messages to the host and to any MIDI
application or device.
▪ Controlling MIDI applications and devices: KOMPLETE KONTROL’s MIDI mode allows you to
send Control Change and Program Change messages to any MIDI application or device.
KOMPLETE KONTROL S-Series - Manual - 95
Page 96

MIDI Communication
Host Automation
▪ Routing and recording processed MIDI notes: KOMPLETE KONTROL outputs the MIDI notes
generated by the Scale engine and the Arpeggiator through the MIDI outputs of the standalone application as well as the plug-in. You can route the MIDI notes to other MIDI instruments or record them as a MIDI pattern in the host.
MIDI output is only supported by the stand-alone application as well as the VST and AAX versions of
the plug-in. The AU (Audio Unit) version of the plug-in does not support MIDI output.
7.1 Host Automation
When you load KOMPLETE KONTROL as a plug-in in a host, the parameters of the loaded Instrument, the Scale parameters, and the Arpeggiator parameters can be automated from the
host.
7.1.1 Recording Automation
Once your host is set up to record automation you can perform the following actions in the
software as well as from the keyboard:
▪ You can enable or disable Scale and Arpeggiator functions by clicking individual buttons in
the software or by pressing the corresponding buttons on the keyboard.
▪ You can select values of parameters by turning individual knobs in the software or on the
keyboard.
For detailed information about recording automation in your host, refer to the documentation of your
host software.
Some hosts allow you to handle automation by using automation IDs that are mapped to specific parameters of the plug-in. KOMPLETE KONTROL comes with a predefined list of automation IDs which allows the host find them automatically.
KOMPLETE KONTROL S-Series - Manual - 96
Page 97

MIDI Communication
Host Automation
7.1.2 Automation IDs for the Perform Panel
The following automation IDs are reserved for parameters in KOMPLETE KONTROL’s Perform
panel:
Automation ID Parameter
000 Reserved for Instance Recognition
and Automatic Focus Follow
001 Scale On / Off
002 Root Note (Scale)
003 Scale Type (Scale)
004 Key Mode (Scale)
006 Chord Mode (Scale)
007 Chord Type (Scale)
026 Arp On / Off
027 Mode (Arp)
028 Type (Arp)
029 Rate (Arp)
030 Sequence (Arp)
031 Swing (Arp)
032 Octaves (Arp)
033 Dynamic (Arp)
034 Gate (Arp)
035 Retrigger (Arp)
036 Repeat (Arp)
037 Offset (Arp)
KOMPLETE KONTROL S-Series - Manual - 97
Page 98

MIDI Communication
Using the Keyboard in MIDI Mode
Automation ID Parameter
038 Inversion (Arp)
039 Min. Key (Arp)
040 Max. Key (Arp)
041 Hold (Arp)
7.2 Using the Keyboard in MIDI Mode
Besides using the KOMPLETE KONTROL keyboard in combination with the KOMPLETE KONTROL software, you can also use it in MIDI mode as a versatile MIDI controller to pilot MIDI
applications or devices, both via USB or via 5-pin DIN MIDI connections.
KOMPLETE KONTROL sends MIDI Note, Pitch Bend, and Channel Pressure (aftertouch) messages to trigger MIDI instruments, as well as Control Change and Program Change messages to
control any MIDI application or device.
▪ When you switch on the keyboard and the displays show the message PRESS BROWSE,
you are controlling an instance of the KOMPLETE KONTROL software.
▪ When you switch on the keyboard and the displays show various MIDI CC numbers, the
keyboard is in MIDI mode. The keyboard directly launches into MIDI mode when the KOMPLETE KONTROL software is not running.
Switching to MIDI Mode
To switch the keyboard between controlling the KOMPLETE KONTROL software and MIDI
mode:
1. Press MIDI on the keyboard.
2. To leave MIDI mode, press any button switching to another mode.
When using the KOMPLETE KONTROL plug-in in a supported host, the keyboard automatically
switches between controlling the KOMPLETE KONTROL software and MIDI mode, depending on the
content of the selected track.
KOMPLETE KONTROL S-Series - Manual - 98
Page 99

MIDI Communication
Using the Keyboard as Stand-Alone MIDI Controller
MIDI Assignment
The MIDI mode’s versatility is made possible by the MIDI Assignment editor, which allows you
to freely define MIDI assignments for the controls on the keyboard. For more information, refer
to ↑8, Using the MIDI Assignment Editor.
1. Use the Page left / right buttons on the keyboard to switch between Pages you created in
the MIDI Assignment editor.
2. Use the PRESET up/down buttons on the keyboard to switch between Templates you created in the MIDI Assignment editor.
7.3 Using the Keyboard as Stand-Alone MIDI Controller
If you power up the KOMPLETE KONTROL keyboard without a USB connection (while the power supply is connected), you can use it as a stand-alone MIDI controller by connecting MIDI
devices to the 5-pin DIN MIDI sockets on the keyboard’s rear panel.
The keybed and the controls on the keyboard send out the following MIDI messages:
KOMPLETE KONTROL S-Series - Manual - 99
Page 100

MIDI Communication
Using the Keyboard as Stand-Alone MIDI Controller
Control Element
Pedal A Controller Tip 64
Message
Type
CC# Mode / Type Range /
Values
Gate 0-127 Damper Pedal On /
Ring
Control Function
Off (Sustain)
65
Pedal B Controller 11 - 0-127 Expression
Controller
Pitch
Wheel
Modulatio
n Wheel
Touch
Strip
Pitch
- - 0-16384 Pitch Bend
Bend
Controller 1 - 0-127 Modulation Wheel
or Lever
Controller 11 Mode: Standard
Display: Unipolar
0-127 Expression
Controller
LED Mode: Bar
Knob 1 Controller 14 Absolute 0-127 Undefined
Knob 2 Controller 15 Absolute 0-127 Undefined
Knob 3 Controller 16 Absolute 0-127 General Purpose
Controller 1
Knob 4 Controller 17 Absolute 0-127 General Purpose
Controller 2
Knob 5 Controller 18 Absolute 0-127 General Purpose
Controller 3
Knob 6 Controller 19 Absolute 0-127 General Purpose
Controller 4
Knob 7 Controller 20 Absolute 0-127 Undefined
Knob 8 Controller 21 Absolute 0-127 Undefined
KOMPLETE KONTROL S-Series - Manual - 100
 Loading...