

Page 1
MANUAL
Page 2

The information in this document is subject to change without notice and does not represent a
commitment on the part of Native Instruments GmbH. The software described by this document is subject to a License Agreement and may not be copied to other media. No part of this
publication may be copied, reproduced or otherwise transmitted or recorded, for any purpose,
without prior written permission by Native Instruments GmbH, hereinafter referred to as Native
Instruments.
“Native Instruments”, “NI” and associated logos are (registered) trademarks of Native Instruments GmbH.
Ableton is a trademark of Ableton AG.
Mac, MacOS, OS X, GarageBand, Logic, iTunes and iPod are registered trademarks of Apple
Inc., registered in the U.S. and other countries.
Windows, Windows Vista and DirectSound are registered trademarks of Microsoft Corporation
in the United States and/or other countries.
All other trademarks are the property of their respective owners and use of them does not imply
any affiliation with or endorsement by them.
Document authored by: Gustav Sto. Tomas, Jan Ola Korte, Nicolas Sidi, David Gover
Disclaimer
Software version: 1.8 (02/2017)
Special thanks to the Beta Test Team, who were invaluable not just in tracking down bugs, but
in making this a better product.
Page 3

NATIVE INSTRUMENTS GmbH
Schlesische Str. 29-30
D-10997 Berlin
Germany
www.native-instruments.de
NATIVE INSTRUMENTS North America, Inc.
6725 Sunset Boulevard
5th Floor
Los Angeles, CA 90028
USA
www.native-instruments.com
NATIVE INSTRUMENTS K.K.
YO Building 3F
Jingumae 6-7-15, Shibuya-ku,
Tokyo 150-0001
Japan
www.native-instruments.co.jp
Contact
NATIVE INSTRUMENTS UK Limited
18 Phipp Street
London EC2A 4NU
UK
www.native-instruments.co.uk
© NATIVE INSTRUMENTS GmbH, 2017. All rights reserved.
Page 4

Table of Contents
Table of Contents
1 Welcome to KOMPLETE KONTROL ...............................................................................
1.1 Installation and Getting Started ................................................................................................. 12
1.2 Manual Conventions ................................................................................................................... 14
1.3 System Requirements ................................................................................................................. 16
1.4 Accessibility ............................................................................................................................... 17
1.5 What Is New in KOMPLETE KONTROL 1.8 ..................................................................................... 22
1.4.1 Accessibility Overview ............................................................................................... 18
1.4.2 Hardware Overview .................................................................................................... 20
1.4.3 Training Mode ............................................................................................................ 21
2 Basic Concepts .........................................................................................................
2.1 KOMPLETE KONTROL and KOMPLETE KONTROL S-SERIES ........................................................... 24
2.2 Adjusting the KOMPLETE KONTROL Software Interface ............................................................... 30
2.3 Loading Instruments .................................................................................................................. 33
2.4 Stand-Alone and Plug-in Mode ................................................................................................... 35
2.1.1 The Browser and the Navigate Section ...................................................................... 25
2.1.2 The Perform Panel and the PERFORM Section (Smart Play) ....................................... 26
2.1.3 The Light Guide ......................................................................................................... 27
2.1.4 The Control Section and Instrument Parameters ....................................................... 28
2.1.5 The Transport Section and Your Host Application ...................................................... 29
2.2.1 Showing/Hiding the Browser ...................................................................................... 31
2.2.2 Showing/Hiding the Perform Panel ............................................................................ 31
2.2.3 Showing/Hiding the Plug-in Panel ............................................................................. 32
2.2.4 Selecting Instrument Views ....................................................................................... 32
2.4.1 Transport and Navigate Controls ............................................................................... 36
2.4.2 Audio and MIDI Handling ........................................................................................... 38
11
24
KOMPLETE KONTROL - Manual - 4
Page 5

Table of Contents
2.5 Controlling MASCHINE with KOMPLETE KONTROL S-SERIES ........................................................ 41
2.6 MIDI Mode ...................................................................................................................................44
2.7 Preferences .................................................................................................................................45
2.8 Connecting External MIDI Equipment to KOMPLETE KONTROL S-SERIES ..................................... 60
2.9 Incoming and Outgoing MIDI ...................................................................................................... 61
2.10 Native Map ................................................................................................................................. 63
2.11 Controlling Parameters via MIDI and Host Automation ............................................................... 64
2.12 Using Pedals with KOMPLETE KONTROL S-SERIES ...................................................................... 69
2.4.3 Multiple Plug-in Instances ........................................................................................ 38
2.4.4 Switching Instances .................................................................................................. 39
2.4.5 Configuring Your Host Application ............................................................................. 40
2.7.1 Preferences – Audio Page .......................................................................................... 46
2.7.2 Preferences – MIDI Page ............................................................................................ 48
2.7.3 Preferences – Library Page ........................................................................................ 50
2.7.4 Preferences – Plug-ins Page ..................................................................................... 54
2.7.5 Preferences – Hardware Page .................................................................................... 59
2.9.1 Incoming MIDI and Host Automation ......................................................................... 61
2.9.2 Outgoing MIDI and Host Control ................................................................................ 62
2.9.3 MIDI Mode and Stand-alone Operation ...................................................................... 63
2.11.1 Recording Automation ............................................................................................... 64
2.11.2 Automation IDs .......................................................................................................... 67
3 Quick Start ................................................................................................................
71
3.1 First Steps .................................................................................................................................. 72
3.2 Controlling Instruments .............................................................................................................. 81
3.1.1 Opening the Browser ................................................................................................. 72
3.1.2 Finding and Loading an Instrument Preset ................................................................ 74
KOMPLETE KONTROL - Manual - 5
Page 6

Table of Contents
3.3 Using Smart Play: Scale, Arp, and the Light Guide ..................................................................... 83
3.4 What’s Next? ...............................................................................................................................85
3.2.1 Controlling Instrument Parameters ........................................................................... 82
3.2.2 More than Eight Parameters: Switching Parameter Pages ......................................... 82
3.3.1 Selecting a Scale ....................................................................................................... 83
3.3.2 Playing Chords .......................................................................................................... 84
3.3.3 Playing Arpeggiated Chords ...................................................................................... 84
4 KOMPLETE KONTROL Software Overview .....................................................................
4.1 Software Interface Overview ....................................................................................................... 88
4.2 Header ........................................................................................................................................ 90
4.3 Plug-in Panel ..............................................................................................................................92
4.4 Instrument Area ..........................................................................................................................95
4.4.1 Default View .............................................................................................................. 96
4.4.2 Additional View .......................................................................................................... 97
4.4.3 Edit View ................................................................................................................... 99
5 KOMPLETE KONTROL S-SERIES Overview ....................................................................
5.1 Keyboard Interface Overview ....................................................................................................... 101
5.2 MIDI Mode ...................................................................................................................................104
5.3 Host Control and the Transport Section ...................................................................................... 105
5.4 Control Section ........................................................................................................................... 113
5.2.1 Switching Controller Modes ....................................................................................... 104
5.2.2 Host Control in MIDI Mode ......................................................................................... 105
5.2.3 Stand-Alone Operation .............................................................................................. 105
5.3.1 Transport Controls ..................................................................................................... 107
5.3.2 Automatic Track Focus and the Navigate Section ...................................................... 109
5.3.3 Switching between KOMPLETE KONTROL Instances ................................................... 112
87
101
KOMPLETE KONTROL - Manual - 6
Page 7

Table of Contents
5.5 Touch Strips ............................................................................................................................... 122
5.6 The Light Guide .......................................................................................................................... 133
5.4.1 Control Section Controls ............................................................................................ 114
5.4.2 Native Map ................................................................................................................ 115
5.4.3 Controlling Instrument Parameters with the Control Section ..................................... 116
5.4.4 Controlling Smart Play with the Control Section ........................................................ 121
5.4.5 Controlling Touch Strip Settings with the Control Section ......................................... 121
5.5.1 Pitch Strip ................................................................................................................. 125
5.5.2 Modulation Strip ........................................................................................................ 128
5.6.1 Instrument Mapping .................................................................................................. 134
5.6.2 Smart Play Mapping .................................................................................................. 135
6 KOMPLETE KONTROL Browser .....................................................................................
6.1 Browser Basics ........................................................................................................................... 137
6.2 Searching and Loading Files from the Library ............................................................................ 143
6.3 Loading and Importing Files from Your File System .................................................................... 163
6.1.1 The Library ................................................................................................................. 137
6.1.2 Native Kontrol Standard ............................................................................................ 138
6.1.3 Browsing the Library vs. Browsing Your Hard Disks ................................................... 142
6.2.1 Overview of the Library pane ..................................................................................... 143
6.2.2 Choosing Between Factory and User Content ............................................................. 145
6.2.3 Selecting or Loading an Instrument and Selecting a Bank ........................................ 145
6.2.4 Filtering by Types and Modes ..................................................................................... 154
6.2.5 Performing a Text Search ........................................................................................... 158
6.2.6 Using the Result List in the Library Pane ................................................................... 159
6.2.7 Using Favorites in the Library Pane ........................................................................... 161
6.3.1 Overview of the Files Pane ......................................................................................... 163
136
KOMPLETE KONTROL - Manual - 7
Page 8

Table of Contents
6.4 Saving Files to the User Library .................................................................................................. 172
6.5 Displaying and Editing File Information ..................................................................................... 174
6.6 Browsing with the KOMPLETE KONTROL S-SERIES ...................................................................... 182
6.3.2 Using Favorites .......................................................................................................... 165
6.3.3 Using the Location Bar .............................................................................................. 166
6.3.4 Navigating to Recent Locations ................................................................................. 167
6.3.5 Using the Result List in the Files Pane ...................................................................... 168
6.3.6 Importing Files to the KOMPLETE KONTROL Library .................................................... 170
6.5.1 Displaying File Information ........................................................................................ 175
6.5.2 Editing the File Tags and Properties .......................................................................... 175
6.5.2.1 Attribute Editor Basics ..............................................................................175
6.5.2.2 The BANK Page ..........................................................................................177
6.5.2.3 The TYPES and MODES Pages ....................................................................178
6.5.2.4 The PROPERTIES Page ...............................................................................180
6.6.1 Browse Mode and Hardware Browsing ....................................................................... 184
6.6.2 Hardware Browsing ................................................................................................... 185
6.6.3 Browser Overview ...................................................................................................... 187
6.6.4 Choosing Between Factory and User Content via the On-Screen Overlay ................... 189
6.6.5 Selecting an Instrument via the On-Screen Overlay ................................................... 190
6.6.6 Selecting a Bank via the On-Screen Overlay .............................................................. 194
6.6.7 Filtering by Types via the On-Screen Overlay ............................................................. 195
6.6.8 Filtering by Modes via the On-Screen Overlay ............................................................ 201
6.6.9 Using the Result List in the On-Screen Overlay ......................................................... 203
6.6.10 Filtering by Favorites via the On-Screen Overlay ........................................................ 204
6.6.11 Adding and Removing Favorites ................................................................................ 205
KOMPLETE KONTROL - Manual - 8
Page 9

Table of Contents
7 KOMPLETE KONTROL Smart Play .................................................................................
7.1 Software Perform Panel Overview ............................................................................................... 207
7.2 Keyboard PERFORM Section Overview ......................................................................................... 211
7.3 A Note about Music Theory .......................................................................................................... 213
7.4 Scale Engine ...............................................................................................................................215
7.5 Scale Parameters ....................................................................................................................... 217
7.6 Arpeggiator .................................................................................................................................238
7.7 Arp Parameters ...........................................................................................................................240
7.8 Using ARP with a Sustain Pedal ................................................................................................. 252
7.9 Scale and Arp MIDI Output ......................................................................................................... 253
7.2.1 SCALE Button Functions ............................................................................................ 212
7.2.2 ARP Button Functions ................................................................................................ 213
7.3.1 Scales ........................................................................................................................ 213
7.3.2 Chords ....................................................................................................................... 214
7.3.3 Arpeggios .................................................................................................................. 214
7.5.1 Scale ......................................................................................................................... 218
7.5.2 Key Mode ................................................................................................................... 225
7.5.3 Chord Mode ............................................................................................................... 230
7.5.4 Chord Type ................................................................................................................. 233
7.5.5 Chord Position ........................................................................................................... 237
7.7.1 Main .......................................................................................................................... 241
7.7.2 Rhythm ...................................................................................................................... 243
7.7.3 Other ......................................................................................................................... 246
7.7.4 Advanced ................................................................................................................... 248
7.7.5 Range ........................................................................................................................ 250
7.7.6 Hold ........................................................................................................................... 251
206
KOMPLETE KONTROL - Manual - 9
Page 10

Table of Contents
7.9.1 MIDI Output from the KOMPLETE KONTROL Stand-alone Application ......................... 253
7.9.2 MIDI Output from the KOMPLETE KONTROL Plug-in ................................................... 254
8 Troubleshooting – Getting Help ..................................................................................
8.1 Troubleshooting .......................................................................................................................... 255
8.2 Getting Help ............................................................................................................................... 257
8.1.1 The KOMPLETE KONTROL Software Won’t Start .......................................................... 255
8.1.2 No Output from Your KOMPLETE Instrument .............................................................. 255
8.1.3 Latency Issues ........................................................................................................... 256
8.1.4 The KOMPLETE KONTROL Software Crashes ............................................................... 256
8.1.5 Updates ..................................................................................................................... 256
8.2.1 Knowledge Base ........................................................................................................ 257
8.2.2 User Forum ................................................................................................................ 258
8.2.3 Technical Support ...................................................................................................... 258
8.2.4 Registration Support ................................................................................................. 259
Index ........................................................................................................................
255
260
KOMPLETE KONTROL - Manual - 10
Page 11

Welcome to KOMPLETE KONTROL
1 Welcome to KOMPLETE KONTROL
Thank you for choosing KOMPLETE KONTROL!
KOMPLETE KONTROL and its dedicated keyboard—the KOMPLETE KONTROL S-SERIES—is
a tightly integrated music production and performance system for use with your software instruments, offering advanced integration and full control of KOMPLETE Instruments as well as
any instruments supporting the Native Kontrol Standard (NKS).
KOMPLETE KONTROL lets you browse your instruments in an intuitive way and play them creatively with its unique Smart Play features. You can also control your host software with the
KOMPLETE KONTROL S-SERIES keyboard, and customize the functions of the touch strips,
knobs and buttons for use with other software utilizing the included Controller Editor application. We hope you enjoy this fantastic instrument as much as we do. Now let’s get going!
—The team at Native Instruments
KOMPLETE KONTROL - Manual - 11
Page 12
Welcome to KOMPLETE KONTROL
Installation and Getting Started
1.1 Installation and Getting Started
KOMPLETE KONTROL can be conveniently installed with Native Access. Native Access is an
administration tool for easy product activation, installation and updates for all your Native Instruments products. Native Access is available for download here:
https://www.native-instruments.com/specials/native-access
To learn more about Native Access, please read the following Knowledge Base article:
https://support.native-instruments.com/hc/articles/210314365-What-is-Native-Access-
To install KOMPLETE KONTROL, launch Native Access on your computer and click IN-
►
STALL for the corresponding entry in the list of available software. If KOMPLETE KON-
TROL is not available in this list, click Add a serial in the upper left corner of Native Access and type in your KOMPLETE KONTROL serial number.
To get started with KOMPLETE KONTROL and learn all about its functionality, the following
information sources are available:
▪ KOMPLETE KONTROL Manual (this document)
▪ Controller Editor Manual
▪ KOMPLETE KONTROL S-SERIES Ableton Live Setup document
▪ Support section on the Native Instruments website
Hereafter is a quick description of each of these information sources.
KOMPLETE KONTROL Manual
This document, the KOMPLETE KONTROL Manual, provides you with a comprehensive description of all KOMPLETE KONTROL software and KOMPLETE KONTROL S-SERIES hardware
features.
You can download the latest version of this document from the Native Instruments website:
https://www.native-instruments.com/kompletekontroldownloads
KOMPLETE KONTROL - Manual - 12
Page 13

Welcome to KOMPLETE KONTROL
Installation and Getting Started
Controller Editor Manual
Besides using your KOMPLETE KONTROL S-SERIES keyboard together with its dedicated
KOMPLETE KONTROL software, you can also use it as a powerful and highly versatile MIDI
controller to pilot any other MIDI-capable software or hardware. The Controller Editor software,
which is part of the KOMPLETE KONTROL installation, allows you to precisely define all MIDI
assignments for your KOMPLETE KONTROL S-SERIES keyboard. Find the Controller Editor
Manual in the Documentation subfolder of the Controller Editor installation folder on your hard
disk.
Installat
Using KOMPLETE KONTROL S-SERIES Keyboards with Other Host Software
KOMPLETE KONTROL S-SERIES includes advanced integration with Apple Logic Pro X / GarageBand, Steinberg Cubase Pro / Cubase Artist / Nuendo, and Ableton Live.
When using KOMPLETE KONTROL S-SERIES with Ableton Live, additional installation steps
are required. A detailed guide for setting up Ableton Live for use with KOMPLETE KONTROL
S-SERIES is available as a PDF file in the Host Integration Files subfolder of the KOMPLETE
KONTROL installation folder on your hard disk. It can also be found here: https://support.na-
tive-instruments.com/hc/articles/209557689
No additional installation steps are required for Apple Logic Pro X / GarageBand or Steinberg
Cubase Pro / Cubase Artist / Nuendo. For more information on using KOMPLETE KONTROL SSERIES with these hosts, please refer to: https://support.native-instruments.com/hc/articles/
210280325
Other Online Resources
If you are experiencing problems related to your Native Instruments product that the supplied
documentation does not cover, there are several ways of getting help:
▪ Knowledge Base
▪ User Forum
▪ Technical Support
▪ Registration Support
Find more information on these in section ↑8, Troubleshooting – Getting Help.
KOMPLETE KONTROL - Manual - 13
Page 14

Welcome to KOMPLETE KONTROL
Manual Conventions
1.2 Manual Conventions
This section introduces you to the signage and text highlighting used in this manual. This manual uses particular formatting to point out special facts and to warn you of potential issues.
The icons introducing these notes let you see what kind of information is to be expected:
The speech bubble icon indicates a useful tip that may often help you to solve a task
more efficiently.
The exclamation mark icon highlights important information that is essential for the given context.
The red cross icon warns you of serious issues and potential risks that require your full
attention.
Furthermore, the following formatting is used:
▪ Text appearing in (drop-down) menus (such as Open…, Save as… etc.) and paths to loca-
tions on your hard disk or other storage devices is printed in italics.
▪ Text appearing elsewhere (labels of buttons, controls, text next to checkboxes etc.) is print-
ed in blue. Whenever you see this formatting applied, you will find the same text appearing
somewhere on the screen.
▪ Text appearing on displays of the keyboard is printed in light grey. Whenever you see this
formatting applied, you will find the same text on a keyboard display.
▪ Text appearing on labels of the keyboard is printed in orange. Whenever you see this for-
matting applied, you will find the same text on the keyboard.
▪ Important names and concepts are printed in bold.
▪ References to keys on your computer’s keyboard you’ll find put in square brackets (e.g.,
“Press [Shift] + [Enter]”).
Single instructions are introduced by this play button type arrow.
►
KOMPLETE KONTROL - Manual - 14
Page 15
Welcome to KOMPLETE KONTROL
Manual Conventions
Results of actions are introduced by this smaller arrow.
→
Naming Convention
Throughout the documentation we will refer to KOMPLETE KONTROL S-SERIES as the keyboard
and KOMPLETE KONTROL as the software installed on your computer.
Button Combinations and Shortcuts on Your Keyboard
Most instructions will use the “+” sign to indicate buttons that must be pressed simultaneously, starting with the button indicated first. E.g., an instruction such as:
“Press SHIFT + PLAY” means:
1. Press and hold SHIFT.
2. While holding SHIFT, press PLAY and release it.
3. Release SHIFT.
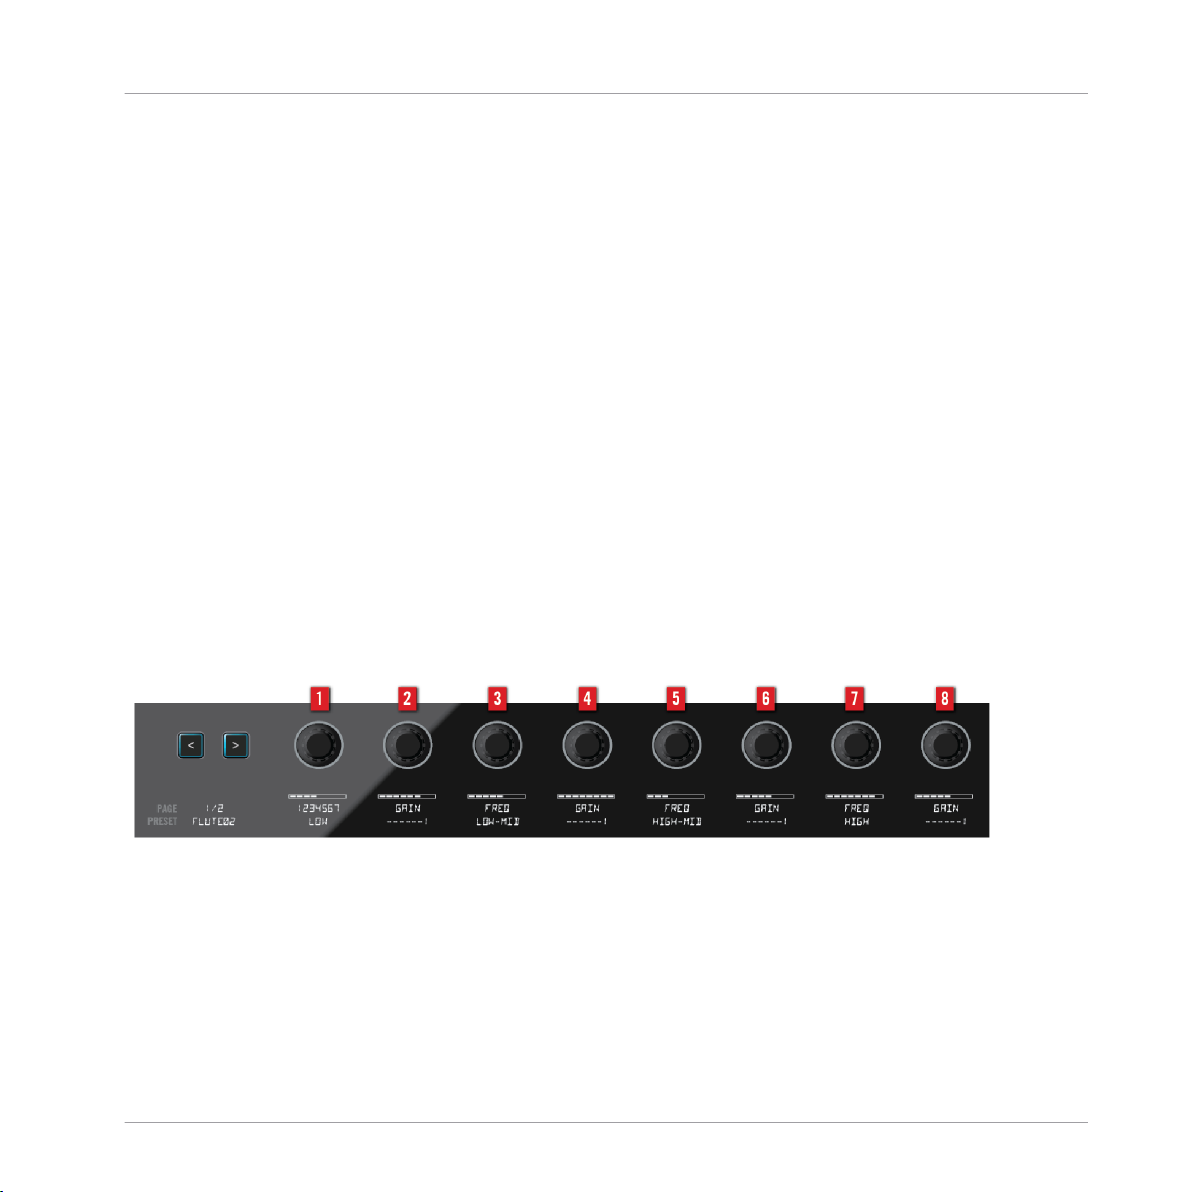
Unlabeled Knobs on the KOMPLETE KONTROL S-SERIES Keyboard
The knobs above the displays on your KOMPLETE KONTROL S-SERIES keyboard do not have
labels.
The unlabeled knobs on the KOMPLETE KONTROL S-SERIES keyboard.
For better reference, we applied a special formatting here: throughout the document, the elements are capitalized and numbered, so the knobs above the displays are written Knob 1 to
Knob 8. E.g., whenever you see an instruction such as “Turn Knob 2 to increase the value,”
you’ll know it’s the second knob from the left above the displays.
KOMPLETE KONTROL - Manual - 15
Page 16

Welcome to KOMPLETE KONTROL
System Requirements
1.3 System Requirements
For KOMPLETE KONTROL and KOMPLETE KONTROL S-SERIES to fully function as indented,
your system needs to meet certain requirements.
For the latest KOMPLETE KONTROL system requirements and compatibility information, including compatibility with third-party software, visit:
www.native-instruments.com/products/komplete/keyboards/komplete-kontrol-s-series/specifications/
KOMPLETE
KOMPLETE KONTROL is optimized for use with KOMPLETE 11 SELECT, KOMPLETE 11 and
KOMPLETE 11 ULTIMATE.
For the latest KOMPLETE system requirements and compatibility information, visit:
www.native-instruments.com/products/komplete/bundles/komplete-11/specifications/
Supported Host Applications
For some of the advanced host integration features of KOMPLETE KONTROL to function as intended, your host application must be compatible. The following Knowledge Base article gives
you an overview of the features that are available in each of the most commonly used DAWs:
https://support.native-instruments.com/hc/articles/210280325
KOMPLETE KONTROL - Manual - 16
Page 17

Welcome to KOMPLETE KONTROL
1.4 Accessibility
KOMPLETE KONTROL offers a set of accessibility features for visually-impaired users. These
are focused exclusively on the KOMPLETE KONTROL S-SERIES keyboard itself and include
voice-over for the following features:
▪ All Perform and Transpose buttons, Parameter Page Left / Right buttons and key Naviga-
tion buttons.
▪ All Browser functions.
▪ Instance selection (find more information in ↑5.3.3, Switching between KOMPLETE KON-
TROL Instances).
▪ The current edit mode, including the Plug-in Panel, Scale, Arp, and Touch Strip (find more
information in ↑4.3, Plug-in Panel, ↑7, KOMPLETE KONTROL Smart Play, and ↑5.5,
Touch Strips).
▪ Names of parameters and parameter sections when touching knobs, including all edit
modes.
Accessibility
To activate or deactivate the accessibility features from the KOMPLETE KONTROL S-
►
SERIES keyboard while the KOMPLETE KONTROL software is running, press and hold
the SHIFT button on the top left of the keyboard and then press the PRESET Up button
on the top right of the keyboard.
The voice-over confirms that the accessibility features have been activated or deactivat-
→
ed.
Activating the accessibility features automatically switches KOMPLETE KONTROL’s Browse
Mode to Hardware. Find more information in ↑6.6.1, Browse Mode and Hardware Browsing.
The accessibility features are designed to be used with the KOMPLETE KONTROL plug-in.
However, the KOMPLETE KONTROL stand-alone application must be opened after initial installation and after installing additional instruments. This will ensure that all instruments are
displayed correctly in the KOMPLETE KONTROL Browser.
KOMPLETE KONTROL - Manual - 17
Page 18

Welcome to KOMPLETE KONTROL
The accessibility features are particularly useful when combined with VoiceOver and
host integration in Apple Logic Pro X or GarageBand. Find more information about KOMPLETE KONTROL’s host integration features in ↑5.3, Host Control and the Transport
Section.
See also
2 Keyboard Interface Overview [➙ 101]
2 Keyboard PERFORM Section Overview [➙ 211]
Control Section [➙ 113]
2
2 Browsing with the KOMPLETE KONTROL S-SERIES [➙ 182]
1.4.1 Accessibility Overview
The following table outlines the availability of accessibility features for different aspects of
KOMPLETE KONTROL from both the KOMPLETE KONTROL S-SERIES keyboard and the
KOMPLETE KONTROL software.
Accessibility
Feature Acces-
sible
from
Keyboard
Accessib
ility
Browser Browse for Native
Enable and disable
Accessibility mode
Yes No
Yes No
Accessible
from
Software
Instruments, NKS, and user
presets
Set or sort by Favorites Yes No
Save and edit user presets No No
Browse for NKS plug-ins
No No
from other vendors
Notes
KOMPLETE KONTROL - Manual - 18
Page 19

Welcome to KOMPLETE KONTROL
Accessibility
Feature Acces-
sible
from
Keyboard
Native
Map
Custom map Instrument
Adjust key Instrument
parameters
Yes No
No No
Accessible
from
Software
Notes
parameters
Smart
Play
Adjust Scale & Chord
parameters
Yes No
Adjust Arp parameters Yes No
Touch
Strips
DAW
control
Adjust Touch Strip
Yes No
parameters
Navigate tracks Yes No Logic Pro X, GarageBand, Cubase
Pro, Cubase Artist, Nuendo, and
Live: audible feedback is dependent
on host.
Control transport Yes No Logic Pro X, GarageBand, Cubase
Pro, Cubase Artist, Nuendo, and
Live: audible feedback is dependent
on host.
Other DAWs: Transport can be set
up manually via MCU.
Turn metronome and count-
in on and off
Yes No Logic Pro X, GarageBand, Cubase
Pro, Cubase Artist, Nuendo, and
Live: audible feedback is dependent
on host.
KOMPLETE KONTROL - Manual - 19
Page 20
Welcome to KOMPLETE KONTROL
Accessibility
Feature Acces-
sible
from
Keyboard
Accessible
from
Software
Notes
Reposition loop Yes No Logic Pro X, GarageBand, Cubase
Pro, Cubase Artist, Nuendo, and
Live: audible feedback is dependent
on host.
Undo & redo Yes No Logic Pro X, GarageBand, Cubase
Pro, Cubase Artist, Nuendo, and
Live: audible feedback is dependent
on host.
Training
mode
Find a control without
accidentally triggering
Yes No
actions
Preferen
ces
Adjust software & hardware
preferences
No No
1.4.2 Hardware Overview
The KOMPLETE KONTROL S-SERIES keyboard is divided into five main sections: Transpose,
Perform, Transport, the Control section and Navigate.
The Transpose section (find more information in ↑5.1, Keyboard Interface Overview) is on the
far left of the keyboard next to the keybed and directly above the two Touch Strips. It contains
two buttons that are arranged as follows:
OCT - OCT +
The Perform section (find more information in ↑7.2, Keyboard PERFORM Section Overview) is
on the top left of the keyboard and contains three buttons that are arranged as follows:
SHIFT SCALE ARP
KOMPLETE KONTROL - Manual - 20
Page 21

Welcome to KOMPLETE KONTROL
The Transport section (find more information in ↑5.3, Host Control and the Transport Section)
is directly below the Perform section and contains six buttons that are arranged as follows:
LOOP RWD FFW
PLAY REC STOP
There are eight continuous rotary encoders in the center of the KOMPLETE KONTROL S-SERIES keyboard, called the Control section (find more information in ↑5.4, Control Section). Directly to the left of these are two small buttons to switch the parameter pages left and right.
The Navigate section (find more information in ↑6.6, Browsing with the KOMPLETE KONTROL
S-SERIES) is on the top right of the KOMPLETE KONTROL S-SERIES keyboard and contains
ten buttons and a large click encoder. These are arranged as follows:
Accessibility
BROWSE
Control encoder PRESET Up
INSTANCE PRESET Down
BACK Up Enter
Left Down Right
1.4.3 Training Mode
KOMPLETE KONTROL S-SERIES Training Mode makes it easy to locate a specific button or
parameter without accidentally triggering an action. When Training Mode is activated, all button presses and parameter names are announced but the corresponding action is not triggered.
To activate or deactivate Training Mode from the KOMPLETE KONTROL S-SERIES key-
►
board while the KOMPLETE KONTROL software is running, double-press the SHIFT button on the top left of the keyboard.
Training Mode is only available when the accessibility features have been activated.
KOMPLETE KONTROL - Manual - 21
Page 22

Welcome to KOMPLETE KONTROL
What Is New in KOMPLETE KONTROL 1.8
1.5 What Is New in KOMPLETE KONTROL 1.8
KOMPLETE KONTROL 1.8 includes significant enhancements to Smart Play’s Scale & Chord
engine, and a stand-alone Transport for integration with clock-based instruments. All of the
new features are fully accessible to visually-impaired users via the KOMPLETE KONTROL SSERIES keyboards.
Smart Play Scale & Chord
▪ The Smart Play Scale engine now includes over one-hundred Scales to quickly and easily
take melodies and harmonies in new directions.
▪ The Smart Play Chord Position parameter extends creative possibilities with full control
over the position of individual notes in a chord. When set to Auto, KOMPLETE KONTROL
automatically calculates the most natural transitions between chords, all in real time.
See ↑7.5, Scale Parameters for more information.
Stand-alone Transport
▪ KOMPLETE KONTROL’s stand-alone transport provides an internal clock, which can be
used by sequenced KONTAKT and REAKTOR instruments.
▪ Control the transport from the software via the Play and Restart buttons in the toolbar.
▪ Control the transport from KOMPLETE KONTROL S-Series keyboards via:
◦ PLAY: Start the internal clock.
◦ STOP: Stop/reset the internal clock.
◦ SHIFT + PLAY: Restart the internal clock.
◦ SHIFT + PUSH + Control encoder (turn): Adjust the tempo of the internal clock.
See ↑2.4.1, Transport and Navigate Controls for more information.
KOMPLETE KONTROL - Manual - 22
Page 23

Welcome to KOMPLETE KONTROL
What Is New in KOMPLETE KONTROL 1.8
Other Improvements
▪ Pressing REC on a KOMPLETE KONTROL S-Series keyboard enables or disables recording
in the focused MASCHINE plug-in, not the corresponding track of the host software. See
↑2.5, Controlling MASCHINE with KOMPLETE KONTROL S-SERIES for more information.
▪ Support for NKS content products.
KOMPLETE KONTROL - Manual - 23
Page 24

Basic Concepts
KOMPLETE KONTROL and KOMPLETE KONTROL S-SERIES
2 Basic Concepts
This chapter will introduce you to KOMPLETE KONTROL’s main elements and explain how
they relate to one another. You will also learn how to set up your audio interface and how to
connect MIDI devices.
2.1 KOMPLETE KONTROL and KOMPLETE KONTROL S-SERIES
KOMPLETE KONTROL is the combination of the KOMPLETE KONTROL software with its quick
browsing experience and powerful performance abilities, and the versatile KOMPLETE KONTROL S-SERIES keyboard’s tactility—both fully integrated with the instruments of Native Instruments KOMPLETE as well as any instrument supporting the Native Kontrol Standard (see
section ↑6.1.2, Native Kontrol Standard for more information).
KOMPLETE KONTROL and each area of its software interface correspond directly to the hardware sections of your KOMPLETE KONTROL S-SERIES keyboard. Adjusting instrument parameters from the knobs on your keyboard also adjusts the corresponding controls in the software.
You can see the software controls move in real-time whenever you turn your hardware knobs,
swipe the touch strips, or switch button states on and off.
Via KOMPLETE KONTROLS’s Browser you can load any instrument and even search for specific types of files from your KOMPLETE KONTROL Library, e.g. “soundscapes” or “percussion.”
It also lets you save, tag and organize your own user presets to further add to your KOMPLETE KONTROL Library.
When you load an instrument inside KOMPLETE KONTROL, you instantly get access to the instrument’s controls from the KOMPLETE KONTROL S-SERIES keyboard. The knobs, displays,
and touch strips on the keyboard are automatically mapped to the parameters of the loaded
instrument via Native Instruments’ own unique Native Map protocol.
KOMPLETE KONTROL’s Smart Play lets you generate and play a multitude of scales, chords,
and arpeggios simply by pressing a key on your KOMPLETE KONTROL S-SERIES keyboard. By
mapping the keyboard’s keys to a scale, you can ensure that you’ll always stay in key as well as
learn to play new and interesting types of music.
KOMPLETE KONTROL - Manual - 24
Page 25

Basic Concepts
KOMPLETE KONTROL and KOMPLETE KONTROL S-SERIES
The LEDs in the Light Guide give you visual feedback in real time, letting you know what keys
are active and which notes are being played back. You can even follow the Light Guide when
you are playing back a MIDI note pattern from a host application.
▪ For an overview of how KOMPLETE KONTROL and KOMPLETE KONTROL S-SERIES inte-
grate with each other, continue reading below.
▪ For a quick start to get you going with KOMPLETE KONTROL S-SERIES, see chapter ↑3,
Quick Start.
▪ For a detailed description of the KOMPLETE KONTROL software, see chapter ↑4, KOM-
PLETE KONTROL Software Overview and onward.
▪ For a detailed description of the KOMPLETE KONTROL S-SERIES keyboard, see chapter
↑5, KOMPLETE KONTROL S-SERIES Overview and onward.
▪ For a detailed description of the KOMPLETE KONTROL Browser, see chapter ↑6, KOM-
PLETE KONTROL Browser and onward.
▪ For a detailed description of the KOMPLETE KONTROL Smart Play functions, see chapter
↑7, KOMPLETE KONTROL Smart Play and onward.
Corresponding Features
In the following sections we outline the KOMPLETE KONTROL software and the KOMPLETE KONTROL S-SERIES keyboard and give you an overview of how they relate to each other.
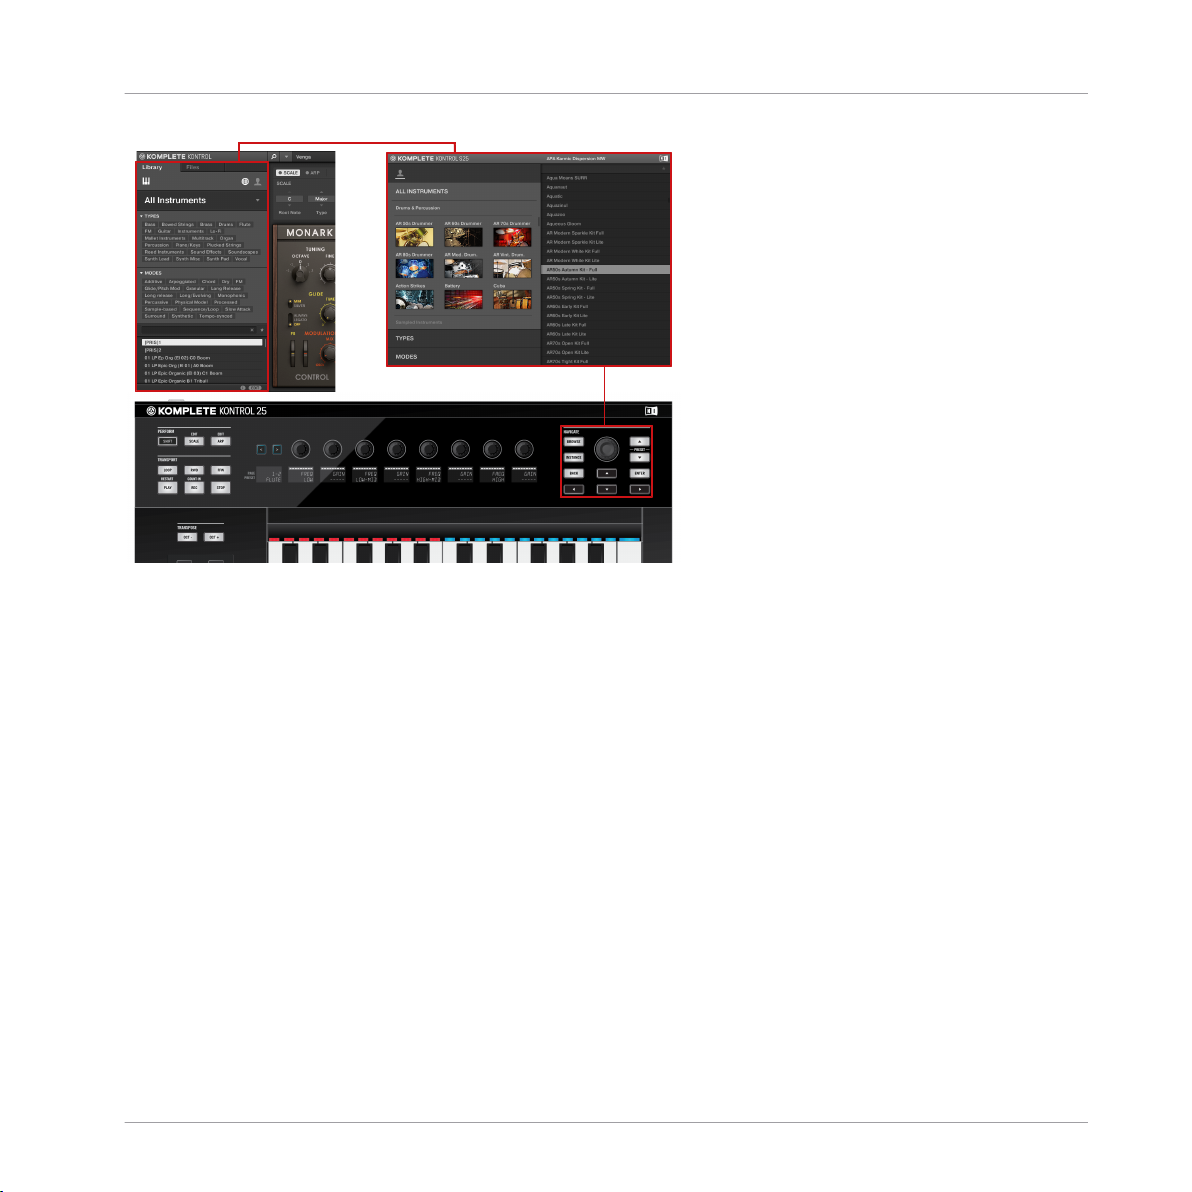
2.1.1 The Browser and the Navigate Section
The KOMPLETE KONTROL Browser is your interface for finding, loading and organizing your
instruments and files. The NAVIGATE section on the KOMPLETE KONTROL S-SERIES keyboard allows for instant access to your KOMPLETE KONTROL Library by using hardware controls. It is possible to browse using a combination of KOMPLETE KONTROL S-SERIES and the
computer display, or using only KOMPLETE KONTROL S-SERIES. For more information, read
↑6, KOMPLETE KONTROL Browser.
KOMPLETE KONTROL - Manual - 25
Page 26
Basic Concepts
KOMPLETE KONTROL and KOMPLETE KONTROL S-SERIES
The Browser at the left side of the KOMPLETE KONTROL software interface and the Browser displayed by the on-screen
overlay, called up from the NAVIGATE section of the KOMPLETE KONTROL S-SERIES keyboard (S25 depicted).
2.1.2 The Perform Panel and the PERFORM Section (Smart Play)
Smart Play provides you functions for generating and playing scales, chords, and arpeggios using instruments from the KOMPLETE KONTROL Library and other MIDI-controlled instruments
as sound sources. The parameters can be accessed from the Perform Panel near the top of the
KOMPLETE KONTROL software interface as well as the PERFORM section in the upper left
corner of your KOMPLETE KONTROL S-SERIES keyboard. The Smart Play parameters are then
mapped to the knobs and the displays on the keyboard, letting you edit the scales and arps
using the hardware controls.
KOMPLETE KONTROL - Manual - 26
Page 27
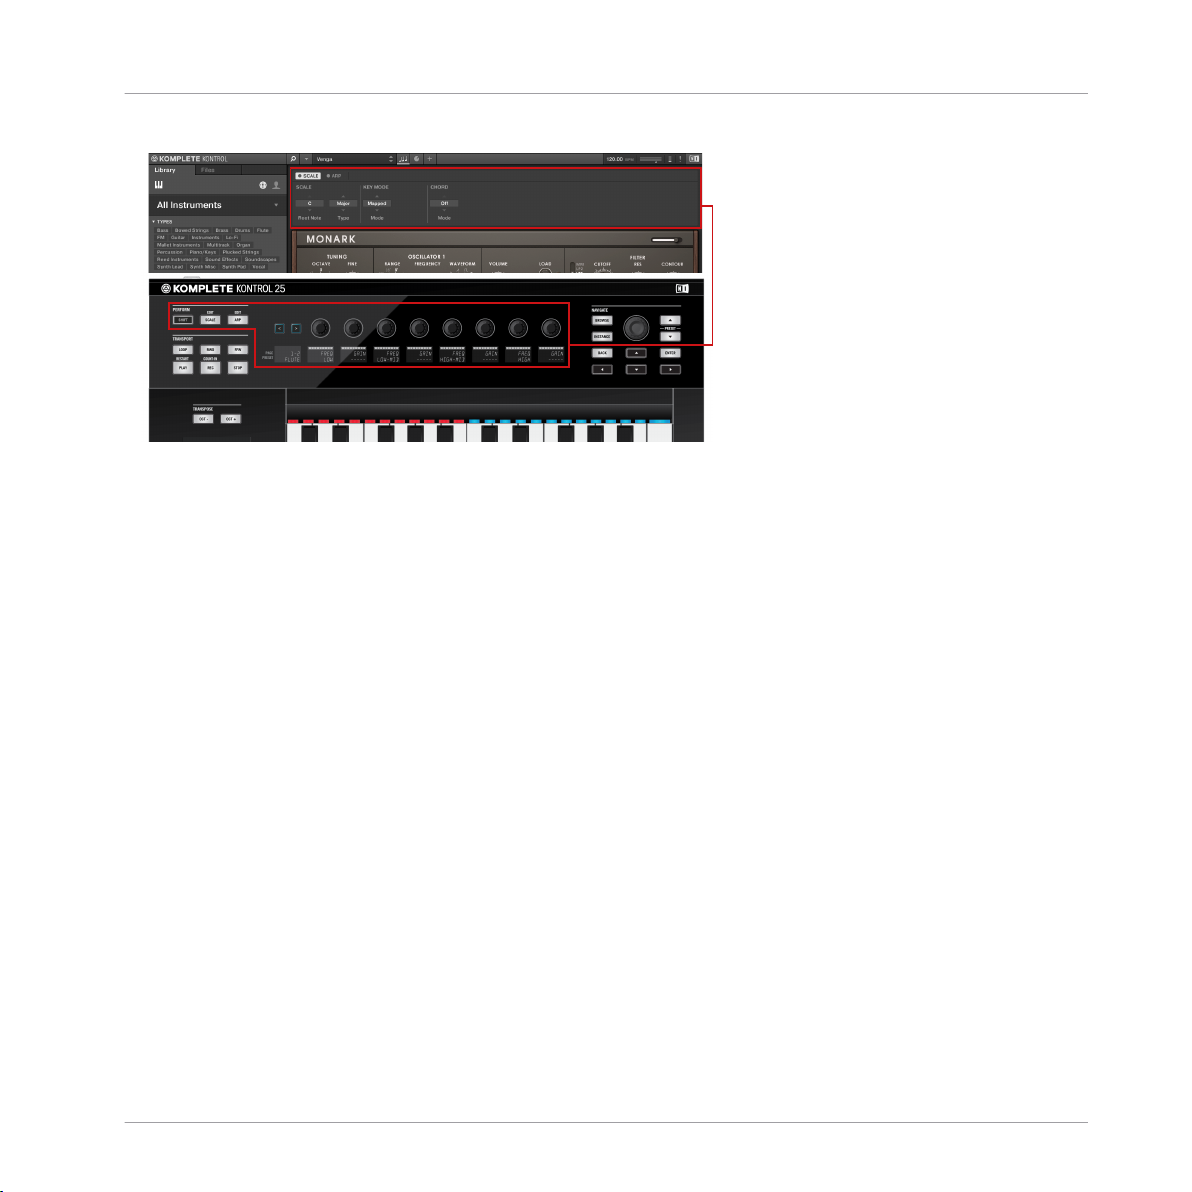
Basic Concepts
KOMPLETE KONTROL and KOMPLETE KONTROL S-SERIES
The Perform Panel in the KOMPLETE KONTROL software with the corresponding controls of KOMPLETE KONTROL S-SERIES’ PERFORM section mapped to the knobs and displays
2.1.3 The Light Guide
The settings of the Smart Play parameters are instantly reflected by the LEDs of the
Light Guide—located just above the keybed—effectively letting you know what keys belong to
the scale selected in the Perform Panel (software) or PERFORM section (keyboard) by switching the LEDs on and off. The Light Guide also gives you visual feedback when you play back
incoming MIDI note patterns from your host sequencer.
KOMPLETE KONTROL - Manual - 27
Page 28

Basic Concepts
KOMPLETE KONTROL and KOMPLETE KONTROL S-SERIES
The Light Guide reflects the settings of the Perform parameters by switching the LEDs on or off to display the selected scale
(C major).
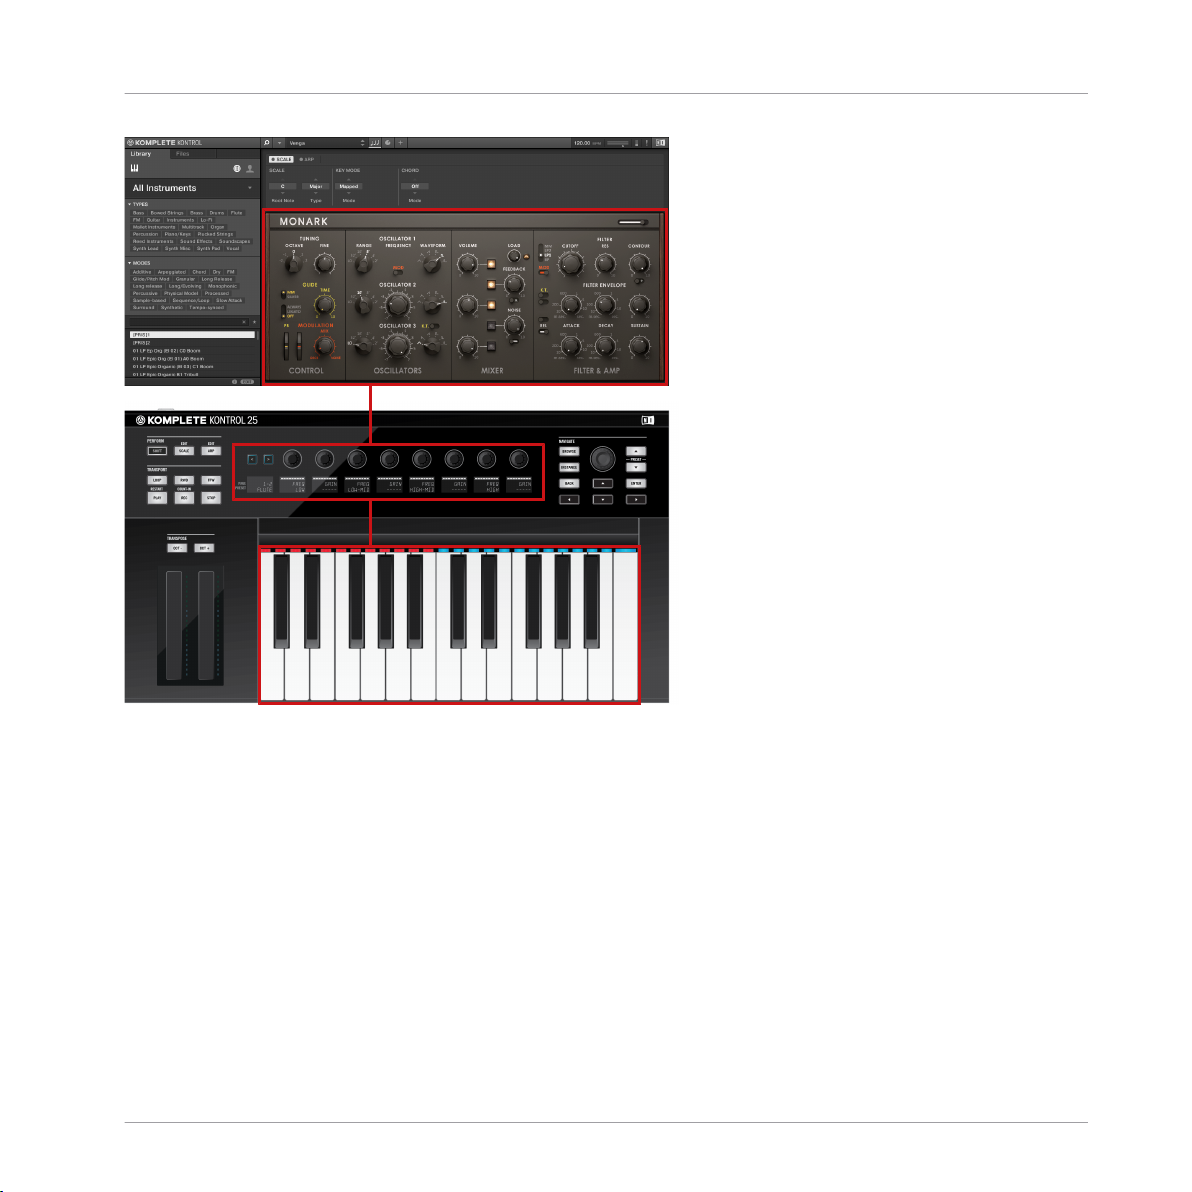
2.1.4 The Control Section and Instrument Parameters
The touch strips, knobs, and displays on the KOMPLETE KONTROL S-SERIES keyboard are
automatically mapped to the controls and parameters of any loaded instrument via Native Instruments’ unique integration mapping protocol Native Map. No further MIDI assignments are
necessary: Just load an instrument from the Browser and start playing!
KOMPLETE KONTROL - Manual - 28
Page 29
Basic Concepts
KOMPLETE KONTROL and KOMPLETE KONTROL S-SERIES
MONARK loaded in KOMPLETE KONTROL—the touch strips, knobs, and displays on KOMPLETE KONTROL S-SERIES are
automatically assigned to control the instrument.
2.1.5 The Transport Section and Your Host Application
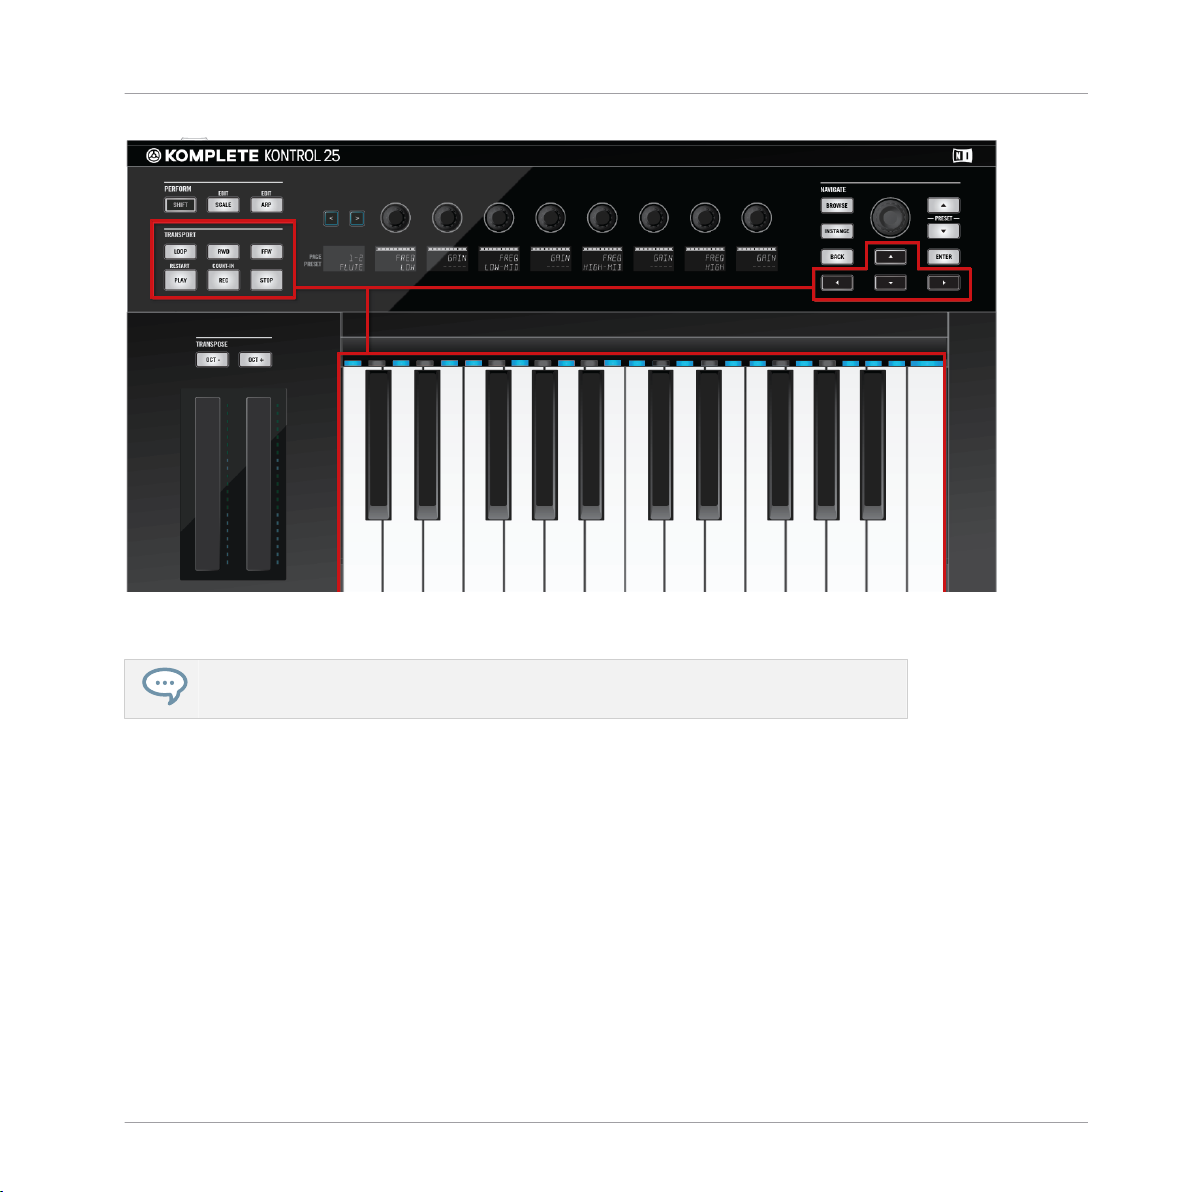
Controlling your host application from the KOMPLETE KONTROL S-SERIES keyboard is a great
way to keep your workflow going without needing to grab for the computer mouse and can be
very helpful in live performance situations. The TRANSPORT section on the far left and the arrow buttons in the NAVIGATE section on the right are both used to select tracks in your DAW,
so you can play and record notes from your keyboard. For detailed information on how controlling your host from the KOMPLETE KONTROL S-SERIES, see section ↑5.3, Host Control and
the Transport Section.
KOMPLETE KONTROL - Manual - 29
Page 30
Basic Concepts
Adjusting the KOMPLETE KONTROL Software Interface
The TRANSPORT section and the NAVIGATE buttons let you control your host application from the KOMPLETE KONTROL S-SERIES.
For information on how to configure your host application for use with external MIDI
hardware, refer to the documentation of your DAW.
2.2 Adjusting the KOMPLETE KONTROL Software Interface
The KOMPLETE KONTROL software user interface is very flexible. You can choose what to display and what not, allowing you to focus on your workflow. This section shows you how to adjust the KOMPLETE KONTROL GUI to suit your needs.
KOMPLETE KONTROL - Manual - 30
Page 31

Basic Concepts
Adjusting the KOMPLETE KONTROL Software Interface
2.2.1 Showing/Hiding the Browser
Click the Browser button (with the magnifier symbol) in the header to show and hide the
►
Browser. You can also select Browser from the View menu in the application menu bar or
from the View submenu in the KOMPLETE KONTROL menu.
The Browser button in the header.
For detailed information about the KOMPLETE KONTROL Browser, see section ↑6, KOM-
PLETE KONTROL Browser.
In stand-alone mode, you can also show/hide the Browser from your computer keyboard
via the [B] key.
2.2.2 Showing/Hiding the Perform Panel
Click the Perform Panel button (with the three-notes symbol) in the header to show and
►
hide the Perform Panel. You can also select Perform Panel from the View menu in the
application menu bar or from the View submenu in the KOMPLETE KONTROL menu.
The Perform Panel button in the header.
For detailed information about the Perform Panel, see section ↑7, KOMPLETE KONTROL
Smart Play.
KOMPLETE KONTROL - Manual - 31
Page 32

Adjusting the KOMPLETE KONTROL Software Interface
In stand-alone mode, you can also show/hide the Perform Panel from your computer
keyboard via the [P] key.
2.2.3 Showing/Hiding the Plug-in Panel
Click the Plug-in Panel button in the header to show and hide the Plug-in Panel. You can
►
also select Plug-in Panel from the View menu in the application menu bar or from the
View submenu in the KOMPLETE KONTROL menu.
The Plug-in Panel button in the header
Basic Concepts
For detailed information about the Plug-in Panel, see section ↑4.3, Plug-in Panel.
In stand-alone mode, you can also show/hide the Plug-in Panel from your computer keyboard via the [I] key.
2.2.4 Selecting Instrument Views
Once you have loaded an instrument from the Browser, it appears in the instrument area of the
KOMPLETE KONTROL software. Most KOMPLETE Instruments come equipped with more than
one view, giving you access to another set of controls or letting you edit certain features in finer detail. The three possible instrument views are described below.
To switch between the instrument views, click View in the application menu bar or the
►
View submenu of the KOMPLETE KONTROL menu and select Default View, Additional
View, or Edit View.
KOMPLETE KONTROL - Manual - 32
Page 33

Basic Concepts
Loading Instruments
Instrument views in the View menu of the application menu bar (Windows depicted), and in the View submenu of the KOMPLETE KONTROL menu.
For detailed information about instrument views, see section ↑4.4, Instrument Area.
The available views may vary with the loaded instrument.
All instrument parameters can be controlled at all time from the KOMPLETE KONTROL S-SERIES keyboard, regardless of the selected instrument view in the KOMPLETE KONTROL software.
2.3 Loading Instruments
KOMPLETE Instruments and VST plug-ins supporting the Native Kontrol Standard (NKS) are
automatically loaded when you call up a preset from the KOMPLETE KONTROL Library. The
Browser lets you conveniently search for presets from all of these Instruments and plug-ins,
which means that you do not have to load a plug-in first and then look for a preset you like.
This way you benefit from the advanced tagging and filtering in the KOMPLETE KONTROL
Browser, and from the immediate control your KOMPLETE KONTROL S-SERIES keyboard offers.
KOMPLETE KONTROL - Manual - 33
Page 34

Basic Concepts
Loading Instruments
KOMPLETE Instruments and NKS instruments in the KOMPLETE KONTROL Browser
However, you can also load plug-ins directly, allowing you to integrate any VST plug-in in KOMPLETE KONTROL. This way you can play your VST plug-ins using the Smart Play features and
the Touch Strips, map their parameters to the controls on the KOMPLETE KONTROL S-SERIES keyboard, and save presets for them in your KOMPLETE KONTROL User Library:
▪ For more information about Smart Play, see section ↑7, KOMPLETE KONTROL Smart Play.
▪ For more information about customizing parameter mappings, see section ↑4.3, Plug-in
Panel.
KOMPLETE KONTROL - Manual - 34
Page 35

Stand-Alone and Plug-in Mode
▪ For more information about saving presets in the User Library, see section ↑6.4, Saving
Files to the User Library.
To load a VST plug-in in KOMPLETE KONTROL, go to the Plug-ins submenu of the KOM-
►
PLETE KONTROL menu and click on the plug-in you want to load.
If your VST plug-ins do not show up in the Plug-ins submenu, check if the VST plug-in
folders on your hard drive are correctly added to the Locations pane on the Preferences’
Plug-ins page. For more information, see section ↑2.7.4, Preferences – Plug-ins Page.
Basic Concepts
2.4 Stand-Alone and Plug-in Mode
You can run the KOMPLETE KONTROL software as a stand-alone application or integrate it into your favorite Digital Audio Workstation (or DAW, in short) by loading it as a plug-in. The
KOMPLETE KONTROL software is available in the VST, Audio Unit, and AAX plug-in formats.
For further information on plug-in compatibility and for a detailed description of how to use
plug-ins in your host, please refer to the documentation included with your host software.
You cannot record MIDI in stand-alone mode. For information on audio and MIDI routing, see section ↑2.7, Preferences.
KOMPLETE KONTROL - Manual - 35
Page 36

Basic Concepts
Stand-Alone and Plug-in Mode
For information on how to load KOMPLETE KONTROL as a VST, AAX or AU plug-in, refer to the documentation of your host application.
2.4.1 Transport and Navigate Controls
When KOMPLETE KONTROL is used as a plug-in within a host sequencer software, KOMPLETE KONTROL is automatically synchronized to the host’s transport and tempo settings.
The transport and navigate controls on the KOMPLETE KONTROL S-SERIES keyboard can be
used to control your host application. For example, you can switch tracks in your DAW, record
arm them, and play back your recordings, all from your keyboard (see section ↑5.3, Host Con-
trol and the Transport Section).
When using KOMPLETE KONTROL S-SERIES in MIDI mode, you can do this even when
no instance of KOMPLETE KONTROL is running.
Transport and Tempo in Stand-Alone Mode
If KOMPLETE KONTROL is used in stand-alone mode, it features its own transport and tempo
settings. They are used by sequenced KONTAKT and REAKTOR instruments as well as the arpeggiator. Additionally, the tempo setting is used by all instruments and effects that allow you
to set timing parameters in relation to the musical tempo (e.g. rhythmic modulation, delay effects).
You can find the transport and tempo settings in the header:
KOMPLETE KONTROL - Manual - 36
Page 37

2 3
1
Basic Concepts
Stand-Alone and Plug-in Mode
Transport and tempo in KOMPLETE KONTROL
The play button (1) starts and stops the internal clock. This can be used to control the playback of sequenced KONTAKT and REAKTOR instruments.
To start the internal clock from the KOMPLETE KONTROL S-SERIES keyboard, press
►
PLAY.
To stop the internal clock from the KOMPLETE KONTROL S-SERIES keyboard, press
►
STOP.
The reset button (2) resets the internal clock to its start position. Consequently, sequencers in
KONTAKT and REAKTOR instruments will start their playback from the beginning. The same
applies to the arpeggiator.
When the internal clock is stopped, clicking reset allows you to start playback from the beginning by pressing the play button. When the internal clock is running, clicking reset allows you
to resume playback from the beginning.
To reset the internal clock from the KOMPLETE KONTROL S-SERIES keyboard when the
►
internal clock is stopped, press STOP.
To reset and start the internal clock from the KOMPLETE KONTROL S-SERIES keyboard
►
when the internal clock is stopped, press SHIFT + PLAY.
KOMPLETE KONTROL - Manual - 37
Page 38

Basic Concepts
Stand-Alone and Plug-in Mode
To reset the internal clock from the KOMPLETE KONTROL S-SERIES keyboard when the
►
internal clock is running, press SHIFT + PLAY.
The tempo (3) is set globally in BPM (beats per minute). You can either click and drag up /
down to set the tempo or double-click the display to enter a value numerically.
To set the tempo from the KOMPLETE KONTROL S-SERIES, press SHIFT while pushing
►
and turning the Control encoder.
In plug-in mode, KOMPLETE KONTROL is synchronized to the host. Therefore the transport and tempo functions are grayed out and inactive in the KOMPLETE KONTROL
header.
2.4.2 Audio and MIDI Handling
When KOMPLETE KONTROL is used in stand-alone mode, it directly communicates with your
audio and MIDI interface. You can select which physical audio/MIDI ports have to be used on
your interface, and configure crucial audio settings like the sample rate. All this is done via the
Audio and MIDI pages in the Preferences (see section ↑2.7, Preferences for more information).
▪ On the contrary, when KOMPLETE KONTROL is used as a plug-in within a host applica-
tion, the communication with your audio and MIDI interfaces is managed by the host—the
KOMPLETE KONTROL plug-in only communicates with the host.
For all details on the audio and MIDI configuration of your host application, please refer
to its documentation.
2.4.3 Multiple Plug-in Instances
When you are using KOMPLETE KONTROL as a plug-in within a host application, you can
open multiple KOMPLETE KONTROL instances. Actually, you can load as many instances of
KOMPLETE KONTROL as your computer and your host application can handle CPU-wise. In
contrast to the stand-alone application, they are always tempo synced to the host. In plug-in
mode you can also record automation for KOMPLETE KONTROL or instrument parameters
from your host. To learn more, have a look at chapter ↑5.3.3, Switching between KOM-
PLETE KONTROL Instances and ↑2.11, Controlling Parameters via MIDI and Host Automation.
KOMPLETE KONTROL - Manual - 38
Page 39

Basic Concepts
Stand-Alone and Plug-in Mode
2.4.4 Switching Instances
When two or more instances of the KOMPLETE KONTROL software are running (e.g., as plugins on different tracks of your DAW), you must choose which instance you want to control from
your KOMPLETE KONTROL S-SERIES keyboard. You can do this both from your keyboard and
in the software.
Click the Connect button to connect the keyboard to that instance.
Switching Instance from the Software
To select your keyboard from a particular KOMPLETE KONTROL instance, click the Con-
►
nect button (keyboard icon) in the KOMPLETE KONTROL header of that instance.
Switching Instance from the Keyboard
To select a particular KOMPLETE KONTROL instance from your keyboard:
Depending on the compatibility and version number of your host application, switching
between instances of KOMPLETE KONTROL may not function as described.
For use of KOMPLETE KONTROL S-SERIES with Ableton Live, refer to the KOMPLETE KONTROL S-SERIES Ableton Live Setup document available as a PDF file in the
Host Integration Files subfolder of the Komplete Kontrol installation folder on your hard
disk.
To select a KOMPLETE KONTROL instance from your keyboard, use the NAVIGATE up
►
and down buttons on your KOMPLETE KONTROL S-SERIES to select the track containing the instance in your DAW. The KOMPLETE KONTROL instance loaded on that track is
automatically selected.
KOMPLETE KONTROL - Manual - 39
Page 40

Basic Concepts
Stand-Alone and Plug-in Mode
For detailed information about selecting tracks and KOMPLETE KONTROL instances from your
keyboard, see section ↑5.3, Host Control and the Transport Section.
2.4.5 Configuring Your Host Application
Though KOMPLETE KONTROL can be used stand-alone, most of the time you will want to load
it as a plug-in in a host application. Before using the KOMPLETE KONTROL S-SERIES keyboard to control your host application, there are a few things to be aware of. To learn more
about the necessary configuration steps, continue reading below.
For detailed information on how to set up your DAW for fully integrated use with KOMPLETE KONTROL and KOMPLETE KONTROL S-SERIES, refer to the documentation of
your host application.
Configuring Your Host for Use with KOMPLETE KONTROL S-SERIES
For some of KOMPLETE KONTROL’s advanced host integration features to function as intended, your host application must support these features. For an overview of which host integration features that are supported by which host applications, refer to the following Knowledge
Base article: https://support.native-instruments.com/hc/articles/210280325.
For information on how to configure your host application for use with external MIDI
hardware, refer to the documentation of your DAW.
For detailed guides to help to you set up and configure your host application for use with KOMPLETE KONTROL S-SERIES, refer to these Knowledge Base articles:
▪ Setting up Ableton Live for KOMPLETE KONTROL:
https://support.native-instruments.com/hc/articles/209557689
▪ Setting up Apple Logic for KOMPLETE KONTROL:
https://support.native-instruments.com/hc/articles/210279905
▪ Setting up GarageBand for KOMPLETE KONTROL:
https://support.native-instruments.com/hc/articles/210844489
▪ Setting up Steinberg Cubase / Nuendo for KOMPLETE KONTROL:
https://support.native-instruments.com/hc/articles/209557849
KOMPLETE KONTROL - Manual - 40
Page 41

Basic Concepts
Controlling MASCHINE with KOMPLETE KONTROL S-SERIES
2.5 Controlling MASCHINE with KOMPLETE KONTROL S-SERIES
If you own MASCHINE, you can use your KOMPLETE KONTROL S-SERIES keyboard to control
many of MASCHINE’s basic functions directly from the hardware. The available functions mapped to the sections of the KOMPLETE KONTROL S-SERIES keyboard are listed below.
To switch the focus of your connected KOMPLETE KONTROL S-SERIES keyboard to MA-
►
SCHINE, click on the keyboard icon in the Header.
Detailed information about KOMPLETE KONTROL integration can be found in the MASCHINE Manual.
PERFORM Section
Button on KOMPLETE KONTROL S-SERIES
SCALE Enable/disable SCALE for the selected Group
ARP Enable/Disable ARP for the selected Group
SHIFT + SCALE Edit SCALE for the selected Group
SHIFT + ARP Edit ARP for the selected Group
Action in MASCHINE
TRANSPORT Section
Button on KOMPLETE KONTROL S-SERIES
Basic Transport
PLAY Start/stop playback
Action in MASCHINE
KOMPLETE KONTROL - Manual - 41
Page 42

Controlling MASCHINE with KOMPLETE KONTROL S-SERIES
Button on KOMPLETE KONTROL S-SERIES Action in MASCHINE
SHIFT + PLAY (RESTART) Restart playback at the beginning of the Loop
Range
REC Enable/disable recording
SHIFT + REC (COUNT-IN) Record with count-in
STOP Stop
SHIFT + STOP Enable/disable the metronome
Loop Range
LOOP + Control encoder Move the whole Loop Range
LOOP + Navigate Left + Control encoder Move the Loop Range’s start point
LOOP + Navigate Right + Control encoder Move the Loop Range’s end point
SHIFT + LOOP Include all Scenes in the Loop Range
Playhead Jumps
RWD Move the playhead backwards by Pattern Grid
increments
Basic Concepts
FFW Move the playhead forwards by Pattern Grid
increments
SHIFT + RWD Move the playhead backwards by Step Grid
increments
SHIFT + FFW Move the playhead forwards by Step Grid
increments
KOMPLETE KONTROL - Manual - 42
Page 43

Controlling MASCHINE with KOMPLETE KONTROL S-SERIES
TRANSPOSE Section
Button on KOMPLETE KONTROL S-SERIES Action in MASCHINE
SHIFT + OCT- Edit the Touch Strip settings for the Pitch
Strip
SHIFT + OCT+ Edit the Touch Strip settings for the
Modulation Strip
Control Section
Button on KOMPLETE KONTROL S-SERIES Action in MASCHINE
Page left Skip the Plug-in page to the left
Page right Skip the Plug-in page to the right
NAVIGATE Section
Basic Concepts
Button on KOMPLETE KONTROL S-SERIES
Control Encoder
Control encoder (turn) Move the playhead by Pattern Grid
SHIFT + Control encoder (turn) Adjust the Slot volume
SHIFT + Control encoder (push) Set a preset as Favorite when browsing
Navigate Arrows
Left Navigate arrow Select the previous Plug-in Slot of selected
Right Navigate arrow Select the next Plug-in Slot of selected Sound
Up Navigate arrow Select the previous Sound Slot of selected
Down Navigate arrow Select the next Sound Slot of selected Group
Action in MASCHINE
increments
Sound Slot
Slot
Group
KOMPLETE KONTROL - Manual - 43
Page 44

Button on KOMPLETE KONTROL S-SERIES Action in MASCHINE
SHIFT + Up Navigate arrow Select the previous Group
SHIFT + Down Navigate arrow Select the next Group
Other
BROWSE Browse with the on-screen overlay
INSTANCE Switch between MASCHINE and
KOMPLETE KONTROL instances
SHIFT + INSTANCE Enter MIDI Mode
PRESET Up Select the previous preset
PRESET Down Select the next preset
BACK Go one step back in the on-screen overlay
ENTER Advance one step in the on-screen overlay
Basic Concepts
MIDI Mode
2.6 MIDI Mode
Besides using your KOMPLETE KONTROL S-SERIES keyboard together with its dedicated
KOMPLETE KONTROL software, you can also use it as a powerful and highly versatile MIDI
controller to pilot any other MIDI-capable software or hardware, both via USB as well as standard MIDI connections.
Switching to MIDI Mode
To switch your keyboard between KOMPLETE KONTROL mode and MIDI mode:
Press SHIFT + INSTANCE on your KOMPLETE KONTROL S-SERIES keyboard.
►
Learn more about MIDI mode in section ↑5.2, MIDI Mode.
►
KOMPLETE KONTROL - Manual - 44
Page 45

Basic Concepts
Controller Editor
The versatility of the MIDI mode is made possible by the Controller Editor software, an application that allows you to precisely define all MIDI assignments for your KOMPLETE KONTROL SSERIES keyboard. The Controller Editor is installed during the KOMPLETE KONTROL installation procedure. For more information on this, please refer to the Controller Editor Manual available as a PDF file in the Documentation subfolder of the Controller Editor installation folder on
your hard disk.
2.7 Preferences
The Preferences panel lets you specify various settings for KOMPLETE KONTROL.
To open the Preferences panel, click Preferences… in the Komplete Kontrol menu (Mac
►
OS X) or Edit menu (Windows) of the application menu bar, or in the Edit submenu of the
KOMPLETE KONTROL menu:
Preferences
The following pages are available in the Preferences panel:
▪ Audio: see ↑2.7.1, Preferences – Audio Page
▪ MIDI: see ↑2.7.2, Preferences – MIDI Page
▪ Library: see ↑2.7.3, Preferences – Library Page
▪ Plug-ins: see ↑2.7.4, Preferences – Plug-ins Page
▪ Hardware: see ↑2.7.5, Preferences – Hardware Page
KOMPLETE KONTROL - Manual - 45
Page 46

Basic Concepts
2.7.1 Preferences – Audio Page
The Audio page holds settings related to your audio interface when KOMPLETE KONTROL is
running as a stand-alone application.
When KOMPLETE KONTROL is running as a plug-in in a host application, its audio configuration is managed by the host, and the Audio page is not available. See section
↑2.4, Stand-Alone and Plug-in Mode for more information on using KOMPLETE KON-
TROL in a host environment.
The Routings section allows you to configure the connections between the virtual outputs of
KOMPLETE KONTROL and the physical outputs of your audio interface.
Preferences
KOMPLETE KONTROL - Manual - 46
Page 47

Basic Concepts
Preferences
Preferences panel — Audio page
Setting Description
Driver Select your audio driver here.
Device This allows you to choose from the available devices if you have
connected more than one audio interface.
KOMPLETE KONTROL - Manual - 47
Page 48

Setting Description
Status This shows you whether your audio interface is currently
running.
Sample Rate This displays the selected sample rate of your audio interface.
Please restart KOMPLETE KONTROL after changing the sample
rate.
Buffer Size Mac OS X: This slider allows you to adjust the buffer size of your
audio interface in samples. Lower values result in a more
immediate playing response but increase the CPU load, and
may result in audible clicks and pops. Larger values decrease
the CPU load, but introduce a larger latency (a small delay
between hitting a pad and hearing it). It is recommended to find
the lowest value that does not cause clicks and pops even when
playing more demanding instruments.
Windows: When using an ASIO driver, the Audio page shows an
ASIO Config button instead of the Buffer Size slider. Click this
button to open the settings window of the selected ASIO driver.
Basic Concepts
Preferences
Latency
This shows the delays introduced by the current Buffer Size
setting.
Routings Under Routings, you will be presented with a list of the 16
stereo outputs from KOMPLETE KONTROL: In the right column,
you can assign them to the outputs of your audio interface.
Click the fields in the right column to select the desired outputs
via a drop-down menu.
2.7.2 Preferences – MIDI Page
The MIDI page allows you to set up the MIDI input and output ports that you want to use when
KOMPLETE KONTROL is running as a stand-alone application. See section ↑2.9, Incoming
and Outgoing MIDI for more information on KOMPLETE KONTROL’s MIDI capabilities.
KOMPLETE KONTROL - Manual - 48
Page 49

When KOMPLETE KONTROL is running as a plug-in in a host application, its MIDI configuration is managed by the host, and the MIDI page is not available. See section ↑2.4,
Stand-Alone and Plug-in Mode for more information on using KOMPLETE KONTROL in
a host environment.
Basic Concepts
Preferences
Preferences panel — MIDI page (entries may vary on your computer)
KOMPLETE KONTROL - Manual - 49
Page 50

Basic Concepts
Element Description
Input Clicking Input displays a list of all the available MIDI inputs of
your system. You can activate/deactivate each input by clicking
the checkbox next to its name.
Output Clicking Output displays a list of all the available MIDI outputs
of your system. You can activate/deactivate each input by
clicking the checkbox next to its name.
The MIDI Output settings are required for using KOMPLETE KONTROL’s Smart Play
features with other MIDI instruments. For more information, see section ↑7.9, Scale and
Arp MIDI Output.
2.7.3 Preferences – Library Page
The Library page allows you to edit the locations of all KOMPLETE KONTROL Library files
(both factory and user) that appear in the Library pane of the Browser.
The Library pane of the Browser is described in section ↑6.2, Searching and Loading
Files from the Library.
Preferences
To display the Library page click the Library tab on the left of the Preferences panel.
►
At the top of the page, the Factory and User buttons allow you to switch between the Factory
pane and the User pane.
Factory Pane
The Factory pane shows all factory libraries available. These libraries will appear in the Factory
view of the Browser’s Library pane.
To display the Factory pane, click the Factory button at the top of the Library page.
►
KOMPLETE KONTROL - Manual - 50
Page 51

Basic Concepts
Preferences
Preferences panel – the Library page’s Factory pane.
Location column Shows the path of each library. If you have moved any library to
another location on your computer, click the folder icon on the left of
that library and select its new path.
Product column Shows the name of each product. These names cannot be edited.
Rescan button If you have made any change to a library (e.g., changed its location),
select it in the list and click the Rescan button to rescan that library.
KOMPLETE KONTROL - Manual - 51
Page 52

Basic Concepts
User Pane
The User pane shows all user libraries currently used. These include KOMPLETE KONTROL’s
standard user directory as well as any other user directory you might have defined. These libraries will appear in the User view of the Browser’s Library pane.
To display the User pane, click the User button at the top of the Library page.
►
Preferences
Preferences panel – the Library page’s User pane.
KOMPLETE KONTROL - Manual - 52
Page 53

Location column Shows the path of each library. If you have moved any library to
another location on your computer, click the folder icon on the left of
that library and select its new path.
Alias column Shows the alias stored for each library. Click an alias to edit it.
Defining aliases for your user folders is not mandatory, but it can be
of great help when working on different computers (see description
below). After adding a location (see Add below), click the field in the
new row and in the Alias column to set the alias for that new
location. The alias of the default user folder, Native Instruments User
Directory, cannot be edited — this is the location where all your user
files will be stored by default.
Basic Concepts
Preferences
Scan user content for
changes at start-up
Enabled by default, this option automatically detects any new user
content you created in MASCHINE when starting KOMPLETE
KONTROL.
Add button Click Add to manually add directories to the user library. See below
for more details.
Remove button Click Remove to remove the selected user library. Files will only be
removed from the KOMPLETE KONTROL Browser, not from your hard
disk.
Rescan button If you have made any change to a library (e.g., added/removed files),
select it in the list and click the Rescan button to rescan that library.
You can resize the Preferences panel at your convenience using the usual method on
your operating system. You can also resize each column by clicking and dragging the
limit between both column headers.
Adding Folders to the User Library
In the User pane of the Library page, you can add other folders to the user content of your
KOMPLETE KONTROL Library. To do this:
1. Click Add at the bottom of the pane.
A folder selection dialog opens up.
KOMPLETE KONTROL - Manual - 53
Page 54

Basic Concepts
2. In the dialog, navigate to the desired folder on your computer and click OK (Choose on
Mac OS X).
All KOMPLETE KONTROL-compatible files found in the selected folder are added to your
→
user content in KOMPLETE KONTROL.
KOMPLETE KONTROL-compatible files include ens, rkplr, nrkt, nksn, nfm8, nabs, nki,
nmsv, nbkt, nis.
Furthermore, the attributes (Instrument/Bank/Sub-Bank, Type/Sub-Type/Mode tags, as well as
properties) of all imported files will be retained.
By adding a folder to the user content of your KOMPLETE KONTROL Library, you make their
files available in the Browser’s Library pane for quick searching and loading! For more information on how to use the Library pane of the Browser, please refer to section ↑6.2, Searching and
Loading Files from the Library.
Paths to folders added via the IMPORT button in the Browser’s Files pane will also show
up here. The only difference between adding folders via the Add button in Preferences
panel, described here, and via the IMPORT button in the Files pane of the Browser is
that the latter allows you to directly tag the files as they are imported. See section
↑6.3.5, Using the Result List in the Files Pane for more information on how to import
folders via the Files pane.
Preferences
Please note that the selected folder cannot contain, or be contained within, a folder already
listed in the User or Factory pane. If KOMPLETE KONTROL detects such a folder as you press
OK (Choose on Mac OS X) in the folder selection dialog, a Duplicate Location message ap-
pears: Click OK to return to the folder selection dialog and select another folder on your computer.
Removing Folders from the User Library
You can also remove any user folder from your library—except the default user content directory Native Instruments User Content.
2.7.4 Preferences – Plug-ins Page
The Plug-ins page allows you to manage your VST plug-ins in KOMPLETE KONTROL.
KOMPLETE KONTROL - Manual - 54
Page 55

Basic Concepts
To display the Plug-ins page click the Plug-ins tab on the left of the Preferences panel.
►
At the top of the page, the Manager and Locations buttons allow you to switch between the
Manager pane and the Locations pane.
Manager Pane
The Manager Pane allows you to view and manage all VST plug-ins available in KOMPLETE
KONTROL. By default, all available plug-ins are activated for use in KOMPLETE KONTROL.
To deactivate a plug-in for use in KOMPLETE KONTROL, click on the checkbox icon next
►
to its name so it is unchecked.
The option to Always use latest version of NI Plug-ins selects whether or not your Library content is always loaded with the latest version of the associated plug-in. If this option is disabled,
your Library content is loaded with the lowest required version of the associated plug-in found
on the computer.
For example, this option is required if you have installed both the full version of REAKTOR 5 as well as a KOMPLETE Instrument that came with REAKTOR 6 Player. By disabling the option, the REAKTOR 5 Factory Library will be loaded with the full version of
REAKTOR 5, while the KOMPLETE Instrument will be loaded with REAKTOR 6 Player.
This is necessary since the REAKTOR 5 Factory Library is not authorized for use with
REAKTOR 6 Player.
Preferences
To display the Manager pane, click the Manager button at the top of the Plug-ins page.
►
KOMPLETE KONTROL - Manual - 55
Page 56

Basic Concepts
Preferences
Preferences panel — the Plug-ins page's Manager pane
Checkbox column Activates or deactivates a plug-in for use in KOMPLETE KONTROL.
KOMPLETE KONTROL - Manual - 56
Page 57

Plug-in column Lists all available VST plug-ins in KOMPLETE KONTROL.
Basic Concepts
Preferences
Always use latest
version of NI Plug-ins
If this option in enabled (default), Library content is loaded with the
latest version of the associated plug-in.
If this option is disabled, Library content is loaded with the lowest
required version of the associated plug-in.
Locations Pane
The Locations pane allows you manage the folders containing your plug-ins on the hard drive.
KOMPLETE KONTROL scans these folders for VST plug-ins and adds them to the Manager
pane. You can Add and Remove folders from the list, as well as use the Rescan function to
update the available plug-ins in KOMPLETE KONTROL according to any changes made to the
folders or their contents.
To display the Locations pane, click the Locations button at the top of the Plug-ins page.
►
KOMPLETE KONTROL - Manual - 57
Page 58

Basic Concepts
Preferences
Preferences panel — the Plug-ins page's Locations pane
Plug-in column Lists all folders that KOMPLETE KONTROL scans for VST plug-ins.
Add Opens a file dialogue that lets you add another folder to the list.
Remove Removes the currently selected folder from the list.
Rescan Scans all folders in the list for compatible plug-ins and updates the
Manager pane accordingly.
KOMPLETE KONTROL - Manual - 58
Page 59

Basic Concepts
2.7.5 Preferences – Hardware Page
The Hardware page enables you to customize how the keys react to your playing, as well as
switch the Light Guide on or off (see section ↑5.6, The Light Guide).
To display the Hardware page click the Hardware tab on the left of the Preferences panel
►
while your KOMPLETE KONTROL S-SERIES keyboard is connected.
Preferences
Preferences panel — Hardware page
KOMPLETE KONTROL - Manual - 59
Page 60

Connecting External MIDI Equipment to KOMPLETE KONTROL S-SERIES
Keyboard
Velocity Scaling Velocity Scaling determines how your playing is translated into
velocity values: starting from Soft 3 (a soft touch is enough to
get a big velocity value) through Linear (default) to Hard 3 (you
really have to press the key hard to get a big velocity value).
Light Guide
Enabled Light Guide allows you to switch the colored LEDs above the
keybed on or off. The Light Guide visualizes MIDI patterns being
played back from your host application as well as shows you the
active keys in any scale from the Perform Panel.
Navigate
Browse Mode Switches between the Hardware and On-Screen Overlay modes
for browsing with the KOMPLETE KONTROL S-SERIES
keyboard. For more information, see section ↑6.6.1, Browse
Mode and Hardware Browsing
Accessibility
Basic Concepts
Enabled Enables the text-to-speech feature for visually impairment users
(OS X only). For more information, see section ↑1.4,
Accessibility.
Volume Controls the volume of the text-to-speech feature
2.8 Connecting External MIDI Equipment to KOMPLETE KONTROL S-
SERIES
You can integrate KOMPLETE KONTROL S-SERIES into your MIDI setup.
KOMPLETE KONTROL - Manual - 60
Page 61

Basic Concepts
Incoming and Outgoing MIDI
The MIDI sockets on the rear panel of the KOMPLETE KONTROL S-SERIES
To connect your external MIDI equipment:
1. Hook it up to the KOMPLETE KONTROL S-SERIES keyboard’s MIDI IN or MIDI OUT
socket on the rear panel using a standard MIDI cable.
2. If KOMPLETE KONTROL is running as a stand-alone application, activate the corresponding MIDI input and/or output(s) of your KOMPLETE KONTROL S-SERIES keyboard in the
MIDI page of the Preferences (see section ↑2.7, Preferences).
3. If KOMPLETE KONTROL is running as a plug-in in a host application, the MIDI configuration is managed by the host (see sections ↑2.4, Stand-Alone and Plug-in Mode and
↑2.4.5, Configuring Your Host Application). Please refer to your host documentation to
know how to configure MIDI in your host.
4. If you are using the KOMPLETE KONTROL S-SERIES without a USB connection, MIDI
data will be directly sent and received via the keyboard’s MIDI IN or MIDI OUT sockets on
the rear panel (see section ↑5.2.3, Stand-Alone Operation).
2.9 Incoming and Outgoing MIDI
KOMPLETE KONTROL provides you with flexible MIDI control and host automation capabilities that can be used in many situations.
2.9.1 Incoming MIDI and Host Automation
KOMPLETE KONTROL and the instruments you load inside it can be controlled via MIDI and
the host (when KOMPLETE KONTROL is running as a plug-in):
KOMPLETE KONTROL - Manual - 61
Page 62

Basic Concepts
Incoming and Outgoing MIDI
▪ Triggering instruments via MIDI notes: By default, incoming MIDI notes will trigger the load-
ed instrument and will also be visually reflected by the Light Guide. For information on the
MIDI settings, see section ↑2.7.2, Preferences – MIDI Page.
▪ Controlling parameters via host automation: You can control both KOMPLETE KONTROL and
your loaded instruments’ parameters via host automation (when KOMPLETE KONTROL is
running as a plug-in). This is described in section ↑2.11, Controlling Parameters via MIDI
and Host Automation.
Receiving MIDI Clock
When you load KOMPLETE KONTROL as a plug-in in a host application, the tempo is automatically synced to host tempo. The tempo display in KOMPLETE KONTROL’s header is grayed
out and tempo is adjusted in the host.
2.9.2 Outgoing MIDI and Host Control
You can also send MIDI data from KOMPLETE KONTROL S-SERIES:
▪ Recording MIDI notes: When KOMPLETE KONTROL is running as a plug-in in a host envi-
ronment, you can record your performance playing the keys of your KOMPLETE KONTROL S-SERIES as a MIDI pattern in your host application.
▪ Routing and recording processed MIDI notes: Both the KOMPLETE KONTROL stand-alone ap-
plication and the KOMPLETE KONTROL plug-in output the MIDI notes generated by the
scale engine and the arpeggiator (see section ↑7, KOMPLETE KONTROL Smart Play). You
can route the MIDI notes to other MIDI instruments or record them as a MIDI pattern in
your host application (see section ↑7.9, Scale and Arp MIDI Output).
The AU (Audio Unit) standard does not support MIDI output.
▪ Controlling the host application: You can control your supported host application from your
KOMPLETE KONTROL S-SERIES keyboard by using the TRANSPORT and NAVIGATE sections. This is described in section ↑5.3, Host Control and the Transport Section.
KOMPLETE KONTROL - Manual - 62
Page 63

Basic Concepts
Incoming and Outgoing MIDI
2.9.3 MIDI Mode and Stand-alone Operation
Beyond controlling KOMPLETE KONTROL you can also use your KOMPLETE KONTROL SSERIES keyboard in MIDI mode to assign and control any parameters you want via MIDI CC
(see section ↑5.2, MIDI Mode).
For more information about assigning controls via MIDI, please refer to the Controller
Editor Manual available as a PDF file in the Documentation subfolder of the Controller
Editor installation folder on your hard disk
Stand-alone Operation
When using the keyboard without a USB connection, the 5-pin MIDI ports on KOMPLETE KONTROL S-SERIES’ rear panel can be used to control external MIDI equipment in
stand-alone operation (see section ↑5.2.3, Stand-Alone Operation).
2.10 Native Map
You do not have to assign KOMPLETE KONTROL’s parameters to MIDI messages in order to
control and automate them via MIDI. Instead, KOMPLETE KONTROL has its own proprietary
mapping system called Native Map that allows you to switch your keyboard on, load an instrument in KOMPLETE KONTROL, and get instant access to its parameters via the knobs, displays, and touch strips on the KOMPLETE KONTROL S-SERIES keyboard.
Automatically Assigning Controls via Native Map
Immediately after you load an instrument from the Browser, the instrument’s parameters are
automatically assigned to the eight knobs at the center of your KOMPLETE KONTROL S-SERIES keyboard and to the two touch strips on the left-hand side. You do not need to step
through any complicated configurations to map software and hardware controls to each other.
The mapping of each knob is reflected by its corresponding display. The two arrow shaped
page buttons to the left of the knobs let you skip through all parameters of the loaded instrument while automatically mapping them to the eight knobs on your keyboard. The change in
mapping is reflected by the displays, always informing you of the current mapping. For detailed information, see section ↑5.4, Control Section.
KOMPLETE KONTROL - Manual - 63
Page 64

Basic Concepts
Controlling Parameters via MIDI and Host Automation
You can customize the parameter mapping for each preset in the Plug-in Panel of the
KOMPLETE KONTROL software. For more information, see section ↑4.3, Plug-in Panel.
2.11 Controlling Parameters via MIDI and Host Automation
When you load KOMPLETE KONTROL as a plug-in into your host application, the parameters
of the loaded instrument that are currently mapped to the knobs and displays on KOMPLETE KONTROL S-SERIES also become available for automation from your host.
Which KOMPLETE KONTROL Parameters Can Be Automated?
All the parameters available for automation are found in the Perform Panel or in the loaded
instrument. You cannot automate the controls located in the Browser as they do not send MIDI
and therefore cannot be found by your host application. This means that only parameters that
are assigned to the knobs and displays on your KOMPLETE KONTROL S-SERIES via either Native Map or MIDI CC can be automated.
For more information about assigning controls via MIDI, please refer to the Controller
Editor documentation in the software installation folder on your hard disk
In turn, you can also use your KOMPLETE KONTROL S-SERIES to control your host application. This is described in section ↑5.3, Host Control and the Transport Section.
2.11.1 Recording Automation
Many DAWs require that you have set transport record to on (see section ↑5.3.1, Transport
Controls) in order to record automation, while others make use of dedicated automation con-
trols.
For detailed information regarding automation recording in your DAW, refer to the documentation of your host software.
To record automation data in your host using KOMPLETE KONTROL, you can take the following measures:
KOMPLETE KONTROL - Manual - 64
Page 65

Controlling Parameters via MIDI and Host Automation
On/Off Switches
To change the state of an on/off switch:
Click the corresponding button with your computer mouse.
►
or:
Turn the knob on your KOMPLETE KONTROL S-SERIES keyboard currently assigned to
►
the corresponding parameter.
Drop-Down Menus
To select another entry from a drop-down menu:
Basic Concepts
KOMPLETE KONTROL - Manual - 65
Page 66

Controlling Parameters via MIDI and Host Automation
Click the corresponding menu with your computer mouse and select an entry.
►
Basic Concepts
or:
Turn the knob on your KOMPLETE KONTROL S-SERIES keyboard currently assigned to
►
the corresponding parameter.
Drag Controls
To change the value of a drag control:
Click and drag the corresponding drag control with your computer mouse.
►
KOMPLETE KONTROL - Manual - 66
Page 67

Basic Concepts
Controlling Parameters via MIDI and Host Automation
or:
Turn the knob on your KOMPLETE KONTROL S-SERIES keyboard currently assigned to
►
the corresponding parameter.
2.11.2 Automation IDs
Some DAWs let you handle automation by using automation IDs that are mapped to specific
parameters of the plug-in. KOMPLETE KONTROL comes with a predefined list of automation
IDs that lets your host application find them automatically.
For detailed information regarding automation recording in your DAW, refer to the documentation of your host software.
Automation IDs for the Perform Panel
The following automation IDs are reserved for KOMPLETE KONTROL’s perform parameters:
Automation ID Parameter
000 Reserved for Instance Recognition
and Automatic Focus Follow
001 Scale On / Off
002 Root Note (Scale)
003 Scale Type (Scale)
004 Key Mode (Scale)
006 Chord Mode (Scale)
007 Chord Type (Scale)
026 Arp On / Off
027 Mode (Arp)
028 Type (Arp)
029 Rate (Arp)
KOMPLETE KONTROL - Manual - 67
Page 68

Automation ID Parameter
030 Sequence (Arp)
031 Swing (Arp)
032 Octaves (Arp)
033 Dynamic (Arp)
034 Gate (Arp)
035 Retrigger (Arp)
036 Repeat (Arp)
037 Offset (Arp)
038 Inversion (Arp)
039 Min. Key (Arp)
040 Max. Key (Arp)
041 Hold (Arp)
Basic Concepts
Controlling Parameters via MIDI and Host Automation
When configuring your own automation IDs, it is important you do not overwrite the
NIKB00 ID, as this is used to recognize the KOMPLETE KONTROL S-SERIES keyboard
in you host.
Automation IDs for KOMPLETE Instruments
The automation IDs 101-1194 are reserved for KOMPLETE Instruments’ automation parameters. This way, automation IDs previously used by e.g. KONTAKT or REAKTOR are remapped
thus:
▪ KONTAKT or REAKTOR automation ID 000 is moved to KOMPLETE KONTROL automation
ID 100.
▪ KONTAKT or REAKTOR automation ID 100 is moved to KOMPLETE KONTROL automation
ID 200.
KOMPLETE KONTROL - Manual - 68
Page 69

Basic Concepts
Using Pedals with KOMPLETE KONTROL S-SERIES
2.12 Using Pedals with KOMPLETE KONTROL S-SERIES
Your KOMPLETE KONTROL S-SERIES provides you two pedal inputs in the form of 1/4" sockets on its rear panel: SUSTAIN and EXPRESSION.
The pedal inputs on the rear panel of your keyboard
These sockets allow you to connect sustain and expression pedals in order to further refine
your performance.
▪ SUSTAIN: Lets you connect a footswitch to control the sustain of the notes you play. This
is an on/off switch.
▪ EXPRESSION: Lets you connect an expression pedal to control e.g. velocity. This is a con-
tinuous control.
For information on how to assign the pedals via MIDI, refer to the Controller Editor Manual.
Setting the Polarity for the Sustain Pedal
The KOMPLETE KONTROL S-SERIES automatically configures the polarity for the connected
sustain pedal when you switch on the keyboard.
Set your sustain pedal to the ‘off’ or ‘non-pressed’ state when switching on your KOM-
►
PLETE KONTROL S-SERIES keyboard to ensure the polarity is configured correctly.
If your sustain pedal acts inversely, you can correct the polarity by following the steps below:
1. Switch off your KOMPLETE KONTROL S-SERIES keyboard.
2. Set your sustain pedal to the ‘off’ or ‘non-pressed’ state.
KOMPLETE KONTROL - Manual - 69
Page 70

3. Switch on your KOMPLETE KONTROL S-SERIES keyboard.
The correct polarity for your sustain pedal is set.
→
Basic Concepts
Using Pedals with KOMPLETE KONTROL S-SERIES
KOMPLETE KONTROL - Manual - 70
Page 71

3 Quick Start
If you have installed KOMPLETE KONTROL with Native Access, connected your KOMPLETE KONTROL S-SERIES keyboard to your computer and to the power supply, and finally
made the required configurations in your DAW and the KOMPLETE KONTROL preferences, you
are ready to start playing music with KOMPLETE KONTROL. In this section we will show you
some basic workflows and use cases to get you started.
This section describes the fine-tuned integration and use of KOMPLETE KONTROL and
the KOMPLETE KONTROL S-SERIES keyboard. If you do not yet own a KOMPLETE KONTROL S-SERIES keyboard, continue reading in section ↑4, KOM-
PLETE KONTROL Software Overview.
KOMPLETE KONTROL S-SERIES and MIDI Mode
When you switch on your KOMPLETE KONTROL S-SERIES keyboard, you will either notice a
message on the displays reading PRESS BROWSE or be presented with various MIDI CC numbers, depending on whether you have entered KOMPLETE KONTROL mode or MIDI mode:
Quick Start
▪ If you first started the KOMPLETE KONTROL software on your computer and then switched on
your KOMPLETE KONTROL S-SERIES, your keyboard will launch into KOMPLETE KONTROL
mode. For information on KOMPLETE KONTROL mode, continue reading in section ↑3.1,
First Steps. If instead you want to launch MIDI mode, press the INSTANCE button on your
keyboard and select MIDI MODE from the appearing on-screen overlay.
▪ If you switched on your KOMPLETE KONTROL S-SERIES without first starting the KOM-
PLETE KONTROL software, your keyboard will launch into MIDI mode. To switch to KOM-
PLETE KONTROL mode, start the software from your computer. For information on switching between modes, see section ↑2.6, MIDI Mode.
▪ If you are using your KOMPLETE KONTROL S-SERIES as a MIDI controller to control your
DAW without using the KOMPLETE KONTROL software, your keyboard is set to MIDI mode. For
information on MIDI mode, see section ↑5.2, MIDI Mode.
KOMPLETE KONTROL - Manual - 71
Page 72

3.1 First Steps
Once both the KOMPLETE KONTROL software and the KOMPLETE KONTROL S-SERIES keyboard are up and running, your first stop is the Browser. For detailed information about the
Browser, see section ↑6, KOMPLETE KONTROL Browser.
This section assumes that you are running KOMPLETE KONTROL either in stand-alone
mode or as a plug-in in a host application.
3.1.1 Opening the Browser
This section assumes that you are using the default KOMPLETE KONTROL S-SERIES
and computer display method of browsing. If you prefer to browse using only KOMPLETE KONTROL S-SERIES, please read ↑6.6.1, Browse Mode and Hardware Browsing
To open the Browser and access your KOMPLETE KONTROL Library, press the BROWSE
►
button on your KOMPLETE KONTROL S-SERIES keyboard. You find it to the right of the
displays in the NAVIGATE section.
Quick Start
First Steps
KOMPLETE KONTROL - Manual - 72
Page 73

Quick Start
First Steps
The on-screen overlay displaying the Browser
The appearance of the Browser will vary with the installed content in your KOMPLETE
KONTROL Library.
If you set up the correct plug-in folder during installation, all KOMPLETE Instruments as well
as NKS instruments should appear on your computer screen via the on-screen overlay. If you
cannot find your instruments, see section ↑2.7.3, Preferences – Library Page.
KOMPLETE KONTROL - Manual - 73
Page 74

3.1.2 Finding and Loading an Instrument Preset
As browsing through your entire KOMPLETE KONTROL Library can be time consuming—especially in a live performance situation—the Browser comes equipped with some handy features
to enhance your browsing experience, such as the TYPES and MODES filters. In this tutorial
you will learn how to:
▪ Navigate the Browser from your keyboard
▪ Filter the library using the TYPES and MODES filters
▪ Select and load an instrument preset from the result list
Quick Start
First Steps
KOMPLETE KONTROL - Manual - 74
Page 75

1. To open the Browser, press the BROWSE button.
Quick Start
First Steps
By default the factory content is selected. For detailed information on the user content,
see section ↑6.2.2, Choosing Between Factory and User Content.
If you already know what instrument you want to load, you can scroll through the instrument icons using the Control encoder.
KOMPLETE KONTROL - Manual - 75
Page 76

2. To set focus to the TYPES filter, press the Control encoder or the NAVIGATE down button.
Quick Start
First Steps
3. To select a Type, turn the Control encoder until the desired Type is highlighted. The result
list on the right side is filtered accordingly. If you do not want to filter by a Type, turn the
Control encoder to the left until nothing is highlighted.
KOMPLETE KONTROL - Manual - 76
Page 77

Quick Start
First Steps
If the selected Type has any Sub-Types, these appear beneath the Types. To set focus to
the SUBTYPES filter, press the Control encoder or NAVIGATE down button. You can then
select a Sub-Type to further filter the result list.
KOMPLETE KONTROL - Manual - 77
Page 78

4. To set focus to the MODES filter, press the Control encoder or the NAVIGATE down button.
Quick Start
First Steps
KOMPLETE KONTROL - Manual - 78
Page 79

5. To select a Mode, turn the Control encoder until the desired Mode is highlighted. The result list on the right side is filtered accordingly. If you do not want to filter by a Mode,
turn the Control encoder to the left until nothing is highlighted.
Quick Start
First Steps
The result list on the right side is filtered accordingly.
KOMPLETE KONTROL - Manual - 79
Page 80

6. To set focus to the result list on the right side, press the Control encoder or the NAVI-
GATE right button.
Quick Start
First Steps
7. To scroll to an instrument preset you want to load, turn the Control encoder.
KOMPLETE KONTROL - Manual - 80
Page 81

Controlling Instruments
8. To load the instrument preset, press either the Control encoder or the ENTER button.
Quick Start
The instrument with the selected preset is loaded into the KOMPLETE KONTROL software
and its parameters are automatically mapped to the knobs, displays, and touch strips on
your KOMPLETE KONTROL S-SERIES keyboard, giving you direct hands-on access to the
controls on the instrument panel.
For more information about automatically assigning controls, see section ↑2.10, Na-
tive Map.
You are ready to play the loaded instrument with the keys and knobs on your KOM-
→
PLETE KONTROL S-SERIES or via MIDI notes from your host application of choice. Have
fun!
3.2 Controlling Instruments
This section introduces you to controlling instruments using your keyboard.
KOMPLETE KONTROL - Manual - 81
Page 82

Controlling Instruments
3.2.1 Controlling Instrument Parameters
Once you have loaded an instrument, you can control its parameters from your KOMPLETE KONTROL S-SERIES keyboard, without the need to first map them via MIDI learn. The
eight knobs on your keyboard and their corresponding displays are automatically assigned to
eight instrument parameters. Whenever you turn a knob on your keyboard, the mapped parameter visually reflects the movement in the KOMPLETE KONTROL software.
To adjust an instrument parameter, turn the corresponding knob on your KOM-
►
PLETE KONTROL S-SERIES keyboard. The mapping of each knob is indicated by its corresponding display.
The displays on KOMPLETE KONROL S-SERIES mapped to MONARK’s controls (preset At The Parade (ATTHPRD) selected)
If you are playing a KONTAKT instrument with key switches, the name of the key switch
will show up in the leftmost display of the Control section (PRESET display) after pressing the corresponding key (learn more about key switches in the user manual of your
KONTAKT instrument).
Quick Start
3.2.2 More than Eight Parameters: Switching Parameter Pages
Many instruments are equipped with much more than eight parameters. KOMPLETE KONTROL
has an easy solution for this in the PAGE buttons (left and right arrows). They let you quickly
skip through parameter pages, all the while remapping the knobs to a different set of instrument parameters. The current parameter page is always indicated by the PAGE display at the
far left. The displayed value will depend on the loaded instrument and its amount of controls.
The PAGE display at the left indicates the current mapping (1/8)
KOMPLETE KONTROL - Manual - 82
Page 83

Using Smart Play: Scale, Arp, and the Light Guide
To skip to another parameter page and remap the eight knobs to a new set of controls,
►
press the arrow-shaped PAGE buttons left or right. The PAGE display indicates the
changed parameter page and the eight knobs and their corresponding displays reflect
their new parameter mappings.
You can customize the parameter mapping for each preset in the Plug-in Panel of the
KOMPLETE KONTROL software. For more information, see section ↑4.3, Plug-in Panel.
3.3 Using Smart Play: Scale, Arp, and the Light Guide
Once you have learned to call up the Browser via the on-screen overlay and to use it to load an
instrument, it is time to find out more about some of the features that make KOMPLETE KONTROL so unique: Smart Play and the Light Guide.
Smart Play
Rather than just being a Browser for your instruments, KOMPLETE KONTROL is also equipped
with the versatile and powerful Smart Play functions. You can generate and play a huge variety
of scales, chords, and sequences and even have them played back visually to you by the LEDs
in the Light Guide on your KOMPLETE KONTROL S-SERIES. For detailed information about
Smart Play and its parameters, see section ↑7, KOMPLETE KONTROL Smart Play. In the tutorials below you will learn how to:
Quick Start
▪ Edit the scale and arp parameters
▪ Map the keys to a scale and play it
▪ Understand the information given by the Light Guide
▪ Automatically play notes as harmonized chords
▪ Automatically play back chords as arpeggiated note sequences
3.3.1 Selecting a Scale
To open and edit the scale parameters in the keyboard’s Control section, follow these instructions:
KOMPLETE KONTROL - Manual - 83
Page 84

Using Smart Play: Scale, Arp, and the Light Guide
1. Press SHIFT + SCALE to map the displays and knobs of the Control section to the SCALE
parameters:
2. To select a scale, turn Knob 2 (by default set to MAJOR) until you find a scale you like.
3. To switch on the scale you selected, press the SCALE button so it lights up.
3.3.2 Playing Chords
You can play chords in the usual way by pressing any number of keys simultaneously (or send
multiple MIDI notes simultaneously from your host application), but KOMPLETE KONTROL also lets you create and play chords by using Smart Play.
To play multiple notes in a chord simultaneously, the loaded instrument must be able to
handle polyphony.
To play a chord by only pressing a single key on your keyboard, follow these instructions:
Quick Start
1. Press SHIFT + SCALE to map the displays and knobs of the Control section to the SCALE
parameters:
2. To activate Chord Mode, set CHORD to HARM by turning Knob 5 (by default set to OFF).
3. Define the intervals of your chord with the Chord Type parameter that appears on the display below Knob 6 (by default set to 1-3-5).
4. To enable playing full chords, ensure that the SCALE button is lit.
3.3.3 Playing Arpeggiated Chords
In the tutorials above you learned to select a scale and to play full chords that follow the selected scale. You can also play back a chord as an arpeggiated note sequence:
KOMPLETE KONTROL - Manual - 84
Page 85

To switch on the arpeggiator, press the ARP button so it lights up.
►
Pressing a key (or receiving a MIDI note) starts the arpeggiator, which automatically plays
→
back the notes in the chord that you generated in the SCALE settings as a sequence,
rather than simultaneously.
You can also edit the ARP parameters in the Control section for further tweaking of the sequence:
1. Press SHIFT + ARP to map the displays and knobs of the Control section to the ARP parameters:
2. To change the direction of the sequence to e.g. UP-DOWN, turn Knob 2 (by default set to
UP).
3. To adjust the OCTAVES reach of the arpeggiator, turn Knob 6 (by default set to 1) to e.g.
4.
Quick Start
What’s Next?
3.4 What’s Next?
You have already learned to use some of the most important features of KOMPLETE KONTROL. Do not be afraid to test other controls not described in the above tutorials or to load an
instrument and try out to figure out the settings by yourself. To learn more in detail about
KOMPLETE KONTROL, continue reading the following sections:
▪ For an overview of the KOMPLETE KONTROL software, see section ↑4, KOMPLETE KONTROL
Software Overview.
▪ For an overview of the KOMPLETE KONTROL S-SERIES keyboard, see section ↑5, KOM-
PLETE KONTROL S-SERIES Overview.
▪ For a thorough description of the Browser and how to edit and add files to the KOMPLETE
KONTROL Lbrary, see section ↑6, KOMPLETE KONTROL Browser.
▪ For detailed information on Smart Play and all parameters and settings of the scales and
the arpeggiator, see section ↑7, KOMPLETE KONTROL Smart Play.
KOMPLETE KONTROL - Manual - 85
Page 86

▪ For information about controlling your host application, see section ↑5.3, Host Control and
the Transport Section.
▪ For information about using the touch strips, see section ↑5.5, Touch Strips.
▪ For information about the multicolored LEDs in the Light Guide, see section ↑5.6, The
Light Guide.
▪ For information about MIDI mode, see section ↑5.2, MIDI Mode.
▪ For help and troubleshooting, see section ↑8, Troubleshooting – Getting Help.
Quick Start
What’s Next?
KOMPLETE KONTROL - Manual - 86
Page 87

KOMPLETE KONTROL Software Overview
4 KOMPLETE KONTROL Software Overview
Though the integration of the KOMPLETE KONTROL S-SERIES keyboard and the KOMPLETE KONTROL software is what makes KOMPLETE KONTROL so powerful and at the same
time so easy to use, you can also use the software alone. In this section we will give you an
overview of the software interface.
▪ To learn more about the KOMPLETE KONTROL software interface and how to access all of
its function, continue reading below.
▪ To learn more about the Browser and how to access and maintain your KOMPLETE KON-
TROL Library, see section ↑6, KOMPLETE KONTROL Browser.
▪ To learn more about KOMPLETE KONTROL’s powerful Smart Play functions and how to
control them both in the software as well as from the keyboard, see section ↑7, KOM-
PLETE KONTROL Smart Play.
KOMPLETE KONTROL - Manual - 87
Page 88

KOMPLETE KONTROL Software Overview
Software Interface Overview
The KOMPLETE KONTROL software interface.
4.1 Software Interface Overview
Most of KOMPLETE KONTROL’s parameters can be accessed both from the controls on your
KOMPLETE KONTROL S-SERIES keyboard and by using your computer mouse to adjust the
KOMPLETE KONTROL software. This section gives you an overview of the areas and controls of
the KOMPLETE KONTROL software.
KOMPLETE KONTROL - Manual - 88
Page 89

1
3 2
KOMPLETE KONTROL Software Overview
Software Interface Overview
Overview of the KOMPLETE KONTROL software.
(1) Header: Gives you access to general controls like the KOMPLETE KONTROL menu as well
as possibilities to show and hide areas of the GUI, e.g. the Browser and the Perform Panel. For
details, see section ↑4.2, Header.
(2) Instrument area: Displays your loaded instrument and gives you visual feedback as you control it with your KOMPLETE KONTROL S-SERIES keyboard. For information, see sections
↑2.2.4, Selecting Instrument Views and ↑4.4, Instrument Area.
(3) Browser: Lets you search, edit, and load all your instrument files. For details, see section
↑6, KOMPLETE KONTROL Browser.
KOMPLETE KONTROL - Manual - 89
Page 90

1 2
3
4 5
6
7
8
9 10 11 12
1313
14
KOMPLETE KONTROL Software Overview
4.2 Header
The header is where you find general settings that affect KOMPLETE KONTROL globally and
controls to customize the appearance of the KOMPLETE KONTROL software (see section ↑2.2,
Adjusting the KOMPLETE KONTROL Software Interface).
The header
(1) KOMPLETE logo: The KOMPLETE logo opens the About screen which displays the version
number of your KOMPLETE KONTROL software.
(2) Browser button: Shows or hides the Browser. For detailed information on the Browser, see
section ↑6, KOMPLETE KONTROL Browser.
(3) KOMPLETE KONTROL menu: Opens the KOMPLETE KONTROL menu and lets you select general settings, e.g. instrument view or access the preferences panel (see section ↑2.7, Preferen-
ces).
Header
(4) Preset display: Displays the name of the loaded preset file or KONTAKT key switch. The arrow buttons on the right skip to the next preset in the Browser’s result list. The presets of all
instruments can be browsed via the Browser as well as via the BROWSE button on your KOMPLETE KONTROL S-SERIES keyboard (see sections ↑6, KOMPLETE KONTROL Browser and
↑6.6, Browsing with the KOMPLETE KONTROL S-SERIES).
(5) Perform Panel button: Shows or hides the Perform Panel, which gives you access to the
Scale and Arp parameters. The Perform Panel button lights blue when Scale and/or Arp is ac-
tive. For detailed information on the Perform Panel and how to generate scales and chords with
Smart Play, see section ↑7, KOMPLETE KONTROL Smart Play.
(6) Control area button: Shows or hides the Control area, which allows you to customize the parameter mapping for the Control section on your KOMPLETE KONTROL S-SERIES keyboard for
every preset. For details, see section ↑4.3, Plug-in Panel)
KOMPLETE KONTROL - Manual - 90
Page 91

KOMPLETE KONTROL Software Overview
(7) + button: Switches a loaded KOMPLETE Instrument between default view and additional
view. To open edit view, use the KOMPLETE KONTROL menu (3). For details, see section
↑2.2.4, Selecting Instrument Views.
(8) Keyboard display: Shows the currently connected KOMPLETE KONTROL S-SERIES Keyboard, S25, S49, S61, or S88. If multiple instances of the KOMPLETE KONTROL software
have been instantiated (for example in a host application), click this to connect your KOMPLETE KONTROL S-SERIES to the intended instance.
(9) Transport: The transport controls let you start, stop, and reset the internal clock. When
KOMPLETE KONTROL is loaded as a plug-in in a host application, the transport automatically
follows the host transport and this feature is grayed out. For details, see section ↑2.4.1, Trans-
port and Navigate Controls.
(10) Tempo: Displays the tempo in BPM (beats per minute). Click and drag this up or down
with your mouse to change tempo, or double-click and then type in a value with your computer
keyboard. When KOMPLETE KONTROL is loaded as a plug-in in a host application, the tempo
is automatically synchronized to the host tempo and this feature is grayed out. For details, see
section ↑2.4.1, Transport and Navigate Controls.
(11) Volume Control and Meter: Lets you adjust the overall output volume of KOMPLETE KONTROL. The meter shows the current peak level of the output signal. You can also control the
output volume of the active KOMPLETE KONTROL instance from the keyboard by pressing
SHIFT and simultaneously turning the BROWSE encoder. This will adjust the output volume in
0.5dB increments from -30dB to +10dB. Below -30dB, the keyboard’s volume control is expo-
nentially scaled and quickly lowers the output signal to complete silence.
Header
(12) CPU meter: Represents the current load on your computer’s processor and is constantly
measured; it should not go above 70% to avoid clicks and interruptions.
(13) ! button: Click the ! button to disable the entire sound processing of KOMPLETE KONTROL.
(14) NI logo: The NI logo opens the About screen which displays the version number of your
KOMPLETE KONTROL software.
KOMPLETE KONTROL - Manual - 91
Page 92

KOMPLETE KONTROL Software Overview
4.3 Plug-in Panel
The Plug-in Panel lets you view and customize the parameters mapped to the Control section
on your KOMPLETE KONTROL S-SERIES keyboard (see ↑5.4, Control Section) for individual
instrument presets.
To open the Plug-in Panel, click on the Plug-in Panel button in the Header of the KOM-
►
PLETE KONTROL software.
The Plug-in Panel opens, showing all currently mapped controls for each page of the Con-
→
trol section.
Plug-in Panel
If you want to customize the parameter mapping for an instrument preset, you have to enable
the Edit mode of the Plug-in Panel.
KOMPLETE KONTROL - Manual - 92
Page 93

KOMPLETE KONTROL Software Overview
To enable or disable the Plug-in Panel’s Edit mode, click on the Edit mode button in the
►
upper right corner.
The Edit mode allows you to:
▪ Add, delete, and replace parameters in the mapping.
▪ Learn parameters to controls.
▪ Rename controls.
▪ Add pages to the Control section, or delete existing pages.
▪ Add and rename sections on the pages to group controls.
Plug-in Panel
Plug-in Panel Edit Mode Overview
The Edit mode of the Plug-in Panel
(1) Control section pages: Each page of the Control section on your KOMPLETE KONTROL SSERIES keyboard shows up as a label at the top of the Plug-in Panel.
KOMPLETE KONTROL - Manual - 93
Page 94

KOMPLETE KONTROL Software Overview
Click on a label to view and edit the controls on this page. The current page is highlight-
►
ed.
To delete a page, click on the cross icon next to its label.
►
(2) Add page: This button allows you to add more pages to the Control section for the current
preset.
Click on the Add page button to create a new page.
►
(3) Learn mode: This button enables Learn mode for the Plug-in Panel.
In Learn mode, select a control in the Plug-in Panel and move any parameter on the in-
►
strument’s panel to learn this parameter to the selected control (highlighted in blue).
(4) Control name: The name of each control is shown below the corresponding knob in the Plugin Panel.
To change the name of a control, double-click on it and enter a new name. Press [enter]
►
or click elsewhere to confirm the changes.
(5) Sections: Controls can be grouped in sections to show related parameters in a coherent
manner.
Plug-in Panel
Double-click on the empty space above a parameter, enter a name, and then press [enter]
►
or click elsewhere to create a new section starting with the chosen parameter.
To rename an existing section, double-click on it and enter a new name. Press [enter] or
►
click elsewhere to confirm the changes.
(6) Control: If you place the mouse over a control in Edit mode, additional options allow for
changing the parameter mapping of this control.
Click on the arrow icon at the left of the control’s knob and select a parameter from the
►
drop-down menu to map it to this control.
Click on the cross icon at the right of the control’s knob to delete this control from the
►
current page.
KOMPLETE KONTROL - Manual - 94
Page 95

KOMPLETE KONTROL Software Overview
Instrument Area
In order to make your changes permanent, you have to save the preset to the KOMPLETE KONTROL User Library. Learn more about saving preset to the User Library in
section ↑6.4, Saving Files to the User Library.
4.4 Instrument Area
The instrument area of the KOMPLETE KONTROL software is where your instruments are displayed once you have loaded them from the Browser. Each instrument offers a different set of
controls and parameters, but they are all easily controlled both with your computer mouse and
from the KOMPLETE KONTROL S-SERIES keyboard. The keyboard has some clear advantages
here, such as the keys, which let you play chords and melodies, and the hands-on tactility of
the knobs and touch strips. Either way you choose to control them, the parameters of the loaded instrument are mutually reflected by both the displays on the KOMPLETE KONTROL SSERIES and the software interfaces in the instrument area.
Selecting Instrument Views
Once you have loaded an instrument from the Browser, it appears in the instrument area of the
KOMPLETE KONTROL software. Most KOMPLETE Instruments come equipped with more than
one view, giving you access to another set of controls or letting you edit certain features in finer detail. The three possible instrument views are described below.
To switch between the instrument views, click View in the application menu bar or the
►
View submenu of the KOMPLETE KONTROL menu and select Default View, Additional
View, or Edit View.
KOMPLETE KONTROL - Manual - 95
Page 96

KOMPLETE KONTROL Software Overview
Instrument Area
Instrument views in the View menu of the application menu bar (Windows depicted), and in the View submenu of the KOMPLETE KONTROL menu.
The available views may vary with the loaded instrument.
All instrument parameters can be controlled at all time from the KOMPLETE KONTROL S-SERIES keyboard, regardless of the selected instrument view in the KOMPLETE KONTROL software.
4.4.1 Default View
The default view is the view that first appears when you load an instrument from the Browser.
It gives you access to some of the most important features of each KOMPLETE Instrument with
an easy-to-use interface.
KOMPLETE KONTROL - Manual - 96
Page 97

KOMPLETE KONTROL Software Overview
Instrument Area
POLYPLEX in default view
4.4.2 Additional View
Most KOMPLETE Instruments have more parameters than can be displayed at once in small
surface and therefore come with a second, additional view. The additional view can give you
access to detailed edit controls or to a completely different set of controls altogether depending on the loaded instrument.
KOMPLETE KONTROL - Manual - 97
Page 98

KOMPLETE KONTROL Software Overview
Instrument Area
POLYPLEX in additional view
To switch to the additional view, click the + button in the KOMPLETE KONTROL header.
►
Clicking it again will return the KOMPLETE Instrument to default view.
KOMPLETE KONTROL - Manual - 98
Page 99

KOMPLETE KONTROL Software Overview
Instrument Area
4.4.3 Edit View
You also have the possibility to open any KOMPLETE Instrument that can be loaded and
played by either the KONTAKT or REAKTOR players in edit view. Use the edit view to access
all the flexible controls and features you would normally have when using KONTAKT or REAKTOR in stand-alone mode.
To switch to the edit view, click Edit View in the View submenu of the KOMPLETE KON-
►
TROL menu.
Edit view is only available for instruments powered by KONTAKT or REAKTOR.
Edit view enables you to access files that cannot be loaded from the KOMPLETE KONTROL Browser, e.g. KONTAKT Multis which can be loaded from the KONTAKT Browser
in edit view.
KOMPLETE KONTROL - Manual - 99
Page 100

KOMPLETE KONTROL Software Overview
Instrument Area
POLYPLEX in edit view
KOMPLETE KONTROL - Manual - 100
 Loading...