


 Loading...
Optix Series
LCD Monitor
Optix MAG274QRF (3CA8)
Optix MAG274QRF-QD (3CA8)
Contents |
|
Getting Started.............................................................................................................. |
3 |
Package Contents................................................................................................... |
3 |
Installing the Monitor Stand................................................................................... |
4 |
Adjusting the Monitor.............................................................................................. |
5 |
Monitor Overview.................................................................................................... |
6 |
Connecting the Monitor to PC................................................................................. |
8 |
OSD Setup...................................................................................................................... |
9 |
Navi Key................................................................................................................... |
9 |
Hot Key.................................................................................................................... |
9 |
OSD Menus.................................................................................................................. |
10 |
Gaming.................................................................................................................. |
10 |
Professional.......................................................................................................... |
12 |
Image..................................................................................................................... |
13 |
Input Source.......................................................................................................... |
14 |
Navi Key................................................................................................................. |
14 |
Setting................................................................................................................... |
15 |
Specifications.............................................................................................................. |
17 |
Preset Display Modes................................................................................................. |
19 |
Troubleshooting.......................................................................................................... |
20 |
Safety Instructions...................................................................................................... |
21 |
Regulatory Notices..................................................................................................... |
22 |
Revision
V1.0, 2020/10
2 Contents

Getting Started
This chapter provides you with the information on hardware setup procedures. While connecting devices, be careful in holding the devices and use a grounded wrist strap to avoid static electricity.
Package Contents
Monitor
Documentation
Accessories
Cables
Important
∙∙Contact your place of purchase or local distributor if any of the items is damaged or missing.
∙∙Package contents may vary by country.
Getting Started 3

Installing the Monitor Stand
1. Leave the monitor in its protective foam packaging. Align the stand bracket to the monitor groove.
2. Tighten the stand bracket with screws.
3. Connect the base to the stand and tighten the base screw to secure the base. 4. Make sure the stand assembly is properly installed before setting the monitor
upright.
Important
∙∙Place the monitor on a soft, protected surface to avoid scratching the display panel. ∙∙Do not use any sharp objects on the panel.
∙∙The groove for installing the stand bracket can also be used for wall mount. Please contact your dealer for proper wall mount kit.
2
3
1
4 Getting Started

Adjusting the Monitor
This monitor is designed to maximize your viewing comfort with its adjustment capabilities.
Important
∙∙Avoid touching the display panel when adjusting the monitor. ∙∙Please slightly tilt the monitor backwards before pivoting it.
|
O |
O |
-5 |
|
20 |
100mm
O |
O |
90 |
90 |
75 |
O |
75 |
|
O
Getting Started 5

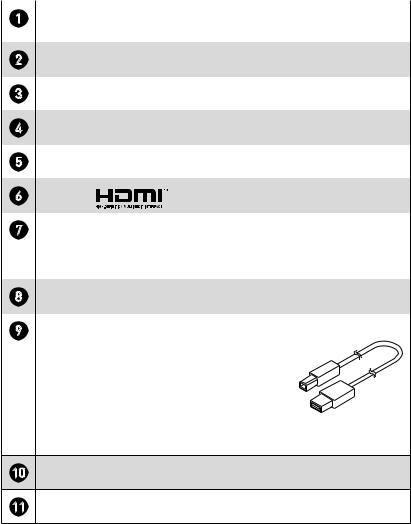
Monitor Overview
1 |
2 |
3 |
4 |
5 |
6 |
6 |
7 |
8 |
9 |
10 |
10 |
11 |
6 Getting Started
|
|
|
|
|
1 |
Macro Key |
|
|
|
|
To activate OSD. |
|
|
|
2 |
Power Button |
|
|
|
3 |
Navi Key |
|
|
|
4 |
Kensington Lock |
|
|
|
5 |
DisplayPort |
|
|
|
6 |
HDMI Port |
|
|
|
7 |
USB Type-C Port |
|
|
|
This port supports DisplayPort Alternate (DP Alt) Mode and up to 5V/3A |
||||
|
(15W) power delivery. It only carries video signals and doesn’t support data |
|||
|
transmission function. |
|
|
|
8 |
Headphone Jack |
|
|
|
9 |
USB 2.0 Type B Upstream Port |
|
|
|
|
For USB Upstream Cable. |
|
|
|
|
|
To Monitor |
||
|
Important |
|
|
|
|
Check the package for USB Upstream Cable |
|
|
|
|
|
|
|
|
|
and connect it to the PC and monitor. Once |
|
|
|
|
|
|
|
|
|
|
|
|
|
|
this cable is connected, the USB Type A |
To PC |
||
|
Downstream Ports on the monitor will be |
|||
|
ready for use. |
|
|
|
10USB 2.0 Type A Port
11Power Jack
Getting Started 7
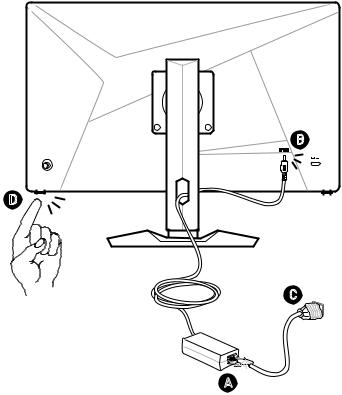
Connecting the Monitor to PC
1. Turn off your computer.
2. Connect the video cable from the monitor to your computer. 3. Assemble the monitor power adapter & power cord. (Figure A)
4. Connect the power adapter to the monitor power jack. (Figure B) 5. Plug the power cord into the electrical outlet. (Figure C)
6. Turn on the monitor. (Figure D)
7. Power on the computer and the monitor will auto detect the signal source.
B
D |
C
A
8 Getting Started
Loading...