


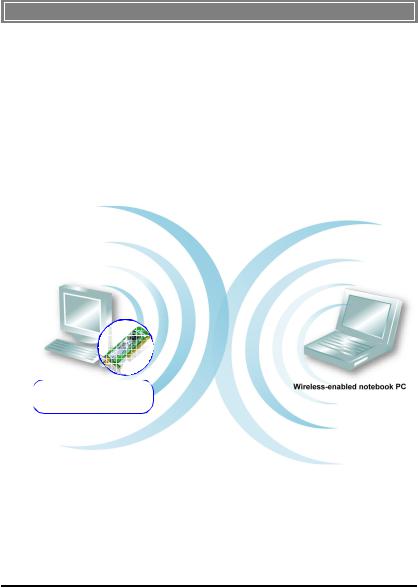
 Loading...
MSI PC60G (MS-6834B)
Wireless 11g Turbo G PCI Card
User’s Manual
i

Hiermit erklärt Micro Star International CO., LTD dass sich dieses Produkt in Übereinstimmung mit den grundlegenden Anforderungen und den anderen relevanten Vorschriften der Richtlinie 1999/5/EG befindet. Die Konformitätserklärung kann auf folgender website eingesehen werden: http://www.msi-computer.de/support/dl_man.php
Hereby, Micro Star International CO., LTD declares that this device is in compliance with the essential requirements and other relevant provisions of Directive 1999/5/EC. The respective Declaration of conformity can be found online:
http://www.msi-computer.de/support/dl_man.php IEEE 802.11b/g and Bluetooth® 2.4 GHz operation Europe: Frequencies: 2.400 – 2.4835 GHz
France: Frequencies: 2.4465– 2.4835 GHz,
Outdoor use is limited to 10mW e.i.r.p. within the band 2454-2483.5 MHz IEEE 802.11b/g und Bluetooth® 2.4 GHz Betrieb
Europa: Frequenzen: 2.400 – 2.4835 GHz Frankreich: Frequenzen: 2.4465– 2.4835 GHz,
Außerhalb von geschlossenen Gebäuden ist die genehmigte Sendeleistung im Frequenzband 2454-2483.5 MHz auf maximal 10mW beschränkt.
Italy:
If used outside of own premises, general authorisation is required. Luxembourg:
General authorisation required for public service.
Notified Countries:
Germany, UK, Netherlands, Belgium, Sweden, Denmark, Finland, France, Italy, Spain, Austria, Ireland, Portugal, Greece, Luxembourg, Estonia, Letvia, Lithuania, Czech Republic, Slovakia , Slovenia, Hungary, Poland und Malta.
Bestimmungsgemäße Verwendung:
Dieses Produkt integriert als Teil der Produktausstattung eine WLANKomponente und/oder eine Bluetooth®-Komponente.
Die entsprechende Komponente verbindet Computer über eine Funkverbindung . Es kann auch eine Funkverbindung zu anderen geeigneten WLANoder Bluetooth® Geräten hergestellt werden.
i i

Prescribed use:
This product integrates a WLANand/or Bluetooth® device.
The device sets up a radio link between to computer. In addition it is possible to link the WLANor Bluetooth® device to any other WLANor Bluetooth® device which stick to the IEEE 802.11b/g or Bluetooth® requirements.
Hinweise zur Reichweite:
Der Abstand zwischen Sender und Empfδnger (von einem WLANoder Bluetooth® -Gerδt zu einem entsprechenden anderen Gerδt) hδngt stark von der Einsatzumgebung ab. Wδnde, Betonboden (Eisen), beschichtete Fensterscheiben, Fahrzeug-Karosserie, etc..
Weitere Beeinflussungen:
-Hochfrequenzaussendungen jeder Art
-Gebδude, Bδume, etc.
-Heizkφrper, Stahlbeton, etc.
-offen betriebene Computer, etc.
-Mikrowellenherde, etc,
Die Kommunikation zwischen unterschiedlichen WLANoder Bluetooth® - Gerδten ist von der jeweiligen Software und dem entsprechenden Versionsstand abhδngig
Operating range:
The transmission range between different WLANor Bluetooth® devices varies depending the specific environment. Walls, concrete floor (iron), laminated windows, vehicle-body, etc..
More electromagnetic interferences:
-high frequency emission of any kind,
-Buildings, trees, etc.
-Heaters, ferroconcrete, etc.
-open computer systems, etc.
-Microwave oven, etc,
Communication (exchange data) is dependent on the software of the WLAN or Bluetooth® devices.
MSI Technology GmbH
Hanauer Landstraίe 306
60314 Frankfurt
Telefon: +49 (0)69 40893-0
Telefax: +49 (0)69 40893-202
iii

 FCC Caution
1.The device complies with Part 15 of the FCC rules. Operation is subject to the following two conditions:
(1)This device may not cause harmful interference, and
(2)This device must accept any interference received, including interference that may cause undesired operation.
2.FCC RF Radiation Exposure Statement: The equipment complies with FCC RF radiation exposure limits set forth for an uncontrolled environment. This equipment should be installed and operated with a minimum
distance of 20 centimeters between the radiator and your body.
3.This Transmitter must not be co-located or operating in conjunction with any other antenna or transmitter.
4.Changes or modifications to this unit not expressly approved by the party responsible for compliance could void the user authority to operate the equipment.
Copyright Notice
The material in this document is the intellectual property of MICRO-STAR INTERNATIONAL. We take every care in the preparation of this document, but no guarantee is given as to the correctness of its contents. Our products are under continual improvement and we reserve the right to make changes without notice.
Trademarks
Microsoft Windows and Internet Explorer are registered trademarks or trademarks of Microsoft Corporation.
All brand names, icons, and trademarks used in this manual are the sole property of their respective owners.
Revision History
Revision |
History |
Date |
V 1.0 |
First Release |
September 2006 |
i v

Important Safety Precautions
Always read and follow these basic safety precautions carefully when handling any piece of electronic component.
1.Keep this User’s Manual for future reference.
2.Keep this equipment away from humidity.
3.Lay this equipment on a reliable flat surface before setting it up.
4.The openings on the enclosure are for air convection hence protects the equipment from overheating.
5.All cautions and warnings on the equipment should be noted.
6.Never pour any liquid into the opening that could damage or cause electrical shock.
7.If any of the following situations arises, get the equipment checked by a service personnel:
 Liquid has penetrated into the equipment
 The equipment has been exposed to moisture
 The equipment has not work well or you can not get it work according to User’s Manual
 The equipment has dropped and damaged
 If the equipment has obvious sign of breakage
8.DO NOT LEAVE THIS EQUIPMENT IN AN ENVIRONMENT UNCONDITIONED, STORAGE TEMPERATURE ABOVE 70O C OR BELOW -20OC, IT MAY DAMAGE THE EQUIPMENT.
v

Table of Contents
Chapter 1. |
Introduction ............................................................................................. |
1 |
|
1.1 PC60G - MSI Wireless 11g Turbo G PCI Card .................................................... |
1 |
||
1.2 |
How PC60G Works ............................................................................................. |
2 |
|
1.3 |
Specifications ...................................................................................................... |
4 |
|
1.4 |
System Requirements ......................................................................................... |
6 |
|
1.5 |
Package Contents ............................................................................................... |
6 |
|
1.6 |
Product View ...................................................................................................... |
7 |
|
Chapter 2. |
Hardware Installation ............................................................................ |
8 |
|
Chapter 3. |
Software Installation ............................................................................. |
10 |
|
Chapter 4. |
Wireless Network Utility ...................................................................... |
13 |
|
4.1 |
Introduction .......................................................................................................... |
13 |
|
|
4.1.1 The MSI Wireless LAN Icon ........................................................................ |
13 |
|
|
4.1.2 |
Changing the Control Setting (for Windows XP only) .............................. |
15 |
4.2 |
Networking .......................................................................................................... |
16 |
|
|
4.2.1 |
Infrastructure Mode .................................................................................... |
16 |
|
4.2.2 |
Ad-hoc Mode............................................................................................... |
22 |
4.3 |
Link Status ........................................................................................................... |
24 |
|
4.4 |
Statistics .............................................................................................................. |
25 |
|
4.5 |
About ................................................................................................................... |
26 |
|
Chapter 5. |
MSI Software AP Setup ........................................................................ |
27 |
|
Chapter 6. |
Networking Basics ................................................................................ |
30 |
|
6.1 |
Setup ................................................................................................................... |
30 |
|
6.2 |
Configuration ....................................................................................................... |
33 |
|
6.3 |
Confirmation ........................................................................................................ |
34 |
|
Chapter 7. |
Networking Basics ................................................................................ |
35 |
|
7.1 |
Checking the Network Elements ........................................................................ |
35 |
|
7.2 |
Computer Identification ....................................................................................... |
37 |
|
7.3 |
Configuring a Dynamic/Fixed IP Address .......................................................... |
40 |
|
7.4 Checking TCP/IP Address ................................................................................... |
44 |
||
7.5 |
Checking Connection by Pinging ........................................................................ |
46 |
|
7.6 |
Sharing Files ........................................................................................................ |
47 |
|
Chapter 8. |
Trouble Shooting.................................................................................... |
51 |
|
Appendix: CE Compliance Booklet ......................................................................... |
56 |
||
v i

1 Introduction
>>> 1.1 PC60G - MSI Wireless 11g Turbo G PCI Card
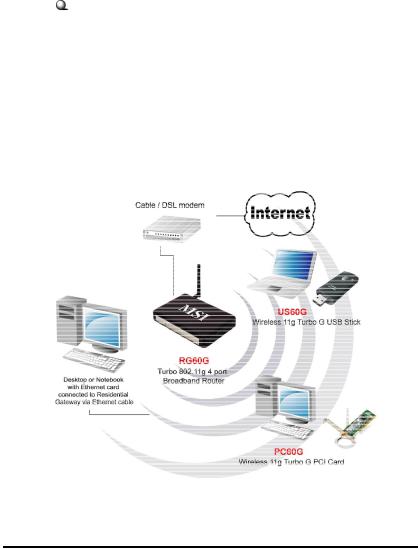
The MSI PC60G Wireless 11g Turbo G PCI Card (hereafter called PC60G), compliant with IEEE802.11g, is a high-efficiency wireless adapter for wireless networking at home, in office or in public places. The data rate can be up to 54 Mbps and autonegotiated to 48, 36, 24, 18, 12, 9, 6Mbps (IEEE 802.11g), or 11, 5.5, 2, 1Mbps (IEEE802.11b).
W ith PC60G, you can roam between conference room and office without being disconnected the LAN cables; in addition, sharing files and printers can be easy tasks.
The PC60G is available to Microsoft Windows operating systems (Windows® XP/2000/ME/98SE/XP 64-bit) and can be integrated into networking with either Ad-hoc mode (computer-to- computer, without an Access Point) or Infrastructure mode (computer-to-access point, an Access Point is required).
*Experiencing the high throughouput of the MSI Turbo G mode, MSI Turbo G series wireless products are highly recommended as your best choices. MSI Turbo G mode is suggested to function with MSI Turbo G series wireless products to optimize performance. The compatibility of other brands of wireless products with MSI Turbo G mode is not guaranteed.
(MSI Turbo G Mode support is also required on host/router side, such as the MSI RG60G).
Actual throughput value might vary due to environmental, operational and other factors.
1
>>> 1.2 How PC60G Works
 Ad-hoc Mode : An Ad-hoc network is a local area network or other small network, especially one with wireless or temporary plug-in connections, in which some of the network devices are part of the network only for the duration of a communications session. Users in the network can share files, print to a shared printer, and access the Internet with a shared modem. In this kind of network, new devices can be quickly added; however, users can only communicate with other wireless LAN computers that are in this wireless LAN workgroup, and are within range.
PC60G
MSI Wireless 11g Turbo G PCI Card
2
Infrastructure Mode : The difference between Infrastructure network and Ad-hoc network is that the former one includes an Access Point. In an Infrastructure network, the Access Point can manage the bandwidth to maximize bandwidth utilization. Additionally, the Access Point enables users on a wireless LAN to access an existing wired network, allowing wireless users to take advantage of the wired networks resources, such as Internet, email, file transfer, and printer sharing. The scale and range of the Infrastructure networking are larger and wider than that of the Ad-hoc networking.
3

>>> 1.3 Specifications
Network Standard |
IEEE802.11b/g |
|
|
|
|
Frequency Band |
2.400-2.4835GHz |
|
|
|
|
Special Feature |
Support MSI Turbo G Mode* Technology |
|
|
|
|
Interface |
Compliant with the 32-bit PCI v2.2 and above |
|
|
|
|
Antenna |
Dipole |
|
|
|
|
Data Rate |
IEEE802.11g (auto-fallback): |
|
|
- OFDM: 54, 48, 36, 24, 18, 12, 9 and 6 Mbps |
|
|
IEEE 802.11b (auto-Fallback): |
|
|
- CCK: 11, 5.5 Mbps |
|
|
- DQPSK: 2 Mbps |
|
|
- DBPSK: 1 M bps |
|
|
|
|
Media Access Protocol |
CSMA/CA witha ACK |
|
|
|
|
Channel |
IEEE802.11g |
IEEE 802.11b |
|
Ch. 1-11--N. America |
Ch. 1-11--N. America |
|
Ch. 1-13--Japan |
Ch. 1-14--Japan |
|
Ch. 1-13--Europe ETSI |
Ch. 1-13--Europe ETSI |
|
Ch. 10-11--Spain |
Ch. 10-11--Spain |
|
Ch. 10-13--France |
Ch. 10-13--France |
|
|
|
Transmission |
IEEE802.11b (DSSS), IEEE 802.11g(OFDM) |
|
|
|
|
Modulation |
IEEE 802.11b(DSSS) |
IEEE802.11g(OFDM) |
|
CCK@11, 5.5 Mbps |
BPSK@6,9Mbps |
|
DQPSK@2Mbps |
QPSK@12, 18Mbps |
|
DBPSK@1Mbps |
16-QAM@24, 36 Mbps |
|
|
64-QAM@48, 54 Mbps |
|
|
|
Network Architecture |
Ad-Hoc Mode (Peer to Peer) |
|
|
Infrastructure Mode |
|
*MSI Turbo G Mode support is also required on host/router side, such as the MSI RG60G.
4
Temperature Operating |
0oC to 70oC |
|
Storage |
-20oC to 100oC |
|
Humidty |
10% - 90% (non-condensing) |
|
|
|
|
Power Consumption |
802.11g (54Mbps) |
|
|
330mA@3.3v |
in continue Tx |
|
250mA@3.3v |
in continue Rx |
|
150mA@3.3V in Standby mode |
|
|
802.11b(11Mbps) |
|
|
340mA@3.3V in continue Tx |
|
|
230mA@3.3V in continue Rx |
|
|
150mA@3.3V in Standby mode |
|
Operating Voltage |
3.3V +/- 5% |
|
|
|
|
Output Power |
802.11g |
|
|
54Mbps, 14.0+2/-1 dBm |
|
|
802.11b |
|
|
11Mbps, 17.5+/-2 dBm |
|
Receiver Sensitivity |
54 Mbps OFDM@ 10% PER = -65dBm |
|
|
11 Mbps CCK@ 8% PER = -80dBm |
|
|
|
|
Range |
Up to 400m (outdoor operating range) |
|
|
|
|
Security |
64/128-bit WEP, WPA, WPA2, TKIP,AES, |
|
|
802.1x |
|
Operating System |
Windows 98SE/2000/ME/XP/XP 64-bit |
|
Certification |
FCC Part 15, CE, DGT, C-Tick, Wi-Fi |
|
|
|
|
Dimension |
133.5(L)x121(W)x21.5(H) mm |
|
|
|
|
Weight |
46g (without antenna) |
|
|
82g (with antenna) |
|
|
|
|
5
>>> 1.4 System Requirements
Before installing the PC60G, your PC should meet the following items:
- One desktop PC with an available PCI slot.
- Windows® 98SE/ME/2000/XP/XP 64-bit operating system.
- Minimum 5MB free disk space for installing the driver and utilities.
- One CD-ROM drive, double speed or higher.
>>> 1.5 Package Contents
Unpack the package and check all the items carefully. If any item contained is damaged or missing, please contact your local dealer as soon as possible. Also, keep the box and packing materials in case you need to ship the unit in the future. The package should contain the following items:
- One Wireless 11g Turbo G PCI Card - PC60G.
- One external antenna.
- One Quick Installtion Manual.
-One Installation CD including drivers, utilities, and the manual files.
6
>>> 1.6 Product View
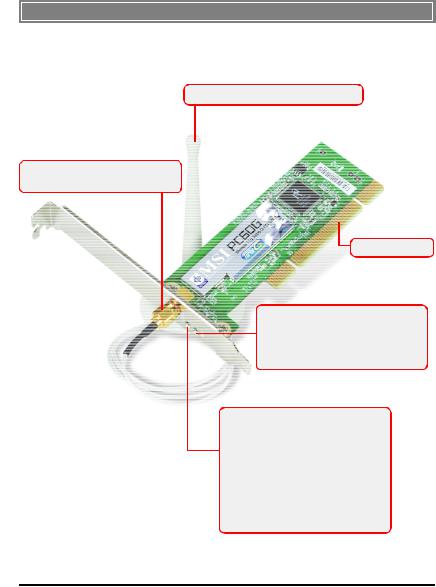
Wireless 11g Turbo G PCI Card PC60G
External Antenna
Antenna Connector
Connecting the external antenna.
Golden Finger
PWR LED - GREEN, indicating the networking status by:
ON - Power inputted OFF - No power
LNK/ACT LED - GREEN, indicating the networking status by:
ON - The WLAN PCI Card is connected.
Flash -The WLAN PCI Card is searching for available Access Point or receiving/ transmitting data over the wireless network.
7

2 Hardware Installation
The following diagrams provide you a basic installation for your PC60G, which is suitable for most desktop PCs. For more information about the PCI slot, please refer to the user’s manual of your mainboard.
STEP1 Remove the computer cover. Locate the available PCI slot on your mainboard.
NOTE: TURN OFF your
system and disconnect
the power cable before PCI slot installing the PC60G.
STEP2 Put the PC60G directly over the PCI slot and press it into the slot firmly.
DO NOT hold the PC60G on the golden finger while installing; doing this may cause interference or damage.
8
STEP3
STEP4
Replace the computer cover after securing the PC60G with a bracket screw.
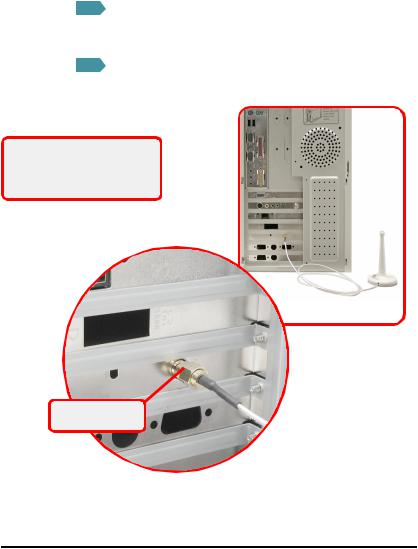
Connect the external antenna to the connector on the PC60G’s bracket.
If your are not skilled at installing the PCI adapter, please ask the vendor or an experienced technician for help.
Connecting the external antenna
9
3 Software Installation
This chapter describes the procedures of installing the driver and utility. Follow the instruction step by step to finish the installation. If you use Windows® 98SE/ME, please prepare the Windows® Setup CD at hand before installing the driver; because the system will ask you to insert the Setup CD to copy files during the installation.
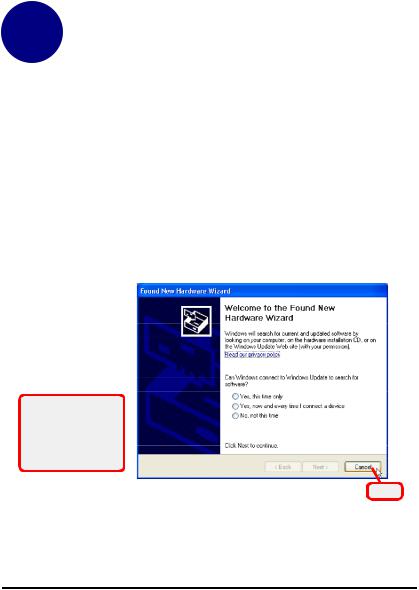
Please NOTE that the PC60G should be installed into your computer before installing the driver and utility. Then, the operating system will detect a new device and start to configure the new device. Click Cancel here to start installation from the InstallShield Wizard.
Tip: The wireless LAN adapter should be installed into your PC before installing the driver and utility.
Click
1 0

>>> 3.1 Software Setup
After installing the Wireless PCI Card to your computer and then turning on the computer, the operating system will detect a new device and start the configuraton automatically. Please CANCEL the pop-up window from Found New Hardare Wizard to install necessary driver and utility from the InstallShield Wizard of your Software CD.
STEP1 Insert the Software CD into your CD-ROM driver, and the Setup program shall launch automatically.
If the Autorun program didn’t launch automatically, click Start at the taskbar and select Run.... Type E:\setup. exe (where E is your CD-drive) in the Open box and click OK to launch the Setup program manually.
Click
STEP2 The welcome screen of InstallShield Wizard appears. Read and Accept the License Agreement; then click
Next.
1 1

STEP3 The program will copy the necessary files to the system. The progress indicator shall show the installing status.
STEP4 Click Finish when the installation is completed. The MSI Wireless LAN icon will appear in the status area.
MSI Wireless LAN icon
1 2
4 Wireless Network Utility
After installing the driver, MSI PC60G provides a convenient and powerful utility that allows you to set up, configure, and know your networking status easily and clearly.
>>>4.1 Introduction
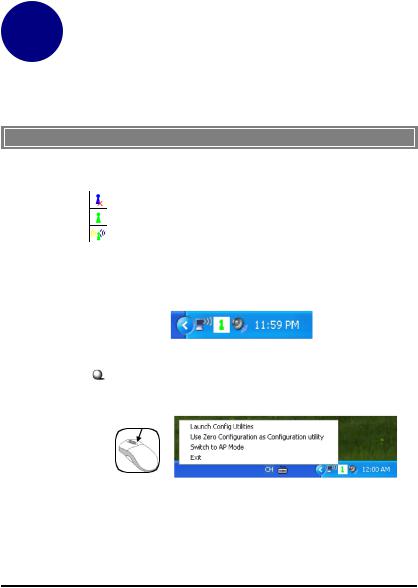
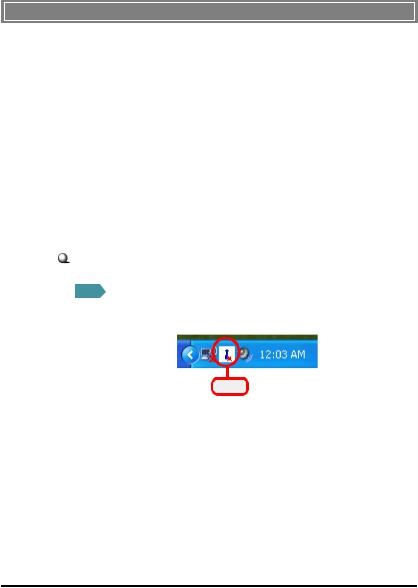
4.1.1The MSI Wireless LAN icon
- Not connected to the network. - Connected to the network.
- Receiving/transmitting data from/to the network.
When you move the mouse over the icon, it shows the current connection information.
Right-clicking the icon will bring up a sub-menu containing more settings:
1 3
1Launch Config Utilities
Launch the MSI Wireless utility to configure your network setting.
2Use Zero Configuration as Configuration utility
Windows XP also provides user another wireless utility to choose from. If you intened to use the utility to set your network, this item is selectable to change the MSI Wireless Utility to the Windows XP Wireless Utility at your reference.
3Switch to AP Mode
If your MSI wireless LAN adapter supports Software AP function, you shall see this item under the sub-menu, which allows you to user MSI wireless adapter as a virtural access point.
4Exit
Close the program.
Clicking the icon will launch the utility as shown below to configure your network settings.
Click
1 4
4.1.2Changing the Control Setting (for Windows XP only)
If you use Windows XP, the wireless LAN is controlled by the operating system (default). To take full advantage of your MSI wireless adapter, it is recommended to use the MSI Wireless Network Utility to control your wireless LAN.
To change the control setting:
STEP1
STEP2
Click Start to select Network Connections under
Setting.
Right-click the Wireless Network Connection, select
Properties to bring up following dialogue windows. Click Wireless Network and uncheck the Use Windows to configure my wireless network settings, then click OK.
Uncheck this option
Click
STEP3 Now you can use the MSI Wireless Utility to configure your wireless network settings.
1 5
>>> 4.2 Networking
Since PC60G is installed in your computer, you have to configure the settings for communication to start working in your network environment.
4.2.1Infrastructure Mode
Infrastructure mode allows your computer to communicate with the other computers in the network through an Access Point. The following tasks should be done before you configure the settings:
-The Access Point must be turned on.
-Your computer with wireless adapter installed and the Access Point must be located with the communication range of the Access Point (see the Access Point's manual for details).
Connecting to the Access Point:
STEP1 Click the MSI Wireless LAN icon to bring up the
Wireless Network Connection window.
Click
1 6
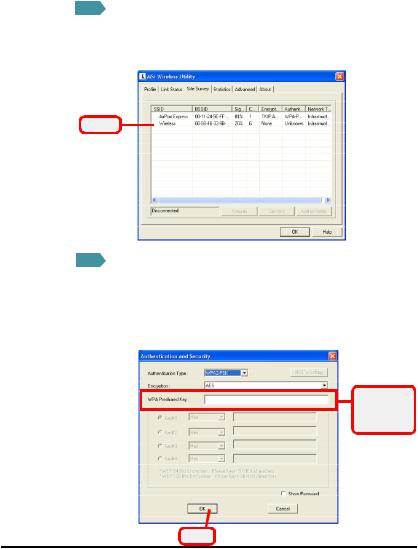
STEP2
Select
STEP3
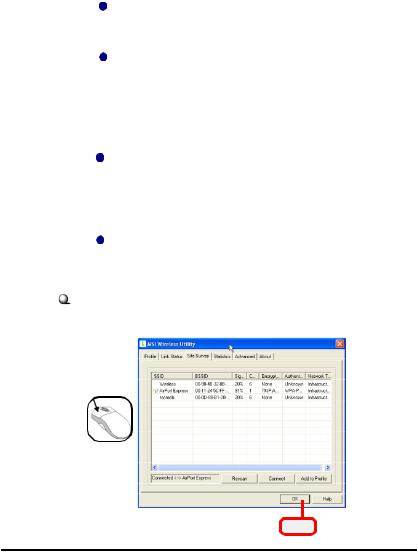
In the tab of Site Survey, select the network you want, and then click Connect.
You also can click Rescan to search the available Access Point in the network again.
If the Access Point selected to connect has been connected and had set up the Authentication and Security, you need to have the WPA Pre-shared Key or WEP Key beforehand from the Access Point administrator to enter in the blank. Then click OK to complete the configuration.
Enter WPA
Preshared
Key
Click
1 7
STEP4 Please refer to page 19 for more detail configuration regarding Add to Profile selection.
Advanced network settings:
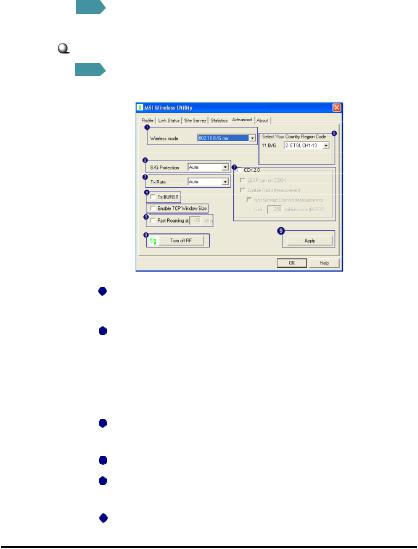
STEP1 Click the Advanced in the MSI Wireless Utility window to set advanced network settings.
1Wireless mode: Select wireless mode. 802.11 B/G mix, 802.11b only, and 802.11g only modes are supported.
2B/G Protection: ERP protection mode of 802.11g definition. User can choose from Auto, On, and Off.
a.Auto: STA will dynamically change as AP announcement.
b.On: Always send frame with protection.
c.Off: Always send frame without protection.
3Tx Rate: Manually force the Transmit using selected rate. Default is Auto.
4Tx Burst: MSI proprietary frame burst mode.
5Fast Roaming at: Fast to roaming, setup by transmit power.
6Select Your Country Region Code: Seven countries to choose.
1 8
7CCX2.0: Support Cisco Compatible Extensions function.
a.LEAP turn on CCKM
b.Enable Radio Measurement: can channel
measurement every 0~2000 milliseconds.
8Turn radio ON/OFF for FAA requirement.
a.Radio On: Indicate to turn on radio.
b.Radio Off: Indicate to turn off radio.
9Apply: Apply the above changes.
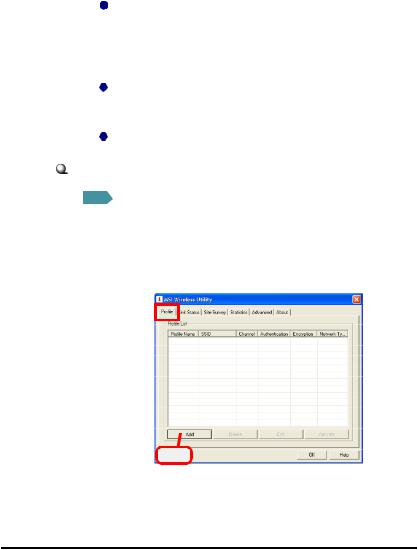
Add Profile to keep your favorite wireless settings:
STEP1 Click the Profile in the MSI Wireless Utility window to select Add or click Add to Profile after you select one of available Access Point under Site Survey window to configure your favorite wireless settings. You may save multiple profiles, and activate the correct one at your preference.
Click
1 9
Loading...