

Page 1

Operating Instructions
Washer-Extractor
WS 5240
WS 5320
To prevent accidents
and machine damage read these
instructions before installing or
using the machine. M.-Nr. 05 649 900
UV
Page 2

Contents
Warning and Safety Instructions . . . . . . . . . . . . . . . . . . . . . . . . . . . . . . . . . . . . . . . . . . . . . . . 3
Caring for the environment . . . . . . . . . . . . . . . . . . . . . . . . . . . . . . . . . . . . . . . . . . . . . . . . . . . . 5
Guide to the washer-extractor. . . . . . . . . . . . . . . . . . . . . . . . . . . . . . . . . . . . . . . . . . . . . . . . . . 6
Control panel . . . . . . . . . . . . . . . . . . . . . . . . . . . . . . . . . . . . . . . . . . . . . . . . . . . . . . . . . . . . . . . . 7
Special options buttons . . . . . . . . . . . . . . . . . . . . . . . . . . . . . . . . . . . . . . . . . . . . . . . . . . . . . . . 10
Operation . . . . . . . . . . . . . . . . . . . . . . . . . . . . . . . . . . . . . . . . . . . . . . . . . . . . . . . . . . . . . . . . .12
Language selection* . . . . . . . . . . . . . . . . . . . . . . . . . . . . . . . . . . . . . . . . . . . . . . . . . . . . . . . . . 12
Setting current time and date* . . . . . . . . . . . . . . . . . . . . . . . . . . . . . . . . . . . . . . . . . . . . . . . . . .12
Start up. . . . . . . . . . . . . . . . . . . . . . . . . . . . . . . . . . . . . . . . . . . . . . . . . . . . . . . . . . . . . . . . . . . . 13
Program selection . . . . . . . . . . . . . . . . . . . . . . . . . . . . . . . . . . . . . . . . . . . . . . . . . . . . . . . . . . . 13
Changing temperaure and spin speed . . . . . . . . . . . . . . . . . . . . . . . . . . . . . . . . . . . . . . . . . . . 14
Adding detergent . . . . . . . . . . . . . . . . . . . . . . . . . . . . . . . . . . . . . . . . . . . . . . . . . . . . . . . . . . . . 14
Program end display . . . . . . . . . . . . . . . . . . . . . . . . . . . . . . . . . . . . . . . . . . . . . . . . . . . . . . . . . 15
Program end - opening the drum door . . . . . . . . . . . . . . . . . . . . . . . . . . . . . . . . . . . . . . . . . . . 15
Delayed Start W . . . . . . . . . . . . . . . . . . . . . . . . . . . . . . . . . . . . . . . . . . . . . . . . . . . . . . . . . . . . . 16
Notes . . . . . . . . . . . . . . . . . . . . . . . . . . . . . . . . . . . . . . . . . . . . . . . . . . . . . . . . . . . . . . . . . . . . . 17
Prewash T . . . . . . . . . . . . . . . . . . . . . . . . . . . . . . . . . . . . . . . . . . . . . . . . . . . . . . . . . . . . . . . . .17
Starch U. . . . . . . . . . . . . . . . . . . . . . . . . . . . . . . . . . . . . . . . . . . . . . . . . . . . . . . . . . . . . . . . . . . 17
Without spin V . . . . . . . . . . . . . . . . . . . . . . . . . . . . . . . . . . . . . . . . . . . . . . . . . . . . . . . . . . . . . . 18
Skipping program cycles . . . . . . . . . . . . . . . . . . . . . . . . . . . . . . . . . . . . . . . . . . . . . . . . . . . . . . 19
Program cancellation . . . . . . . . . . . . . . . . . . . . . . . . . . . . . . . . . . . . . . . . . . . . . . . . . . . . . . . . . 19
Liquid dispensing. . . . . . . . . . . . . . . . . . . . . . . . . . . . . . . . . . . . . . . . . . . . . . . . . . . . . . . . . . . 20
Peak load cut-out / PC- Printer connection . . . . . . . . . . . . . . . . . . . . . . . . . . . . . . . . . . . . . . 25
Problem solving guide. . . . . . . . . . . . . . . . . . . . . . . . . . . . . . . . . . . . . . . . . . . . . . . . . . . . . . . 26
Power failure - Emergency door release . . . . . . . . . . . . . . . . . . . . . . . . . . . . . . . . . . . . . . . . . . 26
Problem solving guide. . . . . . . . . . . . . . . . . . . . . . . . . . . . . . . . . . . . . . . . . . . . . . . . . . . . . . . 27
Fault messages . . . . . . . . . . . . . . . . . . . . . . . . . . . . . . . . . . . . . . . . . . . . . . . . . . . . . . . . . . . . . 27
After sales service . . . . . . . . . . . . . . . . . . . . . . . . . . . . . . . . . . . . . . . . . . . . . . . . . . . . . . . . . . 29
Cleaning and Care . . . . . . . . . . . . . . . . . . . . . . . . . . . . . . . . . . . . . . . . . . . . . . . . . . . . . . . . . . 30
After each use . . . . . . . . . . . . . . . . . . . . . . . . . . . . . . . . . . . . . . . . . . . . . . . . . . . . . . . . . . . . . . 30
Cleaning the exterior . . . . . . . . . . . . . . . . . . . . . . . . . . . . . . . . . . . . . . . . . . . . . . . . . . . . . . . . . 30
Cleaning the dispenser box and siphon . . . . . . . . . . . . . . . . . . . . . . . . . . . . . . . . . . . . . . . . . . 30
Cleaning the cooling fan . . . . . . . . . . . . . . . . . . . . . . . . . . . . . . . . . . . . . . . . . . . . . . . . . . . . . . 30
Cleaning the filters . . . . . . . . . . . . . . . . . . . . . . . . . . . . . . . . . . . . . . . . . . . . . . . . . . . . . . . . . . . 31
Cleaning the drum . . . . . . . . . . . . . . . . . . . . . . . . . . . . . . . . . . . . . . . . . . . . . . . . . . . . . . . . . . . 31
Maintaining the drum . . . . . . . . . . . . . . . . . . . . . . . . . . . . . . . . . . . . . . . . . . . . . . . . . . . . . . . . . 31
Guide to the symbols on the data plate . . . . . . . . . . . . . . . . . . . . . . . . . . . . . . . . . . . . . . . . . 32
Installation . . . . . . . . . . . . . . . . . . . . . . . . . . . . . . . . . . . . . . . . . . . . . . . . . . . . . . . . . . . . . . . . 33
Plumbing . . . . . . . . . . . . . . . . . . . . . . . . . . . . . . . . . . . . . . . . . . . . . . . . . . . . . . . . . . . . . . . . . . 34
Electrical connection . . . . . . . . . . . . . . . . . . . . . . . . . . . . . . . . . . . . . . . . . . . . . . . . . . . . . . . . . 35
Steam connection . . . . . . . . . . . . . . . . . . . . . . . . . . . . . . . . . . . . . . . . . . . . . . . . . . . . . . . . . . . 35
2
Page 3

Warning and Safety Instructions
WARNING
Read all instructions before installation or
use to prevent injury and machine dam
age.
This washer-extractor is only intended for
laundry not impregnated with dangerous
or flammable substances.
Dry cleaning solvents must not be used
in this machine. Such solvents could
cause a fire or explosion.
This appliance conforms to all uniform
safety codes and regulations. The manu
facturer cannot be held responsible for
damage or injury caused by improper use
of this appliance.
All personnel working with this machine
must be fully trained in its use and safety.
SAVE THESE INSTRUCTIONS AND REVIEW THEM PERIODICALLY
-
-
Electrical Safety
Installation, repair and maintenance
work should be by a Miele authorized
service technician. Work by unqualified persons could be dangerous.
Before installation make sure that the
voltage and frequency listed on the
data plate correspond with the site electrical
supply. This data must correspond to pre
vent injury and machine damage. Consult a
qualified electrician if in doubt.
Be certain your appliance is properly in
stalled and grounded by a qualified
technician.
To guarantee the electrical safety of this ap
pliance, continuity must exist between the
appliance and an effective grounding sys
tem. It is imperative that this basic safety re
quirement be met. If there is any doubt, have
the electrical system of the house checked
by a qualified electrician. The manufacturer
cannot be held responsible for damages
caused by the lack, or inadequacy of, an ef
fective grounding system.
-
-
-
-
The appliance is only completely iso
lated from the electrical supply when
the fuse is withdrawn, the circuit breaker has
been tripped, or the unit has been un
plugged.
Do not damage, remove or bypass the
safety features and controls of the ma
chine.
If there is any damage to the machine
or to the cable insulation, the machine
must not be used until it has been repaired.
Any removable outer panels must be in
place, and all moving or electrical parts
shielded before the machine is operated.
-
-
-
Use
Never use or store gasoline or gasoline
based substances or any easily flam
mable substances near the machine. Do not
use the machine lid as a storage area.
Danger of fire or explosion.
Only machine wash articles with a care
label stating they are suitable for machine washing.
Never attempt to force open the door of
the washer extractor. As a safety feature
the door handle has been designed with a
break line.
Never allow children to play in, on or
near the washer extractor, or to operate
it themselves. Please supervise its use by
the elderly or infirm.
The door porthole glass can become
hot during use of the machine. Do not
allow children to touch the glass.
-
-
Always make sure the drum is station
ary before reaching in to remove laun
dry. Reaching into a moving drum is ex
tremely dangerous.
Waste water from washing and rinsing
must not be used as drinking water. It
must be discharged into a proper sewage
system.
The machine should only be operated
unsupervised if there is a floor drain
(gully) in the direct vicinity of the machine.
-
-
-
-
3
Page 4

Warning and Safety Instructions
Only use genuine Miele accessories. If
unapproved parts are used, guarantee,
performance and product liability claims
may become void.
Chlorine or agents containing chlorine
are corrosive, and can under certain
conditions lead to permanent damage to
components.
Disinfecting and cleaning agents often
contain chloride (salts). If these sub
stances dry on steel surfaces the residual
chlorides can attack the steel and cause
rusting.
To protect your machine from rust damage,
only use chloride free disinfecting and
cleaning agents for washing and disinfect
ing, and for cleaning the machine. If you ac
cidentally spill an agent containing chloride
on the machine it should be rinsed off with
water and dried using a soft cloth.
Always follow the instructions of the
chemical manufacturer when using
cleaning agents and special application
chemicals. Only use such chemicals for the
purpose and in the situation specified by the
manufacturer in order to avoid the danger of
adverse chemical reactions and material
damage. If in doubt check the suitability of
the product for use in this machine with the
manufacturer before using it.
Where a chemical cleaning agent is
recommended on technical application
grounds, this does not imply that the manu
facturer of the machine takes responsibility
for the effect of the chemical on the material
of the items being cleaned or on the ma
chine. Please be aware that changes in for
mulation, storage conditions etc., which may
not be published by the chemical producer,
can have a negative effect on the cleaning
result.
-
-
-
-
-
Maintenance
Faulty components should only be re
placed with genuine Miele spare parts.
The safety standards of the machine can
only be guaranteed when Miele spare parts
are used.
Over time deterioration of parts can oc
cur, especially rubber components
such as hoses. Check the inlet hoses regu
larly for signs of deterioration or leaks, to
prevent water or machine damage.
Local regulations regarding regular in
spection and maintenance of this ma
chine must be observed.
-
Noise level
Wash cycle Spin cycle
WS 5240 60.3 dB 82.2 dB
WS 5320 60.0 dB 80.3 dB
-
-
-
-
-
Disposal of an old appliance
When disposing of an appliance first
make it unusable. Disconnect it from
electricity, cut off the power cord and remove the plug.
Disable the door lock, so children cannot accidentally shut themselves in. Make appropriate arrangements for the safe disposal of
the appliance.
KEEP THESE INSTRUCTIONS
IN A SAFE PLACE.
Dyes, dye removers and descaling
agents may only be used in this ma
chine if the manufacturer expressly states
that they are suitable for use in a washing
machine. There may be the danger of fire or
explosion.
Do not use high pressure cleaners to
hose down the machine.
4
-
Page 5

Caring for the environment
Disposal of the packing material
The transport and protective packing materi
als are environmentally friendly for disposal
and can normally be recycled. Please recy
cle.
Ensure that any plastic wrappings, bags etc.
are disposed of safely and kept out of the
reach of babies and young children.
Danger of suffocation!
-
Disposal of an old appliance
-
Old appliances contain materials that may
be recyclable. Please contact your local re
cycling authority about potential recycling,
before disposing of the appliance.
-
5
Page 6
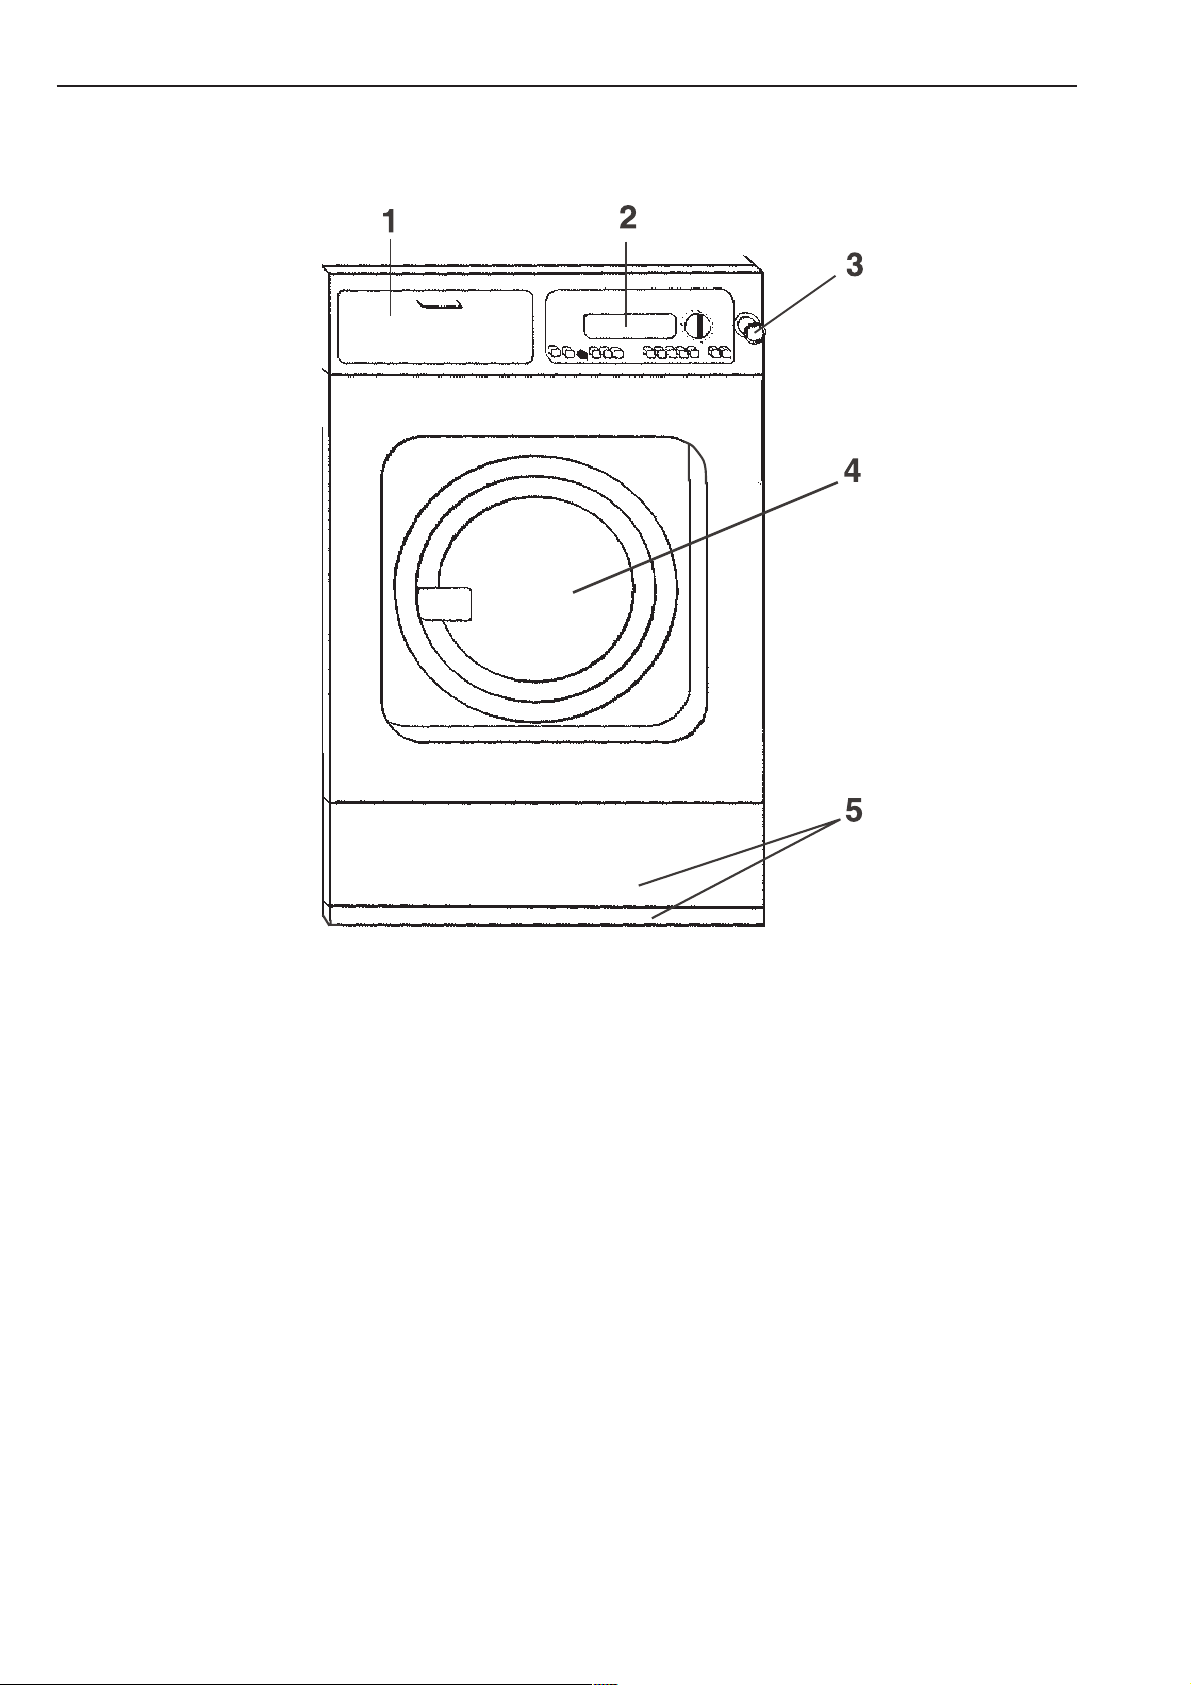
Guide to the washer-extractor
1 Detergent dispenser
2 Control panel
3 Emergency Stop button
4 Drum door
5 Service panel with plinth
6
Page 7
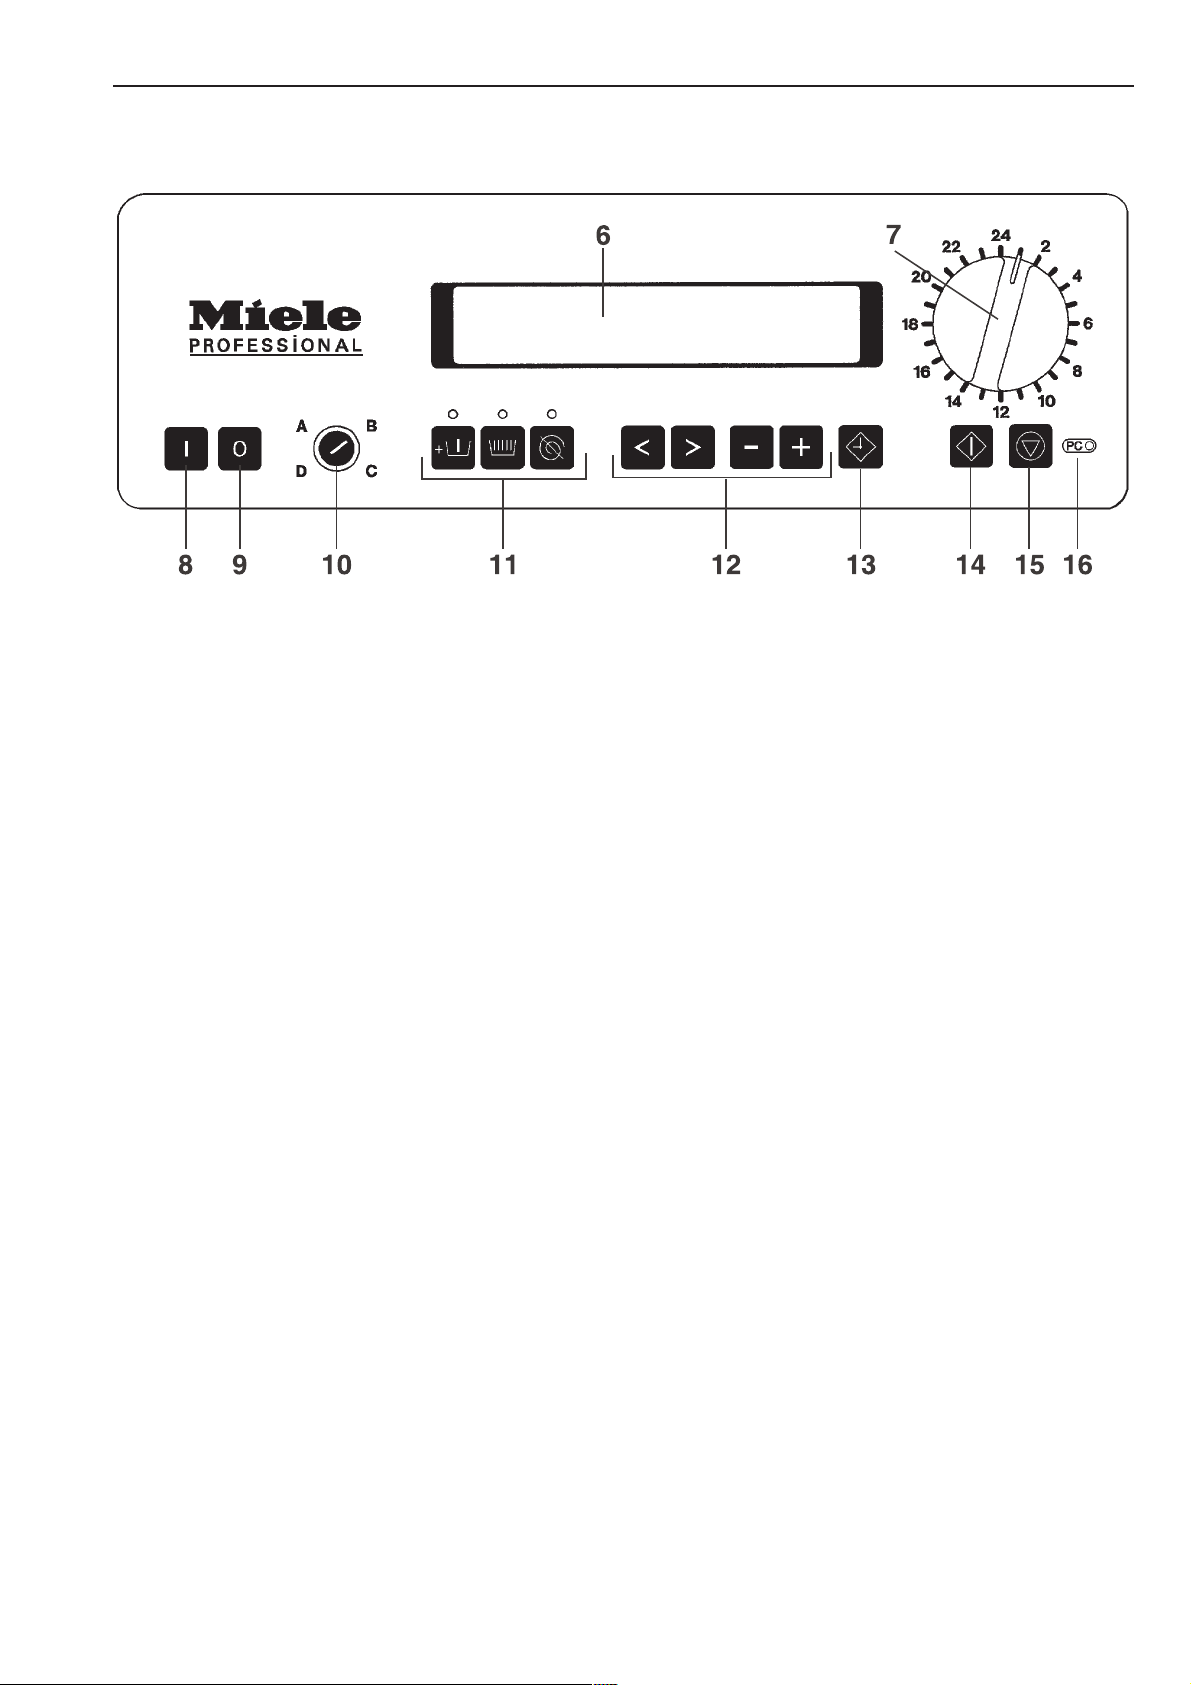
Control panel
Guide to the washer-extractor
6 Display
7 Program selector
8 Y Power on button
9 Z Power off button
10 Access lock
11 Special options buttons
12 Cursor and input buttons
13 Delay Start button
14 X Start
15 7 End
16 Optic interface
7
Page 8
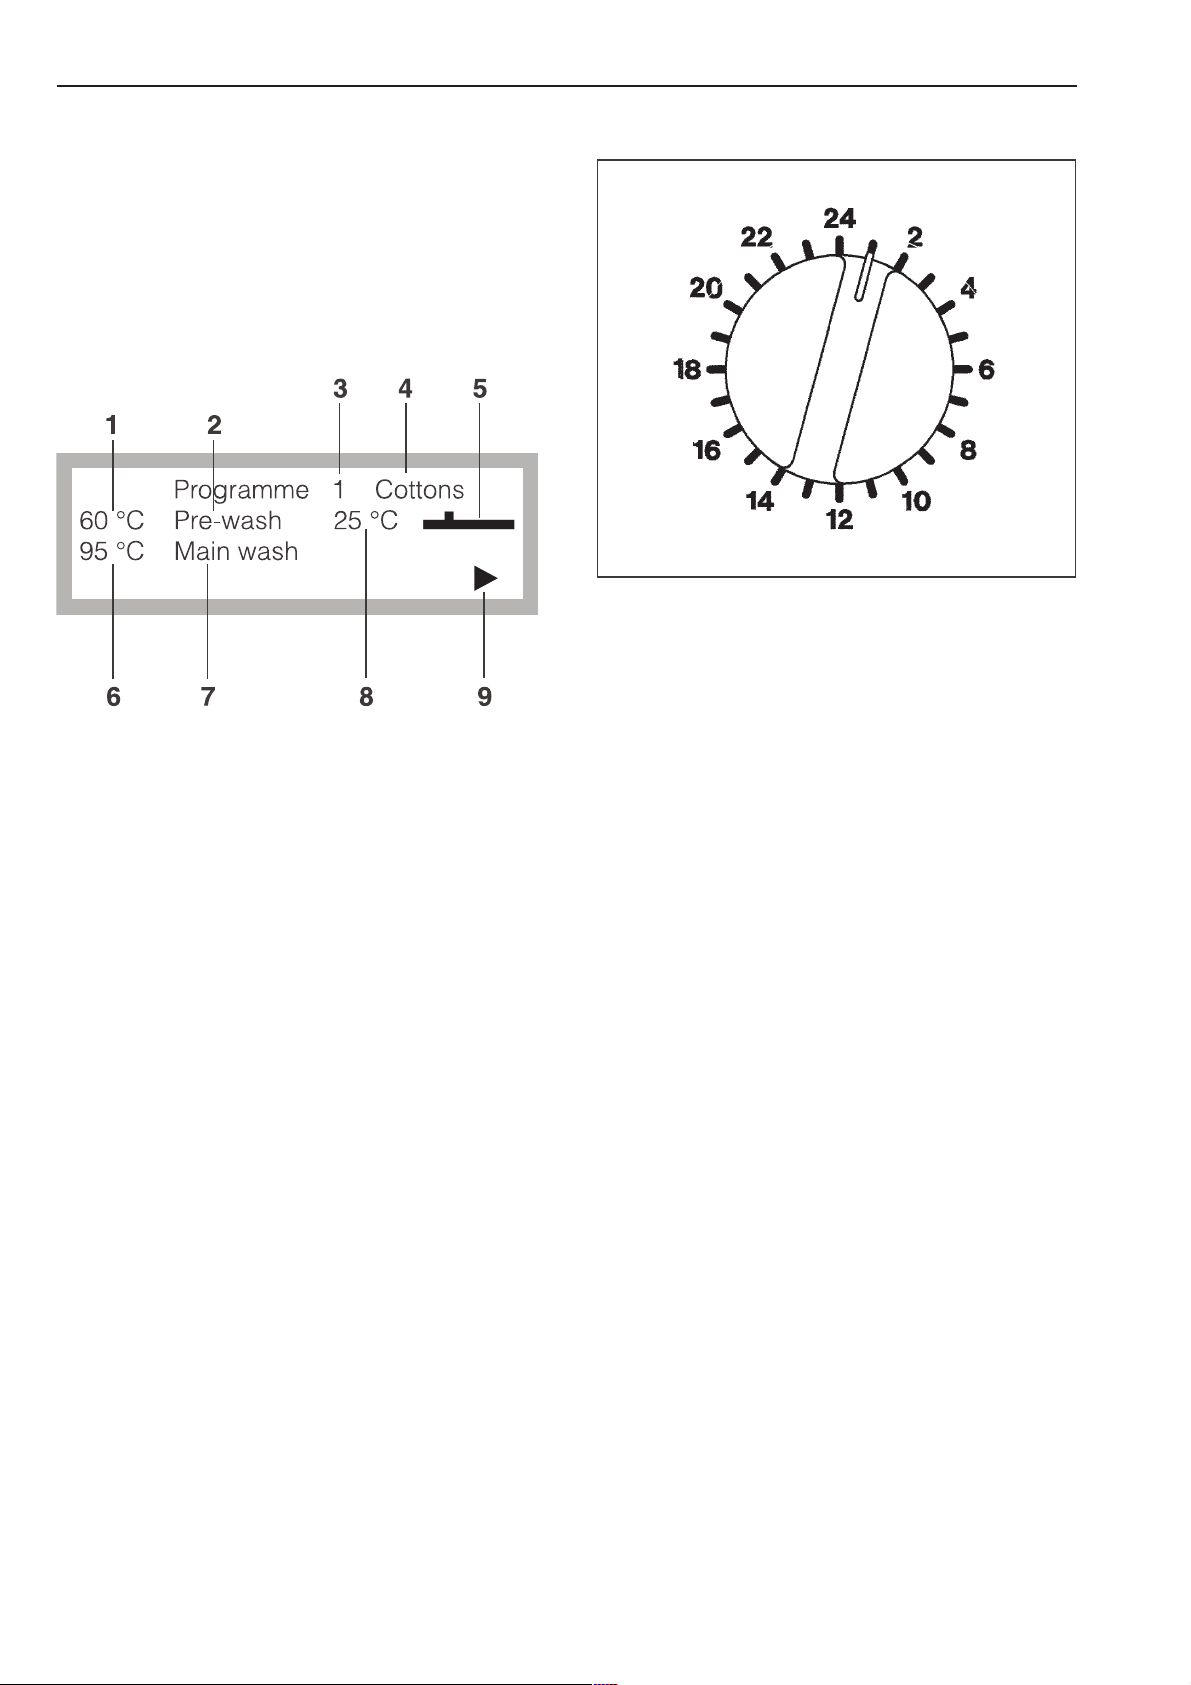
Guide to the washer-extractor
Display
The display content will appear once the
machine is turned on. It is up to four lines
and 40 digits long, showing which program
has been selected.
Display during a program
1 Planned temperature for the current cycle
2 Name of the current cycle
3 Program number
4 Program name
5 Time line for the current cycle
6 Planned temperature of the next cycle
7 Name of the next cycle
8 Actual temperature
Program selector
Program numbers 1 - 24 can be selected di
rectly.
Program numbers 25 - 99 can be selected
using selector position 24 and the 4 "Plus"
button.
The name of the selected program and its
corresponding number appear in the display. Program positions 1 - 10 are standard
programs.
The subsequent program positions vary according to the version of the model, and are
set out in the Programming Instruction. If the
program selector switch is turned to another
position after the start of the program, the
first line of the display flashes. The program
does not however change.
-
9 Points to a further display line
8
Main buttons
Y "Power on" button
Z "Power off" button
Page 9

Guide to the washer-extractor
Key access lock
Position A - Free access
Programs which have been allocated free
access can be run.
See Programming Instructions for allocation
of free access.
Position B - Operation
All programs can be started in this position.
The display will show the selected program
information.
Position C - Programming
Access keys
Key 1 (2 supplied) for operating levels
A and B.
Key 2 for operating levels A, B, C.
Key 3 for operating levels A, B, C, D.
At this position, programming, copying, deleting, printing, altering, giving or barring
free access, and creating new program sequences can be done. See Programming Instructions.
Position D - Unlocking
At this operating level barred programs can
be unlocked. Locked Programs (e.g. Disinfection programs) can not be cancelled
once they have started. If the key switch is
turned to position D in such a program, the
program running is unlocked and can be
cancelled. See Programming Instructions.
9
Page 10

Guide to the washer-extractor
Special options buttons
The indicator above each button will light
when a special option is selected.
T "Prewash"
Press this button to add a cycle to a pro
gram. A Prewash is added to the program.
Press the button a second time to deselect
the function.
U "Starch"
-
Cursor buttons and Delay Start
1 2 "Cursor"
The cursor buttons are used to pass back
wards or forwards into the input fields or into
the next display, (this appears as > <
flashing in the display).
Pressing continuously on the button runs
quickly through the display screens.
3 4 "Minus-/-Plus"
-
Press this button for starched laundry.
V "Spin-stop"
Press this button if a final spin is not required
after the final rinse.
The Minus/Plus buttons allow you to modify
an input field. Pressing continuously on the
buttons makes rapid changes.
W "Delay start"
The display indicates that a start time should
be selected. If the button is pressed again
the Delay start option is cancelled.
If the button is pressed after the start of a
program the current time of day and date
are shown.
^
Press this button to delay the start of a pro
gram.
-
10
Page 11
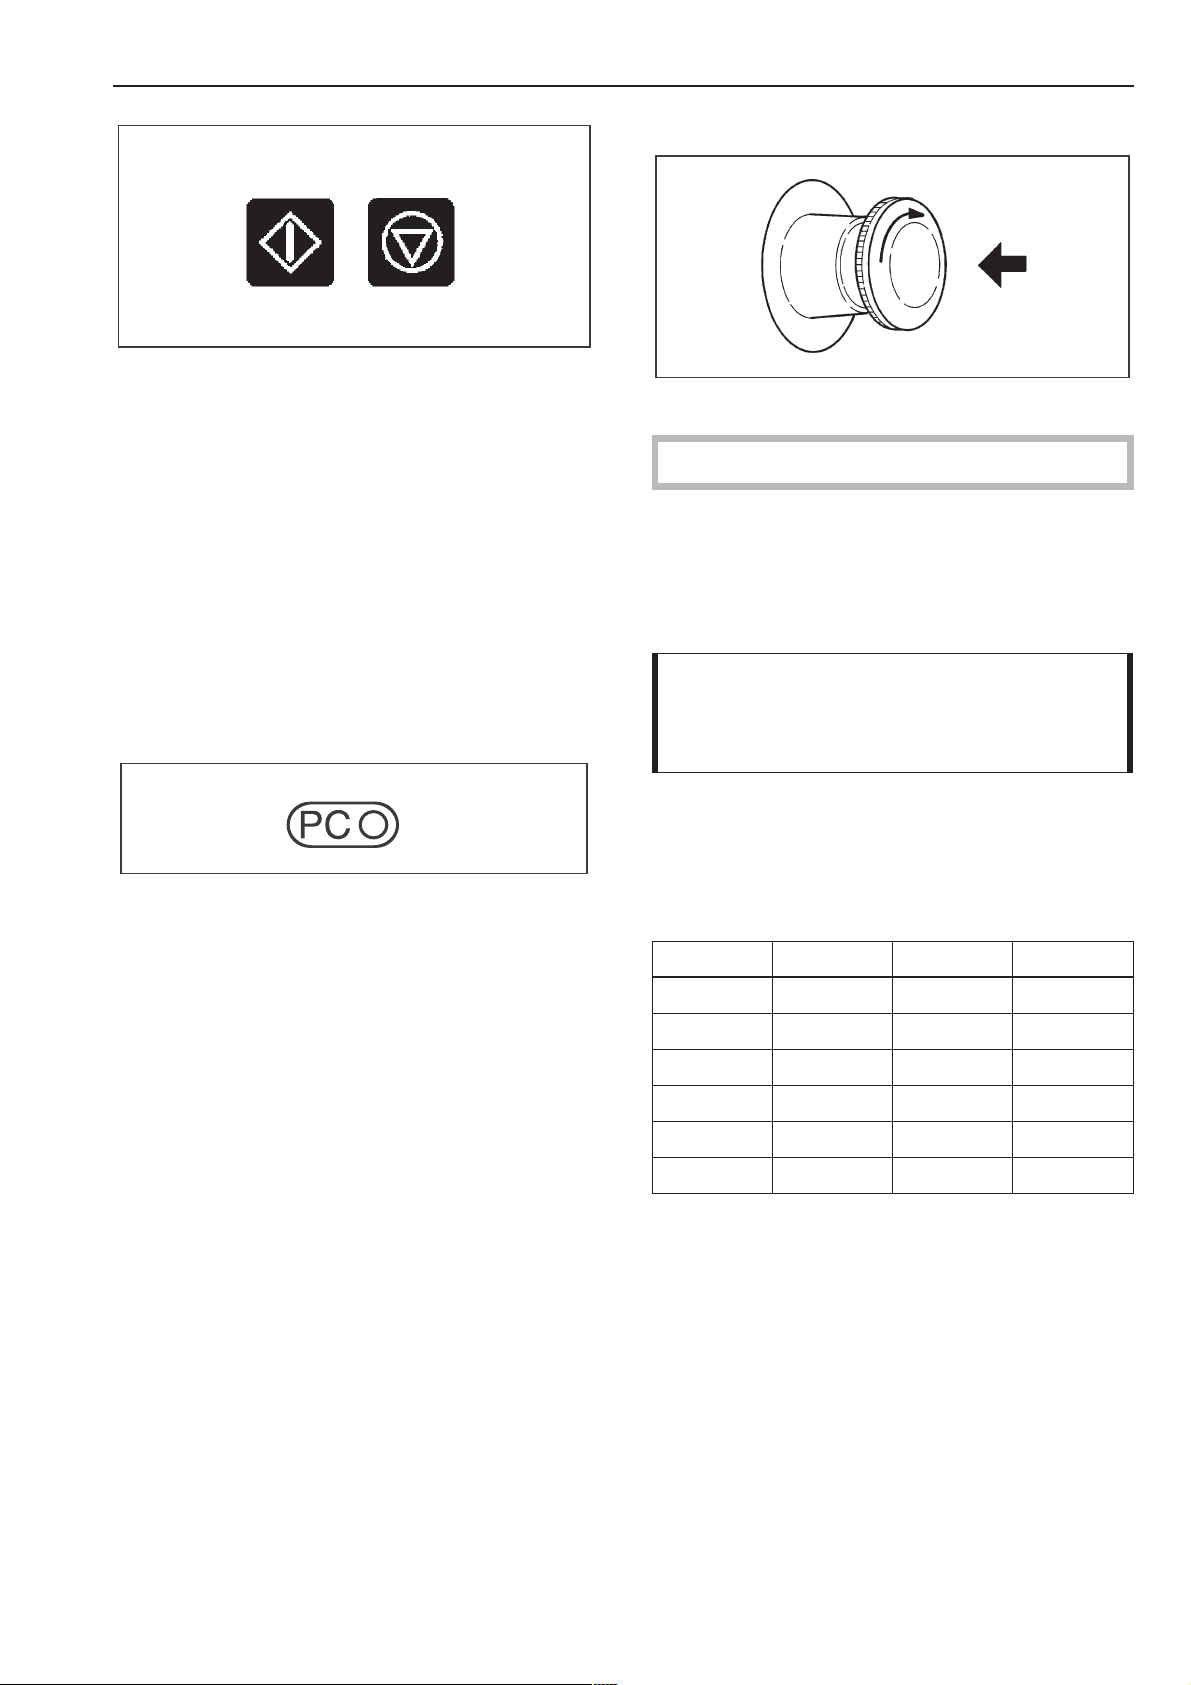
X "Start"
Guide to the washer-extractor
Emergency Stop Switch
Press this button to start the selected pro
-
gram.
7 "End"
Press this button to stop a program. Immedi
ately press once again to terminate a pro
gram. A stopped program can be restarted
by pressing the Start button.
9 Optic interface
Data transfer to and from the machine’s controls and a PC can take place using relevant
software. The optic interface on the machine’s control panel provides the connec
-
tion point.
Only to be used in an emergency.
The switch can be reset by turning the
-
ribbed disc clockwise.
After resetting the following appears in the
display:
PROGRAMME 1 COTTONS
PROGRAMME STOP
THROUGH POWER CUT
Please press the Start button.
^ Press X "Start" to continue the program.
Conversion of °C to °F
°C °F °C °F
10 50 70 158
20 68 80 176
30 86 90 194
40 104 100 212
50 122 110 230
60 140 120 248
11
Page 12

Operation
Language selection*
(if necessary)
Turn the unit on at the wall switch.
^
Turn the key to position B "Operation".
^
Press the "OFF" Z button to turn off the
machine.
Press the X "Start" button and the Y "ON"
^
button at the same time and hold pressed
in, until the display shows the following:
SETTING LOCAL LANGUAGE
DEUTSCH >ENGLISH<
After selection press Start button.
Select the desired language with the 1 2
^
"Cursor" buttons.
The display content being shown is immediately converted into the selected language.
^ Confirm the selected language by press-
ing the X "Start" button.
Setting current time and date*
Turn off the machine with the Z "Power off"
^
button.
Turn the key to position B "Operation".
^
Press the W "Delay start" button and the Y
^
"ON " button at the same time and hold
pressed in, until the display shows the fol
lowing:
SETTING TIME AND DATE
Time of the day >14< : 30 hrs
Date 23. 03. 1995
After selection press Start.
Use the 2 "Cursor" to position the cursor
^
on the input field to be changed and set
the change with the 3 4 "Minus or Plus"
buttons.
^ Position the 2 "Cursor" on the hours and
set the hours.
^ Position the cursor on the minutes and set
the minutes.
-
^ Position the cursor on Day and set the day.
^ Position the cursor on Month and set the
month.
^ Position the cursor on Year and set the
year.
^
Store the changes by pressing the X
"Start" button.
*If pauses between programming steps
lasts longer than 25 seconds, the display
will return to the basic stage and the
changes will be lost.
12
Page 13

Operation
Start up
Open the on-site water valves, (and the
^
supply valves for steam, if relevant).
Turn on the electricity supply at the mains
^
(on site).
Turn the key to position B "Operation".
^
The functions described below are re
stricted only to the "Operation" condition.
Empty all pockets.
^
Foreign objects, (eg nails, coins, paper
clips etc) can cause damage to textiles
and components in the machine.
Load the laundry.
^
Close the drum door.
^
^ Press the Y "Power on" button.
-
Program selection
Select a program (e.g. Program 1 COT
^
TONS).
The display shows the following (example):
-
PROGRAMME 1 COTTONS
>95 °C< Main wash 1
Rinses 3 1000 RPM
-
^
Use the button T "Prewash" to select a
"Prewash" if required.
When T "Prewash" has been pressed the
following shows in the display:
PROGRAMME 1 COTTONS
>60 °C< Prewash 1
95 °C Main wash 1
Rinses 3 1000 RPM
13
Page 14

Operation
Changing temperaure and spin
speed
The following parameters can be changed
before the start of a program:
the temperature in 1 °C steps from cold,
–
15 °C to maximum 95 °C .
the spin speed in 100 rpm steps.
–
WS 5240 300 - 1100 rpm
WS 5320 300 - 1000 rpm
PROGRAMME 1 COTTONS
>60°< Prewash 1
95 °C Main wash 1
Rinses 3 1000 rpm
Use the 2 "Cursor" to position the cursor
^
on the input field for the Prewash tempera
ture, and set the temperature required
(here 60 °C) with the 3 4 "Minus or Plus".
^ Position the cursor on the input field for the
Main wash temperature, and set the temperature required with 3 4 """.
^ Position the cursor on the input field for the
Spin speed, and set the spin speed required with the 3 4 "Minus or Plus".
Adding detergent
For the standard programs add detergent
^
-
to compartment:
2 = for the main wash
1 = for the Prewash (if required)
3 = fabric softener
4 = liquid bleach
5 = liquid detergent
Detergent use
^ Only use low sudsing detergents.
^ Do not oversuds the unit with too much de-
tergent.
^ Take into account the water hardness, and
the detergent manufacturer’s instructions
when filling the dispenser.
^
Do not fill fabric softener or bleaching
agent higher than the level marker in the
relevant dispenser compartment. Other
wise they will be siphoned into the suds
container.
^
Press X "Start" to begin washing.
-
14
Page 15

Operation
The program sequence is shown in the dis
-
play after the start of the program.
PROGRAMME 1 COTTONS
60 °C Prewash 20 °C
95 °C Main wash
^
^^^^^^^^^
~
In the second display line, here Prewash, the
actual suds temperature is shown, and the
time line extending off to the right, underneath the next cycle of the program is
shown, here Main wash.
PROGRAMME 1 COTTONS
95 °C Main wash 20 °C
Rinse 1
^
^^^^^^^^^
~
When the Prewash cycle has finished, the
Main wash appears in the display, with the
actual suds temperature, and the time line
extending off to the right. Underneath the
next cycle of the program is shown, here
Rinse 1.
When an arrow appears at the right of the
last line (~), this indicates that there is a following display line.
Program end - opening the drum
door
At the end of the program, with a stationary
drum and no more water in the machine the
following display is shown (for example):
PROGRAMME 1 COTTONS
PROGRAM END
DOOR IS UNLOCKED
Pull the handle to open the door.
^
If the door can not be opened, press
^
against the door, and once again pull on
the handle.
Never use force to open the door.
Remove the laundry.
^
If the program is interrupted during a cycle,
the following display messages will appear:
PROGRAMME 1 COTTONS
PROGRAMME END
DOOR IS LOCKED
THERE IS WATER IN THE MACHINE
or:
Press the 2 "Cursor", and further information
on the program appears in the lower lines.
Program end display
PROGRAMME 1 COTTONS
Rinse 1
Rinse 2
Program end 11 : 25 hrs ~
After water from the last heating phase has
drained away, or after the last "Cool Down"
the program end time is shown in hours and
minutes.
^
^^^^^^^^^
PROGRAMME 1 COTTONS
PROGRAMME END
DOOR IS LOCKED
DRUM NOT YET STATIONARY
^
Select the separate drain or separate spin
program and start it. At the end of the pro
gram open the door.
If this was the last load of wash for the day,
or longer:
^
Leave the drum door open.
^
Turn off the machine.
^
Switch off the main power supply (at the
wall switch).
^
Turn off the on site water and steam (if ap
plicable) valves.
-
-
15
Page 16

Operation
Delayed Start W
Use the "Delay start" button to program the
unit to start automatically at a later time.
Turn the key to position B "Operation".
^
Turn on the machine and select the re
^
quired program with the program selector.
The display shows the following (example):
PROGRAMME 1 COTTONS
>95 °C< Main wash 1
Rinses 3 1000 RPM
Press W "Delay start".
^
Here the display shows the following:
PROGRAMME 1 COTTONS
Start time >14< : 30 hrs
After the time has been set
press the Start button
-
Press X "Start" to confirm the delayed
^
start, and the following will appear in the
display:
PROGRAMME 1 COTTONS
95 °C Main wash 1
Start time 18 : 30 hrs
When the start time is reached the program
begins and the display shows the program
sequence. If W "Delay start" is pressed dur
ing the program, the actual time of day and
date are shown.
If 7 "End" is pressed the delay start function
will be cancelled.
-
The current time of day (military time) is always displayed first.
The cursor points to the input field for
‘hours’.
^ Select the start time with 3 4 "Minus or
Plus" buttons.
^
Position the cursor on the input field for
minutes and select the minutes with 3 4
"Minus or Plus".
Before pressing the X "Start" button the
start time can be deleted by pressing
again on the W "Delay start" button, or by
turning the machine off and then on
again.
16
Page 17

Notes
Prewash T
A Prewash should be selected when the
load is heavily soiled.
-
A Prewash can be selected before the
^
start, in Programs 1 to 6, by pressing T
"Prewash". The indicator light above the
button lights up.
Starch U
Starching can be selected in all programs
(except "Separate spin" and "Separate
drain").
Powder and low viscosity starches
When the "Starch" point is reached in the se
quence, "Starch hold" flashes in the Display.
PROGRAMME 1 COTTONS
Rinse 3
STARCH HOLD
Press the Starch and Starch hold button.
Open the drum door and add the starch
^
formulation, prepared according to the
manufacturer’s instructions.
Shut the drum door.
^
The message "PROGRAM STOP POWER
CUT" appears in the display.
PROGRAMME 1 COTTONS
PROGRAMME STOP
THROUGH POWER CUT
Please press the Start button.
^ Press X "Start".
-
-
"Starch hold" flashes in the display when it is
time to add starch to the laundry.
Liquid starch
PROGRAMME 1 COTTONS
Rinse 3
STARCH HOLD
Press the Starch and Starch hold button.
^
Add liquid starch into compartment 3, 4 or
^^^^^^^^^
5. The wash time is automatically extended
by 4 minutes.
^
This message appears again:
PROGRAMME 1 COTTONS
Rinse 3
STARCH HOLD
Press the Starch and Starch hold button.
^
Press the U "Starch" button, (the indicator
light goes out) and the program continues.
^
Press U "Starch" to continue the program.
17
Page 18

Notes
Without spin V
Without spin can be selected in all programs
(except "Separate spin").
-
When the "Spin" program is reached, "Spin
stop" flashes in the display.
PROGRAMME 2 COTTONS
Rinse 3
^^^^^^^^^
WITHOUT SPIN
Press without spin or End button.
^
Bleaching agents
Only use bleaching agents on textiles with
the symbol y on the wash care label.
Liquid bleaching agents must only be added
to compartment 4. The agent will then be
dispensed automatically during the second
rinse (cold bleaching).
Liquid bleaching agents should only be
used with colored fabrics if the textile manu
facturer’s wash care label states that the ma
terial is color fast and suitable for bleaching.
For cold bleaching the 4th rinse must be
programmed, (see Programming Instruc
-
tions).
-
^ Either press V "Without spin" again to con-
tinue the program with a spin, or press 7
"End", for the program to finish with water
in the machine.
18
Page 19

Notes
Skipping program cycles
Cycles of a program in progress can be
skipped or repeated.
Press 7 "End" and the program is
^
stopped.
PROGRAMME 2 COTTONS
Main wash
PROGRAMME STOP
PROGRAMME STOP flashes in the display.
Use the 1 or 2 "Cursor" to skip ahead or
^
move back to a cycle in the program.
At the position required press X "Start" to
^
continue the program again.
Program cancellation
To cancel a program, press 7 "End" twice
^
in succession.
If the program was cancelled while there
was water in the machine, or during a spin,
the following may appear in the display (ex
ample):
PROGRAMME 2 COTTONS
PROGRAMME END
DOOR IS LOCKED
WATER IS IN THE MACHINE
or:
PROGRAMME 2 COTTONS
PROGRAMME END
DOOR IS LOCKED
DRUM IS NOT YET STATIONARY
-
^ Run the Separate Drain or Separate Spin
program. On completion the door can be
opened.
Rinsing with hot water
Standard programs
1 Cottons 200 °F (95°C) and
2 Cottons 140 °F (60°C)
are programmed to rinse with hot water.
If a hot water supply is available it is an ad
vantage to run the final rinse with hot water.
This reduces the residual moisture content of
the laundry after spinning.
If the laundry is dried or ironed immediately
after washing, drying times will be shortened
and ironing easier.
19
Page 20

Liquid dispensing
Dispenser pump and Suction pipe
1 = Hose connection socket (suction side)
2 = Hose connection socket (pressure side)
3 = Leakage outlet
4 = Suction inlet opening
5 = Level indicator
When the dispenser container is empty
the pump and the machine will shut off.
Amount to be dispensed
Follow the detergent manufacturer’s guide
^
lines.
Always follow the instructions of the chemi
cal manufacturer when using cleaning
agents and special application chemicals.
Only use such chemicals for the purpose
and in the situation specified by the manu
facturer to prevent adverse chemical reac
-
-
tions and material damage.
If in doubt, contact the detergent manu
-
facturer to verify its safety in this machine.
Correct dosage also depends on the viscos
ity of the liquid detergent. It should stand at
normal room temperature before being used.
Maintenance of the dispensing system
^ Rinse the dispensing system through with
hot water every 2 weeks, or before shutting
the dispenser pumps down for any length
of time, to prevent the system clogging.
-
-
PROGRAMME - - - - - - - - - - -
PROGRAMME STOP
DISPENSING SYSTEM FAULT
Dispensing container 1 empty.
The display will indicate that the detergent
dispenser is empty.
The program will continue automatically
once the container has been refilled.
^ Rinse out the suction pipes with water.
^ Put the suction pipes in a container with
warm water, 104 - 122 °F (40 - 50 °C) .
^
In Service-Operation turn on each pump,
until the dispensing system is rinsed
through.
^
Check the connection points, hoses and
washers for leaks.
20
Page 21

Priming the dispensing pumps
Before the liquid dispensing pumps can be
used the liquid detergent must be drawn into
the system and the amount to be dispensed
set. Access the Service-Operation program
to do this.
Liquid dispensing
SERVICE-OPERATION SERVICE PROGS
SERVICE PROGRAMME 2
Dispenser valve >D1< Disp. time 20 sec.
Cancel with the End button.
Cancel with the 7 "End" button.
^
Drawing in the liquid detergent
Insert the suction pipes into the liquid de
^
tergent containers.
Turn off the washer-extractor.
^
Turn the access selection key to position
^
B, "Operation" and set the program selec
tor to 24.
Turn on the washer-extractor, and within
^
4 seconds, press the T "Prewash" button
4 times in quick succession. This brings
you into Service-Operation.
SERVICE-OPERATION
>SERVICE PROGRAMMES< MACHINE DATA
After selection press Start button. ~
^ Press X "Start".
Repeat the whole process with the other
pumps.
-
>SERVICE PROGRAMMES< MACHINE DATA
SERVICE - OPERATION
After selection press Start button. ~
Press the X "Start" button, select the SER
^
VICE PROGRAMME 2, and press X "Start"
again.
To exit Service-Operation:
^ Press 7 "End" and turn off the machine.
^ Turn on the machine and select Program 8,
Separate Rinse and Spin, to flush the
proofing agent out of the machine.
To adjust the amount dispensed by the
pumps
SERVICE-OPERATION SERVICE PROGS
SERVICE PROGRAMME >1<
After selection press Start button. ~
^
Select SERVICE PROGRAMME 2 with the
4 "Plus" button and press the X "Start"
button.
SERVICE-OPERATION SERVICE PROGS
SERVICE PROGRAMME 2
Dispenser valve >D1< Disp. time 0 secs.
After selection press Start button.
^
With the 4 "Plus" button select D1, with the
2 "Cursor" button move to the input field
for dispensing time and with the 4 "Plus"
button set a dispensing time of approx. 20
seconds. Press X "Start", and the hoses of
pump 1 will be filled.
The amount to be dispensed is measured in
liters in the Service Program. The dispensing
time is then set in key access position C
"Programming".
^
Put the suction pipe into a deep measuring
container with sufficient liquid detergent
and keep it at the full level.
^
Continue as for Drawing in liquid deter
-
gent
21
Page 22

Liquid dispensing
A Pump for spray proofing
1 = "On-Off" switch
2 = Pressure control valve
With the pressure control valve the working
pressure can be set between 7.25 - 87 psi
(0.5 - 6 bar).
3 = Pressure connection
(for the pipe to the spray jet)
4 = Return feed connection
(Pipe into dispensing container for proofing
agent)
5 = Suction connection
(Pipe to suction pipe)
B Suction pipe
6 = Suction inlet opening
7 = Level indicator
When the dispenser container is empty the
pump and the machine will shut off.
PROGRAMME 18 WASH/ PROOF & SPRAY
PROGRAMME STOP
DISPENSING SYSTEM FAULT
Dispensing container 1 empty.
At the same time the display indicates that
the dispenser is empty.
^ Replace or refill the dispenser and press
the X "Start" button to continue the program.
,
Do not use liquids which attack brass.
Correct dosage also depends on the viscos
ity of the liquid detergent. It should stand at
room temperature before being used.
Amount to be dispensed
Follow the detergent manufacturer’s guide
-
lines.
-
22
Page 23

Priming the dispensing pumps
Before the liquid dispensing pumps can be
used the liquid detergent must be drawn into
the system and the amount to be dispensed
set. Access the Service Operation program
to do this.
Liquid dispensing
SERVICE-OPERATION
>SERVICE PROGRAMMES< MACHINE DATA
After selection press Start button. ~
Press the X "Start" button.
^
Drawing in the proofing agent and setting
the spray pressure.
Put the suction pipe and pump return feed
^
piping into the dispensing container.
^ Switch on the pump.
SERVICE-OPERATION SERVICE PROGS
SERVICE PROGRAMME >1<
After selection press Start button. ~
Select SERVICE PROGRAMME 2 with the
^
4 "Plus" button and press X "Start".
SERVICE-OPERATION SERVICEPROGS
SERVICE PROGRAMME 2
Dispenser valve >D1< Disp. time 0 Secs.
After selection press Start button.
^ With the 4 "Plus" button select D6, with the
2 "Cursor" button move to the input field
for dispensing time and with the 4 "Plus"
button set a dispensing time.
Press the X "Start" button and the pump
runs.
^ The proofing agent comes out of the jet
when the hoses have filled up. Now the
spray pressure can be adjusted on the
pressure control valve to achieve the best
spray pattern.
^
Turn the pressure control valve to the mid
dle position.
Service operation:
^
Turn off the washer-extractor.
^
Turn the access key to position B, "Opera
tion mode" and set the program selector to
24.
^
Turn on the washer-extractor and within 4
seconds press the T "Prewash" button.
This brings you into Service-Operation.
SERVICE-OPERATION SERVICE PROGS
SERVICE PROGRAMME 2
Dispenser valve >D6< Disp. time 15 Secs.
-
^
Cancel with the 7 "End" button.
Cancel with the End button.
-
23
Page 24

Liquid dispensing
Setting the amount dispensed by the
pump
The amount to be dispensed is measured in
liters in the service program.
The dispensing time fixed is then set in oper
ating mode C "Programming".
Insert the suction pipe into a measuring
^
container with sufficient proofing agent
and maintain the fill level.
SERVICE-OPERATION
>SERVICE PROGS< MACHINE DATA
After selection press Start button.
After selection press the X "Start" button.
^
Select SERVICE PROGRAMME 2 and
press the X "Start" button.
SERVICE-OPERATION SERVICE PROGS
SERVICE PROGRAMME 2
Dispenser valve >D1< Disp. time 0 Secs.
After selection press Start button.
^ With the 4 "Plus" button select D6.
Set the access key to position C "Pro
^
-
gramming" and select menu point ALTER.
Select the number of the Proofing program
^
with the 4 "Plus" or 3 "Minus" button.
-
Press X "Start".
If the U "Starch" button is pressed, the
^
LED lights up, and then the 2 "Cursor" (or
1) is pressed, the cycle is skipped
through to the end (or back again). In the
area programming and at each end of a
block the skipping is stopped and the dis
play calls for "saving".
If the X "Start" button is pressed this
jumps into the next block.
PROGRAMMING ALTER
PROGRAMME 18 WASH/PROOF & SPRAY
Dispensing 1 >D 1/ 0 Secs, D 1/ 0 Secs <
Disp. delay 1 >no< ~
^ Once the dispensing point has been
found, set D6 with the 4 "Plus" button and
with the 2 "Cursor" move to the input field
for dispensing time, and with the 4 "Plus"
button set the fixed dispensing time.
^ With the cursor button move to the input
field for dispensing time and with the 4
"Plus" button set a dispensing time.
SERVICE-OPERATION SERVICE PROGS
SERVICE PROGRAMME 2
Dispenser valve >D6< Disp. time 35 Secs.
After selection press Start button.
^
Press the X "Start" button and the pump
will draw a certain amount from the mea
suring container.
^
Repeat this process until the desired dis
pensing amount is set.
Maintain the dispensing time because this
time must be carried over into the program
to be run.
^
Cancel with the 7 "End" button and turn
off the machine.
^
Turn on the machine and select Separate
Drain, to flush the proofing agent deter
gent out of the machine.
PROGRAMMING ALTER
PROGRAMME 18 WASH/PROOF & SPRAY
Dispensing 1 >D 6/ 60 Secs, D 1/ 0 Secs<
Disp. delay 1 >no< ~
^
Skip the program through to the end and
press X "Start" to save.
^
To start the program turn the access key to
position B "Operation".
-
-
-
24
Page 25

Peak load cut-out
Peak load cut-out / PC- Printer connection
When the peak load (overload) cut-out func
tion is activated the heating is switched off
and the program is stopped. The following
message appears in the Display:
PROGRAMME 1 COTTONS
PROGRAMME STOP
PEAK LOAD CUT OUT ACTIVE
If the set temperature has not been reached,
the program sequence is stopped.
When the peak load cut out function is finished the program automatically carries on
from where it was left off.
PC- Printer connection:
The machine can be connected to a PC or
printer using an SD kit.
-
PC-Operation:
Program changes can be made via a PC, or
a new program can be downloaded. This requires a special Editor Program which is
available from the Miele Professional Department.
Printer-Operation:
It is possible to print out whole programs or
parts of programs. See "Programming In
structions".
-
25
Page 26

Problem solving guide
Power failure - Emergency door
release
With a short power failure:
The program remains in the last position,
and when power is restored the following
message appears in the display:
PROGRAMME 1 COTTONS
PROGRAMME STOP
THROUGH POWER CUT
Please press the Start button.
Press X "Start", to continue the program.
^
With an extended power failure:
Turn off the machine.
^
Switch off the main power supply at the
^
wall switch.
^ Turn off the on site valves for water or
steam.
To remove the laundry the drain valve will
need to be opened manually and the drum
door unlocked manually.
^
Open the drain valve by partially opening
the venting screw.
^
Use a wrench at the rear of the machine,
but do not unscrew completely. Drain off
the suds.
^
Be careful, some water will seep out of the
screw opening. Catch water in a suitable
container.
^ First position the screwdriver in the
opening, push in and hold firm.
^ Press against the door handle with your
right hand, and then pull on the door handle to open the door.
Never use force to open the door.
^
Take out the laundry.
Large articles of laundry stretching dur
-
ing the spin cycle
Large articles of laundry (e.g. table cloths)
might stretch during the spin cycle. This can
generally be prevented by reprogramming
the machine.
Procedure
Reprogram programs from program selector
setting 11.
Drain valve: program to "NO"
Drain with tumble: program to "NO"
^
Tighten up the venting screw and check
that there is no leak.
26
Page 27

Fault messages
Repairs should only be performed by a
qualified technician in accordance with
applicable codes and standards. Repairs
and other work by unqualified persons
could be dangerous and the manufacturer
will not be held responsible.
Problem solving guide
PROGRAMME 1 COTTONS
PROGRAMME STOP
HEATING SYSTEM FAULT
Cut-out of heating sensor 1.
Call the Miele Technical Service Depart
^
ment.
-
Faults that occur before or after the start of a
program are shown in a flashing display.
PROGRAMME 1 COTTONS
PROGRAMME STOP
THROUGH POWER CUT
Please press the Start button.
When power is restored press X "Start".
^
This fault message can also indicate that the
winding protection of the drive motor has
overheated.
^ Allow the motor to cool down.
PROGRAMME 1 COTTONS
PROGRAMME STOP
WATER INLET FAULT
Open water stopcock and press Start button.
^ Open up the water stopcock (valve) and
press X "Start".
PROGRAMME 1 COTTONS
PROGRAMME STOP
DRAIN FAULT
Clean drain system and press Start button.
^
Check the drainage system on site and
press X "Start". A defective drain valve
should only be repaired by an authorized
service technician.
PROGRAMME 1 COTTONS
PROGRAMME STOP
HEATING SYSTEM FAULT
Short circuit on heater sensor 1.
PROGRAMME 1 COTTONS
PROGRAMME STOP
HEATING SYSTEM FAULT
Call the Miele Technical Service Depart
^
-
ment.
PROGRAMME 1 COTTONS
PROGRAMME STOP
DRIVE SYSTEM FAULT
Multiplug drive variants lacking.
^ Call the Miele Technical Service Depart-
ment.
PROGRAMME 1 COTTONS
95 °C Main wash 20 °C
Rinses 1
DRIVE SYSTEM FAULT
^
Call the Miele Technical Service Depart
^
^^^^^^^^^
ment if there is no drum movement after
this message.
PROGRAMME 1 COTTONS
PROGRAMME STOP
PEAK LOAD CUT OUT ACTIVE
At the end of the peak load cut out function
the program continues automatically.
PROGRAMME 1 COTTONS
PROGRAMME STOP
IMBALANCE SWITCH
Press the On-Off switch.
^
Call the Miele Technical Service Depart
ment.
-
^
Press Z "Power off" and Y "Power on".
27
Page 28

Problem solving guide
PROGRAMME 1 COTTONS
PROGRAMME STOP
PRESSURE MONITOR FAULT
Call the Miele Technical Service Depart
^
ment.
PROGRAMME 1 COTTONS
PROGRAMME STOP
DISPENSING SYSTEM-FAULT
Dispensing container 1 empty.
Change the dispensing container.
^
PROGRAMME 1 COTTONS
PROGRAMME STOP
HEATER SYSTEM FAULT
Dry step switch has cut out.
^ Call the Miele Technical Service Depart-
ment.
Possible reasons for excessive suds:
Detergent type
^ Only use detergent formulated for use in
commercial washer-extractors. Domestic
laundry detergent is not suitable.
Residues, e.g. detergent left on laundry
Run an additional Prewash without deter
^
-
gent and without selecting a temperature.
Laundry which has been soaked before
-
washing must be thoroughly rinsed before
running a wash program.
Small loads
Reduce the amount of detergent dis
^
-
pensed according to the size of the load.
Drum speed too high during the wash
(Profitronic-controls)
Reduce the drum speed and wash rhythm.
^
Water hardness levels
Hard
-
ness
range
I soft 0 - 130 0 - 7
II medium 131 - 250 7 - 14
III hard 251 - 380 14 - 21
IV very hard over 380 over 21
Water
quality
Hardness
level in ppm*
Hardness
level in
gr/gal*
*) Contact the local water authority for the
hardness level of the water supplied to the
machine.
Overdosing of detergent
^
Dispense detergent following the deter
gent manufacturer’s instructions on the
packaging and adjust to local water hard
ness levels.
Detergent creates too many suds
^
Use a low sudsing detergent or contact
your detergent application specialist.
Very soft water
^
In areas with soft water dispense less de
tergent.
Soiling level of the laundry
^
For lightly soiled laundry dispense less de
tergent.
-
-
-
-
28
Page 29

After sales service
In the event of a fault which you cannot
correct yourself please contact:
Miele Technical Service
USA 1-800-999-1360
techserv@mieleusa.com
CDN 1-800-565-6435
service@miele.ca
When contacting Technical Service please
quote the model and serial number of the
machine.
These can be found on the data plate with
the door open,
Service interval
If the following message appears in the dis
play after turning the machine on:
PROGRAMME 1 COTTONS
PLEASE CALL THE SERVICE DEPARTMENT
(SERVICE INTERVAL 1)
The machine needs to be serviced.
The Service interval display will go out after
5 seconds or by pressing the X "Start" but
ton.
-
-
or at the rear of the machine towards the
top.
29
Page 30

Cleaning and Care
After each use
Never use high pressure cleaners to hose
down the machine.
The machine should be cleaned immediately
after use.
After use do not shut the drum door but
^
leave it slightly ajar, to allow the machine to
dry out.
Cleaning the exterior
Never use abrasive cleaners, scouring
,
pads, steel wool or caustic cleaners on
the washer-extractor. They will
the surface.
Plastic
All plastic surfaces and the control panel
can be cleaned with warm water and liquid
dish soap applied with a soft sponge.
^ Wipe dry using a soft cloth.
damage
Cleaning the dispenser box and
siphon
After use the dispenser compartment should
be cleaned with warm water to remove any
detergent or other residues.
The siphon tube in the detergent dispenser
should also be cleaned.
Pull the siphon tubes upwards to remove
^
for cleaning in warm water. Replace in the
reverse order checking that the siphon
tubes are hooked in correctly.
Cleaning the cooling fan
,
Do not use too much water when
cleaning the controls. Water could penetrate into the electronics and cause damage.
Stainless steel
Stainless steel surfaces can be cleaned us
ing a non-abrasive stainless steel cleaner.
To help prevent resoiling, a conditioner for
stainless steel can also be used.
^
Apply sparingly with even pressure.
-
The ventilation slats in the cover for the cool
ing fan at the rear of the machine must be
regularly checked for lint and dirt and
cleaned whenever necessary.
-
30
Page 31

Cleaning and Care
Cleaning the filters
The filters in the water inlet valves must be
checked periodically for build up and
cleaned if necessary.
Cleaning the drum
The drum is made of non-rusting stainless
steel. It is however possible that water with a
high iron content or foreign bodies in the
wash, (e.g. paper clips or metal buttons),
may lead to the formation of superficial rust
spots especially, if the machine is not used
for some time. If this occurs the drum can be
cleaned with a scouring powder.
Maintaining the drum
After about 1000 running hours:
^
Apply Arcanol L 12 V to both grease nip
ples of the drum.
-
31
Page 32

Guide to the symbols on the data plate
1 Machine type
2 Serial number/year of manufacturer*
3 Voltage/Frequency
4 Control fusing
5 Drive motor
6 Plate diameter/Plate quantity *
7 Drum data
8 Drum diameter/Drum depth *
9 Spin speed
10 Drum volume/Laundry dry weight
11 Kinetic Energy
12 Ex. time to top speed
13 Braking time
14 Heating
15 Electric heating
16 Fusing (on site)
17 Steam heating indirect
18 Steam heating direct
19 Gas heating
20 Commissioning date
21 Water-Registration
DVGW-test cert (Water)
22 Field for CE test symbol /
(Product ID-No./Gas)
*does not apply to WS 5240 / WS 5320
32
Page 33

This machine is for use only with articles
which have not been treated with danger
ous or flammable substances.
To prevent frost damage do not install this
machine in a room exposed to frost.
It is essential that the machine is level, and
secured (see Installation diagram supplied).
The machine must not be moved without
all the outer panels in place.
Shipping struts
Once the machine has been set in its final
position the red-marked shipping struts
must be removed. Ensure they are re
moved before using the machine.
-
-
Installation
The plinths for the front and rear panels are
secured with the rear panel, and should be
fitted when the machine has been installed.
The screws are found in the pre-drilled
holes.
The shipping struts should be stored in a
safe place for future use. They must be re
fitted if the machine is moved.
-
^
The red-marked shipping struts "A" on the
diagram, 2 at the side front and 2 at the
side rear are each fixed with 3 M 10
(SW 17) hex screws. Remove these.
The red-marked shipping struts "B" on the
diagram, 2 at the front and 2 at the rear are
each fixed with 3 M 10 (SW 17) hex screws.
^
To remove them detach the front service
panel and the rear panel. Unscrew the 3
M6 hex screws (SW 8) at the bottom edge
of the front service panel, and take it off.
Unscrew 8 hex screws in the rear panel
and remove.
33
Page 34

Installation
Please take note of the Installation Dia
gram and instructions supplied. They are
important for the proper connection of
supplies.
-
Plumbing
The water hook up is by a water valve, which
conforms with local and national regulations.
This work must be carried out by an autho
rized Miele service technician.
To ensure the machine is correctly con
nected please follow the installation plan
and the installation instructions supplied with
the machine.
The inlet pressure hoses supplied with the
machine must be used for connection to the
water supply. To ensure the hot water inlet
hose (marked 194°F/90°C) lasts for many
years, do not hook the hose up to a hot
water connection supplying water hotter
than 158°F/70°C. This hose should only be
replaced with a genuine Miele spare part.
-
-
Before connecting the inlet hoses to the ma
chine ensure that the filters and seals sup
plied in the accessories pack have been
correctly fitted.
A water pressure flow rate of at least 30 psi
(2 bar), maximum 145 psi (10 bar) is re
quired.
Water taken into the machine must not ex
ceed a temperature of 70°C/158°F.
Connection to cold water only
See the Installation diagram supplied
-
-
-
-
34
Page 35

Electrical connection
All electrical work must be performed by a
qualified technician in accordance with ap
plicable codes and standards.
The machine must only be connected to the
voltage and frequency shown on the data
plate.
The machine is supplied as standard for
connection to a 208 V, 60 Hz, 20 A, 3-phase
electricity supply.
The electric heater rating is factory preset
to 24 kW (WS 5240), 30 kW (WS 5320).
-
Installation
The minimum suds level required for activat
ing the heating is 110 mm column of water.
The motor has an overload protection
switch.
Connection should be made via a suitable,
approved isolator, with an on-off switch easily accessible for servicing.
WARNING
THIS APPLIANCE MUST BE
GROUNDED !
Steam connection
Steam connection must only be undertaken
by an authorized Miele installer.
All removable outer housing parts must
be refitted after the machine has been in
stalled and the necessary connections
made to on-site supplies.
-
-
35
Page 36

Alteration rights reserved / 000 USA - 4401
This paper is made from cellulose bleached without the use of chlorine.
 Loading...