


DRYER DOOR REVERSAL INSTRUCTIONS
You can change your door swing from a right-side opening to a left-side opening, if desired. The following instructions are applicable for models with a side-opening door.
NOTE: To complete the door swing reversal exactly as seen in these instructions, a door reversal kit must be purchased. For ordering information, please visit the manufacturer’s website or reference the contact information listed on your Quick Start Guide.
Tools Needed
Plastic putty knife |
Minimum 8" (203 mm) long |
|
TORX® T20® star driver |
 WARNING
Electrical Shock Hazard Disconnect power before removing doors.
Failure to do so could result in death or electrical shock.
#2 Phillips screwdriver |
Optional assembly kit covers |
3. Remove hinge screws
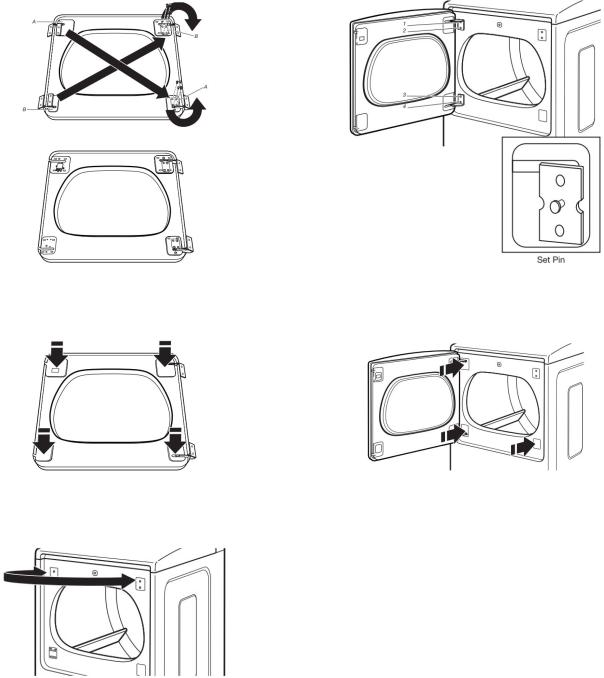
Using a T20® star driver, remove screws (A) and then screws (B) from each of the two hinges attaching the dryer door to the front panel of the dryer. Set the hinge screws off to the side for use in reinstalling the door.
1. Place towel on flat workspace
Place a towel or soft cloth on a flat workspace, such as the top of the dryer or the floor, to avoid damaging the dryer’s surface or the dryer door.
4. Remove door from cabinet
Remove the dryer door from the cabinet by lifting upward and out. Lay the door on the towel or soft cloth you placed on a flat workspace.
2. Remove hinge covers from dryer
Open the dryer door. Use a plastic putty knife to remove the hinge covers and plastic covers from the front panel of the dryer. Set them aside.
5. Remove door hinge covers
Use a plastic putty knife to remove the door hinge covers. Set them aside.
TORX and T20 are trademarks of Acument Intellectual Property, LLC. |
1 |

6. Remove hinges from door
Using a #2 Phillips screwdriver, remove the remaining 4 screws from the hinges. Then remove hinges A and B and set the screws and hinges aside.
C.
After removing the magnet latch, move it to the opposite side of the door by reversing the previous steps.
7. Transfer magnet latch |
D. |
Using a #2 Phillips screwdriver, remove the magnet latch and install it on the other side of the door.
IMPORTANT: Because the magnetic force is strong, it is important to maintain a firm grip and to slide the magnet with a steady, gradual movement. Doing so can keep the magnet from reattaching to the metal surface and breaking, or from possibly pinching your fingers.
A.
Remove housing.
Holding it tightly, slide magnet over.
B.
Holding it tightly, lift magnet off of shim.
Remove shim.
Make sure arrow on front of shim points up.
Rear of shim is embossed to ensure correct seating in opening.
E.
Screw on shim.
Holding magnet tightly, place edge of magnet on shim and lower magnet so edge rests flatly on shim.
F.
Holding magnet tightly, slide into place.
Screw on housing.
2
8. Reinstall door hinges
Using the screws you set aside, reinstall hinge B (removed from the lower-left corner of the door) in the upper-right corner. Tighten all screws.
Using the screws you set aside, reinstall hinge A (removed from the upper-left corner of the door) in the lower-right corner. Tighten all screws.
9. Replace hinge covers
Replace the door hinge covers.
10. Transfer strike plate
Using a T20® star driver, remove the two screws securing the strike plate and move the strike plate from the left side of the dryer cabinet to the right side, securing it with the removed screws.
11. Hang door
Hang the door on the unit by placing set pin in dryer cabinet hole and sliding door down. Using a Phillips screwdriver, install screws 1 and 3 and then screws 2 and 4. Tighten all hinge screws.
12. Install cover from accessory kit
Install the plastic cover from the accessory kit into the space where the lower hinge was removed. Place the plastic hinge covers over the exposed hinges.
Troubleshooting
See your Owner’s Manual or visit our website and reference Frequently Asked Questions to possibly avoid the cost of a service call.
3
 Loading...