

Page 1
LÁMPARA SOLAR DE LED / LAMPADA SOLARE A LED
LÁMPARA SOLAR DE LED
Instrucciones de montaje, de uso y de
seguridad
LED SOLAR LAMP
Assembly, operating and safety
instructions
LAMPADA SOLARE A LED
Istruzioni di montaggio, d’uso e
di sicurezza
LED-SOLARLEUCHTE
Montage-, Bedienungs- und
Sicherheitshinweise
IAN 63018
63018_livx_A_LED-Solarleuchte_cover_ES.indd 2 21.05.14 15:10
Page 2
ES Instrucciones de montaje, de uso y de seguridad Página 5
IT / MT Istruzioni di montaggio, d’uso e di sicurezza Pagina 17
GB / MT Assembly, operating and safety instructions Page 29
DE / AT / CH Montage-, Bedienungs- und Sicherheitshinweise Seite 41
63018_livx_A_LED-Solarleuchte_cover_ES.indd 3 21.05.14 15:10
Page 3
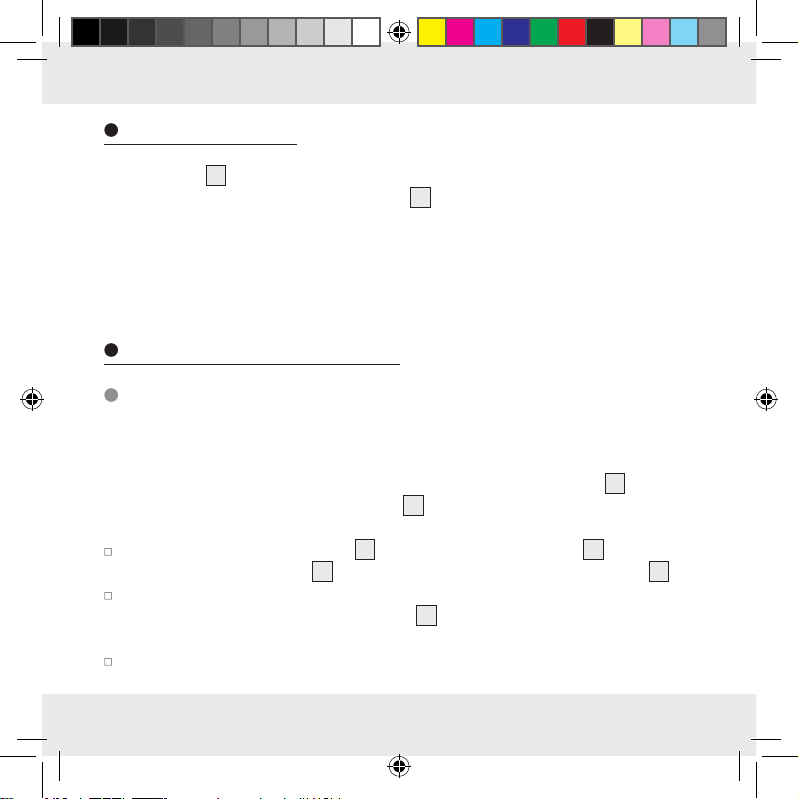
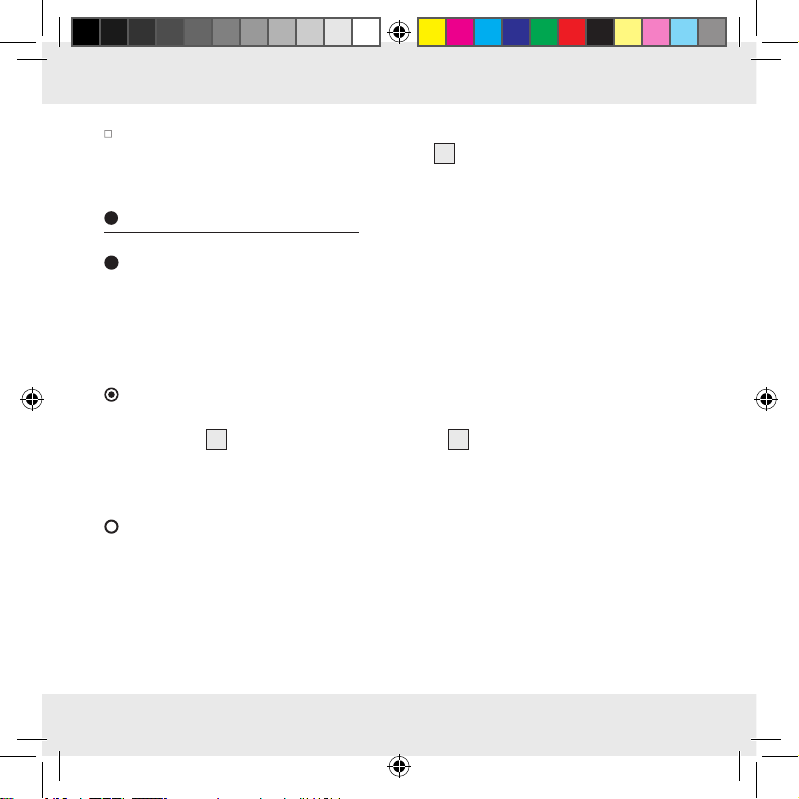
A B
1 1
2 3
C
4
5
2
3
3
63018_livx_A_LED-Solarleuchte_content_ES.indd 3 21.05.14 15:36
Page 4
D
1.
2.
E
2.
1.
6 7
F
4
63018_livx_A_LED-Solarleuchte_content_ES.indd 4 21.05.14 15:36
7
8
G
10
7
8
7
8
9
Page 5
Uso adecuado .......................................................................................................Página 6
Descripción de las piezas ............................................................................Página 6
Características técnicas .................................................................................Página 7
Volumen de suministro .................................................................................Página 7
Indicaciones generales de seguridad ..............................................Página 8
Indicaciones de seguridad sobre baterías ..................................Página 9
Funcionamiento....................................................................................................Página 10
Puesta en funcionamiento
Cómo montar la lámpara .............................................................................................Página 10
Antes de la primera puesta en funcionamiento
Cargar la batería...........................................................................................................Página 11
Cómo colocar la lámpara ............................................................................................Página 12
Limpieza y cuidados / almacenamiento .........................................Página 13
Sustitución de la batería ..............................................................................Página 13
Solucionar problemas ....................................................................................Página 14
Desecho del producto .....................................................................................Página 15
Garantía .....................................................................................................................Página 16
5 ES
63018_livx_A_LED-Solarleuchte_content_ES.indd 5 21.05.14 15:36
Page 6
Lámpara solar de LED
Uso adecuado
El farol solar LED ha sido diseñado como decoración lumínica para espacios exteriores
que no disponen de conexión eléctrica, por ejemplo jardines, balcones, terrazas, etc.
El farol solar LED no es apto para un uso comercial.
Descripción de las piezas
1
Pantalla de la lámpara
2
Base (con alojamiento para piqueta)
3
Piqueta
4
LED
5
Placa solar
6
Interruptor ENCENDIDO / APAGADO (ON / OFF)
7
Tapa del compartimento para baterías
8
Compartimento para baterías
9
Batería
10
Cinta de aislamiento
6 ES
63018_livx_A_LED-Solarleuchte_content_ES.indd 6 21.05.14 15:36
Page 7
Características técnicas
Tensión de funcionamiento: 1,2 V
Batería: 1 x batería NiMH 1,2 V , 600 mAh, AAA
Bombilla: 1 LED con 0,06 W (LED no reemplazable)
Placa solar: 2 x monocristalino, máx. 1,1 V, cada uno máx. 110 mA
Tipo de protección: IP 44 (protección contra salpicaduras de agua)
Volumen de suministro
Compruebe siempre inmediatamente después de desembalar el producto la
integridad del contenido y el perfecto estado del aparato.
1 lámpara solar de LED
(compuesto por una base y una pantalla de lámpara desmontable)
1 piqueta
1 batería NiMH 1,2 V
1 manual de instrucciones de montaje y manejo
, 600 mAh, AAA (preinstalada)
7 ES
63018_livx_A_LED-Solarleuchte_content_ES.indd 7 21.05.14 15:36
Page 8

Indicaciones generales de seguridad
¡Familiarícese con todas las instrucciones de uso y seguridad antes de utilizar este
producto! Si entrega este producto a terceros, ¡no olvide adjuntar igualmente toda la
documentación!
Este producto puede ser utilizado por niños mayores de 8 años, así como por
personas con capacidades físicas, sensoriales o mentales reducidas o que cuenten con poca experiencia y/o falta de conocimientos, siempre y cuando se les
haya enseñado cómo utilizar el aparato de forma segura y hayan comprendido
los peligros que pueden resultar de un mal uso del mismo. No permita que los
niños jueguen con el producto. La limpieza y mantenimiento no deben llevarse a
cabo por niños sin la vigilancia de un adulto.
No permita que los niños jueguen con el material de embalaje sin la vigilancia
de un adulto. Existe peligro de asfixia con el material de embalaje. Los niños no
suelen ser conscientes del peligro.
Mantenga a los niños alejados de la zona de trabajo durante el montaje o el
cambio de batería. El volumen de suministro incluye tornillos. Estas pueden
suponer peligro de muerte por ingestión o inhalación.
¡No utilice el producto si detecta cualquier desperfecto!
8 ES
63018_livx_A_LED-Solarleuchte_content_ES.indd 8 21.05.14 15:36
Page 9
Indicaciones de seguridad sobre baterías
¡PELIGRO DE MUERTE! Mantenga las baterías fuera del
alcance de los niños. ¡En caso de ingestión, acuda inmediatamente a un médico!
¡CUIDADO! ¡PELIGRO DE EXPLOSIÓN!
¡No tire las baterías al fuego o al agua!
¡Evite condiciones y temperaturas extremas que puedan influir en el funciona-
miento de las baterías, por ejemplo, acercarlas a un radiador o exponerlas
directamente a la luz solar!
¡No aplique a las baterías ninguna carga mecánica!
No utilice baterías no recargables.
No cortocircuite ni abra las baterías.
Peligro de daños materiales
¡Utilice únicamente el tipo de baterías indicado!
¡Cuando coloque la pila preste atención a la polaridad correcta! ¡Esta se
especifica en el compartimento de las baterías!
¡Si fuera necesario, limpie los contactos de las pilas y del aparato antes de
introducirlas!
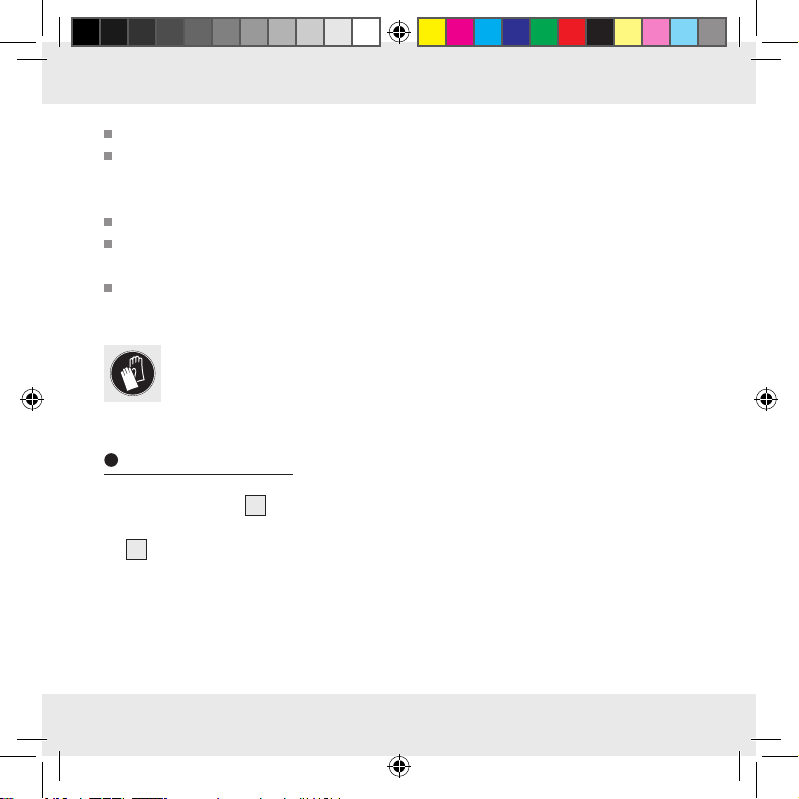
¡Use guantes de seguridad! Las baterías gastadas o dañadas
pueden provocar causticaciones en contacto con la piel. Para evitarlo,
utilice unos guantes de protección adecuados.
9 ES
63018_livx_A_LED-Solarleuchte_content_ES.indd 9 21.05.14 15:36
Page 10
Funcionamiento
La placa solar 5 transforma la energía solar en energía eléctrica. Carga las baterías
integradas en el compartimento para baterías
a través del cable eléctrico conectado.
8
Esta baterías almacena la energía eléctrica alimentada por la placa solar. La carga
de baterías completamente descargadas dura en verano con una radiación solar
buena entre 2 y 4 días. La batería debe estar cargada antes de la primera puesta en
funcionamiento (ver „Cargar batería“).
Puesta en funcionamiento
Cómo montar la lámpara
En el momento de envío el farol solar LED ya está preinstalado y listo para su funcionamiento. El farol solar LED puede colocarse con su piqueta en arriates, jardineras o
cerca de caminos como iluminación puntual. Para ello, inserte la piqueta
alojamiento de debajo de la base del farol
2
.
Retire la pantalla de la lámpara 1 tirando levemente de la base 2. Dentro de
la pantalla de la lámpara
1
se encuentra el compartimento para baterías 8.
En primer lugar presione una de las dos lengüetas de plástico en dirección del
interruptor de ENCENDIDO/APAGADO
6
. A continuación presione la otra
lengüeta de plástico y saque con cuidado la unidad de las baterías.
Abra el compartimento de las baterías en la dirección de la flecha (ver fig. F).
3
en el
10 ES
63018_livx_A_LED-Solarleuchte_content_ES.indd 10 21.05.14 15:36
Page 11
Después retire las cintas aislantes 10 situadas entre la batería 9 y el polo del
compartimento (ver fig. G).
Finalmente monte todos los componentes en orden opuesto. Preste atención para
no dañar el cable.
Coloque el interruptor de ENCENDIDO/APAGADO en posición „ON“
(encendido).
El producto ya está listo para su uso.
Antes de la primera puesta en funcionamiento
Nota: la bombilla LED instalada dispone de función de parpadeo para simular el
titileo natural de una llama. ¡Esto no es un defecto!
Cargar la batería
Nota: la batería del farol solar LED se envía cargada. No obstante, durante el trans-
porte por parte del fabricante hasta el punto de venta puede perder algo de carga.
Por lo tanto, cargue completamente la batería antes de utilizarla por primera vez. La
primera carga dura en verano con una radiación solar buena al menos un día.
Coloque el interruptor de ENCENDIDO/APAGADO (6) en posición „ON“
(encendido) (ver fig. D).
11 ES
63018_livx_A_LED-Solarleuchte_content_ES.indd 11 21.05.14 15:36
Page 12
Nota: Con una radiación solar normal (según la estación del año) las baterías
vacías deberían cargarse en un plazo de entre dos a diez días.
Sustituya la batería 9 cuando la potencia de la luz no mejore tras haberlas
cargado (ver fig. E).
Cómo colocar la lámpara
Para obtener un resultado óptimo, coloque el farol en un lugar en el que la placa
5
solar
esté expuesta el mayor tiempo posible directamente a la luz solar.
No coloque la lámpara bajo arbustos, árboles, voladizos, etc. ya que impiden la
incidencia directa de la luz solar.
Oriente la lámpara de forma que la célula solar no quede cubierta o en una
zona de sombra.
Asegúrese de que la célula solar no recibe la influencia de otra fuente de luz,
como por ej. el alumbrado de una finca o de la calle, puesto que de ser así, la
luz no se encenderá al atardecer.
En caso de poca claridad, la luz se enciende de forma automática y con claridad
normal, la luz se vuelve a apagar.
Indicación en caso de uso como iluminación puntual (con piqueta):
Clave la lámpara solar ya montada en el suelo (césped, arriate) lo suficiente para
que se mantenga estable. Asegúrese de que el producto se encuentra firmemente
insertado.
12 ES
63018_livx_A_LED-Solarleuchte_content_ES.indd 12 21.05.14 15:36
Page 13
Al montar la lámpara no aplique fuerza excesiva (por ej. martillazos). Esto puede
dañar el producto.
Limpieza y cuidados/almacenamiento
No utilice productos de limpieza corrosivos bajo ningún concepto.
En primer lugar apague el producto.
Limpie el producto frecuentemente con un paño seco sin pelusas. Para la
suciedad más persistente, utilice un paño ligeramente humedecido.
Nota: asegúrese de que la placa solar
5
siempre esté limpia para obtener un buen
resultado de carga.
Las bajas temperaturas influyen negativamente en la duración de las baterías. Si no
va a utilizar el producto durante un periodo prolongado, por ej. en invierno, es conveniente limpiarlo y conservarlo en un lugar seco y cálido. Cuando guarde el producto,
asegúrese de que el interruptor de ENCENDIDO/APAGADO
6
se encuentra en
posición „OFF“ (apagado).
Sustitución de la batería
Para cambiar la batería preinstalada, siga las instrucciones descritas en „Puesta
en funcionamiento“.
13 ES
63018_livx_A_LED-Solarleuchte_content_ES.indd 13 21.05.14 15:36
Page 14
Retire la batería antigua y coloque la nueva teniendo en cuenta la polaridad
indicada en el compartimento de la batería
Solucionar problemas
(ver fig. D-G).
8
Problema
· La luz no se enciende a pesar de que la lámpara ha recibido los rayos del
sol todo el día.
· Rendimiento de batería limitado.
· La luz no se enciende o solo lo hace brevemente.
Causa
· El farol solar LED no está encendido.
· La batería
se ha agotado o la placa solar 5 está sucia.
9
· Las fuentes de luz artificial, como por ejemplo la luz de las farolas, interfieren con
la lámpara.
Solución
· Coloque la lámpara en un lugar en donde no haya otras fuentes de luz que
puedan causar interferencia.
· Sustituya la batería.
14 ES
63018_livx_A_LED-Solarleuchte_content_ES.indd 14 21.05.14 15:36
Page 15

Desecho del producto
El embalaje está compuesto por materiales no contaminantes que pueden
ser eliminados en el centro de reciclaje local.
Para obtener información sobre las posibles formas de eliminación del producto al
final de su vida útil, acuda a la administración de su municipio o ciudad.
En beneficio del medio ambiente no tire el producto junto con la basura
doméstica cuando ya no le sea útil. Deséchelo adecuadamente. Diríjase a
la administración competente para obtener información sobre los puntos
de recogida de residuos y sus horarios.
Las baterías defectuosas o usadas deben ser recicladas según lo indicado en la
directiva 2006/66/ CE. Recicle las baterías y/o el aparato en los puntos de reciclaje
disponibles.
¡Daños medioambientales debidos a
un reciclaje incorrecto de las baterías!
Pb
Las pilas usadas no deben desecharse en la basura doméstica. Las pilas usadas
deben reciclarse en un punto de recogida local.
15 ES
63018_livx_A_LED-Solarleuchte_content_ES.indd 15 21.05.14 15:36
Page 16
Garantía
El aparato ha sido fabricado cuidadosamente sigu
ha sido probado
antes de su entrega. En caso de defecto del pro
iendo exigentes normas de calidad y
ducto, usted tiene
derechos legales frente al vendedor del mismo. Nuestra garantía (abajo indicada) no
supone una restricción de dichos derechos legales.
Este aparato tiene una garantía de 3 años a partir de la fecha de compra. El plazo
de garantía comienza a partir de la fecha de compra. Por favor, conserve adecuadamente el justificante de compra original. Este documento se requerirá como prueba
de que se realizó la compra.
Si en el plazo de 3 años a partir de la fecha de compra se produce un fallo de
material o fabricación en este producto, repararemos el producto o lo sustituiremos
gratuitamente por un producto nuevo (según nuestra elección). La garantía quedará
anulada si el producto resulta dañado o es utilizado o mantenido de forma inadecuada.
La garantía cubre defectos de materiales o de fabricación. Esta garantía no cubre aquellos componentes del producto sometidos a un desgaste normal y que, por ello, puedan
considerarse piezas de desgaste (por ej. las pilas). Tampoco cubre daños de componentes frágiles como, por ejemplo, los interruptores, baterías y piezas de cristal.
16 ES
63018_livx_A_LED-Solarleuchte_content_ES.indd 16 21.05.14 15:36
Page 17

Utilizzo secondo la destinazione d’uso ..........................................Pagina 18
Descrizione dei componenti ......................................................................Pagina 18
Dati tecnici .................................................................................................................Pagina 19
Contenuto della confezione ......................................................................Pagina 19
Avvertenze generali di sicurezza ........................................................Pagina 19
Avvertenze di sicurezza per le batterie .........................................Pagina 20
Funzionamento.....................................................................................................Pagina 21
Messa in funzione
Montaggio della lampada ...........................................................................................Pagina 22
Prima della prima messa in funzione
Caricamento della batteria ...........................................................................................Pagina 23
Installazione della lampada .........................................................................................Pagina 23
Pulizia e manutenzione / conservazione.......................................Pagina 24
Sostituzione delle batterie .........................................................................Pagina 25
Eliminazione degli errori .............................................................................Pagina 25
Smaltimento ............................................................................................................Pagina 26
Garanzia ....................................................................................................................Pagina 27
17 IT/MT
63018_livx_A_LED-Solarleuchte_content_ES.indd 17 21.05.14 15:36
Page 18

Lampada solare a LED
Utilizzo secondo la destinazione d’uso
La lampada solare a LED è destinata solo ad uso decorativo per ambienti esterni
disposti di connessione alla rete elettrica, ad esempio giardini, balconi, terrazze ecc.
La lampada solare a LED non è adatta per uso commerciale.
Descrizione dei componenti
1
Paralume
2
Zoccolo (con apertura per picchetto)
3
Picchetto
4
LED
5
Cella fotovoltaica
6
Interruttore ON / OFF
7
Coperchio per vano portabatterie
8
Vano portabatterie
9
Batteria
10
Strisce isolanti
18 IT/MT
63018_livx_A_LED-Solarleuchte_content_ES.indd 18 21.05.14 15:36
Page 19

Dati tecnici
Tensione di funzionamento: 1,2 V
Batterie: 1 batteria NiMH da 1,2 V , 600 mAh, AAA
Lampadina: 1 LED da 0,06 W (LED non sostituibile)
Celle fotovoltaiche: 2 monocristalline, max. 1,1 V, ognuna da max. 110 mA
Tipo di protezione: IP44 (resistente agli spruzzi d‘acqua)
Contenuto della confezione
Dopo il disimballaggio, controllare subito l‘integrità e le condizioni perfette dei
componenti.
1 lampada solare a LED (costituita da zoccolo e paralume rimovibile)
1 picchetto
1 batteria NiMH da 1,2 V
1 manuale d‘uso e di montaggio
, 600 mAh, AAA (premontata)
Avvertenze generali di sicurezza
Prima dell‘uso leggere attentamente tutte le istruzioni e le avvertenze di sicurezza allegate al prodotto! In caso di cessione del prodotto a terzi, consegnare anche l‘intera
documentazione del prodotto!
19 IT/MT
63018_livx_A_LED-Solarleuchte_content_ES.indd 19 21.05.14 15:36
Page 20

Quest‘apparecchio può essere utilizzato da bambini di età superiore agli 8 anni,
da persone con capacità fisiche, sensoriali o mentali ridotte o da persone inesperte solo se supervisionate o preventivamente istruite sull’utilizzo in sicurezza
del prodotto e solo se informate dei pericoli legati al prodotto stesso. Non lasciare che i bambini giochino con l‘apparecchio. La pulizia e la manutenzione
non devono essere eseguite da bambini senza supervisione.
Non lasciare mai i bambini incustoditi con il materiale per imballaggio. Sussiste il
rischio di soffocamento a causa di tale materiale. Spesso i bambini sottovalutano i
pericoli.
Allontanare i bambini durante il montaggio o sostituzione della batteria. Nella
confezione sono contenute viti. Queste possono causare un pericolo di vita se
vengono ingoiati o inalati per sbaglio.
Non utilizzare l‘articolo se si notano dei danni!
Avvertenze di sicurezza per le batterie
PERICOLO DI MORTE! Tenere le batterie fuori dalla portata
dei bambini. In caso di ingerimento consultare subito un medico!
ATTENZIONE! PERICOLO DI ESPLOSIONE!
Non gettare mai le batterie nel fuoco o in acqua!
Evitare condizioni e temperature estreme che potrebbero avere influenza sulle
batterie, quali ad esempio vicinanza a caloriferi / irraggiamento solare diretto!
Non esercitare alcuna pressione meccanica sulle batterie!
20 IT/MT
63018_livx_A_LED-Solarleuchte_content_ES.indd 20 21.05.14 15:36
Page 21
Non utilizzare batterie ricaricabili.
Non causare cortocircuiti e / o aprire le batterie.
Pericolo di danni materiali
Utilizzare esclusivamente il tipo di batterie indicato!
Prestare attenzione alla polarità corretta quando vengono inserite le batterie!
Essa è indicata all‘interno del vano portabatterie!
Se necessario, pulire i contatti della batteria e dell’apparecchio prima di inserire
le batterie!
Indossare guanti protettivi! Le batterie scariche o danneggiate
possono causare corrosioni in caso di contatto con la pelle; in tal caso,
indossare sempre guanti di protezione adatti.
Funzionamento
La cella fotovoltaica 5 trasforma l‘energia della luce del sole in energia elettrica.
Attraverso il cavo elettrico collegato essa carica la batteria inserita el vano portabatte-
8
rie
. La batteria accumula l‘energia elettrica alimentata dalla cella fotovoltaica.
D‘estate e con radiazione solare costante, il caricamento di batterie completamente
scarica dura da 2 a 4 giorni. Prima della prima messa in funzione della lampada, la
batteria deve essere completamente carica (vedere „Caricamento della batteria“).
21 IT/MT
63018_livx_A_LED-Solarleuchte_content_ES.indd 21 21.05.14 15:36
Page 22

Messa in funzione
Montaggio della lampada
La lampada solare a LED è consegnata premontata e pronta all‘uso. Tramite il picchetto allegato la lampada solare a LED può inoltre essere posizionata in aiuole, cesti
da balcone o lastre per accentuare l‘illuminazione. Per fare ciò inserire il picchetto
nell‘apertura predefinita al di sotto dello zoccolo della lampada
2
.
Rimuovere il paralume 1 estraendolo delicatamente dallo zoccolo 2. Il vano
portabatterie
8
si trova all‘interno del paralume 1.
Premere inizialmente una delle due linguette di plastica nella direzione dell‘inter-
ruttore ON / OFF
6
. Adesso premere anche l‘altra linguetta e estrarla con
attenzione dall‘unità del vano portabatterie.
Aprire il vano portabatterie nella direzione delle freccia (vedere fig. F).
Rimuovere ora le strisce isolanti 10 inserite tra la batteria 9 e il polo del vano
portabatterie (vedere fig. G).
Montare infine tutti i componenti nella successione descritta al contrario.
Assicurarsi che il cavo non venga danneggiato.
Spostare l‘interruttore ON / OFF nella posizione ON.
Adesso il prodotto è pronto per l‘uso.
3
22 IT/MT
63018_livx_A_LED-Solarleuchte_content_ES.indd 22 21.05.14 15:36
Page 23

Prima della prima messa in funzione
Nota: La lampadina LED inserita è possiede una funzione lampeggiante, per
simulare il tremolio naturale della luce di una candela. Questo non è un difetto!
Caricamento della batteria
Nota: La batteria inserita nell luce solare a LED è consegnata carica. Tuttavia
durante il trasporto dal produttore al rivenditore potrebbe già aver perso un po‘ di
carica. Ricaricare quindi la batteria prima della prima messa in funzione. Con radiazione solare costante, d‘estate, la prima carica dura almeno un giorno.
Spostare l‘interruttore ON / OFF 6 nella posizione „ON“ (vedere fig. D).
Nota: Con radiazione solare costante (in funzione del periodo dell‘anno) delle
batterie completamente scariche dovrebbero ricaricarsi da due a dieci giorni.
Sostituire la batteria 9 se la potenza di illuminazione non migliora al termine del
caricamento (vedere fig. E).
Installazione della lampada
Per ottenere un risultato ottimale installare la lampada in un luogo dove la cella
5
solare
sia esposta il più a lungo possibile alla luce diretta del sole.
23 IT/MT
63018_livx_A_LED-Solarleuchte_content_ES.indd 23 21.05.14 15:36
Page 24

Non porre la lampada solare a LED sotto cespugli, alberi, pensiline ecc. poiché
ciò riduce l’assorbimento di luce solare.
Posizionare la lampada solare a LED in modo tale che la cella solare non sia
coperta o all’ombra.
Assicurarsi che la cella solare non subisca l‘influsso di un‘altra onte di luce come,
p. es., l‘illuminazione di strade o terrazze poiché la luce, in questo caso, non si
accenderebbe al crepuscolo.
In presenza di scarso chiarore, la luce si accende automaticamente, mentre, in
presenza di una luce solare normale, la lampada si spegne nuovamente.
Indicazione per l‘utilizzo da illuminazione d‘accento (con picchetto):
Inserire la lampada solare a LED montata, per quanto possibile, nel terreno (zona
erbosa, aiuola di fiori) affinché sia stabile. Fare attenzione che il prodotto sia
posizionato in maniera sicura e stabile.
Eseguendo il montaggio e l’installazione non usare violenza, evitando di inserire
la lampada, ad esempio, con colpi di martello. Un tale modo di procedere
danneggia il prodotto.
Pulizia e manutenzione / conservazione
Non utilizzare mai detergenti corrosivi.
Spegnere in seguito il prodotto.
Pulire regolarmente il prodotto con un panno asciutto e privo di peli. In caso di
sporco ostinato, utilizzare un panno leggermente inumidito.
24 IT/MT
63018_livx_A_LED-Solarleuchte_content_ES.indd 24 21.05.14 15:36
Page 25

Nota: assicurarsi che la cella fotovoltaica 5 sia sempre pulita per poter produrre
una buona illuminazione.
Le basse temperature incidono negativamente sulla durata della batteria. Qualora il
prodotto non venisse utilizzato per lungo tempo, ad esempio in inverno, questo deve
essere pulito e conservato in un luogo asciutto e caldo. Assicurarsi che l‘interruttore
ON/OFF
6
si trovi sulla posizioni „OFF“ durante il periodo di conservazione.
Sostituzione delle batterie
Per sostituire la batteria inserita, seguire le indicazioni descritte nella sezione
„messa in funzione“.
Rimuovere la vecchia batterie e inserire la nuova tenendo conto della polarità
indicata nel vano portabatterie
Eliminazione degli errori
8
(vedere fig. D-G).
Errore
· La luce non si accende, sebbene la lampada sia stata esposta tutto il giorno alla
luce solare.
· La potenza della batteria è ridotta.
· La luce non si accende o resta accesa solo per poco tempo.
25 IT/MT
63018_livx_A_LED-Solarleuchte_content_ES.indd 25 21.05.14 15:36
Page 26

Causa
· La lampada solare a LED non è accesa.
· La batteria
9
è esaurita o la cella fotovoltaica 5 è sporca.
· Fonti di illuminazione artificiali, quali ad esempio l’illuminazione stradale,
interferiscono con la lampada.
Soluzione
· Posizionare la lampada in un punto in cui non possa essere disturbata da altre
fonti di illuminazione.
· Sostituire la batteria.
Smaltimento
L’imballaggio è composto da materiali ecologici che possono essere
smaltiti presso i siti di riciclaggio locali.
È possibile informarsi sulle possibilità di smaltimento del prodotto presso l‘amministrazione comunale e cittadina.
Non gettare il prodotto usurato tra i rifiuti domestici ma, per motivi di tutela
dell‘ambiente, provvedere al suo corretto smaltimento. È possibile informarsi
sui luoghi di raccolta e i loro orari di apertura presso l‘amministrazione
competente.
26 IT/MT
63018_livx_A_LED-Solarleuchte_content_ES.indd 26 21.05.14 15:36
Page 27

Accumulatori difettosi o usati devono essere riciclati ai sensi della Direttiva 2006 / 66 / CE.
Restituire le batterie e/o l‘apparecchio tramite i punti di raccolta indicati.
Uno smaltimento scorretto delle batterie
può arrecare danni all‘ambiente!
Pb
Le batterie non devono essere smaltite nella spazzatura domestica. Consegnare
quindi le batterie usate presso un punto di raccolta comunale.
Garanzia
L‘apparecchio è stato prodotto secondo severe direttive di qualità e controllato con
premura prima della consegna. In caso di difetti del prodotto, l‘acquirente può far
valere i propri diritti legali nei confronti del venditore. Questi diritti legali non vengono
limitati in alcun modo dalla garanzia di seguito riportata.
Se entro 3 anni dalla data di acquisto di questo prodotto si rileva un difetto di materiale o di fabbricazione, il prodotto verrà riparato o sostituito gratuitamente, a nostra
discrezione. Il termine di garanzia
lo scontrino di acquisto originale in buone condizioni. Questo documento servirà a
documentare l‘avvenuto acquisto.
ha inizio a partire dalla data di acquisto. Conser
vare
27 IT/MT
63018_livx_A_LED-Solarleuchte_content_ES.indd 27 21.05.14 15:36
Page 28

L‘apparecchio da Lei acquistato dà diritto ad una garanzia di 3 anni a partire dalla
data di acquisto. La presente garanzia decade nel caso di danneggiamento del
prodotto, di utilizzo o di manutenzione inadeguati.
La prestazione di garanzia vale sia per difetti di materiale che per difetti di fabbricazione. La presente garanzia non si estende a parti del prodotto soggette a normale
usura e che possono essere identificate, pertanto, come parti soggette a usura (p. es.,
le batterie), né a danni su parti staccabili,
in ve
tro.
come interruttore, batterie o simili, realizzate
28 IT/MT
63018_livx_A_LED-Solarleuchte_content_ES.indd 28 21.05.14 15:36
Page 29

Intended use ...........................................................................................................Page 30
Parts description .................................................................................................Page 30
Technical Data .......................................................................................................Page 31
Scope of delivery................................................................................................Page 31
General safety instructions .......................................................................Page 32
Safety instructions for rechargeable batteries ........................Page 33
Function .......................................................................................................................Page 34
Start-up
Mounting the light .........................................................................................................Page 34
Before first use
Charging ........................................................................................................................ Page 35
Installing the light ........................................................................................................... Page 36
Cleaning and care / storage ......................................................................Page 37
Replacing the rechargeable battery .................................................Page 37
Troubleshooting...................................................................................................Page 38
Disposal .......................................................................................................................Page 38
Warranty ...................................................................................................................Page 39
29 GB/MT
63018_livx_A_LED-Solarleuchte_content_ES.indd 29 21.05.14 15:36
Page 30

LED Solar Lamp
Intended use
The LED solar lamp is only suitable for decoration purposes and outdoor use, e.g. garden, balcony, terrace, etc. The LED solar light is not suitable for commercial use.
Parts description
1
Lamp shade
2
Base (with holder for ground spike)
3
Ground stake
4
LED
5
Solar cell
6
ON/OFF switch (ON / OFF)
7
Battery cover
8
Battery compartment
9
Rechargeable battery
10
Insulating strip
30 GB/MT
63018_livx_A_LED-Solarleuchte_content_ES.indd 30 21.05.14 15:36
Page 31

Technical Data
Operating voltage: 1.2 V
Rechargeable battery: 1 x NiMH battery 1.2 V , 600 mAh, AAA
Lamp: 1 LED with 0.06 W (LED not replaceable)
Solar cell: 2 x monocrystalline, max. 1.1 V, max. 110 mA each
Protection type: IP44 (splashproof)
Scope of delivery
Check immediately after unpacking that the parts are complete and that the product is
in proper condition.
1 LED solar lamp (consisting of base and detachable lamp shade)
1 Ground spike
1 Rechargeable NiMH battery1.2 V
1 Instructions for assembly and use
, 600 mAh, AAA (assembled in lamp)
31 GB/MT
63018_livx_A_LED-Solarleuchte_content_ES.indd 31 21.05.14 15:36
Page 32
General safety instructions
Before using the product, please familiarise yourself with all of the safety information
and instructions for use! When passing this product on to others, please also include
all the documents!
This appliance may be used by children age 8 years and up, as well as by persons
with reduced physical, sensory or mental capacities, or lacking experience and/
or knowledge, so long as they are supervised or instructed in the safe use of the
appliance and understand the associated risks. Children should not be allowed to
play with the device. Cleaning and user maintenance should not be performed by
children without supervision.
Never leave children unsupervised with the packaging material. The packaging
material represents a danger of suffocation. Children frequently underestimate the
dangers.
Keep children out of the area you are working in during assembly or whilst chang-
ing batteries. Screws are included. These may prove life-threatening if swallowed
or inhaled.
Do not use this article if you notice any damage!
32 GB/MT
63018_livx_A_LED-Solarleuchte_content_ES.indd 32 21.05.14 15:36
Page 33

Safety instructions for rechargeable batteries
DANGER TO LIFE! Rechargeable batteries are not intended to
be in the hands of children. If accidentally swallowed, seek immediate medical
attention!
CAUTION! EXPLOSION HAZARD!
Never throw rechargeable batteries into fire or water!
Avoid extreme environmental conditions and temperatures, which could affect
batteries, e.g. above radiators/in direct sunlight.
Do not exert mechanical loads to batteries!
Do not use single-use batteries.
Never short-circuit or open rechargeable batteries.
Risk of property damage
Only use the specified battery type!
When inserting the battery ensure that it is inserted the right way round! This is
shown inside the battery compartment!
If necessary, clean the battery and device contacts before inserting the battery!
Wear safety gloves! If they come into contact with skin, leaked or
damaged rechargeable batteries could cause chemical burns; you should
therefore wear suitable protective gloves at all times if such an event occurs.
33 GB/MT
63018_livx_A_LED-Solarleuchte_content_ES.indd 33 21.05.14 15:36
Page 34

Function
The solar cell 5 converts energy from sunlight into electricity. It charges the rechargeable battery inside the battery compartment
The battery stores electric energy supplied by the solar cell. In summer, completely
drained batteries take about 2 to 4 days to fully recharge in good sunlight. The
battery must be charged before using the light for the first time (see „Charging“).
through the connected power cable.
8
Start-up
Mounting the light
The LED solar light is preassembled and ready for use at the time of delivery. Using the
included ground spike the LED solar light can also be placed in flower beds, lower
boxes or near pathways as accent lighting. To do so, insert the ground spike
the designated holder on the underside of the light base
Remove the lamp shade 1 by lightly pulling it off the base 2. The battery
compartment
First press one of the two plastic straps in the direction of the ON / OFF switch 6.
Then press the other plastic strap and carefully pull out the battery compartment
unit.
Open the battery compartment in the direction of the arrow (see fig. F).
is located inside the lamp shade 1.
8
.
2
3
into
34 GB/MT
63018_livx_A_LED-Solarleuchte_content_ES.indd 34 21.05.14 15:36
Page 35

Now remove the insulating strip 10 located between the battery 9 and the
compartment pole (see Fig. G).
Then install all components in the reverse order. Be careful not to damage the cable.
Set the ON/OFF switch to the „ON“ position.
Your product is now ready for use.
Before first use
Note: The built-in LED lamp features a flicker function to simulate the natural flickering
of candlelight. This is not a defect!
Charging
Note: The battery built into the LED solar light is charged at the time of delivery.
However, it may have lost charge during transport from the manufacturer to the retail
location. Therefore please charge the battery before the first use. The first charging will
take at least one day in good sunlight during the summer.
Set the ON/ OFF switch 6 to the „ON“ position (see Fig. D).
Note: In constant sunlight (depending on the season) drained batteries should
take two to ten days to charge.
35 GB/MT
63018_livx_A_LED-Solarleuchte_content_ES.indd 35 21.05.14 15:36
Page 36

Replace the rechargeable battery 9 if the light output does not improve after
charging (see Fig. E).
Installing the light
For optimal results, please the LED solar light in a location where the solar cell 5
is exposed to direct sunlight for as long as possible.
Do not place the LED solar light under shrubs, trees, awnings, etc. This will reduce
the incidence of sunlight.
Position the LED solar light so the solar cell is not covered or shaded.
Make sure the solar cell is not impacted by other light sources, e.g. yard- or street
lighting, or the light will not switch on at twilight.
In low light the light will automatically switch on, and automatically switch off in
normal ambient light.
Note when using as accent lighting (with ground spike):
Push the assembled LED solar light far enough into the ground (grass, flower bed)
so it is stable. Make sure it is firmly placed.
Do not use force during assembly or setup, e.g. hammer blows. This damages the
product.
36 GB/MT
63018_livx_A_LED-Solarleuchte_content_ES.indd 36 21.05.14 15:36
Page 37

Cleaning and care/ storage
Never use caustic cleaners.
First switch off the product.
Regularly clean the product with a dry, lint-free cloth. Use a slightly moist cloth to
remove any stubborn dirt.
Note: Be sure the solar cell
Cold temperatures do not negatively impact the battery operating time. When not using
the product for extended periods, e.g. in winter, it should be cleaned and stored in a
dry, warm location. Be sure the ON/OFF switch
storage.
Replacing the rechargeable battery
To replace the built-in rechargeable battery, please follow the steps under section
„Start-up“.
Remove the old battery and insert a new rechargeable battery in the battery
compartment
noting correct polarity (see Fig. D–G).
8
is always clean to achieve good charging.
5
is set to the „OFF“ position during
6
37 GB/MT
63018_livx_A_LED-Solarleuchte_content_ES.indd 37 21.05.14 15:36
Page 38

Troubleshooting
Problem
· The light will not switch on even though the sun shone on the lamp all day.
· Limited battery power.
· The light does not come on or only comes on briefly.
Cause
· LED solar light is not switched on.
· Battery
is drained or the solar cell 5 is dirty.
9
· Artificial light sources, e.g. street lights, are interfering with the light.
Solution
· Place the light in a location where other light sources will not interfere with it.
· Replace the battery.
Disposal
The packaging is made of environmentally friendly materials, which may be
disposed of through your local recycling facilities.
Contact your local community or municipal administration for more details on how to
dispose your worn-out product.
38 GB/MT
63018_livx_A_LED-Solarleuchte_content_ES.indd 38 21.05.14 15:36
Page 39

To help protect the environment, please dispose of the product properly,
and not in household waste, when it has reached the end of its useful life.
Please contact your local authority for information on collection points and
their opening hours.
Faulty or used rechargeable batteries must be recycled in accordance with Directive
2006/66/EC. Return rechargeable batteries and / or the appliance using the recycling facilities provided.
Environmental damage due to
improper battery disposal!
Pb
Rechargeable batteries may not be disposed of with the usual domestic waste.
Therefore dispose of used batteries through your municipal collection site.
Warranty
The device has been manufactured to strict quality guidelines and meticulously examined before delivery. In the event of product defects you have legal rights against the
retailer of this product. Your legal rights are not limited in any way by our warranty
detailed below.
39 GB/MT
63018_livx_A_LED-Solarleuchte_content_ES.indd 39 21.05.14 15:36
Page 40

The warranty for this device is 3 years from the date of purchase. Should this device
show any fault in materials or manufacture within 3 years from the
will repair or replace it – at our
choice – free of charge to you.
date
of purchase, we
The warranty period begins on the date of pur
in a safe location.
This document is required as your proof of purchase. This warranty
chase.
Please keep the original sales receipt
becomes void if the device has been damaged or improperly used or maintained.
The warranty applies to faults in material or manufacture. This warranty does not
cover product parts subject to normal wear, thus possibly considered con
(e.g. batteries) or for damage to fragile
parts, e.g. switches, rechargeable batteries or
sumables
glass parts.
40 GB/MT
63018_livx_A_LED-Solarleuchte_content_ES.indd 40 21.05.14 15:36
Page 41

Bestimmungsgemäße Verwendung ......................................................Seite 42
Teilebeschreibung ..................................................................................................Seite 42
Technische Daten ....................................................................................................Seite 43
Lieferumfang ..............................................................................................................Seite 43
Allgemeine Sicherheitshinweise ...............................................................Seite 43
Sicherheitshinweise für Akkus ...................................................................Seite 44
Funktion ..........................................................................................................................Seite 45
Inbetriebnahme
Leuchte montieren ..............................................................................................................Seite 46
Vor der ersten Inbetriebnahme
Akku aufladen ....................................................................................................................Seite 47
Leuchte aufstellen...............................................................................................................Seite 47
Reinigung und Pflege / Lagerung .............................................................Seite 48
Akku austauschen .................................................................................................Seite 49
Fehler beheben ........................................................................................................Seite 49
Entsorgung ...................................................................................................................Seite 50
Garantie .........................................................................................................................Seite 51
41 DE/AT/CH
63018_livx_A_LED-Solarleuchte_content_ES.indd 41 21.05.14 15:36
Page 42

LED-Solarleuchte
Bestimmungsgemäße Verwendung
Die LED-Solarleuchte ist nur als Dekoleuchte für den Außenbereich vorgesehen, die
über keinen Stromanschluss verfügen, z. B. Garten, Balkon, Terrasse etc. Die LED-Solarleuchte ist nicht für den gewerblichen Einsatz geeignet.
Teilebeschreibung
1
Lampenschirm
2
Sockel (mit Aufnahme für Erdspieß)
3
Erdspieß
4
LED
5
Solarzelle
6
EIN / AUS-Schalter (ON / OFF)
7
Akkufachdeckel
8
Akkufach
9
Akku
10
Isolierstreifen
42 DE/AT/CH
63018_livx_A_LED-Solarleuchte_content_ES.indd 42 21.05.14 15:36
Page 43

Technische Daten
Betriebsspannung: 1,2 V
Akku: 1 x NiMH-Akku 1,2 V , 600 mAh, AAA
Leuchtmittel: 1 LED mit 0,06 W (die LED ist nicht austauschbar)
Solarzelle: 2 x monokristallin, max. 1,1 V, je max. 110 mA
Schutzart: IP44 (spritzwassergeschützt)
Lieferumfang
Kontrollieren Sie unmittelbar nach dem Auspacken immer den Lieferumfang auf
Vollständigkeit sowie den einwandfreien Zustand des Gerätes.
1 LED-Solarleuchte (bestehend aus Sockel und abnehmbarem Lampenschirm)
1 Erdspieß
1 NiMH-Akku 1,2 V
1 Montage- und Bedienungsanleitung
, 600 mAh, AAA (vormontiert)
Allgemeine Sicherheitshinweise
Machen Sie sich vor der ersten Benutzung des Produkts mit allen Bedien- und Sicherheitshinweisen vertraut! Händigen Sie alle Unterlagen bei Weitergabe des Produkts
an Dritte ebenfalls mit aus!
43 DE/AT/CH
63018_livx_A_LED-Solarleuchte_content_ES.indd 43 21.05.14 15:36
Page 44

Dieses Gerät kann von Kindern ab 8 Jahren und darüber sowie von Personen mit
verringerten physischen, sensorischen oder mentalen Fähigkeiten oder Mangel an
Erfahrung und Wissen benutzt werden, wenn sie beaufsichtigt oder bezüglich des
sicheren Gebrauchs des Gerätes unterwiesen wurden und die daraus resultierenden Gefahren verstehen. Kinder dürfen nicht mit dem Gerät spielen. Reinigung
und Benutzerwartung dürfen nicht von Kindern ohne Beaufsichtigung durchgeführt
werden.
Lassen Sie Kinder niemals unbeaufsichtigt mit dem Verpackungsmaterial. Es
besteht Erstickungsgefahr durch Verpackungsmaterial. Kinder unterschätzen
häufig die Gefahren.
Halten Sie Kinder während der Montage oder einem Akkuwechsel vom Arbeitsbe-
reich fern. Zum Lieferumfang gehören Schrauben. Diese können beim Verschlucken oder Inhalieren lebensgefährlich sein.
Benutzen Sie den Artikel nicht, wenn Sie irgendwelche Beschädigungen feststellen!
Sicherheitshinweise für Akkus
LEBENSGEFAHR! Akkus gehören nicht in Kinderhände. Suchen
Sie im Falle eines Verschluckens sofort einen Arzt auf!
VORSICHT! EXPLOSIONSGEFAHR!
Werfen Sie Akkus niemals in Feuer oder Wasser!
Vermeiden Sie extreme Bedingungen und Temperaturen, die auf Akkus einwirken
können z. B. auf Heizkörpern / direkte Sonneneinstrahlung!
Setzen Sie Akkus keiner mechanischen Belastung aus!
44 DE/AT/CH
63018_livx_A_LED-Solarleuchte_content_ES.indd 44 21.05.14 15:36
Page 45

Verwenden Sie keine nicht aufladbare Batterien.
Schließen Sie Akkus nicht kurz und / oder öffnen Sie sie nicht.
Gefahr der Sachbeschädigung
Ausschließlich den angegebenen Akkutyp verwenden!
Achten Sie beim Einlegen auf die richtige Polarität! Diese wird im Akkufach ange-
zeigt!
Reinigen Sie Batterie- und Gerätekontakt vor dem Einlegen falls erforderlich!
Schutzhandschuhe tragen! Ausgelaufene oder beschädigte Akkus
können bei Berührung mit der Haut Verätzungen verursachen; tragen Sie
deshalb in diesem Fall unbedingt geeignete Schutzhandschuhe.
Funktion
Die Solarzelle 5 wandelt Lichtenergie der Sonne in elektrische Energie um. Über das
angeschlossene Stromkabel lädt sie den im Akkufach
Akku speichert die von der Solarzelle eingespeiste elektrische Energie. Das Aufladen
vollständig entleerter Akkus dauert im Sommer bei guter Sonneneinstrahlung etwa
2 bis 4 Tage. Vor der ersten Inbetriebnahme der Leuchte muss der Akku geladen sein
(siehe „Akku aufladen“).
8
eingelegten Akku auf. Der
45 DE/AT/CH
63018_livx_A_LED-Solarleuchte_content_ES.indd 45 21.05.14 15:36
Page 46

Inbetriebnahme
Leuchte montieren
Die LED-Solarleuchte ist bei Auslieferung bereits vormontiert und betriebsbereit. Die
LED-Solarleuchte kann zusätzliche mit dem mitgelieferten Erdspieß in Blumenbeeten,
Balkonkästen oder in der Nähe von Gehwegplatten als Akzentbeleuchtung platziert
werden. Stecken Sie hierzu den Erdspieß
Sockels
2
vorgesehene Aufnahme.
Entfernen Sie den Lampenschirm 1 durch leichtes Ziehen vom Sockel 2. Im
Inneren des Lampenschirms
1
Drücken Sie zuerst eine der beiden Kunststofflaschen in Richtung des EIN / AUS-
Schalters
6
. Nun drücken Sie die andere Kunststofflasche und ziehen Sie die
Akkufacheinheit vorsichtig heraus.
Öffnen Sie das Batteriefach in Pfeilrichtung (siehe Abb. F).
Entfernen Sie jetzt den zwischen Akku 9 und Akkufachpol eingesetzten Isolier-
10
streifen
(siehe Abb G).
Montieren Sie anschließend alle Komponenten in umgekehrter Reihenfolge.
Achten Sie darauf, dass Sie das Kabel nicht beschädigen.
Drücken Sie den EIN / AUS-Schalter in die Position „ON“ (EIN).
Ihr Produkt ist nun einsatzbereit.
3
in die an der Unterseite des Leuchten-
befindet sich das Akkufach 8.
46 DE/AT/CH
63018_livx_A_LED-Solarleuchte_content_ES.indd 46 21.05.14 15:36
Page 47

Vor der ersten Inbetriebnahme
Hinweis: Das eingebaute LED-Leuchtmittel ist mit einer Flackerfunktion ausgestattet,
um das natürliche Flackern einer Kerzenflamme zu simulieren. Dies ist kein Defekt!
Akku aufladen
Hinweis: Der in der LED-Solarleuchte eingebaute Akku ist bei Auslieferung
geladen. Allerdings kann er während des Transports vom Hersteller zur Verkaufsstelle
bereits an Ladung verloren haben. Laden Sie daher vor der ersten Inbetriebnahme den
Akku auf. Die erste Aufladung dauert bei guter Sonneneinstrahlung im Sommer mindestens einen Tag.
Drücken Sie den EIN / AUS-Schalter 6 in die Position „ON“ (EIN) (siehe Abb. D).
Hinweis: Bei regelmäßiger Sonneneinstrahlung (abhängig von der Jahreszeit)
sollten leere Akkus nach zwei bis zehn Tagen aufgeladen sein.
Tauschen Sie den Akku 9 aus, wenn sich die Leuchtleistung nach der Aufladung
nicht verbessert hat (siehe Abb. E).
Leuchte aufstellen
Um ein optimales Ergebnis zu erzielen, stellen Sie die LED-Solarleuchte an einem Ort
auf, an dem die Solarzelle
5
möglichst lange direktem Sonnenlicht ausgesetzt ist.
47 DE/AT/CH
63018_livx_A_LED-Solarleuchte_content_ES.indd 47 21.05.14 15:36
Page 48

Stellen Sie die LED-Solarleuchte nicht unter Büsche, Bäume, Vordächer, etc. Dies
vermindert den Einfall von Sonnenlicht.
Positionieren Sie die LED-Solarleuchte so, dass die Solarzelle nicht bedeckt oder
beschattet wird.
Stellen Sie sicher, dass die Solarzelle nicht von einer anderen Lichtquelle, wie z.B.
Hof- oder Straßenbeleuchtung, beeinflusst wird, da sich das Licht sonst in der
Dämmerung nicht einschaltet.
Bei niedriger Helligkeit schaltet sich das Licht automatisch ein, bei normaler
Umgebungshelligkeit schaltet sich das Licht wieder aus.
Hinweis bei Verwendung als Akzentbeleuchtung (mit Erdspieß):
Stecken Sie die montierte LED-Solarleuchte so weit in den Boden (Rasen,
Blumenbeet), dass sie stabil steht. Achten Sie auf einen sicheren Stand.
Wenden Sie bei der Montage bzw. beim Aufstellen keine Gewalt an, z.B. durch
Hammerschläge. Dies beschädigt das Produkt.
Reinigung und Pflege / Lagerung
Verwenden Sie keinesfalls ätzende Reinigungsmittel.
Schalten Sie das Produkt zunächst aus.
Reinigen Sie das Produkt regelmäßig mit einem trockenen, fusselfreien Tuch.
Verwenden Sie bei stärkeren Verschmutzungen ein leicht angefeuchtetes Tuch.
48 DE/AT/CH
63018_livx_A_LED-Solarleuchte_content_ES.indd 48 21.05.14 15:36
Page 49

Hinweis: Achten Sie darauf, dass die Solarzelle 5 immer sauber ist, um ein gutes
Ladeergebnis zu erzielen.
Kalte Temperaturen haben einen negativen Einfluss auf die Akku-Betriebsdauer. Wenn
Sie das Produkt längere Zeit nicht benötigen, z.B. im Winter, so sollte dieses gereinigt
und an einem trockenen, warmen Ort aufbewahrt werden. Achten Sie darauf, dass sich
der EIN / AUS-Schalter
Akku austauschen
6
während der Lagerung in der Position „OFF“ (AUS) befindet.
Um den eingebauten Akku auszutauschen, gehen Sie vor wie unter „Inbetrieb-
nahme“ beschrieben.
Entnehmen Sie den alten Akku und legen Sie einen neuen Akku unter Beachtung
der Polarität in das Akkufach
Fehler beheben
8
ein (siehe Abb. D–G).
Fehler
· Das Licht schaltet sich nicht ein, obwohl die Leuchte den ganzen Tag von der
Sonne angestrahlt wurde.
· Akkuleistung ist eingeschränkt.
· Das Licht schaltet sich nicht oder nur kurz ein.
49 DE/AT/CH
63018_livx_A_LED-Solarleuchte_content_ES.indd 49 21.05.14 15:36
Page 50

Ursache
· LED-Solarleuchte ist nicht eingeschaltet.
· Akku
9
ist erschöpft oder die Solarzelle 5 ist verschmutzt.
· Künstliche Lichtquellen, wie z.B. Straßenlichter, stören die Leuchte.
Lösung
· Positionieren Sie die Leuchte an einer Stelle, an der sie nicht von anderen
Lichtquellen gestört werden kann.
· Akku austauschen.
Entsorgung
Die Verpackung besteht aus umweltfreundlichen Materialien, die Sie über
die örtlichen Recyclingstellen entsorgen können.
Möglichkeiten zur Entsorgung des ausgedienten Produktes erfahren Sie bei Ihrer
Gemeinde oder Stadtverwaltung.
Werfen Sie Ihr Produkt, wenn es ausgedient hat, im Interesse des Umweltschutzes nicht in den Hausmüll, sondern führen Sie es einer fachgerechten
Entsorgung zu. Über Sammelstellen und deren Öffnungszeiten können Sie
sich bei Ihrer zuständigen Verwaltung informieren.
50 DE/AT/CH
63018_livx_A_LED-Solarleuchte_content_ES.indd 50 21.05.14 15:36
Page 51

Defekte oder verbrauchte Akkus müssen gemäß Richtlinie 2006 / 66 / EC recycelt
werden. Geben Sie Akkus und / oder das Gerät über die angebotenen Sammeleinrichtungen zurück.
Umweltschäden durch falsche
Entsorgung der Akkus!
Pb
Akkus dürfen nicht über den Hausmüll entsorgt werden. Geben Sie deshalb
verbrauchte Batterien bei einer kommunalen Sammelstelle ab.
Garantie
Das Produkt wurde nach strengen Qualitätsrichtlinien sorgfältig produziert und vor
Anlieferung gewissenhaft geprüft. Im Falle von Mängeln dieses Produkts stehen Ihnen
gegen den Verkäufer des Produkts gesetzliche Rechte zu. Diese gesetzlichen Rechte
werden durch unsere im Folgenden dargestellte Garantie nicht eingeschränkt.
Sie erhalten auf dieses Gerät 3 Jahre Garantie ab Kaufdatum. Die Garantiefrist
beginnt mit dem Kaufdatum. Bitte bewahren Sie den Original Kassenbon gut auf.
Diese Unterlage wird als Nachweis für den Kauf benötigt.
Tritt innerhalb von drei Jahren ab dem Kaufdatum dieses Produkts ein Material- oder
Fabrikationsfehler auf, wird das Produkt von uns – nach unserer Wahl – für Sie kostenlos repariert oder ersetzt. Diese Garantie verfällt, wenn das Produkt beschädigt, nicht
sachgemäß benutzt oder gewartet wurde.
51 DE/AT/CH
63018_livx_A_LED-Solarleuchte_content_ES.indd 51 21.05.14 15:36
Page 52

Die Garantieleistung gilt für Material- oder Fabrikationsfehler. Diese Garantie erstreckt
sich nicht auf Produktteile, die normaler Abnutzung ausgesetzt sind (z. B. Batterien)
und daher als Verschleißteile angesehen werden können oder für Beschädigungen an
zerbrechlichen Teilen, z. B. Schalter, Akkus oder die aus Glas gefertigt sind.
52 DE/AT/CH
63018_livx_A_LED-Solarleuchte_content_ES.indd 52 21.05.14 15:36
Page 53

OWIM GmbH & Co. KG
Stiftsbergstraße 1
D-74167 Neckarsulm
Model no.: Z32102A
Version: 02 / 2014
Estado de las informaciones · Versione delle informazioni
Last Information Update · Stand der Informationen:
05 / 2014 · Ident.-No.: Z32102A052014-ES
IAN 63018
63018_livx_A_LED-Solarleuchte_cover_ES.indd 1 21.05.14 15:10
5
 Loading...