

Page 1
REFLECTOR SOLAR LED /
FARETTO A LED AD ENERGIA SOLARE
REFLECTOR SOLAR LED
Instrucciones de montaje, de uso y de
seguridad
PROJETOR SOLAR LED
Indicações de montagem, utilização e segurança
LED-SOLAR-STRAHLER
Montage-, Bedienungs- und Sicherheitshinweise
IAN 97740
FARETTO A LED AD
ENERGIA SOLARE
Istruzioni di montaggio, d’uso e di sicurezza
LED SOLAR SPOTLIGHT
Assembly, operating and safety instructions
Page 2

ES Instrucciones de montaje, de uso y de seguridad Página 5
IT / MT Istruzioni di montaggio, d’uso e di sicurezza Pagina 17
PT Indicações de montagem, utilização e segurança Página 29
GB / MT Assembly, operating and safety instructions Page 41
DE / AT / CH Montage-, Bedienungs- und Sicherheitshinweise Seite 52
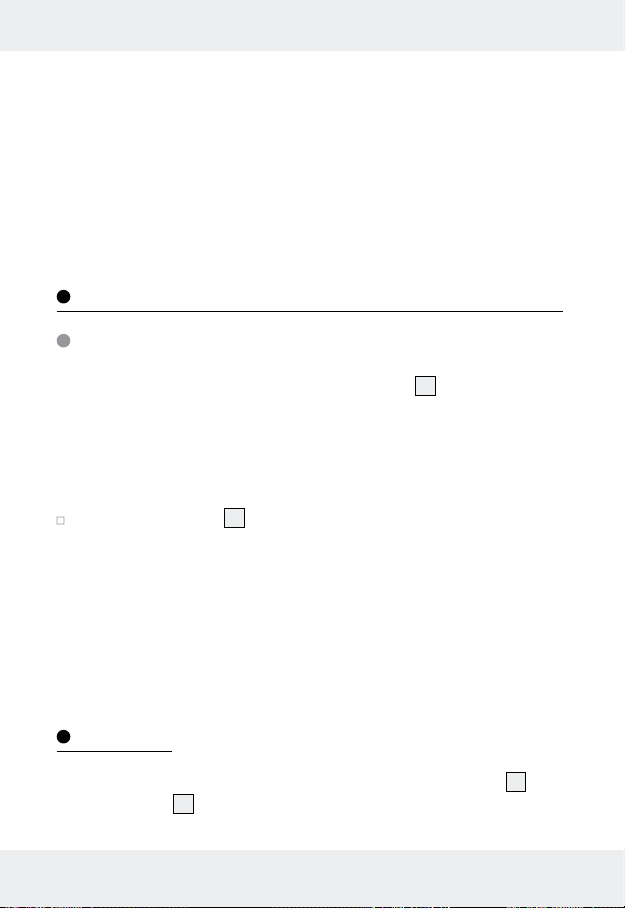
Page 3
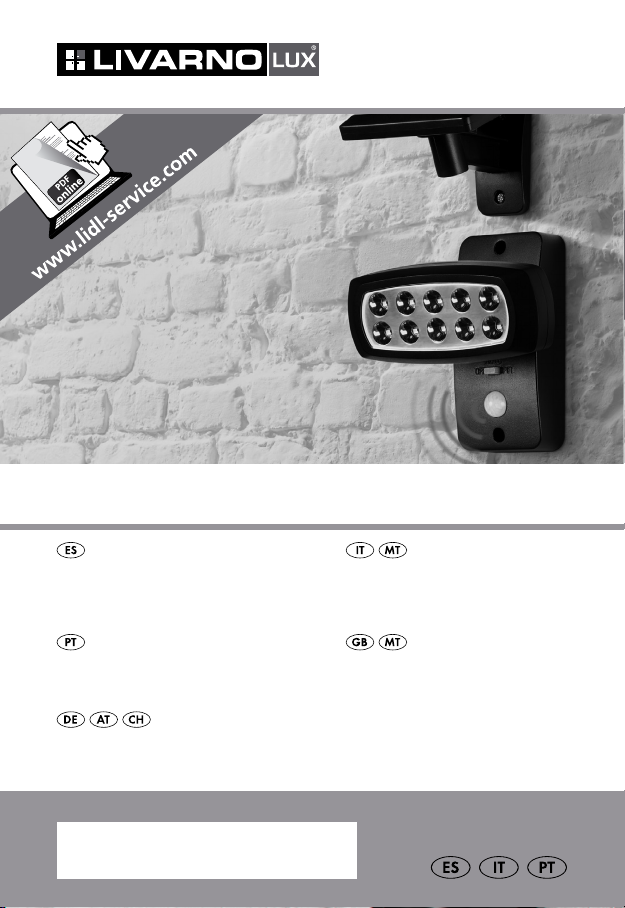
A
1
45
62 3
B C
7
D
4
7 88
9
3
Page 4
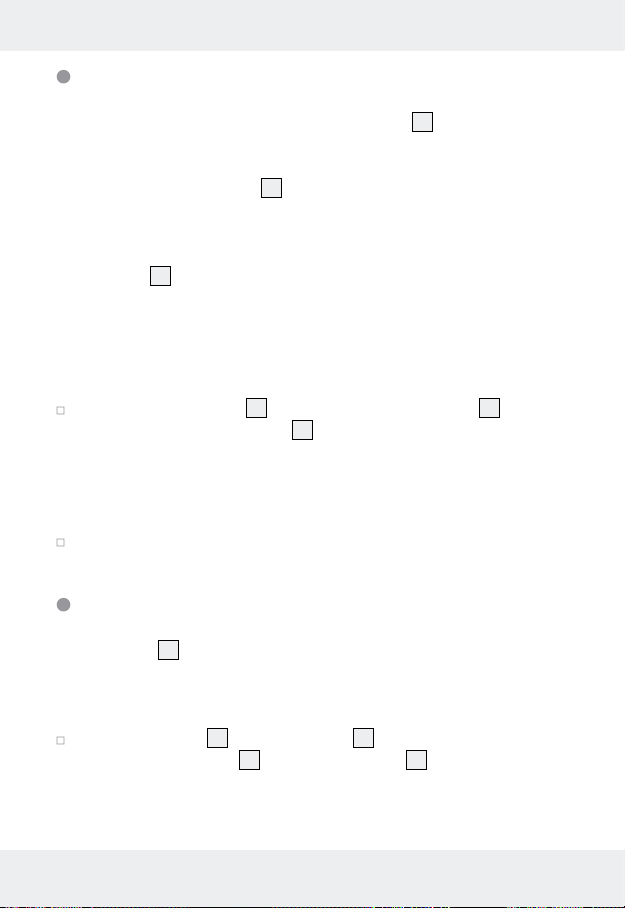
E
F
10
11
4
Page 5

Uso adecuado .....................................................................Página 6
Descripción de las piezas ...........................................Página 6
Características técnicas ................................................Página 6
Volumen de suministro ................................................Página 7
Indicaciones generales de seguridad .............Página 7
Indicaciones de seguridad para baterías ....Página 8
Funcionamiento .................................................................Página 8
Antes de la primera puesta en
funcionamiento
Carga de las baterías .................................................................Página 9
Montaje ....................................................................................Página 9
Montaje del foco ........................................................................Página 10
Montaje de la placa solar ..........................................................Página 10
Conexión de la placa solar con la unidad principal ................Página 11
Puesta en funcionamiento ........................................Página 11
Mantenimiento / cambio de las baterías ......Página 12
Uso en invierno ..................................................................Página 13
Limpieza y cuidado .........................................................Página 13
Solución de problemas ................................................Página 13
Eliminación .............................................................................Página 14
Garantía ...................................................................................Página 15
5 ES
Page 6
Reflector solar LED
Uso adecuado
El foco LED solar está previsto para iluminar espacios exteriores que no
dispongan de conexión a la corriente, p. ej. casetas de jardín, garajes,
etc. El foco LED solar no está indicado para su uso comercial.
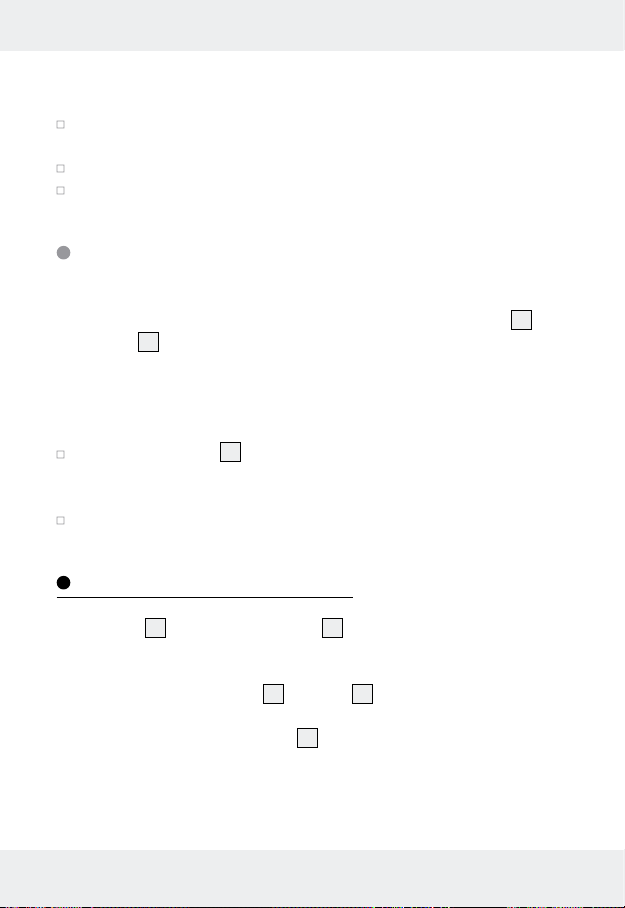
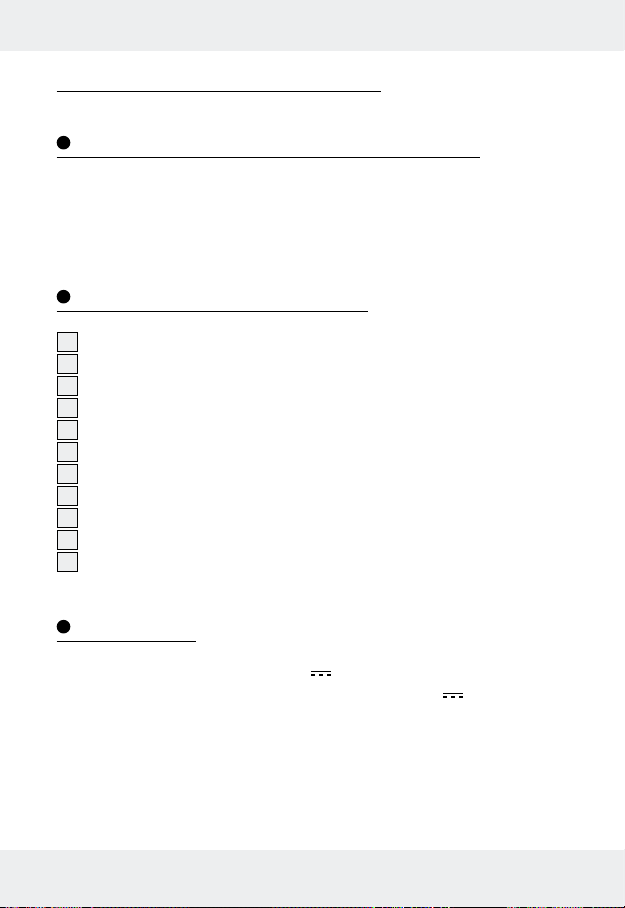
Descripción de las piezas
1
Unidad principal
2
Foco
3
Sensor
4
Conector
5
Interruptor (AUTO / OFF / PIR)
6
Placa solar
7
Tornillo (4 x 30 mm)
8
Taco (ø 6 mm)
9
Soporte (placa solar)
10
Compartimento para baterías
11
Tornillos de cierre
Características técnicas
Tensión de funcionamiento: 3,6 V
Baterías: 3 x baterías de NiMH de 1,2 V ,
600 mAh, AA
Bombillas: 10 LED de 0,06 W (los LED no son inter-
cambiables)
Placa solar: amorfa, 8 x 8 cm, máx. 5,4 V, máx. 70 mA
6 ES
Page 7
Sensor: alcance: aprox. 5–12 m,
ángulo de detección: aprox. 90° horizontal,
90° vertical,
Clase de protección:
IP44 (protegido contra salpicaduras de agua)
Volumen de suministro
Compruebe siempre inmediatamente después de desembalar el producto
la integridad del contenido y el perfecto estado del aparato.
1 unidad principal (compuesta por un foco con 10 LED, sensor, carcasa
de montaje con baterías integradas y control integrado)
1 placa solar (8 cm x 8 cm) (incl. aprox. 2,5 m de cable eléctrico)
4 tornillos (4 x 30 mm)
4 tacos (ø 6 mm)
1 manual de instrucciones de montaje y manejo
Indicaciones generales de seguridad
Familiarícese con todas las instrucciones de uso y seguridad antes de utilizar este producto. Si entrega este producto a terceros, no olvide adjuntar
igualmente toda la documentación.
Este producto puede ser utilizado por niños mayores de 8 años, así
como por personas con capacidades físicas, sensoriales o mentales
reducidas o que cuenten con poca experiencia y / o falta de conocimientos, siempre y cuando se les haya enseñado cómo utilizar el aparato de forma segura y hayan comprendido los peligros que pueden
resultar de un mal uso del mismo. No permita que los niños jueguen
con el producto. La limpieza y mantenimiento no deben llevarse a
cabo por niños sin la vigilancia de un adulto.
7 ES
Page 8
No permita que los niños jueguen con el material de embalaje sin la
vigilancia de un adulto. Existe peligro de asfixia con el material de
embalaje. Los niños no suelen ser conscientes del peligro.
Mantenga a los niños alejados de la zona de trabajo durante el mon-
taje. Entre los componentes suministrados se encuentra una gran cantidad de tornillos y piezas pequeñas. Estas pueden suponer peligro de
muerte por ingestión o inhalación.
No utilice el producto si detecta cualquier desperfecto.
Indicaciones de seguridad para baterías
¡PELIGRO DE MUERTE! Mantenga las baterías
fuera del alcance de los niños. ¡En caso de ingesta, acuda inmediata-
mente a un médico!
¡CUIDADO! ¡PELIGRO DE EXPLOSIÓN!
No tire las baterías al fuego o al agua.
No aplique a las baterías ninguna carga mecánica.
No utilice baterías no recargables.
No cortocircuite ni abra las baterías.
Peligro de daños materiales
Utilice únicamente el tipo de baterías indicado.
¡Cuando coloque la batería asegúrese de que la polaridad es la
correcta! Esta se indica en el compartimento para las baterías.
Si fuera necesario, limpie los contactos de las baterías y del aparato
antes de colocarlas.
Funcionamiento
La placa solar 6 transforma la energía solar en energía eléctrica. Carga
las baterías integradas en el compartimento para baterías
cable eléctrico conectado.
8 ES
10
a través del
Page 9
Estas baterías almacenan la energía eléctrica alimentada por la placa
solar. Las baterías completamente cargadas tienen energía para unas
2 horas de luz en la posición „PIR“ y para unas 8 horas en la posición
„AUTO“.
La carga de baterías completamente descargadas dura en verano con
una radiación solar normal entre 2 y 4 días. Antes de la primera puesta
en funcionamiento de las luces, las baterías deben estar cargadas (véase
„Carga de las baterías“).
Antes de la primera puesta en funcionamiento
Carga de las baterías
Nota: Las baterías incluidas en la unidad principal 1 se suministran
cargadas. No obstante, durante el transporte por parte del fabricante
hasta el punto de venta puede perder algo de carga. Por eso, cargue las
baterías antes de la primera puesta en funcionamiento. La primera carga
dura en verano con una radiación solar normal al menos un día.
Ponga el interruptor 5 en la posición „OFF“.
Nota: Con una radiación solar normal (según la estación del año) las
baterías vacías deberían cargarse en dos o diez días.
Nota: El controlador de carga del foco LED solar evita una sobrecarga
de las baterías.
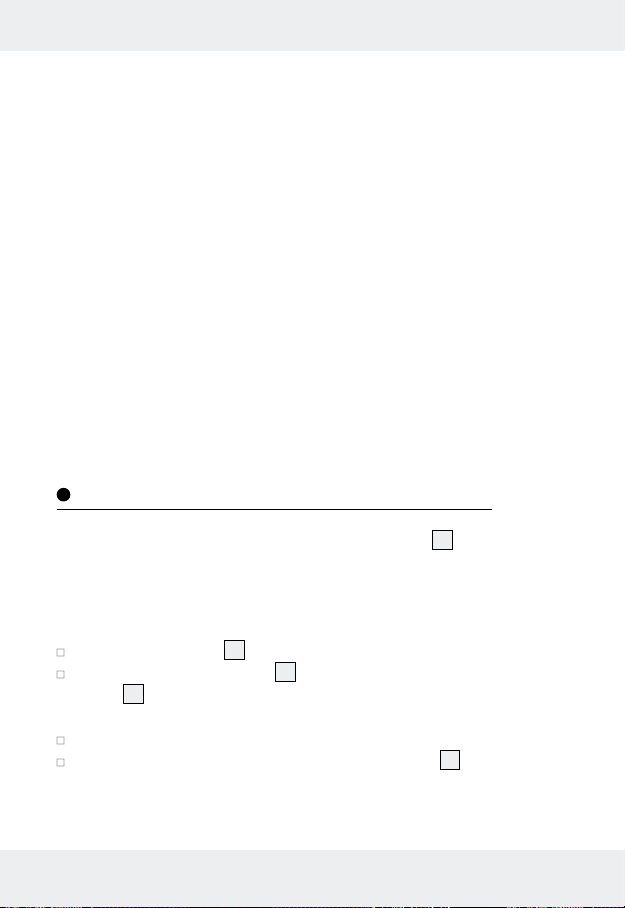
Sustituya las baterías cuando la potencia de la luz no mejore tras haberlas
cargado (fig. E).
Montaje
Nota: Decida antes del montaje, dónde colocará la placa solar 6 y la
unidad principal
la unidad principal tiene una longitud aproximada de 2,5 m.
1
. Tenga en cuenta que el cable entre la placa solar y
9 ES
Page 10
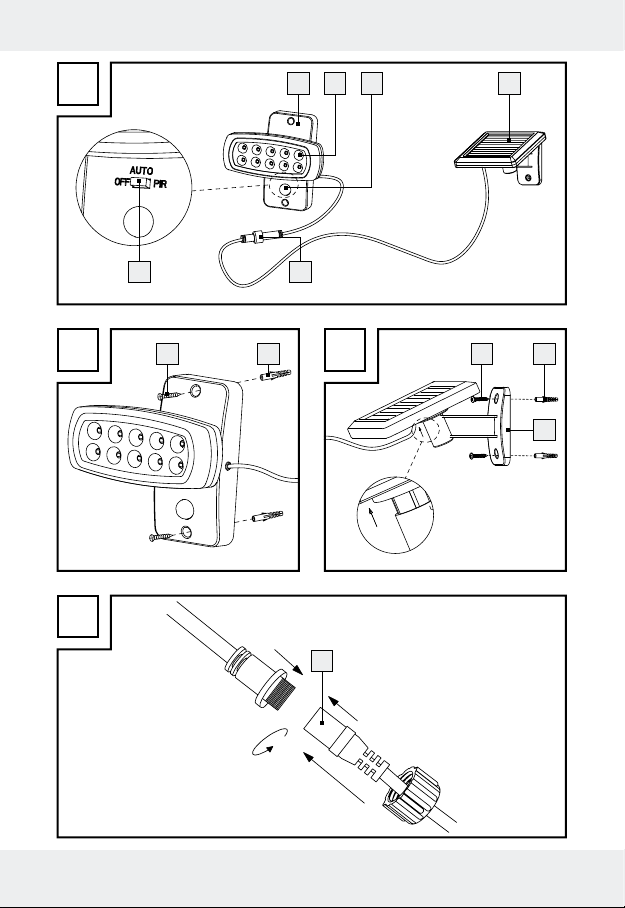
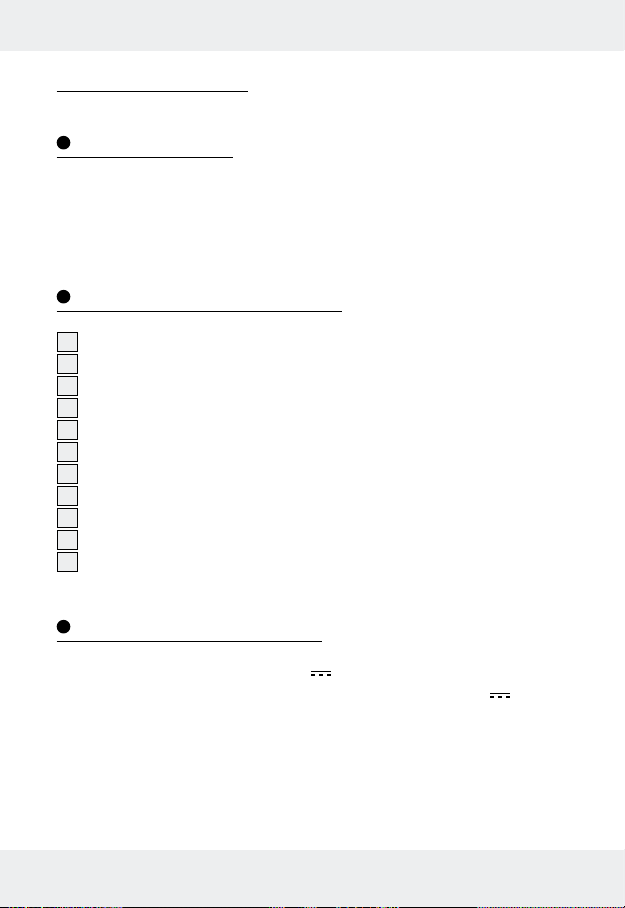
Montaje del foco
Al elegir el lugar de montaje de la unidad principal 1 preste atención a
lo siguiente:
1. La conexión entre el foco
2
y la unidad principal es giratoria y este
debería poder iluminar la zona deseada. Tenga en cuenta aflojar un
poco el tornillo articulado del foco antes de mover el foco. Después
vuelva a apretar el tornillo articulado (véase fig. F).
2. El sensor
3
(según la altura de montaje, la altura ideal es de 1,80 –
2,00 m) tiene una zona de detección de 12 m como máximo con un
ángulo de detección de 90° horizontal y 90° vertical.
3. Asegúrese de que por la noche no existan farolas que iluminen el
sensor. Ello puede afectar al funcionamiento.
Fije la unidad principal 1 con dos de los tacos adjuntos 8 (ø 6 mm)
y dos de los tornillos adjuntos
7
(4 x 30 mm) (véase fig. B).
Nota: El material de montaje adjunto está indicado para la fijación
en mamposterías normales. Para otro tipo de materiales deberán utilizarse elementos de fijación adecuados. En caso de duda, consulte a
un especialista.
Compruebe tras el montaje que la unidad principal esté bien fijada.
Montaje de la placa solar
La placa solar 6 requiere luz solar directa si es posible. Lo ideal es
orientar la superficie de la placa solar hacia el sur. La orientación horizontal de la placa solar se realiza mediante el pie de montaje adjunto.
Monte el soporte 9 de la placa solar 6 en una pared vertical
mediante dos tornillos
(véase fig. C).
Nota: El material de montaje adjunto está indicado para la fijación
en mamposterías normales. Para otro tipo de materiales deberán
7
(4 x 30 mm) y tacos 8 (ø 6 mm) adjuntos
10 ES
Page 11
utilizarse elementos de fijación adecuados. En caso de duda, consulte
a un especialista.
Compruebe tras el montaje que el soporte de la placa solar esté bien
fijado.
Enchufe la placa solar tal y como se indica en la fig. C.
A continuación oriente la placa solar hacia el sur.
Conexión de la placa solar
con la unidad principal
Después de montar las dos unidades operativas (unidad principal 1 y
placa solar
mecánica. Para fijar el cable utilice material de instalación habitual como
p. ej. sujetacables o canales para cables para evitar daños en el aislamiento.
Una los conectores 4 del cable entre la unidad principal y la placa
Apriete los dos conectores con la sobretuerca (véase fig. D).
Puesta en funcionamiento
El interruptor 5 de la unidad principal 1 (fig. A) dispone de las siguientes
funciones:
6
) tienda el cable de forma que no sufra ninguna carga
solar. Tenga en cuenta que estos conectores se ajustan sólo en una
dirección.
Posición „OFF“: El sensor
3
y el foco 2 no están operativos. Las
baterías se cargan con la radiación solar a través de
la placa solar
6
. Utilice esta posición para cargar
las baterías descargadas (véase „Carga de las
baterías“).
Posición „AUTO“: Al incidir el sol las baterías se cargan a través de la
placa solar. El foco se conecta automáticamente al
11 ES
Page 12
atardecer y por la noche y se vuelve a desconectar
con la luz del día. Para conseguir que la luz dure más
tiempo, en esta posición los LED no funcionan a pleno
rendimiento, sino únicamente al 25% (modo Eco).
Cuando las baterías estén completamente cargadas,
la carga en esta posición es suficiente para aprox.
8 horas de luz.
Posición „PIR“: Al incidir el sol las baterías se cargan a través de la
placa solar. El sensor conecta el foco al atardecer y
por la noche en cuanto detecte un movimiento. La luz
está programada para que dure 1,5 minutos. Si durante estos 1,5 minutos se detecta otro movimiento,
vuelve a empezar el tiempo de funcionamiento de la
luz. En esta posición los LED funcionan a pleno rendimiento. Cuando las baterías estén completamente
cargadas, la carga en esta posición es suficiente para
aprox. 2 horas de luz.
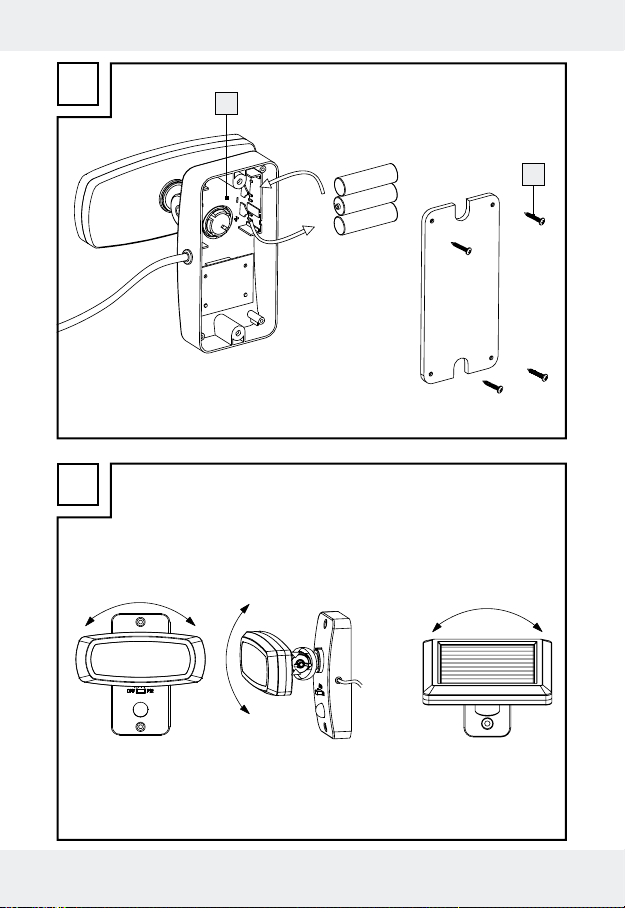
Mantenimiento / cambio de las baterías
Para garantizar un buen rendimiento de la placa solar 6 esta se debe
limpiar regularmente (véase „Limpieza y cuidado“).
Para cambiar las baterías proceda de la siguiente forma:
Ponga el interruptor 5 en la posición „OFF“.
Afloje los tornillos de cierre 11 de la parte posterior de la unidad prin-
1
cipal
con ayuda de un destornillador con ranura en cruz (véase
fig. E).
Retire la parte trasera aflojada de la unidad principal.
Retire las baterías del compartimento para baterías 10 y sustitúyalas
por unas nuevas con las mismas características técnicas. Al introducir
la batería asegúrese de que la polaridad es la correcta. Ésta se espe-
cifica en el compartimento de las baterías.
12 ES
Page 13
Vuelva a cerrar la parte posterior de la unidad principal y apriete los
tornillos de cierre.
Uso en invierno
Debido a la menor radiación solar puede reducirse la duración de la luz
dependiendo del funcionamiento durante la noche. Compruebe también
en invierno si la placa solar
a la sombra durante el día y elimine la nieve o el hielo si fuera necesario.
Si debido a las condiciones climatológicas la luz no dura lo suficiente, cargue o cambie las baterías (véase „Carga de las baterías“ o „Cambio de
las baterías“).
6
, a pesar de la menor radiación solar, está
Limpieza y cuidado
Apague el foco LED solar para limpiarlo.
Utilice un paño que no suelte pelusas ligeramente humedecido y un
agente limpiador suave.
Compruebe regularmente si hay suciedad sobre todo en el sensor 3
y en la placa solar
Limpie regularmente el sensor y la placa solar para garantizar un
funcionamiento perfecto.
Elimine la nieve y el hielo de la placa solar, especialmente en invierno.
6
.
Solución de problemas
= Problema
= causa
= Solución
13 ES
Page 14
La luz no se enciende.
El interruptor 5 está en posición „OFF“.
Poner el interruptor en posición „ON“.
El sensor 3 está sucio.
Limpiar el detector de movimiento.
Las baterías están vacías.
Cargar las baterías (véase „Carga de las baterías“).
La lámpara parpadea.
Las baterías están casi vacías.
Cargar las baterías (véase „Carga de las baterías“).
La batería se descarga muy rápidamente.
La placa solar está sucia.
Limpiar la placa solar.
La placa solar está mal orientada.
Volver a orientar la placa solar (véase „Montaje de la placa solar“).
Condiciones meteorológicas desfavorables.
Véase „Uso en invierno“.
Las baterías están defectuosas.
Sustituir las baterías (véase „Mantenimiento / cambio de las baterías“).
Eliminación
El embalaje está compuesto por materiales no contaminantes
que pueden ser eliminados en el centro de reciclaje local.
Puede averiguar las posibilidades de eliminación del producto a la conclusión de su vida útil en la administración de su comunidad o ciudad.
En beneficio del medio ambiente no tire el producto junto con
la basura doméstica cuando ya no le sea útil. Deséchelo adecuadamente. Diríjase a la administración competente para
14 ES
Page 15
obtener información sobre los puntos de recogida de residuos
y sus horarios.
Las baterías usadas o defectuosas se deben reciclar según la Directiva
2006 / 66 / CE. Recicle las baterías y / o el aparato en los puntos de
reciclaje disponibles.
¡Daños medioambientales debidos a un reciclaje
incorrecto de las baterías!
Pb
Las baterías usadas no deben desecharse en la basura doméstica. Las
baterías usadas deben reciclarse en un punto de recogida local.
Garantía
El aparato ha sido fabricado cuidadosamente sigu
de calidad y ha sido probado
pro
ducto, usted tiene derechos legales frente al vendedor del mismo.
antes de su entrega. En caso de defecto del
iendo exigentes normas
Nuestra garantía (abajo indicada) no supone una restricción de dichos
derechos legales.
Este aparato tiene una garantía de 3 años a partir de la fecha de compra.
El plazo de garantía comienza a partir de la fecha de compra. Por favor,
conserve adecuadamente el justificante de compra original. Este documento
se requerirá como prueba de que se realizó la compra.
Si en el plazo de 3 años a partir de la fecha de compra se produce un fallo
de material o fabricación en este producto, repararemos el producto o lo
sustituiremos gratuitamente por un producto nuevo (según nuestra elección).
La garantía quedará anulada si el producto resulta dañado o es utilizado
o mantenido de forma inadecuada.
La garantía cubre defectos de materiales o de fabricación. Esta garantía no
cubre aquellos componentes del producto sometidos a un desgaste normal y
15 ES
Page 16
que, por ello, puedan considerarse piezas de desgaste (por ej. las pilas).
Tampoco cubre daños de componentes frágiles como, por ejemplo, los interruptores, baterías y piezas de cristal.
16 ES
Page 17

Utilizzo secondo la destinazione d’uso .........Pagina 18
Descrizione dei componenti ....................................Pagina 18
Dati tecnici ..............................................................................Pagina 18
Contenuto della confezione .....................................Pagina 19
Avvertenze generali di sicurezza .......................Pagina 19
Avvertenze di sicurezza per le batterie ........Pagina 20
Funzionamento ..................................................................Pagina 20
Prima della prima messa in funzione
Caricamento delle batterie .........................................................Pagina 21
Montaggio ..............................................................................Pagina 21
Montaggio del faretto ................................................................Pagina 22
Montaggio della cella fotovoltaica ...........................................Pagina 22
Collegamento della cella fotovoltaica con l‘apparecchio
principale .....................................................................................Pagina 23
Messa in funzione ............................................................Pagina 23
Manutenzione / Sostituzione delle
batterie
.....................................................................................Pagina 24
Funzionamento invernale .........................................Pagina 25
Pulizia e manutenzione ...............................................Pagina 25
Eliminazione dei problemi ........................................Pagina 26
Smaltimento ..........................................................................Pagina 27
Garanzia ..................................................................................Pagina 27
17 IT/MT
Page 18
Faretto a LED ad energia solare
Utilizzo secondo la destinazione d’uso
Il faretto fotovoltaico a LED è destinato all‘illuminazione di zone esterne che
non dispongono di prese elettriche, per es. casette da giardino, garage
ecc. Il faretto fotovoltaico a LED non è idoneo all‘uso commerciale.
Descrizione dei componenti
1
Apparecchio principale
2
Faretto
3
Sensore
4
Connettore
5
Interruttore (AUTO / OFF / PIR)
6
Cella fotovoltaica
7
Vite (4 x 30 mm)
8
Tassello (ø 6 mm)
9
Supporto (cella fotovoltaica)
10
Vano portabatterie
11
Viti di chiusura
Dati tecnici
Tensione di funzionamento: 3,6 V
Batteria: 3 x batterie NiMH 1,2 V , 600 mAh, AA
Lampadine: 10 LED da 0,06 W ognuna (i LED non pos-
sono essere sostituiti)
Cella fotovoltaica: amorfa, 8 x 8 cm, max. 5,4 V, max. 70 mA
18 IT/MT
Page 19
Sensore: Portata: ca. 5–12 m,
angolo di rilevamento: ca. 90° orizzontale,
90° verticale
Tipo di protezione: IP44 (protezione da spruzzi d‘acqua)
Contenuto della confezione
Dopo il disimballaggio, controllare subito l‘integrità e le condizioni perfette
dei componenti.
1 apparecchio principale (composto da faretto con 10 LED, sensore,
scatola di montaggio con batterie integrate e controllo integrato)
1 cella fotovoltaica (8 cm x 8 cm) (incl. cavo elettrico di ca. 2,5 m)
4 viti (4 x 30 mm)
4 tasselli (ø 6 mm)
1 manuale d‘uso e di montaggio
Avvertenze generali di sicurezza
Prima dell‘uso leggere attentamente tutte le istruzioni e le avvertenze di
sicurezza allegate al prodotto! In caso di cessione del prodotto a terzi,
consegnare anche l‘intera documentazione del prodotto!
Quest‘apparecchio può essere utilizzato da bambini di età superiore
agli 8 anni, da persone con capacità fisiche, sensoriali o mentali ridotte
o da persone inesperte solo se supervisionate o preventivamente istruite
sull’utilizzo in sicurezza del prodotto e solo se informate dei pericoli
legati al prodotto stesso. Non lasciare che i bambini giochino con
l‘apparecchio. La pulizia e la manutenzione non devono essere eseguite da bambini senza supervisione.
Non lasciare mai i bambini incustoditi con il materiale per imballaggio.
Sussiste il rischio di soffocamento a causa di tale materiale. Spesso i
bambini sottovalutano i pericoli.
19 IT/MT
Page 20

Tenere i bambini lontano dal luogo di lavoro durante il montaggio. La
confezione comprende numerose viti e altri piccoli pezzi. Tali materiali
possono avere conseguenze mortali in caso di ingestione o di inalazione.
Non utilizzare l‘articolo se si notano dei danni!
Avvertenze di sicurezza per le batterie
PERICOLO DI MORTE! Tenere le batterie fuori
dalla portata dei bambini. In caso di ingerimento consultare subito un
medico!
ATTENZIONE! PERICOLO DI ESPLOSIONE!
Non gettare mai le batterie nel fuoco o in acqua!
Non esercitare alcuna pressione meccanica sulle batterie!
Non utilizzare batterie ricaricabili.
Non cortocircuitare e / o aprire le batterie.
Pericolo di danni materiali
Utilizzare esclusivamente il tipo di batterie indicato!
Prestare attenzione alla polarità corretta quando vengono inserite le
batterie! Questa viene indicata nel vano batterie!
Se necessario, pulire i contatti della batteria e dell’apparecchio prima
di inserire le batterie!
Funzionamento
La cella fotovoltaica 6 trasforma l‘energia della luce del sole in energia
elettrica. Attraverso il cavo elettrico collegato essa carica le batterie contenute nel vano portabatterie
Queste batterie accumulano l‘energia elettrica alimentata dalla cella fotovoltaica. Con l‘interruttore in posizione „PIR“ delle batterie completamente
cariche offrono energia per ca. 2 ore di luce, con l‘interruttore in posizione
„AUTO“ per ca. 8 ore.
20 IT/MT
10
.
Page 21

D‘estate e con radiazione solare costante, il caricamento di batterie completamente scarica dura da 2 a 4 giorni. Prima di mettere in funzione la
lampada per la prima volta, le batterie devono essere cariche (vedere alla
voce „caricamento delle batterie“).
Prima della prima messa in funzione
Caricamento delle batterie
Avviso: Al momento della consegna, le batterie montate nell‘apparecchio
principale
duttore al rivenditore esse possono aver già perso un po‘ di carica. Per tale
motivo, caricare le batterie prima della prima messa in funzione. Con radiazione solare costante, d‘estate, la prima carica dura almeno un giorno.
Posizionare l‘interruttore 5 in posizione „OFF“.
Avviso: Con radiazione solare costante (in funzione del periodo dell‘anno)
delle batterie completamente scariche dovrebbero ricaricarsi da due a
dieci giorni.
Avviso: Il regolatore di carica integrato del faretto fotovoltaico a LED
impedisce un sovraccaricamento delle batterie.
Sostituire le batterie se la potenza di illuminazione non migliora al termine
del ricaricamento delle batterie (fig. E).
1
sono cariche. Nonostante ciò, durante il trasporto dal pro-
Montaggio
Avviso: Decidere prima del montaggio dove voler montare la cella foto-
voltaica
via cavo fra la cella fotovoltaica e l‘apparecchio principale ha una lunghezza
di ca. 2,5 m.
6
e l‘apparecchio principale 1. Osservare che il collegamento
21 IT/MT
Page 22

Montaggio del faretto
Nella scelta del luogo di montaggio dell‘apparecchio principale 1 osservare i seguenti punti:
1. Il faretto
2
è collegato in maniera mobile con l‘apparecchio principale
e deve essere in grado di illuminare la zona desiderata. Prima di muovere il faretto, osservare di allentare leggermente la vite snodata del
faretto stesso. Successivamente, stringere nuovamente la vite snodata
(vedere la fig. F).
2. Il sensore
3
possiede un campo di rilevamento di max. 12 m e un
angolo di rilevamento di 90° in orizzontale e di 90° in verticale
(a seconda dell‘altezza di montaggio - l‘altezza ideale sarebbe di
1,80 m – 2,00 m).
3. Fare attenzione che, di notte, il sensore non venga illuminato dai lampioni stradali. Ciò potrebbe compromettere il corretto funzionamento.
Fissare l‘apparecchio principale 1 per mezzo di due tasselli fra quelli
contenuti
8
(ø 6 mm) e due viti di quelle contenute 7 (4 x 30 mm)
(vedere la fig. B).
Avviso: il materiale di montaggio fornito è idoneo al fissaggio sulle
comuni pareti in muratura. Per altre superfici, possono essere necessari
altri materiali di montaggio. In caso di dubbi, rivolgersi ad uno specialista.
Dopo il montaggio, controllare che l‘apparecchio principale sia corret-
tamente fissato.
Montaggio della cella fotovoltaica
La cella fotovoltaica 6 ha bisogno di un‘esposizione la più diretta possibile
ai raggi del sole. L‘orientamento cardinale ottimale della superficie della
cella fotovoltaica è quello verso sud. L‘orientamento orizzontale della cella
fotovoltaica è preimpostata attraverso il piede di montaggio incluso.
22 IT/MT
Page 23

Fissare il supporto 9 della cella fotovoltaica 6 ad una parete verti-
cale usando due tasselli fra quelli contenuti
quelle contenute
7
(4 x 30 mm) (vedere la fig. C).
8
(ø 6 mm) e due viti di
Avviso: il materiale di montaggio fornito è idoneo al fissaggio sulle
comuni pareti in muratura. Per altre superfici, possono essere necessari
altri materiali di montaggio. In caso di dubbi, rivolgersi ad uno specialista.
Dopo il montaggio, controllare che il supporto della cella fotovoltaica
sia saldamente fissato.
Innestare poi la cella fotovoltaica, come mostrato in figura C.
Orientare poi la cella fotovoltaica verso sud.
Collegamento della cella fotovoltaica con
l‘apparecchio principale
Dopo il montaggio delle due unità di funzionamento (apparecchio princi-
1
pale
e cella fotovoltaica 6) posare il cavo in maniera tale che non sia
esposto a sollecitazioni meccaniche. Per il fissaggio del cavo, utilizzare
comune materiale di installazione come p.e. fascette fissacavo o canalette
per cavi, al fine di evitare il danneggiamento dell‘isolamento dei cavi stessi.
Unite i connettori 4 dei cavi dell‘apparecchio principale e della cella
fotovoltaica. Osservare che questo connettori si innestano in un‘unica
direzione di collegamento.
Avvitare i due connettori con il dado a risvolto (vedere la fig. D).
Messa in funzione
L’interruttore 5 della stazione principale 1 (fig. A) dispone delle seguenti
funzioni:
Posizione „OFF“: Il sensore
3
e il faretto 2 sono fuori funzione. Le
batterie vengono ricaricare dalla cella fotovoltaica
23 IT/MT
Page 24

6
in caso di esposizione ai raggi del sole. Utilizzare
questa posizione dell‘interruttore per ricaricare le batterie scariche (vedere alla voce „Caricamento delle
batterie“).
Posizione „AUTO“: In caso di esposizione ai raggi del sole, le batterie
vengono ricaricate tramite la cella fotovoltaica. Il faretto
si accende automaticamente al crepuscolo o in caso
di oscurità e si spegne automaticamente in caso di luce
diurna. Per ottenere una lunga durata di illuminazione,
in questa posizione dell‘interruttore i LED non ottengono
la massima potenza, ma forniscono solo ca. 25 %
della loro capacità luminosa (modalità Eco). Una
volta che le batterie sono completamente cariche, in
questa posizione dell‘interruttore la carica è sufficiente
a fornire luce per ca. 8 ore.
Posizione „PIR“: In caso di esposizione ai raggi del sole, le batterie
vengono ricaricate tramite la cella fotovoltaica. Il sensore accende il faretto in condizioni crepuscolari o di
oscurità non appena rileva un movimento. La durata
di illuminazione è preimpostata ed è di ca. 1,5 minuti.
Se durante questi 1,5 minuti viene rilevato un ulteriore
movimento, il tempo di conteggio dell‘illuminazione
incomincia da capo. In questa posizione dell‘interruttore i LED si accendono alla massima potenza. Se le
batterie sono completamente cariche, in questa posizione dell‘interruttore la carica è sufficiente per ca.
2 ore di luce.
Manutenzione / Sostituzione delle batterie
Per garantire ottime prestazioni della cella fotovoltaica 6, essa deve essere
pulita ad intervalli regolari (vedere alla voce „Pulizia e manutenzione“).
24 IT/MT
Page 25

Per la sostituzione delle batterie, procedere come di seguito:
Spingere l‘interruttore 5 in posizione „OFF“.
Allentare con un cacciavite a croce le viti di chiusura 11 sul retro
dell‘apparecchio principale
1
(vedere la fig. E).
Staccare la parte posteriore staccare dell‘apparecchio principale.
Estrarre le batterie dal vano portabatterie 10 e sostituirle con nuove
batterie con gli stessi dati tecnici. Inserendo le batteria, fare attenzione
a rispettare la polarità corretta. Essa è indicata all‘interno del vano
portabatterie.
Chiudere la parete posteriore dell‘apparecchio principale e stringere
le viti di chiusura.
Funzionamento invernale
A causa della ridotta intensità e frequenza della radiazione solare, a seconda
della durata di accensione notturna è possibile che la durata di illuminazione si riduca. Per tale motivo è necessario verificare anche d‘inverno,
data la ridotta altezza del sole, che la cella fotovoltaica
6
non si trovi in
zone d‘ombra, eliminando, se necessario, depositi di ghiaccio o di neve.
Se a causa delle condizioni atmosferiche la durata di accensione non dovesse essere sufficiente, caricare le batterie o sostituirle (vedere alla voce
„Caricamento delle batterie“ oppure „Sostituzione delle batterie“).
Pulizia e manutenzione
Per la pulizia, spegnere il faretto fotovoltaico a LED.
Per la pulizia utilizzare solamente un panno umido e privo di lanugine
insieme ad un detergente delicato.
Controllare regolarmente che soprattutto il sensore 3 e la cella foto-
voltaica
6
non siano sporchi.
Pulire regolarmente il sensore e la cella fotovoltaica per garantirne il
perfetto funzionamento.
25 IT/MT
Page 26

Durante l‘inverno, mantenere soprattutto la cella fotovoltaica libera da
neve e ghiaccio.
Eliminazione dei problemi
= Problema
= Causa
= Soluzione
La lampada non si accende.
Interruttore 5 in posizione „OFF“.
Posizionare l‘interruttore in posizione „ON“.
Il sensore 3 è imbrattato.
Pulire il rilevatore di movimento.
Le batterie sono vuote.
Caricare le batterie (vedere alla voce „Caricamento delle batterie“).
La lampada sfarfalla.
Le batterie sono quasi esaurite.
Caricare le batterie (vedere alla voce „Caricamento delle batterie“).
Le batterie si scaricano in breve tempo.
La cella fotovoltaica è imbrattata.
Pulire la cella fotovoltaica.
La cella fotovoltaica è orientata in maniera svantaggiosa.
Orientare correttamente la cella fotovoltaica (vedere al capitolo
„Montaggio della cella fotovoltaica“).
Condizioni meteorologiche avverse.
Vedere alla voce „Funzionamento invernale“.
Le batterie sono difettose.
Sostituire le batterie (vedere alla voce „Sostituzione / manutenzione
delle batterie“).
26 IT/MT
Page 27

Smaltimento
L’imballaggio è composto da materiali ecologici che possono
essere smaltiti presso i siti di riciclaggio locali.
È possibile informarsi sulle possibilità di smaltimento del prodotto presso
l‘amministrazione comunale e cittadina.
Non gettare il prodotto usurato tra i rifiuti domestici ma, per
motivi di tutela dell‘ambiente, provvedere al suo corretto smaltimento. È possibile informarsi sui luoghi di raccolta e i loro orari
di apertura presso l‘amministrazione competente.
Le batterie difettose o già usate devono essere riciclate ai sensi della direttiva 2006 / 66 / CE. Smaltire le batterie e / o l’apparecchio presso i punti
di raccolta indicati.
Uno smaltimento scorretto delle batterie può
arrecare danni all‘ambiente!
Pb
Le batterie non devono essere smaltite nella spazzatura domestica. Consegnare quindi le batterie usate presso un punto di raccolta comunale.
Garanzia
L‘apparecchio è stato prodotto secondo severe direttive di qualità e controllato con premura prima della consegna. In caso di difetti del prodotto,
l‘acquirente può far valere i propri diritti legali nei confronti del venditore.
Questi diritti legali non vengono limitati in alcun modo dalla garanzia di
seguito riportata.
Se entro 3 anni dalla data di acquisto di questo prodotto si rileva un difetto
di materiale o di fabbricazione, il prodotto verrà riparato o sostituito gratuitamente, a nostra discrezione. Il termine di garanzia
ha inizio a partire dalla
27 IT/MT
Page 28

data di acquisto. Conser
vare lo scontrino di acquisto originale in buone
condizioni. Questo documento servirà a documentare l‘avvenuto acquisto.
L‘apparecchio da Lei acquistato dà diritto ad una garanzia di 3 anni a
partire dalla data di acquisto. La presente garanzia decade nel caso di
danneggiamento del prodotto, di utilizzo o di manutenzione inadeguati.
La prestazione di garanzia vale sia per difetti di materiale che per difetti di
fabbricazione. La presente garanzia non si estende a parti del prodotto
soggette a normale usura e che possono essere identificate, pertanto, come
parti soggette a usura (p. es., le batterie), né a danni su parti staccabili,
come interruttore, batterie o simili, realizzate in ve
tro.
28 IT/MT
Page 29

Utilização adequada .....................................................Página 30
Descrição das peças .......................................................Página 30
Dados técnicos ....................................................................Página 30
Material fornecido...........................................................Página 31
Indicações gerais de segurança ..........................Página 31
Indicações de segurança relativas às
pilhas recarregáveis
......................................................Página 32
Função ........................................................................................Página 32
Antes da primeira utilização
Carregar bateria .........................................................................Página 33
Montagem
Montar o foco .............................................................................Página 33
Montar a célula solar .................................................................Página 34
Ligar a célula solar ao aparelho principal ................................Página 35
Colocação em funcionamento ...............................Página 35
Manutenção / Substituição da bateria ...........Página 36
Modo Inverno......................................................................Página 37
Limpeza e conservação...............................................Página 37
Resolução de problemas ...........................................Página 37
Eliminação ..............................................................................Página 38
Garantia ...................................................................................Página 39
29 PT
Page 30

Projetor solar LED
Utilização adequada
O projector Solar LED foi concebido para a iluminação de áreas externas
que não disponham de ligação à corrente, por ex. estufas, garagens etc.
O projector Solar LED não é indicado para o uso comercial.
Descrição das peças
1
Aparelho principal
2
Foco
3
Sensor
4
Conector de encaixe
5
Interruptor (AUTO / OFF / PIR)
6
Célula solar
7
Parafuso (4 x 30 mm)
8
Buchas (ø 6 mm)
9
Suporte (célula solar)
10
Compartimento da bateria
11
Parafusos de aperto
Dados técnicos
Tensão de serviço: 3,6 V
Bateria: 3 x NiMH-Bateria 1,2 V , 600 mAh, AA
Lâmpada: 10 LEDs cada com 0,06 W (os LED não são
substituíveis)
Célula solar: amorfa, 8 x 8 cm, máx. 5,4 V, máx. 70 mA
Sensor: Alcance: aprox. 5–12 m,
ângulo de captura: aprox. 90° horizontal, 90° vertical
Tipo de protecção: IP44 (protegido contra salpicos de água)
30 PT
Page 31

Material fornecido
Após desembalar o aparelho, verifique sempre o material fornecido
quanto à integridade, bem como o estado do aparelho.
1 aparelho principal (composto por um projector com 10 LED, sensor,
caixa de montagem com bateria incorporada e comando incorporado)
1 célula solar (8 cm x 8 cm) (incl. cabo de corrente com aprox. 2,5 m)
4 parafusos (4 x 30 mm)
4 bucha (ø 6 mm)
1 manual de instruções de utilização e montagem
Indicações gerais de segurança
Familiarize-se com todas as indicações de utilização e de segurança do
artigo! Se entregar o produto a terceiros, entregue também os respetivos
documentos!
Este aparelho pode ser utilizado por crianças a partir dos 8 anos,
assim como por pessoas com capacidades físicas, sensoriais ou mentais reduzidas ou deficiências na experiência e conhecimento, se forem
vigiadas ou instruídas em relação ao uso seguro do aparelho e se
compreenderem os perigos que daí possam resultar. As crianças não
devem brincar com o aparelho. A limpeza e a manutenção pelo utilizador não devem ser realizadas por crianças sem vigilância.
Nunca deixe as crianças sem vigilância com o material da embalagem.
Existe perigo de asfixia através do material de embalagem. As crianças subestimam frequentemente os perigos.
Mantenha as crianças afastadas da área de trabalho durante a
montagem. No material fornecido incluem-se vários parafusos e outras peças pequenas. Estas podem ser mortais em caso de ingestão
ou inalação.
Não usar o artigo se detectar no mesmo algum defeito!
31 PT
Page 32

Indicações de segurança relativas às
pilhas recarregáveis
PERIGO DE MORTE! As pilhas não devem ficar ao
alcance das crianças. Se a pilha for ingerida, contacte imediatamente
um médico!
CUIDADO! PERIGO DE EXPLOSÃO!
Nunca atire as pilhas para o fogo ou para a água!
Não exponha as pilhas a uma carga mecânica demasiado elevada!
Nunca deve utilizar pilhas não recarregáveis.
Não faça ligação directa de pilhas e / ou as abra.
Perigo de danos materiais
Utilize apenas o tipo de bateria indicado!
Ao colocar as pilhas, tenha em atenção a polaridade correcta! Esta é
indicada no compartimento das pilhas!
Se necessário, limpe os contactos das pilhas e do aparelho antes da
sua colocação.
Função
As células solares 6 convertem a energia luminosa do sol em energia
eléctrica. A bateria incorporada no compartimento da bateria
gada através do cabo de corrente.
Estas baterias armazenam a energia eléctrica fornecida pela célula solar.
A bateria totalmente carregada fornece na posição „PIR“ do interruptor
energia para cerca de 2 horas de luz e na posição „AUTO“ do interruptor
para cerca de 8 horas.
O carregamento da bateria completamente descarregada demora no Verão, com radiação solar constante, aprox. 2 até 4 dias. Antes da primeira
colocação em funcionamento das luzes do projector, a bateria deve estar
carregada (ver „Carregar bateria“).
10
é carre-
32 PT
Page 33

Antes da primeira utilização
Carregar bateria
Nota: As baterias incorporadas no aparelho principal 1 são fornecidas
já carregadas. No entanto, elas podem ficar sem carga durante o transporte
desde o fabricante até ao ponto de venda. Por isso, deve carregar a bateria
antes da primeira colocação em funcionamento. O primeiro carregamento
demora no mínimo um dia no Verão, com radiação solar constante.
Coloque o interruptor 5 na posição „OFF“.
Nota: Com radiação solar constante (dependente da época do ano) a
bateria vazia deve ser carregada passado dois a dez dias.
Nota: O regulador de bateria incorporado do Projector Solar LED previne
o sobrecarregamento da bateria.
Substitua a bateria se a potência da luz do projector não melhorar após o
recarregamento (fig. E).
Montagem
Nota: Antes da montagem, decida onde quer montar a célula solar 6 e
o aparelho principal
solar e o aparelho principal tem um comprimento de aprox. 2,5 m.
1
. Verifique se a ligação de cabo entre a célula
Montar o foco
Na selecção do local de montagem do aparelho principal 1 tenha em
atenção o seguinte:
1. O foco
2
deve ser ligado de modo articulado com o aparelho
principal para poder iluminar a área desejada. Tenha em atenção
33 PT
Page 34

que antes de mover o foco deve soltar um pouco os parafusos com
pivot do mesmo. Volte a apertar os parafusos com pivot (ver fig. F).
2. O sensor
3
tem (dependendo da altura de montagem, a altura ideal
é de 1,80 m – 2,00 m) abrange uma área de captura de aprox. 12 m,
com um ângulo de captura de 90° na horizontal e 90° na vertical.
3. Certifique-se de que durante a noite o sensor não é atingido pelas
luzes rodoviárias. Isto pode influenciar o modo de funcionamento.
Fixe o aparelho principal 1 através de duas das buchas 8 (ø 6 mm)
fornecidas e de dois dos parafusos
7
(4 x 30 mm) fornecidos (ver fig. B).
Nota: o material de montagem fornecido é adequado para a fixação
em paredes convencionais. Para outras superfícies podem possivelmente
ser necessários outros materiais de fixação. Para outras superfícies
podem possivelmente ser necessários outros materiais de fixação. Em
caso de dúvidas, consulte um técnico qualificado.
Após a montagem verifique se o aparelho principal está fixamente
montado.
Montar a célula solar
A célula solar 6 necessita de uma exposição solar o mais directa possível.
A melhor disposição passa pela orientação da superfície da célula solar
para sul. A orientação na horizontal da célula solar é a proposta pela
base de montagem fornecida.
Monte o suporte 9 da célula solar 6 numa parede vertical através
de dois dos parafusos
8
buchas
(ø 6 mm) fornecidas (ver fig. C).
Nota: o material de montagem fornecido é adequado para a fixação
em paredes convencionais. Para outras superfícies podem possivelmente ser necessários outros materiais de fixação. Para outras superfícies podem possivelmente ser necessários outros materiais de fixação.
Em caso de dúvidas, consulte um técnico qualificado.
7
(4 x 30 mm) fornecidos e de duas das
34 PT
Page 35

Após a montagem, verifique se o suporte da célula solar está correc-
tamente montado.
Insira depois a célula solar, tal como ilustrado na fig. C.
Em seguida, oriente a célula solar para sul.
Ligar a célula solar ao aparelho principal
Após a montagem das duas unidades de controlo (aparelho principal 1
e célula solar
a nenhumas cargas mecânicas. Para a fixação do cabo utilize material
isolador comum como por ex. braçadeiras ou calha para cabos, de modo
a evitar danos no isolamento de cabos.
Retire o conector de encaixe 4 do cabo do aparelho principal e da
célula solar em conjunto. Certifique-se de que o encaixe destes conectores é feito apenas numa direcção.
Aparafuse ambos os conectores de encaixe com a porca de capa
(ver fig. D).
Colocação em funcionamento
O interruptor 5 da estação principal 1 (fig. A) dispõe das seguintes
funções:
6
) instale o cabo de forma a que este não esteja exposto
Posição „OFF“: Sensor
3
e foco 2 fora de serviço. Com radiação
solar, as baterias são carregadas através da célula
6
solar
. Utilize esta posição do interruptor para
recarregar a bateria descarregada (ver „Carregar
bateria“).
Posição „AUTO“: Durante a entrada de luz as baterias são carregadas
através da célula solar. O foco activa-se automaticamente durante o entardecer ou o anoitecer e volta a
desligar ao nascer do dia. Para uma maior duração
35 PT
Page 36

da luz do projector, com esta posição do interruptor
activa os LED não trabalham à potência máxima,
antes fornecem apenas aprox. 25% da sua capacidade total (modo Eco). Se a bateria tive carga total,
o carregamento nesta posição do interruptor dura até
aprox. 8 horas de luz.
Posição „PIR“ Durante a entrada de luz as baterias são carregadas
através da célula solar. Desde que registe movimento,
o sensor activa o foco durante o entardecer ou anoitecer. A duração da luz do projector está pré-definida
e é de aprox. 1,5 minutos. Se durante este 1,5 minuto
for registado um outro movimento, o tempo da duração da luz do projector é reiniciado. Nesta posição
do interruptor os LED trabalham à potência máxima.
Se a bateria tive carga total, o carregamento nesta
posição do interruptor dura até um total aprox. de
2 horas de luz.
Manutenção / Substituição da bateria
Para garantir um bom desempenho da célula solar 6 esta deve ser limpa
regularmente (ver „Limpeza e conservação“).
Para substituir a bateria, proceda da seguinte forma:
Coloque o interruptor 5 na posição „OFF“.
Desaperte os parafusos 11 com uma chave de parafusos de estrela
na traseira do aparelho principal
Remova a parte traseira solta do aparelho principal.
Remova a bateria do compartimento da bateria 10 e substitua-a por
uma bateria nova com as mesmas características técnicas. Durante a
colocação, respeite a polaridade correcta. Esta é indicada no com-
partimento da bateria.
1
(ver fig. E).
36 PT
Page 37

Volte a fechar o painel traseiro do aparelho principal e fixe-o com os
parafusos de aperto.
Modo Inverno
Devido à baixa radiação solar a duração da luz do projector durante a
noite pode ser menor dependendo do tempo de funcionamento nocturno.
Por isso verifique, mesmo no Inverno, se a célula solar
estar em posição de sol baixo, fica sempre na sombra e, se necessário,
elimine o gelo e a neve.
Se a duração da luz do projector, devido às condições atmosféricas, não
for suficiente, carregue a bateria ou troque-a (ver „Carregar bateria“ e
„Substituir bateria“).
6
, não obstante
Limpeza e conservação
Desligue o projector Solar LED para a limpeza.
Para a limpeza, utilize um pano ligeiramente humedecido, que não
liberte pêlos e um detergente suave.
Verifique regularmente em particular o sensor 3 e a célula solar 6
quanto a sujidade.
Limpe regularmente o sensor e a célula solar para garantir o seu
funcionamento correcto.
No Inverno mantenha o aparelho, especialmente a célula solar, livre
de neve e gelo.
Resolução de problemas
= Problema
= Causa
= Solução
37 PT
Page 38

A luz do projector não liga.
Interruptor 5 na posição „OFF“.
Colocar o interruptor na posição „ON“.
O sensor 3 está sujo.
Limpar o detector de movimentos.
Baterias vazias.
Recarregar baterias (ver „Carregar bateria“).
Luz do projector está trémula.
Baterias quase descarregadas.
Recarregar baterias (ver „Carregar bateria“).
A bateria descarrega-se em pouco tempo.
A célula solar está suja.
Limpar célula solar.
Célula solar não está alinhada da melhor forma.
Orientar novamente a célula solar (ver „Montar célula solar“).
Condições meteorológicas adversas.
Ver „Modo Inverno“.
Baterias com anomalia.
Substituir baterias (ver „Manutenção / Substituir bateria“).
Eliminação
A embalagem é feita de materiais não poluentes que podem
ser eliminados nos contentores de reciclagem locais.
As possibilidades de eliminação do produto utilizado poderão ser averiguadas junto do seu Município ou Câmara Municipal.
Não deposite o produto utilizado no lixo doméstico, a favor da
proteção do ambiente. Elimine-o de forma responsável. Pode
informar-se no seu município sobre os locais de recolha adequados e o seu período de funcionamento.
38 PT
Page 39

As baterias avariadas ou gastas têm de ser recicladas de acordo com a
directiva 2006 / 66 / CE. Devolva as baterias e / ou o aparelho através
das entidades de recolha disponíveis.
Danos ambientais devido à eliminação incorrecta
das baterias!
Pb
As baterias não podem ser eliminadas no lixo doméstico. Como tal,
deposite as pilhas utilizadas num ponto de recolha adequado do seu
município.
Garantia
O aparelho foi cuidadosamente fabricado segundo rigorosas directivas
de qualidade e meticulosamente testado antes da sua distribuição. Em caso
de falhas deste aparelho, possui direitos legais relativamente ao vendedor
do aparelho. Os seus direitos legais não estão limitados pela garantia
representada de seguida.
Tem sobre este aparelho 3 anos de garantia a partir
A validade da garantia inicia-
se com a data de compra. Guarde o talão
da data de compra.
da caixa como comprovativo da compra. Esse documento é necessário
para comprovar a compra.
Caso num espaço de tempo de 3 anos a partir da data da compra deste
aparelho surja um erro de material ou de fabrico, o aparelho será reparado ou substituído por nós – segundo a nossa escolha – e sem qualquer
custo. Esta garantia expira se o aparelho estiver danificado, se não for devidamente utilizado ou se não for efectuada a devida manutenção.
A garantia é válida em caso de defeitos de material ou de fabrico. Esta
garantia não é extensível a componentes do produto que se desgastam
com o uso e que, por isso, podem ser consideradas peças de desgaste
39 PT
Page 40

(por ex.º pilhas) ou a danos em peças frágeis, por ex.º interruptores,
baterias ou peças de vidro.
40 PT
Page 41

Intended use ............................................................................ Page 42
Parts description .................................................................. Page 42
Technical Data ........................................................................ Page 42
Scope of delivery.................................................................Page 43
General safety instructions ......................................... Page 43
Safety instructions for rechargeable
batteries
...................................................................................... Page 44
Function........................................................................................Page 44
Before use
Charging the rechargeable batteries............................................Page 45
Assembly
Mounting the spotlight ................................................................... Page 45
Mounting the solar cell .................................................................. Page 46
Connecting the solar cell to the main unit .................................... Page 46
Start-up ........................................................................................ Page 47
Maintenance / changing batteries .........................Page 48
Winter-time use ..................................................................... Page 48
Cleaning and Care .............................................................. Page 48
Troubleshooting ................................................................... Page 49
Disposal ....................................................................................... Page 49
Warranty .................................................................................... Page 50
41 GB/MT
Page 42

LED solar spotlight
Intended use
The LED solar spotlight is intended to illuminate outdoor areas without electrical connection, e.g. garden sheds, garages, etc. The LED solar spotlight
is not suitable for commercial use.
Parts description
1
Main unit
2
Spotlight
3
Sensor
4
Electrical connector
5
Switch (AUTO / OFF / PIR)
6
Solar cell
7
Screw (4 x 30 mm)
8
Wall plug (ø 6 mm)
9
Bracket (solar cell)
10
Rechargeable battery compartment
11
Locking screws
Technical Data
Operating voltage: 3.6 V
Rechargeable battery: 3 x NiMH battery 1.2 V , 600 mAh, AA
Light bulb: 10 LEDs, 0.06 W each (LEDs not replaceable)
Solar cell: amorphous, 8 x 8 cm, max. 5.4 V, max. 70 mA
Sensor: range: approx. 5–12 m,
detection angle: approx. 90° horizontal, 90°
vertical
Protection type: IP44 (splash-proof)
42 GB/MT
Page 43

Scope of delivery
Check immediately after unpacking that the parts are complete and that
the product is in proper condition.
1 Main unit (consisting of spotlight with 10 LEDs, sensor, mounting bracket
with built-in batteries and built-in control)
1 Solar cell (8 cm x 8 cm) (incl. approx. 2.5 m power cable)
4 Screws (4 x 30 mm)
4 Wall plugs (ø 6 mm)
1 Instructions for assembly and use
General safety instructions
Before using the product, please familiarise yourself with all of the safety
information and instructions for use! When passing this product on to
others, please also include all the documents!
This appliance can be used by children aged from 8 years and above
and persons with reduced physical, sensory or mental capabilities or
lack of experience and knowledge if they have been given supervision
or instruction concerning use of the appliance in a safe way and understand the hazards involved. Children shall not play with the appliance. Cleaning and user maintenance shall not be made by children
without supervision.
Never leave children unsupervised with the packaging material. The
packaging material represents a danger of suffocation. Children frequently underestimate the dangers.
Keep children out of the area you are working in. A large number of
screws and other small parts are included with delivery. These may
prove life-threatening if swallowed or inhaled.
Do not use this article if you notice any damage!
43 GB/MT
Page 44

Safety instructions for
rechargeable batteries
DANGER TO LIFE! Keep rechargeable batteries away
from children. If accidentally swallowed seek immediate medical
attention!
CAUTION! EXPLOSION HAZARD!
Never throw rechargeable batteries into fire or water!
Do not exert mechanical loads to batteries!
Do not use single-use batteries.
Never short-circuit or open rechargeable batteries.
Risk of property damage
Only use the specified battery type!
When inserting the battery ensure that it is inserted the right way round!
This is shown in the battery compartment!
If necessary, clean the battery and device contacts before inserting the
battery!
Function
The solar cell 6 converts energy from sunlight into electricity. This recharges
the battery inside the battery compartment
These batteries store the electricity fed by the solar cell. Fully charged batteries will provide about 2 hours of light on the „PIR“ setting, and about
8 hours on „AUTO“.
In summer completely drained batteries take about 2 to 4 days to fully
recharge in constant sunlight. The batteries must be charged prior to initial
use (see „Charging rechargeable
batteries“).
10
via the power cable.
44 GB/MT
Page 45

Before use
Charging the rechargeable batteries
Note: The rechargeable batteries inside the main unit 1 are fully charged
at delivery. However, they may already have lost charge during transport
from the manufacturer to the retail location. Therefore charge the batteries
prior to use. During summer, initial charging will take at least one day in
constant sunlight.
Set the switch 5 to the „OFF“ position.
Note: In constant sunlight (depending on the season) drained batteries
should take two to ten days to charge.
Note: the built-in charging controller of the LED solar spotlight prevents
the rechargeable batteries from overcharging.
Replace the rechargeable batteries if the light output does not improve
after charging (Fig. E).
Assembly
Note: Before mounting, decide where you want to mount the solar cell 6
and the main unit
the main unit is approx. 2.5 m long.
1
. Please remember the cord between the solar cell and
Mounting the spotlight
Please remember when selecting the location for mounting the main unit 1:
1. The connection between the spotlight
and should be able to illuminate the selected area. Please remember
to slightly loosen the swivel screw before moving the spotlight. Tighten
the swivel screw afterwards (see Fig. F).
2
and the main unit is flexible
45 GB/MT
Page 46

2. Depending on the mounting height (ideally between 1.80 m – 2.00 m)
the sensor
3
has a detection range of max. 12 m with a detection
angle of 90° horizontally and 90° vertically.
3. Be sure the sensor is not illuminated by street lighting at night. This can
influence its functioning.
Secure the main unit 1 using two of the enclosed wall plugs 8
(ø 6 mm) and two of the enclosed screws
7
(4 x 30 mm) (see Fig. B).
Note: The enclosed mounting material is suitable for ordinary masonry
construction. Other wall substrates may require other fastening materials. Seek specialist advice when in doubt.
After mounting, check that the main unit is fitted securely.
Mounting the solar cell
The solar cell 6 requires direct sunlight when possible. Ideally, the solar
cell surface will be directed to the south. The enclosed mounting base will
ensure the solar cell is mounted horizontally.
Mount the bracket 9 of the solar cell 6 to a vertical wall using the
enclosed screws
(ø 6 mm) (see Fig. C).
Note: The enclosed mounting material is suitable for ordinary masonry
construction. Other wall substrates may require other fastening materi-
als. Seek specialist advice when in doubt.
After mounting, verify the solar cell is fitted securely.
Then attach the solar cell as shown in Fig. C.
Next adjust the solar cell to face south.
7
(4 x 30 mm) and the enclosed wall plugs 8
Connecting the solar cell to the main unit
After mounting the two operating units (main unit 1 and solar cell 6) run
the cable so it is not subjected to mechanical stress. Use typical installation
46 GB/MT
Page 47

material such as cable clamps or conduit to fasten the cable, to prevent
damage to the insulation.
Connect the plug connector 4 from the main unit cable and the solar
cell. Please note these plug-in connector only fit one way.
Screw the two plug-in connectors together using the swivel nut (see
Fig. D).
Start-up
The switch 5 on the main unit 1 (Fig. A) features the following functions:
Position „OFF“: Sensor
3
and spotlight 2 are off. In direct sunlight
the rechargeable batteries are charged by the solar
6
cell
. Use this setting to charge drained batteries
(see „Charging the rechargeable
batteries“).
Position „AUTO“: The solar cell charges the batteries in sunlight. The
spotlight will automatically switch on at dusk and off
in daylight. To ensure a long life the LEDs will not be
fully powered in this setting, but only provide approx.
25 % of their full light power (eco mode). When fully
charged, the batteries will provide approx. 8 hours of
light in this setting.
Position „PIR“: The solar cell charges the batteries in sunlight. The
sensor will activate the spotlight at twilight or in the
dark as soon as movement is detected. The light ON
time is preset to approx. 1.5 minutes. If additional
movement is detected during these 1.5 minutes, the
light ON time will reset. In this setting the LEDs will be
fully powered. With the batteries fully charged the
charge on this setting will provide light for a total of
approx. 2 hours.
47 GB/MT
Page 48

Maintenance / changing batteries
To ensure good solar cell 6 performance the solar cell must be cleaned
regularly (see „Cleaning and care“).
Change the batteries as follows:
Slide the switch 5 to the „OFF“ position.
Loosen the cover screws 11 the back of the main unit 1 using a
cross-tip screwdriver (see Fig. E).
Remove the back of the main unit.
Remove the batteries from the battery compartment 10 and replace
with new rechargeable batteries with the same technical data. Be sure
to insert the batteries in the correct direction. The correct polarity is
shown inside the battery compartment.
Close the back of the main unit and secure the cover screws.
Winter-time use
The low amount of sunlight may reduce the light ON time at night depending on the on-time. Due to the low position of the sun please also verify the
solar cell
and snow as necessary.
If the light ON time is inadequate due to the weather, recharge or replace
the batteries (see„Charging the rechargeable
6
is out of shade throughout the day in winter and remove ice
batteries“ or „changing batteries“).
Cleaning and Care
Switch off the LED solar spotlight before cleaning.
Use a slightly dampened, lint-free cloth and mild cleaning agent to clean.
Regular check the sensor 3 and solar cell 6 particularly for dirt.
Regularly clean the sensor and solar cell to ensure proper functionality.
Especially keep the solar cell free of snow and ice in winter.
48 GB/MT
Page 49

Troubleshooting
= Problem
= Cause
= Solution
Light doesn‘t come on.
Switch 5 set to „OFF“ position.
Set switch to „ON“ position.
Dirty sensor 3.
Clean motion detector.
Batteries are drained.
Charge batteries (see „Charging the rechargeable batteries“).
Spotlight is flickering.
Batteries are almost drained.
Charge batteries (see „Charging the rechargeable batteries“).
Battery quickly loses its charge.
The solar cell is dirty.
Clean the solar cell.
Solar cell is positioned incorrectly.
Reposition solar cell (see „Mounting the solar cell“).
Poor weather conditions.
See „Winter-time use“.
Defective batteries.
Replace batteries (see „Maintenance/changing batteries“).
Disposal
The packaging is made of environmentally friendly materials,
which may be disposed of through your local recycling facilities.
49 GB/MT
Page 50

Contact your local community or municipal administration for more details
on how to dispose your worn-out product.
To help protect the environment, please dispose of the product
properly, and not in household waste, when it has reached the
end of its useful life. Please contact your local authority for information on collection points and their opening hours.
Faulty or used rechargeable batteries must be recycled in accordance with
Directive 2006 / 66 / EC. Return rechargeable batteries and / or the appliance using the recycling facilities provided.
Environmental damage through incorrect disposal
of the rechargeable batteries!
Pb
Rechargeable batteries may not be disposed of with the usual domestic
waste. Therefore dispose of used batteries through your municipal collection site.
Warranty
The device has been manufactured to strict quality guidelines and meticulously examined before delivery. In the event of product defects you have
legal rights against the retailer of this product. Your legal rights are not
limited in any way by our warranty detailed below.
The warranty for this device is 3 years from the date of purchase. Should
this device show any fault in materials or manufacture within three years
from the date of purchase, we will repair or replace it – at our choice –
free of charge to you.
The warranty period begins on the date of purchase. Please keep the original sales receipt in a safe location. This document is required as your proof
50 GB/MT
Page 51

of purchase. This warranty becomes void if the device has been damaged
or improperly used or maintained.
The warranty applies to faults in material or manufacture. This warranty
does not cover product parts subject to normal wear, thus possibly considered consumables (e.g. batteries) or for damage to fragile parts, e.g.
switches, rechargeable batteries or glass parts.
51 GB/MT
Page 52

Bestimmungsgemäße Verwendung .................... Seite 53
Teilebeschreibung ............................................................... Seite 53
Technische Daten ................................................................. Seite 53
Lieferumfang ........................................................................... Seite 54
Allgemeine Sicherheitshinweise ............................. Seite 54
Sicherheitshinweise für Akkus ................................. Seite 55
Funktion.......................................................................................Seite 55
Vor der ersten Inbetriebnahme
Akkus aufladen ...............................................................................Seite 56
Montage
Spot montieren ............................................................................... Seite 56
Solarzelle montieren ...................................................................... Seite 57
Solarzelle mit dem Hauptgerät verbinden ................................... Seite 58
Inbetriebnahme .................................................................... Seite 58
Wartung / Akkus wechseln ......................................... Seite 59
Winterbetrieb ......................................................................... Seite 60
Reinigung und Pflege .......................................................Seite 60
Fehlerbehebung ................................................................... Seite 60
Entsorgung ................................................................................ Seite 61
Garantie ...................................................................................... Seite 62
52 DE/AT/CH
Page 53

LED-Solar-Strahler
Bestimmungsgemäße Verwendung
Der LED-Solar-Strahler ist vorgesehen zur Ausleuchtung von Außenbereichen,
die über keinen Stromanschluss verfügen, z. B. Gartenhäuser, Garagen etc.
Der LED-Solar-Strahler ist nicht für den gewerblichen Einsatz geeignet.
Teilebeschreibung
1
Hauptgerät
2
Spot
3
Sensor
4
Steckverbinder
5
Schalter (AUTO / OFF / PIR)
6
Solarzelle
7
Schraube (4 x 30 mm)
8
Dübel (ø 6 mm)
9
Halterung (Solarzelle)
10
Akkufach
11
Verschlussschrauben
Technische Daten
Betriebsspannung: 3,6 V
Akku: 3 x NiMH-Akku 1,2 V , 600 mAh, AA
Leuchtmittel: 10 LEDs mit je 0,06 W (die LEDs sind nicht
austauschbar)
Solarzelle: amorph, 8 x 8 cm, max. 5,4 V, max. 70 mA
Sensor: Reichweite: ca. 5–12 m,
Erfassungswinkel: ca. 90° horizontal, 90° vertikal
Schutzart: IP44 (spritzwassergeschützt)
53 DE/AT/CH
Page 54

Lieferumfang
Kontrollieren Sie unmittelbar nach dem Auspacken immer den Lieferumfang auf Vollständigkeit sowie den einwandfreien Zustand des Gerätes.
1 Hauptgerät (bestehend aus Strahler mit 10 LEDs, Sensor,
Montagegehäuse mit eingebauten Akkus und eingebauter Steuerung)
1 Solarzelle (8 cm x 8 cm) (inkl. ca. 2,5 m Stromkabel)
4 Schrauben (4 x 30 mm)
4 Dübel (ø 6 mm)
1 Montage- und Bedienungsanleitung
Allgemeine Sicherheitshinweise
Machen Sie sich vor der ersten Benutzung des Produkts mit allen Bedienund Sicherheitshinweisen vertraut! Händigen Sie alle Unterlagen bei
Weitergabe des Produkts an Dritte ebenfalls mit aus!
Dieses Gerät kann von Kindern ab 8 Jahren und darüber sowie von
Personen mit verringerten physischen, sensorischen oder mentalen
Fähigkeiten oder Mangel an Erfahrung und Wissen benutzt werden,
wenn sie beaufsichtigt oder bezüglich des sicheren Gebrauchs des
Gerätes unterwiesen wurden und die daraus resultierenden Gefahren
verstehen. Kinder dürfen nicht mit dem Gerät spielen. Reinigung und
Benutzerwartung dürfen nicht von Kindern ohne Beaufsichtigung
durchgeführt werden.
Lassen Sie Kinder niemals unbeaufsichtigt mit dem Verpackungsmate-
rial. Es besteht Erstickungsgefahr durch Verpackungsmaterial. Kinder
unterschätzen häufig die Gefahren.
Halten Sie Kinder während der Montage vom Arbeitsbereich fern.
Zum Lieferumfang gehört eine Vielzahl von Schrauben und anderen
Kleinteilen. Diese können beim Verschlucken oder Inhalieren lebensgefährlich sein.
54 DE/AT/CH
Page 55

Benutzen Sie den Artikel nicht, wenn Sie irgendwelche Beschädigun-
gen feststellen!
Sicherheitshinweise für Akkus
LEBENSGEFAHR! Akkus gehören nicht in Kinder-
hände. Suchen Sie im Falle eines Verschluckens sofort einen Arzt auf!
VORSICHT! EXPLOSIONSGEFAHR!
Werfen Sie Akkus niemals in Feuer oder Wasser!
Setzen Sie Akkus keiner mechanischen Belastung aus!
Verwenden Sie keine nicht aufladbare Batterien.
Schließen Sie Akkus nicht kurz und / oder öffnen Sie sie nicht.
Gefahr der Sachbeschädigung
Ausschließlich den angegebenen Akkutyp verwenden!
Achten Sie beim Einlegen auf die richtige Polarität! Diese wird im
Batteriefach angezeigt!
Reinigen Sie Batterie- und Gerätekontakt vor dem Einlegen falls
erforderlich!
Funktion
Die Solarzelle 6 wandelt Lichtenergie der Sonne in elektrische Energie
um. Über das angeschlossene Stromkabel lädt sie die im Akkufach
eingebauten Akkus auf.
Diese Akkus speichern die von der Solarzelle eingespeiste elektrische Energie.
Vollständig geladene Akkus liefern in der Schalterstellung „PIR“ Energie für
etwa 2 Stunden Licht, in der Schalterstellung „AUTO“ für etwa 8 Stunden.
Das Aufladen vollständig entleerter Akkus dauert im Sommer bei regelmäßiger Sonneneinstrahlung etwa 2 bis 4 Tage. Vor der ersten Inbetriebnahme der Leuchte müssen die Akkus geladen sein (siehe „Akkus aufladen“).
10
55 DE/AT/CH
Page 56

Vor der ersten Inbetriebnahme
Akkus aufladen
Hinweis: Die im Hauptgerät 1 eingebauten Akkus sind bei Auslieferung
geladen. Allerdings können sie während des Transports vom Hersteller zur
Verkaufsstelle bereits an Ladung verloren haben. Laden Sie daher vor der
ersten Inbetriebnahme die Akkus auf. Die erste Aufladung dauert bei regelmäßiger Sonneneinstrahlung im Sommer mindestens einen Tag.
Stellen Sie den Schalter 5 in die Position „OFF“.
Hinweis: Bei regelmäßiger Sonneneinstrahlung (abhängig von der Jahreszeit) sollten leere Akkus nach zwei bis zehn Tagen aufgeladen sein.
Hinweis: Der eingebaute Laderegler des LED-Solar-Strahlers verhindert
eine Überladung der Akkus.
Tauschen Sie die Akkus aus, wenn sich die Leuchtleistung nach der
Aufladung nicht verbessert hat (Abb. E).
Montage
Hinweis: Entscheiden Sie vor der Montage, wo Sie die Solarzelle 6
und das Hauptgerät
dung zwischen Solarzelle und Hauptgerät eine Länge von ca. 2,5 m hat.
1
montieren. Beachten Sie, dass die Kabelverbin-
Spot montieren
Achten Sie bei der Auswahl des Montageortes des Hauptgeräts 1 auf
folgende Dinge:
1. Der Spot
den gewünschten Bereich ausleuchten können. Beachten Sie, dass Sie
die Gelenkschraube des Spots etwas lösen, bevor Sie den Spot bewe-
56 DE/AT/CH
2
ist beweglich mit dem Hauptgerät verbunden und sollte
Page 57

gen. Ziehen Sie die Gelenkschraube hinterher wieder an
(siehe Abb. F).
2. Der Sensor
3
hat (abhängig von der Montagehöhe, ideal ist eine
Höhe von 1,80 m – 2,00 m) einen Erfassungsbereich von max. 12 m,
bei einem Erfassungswinkel von 90° horizontal und 90° vertikal.
3. Achten Sie darauf, dass der Sensor nachts nicht von Straßenbeleuchtungen angestrahlt wird. Dies kann die Wirkungsweise beeinflussen.
Befestigen Sie das Hauptgerät 1 mittels zwei der beiliegenden
8
Dübel
(ø 6 mm) und zwei der beiliegenden Schrauben 7
(4 x 30 mm) (siehe Abb. B).
Hinweis: Das beiliegende Montagematerial ist zur Befestigung im
normalem Mauerwerk geeignet. Für andere Untergründe benötigen
Sie möglicherweise andere Befestigungsmaterialien. Im Zweifelsfall
ziehen Sie eine Fachkraft zu Rate.
Überprüfen Sie nach der Montage den festen Sitz des Hauptgeräts.
Solarzelle montieren
Die Solarzelle 6 benötigt möglichst direkte Sonneneinstrahlung. Optimal
ist eine Ausrichtung der Solarzellenoberfläche nach Süden. Die horizontale Ausrichtung der Solarzelle ist durch den beiliegenden Montagefuß
vorgegeben.
Montieren Sie die Halterung 9 der Solarzelle 6 an einer senkrech-
ten Wand mittels zwei der beiliegenden Schrauben
und der beiliegenden Dübel
8
(ø 6mm) (siehe Abb. C).
Hinweis: Das beiliegende Montagematerial ist zur Befestigung im
normalem Mauerwerk geeignet. Für andere Untergründe benötigen
Sie möglicherweise andere Befestigungsmaterialien. Im Zweifelsfall
ziehen Sie eine Fachkraft zu Rate.
Überprüfen Sie nach der Montage den festen Sitz der Halterung der
Solarzelle.
7
(4 x 30 mm)
57 DE/AT/CH
Page 58

Stecken Sie dann die Solarzelle auf, wie in Abb. C gezeigt.
Richten Sie anschließend die Solarzelle nach Süden aus.
Solarzelle mit dem Hauptgerät verbinden
Verlegen Sie nach der Montage der beiden Betriebseinheiten (Hauptgerät
1
und Solarzelle 6) das Kabel so, dass es keinerlei mechanischen
Belastungen ausgesetzt ist. Verwenden Sie zur Befestigung des Kabels
handelsübliche Installationsmaterialien wie z. B. Kabelschellen oder Kabelkanal, um Beschädigungen der Kabelisolation zu vermeiden.
Stecken Sie die Steckverbinder 4 der Kabel des Hauptgeräts und der
Solarzelle zusammen. Beachten Sie, dass diese Steckverbinder nur in
einer Richtung zusammenpassen.
Verschrauben Sie die beiden Steckverbinder mit der Überwurfmutter
(siehe Abb. D).
Inbetriebnahme
Der Schalter 5 der Hauptstation 1 (Abb. A) verfügt über folgende
Funktionen:
Position „OFF“: Sensor
3
und Spot 2 sind außer Betrieb. Die
Akkus werden bei Sonneneinstrahlung durch die
Solarzelle
6
geladen. Verwenden Sie diese Schalterstellung zum Aufladen entladener Akkus (siehe
„Akkus aufladen“).
Position „AUTO“: Bei Lichteinfall werden die Akkus über die Solarzelle
geladen. Der Spot schaltet sich automatisch bei Dämmerung bzw. Dunkelheit ein und bei Tageslicht wieder
aus. Um eine lange Leuchtdauer zu erreichen, werden
die LEDs in dieser Schalterstellung nicht mit voller Leistung angesteuert, sondern liefern nur ca. 25 % ihrer
58 DE/AT/CH
Page 59

vollen Lichtleistung (Eco-Modus). Wenn die Akkus voll
aufgeladen sind, reicht die Ladung bei
dieser Schalterstellung für ca. 8 Stunden Licht.
Position „PIR“: Bei Lichteinfall werden die Akkus über die Solarzelle ge-
laden. Der Sensor schaltet den Spot bei Dämmerung
bzw. Dunkelheit ein, sobald er eine Bewegung erfasst.
Die Leuchtdauer ist voreingestellt und beträgt ca.
1,5 Minuten. Wird während dieser 1,5 Minuten eine
weitere Bewegung erfasst, startet die Zeit der Leuchtdauer erneut. In dieser Schalterstellung werden die
LEDs mit der vollen Leistung angesteuert. Wenn die Akkus voll aufgeladen sind, reicht die Ladung bei dieser
Schalterstellung für insgesamt ca. 2 Stunden Licht.
Wartung / Akkus wechseln
Um eine gute Leistung der Solarzelle 6 zu gewährleisten, muss die Solarzelle in regelmäßigen Abständen gereinigt werden (siehe „Reinigung und
Pflege“).
Gehen Sie zum Akkuwechseln folgendermaßen vor:
Schieben Sie den Schalter 5 in die Position „OFF“.
Lösen Sie mit einem Kreuzschlitzschraubendreher die Verschlussschrau-
11
ben
auf der Rückseite des Hauptgeräts 1 (siehe Abb. E).
Nehmen Sie die gelöste Rückseite des Hauptgeräts ab.
Nehmen Sie die Akkus aus dem Akkufach 10 und ersetzen Sie sie
durch neue Akkus mit den gleichen technischen Daten. Achten Sie
beim Einsetzen auf die richtige Polarität. Diese wird im Akkufach
angezeigt.
Schließen Sie die Rückwand des Hauptgeräts wieder und befestigen
Sie die Verschlussschrauben.
59 DE/AT/CH
Page 60

Winterbetrieb
Aufgrund der niedrigen Sonneneinstrahlung kann sich abhängig von der
nächtlichen Einschaltdauer während der Nacht die Leuchtdauer verringern.
Überprüfen Sie daher auch im Winter, ob die Solarzelle
rigeren Sonnenstandes ganztägig unbeschattet ist und beseitigen Sie, falls
nötig, Eis oder Schnee.
Sollte die Leuchtdauer aufgrund der Wetterlage nicht ausreichend sein,
laden Sie die Akkus auf oder wechseln Sie diese (siehe „Akkus aufladen“
bzw. „Akkus wechseln“).
6
trotz des nied-
Reinigung und Pflege
Schalten Sie den LED-Solar-Strahler zur Reinigung aus.
Verwenden Sie zur Reinigung ein leicht angefeuchtetes fusselfreies
Tuch mit einem milden Reinigungsmittel.
Untersuchen Sie insbesondere den Sensor 3 und die Solarzelle 6
regelmäßig auf Verschmutzung.
Reinigen Sie Sensor und Solarzelle regelmäßig, um eine einwandfreie
Funktion zu gewährleisten.
Halten Sie insbesondere die Solarzelle im Winter schnee- und eisfrei.
Fehlerbehebung
= Problem
= Ursache
= Lösung
Leuchte schaltet nicht ein.
Schalter 5 auf „OFF“-Position.
Schalter auf „ON“-Position stellen.
Sensor 3 ist verschmutzt.
Bewegungsmelder reinigen.
60 DE/AT/CH
Page 61

Akkus sind leer.
Akkus aufladen (siehe „Akkus aufladen).
Leuchte flackert.
Akkus sind fast leer.
Akkus aufladen (siehe „Akkus aufladen).
Akku entlädt sich innerhalb von kurzer Zeit.
Solarzelle ist verschmutzt.
Solarzelle reinigen.
Solarzelle ist falsch ausgerichtet.
Solarzelle neu ausrichten (siehe „Solarzelle montieren“).
Schlechte Wetterbedingungen.
Siehe „Winterbetrieb“.
Akkus sind defekt.
Akkus austauschen (siehe „Wartung/Akkus wechseln“).
Entsorgung
Die Verpackung besteht aus umweltfreundlichen Materialien,
die Sie über die örtlichen Recyclingstellen entsorgen können.
Möglichkeiten zur Entsorgung des ausgedienten Produktes erfahren Sie
bei Ihrer Gemeinde oder Stadtverwaltung.
Werfen Sie Ihr Produkt, wenn es ausgedient hat, im Interesse
des Umweltschutzes nicht in den Hausmüll, sondern führen Sie
es einer fachgerechten Entsorgung zu. Über Sammelstellen und
deren Öffnungszeiten können Sie sich bei Ihrer zuständigen
Verwaltung informieren.
Defekte oder verbrauchte Akkus müssen gemäß Richtlinie 2006/66/EG
recycelt werden. Geben Sie Akkus und / oder das Gerät über die angebotenen Sammeleinrichtungen zurück.
61 DE/AT/CH
Page 62

Umweltschäden durch falsche
Entsorgung der Akkus!
Pb
Akkus dürfen nicht über den Hausmüll entsorgt werden. Geben Sie deshalb verbrauchte Batterien bei einer kommunalen Sammelstelle ab.
Garantie
Das Produkt wurde nach strengen Qualitätsrichtlinien sorgfältig produziert
und vor Anlieferung gewissenhaft geprüft. Im Falle von Mängeln dieses
Produkts stehen Ihnen gegen den Verkäufer des Produkts gesetzliche
Rechte zu. Diese gesetzlichen Rechte werden durch unsere im Folgenden
dargestellte Garantie nicht eingeschränkt.
Sie erhalten auf dieses Gerät 3 Jahre Garantie ab Kaufdatum. Die Garantiefrist beginnt mit dem Kaufdatum. Bitte bewahren Sie den Original Kassenbon gut auf. Diese Unterlage wird als Nachweis für den Kauf benötigt.
Tritt innerhalb von drei Jahren ab dem Kaufdatum dieses Produkts ein Material- oder Fabrikationsfehler auf, wird das Produkt von uns – nach unserer Wahl – für Sie kostenlos repariert oder ersetzt. Diese Garantie verfällt,
wenn das Produkt beschädigt, nicht sachgemäß benutzt oder gewartet
wurde.
Die Garantieleistung gilt für Material- oder Fabrikationsfehler. Diese Garantie erstreckt sich nicht auf Produktteile, die normaler Abnutzung ausgesetzt sind (z. B. Batterien) und daher als Verschleißteile angesehen werden
können oder für Beschädigungen an zerbrechlichen Teilen, z. B. Schalter,
Akkus oder die aus Glas gefertigt sind.
62 DE/AT/CH
Page 63

OWIM GmbH & Co. KG
Stiftsbergstraße 1
D-74167 Neckarsulm
Model-No.: Z31999
Version: 02 / 2014
Estado de las informaciones · Versione delle
informazioni · Estado das informações · Last
Information Update · Stand der Informationen:
01 / 2014 · Ident.-No.: Z31999012014-5
IAN 97740
 Loading...