

Page 1
LED SOLAR SPOTLIGHT
LED SOLAR SPOTLIGHT
Assembly, operating and safety instructions
LED STRÅLKASTARE MED SOLCELL
Monterings-, bruks- och säkerhetsanvisningar
PROJECTEUR SOLAIRE LED
Instructions de montage, d‘utilisation et
consignes de sécurité
LED-SOLAR-STRAHLER
Montage-, Bedienungs- und Sicherheitshinweise
IAN 97740
AURINKOKÄYTTÖINEN
LED-VALAISIN
Asennus-, käyttö- ja turvallisuusohjeet
LED-SOLARLAMPE
Monterings-, betjenings- og sikkerhedshenvisninger
LED-SOLAR-SCHIJNWERPER
Montage-, bedienings- en veiligheidsinstructies
Page 2

GB / IE Assembly, operating and safety instructions Page 5
FI Asennus-, käyttö- ja turvallisuusohjeet Sivu 16
SE Monterings-, bruks- och säkerhetsanvisningar Sidan 27
DK Monterings-, betjenings- og sikkerhedshenvisninger Side 38
FR / BE Instructions de montage, d‘utilisation et
consignes de sécurité Page 49
NL / BE Montage-, bedienings- en veiligheidsinstructies Pagina 61
DE / AT / CH Montage-, Bedienungs- und Sicherheitshinweise Seite 73
Page 3
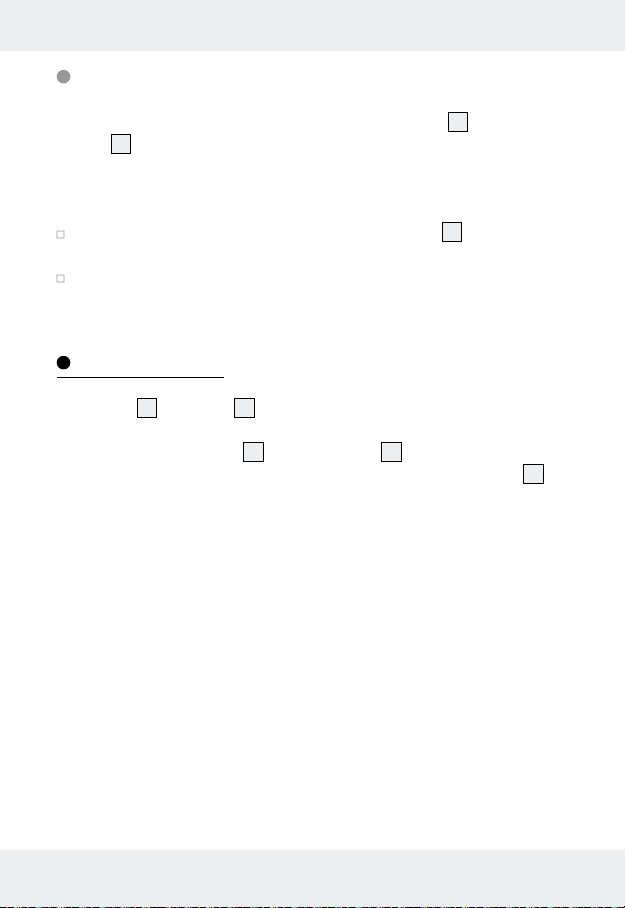
A
1
45
62 3
B C
7
D
4
7 88
9
3
Page 4
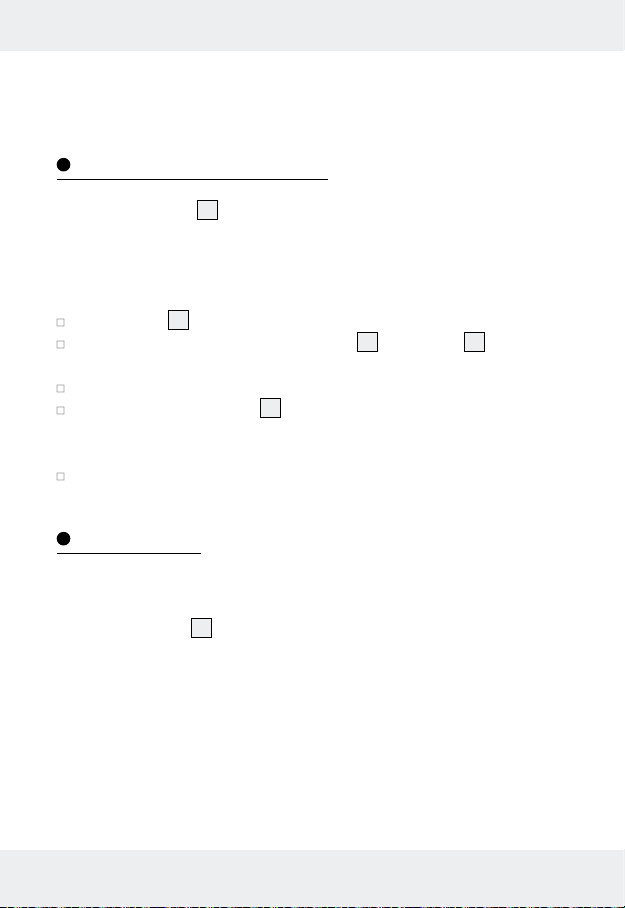
E
F
10
11
4
Page 5

Intended use ............................................................................ Page 6
Parts description .................................................................. Page 6
Technical Data ........................................................................ Page 6
Scope of delivery.................................................................Page 7
General safety instructions ......................................... Page 7
Safety instructions for rechargeable
batteries
...................................................................................... Page 8
Function........................................................................................Page 8
Before use
Charging the rechargeable batteries............................................Page 9
Assembly
Mounting the spotlight ................................................................... Page 9
Mounting the solar cell .................................................................. Page 10
Connecting the solar cell to the main unit .................................... Page 10
Start-up ........................................................................................ Page 11
Maintenance / changing batteries .........................Page 12
Winter-time use ..................................................................... Page 12
Cleaning and Care .............................................................. Page 12
Troubleshooting ................................................................... Page 13
Disposal ....................................................................................... Page 13
Warranty ....................................................................................Page 14
5 GB/IE
Page 6
LED solar spotlight
Intended use
The LED solar spotlight is intended to illuminate outdoor areas without electrical connection, e.g. garden sheds, garages, etc. The LED solar spotlight
is not suitable for commercial use.
Parts description
1
Main unit
2
Spotlight
3
Sensor
4
Electrical connector
5
Switch (AUTO / OFF / PIR)
6
Solar cell
7
Screw (4 x 30 mm)
8
Wall plug (ø 6 mm)
9
Bracket (solar cell)
10
Rechargeable battery compartment
11
Locking screws
Technical Data
Operating voltage: 3.6 V
Rechargeable battery: 3 x NiMH battery 1.2 V , 600 mAh, AA
Light bulb: 10 LEDs, 0.06 W each (LEDs not replaceable)
Solar cell: amorphous, 8 x 8 cm, max. 5.4 V, max. 70 mA
Sensor: range: approx. 5–12 m,
detection angle: approx. 90° horizontal, 90°
vertical
Protection type: IP44 (splash-proof)
6 GB/IE
Page 7

Scope of delivery
Check immediately after unpacking that the parts are complete and that
the product is in proper condition.
1 Main unit (consisting of spotlight with 10 LEDs, sensor, mounting bracket
with built-in batteries and built-in control)
1 Solar cell (8 cm x 8 cm) (incl. approx. 2.5 m power cable)
4 Screws (4 x 30 mm)
4 Wall plugs (ø 6 mm)
1 Instructions for assembly and use
General safety instructions
Before using the product, please familiarise yourself with all of the safety
information and instructions for use! When passing this product on to
others, please also include all the documents!
This appliance can be used by children aged from 8 years and above
and persons with reduced physical, sensory or mental capabilities or
lack of experience and knowledge if they have been given supervision
or instruction concerning use of the appliance in a safe way and understand the hazards involved. Children shall not play with the appliance. Cleaning and user maintenance shall not be made by children
without supervision.
Never leave children unsupervised with the packaging material. The
packaging material represents a danger of suffocation. Children frequently underestimate the dangers.
Keep children out of the area you are working in. A large number of
screws and other small parts are included with delivery. These may
prove life-threatening if swallowed or inhaled.
Do not use this article if you notice any damage!
7 GB/IE
Page 8

Safety instructions for
rechargeable batteries
DANGER TO LIFE! Keep rechargeable batteries away
from children. If accidentally swallowed seek immediate medical
attention!
CAUTION! EXPLOSION HAZARD!
Never throw rechargeable batteries into fire or water!
Do not exert mechanical loads to batteries!
Do not use single-use batteries.
Never short-circuit or open rechargeable batteries.
Risk of property damage
Only use the specified battery type!
When inserting the battery ensure that it is inserted the right way round!
This is shown in the battery compartment!
If necessary, clean the battery and device contacts before inserting the
battery!
Function
The solar cell 6 converts energy from sunlight into electricity. This recharges
the battery inside the battery compartment
These batteries store the electricity fed by the solar cell. Fully charged batteries will provide about 2 hours of light on the „PIR“ setting, and about
8 hours on „AUTO“.
In summer completely drained batteries take about 2 to 4 days to fully
recharge in constant sunlight. The batteries must be charged prior to initial
use (see „Charging rechargeable
batteries“).
10
via the power cable.
8 GB/IE
Page 9
Before use
Charging the rechargeable batteries
Note: The rechargeable batteries inside the main unit 1 are fully charged
at delivery. However, they may already have lost charge during transport
from the manufacturer to the retail location. Therefore charge the batteries
prior to use. During summer, initial charging will take at least one day in
constant sunlight.
Set the switch 5 to the „OFF“ position.
Note: In constant sunlight (depending on the season) drained batteries
should take two to ten days to charge.
Note: the built-in charging controller of the LED solar spotlight prevents
the rechargeable batteries from overcharging.
Replace the rechargeable batteries if the light output does not improve
after charging (Fig. E).
Assembly
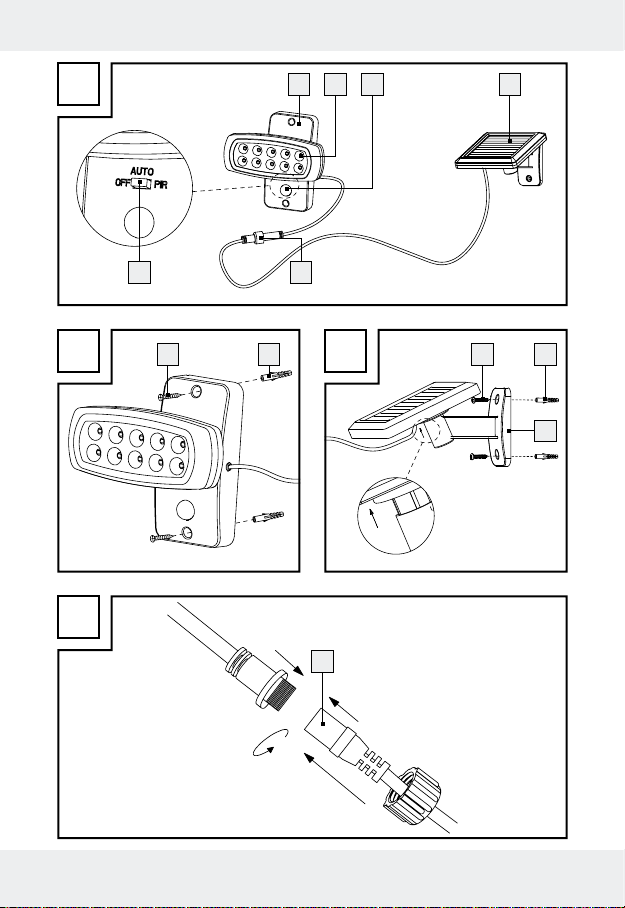
Note: Before mounting, decide where you want to mount the solar cell 6
and the main unit
the main unit is approx. 2.5 m long.
1
. Please remember the cord between the solar cell and
Mounting the spotlight
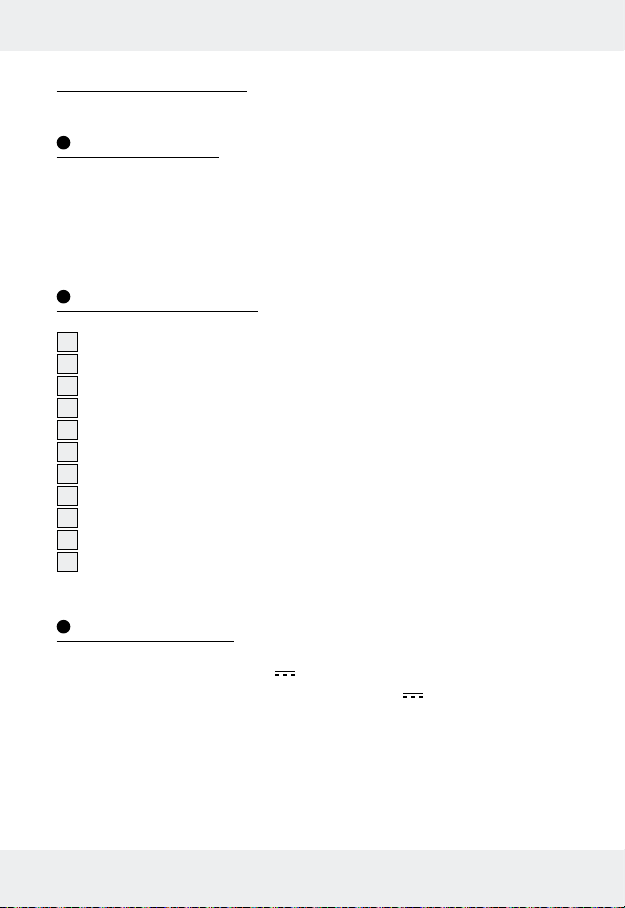
Please remember when selecting the location for mounting the main unit 1:
1. The connection between the spotlight
and should be able to illuminate the selected area. Please remember
to slightly loosen the swivel screw before moving the spotlight. Tighten
the swivel screw afterwards (see Fig. F).
2
and the main unit is flexible
9 GB/IE
Page 10
2. Depending on the mounting height (ideally between 1.80 m – 2.00 m)
the sensor
3
has a detection range of max. 12 m with a detection
angle of 90° horizontally and 90° vertically.
3. Be sure the sensor is not illuminated by street lighting at night. This can
influence its functioning.
Secure the main unit 1 using two of the enclosed wall plugs 8
(ø 6 mm) and two of the enclosed screws
7
(4 x 30 mm) (see Fig. B).
Note: The enclosed mounting material is suitable for ordinary masonry
construction. Other wall substrates may require other fastening materials. Seek specialist advice when in doubt.
After mounting, check that the main unit is fitted securely.
Mounting the solar cell
The solar cell 6 requires direct sunlight when possible. Ideally, the solar
cell surface will be directed to the south. The enclosed mounting base will
ensure the solar cell is mounted horizontally.
Mount the bracket 9 of the solar cell 6 to a vertical wall using the
enclosed screws
(ø 6 mm) (see Fig. C).
Note: The enclosed mounting material is suitable for ordinary masonry
construction. Other wall substrates may require other fastening materi-
als. Seek specialist advice when in doubt.
After mounting, verify the solar cell is fitted securely.
Then attach the solar cell as shown in Fig. C.
Next adjust the solar cell to face south.
7
(4 x 30 mm) and the enclosed wall plugs 8
Connecting the solar cell to the main unit
After mounting the two operating units (main unit 1 and solar cell 6) run
the cable so it is not subjected to mechanical stress. Use typical installation
10 GB/IE
Page 11
material such as cable clamps or conduit to fasten the cable, to prevent
damage to the insulation.
Connect the plug connector 4 from the main unit cable and the solar
cell. Please note these plug-in connector only fit one way.
Screw the two plug-in connectors together using the swivel nut (see
Fig. D).
Start-up
The switch 5 on the main unit 1 (Fig. A) features the following functions:
Position „OFF“: Sensor
3
and spotlight 2 are off. In direct sunlight
the rechargeable batteries are charged by the solar
6
cell
. Use this setting to charge drained batteries
(see „Charging the rechargeable
batteries“).
Position „AUTO“: The solar cell charges the batteries in sunlight. The
spotlight will automatically switch on at dusk and off
in daylight. To ensure a long life the LEDs will not be
fully powered in this setting, but only provide approx.
25 % of their full light power (eco mode). When fully
charged, the batteries will provide approx. 8 hours of
light in this setting.
Position „PIR“: The solar cell charges the batteries in sunlight. The
sensor will activate the spotlight at twilight or in the
dark as soon as movement is detected. The light ON
time is preset to approx. 1.5 minutes. If additional
movement is detected during these 1.5 minutes, the
light ON time will reset. In this setting the LEDs will be
fully powered. With the batteries fully charged the
charge on this setting will provide light for a total of
approx. 2 hours.
11 GB/IE
Page 12
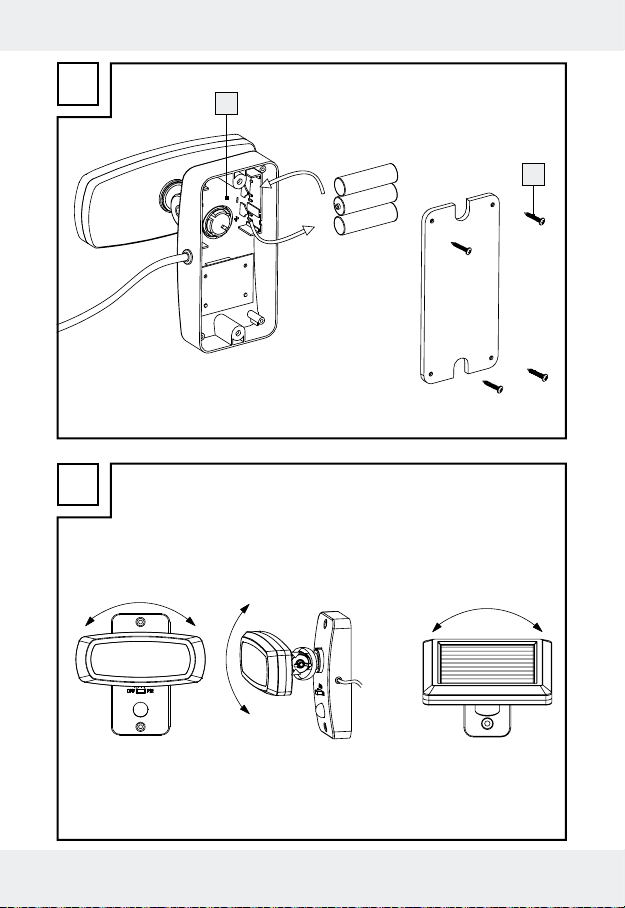
Maintenance / changing batteries
To ensure good solar cell 6 performance the solar cell must be cleaned
regularly (see „Cleaning and care“).
Change the batteries as follows:
Slide the switch 5 to the „OFF“ position.
Loosen the cover screws 11 the back of the main unit 1 using a
cross-tip screwdriver (see Fig. E).
Remove the back of the main unit.
Remove the batteries from the battery compartment 10 and replace
with new rechargeable batteries with the same technical data. Be sure
to insert the batteries in the correct direction. The correct polarity is
shown inside the battery compartment.
Close the back of the main unit and secure the cover screws.
Winter-time use
The low amount of sunlight may reduce the light ON time at night depending on the on-time. Due to the low position of the sun please also verify the
solar cell
and snow as necessary.
If the light ON time is inadequate due to the weather, recharge or replace
the batteries (see„Charging the rechargeable
6
is out of shade throughout the day in winter and remove ice
batteries“ or „changing batteries“).
Cleaning and Care
Switch off the LED solar spotlight before cleaning.
Use a slightly dampened, lint-free cloth and mild cleaning agent to clean.
Regular check the sensor 3 and solar cell 6 particularly for dirt.
Regularly clean the sensor and solar cell to ensure proper functionality.
Especially keep the solar cell free of snow and ice in winter.
12 GB/IE
Page 13
Troubleshooting
= Problem
= Cause
= Solution
Light doesn‘t come on.
Switch 5 set to „OFF“ position.
Set switch to „ON“ position.
Dirty sensor 3.
Clean motion detector.
Batteries are drained.
Charge batteries (see „Charging the rechargeable batteries“).
Spotlight is flickering.
Batteries are almost drained.
Charge batteries (see „Charging the rechargeable batteries“).
Battery quickly loses its charge.
The solar cell is dirty.
Clean the solar cell.
Solar cell is positioned incorrectly.
Reposition solar cell (see „Mounting the solar cell“).
Poor weather conditions.
See „Winter-time use“.
Defective batteries.
Replace batteries (see „Maintenance/changing batteries“).
Disposal
The packaging is made of environmentally friendly materials,
which may be disposed of through your local recycling facilities.
13 GB/IE
Page 14
Contact your local community or municipal administration for more details
on how to dispose your worn-out product.
To help protect the environment, please dispose of the product
properly, and not in household waste, when it has reached the
end of its useful life. Please contact your local authority for information on collection points and their opening hours.
Faulty or used rechargeable batteries must be recycled in accordance with
Directive 2006 / 66 / EC. Return rechargeable batteries and / or the appliance using the recycling facilities provided.
Environmental damage through incorrect disposal
of the rechargeable batteries!
Pb
Rechargeable batteries may not be disposed of with the usual domestic
waste. Therefore dispose of used batteries through your municipal collection site.
Warranty
The device has been manufactured to strict quality guidelines and meticulously examined before delivery. In the event of product defects you have
legal rights against the retailer of this product. Your legal rights are not
limited in any way by our warranty detailed below.
The warranty for this device is 3 years from the date of purchase. Should
this device show any fault in materials or manufacture within three years
from the date of purchase, we will repair or replace it – at our choice –
free of charge to you.
The warranty period begins on the date of purchase. Please keep the original sales receipt in a safe location. This document is required as your proof
14 GB/IE
Page 15
of purchase. This warranty becomes void if the device has been damaged
or improperly used or maintained.
The warranty applies to faults in material or manufacture. This warranty
does not cover product parts subject to normal wear, thus possibly considered consumables (e.g. batteries) or for damage to fragile parts, e.g.
switches, rechargeable batteries or glass parts.
15 GB/IE
Page 16

Määräystenmukainen käyttö ....................................Sivu 17
Osien kuvaus ............................................................................Sivu 17
Tekniset tiedot ..........................................................................Sivu 17
Toimituksen sisältö ...............................................................Sivu 18
Yleiset turvallisuusohjeet ...............................................Sivu 18
Ladattavien akkujen turvallisuusohjeet ............Sivu 19
Toiminto .........................................................................................Sivu 19
Ennen ensimmäistä käyttöönottoa
Akkujen lataaminen .........................................................................Sivu 20
Asennus
Spotti-lampun asennus .....................................................................Sivu 20
Aurinkokennon asennus ...................................................................Sivu 21
Aurinkokennon yhdistäminen päälaitteeseen .................................Sivu 22
Käyttöönotto .............................................................................Sivu 22
Huolto / akkujen vaihto ...................................................Sivu 23
Talvikäyttö ..................................................................................Sivu 23
Puhdistus ja hoito ..................................................................Sivu 24
Virheiden korjaaminen ....................................................Sivu 24
Hävittäminen ............................................................................Sivu 25
Takuu ...............................................................................................Sivu 25
16 FI
Page 17
Aurinkokäyttöinen LED-valaisin
Määräystenmukainen käyttö
LED-aurinkoenergiavalaisin on suunniteltu ulkona oleviin tiloihin, joissa ei ole
käytettävissä sähköliitäntää, esim. ulkovajoihin, autotalleihin jne. LED-aurinkoenergiavalaisinta ei ole suunniteltu ammattikäyttöön.
Osien kuvaus
1
Päälaite
2
Spottilamppu
3
Anturi
4
Pistokeliitin
5
Kytkin (AUTO / OFF / PIR)
6
Aurinkokenno
7
Ruuvi (4 x 30 mm)
8
Tulppa (ø 6 mm)
9
Pidike (aurinkokenno)
10
Akkulokero
11
Sulkuruuvi
Tekniset tiedot
Käyttöjännite: 3,6 V
Akku: 3 x NiMH-Akku 1,2 V , 600 mAh, AA
Valaisimet: 10 LED-lamppua kulloinkin 0,06 W (LED-lamppuja ei voi
vaihtaa)
Aurinkokenno: amorfinen, 8 x 8 cm, enintään 5,4 V, enintään 70 mA
Anturi: ulottuvuus: n. 5–12 m,
toimintakulma: n. 90° horisontaalinen, 90° vertikaalinen
Kotelointiluokka: IP44 (roiskevesisuojattu)
17 FI
Page 18
Toimituksen sisältö
Tarkista välittömästi aina pakkauksen avaamisen jälkeen toimituksen täydellisyys sekä laitteen moitteeton kunto.
1 päälaite (koostuu valaisimesta, jossa on 10 LED-lamppua, anturista,
asennuskotelosta, jonka sisältä löytyy akut ja ohjausyksikkö)
1 aurinkokenno (8 cm x 8 cm) (sis. n. 2,5 m virtajohdon)
4 ruuvia (4 x 30 mm)
4 tulppaa (ø 6 mm)
1 asennus- ja käyttöohje
Yleiset turvallisuusohjeet
Tutustu ennen tuotteen käyttöä huolellisesti kaikkiin käyttö- ja turvallisuusohjeisiin! Anna kaikki ohjeet tuotteen mukana mahdolliselle uudelle omistajalle!
Laitetta voivat käyttää 8 vuotta täyttäneet lapset sekä henkilöt, jotka
ovat fyysisiltä tai psyykkisiltä kyvyiltään tai aisteiltaan rajoittuneita tai
joilla ei ole kokemusta tai tietoa laitteen käytöstä, jos he käyttävät laitetta valvonnan alaisina tai heitä on opastettu laitteen turvallisessa
käytössä ja he ovat tietoisia laitteeseen liittyvistä vaaroista. Lapset eivät
saa leikkiä laitteella. Lapset eivät saa puhdistaa tai huoltaa laitetta ilman
valvontaa.
Älä koskaan jätä lapsia pakkausmateriaalien läheisyyteen ilman val-
vontaa. Pakkausmateriaali voi aiheuttaa tukehtumisen. Lapset aliarvioivat useimmiten vaaratilanteet.
Pidä huolta siitä, ettei lapsia ole työskentelyalueen läheisyydessä asen-
nuksen aikana. Toimitukseen kuuluu suuri määrä ruuveja ja muita pieniä
osia. Nämä voivat nieltynä tai sisään hengitettynä olla hengenvaarallisia.
Tuotetta saa käyttää vain, jos siinä ei ole havaittavissa minkäänlaisia
vaurioita.
18 FI
Page 19
Ladattavien akkujen turvallisuusohjeet
HENGENVAARA! Pidä akut lasten ulottumattomissa.
Akun nielaisseen henkilön on välittömästi otettava yhteyttä lääkäriin!
VARO! RÄJÄHDYSVAARA!
Älä koskaan heitä akkuja tuleen tai veteen!
Älä altista akkuja mekaaniselle kuormitukselle!
Älä käytä ladattavia akkuja.
Älä oikosulje akkuja ja/tai älä avaa niitä.
Aineellisten vahinkojen vaara
Käytä vain ohjeessa mainittua akkutyyppiä!
Huomioi akkujen oikeanlainen napaisuus, kun asetat ne lokeroon!
Napaisuus on merkitty akkulokeroon!
Puhdista tarvittaessa akkujen ja laitteen kosketuspinnat ennen akkujen
asettamista sisään!
Toiminto
Aurinkokenno 6 muuttaa auringon valoenergiaa sähköiseksi energiaksi.
Akkulokeroon
Akut tallentavat aurinkokennon syöttämän energian. Täysin täyteen ladatut
akut toimivat kytkentäasennossa „PIR“ 2 tunnin ajan ja kun taas kytkentäasennossa „AUTO“ valot palavat noin 8 tuntia.
Täysin tyhjien akkujen lataaminen kestää kesällä säännöllisessä auringonvalossa noin kahdesta neljään päivään. Ennen valaisimen ensimmäistä
käyttöönottoa täytyy akkujen olla ladattuna (ks. luku „Akkujen lataaminen“).
10
asetut akut latautuvat virtajohdon kautta.
19 FI
Page 20
Ennen ensimmäistä käyttöönottoa
Akkujen lataaminen
Hinweis: Päälaitteen 1 sisältämät akut toimitetaan ladattuina. Tosin voi
olla, että niiden lataus on heikentynyt kuljetuksen aikana valmistajalta myyjälle. Lataa akut sen vuoksi ennen ensimmäistä käyttöönottoa. Ensimmäinen
lataus kestää säännöllisessä auringonvalossa kesällä vähintään yhden
päivän.
Aseta kytkin 5 asentoon „OFF“.
Ohje: Säännöllisessä auringonvalossa (vuodenajasta riippuen) pitäisi
tyhjien akkujen olla ladattuna 2-10 päivän jälkeen.
Huomautus: LED-aurinkoenergiavalaisimeen asennettu lataussäädin
estää akkujen ylilatautumisen.
Vaihda akut, jos valaisuteho ei parane enää latauksen jälkeen (kuva E).
Asennus
Huomautus: Päätä ennen asennusta, minne asennat aurinkokennon 6
ja päälaitteen
kaapelin pituus on 2,5 m.
1
. Huomaa, että aurinkokennon ja päälaitteen välisen
Spotti-lampun asennus
Huomioi seuraavat seikat päälaitteen 1 asennuspaikan valinnan yhteydessä:
1. Spotti-lamppu
koska sen pitäisi pystyä valaisemaan toivottu alue. Muista löysätä spotti-lampun nivelruuvia ennen lampun liikuttamista. Kiristä nivelruuvi taas
kireäksi liikuttamisen jälkeen (katso kuva F).
20 FI
2
on liitetty päälaitteeseen siten, että sitä voi liikuttaa,
Page 21
2. Anturin 3 tunnistusalue on enintään 12 metriä n. 90° tunnistuskulmassa
vaakasuoraan ja 90° pystysuoraan (asennuskorkeudesta riippuen –
paras korkeus on välillä 1,80 m ja 2,00 m).
3. Varmista, etteivät katuvalot valaise liiketunnistinta yöllä. Tämä voi
vaikuttaa liiketunnistimen toimintaan.
Kiinnitä päälaite 1 kahden mukana toimitetun tulpan 8 (ø 6 mm) ja
kahden mukana toimitetun ruuvin
7
(4 x 30 mm) avulla (katso kuva B).
Huomautus: Mukana toimitettu asennusmateriaali on suunniteltu
tavallista julkisivua varten. Muihin pohjiin tarvitaan mahdollisesti muita
kiinnitystarvikkeita. Pyydä tarvittaessa apua alan ammattilaiselta.
Tarkasta asennuksen jälkeen, onko päälaite kiinnitetty pitävästi.
Aurinkokennon asennus
Aurinkokenno 6 asennetaan mahdollisuuksien mukaan suoraan auringonvaloon. Ihanteellisessa tapauksessa aurinkokennon pinta kohdistetaan
etelän suuntaan. Aurinkokennon vaakasuora kohdistus onnistuu mukana
toimitetun asennusjalan avulla.
Asenna aurinkokennon 6 pidike 9 vaakasuoraan seinään kahden
mukana toimitetun ruuvin
avulla (katso kuva C).
Huomautus: Mukana toimitettu asennusmateriaali on suunniteltu
tavallista julkisivua varten. Muihin pohjiin tarvitaan mahdollisesti muita
kiinnitystarvikkeita. Pyydä tarvittaessa apua alan ammattilaiselta.
Tarkasta asennuksen jälkeen, että aurinkokenno on varmasti pysyvästi
paikoillaan.
Asenna sen jälkeen aurinkokenno kuvan C mukaisesti.
Kohdista aurinkokenno sen jälkeen etelän suuntaan.
7
(4 x 30 mm) ja tulppien 8 (ø 6 mm)
21 FI
Page 22
Aurinkokennon yhdistäminen päälaitteeseen
Vedä virtajohto molempien käyttöyksiköiden (päälaitteen 1 ja aurinko-
6
kennon
kuormitukselle. Käytä johdon kiinnitykseen tavallisia asennustarvikkeita kuten kaarikiinnikkeitä tai kaapelikanavia, jotta johdon eristys ei vaurioituisi.
Yhdistä päälaitteen ja aurinkokennon pistokeliittimet 4 yhteen. Huo-
Kiinnitä molemmat pistokeliittimet ruuvaamalla hattumutterilla (katso
Käyttöönotto
Päälaitteen 1 kytkimellä 5 (kuva A) voi suorittaa seuraavat toiminnot:
) asennuksen jälkeen siten, että sitä ei ole altistettu mekaaniselle
maa, että nämä pistokeliittimet sopivat yhteen vain yhdessä suunnassa.
kuva D).
Asento „OFF“: Anturi
3
ja spotti-lamppu 2 ovat pois päältä. Akut
ladataan auringon paistaessa aurinkokennojen
avulla. Käytä tätä kytkentätapaa tyhjien akkujen
lataamiseen (katso „Akkujen lataaminen“).
Asento „AUTO“: Valon osuessa aurinkokenno lataa akut. Spotti-lamppu
kytkeytyy automaattisesti hämärässä tai pimeässä
päälle ja päivänvalossa pois päältä. Jotta valaisu kestäisi kauan, ei LED-lamppuja käytetä täydellä teholla
tässä käyttötavassa, vaan vain n. 25 % niiden täydestä
valaisutehosta hyödynnetään (Eco-käyttötapa). Kun
akut on ladattu täysin, valoa riittää tässä kytkentäasennossa noin 8 tunniksi.
Asento „PIR“: Valon osuessa aurinkokenno lataa akut. Anturi kytkee
spotti-lampun päälle hämärässä tai pimeässä heti, kun
se tunnistaa liikkeen. Valaisuaika on säädetty etukäteen
ja se on n. 1,5 minuuttia. Jos anturi tunnistaa tämän
1,5 minuutin aikana lisää liikettä, valaisuaika alkaa
uudestaan. LED-lamppuja käytetään täydellä teholla
22 FI
6
Page 23
tässä käyttötavassa. Kun akut on ladattu täysin, valaisu
toimii tässä kytkentäasennossa noin 2 tunnin ajan.
Huolto / akkujen vaihto
Jotta aurinkokennon 6 tehokas toiminta olisi taattu, aurinkokenno täytyy
puhdistaa tietyin väliajoin (katso „Puhdistus ja hoito“).
Vaihda akku seuraavalla tavalla:
Siirrä kytkin 5 asentoon „OFF“.
Irrota ristipääruuvimeisselillä sulkuruuvit 11 päälaitteen 1 takasivulta
(katso kuva E).
Poista päälaitteen irrotettu takasivu.
Poista akut akkulokerosta 10 ja korvaa ne uusilla teknisesti vastaavilla
akuilla. Tarkista oikea napaisuus akkuja asettaessasi. Se on merkitty
akkulokeroon.
Sulje päälaitteen takasivu uudestaan ja kiinnitä se sulkuruuvilla.
Talvikäyttö
Jos auringonvaloa on vain vähän, voi valaisuaika lyhentyä aina siitä riippuen,
kuinka kauan laitteisto on yöllä päällä. Tarkasta sen vuoksi myös talvella,
onko aurinkokenno
ilman varjoa ja poista tarvittaessa jää ja lumi aurinkokennon edestä.
Jos valaisuaika ei ole riittävä vähäisestä auringonvalosta johtuen, lataa akut
tai vaihda ne (katso „Akkujen lataaminen“ tai „Akkujen vaihto“).
6
vähäisestä auringonvalosta huolimatta koko päivän
23 FI
Page 24
Puhdistus ja hoito
Kytke LED-aurinkoenergiavalaisin pois päältä puhdistuksen ajaksi.
Käytä puhdistukseen hieman kostutettua, nukatonta liinaa ja mietoa
puhdistusainetta.
Tarkasta erityisesti anturi 3 ja aurinkokenno 6 säännöllisesti likaan-
tumisen varalta.
Puhdista anturi ja aurinkokenno säännöllisesti häiriöttömän toiminnan
takaamiseksi.
Puhdista erityisesti aurinkokenno talvella lumesta ja jäästä.
Virheiden korjaaminen
= Ongelma
= Syy
= Ratkaisu
Valaisin ei kytkeydy päälle.
Aseta kytkin 5 asentoon „OFF“.
Aseta kytkin asentoon „ON“.
Anturi 3 on likaantunut.
Puhdista liikeilmaisin.
Akut ovat tyhjiä.
Lataa akut (katso „Akkujen lataaminen“).
Valo lepattaa.
Akut ovat melkein tyhjiä.
Lataa akut (katso „Akkujen lataaminen“).
Akku tyhjenee lyhyessä ajassa.
Aurinkokenno on likaantunut.
Puhdista aurinkokenno.
Aurinkokenno on kohdistettu väärin.
Kohdista aurinkokenno uudestaan (katso „Aurinkokennon asennus“).
24 FI
Page 25
Huonot sääolosuhteet.
Katso „Talvikäyttö“.
Akut ovat viallisia.
Vaihda akut (katso „Huolto / akkujen vaihto“).
Hävittäminen
Pakkaus on valmistettu ympäristöystävällisistä materiaaleista,
jotka voidaan hävittää paikallisen kierrätyspisteen kautta.
Lisätietoja käytettyjen tuotteiden hävittämismahdollisuuksista saat kunnan
tai kaupungin virastoista.
Älä heitä käytettyä tuotetta kotitalousjätteisiin. Hävitä tuote
ympäristöystävällisesti toimittamalla se asianmukaiseen jätehuoltoon. Lisätietoja kierrätyspisteistä ja niiden aukioloajoista saat
kuntasi viranomaisilta.
Vialliset ja käytetyt akut on toimitettava kierrätykseen direktiivin 2006 / 66 / EY
mukaisesti. Hävitä akut ja/tai laite toimittamalla ne paikalliseen kierrätyspisteeseen.
Akkujen vääränlainen hävittämistapa aiheuttaa
ympäristövahinkoja!
Pb
Akkuja ei saa hävittää talousjätteenä. Toimita tästä syystä vanhat akut
kunnalliseen keräyspisteeseen.
Takuu
Laite on valmistettu huolellisesti tiukkojen laatudirektiivien mukaan ja tarkistettu huolella ennen toimitusta. Jos tuote on virheellinen, sinulla on ostajana
25 FI
Page 26
lakisääteiset oikeudet esittää vaatimuksia tuotteen myyjää kohtaan. Seuraavassa esitetty takuu ei rajoita lakisääteisiä oikeuksiasi.
Laitteelle myönnetty takuu on voimassa 3 vuotta ostopäivästä lukien. Takuun
voimassaolo alkaa tuotteen ostopäivästä. Säilytä aina alkuperäinen kassakuitti. Se toimii todisteena tehdystä ostoksesta.
Jos 3 vuoden sisällä tuotteen ostopäivästä alkaen tuotteesta löytyy materiaalitai valmistusvirhe, korjaamme tuotteen ilmaiseksi tai toimitamme tilalle uuden tuotteen harkintamme mukaan. Takuu raukeaa, jos tuote on vioittunut
asiattoman käytön tai huollon vuoksi.
Takuu koskee materiaali- ja valmistusvirheitä. Takuu ei kata tuotteen osia,
jotka kuluvat normaalissa käytössä ja siitä syystä pidetään kuluvina osina
(esim. paristot) tai vaurioita särkyvissä osissa esim. kytkimessä, akuissa tai
lasista valmistetuissa osissa.
26 FI
Page 27

Ändamålsenlig användning ......................................Sidan 28
Beskrivning av delarna ................................................Sidan 28
Tekniska specifikationer ..............................................Sidan 28
Leveransomfattning .........................................................Sidan 29
Allmän säkerhetsinformation ..................................Sidan 29
Säkerhetsinformation för batterier ....................Sidan 30
Funktion......................................................................................Sidan 30
Före första användning
Ladda batterierna .........................................................................Sidan 31
Montering
Montera spotlightlampan .............................................................Sidan 31
Montera solcellen .........................................................................Sidan 32
Ansluta solcellen till huvudapparaten ..........................................Sidan 33
Idrifttagning ............................................................................Sidan 33
Underhåll / byta batterier ...........................................Sidan 34
Vinteranvändning ..............................................................Sidan 34
Rengöring och skötsel ....................................................Sidan 35
Felavhjälpning ......................................................................Sidan 35
Avfallshantering .................................................................Sidan 36
Garanti ........................................................................................Sidan 36
27 SE
Page 28

LED Strålkastare med solcell
Ändamålsenlig användning
Den solcellsdrivna LED-strålkastaren är avsedd för att lysa upp områden utomhus där strömanslutning saknas, t.ex. lusthus och garage. Den solcellsdrivna LED-strålkastaren passar inte för industriell användning.
Beskrivning av delarna
1
Huvudapparat
2
Spotlightlampa
3
Sensor
4
Stickkontakt
5
Br ytare (AUTO / OFF / PIR)
6
Solcell
7
Skruv (4 x 30 mm)
8
Plugg (ø 6 mm)
9
Hållare (solarcell)
10
Batterifack
11
Låsskruvar
Tekniska specifikationer
Driftspänning: 3,6 V
Batteri: 3 x NiMH-batteri 1,2 V , 600 mAh, AA
Ljuskälla: 10 LED-lampor med vardera 0,06 W (LED-lamporna
kan inte bytas ut)
Solcell: amorf, 8 x 8 cm, max. 5,4 V, max. 70 mA
Sensor: räckvidd: ca. 5–12 m,
avkänningsvinkel: ca. 90° horisontalt, 90° vertikalt.
Kapslingsklass: IP44 (stänkvattenskyddad)
28 SE
Page 29

Leveransomfattning
Kontrollera omedelbart efter uppackning att alla delar finns med i leveransen
och att apparaten är i felfritt skick.
1 huvudapparat (bestående av strålkastare med 10 LED-lampor, sensor,
monteringshållare med inbyggda batterier och integrerad styrning)
1 solcell (8 cm x 8 cm) (inkl. ca 2,5 m strömkabel)
4 skruvar (4 x 30 mm)
4 pluggar (ø 6 mm)
1 monterings- och bruksanvisning
Allmän säkerhetsinformation
Gör dig förtrogen med produktens bruksanvisning och säkerhetsinformation
innan du använder den för första gången! Lämna även över alla handlingar
om du överlåter produkten till tredjeman!
Denna apparat kan användas av barn från och med 8 år samt av
personer med nedsatt fysisk, motorisk eller mental förmåga eller med
bristande erfarenhet och kunskap, om de hålls under uppsikt eller instruerats om en säker användning av apparaten och om de förstått de
risker som användningen kan medföra. Barn får inte leka med apparaten. Rengöring och underhåll får inte utföras av barn utan uppsikt av
vuxen person.
Lämna aldrig barn med förpackningsmaterial utan uppsikt. Kvävnings-
risk föreligger på grund av förpackningsmaterial. Barn underskattar
ofta riskerna.
Håll barn borta från arbetsområdet under pågående montering. I leve-
ransen ingår ett flertal skruvar och andra smådelar. Dessa smådelar
kan vara livsfarliga om de sväljs eller andas in.
Använd inte denna artikel om du upptäcker att den är skadad!
29 SE
Page 30

Säkerhetsinformation för batterier
LIVSFARA! Batterier får ej vara tillgängliga för barn.
Uppsök omedelbart läkare om någon råkar svälja ett batteri!
SE UPP! EXPLOSIONSRISK!
Kasta aldrig batterier in i eld eller i vatten!
Utsätt inte batterier för mekanisk belastning!
Använd inte batterier som inte kan laddas upp.
Kortslut inte batterier och / eller öppna dem inte.
Risk för materialskador
Använd endast den angivna batteritypen!
Kontrollera polriktningen när du sätter i batterierna! Den visas i
batterifacket!
Rengör batteri- och apparatkontakter vid behov innan du sätter i
batterierna!
Funktion
Solarcellen 6 omvandlar ljusenergi från solen till elenergi. Via den anslutna
strömkabeln laddar solcellen batterierna i batterifacket
I batterierna lagras den elenergi som solarcellen matat in. Fulladdade
batterier ger i kopplingsläget ”PIR” energi för ca 2 timmars ljus, i kopplingsläget ”AUTO” för ca 8 timmars ljus.
På sommaren tar det ca 2 till 4 dagar att ladda upp helt urladdade batterier
om solen skiner regelbundet. Batterierna måste vara laddade innan lamporna används för första gången (se ”Ladda batterierna”).
10
.
30 SE
Page 31

Före första användning
Ladda batterierna
Observera: De batterier som sitter i huvudapparaten 1 är laddade
vid leverans. Laddnivån kan dock redan ha sjunkit under transporten från
tillverkaren till försäljningsstället. Ladda därför batterierna innan du använder
dem för första gången. På sommaren tar det vid regelbunden solstrålning
minst en dag att ladda batterierna för första gången.
Sätt brytaren 5 i läget ”OFF”.
Observera: När solen skiner regelbundet (oavsett årstid) tar det två till
tio dagar att ladda upp helt urladdade batterier.
Observera: Den inbyggda laddningsregulatorn i den solcellsdrivna
LED-strålkastaren förhindrar att batterierna överladdas.
Byt ut batterierna när lyseffekten inte blir bättre efter laddning (bild E).
Montering
Observera: Bestäm dig för var du vill montera solcellen 6 och huvud-
apparaten
och huvudapparaten är ca 2,5 m lång.
1
innan du börjar arbeta. Tänk på att kabeln mellan solcellen
Montera spotlightlampan
Tänk på följande när du väljer monteringsplats för huvudapparaten 1:
1. Spotlightlampan
kunna lysa upp det utvalda området. Tänk på att lossa spotlightlampans scharnerskruv något innan du rör på spotlightlampan. Dra sedan
åt scharnerskruven igen (se bild F).
2
är rörligt ansluten till huvudapparaten och bör
31 SE
Page 32

2. Sensorn 3 har (beroende på monteringshöjden, som i idealfall ska
vara 1,80 –2,00 m) ett avkänningsområde på max. 12 m, med en
avkänningsvinkel på 90° horisontalt och 90° vertikalt.
3. Se till att gatubelysningen inte träffar sensorn på kvällar och nätter.
Detta kan påverka dess funktion.
Fäst huvudapparaten 1 med två av de medföljande pluggarna 8
(ø 6 mm) och två av de medföljande skruvarna
7
(4 x 30 mm)
(se bild B).
Observera: Det monteringsmaterial som medföljer passar för fästning
i vanligt murverk. För andra underlag krävs eventuellt andra fästmaterial.
Fråga en sakkunnig om råd om du är osäker.
Kontrollera att huvudapparaten sitter fast ordentligt efter monteringen.
Montera solcellen
Solcellen 6 kräver så direkt solljus som möjligt. Det optimala är att rikta
solcellsytan åt söder. Solcellen ska positioneras horisontellt för att passa
ihop med den medföljande monteringsfoten.
Montera solcellens 6 hållare 9 på en lodrät vägg med hjälp av två
av de medföljande skruvarna
pluggarna
8
(ø 6 mm) (se bild C).
Observera: Det monteringsmaterial som medföljer passar för fästning
i vanligt murverk. För andra underlag krävs eventuellt andra fästmaterial.
Fråga en sakkunnig om råd om du är osäker.
Kontrollera att solcellshållaren sitter fast ordentligt efter monteringen.
Sätt sedan på solcellen som bild C visar.
Vänd sedan solcellen åt söder.
7
(4 x 30 mm) och de medföljande
32 SE
Page 33

Ansluta solcellen till huvudapparaten
När du monterat de båda driftsenheterna (huvudapparat 1 och solcell
6
) drar du kabeln så att den inte utsätts för någon som helst mekanisk
belastning. Kabeln bör fästas med vanliga installationsmaterial, t.ex. kabelklämmor eller kabelkanaler, för att undvika skador på kabelisoleringen.
Koppla ihop stickkontakterna 4 på huvudapparatens och solcellens
kablar. Tänk på att stickkontakterna bara passar ihop åt ett håll.
Skruva ihop de båda stickkontakterna med kopplingsmuttern (se bild D).
Idrifttagning
För brytaren 5 på huvudstationen 1 (bild A) finns följande funktioner:
Läget ”OFF”: Sensorn
rierna laddas när solljus träffar solcellen
3
och spotlightlampan 2 är ur drift. Batte-
6
. Använd
detta kopplingsläge för att ladda upp urladdade
batterier (se ”Ladda batterierna”).
Läget ”AUTO”: Vid solljus laddas batterierna med hjälp av solcellen.
Spotlightlampan tänds automatiskt när det börjar skymma
eller blir mörkt och släcks när det blir dagsljus igen.
För att LED-lamporna ska kunna lysa längre slås de
inte på med full effekt i det här kopplingsläget, utan
bara med ca 25 % av sin fulla lyskraft (energisparläge).
När batterierna är fulladdade räcker laddningen i det
här kopplingsläget för ca 8 timmars ljus.
Läget ”PIR”: Vid solljus laddas batterierna med hjälp av solcellen.
Sensorn slår på spotlightlampan i skymning eller mörker
så fort den känner av en rörelse. Lystiden är förinställd
och uppgår till ca 1,5 minut. Om en ny rörelse registreras under denna tid så startas lystiden på nytt. LED-lamporna slås på med full effekt i det här kopplingsläget.
33 SE
Page 34

När batterierna är fulladdade räcker laddningen i det
här kopplingsläget för totalt ca 2 timmars ljus.
Underhåll / byta batterier
För att säkerställa goda prestanda för solcellen 6 måste du rengöra den
med jämna mellanrum (se ”Rengöring och skötsel”).
Gör så här för att byta batterier:
Skjut brytaren 5 till läget ”OFF”.
Lossa låsskruvarna 11 på baksidan av huvudapparaten 1 med en
kryssmejsel (se bild E).
Ta bort den lossade baksidan från huvudapparaten.
Ta ut batterierna ur batterifacket 10 och ersätt dem med nya batterier
med samma tekniska specifikationer. Kontrollera polriktningen när du
sätter i batterierna. Den visas i batterifacket.
Stäng baksidan av huvudapparaten igen och fäst den med låsskruvarna.
Vinteranvändning
På grund av den begränsade mängden solljus kan lystiden under natten
förkortas beroende på hur länge lampan är påslagen nattetid. Försäkra dig
därför även på vintern om att solcellen
befinner sig i skuggan under hela dagen. Avlägsna vid behov is och snö.
Om lystiden inte räcker till på grund av väderförhållandena så måste du
ladda batterierna eller byta ut dem (se ”Ladda batterierna” eller ”Byta
batterier”).
6
trots det låga solståndet inte
34 SE
Page 35

Rengöring och skötsel
Stäng av den solcellsdrivna LED-strålkastaren före rengöring.
Använd en lätt fuktad, luddfri trasa och ett milt rengöringsmedel för
rengöringen.
Kontrollera särskilt sensorn 3 och solcellen 6 regelbundet med
avseende på smuts.
Rengör sensorn och solcellen regelbundet för att säkerställa att de
fungerar felfritt.
Det är särskilt viktigt att solcellen hålls fri från snö och is vintertid.
Felavhjälpning
= Problem
= Orsak
= Lösning
Strålkastaren tänds inte.
Brytare 5 i ”OFF”-läge.
Sätt brytaren i ”ON”-läge.
Sensorn 3 är smutsig.
Rengör rörelsevakten.
Batterierna är urladdade.
Ladda batterierna (se ”Ladda batterierna”).
Strålkastaren flimrar.
Batterierna är nästan urladdade.
Ladda batterierna (se ”Ladda batterierna”).
Batteriet blir urladdat på kort tid.
Solcellen är smutsig.
Rengör solcellen.
Solcellen är inte riktad åt rätt håll.
Rikta in solcellen på nytt (se ”Montera solcellen”).
35 SE
Page 36

Ogynnsamma väderförhållanden.
Se ”Vinteranvändning”.
Batterierna är defekta.
Byt ut batterierna (se ”Underhåll / byta batterier”).
Avfallshantering
Förpackningen består av miljövänliga material, som kan lämnas
på lokala återvinningsstationer.
Information om var du kan kasta den kasserade produkten får du hos
kommunen.
Var rädd om miljön och kasta inte den uttjänta produkten i
hushållsavfallet utan säkerställ en fackmässig avfallshantering.
Information om återvinningsstationer och deras öppettider får
du hos de lokala myndigheterna.
Defekta eller förbrukade batterier måste återvinnas enligt direktiv
2006 / 66 / EG. Lämna batterier och / eller apparaten till befintliga
återvinningsstationer.
Risk för miljöskador p.g.a. felaktig avfallshantering
av batterier!
Pb
Batterier får inte kastas i hushållssoporna. Lämna därför förbrukade batterier
till kommunens återvinningsstation.
Garanti
Denna apparat har tillverkats med omsorg enligt stränga kvalitetskrav och
kontrollerats noggrant före leverans. Om fel uppstår på produkten gäller
36 SE
Page 37

dina lagstadgade rättigheter gentemot säljaren. Dessa lagstadgade rättigheter begränsas inte av vår garanti, som redovisas nedan.
Du erhåller 3 års garanti på denna apparat från och
titiden börjar på inköpsda
gen. Spara originalkvittot. Denna handling behövs
med köpdatum. Garan-
som bevis för köpet.
Om ett material- eller tillverkningsfel uppstår på produkten inom 3 år från
köpdatum, reparerar eller ersätter vi efter eget gottfinnande produkten utan
extra kostnad. Denna garanti förfaller om produkten skadas, används på
fel sätt eller inte underhålls.
Garantin gäller för material- eller tillverkningsfel. Denna garanti omfattar
inte produktkomponenter som utsätts för normalt slitage och därför betraktas som slitdelar (t.ex. batterier). Uteslutna är även skador på ömtåliga delar,
som t.ex. brytare, batteripack eller delar tillverkade av glas.
37 SE
Page 38

Formålsbestemt anvendelse .......................................Side 39
Beskrivelse af de enkelte dele ..................................Side 39
Tekniske data ..........................................................................Side 39
Leverede dele ..........................................................................Side 40
Generelle sikkerhedsanvisninger ..........................Side 40
Sikkerhedshenvisninger for batterier ................Side 41
Funktion........................................................................................Side 41
Inden første ibrugtagning
Opladning af batterier ....................................................................Side 42
Montering
Montering af spotlampen ...............................................................Side 42
Montering af solcellen ....................................................................Side 43
Forbindelse af solcellen med hovedenheden ................................Side 43
Ibrugtagning ............................................................................Side 44
Vedligeholdelse / udskiftning af batterier ......Side 45
Vinterdrift ...................................................................................Side 45
Rengøring og pleje .............................................................Side 45
Fejlafhjælpning .......................................................................Side 46
Bortskaffelse ............................................................................Side 47
Garanti ..........................................................................................Side 47
38 DK
Page 39

LED-Solarlampe
Formålsbestemt anvendelse
LED-solcelle-spotlampen er beregnet til belysning af udendørs områder, der
ikke har nogen strømtilslutning, f.eks. havehuse, garager etc. LED-solcelle-spotlampen er ikke egnet til erhvervsmæssig brug.
Beskrivelse af de enkelte dele
1
Hovedenhed
2
Spot
3
Sensor
4
Stikforbindelse
5
Afbr yder (AUTO / OFF / PIR)
6
Solcelle
7
Skrue (4 x 30 mm)
8
Plug (ø 6 mm)
9
Holder (solcelle)
10
Batterirum
11
Låseskruer
Tekniske data
Driftsspænding: 3,6 V
Batteri: 3 x NiMH-batteri 1,2 V , 600 mAh, AA
Lyskilde: 10 LED‘er med hver især 0,06 W (LED‘erne kan ikke
skiftes ud)
Solcelle: amorf, 8 x 8 cm, maks. 5,4 V, maks. 70 mA
Sensor: Rækkevidde: ca. 5–12 m,
registreringsvinkel: ca. 90° horisontalt, 90° vertikalt
Kapslingsklasse: IP44 (stænkvandsbeskyttet)
39 DK
Page 40

Leverede dele
Kontrollér umiddelbart efter udpakningen, at de leverede dele er komplette
samt at produktet er i korrekt stand.
1 hovedenhed (bestående af spotlampe med 10 LED‘er, sensor, montage-
hus med indbyggede batterier og indbygget styreenhed)
1 solcelle (8 cm x 8 cm) (inkl. ca. 2,5 m strømkabel)
4 skruer (4 x 30 mm)
4 plugs (ø 6 mm)
1 monterings- og betjeningsvejledning
Generelle sikkerhedsanvisninger
Gør dig fortrolig med alle betjenings- og sikkerhedshenvisninger, inden
produktet tages i brug første gang! Hvis du giver produktet videre til
tredjemand, skal alt materiale også følge med!
Dette apparat kan benyttes af børn fra 8-årsalderen og opad, samt af
personer med forringede fysiske, følelsesmæssige eller mentale evner
eller med mangel på erfaring og viden, når de er under opsyn eller
mht. sikker brug af apparatet er blevet vejledt og har forstået de deraf
resulterende farer. Børn må ikke lege med apparatet. Rengøring og
brugervedligeholdelse må ikke udføres af børn uden opsyn.
Børn må ikke være alene eller uden opsyn med indpakningsmaterialet.
Der består kvælningsfare pga. emballagematerialet. Børn undervurderer
ofte farerne.
Hold børn på afstand af arbejdsområdet under monteringen. Den
samlede levering indeholder et stort antal skruer og andre smådele.
Disse smådele kan fremkalde livsfare, hvis de bliver slugt eller inhaleret.
Anvend ikke produktet, hvis du konstaterer nogen form for beskadigelser!
40 DK
Page 41

Sikkerhedshenvisninger for batterier
LIVSFARE! Børnehænder bør ikke komme i berøring
med batterier. Opsøg i tilfælde af slugning straks lægehjælp!
FORSIGTIG! EKSPLOSIONSFARE!
Kast aldrig batterier i ild eller vand!
Udsæt ikke batterier for mekanisk belastning!
Anvend ikke ikke-genopladelige batterier.
Kortslut ikke batterier og / eller åbn dem ikke.
Fare for materielle skader
Anvend udelukkende den angivne batteritype!
Vær opmærksom på korrekt polaritet når batterierne isættes! Polariteten
er angivet i batterirummet!
Rengør kontakten til batteriet og apparatet, såfremt det er nødvendigt,
før de sættes i!
Funktion
Solcellen 6 omdanner solens lysenergi til elektrisk energi. Batterierne, der
er indbygget i batterirummet
Disse batterier lagrer den elektriske energi, der tilføres fra solcellen. Fuldstændigt opladede batterier leverer i kontaktstilling „PIR“ energi til ca.
2 timers lys og i kontaktstilling „AUTO“ til ca. 8 timers lys.
Opladning af fuldstændigt tomme batterier varer om sommeren ved regelmæssig solindstråling ca. 2 til 4 dage. Batterierne skal være opladet inden
første ibrugtagning af lampen (se „Opladning af batterier“).
10
, oplades via det tilsluttede strømkabel.
41 DK
Page 42

Inden første ibrugtagning
Opladning af batterier
Bemærk: Batterierne, der er indbygget i hovedenheden 1 er opladet ved
levering. De kan dog have mistet noget af deres opladning under transporten fra producenten til salgsstedet. Oplad derfor batterierne inden første
ibrugtagning. Den første opladning varer ved regelmæssig solindstråling
om sommeren mindst én dag.
Stil kontakten 5 på stilling „OFF“.
Bemærk: Ved regelmæssig solindstråling (afhængigt af årstiden) bør
tomme batterier være opladet efter to til ti dage.
Bemærk: Den indbyggede opladningsregulator på LED-solcelle-spotlampen forhindrer overopladning af batterierne.
Udskift batterierne, hvis ikke lysydelsen er forbedret efter opladningen (fig. E).
Montering
Bemærk: Afgør inden monteringen, hvor du vil montere solcellen 6
og hovedenheden
hovedenhed har en længde på ca. 2,5 m.
1
. Sørg for, at kabelforbindelsen mellem solcelle og
Montering af spotlampen
Vær opmærksom på følgende, når du vælger et monteringssted til hoveden-
1
heden
1. Spotlampen
42 DK
:
2
er forbundet med hovedenheden og skal kunne belyse
det ønskede område. Husk at løsne spotlampens ledskrue en smule,
før du bevæger spotlampen. Tilspænd ledskruen igen derefter (se fig. F).
Page 43

2. Sensoren 3 har (afhængigt af monteringshøjden, en højde på 1,80 m –
2,00 m er ideel) et registreringsområde på maks. 12 m ved en registreringsvinkel på 90° horisontalt og 90° vertikalt.
3. Sørg for, at sensoren ikke bliver belyst af gadebelysningen om natten.
Dette kan påvirke funktionen.
Fastgør hovedenheden 1 ved hjælp af to af de medfølgende plugs
8
(ø 6 mm) og to af de medfølgende skruer 7 (4 x 30 mm) (se fig. B).
Bemærk: Det medfølgende monteringsmateriale er egnet til fastgø-
relse i normalt murværk. Til andre underlag skal der muligvis anvendes
andre fastgørelsesmaterialer. Spørg en fagmand i tvivlstilfælde.
Kontrollér efter monteringen, at hovedenheden sidder godt fast.
Montering af solcellen
Solcellen 6 behøver en så direkte solindstråling som muligt. Det er mest
hensigtsmæssigt at orientere solcelleoverfladen mod syd. Solcellens horisontale placering defineres af den medfølgende monteringsfod.
Montér holderen 9 til solcellen 6 på en lodret væg ved hjælp af to
af de medfølgende skruer
8
(ø 6 mm) (se fig. C).
Bemærk: Det medfølgende monteringsmateriale er egnet til fastgø-
relse i normalt murværk. Til andre underlag skal der muligvis anvendes
andre fastgørelsesmaterialer. Spørg en fagmand i tvivlstilfælde.
Kontrollér efter monteringen, at solcellens holder sidder godt fast.
Sæt derefter solcellen på holderen, som vist på fig. C.
Orientér derefter solcellen mod syd.
7
(4 x 30 mm) og de medfølgende plugs
Forbindelse af solcellen med hovedenheden
Læg efter monteringen af de to driftsenheder (hovedenhed 1 og solcelle
6
) kablet på en sådan måde, at det ikke udsættes for mekanisk belastning
43 DK
Page 44

af nogen art. Anvend til fastgørelse af kablet almindelige installationsmaterialer som f.eks. kabelklemmer eller kabelkanaler for at undgå beskadigelser
af kabelisoleringen.
Forbind kablernes stikforbindelser 4 på hovedenheden og solcellen.
Vær opmærksom på, at disse stikforbindelser kun passer sammen i én
retning.
Skru de to stikforbindelser fast med omløbermøtrikken (se fig. D).
Ibrugtagning
Kontakten 5 til hovedstationen 1 (fig. A) har følgende funktioner:
Stilling „OFF“: Sensor
3
og spotlampe 2 er ude af drift. Batterierne
oplades af solcellen
6
ved solindstråling. Denne
kontaktstilling anvendes til opladning af afladede
batterier (se „Opladning af batterier“).
Stilling „AUTO“: Batterierne oplades via solcellen ved lysindfald. Spot-
lampen tændes automatisk, når det bliver mørkt, og
slukkes igen ved dagslys. For at opnå en lang driftstid
aktiveres LED‘erne i denne kontaktstilling ikke med fuld
ydelse men leverer kun ca. 25 % af deres maksimale
lysydelse (Eco-modus). Når batterierne er fuldstændigt
opladet, rækker opladningen ved denne kontaktstilling
til ca. 8 timers lys.
Stilling „PIR“: Batterierne oplades via solcellen ved lysindfald. Sen-
soren aktiverer spotlampen, når det er mørkt, så snart
den registrerer en bevægelse. Lystiden er forindstillet
og udgør ca. 1,5 minutter. Hvis der i løbet af disse
1,5 minutter registreres en ny bevægelse, starter lystiden forfra. I denne kontaktstilling aktiveres LED‘erne
med fuld ydelse. Når batterierne er fuldstændigt opladet, rækker opladningen ved denne kontaktstilling til i
alt ca. 2 timers lys.
44 DK
Page 45

Vedligeholdelse / udskiftning af batterier
For at sikre en god ydelse ved solcellen 6 skal solcellen rengøres i regelmæssige tidsintervaller (se „Rengøring og pleje“).
Anvend følgende fremgangsmåde til batteriskift:
Skyd kontakten 5 til stilling „OFF“.
Løsn med en stjerneskruetrækker låseskruerne 11 på bagsiden af
hovedenheden
Tag den løsnede bagside på hovedenheden af.
Tag batterierne ud af batterirummet 10, og udskift dem med nye
batterier med de samme tekniske data. Sørg for korrekt polaritet ved
isætningen. Polariteten er angivet i batterirummet.
Luk igen bagsiden på hovedenheden, og skru låseskruerne fast.
1
(se fig. E).
Vinterdrift
På grund af den lave solindstråling kan lystiden om natten alt efter tilkoblingstiden om natten være forringet. Kontrollér derfor også om vinteren, hvor
solen står lavt, om solcellen
vendigt is eller sne.
Hvis lystiden på grund af vejrsituationen er utilstrækkelig, skal batterierne
oplades eller udskiftes (se „Opladning af batterier“ hhv. „Udskiftning af
batterier“).
6
er utildækket hele dagen, og fjern om nød-
Rengøring og pleje
Sluk LED-spotlampen ved rengøring.
Anvend til rengøringen en let fugtet fnugfri klud med et mildt rengø-
ringsmiddel.
Undersøg især sensoren 3 og solcellen 6 regelmæssigt for tilsmuds-
ning.
45 DK
Page 46

Rengør sensoren og solcellen regelmæssigt for at sikre en upåklagelig
funktion.
Hold om vinteren især solcellen fri for sne og is.
Fejlafhjælpning
= Fejl
= Årsag
= Løsning
Lampen tændes ikke.
Kontakt 5 i „OFF“-stilling.
Sæt kontakten på „ON“-stilling.
Sensoren 3 er tilsmudset.
Rengør bevægelsessensoren.
Batterierne er tomme.
Oplad batterierne (se „Opladning af batterier).
Lyset flakker.
Batterierne er næsten tomme.
Oplad batterierne (se „Opladning af batterier).
Batteriet aflades hurtigt.
Solcellen er tilsmudset.
Rengør solcellen.
Solcellen er orienteret forkert.
Ændr solcellens indstilling (se „Montering af solcellen“).
Dårlige vejrforhold.
Se „Vinterdrift“.
Batterierne er defekte.
Udskift batterierne (se „Vedligeholdelse / udskiftning af batterier“).
46 DK
Page 47

Bortskaffelse
Indpakningen består af miljøvenlige materialer, der kan bortskaffes på de lokale genbrugssteder.
Din kommune oplyser om mulighederne for bortskaffelse af det udtjente
produkt.
For miljøets skyld må produktet aldrig bortskaffes sammen med
husholdningsaffaldet, når det er udtjent, men skal afleveres til
miljøvenlig bortskaffelse. Du kan informere dig omkring indsamlingssteder og deres åbningstider hos de lokale myndigheder.
Defekte eller brugte batterier skal genbruges iht. direktiv 2006 / 66 / EF.
Returnér batterier og / eller produktet på de lokale genbrugsstationer.
Miljøskader på grund af forkert bortskaffelse af
batterier!
Pb
Batterier må ikke bortskaffes med husholdningsaffaldet. Aflever derfor
brugte batterier på det kommunale indsamlingssted.
Garanti
Apparatet er produceret omhyggeligt efter strenge kvalitetskrav og inden
levering afprøvet samvittighedsfuldt. Hvis der forekommer mangler ved dette
produkt, har du juridiske rettigheder over for sælgeren
juridiske rettigheder ind
skrænkes ikke af vores garanti, der beskrives i det føl-
gende.
af dette produkt. Disse
Du får 3 års garanti fra købsdatoen på dette appar
at. Garantifristen begynder med købsdatoen. Opbevar den originale kassebon på et sikkert sted.
Denne kassebon behøves som dokumentation for købet.
47 DK
Page 48

Hvis der inden for 3 år fra købsdatoen for dette produkt opstår en materialeeller fabrikationsfejl, bliver produktet repareret eller erstattet – efter vores
valg – af os uden omkostninger for dig. Garantien bortfalder, hvis apparatet bliver beskadiget eller ikke anvendes eller vedligeholdes korrekt.
Garantien gælder for materiale- eller fabrikationsfejl.
ikke produktdele, som er uds
nor
male sliddele (f.eks. batterier) eller ved skader på skrøbelige dele; f.eks.
at
for normalt slid og derfor kan betragtes som
Denne garanti dækker
kontakter, akkumulatorer som er fremstillet i glas.
48 DK
Page 49

Utilisation conforme ..........................................................Page 50
Description des pièces ..................................................... Page 50
Caractéristiques techniques ........................................Page 50
Contenu de la livraison...................................................Page 51
Consignes générales de sécurité ............................ Page 51
Consignes de sécurité pour les batteries .........Page 52
Fonction ....................................................................................... Page 52
Avant la première mise en service
Charger les batteries......................................................................Page 53
Montage ......................................................................................Page 53
Monter le spot ................................................................................ Page 54
Monter la cellule solaire ................................................................ Page 54
Connecter la cellule solaire à l‘appareil principal .......................Page 55
Mise en service ...................................................................... Page 55
Maintenance / Changer les batteries .................. Page 56
Fonctionnement en hiver .............................................. Page 57
Nettoyage et entretien ................................................... Page 57
Élimination des erreurs ...................................................Page 58
Mise au rebut .......................................................................... Page 58
Garantie ...................................................................................... Page 59
49 FR/BE
Page 50

Projecteur solaire LED
Utilisation conforme
Le projecteur solaire à LED est prévu pour éclairer les espaces extérieurs
ne disposant pas d‘une alimentation électrique, par exemple les maisons
de jardin, les garages, etc. Le projecteur solaire à LED n‘est pas conçu
pour une utilisation commerciale.
Description des pièces
1
Appareil principal
2
Spot
3
Capteur
4
Connecteur à fiche
5
Interrupteur (AUTO / OFF / PIR)
6
Cellule solaire
7
Vis (4 x 30 mm)
8
Cheville (ø 6 mm)
9
Support (Cellule solaire)
10
Compartiment de la batterie
11
Vis de fermeture
Caractéristiques techniques
Tension de service : 3,6 V
Batterie : 3 x batteries NiMH 1,2 V , 600 mAh, AA
Ampoule : 10 LED de respectivement 0,06 W (les LED ne
peuvent pas être remplacées)
Cellule solaire : amorphe, 8 x 8 cm, max. 5,4 V, max. 70 mA
50 FR/BE
Page 51

Capteur : portée : env. 5–12 m,
Angle de détection : env. 90° horizontal, 90° vertical
Type de protection : IP44 (protégé contre les projections d‘eau)
Contenu de la livraison
Contrôlez toujours directement après le déballage l‘intégralité du contenu
de livraison et l‘état parfait de l‘appareil.
1 appareil principal (composé du projecteur avec 10 LED, capteur, boîtier
de montage avec batteries intégrées et système de commande intégré)
1 cellule solaire (8 cm x 8 cm) (avec câble d‘alimentation de env. 2,5 m)
4 vis (4 x 30 mm)
4 chevilles (ø 6 mm)
1 notice de montage et d‘utilisation
Consignes générales de sécurité
Avant la première utilisation du produit, familiarisez-vous avec toutes les
consignes d‘utilisation et de sécurité ! En cas de cession du produit à des
tiers, remettez également tous les documents !
Cet appareil peut être utilisé par des enfants de 8 ans et plus ainsi que
par des personnes à capacités physiques, sensorielles ou mentales réduites ou manquant d‘expérience et de connaissance que sous surveillance ou s‘ils ont été instruits de l‘utilisation sûre de cet appareil et des
risques en découlant. Les enfants ne doivent pas jouer avec cet appareil. Le nettoyage et la maintenance domestique de l‘appareil ne doit
pas être effectué par un enfant sans surveillance.
Ne laissez jamais des enfants sans surveillance avec le matériel d‘em-
ballage. Il existe un risque d‘étouffement avec celui-ci. Les enfants
sous-estiment souvent les dangers.
51 FR/BE
Page 52

Maintenez les enfants éloignés de la zone de travail pendant le mon-
tage. Un grand nombre de vis et d‘autres petites pièces font également
partie de la livraison. Celles-ci peuvent être mortelles en cas d‘ingestion
ou d‘inhalation.
N‘utilisez pas l‘article si vous constatez des dégradations !
Consignes de sécurité pour les batteries
DANGER DE MORT ! Maintenir les batteries
hors de portée des enfants. En cas d‘ingestion, consultez immédiatement
un médecin !
PRUDENCE ! RISQUE D‘EXPLOSTION !
Ne jetez jamais les batteries dans le feu ou à l‘eau !
N‘exposez pas les batteries à une sollicitation mécanique !
N‘utilisez pas de piles non rechargeables.
Ne court-circuitez pas les batteries et / ou ne les ouvrez pas.
Risque de dommage matériel
Utiliser exclusivement le type de batterie indiqué !
Lors de leur insertion, faire attention à la bonne polarité ! Celle-ci est
signalée dans le compartiment des batteries !
Nettoyez le contact de la batterie et de l‘appareil si nécessaire avant
l‘insertion !
Fonction
La cellule solaire 6 transforme l‘énergie de la lumière du solaire en énergie
électrique. Par le câble d‘alimentation branché, elle charge les batteries
installées dans le compartiment
Ces batteries accumulent l‘énergie électrique injectée par la cellule solaire.
Les batteries entièrement chargées livrent dans la position de l‘interrupteur
« PIR » de l‘énergie pour environ 2 heures de lumière, dans la position de
l‘interrupteur « AUTO », elles en fournissent pour environ 8 heures.
52 FR/BE
10
.
Page 53

La charge des batteries entièrement déchargées durent entre 2 à 4 jours
en été avec un rayonnement régulier du soleil. Avant la première mise en
service de la lampe, les batteries doivent être chargées (voir « Charger les
batteries »).
Avant la première mise en service
Charger les batteries
Remarque : Les batteries insérées dans l‘appareil principal 1 sont
chargées à la livraison. Toutefois, elles peuvent déjà avoir perdu de la charge
pendant le transport du fabricant au point de vente. Pour cette raison, chargez-les avant la première mise en service. La première charge dure au
moins une journée en été avec un rayonnement régulier du soleil.
Placez l‘interrupteur 5 sur la position « OFF ».
Remarque : Avec un rayonnement régulier du soleil (en fonction de la
saison), les batteries vides se chargent en deux à dix jours.
Remarque : Le régulateur de charge intégré dans le projecteur solaire à
LED empêche une surcharge des batteries.
Échangez les batteries si la puissance lumineuse ne s‘améliore pas après
la charge (ill. E).
Montage
Remarque : Avant le montage, décidez de l‘endroit où vous souhaitez
monter la cellule solaire
le câble entre la cellule solaire et l‘appareil principal mesure env. 2,5 m de
long.
6
et l‘appareil principal 1. Veuillez noter que
53 FR/BE
Page 54

Monter le spot
Lors de la sélection du lieu de montage de l‘appareil principal 1, faites
attention aux points suivants :
1. Le spot
2
est relié de manière mobile à l‘appareil principal et doit
pouvoir éclairer la zone désirée. Vous devez desserrer un peu la vis
d‘articulation du spot avant de déplacer celui-ci. Ensuite, resserrez
celle-ci à nouveau (voir ill. F).
2. Le capteur
3
possède (en fonction de la hauteur de montage, l‘idéal
est une hauteur de 1,80 m - 2,00 m) une zone de détection de max.
12 m, avec un angle de détection de 90° à l‘horizontale et de 90° à
la verticale.
3. Veillez à ce que le capteur ne soit pas éclairé la nuit par les éclairages
de la rue. Cela peut influencer son efficacité.
Fixez l‘appareil principal 1 à l‘aide des deux chevilles fournies 8
(ø 6 mm) et des deux vis fournies
7
(4 x 30 mm) (voir ill. B).
Remarque : Le matériel de montage fourni est adapté à une fixation
dans une maçonnerie normale. Pour d‘autres surfaces, vous avez éventuellement besoin d‘un autre matériel de fixation. En cas de doute,
faites appel à un spécialiste.
Après le montage, contrôler le bon maintien de l‘appareil principal.
Monter la cellule solaire
La cellule solaire 6 a besoin d‘un rayonnement du soleil aussi direct que
possible. Une orientation de la surface de la cellule solaire vers le sud est
optimale. L‘orientation horizontale de la cellule solaire est déterminée par
le pied de montage fourni.
Montez le support 9 de la cellule solaire 6 sur une paroi verticale
7
(4 x 30 mm) et des chevilles fournies
54 FR/BE
à l‘aide des deux vis fournies
8
(ø 6 mm) (voir ill. C).
Page 55

Remarque : Le matériel de montage fourni est adapté à une fixation
dans une maçonnerie normale. Pour d‘autres surfaces, vous avez éventuellement besoin d‘un autre matériel de fixation. En cas de doute,
faites appel à un spécialiste.
Après le montage, contrôler le bon maintien du support de la cellule
solaire.
Installez ensuite la cellule solaire, comme le montre l‘ill. C.
Orientez ensuite la cellule solaire vers le sud.
Connecter la cellule solaire
à l‘appareil principal
Après le montage des deux unités de service (appareil principal 1 et
cellule solaire
aucune sollicitation mécanique. Pour la fixation du câble, utilisez le matériel
d‘installation traditionnel, comme par ex. les serres-câbles ou un canal de
câble pour éviter les dégradations de l‘isolation du câble.
Enfichez les raccords à fiche 4 des câbles de l‘appareil principal et
de la cellule solaire ensemble. Notez que ces raccords à fiche sont
uniquement compatibles dans une direction.
Vissez les deux raccords à fiche avec l‘écrou-raccord (voir ill. D).
Mise en service
6
), connectez le câble de sorte à ce qu‘il ne soit exposé à
L‘interrupteur 5 de la station principale 1 (ill. A) dispose des fonctions
suivantes :
Position « OFF » : Le capteur
Les batteries sont chargées par la cellule solaire
3
et le spot 2 ne sont pas en service.
6
en cas de rayonnement du soleil. Utilisez cette position de l‘interrupteur pour charger les batteries vides
(voir « Charger les batteries »).
55 FR/BE
Page 56

Position « AUTO » : En cas d‘incidence lumineuse, les batteries sont char-
gées par la cellule solaire. Le spot s‘allume automatiquement au crépuscule et lorsqu‘il fait sombre et s‘éteint
à nouveau à la lumière du jour. Pour atteindre une
longue durée de luminosité, les LED ne sont pas commandées dans cette position à puissance maximale,
elles fournissent env. 25 % seulement de leur puissance
lumineuse complète (mode Eco). Lorsque les batteries
sont entièrement chargées, la charge dans cette position de l‘interrupteur suffit pour env. 8 heures de lumière.
Position « PIR » : En cas d‘incidence lumineuse, les batteries sont char-
gées par la cellule solaire. Le capteur allume le spot
au crépuscule et lorsqu‘il fait sombre dès qu‘il détecte
un mouvement. La durée d‘éclairage est réglée et dure
env. 1,5 minutes. Si pendant ces 1,5 minutes un autre
mouvement est détecté, la durée d‘éclairage redémarre
du début. Dans cette position de l‘interrupteur, les LED
sont commandées à pleine puissance. Lorsque les
batteries sont entièrement chargées, la charge dans
cette position de l‘interrupteur suffit pour env. 2 heures
de lumière au total.
Maintenance / Changer les batteries
Pour garantir une bonne performance de la cellule solaire 6, il faut nettoyer celle-ci régulièrement (voir « Nettoyage et entretien »).
Pour changer les batteries, procédez comme suit :
Placez l‘interrupteur 5 sur la position « OFF ».
Desserrez avec un tournevis cruciforme les vis de fermeture 11 située
à l‘arrière de l‘appareil principal
1
(voir ill. E).
Retirez l‘arrière desserré de l‘appareil principal.
56 FR/BE
Page 57

Retirez les batteries du compartiment 10 et remplacez-les par des nou-
velles avec les mêmes caractéristiques techniques. Lors de l‘insertion,
faire attention à la bonne polarité ! Celle-ci est signalée dans le compartiment des batteries.
Fermez la paroi arrière de l‘appareil principal et fixez à nouveau les
vis de fermeture.
Fonctionnement en hiver
En raison du faible rayonnement du soleil, il est possible que, en fonction
de la durée d‘allumage pendant la nuit, la durée d‘éclairage se réduise.
Ainsi, contrôlez également en hiver si la cellule solaire
ensoleillement est exempte de toute ombre toute la journée et éliminez, si
nécessaire, la glace ou la neige.
Si la durée d‘éclairage n‘est pas suffisante en raison de la situation climatique, chargez les batteries ou échangez-les (voir « Charger les batteries »
ou « Changer les batteries »).
6
malgré le faible
Nettoyage et entretien
Eteignez le projecteur solaire à LED pour le nettoyer.
Utilisez pour le nettoyage un chiffon légèrement humide et ne pelu-
chant pas avec un produit nettoyant doux.
Examinez régulièrement notamment le capteur 3 et la cellule solaire
6
quant à un éventuel encrassement.
Nettoyez le capteur et la cellule solaire régulièrement pour garantir un
fonctionnement sans faille.
Gardez notamment la cellule solaire exempte de neige et de glace en
hiver.
57 FR/BE
Page 58

Élimination des erreurs
= Problème
= Cause
= Solution
La lampe ne s‘allume pas.
Interrupteur 5 sur position « OFF ».
Mettre l‘interrupteur sur position « ON ».
Le capteur 3 est encrassé.
Nettoyer le détecteur de mouvement.
Les batteries sont vides.
Charger les batteries (voir « Charger les batteries »).
La lampe vacille.
Les batteries sont presque vides.
Charger les batteries (voir « Charger les batteries »).
La batterie se décharge rapidement.
La cellule solaire est encrassée.
Nettoyer la cellule solaire.
La cellule solaire est mal orientée.
Orienter à nouveau la cellule solaire (voir « Monter la cellule solaire »).
Mauvaises conditions météorologiques.
Voir « Fonctionnement en hiver ».
Les batteries sont défectueuses.
Remplacer les batteries (voir « Maintenance / Changer les batteries »).
Mise au rebut
58 FR/BE
L‘emballage est composé de matériaux écologiques que vous
pouvez mettre au rebut dans les centres de recyclage locaux.
Page 59

Vous pouvez vous informer des possibilités de mise au rebut du produit
usagé auprès de votre commune ou de votre administration municipale.
Par intérêt pour l‘environnement, ne jetez pas votre produit, une
fois usagé, avec les déchets ménagers, éliminez-le de manière
appropriée. Vous pouvez vous informer auprès de votre administration sur les points de collecte et leurs heures d‘ouverture.
Les batteries défectueuses ou usagées doivent être recyclées en vertu de la
directive 2006 / 66 / CE. Retournez les batteries et / ou l‘appareil aux
centres de collecte proposés.
Dommages écologiques en raison de la mauvaise
mise au rebut des batteries !
Pb
Les batteries ne doivent pas être jetées avec les déchets ménagers. Pour
cette raison, remettez les batteries usagées à votre centre de collecte
communal.
Garantie
Indépendamment de la garantie commerciale souscrite, le vendeur reste
tenu des défauts de conformité du bien et des vices rédhibitoires dans les
conditions prévues aux articles L211-4 et suivants du Code de la consommation et aux articles 1641 et suivants du Code Civil.
L’appareil a été fabriqué selon des critères de qualité stricts et contrôlé
consciencieusement avant sa livraison. En cas de défaillance, vous êtes en
droit de retourner ce produit au vendeur. La présente garantie ne constitue
pas une restriction de vos droits légaux.
Cet appareil bénéficie d‘une garantie de 3ans à compter de sa date
d’achat. La durée de garantie débute à la date d’achat. Veuillez conserver
le ticket de caisse original. Il fera office de preuve d’achat.
59 FR/BE
Page 60

Si un problème matériel ou de fabrication devait survenir dans les trois ans
suivant la date d‘achat de ce produit, nous assurons à notre discrétion la
réparation ou le remplacement de l‘appareil sans frais supplémentaires. La
garantie prend fin si le produit est endommagé suite à une utilisation inappropriée ou à un entretien défaillant.
La garantie couvre les vices matériels et de fabrication. Cette garantie ne
s’étend pas aux pièces du produit soumises à une usure normale (p. ex.
des batteries) et qui, par conséquent, peuvent être considérées comme des
pièces d’usure, ni aux dommages sur des composants fragiles, comme des
interrupteurs, des batteries et des éléments fabriqués en verre.
60 FR/BE
Page 61

Correct gebruik ..................................................................Pagina 62
Beschrijving van de onderdelen ..........................Pagina 62
Technische gegevens .....................................................Pagina 62
Omvang van de levering ...........................................Pagina 63
Algemene veiligheidsinstructies ..........................Pagina 63
Veiligheidsinstructies voor de accu‘s ..............Pagina 64
Functie ........................................................................................Pagina 64
Voor de eerste ingebruikname
Accu‘s opladen ...........................................................................Pagina 65
Montage ...................................................................................Pagina 65
Spot monteren .............................................................................Pagina 66
Zonnecel monteren .....................................................................Pagina 66
Zonnecel met het hoofdapparaat verbinden ............................Pagina 67
Ingebruikname ..................................................................Pagina 67
Onderhoud / accu‘s vervangen ............................Pagina 68
Gebruik in de winter .....................................................Pagina 69
Reiniging en onderhoud .............................................Pagina 69
Oplossen van storingen ..............................................Pagina 70
Verwijdering ........................................................................Pagina 70
Garantie ...................................................................................Pagina 71
61 NL/BE
Page 62

LED-solar-schijnwerper
Correct gebruik
De LED schijnwerper op zonne-energie is bedoeld voor de verlichting van
buitengebieden, die niet aan een stroomcircuit kunnen worden aangesloten,
bijv. tuinhuisjes, garages etc. De LED schijnwerper op zonne-energie is niet
geschikt voor commercieel gebruik.
Beschrijving van de onderdelen
1
Hoofdapparaat
2
Spot
3
Sensor
4
Stekkerverbinding
5
Schakelaar (AUTO / OFF / PIR)
6
Zonnecel
7
Schroef (4 x 30 mm)
8
Plug (ø 6 mm)
9
Houder (zonnecel)
10
Accuvak
11
Sluitschroeven
Technische gegevens
Voedingsspanning: 3,6 V
Accu: 3 x NiMH-accu 1,2 V , 600 mAh, AA
Lamp: 10 LEDs met elk 0,06 W (de LEDs kunnen niet worden
vervangen)
Zonnecel: amorf, 8 x 8 cm, max. 5,4 V, max. 70 mA
62 NL/BE
Page 63

Sensor: reikwijdte: ca. 5–12 m,
Registratiehoek: ca. 90° horizontaal, 90° verticaal
Beschermingsklasse: IP44 (spatwaterdicht)
Omvang van de levering
Controleer direct na het uitpakken altijd of de levering compleet is alsook
of het apparaat zich in een feilloze toestand bevindt.
1 hoofdapparaat (bestaande uit schijnwerper met 10 LEDs, sensor, monta-
gebehuizing met ingebouwde accu‘s en ingebouwde bediening)
1 zonnecel (8 x 8 cm) (incl. ca. 2,5 m stroomkabel)
4 schroeven (4 x 30 mm)
4 pluggen (ø 6 mm)
1 montage- en gebruiksaanwijzing
Algemene veiligheidsinstructies
Maak u voor de eerste ingebruikname van het product vertrouwd met alle
bedienings- en veiligheidsinstructies! Overhandig ook alle documenten als
u het product aan derden overhandigt!
Dit apparaat kan door kinderen vanaf 8 alsook personen met vermin-
derde psychische, sensorische of mentale vaardigheden of een gebrek
aan ervaring en / of kennis worden gebruikt, als zij onder toezicht staan
of geïnstrueerd werden met betrekking tot het veilige gebruik van het
apparaat en de hieruit voortvloeiende gevaren begrijpen. Kinderen
mogen niet met het apparaat spelen. Reiniging en gebruikersonderhoud mogen niet door kinderen zonder toezicht worden uitgevoerd.
Laat kinderen nooit zonder toezicht bij het verpakkingsmateriaal. Er
bestaat verstikkingsgevaar door het verpakkingsmateriaal. Kinderen
onderschatten vaak de gevaren.
63 NL/BE
Page 64

Houd kinderen tijdens de montage uit de buurt van de montageplek. Tot
de levering behoren tal van schroeven en andere kleine voorwerpen.
Deze kunnen bij het inslikken of inademen levensgevaarlijk zijn.
Gebruik het product niet, als u een beschadiging constateert!
Veiligheidsinstructies voor de accu‘s
LEVENSGEVAAR! Houd accu‘s uit de buurt
van kinderen. Raadpleeg in geval van inslikken direct een arts!
WEES VOORZICHTIG! EXPLOSIEGEVAAR!
Gooi accu‘s nooit in vuur of water!
Stel accu‘s nooit bloot aan mechanische belastingen!
Gebruik geen niet oplaadbare batterijen.
Sluit de accu‘s niet kort en / of open ze niet.
Gevaar voor materiële schade
Gebruik uitsluitend het vermelde accutype!
Let bij het plaatsen op de juiste polariteit! Deze wordt in het batterij-
vakje vermeld!
Reinig de contacten van de batterijen en het apparaat indien nodig
voor het plaatsen!
Functie
De zonnecel 6 zet lichtenergie van de zon om in elektrische energie.
Via de aangesloten stroomkabel laden de in het accuvak
accu‘s op.
Deze accu‘s slaan de door de zonnecel toegevoerde elektrische energie
op. Volledig opgeladen accu‘s leveren in de schakelaarpositie “PIR” energie voor ongeveer 2 uur licht, in de schakelaarpositie “AUTO” voor ongeveer 8 uur.
10
ingebouwde
64 NL/BE
Page 65

Het opladen van de volledig lege accu‘s duurt in de zomer bij regelmatig
zonlicht ongeveer 2 tot 4 dagen. Voor de eerste ingebruikname van de
lamp moeten de accu‘s geladen zijn (zie “Accu‘s opladen”).
Voor de eerste ingebruikname
Accu‘s opladen
Opmerking: De in het hoofdapparaat 1 ingebouwde accu‘s zijn op
het tijdstip van levering opgeladen. Echter kunnen ze tijdens het transport
van de fabrikant naar het verkooppunt reeds aan lading verliezen. Laad
de accu‘s voor de eerste ingebruikname op. De eerste oplading duurt bij
regelmatig zonlicht in de zomer minstens één dag.
Zet de schakelaar 5 op “OFF”.
Opmerking: Bij regelmatig zonlicht (afhankelijk van het seizoen) zullen
de lege accu‘s na twee tot tien dagen compleet opgeladen zijn.
Opmerking: De ingebouwde laadregelaar van de LED schijnwerper op
zonne-energie verhindert een overbelading van de accu‘s.
Vervang de accu‘s, als de capaciteit van de verlichting na het opladen niet
verbetert (afb. E).
Montage
Opmerking: Kies voor een montage, waar u de zonnecel 6 en het
hoofdapparaat
binding tussen zonnecel en hoofdapparaat een lengte van ca. 2,5 m heeft.
1
wilt monteren. Houd er rekening mee, dat de kabelver-
65 NL/BE
Page 66

Spot monteren
Let bij de keuze van de montageplek van het hoofdapparaat 1 op de
volgende dingen:
1. De spot
2
is beweeglijk aan het hoofdapparaat verbonden en dient
het gewenste gebied te kunnen verlichten. Let erop, dat de scharnierschroef van de spot een beetje wordt losgedraaid, voordat u de spot
beweegt. Draai de scharnierschroef vervolgens weer vast (zie afb. F).
2. De sensor
3
heeft (afhankelijk van de montagehoogte, idealiter een
hoogte van 1,80 m – 2,00 m) een registratiebereik van max. 12 m, bij
een registratiehoek van 90° horizontaal en 90° verticaal.
3. Let erop, dat de sensor ‚s nachts niet door straatverlichting wordt verlicht. Dit kan invloed op de werking hebben.
Bevestig het hoofdapparaat 1 met behulp van de twee meegeleverde
pluggen
8
(ø 6 mm) en de twee meegeleverde schroeven 7
(4 x 30 mm) (zie afb. B).
Opmerking: Het meegeleverde montagemateriaal is geschikt voor
de bevestiging op normaal metselwerk. Voor een andere ondergrond
hebt u eventueel ander bevestigingsmateriaal nodig. Mocht u twijfelen,
dient u een vakman te consulteren.
Controleer na de montage de stevige bevestiging van het hoofdappa-
raat.
Zonnecel monteren
De zonnecel 6 heeft naar mogelijkheid direct zonlicht nodig. Optimaal is
het als u het oppervlak van de zonnecel richting het zuiden positioneert.
De horizontale positionering van de zonnecel kan door middel van de
meegeleverde montagevoet geschieden.
66 NL/BE
Page 67

Monteer de houder 9 van de zonnecel 6 op een verticale muur
met behulp van de twee meegeleverde schroeven
de meegeleverde pluggen
8
(ø 6 mm) (zie afb. C).
7
(4 x 30 mm) en
Opmerking: Het meegeleverde montagemateriaal is geschikt voor
de bevestiging op normaal metselwerk. Voor een andere ondergrond
hebt u eventueel ander bevestigingsmateriaal nodig. Mocht u twijfelen,
dient u een vakman te consulteren.
Controleer na de montage of de houder van de zonnecel stevig vast
zit.
Plaats vervolgens de zonnecel, zoals te zien is op afb. C.
Positioneer de zonnecel vervolgens richting zuiden.
Zonnecel met het hoofdapparaat verbinden
Sluit na de montage van beide eenheden (hoofdapparaat 1 en zonnecel
6
) de kabel zo aan, dat hij niet wordt blootgesteld aan mechanische belastingen. Gebruik voor de bevestiging van de kabel gangbare installatiematerialen zoals bijv. kabelklemmen of kabelkanalen, om beschadingen
aan de isolatie te voorkomen.
Sluit de stekkerverbinding 4 van de kabel van het hoofdapparaat en
de zonnecel aan elkaar aan. Let erop, dat deze stekkerverbinding op
maar één manier in elkaar past.
Schroef beide stekkerverbindingen vast met de wartelmoer (zie afb. D).
Ingebruikname
De schakelaar 5 van het hoofdapparaat 1 (afb. A) bezit de volgende
functies:
Positie “OFF”: sensor
3
en spot 2 zijn uitgeschakeld. De accu‘s
worden bij zonlicht op de zonnecel
6
opgeladen.
67 NL/BE
Page 68

Gebruik deze schakelaarpositie voor het opladen van
lege accu‘s (zie “Accu‘s opladen”).
Positie “AUTO”: In geval van zonlicht worden de accu‘s via de zonnecel
opgeladen. De spot gaat automatisch bij schemering
c.q. in het donker aan en bij daglicht weer uit. Om een
lange verlichtingsduur te bereiken, worden de LEDs in
deze schakelaarpositie niet met vol vermogen gebruikt,
maar leveren slechts ca. 25% van hun volle verlichtingsvermogen (eco-modus). Als de accu‘s volledig zijn
opgeladen, is de lading bij deze schakelaarpositie
voldoende voor ca. 8 uur licht.
Positie “PIR”: In geval van zonlicht worden de accu‘s via de zonnecel
opgeladen. De sensor schakelt de spot bij schemering
c.q. in het donker aan, zodra er een beweging wordt
geregistreerd. De verlichtingsduur is reeds ingesteld en
bedraagt ca. 1,5 minuut. Wordt tijdens deze 1,5 minuut
opnieuw een beweging geregistreerd, start de tijd van
de verlichtingsduur opnieuw. In deze schakelaarpositie
worden de LEDs met de volledige vermogen gebruikt.
Als de accu‘s volledig zijn opgeladen, is de lading bij
deze schakelaarpositie voldoende voor in totaal ca.
2 uur licht.
Onderhoud / accu‘s vervangen
Om een goede prestatie van de zonnecel 6 te waarborgen, moet de
zonnecel in regelmatige afstanden worden gereinigd (zie “Reiniging en
onderhoud”).
Ga voor het vervangen van de accu‘s als volgt te werk:
Zet de schakelaar 5 op “OFF”.
Maak met een kruiskopschroevendraaier de sluitschroeven 11 aan de
achterkant van het hoofdapparaat
68 NL/BE
1
los (zie afb. E).
Page 69

Verwijder de losgemaakte achterkant van het hoofdapparaat.
Haal de accu‘s uit het accuvak 10 en vervang dee door nieuwe accu‘s
met dezelfde technische gegevens. Let bij het plaatsen op de juiste
polariteit. Deze wordt in het batterijvakje vermeld.
Sluit de achterkant van het hoofdapparaat weer en bevestig de sluit-
schroeven.
Gebruik in de winter
Vanwege het geringe zonlicht kan de verlichtingsduur tijdens de nacht,
afhankelijk van de nachtelijke inschakelduur, verminderen. Controleer
daarom ook in de winter, of de zonnecel
de zon de hele dag uit de schaduw is en verwijder, indien nodig, ijs of
sneeuw.
Mocht de verlichtingsduur vanwege het weer niet voldoende zijn, kunt u de
accu‘s laden of vervangen (zie “Accu‘s opladen” c.q. “Accu‘s vervangen”).
6
ondanks de lage stand van
Reiniging en onderhoud
Schakel de LED schijnwerper op zonne-energie voor het reinigen uit.
Gebruik voor de reiniging een licht vochtige, pluisvrije doek met een
mild reinigingsmiddel.
Onderzoek in het bijzonder de sensor 3 en de zonnecel 6 regel-
matig op verontreinigingen.
Reinig de sensor en zonnecel regelmatig, om een feilloze werking te
waarborgen.
Houd in het bijzonder de zonnecel in de winter vrij van sneeuw en ijs.
69 NL/BE
Page 70

Oplossen van storingen
= Probleem
= Oorzaak
= Oplossing
Lamp gaat niet aan.
Schakelaar 5 staat op “OFF”.
Schakelaar op “ON” zetten.
Sensor 3 is verontreinigd.
Bewegingsmelder reinigen.
Accu‘s zijn leeg.
Accu‘s opladen (zie “Accu‘s opladen”).
Lamp flikkert.
Accu‘s zijn bijna leeg.
Accu‘s opladen (zie “Accu‘s opladen”).
Accu is binnen een mum van tijd leeg.
Zonnecel is verontreinigd.
Zonnecel reinigen.
Zonnecel is niet correct gepositioneerd.
Zonnecel opnieuw positioneren (zie “Zonnecel monteren”).
Slechte weersomstandigheden.
Zie “Gebruik in de winter”.
Accu‘s zijn defect.
Accu‘s vervangen (zie “Onderhoud/accu‘s vervangen”).
Verwijdering
70 NL/BE
De verpakking bestaat uit milieuvriendelijke materialen, die u
via uw lokale recyclingcontainers kunt verwijderen.
Page 71

Mogelijkheden voor het verwijderen van een afgedankt product versterkt
uw gemeentelijke overheid.
Gooi het product, als u het niet meer wilt gebruiken, vanwege
de milieubescherming niet bij het huishoudelijk afval, maar zorg
voor een vakkundige verwijdering. Uw verantwoordelijke bestuur
verstrekt u informatie over de verzamelpunten en de openingstijden hiervan.
Defecte of lege accu‘s moeten conform de richtlijn 2006/66/EG worden
gerecycled. Geef accu‘s en / of het apparaat via de beschikbare verzamelpunten af.
Milieuschade door foutieve verwijdering
van accu‘s!
Pb
Accu‘s mogen niet via het huishoudelijk afval worden verwijderd. Geef
lege batterijen daarom bij een gemeentelijk afgiftepunt af.
Garantie
Het apparaat wordt volgens strenge kwaliteitsrichtlijnen zorgvuldig geproduceerd en voor levering grondig getest. In geval van schade aan het product kunt u rechtmatig beroep doen op de verkoper van het product. Deze
wettelijke rechten worden door onze hierna vermelde garantie niet beperkt.
U ontvangt op dit apparaat 3 jaar garantie vanaf de aankoopdatum.
De garantieperiode start op de dag van aankoop. Bewaar de originele
kassabon alstublieft. Dit document is nodig als bewijs voor aankoop.
Wanneer binnen drie jaar na de aankoopdatum van dit product een materiaal- of productiefout optreedt, dan wordt het product door ons – naar
onze keuze – gratis voor u gerepareerd of vervangen. Deze garantie komt
71 NL/BE
Page 72

te vervallen als het product beschadigd wordt, niet correct gebruikt of
onderhouden wordt.
De garantie geldt voor materiaal- en productiefouten. Deze garantie is niet
van toepassing op productonderdelen, die onderhevig zijn aan normale
slijtage en hierdoor als aan slijtage onderhevige onderdelen gelden (bijv.
batterijen) of voor beschadigingen aan breekbare onderdelen, zoals bijv.
schakelaars, accu’s of dergelijke onderdelen, die gemaakt zijn van glas.
72 NL/BE
Page 73

Bestimmungsgemäße Verwendung ....................Seite 74
Teilebeschreibung ............................................................... Seite 74
Technische Daten ................................................................. Seite 74
Lieferumfang ...........................................................................Seite 75
Allgemeine Sicherheitshinweise .............................Seite 75
Sicherheitshinweise für Akkus .................................Seite 76
Funktion.......................................................................................Seite 76
Vor der ersten Inbetriebnahme
Akkus aufladen ...............................................................................Seite 77
Montage
Spot montieren ............................................................................... Seite 77
Solarzelle montieren ...................................................................... Seite 78
Solarzelle mit dem Hauptgerät verbinden ................................... Seite 79
Inbetriebnahme .................................................................... Seite 79
Wartung / Akkus wechseln ......................................... Seite 80
Winterbetrieb ......................................................................... Seite 81
Reinigung und Pflege .......................................................Seite 81
Fehlerbehebung ................................................................... Seite 81
Entsorgung ................................................................................ Seite 82
Garantie ...................................................................................... Seite 83
73 DE/AT/CH
Page 74

LED-Solar-Strahler
Bestimmungsgemäße Verwendung
Der LED-Solar-Strahler ist vorgesehen zur Ausleuchtung von Außenbereichen,
die über keinen Stromanschluss verfügen, z. B. Gartenhäuser, Garagen etc.
Der LED-Solar-Strahler ist nicht für den gewerblichen Einsatz geeignet.
Teilebeschreibung
1
Hauptgerät
2
Spot
3
Sensor
4
Steckverbinder
5
Schalter (AUTO / OFF / PIR)
6
Solarzelle
7
Schraube (4 x 30 mm)
8
Dübel (ø 6 mm)
9
Halterung (Solarzelle)
10
Akkufach
11
Verschlussschrauben
Technische Daten
Betriebsspannung: 3,6 V
Akku: 3 x NiMH- Akku 1,2 V , 600 mAh, AA
Leuchtmittel: 10 LEDs mit je 0,06 W (die LEDs sind nicht
austauschbar)
Solarzelle: amorph, 8 x 8 cm, max. 5,4 V, max. 70 mA
Sensor: Reichweite: ca. 5–12 m,
Erfassungswinkel: ca. 90° horizontal, 90° vertikal
Schutzart: IP44 (spritzwassergeschützt)
74 DE/AT/CH
Page 75

Lieferumfang
Kontrollieren Sie unmittelbar nach dem Auspacken immer den Lieferumfang auf Vollständigkeit sowie den einwandfreien Zustand des Gerätes.
1 Hauptgerät (bestehend aus Strahler mit 10 LEDs, Sensor,
Montagegehäuse mit eingebauten Akkus und eingebauter Steuerung)
1 Solarzelle (8 cm x 8 cm) (inkl. ca. 2,5 m Stromkabel)
4 Schrauben (4 x 30 mm)
4 Dübel (ø 6 mm)
1 Montage- und Bedienungsanleitung
Allgemeine Sicherheitshinweise
Machen Sie sich vor der ersten Benutzung des Produkts mit allen Bedienund Sicherheitshinweisen vertraut! Händigen Sie alle Unterlagen bei
Weitergabe des Produkts an Dritte ebenfalls mit aus!
Dieses Gerät kann von Kindern ab 8 Jahren und darüber sowie von
Personen mit verringerten physischen, sensorischen oder mentalen
Fähigkeiten oder Mangel an Erfahrung und Wissen benutzt werden,
wenn sie beaufsichtigt oder bezüglich des sicheren Gebrauchs des
Gerätes unterwiesen wurden und die daraus resultierenden Gefahren
verstehen. Kinder dürfen nicht mit dem Gerät spielen. Reinigung und
Benutzerwartung dürfen nicht von Kindern ohne Beaufsichtigung
durchgeführt werden.
Lassen Sie Kinder niemals unbeaufsichtigt mit dem Verpackungsmate-
rial. Es besteht Erstickungsgefahr durch Verpackungsmaterial. Kinder
unterschätzen häufig die Gefahren.
Halten Sie Kinder während der Montage vom Arbeitsbereich fern.
Zum Lieferumfang gehört eine Vielzahl von Schrauben und anderen
Kleinteilen. Diese können beim Verschlucken oder Inhalieren lebensgefährlich sein.
75 DE/AT/CH
Page 76

Benutzen Sie den Artikel nicht, wenn Sie irgendwelche Beschädigun-
gen feststellen!
Sicherheitshinweise für Akkus
LEBENSGEFAHR! Akkus gehören nicht in Kinder-
hände. Suchen Sie im Falle eines Verschluckens sofort einen Arzt auf!
VORSICHT! EXPLOSIONSGEFAHR!
Werfen Sie Akkus niemals in Feuer oder Wasser!
Setzen Sie Akkus keiner mechanischen Belastung aus!
Verwenden Sie keine nicht aufladbare Batterien.
Schließen Sie Akkus nicht kurz und / oder öffnen Sie sie nicht.
Gefahr der Sachbeschädigung
Ausschließlich den angegebenen Akkutyp verwenden!
Achten Sie beim Einlegen auf die richtige Polarität! Diese wird im
Batteriefach angezeigt!
Reinigen Sie Batterie- und Gerätekontakt vor dem Einlegen falls
erforderlich!
Funktion
Die Solarzelle 6 wandelt Lichtenergie der Sonne in elektrische Energie
um. Über das angeschlossene Stromkabel lädt sie die im Akkufach
eingebauten Akkus auf.
Diese Akkus speichern die von der Solarzelle eingespeiste elektrische Energie.
Vollständig geladene Akkus liefern in der Schalterstellung „PIR“ Energie für
etwa 2 Stunden Licht, in der Schalterstellung „AUTO“ für etwa 8 Stunden.
Das Aufladen vollständig entleerter Akkus dauert im Sommer bei regelmäßiger Sonneneinstrahlung etwa 2 bis 4 Tage. Vor der ersten Inbetriebnahme der Leuchte müssen die Akkus geladen sein (siehe „Akkus aufladen“).
10
76 DE/AT/CH
Page 77

Vor der ersten Inbetriebnahme
Akkus aufladen
Hinweis: Die im Hauptgerät 1 eingebauten Akkus sind bei Auslieferung
geladen. Allerdings können sie während des Transports vom Hersteller zur
Verkaufsstelle bereits an Ladung verloren haben. Laden Sie daher vor der
ersten Inbetriebnahme die Akkus auf. Die erste Aufladung dauert bei regelmäßiger Sonneneinstrahlung im Sommer mindestens einen Tag.
Stellen Sie den Schalter 5 in die Position „OFF“.
Hinweis: Bei regelmäßiger Sonneneinstrahlung (abhängig von der Jahreszeit) sollten leere Akkus nach zwei bis zehn Tagen aufgeladen sein.
Hinweis: Der eingebaute Laderegler des LED-Solar-Strahlers verhindert
eine Überladung der Akkus.
Tauschen Sie die Akkus aus, wenn sich die Leuchtleistung nach der
Aufladung nicht verbessert hat (Abb. E).
Montage
Hinweis: Entscheiden Sie vor der Montage, wo Sie die Solarzelle 6
und das Hauptgerät
dung zwischen Solarzelle und Hauptgerät eine Länge von ca. 2,5 m hat.
1
montieren. Beachten Sie, dass die Kabelverbin-
Spot montieren
Achten Sie bei der Auswahl des Montageortes des Hauptgeräts 1 auf
folgende Dinge:
1. Der Spot
den gewünschten Bereich ausleuchten können. Beachten Sie, dass Sie
die Gelenkschraube des Spots etwas lösen, bevor Sie den Spot bewe-
2
ist beweglich mit dem Hauptgerät verbunden und sollte
77 DE/AT/CH
Page 78

gen. Ziehen Sie die Gelenkschraube hinterher wieder an
(siehe Abb. F).
2. Der Sensor
3
hat (abhängig von der Montagehöhe, ideal ist eine
Höhe von 1,80 m – 2,00 m) einen Erfassungsbereich von max. 12 m,
bei einem Erfassungswinkel von 90° horizontal und 90° vertikal.
3. Achten Sie darauf, dass der Sensor nachts nicht von Straßenbeleuchtungen angestrahlt wird. Dies kann die Wirkungsweise beeinflussen.
Befestigen Sie das Hauptgerät 1 mittels zwei der beiliegenden
8
Dübel
(ø 6 mm) und zwei der beiliegenden Schrauben 7
(4 x 30 mm) (siehe Abb. B).
Hinweis: Das beiliegende Montagematerial ist zur Befestigung im
normalem Mauerwerk geeignet. Für andere Untergründe benötigen
Sie möglicherweise andere Befestigungsmaterialien. Im Zweifelsfall
ziehen Sie eine Fachkraft zu Rate.
Überprüfen Sie nach der Montage den festen Sitz des Hauptgeräts.
Solarzelle montieren
Die Solarzelle 6 benötigt möglichst direkte Sonneneinstrahlung. Optimal
ist eine Ausrichtung der Solarzellenoberfläche nach Süden. Die horizontale Ausrichtung der Solarzelle ist durch den beiliegenden Montagefuß
vorgegeben.
Montieren Sie die Halterung 9 der Solarzelle 6 an einer senkrech-
ten Wand mittels zwei der beiliegenden Schrauben
und der beiliegenden Dübel
8
(ø 6mm) (siehe Abb. C).
Hinweis: Das beiliegende Montagematerial ist zur Befestigung im
normalem Mauerwerk geeignet. Für andere Untergründe benötigen
Sie möglicherweise andere Befestigungsmaterialien. Im Zweifelsfall
ziehen Sie eine Fachkraft zu Rate.
Überprüfen Sie nach der Montage den festen Sitz der Halterung der
Solarzelle.
7
(4 x 30 mm)
78 DE/AT/CH
Page 79

Stecken Sie dann die Solarzelle auf, wie in Abb. C gezeigt.
Richten Sie anschließend die Solarzelle nach Süden aus.
Solarzelle mit dem Hauptgerät verbinden
Verlegen Sie nach der Montage der beiden Betriebseinheiten (Hauptgerät
1
und Solarzelle 6) das Kabel so, dass es keinerlei mechanischen
Belastungen ausgesetzt ist. Verwenden Sie zur Befestigung des Kabels
handelsübliche Installationsmaterialien wie z. B. Kabelschellen oder Kabelkanal, um Beschädigungen der Kabelisolation zu vermeiden.
Stecken Sie die Steckverbinder 4 der Kabel des Hauptgeräts und der
Solarzelle zusammen. Beachten Sie, dass diese Steckverbinder nur in
einer Richtung zusammenpassen.
Verschrauben Sie die beiden Steckverbinder mit der Überwurfmutter
(siehe Abb. D).
Inbetriebnahme
Der Schalter 5 der Hauptstation 1 (Abb. A) verfügt über folgende
Funktionen:
Position „OFF“: Sensor
3
und Spot 2 sind außer Betrieb. Die
Akkus werden bei Sonneneinstrahlung durch die
Solarzelle
6
geladen. Verwenden Sie diese Schalterstellung zum Aufladen entladener Akkus (siehe
„Akkus aufladen“).
Position „AUTO“: Bei Lichteinfall werden die Akkus über die Solarzelle
geladen. Der Spot schaltet sich automatisch bei Dämmerung bzw. Dunkelheit ein und bei Tageslicht wieder
aus. Um eine lange Leuchtdauer zu erreichen, werden
die LEDs in dieser Schalterstellung nicht mit voller Leistung angesteuert, sondern liefern nur ca. 25 % ihrer
79 DE/AT/CH
Page 80

vollen Lichtleistung (Eco-Modus). Wenn die Akkus voll
aufgeladen sind, reicht die Ladung bei
dieser Schalterstellung für ca. 8 Stunden Licht.
Position „PIR“: Bei Lichteinfall werden die Akkus über die Solarzelle ge-
laden. Der Sensor schaltet den Spot bei Dämmerung
bzw. Dunkelheit ein, sobald er eine Bewegung erfasst.
Die Leuchtdauer ist voreingestellt und beträgt ca.
1,5 Minuten. Wird während dieser 1,5 Minuten eine
weitere Bewegung erfasst, startet die Zeit der Leuchtdauer erneut. In dieser Schalterstellung werden die
LEDs mit der vollen Leistung angesteuert. Wenn die Akkus voll aufgeladen sind, reicht die Ladung bei dieser
Schalterstellung für insgesamt ca. 2 Stunden Licht.
Wartung / Akkus wechseln
Um eine gute Leistung der Solarzelle 6 zu gewährleisten, muss die Solarzelle in regelmäßigen Abständen gereinigt werden (siehe „Reinigung und
Pflege“).
Gehen Sie zum Akkuwechseln folgendermaßen vor:
Schieben Sie den Schalter 5 in die Position „OFF“.
Lösen Sie mit einem Kreuzschlitzschraubendreher die Verschlussschrau-
11
ben
auf der Rückseite des Hauptgeräts 1 (siehe Abb. E).
Nehmen Sie die gelöste Rückseite des Hauptgeräts ab.
Nehmen Sie die Akkus aus dem Akkufach 10 und ersetzen Sie sie
durch neue Akkus mit den gleichen technischen Daten. Achten Sie
beim Einsetzen auf die richtige Polarität. Diese wird im Akkufach
angezeigt.
Schließen Sie die Rückwand des Hauptgeräts wieder und befestigen
Sie die Verschlussschrauben.
80 DE/AT/CH
Page 81

Winterbetrieb
Aufgrund der niedrigen Sonneneinstrahlung kann sich abhängig von der
nächtlichen Einschaltdauer während der Nacht die Leuchtdauer verringern.
Überprüfen Sie daher auch im Winter, ob die Solarzelle
rigeren Sonnenstandes ganztägig unbeschattet ist und beseitigen Sie, falls
nötig, Eis oder Schnee.
Sollte die Leuchtdauer aufgrund der Wetterlage nicht ausreichend sein,
laden Sie die Akkus auf oder wechseln Sie diese (siehe „Akkus aufladen“
bzw. „Akkus wechseln“).
6
trotz des nied-
Reinigung und Pflege
Schalten Sie den LED-Solar-Strahler zur Reinigung aus.
Verwenden Sie zur Reinigung ein leicht angefeuchtetes fusselfreies
Tuch mit einem milden Reinigungsmittel.
Untersuchen Sie insbesondere den Sensor 3 und die Solarzelle 6
regelmäßig auf Verschmutzung.
Reinigen Sie Sensor und Solarzelle regelmäßig, um eine einwandfreie
Funktion zu gewährleisten.
Halten Sie insbesondere die Solarzelle im Winter schnee- und eisfrei.
Fehlerbehebung
= Problem
= Ursache
= Lösung
Leuchte schaltet nicht ein.
Schalter 5 auf „OFF“-Position.
Schalter auf „ON“-Position stellen.
Sensor 3 ist verschmutzt.
Bewegungsmelder reinigen.
81 DE/AT/CH
Page 82

Akkus sind leer.
Akkus aufladen (siehe „Akkus aufladen).
Leuchte flackert.
Akkus sind fast leer.
Akkus aufladen (siehe „Akkus aufladen).
Akku entlädt sich innerhalb von kurzer Zeit.
Solarzelle ist verschmutzt.
Solarzelle reinigen.
Solarzelle ist falsch ausgerichtet.
Solarzelle neu ausrichten (siehe „Solarzelle montieren“).
Schlechte Wetterbedingungen.
Siehe „Winterbetrieb“.
Akkus sind defekt.
Akkus austauschen (siehe „Wartung/Akkus wechseln“).
Entsorgung
Die Verpackung besteht aus umweltfreundlichen Materialien,
die Sie über die örtlichen Recyclingstellen entsorgen können.
Möglichkeiten zur Entsorgung des ausgedienten Produktes erfahren Sie
bei Ihrer Gemeinde oder Stadtverwaltung.
Werfen Sie Ihr Produkt, wenn es ausgedient hat, im Interesse
des Umweltschutzes nicht in den Hausmüll, sondern führen Sie
es einer fachgerechten Entsorgung zu. Über Sammelstellen und
deren Öffnungszeiten können Sie sich bei Ihrer zuständigen
Verwaltung informieren.
Defekte oder verbrauchte Akkus müssen gemäß Richtlinie 2006/66/EG
recycelt werden. Geben Sie Akkus und / oder das Gerät über die angebotenen Sammeleinrichtungen zurück.
82 DE/AT/CH
Page 83

Umweltschäden durch falsche
Entsorgung der Akkus!
Pb
Akkus dürfen nicht über den Hausmüll entsorgt werden. Geben Sie deshalb verbrauchte Batterien bei einer kommunalen Sammelstelle ab.
Garantie
Das Produkt wurde nach strengen Qualitätsrichtlinien sorgfältig produziert
und vor Anlieferung gewissenhaft geprüft. Im Falle von Mängeln dieses
Produkts stehen Ihnen gegen den Verkäufer des Produkts gesetzliche
Rechte zu. Diese gesetzlichen Rechte werden durch unsere im Folgenden
dargestellte Garantie nicht eingeschränkt.
Sie erhalten auf dieses Gerät 3 Jahre Garantie ab Kaufdatum. Die Garantiefrist beginnt mit dem Kaufdatum. Bitte bewahren Sie den Original Kassenbon gut auf. Diese Unterlage wird als Nachweis für den Kauf benötigt.
Tritt innerhalb von drei Jahren ab dem Kaufdatum dieses Produkts ein Material- oder Fabrikationsfehler auf, wird das Produkt von uns – nach unserer Wahl – für Sie kostenlos repariert oder ersetzt. Diese Garantie verfällt,
wenn das Produkt beschädigt, nicht sachgemäß benutzt oder gewartet
wurde.
Die Garantieleistung gilt für Material- oder Fabrikationsfehler. Diese Garantie erstreckt sich nicht auf Produktteile, die normaler Abnutzung ausgesetzt sind (z. B. Batterien) und daher als Verschleißteile angesehen werden
können oder für Beschädigungen an zerbrechlichen Teilen, z. B. Schalter,
Akkus oder die aus Glas gefertigt sind.
83 DE/AT/CH
Page 84

OWIM GmbH & Co. KG
Stiftsbergstraße 1
D-74167 Neckarsulm
Model-No.: Z31999
Version: 02 / 2014
Last Information Update · Tietojen tila
Informationsstatus · Tilstand af information
Version des informations · Stand van de informatie
Stand der Informationen: 01 / 2014
Ident.-No.: Z31999012014-3
IAN 97740
 Loading...