


Installation
Instructions
For Wine Cooler
HW 3000, HW 4800, HW 8000 7085 009-00

Table of Contents
Please Read and Follow These Instructions
These instructions contain Danger, Warning and Caution notes.
This information is important for safe and efficient installation and operation.
Always read and comply with all Danger, Warning and Caution notes!
 DANGER!
Danger indicates a hazard which will cause serious injury or death if precautions are not followed.

 WARNING!
Warning indicates a potentially hazardous situation which, if not avoided, could result in death or serious injury.
 CAUTION!
Caution indicates a potentially hazardous situation which, if not avoided, may result in minor or moderate injury.
IMPORTANT
This indicates information that is especially relevant to a problem-free installation and operation.
Note to the Installer
It is very important to follow the instructions in the manual to ensure proper installation and operation of the unit.
Before installing the unit, be sure to thoroughly read and understand all of the information in this manual.
Contents |
Page |
Please Read and Follow These Instructions.................. |
2 |
Note to the Installer......................................................... |
2 |
R600a Refrigerant........................................................... |
2 |
Blocking for Safety.......................................................... |
3 |
Disposal of Old Appliance............................................... |
3 |
Important Safety Information........................................... |
3 |
Disposal of Carton........................................................... |
3 |
Electrical Safety............................................................... |
3 |
Supplied Accessories...................................................... |
4 |
Transporting the Appliance............................................. |
5 |
Appliance Venting............................................................ |
5 |
HW 3000 Appliance Dimensions.................................... |
6 |
Installation Dimensions................................................... |
7 |
HW 4800 Appliance Dimensions.................................... |
8 |
Installation Dimensions................................................... |
9 |
HW 8000 Appliance Dimensions.................................. |
10 |
Installation Dimensions................................................. |
11 |
Installation Dimensions 84"........................................... |
11 |
Installing the Appliance................................................. |
12 |
Changing Over Door Hinges......................................... |
16 |
R600a Refrigerant

 WARNING!
The refrigerant R600a contained within the appliance is environmentally friendly, but flammable. Leaking refrigerant can ignite.
To prevent possible ignition, follow the warnings below:
• Keep ventilation openings, in the appliance enclosure or in the built-in structure, clear of obstruction. 
•Do not damage the refrigerant circuit.
• Any repairs and work on the appliance should only be performed by the customer service department.
•Component parts and power cords shall be replaced with like components performed by factory authorized service personnel only.
2

Safety
Blocking for Safety

 WARNING!
To avoid a hazard due to instability of the appliance, it must be fixed in accordance with the instructions.
Disposal of Old Appliance
 DANGER!
Risk of child entrapment.
Child entrapment and suffocation are not problems of the past.
Junked or abandoned refrigerators are still dangerous – even if they will sit for “just a few days.”
If you are getting rid of your old refrigerator, please follow these instructions to help prevent accidents.
Before you discard old appliances:
•Take off the doors.
•Leave the shelves in place so that children may not easily climb inside.
•Cut off the power cord from the discarded appliance. Discard separately from the appliance.
•Be sure to follow your local requirements for disposal of appliances.
Contact the trash collection agency in your area for additional information.
Important Safety Information
•To prevent injury to you or damage to the unit, the appliance should be unpacked and set up by two people.
•If the appliance is damaged on delivery, contact the supplier immediately before connecting it to the power source.
•To guarantee safe operation, ensure that the appliance is set up and connected as described in this manual.
•When disconnecting the appliance, always pull it out by the plug; never pull on the cable.
•To protect the appliance from possible damage, allow it to stand 1/2 to 1 hour in place before turning on the electricity. This allows the refrigerant and system lubrication to reach equilibrium.
Disposal of Carton
The packaging is designed to protect the appliance and individual components during transport and is made of recyclable materials.

 WARNING!
Keep packaging materials away from children. Polythene sheets and bags can cause suffocation!
If possible, please recycle packaging material at a recycling facility.
Electrical Safety
Connect this appliance to a 15 amp or 20 amp, 110120 VAC, circuit which is grounded and protected by a circuit breaker or fuse.
We recommend using a dedicated circuit for this appliance to prevent circuit overload and the chance of interruption to the appliance.
This appliance is equipped with a three-prong (grounding) polarized plug for your protection against possible shock hazards.
Where a two-prong wall receptacle is encountered, contact a qualified electrician and have it replaced with a properly grounded three-prong receptacle in accordance with all local codes and ordinances.

 WARNING!
Electrocution hazard.
Electrical grounding required.
• Do not remove the round grounding 
 prong from the plug.


• Do not use extension cords or ungrounded (two-prong) adapters.
•Do not use a power cord that is frayed or damaged.
•Do not use a power strip. 


•Do not connect to the electrical outlet until installation has been completed.
Failure to follow these instructions may result in fire, electric shock or death.
3
Unpacking
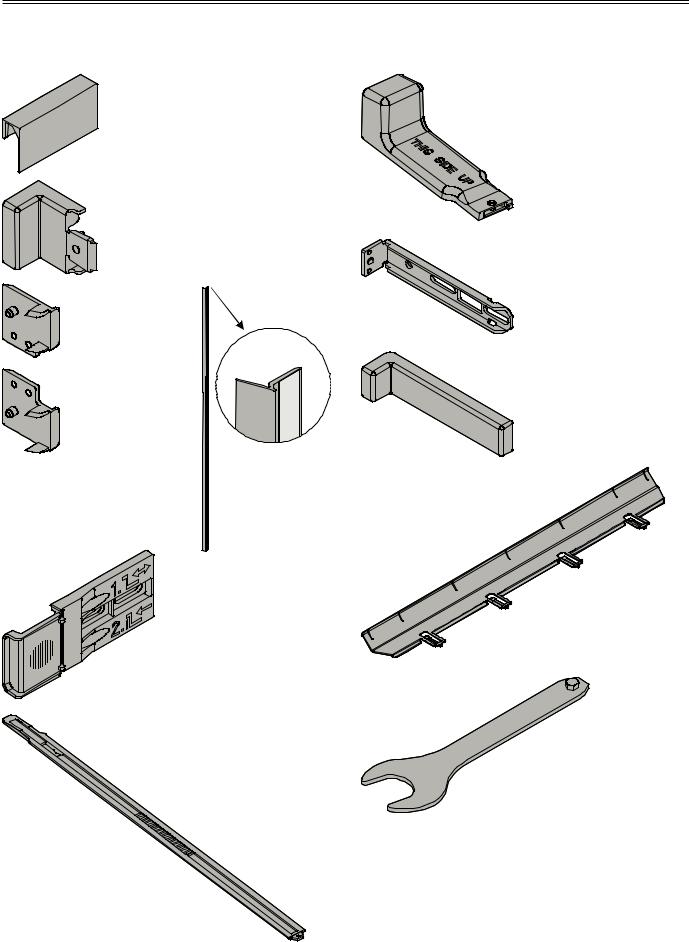
Supplied Accessories
Labels
2 pcs. - HW 3000
4 pcs. - HW 4800
8 pcs. - HW 8000
Cover
Spacer
Spacer
Cover profile
Attachment bracket
Stabilizing rail 2 pcs.
Stabilizing rail handle
Attachment bracket
Cover
Cover profile
Open-ended wrench
4

Planning Information
Cover |
2 pcs.
2 pcs.
5 pcs.
2 pcs.
Transporting the Appliance
 CAUTION!
Danger of injury or damage as a result of incorrect transport!
-Transport the appliance in a packed condition.
-Transport the appliance upright.
-Do not transport the appliance without assistance.
Appliance Venting
IMPORTANT
The clear ventilation cross-section must be at least 31 sq inches from the bottom to the top opening.
Types of Air Outlet
1Directly above the appliance
2Above the top cabinet
3From the front of the top cabinet with decor grille
IMPORTANT
When using decor grilles, the sum of the individual openings must total a minimum of 31 square inches.
A cut-out section of 31 square inches (200 cm²) for installing the ventilation grille is thus not sufficient.
5

Planning Information
HW 3000 Appliance Dimensions
|
|
|
|
Dimensions of Appliance Door |
|
|
|
|
|
|
Top View |
|
|
|
|
|
|||||||||||||||||||||||||||||||
|
|
|
|
|
|
|
|
|
|
|
|
|
|
|
|
|
|
|
|
|
|
|
|
|
|
|
|
|
|
|
|
|
|
|
|
|
|
|
|
|
|
|
|
|
|
|
|
|
|
|
|
|
|
|
|
|
|
|
|
|
|
|
|
|
|
|
|
|
|
|
|
|
|
|
|
|
|
|
|
|
|
|
|
|
|
|
|
|
|
|
|
|
|
|
|
|
|
|
|
|
|
|
|
|
|
|
|
|
|
|
|
|
|
|
|
|
|
|
|
|
|
|
|
|
|
|
|
|
|
|
|
|
|
|
|
|
|
|
|
|
|
|
|
|
|
|
|
|
|
|
|
|
|
|
|
|
|
|
|
|
|
|
|
|
|
|
|
|
|
|
|
|
|
|
|
|
|
|
|
|
|
|
|
|
|
|
|
|
|
|
|
|
|
|
|
|
|
|
|
|
|
|
|
|
|
|
|
|
|
|
|
|
|
|
|
|
|
|
|
|
|
|
|
|
|
|
|
|
|
|
|
|
|
|
|
|
|
|
|
|
|
|
|
|
|
|
|
|
|
|
|
|
|
|
|
|
|
|
|
|
|
|
|
|
|
|
|
|
|
|
|
|
|
|
|
|
|
|
|
|
|
|
|
|
|
|
|
|
|
|
|
|
|
|
|
|
|
|
|
|
|
|
|
|
|
|
|
|
|
|
|
|
|
|
|
|
|
|
|
|
|
|
|
|
|
|
|
|
|
|
|
|
|
|
|
|
|
|
|
|
|
|
|
|
|
|
|
|
|
|
|
|
|
|
|
|
|
|
|
|
|
|
|
|
|
|
|
|
|
|
|
|
|
|
|
|
|
|
|
|
|
|
|
|
|
|
|
|
|
|
|
|
|
|
|
|
|
|
|
|
|
|
|
|
|
|
|
|
|
|
|
|
|
|
|
|
|
|
|
|
|
|
|
|
|
|
|
|
|
|
|
|
|
|
|
|
|
|
|
|
|
|
|
|
|
|
|
|
|
|
|
|
|
|
|
|
|
|
|
|
|
|
|
|
|
|
|
|
|
|
|
|
|
|
|
|
|
|
|
|
|
|
|
|
|
|
|
|
|
|
|
|
|
|
|
|
|
|
|
|
|
|
|
|
|
|
|
|
|
|
|
|
|
|
|
|
|
|
|
|
|
|
|
|
|
|
|
|
|
|
|
|
|
|
|
|
|
|
|
|
|
|
|
|
|
|
|
|
|
|
|
|
|
|
|
|
|
|
|
|
|
|
|
|
|
|
|
|
|
|
|
|
|
|
|
Maximum door opening angle
Dimensions without door panel
Side View
6
 Loading...