


MC8084AB
MC-8087ABR

Contents / fo"k; lwph |
|
|
|
3 |
Precautions / lko/kkfu;k¡ |
|
|
|
4-5 |
Safety Precautions / lqj{kk lko/kkfu;k¡ |
|
|
|
6 |
Unpacking & Installing / [kksyuk vkSj |
LFkkfir |
djuk |
|
7-8 |
Child Lock / pkbYM ykWd |
|
|
|
9 |
Quick Start / fDod LVkVZ |
|
|
|
10 |
Micro Power Cooking / ekbØks ikoj |
dqfdax |
|
|
11 |
Micro Power Level / ekbØks ikoj Lrj |
|
|
|
12 |
Grill Cooking / fxzy dqfdax |
|
|
|
13 |
Grill Combination Cooking / fxzy dkWEchus'ku |
dqfdax |
|
14 |
|
EZ Clean / ,t+ Dyhu |
|
|
|
15 |
Speed Hot Air Preheat / LihM gkWV ,vj izhghV |
|
|
16 |
|
Speed Hot Air Cooking / LihM gkWV ,vj dqfdax |
|
17 |
||
Convection Combination Cooking / dUoSD'ku dkWEchus'ku dqfdax |
|
18 |
||
Convection Preheat / dUoSD'ku izhghV |
|
|
19 |
|
Convection Cooking / dUoSD'ku dqfdax |
|
|
20 |
|
Various Cook Functions / fofHkUUk dqd dk;Ziz.kkfy;ka |
|
21 |
||
Nutri Care (Steam Cook, Health Plus, Soups, Continental) / |
|
22-33 |
||
U;wVªh dsvj ¼LVhe dqd] gSYFk Iyl] lwi] dksUVhusUVy½ |
|
|
||
Inidan Rasoi (Indian Cuisine, Tandoor Se, Sweet Corner, Chatpat Corner) / |
34-44 |
|||
bafM;u jlksbZ ¼Hkkjrh; O;atu] rUnwj ls] LohV dkWuZj] pViV dkWuZj½ |
|
|
||
24 Hours (Breakfast, Snacks, Child Favourite, Bakery) |
|
45-57 |
||
24 vkolZ ¼czsdQkLV] LuSDl] cPpksa dh ilUn] csdjh½ |
|
|
||
Just 4 U (Baby Food, Cake, Sea Food) / tLV QkWj ;w ¼csch QwM] dsd] |
lh QwM½ |
58-65 |
||
Utility Corner (Utility Corner, Fermentation) / ;wVhfyVh dkWuZj ¼lqfo/kk |
dkWuZj] QjesUVs'ku½ |
66-69 |
||
Body Care / ckWMh dsvj |
|
|
|
70-72 |
Important Safety Instructions / egRoiw.kZ lqj{kk |
funsZ'k |
|
73-74 |
|
Technical Specifications / Two recipes for starter @ VSfDudy LisflfQds'ku @ uofl[kq, ds fy, nks O;atu |
75 |
|||
3

tc vkids vou esa rjy inkFkZ tSls lwi] lkWl vkSj vU; is; xeZ djrs le; ;fn mcyukad ls vf/kd xeZ gks tkrs gSa rks cqycqys ugha fn[kkbZ nsrsA blls rjy inkFkZ t:jr ls T;knk xeZ gks tkrs gSaA bl laHkkouk ls cpus ds fy, fuEufyf[kr dne mBkus pkfg,A
WARNING/ psrkouh |
WARNING/ psrkouh |
4

5

Safety Precautions
lqj{kk lko/kkfu;k¡
ªEither use earth or use exclusive 230V socket with earth.
vFkZ dk bLrseky djsa ;k vFkZ ds lkFk fof'k"V 230V dk lkWdsV bLrseky djsaA
ªDo not bend power cord forcefully or break. ikoj dksMZ dks cyiwoZd u eksM+sa vkSj u gh rksM+saA
ªDo not pull out power cord. ikoj dksMZ dks [khaps ughaA
ªDo not use several power plug in one socket at the same time.
,d le; esa cgqr lkjs ikoj Iyx ,d lkWdsV esa ,d lkFk bLrseky u djsaA
ªDo not plug in or pull out power cord with wet hand.
Hkhxs gq, gkFkksa ls Iyx u gh yxk,a vkSj u gh fudkysaA
ªDo not spray water inside and outside of microwave oven. ekbØksoso vksou ds vUnj vkSj ckgj dh vksj ikuh u fNM+dsaA
ªPlug out power cord during cleaning or maintenance of set. vksou dh lQkbZ ;k ejEer ds nkSjku ikoj dksMZ dks ckgj fudky ysaA
ªDo not heat up the food more than necessary.
[kkus dks vko';drk ls vf/kd xeZ u djsaA
ªDo not use microwave oven other than cooking or sterilization such as cloth drying etc.
ekbØksoso vksou dk [kkuk idkus ;k LVsjhykbts'ku ds vfrfjDr bLrseky u djsa tSls diM+ksa dks lq[kkuk bR;kfnA
ªDo not insert pin or steel wire etc. into inside/out side of case. dsl ds vUnj ;k ckgj fiu vFkok LVhy dh rkj u MkysaA
ªPlease be careful during taking the food since high temp. water or soup may be overflow to cause burn.
[kkuk fudkyrs le; lko/kkuh cjrsa D;ksafd mPp rki dk ikuh ;k lwi Nyd dj tyk ldrk gSA
ªDo not plug in power cord when socket hole is loose or plug is damaged. lkWdsV gksy <hyk gksus ;k Iyx fo{kr gksus ij ikoj dksMZ u yxk,aA
ªDo not use oven while some foreign material is attached on the door. tc njokts ij dksbZ cká inkFkZ yxk gks rks vksou dks bLrseky u djsaA
ªDo not place the water container on the set. vksou ds Åij ikuh dk crZu u j[ksaA
ªDo not place heavy things on the set & do not cover the set with cloth while using.
lSV ds Åij Hkkjh pht u j[ksa vkSj bLrseky djrs le; lSV dks diM+s ls u <dsaA
ªDo not install the set in the damp space or water sputtering area. lSV dks xhys LFkku ij ;k tgka ikuh ds NhaVs iM+ jgs gksa] u yxk,aA
ªDo not let children hang onto oven door. cPpksa dks vksou ds njokts ij u yVdus nsaA
ªDo not heat the unpeeled fruit or bottle with lid. fcuk fNys gq, Qy ;k <Ddu yxh gqbZ cksry xeZ u djsaA
ªDo not hold food or accessories as soon as cooking is over.
[kkuk idus ds rqjUr ckn [kkus ;k lgk;d midj.kksa dks u idM+saA
ªPlug out oven if it is not used for long duration.
;fn vksou yEch vof/k ds fy, bLrseky ugh gksuk gS rks Iyx ckgj fudky nsaA
ªInstall microwave oven in the well ventilated, flat place. ekbØksoso vksou dks goknkj vkSj lery LFkku ij gh yxk,aA
There is danger of blast if covered bottle, sealed food, egg, and chestnut etc. are cooked inside oven.
cUn cksry] lhYM [kkuk] v.Ms ;k dktw bR;kfn dks vksou esa idkus ij QVus dk [krjk gSA
6

88:88
HIGH RACK / |
^gkbZ* jSd |
LOW RACK / yks jSd |
GLASS TRAY / |
dk¡p dh Vªs |
ROTATING RING / jksVsfVax fjax |
MULTI COOK TAWA / eYVh dqd rok
88:88
7

88:88
MC8087ABR
8

Child Lock
pkbYM ykWd
Your oven has a safety feature that prevents accidental running of the oven. Once the child lock is set, you will be unable to use any functions and no cooking can take place.
However your child can still open the oven door.
vkids vou esa fo'ks"k lqj{kk O;oLFkk gS tks vou dks vutkus esa pyus ugha nsrhA ^pkbYM ykWd* yxkus ij vou pkyw gh ugha gksxkA ijUrq cPpk ckgjh }kj vo'; [kksy ik;sxkA
Press STOP/CLEAR.
STOP/CLEAR nck;saA
Press and hold STOP/CLEAR until “L” appears on the display and BEEP sounds. / STOP/CLEAR cVu rc rd nck dj j[ksa tc rd ^fMLIys iSuy*
ij “L” u vk tk;s vkSj ^chi* u lqukbZ nsA
The CHILD LOCK is now set. / vc ^pkbYM ykWd* yx x;k gSA
To cancel CHILD LOCK press and hold STOP/CLEARuntil “L” disappears. You will hear BEEP when it’s released. / ;fn ?kM+h dh ^lSfVax* dh gqbZ gS rks
^iSuy* ij le; vn`'; gks tk;sxkA
9

Quick Start
fDod LVkVZ
The QUICK START feature allows you to set 30 seconds intervals of HIGH power cooking with a touch of the QUICK START button.
mPp ikoj Lrj ij 2 feuV pquus ds fy, QUICK START pkj ckj nck,aA pkSFkh nkc iwjk gksus ls igys vkidk vksou pkyw gks tk;sxkA
During QUICK START cooking, you can extend the cooking time up to 99 minutes 59 seconds by repeatedly pressing the QUICK START button or by using DIAL.
fDod LVkVZ cVu nck dj 30 lSds.M ds |
QUICK START dqfdax ds nkSjku vki QUICK START cVu dks ckjEckj nckdj ;k DIAL dk bLrseky djds |
vUrjky esa gkbZ ikoj ij Hkkstu idk |
idkus dk le; 99 feuV 59 lSdsaM rd c<+k ldrs gSa |
ldrs gSaA |
|
10
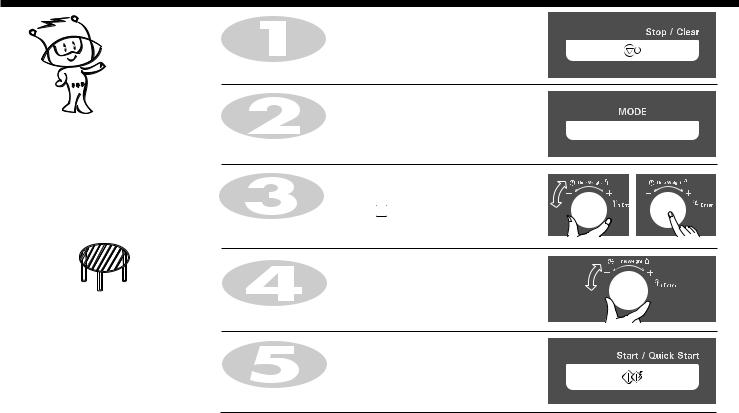
In the following example I will show you how to cook some food on 720W(80%) power for 5 minutes and 30 seconds.
fuEu mnkgj.k esa n'kkZ;k x;k gS fd 5 feuV vkSj 30 lSdsaM ds fy, 720W(80%) ikoj Lrj ij [kkuk dSls idkrs gSaA
Micro Power Cooking
ekbØks ikoj dqfdax
Your oven has five microwave Power settings.
vkids vou esa 5 ikoj Lrj gSaA
Power Level |
% |
Power Output |
|
ikoj Lrj |
|
ikoj ek=kk |
|
HIGH |
100% |
900W(max.) |
|
mPpre |
|
|
|
MEDIUM HIGH |
80% |
720W |
|
e/;e mPp |
|
|
|
MEDIUM |
60% |
540W |
|
e/;e |
|
|
|
DEFROST |
40% |
360W( ) |
|
(MEDIUM LOW) |
|||
e/;e U;wu |
|
|
|
LOW |
20% |
180W |
|
U;wure |
|
|
|
Make sure that you have correctly installed your oven as described earlier in this book.
fuf'pr dj ysa fd vkius viuk vksou bl iqfLrdk esa crk;s vuqlkj yxk;k gSA
Press STOP/CLEAR. / STOP/CLEAR nck,aA
Press MODE.
MODE nck,aA
Press DIAL for micro mode confirmation.
ekbØks eksM fuf'pr djus ds |
fy, DIAL nck,aA |
|
|
(MICRO mode ( |
) is automatically available when MODE button is |
||
selected) / eksM |
cVu pquus |
ij ekbØks eksM |
Lor% gh miyC/k gks tkrk gSA |
Turn DIALuntil display shows “720W”.
DIAL rc rd ?kqek,a tc rd fMlIys “720W” u n'kkZ,A
Press DIAL for power confirmation. ikoj fuf'prrk ds fy, DIAL nck,aA
Turn DIALuntil display shows “5:30”.
DIAL rc rd ?kqek,a tc rd fMlIys “5:30” u n'kkZ,A
Press START. / START nck,aA
When cooking you can increase or decrease cooking time by turning
DIAL.
[kkuk idkrs le; DIAL ?kqekdj vki [kkuk idkus dk le; c<+k ;k ?kVk ldrs gSa
11

Micro Power Level
ekbØks ikoj Lrj
Your microwave oven is equipped with 5 power levels to give you maximum flexibility and control over cooking. The table below shows the examples of food and their recommended cooking power levels for use with this microwave oven.
vkidk ekbØksoso vou 5 ikoj Lrjksa ls ySl gS rkfd Hkkstu vkids vuqdwy o bPNkuqlkj id ldsA uhps nh xbZ lkj.kh esa [kk| inkFkks± ds uke o Hkkstu idkus ds mi;qä ikoj Lrj fn;s tk jgs gSaA
POWER LEVEL |
USE |
POWER |
POWER OUTPUT |
LEVEL (%) |
|||
ikoj Lrj |
iz;ksx |
ikoj Lrj (%) |
ikoj ek=kk |
HIGH |
* Boil Water / ikuh mckyuk |
100% |
900W(max) |
mPpre |
* Cook poultry pieces, fish, vegetables / eqxkZ] eNyh o |
|
|
|
lfCt;k¡ idkuk |
|
|
|
* Cook tender cuts of meat / ek¡l ds ueZ VqdM+s idkuk |
|
|
MEDIUM |
* Reheating(Liquid) / Hkkstu nksckjk xeZ djuk ¼rjy½ |
80% |
720W |
HIGH |
* Roast meat and poultry / ek¡l o eqxkZ Hkwuuk |
|
|
e/;e mPp |
* Cook mushrooms and shellfish / e'k:e o [kksy okyh |
|
|
|
eNyh idkuk |
|
|
|
* Cook foods containing cheese and eggs / Hkkstu |
|
|
|
ftlesa v.Ms o pht+ Mkyh xbZ gksa |
|
|
MEDIUM |
* Reheating(Mashed potato, Plated meal, Ready meal) |
60% |
540W |
e/;e |
Hkkstu nksckjk xeZ djuk ¼elys gq, vkyw] IysV esa j[kk gqvk |
|
|
[kkuk] rS;kkj [kkuk½ |
|
|
|
|
* Prepare eggs / v.Ms idkuk |
|
|
|
* Cook custard / dLVMZ idkuk |
|
|
|
* Prepare rice, soup / pkoy o lwi idkuk |
|
|
|
|
|
|
DEFROST |
* All thawing / lHkh [kk| inkFkks± dks lkekU; rkieku ij ykuk |
40% |
360W( ) |
|
|
|
|
(MEDIUM LOW) |
* Melt butter and chocolate / pkWdysV o eD[ku fi?kyuk |
|
|
fMÝkWLV ¼e/;e U;wu½ |
|
|
|
* Cook less tender cuts of meat /ek¡l ds de uje VqdM+s idkuk |
|
|
|
|
|
|
|
LOW |
* Soften butter & cheese / eD[ku o pht+ dks uje djuk |
20% |
180W |
U;wure |
* Soften ice cream / vkblØhe dks uje djuk |
|
|
|
* Raise yeast dough / vkVs esa [kehj mBkuk |
|
|
|
|
|
|
12
In the following example I will show you how to use the grill to cook some food for 12 minutes and 30 seconds.
fuEu mnkgj.k esa n'kkZ;k x;k gS fd 12 feuV vkSj 30 lSdsaM ds fy, [kkuk idkus esa fxzy dk bLrseky dSls fd;k tkrk gSA
Grill Cooking
fxzy dqfdax
This feature will allow you to brown and crisp food quickly.
;g lqfo/kk [kkus dks 'kh?kzrk ls Hkwjk vkSj dqjdqjk djus esa enn djrk gSA
The rack must be used during grill
cooking.
fxzy dqfdax ds nkSjku jSd dk iz;ksx vo'; djuk pkfg,A
Press STOP/CLEAR. / STOP/CLEAR nck,aA
Press MODE. / MODE nck,aA
Turn DIAL to select GRILL. / GRILL pquus ds fy, DIAL ?kqek,aA
The following indication is displayed: “ “
“
fMlIys ij fuEu ladsr fn[krk gS % “  “A
“A
Press DIAL for mode conformation. /eksM fuf'prrk ds fy, DIAL nck,aA
Turn DIALuntil display shows “12:30”.
DIAL dks tc rd ?kqek,a tc rd fMlIys “12:30” u n'kkZ,A
Press START. / START nck,aA
When cooking you can increase or decrease cooking time by turning
DIAL.
[kkuk idkrs le; DIAL ?kqekdj vki [kkuk idkus dk le; c<+k ;k ?kVk ldrs gSa
13

Grill Combination Cooking
fxzy dkWEchus'ku dqfdax
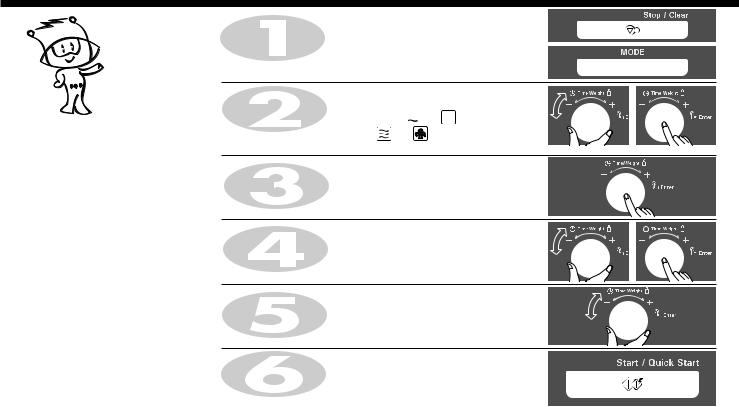
In the following example I will show you how to programme your oven with micro power 180W(20%) and grill for a cooking time of 25 minutes.
fuEu mnkgj.k esa n'kkZ;k x;k gS fd 25 feuV ds fy, [kkuk idkus esa ekbØks ikoj 180W(20%) vkSj fxzy ls vius vksou dks dSls lSV djsaA
Press STOP/CLEAR. / STOP/CLEAR nck,aA
Your oven has a combination cooking feature which allows you to cook food with heater and microwave at the same time or alternately. This generally means it takes less time to cook your food.
vkids vou esa ;g lqfoèkk bl fy;s iznku dh xbZ gS rkfd vki blds iz;ksx ls Hkkstu dks ghVj o ekbØksoso }kjk ,d gh le; esa ckjh ckjh ls idk ldsaA lkekU;r% bldk vFkZ gksrk gS fd Hkkstu idus esa yxus okys le; dh cprA
You can set three kinds of micro power level (20%, 40% and 60%) in combi mode.
vki dkWEch eksM esa rhu izdkj ds ekbØks ikoj Lrj ( 20%, 40% vkSj 60%) pqu ldrs gSaA
Press MODE. / MODE nck,aA
Turn DIAL to select GRILL COMBI until display shows “540W”. The following indications are displayed: “  “, “
“, “  “.
“.
GRILL COMBI pquus ds fy, DIAL rc rd ?kqek,a tc rd fMlIys
“540W” u n'kkZ,A |
|
“A |
fMlIys ij fuEu ladsr fn[krk gS % “ |
“, “ |
Press DIAL for mode conformation. / eksM fuf'prrk ds fy, DIAL nck,aA
Turn DIAL until display shows “180W”.
DIAL rc rd ?kqek,a tc rd fMlIys “180W” u n'kkZ,A
Press DIAL for power confirmation. / ikoj fuf'prrk ds fy, DIAL nck,aA
Turn DIAL until display shows “25:00”.
DIAL rc rd ?kqek,a tc rd fMlIys “25:00” u n'kkZ,A
Press START. / START nck,aA
When cooking you can increase or decrease cooking time by turning DIAL.
[kkuk idkrs le; DIAL ?kqekdj vki [kkuk idkus dk le; c<+k ;k ?kVk ldrs gSa
Be careful when removing your food because the container will be hot!
[kkuk fudkyrs le; lko/kkuh j[ksa D;ksafd ml le; crZu xeZ gksxkA
14

In the following example I will show you how to remove smell in the oven. fuEu mnkgj.k esa n'kkZ;k x;k gS fd vksou dh xU/k dks dSls gVk;k tk,A
EZ Clean
,t+ Dyhu
The oven has a special function to remove the smell in the oven with one touch.
,d Vp esa vksou dh xU/k nwj djus ds vksou esa ,d fo'ks"k fØ;k gksrh gSA
You can use the EZ Clean function without food in the oven.
vksou esa fcuk [kkus j[ks vki ,t+ Dyhu fØ;k dk bLrseky dj ldrs gSaA
Please remove tray and other accessory during EZ-Cleaning operation and then relocate ones after finishing EZ-Cleaning operation.
Ñi;k ,t+-Dyhu vkWijs'ku ds nkSjku Vªs vkSj vU; midj.kksa dks gVk nsa vkSj ,t+-Dyhu vkWijs'ku iwjk gksus ij fQj ls j[k nsaA
Press STOP/CLEAR. / STOP/CLEAR nck,aA
Press MODE. / MODE nck,aA
Turn DIAL to select EZ CLEAN until display shows “220°C”. The following indications are displayed: “ “, “
“, “  “.
“.
EZ CLEAN pquus ds fy, DIAL rc rd ?kqek,a tc rd fMlIys “250°C” u n'kkZ,A
fMlIys ij fuEu ladsr fn[krk gS % “  “, “
“, “  “A
“A
Press DIAL for mode confirmation. / eksM fuf'prrk ds fy, DIAL nck,aA
Press START. / START nck,aA
(Time counts down automatically)
¼le; Lor% gh de gksrk tkrk gS½
15

Speed Hot Air Preheat
LihM gkWV ,vj izhghV
In the following example I will show you how to preheat the oven at a temperature of 230°C. fuEu mnkgj.k esa n'kkZ;k x;k gS fd vksou dks 230°C rkieku ij dSls izhghV djrs gSaA
Press STOP/CLEAR. / STOP/CLEAR nck,aA
The oven has a temperature range of 100°C ~ 250°C. (180°C is automatically available when speed hot air mode is selected.)
vksou esa 100°C ~ 250°C rd rkieku lhek gksrh gSA LihM gkWV ,vj eksM pquus ij 180°C rkieku Lor% gh miyC/k gks tkrk gSA
Press MODE. / MODE nck,aA
Turn DIAL to select SPEED HOT AIR / SPEED HOT AIR pquus ds fy,
DIAL |
?kqek,aA |
. |
|
|
|
The following indications are displayed: “ |
“, “ |
“. |
|||
fMlIys |
ij fuEu |
ladsr fn[krk gS % “ |
“, “ |
“. |
|
Press DIAL for mode confirmation. / eksM fuf'prrk ds fy, DIAL nck,aA
Turn DIAL until display shows “230°C”.
DIAL rc rd ?kqek,a tc rd fMlIys “230°C” u n'kkZ,A
Press DIAL for temperature confirmation. rkieku dh fuf'prrk ds fy, DIAL nck,aA
Press START. / START nck,aA
Preheating will be started with displaying “ Pr-H”. “ Pr-H”
16

In the following example I will show you how to programme your oven with speed hot air cooking at 230 °C for 20 minutes.
fuEu mnkgj.k esa n'kkZ;k x;k gS fd vksou dks 230°C rkieku ij 20 feuV ds fy, LihM gkWV ,vj dqfdax ls lkFk dSls lSV djrs gSaA
Speed Hot Air Cooking
LihM gkWV ,vj dqfdax
Press STOP/CLEAR. / STOP/CLEAR nck,aA
Press MODE. / MODE nck,aA
The oven has a temperature range of 100°C ~ 250°C. (180°C is automatically available when speed hot air mode is selected.)
vksou esa 100°C ~ 250°C rd rkieku lhek gksrh gSA LihM gkWV ,vj eksM pquus ij 180°C rkieku Lor% gh miyC/k gks tkrk gSA
This function allows you to combine convection operation with the grill.
;g fØ;k dUoSD'ku vkWijs'ku dks fxzy ds lkFk tksM+us esa enn djrh gSA
It will reduce your cooking time.
;g [kkuk idkus ds le; dks de djsxhA
Turn DIAL to select SPEED HOT AIR /SPEED HOT AIR pquus ds fy,
DIAL ?kqek,aA |
. |
|
|
The following indications are displayed: “ |
“, “ |
“. |
|
fMlIys ij fuEu ladsr fn[krk gS % “  “, “
“, “  “.
“.
Press DIAL for mode confirmation. / eksM fuf'prrk ds fy, DIAL nck,aA
Turn DIAL until display shows “230°C”.
DIAL rc rd ?kqek,a tc rd fMlIys “230°C” u n'kkZ,A
Press DIAL for temperature confirmation. rkieku dh fuf'prrk ds fy, DIAL nck,aA
Turn DIALuntil display shows “20:00”.
DIAL rc rd ?kqek,a tc rd fMlIys “20:00” u n'kkZ,A
Press START. / START nck,aA
When cooking you can increase or decrease cooking time by turning DIAL.
[kkuk idkrs le; DIAL ?kqekdj vki [kkuk idkus dk le; c<+k ;k ?kVk ldrs gSa
17
Convection Combination Cooking
dUoSD'ku dkWEchus'ku dqfdax
In the following example I will show you how to programme your oven with micro power 540W (60%) and at a convection temperature 200 °C for a cooking time of 25 minutes.
fuEu |
mnkgj.k esa n'kkZ;k x;k gS fd vksou dks 25 feuV ds dqfdax le; ds fy, ekbØks |
ikoj |
540W (60%) vkSj dUoSD'ku rkieku 200°C ds lkFk dSls lSV djsaA |
Press STOP/CLEAR. / STOP/CLEAR nck,aA
Press MODE. / MODE nck,aA
The oven has a temperature range of 100°C ~ 250°C. (180°C is automatically available when convection combination mode is selected.)
vksou esa 100°C ~ 250°C rd rkieku lhek gksrh gSA dUoSD'ku dkWfEcus'ku eksM pquus ij 180°C rkieku Lor% gh miyC/k gks tkrk gSA
You can set three kinds of micro power level (20%, 40% and 60%) in combi mode.
vki dkWEch eksM esa rhu izdkj ds ekbØks ikoj Lrj (20%, 40% vkSj 60%) pqu
ldrs gSaA
Turn DIAL to select CONV. COMBI until display shows “540W”. / CONV.
COMBI pquus ds fy, DIAL rc rd ?kqek,a tc rd fMlIys “540W” u n'kkZ,A
The following indications are displayed: “  “, “
“, “  “.
“.
fMlIys ij fuEu ladsr fn[krk gS % “ |
“, “ |
“. |
|
Press DIAL for mode confirmation. / eksM fuf'prrk ds fy, |
DIAL nck,aA |
||
Press DIAL for power confirmation./ikoj dh fuf'prrk ds fy, |
DIAL nck,aA |
||
(540W is automatically available when CONV. COMBI mode is selected.) 540W
Turn DIAL until display shows “200°C”.
DIAL rc rd ?kqek,a tc rd fMlIys “200°C” u n'kkZ,A
Press DIAL for temperature confirmation. rkieku dh fuf'prrk ds fy, DIAL nck,aA
Turn DIAL until display shows “25:00”.
DIAL rc rd ?kqek,a tc rd fMlIys “25:00” u n'kkZ,A
Press START. / START nck,aA
When cooking you can increase or decrease cooking time by turning DIAL.
[kkuk idkrs le; DIAL ?kqekdj vki [kkuk idkus dk le; c<+k ;k ?kVk ldrs gSa
Be careful when removing your food because the container will be hot!
18 |
[kkuk fudkyrs le; lko/kkuh j[ksa D;ksafd ml le; crZu xeZ gksxkA |
|

In the following example I will show you how to preheat the oven at a temperature of 230°C. fuEu mnkgj.k esa n'kkZ;k x;k gS fd vksou dks 230°C ds rkieku ij dSls izhghV djsaA
Convection Prehat
dUoSD'ku izhghV
The convection oven has a temperature range of 40°C and 100°C~250°C (180°C is automatically available when convection mode is selected).
vksou esa vkSj rd rkieku lhek gksrh gSA dUoSD'ku eksM pquus ij 180°C rkieku Lor% gh miyC/k gks tkrk gSA
*The oven has a ferment function at the oven temperature of 40°C. When you use this function, if the oven temperature is over 70°C, then the display shows "F-14" error code. You may wait until the oven is cool.
vksou esa 40°C ij ngh tekus |
dh lqfo/kk |
gSA ;fn vksou |
|
dk |
rkieku 70°C ls Åij gS rks |
"F-14" error code n'kkZrk |
|
gSA |
vki vksou ds BaMk gksus dh |
izrh{kk dj |
ldrs gSaA |
Your oven will take a few minutes to reach the selected temperature.
vkidk vksou pqus gq, rkieku rd igq¡pus esa dqN feuVksa dk le; ysxkA
Once it has reached correct temperature, your oven will BEEP to let you know that it has reached the correct temperature. Then place your food in your oven: then tell your oven to start cooking.
,d ckj lgh rkieku ij igq¡pus ij vkidk vksou ;g crkus ds fy, ^chi* djsxk fd vksou lgh rkieku ij igq¡p x;k gSA rc vki vksou esa viuk [kkuk j[ksa vkSj idkus ds fy, LVkVZ nck,aA
Press STOP/CLEAR. / STOP/CLEAR nck,aA
Press MODE. / MODE nck,aA
Turn DIAL to select CONV. / CONV pquus ds fy, DIAL ?kqek,aA
The following indication is displayed: “ “ fMlIys ij fuEu ladsr fn[krk gS % “
  “
“
Press DIAL for mode confirmation. / eksM fuf'prrk ds fy, DIAL nck,aA
Turn DIAL until display shows “230°C”.
DIAL rc rd ?kqek,a tc rd fMlIys “230°C” u n'kkZ,A
Press DIAL for temperature confirmation. rkieku dh fuf'prrk ds fy, DIAL nck,aA
Press START. / START nck,aA
Preheating will be started with displaying “ Pr-H”. “ Pr-H” n'kkZus ij izhghfVax vkjEHk gks tk;sxhA
19

Convection Cooking
dUoSD'ku dqfdax
In the following example I will show you how to preheat the oven first, then cook some food at a temperature of 230°C for 50 minutes.
fuEu mnkgj.k esa n'kkZ;k x;k gS fd vksou dks igys dSls izhghV djsa] rc 50 feuV ds fy, 230°C rkieku ij dqN [kkuk idk,aA
The convection oven has a temperature range of 40°C and 100°C ~ 250°C (180°C is automatically available when convection mode is selected).
vksou esa 40°C vkSj 100°C ~ 250°C rd rkieku lhek gksrh gSA dUoSD'ku eksM pquus ij 180°C rkieku Lor% gh miyC/k gks tkrk gSA
If you do not set a temperature your oven will automatically select 180°C, the cooking temperature can be changed by turning DIAL.
;fn vki rkieku lSV ugha djrs gSa rks vkidk vksou Lor% gh 180°C pqu ysxk] dqfdax rkieku DIAL ?kqekdj cnyk tk ldrk gSA
The rack must be used during convection cooking.
fxzy dqfdax ds nkSjku jSd dk iz;ksx vo'; djuk pkfg,A 
Press STOP/CLEAR. / STOP/CLEAR nck,aA
Press MODE. / MODE nck,aA
Turn DIAL to select CONV. / CONV pquus ds fy, DIAL ?kqek,aA
The following indication is displayed: “ “ fMlIys ij fuEu ladsr fn[krk gS % “
 “
“
Press DIAL for mode confirmation. / eksM fuf'prrk ds fy, DIAL nck,aA
Turn DIAL until display shows “230°C”.
DIAL rc rd ?kqek,a tc rd fMlIys “230°C” u n'kkZ,A
Press DIAL for temperature confirmation. rkieku dh fuf'prrk ds fy, DIAL nck,aA
Turn DIAL until display shows “50:00”.
DIAL rc rd ?kqek,a tc rd fMlIys “50:00” u n'kkZ,A
Press START. / START nck,aA
When cooking you can increase or decrease cooking time by turning DIAL.
[kkuk idkrs le; DIAL ?kqekdj vki [kkuk idkus dk le; c<+k ;k ?kVk ldrs gSa
20
Various Cook Functions
fofHkUu dqd dk;Ziz.kkfy;ka
Please follow the given steps to operate cook functions (Nutri Care, Indian Rasoi, 24 Hrs, Just 4 U, Utility Corner & Fast) in your Microwave.
Ñi;k vius ekbØksoso dh fofHkUu dk;Ziz.kkfy;ka (Nutri Care, Indian Rasoi, 24 Hrs, Just 4 U, Utility Corner & Fast) dks pykus ds fy, uhps fn;s x;s pj.kksa dk vuqlj.k djsaA
COOK |
Nutri Care |
Indian Rasoi |
24 Hrs |
Just 4 U |
Utility Corner |
Body Care |
|
MODE |
|||||||
|
|
|
|
|
|
||
STEP-1 |
Press Stop/Clear |
Press Stop/Clear |
Press Stop/Clear |
Press Stop/Clear |
Press Stop/Clear |
Press Stop/Clear |
|
STEP-2 |
Press Nutri Care |
Press Indian Rasoi |
Press 24 Hrs |
Press Just 4 U |
Press Utility Corner |
Press Body Care |
|
|
|
|
|
|
|
|
|
STEP-3 |
Turn DIAL to select any of St(1 to 6) , |
Turn DIAL to select any of IC(1 to 6) , |
Turn DIAL to select any of bF(1 to 6) , |
Turn DIAL to select any of bb(1 to 5) , |
Turn DIAL to select any of |
Turn DIAL to select bC (1~5) |
|
|
HP( 1 to 6) , So (1 to 6), Co(1 to 6 |
tS( 1 to 6) , SC(1 to 6), CC(1 to 6) |
Sn( 1 to 6) ,CF (1 to 6) , bA(1 to 6) |
CA( 1 to 5) , SF(1 to 5) |
UC (1~5), FE (1~4) |
category. |
|
|
food category. |
food category. |
food category. |
food category. |
food category. |
|
|
|
|
|
|
|
|
|
|
STEP-4 |
Press Enter |
Press Enter |
Press Enter |
Press Enter |
Press Enter |
Press Enter |
|
STEP-5 |
Turn Dial to set Weight |
Turn Dial to set Weight |
Turn Dial to set Weight |
Turn Dial to set Weight |
Turn Dial to set Weight |
Turn Dial to set Weight |
|
STEP-6 |
Press Start |
Press Start |
Press Start |
Press Start |
Press Start |
Press Start |
|
|
|
|
|
|
|
|
|
COOK |
Nutri Care |
Indian Rasoi |
24 Hrs |
Just 4 U |
Utility Corner |
Body Care |
|
MODE |
|||||||
|
|
|
|
|
|
||
STEP-1 |
Stop/Clear nck,a |
Stop/Clear nck,a |
Stop/Clear nck,a |
Stop/Clear nck,a |
Stop/Clear nck,a |
Stop/Clear nck,a |
|
STEP-2 |
Nutri Care nck,a |
Indian Rasoi nck,a |
24 Hrs nck,a |
Just 4 U nck,a |
Utility Corner nck,a |
Body Care nck,a |
|
|
|
|
|
|
|
|
|
STEP-3 |
St(1 to 6) , HP( 1 to 6) , So (1 to 6), |
IC(1 to 6) , tS( 1 to 6) , SC(1 to 6), |
bF(1 to 6) , Sn( 1 to 6) ,CF (1 to 6) , |
bb(1 to 5) , CA( 1 to 5) , SF(1 to 5) |
UC (1~5), FE (1~4), bC (1~5) |
bC (1~5) Js.kh pquus ds fy, |
|
|
Co(1 to 6 Js.kh esa ls dksbZ Hkh O;atu |
CC(1 to 6) Js.kh esa ls dksbZ Hkh O;atu |
bA(1 to 6) Js.kh esa ls dksbZ Hkh O;atu |
Js.kh esa ls dksbZ Hkh O;atu pquus ds fy, |
Js.kh esa ls dksbZ Hkh O;atu pquus |
Mk;y ?kqek,aA |
|
|
pquus ds fy, Mk;y ?kqek,aA |
pquus ds fy, Mk;y ?kqek,aA |
pquus ds fy, Mk;y ?kqek,aA |
Mk;y ?kqek,aA |
ds fy, Mk;y ?kqek,aA |
|
|
STEP-4 |
Enter nck,a |
Enter nck,a |
Enter nck,a |
Enter nck,a |
Enter nck,a |
Enter nck,a |
|
STEP-5 |
otu lSV djus ds fy, Mk;y ?kqek,a |
otu lSV djus ds fy, Mk;y ?kqek,a |
otu lSV djus ds fy, Mk;y ?kqek,a |
otu lSV djus ds fy, Mk;y ?kqek,a |
otu lSV djus ds fy, Mk;y ?kqek,a |
otu lSV djus ds fy, Mk;y ?kqek,a |
|
STEP-6 |
Start nck,a |
Start nck,a |
Start nck,a |
Start nck,a |
Start nck,a |
Start nck,a |
Note / fVIi.kh %
While cooking you can extend the cooking time at any point by rotating knob left/right. There is no need to stop the cooking process.
tc vki Hkkstu idk jgs gksa] rks dsoy ukWc dks ckb± ;k nkb± rjQ ?kqekdj gh le; esa ifjorZu fd;k tk ldrk gSA Hkkstu idkus dh izfØ;k dks jksdus dh dksbZ vko';drk ugha gSA
21

NUTRI CARE
U;wVªh dsvj
1.Steam Cook (St)
2.Health Plus (HP)
3.Soups (So)
4. Continental (Co)

|
|
|
|
|
|
|
|
|
|
|
|
|
|
|
Steam Cook |
|||||||||
|
|
|
|
|
|
|
|
|
|
|
|
|
|
|
|
|
|
LVhe dqd |
||||||
|
|
|
|
|
|
|
|
|
|
|
|
|
|
|
|
|
|
|
|
|
|
|
|
|
Category |
Weight Limit |
Utensil |
|
|
|
Instructions |
|
|
|
|
|
|
|
|
|
|
|
|
|
|
|
|
||
St1 |
Keema |
0.1 ~ 0.3 kg |
Microwave |
|
|
|
|
|
|
|
|
|
|
|
|
|
|
|
|
|
|
|||
|
For |
|
0.1 kg |
|
|
|
0.2 kg |
|
|
|
|
0.3 kg |
|
|
|
|
||||||||
|
Balls |
|
safe flat glass dish |
|
Chicken Keema |
|
75 gms |
|
|
|
125 gms |
|
|
175 gms |
|
|
|
|
||||||
|
|
|
& |
|
|
|
|
|
|
|
|
|
|
|
|
|
|
|
|
|
|
|
|
|
|
|
|
|
Boiled & Mashed Potato |
|
1 No. |
|
|
|
2 No. |
|
|
|
|
3 No. |
|
|
|
|
|
||||
|
|
|
Microwave |
|
|
|
|
|
|
|
|
|
|
|
|
|
|
|||||||
|
|
|
safe idli steamer* |
|
Ginger, Garlic Paste, Salt, Garam Masala, Hara Dhania |
|
|
|
|
|
As per your taste |
|
|
|
|
|
|
|
|
|
||||
|
|
|
|
|
Lemon Juice |
|
|
|
|
|
|
|
|
|
|
|
|
|
|
|||||
|
|
|
|
|
|
|
|
|
|
|
|
|
|
|
|
|
|
|
|
|
|
|
|
|
|
|
|
|
|
Besan |
|
1 tsp |
|
|
|
2 tsp |
|
|
|
|
|
3 tsp |
|
|
|
|
|
||
|
|
|
|
|
Method : 1. Mix all the ingredients together. Make balls from it. |
|
fof/k |
% |
1. lHkh lkefxz;ksa |
dks |
,d lkFk |
feykdj |
xksys |
cuk |
ysaA |
fQj |
bu |
xksyksa |
||||||
|
|
|
|
|
Place the balls in greased MWS flat dish. Keep in Idli |
|
|
dks rsy yxh |
gqbZ |
ekbØksoso |
lsQ ¶ySV |
fM'k |
|
esa |
j[ksa |
vkSj |
bMyh LVhej |
|||||||
|
|
|
|
|
Steamer. Select Menu and weight and press start.. |
|
|
|
|
|||||||||||||||
|
|
|
|
|
|
|
|
esa j[k nsaA ehuw vkSj otu fu/kkZfjr djds LVkVZ nck,aA |
|
|
|
|||||||||||||
|
|
|
|
|
|
|
|
|
|
|
|
|
||||||||||||
|
|
|
|
|
|
|
|
|
|
|
|
|
|
|
|
|
|
|
|
|
|
|
|
|
St2 |
Gajar Ka |
0.3 kg |
Microwave Safe |
|
|
|
|
|
|
|
|
|
|
|
|
|
|
|
|
|
|
|
|
|
|
For |
|
|
|
|
|
|
|
|
0.3 kg |
|
|
|
|
|
|
|
|
|
|
||||
|
Halwa |
|
Glass Bowl |
|
|
|
|
|
|
|
|
|
|
|
|
|
|
|
|
|
|
|
|
|
|
|
|
Grated Gajar |
|
|
|
|
|
|
|
300 gms |
|
|
|
|
|
|
|
|
|
||||
|
|
|
& |
|
|
|
|
|
|
|
|
|
|
|
|
|
|
|
|
|
||||
|
|
|
|
Ghee |
|
|
|
|
|
|
|
|
2 tbsp |
|
|
|
|
|
|
|
|
|
|
|
|
|
|
Microwave |
|
|
|
|
|
|
|
|
|
|
|
|
|
|
|
|
|
|
|
||
|
|
|
Safe Idli Steamer* |
|
Milk Powder |
|
|
|
|
|
|
|
|
4 tbsp |
|
|
|
|
|
|
|
|
|
|
|
|
|
|
|
Khoya |
|
|
|
|
|
|
|
|
5 tbsp |
|
|
|
|
|
|
|
|
|
|
|
|
|
|
|
Sugar |
|
|
|
|
|
|
|
|
4 tbsp |
|
|
|
|
|
|
|
|
|
|
|
|
|
|
|
Elaichi Powder and Dry Fruits |
|
|
|
|
|
|
As per your taste |
|
|
|
|
|
|
|
|
|
|||
|
|
|
|
|
Method : 1. In a MWS glass bowl take all the ingredients & mix well. |
fof/k |
% |
1. ekbØksoso lsQ Xykl ckmy esa lHkh lkefxz;ksa dks ysdj vPNh rjg |
||||||||||||||||
|
|
|
|
|
2. Add some water to the MWS idli steamer. |
|
|
|
feyk ysaA |
|
|
|
|
|
|
|
|
|
|
|
|
|
||
|
|
|
|
|
3. Keep the MWS glass bowl in the steamer & press start. |
|
|
|
|
|
|
|
|
|
|
|
|
|
|
|
||||
|
|
|
|
|
|
|
2. ekbØksoso lsQ bMyh LVhej esa FkksM+k lk ikuh MkysaA |
|
|
|
|
|||||||||||||
|
|
|
|
|
|
|
|
|
|
|
|
|
|
|||||||||||
|
|
|
|
|
|
|
|
|
|
3. ekbØksoso lsQ Xykl ckmy dks LVhej esa j[kdj LVkVZ nck,aA |
|
|
||||||||||||
|
|
|
|
|
|
|
|
|
|
|
|
|
|
|
|
|
|
|
|
|
|
|||
St3 |
Shakarkandi |
0.2 ~ 0.5 kg |
Microwave |
|
|
|
|
|
|
|
|
|
|
|
|
|
|
|
|
|||||
|
Shakarkandi |
|
0.2 kg |
|
|
0.3 kg |
|
|
0.4 kg |
|
|
|
0.5 kg |
|
|
|
||||||||
|
|
|
safe flat glass dish |
|
Salt & Chat Masala |
|
|
|
|
|
As per your taste |
|
|
|
|
|
|
|
|
|
||||
|
|
|
& |
|
|
|
|
|
|
|
|
|
|
|
|
|
|
|
|
|
|
|
|
|
|
|
|
|
Method : 1. In MWS idli steamer add water, keep the peeled off shakarkandi fof/k |
|
|
|
|
|
|
|
|
|
|
|
|
|
|
|
|
||||
|
|
|
Microwave |
|
% |
1. bMyh LVhej |
esa FkksM+k ikuh |
ysa vkSj |
¶ySV Xykl fMLd esa ldjdUnh |
|||||||||||||||
|
|
|
safe idli steamer* |
|
in MWS flat glass dish & keep in the Idli steamer. Select menu & |
|
|
Mkydj ehuw rFkk otu fu/kkZfjr djds LVkVZ nck,aA |
|
|
|
|||||||||||||
|
|
|
|
|
weight & press start. |
|
|
|
|
|
|
|||||||||||||
|
|
|
|
|
|
|
|
|
|
|
|
|
|
|
|
|
|
|
|
|
|
|
||
|
|
|
|
|
2. After steaming sprinkle some salt & chat masala & serve. |
|
|
2. LVhe gksus ds |
Ckkn |
FkksMk ued vkSj |
PkkV elkyk fNM+d dj |
ijkslsaA |
||||||||||||
|
|
|
|
|
|
|
|
|
|
|
|
|
|
|
|
|
|
|
|
|
|
|
|
|
* Provided in Starter Kit.
23
 Loading...