


 Loading...
Lexmark™ C54x Maintenance Guide
July 2009 |
www.lexmark.com |
|
|
Contents |
|
Maintaining the printer................................................................................ |
3 |
Storing supplies......................................................................................................................................... |
3 |
Checking the status of supplies................................................................................................................. |
3 |
Checking the status of supplies from the printer control panel......................................................................... |
3 |
Checking the status of supplies from a network computer................................................................................ |
3 |
Ordering supplies...................................................................................................................................... |
4 |
Ordering toner cartridges................................................................................................................................... |
4 |
Ordering imaging kits.......................................................................................................................................... |
5 |
Ordering a waste toner bottle............................................................................................................................ |
6 |
Replacing supplies..................................................................................................................................... |
6 |
Replacing the waste toner bottle........................................................................................................................ |
6 |
Replacing a black imaging kit.............................................................................................................................. |
9 |
Replacing a black and color imaging kit............................................................................................................ |
15 |
Replacing a toner cartridge............................................................................................................................... |
20 |
Replacing a developer unit................................................................................................................................ |
22 |
Cleaning the exterior of the printer........................................................................................................ |
27 |
Moving the printer.................................................................................................................................. |
28 |
Before moving the printer................................................................................................................................. |
28 |
Moving the printer to another location............................................................................................................ |
28 |
Shipping the printer.......................................................................................................................................... |
28 |
Contents
2
Maintaining the printer
Periodically, certain tasks are required to maintain optimum print quality.
Storing supplies
Choose a cool, clean storage area for the printer supplies. Store supplies right side up in their original packing until you are ready to use them.
Do not expose supplies to:
•Direct sunlight
•Temperatures above 35°C (95°F)
•High humidity above 80%
•Salty air
•Corrosive gases
•Heavy dust
Checking the status of supplies
A message appears on the display when a replacement supply item is needed or when maintenance is required.
Checking the status of supplies from the printer control panel
You can check the status of printer supplies by printing a menu settings page: 1 Make sure the printer is on and Ready appears.
2 From the printer control panel, press  .
.
3 Press the arrow buttons until Reports appears, and then press  .
.
4 Press the arrow buttons until Menu Settings Page appears, and then press  .
.
Checking the status of supplies from a network computer
Note: The computer must be connected to the same network as the printer. 1 Type the printer IP address into the address field of your Web browser.
Note: If you do not know the IP address of the printer, print a network setup page and locate the IP address in the TCP/IP section.
2 Click Device Status. The Device Status page appears, displaying a summary of supply levels.
Maintaining the printer
3

Ordering supplies
To order supplies in the U.S., contact Lexmark at 1-800-539-6275 for information about Lexmark authorized supplies dealers in your area. In other countries or regions, visit the Lexmark Web Site at www.lexmark.com or contact the place where you purchased the printer.
Note: All life estimates for printer supplies assume printing on letteror A4-size plain paper.
Ordering toner cartridges
When 88 Cyan Cartridge Low, 88 Magenta Cartridge Low, 88 Yellow Cartridge Low, or 88 Black Cartridge low appears, order a new cartridge.
When 88 Replace Cyan Cartridge, 88 Replace Magenta Cartridge, 88 Replace Yellow Cartridge, or 88 Replace Black Cartridge appears, you must replace the specified toner cartridge.
Part name |
Part number |
C540 and C543 |
C544 |
C546 |
Black Return Program |
C540A1KG |
|
|
|
Toner Cartridge |
|
|
|
|
|
|
|
|
|
Cyan Return Program |
C540A1CG |
|
|
|
Toner Cartridge |
|
|
|
|
|
|
|
|
|
Magenta Return |
C540A1MG |
|
|
|
Program Toner |
|
|
|
|
Cartridge |
|
|
|
|
|
|
|
|
|
Yellow Return Program |
C540A1YG |
|
|
|
Toner Cartridge |
|
|
|
|
|
|
|
|
|
Black High Yield Return |
C540H1KG |
|
|
|
Program Toner |
|
|
|
|
Cartridge |
|
|
|
|
|
|
|
|
|
Cyan High Yield Return |
C540H1CG |
|
|
|
Program Toner |
|
|
|
|
Cartridge |
|
|
|
|
|
|
|
|
|
Magenta High Yield |
C540H1MG |
|
|
|
Return Program Toner |
|
|
|
|
Cartridge |
|
|
|
|
|
|
|
|
|
Yellow High Yield |
C540H1YG |
|
|
|
Return Program Toner |
|
|
|
|
Cartridge |
|
|
|
|
|
|
|
|
|
Black High Yield Toner |
C540H2KG |
|
|
|
Cartridge |
|
|
|
|
|
|
|
|
|
Cyan High Yield Toner |
C540H2CG |
|
|
|
Cartridge |
|
|
|
|
|
|
|
|
|
Magenta High Yield |
C540H2MG |
|
|
|
Toner Cartridge |
|
|
|
|
|
|
|
|
|
Yellow High Yield Toner |
C540H2YG |
|
|
|
Cartridge |
|
|
|
|
|
|
|
|
|
Maintaining the printer
4

Part name |
Part number |
C540 and C543 |
C544 |
C546 |
Black Extra High Yield |
C544X1KG |
X |
|
X |
Return Program Toner |
|
|
|
|
Cartridge |
|
|
|
|
|
|
|
|
|
Cyan Extra High Yield |
C544X1CG |
X |
|
|
Return Program Toner |
|
|
|
|
Cartridge |
|
|
|
|
|
|
|
|
|
Magenta Extra High |
C544X1MG |
X |
|
|
Yield Return Program |
|
|
|
|
Toner Cartridge |
|
|
|
|
|
|
|
|
|
Yellow Extra High Yield |
C544X1YG |
X |
|
|
Return Program Toner |
|
|
|
|
Cartridge |
|
|
|
|
|
|
|
|
|
Black Extra High Yield |
C544X2KG |
X |
|
X |
Toner Cartridge |
|
|
|
|
|
|
|
|
|
Cyan Extra High Yield |
C544X2CG |
X |
|
|
Toner Cartridge |
|
|
|
|
|
|
|
|
|
Magenta Extra High |
C544X2MG |
X |
|
|
Yield Toner Cartridge |
|
|
|
|
|
|
|
|
|
Yellow Extra High Yield |
C544X2YG |
X |
|
|
Toner Cartridge |
|
|
|
|
|
|
|
|
|
Black Extra High Yield |
C546U1KG |
X |
X |
|
Return Program Toner |
|
|
|
|
Cartridge |
|
|
|
|
|
|
|
|
|
Black Extra High Yield |
C546U2KG |
X |
X |
|
Toner Cartridge |
|
|
|
|
|
|
|
|
|
Ordering imaging kits
When Replace black and color imaging kit or Replace black imaging kit appears, order a replacement imaging kit.
Part name |
Part number |
C540, C543, C544 |
C546 |
Black and Color Imaging Kit |
C540X74G |
|
|
|
|
|
|
Black Imaging Kit |
C540X71G |
|
|
|
|
|
|
Photoconductor Unit |
C540X35G |
Not Supported |
|
|
|
|
|
Black Developer Unit |
C540X31G |
Not Supported |
|
|
|
|
|
Cyan Developer Unit |
C540X32G |
Not Supported |
|
|
|
|
|
Magenta Developer Unit |
C540X33G |
Not Supported |
|
|
|
|
|
Yellow Developer Unit |
C540X34G |
Not Supported |
|
|
|
|
|
Maintaining the printer
5
Ordering a waste toner bottle
When 82 Replace Waste Toner appears, order a replacement waste toner box. The waste toner box must be replaced when 82 Replace Waste Toner appears.
Part name |
Part number |
Waste toner bottle |
C540X75G |
|
|
Replacing supplies
Replacing the waste toner bottle
Replace the waste toner bottle when 82 Replace waste toner appears. The printer will not continue printing until the waste toner bottle is replaced.
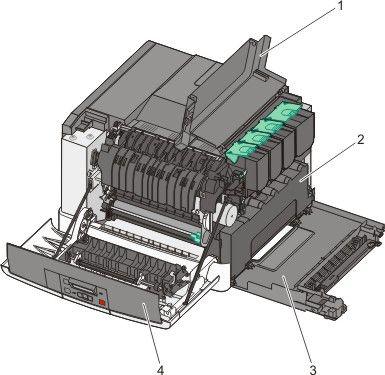
1 |
Top door |
|
|
2 |
Waste toner bottle |
|
|
3 |
Right side cover |
|
|
4 |
Front door |
|
|
Maintaining the printer
6
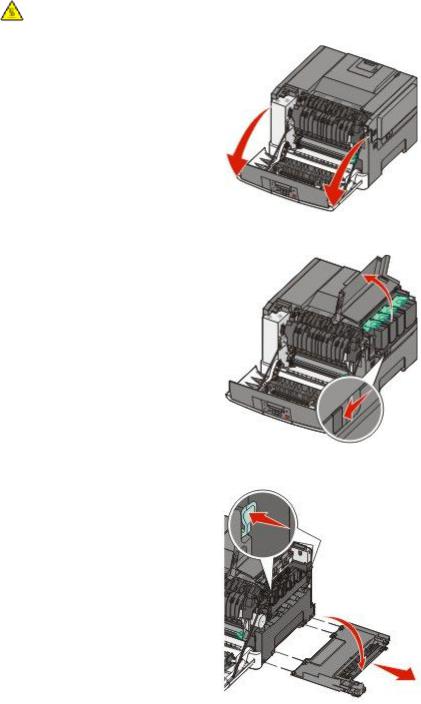
1 Unpack the replacement waste toner bottle.
2
3 Open the top door.
4 Remove the right side cover.
Maintaining the printer
7

5 Press the green levers on each side of the waste toner bottle, and then remove it.
6 Place the waste toner bottle in the enclosed packaging. For more information, see the User’s Guide. 7 Insert the new waste toner bottle.
8 Replace the right side cover.
Maintaining the printer
8
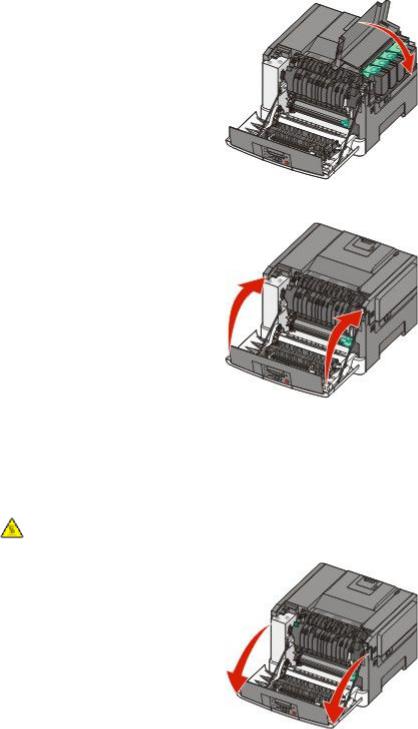
9 Close the top door.
10 Close the front door.
Replacing a black imaging kit
Replace the black imaging kit when Imaging Kit appears.
1 Grasp the front door at the side handholds, and then pull it toward you.
CAUTION—HOT SURFACE: The inside of the printer might be hot. To reduce the risk of injury from a hot component, allow the surface to cool before touching.
Maintaining the printer
9
Loading...