


 Loading...
B2236 Printer
User's Guide
January 2019 |
www.lexmark.com |
|
|
Machine type(s):
1400
Model(s):
438

Contents |
2 |
Contents |
|
Safety information........................................................................................ |
4 |
Conventions.......................................................................................................................................................... |
4 |
Product statements............................................................................................................................................. |
4 |
Learn about the printer................................................................................ |
7 |
Finding information about the printer............................................................................................................. |
7 |
Printer configuration............................................................................................................................................ |
9 |
Using the control panel...................................................................................................................................... |
9 |
Understanding the status of the power button and indicator light....................................................... |
10 |
Set up, install, and configure...................................................................... |
11 |
Selecting a location for the printer................................................................................................................. |
11 |
Attaching cables................................................................................................................................................. |
12 |
Selecting paper................................................................................................................................................... |
12 |
Loading paper .................................................................................................................................................... |
17 |
Networking......................................................................................................................................................... |
20 |
Installing and updating software, drivers, and firmware......................................................................... |
22 |
Secure the printer....................................................................................... |
24 |
Erasing printer memory................................................................................................................................... |
24 |
Restoring factory default settings................................................................................................................. |
24 |
Statement of Volatility...................................................................................................................................... |
24 |
Print.............................................................................................................. |
25 |
Printing from a computer................................................................................................................................. |
25 |
Printing from a mobile device........................................................................................................................ |
25 |
Printing confidential and other held jobs.................................................................................................... |
26 |
Printing a font sample list................................................................................................................................ |
27 |
Adjusting toner darkness................................................................................................................................ |
27 |
Use printer menus...................................................................................... |
28 |
Menu map........................................................................................................................................................... |
28 |
Device.................................................................................................................................................................. |
28 |
Print....................................................................................................................................................................... |
34 |
Paper..................................................................................................................................................................... |
38 |

Contents |
3 |
Network/Ports..................................................................................................................................................... |
39 |
Reports.................................................................................................................................................................. |
51 |
Troubleshooting.................................................................................................................................................. |
51 |
Printing the Menu Settings Page................................................................................................................... |
52 |
Maintain the printer.................................................................................... |
53 |
Checking the status of parts and supplies................................................................................................. |
53 |
Configuring supply notifications.................................................................................................................... |
53 |
Viewing reports.................................................................................................................................................. |
53 |
Ordering parts and supplies........................................................................................................................... |
53 |
Replacing parts and supplies......................................................................................................................... |
55 |
Cleaning the printer.......................................................................................................................................... |
60 |
Saving energy and paper................................................................................................................................ |
60 |
Moving the printer to another location......................................................................................................... |
61 |
Shipping the printer.......................................................................................................................................... |
62 |
Troubleshoot a problem............................................................................. |
63 |
The printer is not responding......................................................................................................................... |
63 |
Network connection problems...................................................................................................................... |
64 |
Issues with supplies.......................................................................................................................................... |
65 |
Clearing jams...................................................................................................................................................... |
66 |
Paper feed problems........................................................................................................................................ |
72 |
Printing problems.............................................................................................................................................. |
75 |
Contacting customer support........................................................................................................................ |
101 |
Privacy........................................................................................................ |
102 |
Recycle and dispose................................................................................. |
103 |
Recycling Lexmark products......................................................................................................................... |
103 |
Recycling Lexmark packaging...................................................................................................................... |
103 |
Returning Lexmark cartridges for reuse or recycling............................................................................. |
103 |
Notices........................................................................................................ |
104 |
Index............................................................................................................ |
115 |
Safety information |
4 |
Safety information
Conventions
Note: A note identifies information that could help you.
Warning: A warning identifies something that could damage the product hardware or software.
CAUTION: A caution indicates a potentially hazardous situation that could injure you.
Different types of caution statements include:
 CAUTION—POTENTIAL INJURY: Indicates a risk of injury.
 CAUTION—SHOCK HAZARD: Indicates a risk of electrical shock.
 CAUTION—HOT SURFACE: Indicates a risk of burn if touched.
 CAUTION—PINCH HAZARD: Indicates a risk of being caught between moving parts.
 CAUTION—MOVING PARTS: Indicates a risk of laceration or abrasion injuries from rotating parts.
Product statements
CAUTION—POTENTIAL INJURY: To avoid the risk of fire or electrical shock, connect the power cord to an appropriately rated and properly grounded electrical outlet that is near the product and easily accessible.
CAUTION—POTENTIAL INJURY: To avoid the risk of fire or electrical shock, use only the power cord provided with this product or the manufacturer's authorized replacement.
CAUTION—POTENTIAL INJURY: Do not use this product with extension cords, multioutlet power strips, multioutlet extenders, or UPS devices. The power capacity of these types of accessories can be easily overloaded by a laser printer and may result in a risk of fire, property damage, or poor printer performance.
CAUTION—POTENTIAL INJURY: Only a Lexmark Inline Surge Protector that is properly connected between the printer and the power cord provided with the printer may be used with this product. The use of non-Lexmark surge protection devices may result in a risk of fire, property damage, or poor printer performance.
CAUTION—SHOCK HAZARD: To avoid the risk of electrical shock, do not place or use this product near water or wet locations.
CAUTION—SHOCK HAZARD: To avoid the risk of electrical shock, do not set up this product or make any electrical or cabling connections, such as the power cord, fax feature, or telephone, during a lightning storm.

Safety information |
5 |
CAUTION—POTENTIAL INJURY: Do not cut, twist, bind, crush, or place heavy objects on the power cord. Do not subject the power cord to abrasion or stress. Do not pinch the power cord between objects such as furniture and walls. If any of these things happen, a risk of fire or electrical shock results. Inspect the power cord regularly for signs of such problems. Remove the power cord from the electrical outlet before inspecting it.
CAUTION—SHOCK HAZARD: To avoid the risk of electrical shock, make sure that all external connections (such as Ethernet and telephone system connections) are properly installed in their marked plug-in ports.
CAUTION—SHOCK HAZARD: To avoid the risk of electrical shock, if you are accessing the controller board or installing optional hardware or memory devices sometime after setting up the printer, then turn the printer off, and unplug the power cord from the electrical outlet before continuing. If you have any other devices attached to the printer, then turn them off as well, and unplug any cables going into the printer.
CAUTION—SHOCK HAZARD: To avoid the risk of electrical shock when cleaning the exterior of the printer, unplug the power cord from the electrical outlet and disconnect all cables from the printer before proceeding.
CAUTION—POTENTIAL INJURY: If the printer weight is greater than 18 kg (40 lb), then it requires two or more trained personnel to lift it safely.
CAUTION—POTENTIAL INJURY: When moving the printer, follow these guidelines to avoid personal injury or printer damage:
•Make sure that all doors and trays are closed.
•Turn off the printer, and then unplug the power cord from the electrical outlet.
•Disconnect all cords and cables from the printer.
•If the printer has separate floor-standing optional trays or output options attached to it, then disconnect them before moving the printer.
•If the printer has a caster base, then carefully roll it to the new location. Use caution when passing over thresholds and breaks in flooring.
•If the printer does not have a caster base but is configured with optional trays or output options, then remove the output options and lift the printer off the trays. Do not try to lift the printer and any options at the same time.
•Always use the handholds on the printer to lift it.
•Any cart used to move the printer must have a surface able to support the full footprint of the printer.
•Any cart used to move the hardware options must have a surface able to support the dimensions of the options.
•Keep the printer in an upright position.
•Avoid severe jarring movements.
•Make sure that your fingers are not under the printer when you set it down.
•Make sure that there is adequate clearance around the printer.
CAUTION—HOT SURFACE: The inside of the printer might be hot. To reduce the risk of injury from a hot component, allow the surface to cool before touching it.
CAUTION—PINCH HAZARD: To avoid the risk of a pinch injury, use caution in areas marked with this label. Pinch injuries may occur around moving parts, such as gears, doors, trays, and covers.

Safety information |
6 |
CAUTION—MOVING PARTS: To avoid the risk of laceration or abrasion injuries, keep hands away from moving parts in areas marked with this label. Injuries from moving parts may occur around gears and other rotating parts.
CAUTION—POTENTIAL INJURY: This product uses a laser. Use of controls or adjustments or performance of procedures other than those specified in the User’s Guide may result in hazardous radiation exposure.
CAUTION—POTENTIAL INJURY: The lithium battery in this product is not intended to be replaced. There is a danger of explosion if a lithium battery is incorrectly replaced. Do not recharge, disassemble, or incinerate a lithium battery. Discard used lithium batteries according to the manufacturer's instructions and local regulations.
This product is designed, tested, and approved to meet strict global safety standards with the use of specific manufacturer's components. The safety features of some parts may not always be obvious. The manufacturer is not responsible for the use of other replacement parts.
Refer service or repairs, other than those described in the user documentation, to a service representative.
This product uses a printing process that heats the print media, and the heat may cause the media to release emissions. You must understand the section in your operating instructions that discusses the guidelines for selecting print media to avoid the possibility of harmful emissions.
This product may produce small amounts of ozone during normal operation, and may be equipped with a filter designed to limit ozone concentrations to levels well below the recommended exposure limits. To avoid high ozone concentration levels during extensive usage, install this product in a well-ventilated area and replace the ozone and exhaust filters if instructed to do so in the product maintenance instructions. If there are no references to filters in the product maintenance instructions, then there are no filters requiring replacement for this product.
SAVE THESE INSTRUCTIONS.

Learn about the printer |
7 |
Learn about the printer
Finding information about the printer
|
What are you looking for? |
Find it here |
||
|
Initial setup instructions: |
See the setup documentation that came with the |
||
|
• |
Connecting the printer |
printer or go to http://support.lexmark.com. |
|
|
• Installing the printer software |
|
|
|
|
|
|
||
|
More setup and instructions for using the printer: |
Information Center—Go to |
||
|
• |
Selecting and storing paper and specialty media |
http://infoserve.lexmark.com. |
|
|
• |
Loading paper |
Product videos—Go to |
|
|
• |
Configuring printer settings |
http://infoserve.lexmark.com/idv/. |
|
|
|
|
||
|
• |
Viewing and printing documents and photos |
|
|
|
• |
Setting up and using the printer software |
|
|
|
• |
Configuring the printer on a network |
|
|
|
• |
Caring for and maintaining the printer |
|
|
|
• |
Troubleshooting and solving problems |
|
|
|
|
|
||
|
Help using the printer software |
Help for Microsoft Windows or Macintosh operating |
||
|
|
|
systems—Open a printer software program or |
|
|
|
|
application, and then click Help. |
|
|
|
|
Click ? to view context sensitive information. |
|
|
|
|
Notes: |
|
|
|
|
• |
Help is automatically installed with the printer |
|
|
|
|
software. |
|
|
|
• |
Depending on the operating system, the |
|
|
|
|
printer software is located in the printer |
|
|
|
|
program folder or on the desktop. |
|
|
|
|
|
Learn about the printer |
|
8 |
||
|
|
|
|
|
|
What are you looking for? |
Find it here |
||
|
The latest supplemental information, updates, and customer |
Go to http://support.lexmark.com. |
||
|
support: |
Note: Select your country or region, and then |
||
|
• |
Documentation |
||
|
select your product to view the appropriate |
|||
|
• |
Driver downloads |
support site. |
|
|
• |
Live chat support |
Support contact information for your country or |
|
|
• |
E mail support |
region can be found on the website or on the |
|
|
printed warranty that came with the printer. |
|||
|
• |
Voice support |
||
|
Have the following information ready when you |
|||
|
|
|
||
|
|
|
contact customer support: |
|
|
|
|
• |
Place and date of purchase |
|
|
|
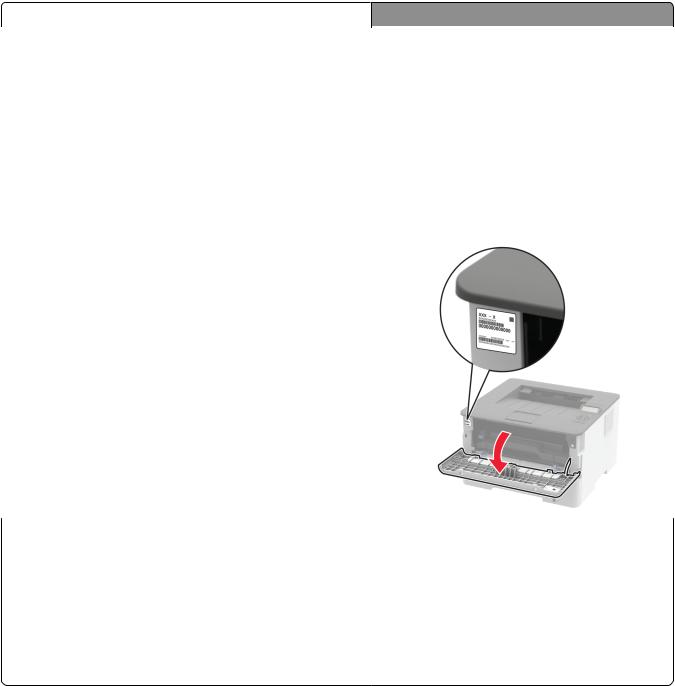
• |
Machine type and serial number |
|
|
|
|
|
• |
Safety information |
Warranty information varies by country or region: |
|
• |
Regulatory information |
• In the U.S.—See the Statement of Limited |
|
• |
Warranty information |
Warranty included with the printer, or go to |
|
• |
Environmental information |
http://support.lexmark.com. |
|
• In other countries and regions—See the |
|||
|
|
||
|
|
printed warranty that came with the printer. |
|
|
|
Product Information Guide—See the |
|
|
|
documentation that came with the printer or go to |
|
|
|
http://support.lexmark.com. |
Learn about the printer |
9 |
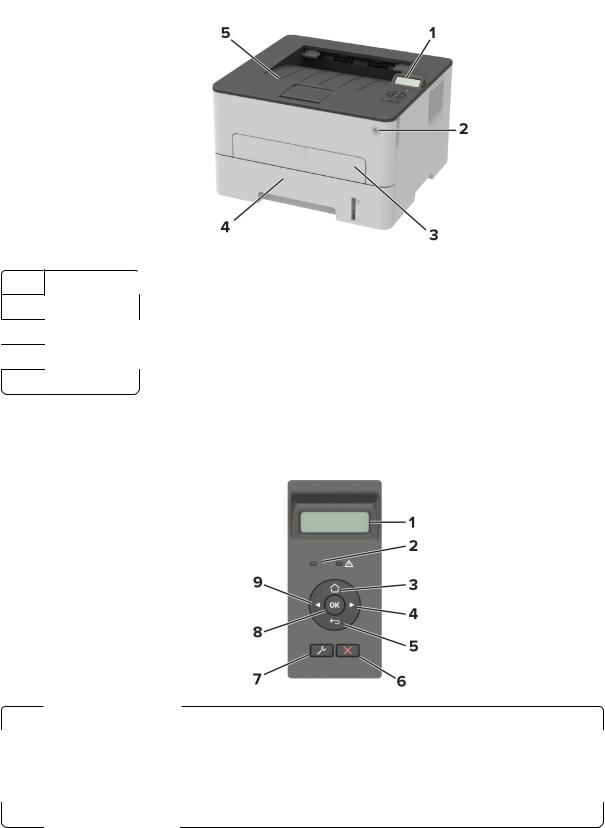
Printer configuration
1 Control panel 
2Power button
3Manual feeder
4250 sheet tray
5 Standard bin
Using the control panel
|
|
Control panel part |
Function |
|
|
1 |
Display |
• |
View printer messages and supply status. |
|
|
|
• |
Set up and operate the printer. |
|
|
|
|
|
|
2 |
Indicator light |
Check the status of the printer. |
|
|
|
|
|
|
|
3 |
Home button |
Go to the home screen. |
|
|
|
|
|
|

Learn about the printer |
|
10 |
||
|
|
|
|
|
|
Control panel part |
Function |
|
|
4 |
Right arrow button |
• |
Scroll through menus or move between screens and menu options. |
|
|
|
• |
Increase the numeric value of a setting. |
|
|
|
|
|
|
5 |
Back button |
Return to the previous screen. |
||
6Stop or Cancel button Stop the current job.
7 |
Menu button |
Access the printer menus. |
|
8 |
Select button |
• |
Select a menu option. |
|
|
• |
Save the changes in a setting. |
|
|
|
|
9 |
Left arrow button |
• |
Scroll through menus or move between screens and menu options. |
|
|
• |
Decrease the numeric value of a setting. |
Understanding the status of the power button and indicator light
|
Indicator light |
Printer status |
|
Solid blue |
The printer is on or ready. |
|
|
|
|
Blinking blue |
The printer is processing data. |
|
|
|
|
Blinking red |
The printer requires user intervention. |
|
|
|
|
Off |
The printer is off or in Sleep mode. |
|
|
|
|
Power button light |
Printer status |
|
Off |
The printer is off, ready, or processing data. |
|
|
|
|
Solid white |
The printer is in Sleep mode. |
|
|
|
|
Blinking white |
The printer is in Hibernate mode. |
|
|
|
Set up, install, and configure |
11 |
Set up, install, and configure
Selecting a location for the printer
•Leave enough room to open trays, covers, and doors and to install hardware options.
•Set up the printer near an electrical outlet.
CAUTION—POTENTIAL INJURY: To avoid the risk of fire or electrical shock, connect the power cord to an appropriately rated and properly grounded electrical outlet that is near the product and easily accessible.
CAUTION—SHOCK HAZARD: To avoid the risk of electrical shock, do not place or use this product near water or wet locations.
•Make sure that airflow in the room meets the latest revision of the ASHRAE 62 standard or the CEN Technical Committee 156 standard.
•Provide a flat, sturdy, and stable surface.
•Keep the printer:
–Clean, dry, and free of dust
–Away from stray staples and paper clips
–Away from the direct airflow of air conditioners, heaters, or ventilators
–Free from direct sunlight and humidity extremes
•Observe the recommended temperatures and avoid fluctuations.
 Ambient temperature 10 to 32.2°C (50 to 90°F)
Storage temperature -40 to 43.3°C (-40 to 110°F)
• Allow the following recommended amount of space around the printer for proper ventilation:
1 |
Top |
120 mm (5 in.) |
|
|
|
2 |
Rear |
260 mm (10 in.) |
|
|
|
3 |
Right side |
120 mm (5 in.) |
|
|
|
Set up, install, and configure |
12 |
||
|
|
|
|
4 Front |
550 mm (22 in.) |
|
|
Note: The minimum space needed in front of the printer is 76 mm (3 in.).
5 Left side 120 mm (5 in.)
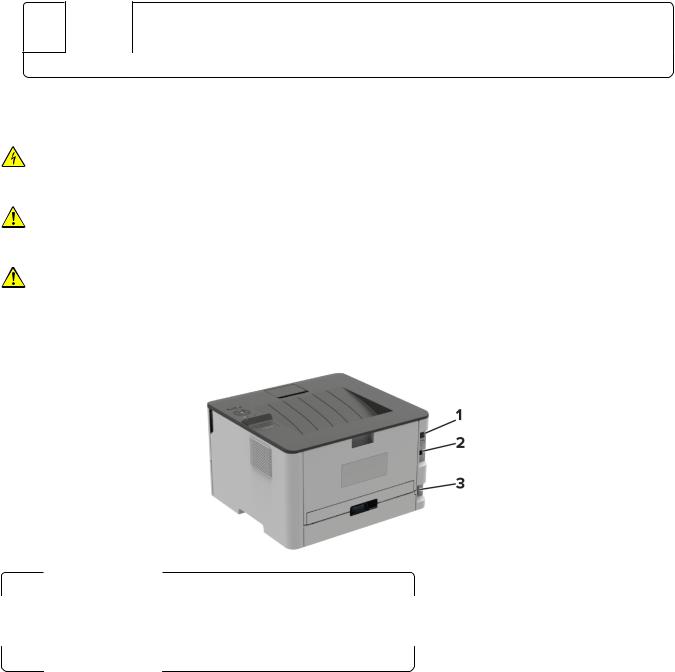
Attaching cables
CAUTION—SHOCK HAZARD: To avoid the risk of electrical shock, do not set up this product or make any electrical or cabling connections, such as the power cord, fax feature, or telephone, during a lightning storm.
CAUTION—POTENTIAL INJURY: To avoid the risk of fire or electrical shock, connect the power cord to an appropriately rated and properly grounded electrical outlet that is near the product and easily accessible.
CAUTION—POTENTIAL INJURY: To avoid the risk of fire or electrical shock, use only the power cord provided with this product or the manufacturer's authorized replacement.
Warning—Potential Damage: To avoid loss of data or printer malfunction, do not touch the USB cable, any wireless network adapter, or the printer in the areas shown while actively printing.
|
|
Printer port |
Function |
|
1 |
Ethernet port |
Connect the printer to a network. |
|
|
|
|
|
2 |
USB printer port |
Connect the printer to a computer. |
|
|
|
|
|
3 |
Power cord socket |
Connect the printer to an electrical outlet. |
|
|
|
|
Selecting paper
Paper guidelines
Use the appropriate paper to prevent jams and help ensure trouble free printing.
•Always use new, undamaged paper.
•Before loading paper, know the recommended printable side of the paper. This information is usually indicated on the paper package.
Set up, install, and configure |
13 |
•Do not use paper that has been cut or trimmed by hand.
•Do not mix paper sizes, types, or weights in the same tray; mixing results in jams.
•Do not use coated papers unless they are specifically designed for electrophotographic printing.
Paper characteristics
The following paper characteristics affect print quality and reliability. Consider these factors before printing on them.
Weight
The tray can feed paper weights from 60 to 105 g/m2 (16 to 28 lb) grain long paper. Paper lighter than 60 g/m2 (16 lb) may not be stiff enough to feed properly, and may cause jams.
Curl
Curl is the tendency for paper to curl at its edges. Excessive curl can cause paper feeding problems. Curl can occur after the paper passes through the printer, where it is exposed to high temperatures. Storing paper unwrapped in hot, humid, cold, or dry conditions can contribute to paper curling before printing and can cause feeding problems.
Smoothness
Paper smoothness directly affects print quality. If paper is too rough, toner cannot fuse to it properly. If paper is too smooth, it can cause paper feeding or print quality issues. We recommend the use of paper with 50 Sheffield points.
Moisture content
The amount of moisture in paper affects both print quality and the printer ability to feed the paper correctly. Leave paper in its original wrapper until you use it. Exposure of paper to moisture changes can degrade its performance.
Store paper in its original wrapper in the same environment as the printer for 24 to 48 hours before printing. Extend the time several days if the storage or transportation environment is very different from the printer environment. Thick paper may also require a longer conditioning period.
Grain direction
Grain refers to the alignment of the paper fibers in a sheet of paper. Grain is either grain long, running the length of the paper, or grain short, running the width of the paper.
For 60–105 g/m2 (16–28 lb) paper, grain long paper is recommended.
Fiber content
Most high quality xerographic paper is made from 100% chemically treated pulped wood. This content provides the paper with a high degree of stability, resulting in fewer paper feeding problems and better print quality. Paper containing fibers such as cotton can negatively affect paper handling.
Set up, install, and configure |
14 |
Unacceptable paper
The following paper types are not recommended for use with the printer:
•Chemically treated papers used to make copies without carbon paper, also known as carbonless papers, carbonless copy paper (CCP), or no carbon required (NCR) paper
•Preprinted papers with chemicals that may contaminate the printer
•Preprinted papers that can be affected by the temperature in the printer fuser
•Preprinted papers that require a registration (the precise print location on the page) greater than ±2.3 mm (±0.9 in.), such as optical character recognition (OCR) forms
In some cases, registration can be adjusted with a software application to successfully print on these forms.
•Coated papers (erasable bond), synthetic papers, thermal papers
•Rough edged, rough or heavily textured surface papers, or curled papers
•Recycled papers that fail EN12281:2002 (European)
•Paper weighing less than 60 g/m2 (16 lb)
•Multiple part forms or documents
Storing paper
Use these paper storage guidelines to help avoid jams and uneven print quality:
•Store paper in its original wrapper in the same environment as the printer for 24 to 48 hours before printing.
•Extend the time several days if the storage or transportation environment is very different from the printer environment. Thick paper may also require a longer conditioning period.
•For best results, store paper where the temperature is 21°C (70°F) and the relative humidity is 40 percent.
•Most label manufacturers recommend printing in a temperature range of 18–24°C (65–75°F) with relative humidity between 40 and 60 percent.
•Store paper in cartons, on a pallet or shelf, rather than on the floor.
•Store individual packages on a flat surface.
•Do not store anything on top of individual paper packages.
•Take paper out of the carton or wrapper only when you are ready to load it in the printer. The carton and wrapper help keep the paper clean, dry, and flat.
Selecting preprinted forms and letterhead
•Use grain long paper.
•Use only forms and letterhead printed using an offset lithographic or engraved printing process.
•Avoid paper with rough or heavily textured surfaces.
•Use inks that are not affected by the resin in toner. Inks that are oxidation set or oil based generally meet these requirements; latex inks might not.
•Print samples on preprinted forms and letterheads considered for use before buying large quantities. This action determines whether the ink in the preprinted form or letterhead affects print quality.
•When in doubt, contact your paper supplier.
•When printing on letterhead, load the paper in the proper orientation for your printer. For more information, see the Paper and Specialty Media Guide.

Set up, install, and configure |
15 |
Supported paper sizes
Notes: |
|
|
|
|||
|
• |
Paper less than 210 mm (8.3 in.) wide always prints at reduced speed. |
|
|||
|
• |
Use the manual feeder when printing on paper less than 105 mm (4.1 in.) wide. |
|
|||
|
• |
The minimum paper dimension supported for two sided printing is 210 x 279.4 mm (8.3 x 11 in.). |
||||
|
• |
For two-sided printing on letter , legal , Oficio , or folio size paper, make sure that the paper size setting |
||||
|
|
in the duplex unit is set to Letter. |
|
|
|
|
|
|
|
|
|
|
|
|
Paper size |
|
250 sheet tray |
Manual feeder |
Two sided printing |
|
|
A4 |
|
|
|
|
|
|
210 x 297 mm (8.3 x 11.7 in.) |
|
|
|
|
|
|
|
|
|
|
|
|
|
A5 (short edge feed) |
|
|
|
X |
|
|
148 x 210 mm (5.8 x 8.3 in.) |
|
|
|
|
|
|
|
|
|
|
|
|
|
A5 (long edge feed) |
|
|
|
X |
|
|
210 x 148 mm (8.3 x 5.8 in.) |
|
|
|
|
|
|
|
|
|
|
|
|
|
A6 |
|
|
|
|
X |
|
105 x 148 mm (4.1 x 5.8 in.) |
|
|
|
|
|
|
|
|
|
|
|
|
|
JIS B5 |
|
|
|
X |
|
|
182 x 257 mm (7.2 x 10.1 in.) |
|
|
|
|
|
|
|
|
|
|
|
|
|
Oficio (Mexico) |
|
|
|
|
|
|
215.9 x 340.4 mm (8.5 x 13.4 in.) |
|
|
|
|
|
|
|
|
|
|
|
|
|
Hagaki |
|
X |
|
X |
|
|
100 x 148 mm (3.94 x 5.83 in.) |
|
|
|
|
|
|
|
|
|
|
|
|
|
Statement |
|
|
|
X |
|
|
139.7 x 215.9 mm (5.5 x 8.5 in.) |
|
|
|
|
|
|
|
|
|
|
|
|
|
Executive |
|
|
|
X |
|
|
184.2 x 266.7 mm (7.25 x 10.5 in.) |
|
|
|
|
|
|
|
|
|
|
|
|
|
Letter |
|
|
|
|
|
|
215.9 x 279.4 mm (8.5 x 11 in.) |
|
|
|
|
|
|
|
|
|
|
|
|
|
Legal |
|
|
|
|
|
|
215.9 x 355.6 mm (8.5 x 14 in.) |
|
|
|
|
|
|
|
|
|
|
|
|
|
Folio |
|
|
|
|
|
|
215.9 x 330.3 mm (8.5 x 13 in.) |
|
|
|
|
|
|
|
|
|
|
|
|
|
Universal |
|
X |
|
X |
|
|
98 x 148 mm (3.9 x 5.8 in.) to |
|
|
|
|
|
|
216 x 356 mm (8.5 x 14 in.) |
|
|
|
|
|
|
|
|
|
|
|
|
|
Universal |
|
|
|
X |
|
|
105 x 148 mm (4.1 x 5.8 in.) to |
|
|
|
|
|
|
216 x 356 mm (8.5 x 14 in.) |
|
|
|
|
|
|
|
|
|
|
|
|

Set up, install, and configure |
16 |
Paper size |
250 sheet tray |
Manual feeder |
Two sided printing |
7 3/4 Envelope (Monarch) |
X |
|
X |
98.4 x 190.5 mm (3.875 x 7.5 in.) |
|
|
|
9 Envelope |
X |
|
X |
98.4 x 225.4 mm (3.875 x 8.9 in.) |
|
|
|
10 Envelope |
X |
|
X |
104.8 x 241.3 mm (4.12 x 9.5 in.) |
|
|
|
DL Envelope |
X |
|
X |
110 x 220 mm (4.33 x 8.66 in.) |
|
|
|
C5 Envelope |
X |
|
X |
162 x 229 mm (6.38 x 9.01 in.) |
|
|
|
B5 Envelope |
X |
|
X |
176 x 250 mm (6.93 x 9.84 in.) |
|
|
|
Other Envelope |
X |
|
X |
98.4 x 162 mm (3.87 x 6.38 in.) to |
|
|
|
176 x 250 mm (6.93 x 9.84 in.) |
|
|
|
Supported paper types
Note: Labels, envelopes, and card stock always print at reduced speed.
Paper type |
250 sheet tray |
Manual feeder |
Two sided printing |
Plain paper |
|
|
|
Card stock |
X |
|
X |
Labels |
X |
|
X |
Bond |
|
|
|
Envelope |
X |
|
X |
Letterhead |
|
|
|
Preprinted |
|
|
|
Colored paper |
|
|
|
Light |
|
|
|
Heavy |
|
|
|
Recycled |
|
|
|
Set up, install, and configure |
17 |
Supported paper weights
250 sheet tray |
Manual feeder |
Two sided printing |
60–105 g/m² (16–28 lb bond) |
60–200 g/m² (16–54 lb bond) |
70–105 g/m² (18.7–28 lb bond) |
Loading paper
Setting the paper size and type
1 From the control panel, navigate to:
 > Paper >
  > Tray Configuration >
  > Paper Size/Type >
2 Select a paper source, and then configure the paper size and type.
Notes:
•For two-sided printing on A4 size paper, make sure that the paper size setting in the duplex unit is set to A4.
•For two-sided printing on letter , legal , Oficio , or folio size paper, make sure that the paper size setting in the duplex unit is set to Letter.
Configuring Universal paper settings
1From the control panel, navigate to:
 > Paper >
  > Media Configuration >
  > Universal Setup >
2 Select Portrait Width or Portrait Height, and then press  .
.
3 Adjust the settings, and then press  .
.
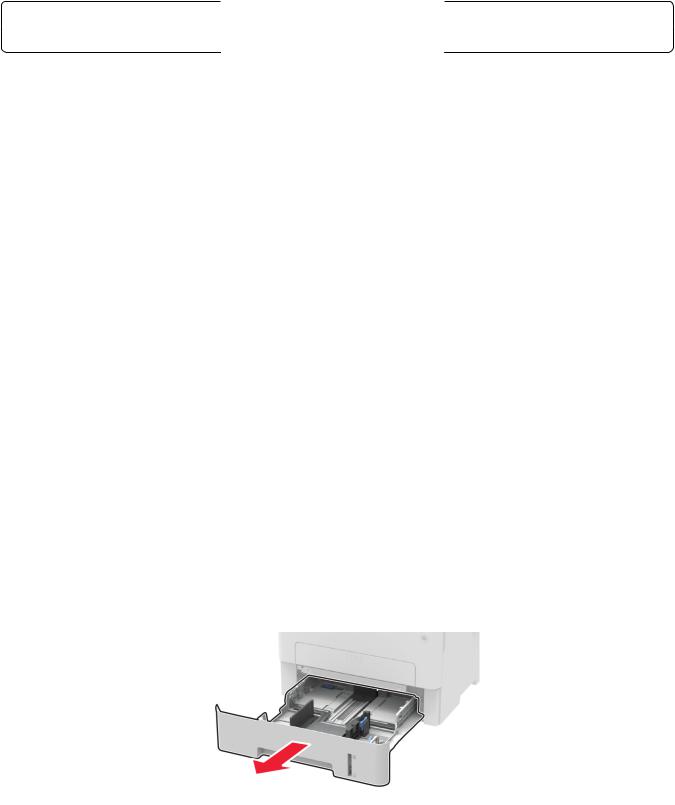
Loading trays
1 Remove the tray.
Set up, install, and configure |
18 |
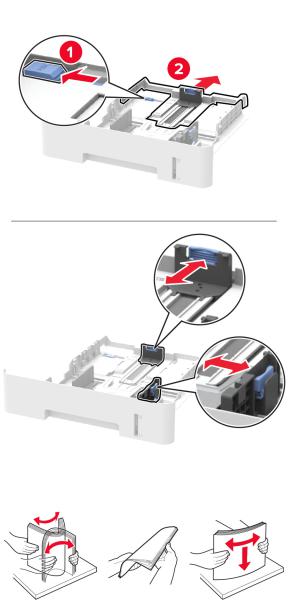
2 Adjust the paper guides to match the size of the paper that you are loading.
3 Flex, fan, and align the paper edges before loading.
Set up, install, and configure |
19 |
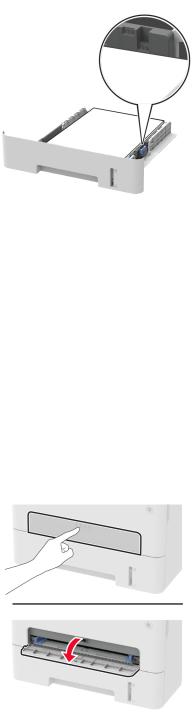
4Load the paper stack with the printable side facedown, and then make sure that the side guides fit snugly against the paper.
Notes:
•Load letterhead facedown with the top edge of the sheet toward the front of the tray for one sided printing.
•Load letterhead faceup with the bottom edge of the sheet toward the front of the tray for two sided printing.
•Do not slide paper into the tray.
•To avoid paper jams, make sure that the stack height is below the maximum paper fill indicator.
5Insert the tray.
If necessary, set the paper size and paper type from the control panel to match the paper loaded.
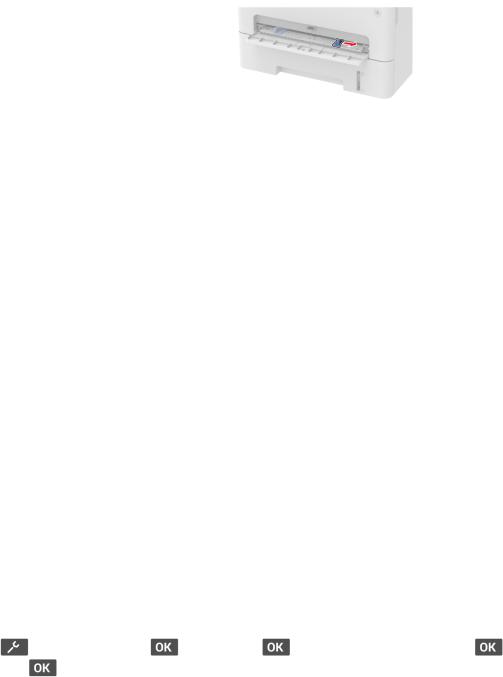
Loading the manual feeder
1 Open the manual feeder.
Set up, install, and configure |
20 |
2 Adjust the guide to match the size of the paper that you are loading.
3Load a sheet of paper with the printable side faceup.
•Load letterhead with the printable side faceup and the top edge entering the printer first for one sided printing.
•Load letterhead with the printable side facedown and the top edge entering the printer last for two sided printing.
•Load envelope with the flap side down and against the left side of the paper guide.
Warning—Potential Damage: To avoid paper jams, do not force paper into the manual feeder.
Networking
Connecting the printer to a Wi Fi network
Using the control panel
1From the control panel, navigate to:
 > Network/Ports >
  > Wireless >
  > Setup On Printer Panel >
2Follow the instructions on the display.
Note: For Wi Fi network ready printer models, a prompt for Wi Fi network setup appears during initial setup.
Using Lexmark Mobile Assistant
1Depending on your mobile device, download the Lexmark Mobile Assistant application from either the Google PlayTM store or App Store online store.
2 |
From the control panel, navigate to: |
|
|
|
|
> Network/Ports > |
> Wireless > |
> Setup Using Mobile App > |
> Continue for Printer |
|
ID > |
|
|
|
3 |
From your mobile device, launch the application, and then accept the Terms of Use. |
|||
4 |
Grant permissions. |
|
|
|
5 |
Tap Start Wi-Fi Setup, and then select the printer. |
|
||
6 |
Select a Wi-Fi network, and then enter your credentials. |
|
||
7 |
Tap Finish Wi-Fi Setup. |
|
|
|
Set up, install, and configure |
21 |
Connecting the printer to a wireless network using Wi Fi Protected Setup
(WPS)
Before you begin, make sure that:
•The access point (wireless router) is WPS certified or WPS compatible. For more information, see the documentation that came with your access point.
•A wireless network adapter is installed in your printer. For more information, see the instructions that came with the adapter.
Using the Push Button method
1 From the control panel, navigate to:
 > Network/Ports >
  > Wireless >
2 |
Select Wi Fi Protected Setup, and then press |
. |
3 |
Select Start Push Button Method, and then press |
. |
4 |
Follow the instructions on the display. |
|
Using the personal identification number (PIN) method
1From the control panel, navigate to:
 > Network/Ports >
  > Wireless >
2 Select Wi Fi Protected Setup >  > Start PIN Method >
  .
.
3 Copy the eight digit WPS PIN.
4Open a web browser, and then type the IP address of your access point in the address field.
Notes:
•View the printer IP address on the printer home screen. The IP address appears as four sets of numbers separated by periods, such as 123.123.123.123.
•If you are using a proxy server, then temporarily disable it to load the web page correctly.
5Access the WPS settings. For more information, see the documentation that came with your access point.
6 Enter the eight digit PIN, and then save the changes.
Deactivating the Wi Fi network
1 |
From the printer control panel, navigate to: |
|
|
|
|
> Network/Ports > |
> Network Overview > |
> Active Adapter > |
> Standard Networking |
|
> |
|
|
|
2 |
Follow the instructions on the display. |
|
|
|
Set up, install, and configure |
22 |
Checking the printer connectivity
1From the control panel, navigate to:  > Reports >
  > Network >
2 Select Network Setup Page, and then press  .
.
3Check the first section of the network setup page, and confirm that the status is connected.
If the status is not connected, then the LAN drop may be inactive, or the network cable may be unplugged or malfunctioning. Contact your administrator for assistance.
Installing and updating software, drivers, and firmware
Installing the printer software
1Obtain a copy of the software installer package.
•From the software CD that came with your printer.
•Go to http://support.lexmark.com, and then select your printer and operating system.
2 Run the installer, and then follow the instructions on the computer screen.
3For Macintosh users, add the printer.
Note: Obtain the printer IP address from the home screen.
Updating firmware
Some applications require a minimum device firmware level to operate correctly.
For more information on updating the device firmware, contact your Lexmark representative.
1 From the Embedded Web Server, click Settings > Device > Update Firmware.
2 Browse to locate the required flash file.
3 Apply the changes.
Exporting or importing a configuration file
You can export the configuration settings of your printer into a text file, and then import the file to apply the settings to other printers.
1Open a web browser, and then type the printer IP address in the address field.
Notes:
•View the printer IP address on the printer home screen. The IP address appears as four sets of numbers separated by periods, such as 123.123.123.123.
•If you are using a proxy server, then temporarily disable it to load the web page correctly.
2 From the Embedded Web Server, click Export Configuration or Import Configuration.
3 Follow the instructions on the screen.
Set up, install, and configure |
23 |
4If the printer supports applications, then do the following: a Click Apps > select the application > Configure.
b Click Export or Import.

Secure the printer |
24 |
Secure the printer
Erasing printer memory
To erase volatile memory or buffered data, turn off the printer.
To erase non volatile memory or individual settings, device and network settings, security settings, and embedded solutions, do the following:
1From the control panel, navigate to:
 > Device >
  > Maintenance >
  > Out of Service Erase >
  > Sanitize all information on nonvolatile memory >
2 Select Yes >  .
.
3 Select either Start initial setup or Leave printer offline, and then press  .
.
Restoring factory default settings
1From the control panel, navigate to:
 > Device >
  > Restore Factory Defaults >
  > Restore all settings >
2 Select Yes, and then press  .
.
Statement of Volatility
Your printer contains various types of memory that can store device and network settings, and user data.
|
Type of memory |
Description |
|
Volatile memory |
Your printer uses standard random access memory |
|
|
(RAM) to temporarily buffer user data during simple print |
|
|
jobs. |
|
|
|
|
Non-volatile memory |
Your printer may use two forms of non-volatile memory: |
|
|
EEPROM and NAND (flash memory). Both types are used |
|
|
to store operating system, device settings, and network |
|
|
information. |
|
|
|
Erase the content of any installed printer memory in the following circumstances:
•The printer is being decommissioned.
•The printer is being moved to a different department or location.
•The printer is being serviced by someone from outside your organization.
•The printer is being removed from your premises for service.
•The printer is being sold to another organization.

25 |
Printing from a computer
Note: For labels, card stock, and envelopes, set the paper size and type in the printer before printing the document.
1 From the document that you are trying to print, open the Print dialog.
2 If necessary, adjust the settings.
3 Print the document.
Printing from a mobile device
Printing from a mobile device using Lexmark Mobile Print
LexmarkTM Mobile Print allows you to send documents and images directly to a supported Lexmark printer.
1 Open the document, and then send or share the document to Lexmark Mobile Print.
Note: Some third party applications may not support the send or share feature. For more information, see the documentation that came with the application.
2 Select a printer.
3 Print the document.
Printing from a mobile device using Google Cloud Print
Google Cloud PrintTM is a printing service that allows you to print to any Google Cloud Print ready printer.
Before you begin, make sure that:
• The printer is registered to the Google Cloud Print server.
• The Cloud Print plugin is downloaded from the Google Play store and is enabled in the mobile device.
1 From your AndroidTM mobile device, open a document or select a document from your file manager.
2 Tap  > Print.
3 Select a printer, and then tap  .
.
Printing from a mobile device using Mopria Print Service
Mopria® Print Service is a mobile printing solution for mobile devices running on Android version 4.4 or later. It allows you to print directly to any Mopria certified printer.
26 |
Note: Before printing, make sure that the Mopria Print Service is enabled.
1 From the home screen of your mobile device, launch a compatible application.
2 Tap Print, and then select the printer.
3 Send the print job.
Printing from a mobile device using AirPrint
AirPrint is a mobile printing solution that allows you to print directly from Apple devices to an AirPrint certified printer.
Notes:
• This application is supported only in some Apple devices.
• This application is supported only in some printer models.
1 From the home screen of your mobile device, launch a compatible application.
2 Select an item to print, and then tap the share icon.
3 Tap Print, and then select a printer.
4 Print the document.
Printing confidential and other held jobs
For Windows users
1 With a document open, click File > Print.
2 Click Properties, Preferences, Options, or Setup.
3 Click Print and Hold.
4 Select Use Print and Hold, and then assign a user name.
5Select the print job type (Confidential, Repeat, Reserve, or Verify). If the print job is confidential, then enter a four digit PIN.
6 Click OK or Print.
7From the printer home screen, release the print job.
•For confidential print jobs, navigate to:
Held jobs > select your user name > Confidential > enter the PIN > select the print job > configure the settings > Print
•For other print jobs, navigate to:
Held jobs > select your user name > select the print job > configure the settings > Print
27 |
For Macintosh users
1With a document open, choose File > Print.
If necessary, click the disclosure triangle to see more options.
2 From the print options or Copies & Pages menu, choose Job Routing.
3Select the print job type (Confidential, Repeat, Reserve, or Verify).
If the print job is confidential, then assign a user name and a four digit PIN.
4 Click OK or Print.
5From the printer home screen, release the print job.
•For confidential print jobs, navigate to:
Held jobs > select your user name > Confidential > enter the PIN > select the print job > configure the settings > Print
•For other print jobs, navigate to:
Held jobs > select your user name > select the print job > configure the settings > Print
Printing a font sample list
1From the control panel, navigate to:
 > Reports >
  > Print >
  > Print Fonts
2 Select PCL Fonts or PostScript Fonts, and then press  .
.
Adjusting toner darkness
1From the control panel, navigate to:
 > Print >
  > Quality >
  > Toner Darkness
2 Adjust the setting, and then press  .
.

Use printer menus |
28 |
Use printer menus
Menu map
Device |
• |
Preferences |
• |
Restore Factory Defaults |
|
• |
Notifications |
• |
Maintenance |
|
• |
Power Management |
• |
About this Printer |
|
• |
Information Sent to Lexmark |
|
|
|
|
|
|
|
• |
Layout |
• |
||
|
• |
Setup |
• |
PCL |
|
• |
Quality |
|
|
|
|
|
|
|
Paper |
• |
Tray Configuration |
• |
Media Configuration |
|
|
|
|
|
Network/Ports |
• |
Network Overview |
• |
LPD Configuration |
|
• |
Wireless |
• |
HTTP/FTP Settings |
|
• |
Ethernet |
• |
USB |
|
• |
TCP/IP |
• Restrict external network access |
|
|
• |
SNMP |
• |
Google Cloud Print |
|
• |
802.1x |
• |
Wi Fi Direct |
|
• |
IPSec |
|
|
|
|
|
|
|
Reports |
• |
Menu Settings Page |
• |
|
|
• |
Device |
• |
Network |
|
|
|
|
|
Troubleshooting |
Print Quality Test Pages |
|
|
|
|
|
|
|
|
Device
Preferences
Menu item |
Description |
Display Language |
Set the language of the text that appears on the display. |
[List of languages] |
|
|
|
Country/Region |
Identify the country or region where the printer is configured |
[List of countries] |
to operate. |
|
|
Run Initial Setup |
Run the setup wizard. |
Yes |
|
No* |
|
|
|
Displayed information |
Specify the information to appear on the home screen. |
Display Text 1
Display Text 2
 Note: An asterisk (*) next to a value indicates the factory default setting.

Use printer menus |
29 |
|
|
|
|
|
Menu item |
Description |
|
Date and Time |
Configure the printer date and time. |
|
Configure |
|
|
Current Date and Time |
|
|
Manually Set Date and Time |
|
|
Date Format [MM DD YYYY*] |
|
|
Time Format [12 hour A.M./P.M.*] |
|
|
Time Zone [GMT*] |
|
|
Network Time Protocol |
|
|
Enable NTP |
|
|
NTP Server |
|
|
|
|
|
Paper Sizes |
Specify the unit of measurement for paper sizes. |
|
U.S.* |
Note: The country or region selected in the initial setup |
|
Metric |
wizard determines the initial paper size setting. |
|
|
|
|
Screen Timeout |
Set the idle time in seconds before the display shows the home |
|
10–300 (60*) |
screen, or before the printer logs out a user account |
|
|
automatically. |
|
|
|
|
Note: An asterisk (*) next to a value indicates the factory default setting. |
|
Notifications |
|
|
|
|
|
|
Menu item |
Description |
|
Supplies |
Show the estimated supply status information. |
|
Show Supply Estimates |
|
|
Show estimates* |
|
|
Do not show estimates |
|
|
|
|
|
Error Prevention |
Set the printer to check for jammed paper automatically. |
|
Jam Assist |
|
|
Off |
|
|
On* |
|
|
|
|
|
Error Prevention |
Let the printer continue processing or printing a job |
|
Auto Continue |
automatically after clearing certain attendance conditions. |
|
Disabled |
|
|
5–255 (5*) |
|
|
|
|
|
Error Prevention |
Set the printer to restart when an error occurs. |
|
Auto Reboot |
|
|
Auto Reboot |
|
|
Reboot always* |
|
|
Reboot never |
|
Reboot when idle
 Note: An asterisk (*) next to a value indicates the factory default setting.

Use printer menus |
30 |
|
|
Menu item |
Description |
Error Prevention |
Set the number of automatic reboots that the printer can |
Auto Reboot |
perform. |
Max Auto Reboots |
|
1–20 (2*) |
|
|
|
Error Prevention |
Set the number of seconds before the printer performs an |
Auto Reboot |
automatic reboot. |
Auto Reboot Window |
|
1–525600 (720*) |
|
|
|
Error Prevention |
Show a read only information of the reboot counter. |
Auto Reboot |
|
Auto Reboot Counter |
|
|
|
Error Prevention |
Set the printer to show a message when a short paper error |
Display Short Paper Error |
occurs. |
Auto clear* |
Note: Short paper refers to the size of the paper loaded. |
On |
|
|
|
Error Prevention |
Set the printer to process the entire page into the memory |
Page Protect |
before printing it. |
Off* |
|
On |
|
|
|
Jam Content Recovery |
Set the printer to reprint jammed pages. |
Jam Recovery
Auto*
Off
On
 Note: An asterisk (*) next to a value indicates the factory default setting.
Power Management
Menu item |
Description |
Sleep Mode Profile |
Allow printing with the display turned off. |
Print with Display off |
|
Allow printing with display off* |
|
Display on when printing |
|
|
|
Timeouts |
Set the idle time before the printer begins operating in Sleep |
Sleep Mode |
mode. |
1–120 minutes (15*) |
|
 Note: An asterisk (*) next to a value indicates the factory default setting.
Loading...