

La Crosse Technology WS6818 Quick Setup Manual
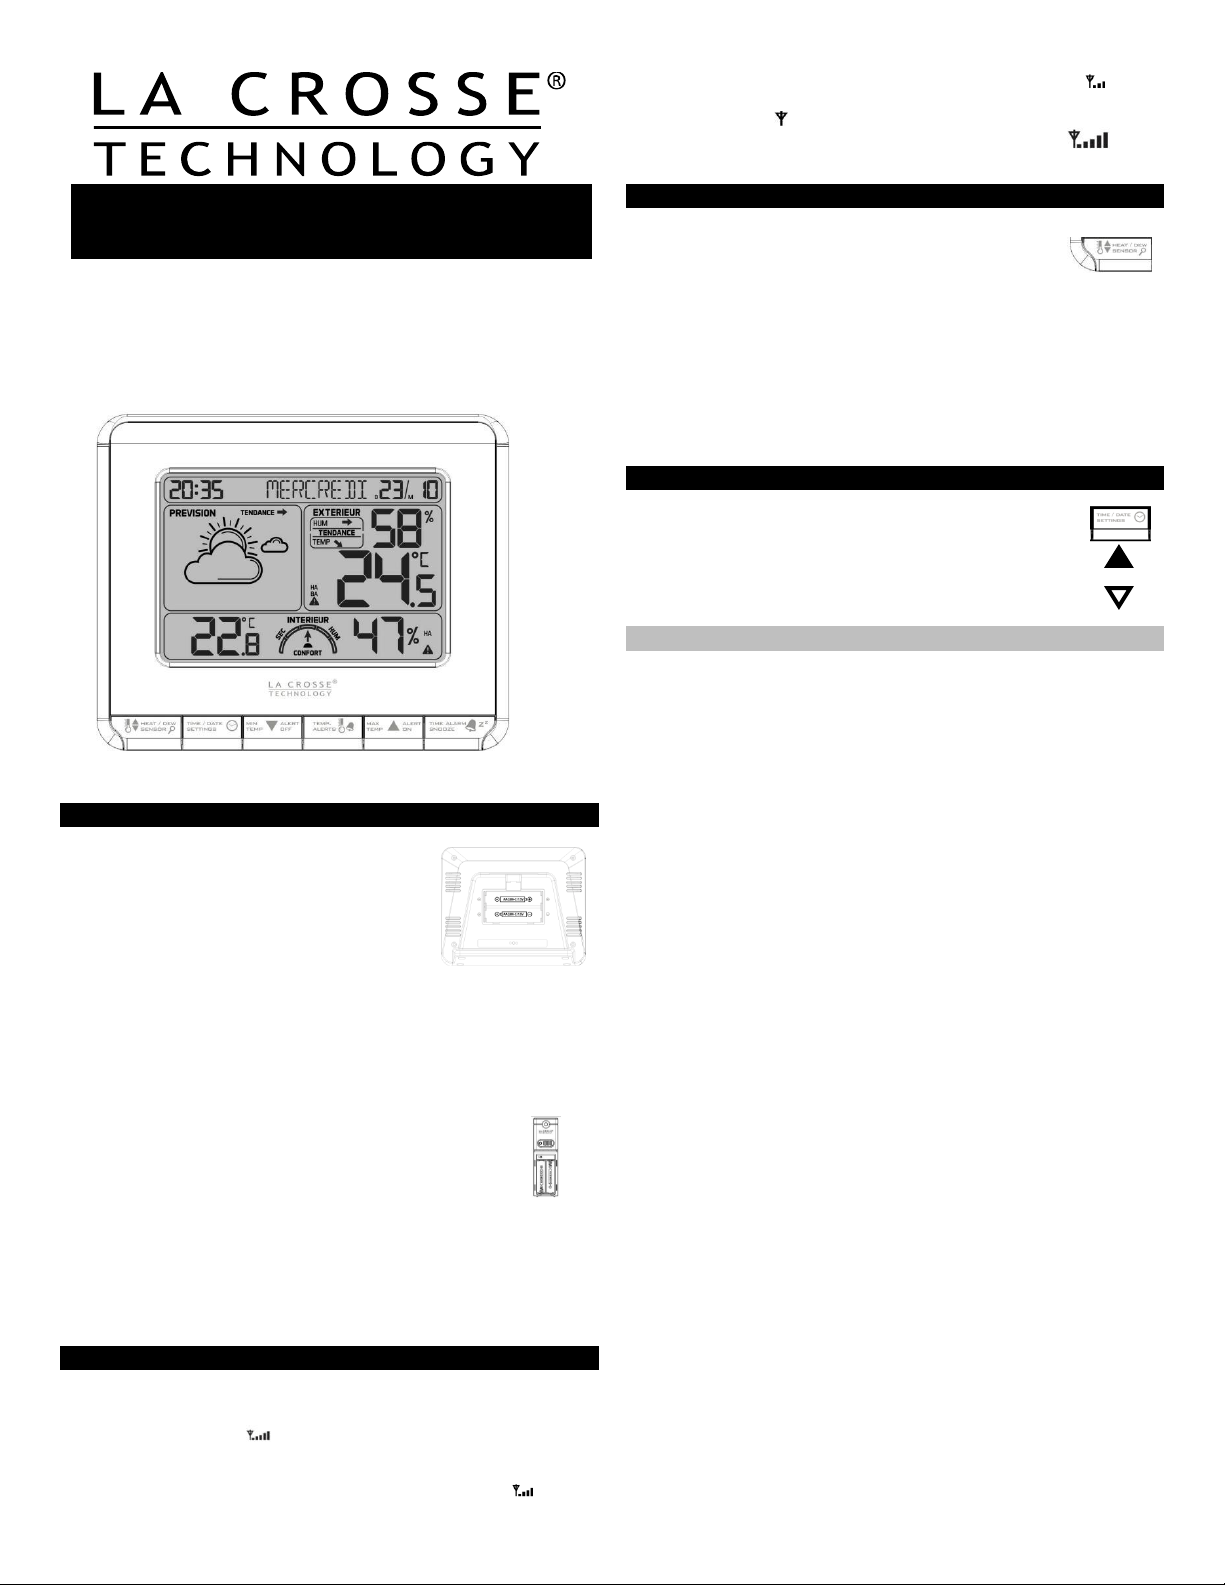
Wireless Weather Station
WS6818 | Quick Setup Guide
The Wireless Weather Station features manual set time, date, time
alarm, weather forecast, indoor and outdoor temperature/humidity, with
temperature alerts, heat index and dew point. Wireless transmission
range of over 90 meters (300 feet) in open air, from transmitter to
forecast station.
SETUP INSTRUCTIONS STEP BY STEP
STEP 1:
Remove battery cover from the forecast
station
Insert 2 NEW AA batteries (not included) into
the back of the forecast station. Observe the
correct polarity (see marking inside the
battery compartment).
The forecast station will light up and show, indoor temperature,
humidity and time.
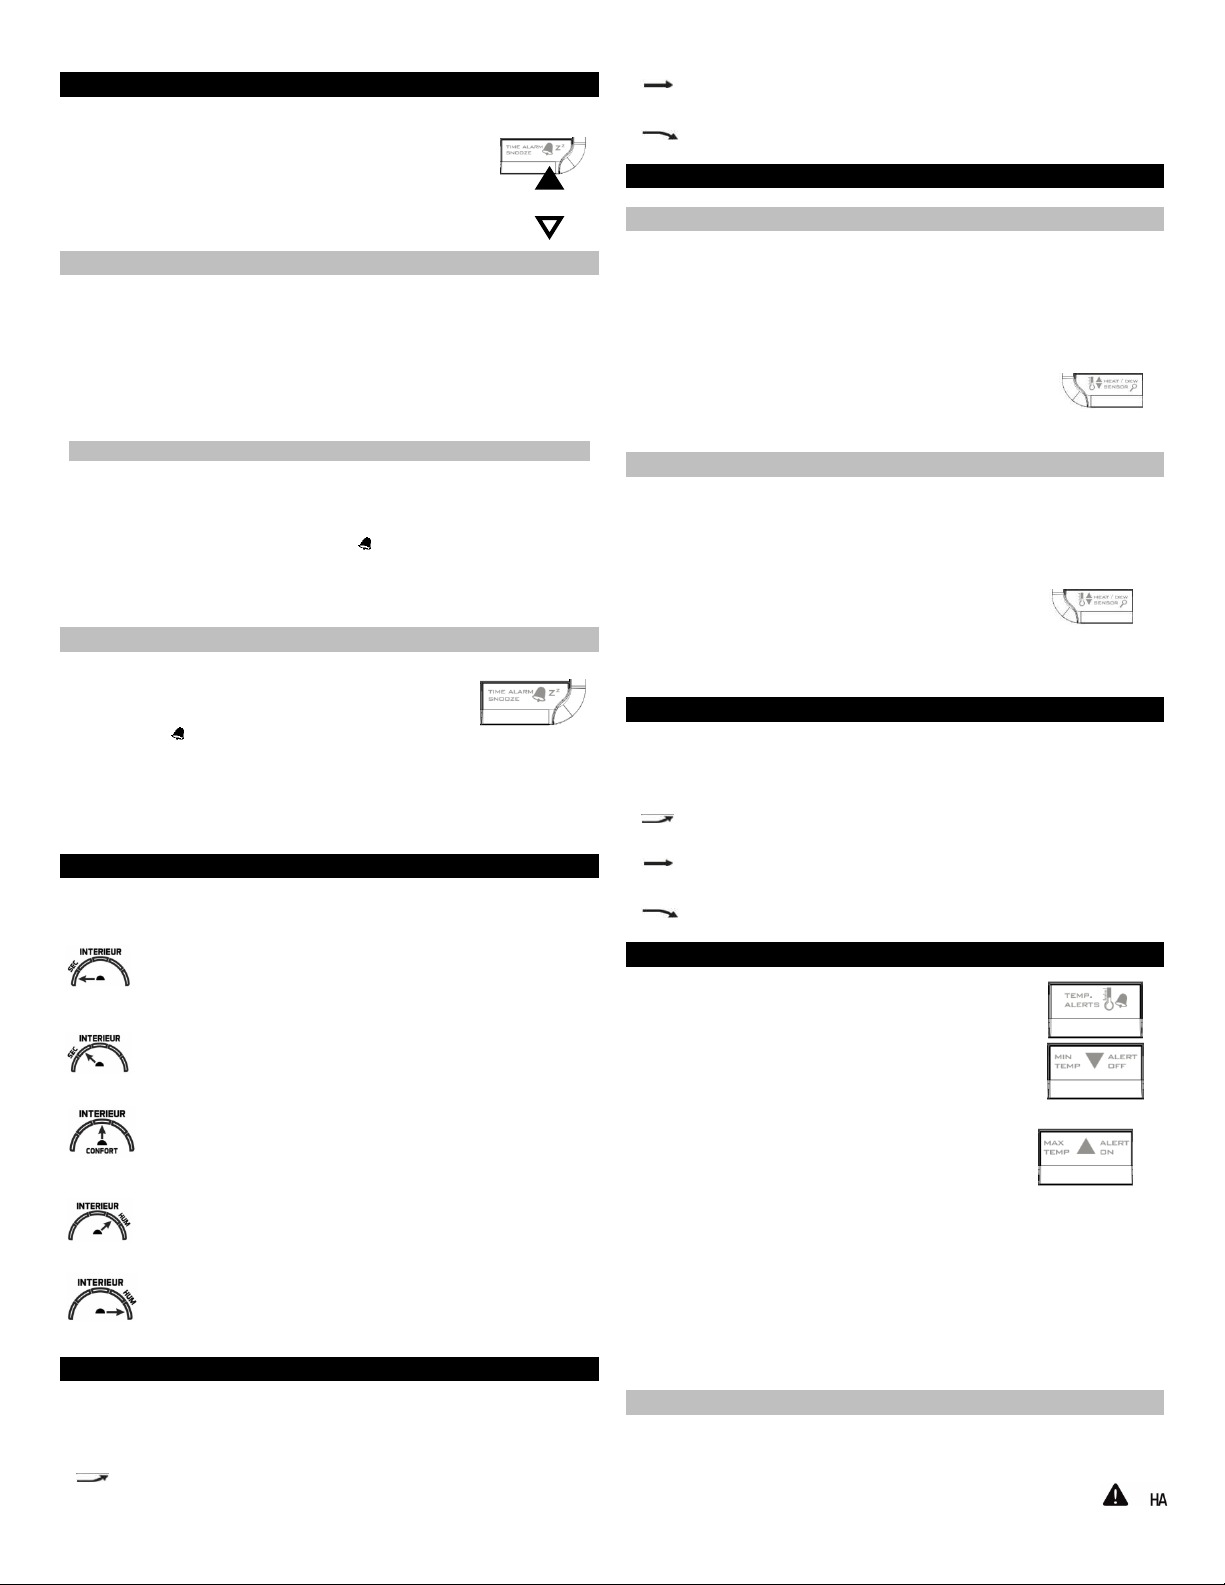
STEP 2:
Ensure that the transmitter is within 3 meters (10 feet) of the forecast
station.
Remove battery cover from transmitter: Slide the battery cover down
and lift off the front of the transmitter.
Insert 2 NEW AA batteries (not included) into the
transmitter.
Observe the correct polarity.
Within 3 minutes, the forecast station will show
readings in the Outdoor temperature area on the LCD.
Note:
Use Alkaline batteries (or Lithium for temperatures
below -28.8°C/- 20°F ).
Allow the weather station and the transmitter to stay within 10 feet of
each other for the first 15 minutes of set up.
TRANSMITTER SIGNAL STRENGTH
After the batteries are inserted, the forecast station will search for the
outdoor temperature/humidity transmitter for 3 minutes.
The antenna symbol will flash during reception, and temperature
display will be dashes “---“.
The antenna symbol will scroll during transmitter synchronization.
If synchronization fails once, the antenna will lose one bar.
If synchronization fails twice, the antenna will lose two bars.
If reception continuously fails to receive 5 times, the antenna symbol
will be shown as .
The antenna will show full display with successful RF
(radio frequency) reception.
TROUBLESHOOTING
If the outdoor temperature is not displayed after three
minutes, hold the HEAT/DEW/SENSOR button on the
forecast station for three seconds to search for outdoor
transmitter.
Next, remove the battery cover from the transmitter then press the TX
button to send a signal.
If it still does not receive the outdoor data, remove the batteries from
both the forecast station and the transmitter for 15 minutes repeat
setup instructions from step 1.
The maximum transmitting range in open air is over 90 meters(300-
feet).Obstacles such as wall, windows, stucco, concrete, and the
large metal objects can reduce the range.
TIME/DATE
The SETTINGS button moves through the program menu
and confirm settings.
Use the UP ARROW button to increase a value.
Use the DOWN ARROW button to decrease a value.
SET TIME/DATE
Hold the SETTINGS button for three seconds to enter time set mode.
BEEP ON/OFF: BP ON(BEEP) will flash .The default is ON. Press
and release the UP or DOWN button to ON or OFF the BEEP button
sound.
12/24-HOUR: The time format will flash. Use the ARROW buttons to
choose 12-hour or 24-hour time format and press the SETTINGS
button to confirm and move to hour.
HOUR: The Hour will flash. Use the ARROW buttons to choose the
hour, and press the SETTINGS button to confirm and move to
minutes.
MINUTES: The Minutes will flash. Use the ARROW buttons to
choose the minutes, and press the SETTINGS button to confirm and
move to the year.
YEAR: The Year will flash. Use the ARROW buttons to choose the
year, and press the SETTINGS button to confirm and move to the DM.
D-M: The D-M will flash. Use the ARROW buttons to choose
DATE/MONTH or MONTH/DATE format, and press the SETTINGS
button to confirm and move to the Month.
MONTH: The Month will flash. Use the ARROW buttons to choose
the month, and press the SETTINGS button to confirm and move to
the date.
DATE: The Date will flash. Use the ARROW buttons to choose the
date, and press the SETTINGS button to confirm and move to
Celsius/ Fahrenheit.
CELSIUS /FAHRENHEIT: °C or °F will flash. Use the ARROW
buttons to select Celsius or Fahrenheit. Press and release the
SETTINGS button to confirm and Move to the language.
LANGUAGE: The language will flash. The default is FRENCH. Use
the ARROW buttons to select the language for weekday display
(French or English) and press the SETTINGS button to confirm and
exit setting.
Note:
Up/Down arrows: Press once to adjust by 1 unit, hold for fast scroll
adjustment.
When in setting mode of any feature, all the rest of the information of
the LCD should disappear, only concentrate in the setting of the
feature
Press the TIME ALARM/SNOOZE button at any time to exit or wait 20
seconds without pressing buttons to return to the normal time display.
1
ALARM TIME
The TIME ALARM button moves through the alarm set
mode and confirms settings.
Use the UP ARROW button to increase a value.
Use the DOWN ARROW button to decrease a value.
SET ALARM TIME
From normal time and temperature display mode, press and release the
TIME ALARM button once to show alarm time. Hold the TIME ALARM
button for three seconds to enter alarm set mode.
HOUR: The Hour will flash. Use the ARROW buttons to set the hour,
and press TIME ALARM button to confirm and switch to minutes.
MINUTES: The Minutes will flash. Use the ARROW buttons to set the
minutes, Press and release the ALARM button to exit.
ACTIVATE/DEACTIVATE TIME ALARM
In normal mode, press and release the TIME ALARM button once to
show alarm time.
Press and release the TIME ALARM button repeatedly to activate or
deactivate the Alarm. The alarm icon appears when alarm is
activated.
Note: The alarm will ring for 2 minutes then turn off if no buttons are
pressed.
SNOOZE ALARM
When the alarm sounds, press the SNOOZE button
to snooze the alarm for 10 minutes. The alarm icon
flashes when the snooze feature is active. The
alarm icon will flash while the snooze feature is active.
To stop alarm for one day, press any button but SNOOZE button,
while in snooze mode. The alarm icon will show solid.
Note: Alarm is crescendo sound. When the alarm sounds, it continues
for 2 minute and then shuts off completely.
INDOOR COMFORT DISPLAY
The indoor comfort display indicators will update by the humidity.
The display shows “sec”, when the humidity is in the range
1%-25%
The display shows “sec”, when the humidity is in the range
26%-39%
The display shows “confort”, when the humidity is in the
range 40%-75%
The display shows “hum”, when the humidity is in the range
76%-83%
The display shows “hum”, when the humidity is in the range
84%-99%
TEMPERATURE TREND ICONS
The outdoor temperature trend indicators will update every 30 minutes
or less. These trends represent temperature changes over the past
three hours.
Temperature rising more than 1°C /2°F in the past three hours.
Temperature has not changed more than 1°C /2°Fin the past three
hours.
Temperature falling more than1°C / 2°Fin the past three hours.
HEAT INDEX & DEW POINT TEMPERATURE
HEAT INDEX
Heat Index combines the effects of heat and humidity. It is the apparent
temperature of how hot it feels to a human being. As humidity increases,
the body is unable to cool effectively. The temperature will feel warmer.
View Heat Index: From normal time and temperature display mode,
press the HEAT/DEW button once and Heat Index will show instead of
the outdoor ambient temperature.
Note: Heat index will be the same number as the
temperature until the outdoor temperature is above
26.7°C (80°F).
DEW POINT TEMPERATURE
Dew Point Temperature is the saturation point of the air, or the
temperature to which the air has to cool in order to create condensation.
The higher the dew points, the higher the moisture content of the air at a
given temperature.
View Dew Point Temperature: From normal time and
temperature display mode, press the HEAT/DEW
button twice and Dew Point temperature will show instead of the outdoor
ambient temperature. PT ROSEE will show at the top of the display.
Note: Dew Point temperature is lower than the actual temperature.
HUMIDITY TREND ICONS
The outdoor humidity trend indicators will update every 30 minutes or
less. These trends represent humidity changes over the past three
hours.
Temperature rising more than 3% in the past three hours.
Temperature has not changed more than 3% in the past three
hours.
Temperature falling more than 3% in the past three hours
TEMPERATURE ALERTS
Hold the ALERTS button for 3 seconds to enter alert
set mode.
The temperature alert value will blink in set mode.
Press the DOWN or UP buttons to adjust the
values.
Press the ALERTS button to confirm the value and
continue.
Press the DOWN or UP buttons to turn the alert
ON or OFF
The alert setting order:
INDOOR TEMP HA INDOOR TEMP BA INDOOR HUMIDITY HA
INDOOR HUMIDITY BA OUTDOOR TEMP HA OUTDOOR
TEMP BA OUTDOOR HUMIDITY HA OUTDOOR HUMIDITY BA
One or all of the HA (high) and BA (low) temperature alerts may be
set.
Range for indoor temperature alert:
0°C to 50°C (+32°F to +122°F)
Range for outdoor temperature alert:
-40°C to 60°C (-40°F to 140°F)
ARM/DISARM TEMPERATURE/HUMIDITY ALERTS
Press and release the ALERTS button to toggle between the alerts:
INDOOR TEMPERATURE (HA/BA) INDOOR HUMIDITY
(HA/BA) OUTDOOR TEMP (HA/BA) OUTDOOR
HUMIDITY (HA/BA)
2
 Loading...