


Advanced Playback/Erasing |
|
Using the PLAY Menu |
|
|
|
|
|
|
-By using the PLAY menu, you can play back images, erase unwanted pictures and edit images.
-The camera’s power can be OFF or ON.
1 |
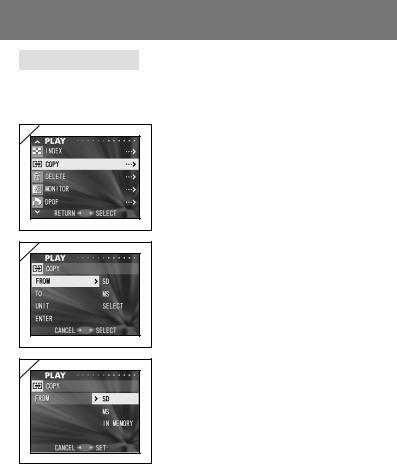
1.After pressing the PLAY button, press the
MENU/SET button and the PLAY menu screen will be displayed.
2.Using or , select the desired settings menu. Every time you press the button, the menu mode screen changes as follows:
|
|
INDEX |
|
|
(→ p.70) |
|
|||||
|
|
COPY |
|
|
(→ p.71) |
|
|
DELETE |
|
|
(→ p.74) |
|
|
MONITOR |
|
|
(→ p.77) |
|
|
DPOF |
|
|
(→ p.78) |
|
|
RESIZE |
|
|
(→ p.81) |
|
PROTECT |
|
(→ p.82) |
||
|
|
MOVE |
|
|
(→ p.85) |
|
|
SLIDE SHOW |
|
|
(→ p.88) |
|
|
ADD REC |
|
|
(→ p.88) |
|
|
SET UP |
|
|
(→ p.88) |
|
|
RETURN |
|
|
|
3.After selecting the menu, press and in the same way as the REC menu
(p.41), the setting screen of the selected menu will be displayed. After selecting the desired contents with or , press either or the MENU/
SET button, completing the setting, and you will return to screen 1.
4.When you are in screen 1 (PLAY menu screen), to exit the PLAY menu mode, press either or the MENU/SET button after selecting “RETURN”. You will return to either the Playback or the through image mode. Press the PLAY button to turn off the LCD monitor.
• For details on making settings for each menu, refer to the following pages.
69

Using the PLAY Menu (Cont’d)
Viewing Multiple Pages at Once (Index Playback)
-Up to nine frames can be displayed on the LCD monitor simultaneously.
You can quickly access the images you want displayed. You can also erase unwanted images.
1 |
2 |
1. Select “INDEX” and press .
2.The 9-frame index are displayed at the same time. The image selected when you entered
the menu will be surrounded by a red frame. Use , , , or to move the frame and
select the image you wish to display (or
erase).
• Pressing when the first frame is selected oron the last frame will switch the screen to the
next nine images.
3 |
3.Press the MENU/SET button and the selected image will be displayed in the normal size.
If you wish to delete the selected image, press the DELETE button. After pressing the DELETE button, the procedures are the same as explained at Step 2 to 3 on page 68.
•If you wish to delete all the images on a card, it doesn’t matter which image is displayed.
70
Using the PLAY Menu (Cont’d)
Copying an Image
-You can copy a previously recorded still photo or movie onto another memory media. (You can select one frame, multiple frames or all frames.)
1 |
2 |
3 |
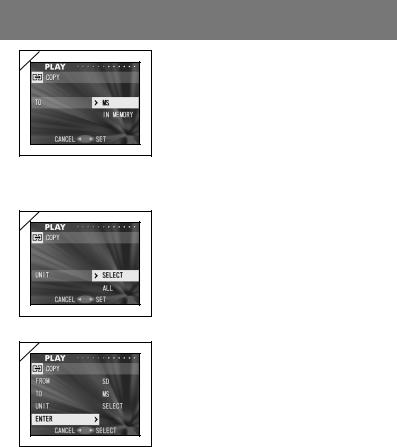
1. Select “COPY” and press .
2.A screen with each setting item will appear.
At first “FROM” is selected, so press .
• To select a different item, press or .
3.The media types will be displayed. Using or , select the media on which the image you wish to copy is recorded, then press
or the MENU/SET button. The setting is completed and you will return to screen 2.
•If you press , the setting is invalidated and you return to screen 2.
•If there are no images on the selected media, or if a card is not inserted in the camera, an error message is displayed and you return to screen 3.
71
Using the PLAY Menu (Cont’d)
4 |
5 |
6 |
4.Returning to screen 2, select “TO”.Then the
screen shown left (screen 4) appears. After pressing , use or to select the destination media by pressing either or
the MENU/SET button. The setting is completed and you will return to screen 2.
•If you press , the setting is invalidated and you return to screen 2.
•If the selected media doesn’t have enough free space or if the media hasn’t been inserted in the camera, an error message will appear, then you will return to screen 4.
5.Returning to screen 2, select “UNIT”. Then
the screen shown left (screen 5) appears. After pressing , use or to choose
“SELECT” (If one or multiple frames are to be selected) or “ALL”. Then press either or the MENU/SET button, and the settings are completed, returning you to screen 2.
•If you press , the setting is invalidated and you return to screen 2.
6.After you have made all the settings, select “ENTER” and press either or the MENU/ SET button.
•If you chose “SELECT” on screen 5, go to Step 7; if you chose “ALL”, go to Step 9.
•If you press , the setting is invalidated and you return to screen 1 on page 71.
72
Using the PLAY Menu (Cont’d)
7 |
8 |
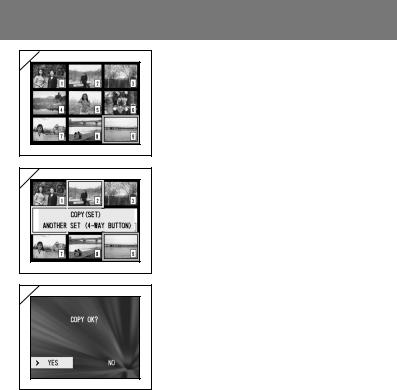
7.The 9-frame index appears. Using , , , or , move the red frame to an image you wish to select and press the MENU/SET button.
•Pressing when the first frame is selected oron the last frame will switch the screen to the
next nine images.
8.Images selected at Step 7 are surrounded by a blue frame. When you have finished selecting images, press the MENU/SET button. (Go to Step 9)
To select other images, repeat the selection procedure (Return to Step 7).
•To select multiple images, repeat the procedures Steps 7 and 8.
9 |
9.A confirmation screen appears. To carry out copying, select “YES” with or , then press the MENU/SET button.
•If you select “NO” and press the MENU/SET button, you will return to screen 1 without making a copy.
10.Once copying starts, “Now COPY…” is displayed. Once copying is completed, the display returns to screen 1.
73
Using the PLAY Menu (Cont’d)
Erasing Unwanted Images
-You can erase unwanted still pictures or movie images (you can select one frame, multiple frames or all frames.)
-Once images are erased, they cannot be recovered.
-Protected images cannot be erased unless the protection is removed.
1 |
2 |
3 |
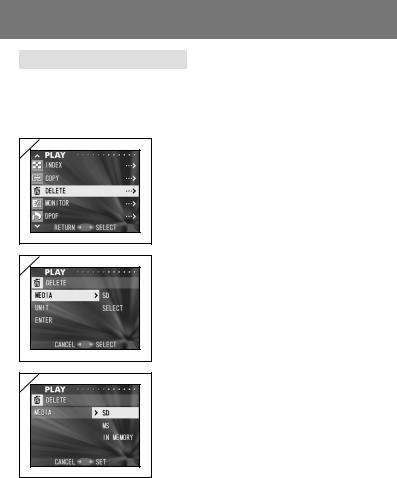
1. Select “DELETE” and press .
2.A screen with each setting item will appear. At first “MEDIA” is selected, so press .
• To select a different item, press or .
3.Using or , select the media on which
the image you wish to erase is recorded, then press or the MENU/SET button. The
setting is completed and you will return to screen 2.
•If you press , the setting is invalidated and you return to screen 2.
•If there are no images on the media selected, or if a card is not inserted in the camera, an error message is displayed and you return to screen 3.
74
 Loading...