


Using the REC Menu (Cont’d)
Selecting the Compression Ratio
Use or to select the desired compression ratio, then press either or the MENU/SET button. You will return to screen 2 with your chosen compression ratio displayed.
•If you press , the setting is invalidated and you will return to screen 2.
4 |
4.Select “ENTER” and press either or the
MENU/SET button.The setting is completed and you will return to screen 1.
•If you press , the selection is invalidated and you will return to screen 1.
Standard number of pictures you can take in each quality mode (without sound or motion)
Image Size |
Compression |
64 MB |
Internal Memory |
||
Ratio |
SD Memory Card |
||||
|
|
|
|||
2304 |
× 1704 |
FINE |
About 40 Photos |
– |
|
|
|
|
|||
NORMAL |
About 80 Photos |
– |
|||
|
|
||||
|
|
|
|
|
|
1600 |
× 1200 |
FINE |
About 80 Photos |
– |
|
|
|
|
|||
NORMAL |
About 160 Photos |
– |
|||
|
|
||||
640 |
× 480 |
FINE |
About 320 Photos |
About 10 Photos |
|
NORMAL |
About 640 Photos |
About 20 Photos |
|||
|
|
||||
|
|
|
|
|
|
•The number of photos you can take may vary depending on the subject.
•When there are files other than images, or when the quality and/or recording mode have been changed, the number of photos you can take is not limited to the table above. Please use the table is a guide for the number of photos you can take.
51
Using the REC Menu (Cont’d)
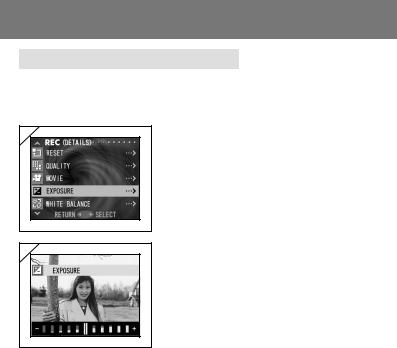
Adjusting Exposure Compensation
-If you wish to brighten or darken an entire image, use the exposure adjustment function.
-The exposure can be corrected ±2.0 EV in adjustment steps of 0.5 EV.
1 |
2 |
1. Select “EXPOSURE” and press .
2.The through image mode is entered, and
the adjusting exposure compensation bar is displayed. If you press , the cursor
moves toward the plus side while pressingmoves it toward the minus. Select the desired compensation level (brightness) and press the MENU/SET button. The setting is completed and you will return to screen 1.
•Even after a correction, there are times when the change is not apparent, such as when the subject is in a semi-dark place.
•When flash is used, the compensation effect may not be sufficient.
52
Using the REC Menu (Cont’d)
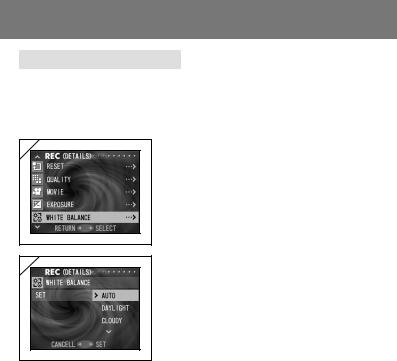
Adjusting White Balance
-The colour tone of your photos will change according to the kind of light source. While the AUTO mode can be used in almost all instances, you can alter the white balance settings to suit the environment and lighting when you take a picture.
1 |
2 |
1. Select “WHITE BALANCE” and press .
2.Use or to select the desired mode, then press either or the MENU/SET button.
The setting is completed and you will return to screen 1.
•If you press , the selection is invalidated and you will return to screen 1.
Available Modes
• AUTO (Default) :The camera adjusts the white balance automatically.
• DAY LIGHT |
:Ideal for taking photos in strong sunlight. |
• CLOUDY |
:Ideal for taking photos in the shade or when it is cloudy. |
• FLOU |
:Ideal for taking photos indoors with normal incandescent lighting. |
• TUNGSTEN |
:Ideal for taking photos indoors with fluorescent lighting. |
About White Balance
The human eye has the ability to compensate so that it sees white subjects as white, whatever the light source. Digital cameras and similar devices can also “see” white subjects as white by first adjusting the colour balance of the ambient light to match the photo subject. This adjustment is called the White
Balance.
53

Using the REC Menu (Cont’d)
Using the Digital Zoom
-Digital zoom can double the largest zoom ratio achieved by the optical zoom.
-When using the digital zoom, view the field through the LCD monitor. Because the zoom effect is accomplished electronically, it is not possible to use the viewfinder.
-When shooting movies, the digital zoom function is not available.
1 |
2 |
3 |
1. Select “DIGITAL ZOOM” and press .
2.Use or to select “ON”, then press either
or the MENU/SET button. The setting is
completed and you will return to screen 1.
• If you press , the selection is invalidated and you will return to screen 1.
3.From screen one, when you press , you will return to the through image mode. To take a picture, press the TELE zoom button until it reaches the end of the optical range, then release the button for a moment, then press and hold the TELE zoom button and the digital zoom is engaged. Use the LCD monitor to compose your photo, and take your photos.
• The LCD monitor will display the digital zoom ratio (×2).
• To return to normal mode, press the WIDE zoom button.
54
Using the REC Menu (Cont’d)
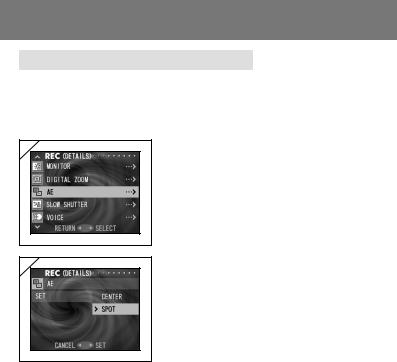
Changing Auto-Exposure (AE) Modes
-Your camera uses center-weighted metering as the default, but it can be changed to spot metering.
-Spot metering is used to ensure matching the exposure to a targeted part of your subject.
1 |
2 |
1. Select “AE” and press .
2.Use or to select “SPOT”, then press either or the MENU/SET button. When the setting is completed, you will return to screen 1.
•If you press , the selection is invalidated and you will return to screen 1.
Center-weighted metering
In this mode the camera sets the exposure according to the metering for the central part of the whole frame. It is ideal for taking photos where the brightness of the subject in the center of the frame is desired.
Spot metering
In spot metering the camera measures the light of just the subject in the center of the frame, and sets the exposure to it. This mode is ideal when the background of the picture is brighter than the subject, or there is a great deal of contrast between the two, as the camera allows you to take the photo with the exposure set to the brightness of your desired subject.
55
Using the REC Menu (Cont’d)
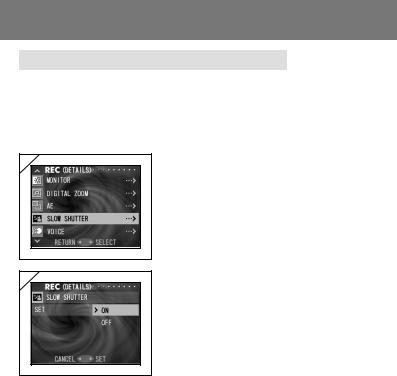
Changing to the Slow Shutter Speed Mode
-The normal (default setting) shutter speed ranges between 1/60th to 1/2000th of a second, but this can be changed to a range of 1 second to 1/2000th of a second.
-When taking photos in dark locations, the shutter speed must be slow, so use a tripod to keep the camera steady.
1 |
1. |
Select “SLOW SHUTTER” and press . |
2 |
2. |
Use or to select “ON”, then press either |
|
|
or the MENU/SET button. When the |
|
|
setting is completed, you will return to |
|
|
screen 1. |
•If you press , the selection is invalidated and you will return to screen 1.
•Slow shutter speed is only in effect whilst in “Slow-Sync”/“Off”/“Distant View”
modes. When in a dark location, use a tripod to keep the camera steady.
• To return to normal shutter speeds, change the setting back to off.
56
 Loading...