


Digital Still Camera
User’s Guide
Thank you for your purchase. For the correct usage of this product, please read this User’s Manual and the warranty card carefully and keep them in a safe place for future reference.
Before accepting the warranty card, please make sure that the date of purchase and the dealer's details have been completed.
1

About trademarks
●Windows 98, Windows 98SE, Windows 2000 Professional and Windows Me are trademarks or registered trademarks of Microsoft Corporation in the U.S. and other countries.
●Apple, Macintosh, Mac OS, QuickTime and Power PC are trademarks or registered trademarks of Apple Computer in the U.S. and other countries.
●The SD logo is a trademark.
●Other company names and product names are trademarks or registered trademarks of their respective owners.
About voluntary restriction concerning radio wave interference
This equipment is a class B information technology device based on the standards of VCCI (Voluntary Control Council for Interference). Use of this device near radios and television tuners may cause reception interference. Please use this product correctly according to the contents of this User’s Manual.
Machine Noise Information Ordinance 3. GSGV, January 18, 1991:
The sound pressure level at the operator position is equal or less than 70 dB(A) according to ISO 7779.
Note: This User’s Guide uses illustrations to explain button operations. Please note, however, that the button layout may differ slightly from the actual product.
2
|
● Important Safety Precautions ............................................... |
|
5 |
|
|
● Before Using ...................................................................... |
|
|
11 |
Contents |
|
|
|
|
|
Chapter 1 |
Preparation |
|
|
|
Checking package contents ................................................... |
|
12 |
|
|
Names of parts ...................................................................... |
|
|
13 |
|
Installing the Battery/AC Adapter (Optional) ............................ |
|
16 |
|
|
Inserting/Removing the SD Memory Card/Multi-Media Card ... |
18 |
||
|
Installing the Strap ................................................................. |
|
|
19 |
|
Adjusting the Menu Display Language and Time/Date ............ |
20 |
||
|
Chapter 2 |
Basic Recording |
/REC |
|
|
Recording .............................................................................. |
|
|
22 |
|
Setting the Picture Quality ...................................................... |
|
28 |
|
|
Selecting the Recording Mode ............................................... |
|
29 |
|
|
(Auto) Mode ................................................................... |
|
|
30 |
|
(Red-eye Reduction) Mode ...................................... |
|
30 |
|
|
(Forced Flash) Mode ........................................................... |
|
30 |
|
|
(Night View Portrait) Mode ............................................... |
|
31 |
|
|
(Flash Off) Mode ............................................................... |
|
31 |
|
|
(Long Distance) Mode ....................................................... |
|
31 |
|
|
(Macro Recording) Mode .................................................. |
|
32 |
|
|
(Self-timer) Mode .............................................................. |
|
34 |
|
|
Adjusting the Screen Contrast ................................................ |
|
35 |
|
|
Chapter 3 |
Advanced Recording |
/M-REC |
|
|
Using the M-REC menu ......................................................... |
|
36 |
|
|
Recording a Movie ................................................................. |
|
|
38 |
|
Using the Digital Zoom ........................................................... |
|
39 |
|
|
Exposure Compensation ........................................................ |
|
40 |
|
|
Changing the White Balance .................................................. |
|
41 |
|
|
Changing the AE mode .......................................................... |
|
42 |
|
|
Changing to Slow Shutter Speed ........................................... |
|
42 |
|
|
Adjusting the Screen Contrast ................................................ |
|
43 |
|
|
Recording in Black and White ................................................ |
|
44 |
|
|
Resetting the Camera to Default Settings ............................... |
|
45 |
|
3

Chapter 4 Basic Playback  /PLAY
/PLAY
Playing Back Images .............................................................. |
46 |
|
Playing Back Movies .............................................................. |
48 |
|
Chapter 5 |
Advanced Playback/Erasing |
/PLAY |
Using the PLAY Menu ............................................................ |
49 |
|
Erasing Images ...................................................................... |
|
50 |
Viewing Multiple Images (Index Playback) ............................... |
52 |
|
Viewing a Slideshow of Images .............................................. |
53 |
|
Keeping Important Images (Protect Setting) ........................... |
54 |
|
Displaying the file number ...................................................... |
56 |
|
Adjusting the Screen Contrast ................................................ |
56 |
|
Selecting the Image to Print (DPOF) ....................................... |
57 |
|
Chapter 6 |
Advanced Operations |
/SET UP |
Using the SET-UP Menu ......................................................... |
62 |
|
Customizing the Camera ........................................................ |
63 |
|
Chapter 7 |
Installing the Software and Transferring Images to a PC |
|
Operating Environments ......................................................... |
67 |
|
Using Windows ...................................................................... |
|
67 |
Using Macintosh .................................................................... |
|
71 |
Chapter 8 |
Appendix |
|
When Carrying the Camera Overseas .................................... |
73 |
|
Caring and storage |
................................................................ |
73 |
Troubleshooting ..................................................................... |
|
75 |
Main specifications ................................................................. |
|
77 |
Warranty and After-sales Service ............................................ |
78 |
|
4

Important Safety Precautions
This product has been designed with safety in mind; however, please read the following display marks, warnings and cautions for its correct usage.
The following warning and caution symbols are to prevent damage to the user, other persons and property.
Definitions of the symbols
The following categories explain the degree of danger or damage that may occur if the displayed content is not followed or the product is misused.
 Warning
This symbol indicates that misuse may result in serious injury and even death.
 Caution
This symbol indicates that misuse may result in bodily injury or physical damage.
The following categories explain the contents to be followed using symbols.
This symbol indicates that the content requires caution when performed.
This symbol indicates that the content is prohibited.
This symbol indicates that the content must always be followed.
5

Important Safety Precautions
 Warning
Should any of the following occur, stop using the product immediately. Remove the batteries from the unit and disconnect the AC adapter. If using the AC adapter, disconnect the power plug from the wall outlet.
Consult the dealer from whom you bought the product for further assistance. Continued use of the product may result in fire or electrical shock.
●If you notice any abnormality such as smoke or an abnormal smell, or if the camera becomes extremely hot.
●If liquid gets inside the camera.
●If any foreign object gets inside the camera.
Do not dismantle, modify or repair the camera yourself.
Fire and/or electrical shock may occur as a result.
For repair or internal inspection, consult the dealer from whom you bought the product.
Do not allow the camera to get wet.
Fire, electrical shock and/or malfunction of the unit may occur if internal parts are exposed to water or other liquids.
Do not drop or insert metal objects or combustible items inside the camera.
Fire, electrical shock and/or malfunction of the unit may occur as a result when metal objects, etc. getting inside the camera.
Do not use the camera while driving.
May cause traffic accidents.
When using the camera while walking, pay attention to the road surface, surroundings, etc.
Do not use the camera on unstable ground.
Serious injury and even death may occur as a result especially when falling from high places.
Do not directly look at the sun through the viewfinder.
Loss of or impaired eyesight may result.
Do not touch the metal parts on the camera during thunder and lighting.
Death may occur if lighting strikes the camera.
6

Important Safety Precautions
 Warning
Do not use AC adapters other than those specified.
Fire may occur as a result of AC adapters other than those specified being used.
Do not dismantle, short-circuit, coat (solder, etc.), apply heat, apply pressure (with nail, etc.) to the battery, or throw into a fire. Furthermore, do not allow metals (wires, necklaces, etc.) to come into contact with batteries.
Fluid leakage, heat, fire and damage may occur as a result.
 Caution
Do not point the lens directly at the sun or at a strong light source.
Malfunction of internal parts may occur from concentrated rays of light. Using the camera in such conditions may cause short circuits and breakdown of insulation, resulting in overheating and/or fire.
Take care not to get fingers caught in the battery/card cover.
Personal injury may occur as a result.
When using the camera inside an airplane, follow the directions of the airline company.
Electric waves emitted from the camera may affect airplane cockpit instruments.
Do not leave the camera in locations such as:
●A location exposed to direct sunlight or inside a car, etc. where the temperature may become extremely high.
Fire and/or damage to the unit may occur.
●Within the reach of children.
The strap may wrap around the neck causing strangulation, or accessories such as batteries, SD Memory Card, etc. may be swallowed.
●Unstable surfaces such as on an unstable table or an angled surface.
Camera dropping on the head or other body parts may not only cause personal injury but malfunction of the unit as well.
●A location exposed to lampblack, steam, high humidity, dust or vibration.
If dust or liquid enters the camera or if the internal parts are damaged by strong vibration, overheating, fire or electrical shock may occur as a result.
7

Important Safety Precautions
 Caution
Do not use force when operating the camera.
The camera may become damaged, causing personal injury as a result.
Do not use the flash near eyes.
Eye injury may occur as a result.
Check that the polarity is correct when inserting batteries.
The battery may heat, damage or leak if the polarity is not correct, possibly causing skin burns and/or personal injury as a result.
Do not use batteries which have become soiled with oil or sweat.
If soiled, wipe the contacts with a dry cloth before use.
When cleaning or carrying out non-photographic operations on the camera, disconnect the AC adapter for safety.
Remove the batteries when the camera will not be used for an extended period.
If the camera is to be used by a child, the correct usage must be taught by a parent or guardian.
Personal injury may occur as a result.
Do not rotate the camera when mounting on a tripod.
About battery fluid leakage
●Should battery fluid leaks ever come into contact with hands or clothing, wash immediately with water.
●Loss of eyesight may occur if battery fluid enters the eye. In such case, do not rub the eye. Immediately flush the eye with water and seek medical attention.
8

About the LCD monitor
●Due to the characteristics of liquid crystals, the brightness of the LCD monitor may appear uneven with changes in temperature, etc.
●The LCD monitor has been developed using high-precision engineering and is superior in sharpness and picture quality. Due to the nature of liquid crystals, however, there may be missing or constantly lit pixels on the monitor. This is not a malfunction of the unit.
●If the LCD monitor becomes damaged for some reason, take care to prevent personal injury from broken glass, etc. Furthermore, take care that liquid crystals do not touch the skin or enter the eyes or mouth.
About the SD Memory Card/Multi-Media Card
As well as the SD Memory Card included with this camera, Multi-Media Cards may also be used.
 Caution
SD Memory Cards and Multi-Media Cards are manufactured using precision electronic components. Do not perform the following as malfunction or damage may occur as a result.
●Do not touch the terminal with hands or metal objects. Damage to the components may occur as a result of static electricity. Before handling an SD Memory Card or Multi-Media Card, discharge any static build-up from your body by touching grounded metal, etc.
●Do not bend, drop or apply excessive force.
●Avoid heat, liquid and direct sunlight when using and for storage.
●Do not open the battery/card cover or remove the SD Memory Card/Multi-Media Card while data is being read or written.
●Do not dismantle or modify.
9

Important
● When using Multi-Media Cards, the operation response time may be longer during shooting and playback when compared with the SD Memory Cards. However, this is due to the specification of the Multi-Media Card and is not a malfunction.
● The SD Memory Card includes a write-protect switch. Sliding this switch downward prevents data from being written to the card and images, etc. saved on the card are protected.
Please note that pictures cannot be taken or deleted when the write-protect switch is on.
If such an operation is attempted, you will be notified by an LED lighting in the viewfinder and a buzzer sounding. (See page 22.)
●When using a large-capacity card, card check and deletion may take some time.
●Always back-up important data.
●When using SD Memory Cards/Multi-Media Cards on a PC, do not change the attributes (read-only, etc.) of the files (image data) on the card. Doing so may prevent the camera from working properly when deleting images, etc.
●Do not change the file names or the directory name of image data saved on an SD Memory Card/Multi-Media Card using a PC or save files other than image data taken by this camera. Images that have been changed or added will not only play back on the camera but may cause the camera to malfunction as well.
●Always format SD Memory Cards/Multi-Media Cards using this camera. A card formatted in a PC may not operate properly.
●Data loss may occur at times due to malfunction or damage. However, Konica will not be responsible in any way in the event of such data loss.
10
Before Using
●Perform test shooting
Always take some test shots before taking important pictures such as weddings, etc. to make sure that the camera is working properly.
●Shot contents are not guaranteed
No compensation will be made for pictures that are unsuccessful due to problems with the camera or SD Memory Card/Multi-Media Card.
●Be aware of copyright
Images that you shoot are for personal use only. Using pictures without the permission of the rightful owner is prohibited by copyright law. Furthermore, there may be places where shooting is restricted even for the purpose of personal enjoyment.
Camera power supply
1.Batteries (available at camera stores, etc)
●CR-V3 lithium battery (1 unit/supplied)
●Rechargeable AA nickel-hydrogen battery (2 units/optional)
●AA alkaline battery (2 units/optional)
Notes: ● Do not mix AA lithium batteries and manganese batteries. Use the pre-
scribed battery.
●When using rechargeable batteries, read the instruction manual of the batteries and charger before use.
●It is a characteristic of rechargeable batteries that they may not be sufficiently charged when used for the first time.
●Rechargeable batteries cannot be charged in the camera.
●The number of pictures that can be taken varies according to the performance and usage conditions of the batteries.
●When discard the used battery, dispose it in accordance with the regulation in the concerned area.
●Don’t use or leave the battery at a high temperature place such as a strong sunshine, a car inside under hot weather, and a front of a stove.
2.Household power outlet
●Use AC adapter (optional/model: DR-AC2).
11
Chapter 1 Preparation
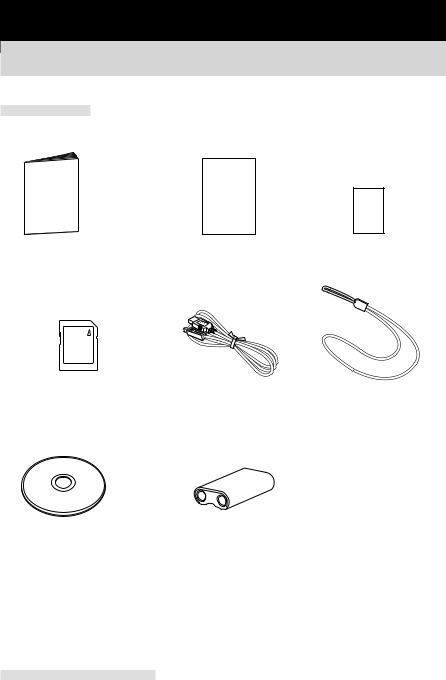
Checking package contents
Accessories
○Quick Guide |
○Konica Card |
○Warranty Card |
○SD Memory Card 8MB (1 unit) ○USB cable |
○Strap |
○CD-ROM |
○CR-V3 lithium battery (1 unit) |
•Driver software (Windows 98/98SE)
•QuickTime (Windows)
•Adobe Acrobat Reader (Windows/Macintosh)
•KD-200Z User’s Guide (Windows/Macintosh)
Optional accessories
●AC adapter (model: DR-AC2)
●Soft case (model: DR-CC1)
12

Names of parts
Shutter button 

 Main switch
Self-timer LED
Flash
Viewfinder window
Flash sensor
Lens
Tripod hole
1
Preparation
MODE button |
Viewfinder LEDs |
Viewfinder eyepiece |
Status LCD |
5-way button
( /
/  /
/  (W) /
(W) /  (T) and center SET buttons)
Strap holder
PICTURE button |
Card access LED |
 AC adapter socket
USB terminal
LCD monitor
MENU button
 Battery/card cover
DISPLAY button
13
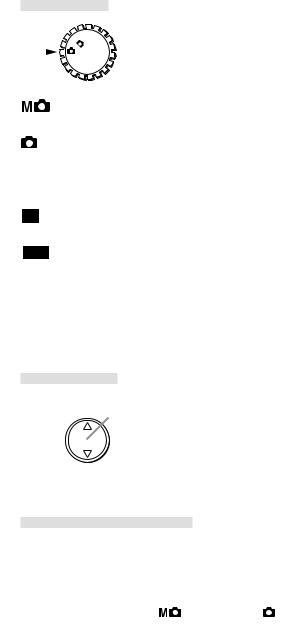
Main switch
M
OFF 

Manual mode (M-REC)
Images can be recorded using manual settings.
Auto mode (REC)
Images can be recorded using default settings.
OFF Power off
The camera is turned off.
Playback mode (PLAY)
Images recorded can be played back on the LCD monitor.
Setup mode (SET UP)
Various settings can be changed.
Note:
*For details on default settings, see “Default settings are” of page 45. The camera mode and picture quality mode can also be selected (see page 15).
5-way button
SET button
W 
 T
T
Used for zoom operation and menu operation. Pressing the center acts as the SET button.
MENU/DISPLAY button
MENU button
Displays menus of various modes.
DISPLAY button
Images can be displayed and recorded using the LCD monitor by pressing the DISPLAY button during Manual mode ( ) and Auto mode ( ).
14
Status LCD
q
MODE t
r |
y |
|
w
 PICTURE
e
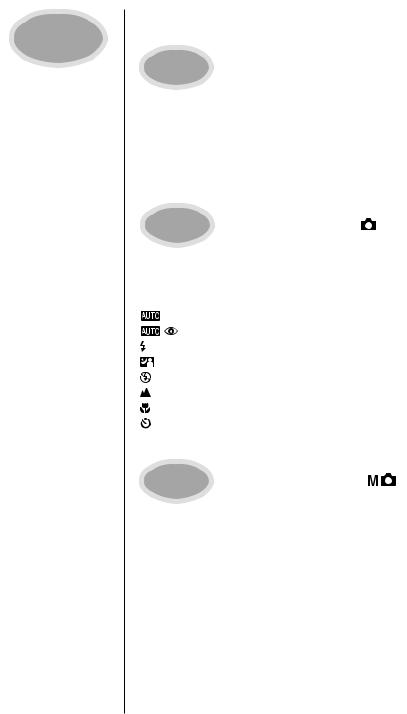
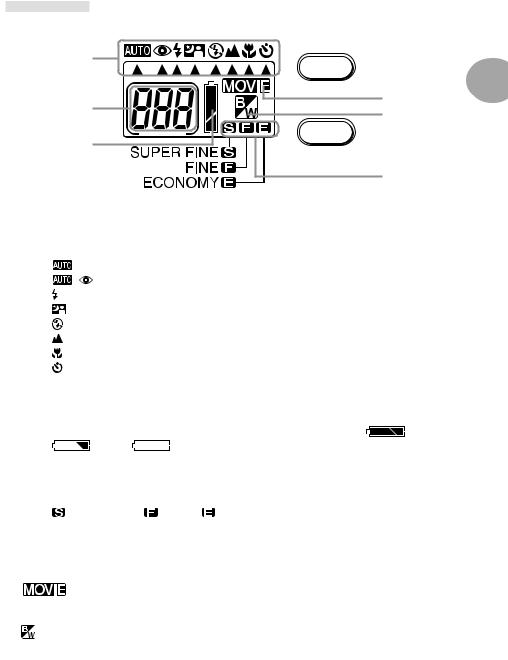
q Camera mode
By selecting a preset recording mode using the MODE button, the subject can be recorded in the optimal condition. 14 modes can be selected using the 8 icons.
(Auto) mode
(Red-eye Reduction) mode (Forced Flash) mode
(Night View Portrait) mode (Flash Off) mode
(Long Distance) mode (Macro recording) mode (Self-timer) mode
For details on each mode, see Chapter 2 Basic Recording.
w Battery level indicator
When using batteries, the battery level is indicated using 3 levels (full: |
; half-full: |
|
; empty: |
). |
|
e Picture quality mode
The picture quality of image data can be selected from 3 types by pressing the PICTURE button.
SUPER FINE |
FINE |
ECONOMY |
r Remaining number of frames
Remaining number of frames available for recording is displayed. When the camera is connected to a PC, “PC” is displayed.
t
This indicator is displayed when the camera is set to movie recording.
y
This indicator is displayed when the camera is set to black-and-white recording.
1
Preparation
15
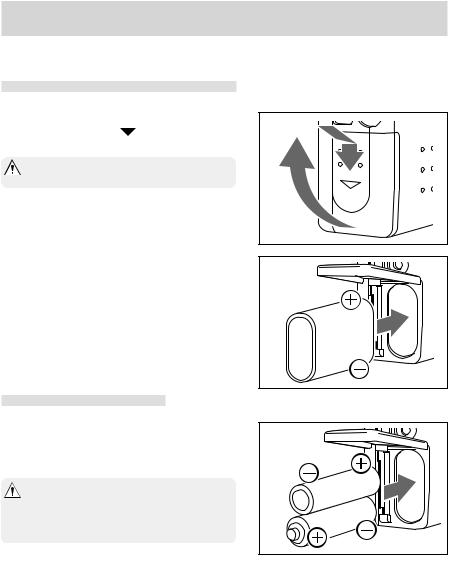
Installing the Battery/AC Adapter (Optional)
Turn the main switch to the OFF position.
CR-V3 lithium battery (supplied)
q Open the battery/card cover by sliding if in
the direction of the arrow.
Warning: Do not operate with wet hands. Electrical shock may occur as a result.
wInert the battery in the correct direction as shown in the diagram.
eAfter checking that the battery has been correctly installed, close the battery/card cover. At this time, check to make sure that the cover is completely closed.
AA batteries (optional)
●Insert AA batteries (2 units) with polarity as shown in the diagram inside the battery compartment.
Caution: Inserting batteries with the polarity incorrect cause battery fluid leakage and heating, resulting in personal injury, defacement, and/or damage to the camera. Dont’ recharge the battery.
Note:
*AA alkaline batteries and AA nickel-hydrogen batteries can be used.
*When using AA alkaline batteries, approximately 150 images can be recorded with the LCD monitor on and 300 images with the LCD monitor off. During continuous playback, the camera can be operated for about 75 minutes. (All values obtained under Konica test conditions.)
*When the battery level indicator on the status LCD is less than half, replace the batteries. When replacing AA batteries, replace both with new batteries. When using the camera outdoors, it is recommended that you carry extra batteries.
q |
BATT./CARD |
OPEN |
w |
16

Battery life guide (reference)
|
Recording (LCD monitor on) |
Recording (LCD monitor off) |
Continuous playback |
CR-V3 lithium battery |
About 500 images |
About 1250 images |
About 300 minutes |
AA alkaline batteries |
About 150 images |
About 300 images |
About 75 minutes |
*Under Konica test conditions (room temperature, Super Fine mode, 50% flash, continuous recording at 20 second interval, and one zoom operation in single direction)
Note:
*Battery life varies according to the brand and grade.
*The above values are for reference only and are not guaranteed.
*Power is consumed by the following operations even when not recording and these will reduce the number of images that can be recorded.
•Repeated focus operations by pressing the shutter button halfway.
•Repeated zoom operations.
•Extensive use of the LCD monitor in the Playback mode.
•Communication with a PC.
Warning: When you continue using the camera for a long time, the batteries become hot. Contact with the batteries can lead to burns.
Caution: Do not use new batteries with old ones. Do not use a mix of different types, different manufactures, different classifications of batteries.
Do not use rechargeable batteries with substantially different charge status.
AC adapter (optional)
●Insert the AC adapter into a wall outlet of 100V AC (1). Next, connect the power cable of the AC adapter into the AC adapter jack on the camera (2).
Handling the AC adapter
● Be sure to read the “Safety Precautions” in this |
q |
|
|
||
manual (pages 6, 7 and 8). |
|
|
● Always use the specified AC adapter (DR-AC2). |
|
|
Otherwise fire and/or electrical shock may oc- |
w |
|
cur as a result. |
||
|
1
Preparation
17
Inserting/Removing the SD Memory Card/Multi-Media Card
Application and handling of the SD Memory Card/Multi-Media Card
●Other than saving recorded images, SD Memory Card/Multi-Media Card can also be used for data transfer to a PC (see Chapter 7 “Installing the Software and Transferring Images to a PC” (page 67)). For handling instructions, see “About the SD Memory Card/Multi-Media
Card” (page 9).
Preparation
●Check to make sure that the main switch is set to the OFF position. Damage may occur to the camera and/or SD Memory Card/Multi-Media Card if the power is on.
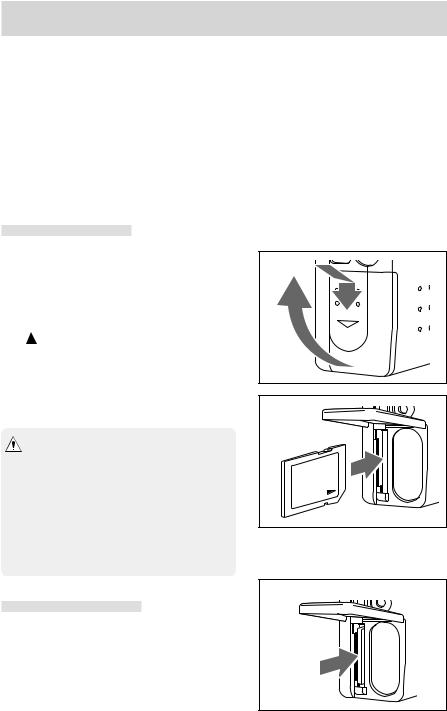
Inserting the card
q Open the battery/card cover.
wFace the label of the SD Memory Card/MultiMedia Card toward the front of the camera and securely insert into the camera with the mark on the label facing up until a click is
heard.
The card will be locked.
e Close the battery/card cover.
* SD Memory Card cannot be inserted and locked if the front/back sides or the up/down direction are incorrect.
*Mutli-Media Card will lock with the card ejected if the front/back sides or the up/down direction are incorrect and the battery/card cover will not close.
*If force is used when inserting SD Memory Card/Multi-Media Card, damage may occur to the connector section.
q |
BATT./CARD |
OPEN |
w |
Removing the card |
w |
q Open the battery/card cover.
w Press in the inserted SD Memory Card/MultiMedia Card.
The card will unlock and eject. (Push-Push system)
18
e Close the battery/card cover.
 * Always turn the main switch to the OFF position and make sure the LED is off before inserting/removing the SD Memory Card/MultiMedia Card. When opening the battery/card cover while the card LED is on, card access is interrupted and the unit may stop operating correctly.
 * During image recording, the card LED is lit. While the lamp is on, do not open the battery/ card cover or remove the SD Memory Card/ Multi-Media Card. Interrupting the writing process will not only cause the camera to malfunction but the card may become unusable.
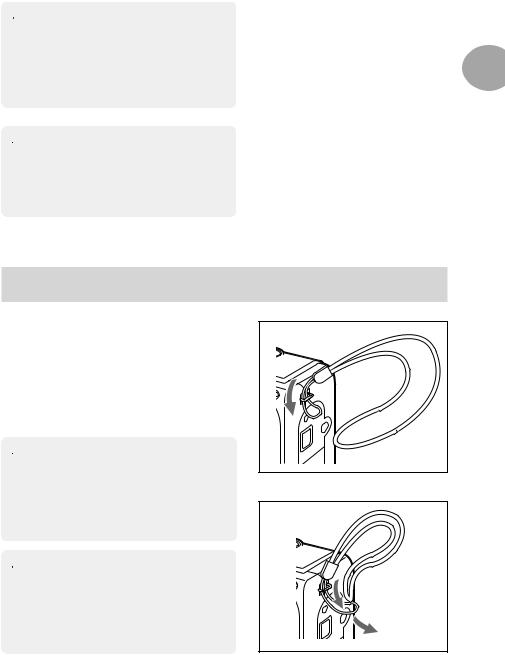
Installing the Strap
q Pass the thin loop through the strap into the |
q |
strap holder on the right side of the camera. |
|
If the strap is difficult to pass through, use a |
|
toothpick, etc., to pull out the strap. |
|
w Pass the strap through the thin loop and pull.
 Warning: When using the camera with the strap attached, take care so that it does not wrap around the neck. On no account hang the camera on the neck of small
children and infants. Strangulation may w occur as a result if the strap wraps
around the neck.
 * When carrying the camera hanging from the strap, take care so that it is not accidentally banged.
*When installing the strap, there is a possibility that the camera could be dropped and damaged. Place the camera on a stable surface before installing the strap.
1
Preparation
19
Adjusting the Menu Display Language and Time/Date
When using the camera for the first time, set the menu display language and time/date. The setting range is between January 1, 2001 and December 31, 2035. (The following shows an example of changing the time and date from 0:00, January 1, 2001 to 10:30, February 14, 2002.)
Note:
*The menu language, time and date are maintained by the backup condenser. The setting contents are therefore retained even when replacing the lithium battery/AA batteries.
*Backup time during battery replacement is about 15 minutes.
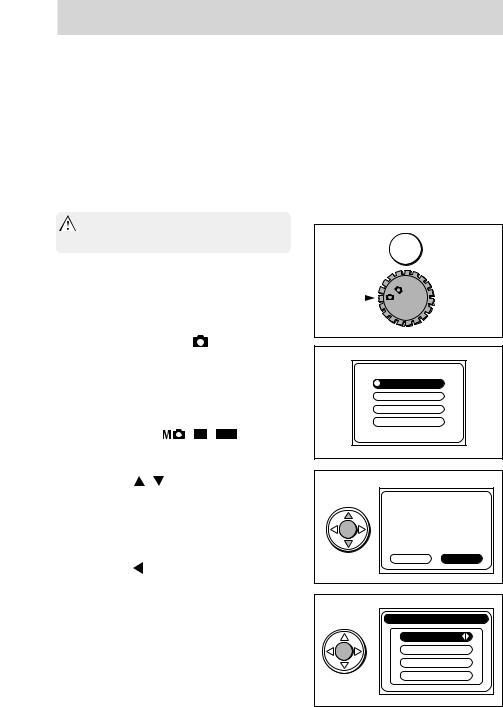
qCheck to make sure that new batteries, fully charged battery, or AC adapter have been installed/connected.
w Set the main switch to .
The LCD monitor will turn on and the Language Setting screen will appear.
Note:
* The same screen will also appear when setting the main switch to other modes ( , , ) with the exception of OFF.
w
M OFF 

English Français Deutsch
e |
Press the |
/ |
button to select the de- |
|
sired language and press the SET button. |
||
|
The Confirmation screen for the selected lan- |
||
|
guage will appear. |
|
|
r |
Press the |
button to select “ ” and |
|
press the SET button.
The selected language will be confirmed and the Time/Date Setting screen will appear.
Note:
*Selecting “ ” and pressing the SET button will return you to the screen of w.
e
English
?

r
Date & Time |
|
Year |
2001 |
Month |
1 |
Day |
1 |
|
00:00 |
20
tThe “Year” is selected.
Press the  /
/ button to adjust the year.
yPress the  button to select “Month”. Press the
  /
/ button to adjust the month.
uPress the  button to select “Day”.
Press the  /
/ button to adjust the date.
iPress the  button to select “Time (hour)”. Press the
  /
/ button to adjust the time
(hour).
oPress the  button to select “Time (minute)”. Press the
  /
/ button to adjust the time
(minute).
Note:
*When selecting each item in steps y through o (“Month”,
“Day”, “Time”), the  /
/ button can be pressed to return to the earlier setting screens to correct previously set items.
!0 Press the SET button.
The Confirmation screen for the date setting will appear.
!1 Press the SET button again.
The set values will be stored and the LCD monitor will turn off.
Note:
*Selecting “NO” by pressing the  button and pressing the SET button will return you to the screen of t.
*If  is selected in step w, the LCD monitor will turn off. If
  or
or  is selected, the LCD monitor will re-
main on and the initial screen of the corresponding setting will appear.
t
Date & Time |
|
Year |
2002 |
Month |
1 |
Day |
1 |
|
00:00 |
y |
|
Date & Time |
|
Year |
2002 |
Month |
2 |
Day |
1 |
|
00:00 |
u
Date & Time |
|
Year |
2002 |
Month |
2 |
Day |
14 |
|
00:00 |
i |
|
Date & Time |
|
Year |
2002 |
Month |
2 |
Day |
14 |
|
10:30 |
o
2002/ 2/14 10:30
Is this correct?
YES NO
!0
1
Preparation
21
Chapter 2 Basic Recording
Recording
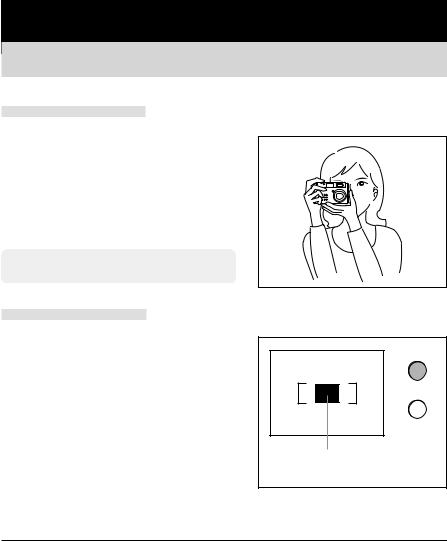
Holding the camera
●Hold the camera securely in both hands with the elbows pressed against the body for stable positioning.
● When using the flash with the camera held sideways, hold the camera so the shutter button is at the top.
 * Take caution not to cover the flash or lens with fingers or strap.
Viewfinder and LED
For normal recording, aim at the subject using |
|
|
the entire viewfinder area. To focus, position the |
|
|
subject within the diagonally-lined center area of |
|
|
[ ] located at the center of the viewfinder. |
|
|
For macro recording (0.25m to 0.8m), or if the |
|
|
zoom position is set to TELE and the distance |
|
|
between the camera and subject is near, record |
|
|
with the LCD monitor set to ON since the |
Focus area |
Finder LED |
viewfinder and the recording range will vary. For |
|
|
macro recording, see page 32. |
|
|
Definitions of viewfinder LED display statuses on the right of the viewfinder are shown below. Use them as references during operation of the camera.
LED display |
Status |
Definition |
Warning sound |
Red |
Flashing |
System error (error code displayed on status LCD) |
Yes |
|
|
|
|
Red |
Flashing |
Image blur warning, Low light warning |
No |
|
|
|
|
Red |
On |
Flash charging |
No |
|
|
|
|
Green |
Flashing |
Auto-focus (AF) unavailable* |
No |
|
|
|
|
Green |
On |
Camera ready for recording |
No |
|
|
|
|
Red and green |
Flashing |
Camera unstable warning, low-luminance warning |
|
|
|
or when subject cannot be focused (AF) |
Yes |
|
|
|
|
Red and green |
Flashing |
Insufficient card space, or card is not inserted, |
|
|
|
damaged, unformatted or write-protected |
No |
|
|
|
|
Red and green |
On |
Formatting card or during process |
No |
|
|
|
|
22
*The LEDs will flash in green even when the distance between the camera and subject is out of the auto-focus range (normal recording: 0.8m ~ ∞, macro recording: 0.25m ~ 0.8m).
Recording
Normal recording is performed with the subject a distance of more than 0.8m. For distances
between 0.25m to 0.8m from the subject, see “ (Macro Recording) mode (page 32)”.
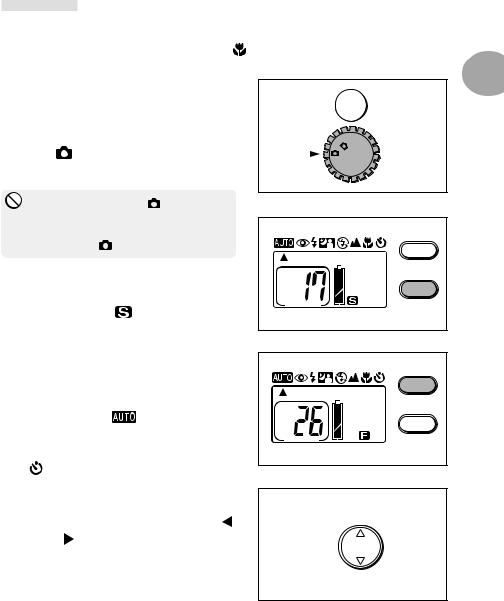
qCheck to make sure that an SD Memory Card/Multi-Media Card is properly inserted.
w Set the main switch on the top of the cam-
era to |
. |
|
The lens will extend. |
|
|
* If the main switch is set to |
while the lens is |
|
being held, “Err” may appear in the status LCD. If this occurs, turn the main switch to OFF and
turn it back to .
ePress the PICTURE button to set the picture quality of the image data to record.
(Default setting is . To change the set-
ting, see “Setting the Picture Quality” (page 28).)
rPress the MODE button to set the recording mode.
(Default setting is . To change the set-
ting according to the subject, read from “Selecting the Recording Mode” (page 29) to
“(Self-timer) Mode” (page 34).)
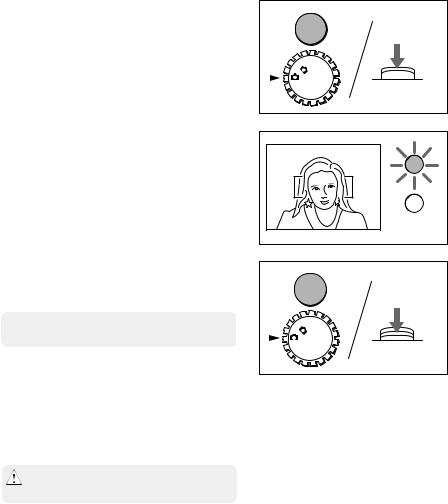
t Look through the viewfinder to determine the image composition, and then press the
(W) and (T) buttons to set the subject size. At this time the image is focused, based on the center auto-focus frame within the viewfinder. (See page 22.)
w
M
OFF 

e
MODE
PICTURE
r
MODE
PICTURE
t
W 
 T
T
2
dingRecor Basic
23
Note:
*When pressing the  (W) button, the subject will become smaller (wide). When pressing the
  (T) button,
the subject will become larger (telescopic). The zoom function will operate within the range is equivalent to 35 – 105mm in a 35mm camera.
yLightly press the shutter button (halfway). The viewfinder LED will light green and the focus and exposure will be locked.
If the subject to focus is not in the center of the viewfinder, perform “Focus Lock Recording” (page 25).
See also: “Release Lock” (page 26)
uGently press the shutter button completely. Recording is completed when a buzzer sound is heard.
The operation of writing the recorded image to the SD Memory Card/Multi-Media Card will start and at the same time, the card access LED on the side of the camera will light (orange). When the card access LED turns off, the writing process is completed.
 * Do not open the battery cover when the card access LED is lit.
Note:
*The number displayed within the frame of the status LCD indicates the remaining number of images that can be recorded. The remaining number of images varies depending on the capacity of the SD Memory Card/Multi-Media Card and the picture quality mode.
* When the battery level indicator is half-full ( ), replace the battery.
iSet the main switch to OFF.
The lens will automatically retract.
y
Press shutter button halfway
M
OFF 

u |
Press shutter button fully
M
OFF 

24
 Loading...