


E
G
F
S
INSTRUCTION MANUAL
BEDIENUNGSANLEITUNG
MODE D’EMPLOI
MANUAL DE INSTRUCCIONES
English
Deutsch
Français
Español

English |
|
Introduction..................................................................................................... |
4 |
Notes .............................................................................................................. |
5 |
Custom Functions .......................................................................................... |
6 |
Deutsch |
|
Einleitung........................................................................................................ |
20 |
Hinweise ......................................................................................................... |
21 |
Custom-Funktionen ........................................................................................ |
22 |
Français |
|
Introduction..................................................................................................... |
36 |
Notes .............................................................................................................. |
37 |
Fonctions Personnalisables ........................................................................... |
38 |
Español |
|
Introducción .................................................................................................... |
52 |
Notas .............................................................................................................. |
53 |
Funciones Personalizadas ............................................................................. |
54 |
3

In honor of being awarded the Japan Camera Grand Prix award for the  −9 camera*, Minolta Co., Ltd. is proud to offer the DYNAX 9Ti /
MAXXUM 9Ti (Titanium model) limited edition camera. One thousand cameras will be produced. This camera possesses all the same award winning features of the DYNAX 9 / MAXXUM 9 model, plus some additional features that will provide even more opportunities to enhance your photographic creativety and enjoyment.
Minolta, for the first time, employs a magnesium alloy for the camera base, and titanium for the upper shell of the SLR camera body to provide a slightweight and strong camera. Wet-type rubber is used to provide a non-slip touch. Other features such as a 100% viewfinder, top continuous drive speed of 5.5 frames per second (4.5 frames per second with autofocus tracking), shutter speeds up to 1/12000 second, and easy-to-operate controls are inherited from the DYNAX 9 / MAXXUM 9 model.
To get the most from your camera, please familiarize youself with both the DYNAX 9 / MAXXUM 9 manual and this manual.
* Japanese version of DYNAX 9 / MAXXUM 9
NOTES
-When using your camera with Wireless Controller IR-1N in singleframe mode with the camera’s built-in flash, the built-in flash may not start charging until the IR-1N transmitting button is pressed and the first picture may not be taken. The shutter is released each time the button is pressed again. In both continous and single-frame mode, the built-in flash will keep charging until either the built-in flash is down or the camera’s main switch is moved to LOCK.
-Total camera weight is reduced to 825g by using titanium and magnesium alloys for the outer shell.
-When using the camera in bright sunlight on warm days, use caution. The temperature of the metal body can become very warm.
-Data Memory Back DM-9, Vertical Control Grip VC-9, and other accessories are available for use with the DYNAX 9Ti / MAXXUM 9 Ti camera.
-This manual replaces pages 91 to 102 in the DYNAX 9 / MAXXUM 9 manual, covering the custom functions. New features found in the Custom Functions include;
•Cust 14 -The LED glowing time of selected local-focus area can be extended.
•Cust 18 -The PA/Ps creative program control is available with the front control dial, while the control of the exposure compensation is available with the rear control dial.
•Cust 22 -The AF illuminator can be cancelled.
•Cust 23 -To prevent accidental turning of the dials while carrying the camera, the front/rear control dials can be disengaged when the exposure is not being metered.
English
4 |
5 |
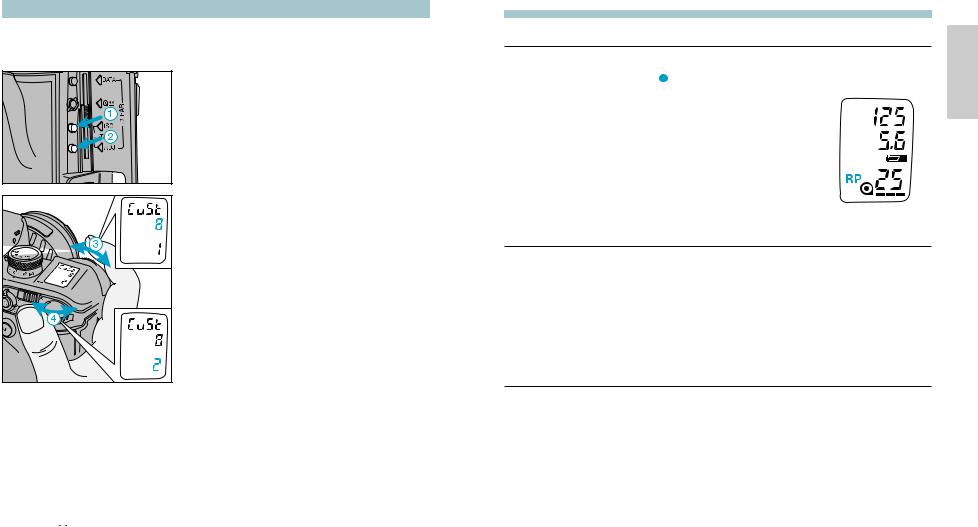
CUSTOM FUNCTIONS
Use the custom functions to tailor the camera to your shooting The customizable functions are explained on pages 7-19 of this
1. Open the control
2. Press the ISO button  adjust button
  .
.
3. Turn the front control dial to select the custom function number.
4. Turn the rear control dial to select the desired setting.
5. Press the shutter-release button partway down to enter the settings.
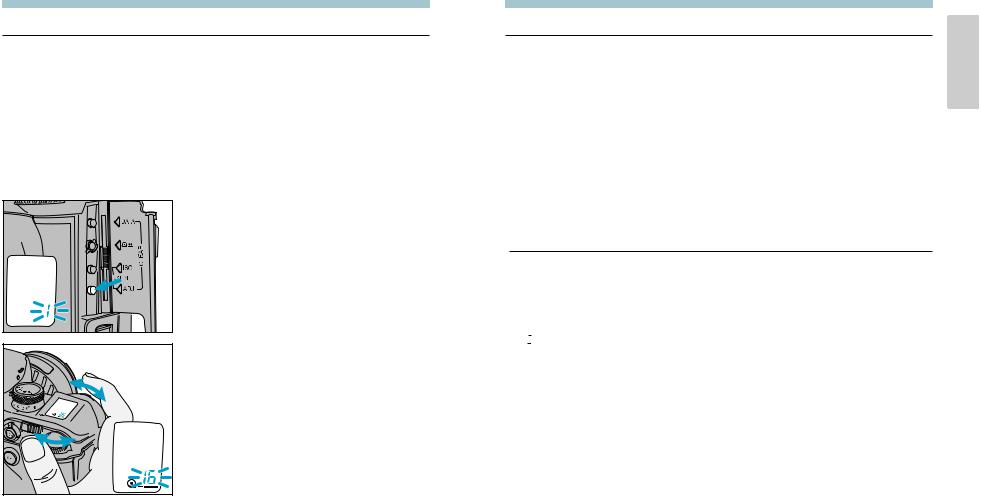
To reset the custom functions to their default setting (1)…
1.Turn the main switch to LOCK.
2.Open the control panel door.
3.Press the adjust button and turn the main switch to ON.
•

 will blink in the data panel when the custom functions are returned to their default settings.

 appears in the viewfinder.
be confirmed. Use release priority when photographing moving subjects.
• RP will appear in the data panel.
Cust 2 — Film Rewind Start
1 – Automatic
Film is automatically rewound at the end of the roll.
2 – Manual
User must press the manual-rewind button to initiate rewind.
Cust 3 — Film Tip
1 – Film is completely rewound into the cartridge.
2 – Leader is left out of the cartridge after rewind.
3 – Leader left out after rewind. / Camera setup for Mid Reload.
English
6 |
7 |
CUSTOM FUNCTIONS
Mid Reload
Mid Reload decreases the chances of accidental double exposure when reloading a partially exposed roll of film.
•Reloading a partially exposed roll increases the risk of film damage (scratches) caused by dust and grit.
1.Set custom function 3 to setting 3 .
2.Load the film.
•The film is automatically advanced to frame 1.
3. Open the control panel door, then press and hold the adjust button until 1 blinks in the data panel.
4. Turn either control dial until the frame number you want to advance the film to blinks in the data panel.
• Advance the film a minimum of two frames past the last exposed frame.
5. Press the adjust button.
• The film is automatically advanced to the desired frame.
Cust 4 — DX Memory
1 – DX Memory Off
Film speed is always set to the DX-coded ISO. Non-DX-coded film is set to the previous roll’s ISO.
2 – DX Memory On
Changes to the film speed for a DX coded roll are saved and applied to future rolls with the same DX coded ISO. Use to consistently over/under-expose a specific film type.
• Film must be loaded before the ISO can be changed.
Cust 5 — Release Lock (Film)
1 – Release Lock Off
2 – Release Lock On
Shutter cannot be released unless film is loaded or the back cover is open.
•
 blinks in the frame counter if the shutter-release button is pressed when film is not loaded.
English
8 |
9 |

CUSTOM FUNCTIONS
Cust 6 — Focus
The mounted lens
1 – Focus Hold
Pressing the focus-hold the focus.
2 – Spot Focus
Pressing the focus-hold button on the lens selects the center focus sensor.
3 – Continuous Focus
Select this setting when focusing on moving subjects.
Pressing the focus-hold button on the lens selects continuous focus.
Cust 7 — Eyepiece Sensor
1 – Grip sensor activated
Eyepiece sensor is activated when the grip sensor is tripped.
2 – Main switch activated
Eyepiece sensor is activated when the main switch is in the ON position. Use this setting when the grip sensor is not being tripped (user wearing gloves).
• Slide the main switch to LOCK when the camera is not being used.
10
|
English |
|
|
||
counts up. |
||
|
||
counts down. |
|
-DX coded film is loaded.
Cust 9 — AF Button
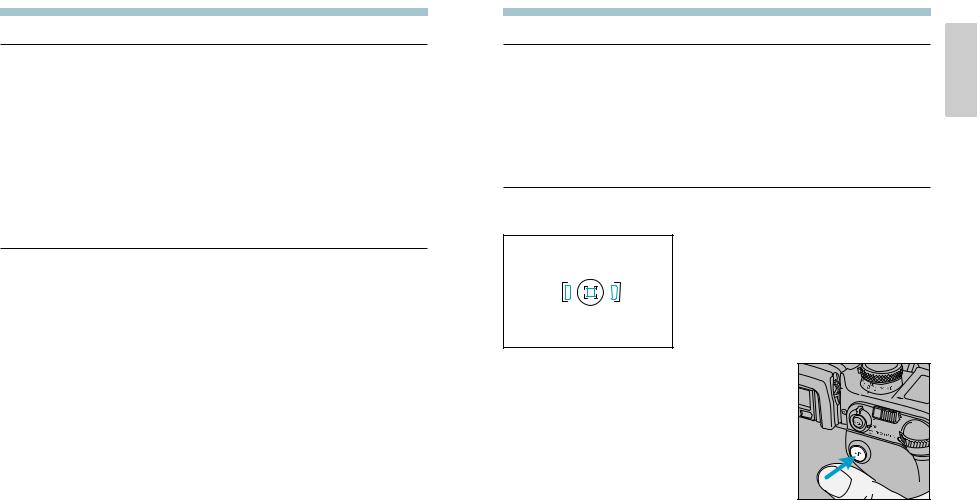
1 – Selectable focus area
Press the AF button and turn the control dial to specify the desired local focus area.
2 – Spot Focus
Press the AF button to focus using the center focus sensor.
Cust 10 — AE-Lock Button
•AEL appears in the viewfinder when AE-lock button is active (down).
•Slow sync is selected when the built-in flash is up or an attached accessory flash is on.
•Manual shift is selected when the exposure mode is set to manual.
1 – Press to activate, release to cancel.
2 – Press once to activate, press again to cancel.
• Turning the built-in flash on or off cancels AE lock.
11 |
CUSTOM FUNCTIONS
Cust 11 — Bracketing
1 – Metered exposure,
• A 5 frame bracket in 1/2EV
Normal -0.5EV
2 – Underexposure(S), Metered exposure, Over-exposure(s)
• A 5 frame bracket in 1/2EV increments is exposed in the following order…
-1.0EV -0.5EV Normal +0.5EV +1.0EV
Cust 12 — Rewind Speed
1 – Fast Rewind
Rewinds a 36 exposure roll in approximately 6 seconds.
2 – Slow (silent) Rewind
Rewinds a 36 exposure roll in approximately 9 seconds.
Illuminator Display Duration
battery performance.
3 – 30 sec
Cust 14 — AF Area Display
•Press and hold the AF button to display the focus area LEDs.
•Pressing the lens focus hold button does not display the focus area LEDs.
1- Focus Area LEDs display the active focus area for 0.1 sec after the focus locks.
2 – Focus Area LEDs display the active focus area for 0.6 sec after the focus locks.
3 – Local focus areas display only when the AF button is pressed.
English
12 |
13 |

CUSTOM FUNCTIONS
Cust 15 — Eyestart Switch
Dial-lock - Disengages the control dials to prevent an accidental turn of the control dials from changing the exposure settings.
1 – Turns Eyestart on and off.
2 – Turns Dial-lock on and off. Eyestart is always on.
3 – Turns Dial-lock on and off. Eyestart is always off.
Cust 16 — Release Lock (Lens)
1 – Shutter cannot be released if a lens is not attached.
• – – appears (blinks) in the data panel when the shutter-release button is pressed.
2 – Shutter can be released if a lens is not attached.
Use when mounting the lens to a non-coupling lens mount (telescope, microscope etc.).
Cust 17 — AF Drive Speed
1 – Speed priority
2 – Silent drive
Cust 18 — Control Dial
1 – Default operation
Exposure |
Control Dial Tasking |
|
Mode |
Front Control Dial |
Rear Control Dial |
P - Mode |
No function |
No function |
|
|
|
A - Mode |
Aperture |
Aperture |
S - Mode |
Shutter speed |
Shutter speed |
|
|
|
2 – Creative Program
Creative program control (PA / Ps) lets you override the exposure settings selected by the camera in P- mode. A and S- mode operation does not change.
Exposure |
Control Dial Tasking |
|
Mode |
Front Control Dial |
Rear Control Dial |
P - Mode |
Ps - shutter speed |
PA - aperture |
A - Mode |
Aperture |
Aperture |
S - Mode |
Shutter speed |
Shutter speed |
|
|
|
3 – Exposure Compensation Using Rear Control Dial - (PA Mode with Front Control Dial in P Mode)
Changes the tasking for the rear control dial to exposure compensation.
•The exposure compensation value is displayed in the meter index.
•Exposure compensation dial must be set to +/– 0.
•Compensation range is +/– 3 EV for both 1/2 and 1/3 EV increments.
•The bottom display in the viewfinder does not show the marks “+” or “_”.
Exposure |
Control Dial Tasking |
||
Mode |
Front Control Dial |
Rear Control Dial |
|
P - Mode |
PA - aperture |
Exposure |
|
A - Mode |
Aperture |
||
compensation |
|||
S - Mode |
Shutter speed |
||
|
|||
|
|
|
|
English
14 |
15 |
CUSTOM FUNCTIONS
4 – Exposure Compensation Using Rear Control Dial - (PS Mode with Front Control Dial in P Mode)
Changes the tasking for the rear control dial to exposure compensation.
•The exposure compensation value is displayed in the meter index.
•Exposure compensation dial must be set to +/– 0.
•Compensation range is +/– 3 EV for both 1/2 and 1/3 EV increments.
•The bottom display in the viewfinder does not show the marks “+” or “_”.
Exposure |
Control Dial Tasking |
||
Mode |
Front Control Dial |
Rear Control Dial |
|
P - Mode |
Ps - shutter speed |
Exposure |
|
A - Mode |
Aperture |
||
compensation |
|||
S - Mode |
Shutter speed |
||
|
|||
|
|
|
|
Cust 18-2 Creative
PA / Ps
After the AE system has been |
you can change the shutter speed or |
aperture selected by the camera |
program remains active until the data |
panel display disappears. |
|
Custom Function Notes


 Refer to page 13 to change the data panel display duration.
While the aperture/shutter speed are displayed in P-mode…
Turn the front control dial to change the shutter speed.
• Aperture is adjusted automatically.
Turn the rear control dial to change the aperture.
• Shutter speed is adjusted automatically.
•The aperture and shutter speed change in 1/2 or 1/3 EV increments depending on the position of the exposure compensation dial.
•Flash can not be used with the PA and PS modes.
-Built-in and accessory flashes will not fire when the PA and Ps modes are active.
-PA and Ps modes can not be selected when  appears in the viewfinder.
•If the shutter speed or aperture blink, the required setting is not available. Turn the control dial until the blinking stops.
Cancelling PA / Ps Mode
Wait until the displayed data disappears from the data panel or raise the built-in flash.
English
16 |
17 |
CUSTOM FUNCTIONS
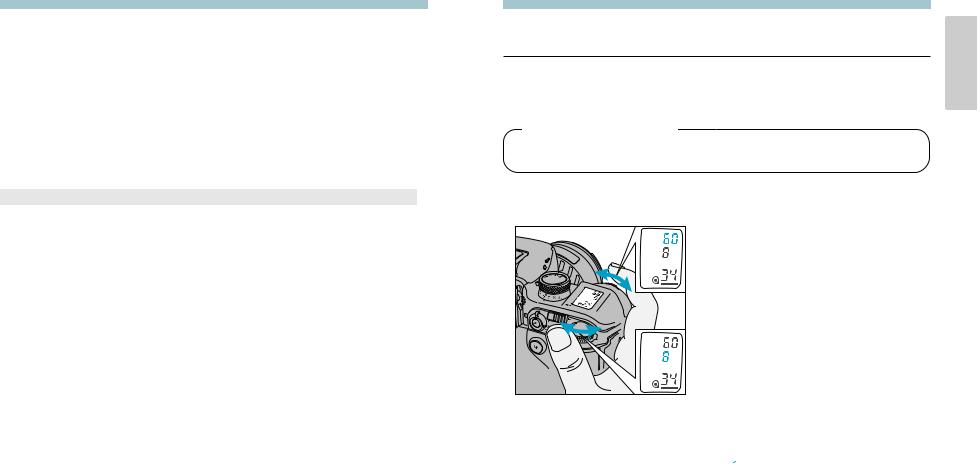
Cust 19 — Control Dial - Exchanged Control
1 – Unchanged from Cust 18.
2 – Front and rear control dial functions exchanged.
• Control dial tasking does not change for bracketing, data memory, and custom functions.
Cust 20 — Flash Metering
1 – 4-Segment Flash Metering
2 – Average metering
All flash metering segments are weighted evenly.
3 – Spot Metering
Flash is metered by the segment corresponding to the currently selected Local Focus Area.
•Do not recompose the image after locking focus. Flash exposure is TTL metered by the segment used to lock focus.
Cust 21 — Exposure Compensation Display
1 – No display
Exposure compensation value is not displayed in the data panel.
2 – Display
Exposure compensation value is displayed in the data panel when the dial is operated.
Cust 22 — AF Illuminator
1 |
– Fires if necessary. |
English |
|
||
2 |
– Canceled |
|
•Both the camera’s and accessory flash’s AF iIluninator will not fire under any circumstance.
•Focusing may be difficult without AF illumination under low-light or low contrast conditions.
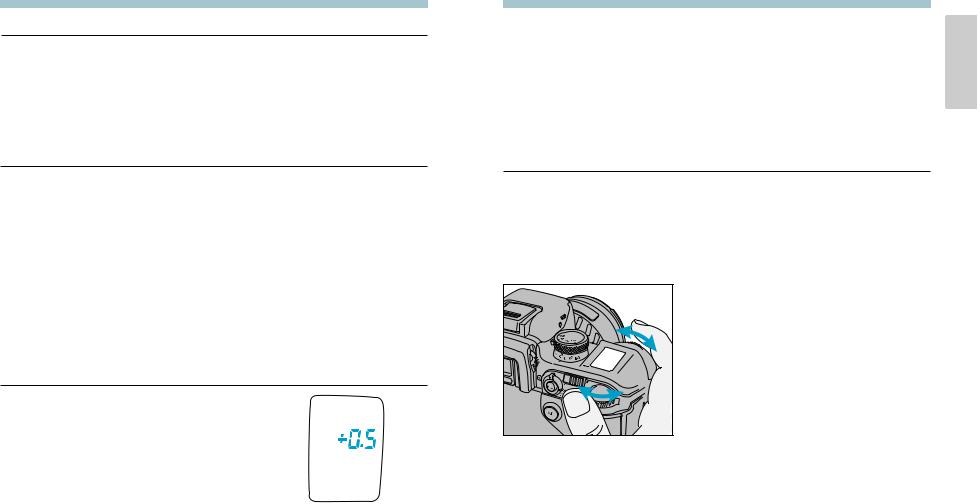
Cust 23 — Front/Rear Control Dial Lock
Use dial lock to prevent the settings from being changed by accidental turning of the dial while carrying the camera. If dial lock is selected, the settings cannot be changed by rotation of the Front/Rear control dial when the camera is not metering. The operation of the Front/Rear control dial changes the settings only when the exposure is being metered (eg: when the shutter button is being pressed partway down, or when Eye-start is activating AF & AE).
1 – Off
Front/Rear dials are functional.
2 – On
The settings cannot be changed by rotation of the front/rear control dials when the camera is not metering.
• Front/Rear control dials are functional for the operations which use bottons inside the control panel (eg: setting bracketing, reading stored data), and when AEL is displayed in the viewfiender.
• In M mode, the shutter speed and aperture can only be changed while metering. Both the shutter speed and aperture will be displayed in the body data panel.
18 |
19 |
Mit der Minolta Dynax 9 Ti ist ein exklusives Sondermodell der Dynax 9 entstanden, die wegen ihrer unübertroffenen Ausstattungsmerkmale, ihrer Leistungsfähigkeit und Zuverlässigkeit bereits voll anerkannt wurde. Die Dynax 9Ti wird in einer limitierten Auflage von nur 1000 Kameras weltweit produziert. Zusätzlich zu den Leistungsmerkmalen der Dynax 9 wurde die Dynax 9Ti mit weiteren praxisgerechten Funktionen ausgestattet, die die Möglichkeit zu noch mehr Kreativität und Fotografierspaß bieten.
Minolta verwendete für das Kameragehäuse Magnesiumund Titanlegierungen, beides leichte und sehr harte Materialien. Für sicheren Halt sorgt der mit einem neuen Material gummierte Griff. Ausstattungsmerkmale, wie z.B. der Sucher mit 100% Sucherbildinhalt, maximale Transportgeschwindigkeit von 5,5 Bildern in der Sekunde im Dauerlauf (mit Schärfenachführung 4,5 Bilder in der Sekunde), die kürzeste Verschlußzeit von 1/12000 s und einfach zu handhabende und sinnvoll angeordnete Bedienungselemente wurden von der Dynax 9 übernommen.
Bevor Sie Ihre Kamera in Gebrauch nehmen, sollten Sie sich mit den Inhalten der Bedienungsanleitung zur Dynax 9 sowie dieser Bedienungsanleitung vertraut machen.
HINWEISE
-Bei Verwendung der Fernsteuerung IR-1N im Einzelbildbetrieb und dem aktivierten eingebauten Blitzgerät, beginnt die Aufladung des eingebauten Blitzgerätes, sobald der Sendeauslöser der Fernsteuerung IR-1N das erste Mal gedrückt wird. Eine Verschlußauslösung erfolgt bei jedem Drücken des Sendeauslösers. Das eingebaute Blitzgerät ist so lange blitzbereit, bis entweder das Blitzgerät eingeklappt oder der Hauptschalter der Kamera auf LOCK gestellt wird.
-Durch die Verwendung von Titanund Magnesiumlegierungen für das Gehäuse wurde das Gewicht der Kamera auf 825 g reduziert.
-Achtung, in der Sonne und bei sehr hohen Temperaturen kann sich das Metallgehäuse der Kamera stark erhitzen.
-Die Datenrückwand DM-9, der Funktionshandgriff VC-9 sowie anderes Zubehör ist ebenfalls für die Verwendung an der Dynax 9Ti geeignet.
-Diese Bedienungsanleitung ersetzt die Seiten 91 bis 102 der Bedienungsanleitung zur Dynax 9 bezüglich der Custom-Funktionen. Die erweiterten Custom-Funktionen beinhalten:
•Cust 14 -Die Dauer der LED-Anzeige kann verlängert werden.
•Cust 18 -PA/Ps –Funktion kann von dem vorderen Einstellrad unterstützt werden, während die Belichtungskorrekturwerte von dem hinteren Einstellrad gesteuert werden.
•Cust 22 -Das AF-Beleuchtungsgerät kann auf Wunsch abgeschaltet werden.
•Cust 23 -Mit dieser Funktion kann das vordere und hintere Einstellrad deaktiviert werden, um ein unabsichtliches Verändern der Einstellungen zu verhindern. Diese Sperre kann nicht aktiviert werden, solange die Kamera eine Belichtungsmessung vornimmt.
Deutsch
20 |
21 |
 Loading...